If your marketing emails or newsletters are going to spam, you are not alone. According to Return Path’s report, one of every five emails sent is being blocked by the email providers and never reaching the recipients’ inbox.
Reports and statistics like these are alarming, especially when you’re putting together an email marketing campaign. But, don’t worry; we’ve got your back!
The main reason behind this problem is, most senders don’t follow the email deliverability best practices – which require some work initially. Still, it will make sure your emails hit the inbox every time without fail.
You need to follow some fundamental rules and guidelines for hitting your clients’ inbox directly to avoid ending up in SPAM. Even if your reaching percentage to the inbox is entirely satisfactory, you should follow the best practices for being 100% sure.
The following sections will describe the recommendations to ensure the best email deliverability to your client’s inbox.
In this article we will cover
- Verification setups
- Domain ownership
- Verification tools
- Tools for testing email before sending
- Cases to consider
- Helpful blacklist FAQ from Amazon SES
- Monitoring
- Email sending best practice
- Bonus tips to avoid SPAM!
- The bottom line
Let’s get started…
Verification Setups
How you will tell the SPAM filters that it’s the “real” you, not a spammer?
Make yourself a secured and authenticated sender applying some of the most reliable verification methods while sending emails. So that the email providers are less likely to reject or mark your email as spam. Let’s see what are methods available out there.
DKIM
DomainKeys Identified Mail (DKIM) is a standard to sign an email message with an encrypted key for security. DKIM allows receivers to check; whether the owner of that domain authorized that email claimed to have come from a specific domain or not. You can sign your email using a DKIM signature to improve the deliverability with DKIM-compliant email providers.
The easiest option for signing your messages with a DKIM signature is to set up a sending identity (like a domain or an email address). Amazon SES will then automatically add a DKIM signature to every message that you send from it. To set up an Easy DKIM in Amazon SES follow the following steps-
1 Sign in at https://console.aws.amazon.com/ses/ Amazon SES console.
2 Choose Domains under Identity Management in the navigation pane.
3 From the list, select the domain for which you want to set up an Easy DKIM. If you don’t find the name of your domain here, you must haven’t verified the domain yet, see the procedures at Verifying a domain with Amazon SES section below to verify the domain.
4 Select the domain for which you want to set up an Easy DKIM from the list if the domain is already verified. Under DKIM, choose Generate DKIM Settings.
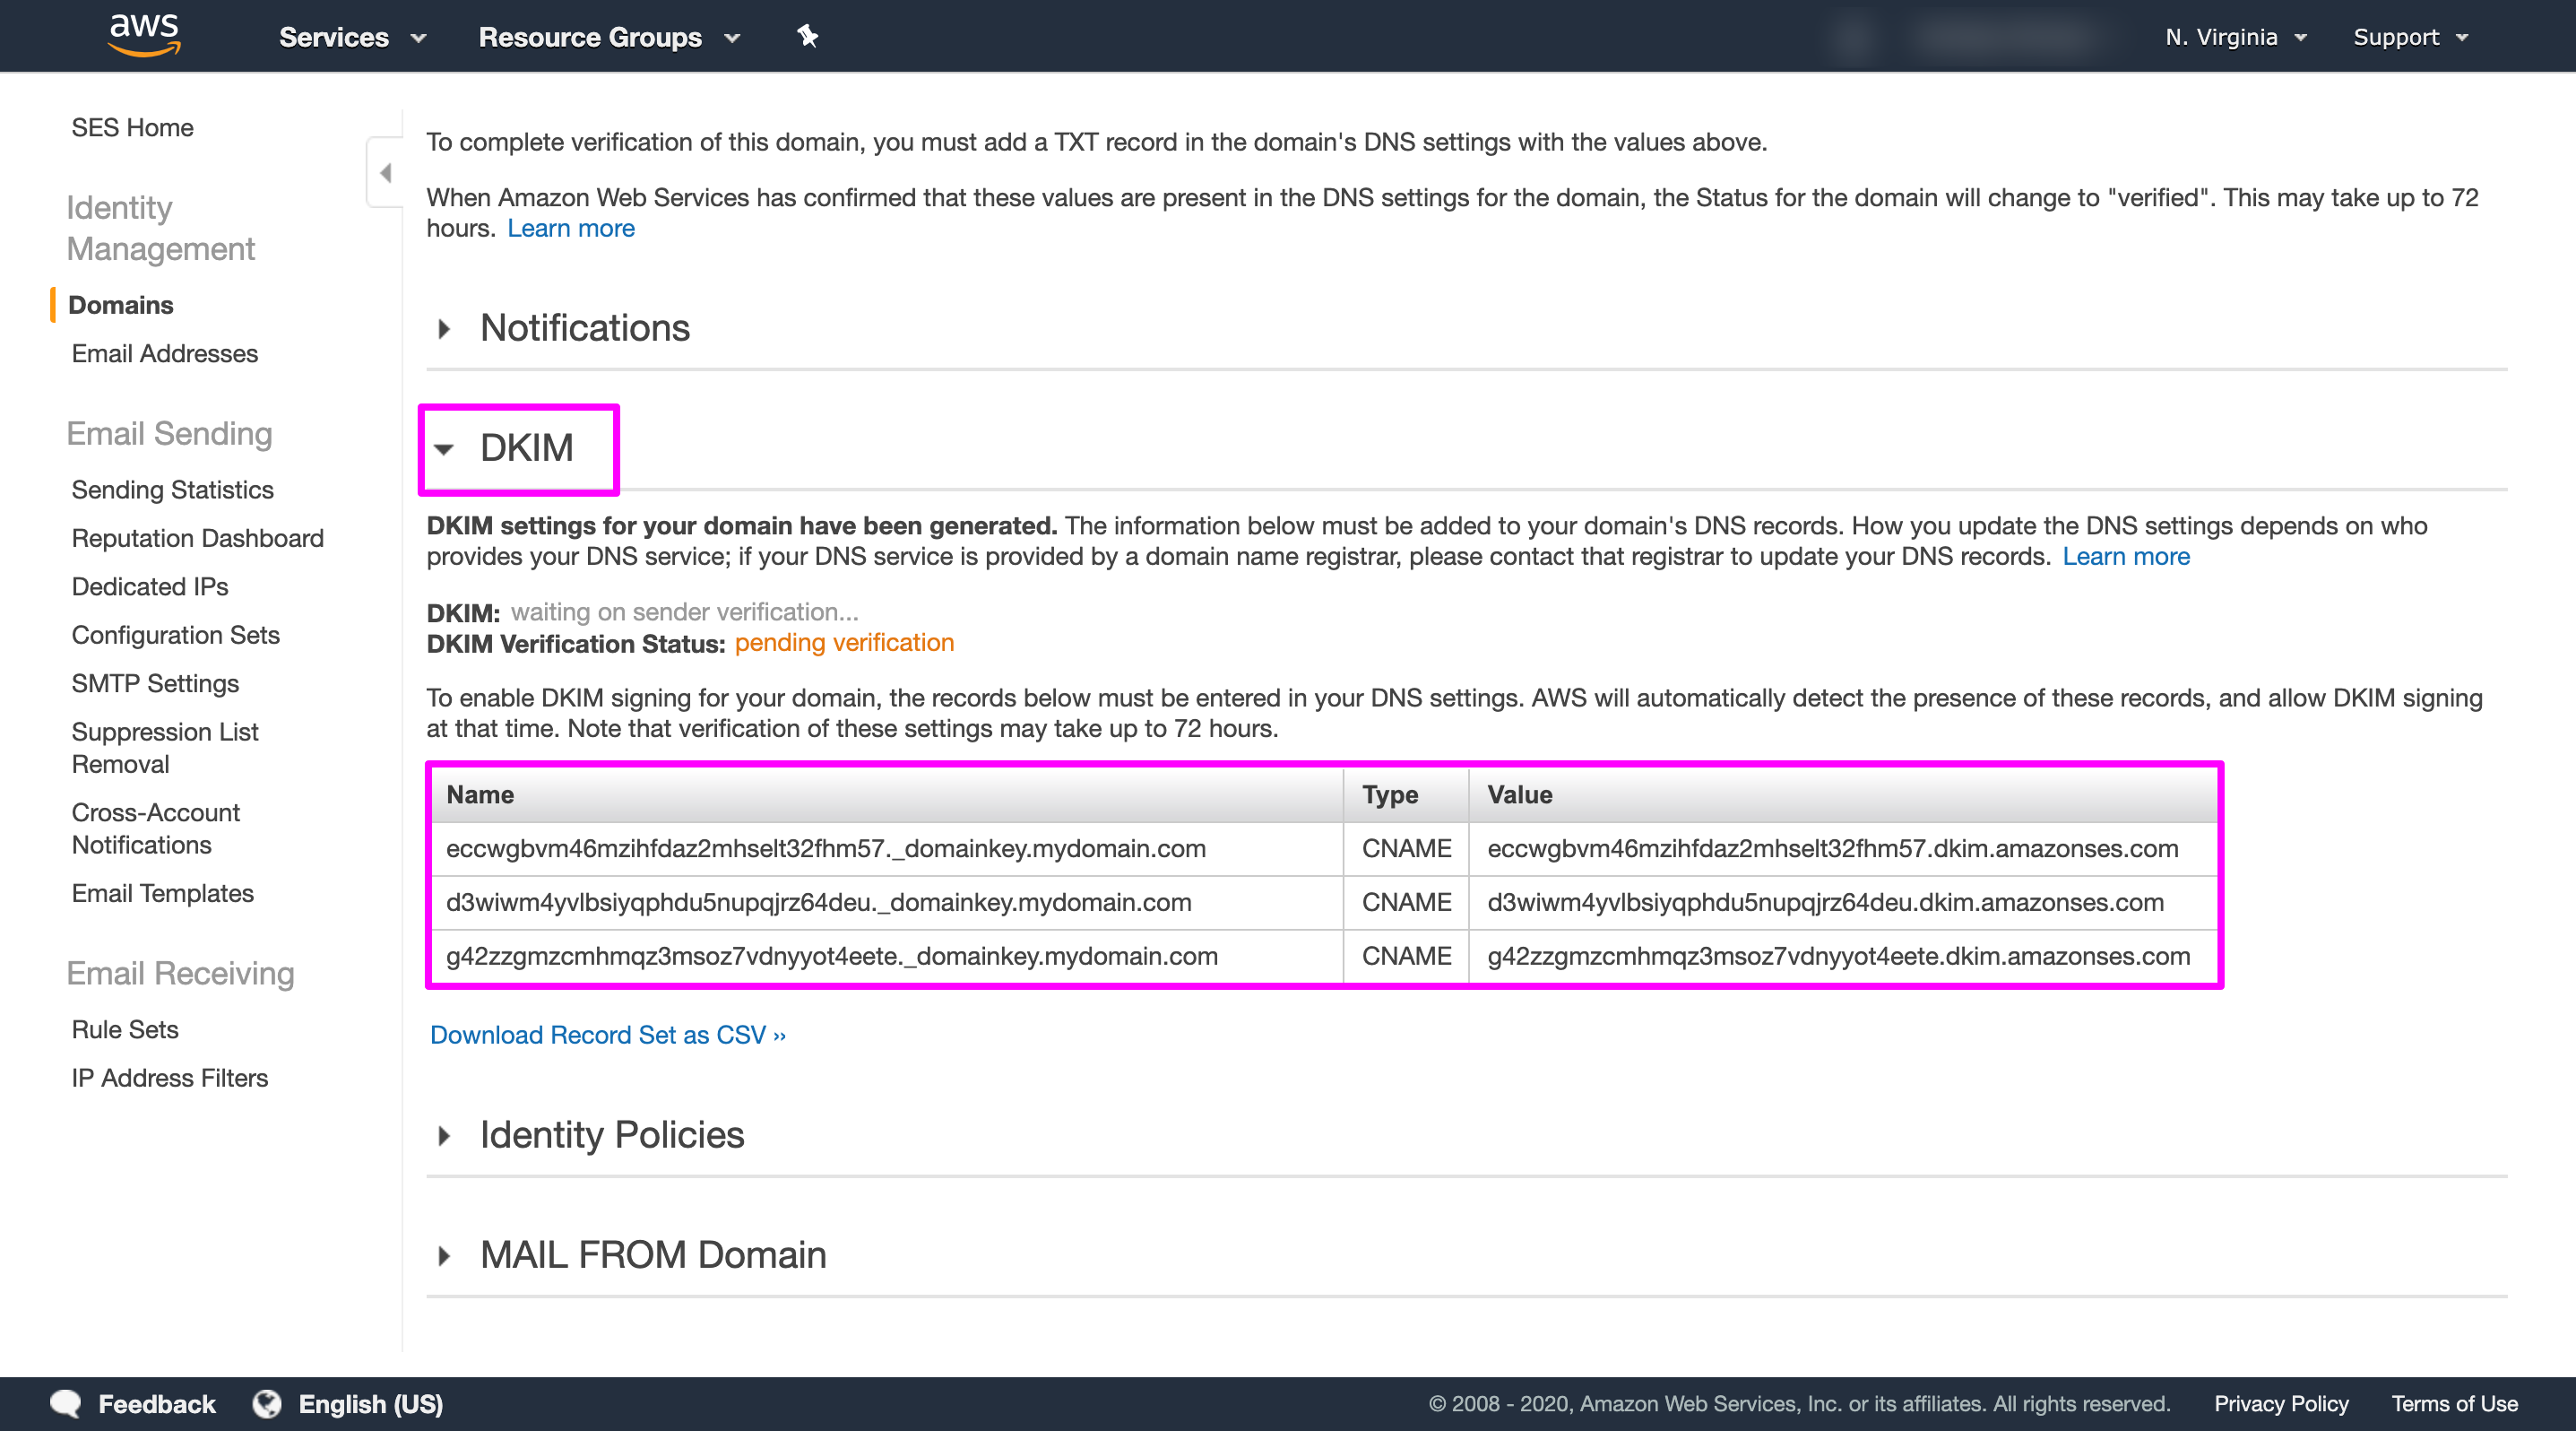
5 Copy the three CNAME records that showed in this section. You can also choose Download Recordset as CSV to save a copy of the records on your computer.
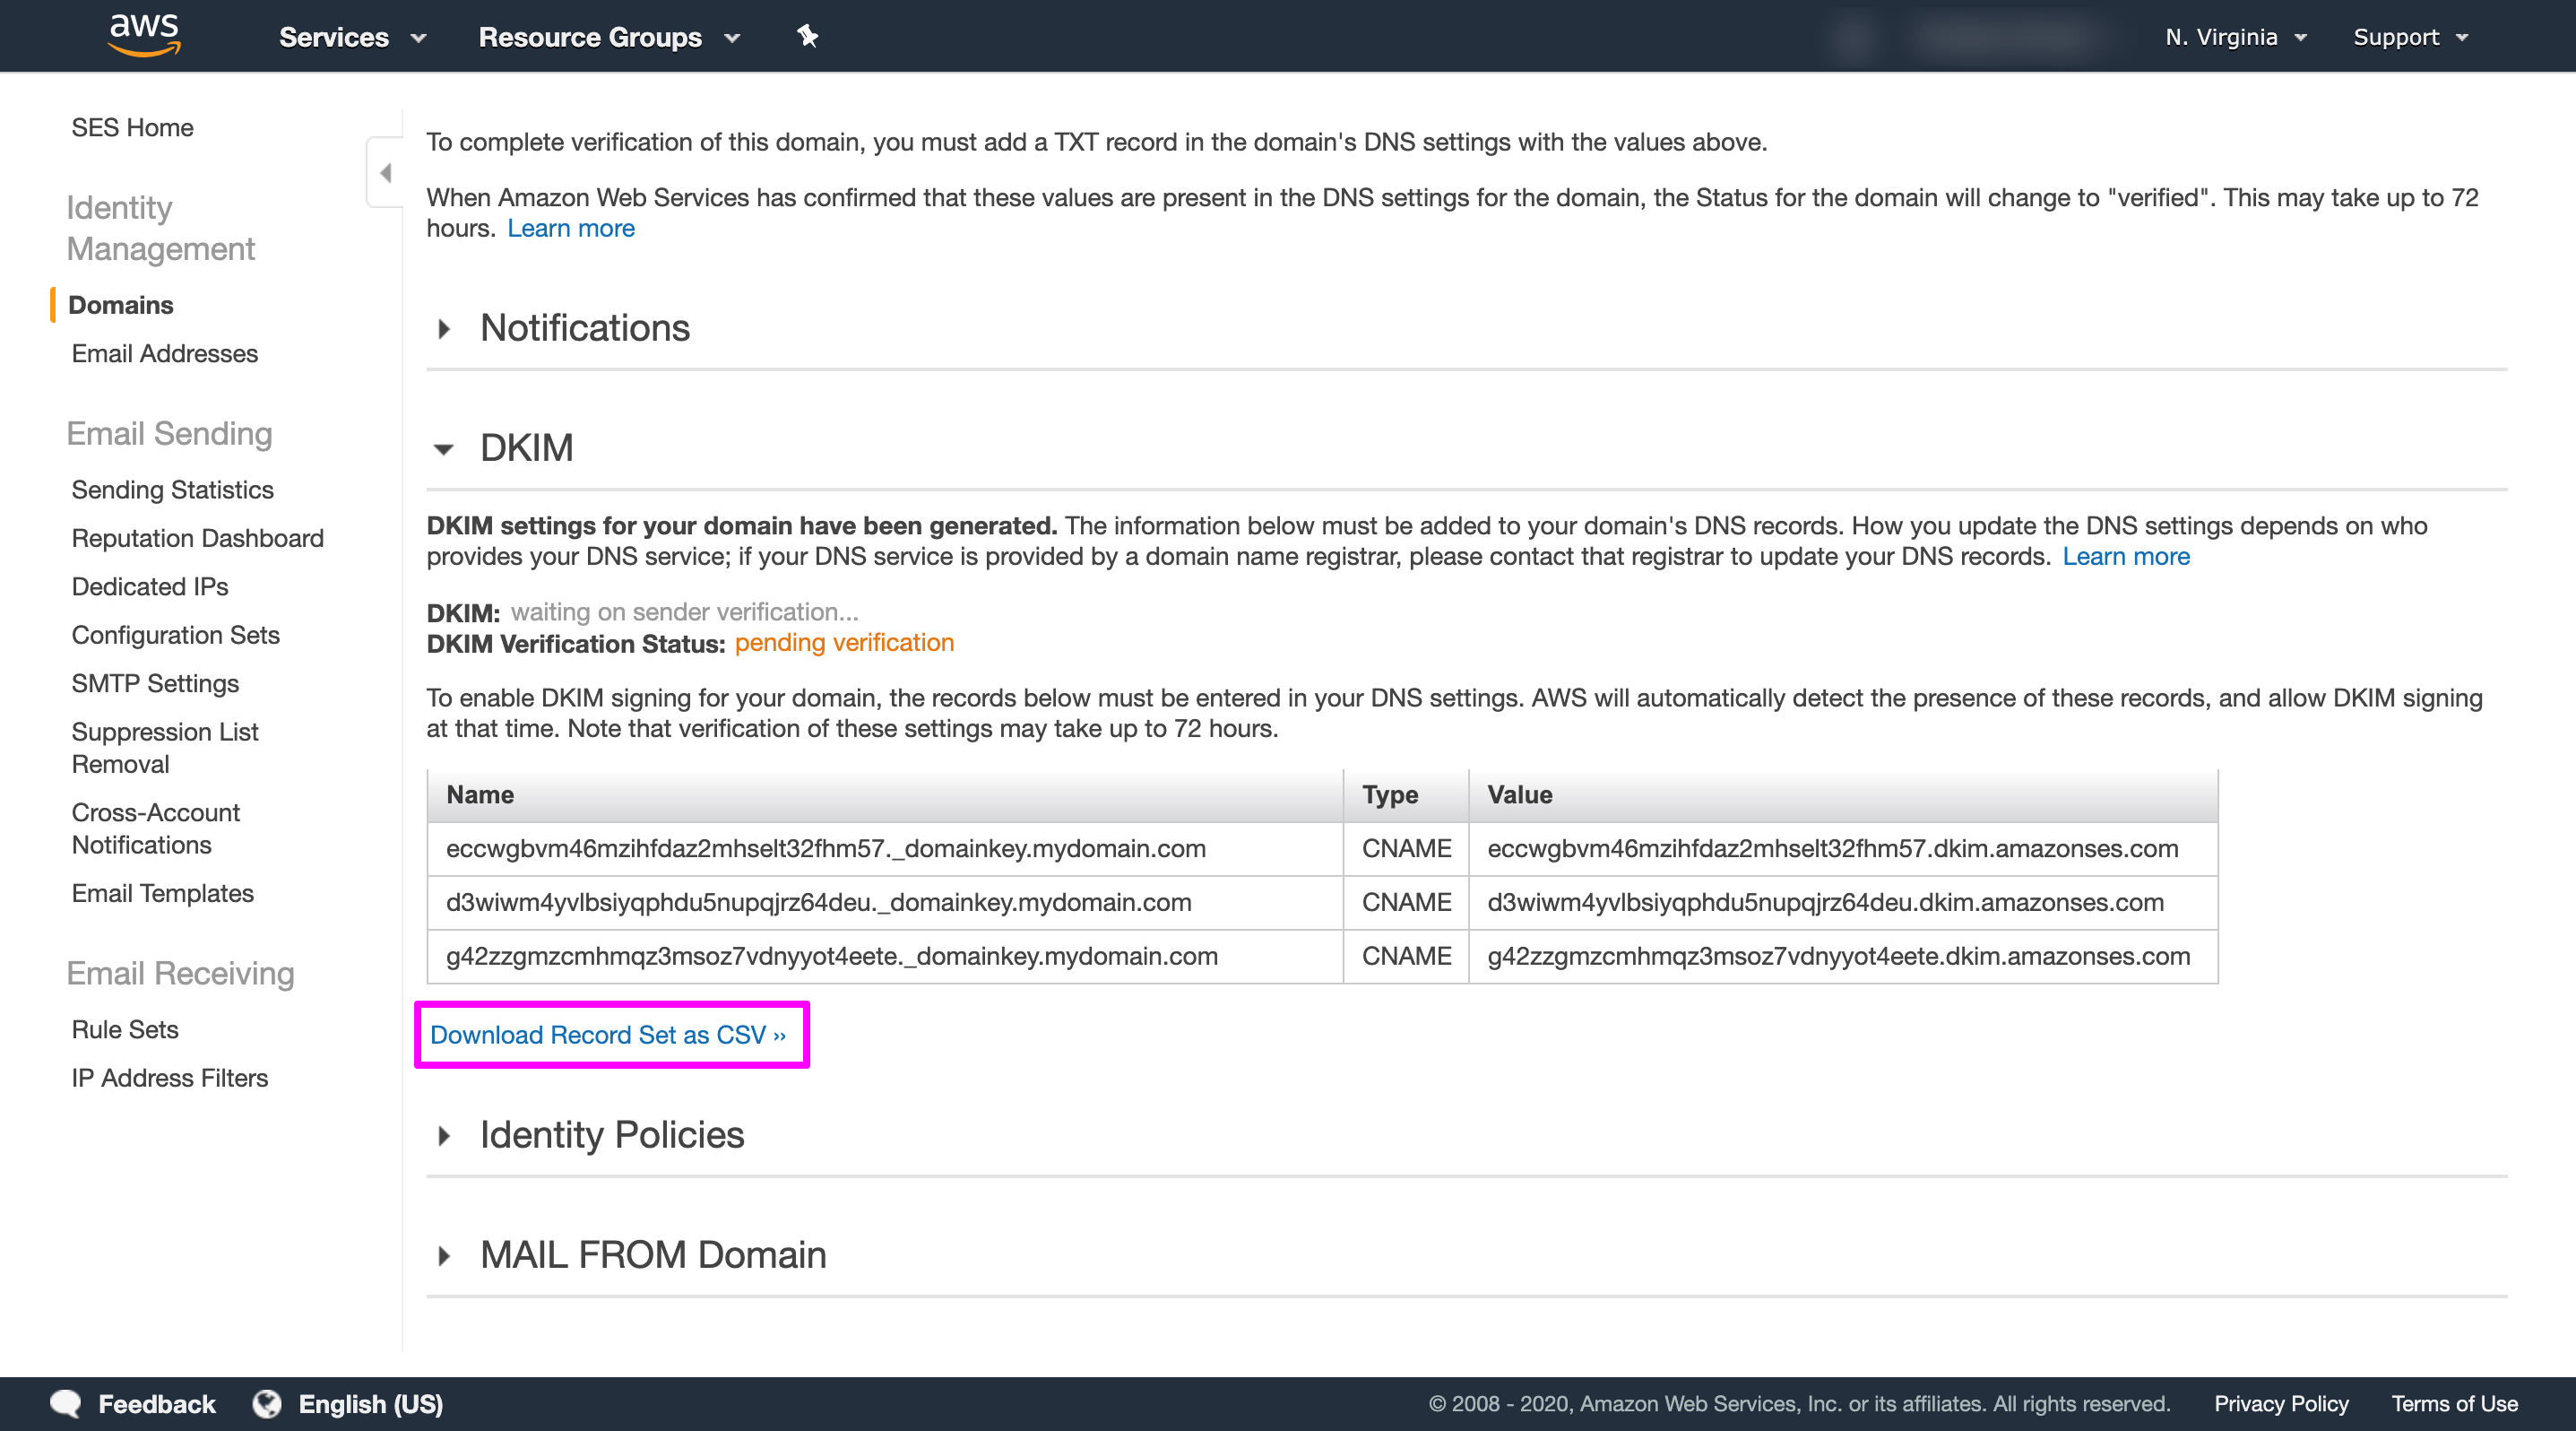
6 Add the CNAME records to the DNS settings of your domain. To update do the following:
Note: Choose Use Route 53 to automatically update the DNS settings for your domain if you send email through Amazon SES using the same account.
If you are using Route 53 as your DNS provider
1 Log in to the AWS Management Console and open the Route 53 console at https://console.aws.amazon.com/route53/.
2 In the navigation pane, choose Hosted zones.
3 On the Hosted Zones page, select the row for the hosted zone containing the records that you want to edit.
4 Select the row for the record that you want to edit.
5 Enter the values, and choose Save Record Set.
If you are using another DNS provider
Different providers have different ways of updating the DNS records. We are taking Cloudflare as an example here.
1 Login to your Cloudflare account.
2 Select the domain name from the drop-down list in the top left corner of the screen.

3 Click on the DNS tab at the top of the page.

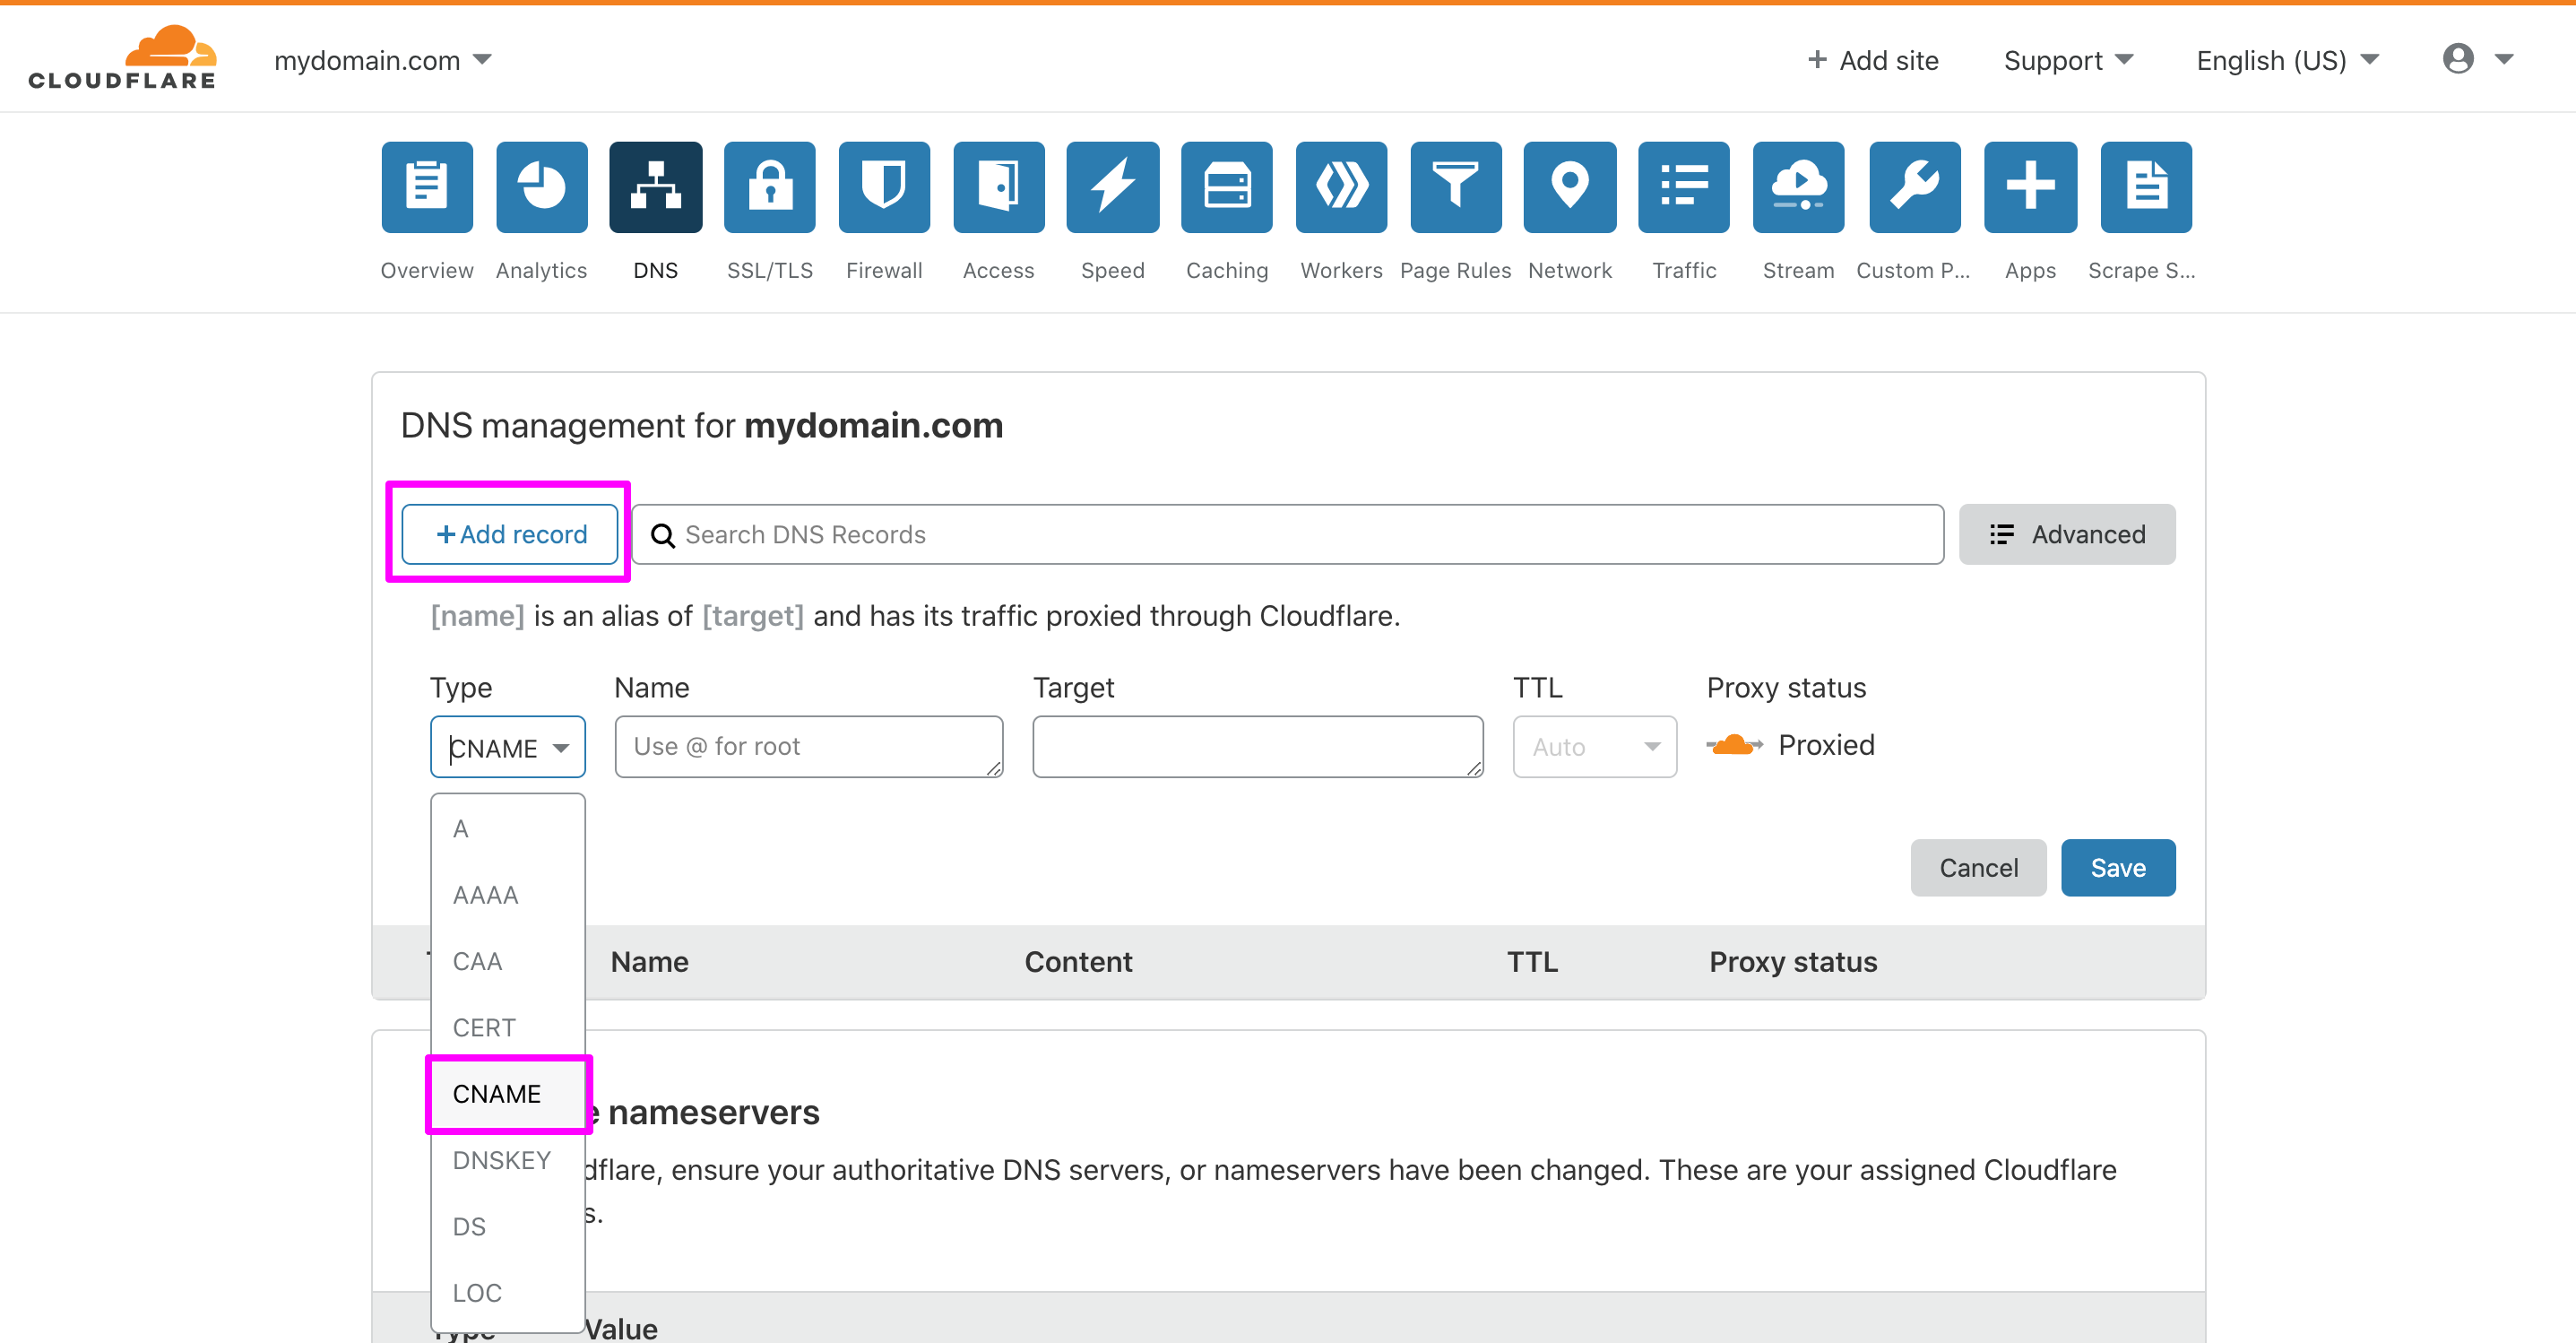
4 In the DNS settings page, click the Add record button and then select CNAME as Type from the first drop-down list.
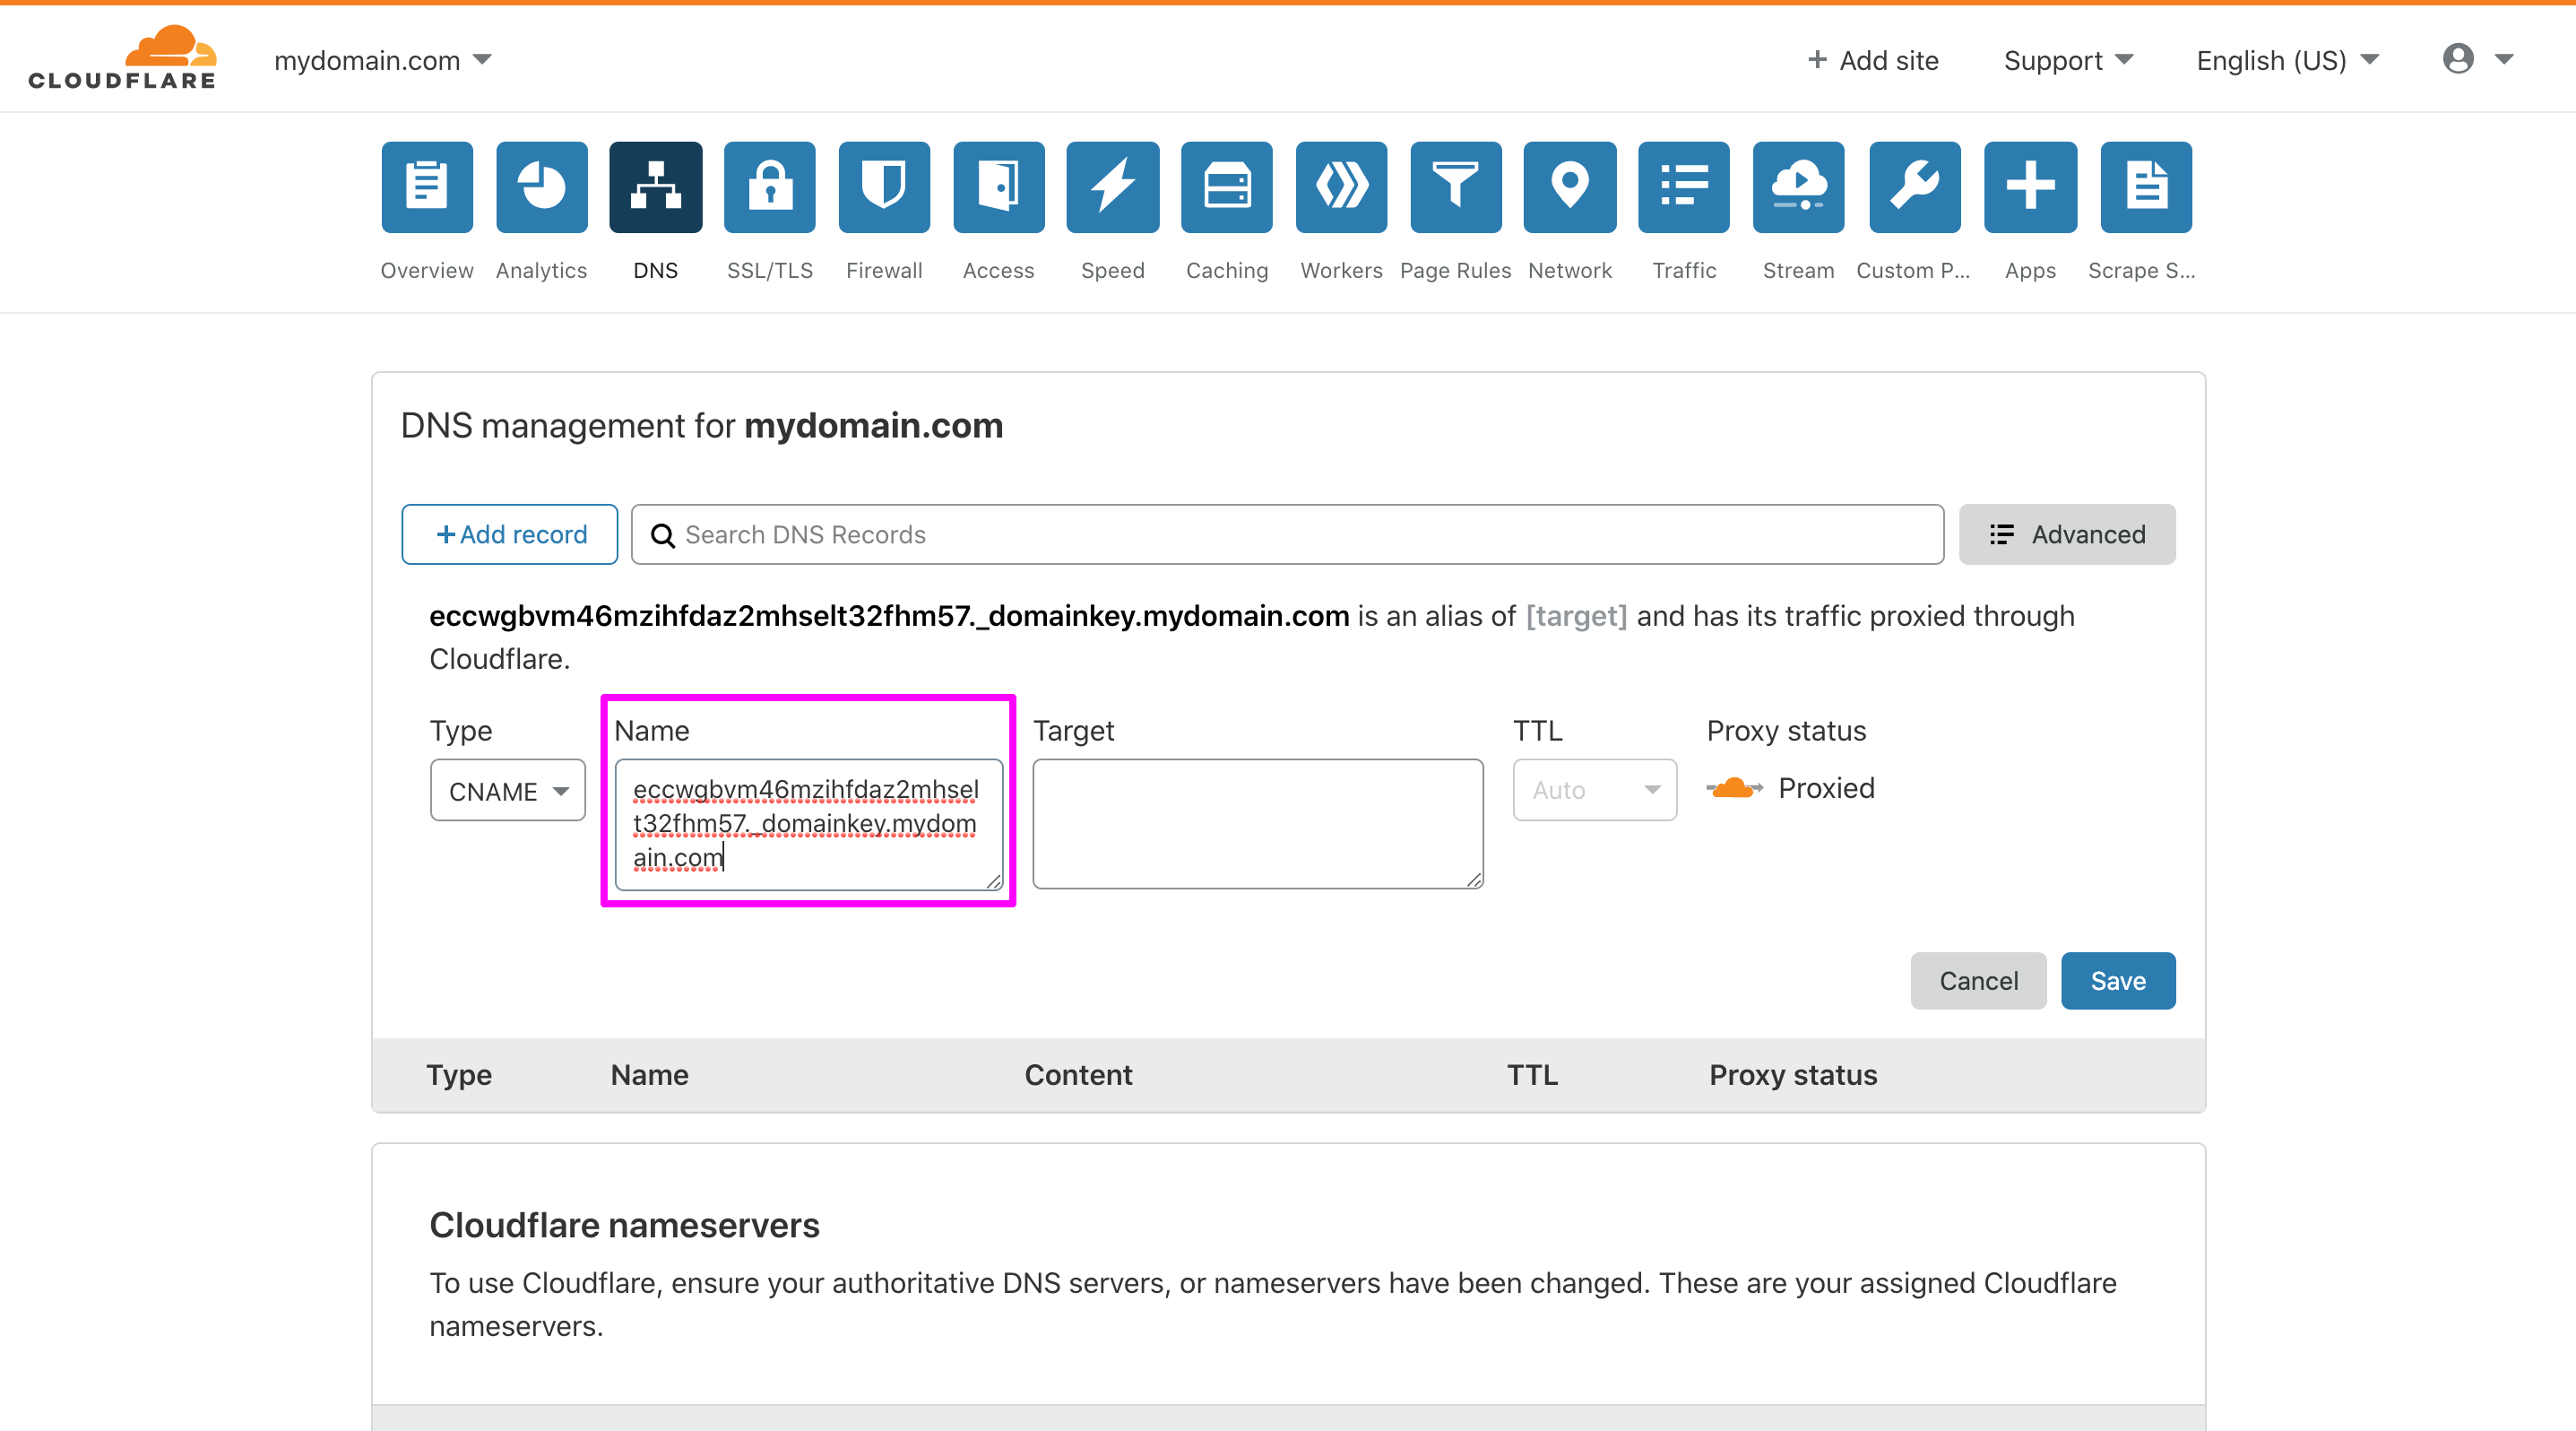
5 Copy and paste the Name from AWS DKIM table to the Name field
6 Copy and paste the Value from the AWS DKIM table to the Target field
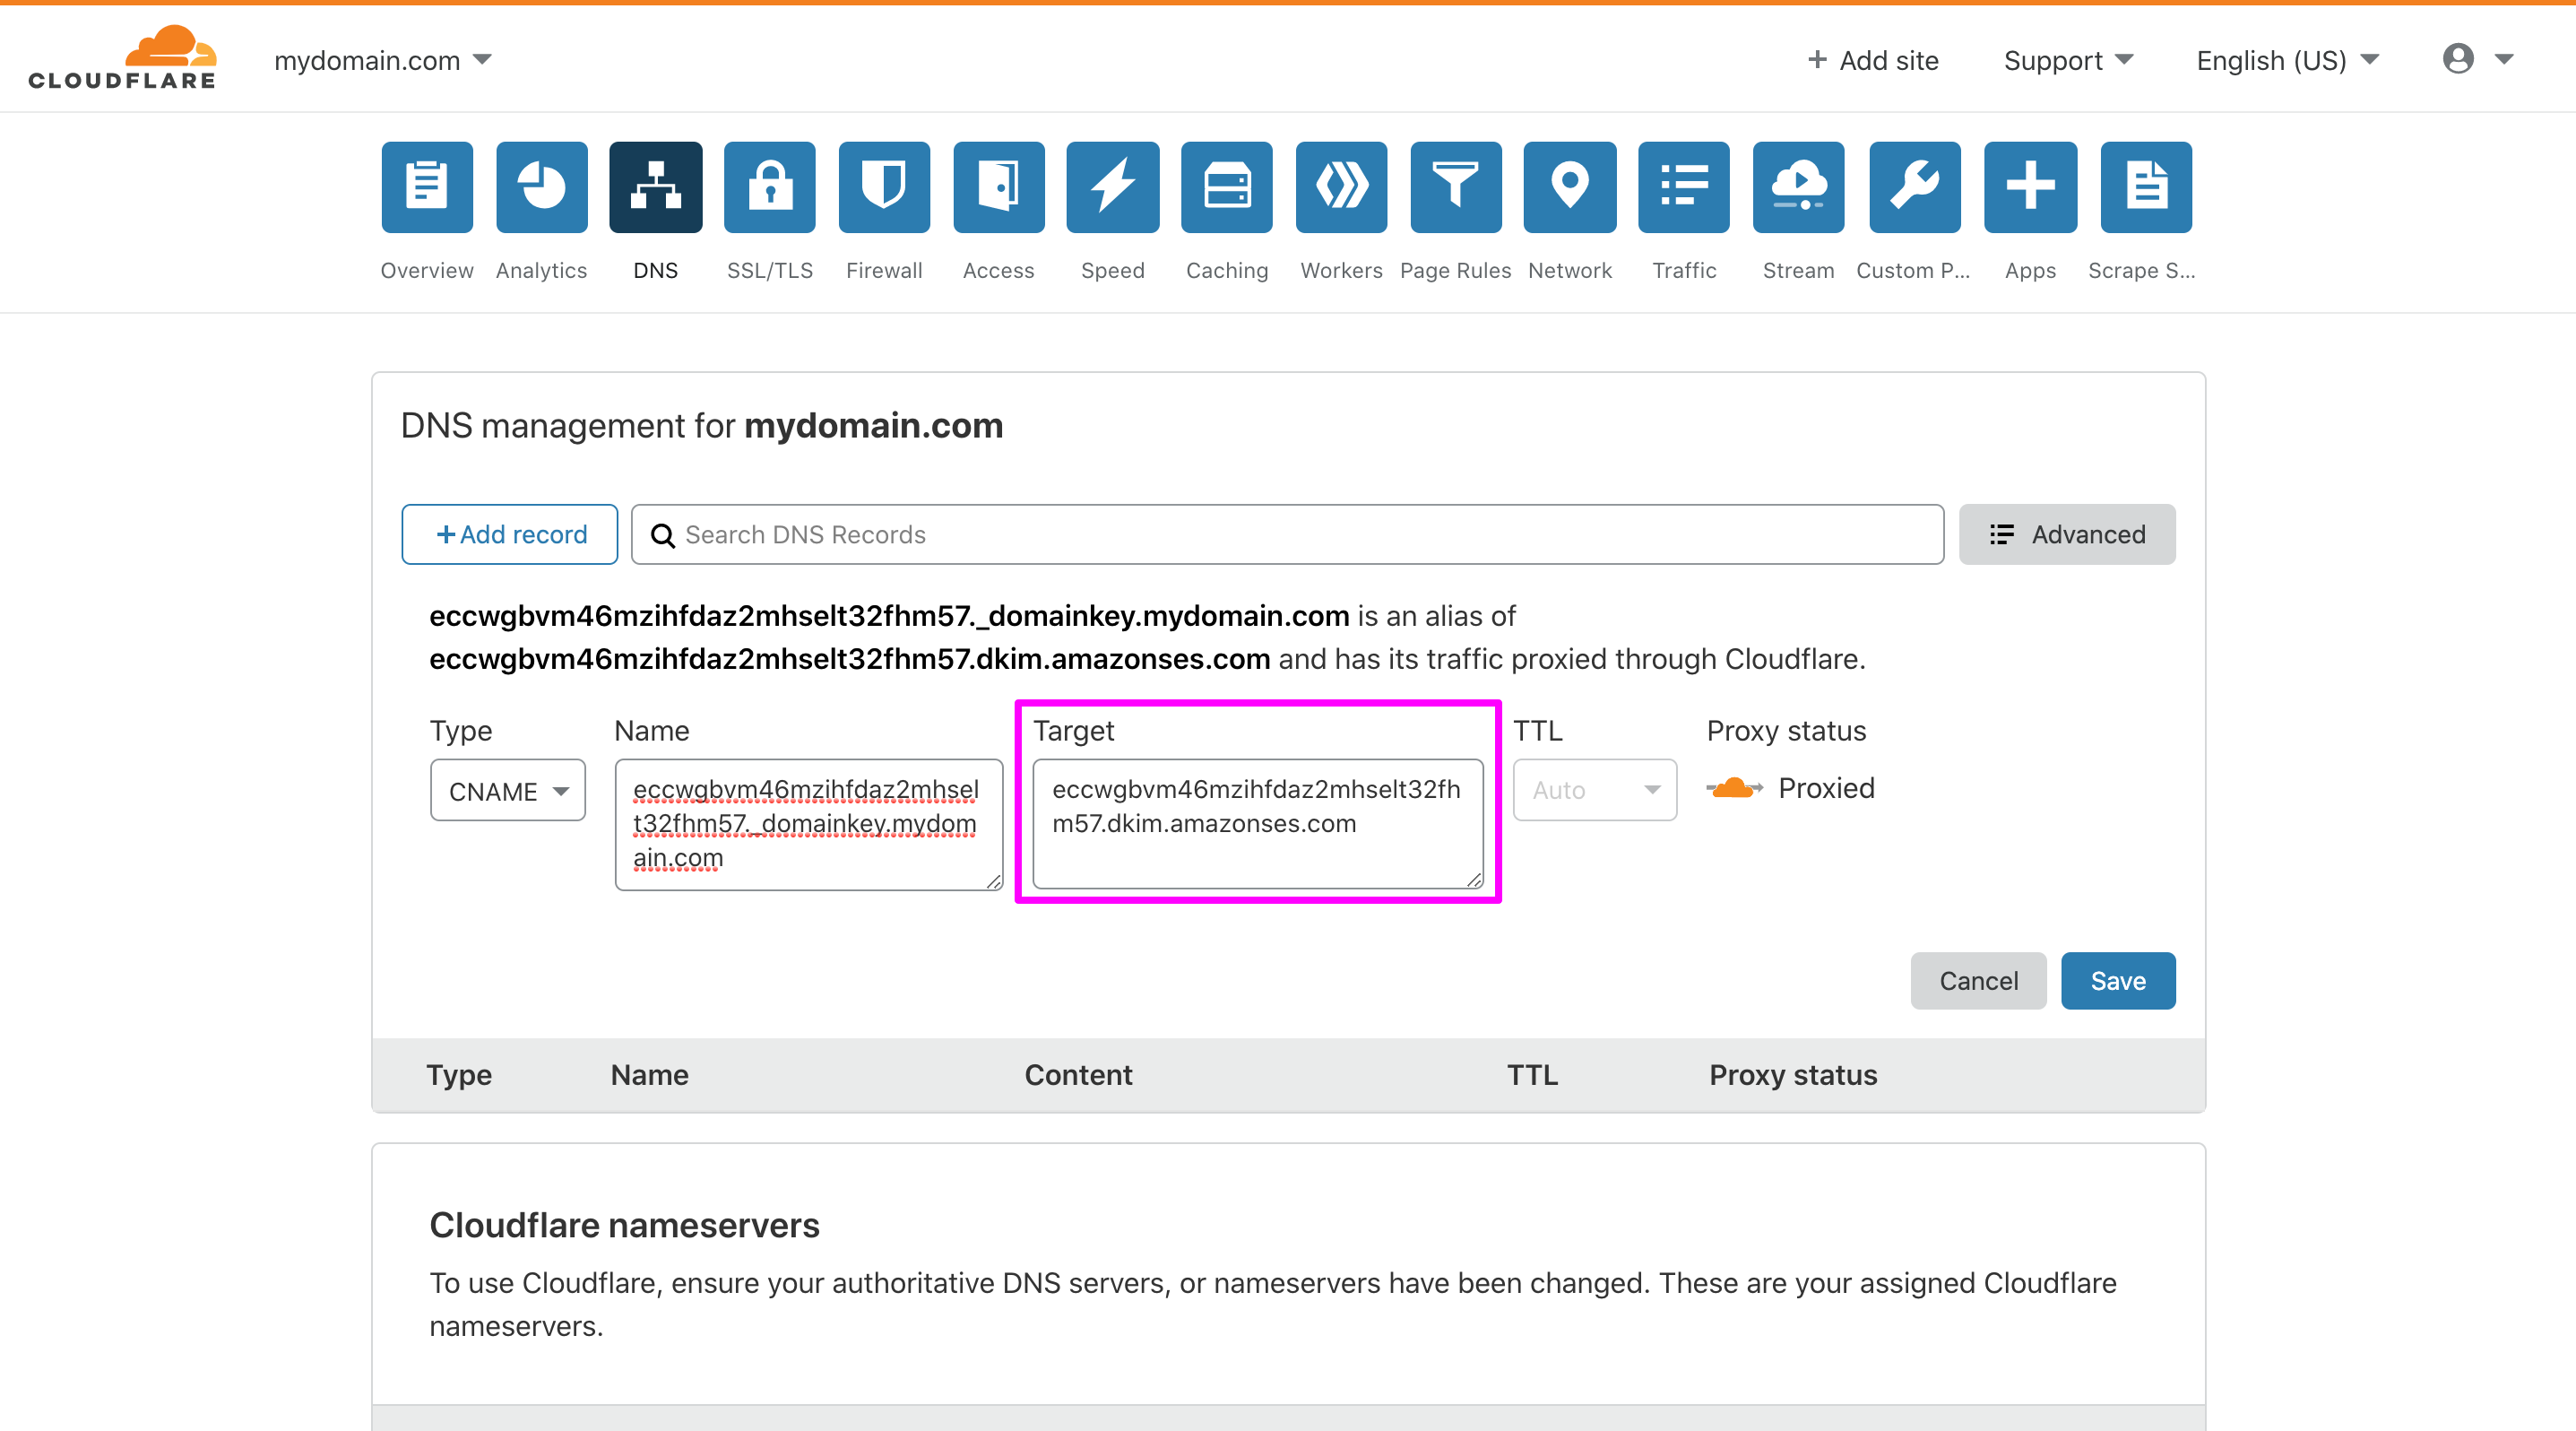
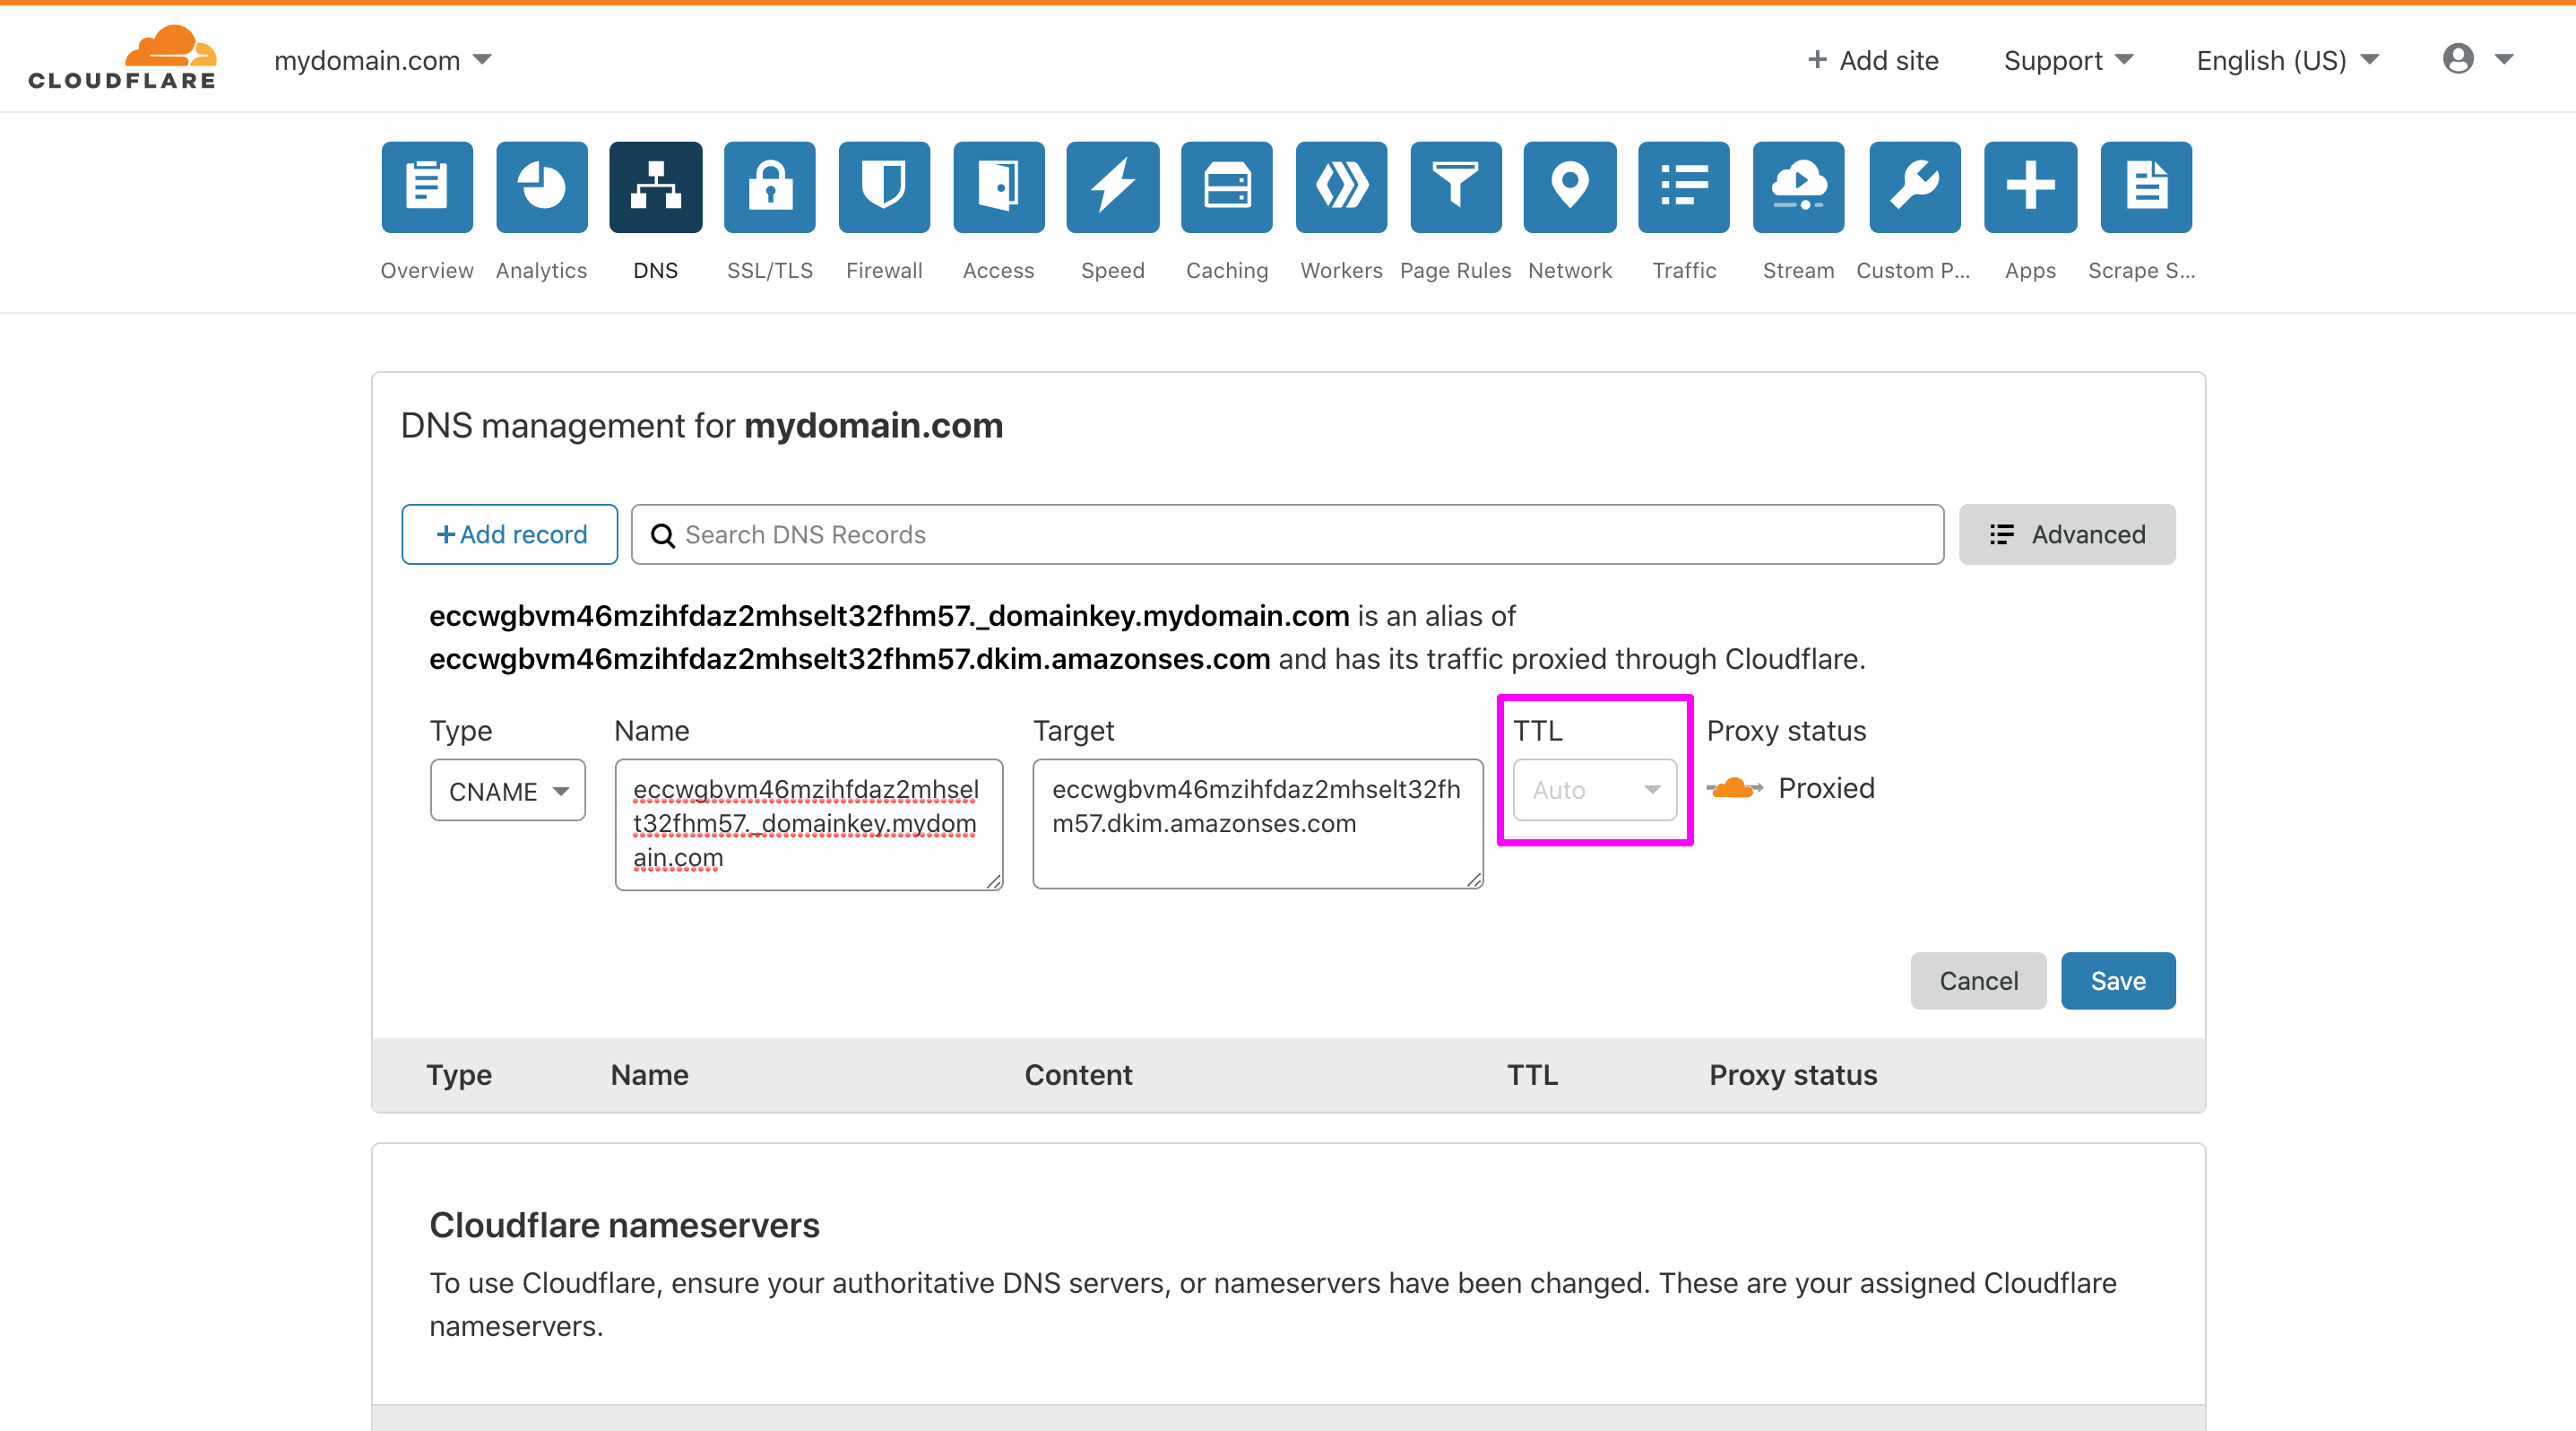
7 Leave the TTL (Time to Live) field as it is (Auto) – let’s stick with Cloudflare’s default setting.
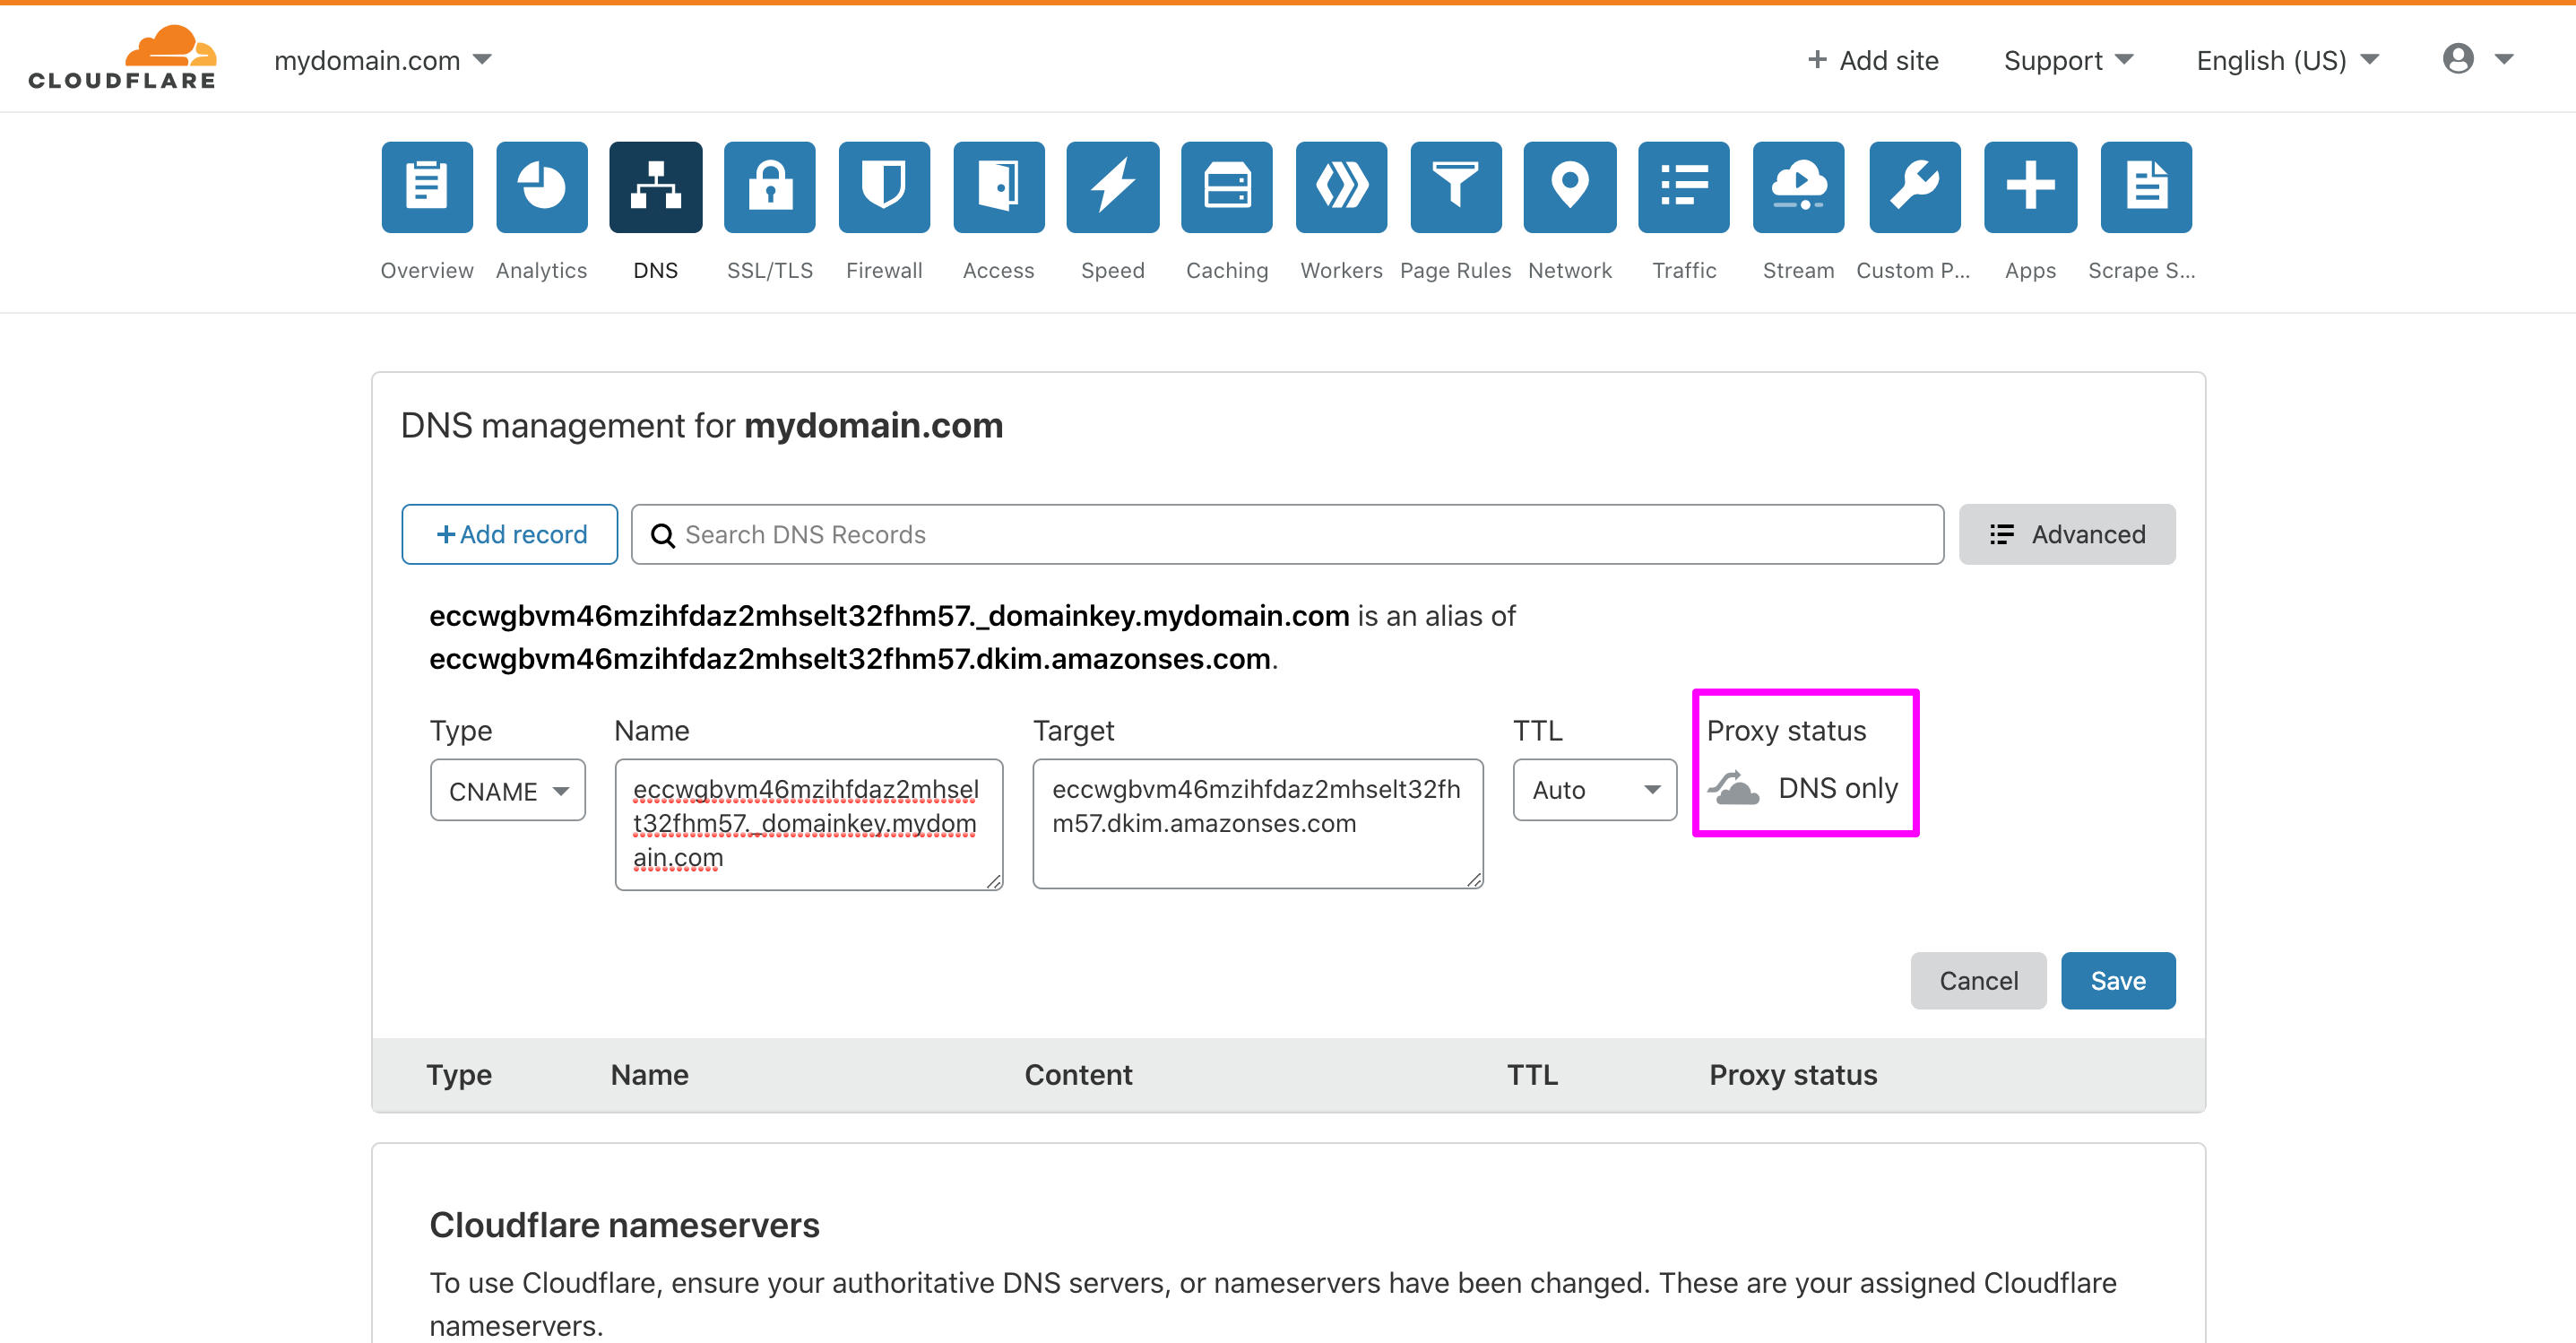
8 Make sure that the Proxy status is DNS only (gray color). If an orange cloud is shown, click it to make it gray.
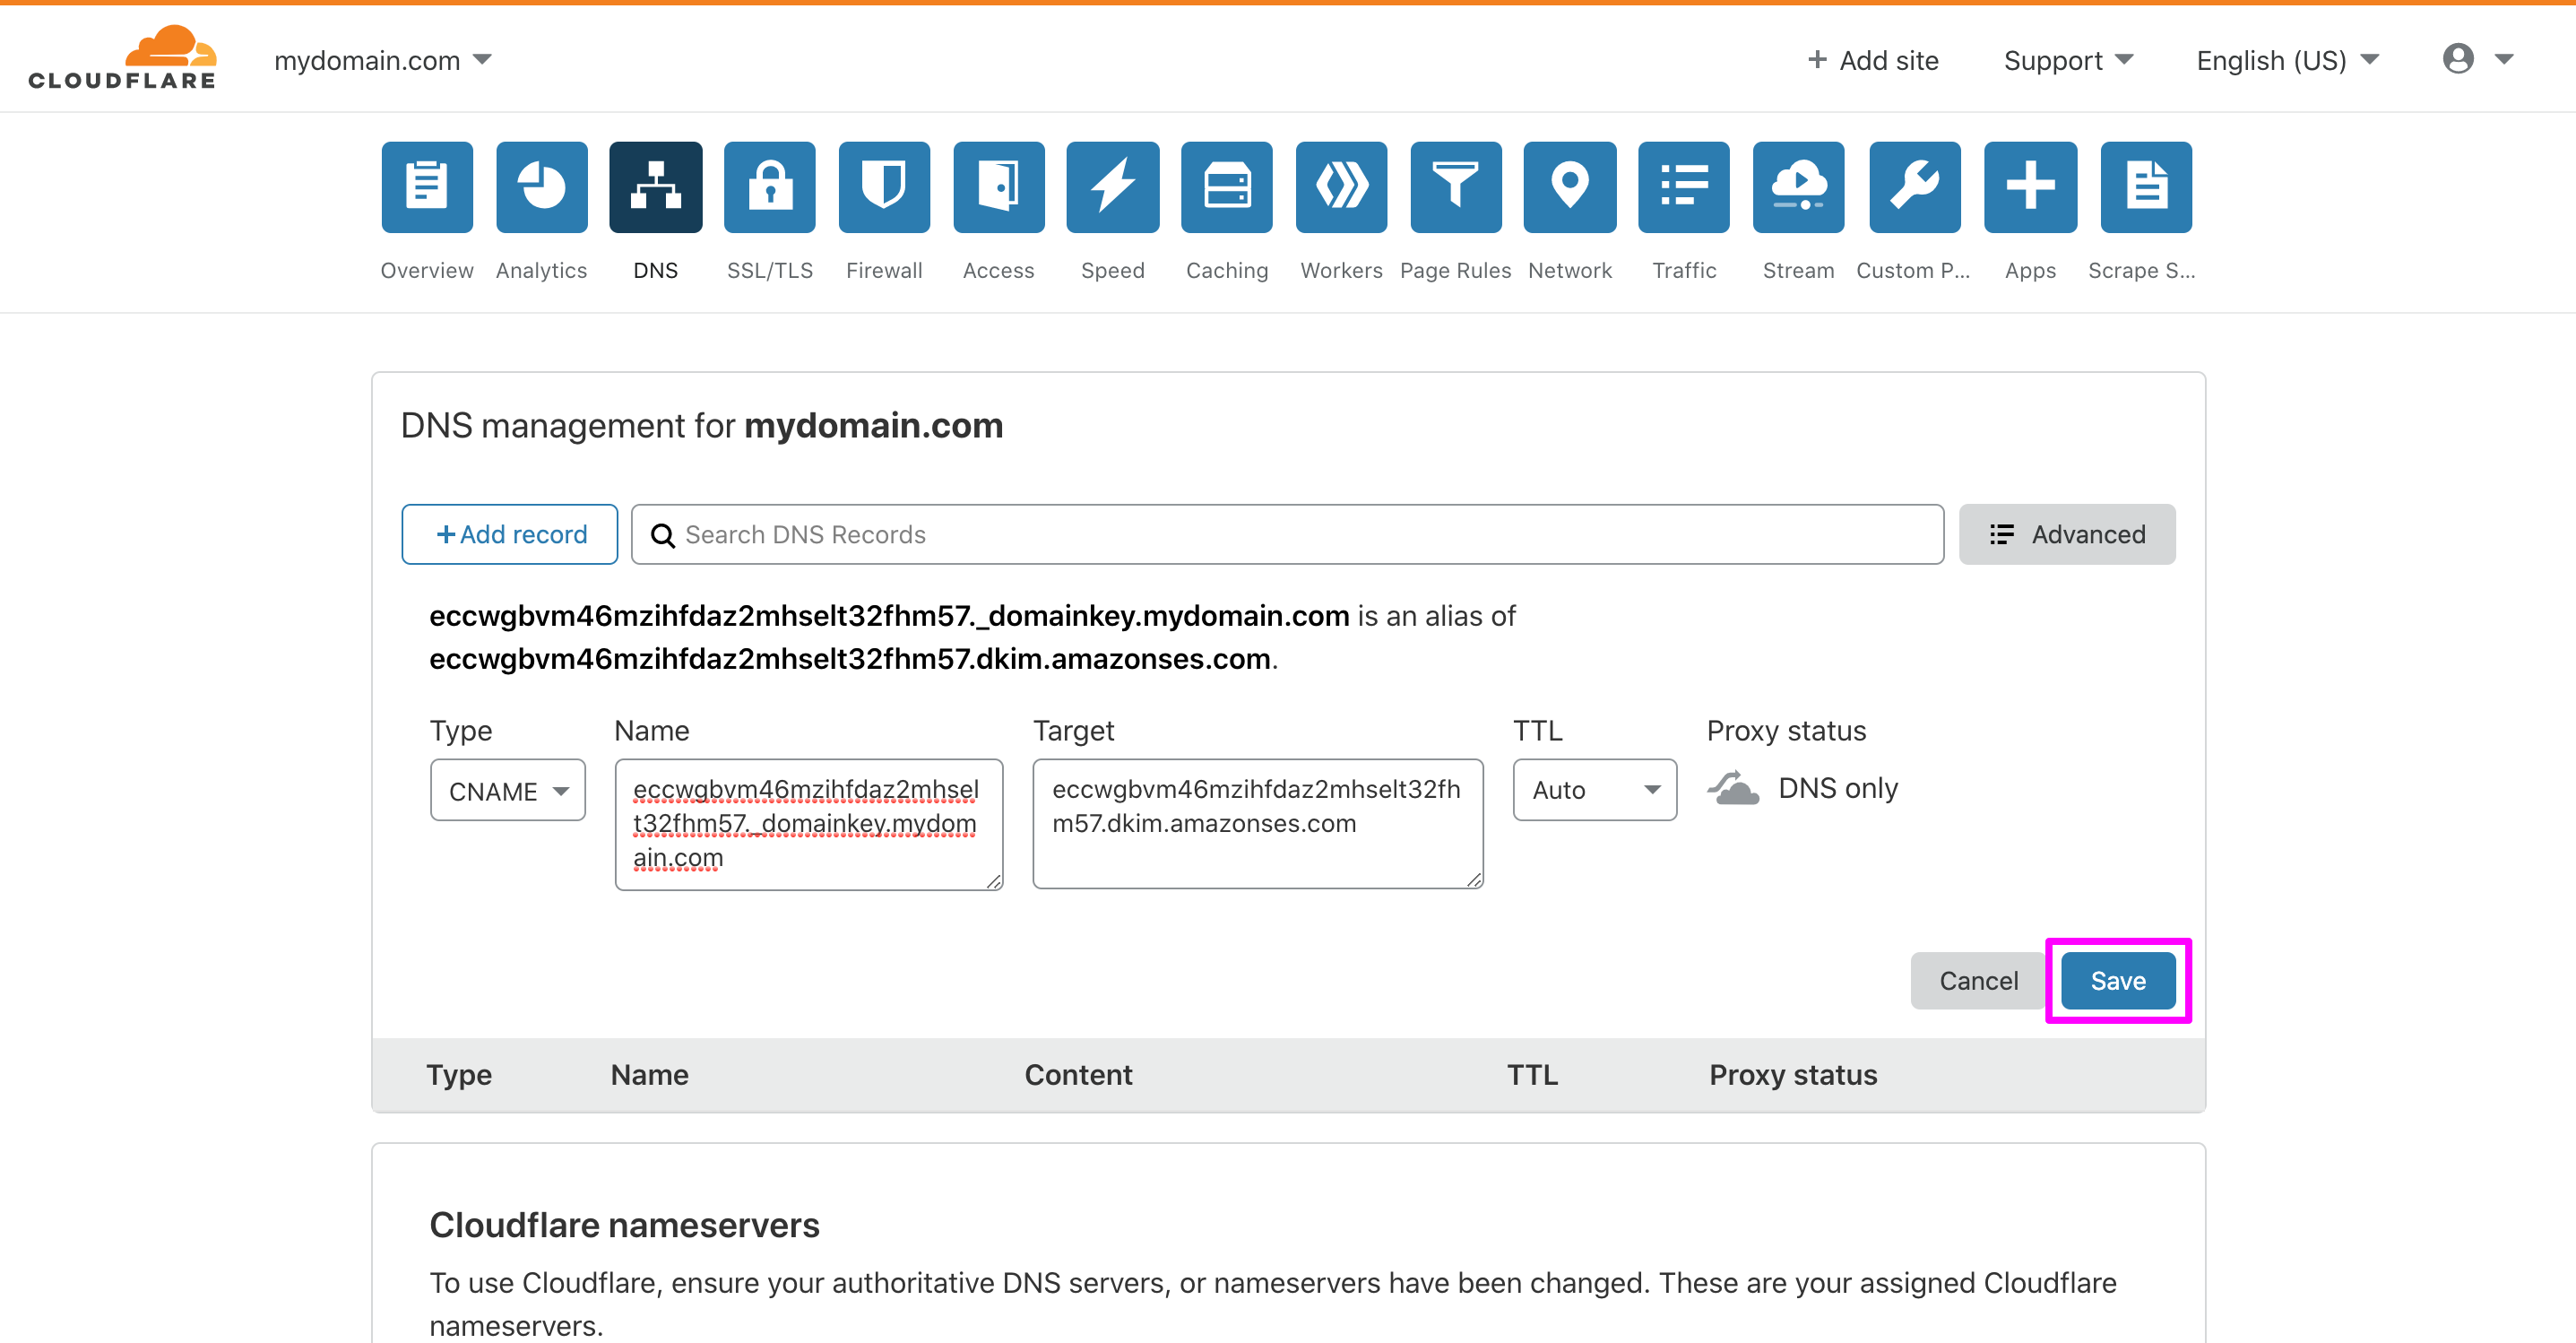
9 Lastly, click the Save button to finish adding your DKIM record.
10 Follow steps 4 to 9 for the rest of the records of your AWS DKIM table.
For reference, see Easy DKIM in Amazon SES.
SPF
Sender Policy Framework (SPF) is the validation standard to filter spoofing. Domain owners use SPF to notify email providers which servers are authorized to send emails from their domains. You need to add a new record to your domain’s DNS settings to publish an SPF record. The procedures for updating DNS records depend on which DNS or web hosting provider you are using.
If you are using Route 53 as the DNS provider
1 Log in to the AWS Management Console and open the Route 53 console at https://console.aws.amazon.com/route53/
2 In the navigation pane, choose Hosted zones.
3 On the Hosted Zones page, select the Domain Name that you want to create the SPF record set for.
4 Choose Create Record Set.
5 If your domain has already published an SPF record. SPF records can contain multiple include statements. For Amazon SES, you can add an include statement by using this format: “v=spf1 include:example.com include:amazonses.com ~all“.
6 In the Value field, paste that content, and then choose Create.
If you are using another DNS provider
Adding SPF records for different providers is different. Here we have taken Cloudflare‘s example.
1 Log in to your Cloudflare account.
2 Click on the DNS tab for your domain.
3 Add a new TXT type record.
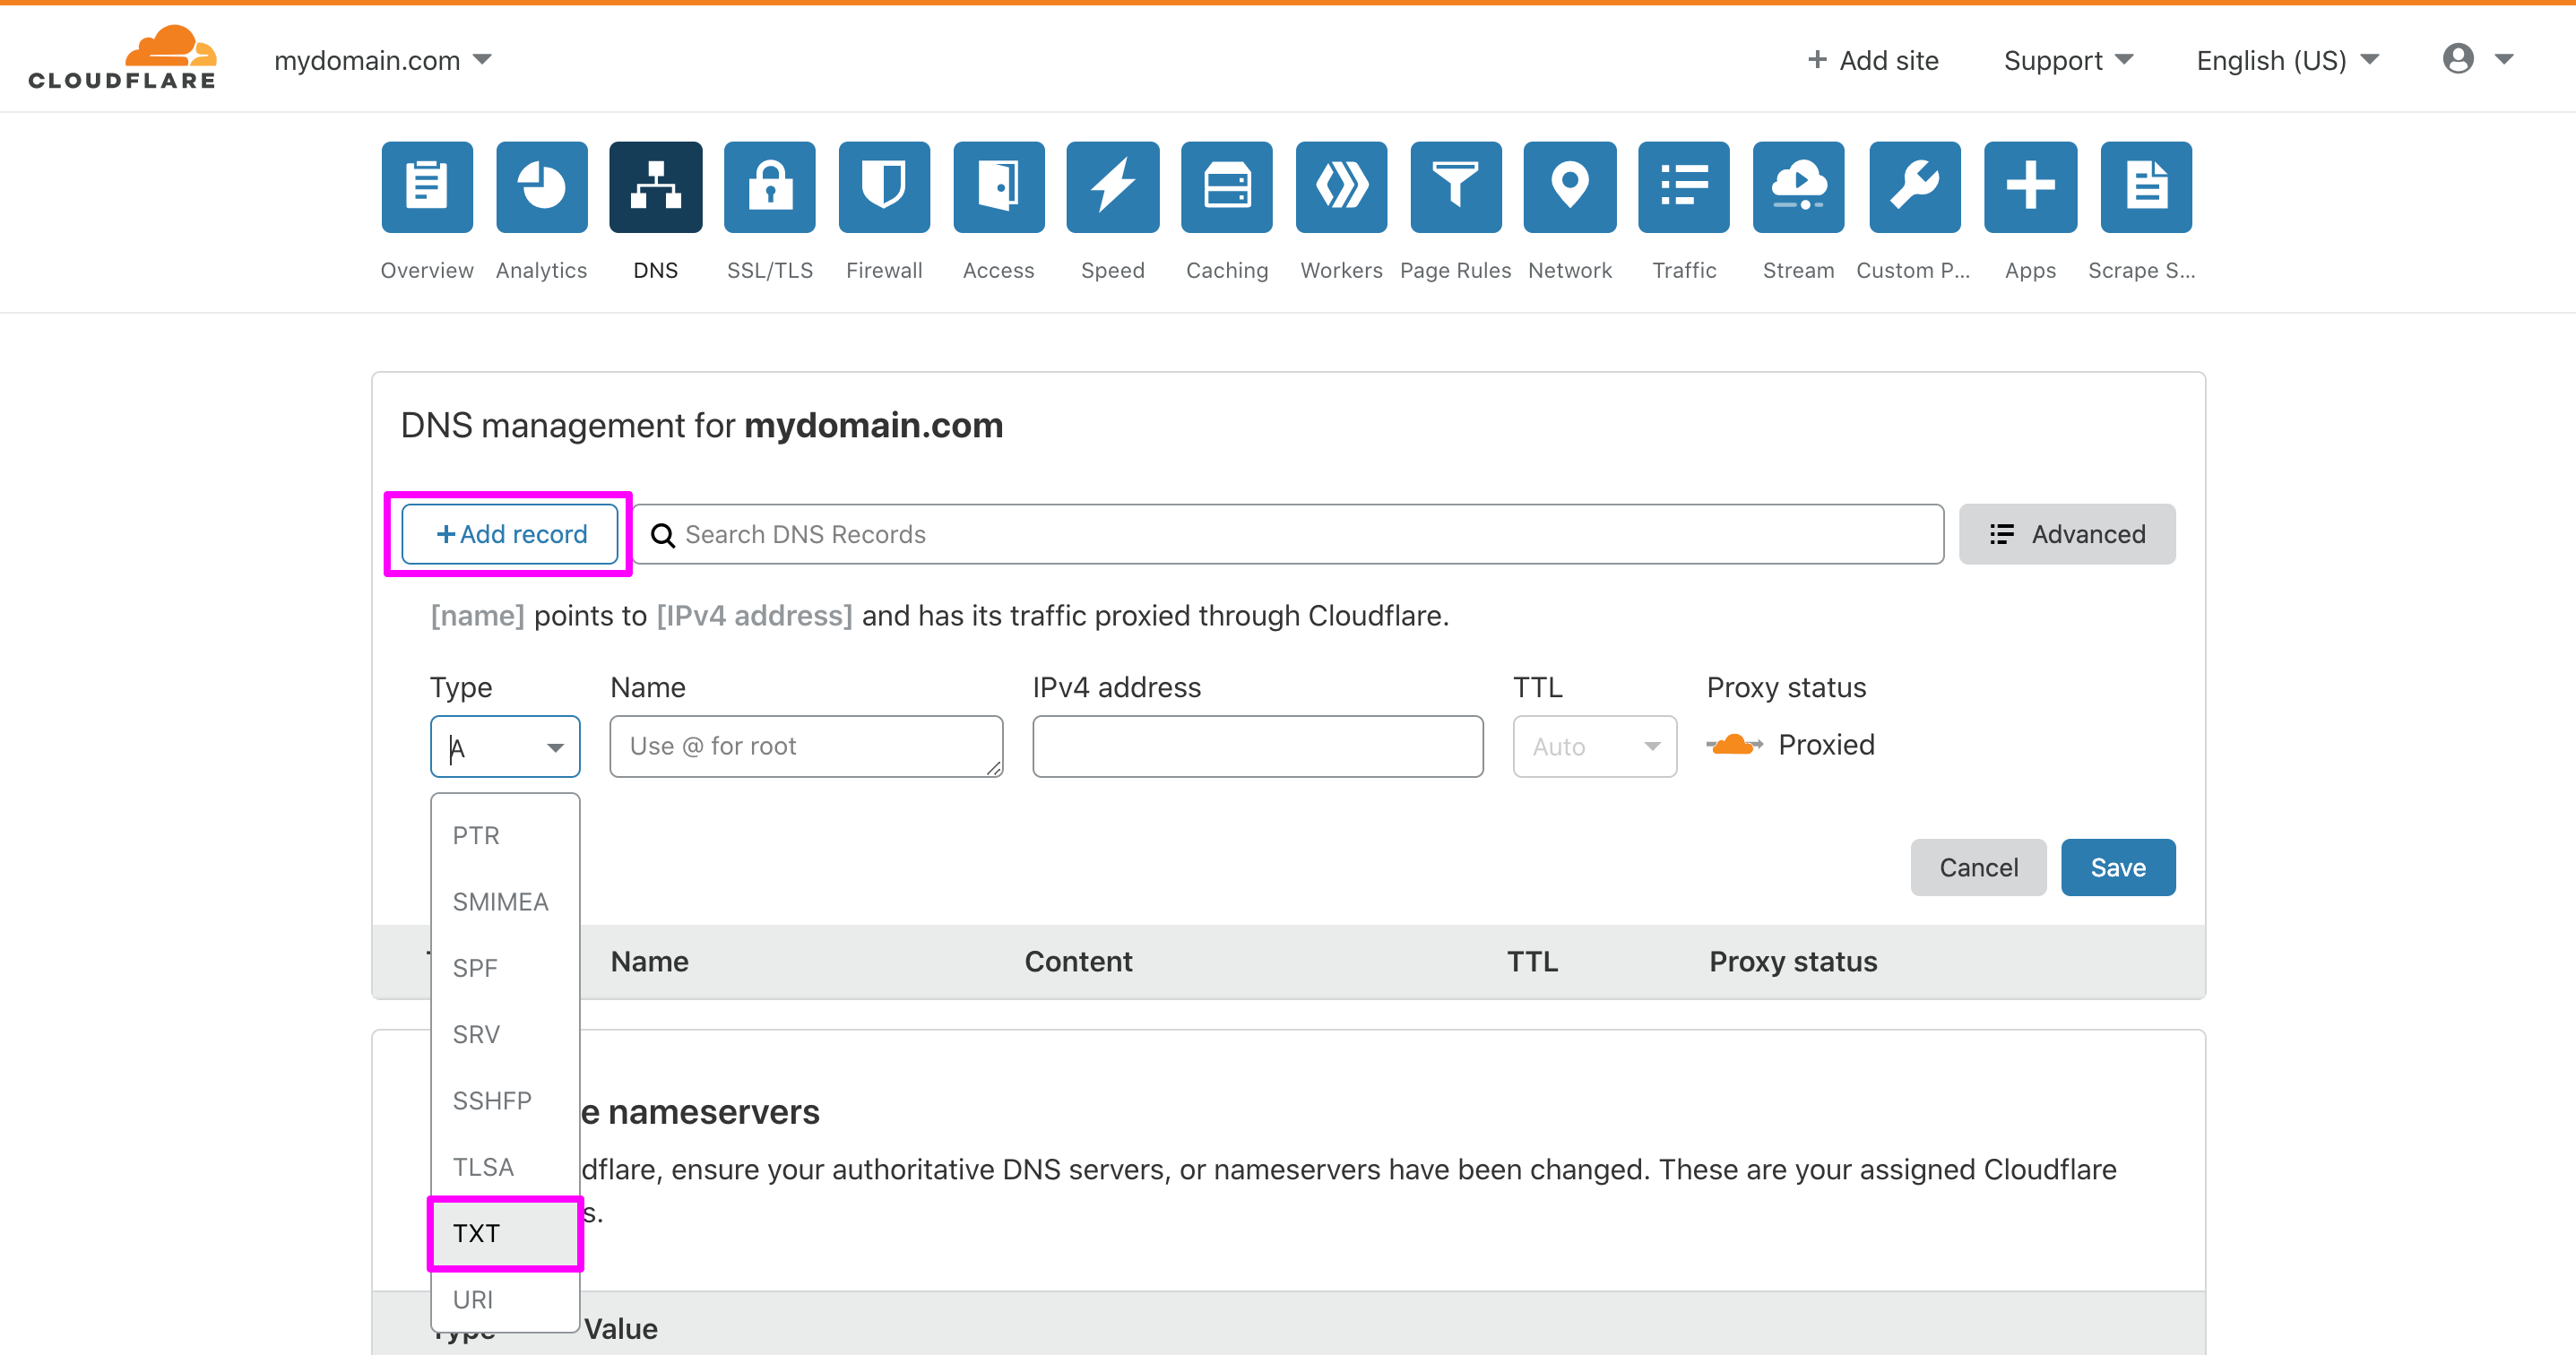
4 Enter your domain name in the Name field.
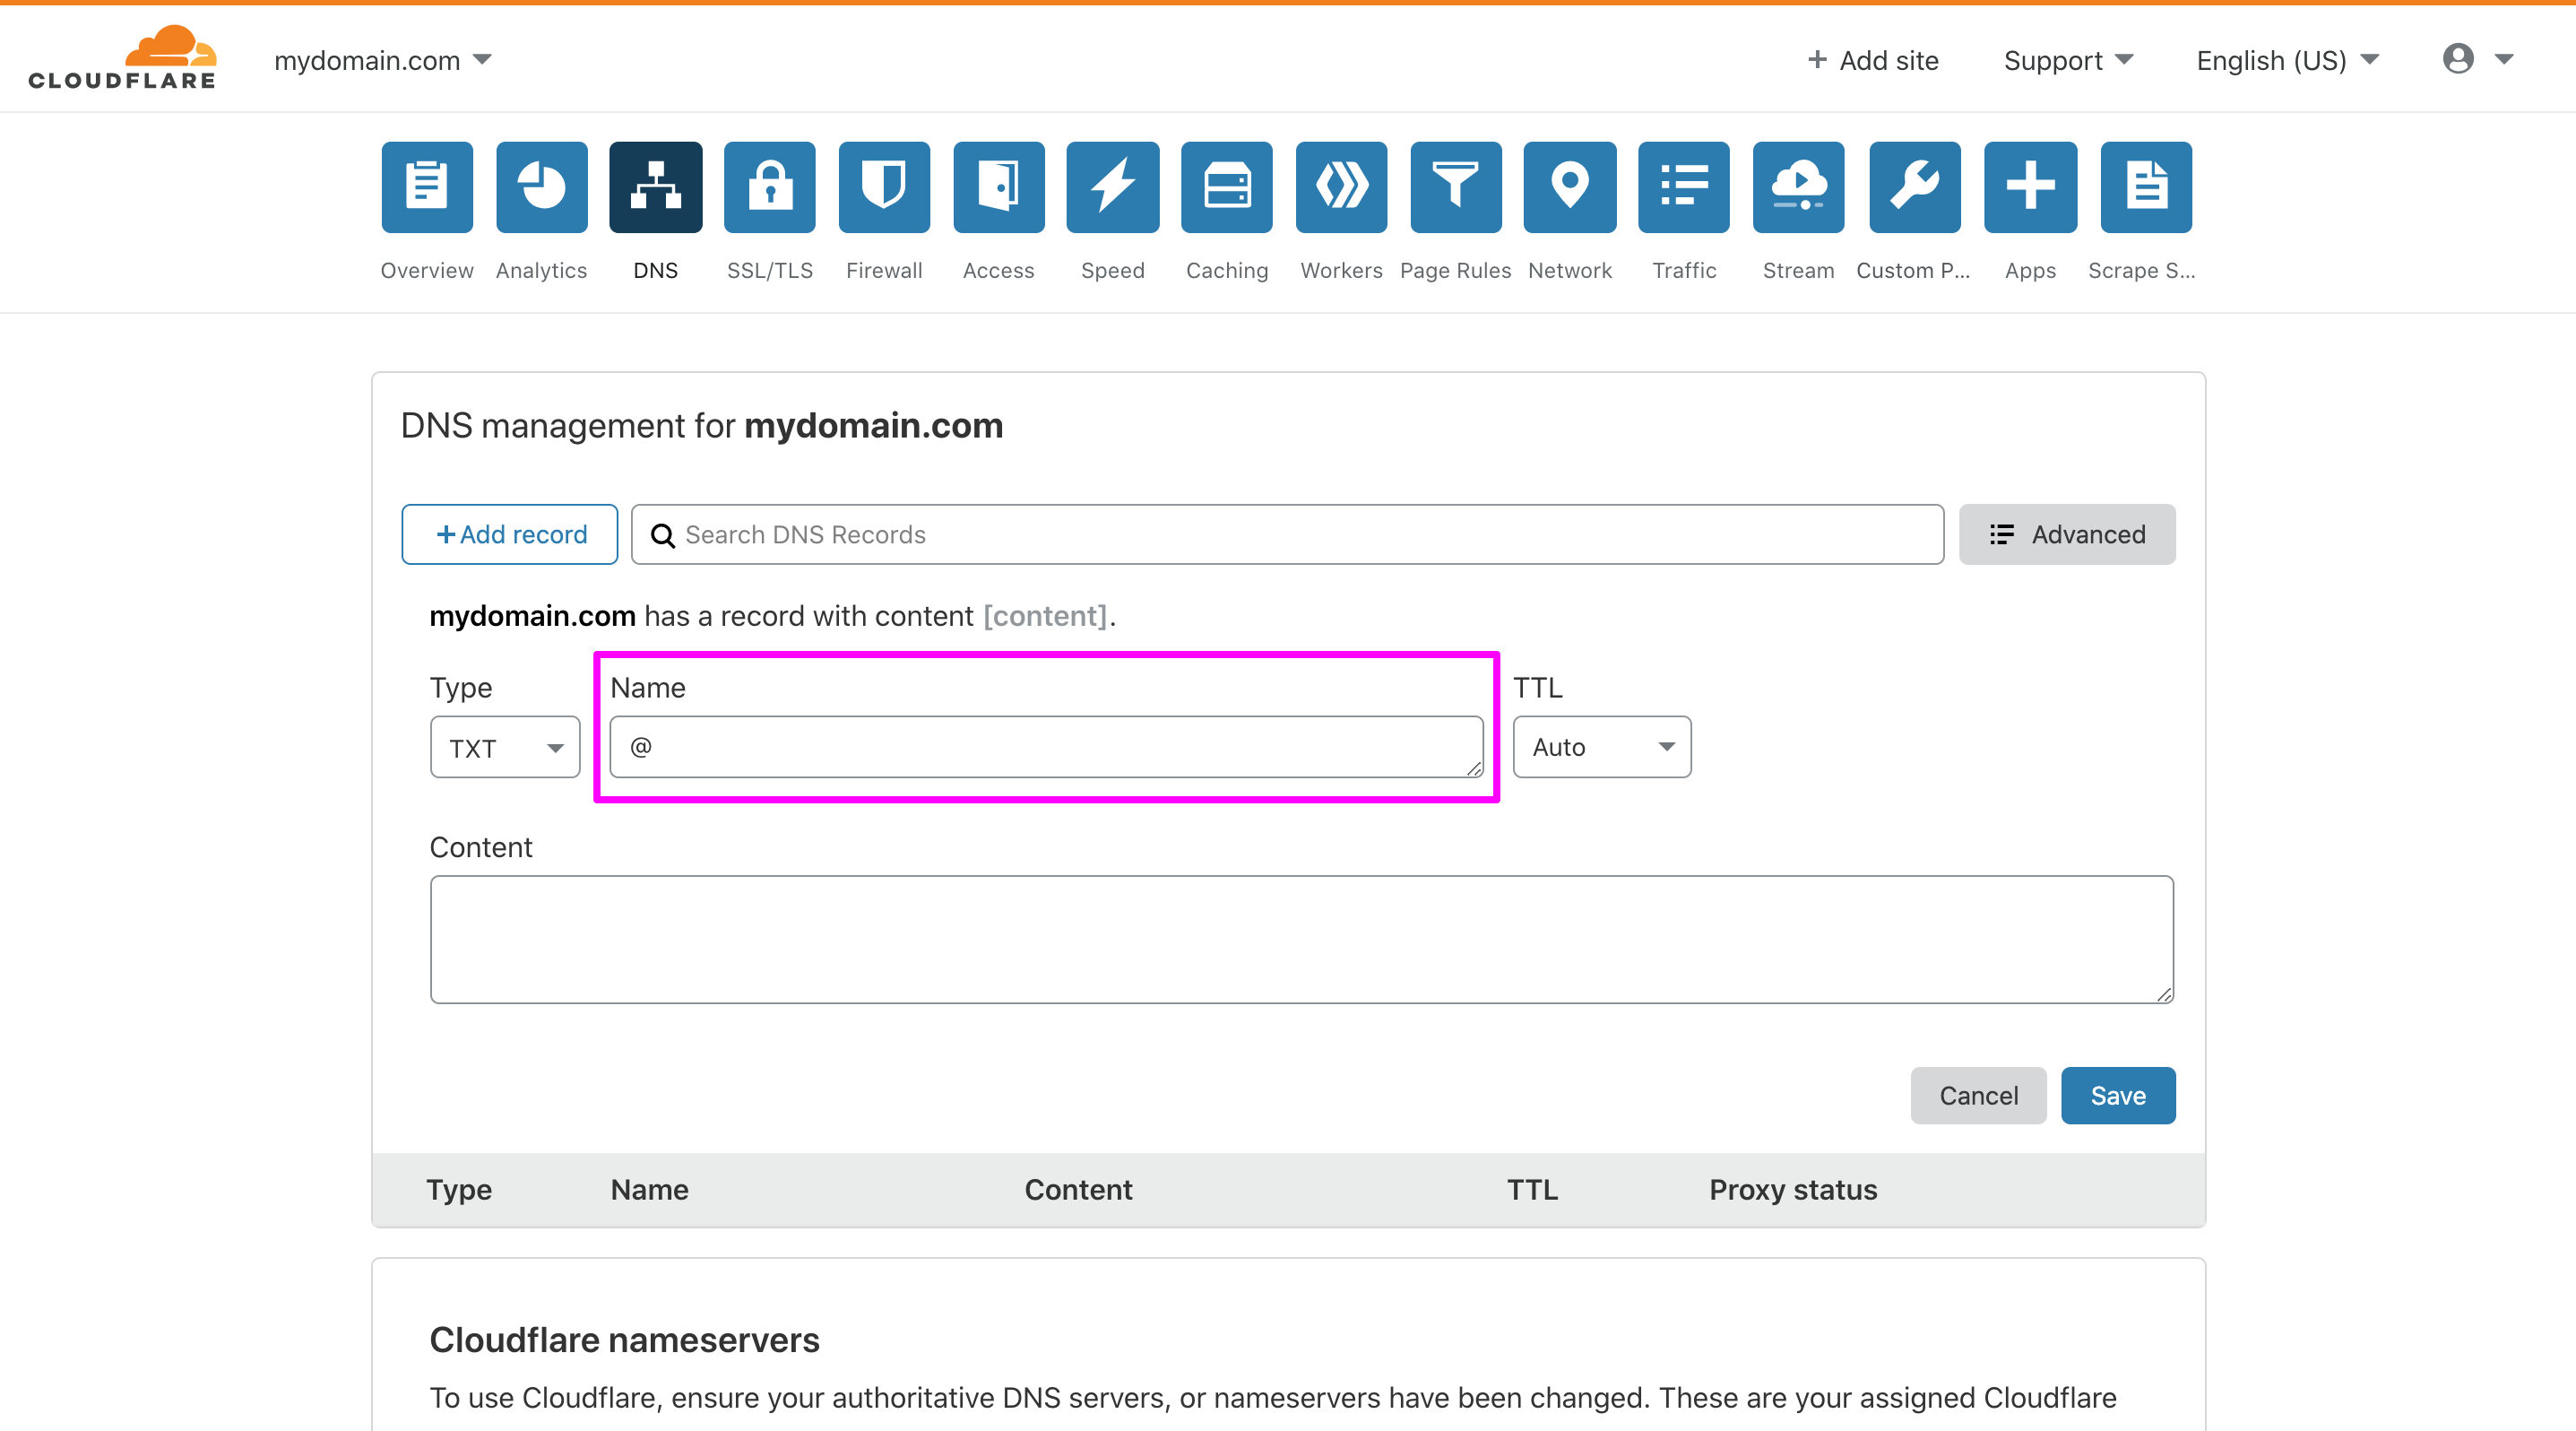
5 Keep the TTL field Auto
6 Enter the SPF record (e.g. “v=spf1 include:amazonses.com ~all“) as the Content
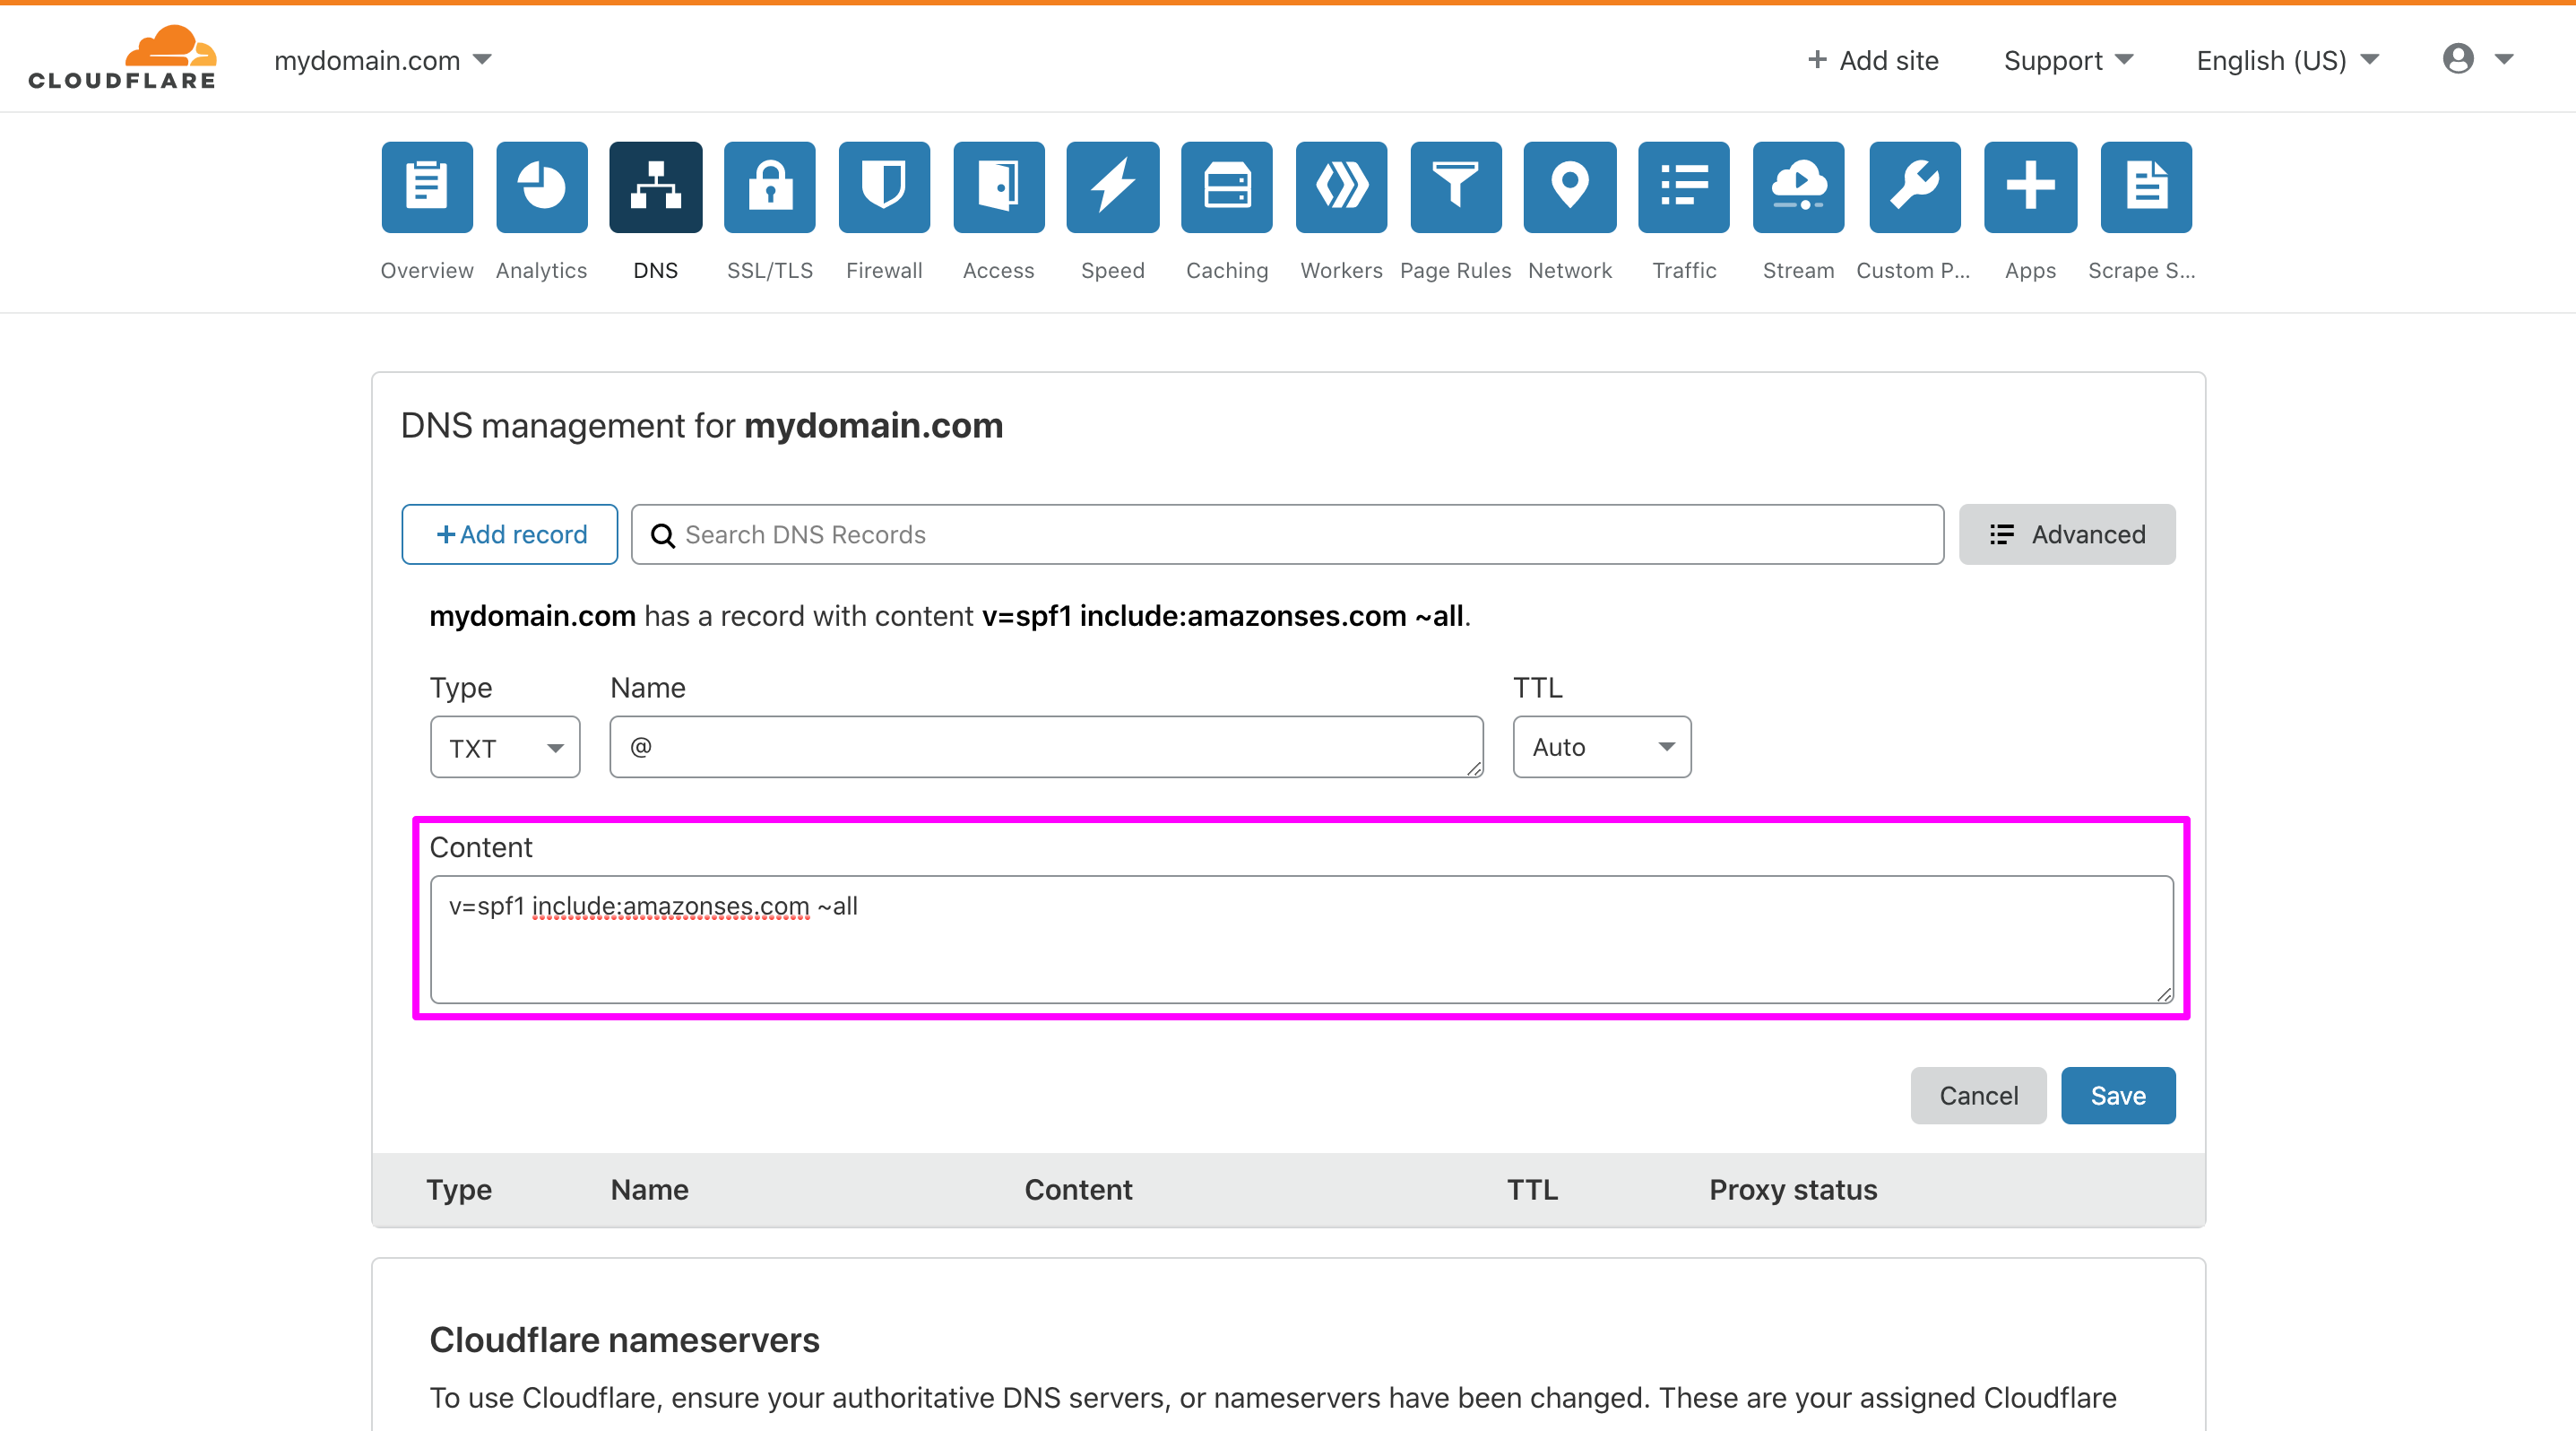
7 Click on the Save button.
For reference, see Authenticating Email with SPF in Amazon SES.
DMARC
Domain-based Message Authentication, Reporting and Conformance (DMARC) is an email authentication protocol. DMARC makes it easier for email senders and receivers to determine whether an email is authentically from the sender and if it isn’t, then what to do. To activate DMARC into the emails, the messages should have been authenticated with SPF, DKIM, or both.
You already set up SPF and DKIM. Now it’s time to set up the DMARC policy. You can define a DMARC policy in a DNS record in the first place without setting up SPF and DKIM, but it won’t work.
DMARC is a simple single line entry to the domain’s DNS records, just like SPF.
If you the Route 53 is your DNS provider
1 Log in to the AWS Management Console and open the Route 53 console at https://console.aws.amazon.com/route53/
2 In the navigation pane, choose Hosted zones.
3 On the Hosted Zones page, select the Domain Name that you want to create the DMARC record set for.
4 Choose Create Record Set and choose TXT as a type.
5 Here is an example below on how to do DMARC entry for the test domain DMARC site:
v=DMARC1;p=quarantine;pct=25;rua=mailto:[email protected]
• There are three options for the ‘p’ option: none, quarantine, or reject. For handling the emails that violate the policies.
• The RUA provides an address for aggregate data reports, while the RUF provides an address for forensic reports
6 Click Save Record Set.
If you are using another DNS provider
The process for adding DMARC records for different providers is different. Here we have taken Cloudflare‘s example.
1 Log into your Cloudflare account.
2 Click on the DNS tab for your domain.
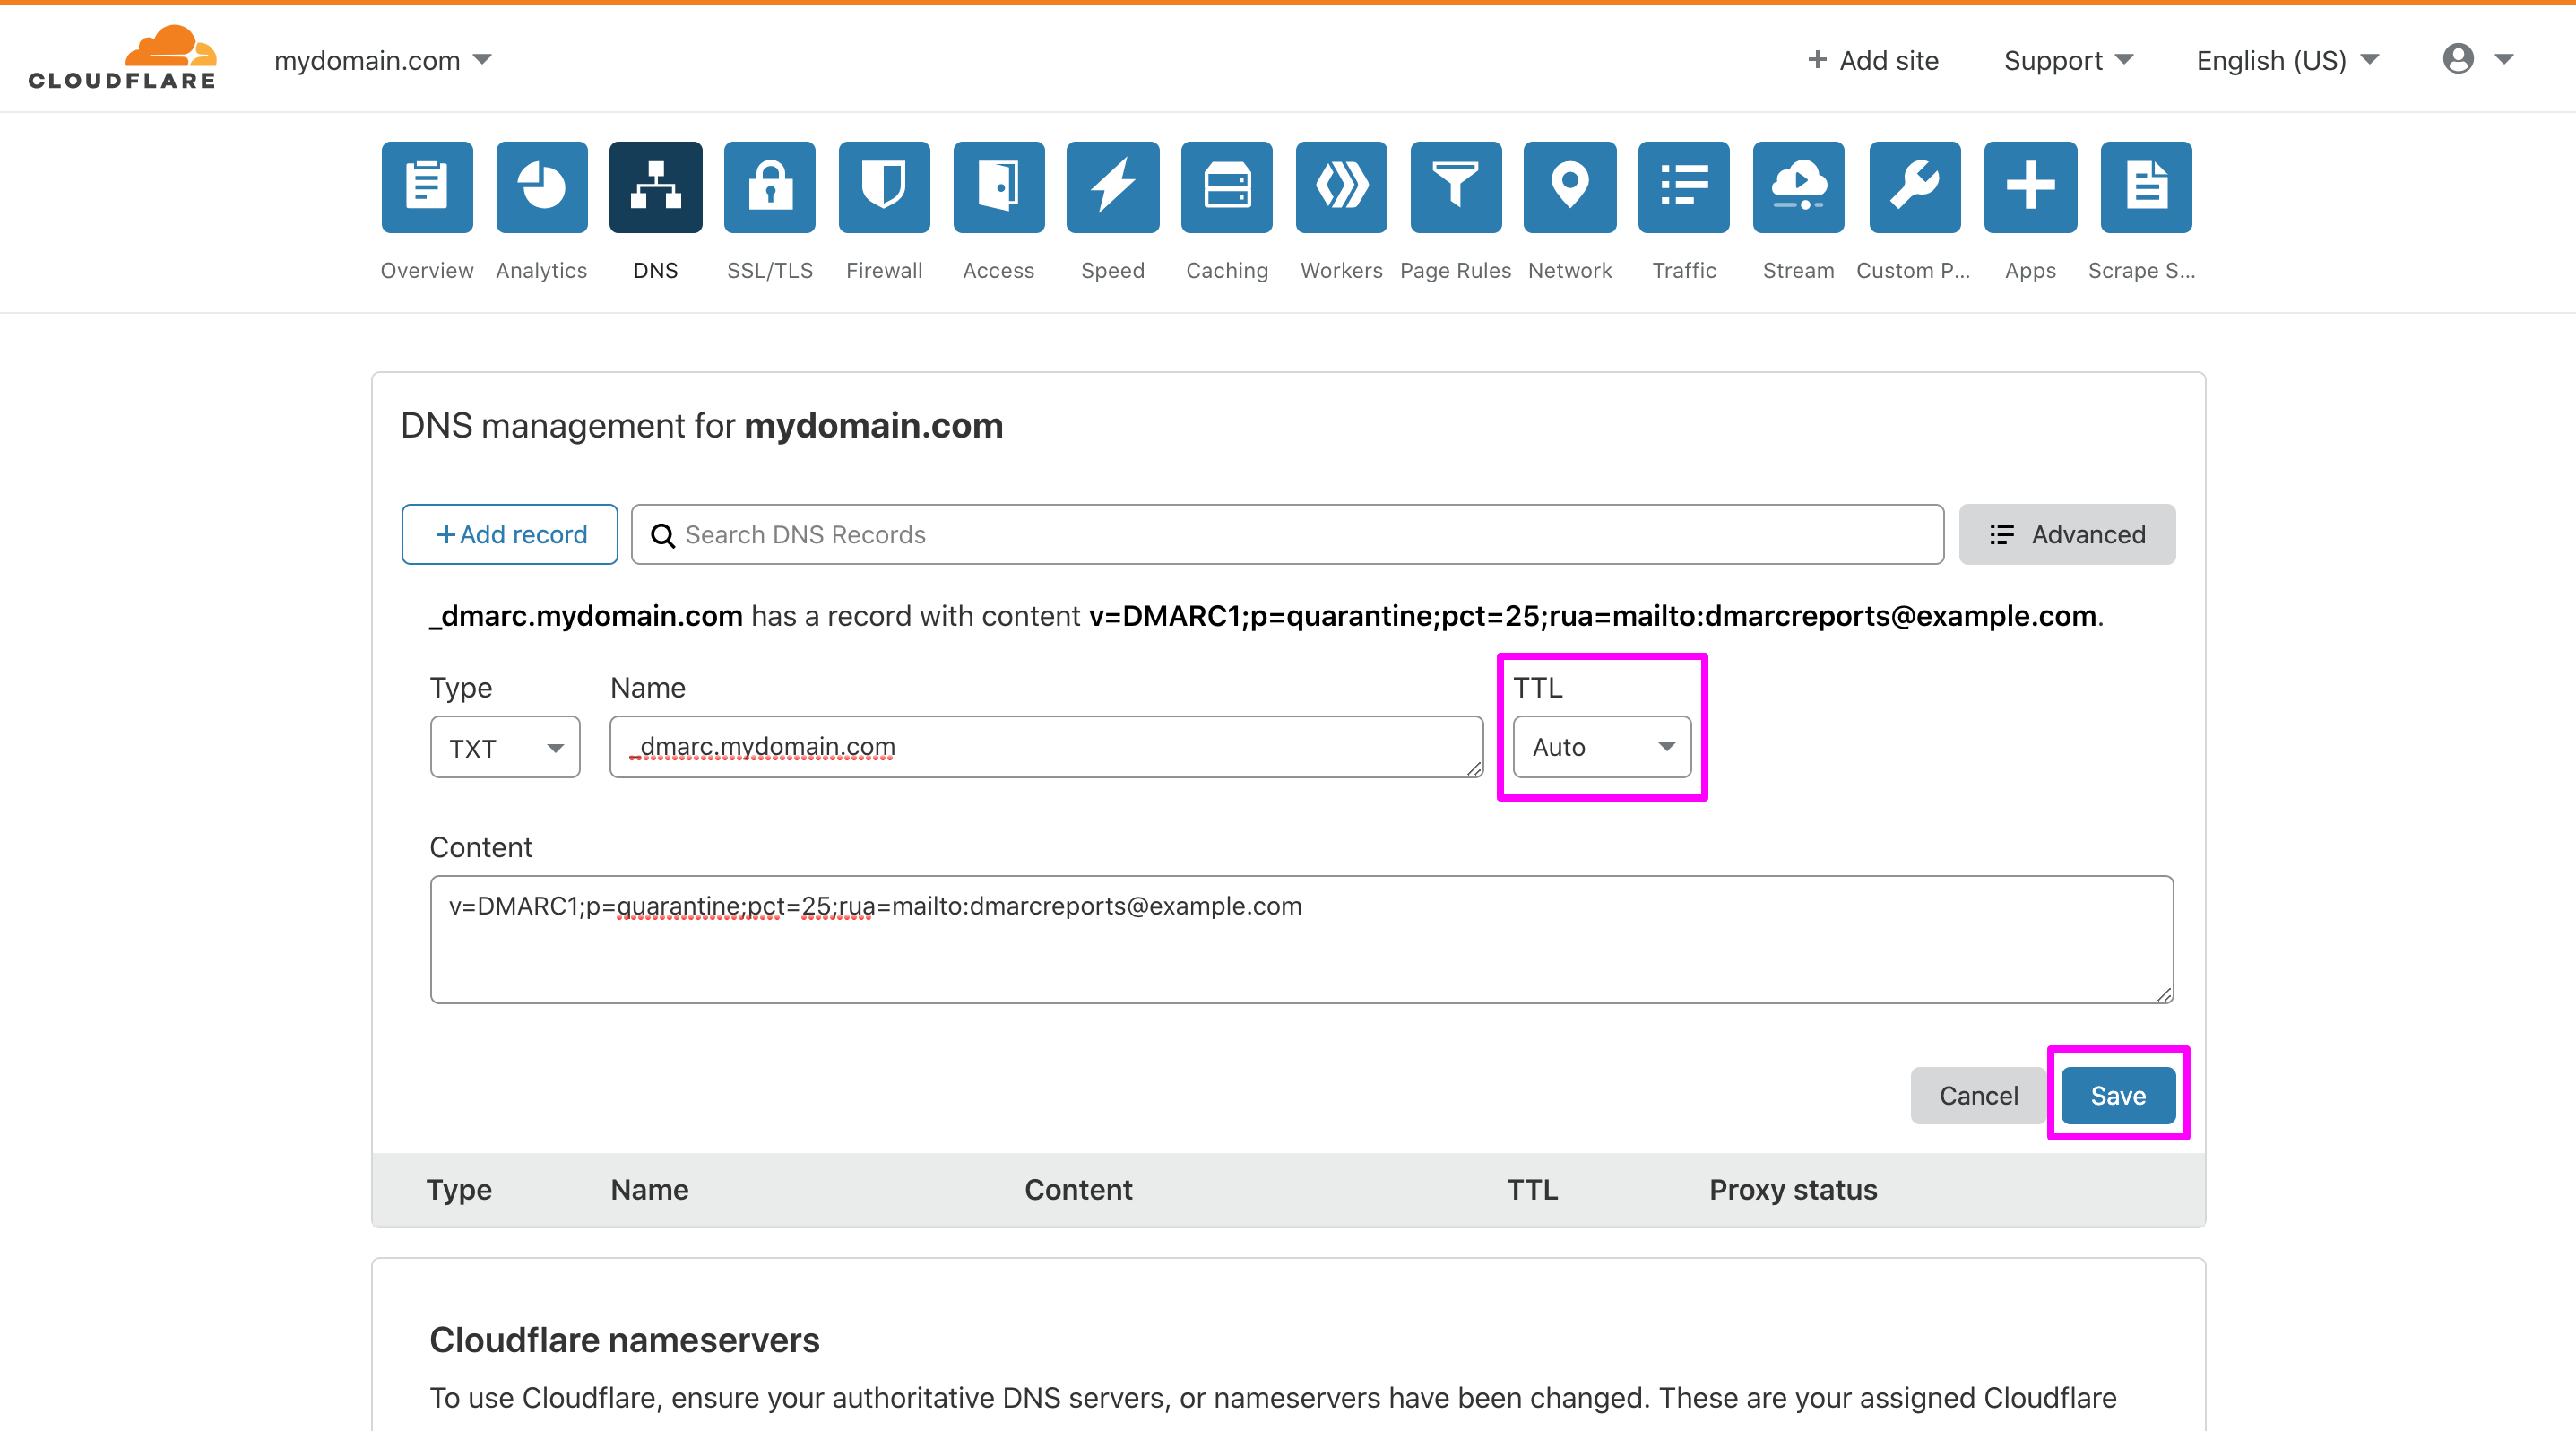
3 Enter the settings for your DMARC record, the record type must be TXT, and the Name should be _dmarc.mydomain.com. For Content, enter the custom DMARC Analyzer TXT record. For example, “v=DMARC1;p=quarantine;pct=25;rua=mailto:[email protected]”
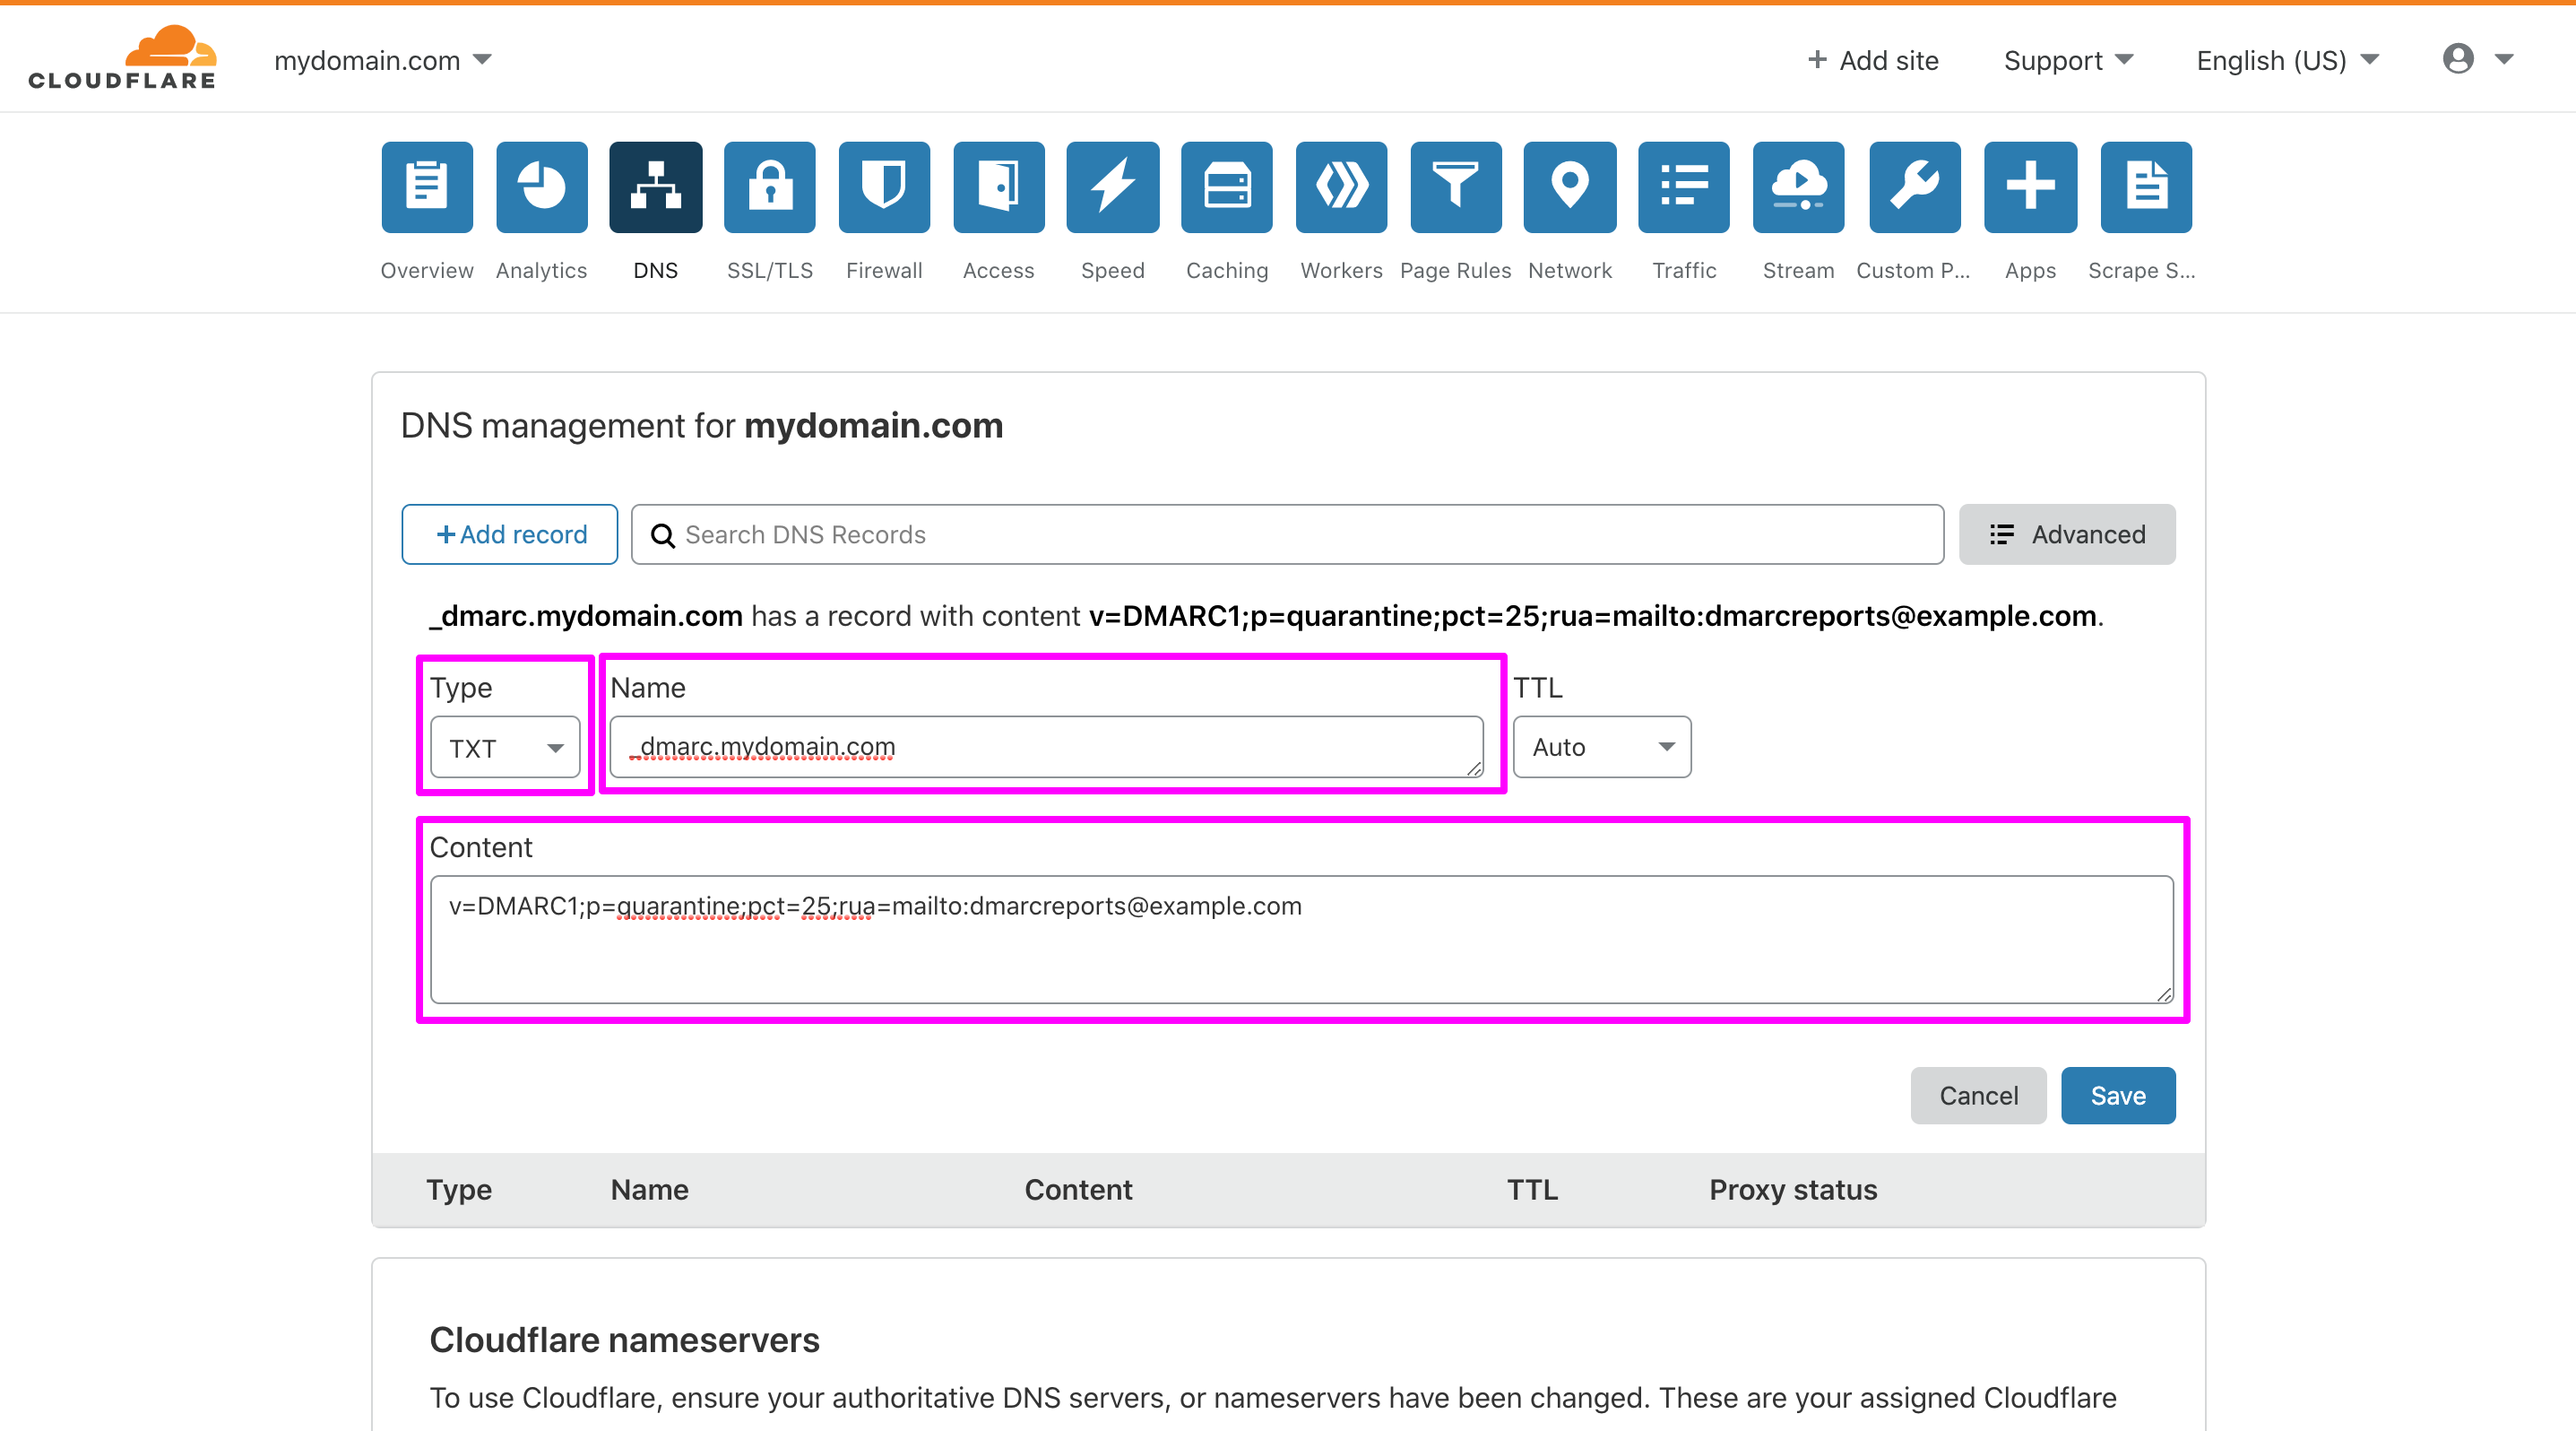
4 Keep it TTL auto as it is and click the Save button. You are done!
For reference, see Complying with DMARC Using Amazon SES.
PTR
A Pointer record (PTR) determines an IP address to a fully-qualified domain name (FQDN). PTR records are also called Reverse DNS and work exactly the opposite of A record’s function. This record is a must-have for outgoing mail servers. Most of the mail providers reject or mark as spam messages received by mail servers without valid reverse DNS configuration (missing PTR or mismatch A record for the hostname).
Creating a reverse DNS zone
You have to create the reverse DNS zone of the DNS nameserver for the primary IP address of your server. Follow the steps below to do so-
1 If your nameserver does not give the Reverse response, then you need to contact the ESP to help you setting up a PTR record. Contact the support team and tell them you want to set a PTR record for the IP address X.X.X.X resolving to example.com (your domain)
2 If you can access the authoritative nameserver, first create a DNS zone in a specific format. For instance, if your IP address is 192.168.0.111, start by dropping the last octet (set of numbers at the last part) for getting 192.168.0. Then, reverse the IP address like 0.168.192.
3 The hostname should start with a portion of your IP address written reversed followed by ” .in-addr.arpa.” Complete reverse zone domain is 0.168.192.in-addr.arpa.
Creating a PTR Record
1 Add a new PTR record. For the name, type the final digit of the IP address for which you’re setting up the reverse record. For example, 100.
2 For the Canonical Hostname, enter the domain you’d like the IP address to resolve. For example, mailserver.example.com
3 After you’ve saved your file zone, allow time for the change before validating the new reverse DNS record.
Domain Ownership
If you are sending emails through MailBluster using a particular domain, then you need to verify the From email address hosted at the domain you have access to send emails. For example, once you have verified example.com, you can send emails through MailBluster with any @example.com email address. This feature is especially useful to keep your campaigns out of SPAM and protect your reputation by ensuring the misuse of your domain without permission.
Google Postmaster
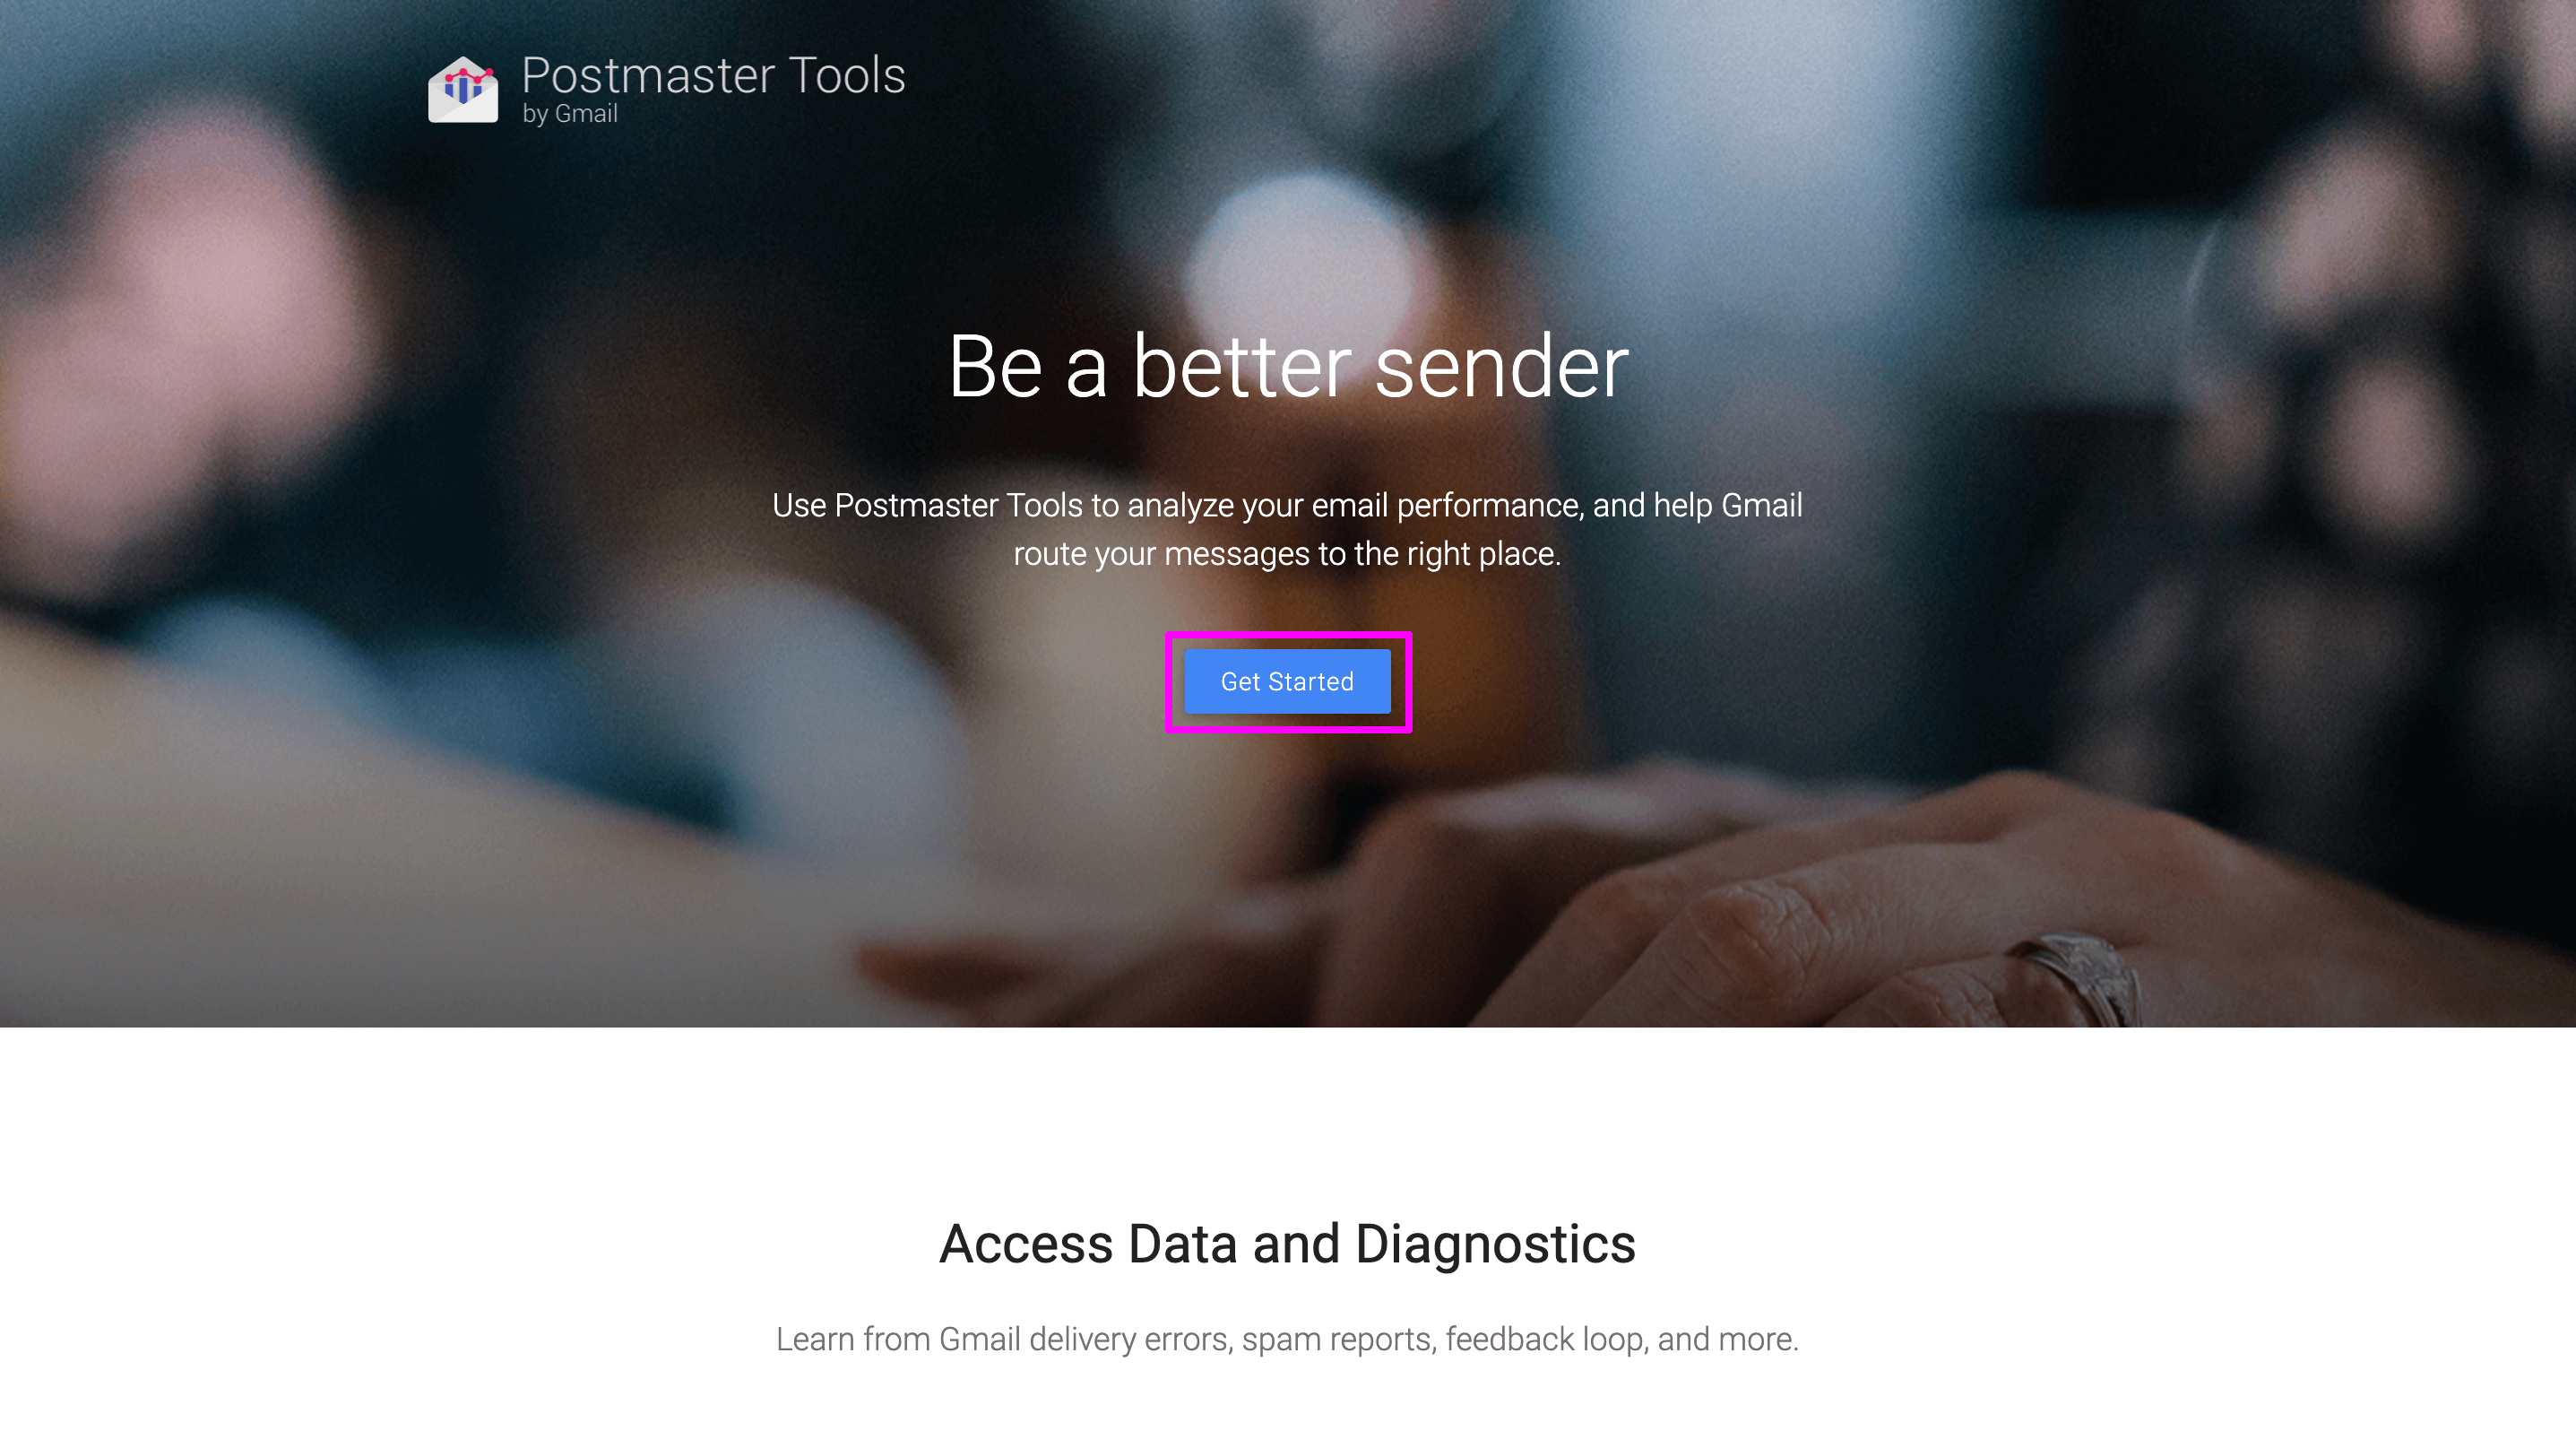
1 Go to https://www.gmail.com/postmaster/ and click on Get Started button.
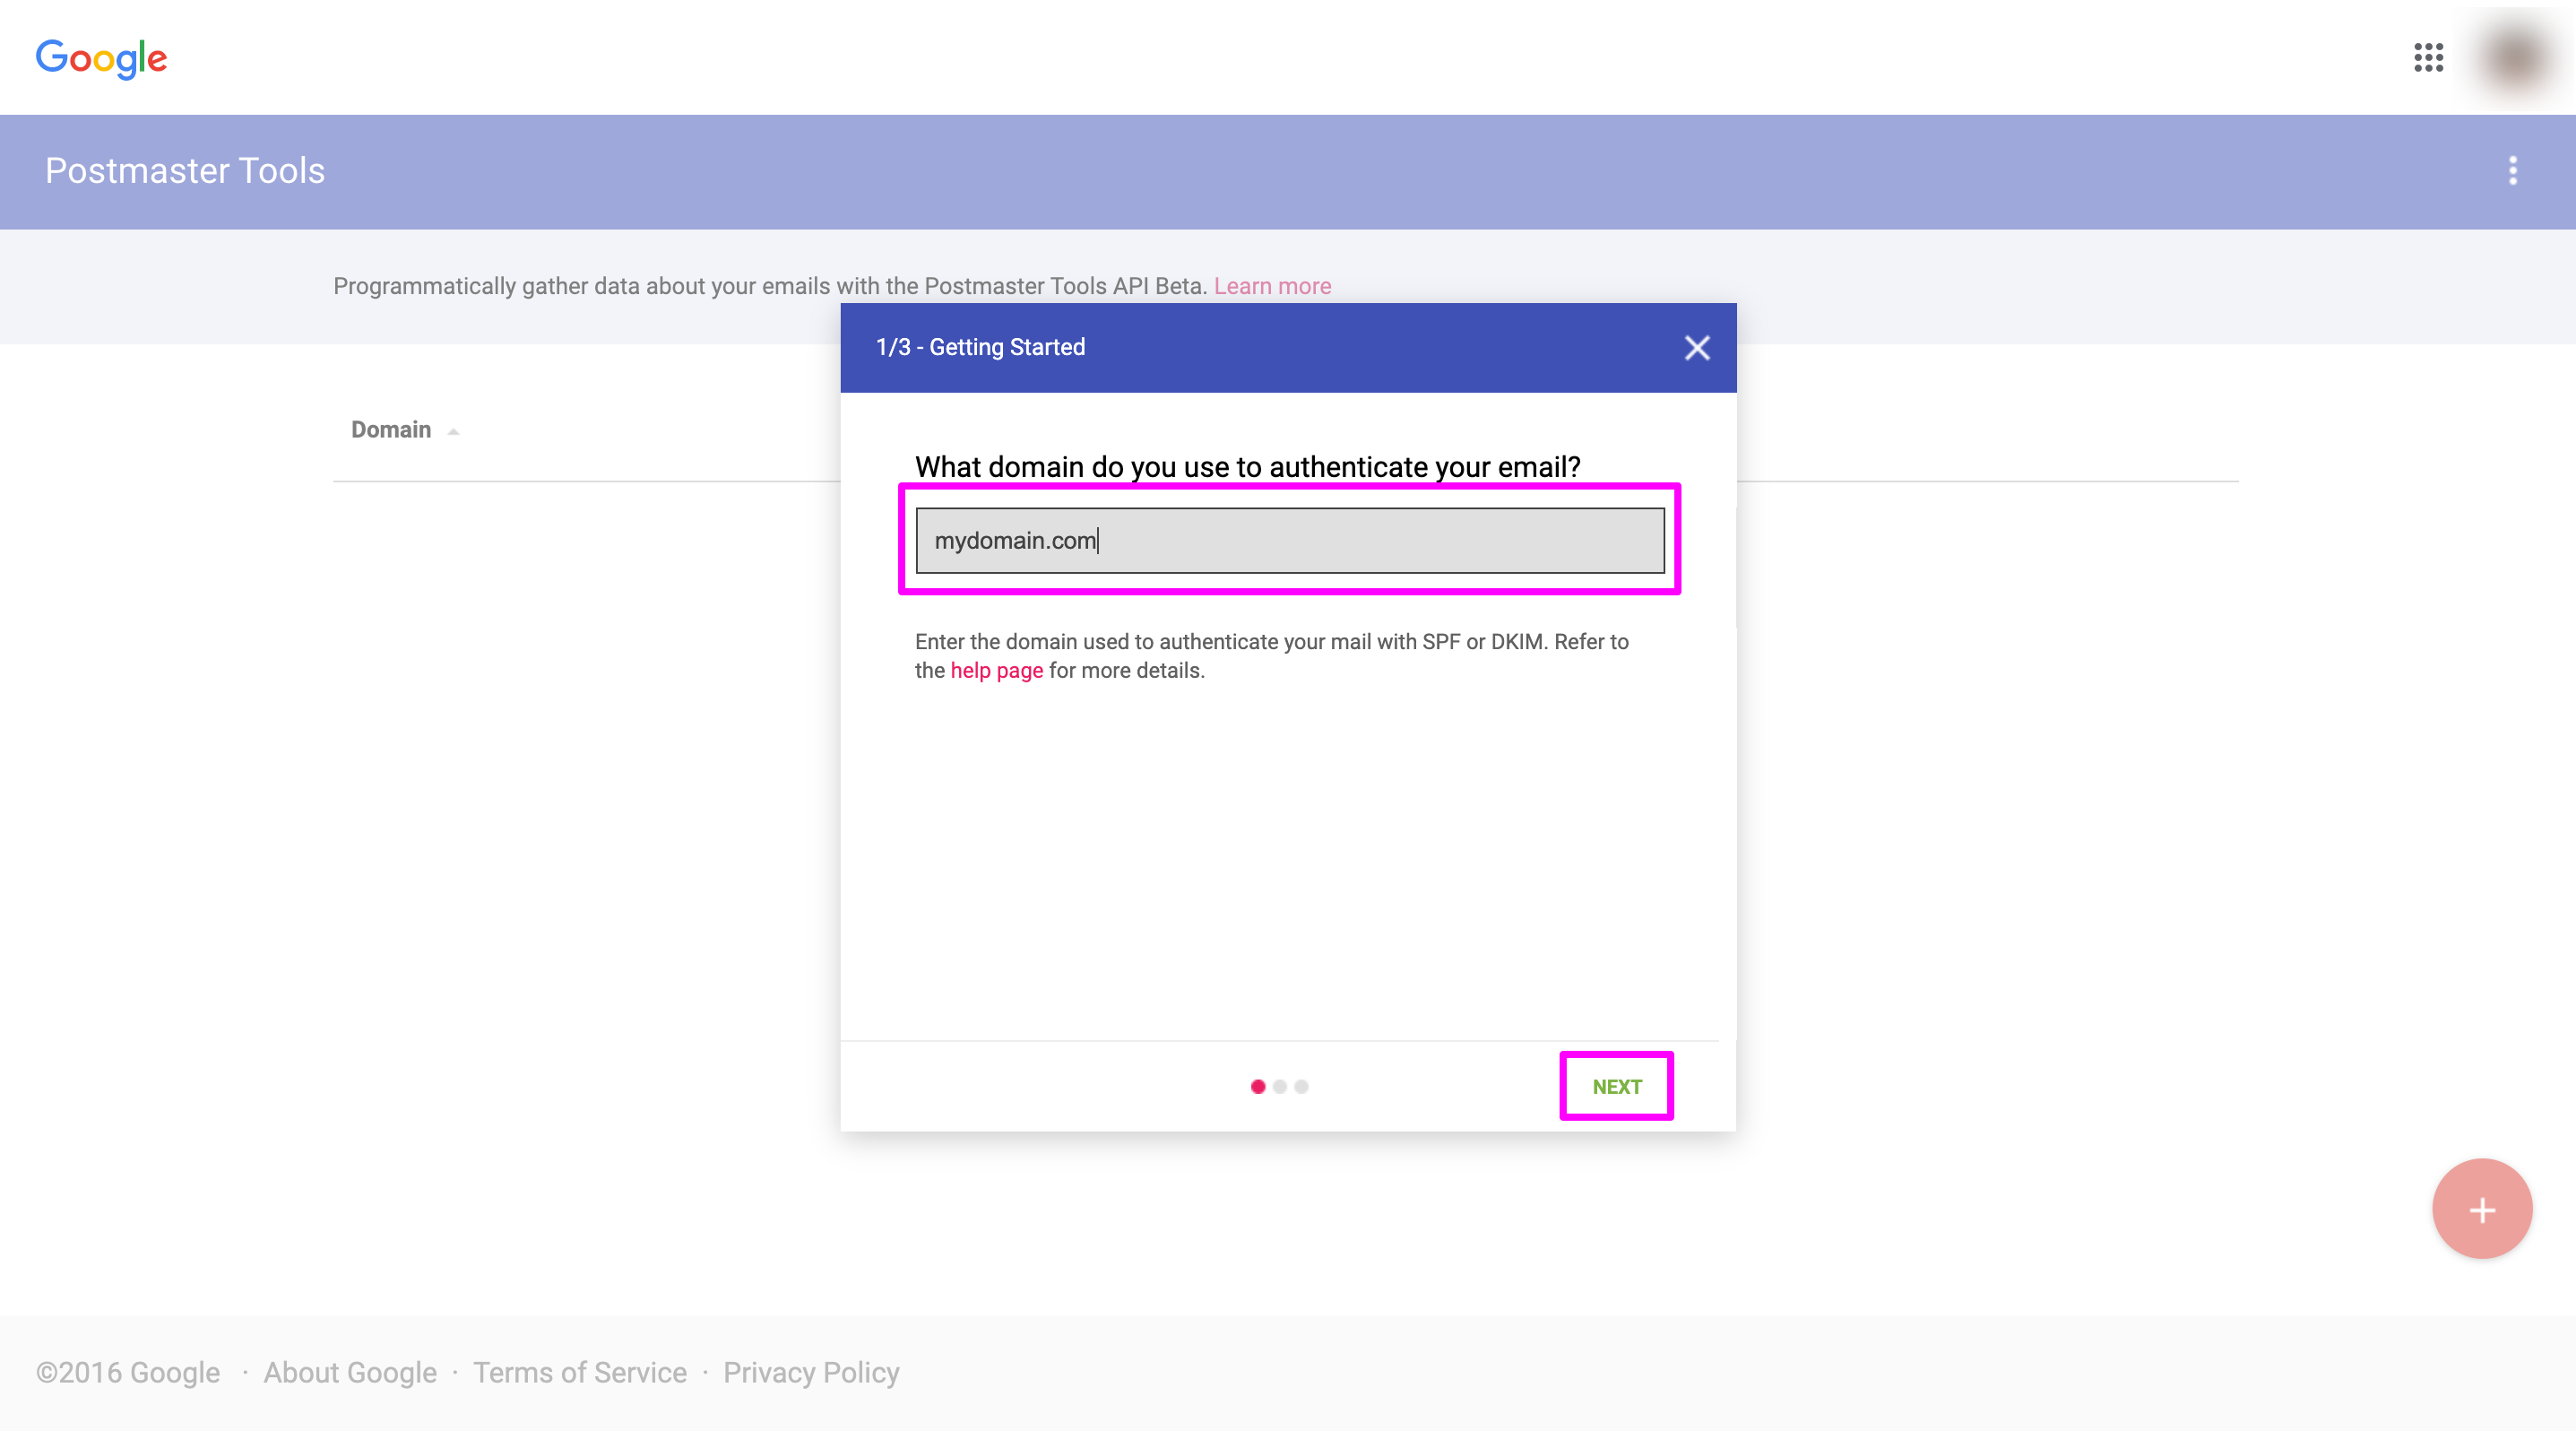
2 First, enter the domain name in the domain name field and click Next.
3 You will be given a TXT record to add that in the DNS configuration of your domain.
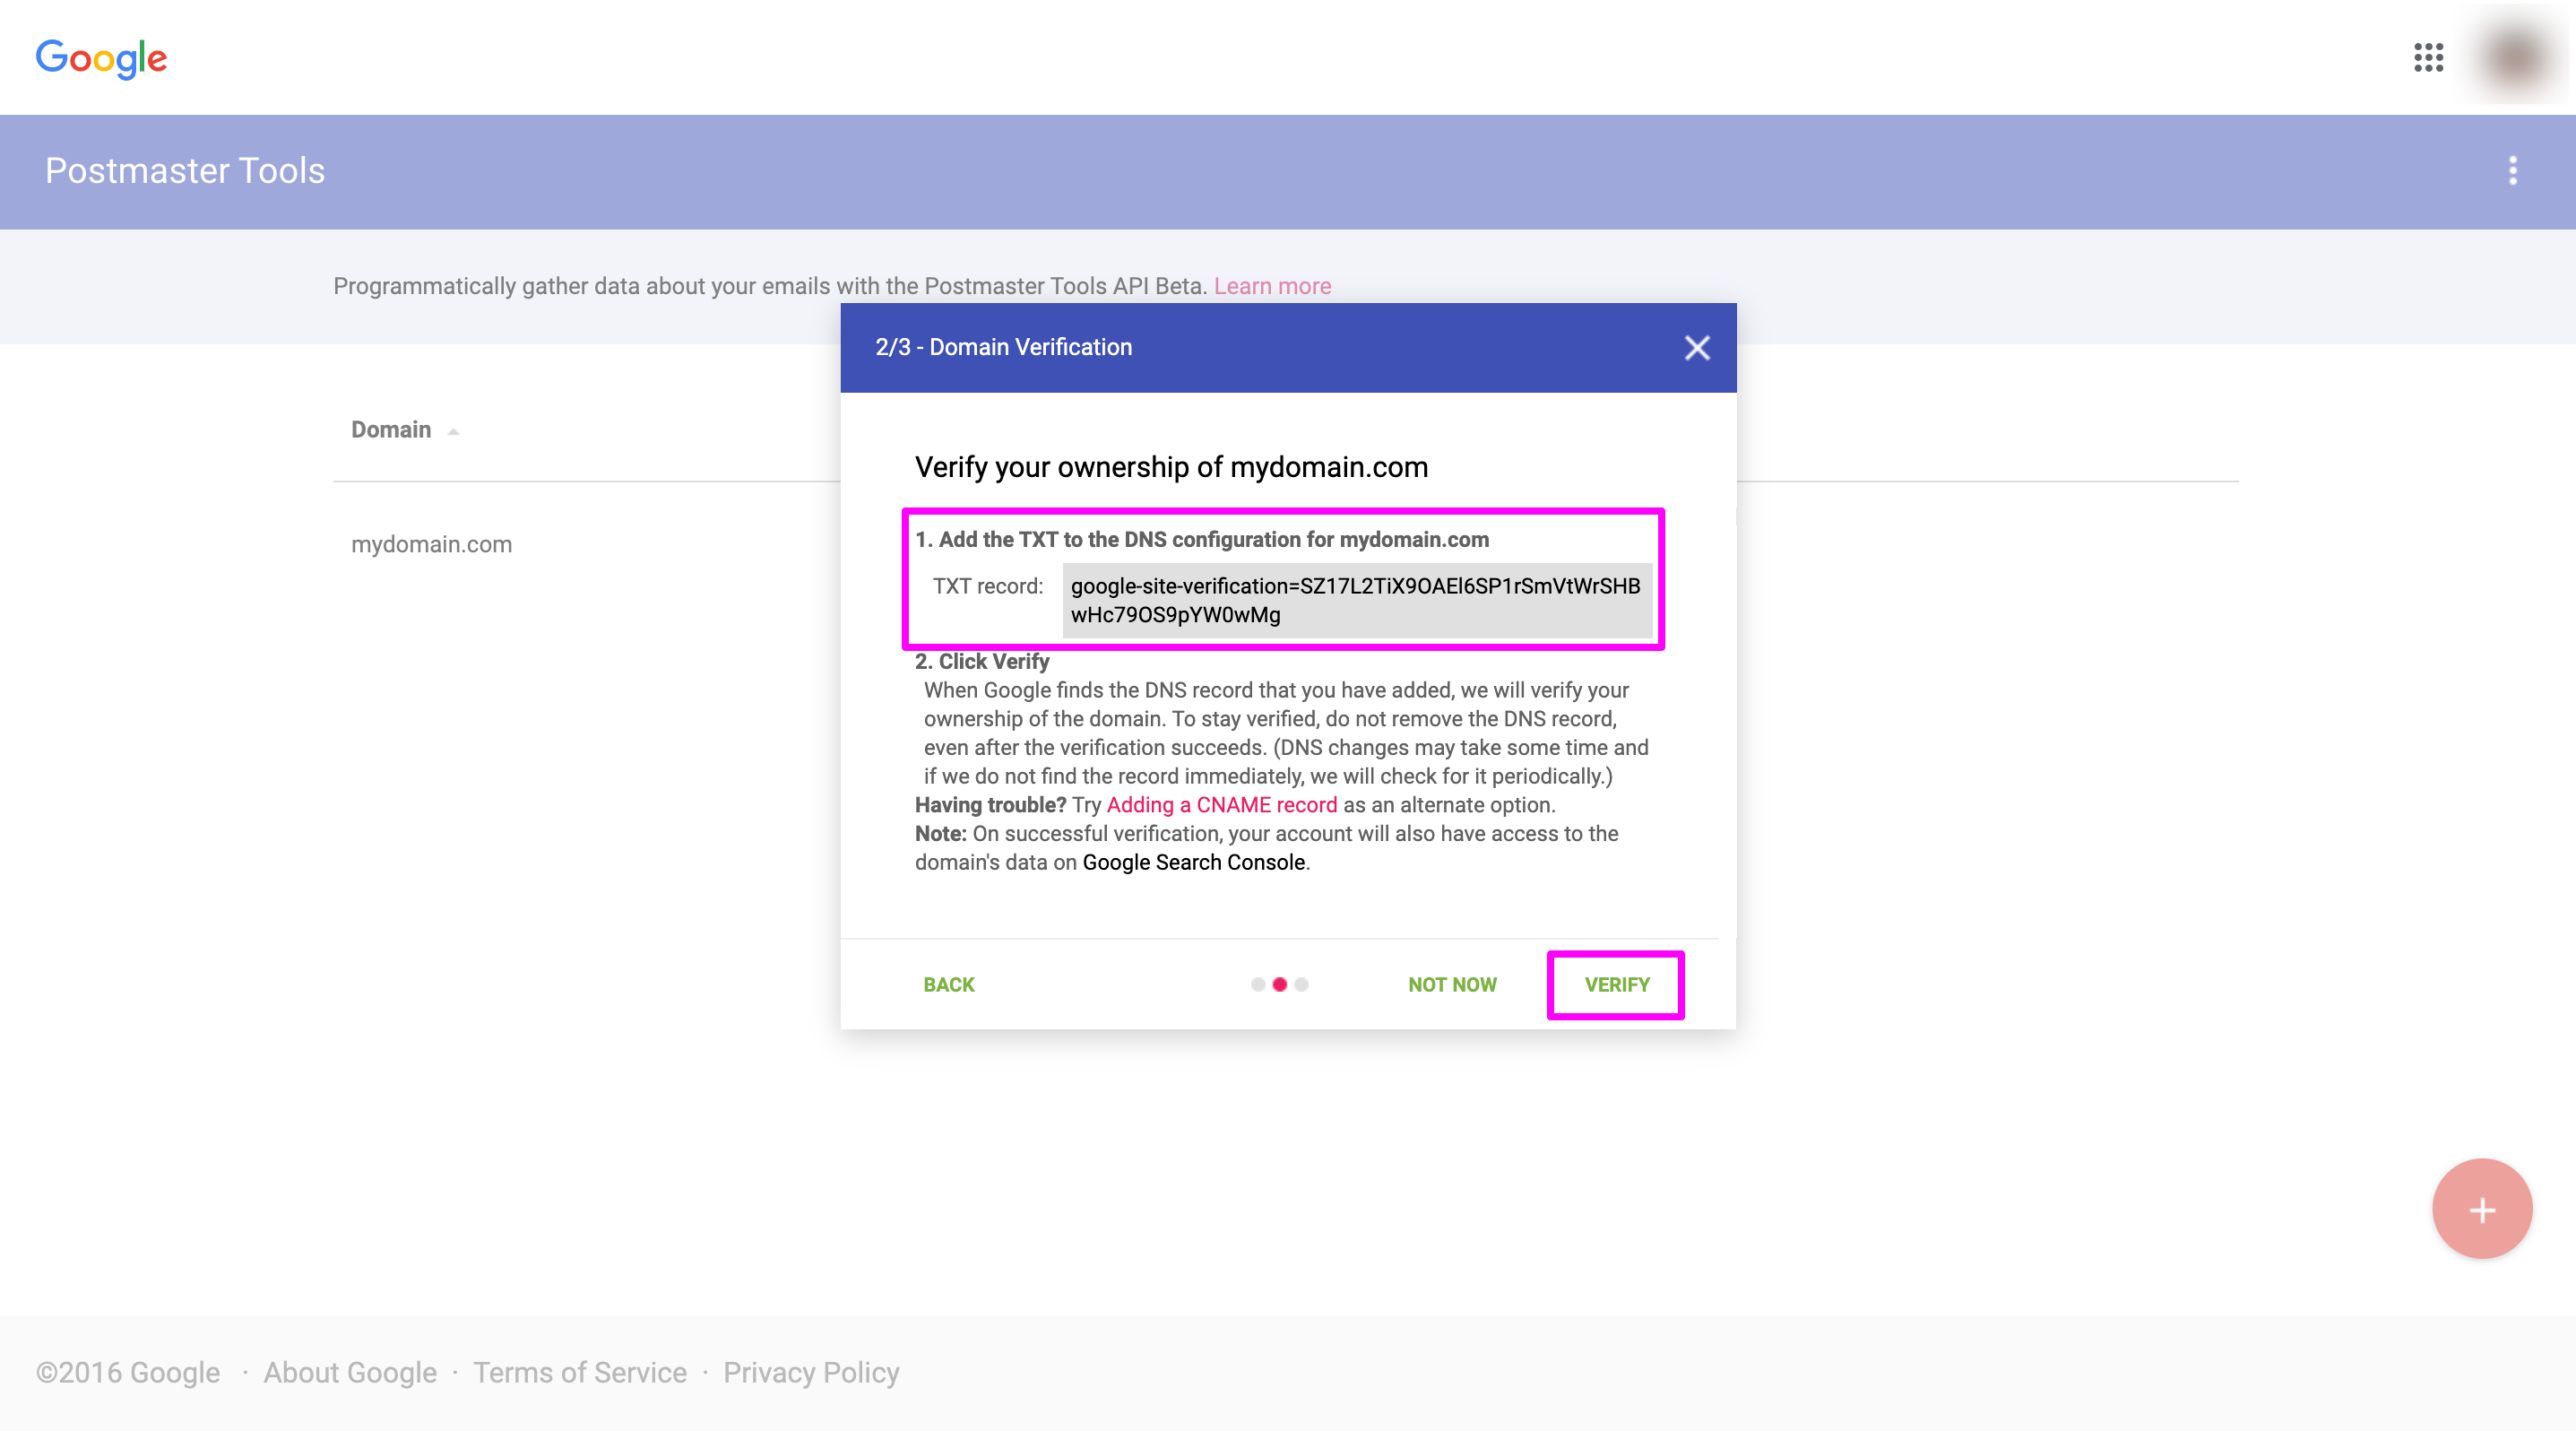
4 Click Verify after changing the DNS configuration. Google will find that configuration in the DNS settings of your domain and verify its ownership.
Amazon SES
Follow this documentation to verify your domain on AWS SES: https://docs.aws.amazon.com/ses/latest/DeveloperGuide/verify-domain-procedure.html
MAIL From domain
Many senders want to set the MAIL FROM domain as the domain they own. Your emails can comply with DMARC by setting up a custom MAIL FROM domain. It allows a sender’s domain to tell that one or more authentication measures secure emails sent from this domain. Using your own MAIL FROM domain will allow you to choose SPF, DKIM, or both to achieve DMARC validation. Usually, when you send messages through Amazon SES, it uses a subdomain of amazonses.com as the MAIL FROM domain. Sender Policy Framework (SPF) can authenticate these messages successfully only because the default MAIL FROM domain matches the domain that sent the email— in this case, Amazon SES.
You can set a custom MAIL FROM domain for your entire domain or set it up for particular email addresses.
Configuring a verified domain to use as a specified MAIL FROM domain
1 Log in to the Amazon SES console and go to https://console.aws.amazon.com/ses/
2 Choose Domains under Identity Management in the navigation pane.
3 Confirm the parent domain of the MAIL FROM domain is verified in the list of domains. If the domain isn’t verified yet, complete the procedures at Verifying domains in Amazon SES to verify the domain. Otherwise, select the domain and go to the next step.
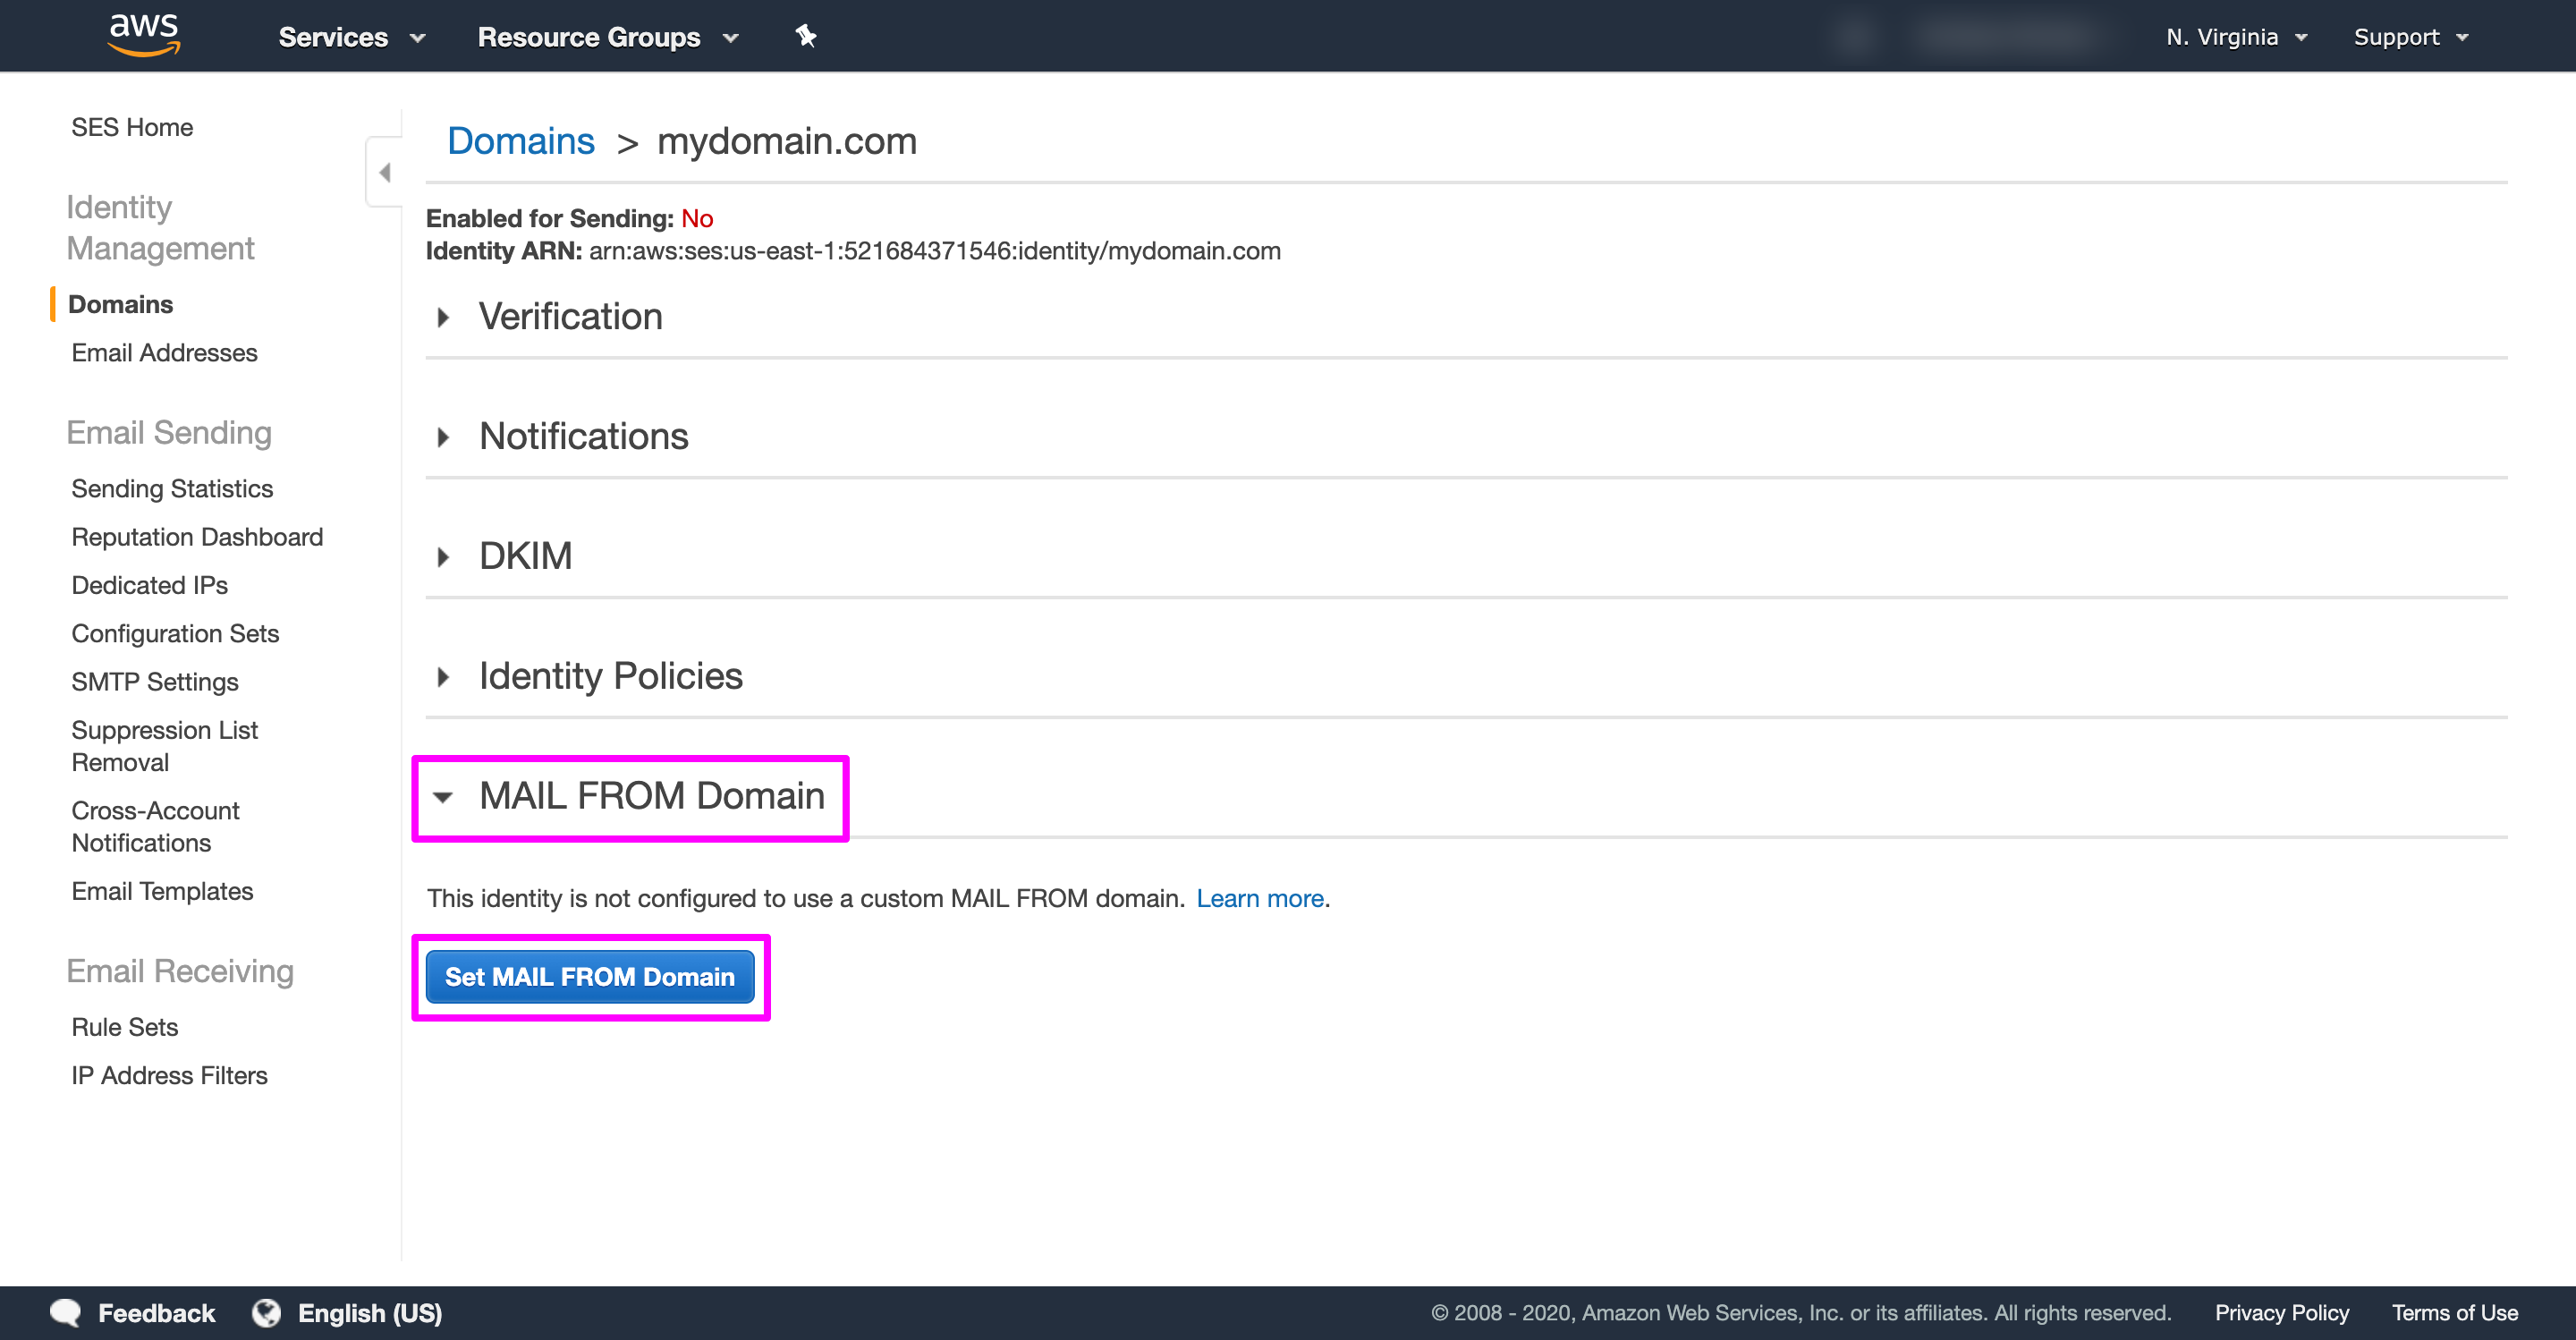
4 Under MAIL FROM Domain, click the Set MAIL FROM Domain button.
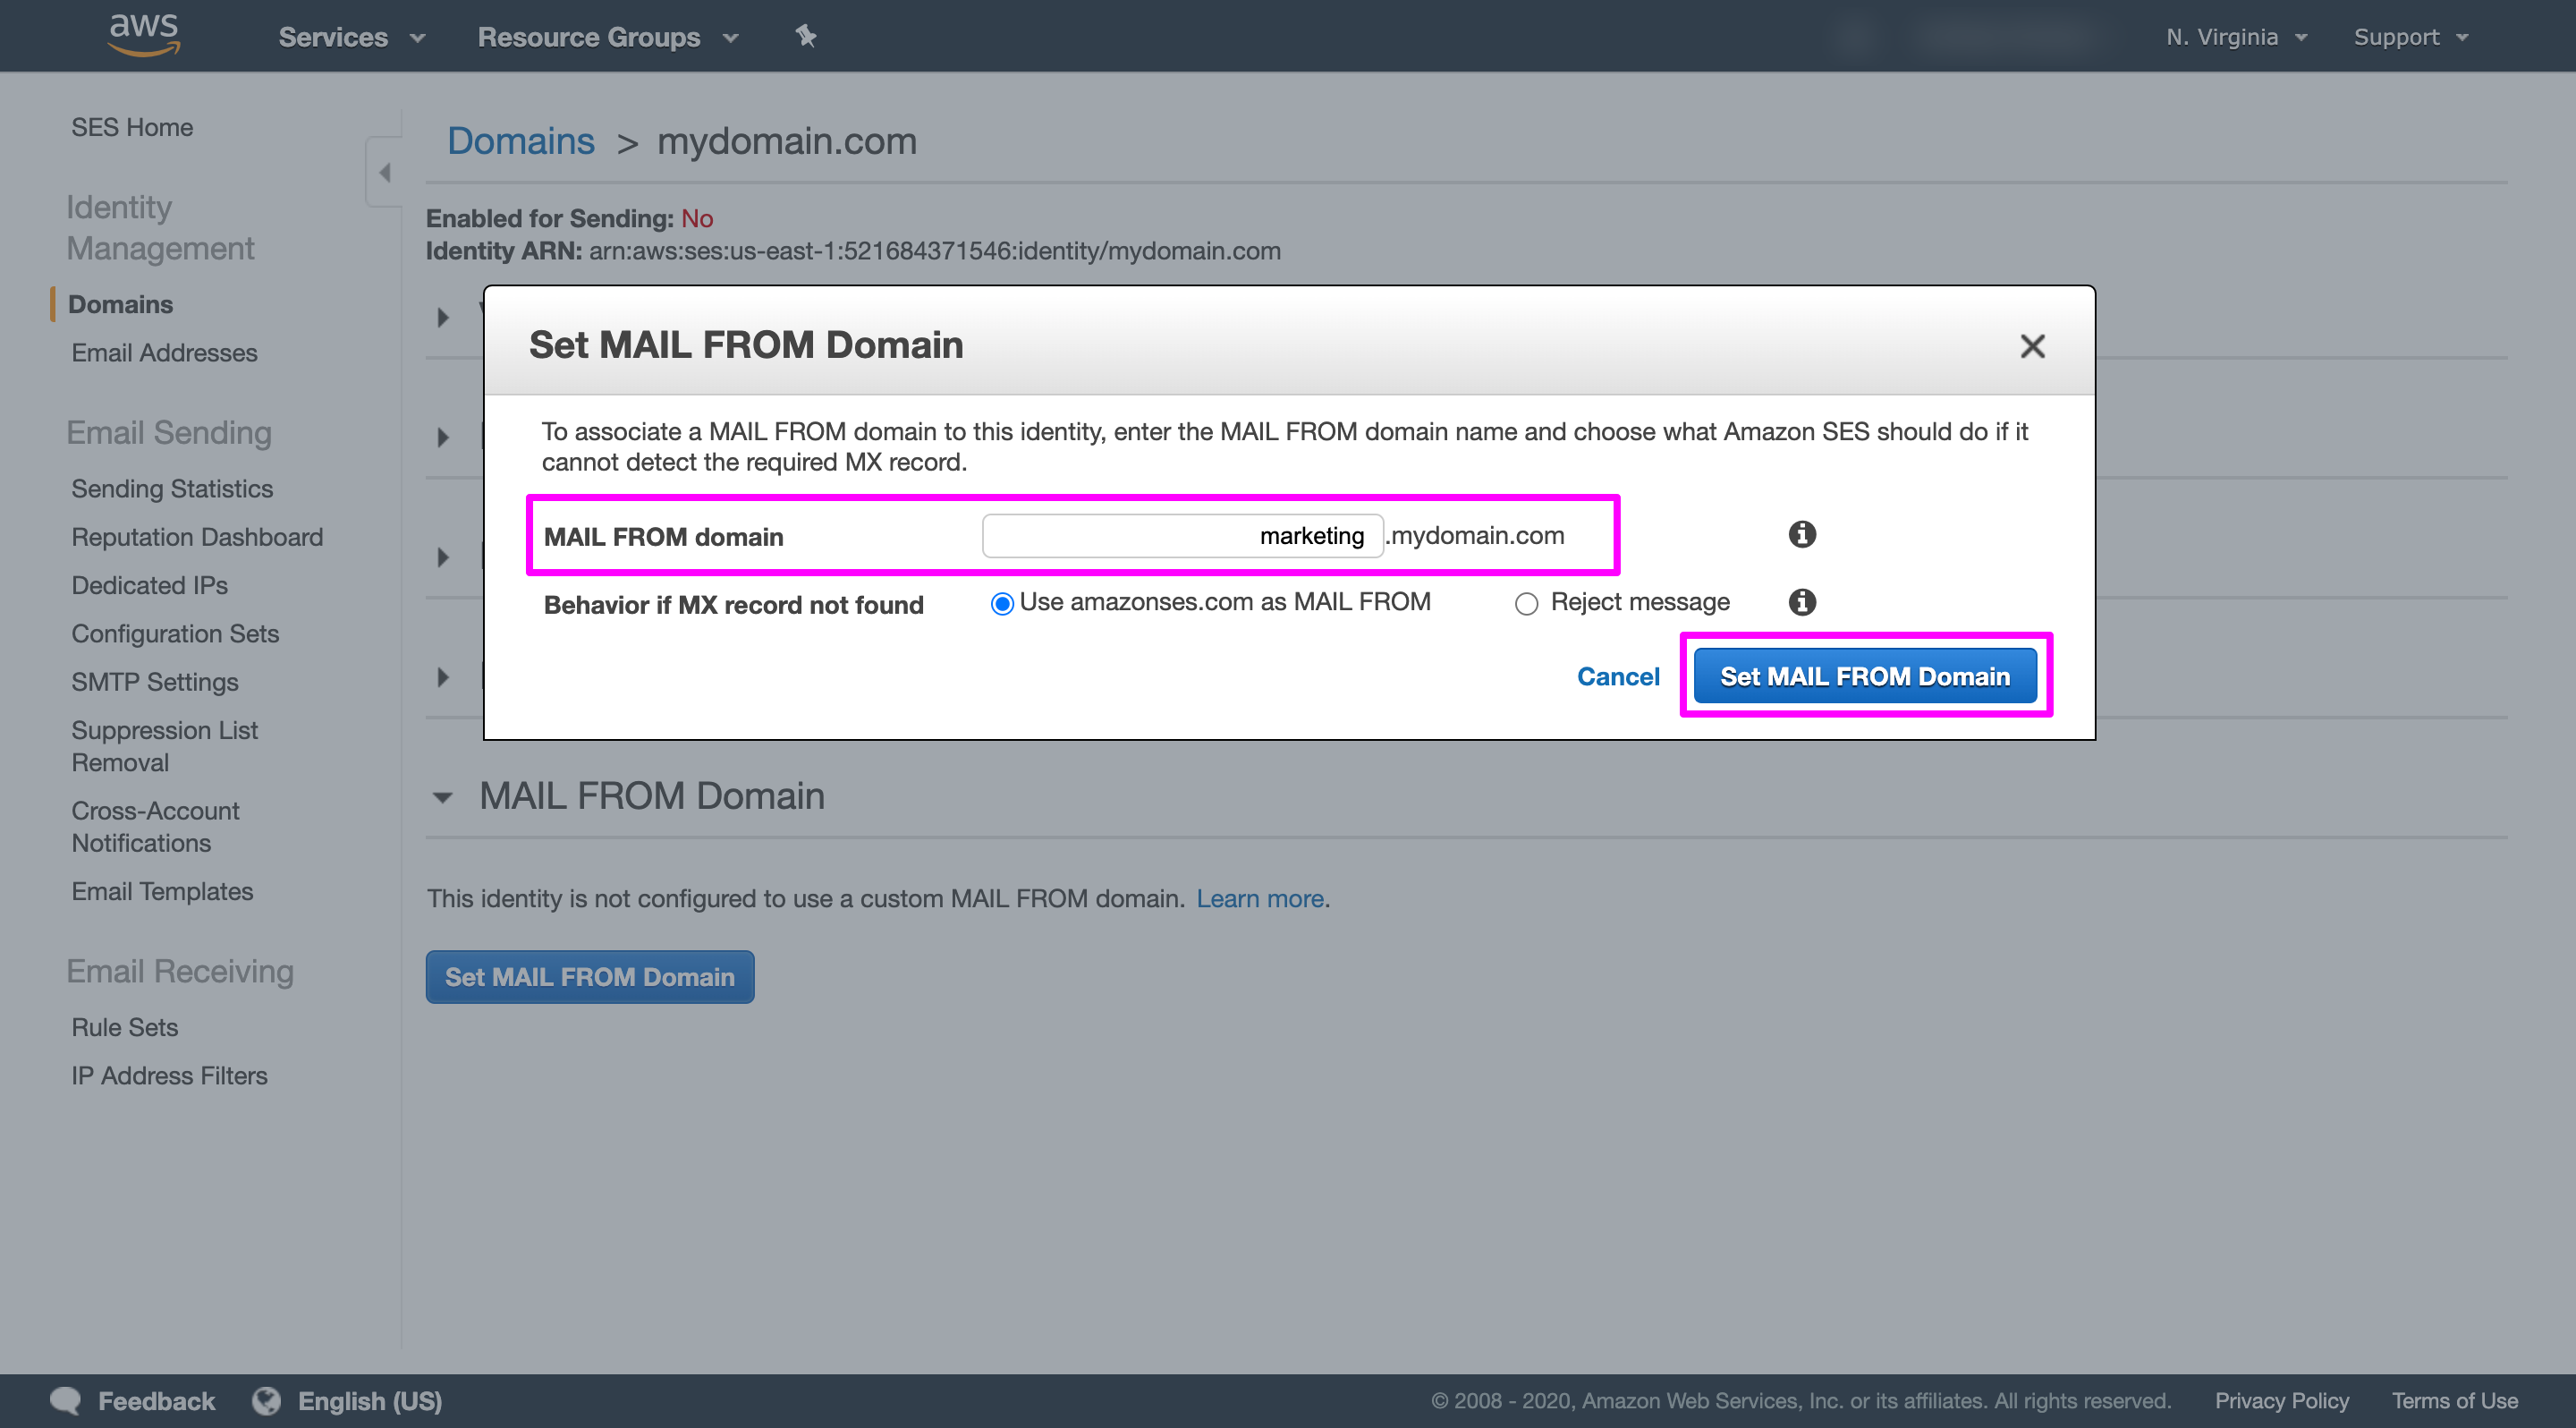
5 On the Set MAIL FROM Domain window, follow the steps below-
5.1 Enter the subdomain which you want to use as the MAIL FROM domain in MAIL FROM domain.
5.2 For the Behavior if MX record not found, select Use region.amazonses.com as MAIL FROM.
5.3 Click the Set MAIL FROM Domain button.
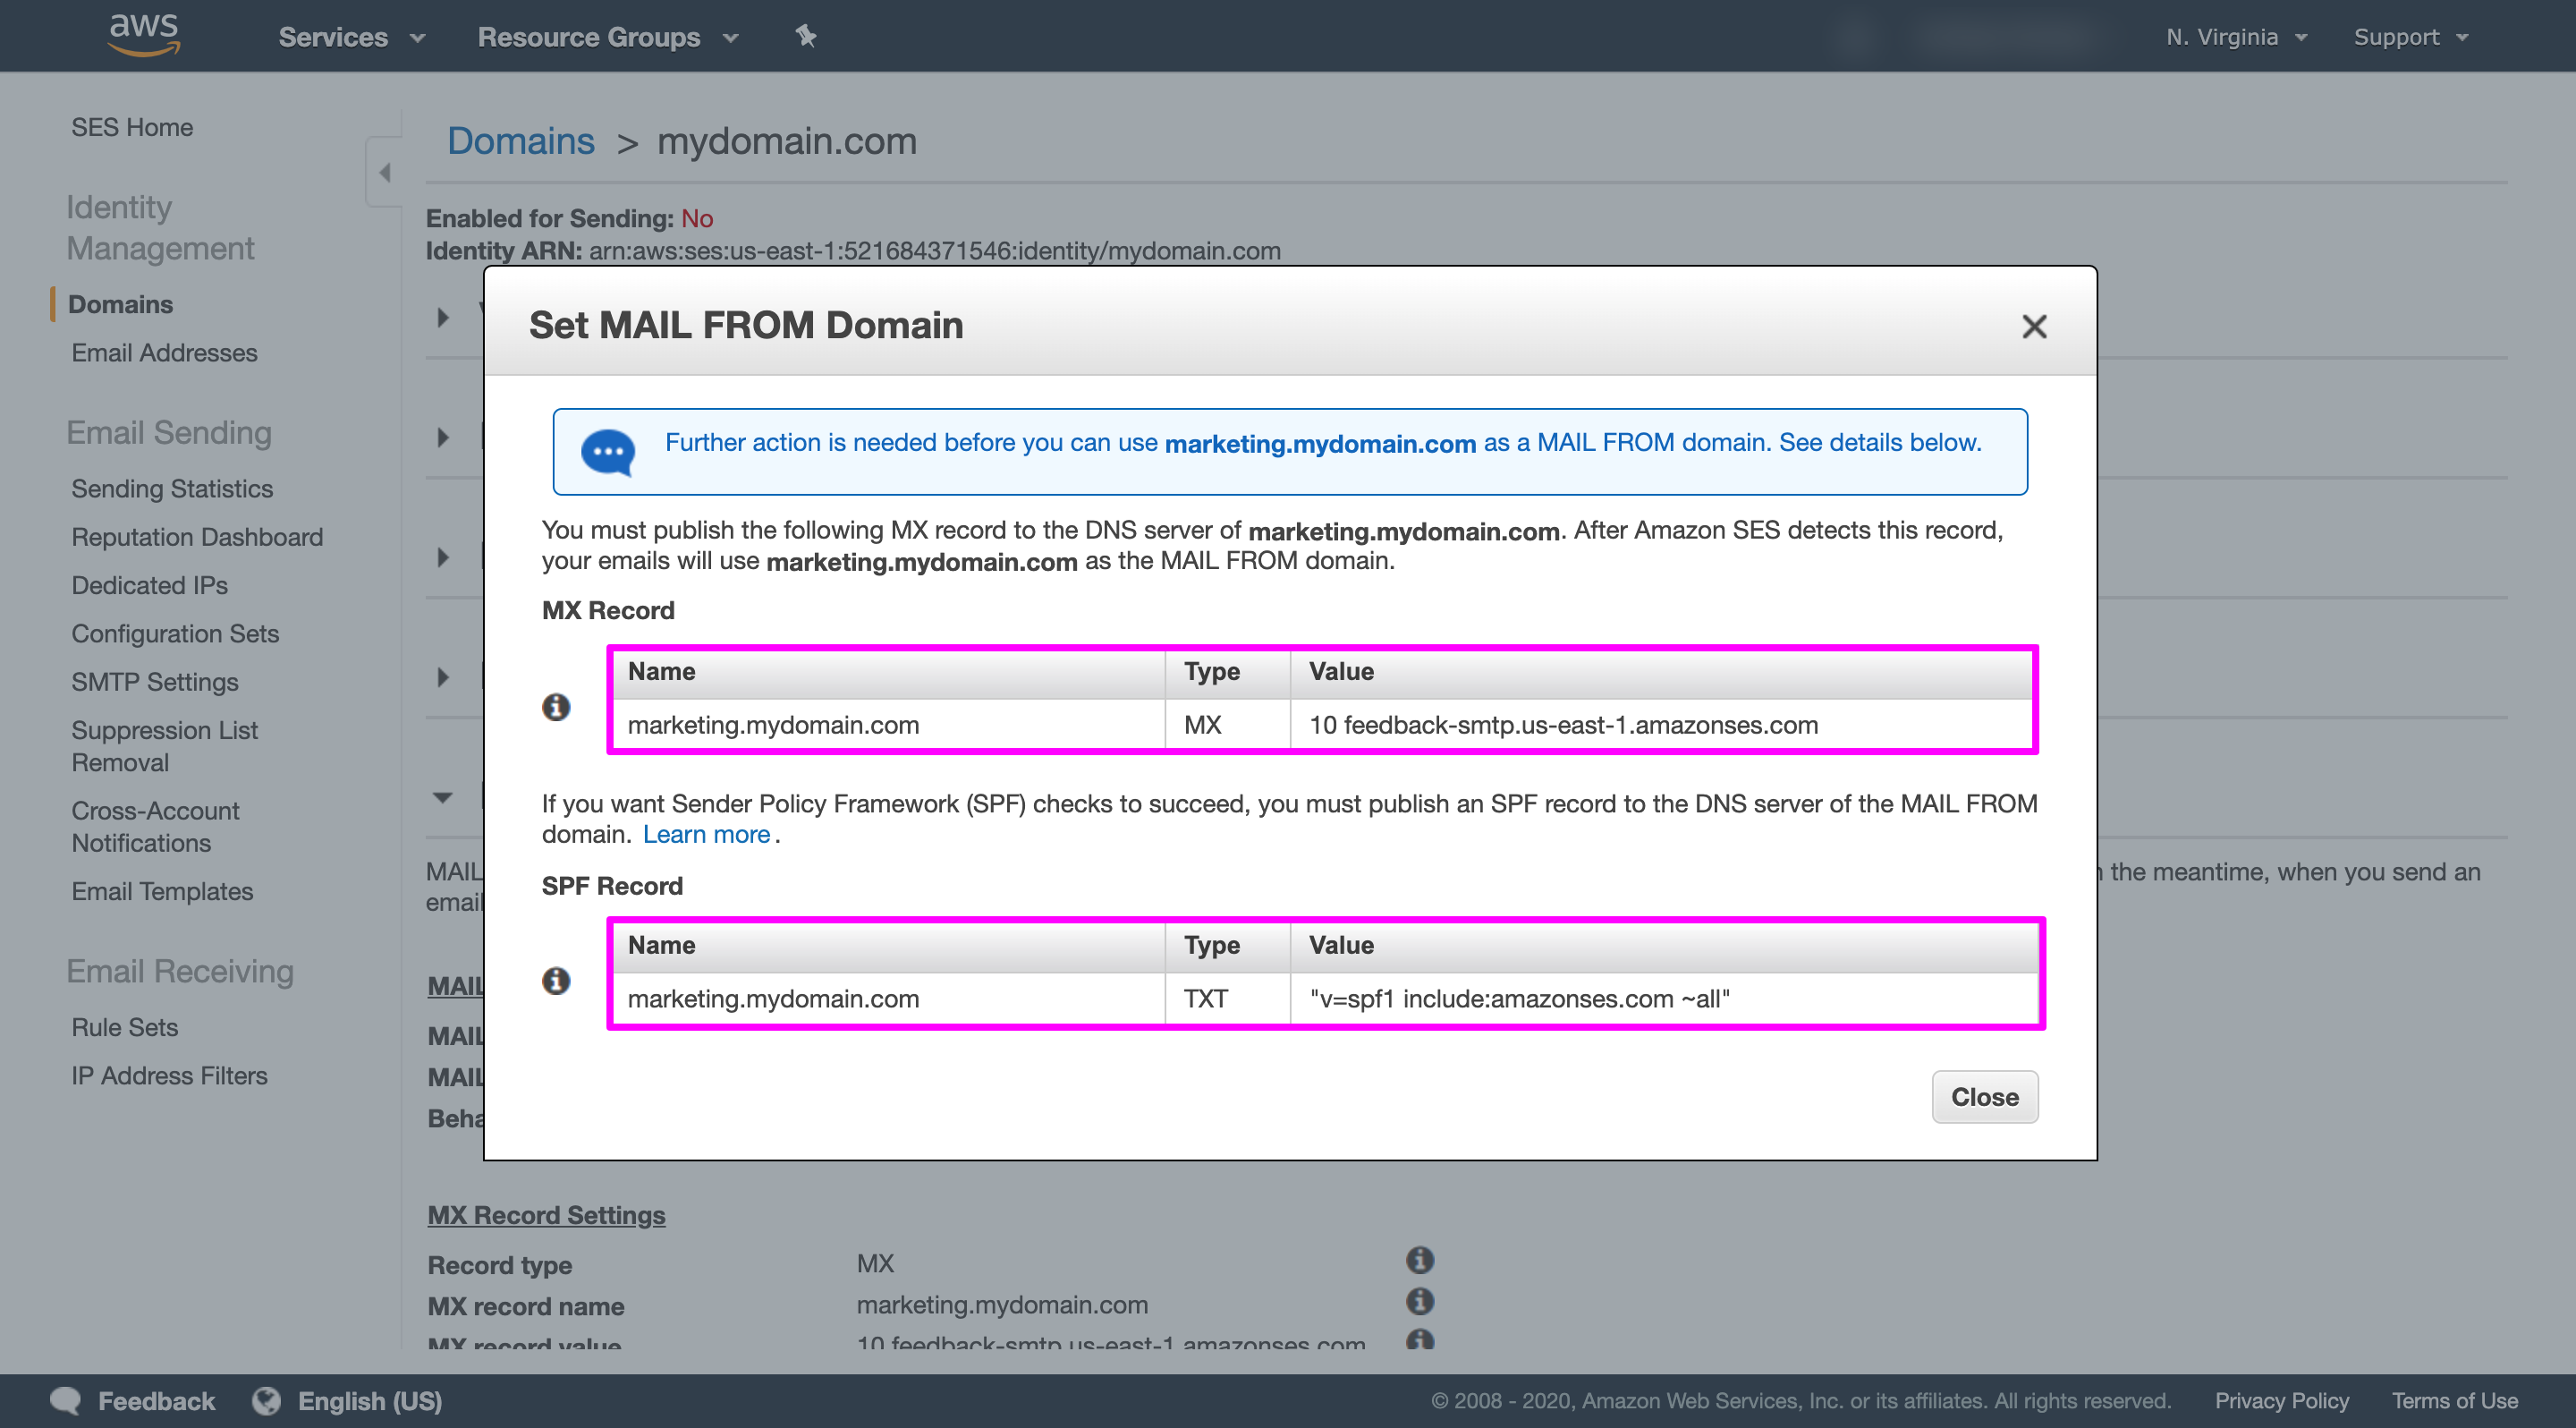
6 Publish the MX records displayed on the next screen to the DNS server of the custom MAIL FROM domain.
Verification Tools
Verify that the setup you made in the earlier step along with your DNS information is valid or not.
DKIM, SPF, DMARC, PTR
Using MailTester, you can verify all the records as well as get helpful tips to resolve any issues of your setup. Also to verity each record manually, you can use MX Lookup Tool. This tool provides you all the information about the MX records a domain has added in their DNS records. You just need to enter a domain name and can quickly check if the email server of that domain is set up properly or not and is responding to the incoming emails. The process of testing your domain is following:
1 DKIM: Enter the domain name and select DKIM Lookup from the dropdown options.
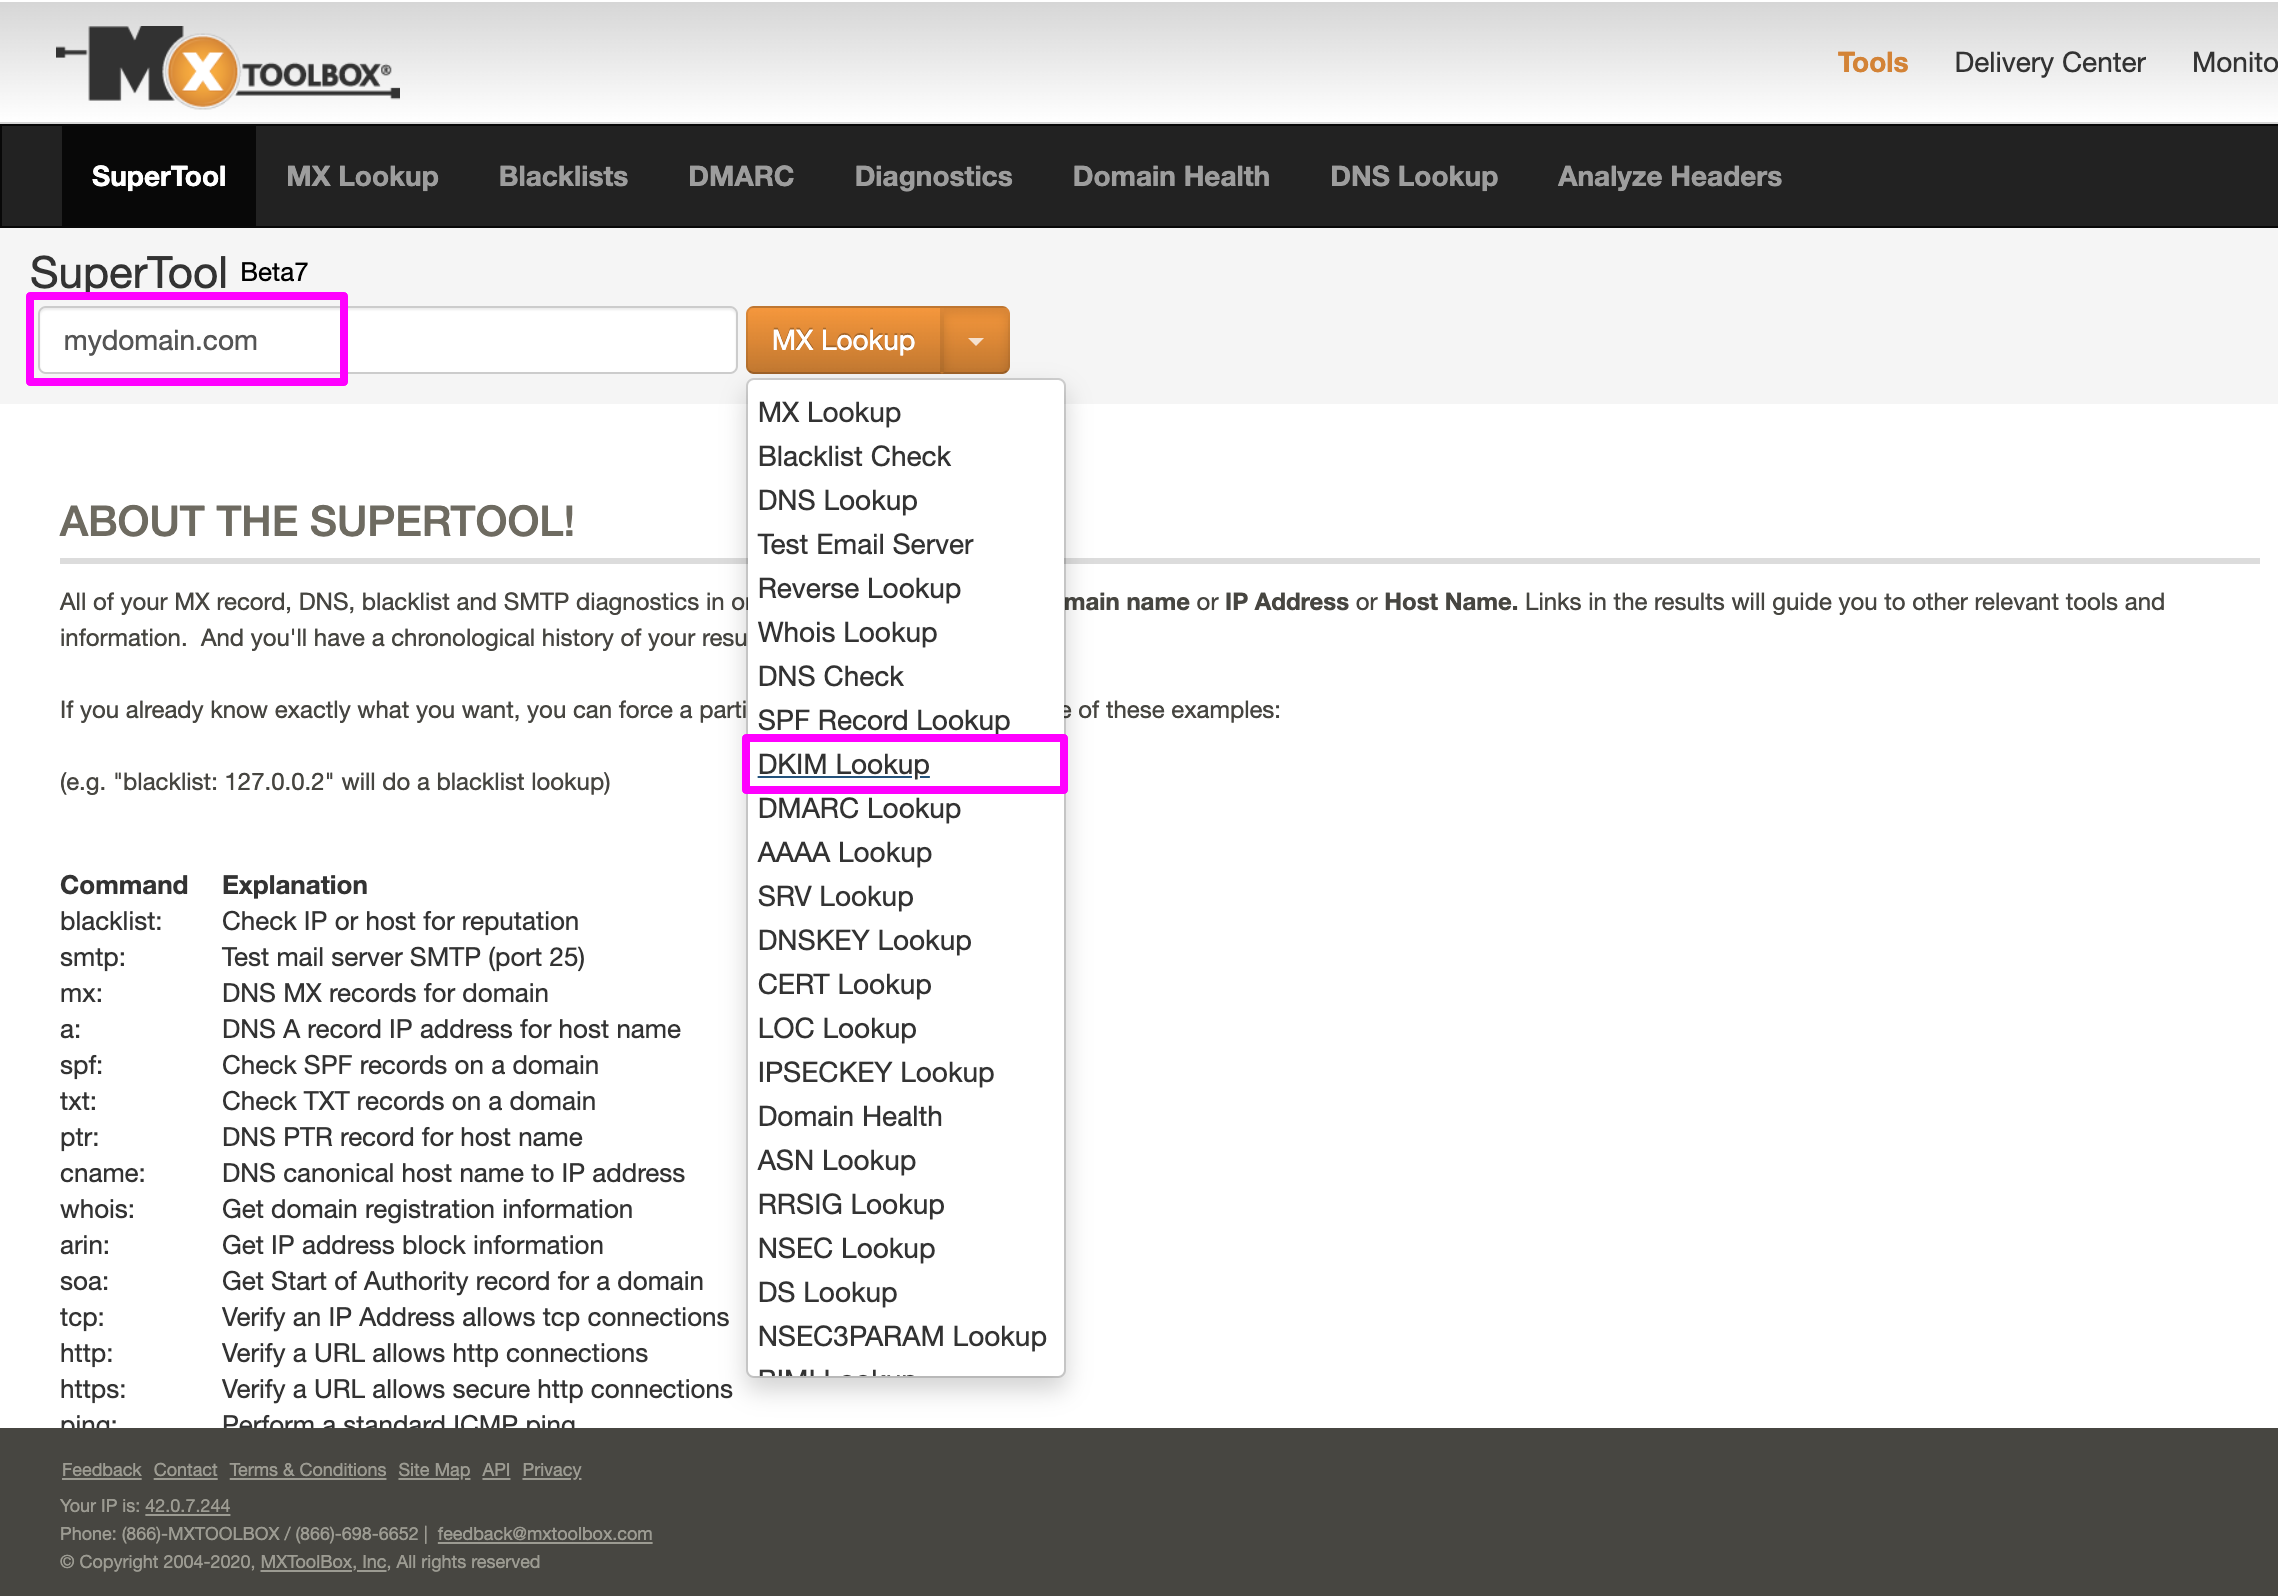
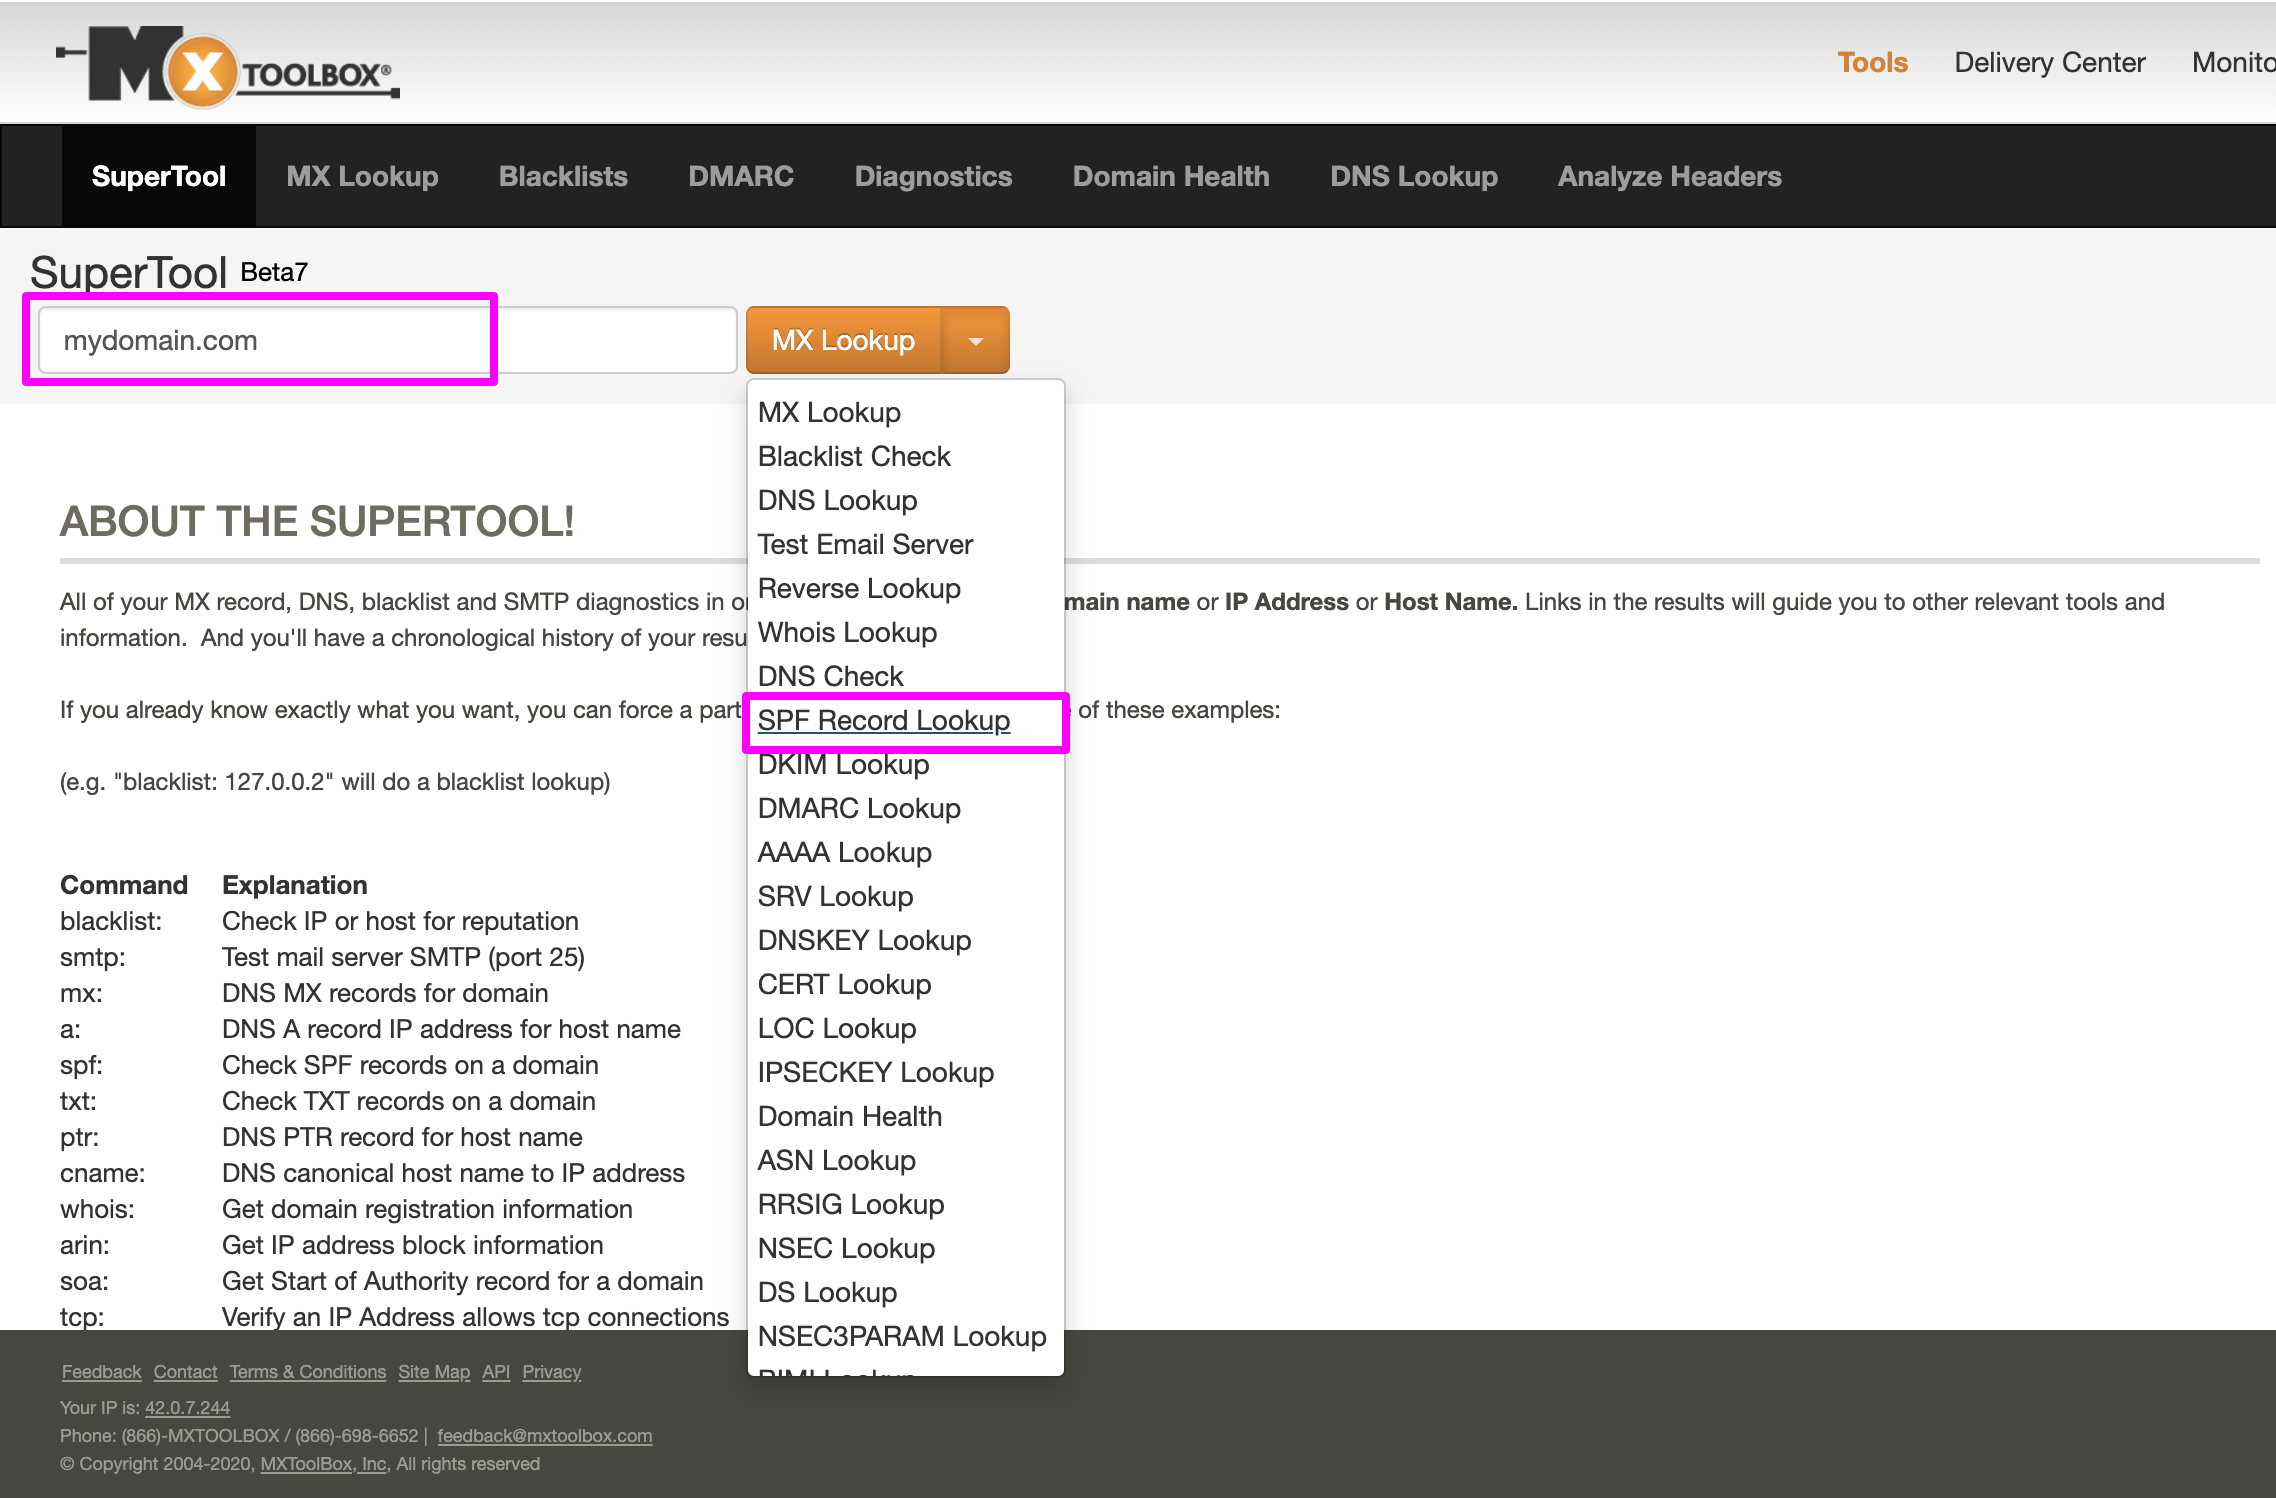
2 SPF: Enter the domain name and select SPF Lookup from the dropdown options.
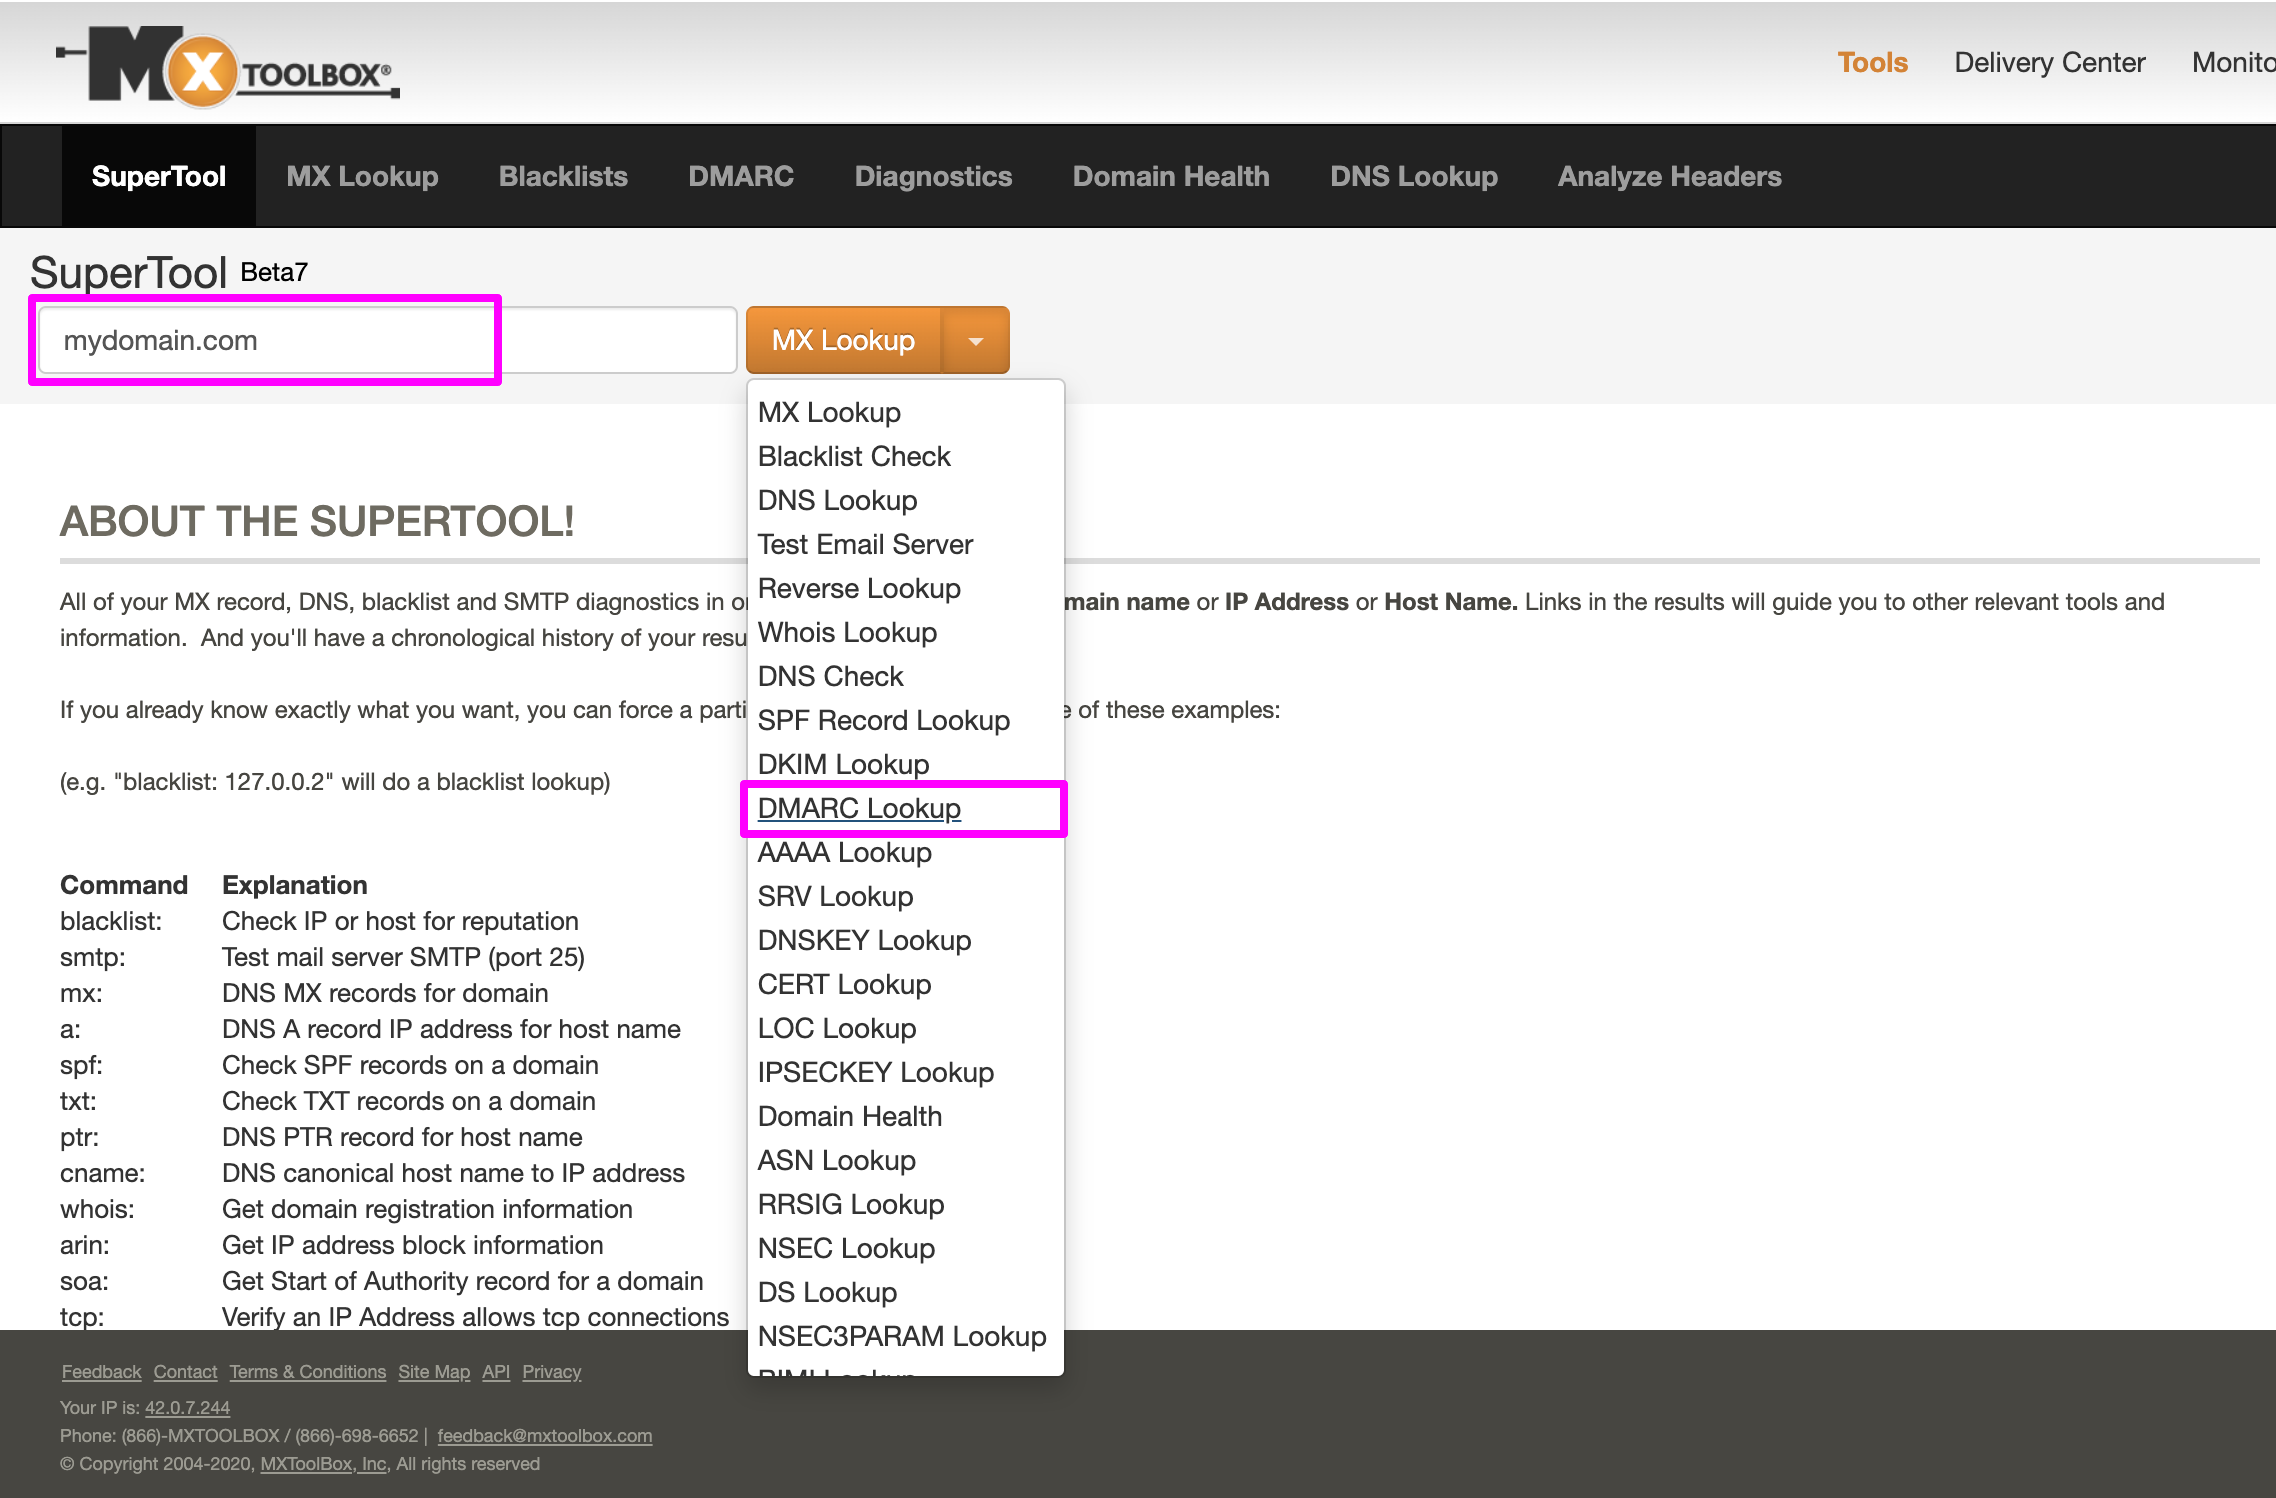
3 DMARC: Enter the domain name and select DMARC Lookup from the dropdown options.
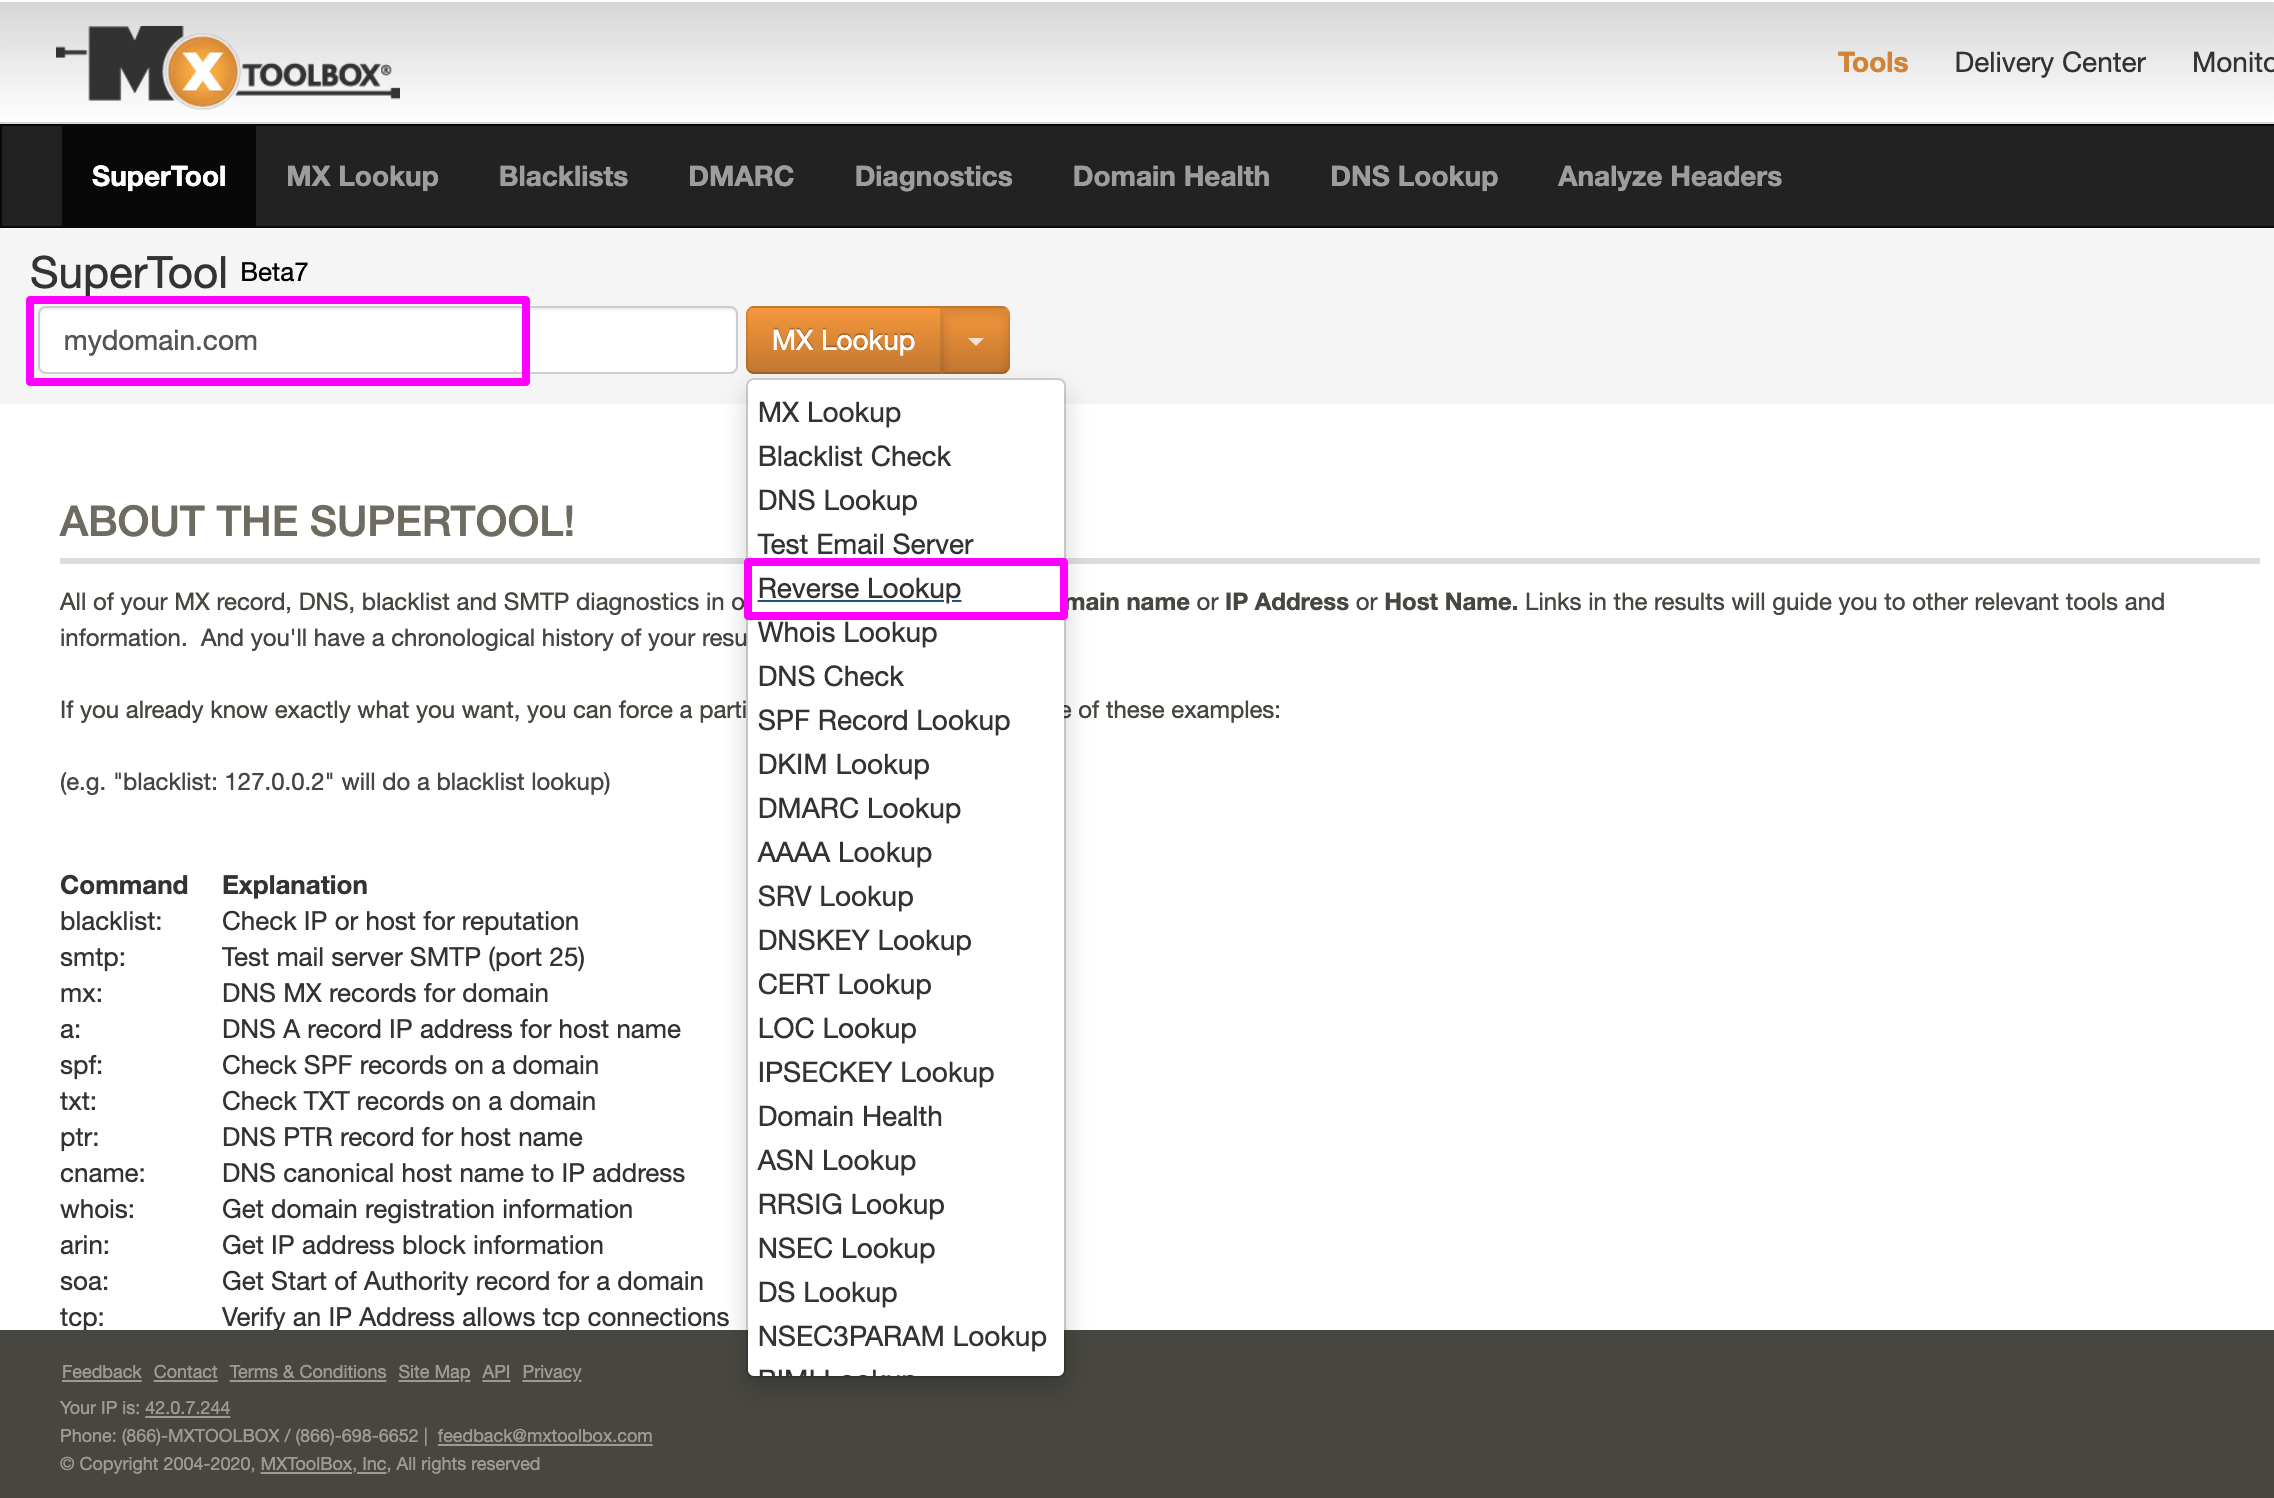
4 PTR: Enter the domain name and select Reverse Lookup from the dropdown options.
DNS
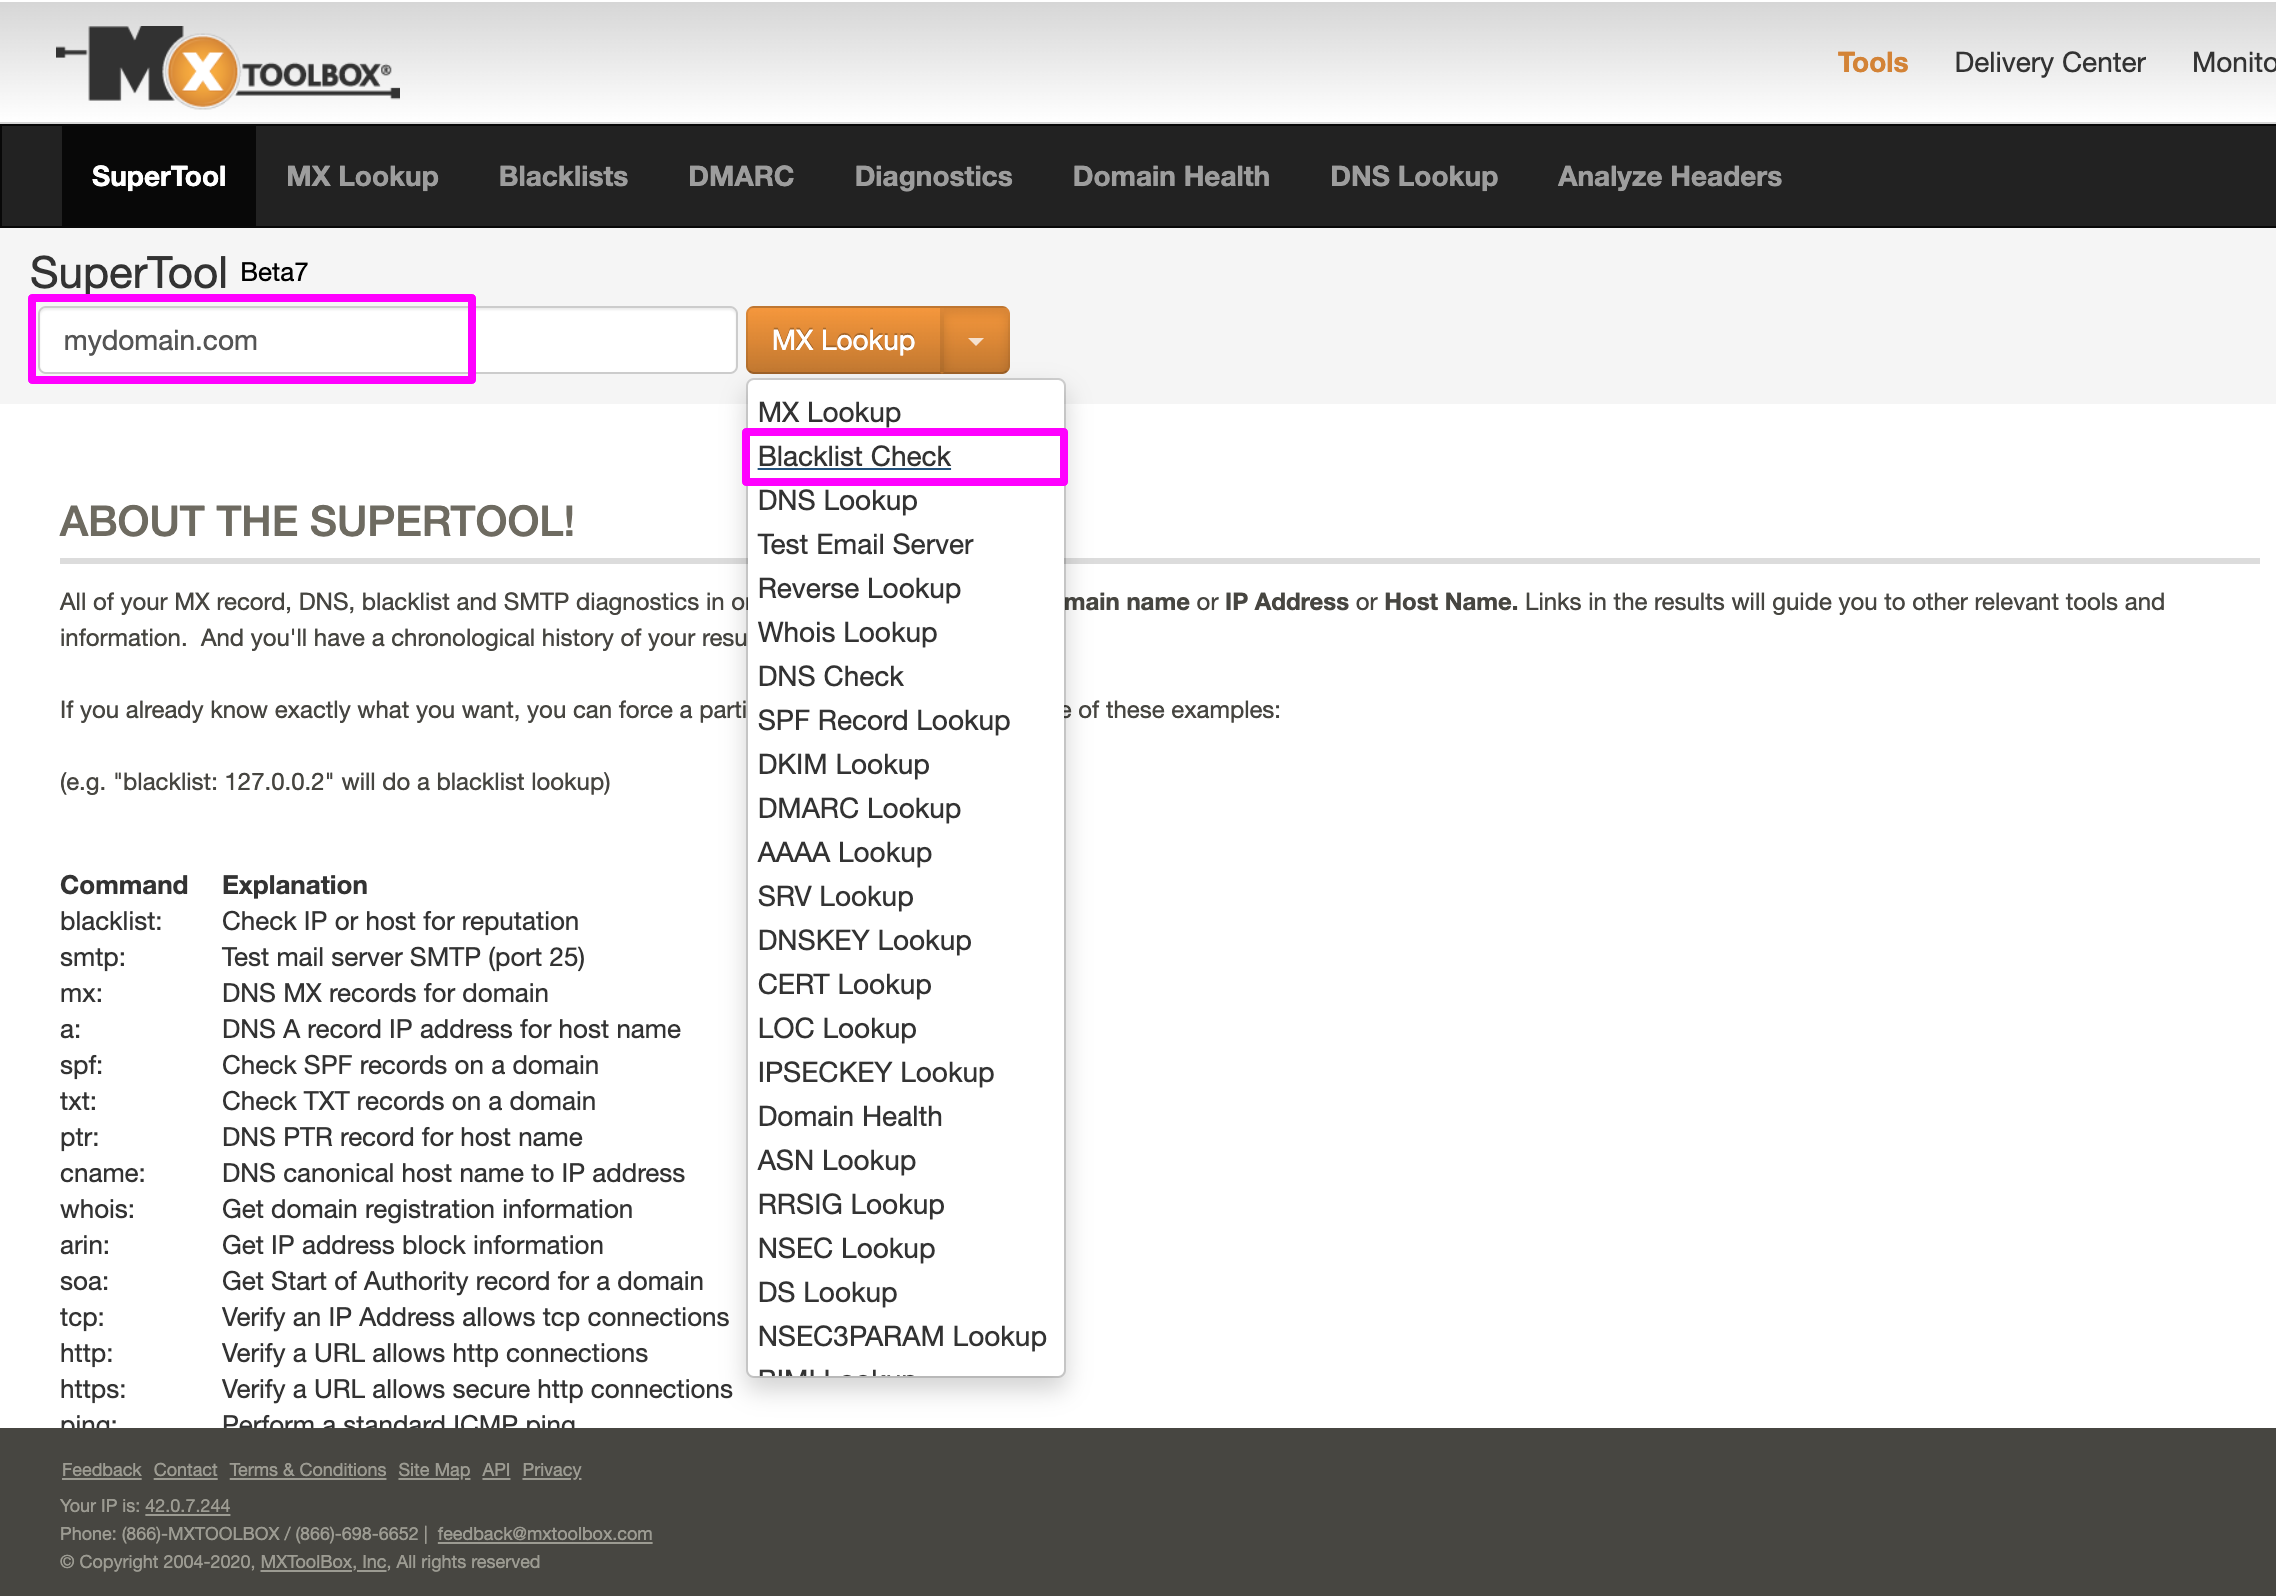
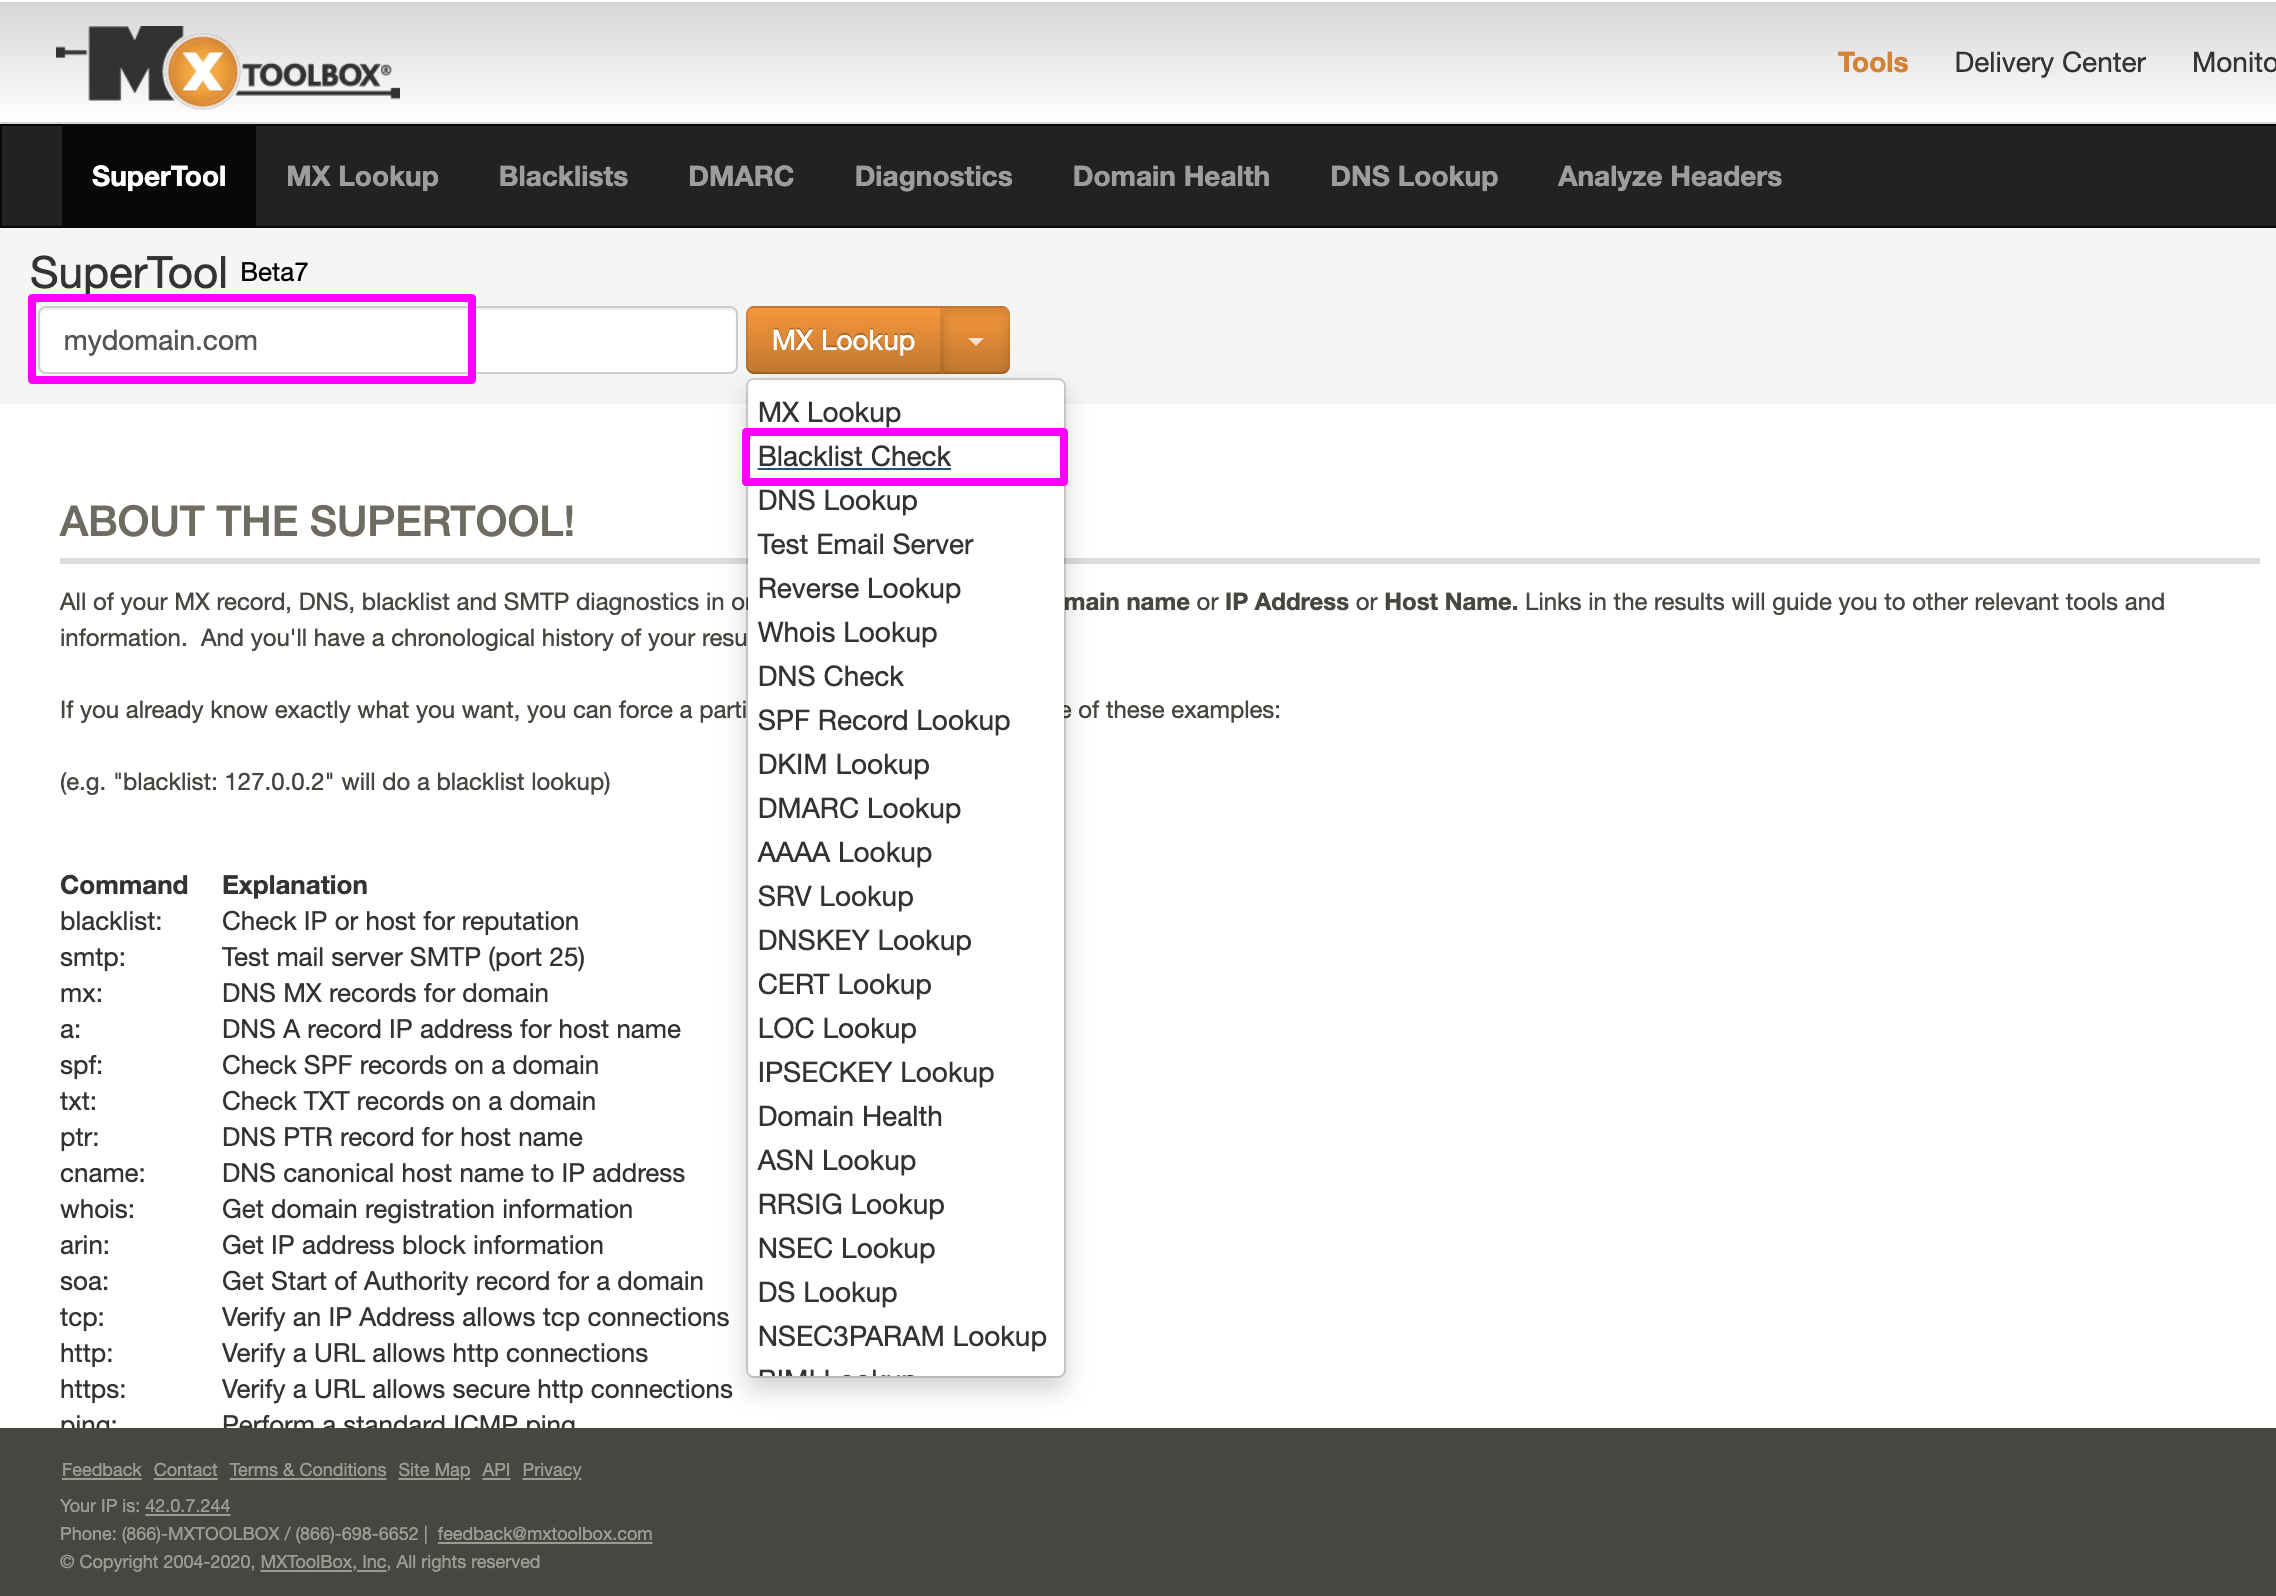
1 As you know MX Lookup Tool can verify reverse DNS records of your domain. You may also check each IP Address against 105 DNS based blacklists such as RBLs, DNSBLs. To do that, enter the domain name and select Blacklist Check from the dropdown options.
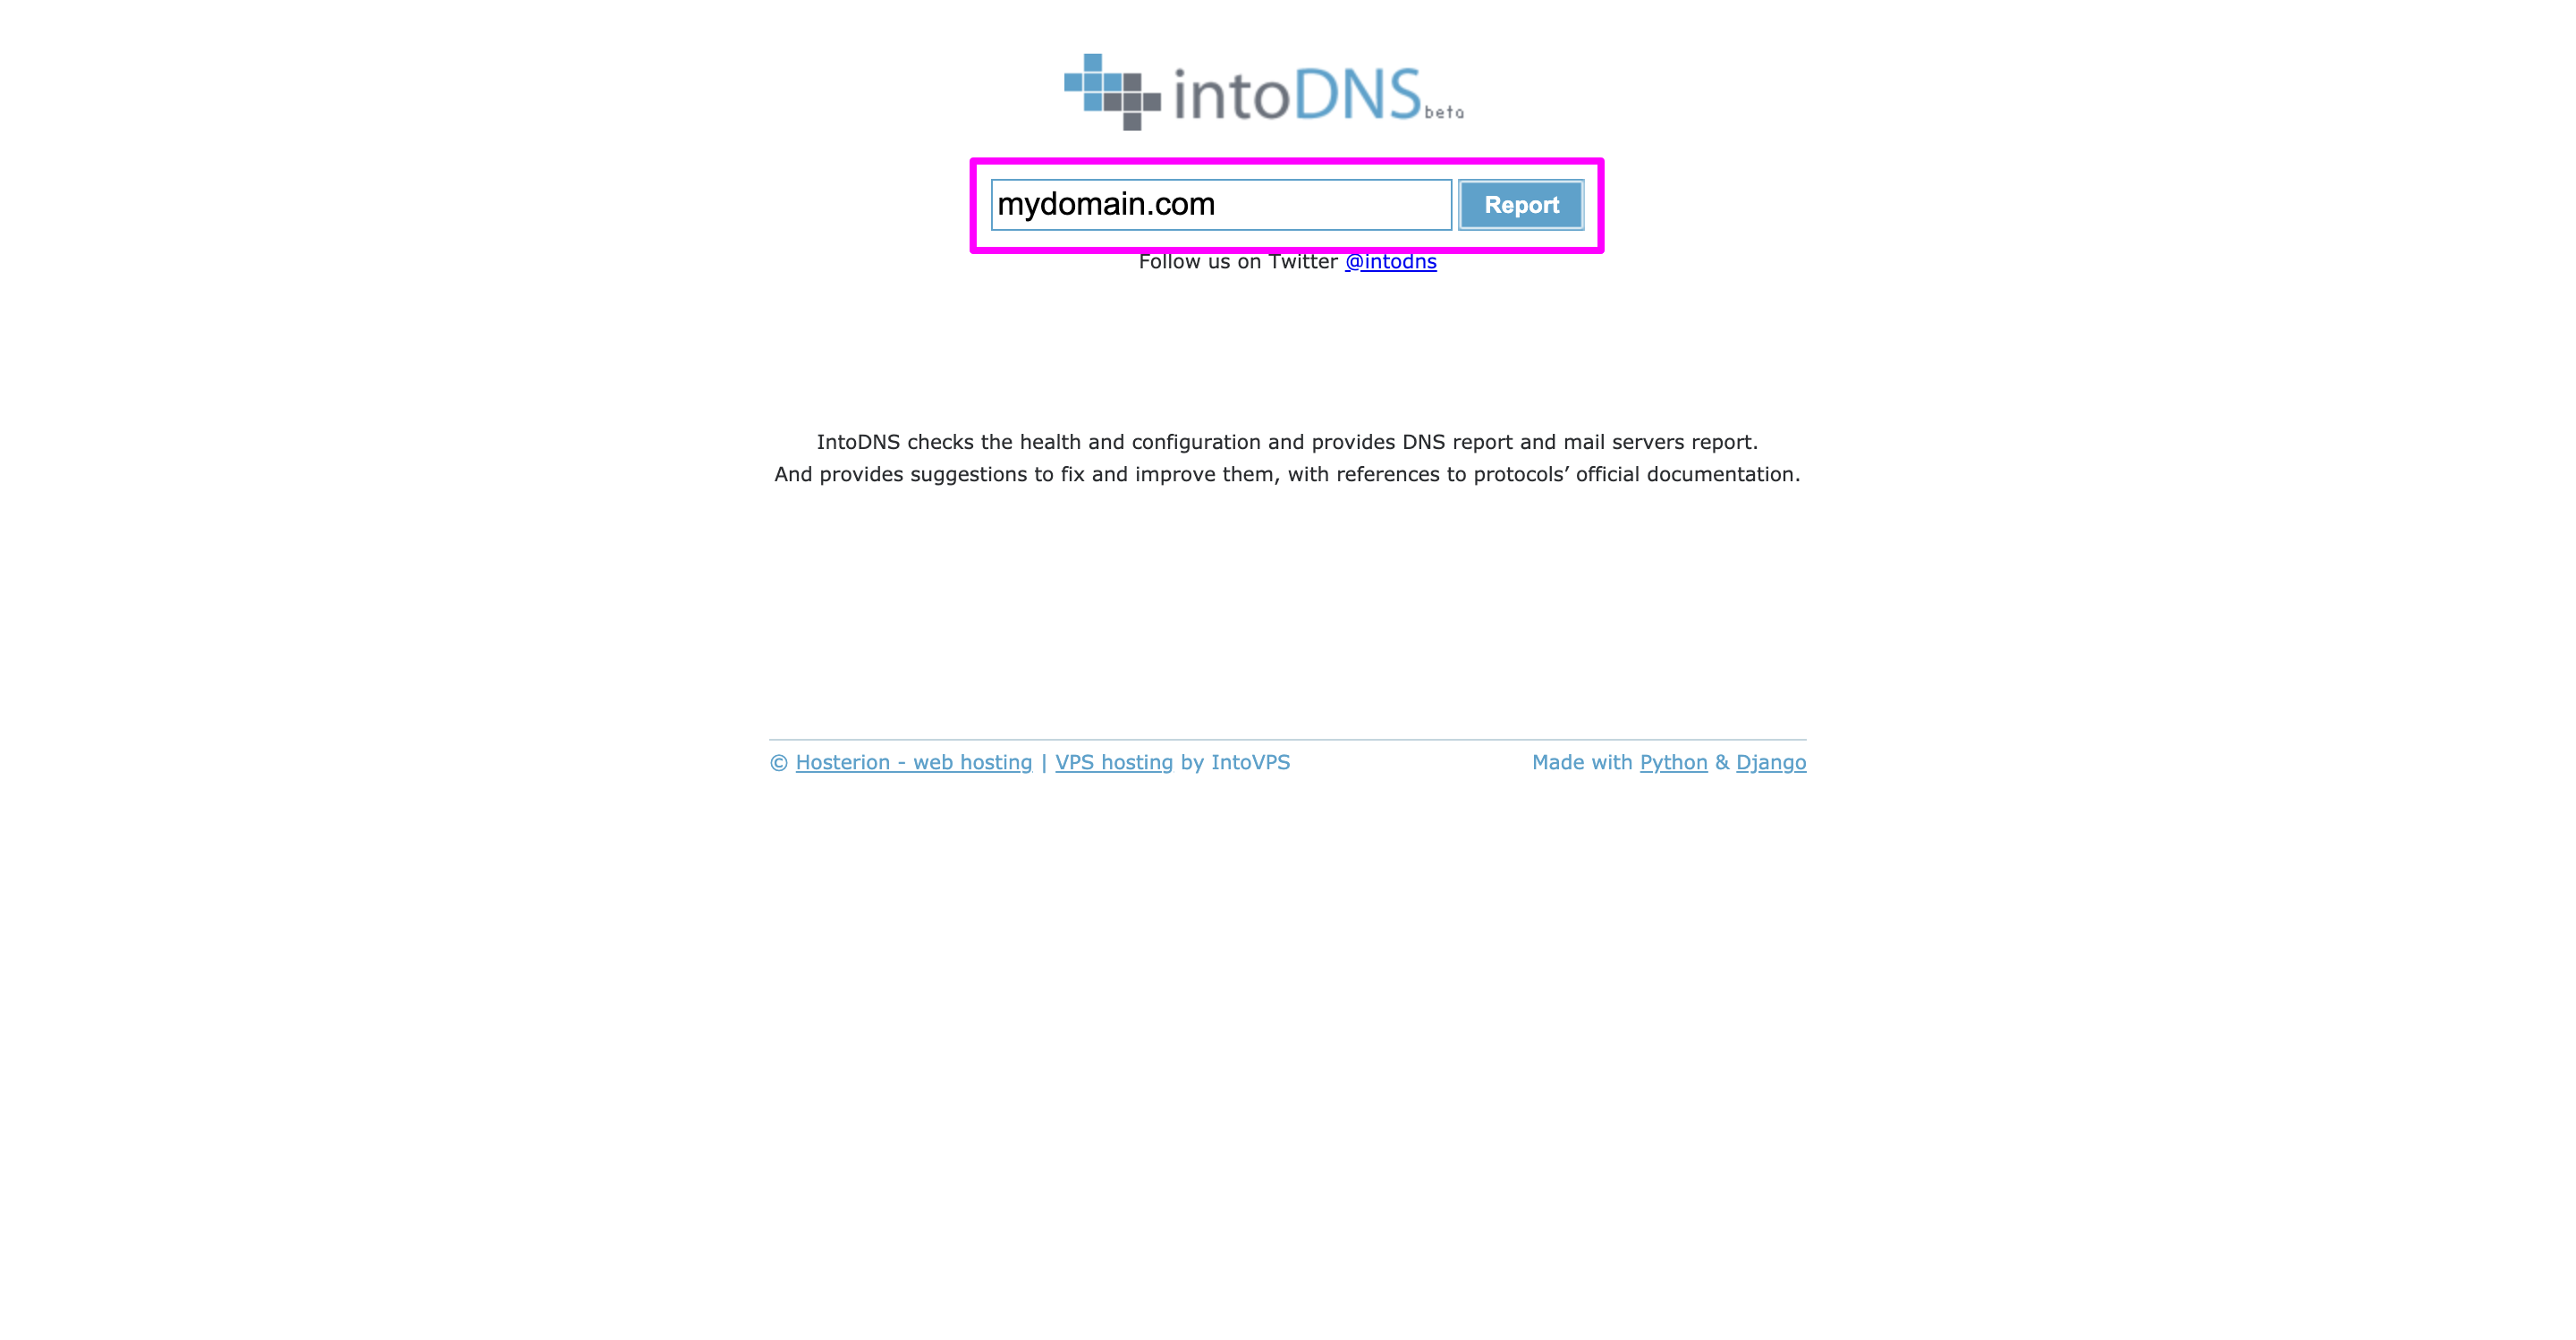
2 IntoDNS provides you the DNS report, and mail servers report by checking the health and configuration of your domain name. It also suggests the solution and how to improve the report, with references to protocols’ official documentation. Enter your domain name, as shown in the screenshot below, to find out the results.
Test email before sending
If the above two steps are completed, test your email using the following tools. Upgrade your email subject, body, fix grammar, and any technical setup according to their suggestion:
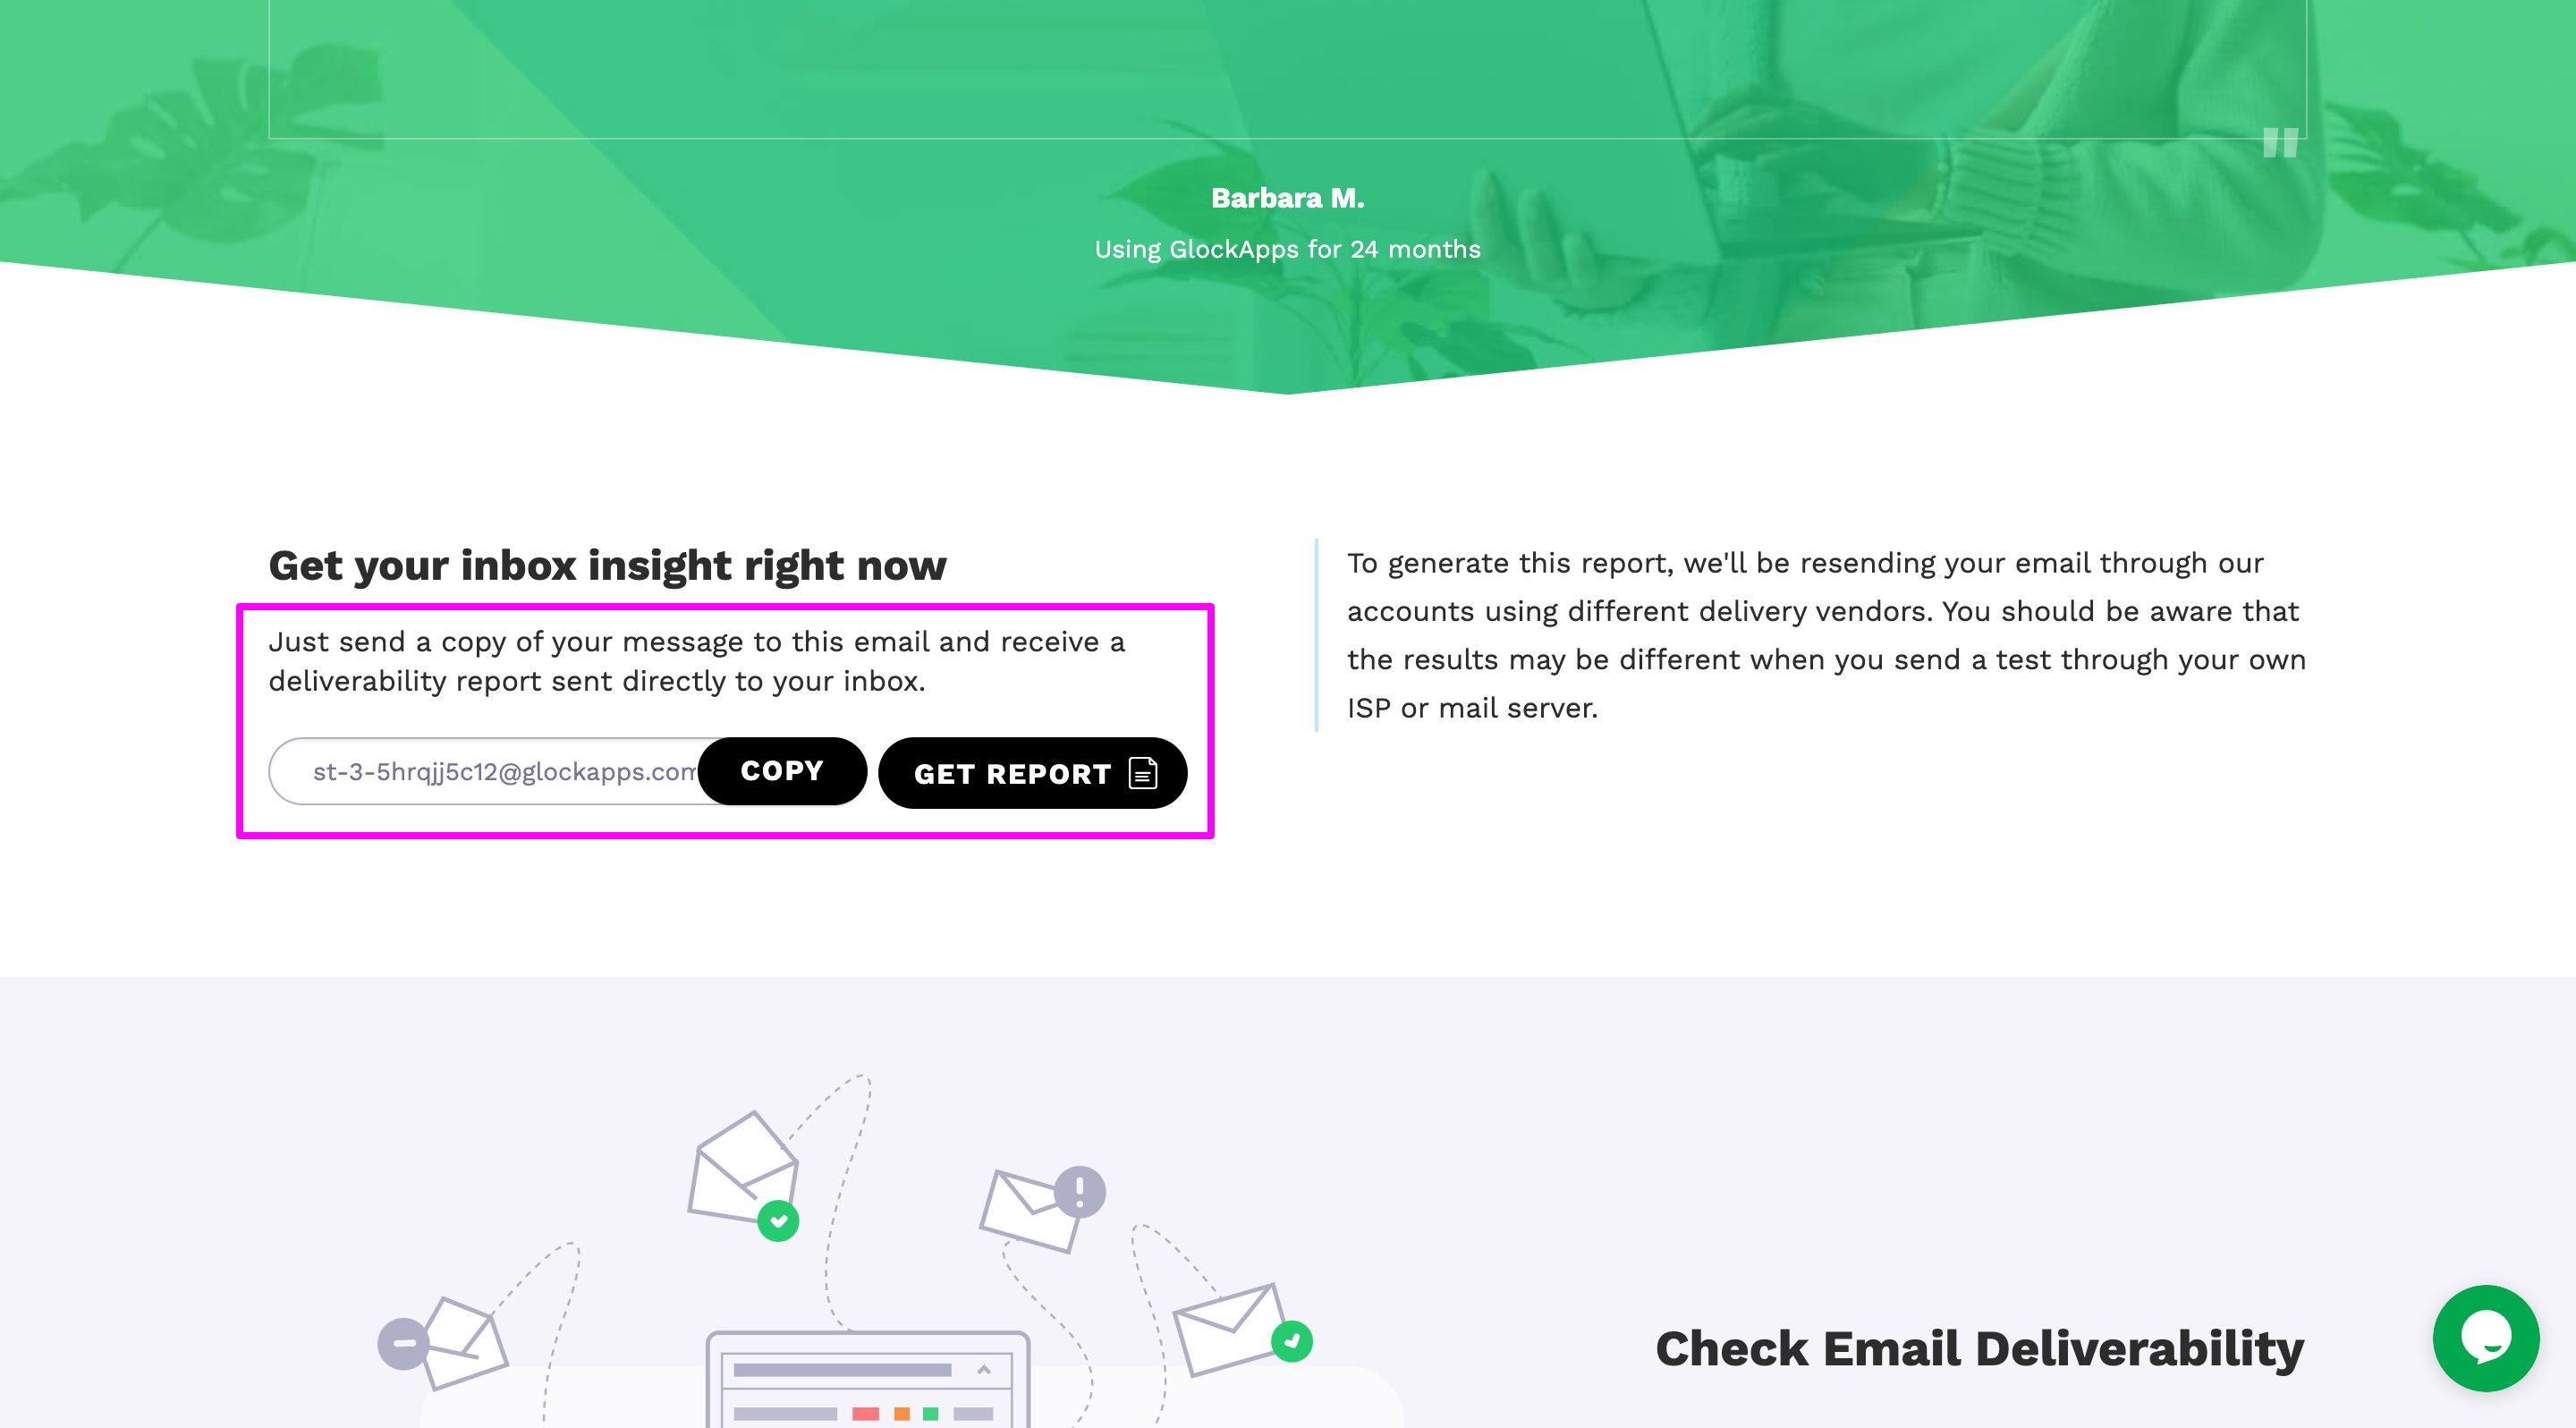
1 Using GlockApps – Check what percentage of your emails will land in your user’s inboxes, spam folders, or update tabs and receive tips on how to improve them. Send a copy of the message to this tool’s inbox and get a detailed report of your email’s deliverability. By tracing the delivery to all major ISPs, it shows where your emails are ending up: Inbox, Spam, or other folders. Save yourself time and money by helping yourself fix the possible deliverability issues without sending bulk emails to your recipients.
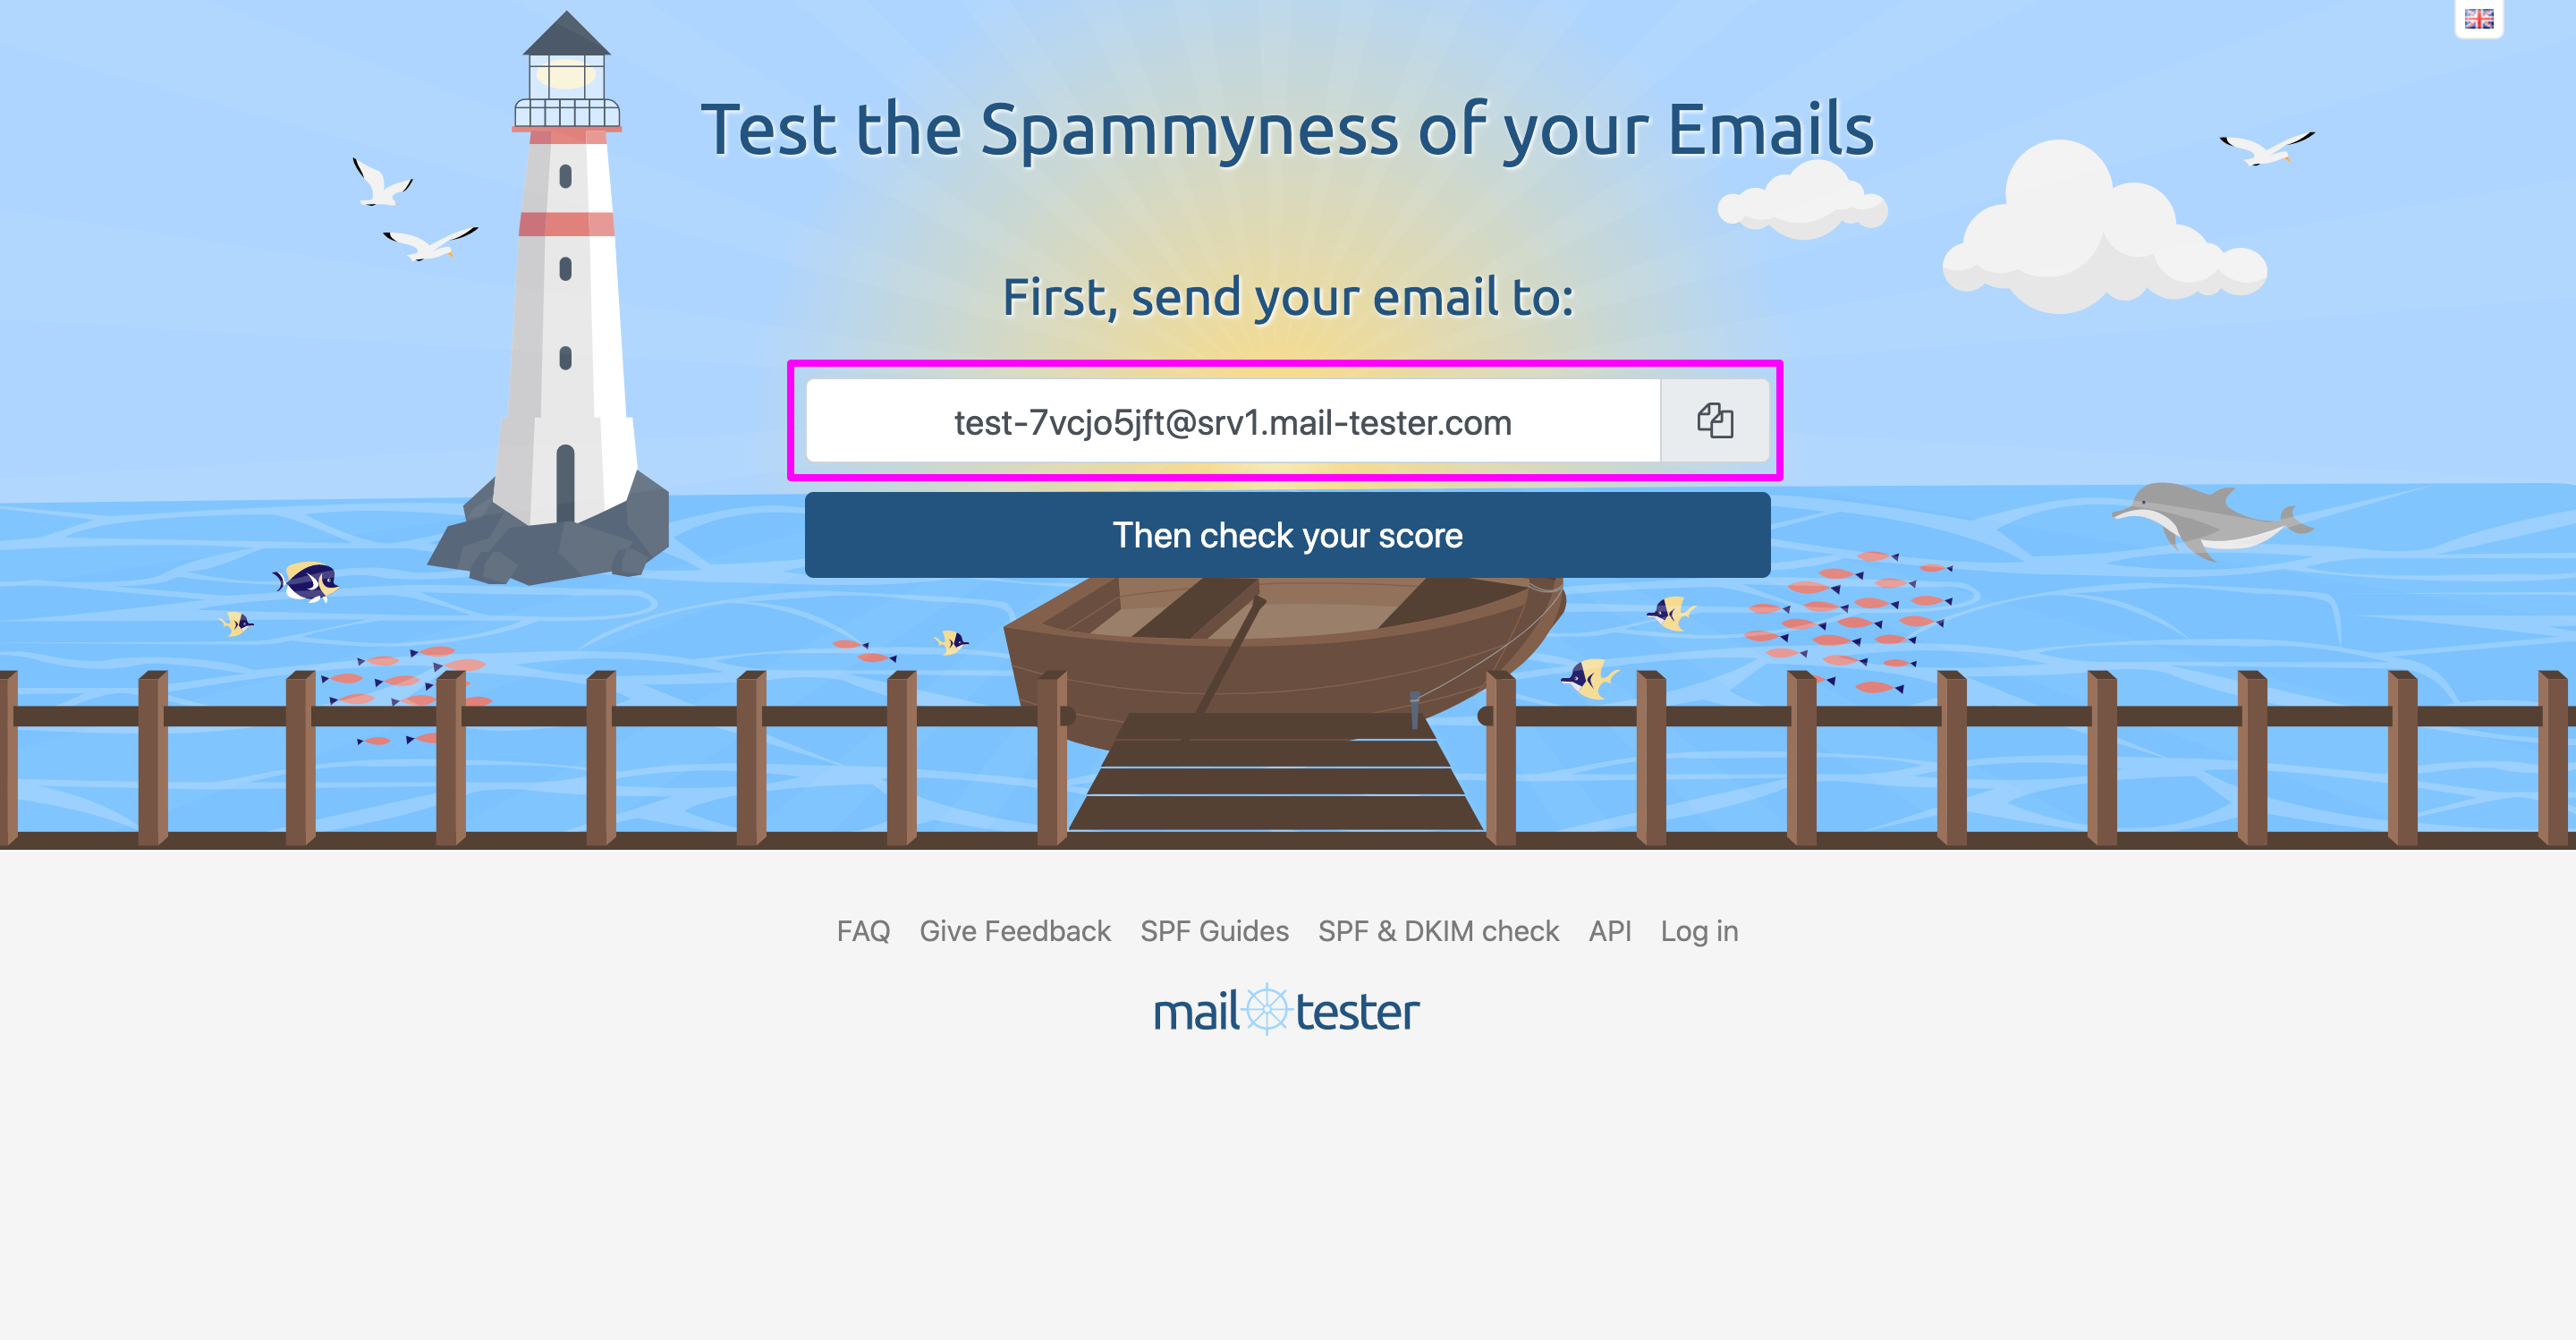
2 Using MailTester – With this tool, you can check the spammyness of your emails. The chances of your email reaching the spam folder. Send a copy of your email to their fixed email address and then check the score of your email’s spamminess.
Cases to consider
After setting all the steps mentioned above, if your campaign still has a deliverability issue, then consider the following cases:
Blacklisted IP address
If you are using a shared IP address to send emails using Amazon SES (by default, everyone uses a shared IP address), Amazon SES might send your emails from a blacklisted IP address. You can find the IP address that Amazon SES used in the raw version of the email, which was received in your inbox/spam folder.
How to find the sender’s IP address in Gmail: Let’s see the details of the method below.
By tracking an email IP address
Gmail’s web interface hides the sender’s IP address, protecting it from casual users’ eyes. You’ll have to find a way to trace the email sender’s IP address if they are using the Gmail web-interface. Follow the following steps-
1 Firstly, go to the email you received. Find and click the three dots (⋮), which are usually located on the right-hand side of the screen. Then there will be a drop-down menu. Select the option Show original. Click it to go to the details behind the email.
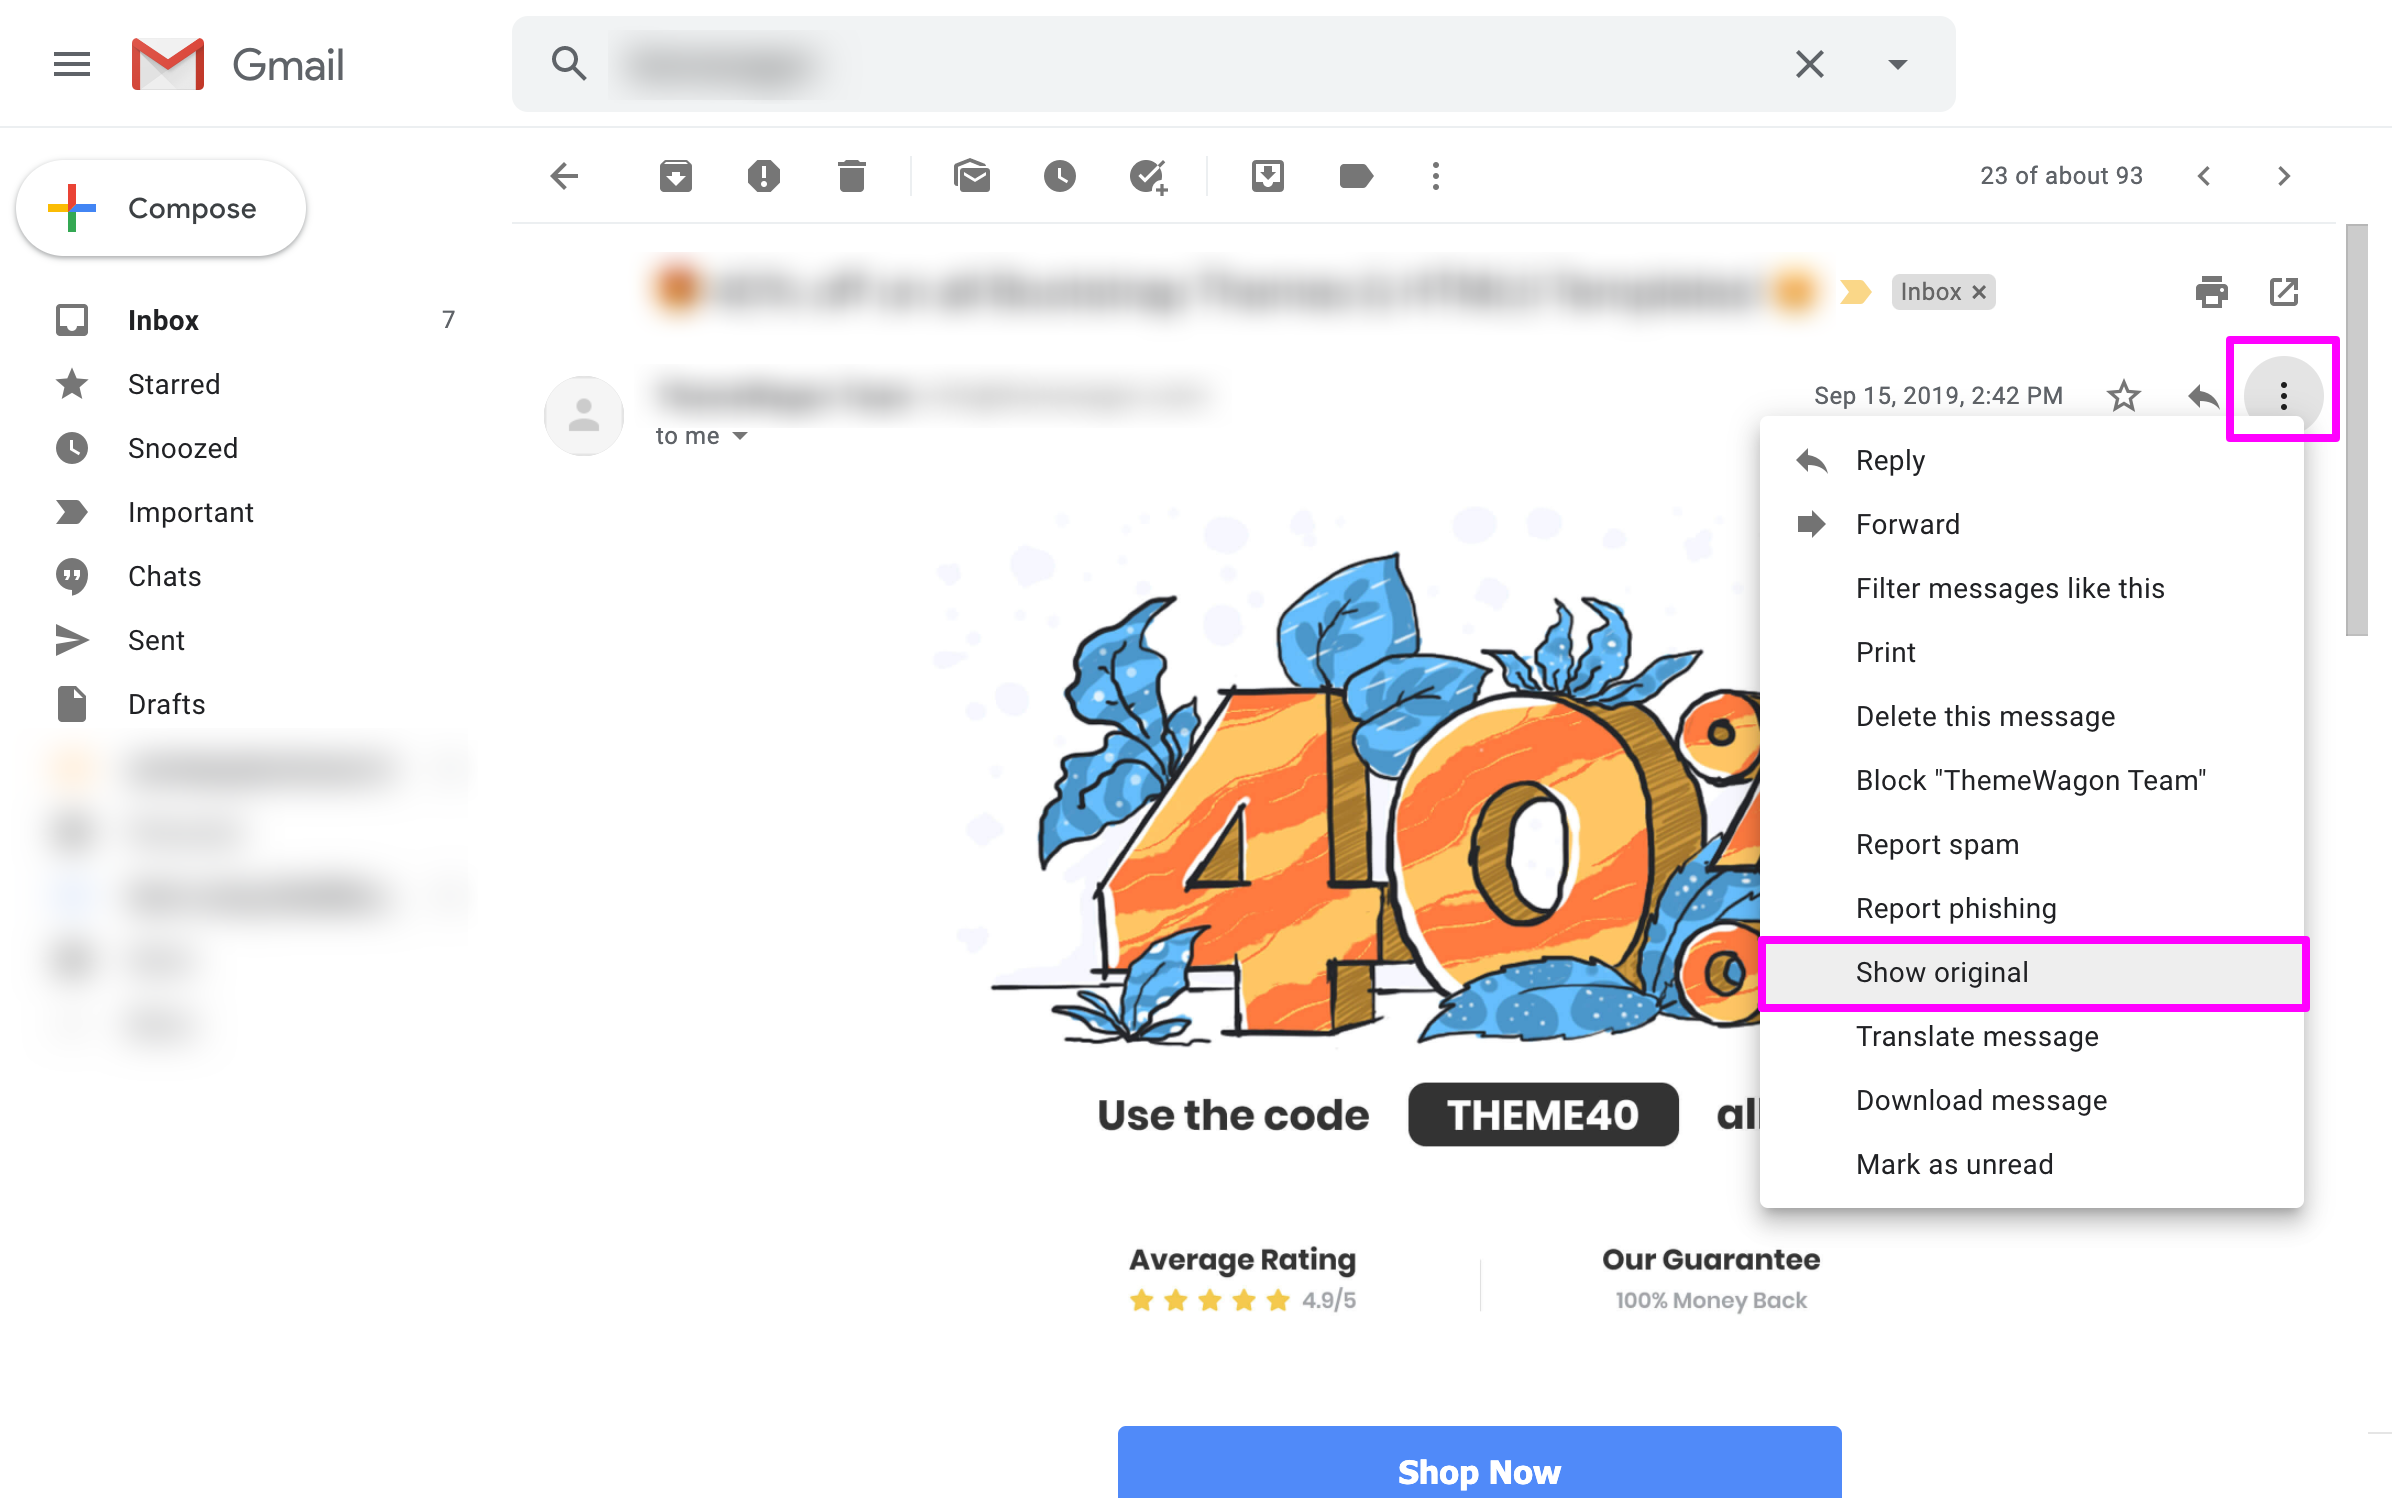
3 It is effortless now, as the information you’re looking for is on that window. You just need to look for the field named “SPF” (sender policy framework), and you’re done.
4 That’s the email IP address you wanted to find out.
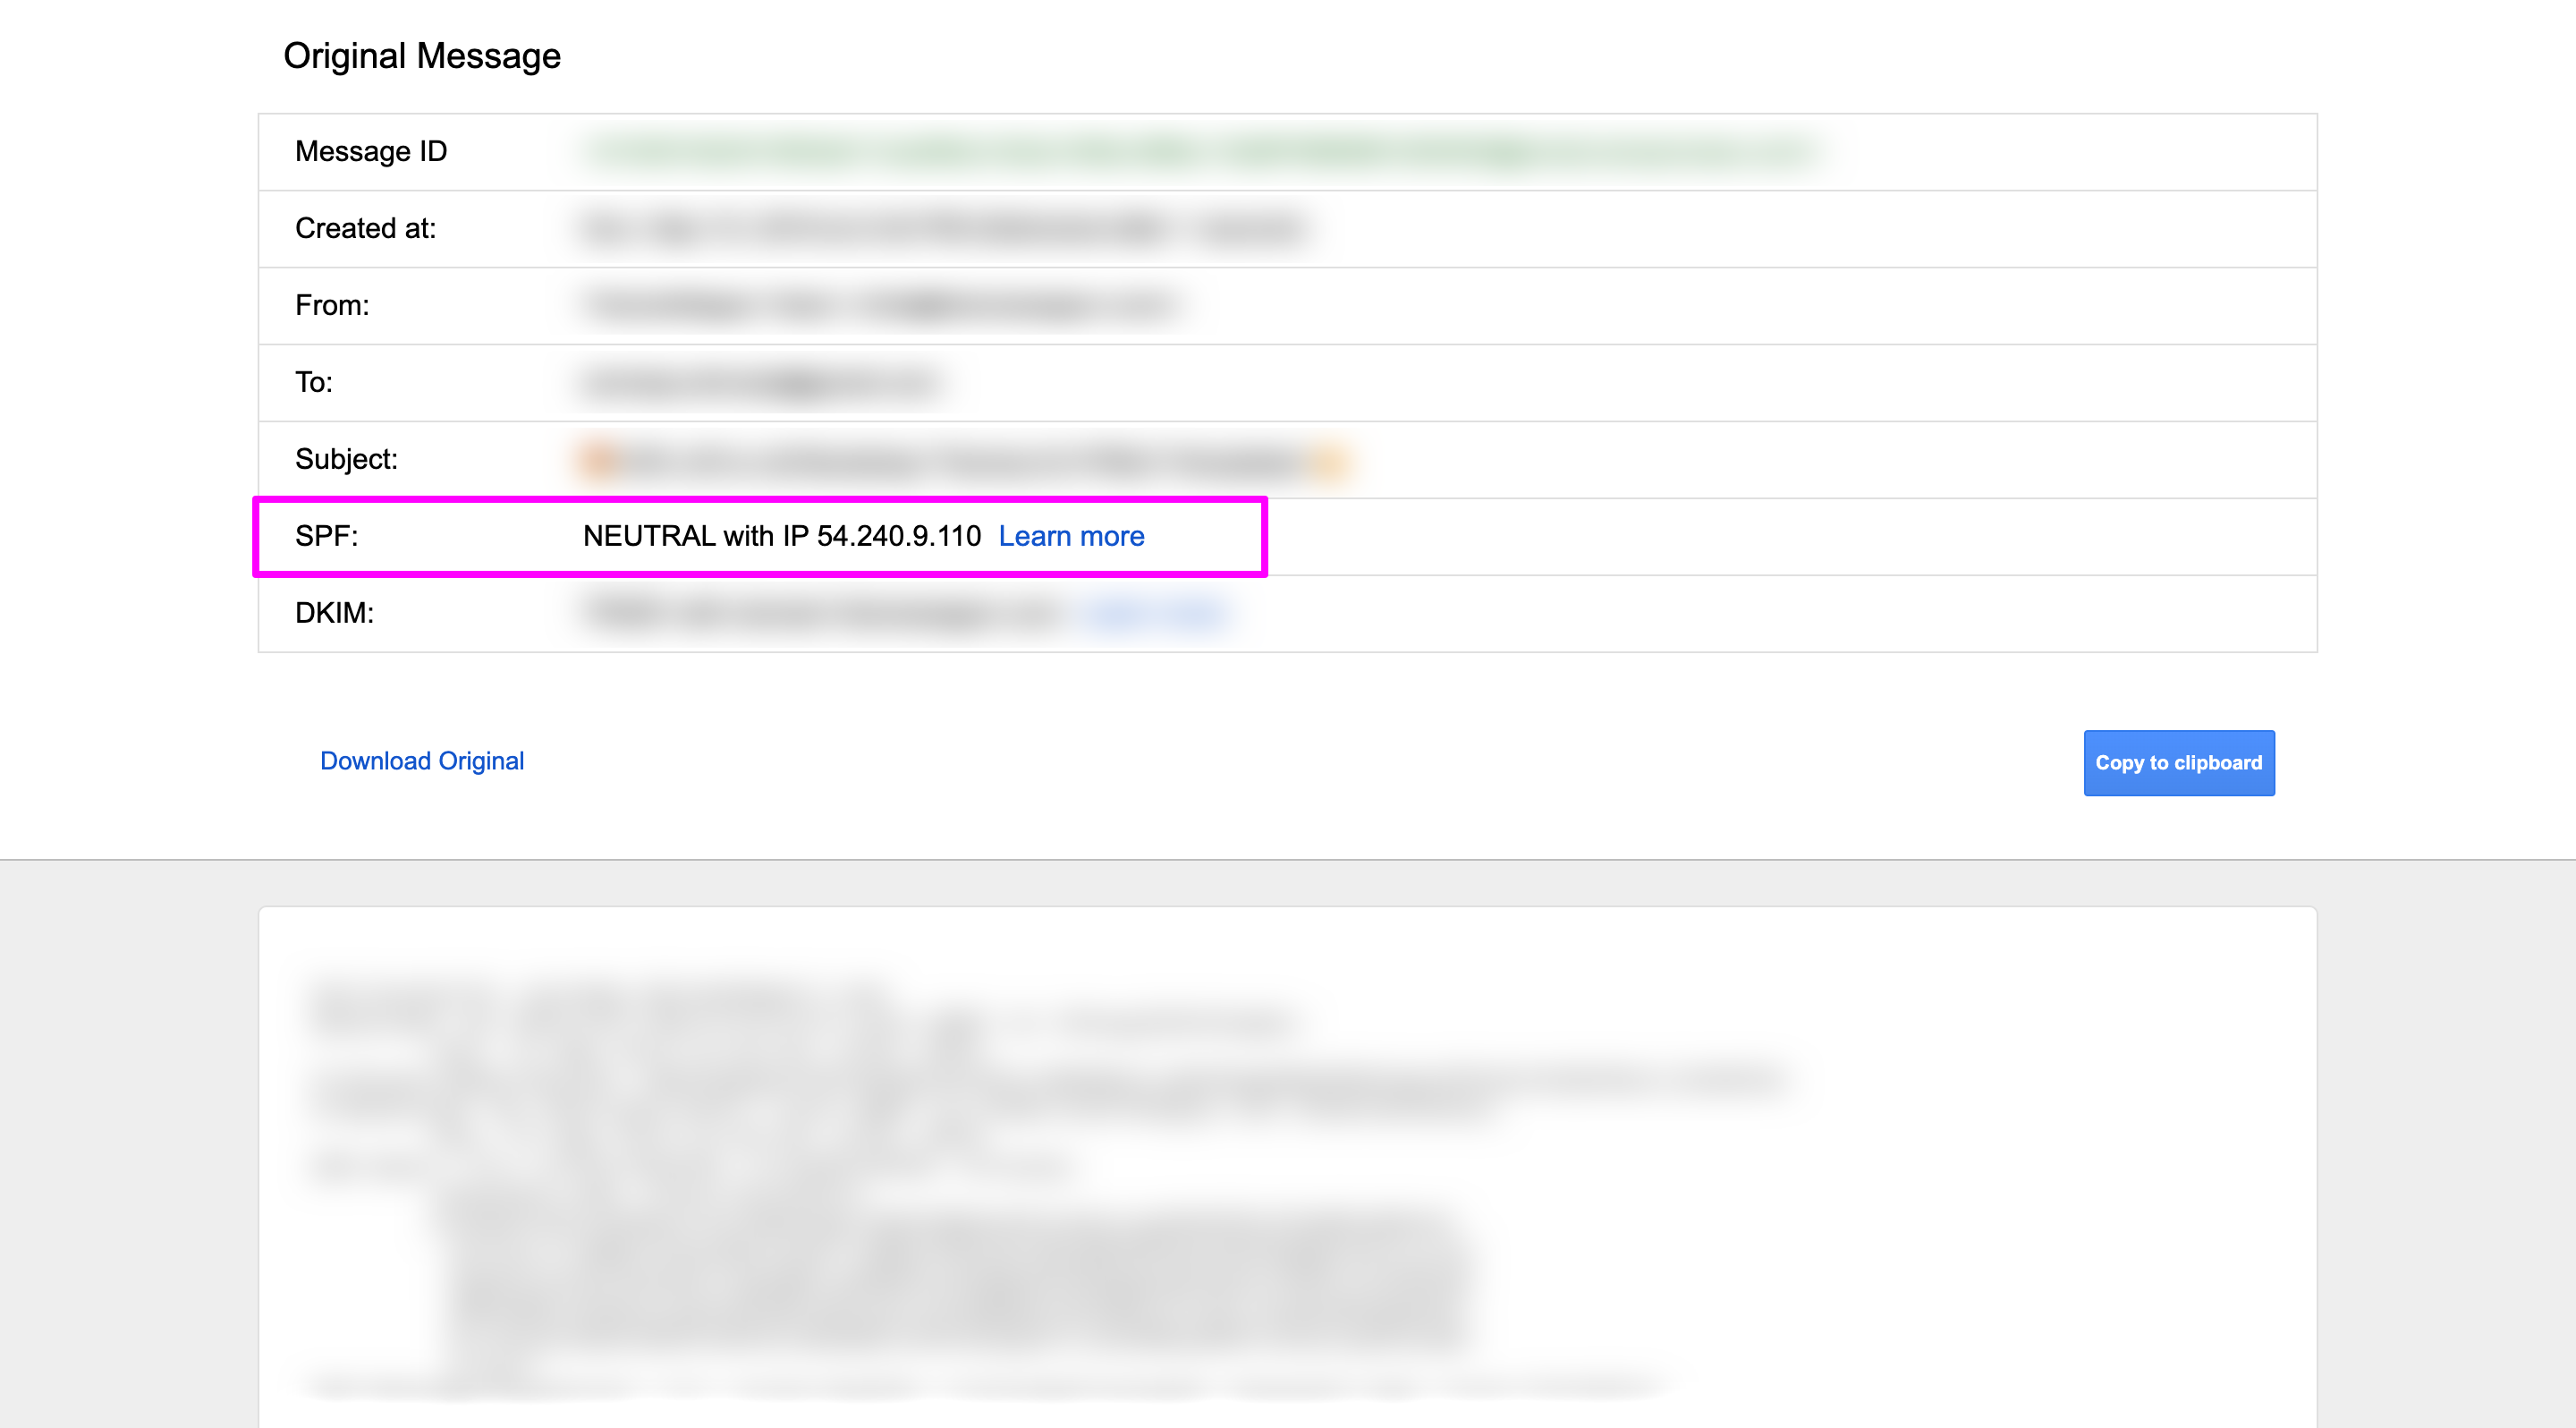
5 Once you have found out the email sender’s IP address, you can check their location using any IP tracking tool.
Check to see if the IP address you are using is blacklisted using these tools:
1 Using MX Lookup Tool – Just enter your domain name and click the Blacklist check button from the dropdown options and get the results in minutes.
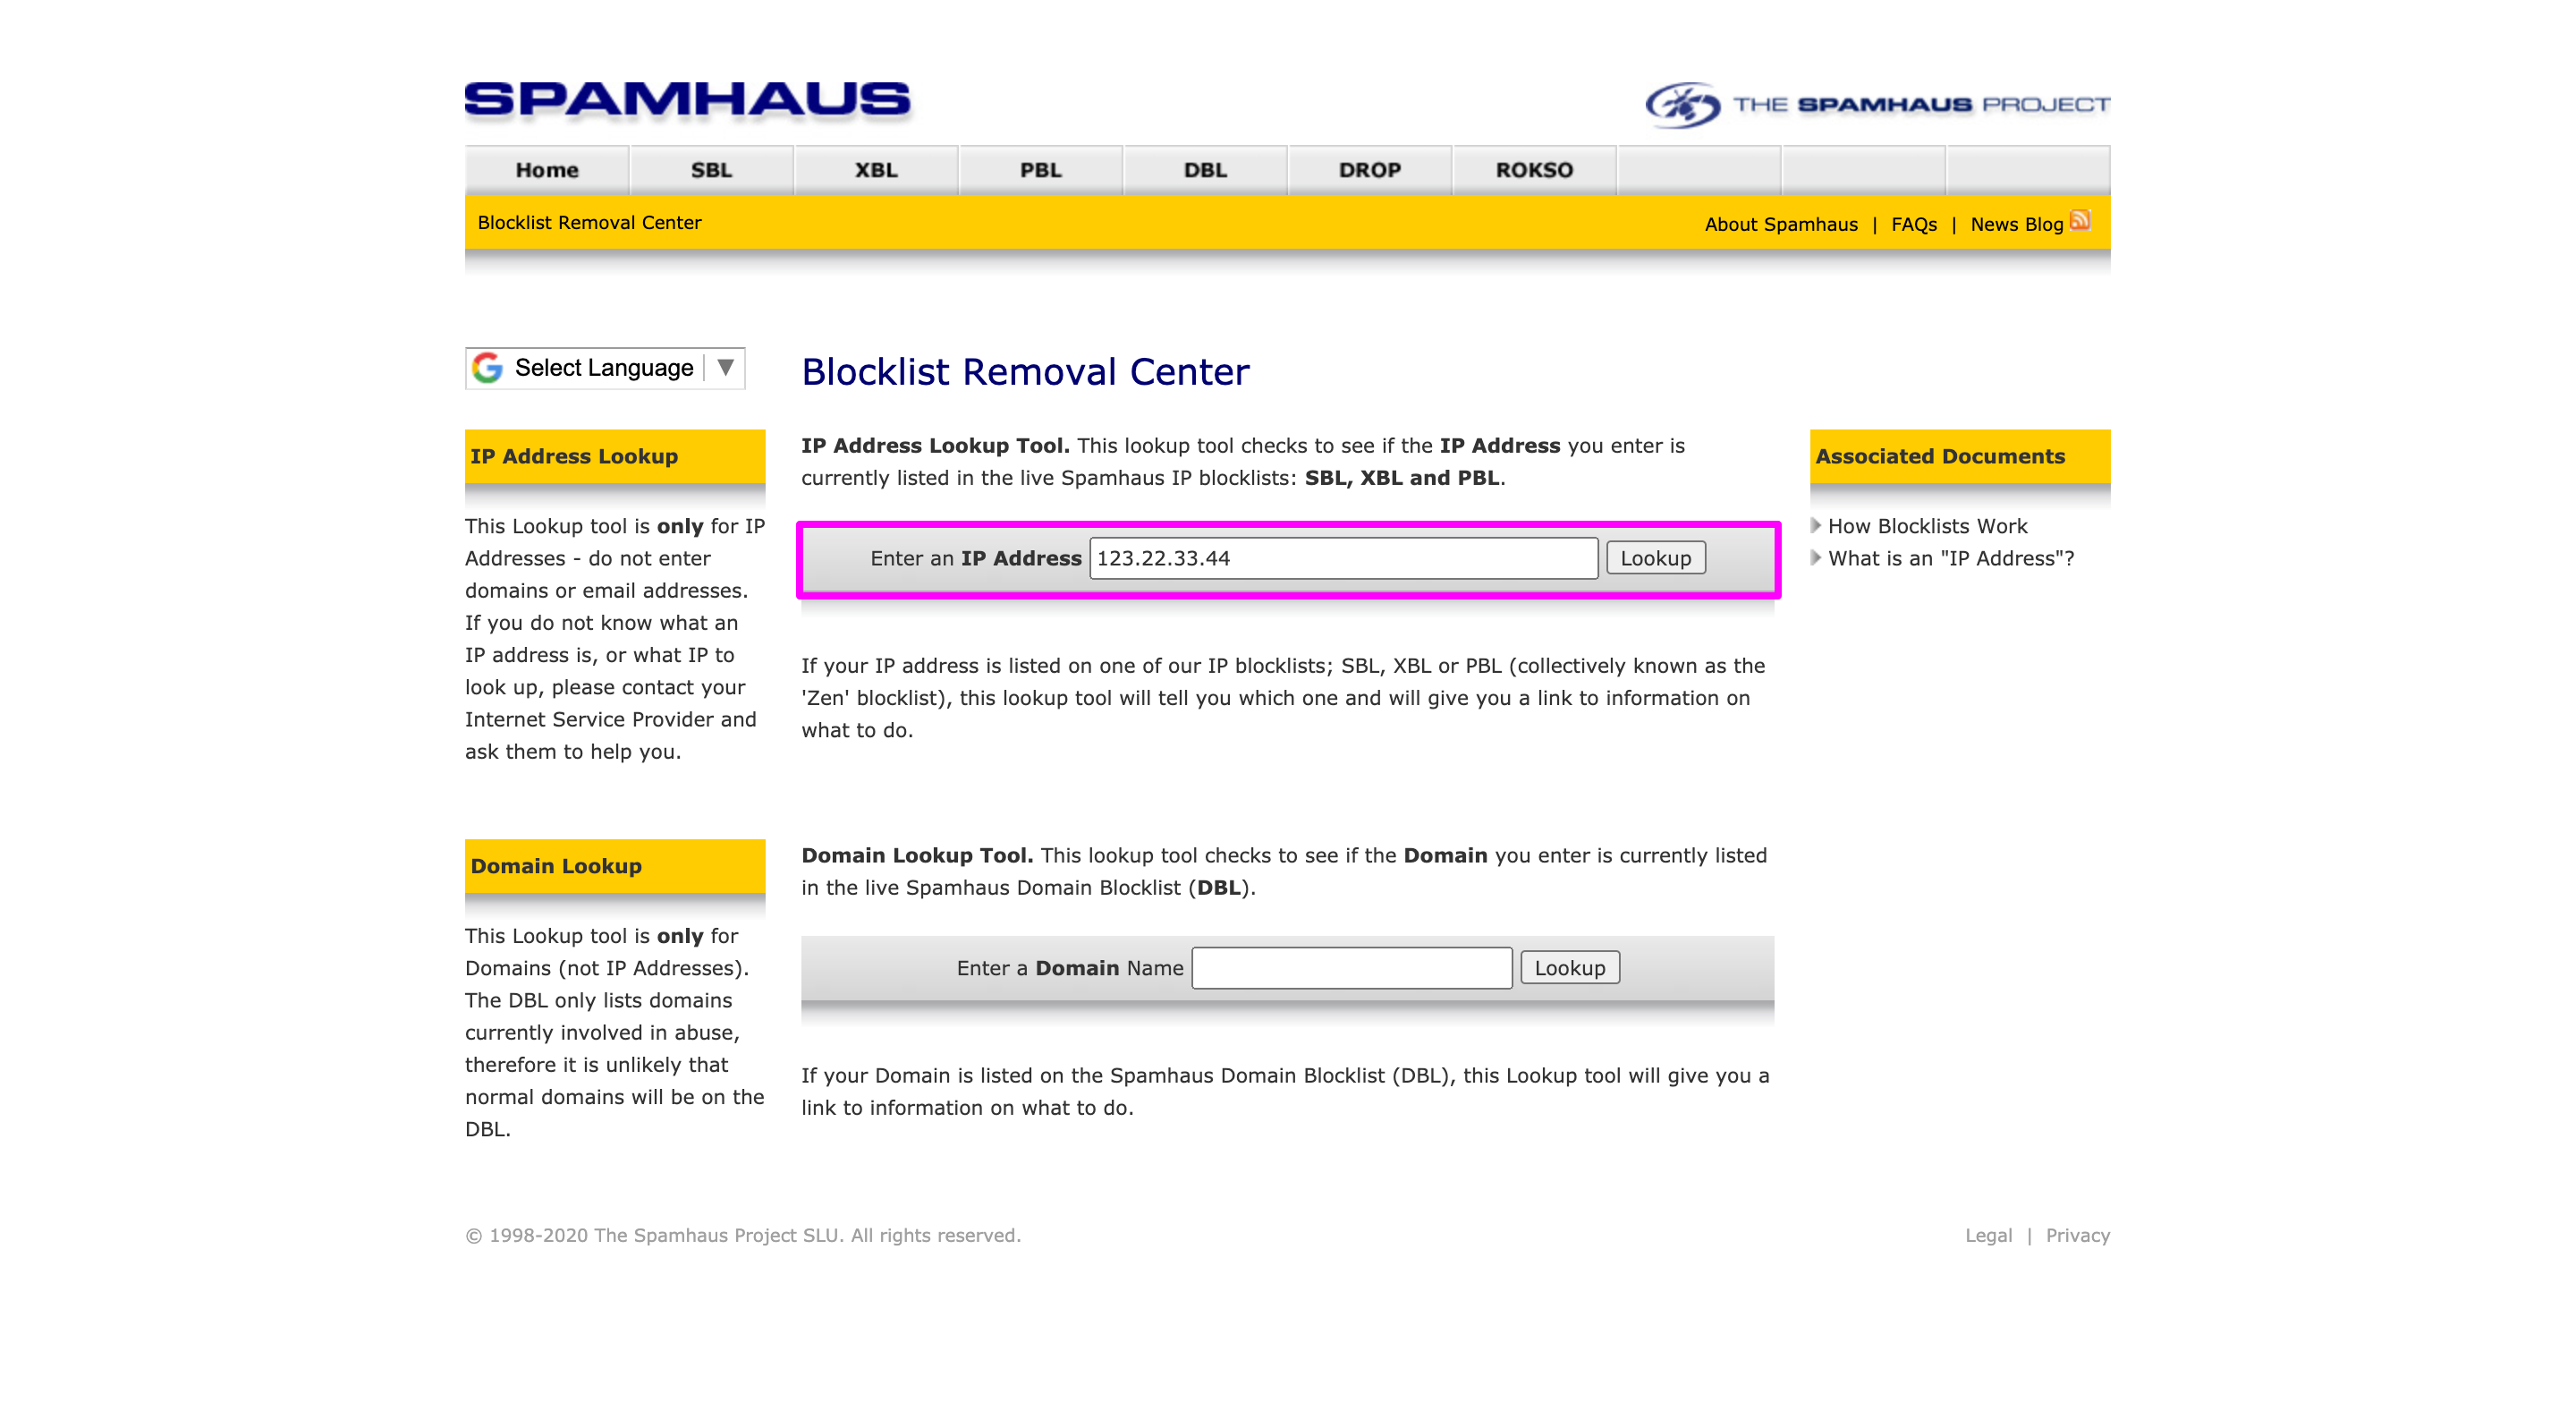
2 Using Spamhaus – Here, you can check the blacklist for both your IP address and the domain name by entering the IP address or the domain name in the relevant field like the screenshot. Just enter your IP address or domain name and click the Lookup button and see the results.
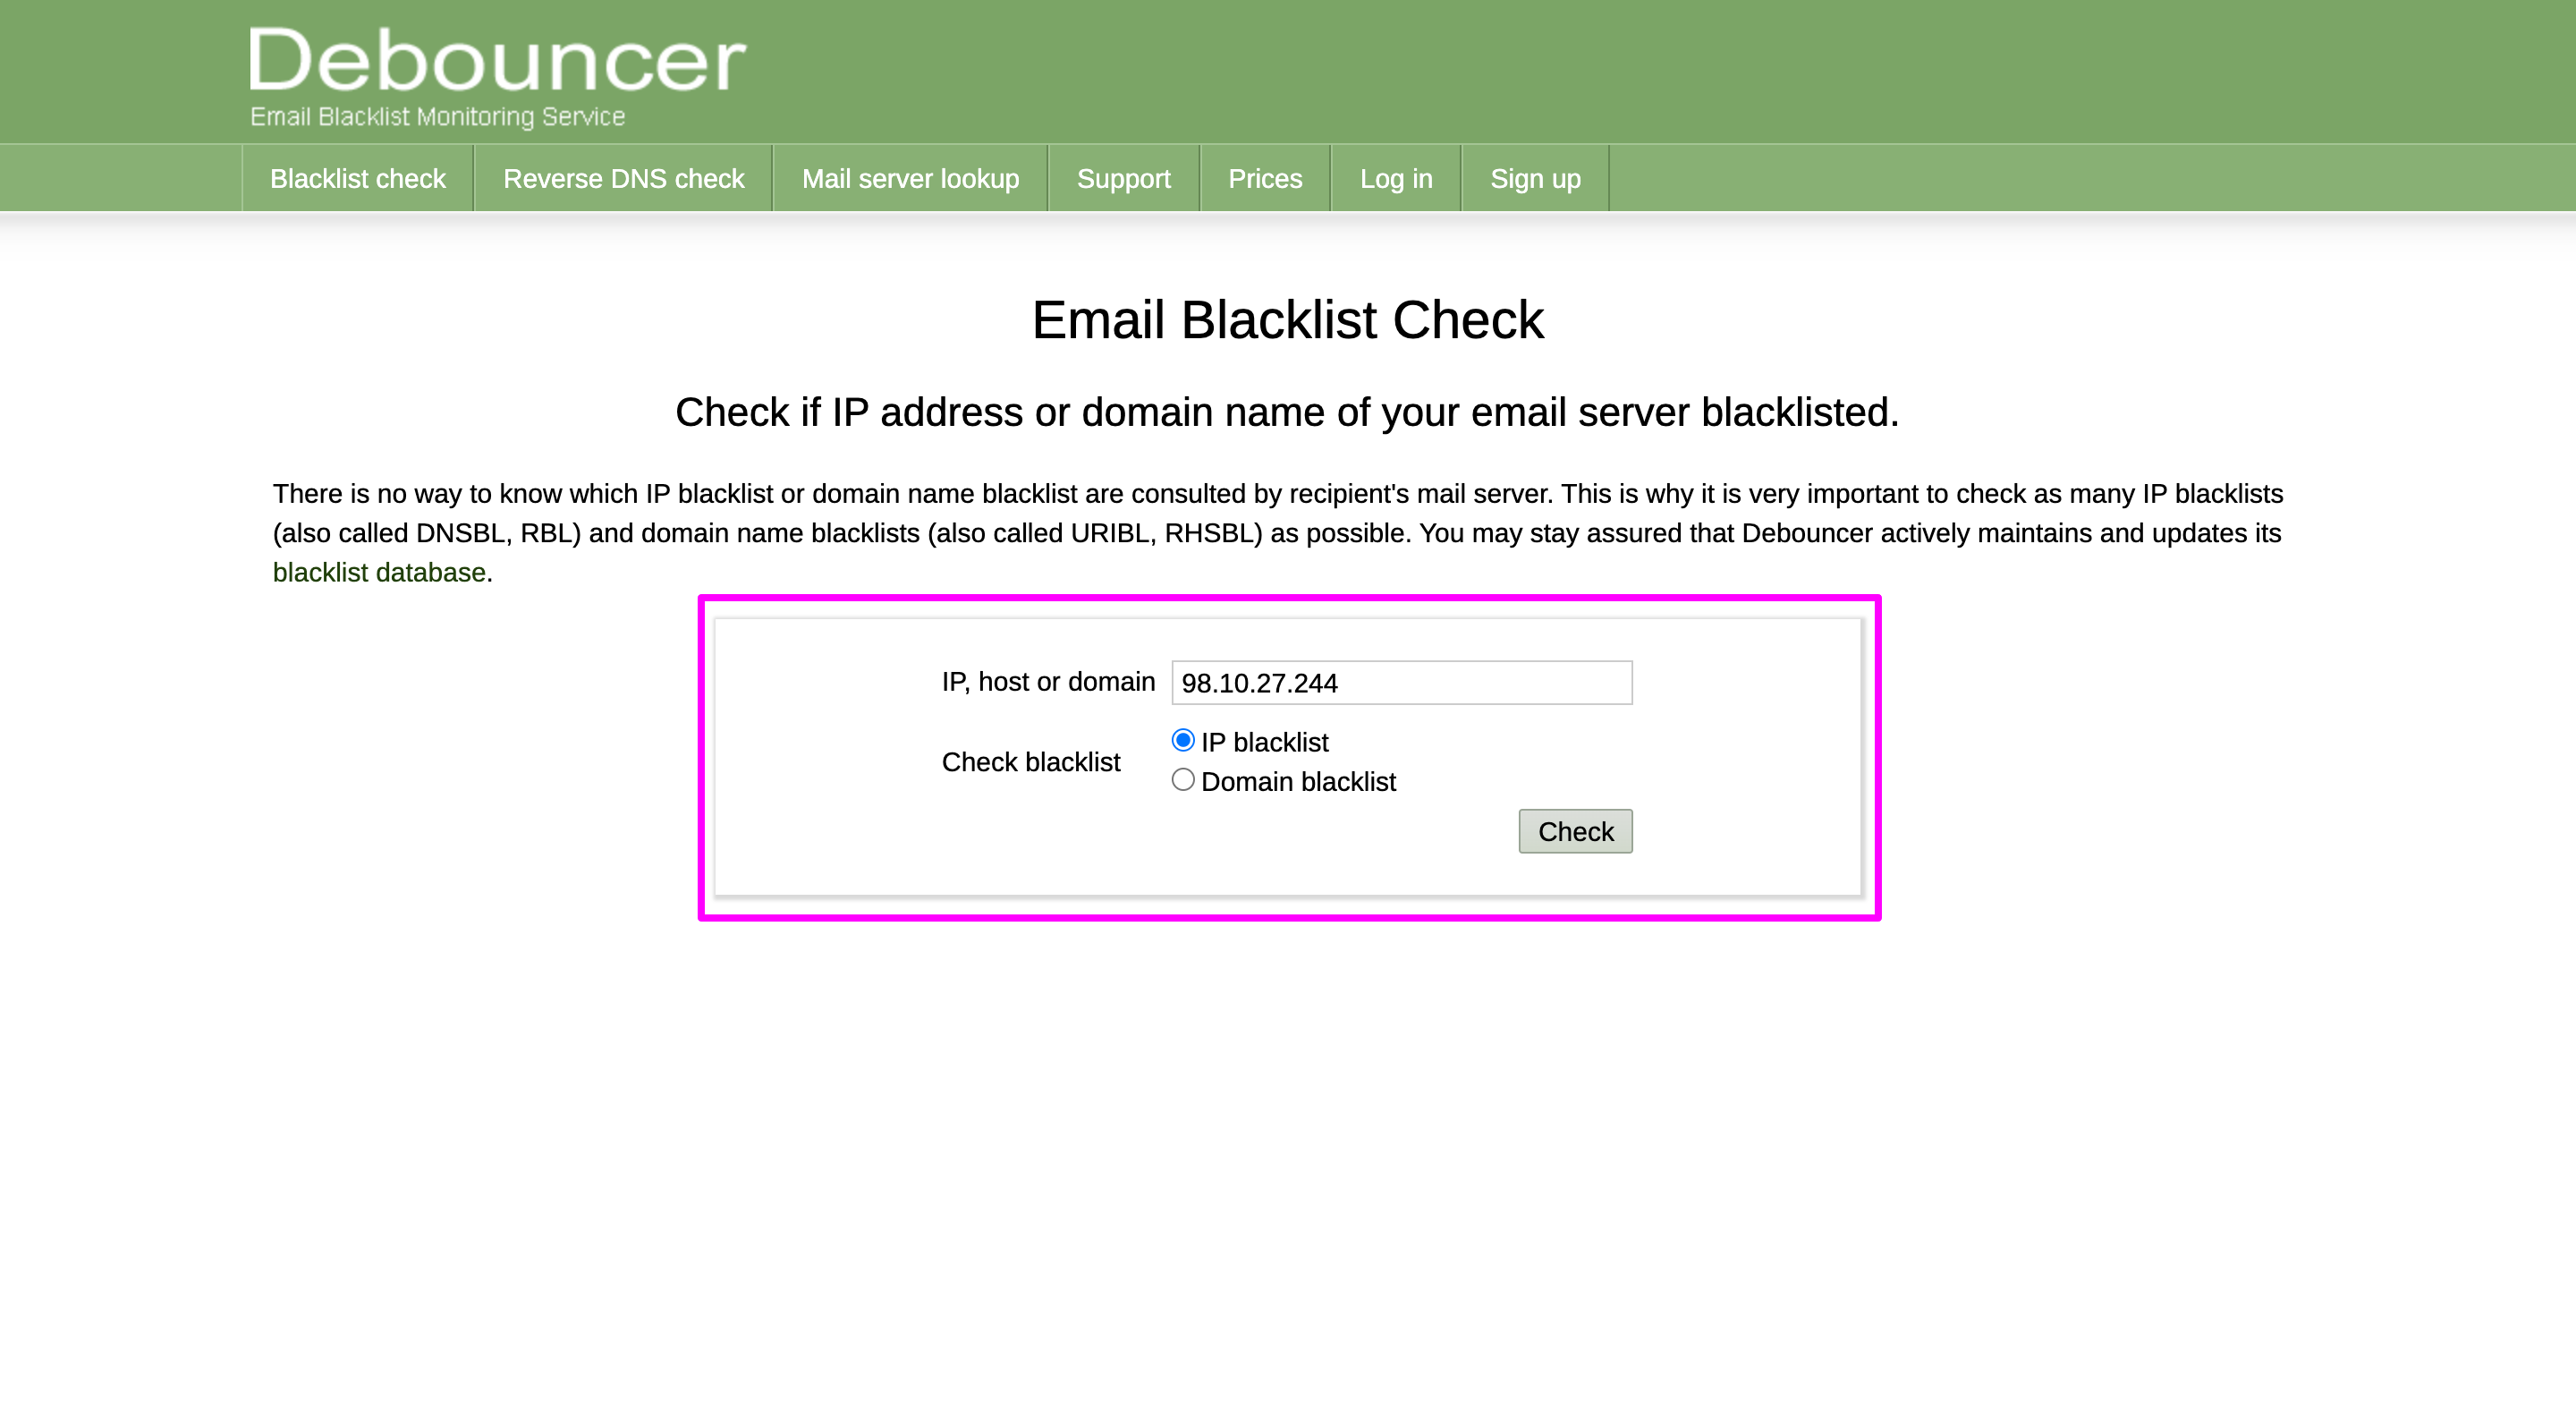
3 Using Debouncer – Enter your domain or IP address and get the results quickly. You can enter your IP address or domain name. Here we have provided our domain name and checked the Domain blacklist button. Then click the Check button and get the results.
If your IP address is blacklisted, these actions can be taken
1 Purchase a dedicated IP address: Prior to the availability of dedicated IPs, all Amazon SES customers sent their email through IP addresses shared by other Amazon SES customers. The shared IP model continues to enable commitment-free sending with arbitrary email volume, and remains the best fit for many Amazon SES customers. But dedicated IPs are Amazon SES IP addresses that are reserved exclusively for your email sending. In the Dedicated IPs page of the Amazon SES console, you will find the values of the addresses that send your email. For reference visit Using Dedicated IP Addresses with Amazon SES.
2 Bring Your Own IP (BYOIP): If you have a reputed existing IP address, you can use that IP address to send emails from Amazon SES. It is called Bring Your Own IP (BYOIP). It allows you to use your own IP addresses to send an email via Amazon SES. If you want to use your IP addresses with Amazon SES, send the below information to [email protected] –
• Your AWS account ID.
• The AWS Region in which you want to use the IP range, For example – ap-south-1.
• A description of your use case.
• The IP range which you want to use with Amazon SES.
• The name of the internet registry that the range is registered with.
Amazon will respond to your request within 48 business hours. They might also request you to provide some additional information, including documents that prove you own the IP address. For reference visit Using Your Own IP Addresses to Send Email Using Amazon SES
Request AWS SES to change your IP address:
1 Log in to the AWS Management Console at https://console.aws.amazon.com/.
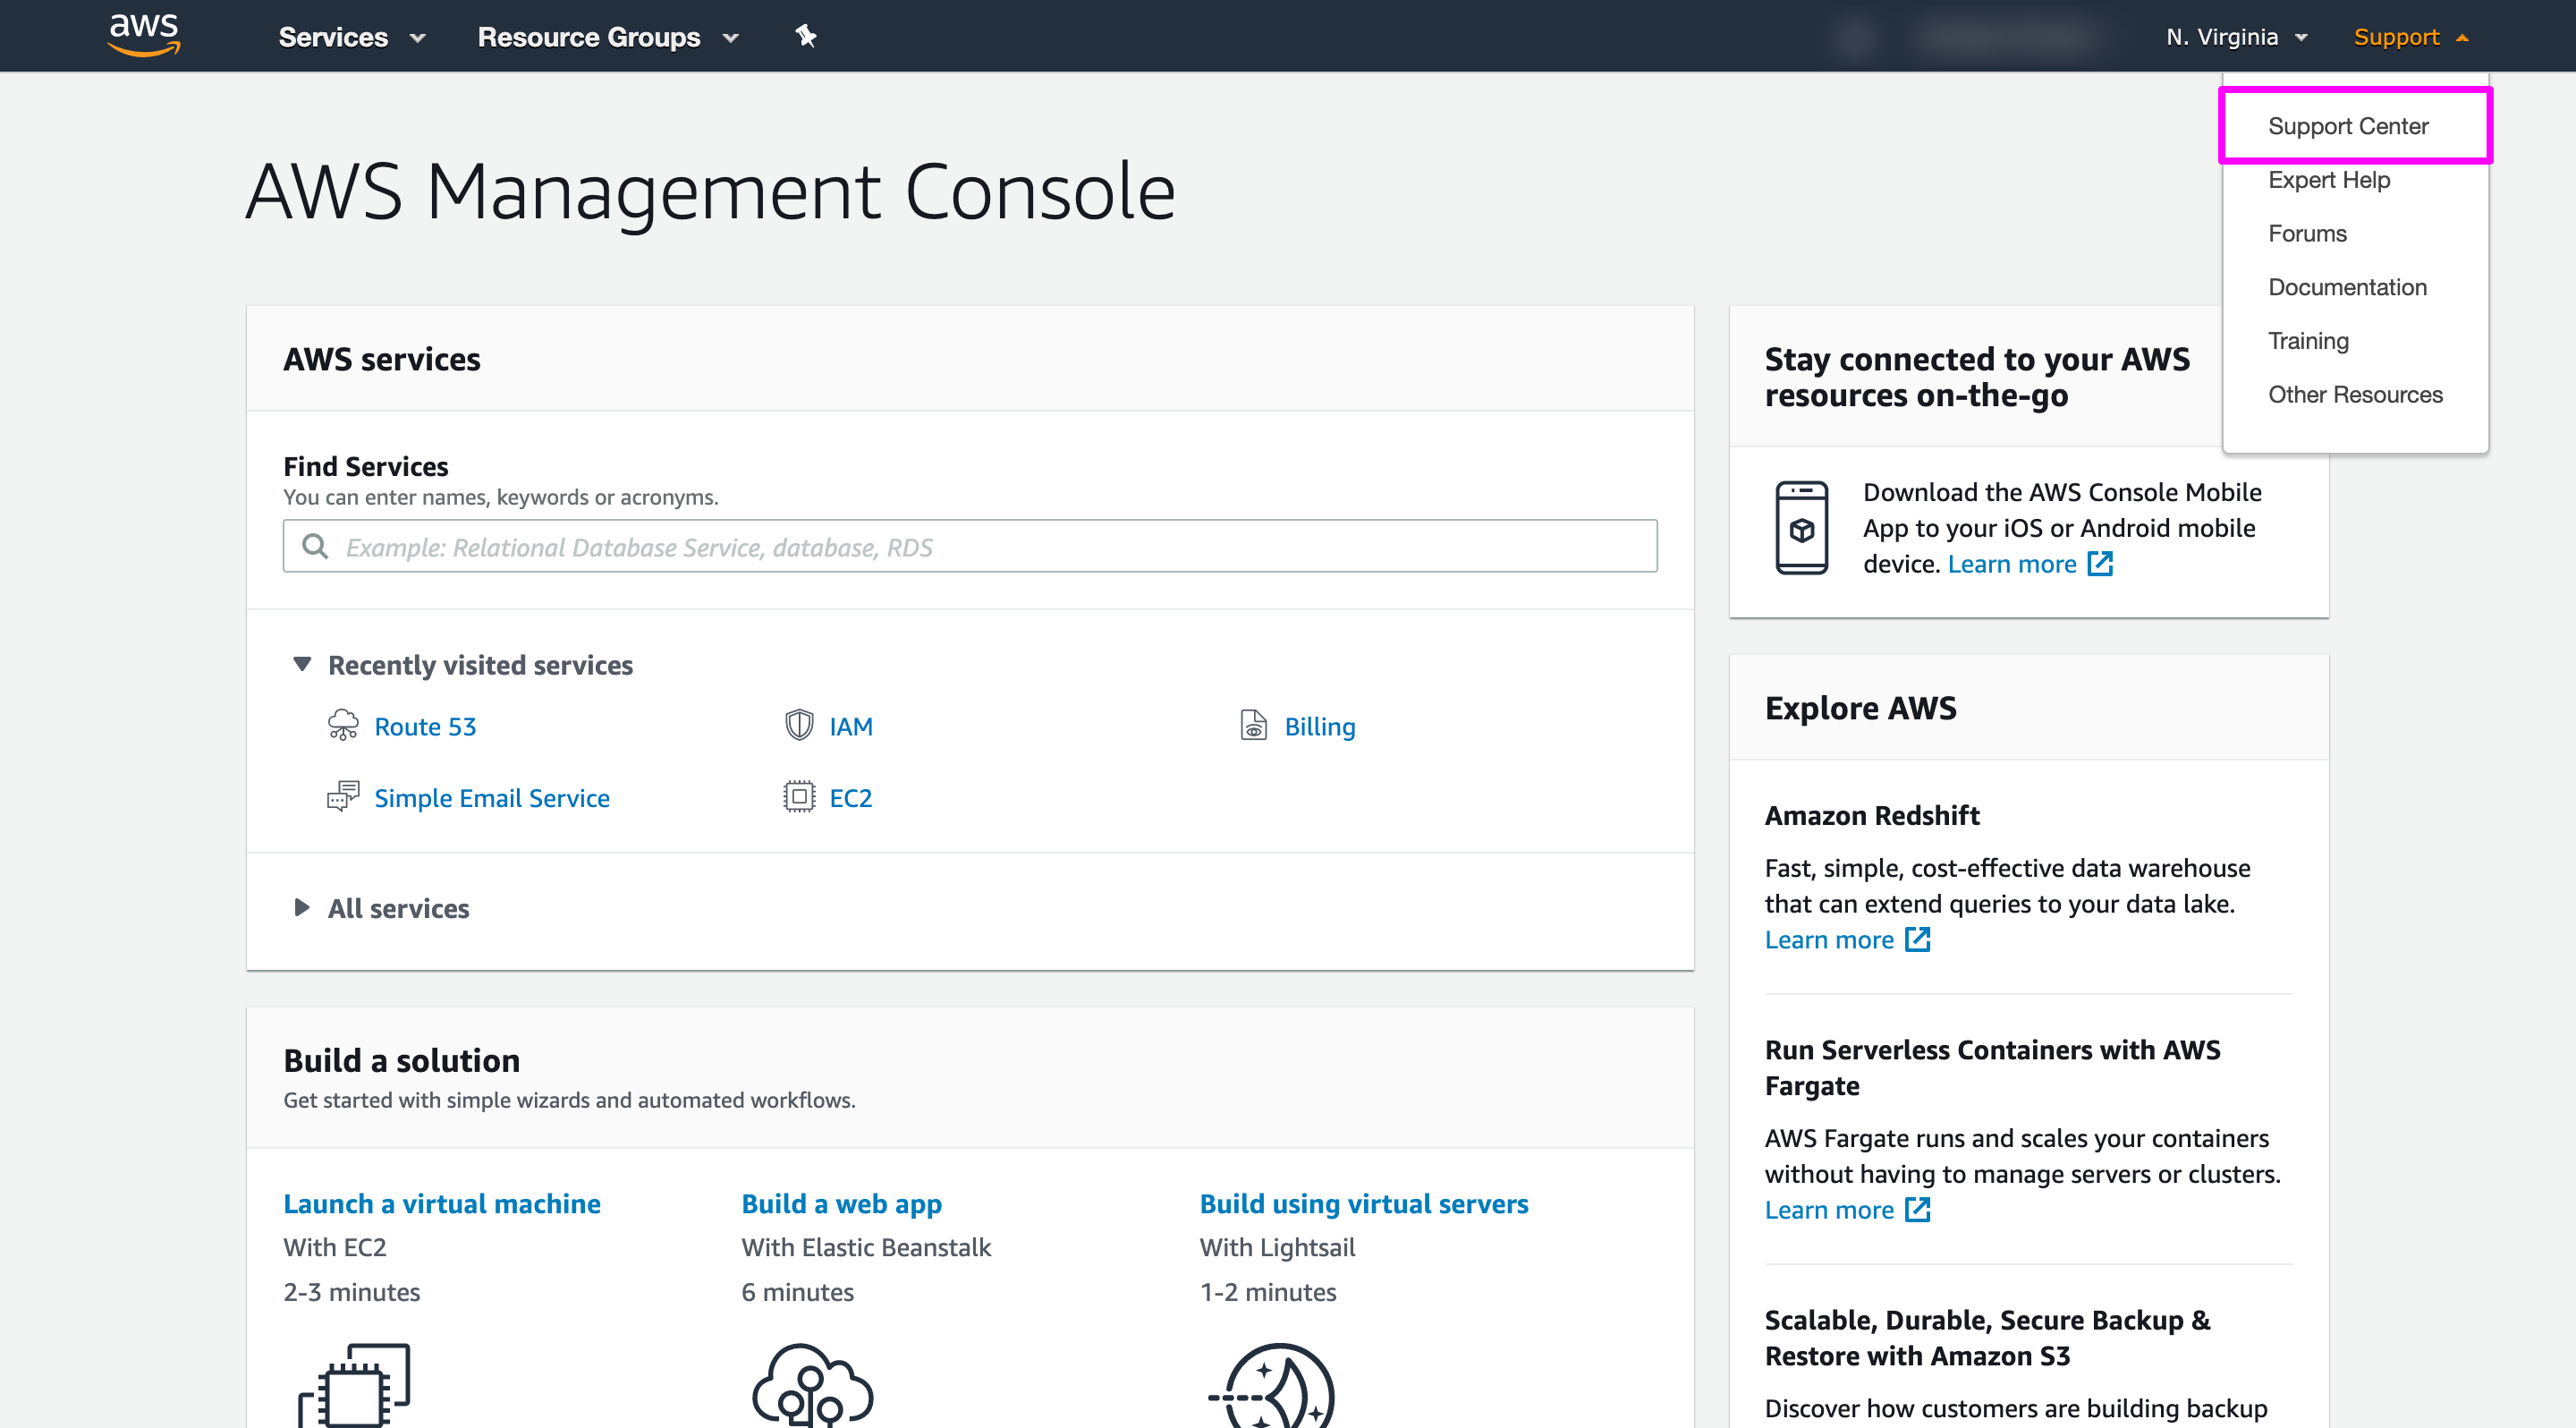
2 Choose Support Center on the Support menu, as shown in the image below to contact Amazon for requesting them to change your IP Address.
Helpful blacklist FAQ from Amazon SES: Amazon SES IP Blacklist FAQs
- Large volumes of email sent from a new IP address
If you have already sent a large volume of emails to your users before which has gained trustworthiness to the ISP, but suddenly you are sending a lot of emails from a new IP address, they will be going to the spam folder. Because ISP trusts the old IP address, but when ISP finds a lot of emails are coming from a new IP address, they will mark them as Spam. Start by sending fewer emails and gradually increase the volume.
- Purchased email list
If you have purchased the email list from any company or black market, that means these users did not subscribe to receive your email. Their complaint report will affect your reputation and deliverability.
- High bounce rates
If you collected your emails a long time ago or purchased them from the black market, then you don’t know your users very well in the current situation. If you send them emails and the bounce rate is high, then it will negatively impact your reputation and deliverability.
- Spam link
If you send an email containing links, check those links against the Spamhaus Domain Block List (DBL). To test your links, use the Domain Lookup Tool on the Spamhaus website.
- Using URL shortener
Most of the generic URL shorteners are blacklisted. Spammers and scammers use them to hide their actual URL. Avoid using them for better deliverability.
- HTTP link
Avoid using HTTP links; instead, use HTTPS (secured) links.
- No way to unsubscribe
If you don’t provide users any way to unsubscribe, that means you are not interested in listening to their opinion. In that case, users might mark you as Spam, which will affect your reputation and deliverability.
- Email subject & body
Sometimes the words you choose as your email subject and body affect your deliverability. If you choose the words used by spammers and scammers, your email might get delivered into the spam folder. Some of these words are: click here, free, dear friend, earn money, etc.
Monitoring
Use the following tools to regularly monitor your reputation, health, lead activity, statistics, and upgrade your strategy according to their suggestion:
1 Google Postmaster – If you send an enormous number of emails to Gmail users, you can use Postmaster Tools to check:
• If the users are sending your emails in Spam folder
• How to prevent your emails from being blocked by Gmail
• What can the reason your emails might not be delivered
• If your emails are being sent securely
2 Amazon SES – Directly from the Amazon SES console, you can monitor the number of emails delivered from your account, and also the number of messages that have been rejected. On the Sending Statistics page, the delivery and rejection rates for your account are displayed.
See the information about bounces and complaints on the Reputation Dashboard. For more details, visit Monitoring your Amazon SES sender reputation.
To see delivery and rejection metrics
2.1 Log in to the AWS Management Console and go to the Amazon SES console at https://console.aws.amazon.com/ses/.
2.2 In the navigation pane, select Sending Statistics. Your usage statistics will be shown under Your Amazon SES Metrics.
2.3 To see trend data for any metric, double-click the related graph. When you double-click on a graph, you can change the analysis period too.
3 GlockApps – send a copy of your campaign to the email address and receive a deliverability report sent to your inbox directly.
Email sending best practice
Last but not least, read more about the best practices of AWS SES and Gmail.
1 AWS SES best practice: Tips and Best Practices
2 Gmail’s bulk sending guideline: Prevent mail to Gmail users from being blocked or sent to Spam
Bonus tips to avoid SPAM!
1 Subject Line – Many emails have spammy subject lines, such as lines that start with “Do you want” or “Do you need.” Try to avoid these kinds of sentences in the subject line. Also, try not to use deceptive subject lines starting with “Re:” or “Fwd:”. Because it’s a straight lie to claim “this is a reply” or “This is a forwarded message” when it is not. Email service providers like Google or Zoho can easily detect spammy behavior like this and put your email in Spam.
Don’t send a message to people saying they’ve won a prize which in reality they haven’t. This is a rapid way to disappoint the recipient and get your content marked as spam. Some marketers hide spam content by creating an image with text written on it. According to Boomerang, a question mark and an exclamation mark used in one subject line may also trigger a spam filter rule. If you include a percentage of over 100% in the subject line, your email might be ignored. You can create a sense of urgency with a proper subject line.
Make an offer that won’t last for a lifetime, and make sure the subject line properly conveyed it. Followings are some great subject line examples that will entice your subscribers to open your messages instead of reporting them as spam.
• Create a fear of missing out – Try to create a sense of urgency in the recipients and click on the email to open it. It can be done by adding a deadline to the email. The subject line will create an emergency feeling inside the recipients. This is called Fear Of Missing Out. For instance, “John, Earn double points today only,” or “Tonight only: A denim lover’s dream.”
• Stimulate curiosity – Try to put a subject line that stimulates the receiver’s curiosity, which will provoke him to click on the email. For example, “Who is more active on Social Media? Girls or Boys?” or “What They Eat In Prison?”
• Personalization – Personalizing the subject line and directly addressing your recipients will create a feeling of trust and care in them. It is key to build a long-term relationship. Examples of such subject lines may include wishing the recipients on their birthday or notifying them what’s a special offer you have for them. For example, “Sarah, check out these hand-picked looks,” or “Happy Birthday Mary – Surprise Inside!”
• Storytelling – Everyone loves good stories! Obviously, you can not complete telling a story in the subject line, but you can tease recipients with the introduction. That will make them click on the email to know the full story. For example, “How I saved ‘$150’ using ‘MailBluster’ in 30 days.”
• Announcements and events – Send some business announcements or event notification to the recipients. You can invite them to join you and send free or discounted tickets. Try using a subject line like “Here are TWOFREE Tickets. You’re invited to join our live sessions.”
2 Use a clearly labeled “from” field address – Make it crystal clear from whom the email is. Many of us have multiple email addresses within our domain, depending on the size of the organization. For example, if a client submits a complaint or query for help on your website, they may get a reply from a [email protected]. But if they make a purchase or return an item, email inquiries might be made through [email protected]. So, the main point is, don’t change the sender field too often. And try to get fixed with the id that works best for your promotional emails. Avoid abnormal choices, such as don’[email protected] or [email protected]. Ensure creating a solid reputation for these sender fields. According to Kissmetrics recommendation, use clear, trustworthy “From” field names, like “contact@,” “newsletter@,” “support@,” “feedback@.” This will increase your reputation as a sender as well as your deliverability statistics will go higher.
3 Spam Triggering Words – Some words are used in the subject line or email body that may trigger spam filters. Such words can be: “prize,” “free,” “bonus,” “buy,” “purchase,” “order,” etc. You might say that it’s almost impossible to write anything without using these words, and no doubt you’d be right about that. Fortunately, spam filters are getting more and more sophisticated nowadays. They can identify separate words and analyze the context in which they have been used. So, send only valuable and related content, and you’ll be safe. Try not to use phrases that are common to phishing attacks in your emails. To avoid a high spam risk, make sure you limit the use of promotional words. Here is a list of common spammy words or phrases below
• Manipulative: creating unnecessary emergency or pressure – Asking the recipients to take action is not wrong, but the spam filters take it as fishy if you create some unnecessary urgency. Such word are as follows –
• Act now
• Action
• Apply now
• Apply online
• Buy
• Buy direct
• Call
• Call now
• Click here
• Clearance
• Needy: sounding desperate or exaggerated claims – The email subscribers do look for immediate value when they see the subject line; they want to know precisely what they’ll get if they click on the email. If you’re genuinely offering something valuable, there’s no need to be desperate or sound exaggerated. Followings are some words and phrases that sound like desperation –
• 100%
• All-new
• Bargain
• Best price
• Bonus
• Email marketing
• Free
• For instant access
• Free gift
• Free trial
• Sleazy: being too pushy – Each subject line sends a significant signal to the recipients. Do you add value in a friendly and non-forcing way? Or are you pushy? Check how the words and phrases below make you feel a little hesitant. No one likes to be pressurized, so please avoid using pushy words or phrases in the subject lines.
• As seen on
• What are you waiting for?
• Click below
• Deal
• Direct email
• Direct marketing
• Do it today
• Order now
• Order today
• Unlimited
• Cheap: no pre-qualifications, everybody wins – Remember, when offering something easily available, the lower its perceived value is. In other words, people desire for unique things. If the subject lines read pre-qualification phrases like “Congratulations!” or have an “everybody wins!” vibe to them, your email is likely to end up in spam. Instead, avoid the spam filter words below –
• Acceptance
• Access
• Avoid bankruptcy
• Boss
• Cancel
• Card accepted
• Certified
• Cheap
• Compare
• Compare rates
• Shady: ethically or legally questionable behavior – As long as there are easily persuadable people in the world, there will always be dishonest individuals trying to take advantage of them. The following words are associated with ethically or legally questionable behavior and may trigger the spam filters to use them with caution –
• Addresses
• Beneficiary
• Billing
• Casino
• Celebrity
• Collect child support
• Copy DVDs
• Fast viagra delivery
• Hidden
• Human growth hormone
• Images, GIFs, and Memes – Emails containing more images than text have more likely to be marked as spam. If your email contains one big image, it will almost definitely end up in spam. Colored text, writing in caps locks, or using several font sizes is also a bad idea. You can check the following list before sending an image in your email –
• Avoid sending a single image;
• Include different lines of text for every image;
• Optimize the images as much as you can;
• Use proper HTML for the email.
5 Make it Easy to Unsubscribe – You must include a “unsubscribe” link at the bottom of every email. Make leaving your email list easy for your subscribers. It might sound like a horrible suggestion, but it’s a key to win subscribers’ trust. Including a way to unsubscribe from your email list proves that you have confidence in your content value. How easily your subscribers can unsubscribe is up to you.
Some brands take the confidence theory to the extreme level, putting an unsubscribe button in the header and the footer as well in the emails. You can do this, but there are also chances of being unnoticed by people. In that case, people will either unsubscribe without reading the email or hit the button by mistake. A simple unsubscribe button in the email footer can reduce the chances of your email not going to SPAM anymore.
6 Split the List – Group your audiences by demographic area wise or based on web traffic sources. Whatever your base of selection for segmentation is, make sure that they define a clear set of user characteristics. Sending bulk emails is bad, according to mailbox providers. However, if you work in sales, the enormous mailing is a must. You can split long lists into smaller ones to avoid spam filters to mark them as SPAM. Always start with the smaller groups and continue building a list.
7 Cleaning Your Contacts -If your email list is long and has inactive addresses or addresses that weren’t checked for a long time, it might raise a red flag for spam filters. Keep a healthy ratio of active and inactive emails, keep cleaning your lists regularly, and do not keep the inactive contacts in them. By following this rule, you can avoid a high bounce rate. Active contacts are always more likely to engage with your email (open, click, read, reply), and this will be seen as a good indicator by most mailbox providers.
8 Ask Subscribers to Whitelist Your Email Address – Every email provider such as Google, Microsoft, and Yahoo! are working hard to make sure that their spam filters don’t catch emails from people in your contacts as SPAM. To enable this privileged option for your emails, you can ask your subscribers to whitelist your emails. It’s easy by adding your “From” address to their contacts or list of safe senders.
9 Use Permission-Based Marketing – Permission-based marketing is a general practice of sending commercial emails to those recipients only who are agreed to receive. It is a safe way of doing email marketing. By implementing it, you can reduce spam rate, spam complaints, and improve your sending reputation. Set up a subscription form on your site or landing page and ask the audience to subscribe to your email list. Whether you add a plugin or go for a complete landing page redesign, it is important to make the process clear and easily understandable. Go a bit further and request them to confirm their subscription to avoid landing on their SPAM folder or bot subscriptions.
10 Don’t buy subscribers – Do not ever purchase email lists and send emails to people who never signed up to receive them. You’ll be landed directly to the spam folder if you do that. Furthermore, you will be putting yourself at risk by violating the CAN-SPAM Act, which the Federal Trade Commission enforced. You should be sending promotional content to only those who want to hear from you instead of the random email addresses you bought.
The bottom line
Put an end to your emails from going to the SPAM folder, use the checklist below –
• Choose a proper IP address and sending domain. If it is a new IP address, then slowly warm it up with a low-frequency sending volume. Sending bulk emails at once from an IP address can easily make your emails end up in the spam folder.
• Make sure your SPF, DKIM, PTR, and DMARC records are set up correctly.
• Monitor your sender reputation with renowned tools.
• Verify your sending IP and domain against blacklists. To avoid relying on one, consider using a double opt-in subscription method.
• Collect a good quality mailing list. Only email people who permitted you to send them messages. Sending emails to uninterested users can put your sender reputation at risk.
• Verify your mailing list through email validators to remove invalid and inactive email addresses and unknown users from your database.
• Remove hard bounces and troubleshoot the reasons for soft bounces.
• Launch re-engagement email campaigns and send relevant content to combat low engagement rates.
• Be careful with your email content and layout; avoid spam-related elements.
Be a good sender, think about the reasons behind low deliverability, resolve them, and enjoy watching your email efficiency grow.
Following these tips will help your emails avoid getting marked as spam and also lead to a higher conversion rate for your business. Grab the advantage of MailBluster for sending your marketing emails at a super low cost without getting into SPAM ever.
Happy Sending! 💛


 Contents