


In email marketing, an intuitive email-sending functionality assists in bringing more authenticity to bulk email sending. MailBluster’s email-sending feature consists of several authentication, verification, and unique features.
In this article, we will cover the ins and outs of MailBluster’s sender feature, its usage, and verifying methods. Check out.
Table of contents
- About sender feature
- Sender feature benefits for user
- Verify Sender Domain & Email from MailBluster
- Domain verification
- Email verification
- Common Questions
About sender feature
The sender’s feature includes the verification process that solidifies the email-sending functionality. This feature guarantees the authenticity and trustworthiness of the email sender, thereby enhancing the sender’s credibility. The verification process includes two methods:
- Email address verification
- Domain verification
Email address verification involves a straightforward process. You simply need access to the mailbox to initiate the verification procedure. On the other hand, domain verification requires you to access DNS management to add SPF, DKIM, DMARC, and Custom MAIL FROM domain records.
Sender feature benefits for user
The sender feature includes some of the valuable options for email senders. Senders need to assign or input some records only. They don’t need to go elsewhere to find extended support. Find out more benefits-
1Beginner-friendly. If you are a newbie and want to start bulk email marketing, the @Senders feature is tailored for you. No worries, you don’t need an advanced grasp of the email features. You merely need to manage DNS settings and input some data to initiate email sending.
2Work in the sender’s workspace. One of the key benefits of the senders feature is you don’t need to go to the default mail provider for setup. All necessary configurations are included within MailBluster’s @Senders feature.
3Generate & edit records. You don’t need to find websites to generate DMARC records. Instantly generate DMARC and input the records right away. Also, edit the MAIL FROM domain record for the secondary address.
4Unlimited sender name. You can add unlimited senders in MailBluster’s senders feature. Unlimited sender numbers offer profound opportunities to create authentic email lists as well.
How to verify Sender Domain & Email from MailBluster: Step-by-step
The sender feature in MailBluster brings you the opportunity to simplify the management system of the sender domain setup. You don’t need to hover over to the AWS dashboard to set up the whole process. You can easily verify your sender domain using MailBluster’s intuitive sender feature.
Verification depends on the type of the sender, and you can verify the sender in 2 ways-
- Domain verification
- Email verification
Let’s head to the domain verification first.
1Domain verification
Domain verification requires you to have access to your DNS management system, such as Cloudflare or GoDaddy. You need to input some DNS records for verification there. Find out the steps.
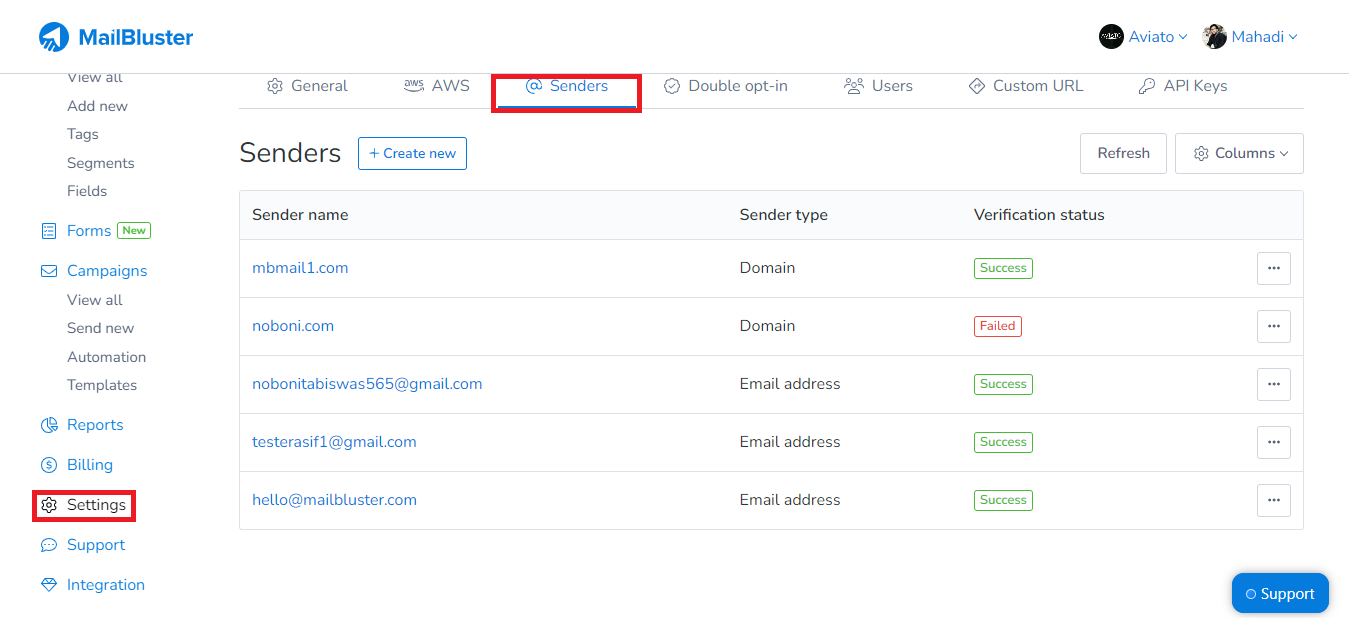
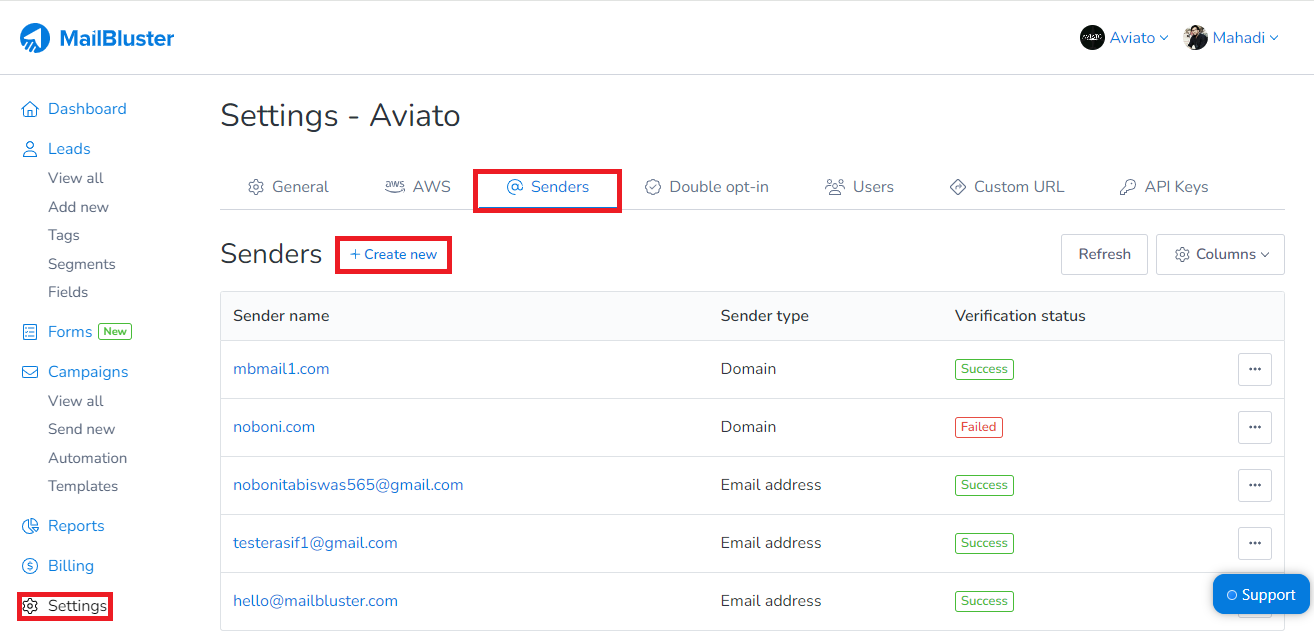
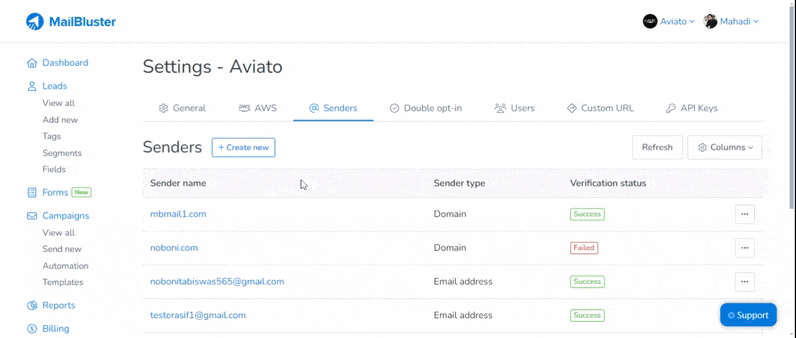
Step 1: Log in to MailBluster
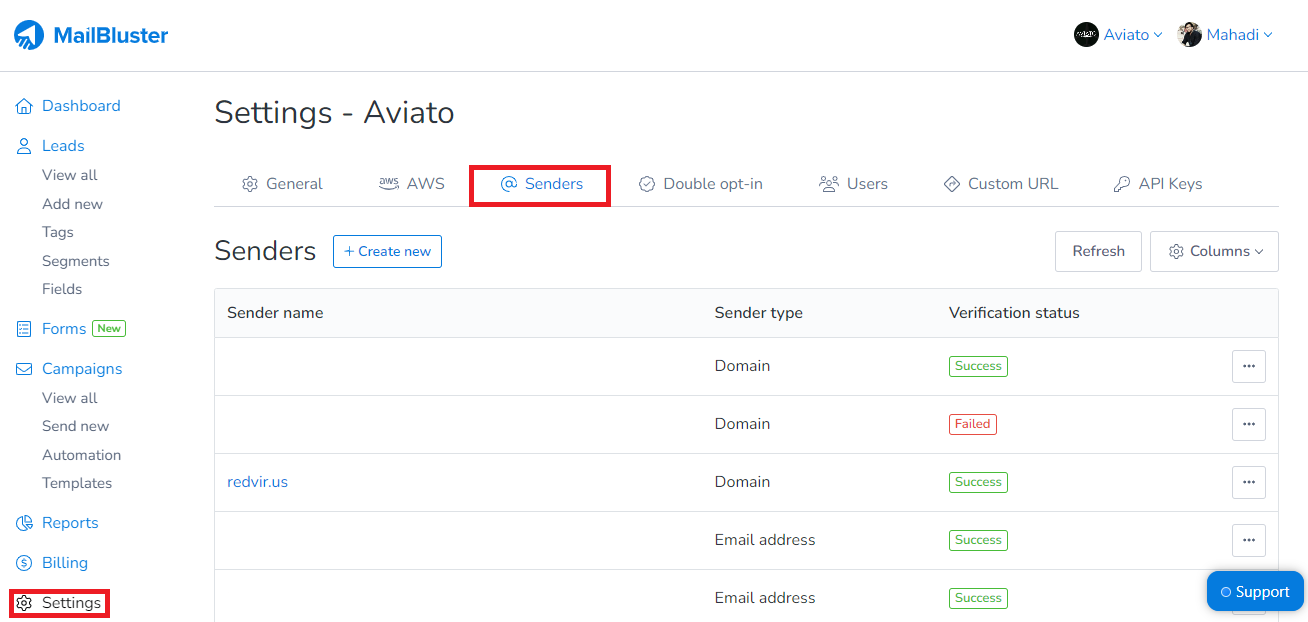
After logging into the MailBluster account, choose your Brand. Later, choose Settings from the side menu and head to the @Senders tab.
Step 2: Add your domain
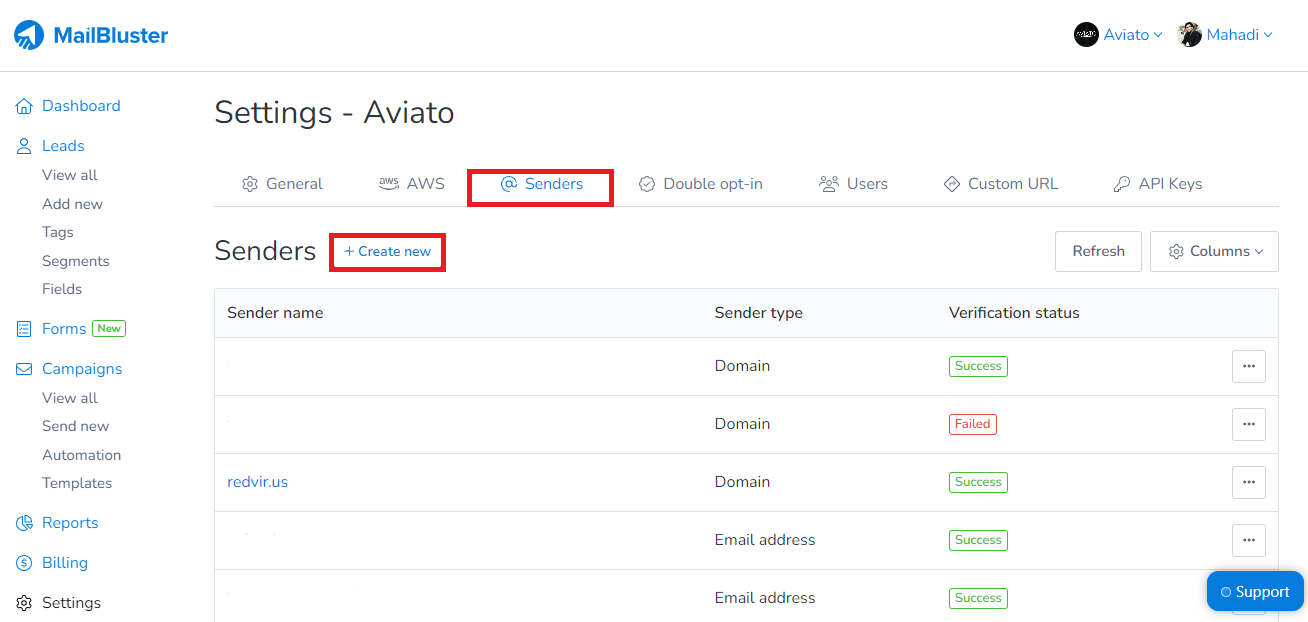
Select Create New, and later appears Type of the sender. This option contains a Domain and Email address verification process. Choose the Domain and add your domain address in the blank field. Click Create Sender.
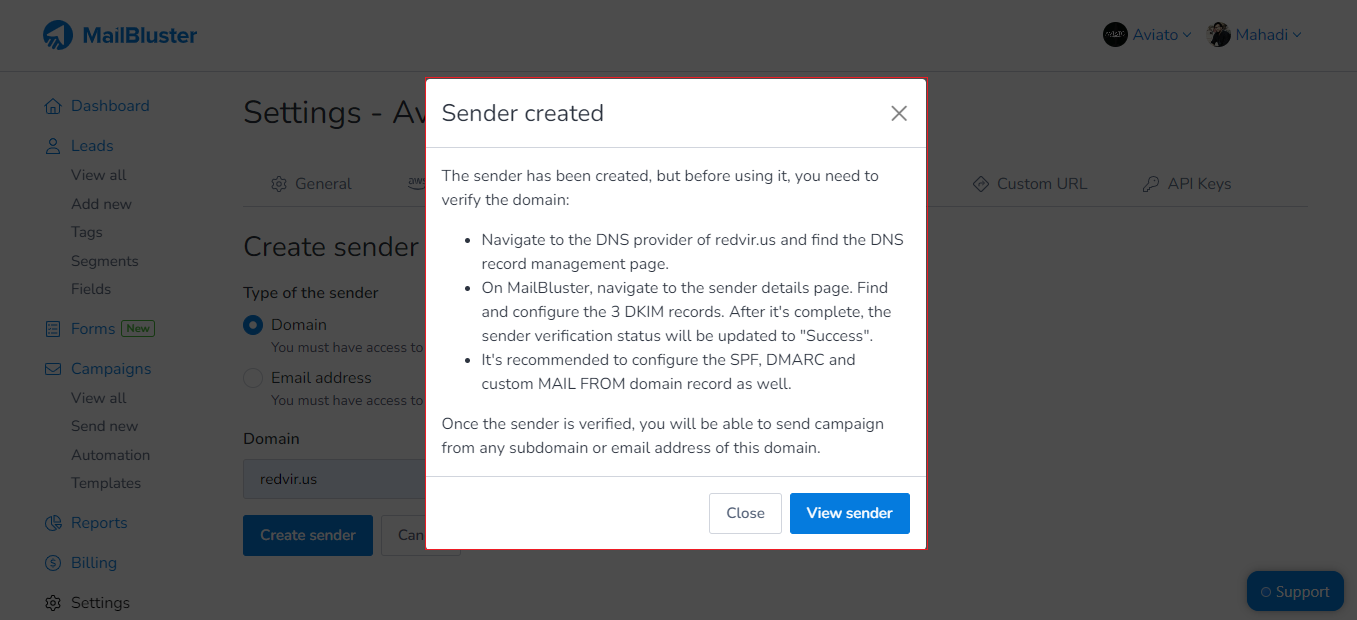
Step 3: Read the instructions
Next, you see the Sender created pop-up and it contains some instructions. Read the instructions carefully to input DKIM, DMARC, SPF, and MAIL FROM domain records. Click on View Sender to navigate to the next phase.
Step 4: Input DNS records
Following the pop-up, different fields appear where you need to input DKIM, DMARC, SPF, and MAIL FROM domain records. All of these Status are now showing Unverified. You need to verify your domain here.
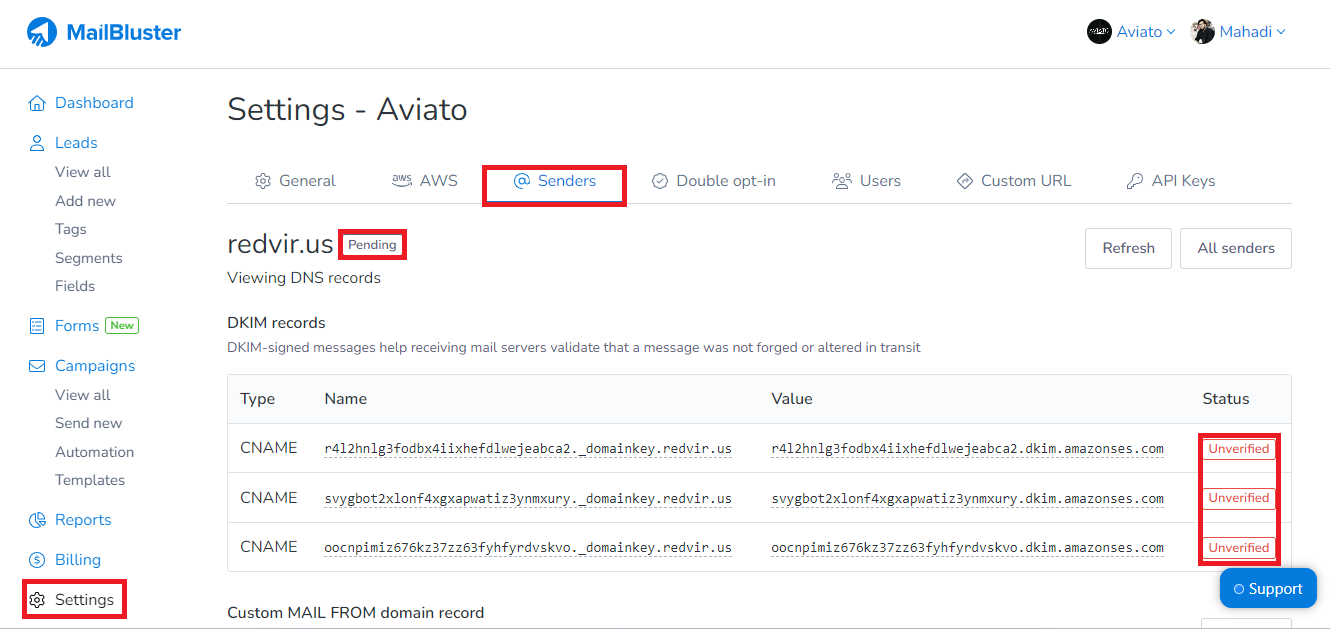
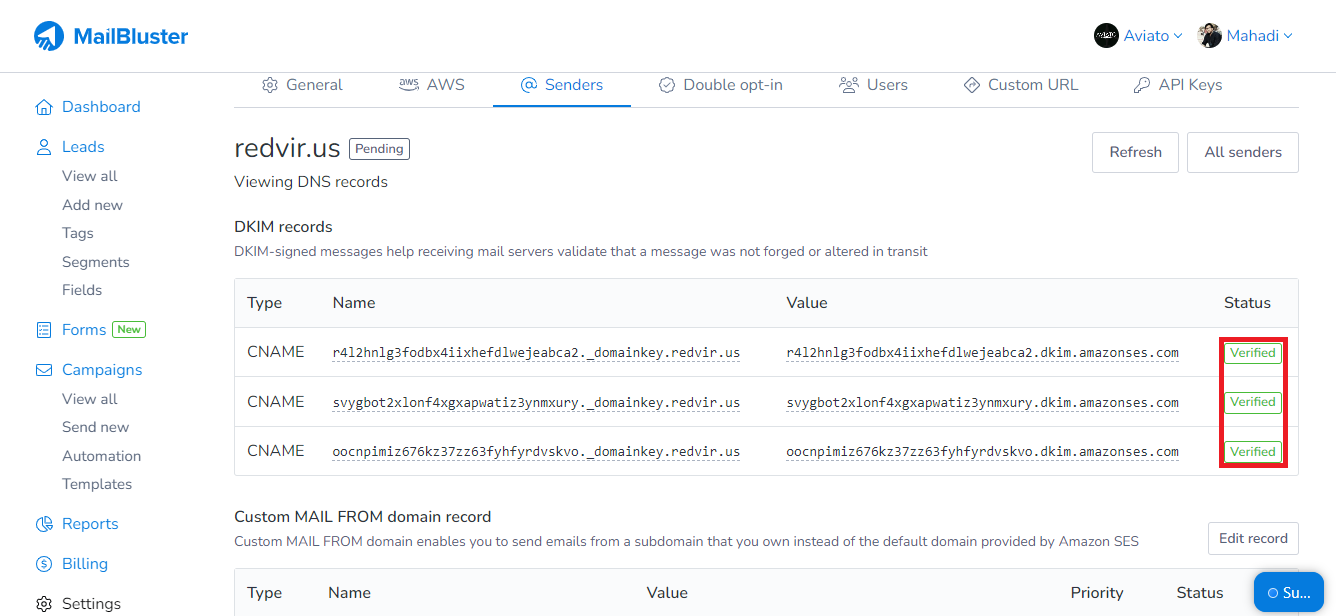
Step 5: Input DKIM records
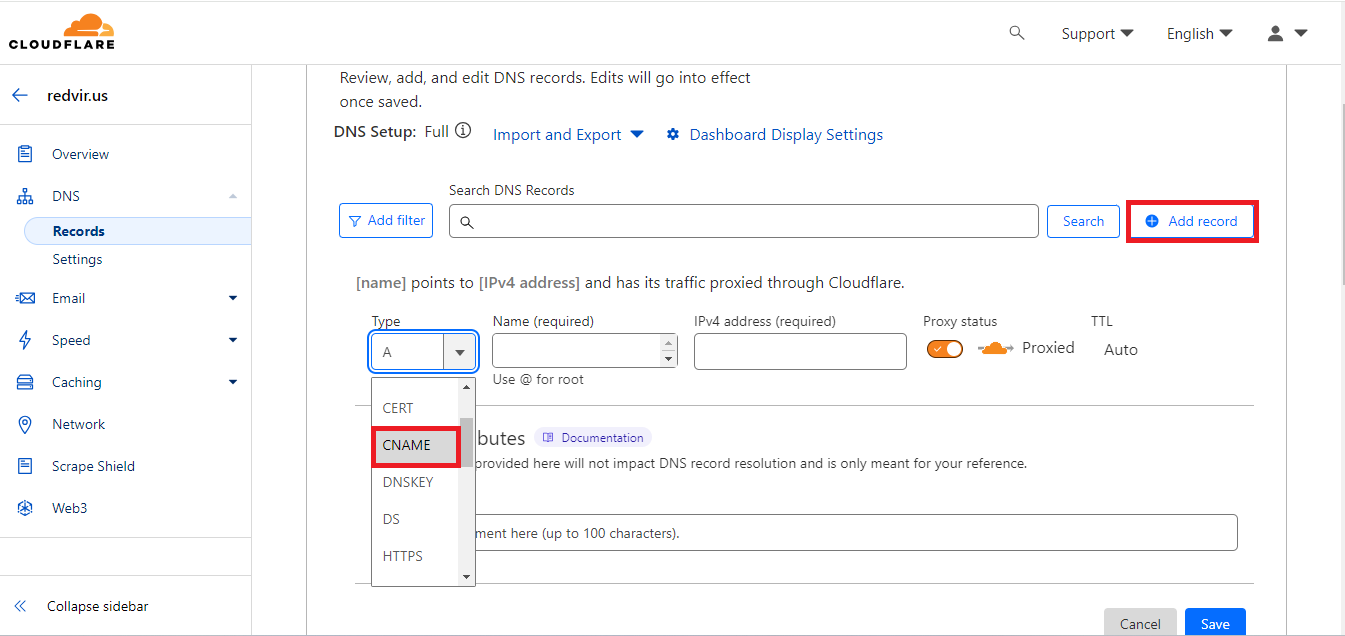
Copy the generated Name and Value under DKIM records. Go to your DNS management in CPANEL and click add records to start adding DKIM records. Select CNAME and input the copied Name to the DKIM records field, just like the image shown below. Set Proxy status to off and click Save.
DKIM-signed messages help to receive mail servers validate that a message was not forged or altered in transit.
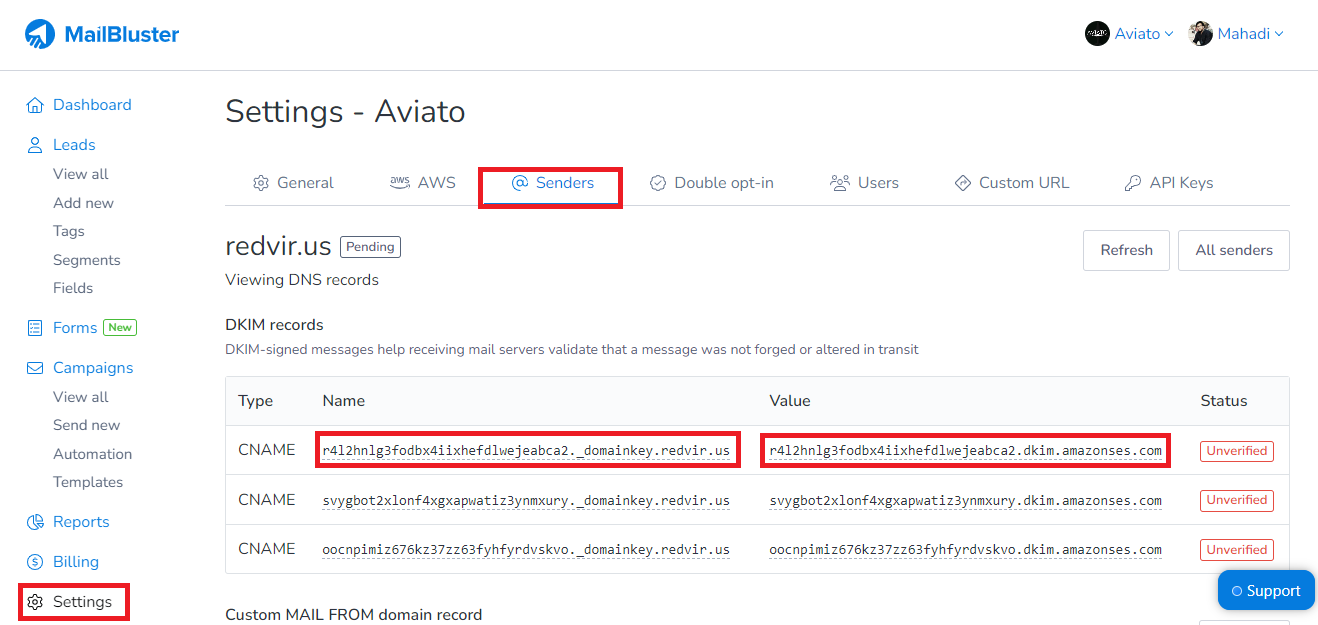
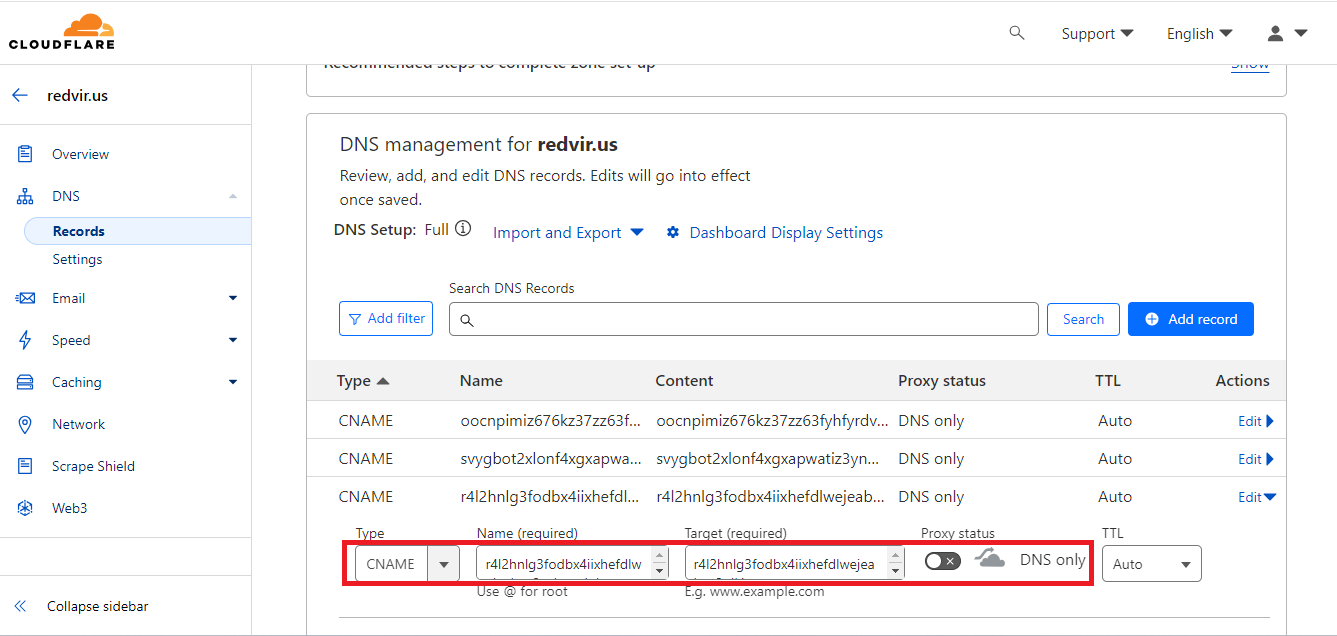
A CNAME record will be added to the DNS management. The other two CNAME fields need to be added in a similar way. Later, wait at most 48 hours to propagate or click refresh to see if it’s Verified.
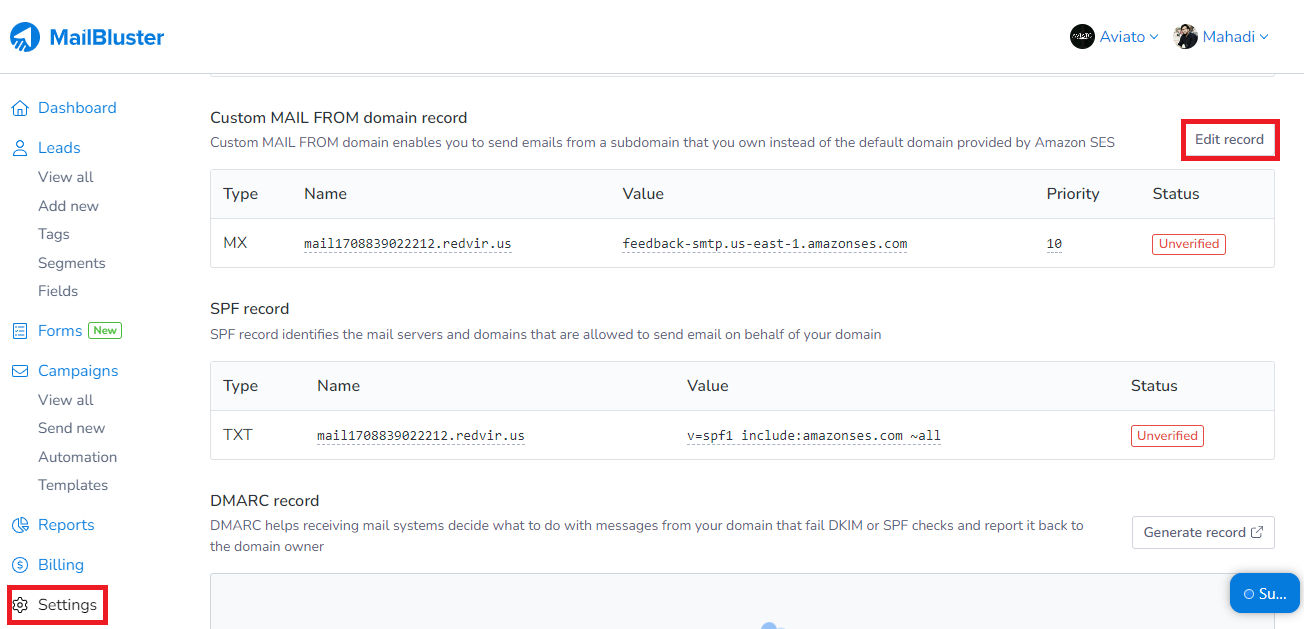
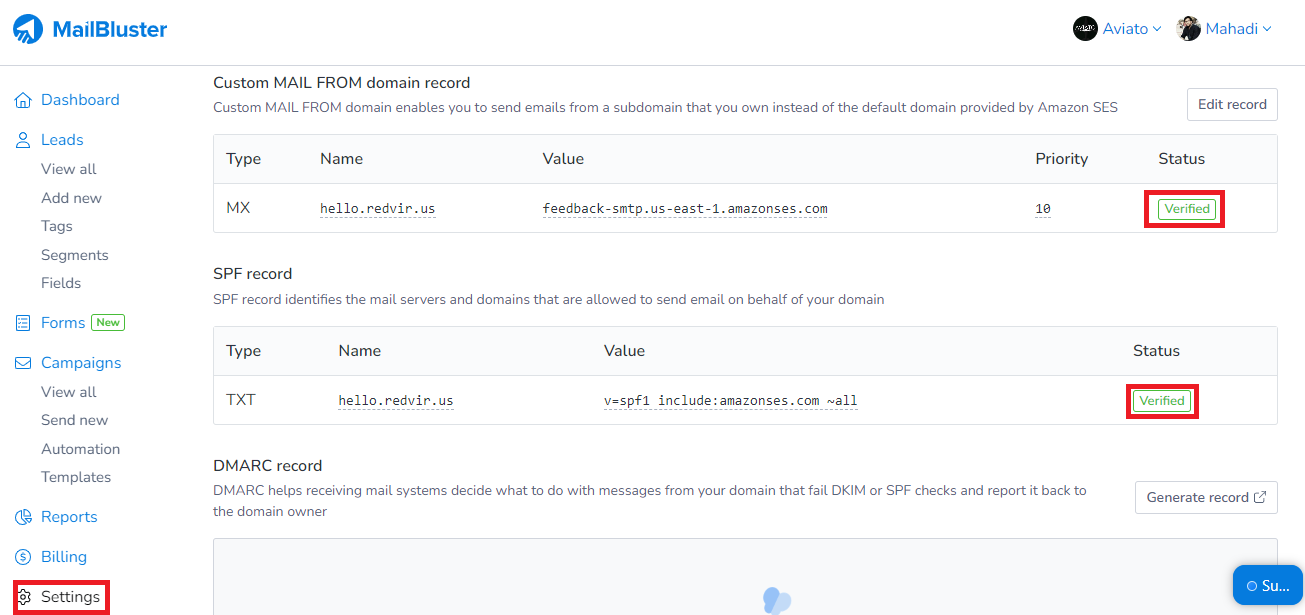
Step 6: Input Custom Mail From the domain record
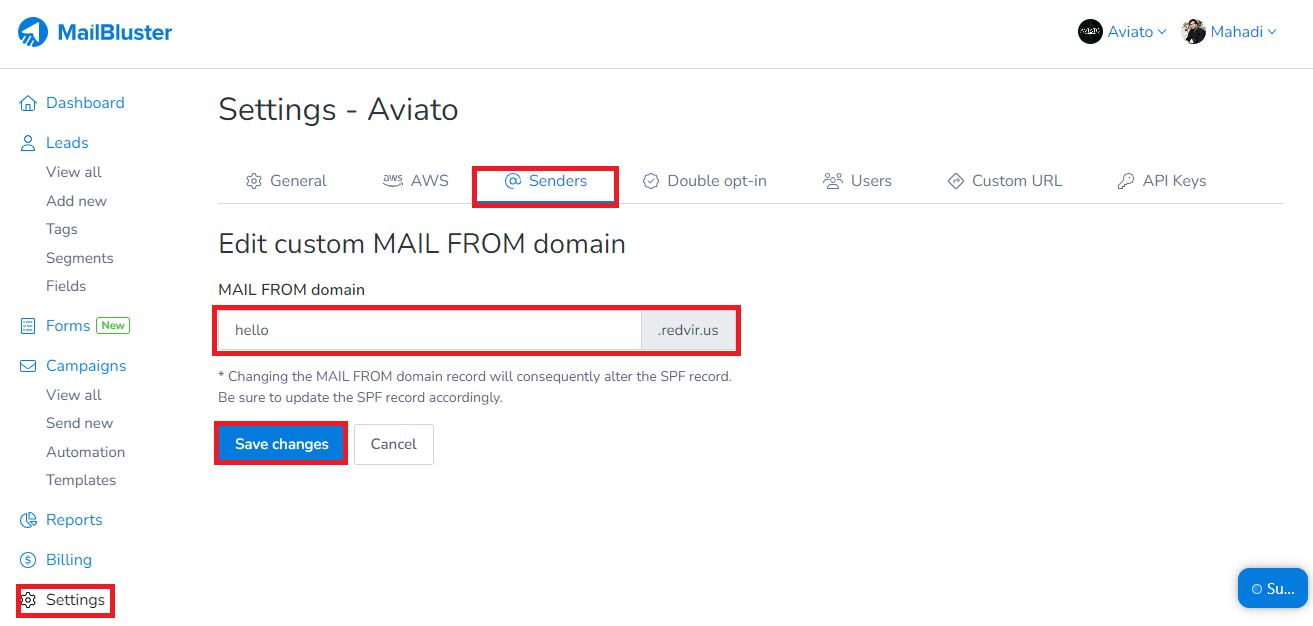
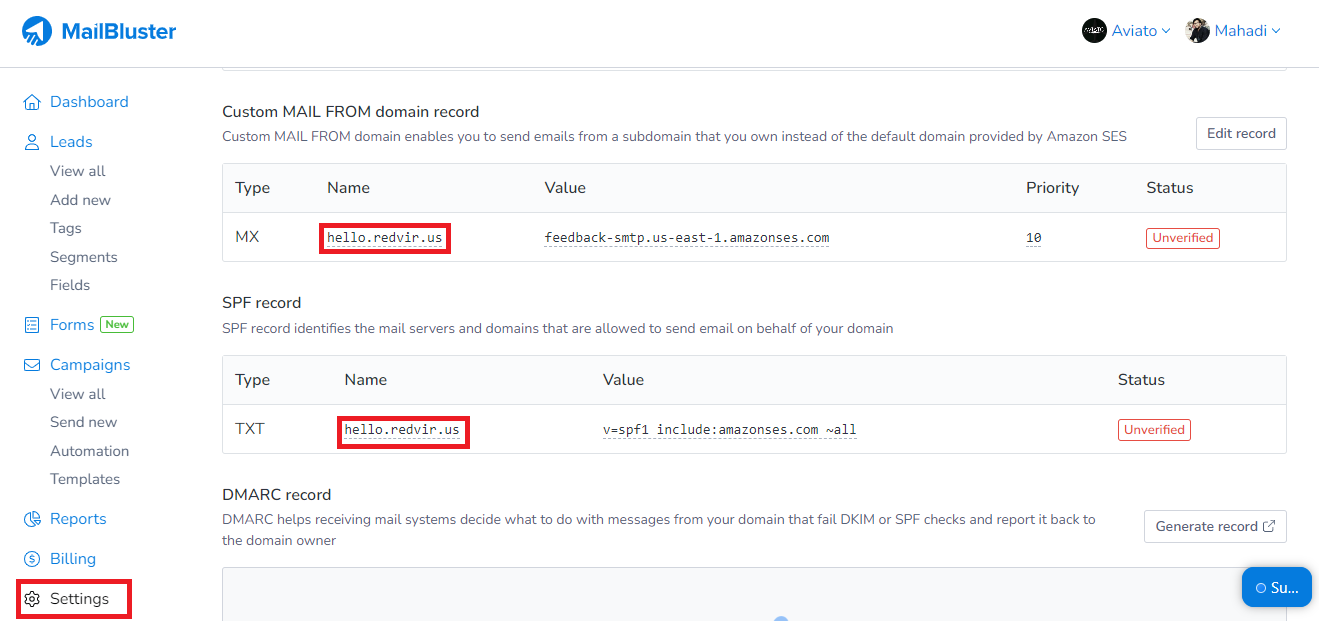
Here you need to add Custom Mail From the domain record. Navigate to the Edit record field. There you get the MAIL FROM domain field. Add your subdomain there and click Save change.
Custom MAIL FROM domain enables you to send emails from a subdomain that you own instead of the default domain provided by Amazon SES.
Your DNS records will be updated to new SPF and CUSTOM MAIL FROM domain records.
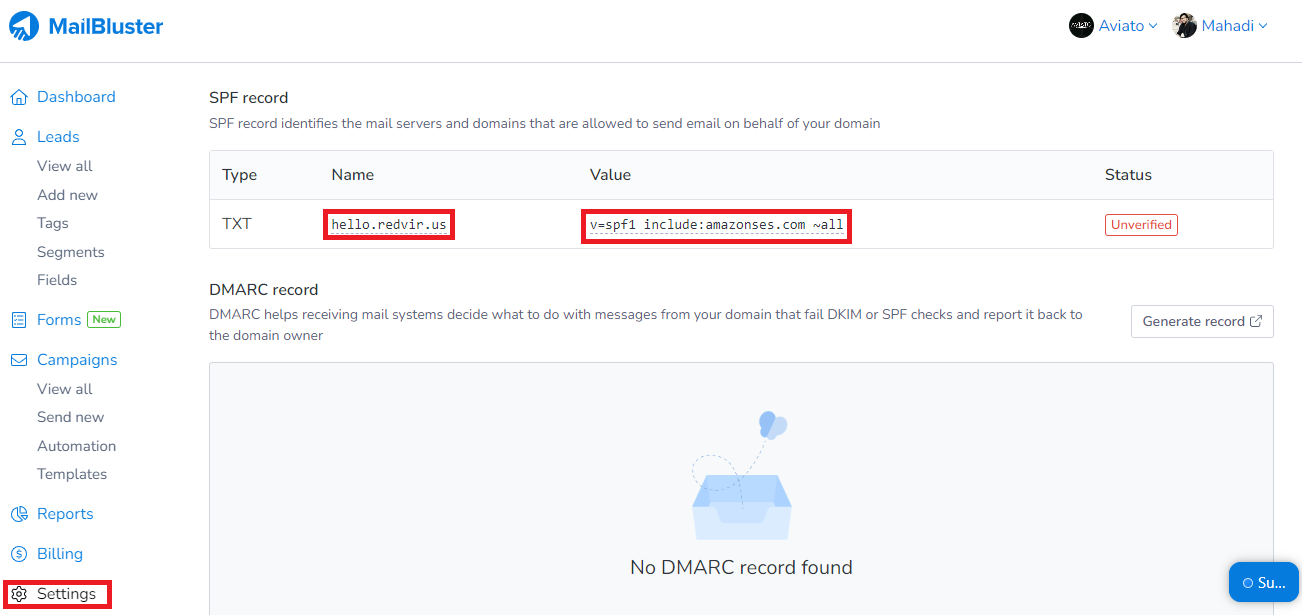
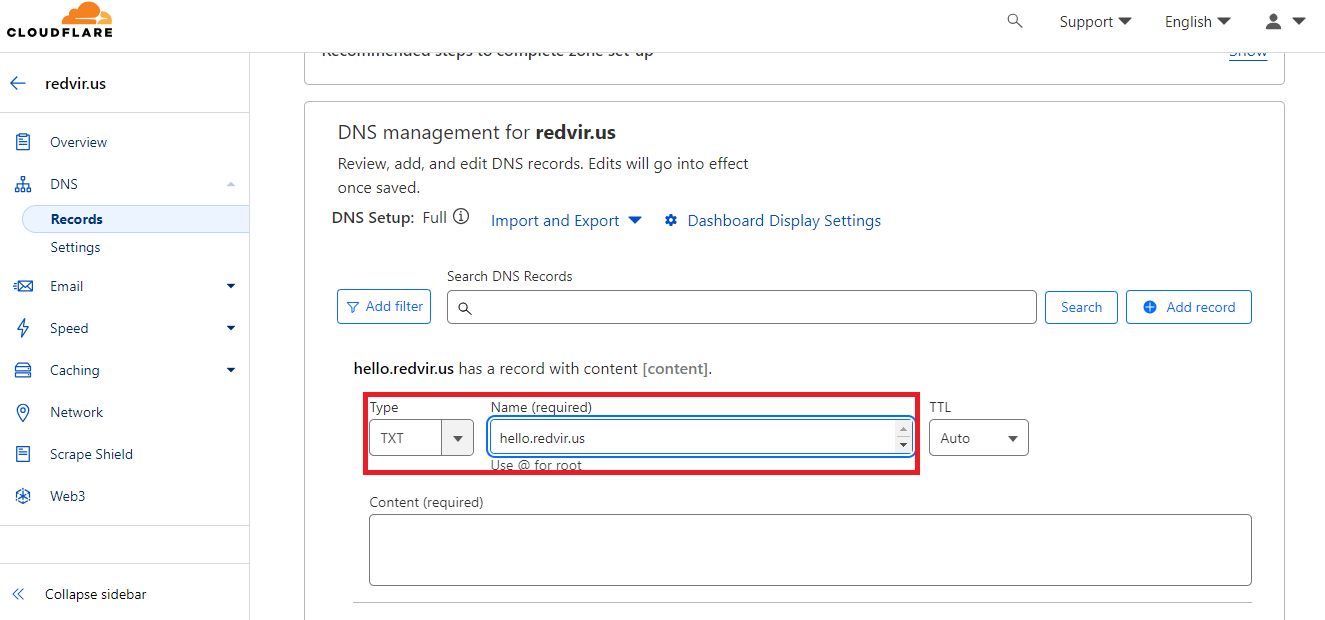
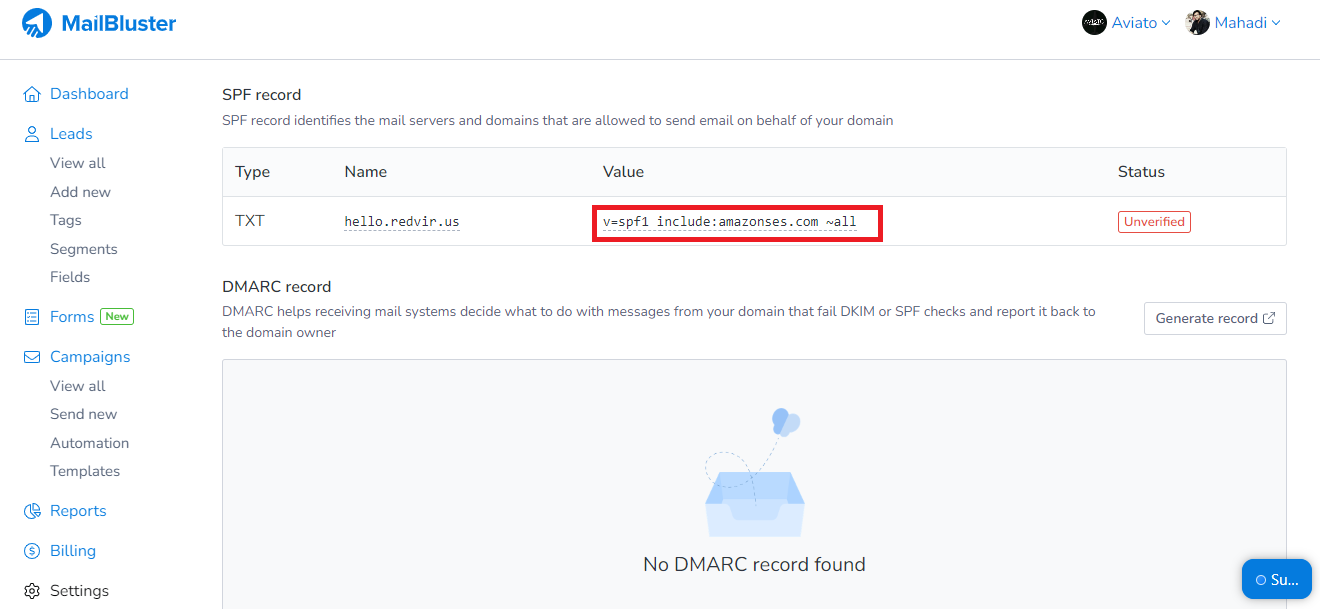
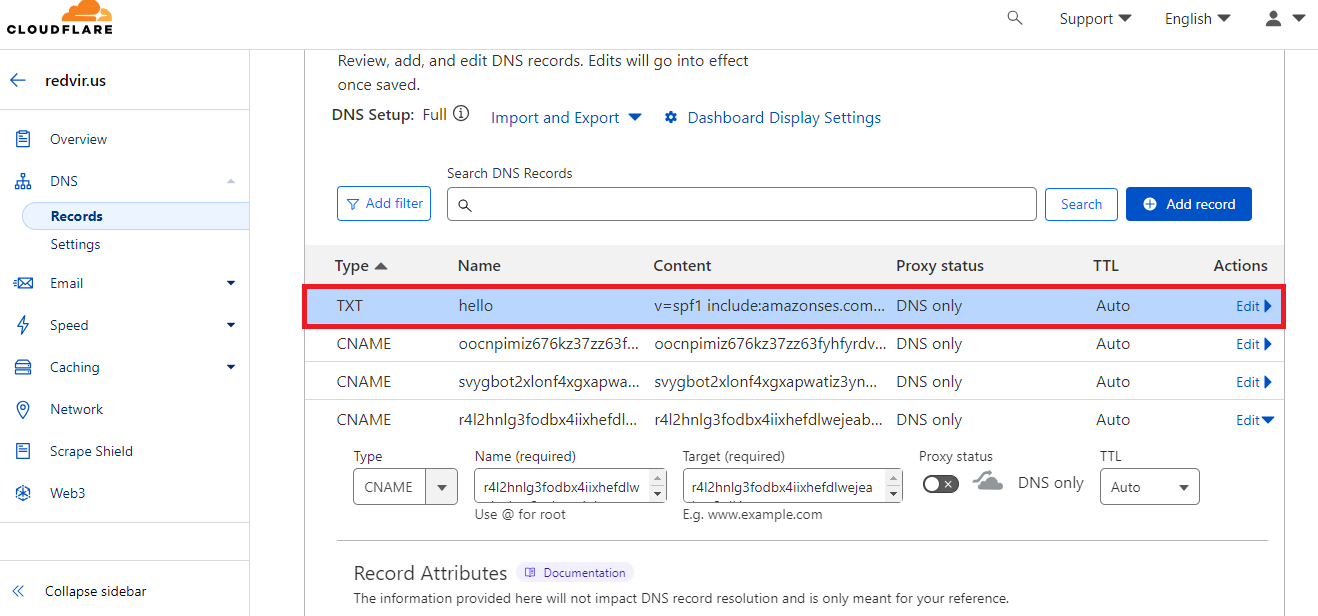
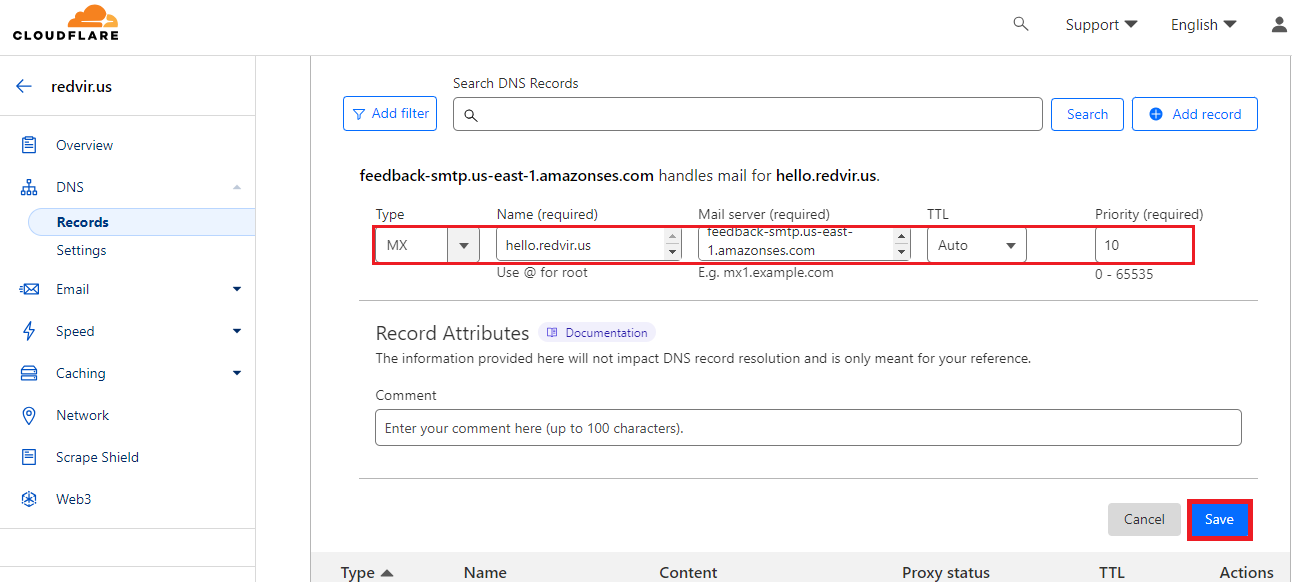
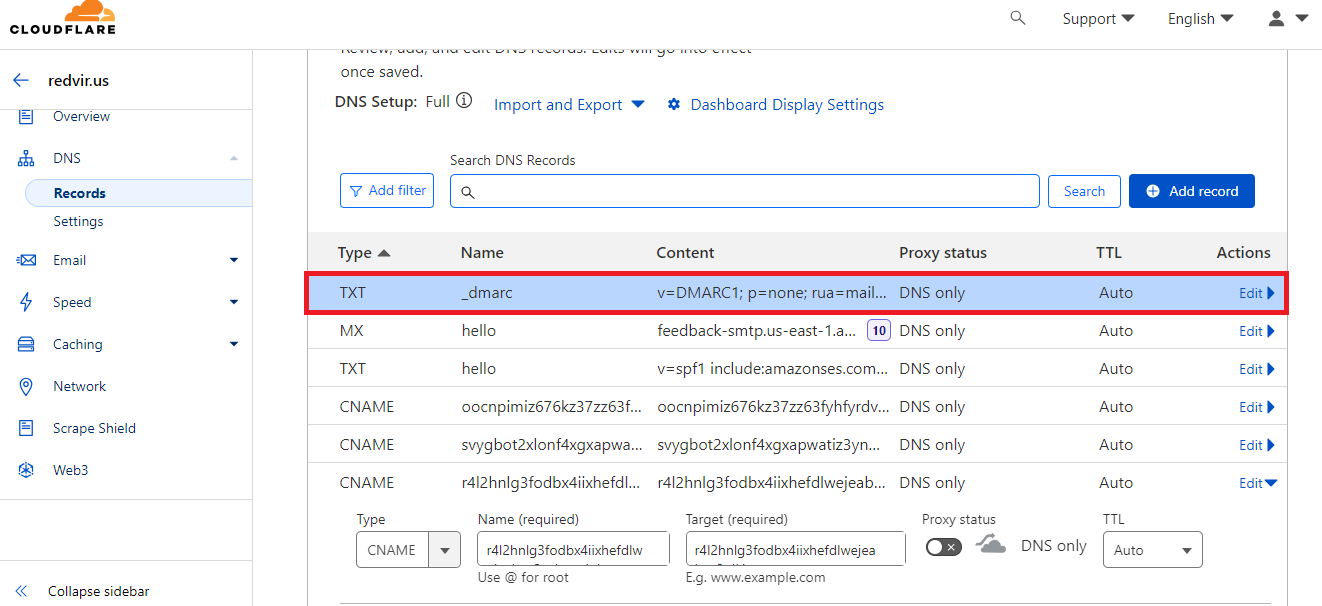
Step 7: Input SPF records
Observe your updated SPF records and copy the Name to input the value to the DNS management. Opt to the add record and Type dropdown menu, and select TXT. Copy the Name, Value field and paste it to the DNS management editor. Click Save. Confirm the green Verified section.
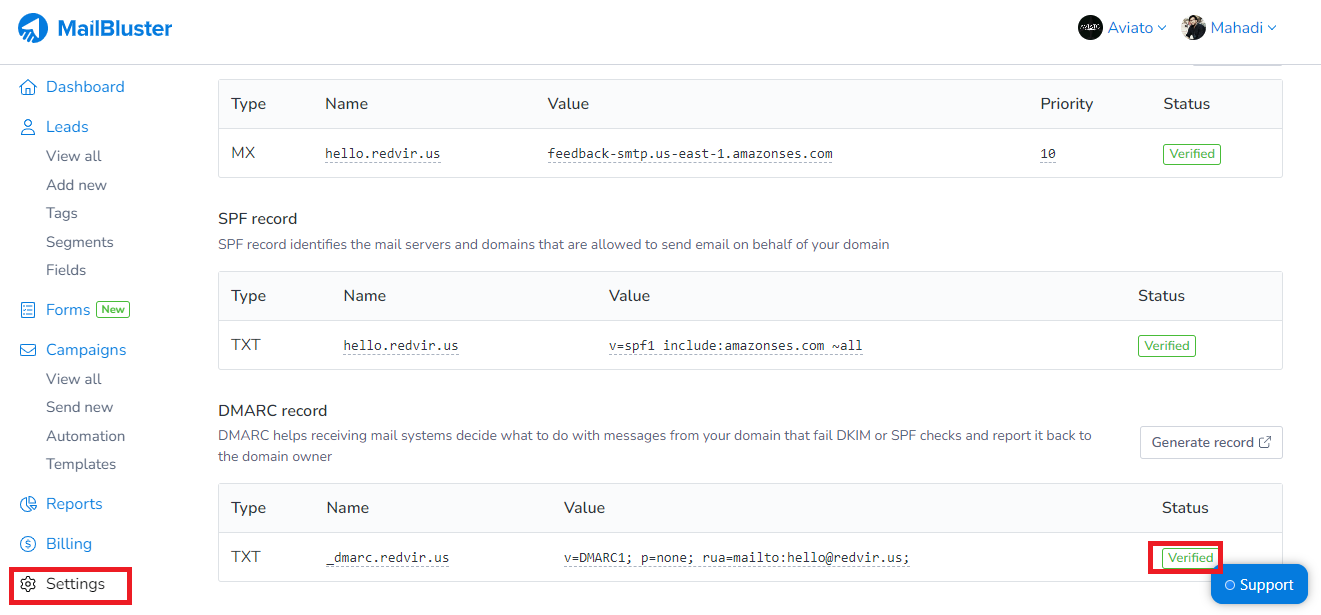
SPF record identifies the mail servers and domains that are allowed to send an email on behalf of your domain.
See the steps in the images below:
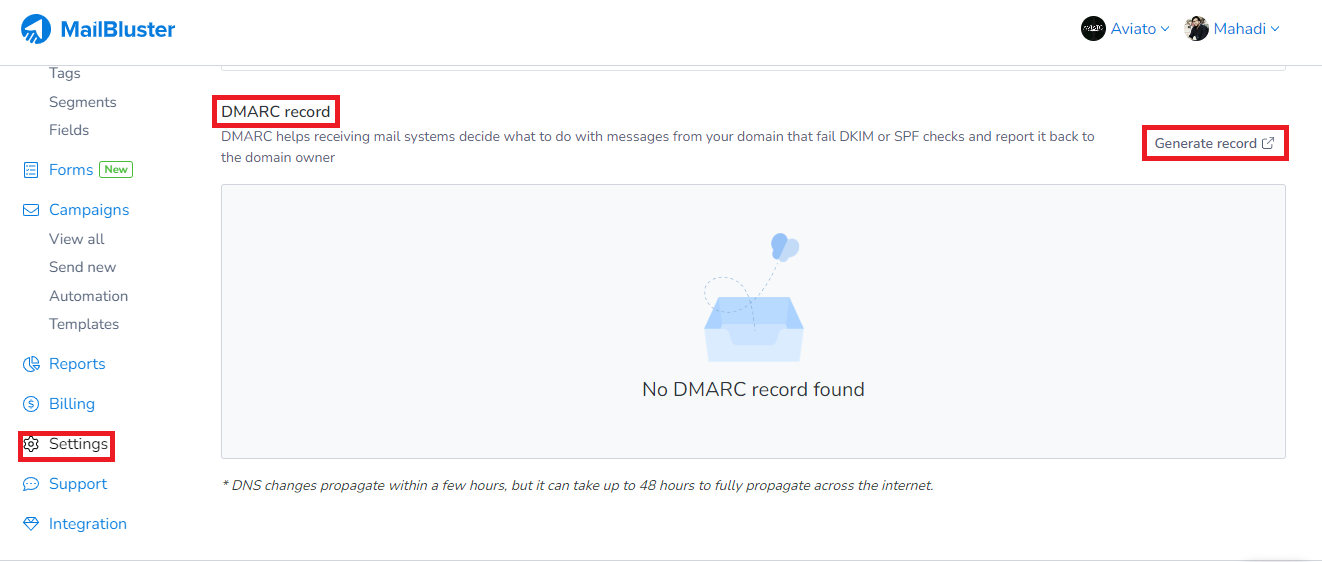
Step 8: Generate DMARC records
DMARC records require you to generate records. Don’t worry! MailBluster takes you to the authentic DMARC record generator. Click on the Generate record in DMARC record section.
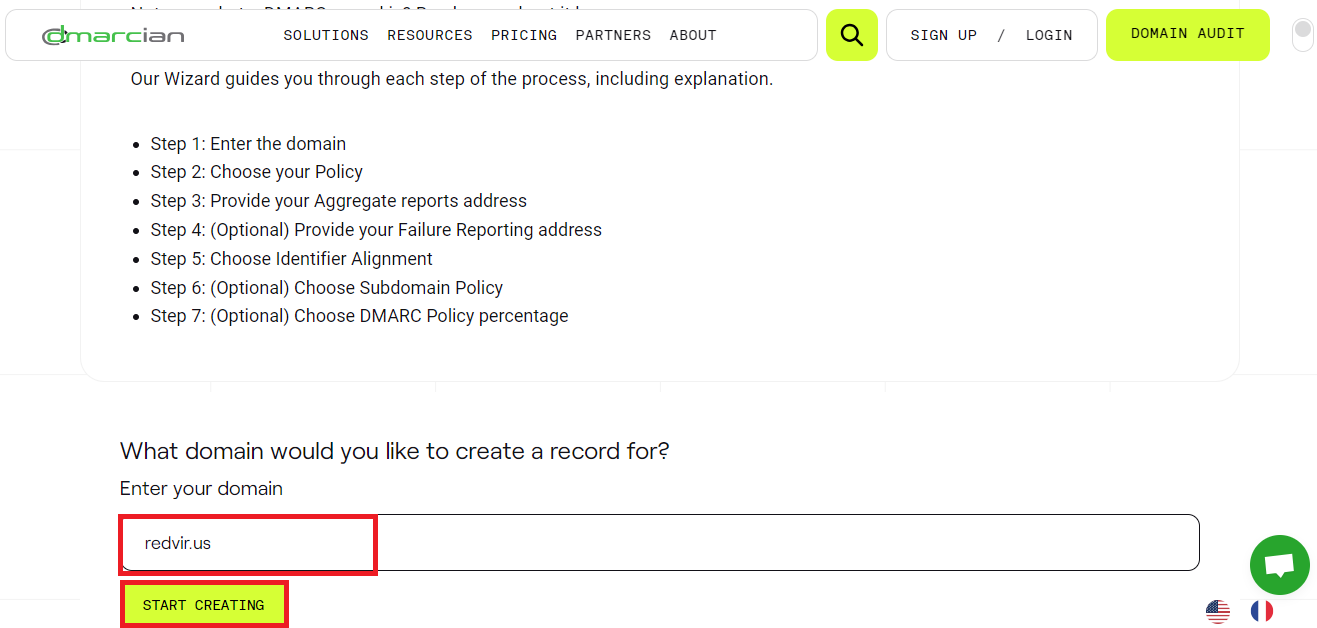
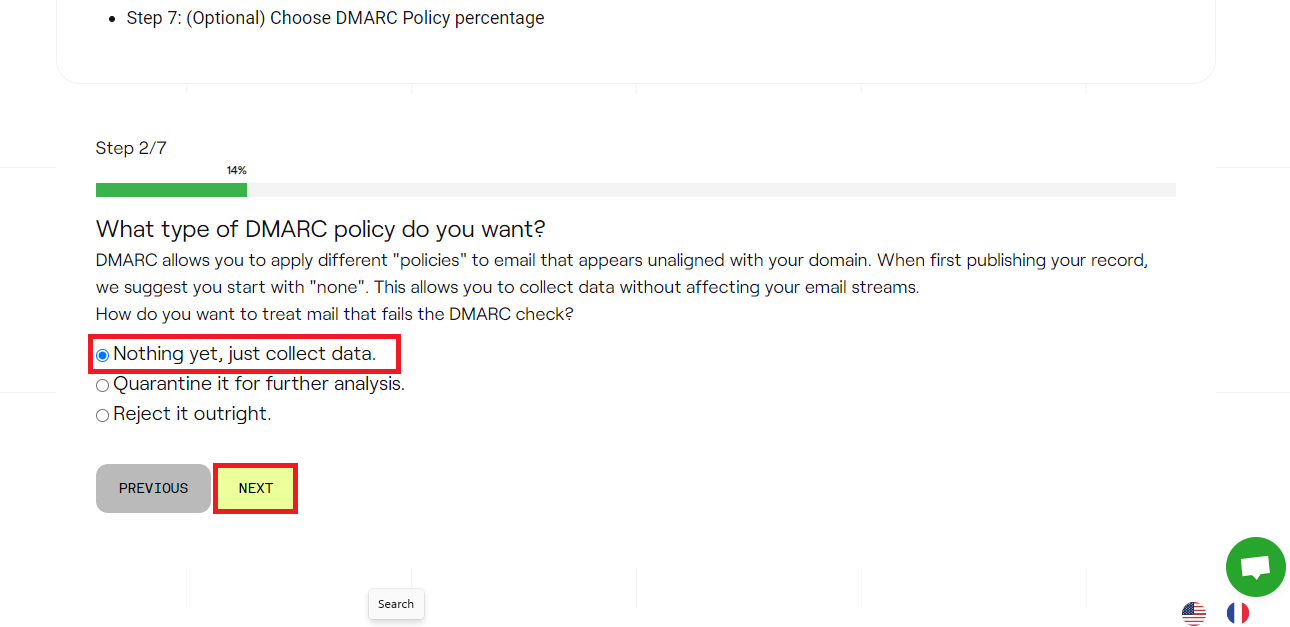
Enter your domain in the blank field on step one and click Start Creating. In step two you need to assign DMARC policy, select Nothing yet, just collect data and click Next.
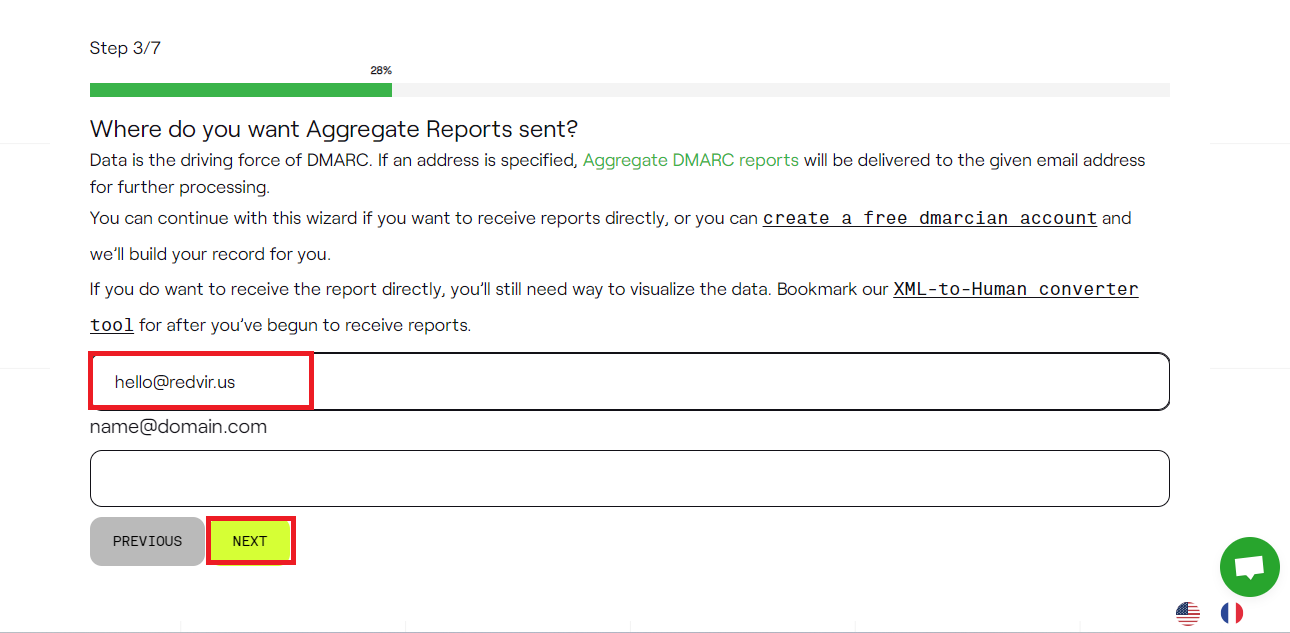
For aggregate reports sending, you need to specify an email address. In step 3, input the email address on the first blank field, leave the second one blank and click Next.
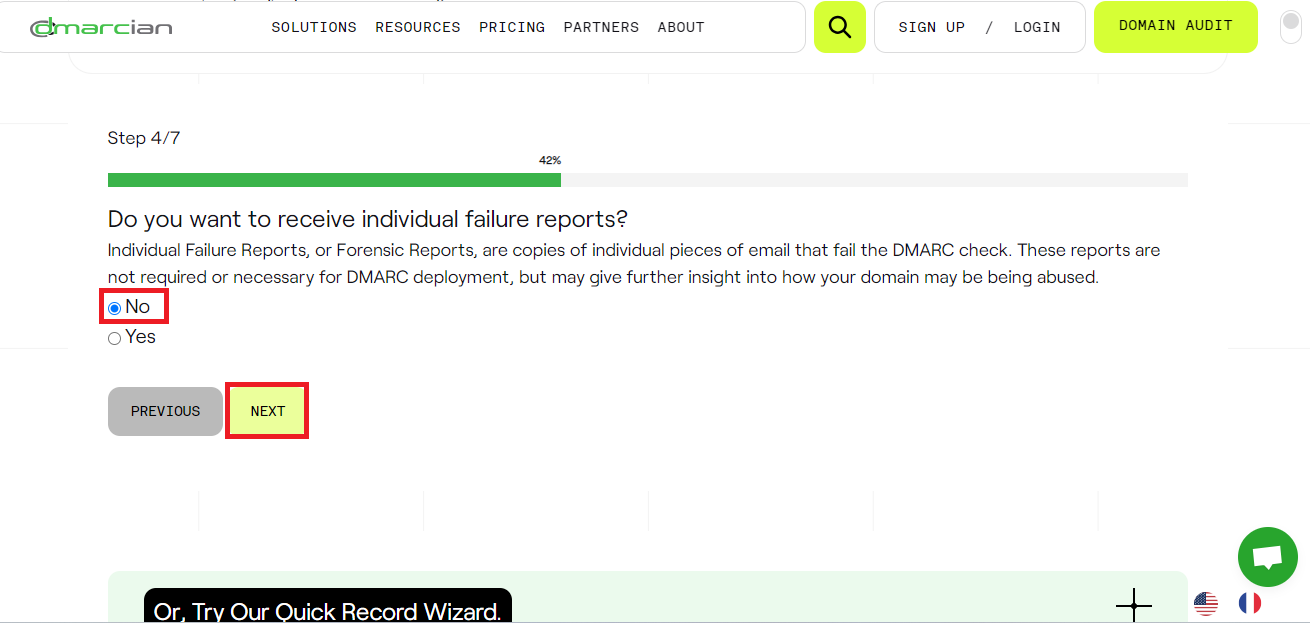
If you want individual failure reports, you can check the field here. But we suggest you go for the No option. Click Next.
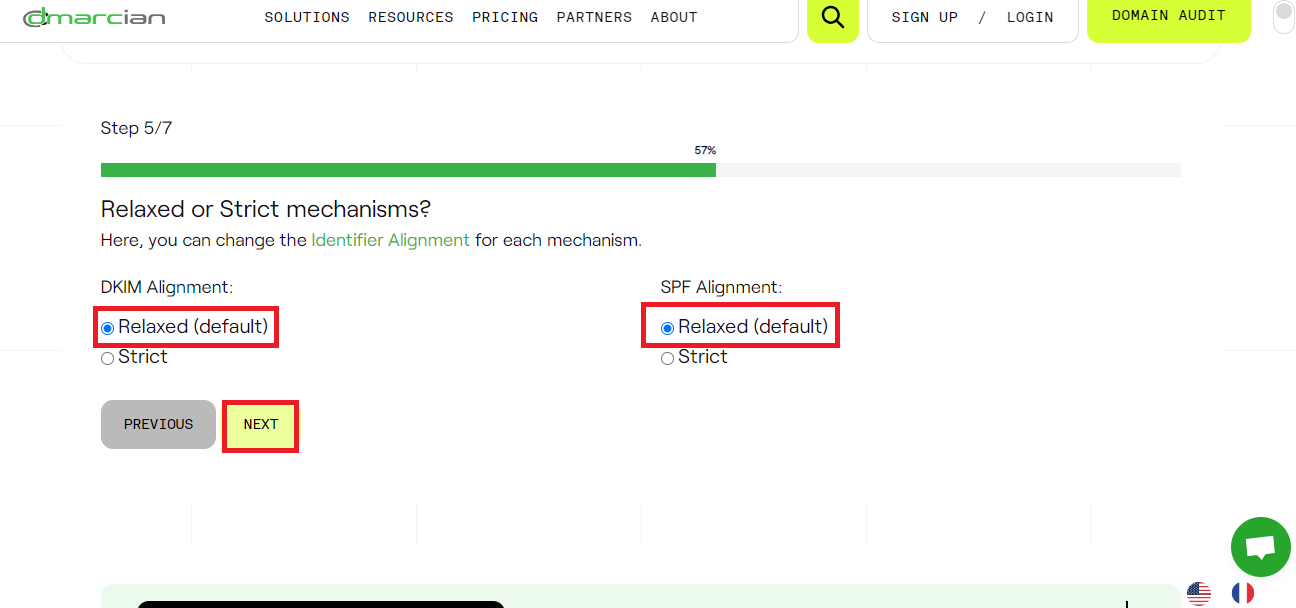
Here you need to assign the Identifier Alignment for DKIM and SPF. Select the default Relaxed option for both alignments.
If you want to apply a different policy for the subdomain, you can use this option for further policy maintenance. We suggest you click No. Click Next.
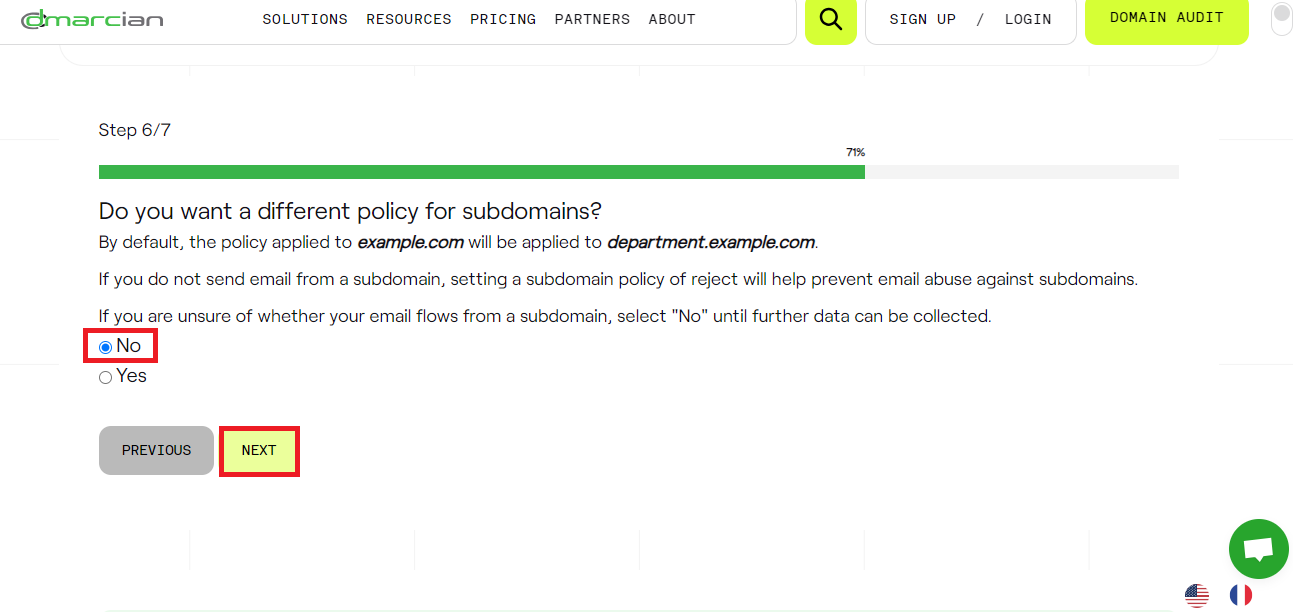
You can specify how much or what percentage of DMARC policy will be applied to the messages. We suggest you input 100. Click Create Record.
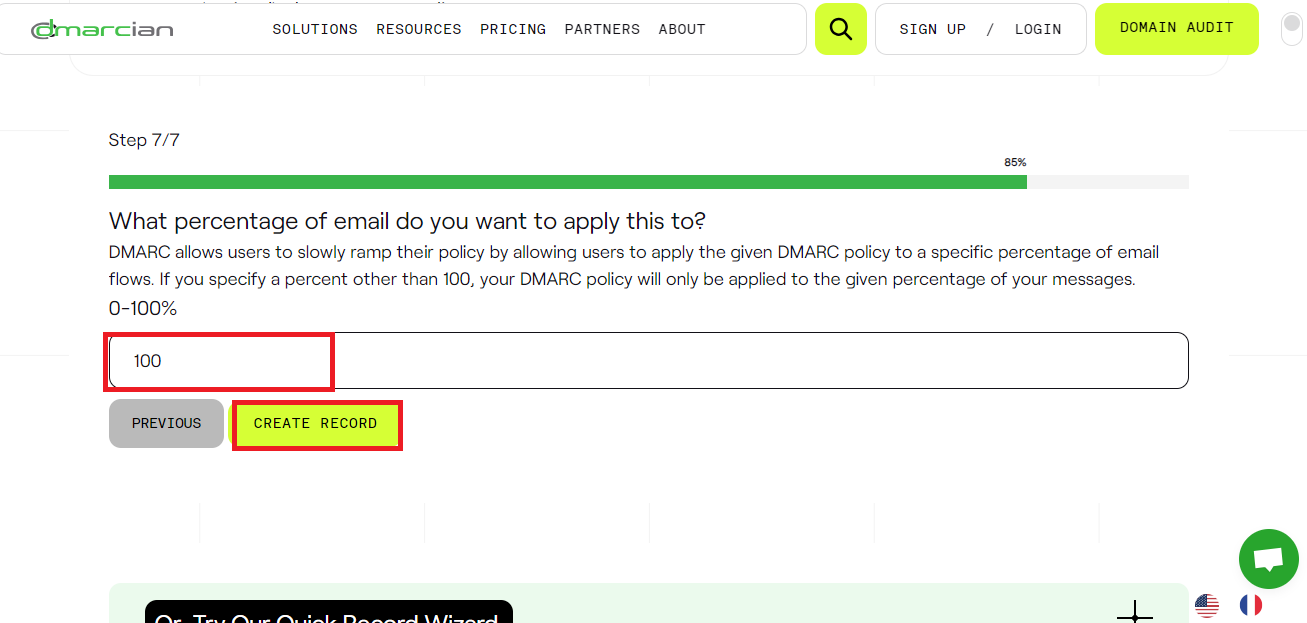
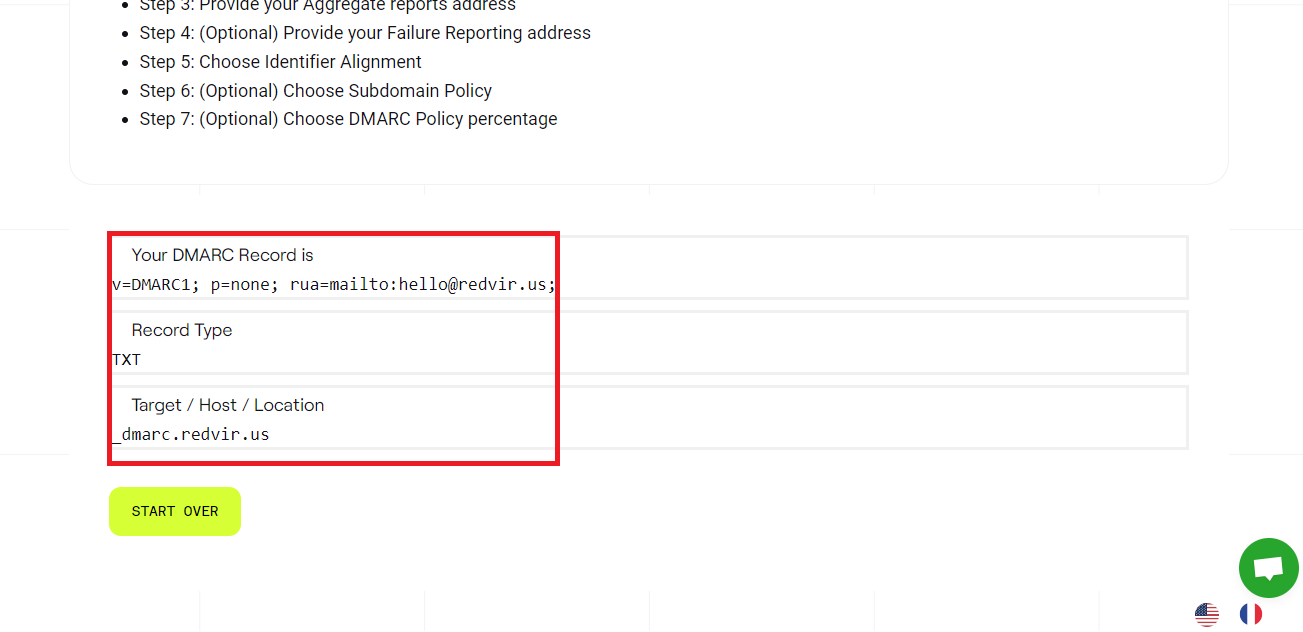
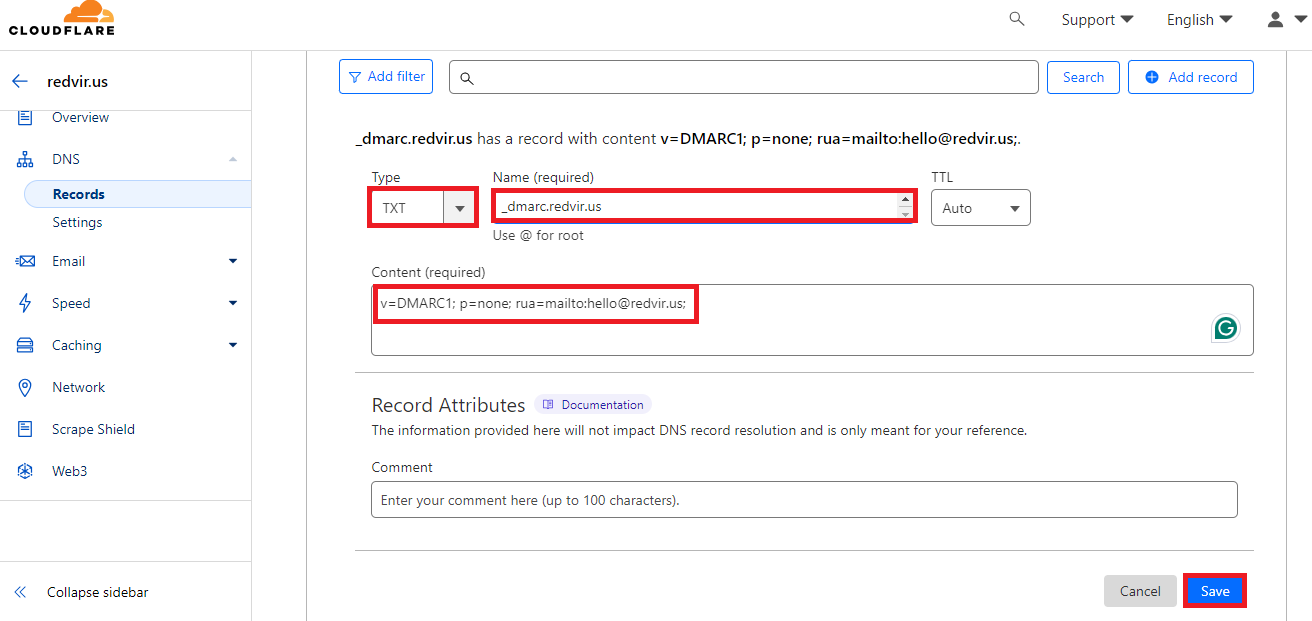
Next, your record will be generated. Copy these codes and input them to the DNS management by creating a New Record. DMARC records will be added to the DNS management.
Go to your MailBluster Sender records and Click Refresh to see if it shows Verified or wait for 48 hours to change it to Verified.
2Email Verification
Need an email address to be verified? No worries!
MailBluster includes seamless email address verification for the senders. This addition is a convenient choice for users as you don’t need to go to the AWS dashboard. So, without further ado, let’s move on to the email verification process!
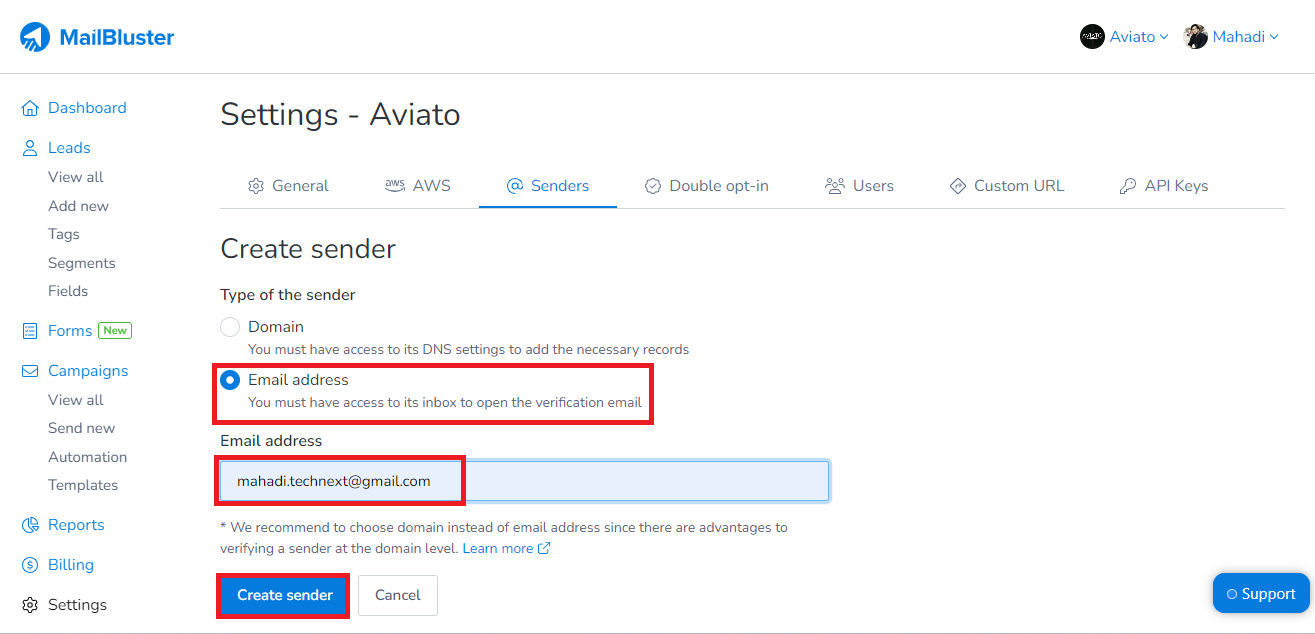
Step 1: Add your Email address
First of all, go to the Senders section and click Create New. Later, you get the Create Sender dashboard. Select the Email address, and make sure you have access to the mailbox while adding email. Type your email and click Create Sender.
We recommend choosing domain instead of email address since there are advantages to verifying a sender at domain level.
Step 2: Read Instructions
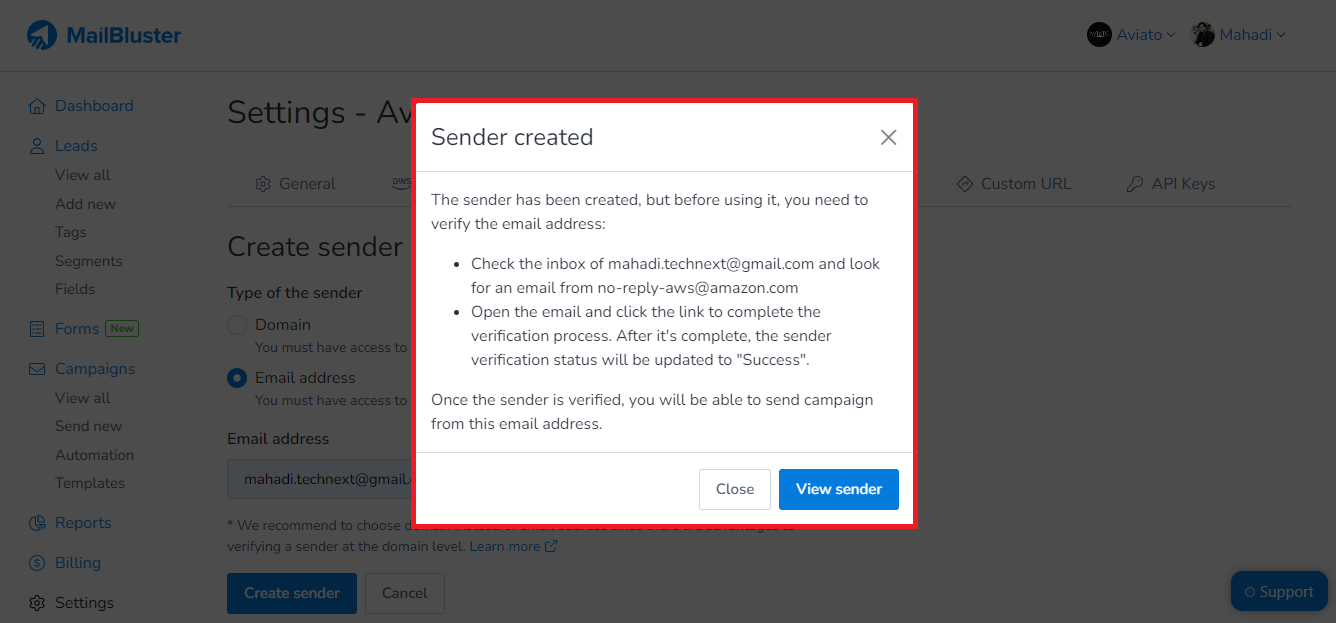
Next up, you see a pop-up appear with instructions. Read the instructions and verify your email address according to it. Later, click View Sender. Now you see, your email address has been added, and it’s on pending status for verification.
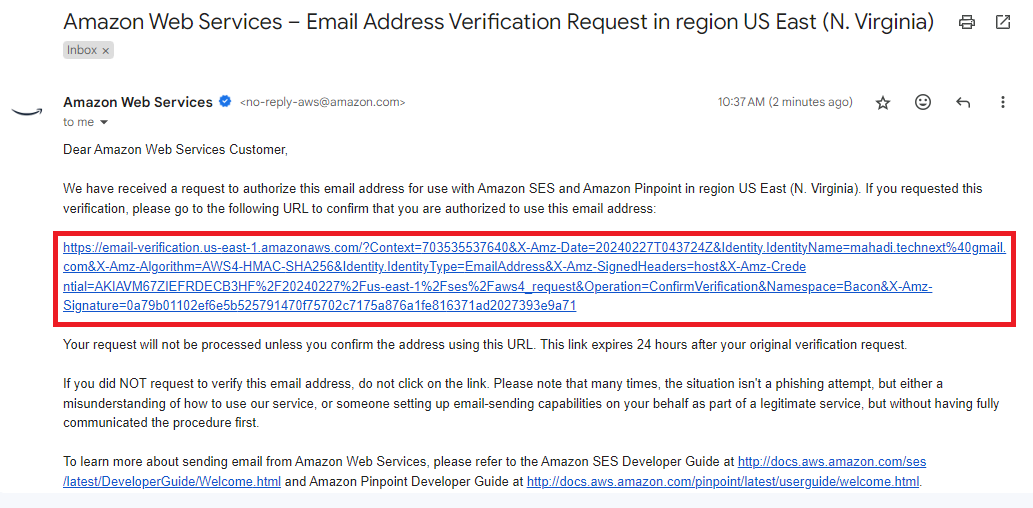
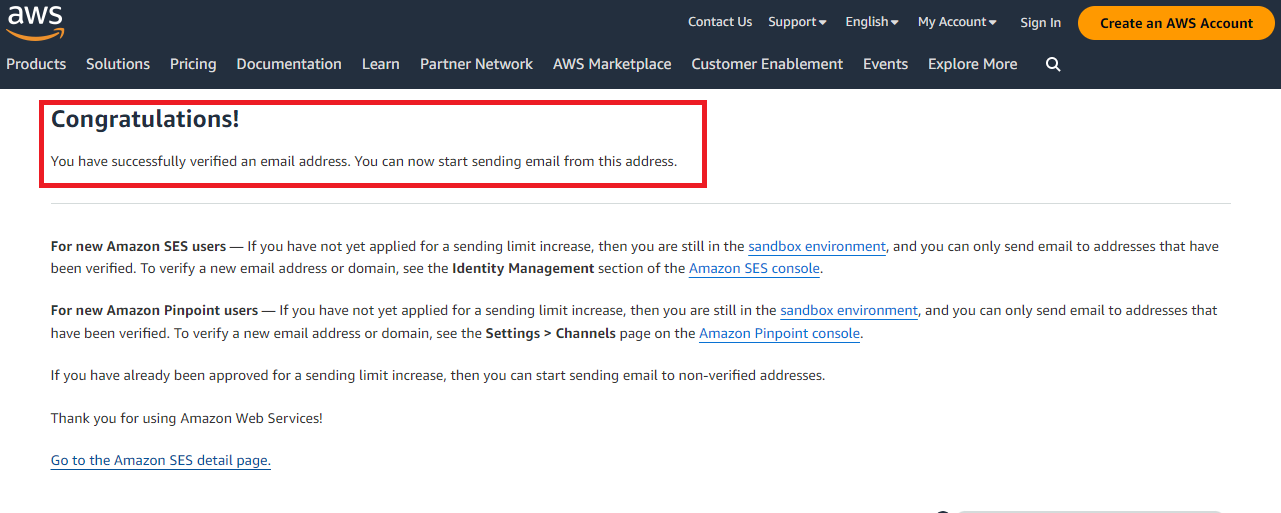
Step 3: Verify email address
Go to your email inbox and see if you receive the verification link from [email protected]. Click the blue verification link, and it brings you to the AWS page and confirms your verification.
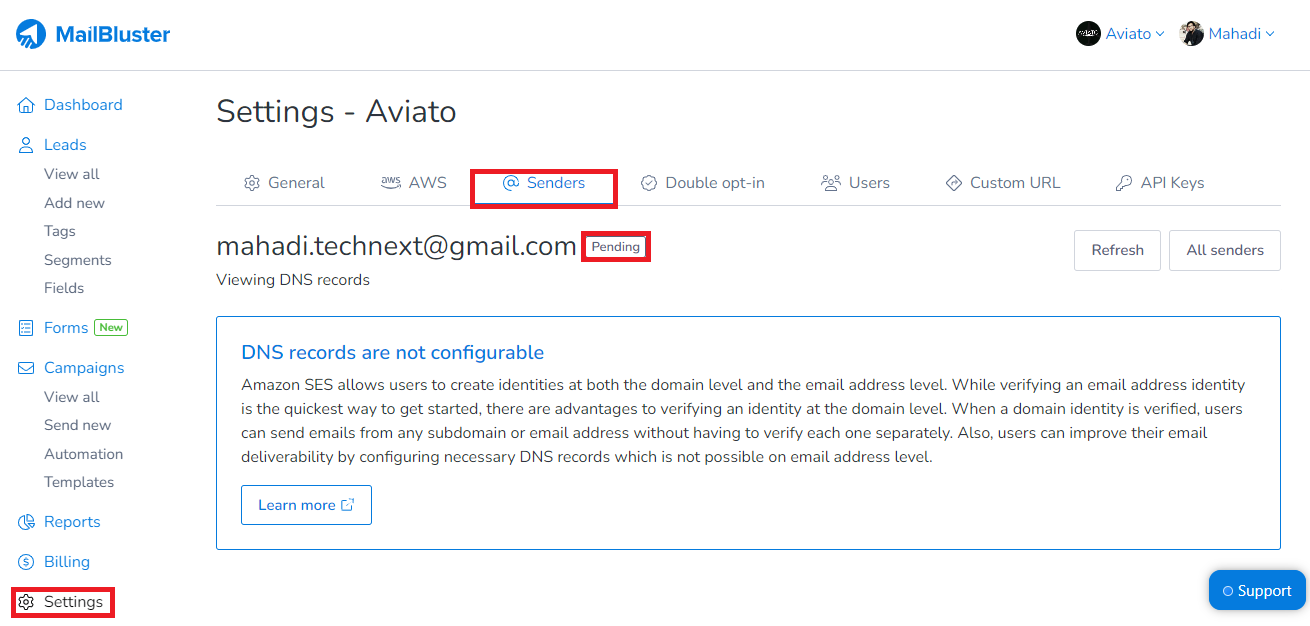
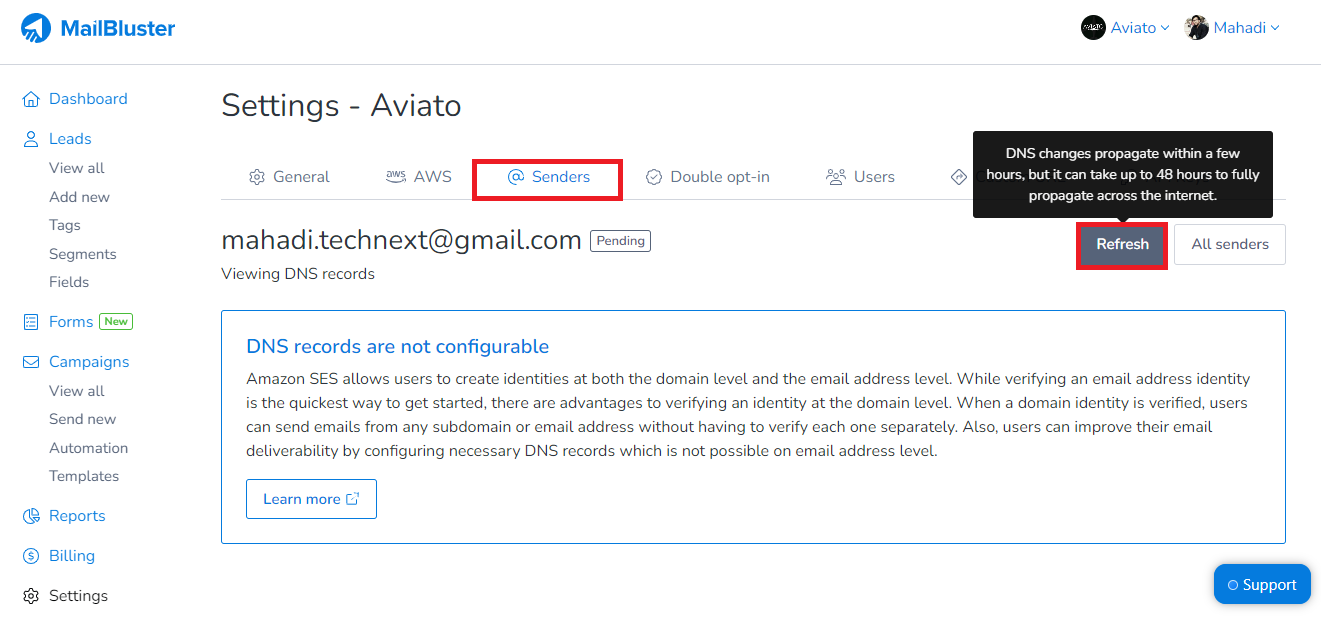
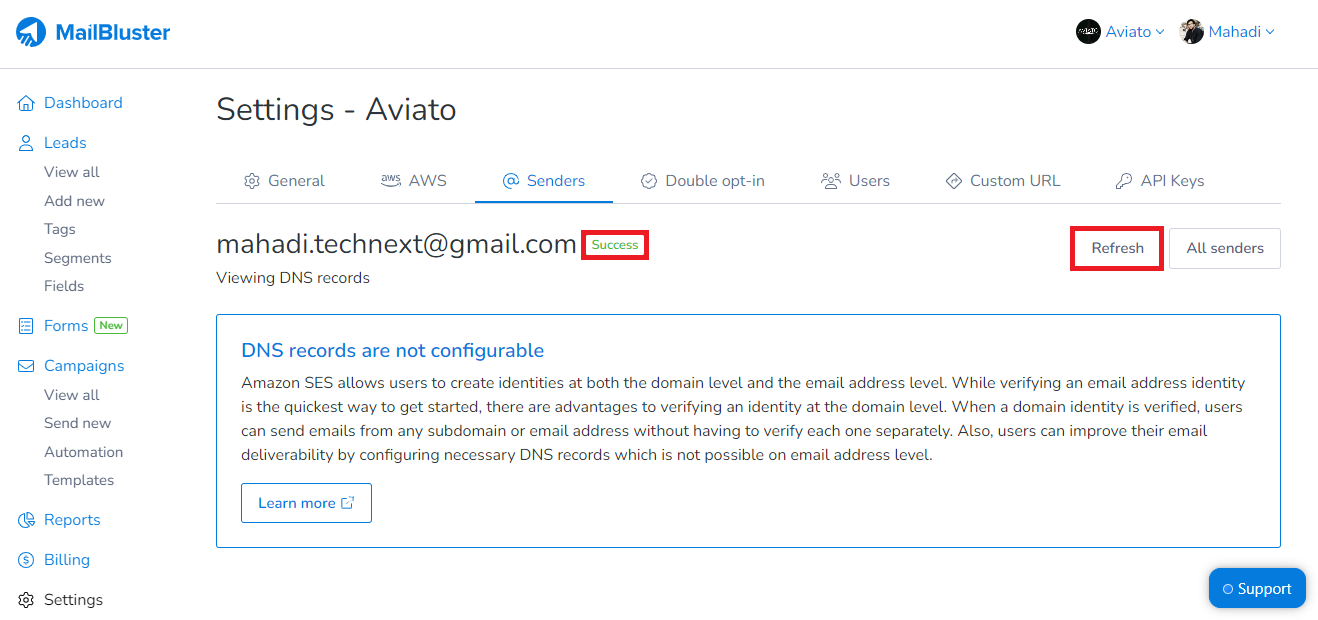
Step 4: Check the verification status
Go to MailBluster’s Sender email marketing feature and check the verification status. Click Refresh, It will change to Success. It may take up to 48 hours for the verification process to finish and show Verified.
You can check the video instructions below for this step-by-step process. Both Domain and email marketing sender verification are intuitively explained in this video.
Common Questions about Email Sender Features
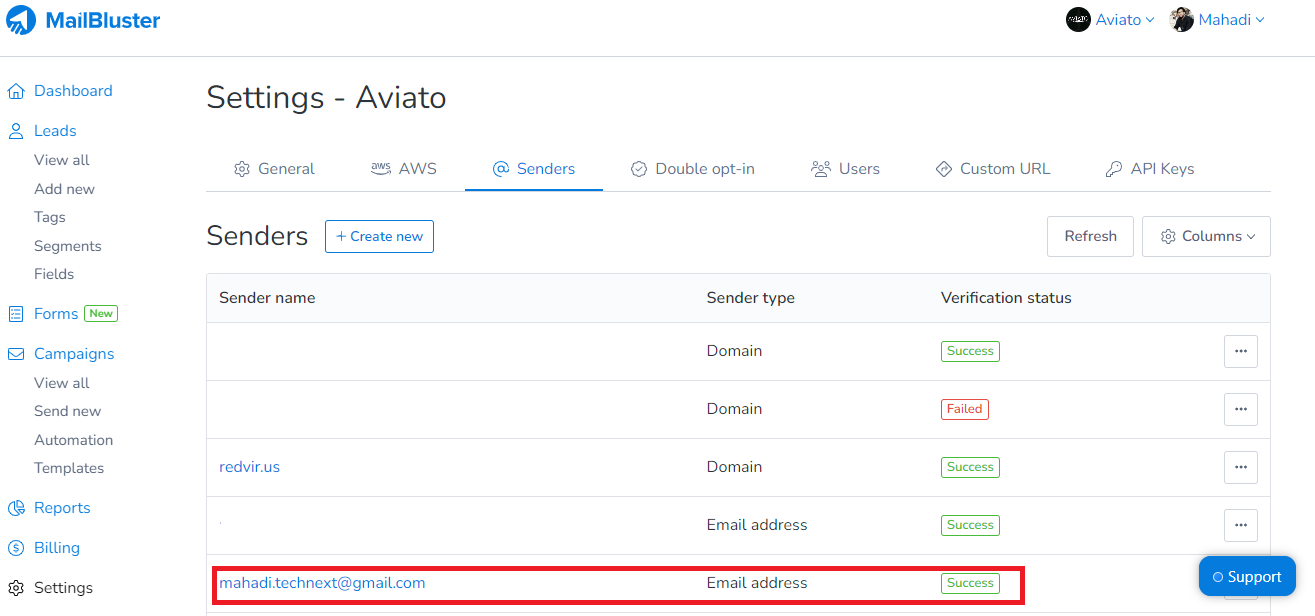
1How many email addresses can I add to the sender feature?
Ans: You can add unlimited email addresses to the Senders section, but your email sending includes up to 3k limitation if you are a free email sender. Upgrade to the Unlimited plan to send unlimited emails.
2Do I need to verify the email address from the same domain?
Ans: Simply No. If you verify your domain, you don’t need to verify the email address under that domain.
Conclusion
The email sender feature in MailBluster includes convenient options to verify your domain or email address. While other bulk email senders may pose challenges, MailBluster stands out with its effortless verification process for batch email sending.
This comprehensive, step-by-step procedure covers domain or email verification and guides you using the @Senders feature in MailBluster.So, entrust your email campaign to MailBluster right now!