The term “email images” is precise – Using images along with other elements in an email gives the email an engaging look. Adding appropriate images to an email template is like adding butter to popcorn. The image impression can boost your simple text-based email message communication to a new level. According to a research article by Snov.io Labs, two-thirds of people say they like emails that usually contain images. Therefore, considering the imagery approach in your email marketing is undoubtedly a wise idea.
Types of image formats in email
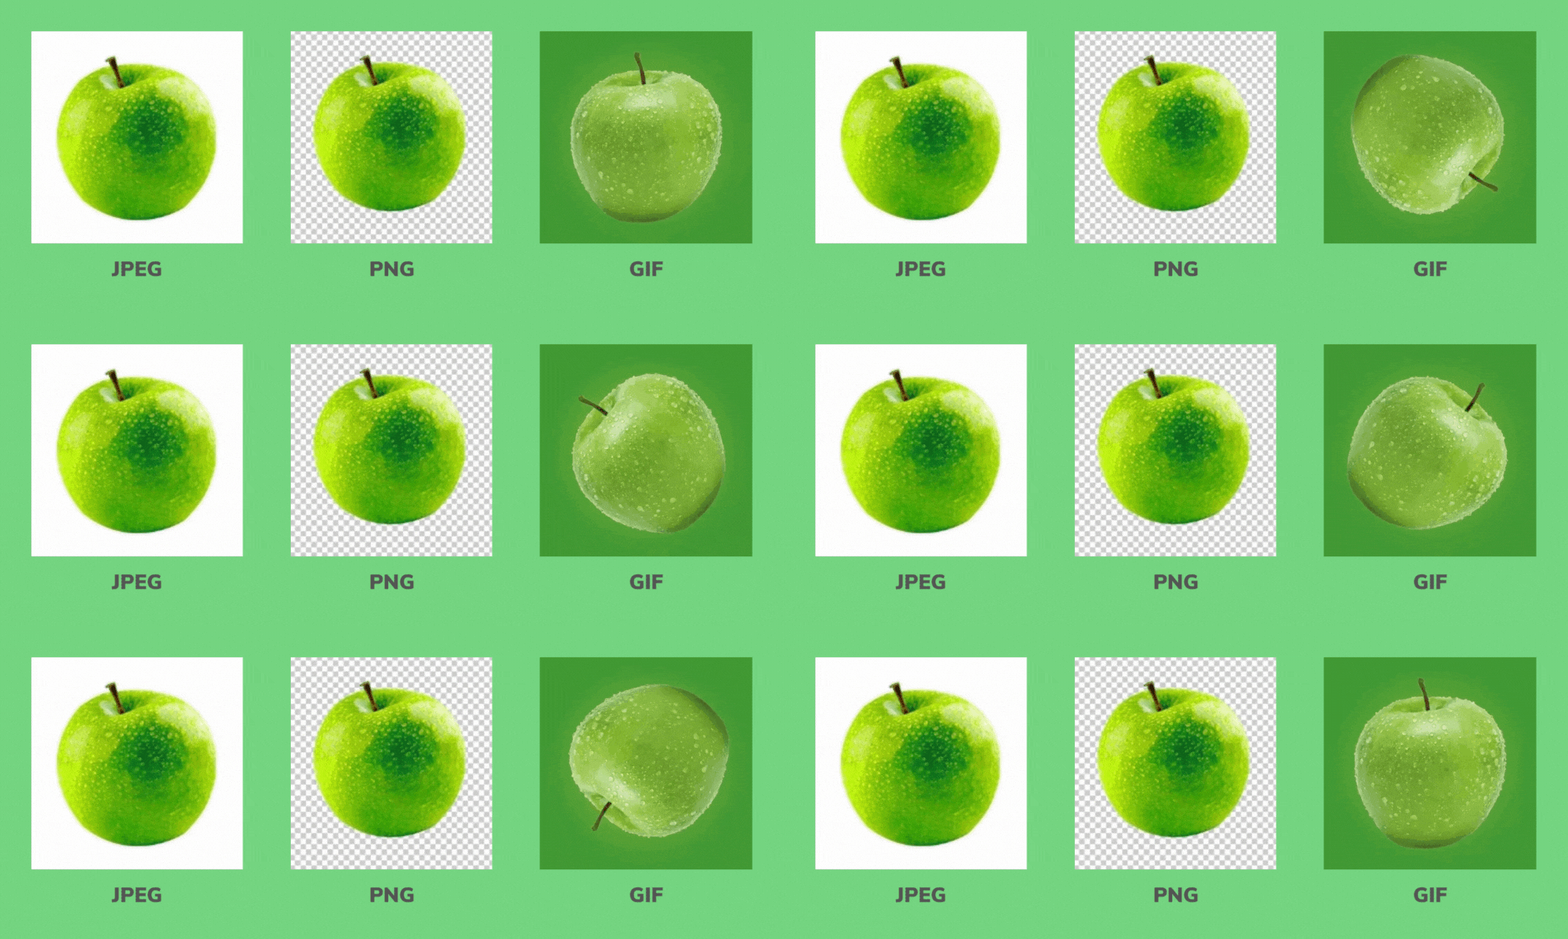
You probably know about several image formats, such as JPEG (or JPG), PNG, PSD, SVG, GIF, TIFF, BMP, ESP, etc. But among all of these, only some image formats are email-friendly, and those are as follows:
JPEG ( or JPG)
The Joint Photographic Experts Group (JPEG) is one of the most common and widely popular image formats. JPEG supports 24 bits per pixel with no transparency. However, the JPEG format is suitable for detail and sharp image output. Furthermore, the JPEG image format is an excellent example of “lossy compression.” This means it retains all color information but compresses the image file size by selectively discarding data. A good advantage of using the JPEG format is its small file size. Moreover, the JPEG format can compress the visual data without affecting the image quality. Overall, JPEG is unquestionably one of the best formats for sending images via email.
PNG
The Portable Network Graphics (PNG) is a newer image format than JPEG and GIF. The PNG format is more significant in one aspect than the JPEG image format, as it is free from lossless compression. Therefore, one can edit and export a PNG image multiple times without losing quality. However, using PNG in terms of logo and icon design is recommended. So, it is not an email-friendly image format, as it is more significant than a JPEG image file.
GIF
The Graphics Interchange Format (GIF) is a popular image format that is very useful in conveying much information in one image. Generally, a GIF is much more eye-catching than a static image. It also supports 8 bits per pixel with transparency. The GIF is widely used in email marketing as it is an animated form of illustration that can grab the recipient’s attention significantly. It can greatly increase visual appeal and make an email template more attractive. In addition, a GIF image can share more content and messages within a single frame, which is its notable advantage. Therefore, a GIF image can provide a good option for combining text and illustrations and shortening a large email message.
APNG (Animated PNG)
The main motive behind developing the Animated Portable Network Graphics (APNG) image format is to replace the GIF format. But APNG formats still need to be email-friendly. This image format has better image sharpness than GIF images. But it is only supported by a few email marketing tools and ESPs. For example, Gmail, the Gmail App, and Outlook are not supported by the APNG format. Therefore, APNG is mainly used in application programs and websites when it is necessary to show animated images with transparent backgrounds.
What is the best email image format?
All ESPs and Email Marketing Tools support JPEG, PNG, and GIF formats; some also support APNG. JPEG and GIF are the two main popular formats for email images. Yes, you should use the PNG format for logo and icon designing. But, avoiding APNG for animated images while email marketing is wise. PNG and APNG image formats are technically less optimized and bulkier than JPEG and GIF. Apart from this, Gmail, Gmail App, and Outlook still do not specifically support the APNG format. In a nutshell, JPEG and GIF are the two most widely used and optimized image formats, and you should choose these two formats while email marketing.
Email images best practices
Using images in email is widely popular, and very clear why it is essential. Therefore, before learning to embed images in emails, you should know the best practices for including images in email campaigns. These tips will advance your email marketing approach. So while designing your email images, consider the following advice:
Use Image Alt text
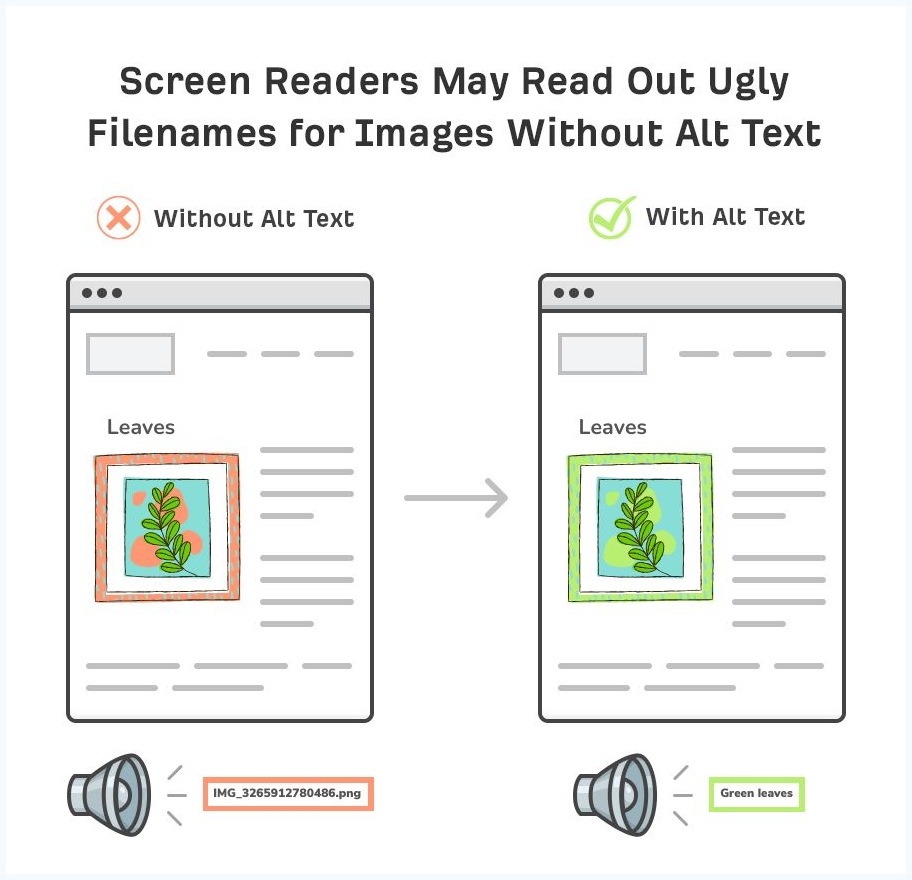
Adding image alt text (alternative text) is one of the fundamental approaches while embedding images in an email. But first, you must know the primary purpose of “image alt text.” Image alt text serves as a description of your embedded image in your email. Also, sometimes pictures in emails fail to load (e.g., because of low internet speed) on the recipient’s end. In that case, an image alt text helps the reader understand the attached image in their email. Another fact is that the image alt text is helpful for a visually impaired person (who mainly depends on audio content). A screen reader or automatic translator will read the image description from the image alt text for them.
Maintain image-to-text ratio
Your email should not consist of either overuse of images or text. An image-only email often ends up in the spam folder. And if you still do not take it seriously, your domain address may be blacklisted sooner or later. Also, if you use an image-only email, the images can get blocked or fail to open on your recipient’s screen. As a result, they will see a couple of broken image logos. And it can be worse if your images do not contain alt text. So, maintain a balance between images and text in your email content to make your email campaign appear more professional.
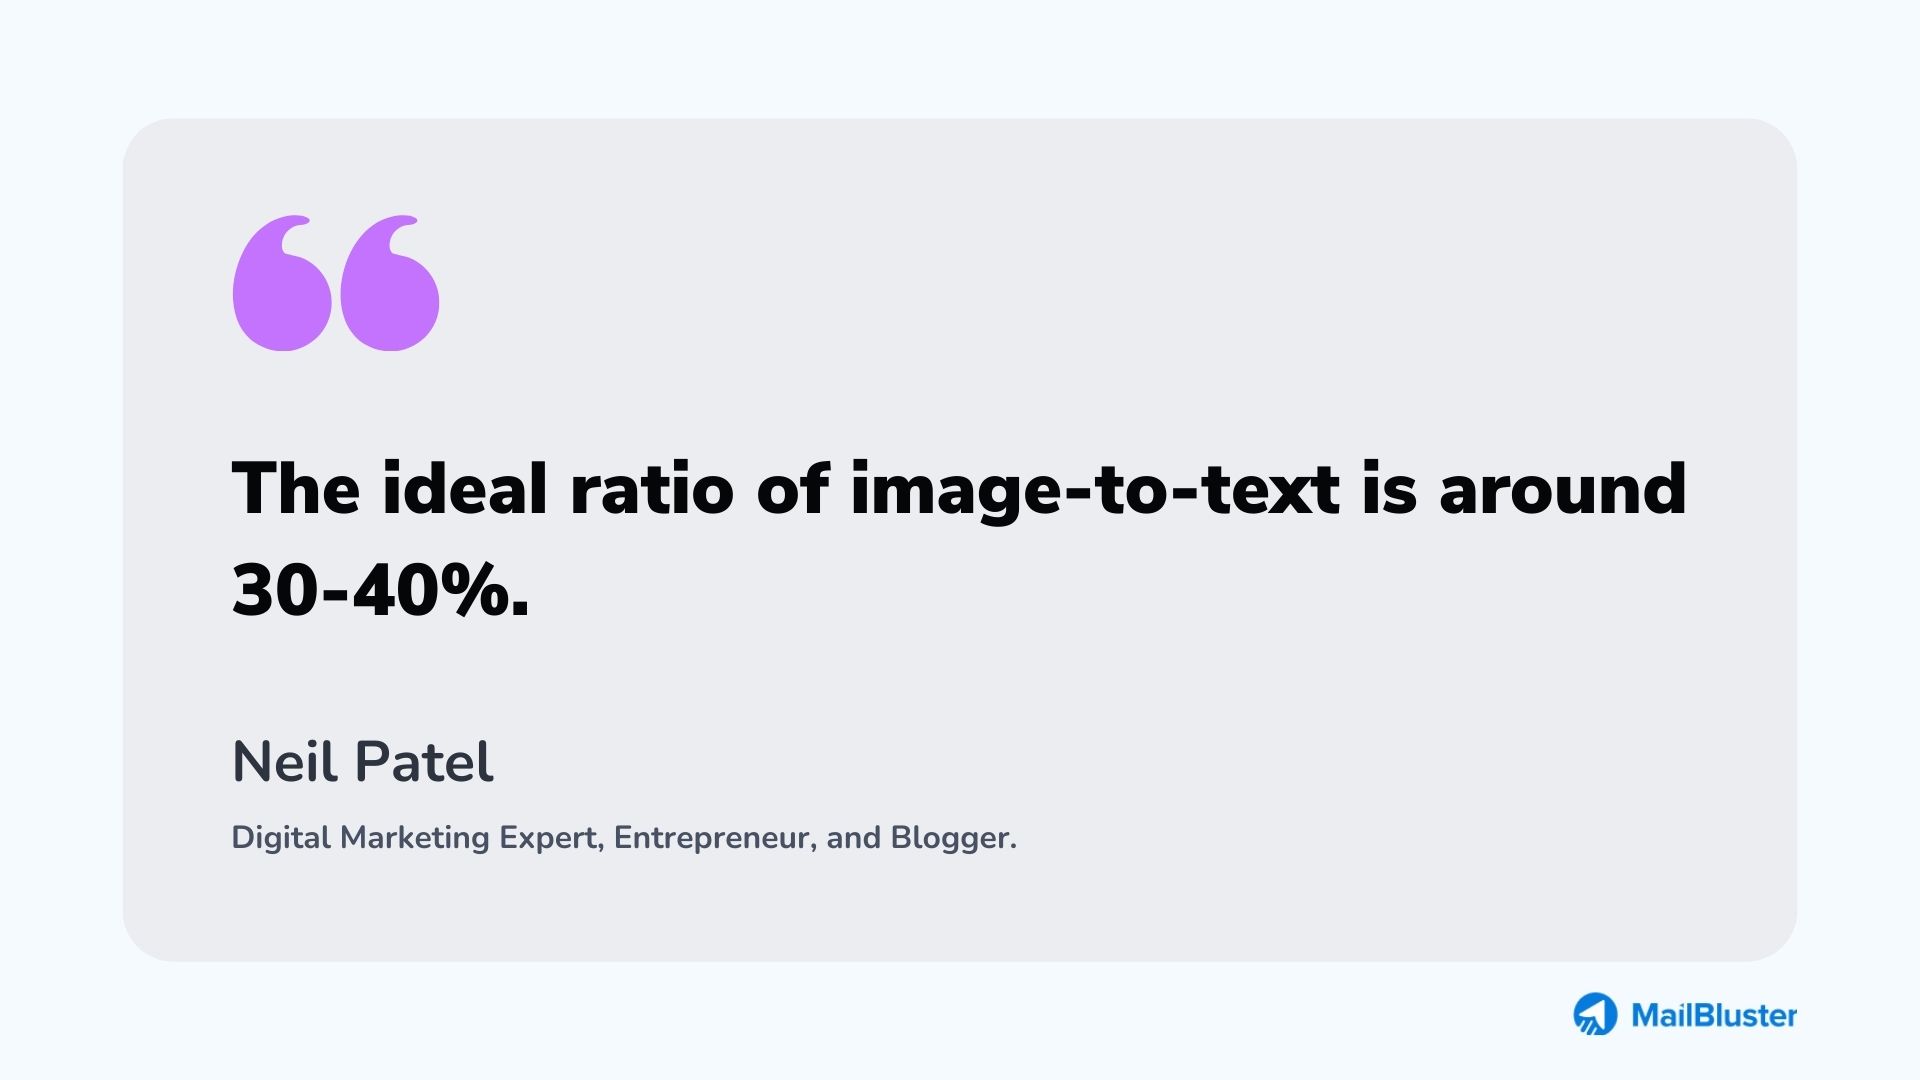
The renowned digital marketing specialist Neil Patel recommended keeping the images with a 30-40% ratio in your email content. Moreover, he warns that if anyone crosses this limit, it may trigger their email content as spam.
However, The ratio may vary when you use an email template because an email template carries visual things mainly. Therefore, the overuse of images in email templates is undoubtedly harmful. It is good not to use more than 40-50% of the imagery in email templates. If you are still confused, you can take a sign-up check and use our various free email templates from MailBluster’s email template gallery.
Watch your image dimension, size, and format
You must consider three aspects while embedding images in an email: the image’s resolution, size, and quality. A bigger image can affect your email’s overall loading time on your recipient’s end. If your image is high resolution, it will take up unnecessary space in your email. On the other hand, a large size image also delays your email’s loading time.
Furthermore, you already know that in terms of static and animated images, “JPEG” and “GIF” are the best two formats for high-quality image output with a small file size.
However, MailBluster supports embedding any resolution images in your email campaign. But MailBluster strongly recommends keeping the email image dimension 800px x 200px image under 2 MB. Also, MailBluster automatically makes your embedded image both desktop and mobile-friendly.
Tip: You should consider using GIFs in your email instead of sending a long message.
Personalize your email images with color psychology
Personalizing your embedded images can leave a good impression on your target recipient’s mind. And when you combine your personalization with color psychology (color theory), you will do the next-level email marketing. According to the Kissmetrics study, 92.6% say that visual appearance is the primary factor affecting their purchase decision.
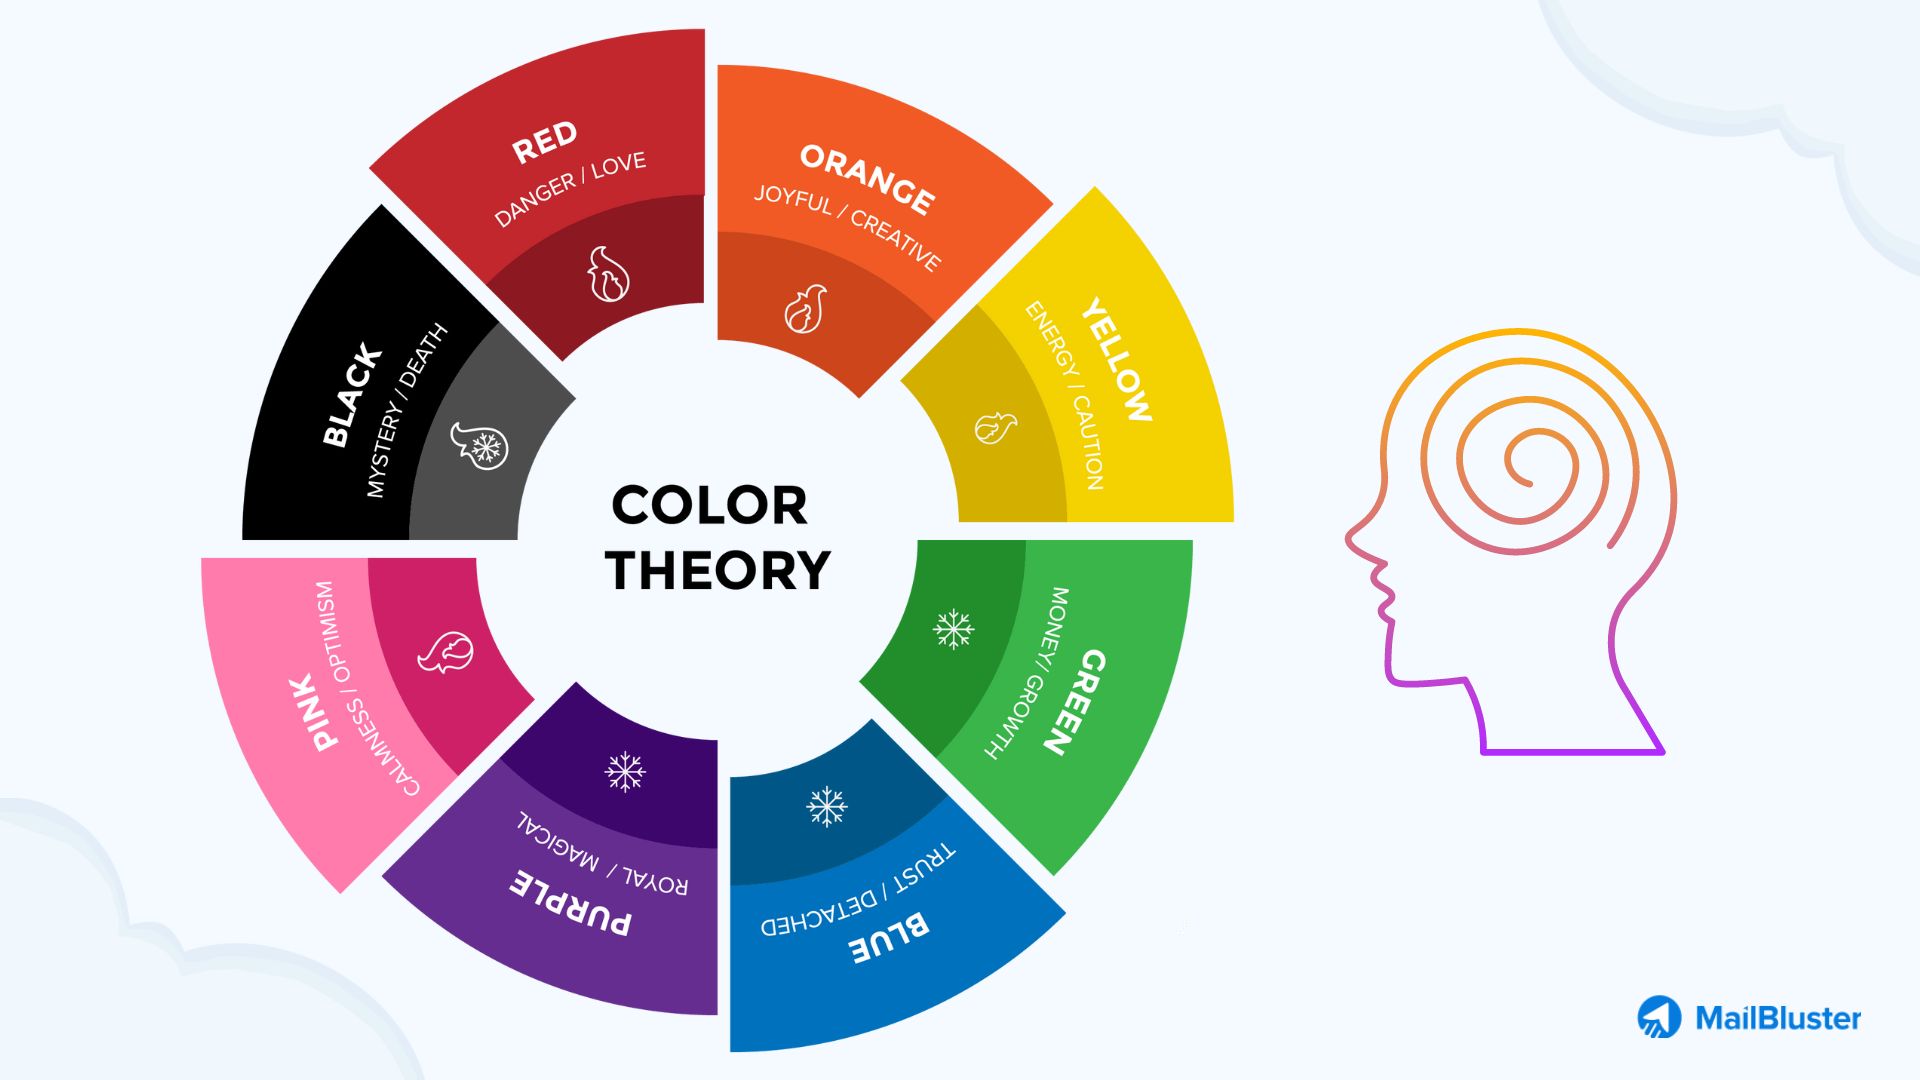
For example, when you plan to send an email campaign for your old loyal customer, you can keep a blueish vibe in your email images and template. As “Blue” represents the color of “trust.”
Ways of adding images in an email campaign
So far, you may understand that including images in emails is crucial to increase response rates. You must know how to embed images in your email body or template. There are four ways of it, each different from the others, with unique advantages. So let us jump in.
CID image embedding
Content-ID (CID) image embedding is the relatively oldest image embedding practice. The CID image embedding works by attaching the image to the email and then using an HTML image tag (content ID) of that image to reference the image in the email. Once your email recipients open the email message, they will see the embedded image. However, the CID image embedding process requires some coding knowledge.
In the CID embedding process, you must split your code into two groups to make it work. First, you must add code to your client library to create a link between it and your email message. Here, the code in your client library will set boundaries for the image, like content type, file name, content ID, etc. After that, you can embed the image in your HTML email by inserting the CID tag. All these processes can be as follows:

Inline embedding
Inline embedding is a relatively more effortless method of image embedding than CID embedding. It is also known as “base64 encoding.” Inline embedding requires a specific encoding scheme named “Base64 string.” The encoding string allows you to embed your image using the standard HTML tag. However, to make it work, you must insert your Base64 string into the image file path of your HTML email. It will look like this:

Linked Images (HTML embedding)
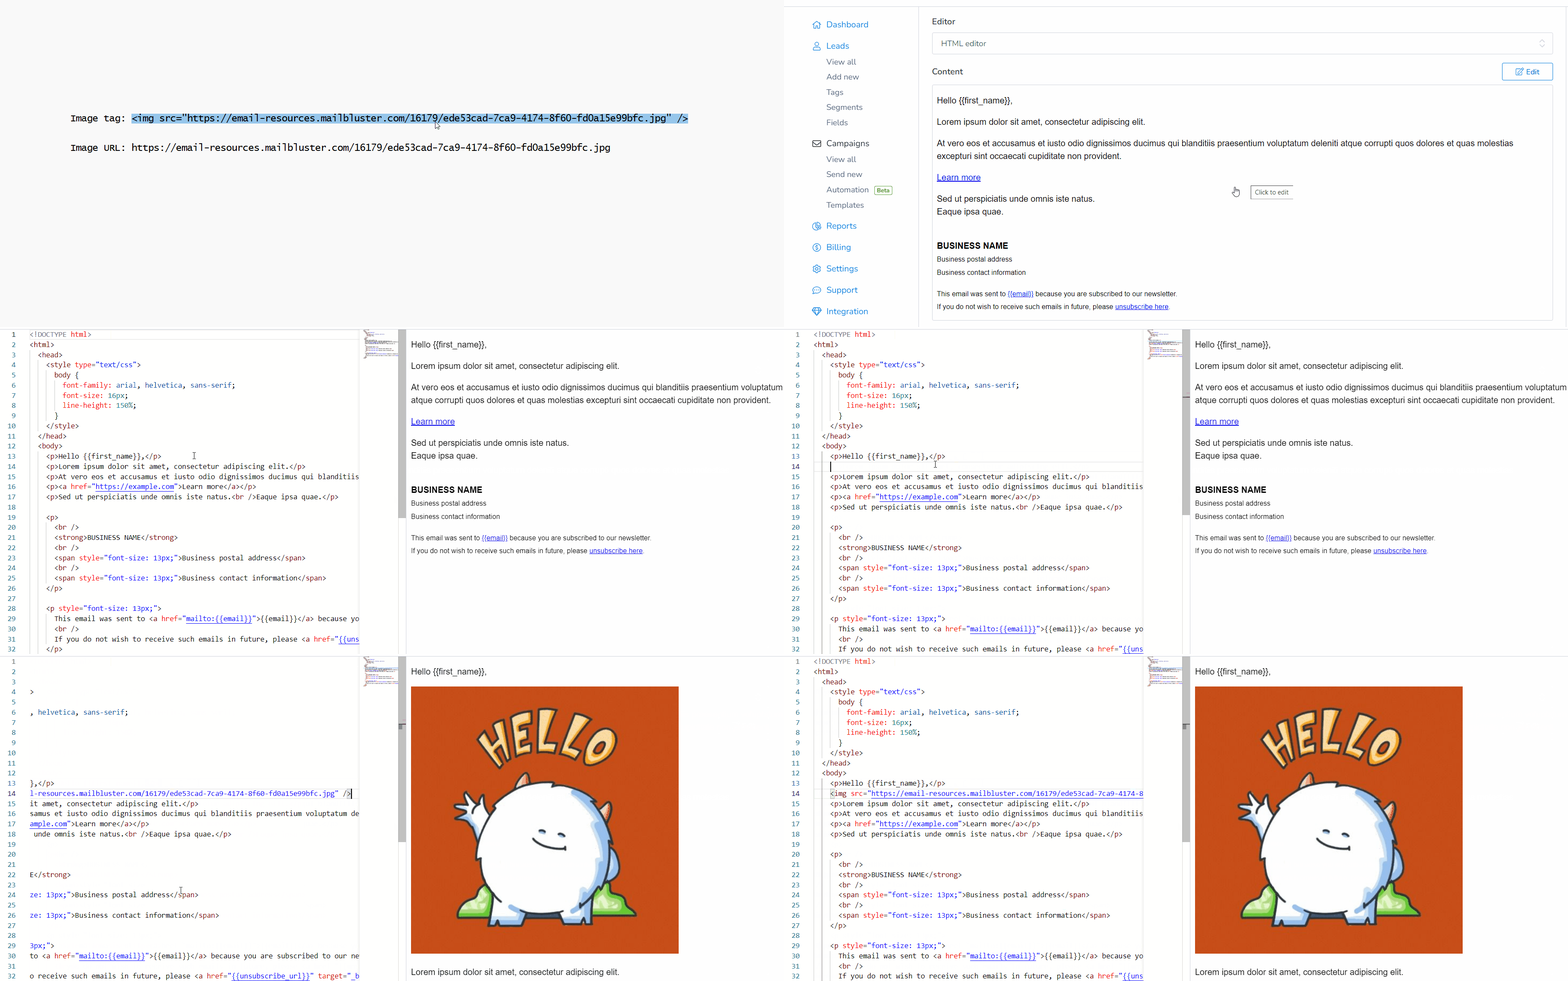
But, linked images are the easiest method of embedding images, rather than the two methods above. Linked images are also known as “HTML embedding.” To embed an image in an HTML email, upload the image source link from your device or host server to the ESP or email marketing tool. This will enable you to insert the image in the appropriate space. The image source link will be like this:

Drag and drop
However, the “drag and drop” editor is the most modern image-attaching feature visually. The drag-and-drop editor uses the “Linked Images” method to attach the image to your email. You do not need to know the coding while dragging and dropping an image from your device. The drag-and-drop feature is available in all ESPs and email marketing tools. All you need to do is simply drag an image from a source (like from your computer’s folder) and drop it into the appropriate location.
Which method is more appropriate then
So you have already learned about three different image embedding methods. It is time to choose the best one to make your image embedding experience simple but effective. But it will be great if you understand the differences visually. Click the picture below to find it:

How MailBluster can help you in image adding
MailBluster can be your best companion whenever you embed images in your email campaign. MailBluster supports the “Linked Image” embedding method with the drag & drop feature. Perhaps you already know why we support this embedding method instead of CID images and inline embedding.
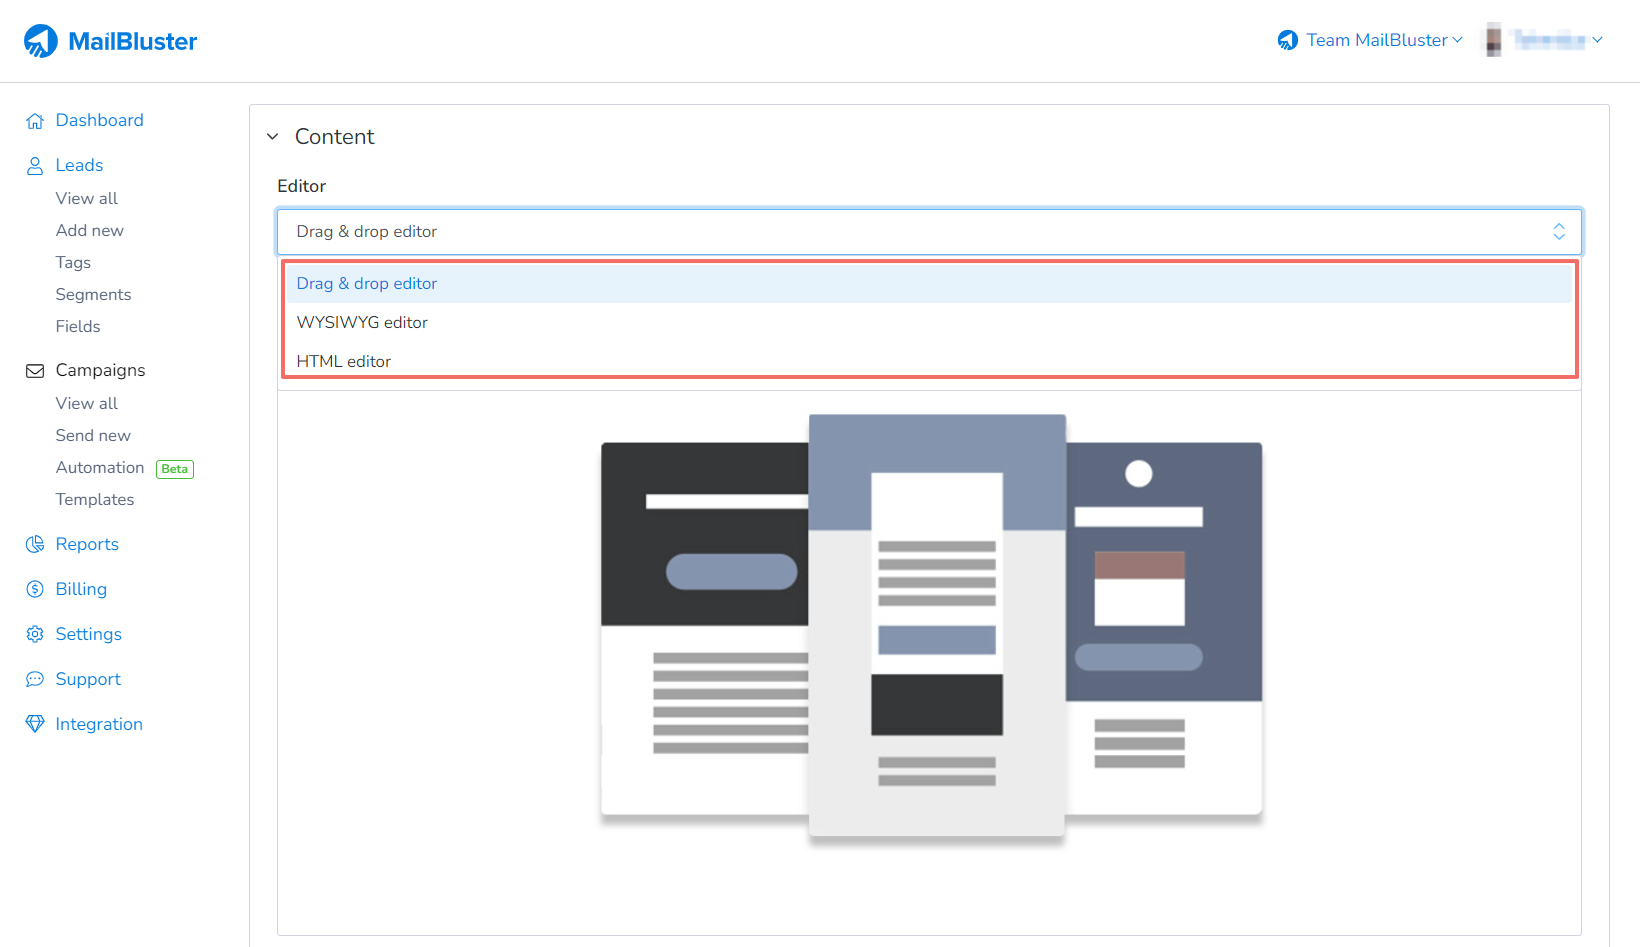
However, to embed images in your email, you must go to our Campaigns and select the Editor from the drop-down menu of Content. You will find three popular email editors: Drag & drop editor, WYSIWYG editor, and an HTML editor. Now choose the editor type according to your needs.
So when you choose MailBluster’s HTML editor, you can embed your required images through the “Linked Images” method. You need to provide the “image tag,” including the source of your image file. The workflow will be as follows:
But if you want to avoid all the technical stuff of editing an HTML email, you can go for the WYSIWYG editor. Indeed, the WYSIWYG editor is the best option for customizing your professional business email. However, you do not need to bother about the “image tag” here. The WYSIWYG editor automatically generates the image tag when you provide the URL. You need to insert your image source URL in the appropriate location. So, the process is as follows:
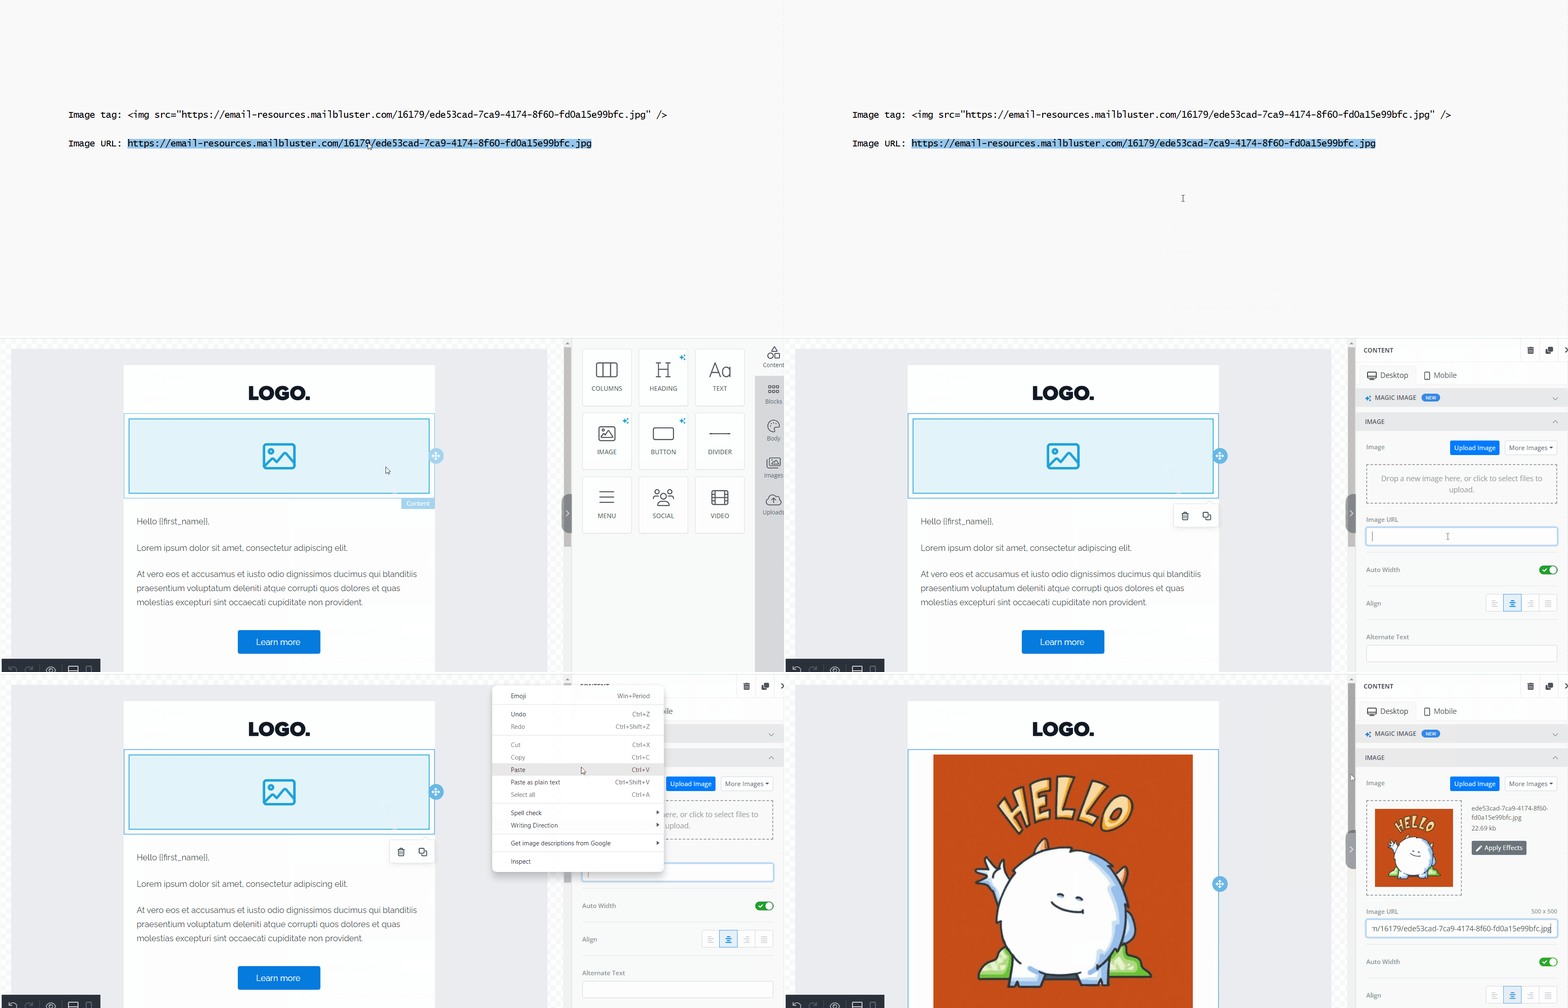
Note: Apart from inserting the image source link, you can just upload the image files from your device directly in the WYSIWYG and Drag & drop editors.
How to find free images
You can find many pictures online (such as through a Google image search), but it is challenging to get copyright-free images. Also, image quality can be another concern. Therefore, you should use ‘free stock images’ to legally use pictures throughout your email campaign.
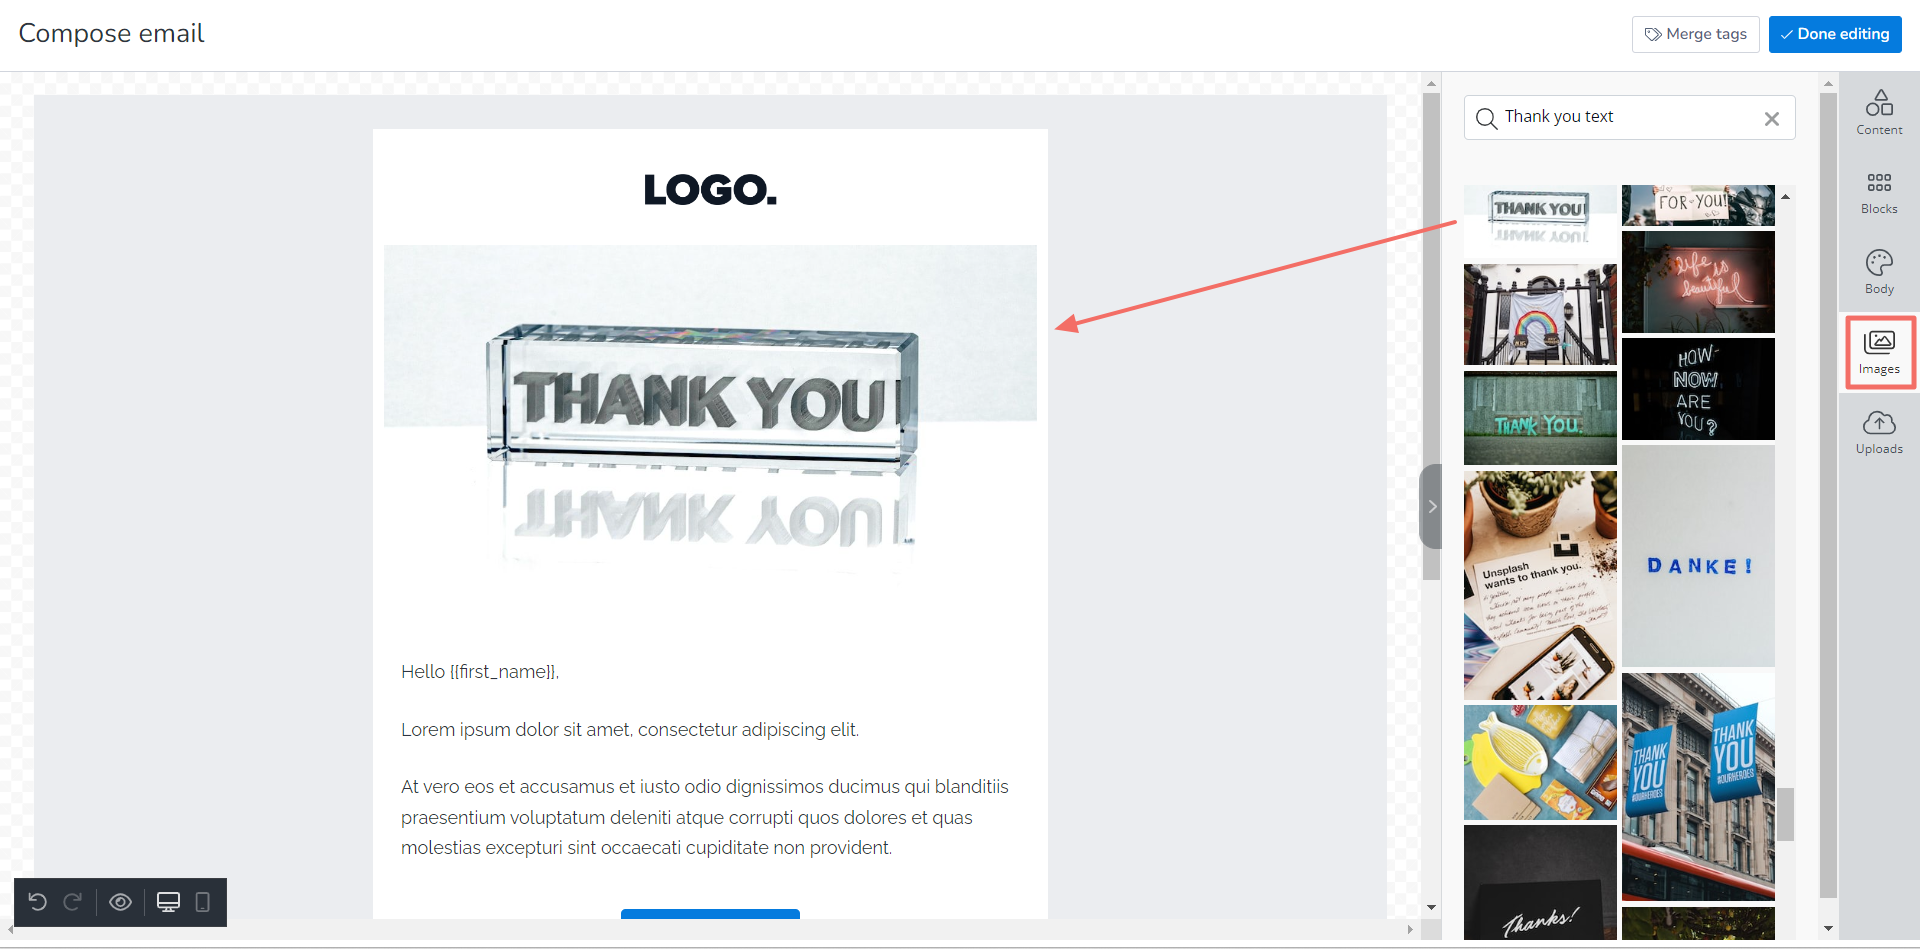
When using MailBluster, you can entirely rely on it. Because in our “Drag & drop editor,” we feature Unsplash, Pexels, and Pixabay. So you can use our “Images Tab” to find tons of copyright-free stock images without watermarks. And then, drag and drop the selected image into the appropriate location in your email template.
Final words
Adding images to an email campaign is the key to making it eye-catching. An appropriate email image can build solid brand recognition and credibility. When you embed optimized and personalized pictures in your email campaign, it will enhance your email engagement rate and encourage the recipients to take the action you planned. So, no matter what type of email you send, confirm that you are using proper images by following all the above tips and guidelines.



 Contents
