


Using forms is essential for your inbound marketing strategy and allows you to boost the lead-generation process. Implementing forms on your landing page is one of the most effective ways to engage website visitors and convert them into subscribers. This powerful tool lets you capture valuable lead information from your new subscribers. Later, you can stay connected with your new subscribers more frequently by sharing updates and fostering lasting relationships.
What are the forms in MailBluster?
Forms, also known as subscription forms or web forms, allow marketers to collect potential subscribers’ information from websites. Likewise, MailBluster forms let you directly collect leads data from your website and send them to your lead list. MailBluster offers two types of forms for its users. Before going into further details, you may check out the following tutorial video for a quick understanding of the form creation process:
Inline form
The inline form will display in a particular section of your website according to where you want to place it. For instance, you can put it at your website’s top, middle, or bottom. However, the inline form is the only form that will be permanently displayed on your website according to your chosen location.
Pop-up form
The pop-up form will appear as a pop-up on your website while browsing. For example, you may select the pop-up time for your pop-up form and put it to the left, center, or right of your website’s beginning, middle, or bottom. The pop-up form will display based on your chosen configuration while creating it, such as the popup position, frequency, and trigger condition.
Both forms are effective, depending on your form creation strategy, website layout, and marketing approach. But remember that your form must be correctly created to achieve success. Here, MailBluster can be your best companion.
How to add forms to your website using MailBluster
Adding forms to your website is not rocket science. You can add it after completing two major stages. First, you must determine what type of form you will use and then create it with MailBluster. Secondly, you must add your form to your website after completing it. Let’s elaborate on this:
1Forms creation by MailBluster
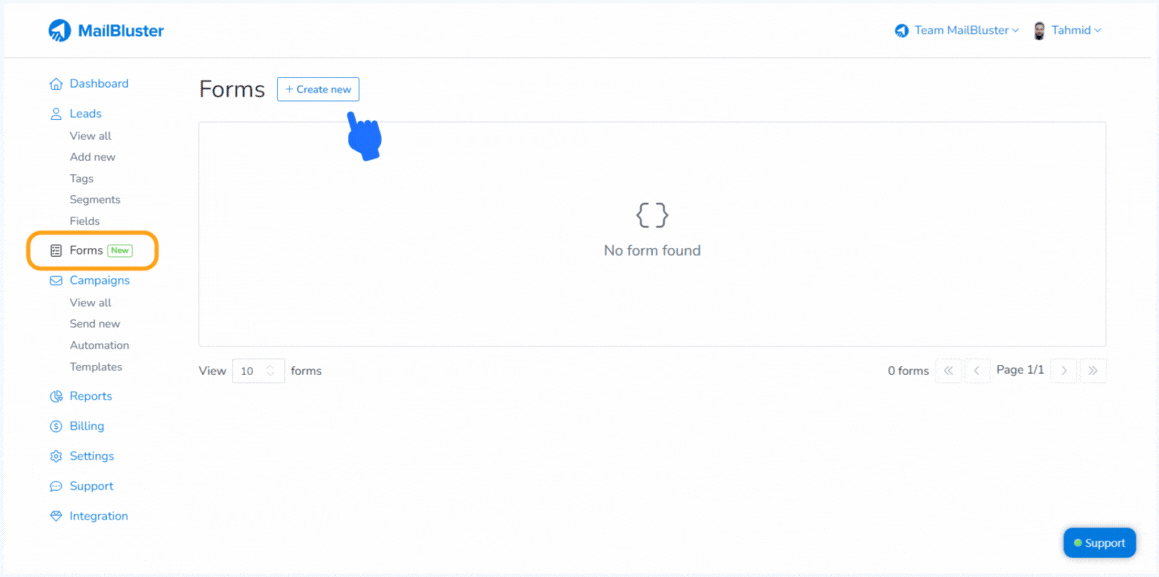
First, log in to your MailBluster account dashboard and click Forms. And then click on Create new.
And then, select the required form type, Inline or Pop-up form, according to your needs.
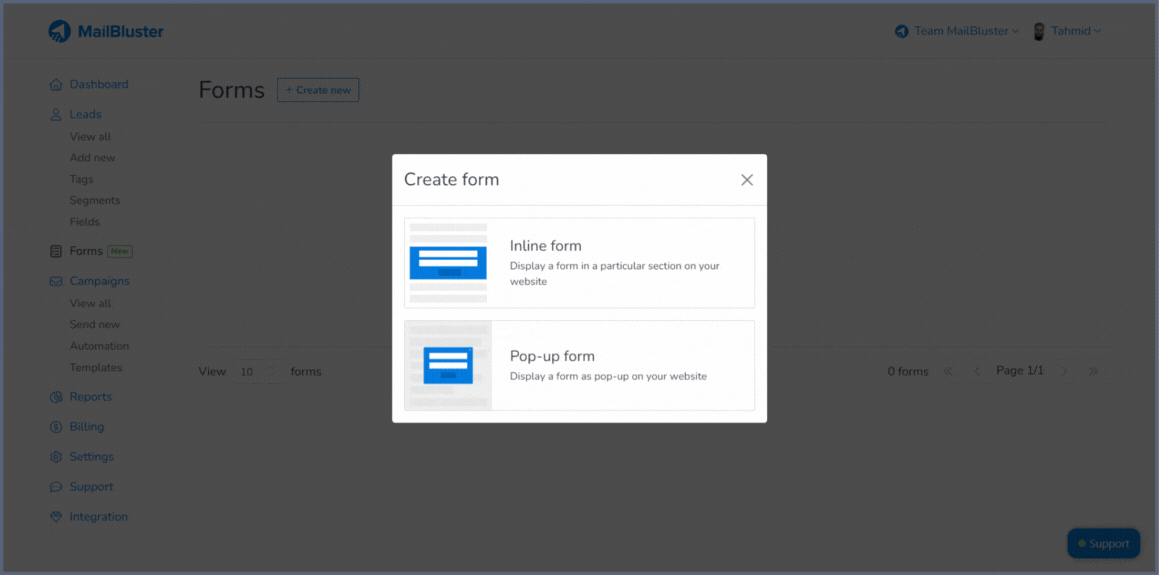
Now, let’s break down the processes of creating these two forms for a clear understanding.
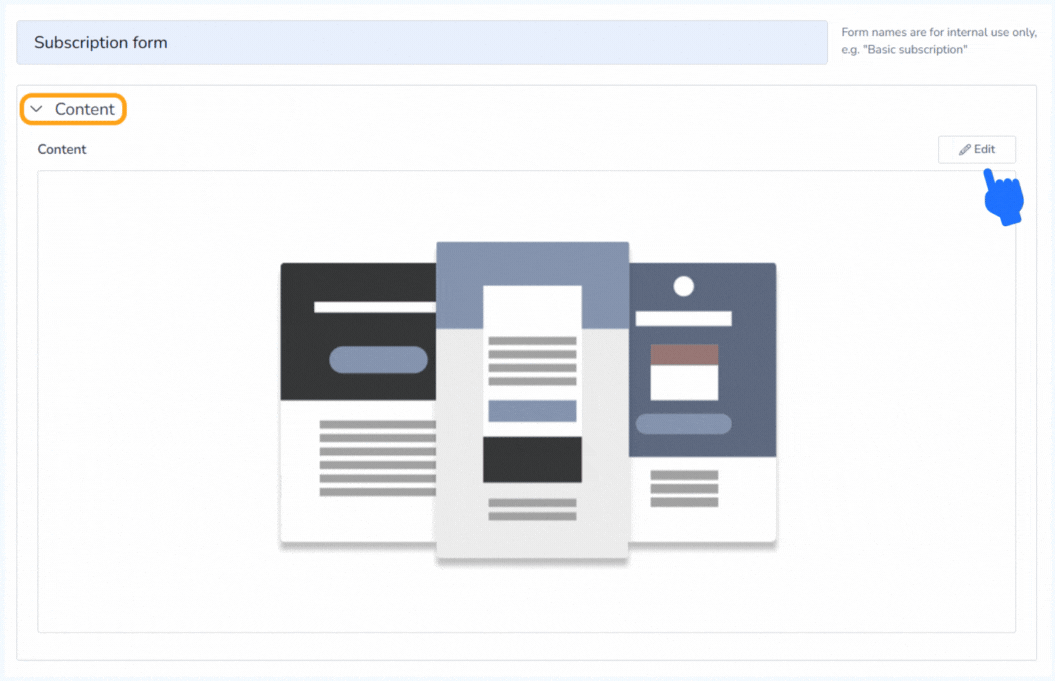
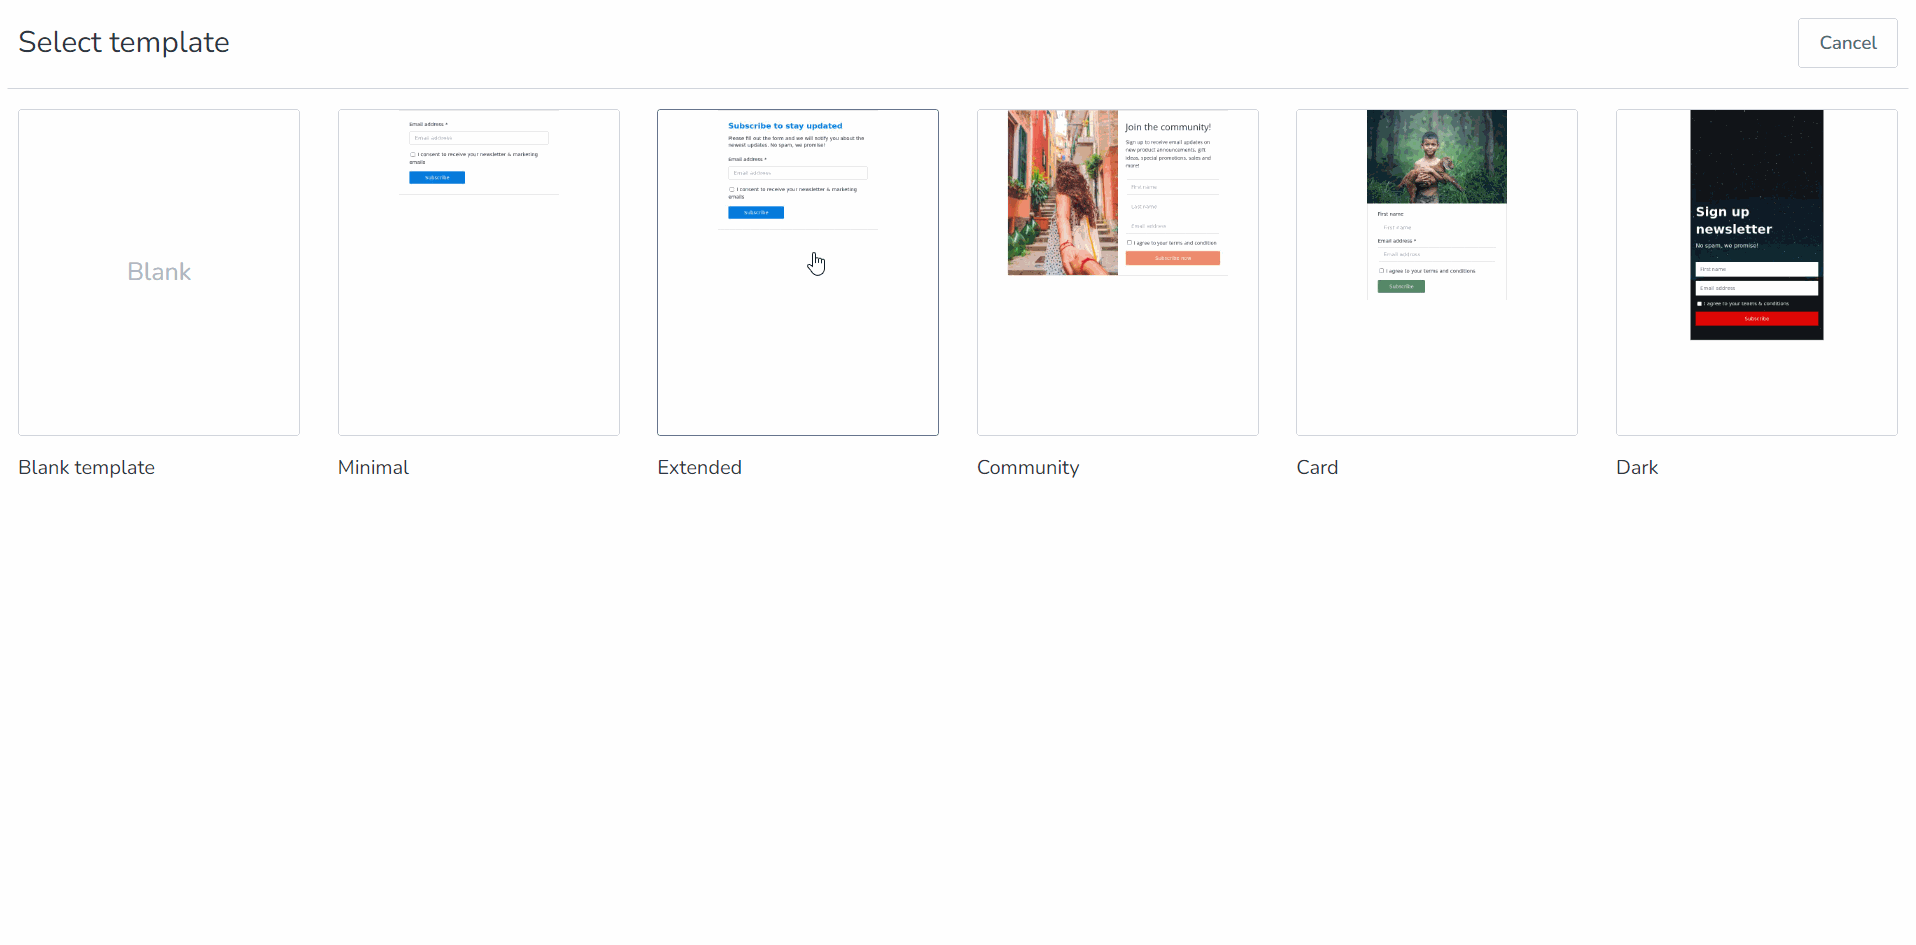
Whatever form type you pick, you will first enter the dashboard of your form editor after selecting the style. You can name your form (for internal use) and go for the form content design with our Drag & drop editor. Let’s name our demo form “subscription form.” After naming it, you will find the Content section, where you can select a form template from our list of pre-designed templates. Also, you can create your custom form template from scratch.
Then, you can create your form as shown below. Remember, even if you select a ready-made form template, you can easily customize it with our powerful Drag & drop editor. Let’s look at the simple steps for designing the form template below:

With this Drag & drop editor, you can fully customize your form according to your needs. You will find many options and additional settings to customize and personalize your form design. For example, you can add more fields to your form, customize your CTA, add images, resize the text and font, and more. Have a look:
After completing your form template’s design, you will return to the form editing dashboard. And then the second section comes with the title “Advanced.”
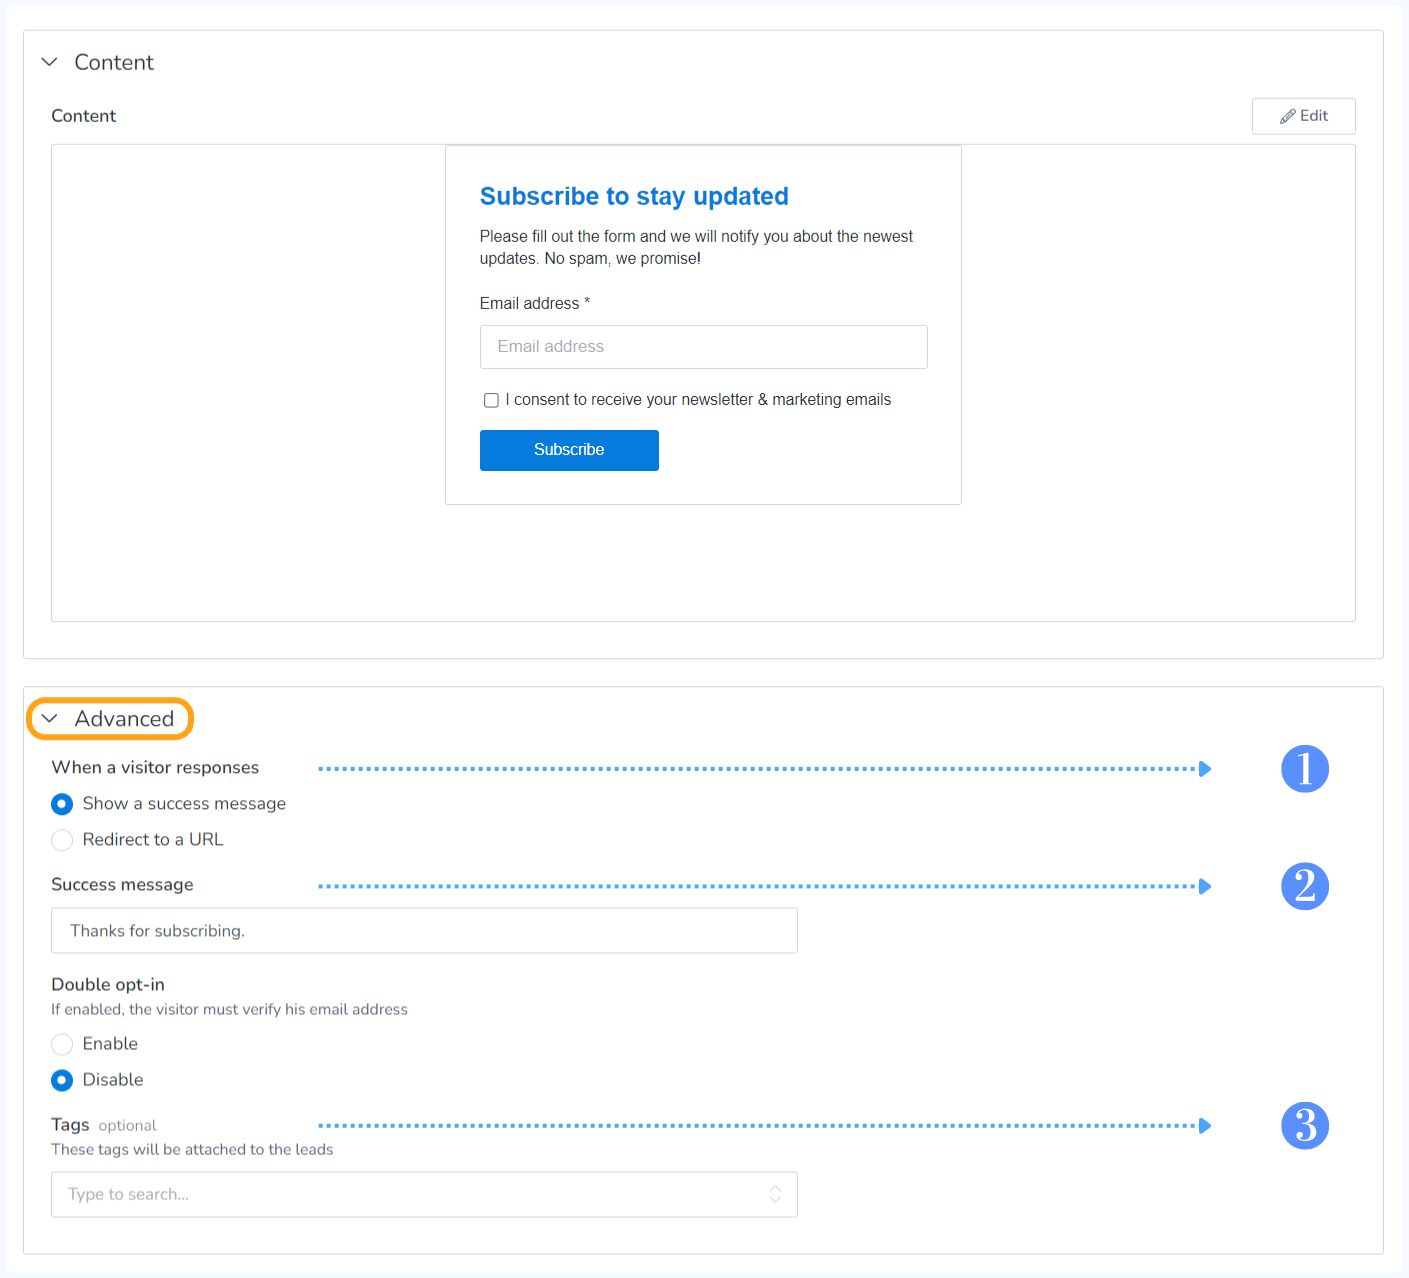
Note: This section has displayed three subsections with a pre-selected condition. But you can change all these pre-selections here and in the upcoming sections.
A brief description of this “Advanced” part:
- When a visitor responds to your form by clicking/subscribing, you can set two conditions: showing a successful message (the message will be customizable) or redirecting to your given URL.
- You may activate the Double opt-in option in your form’s subscription process to request confirmation from the new subscriber before adding them to your lead list. This is a mandatory step for some countries, like Germany. For more information, visit GDPR double opt-in for email marketing.
- Tags, It’s optional. But utilizing it will enable you to give your new leads (that will come through your form) a specific new tag. Also, you can transfer your new leads to an existing tag by adding the tag name to the box.
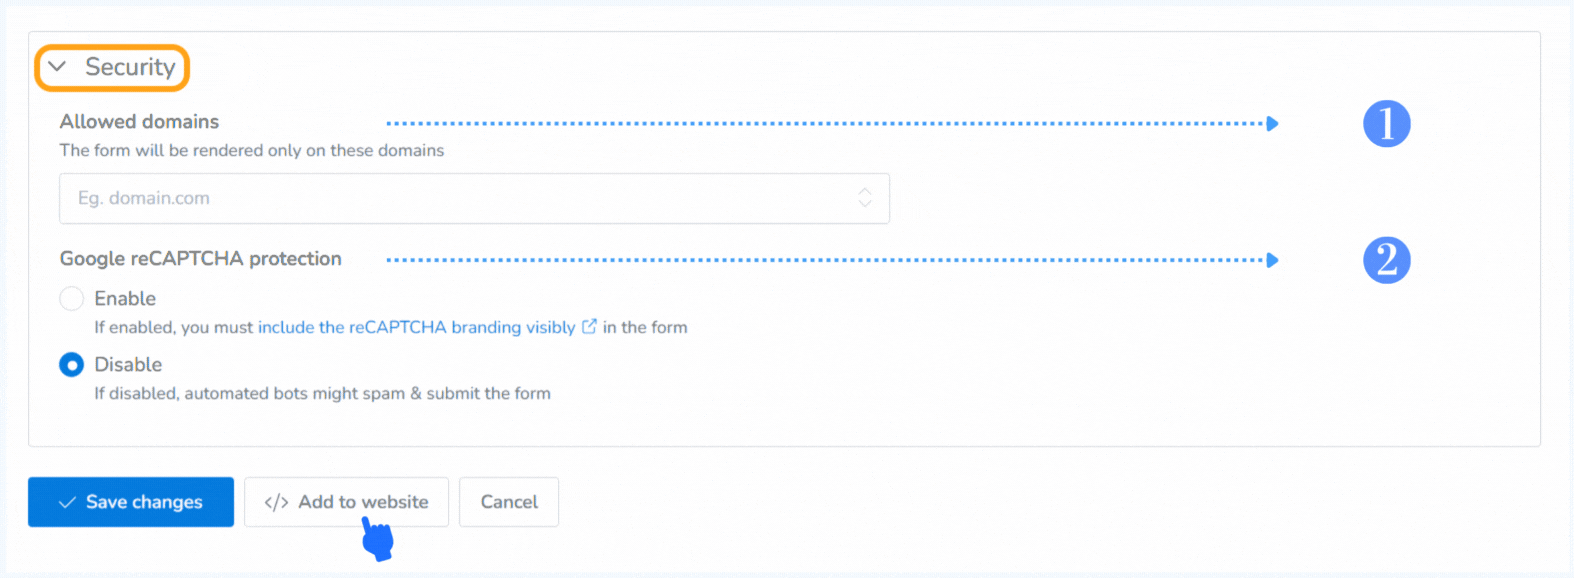
So far, you have come to the last part (Security) of the form editing if you select the inline form. But if you choose the pop-up form, you will find one more stage, which will be covered below. So this part is essential; you need to put your website domain here and click on Save changes if you are creating an inline form.
Note: This is the last section regarding an inline form creation.
A brief description of this “Security” part:
- In the Allowed domains sub-section, you will find a blank field to enter your website’s domain.
- Google reCAPTCHA protection can protect your subscription form on the website against bots that may spam and submit your form.
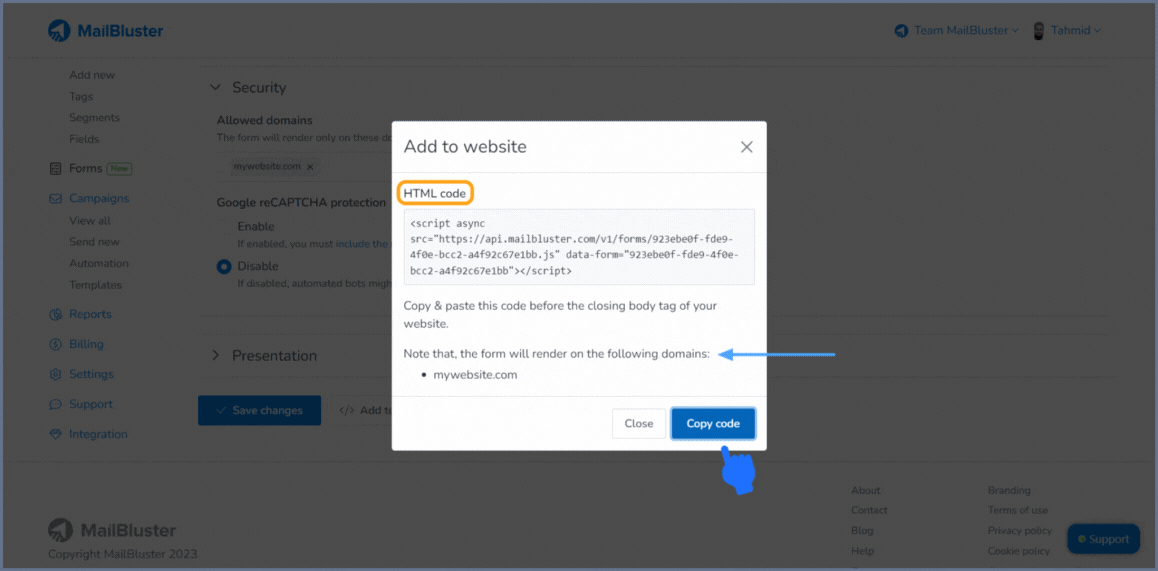
After customizing this section, you can click on Save changes, and you need to copy the code from the </> Add to website and place it in the HTML code of your website. And all your inline form creation work will end here.
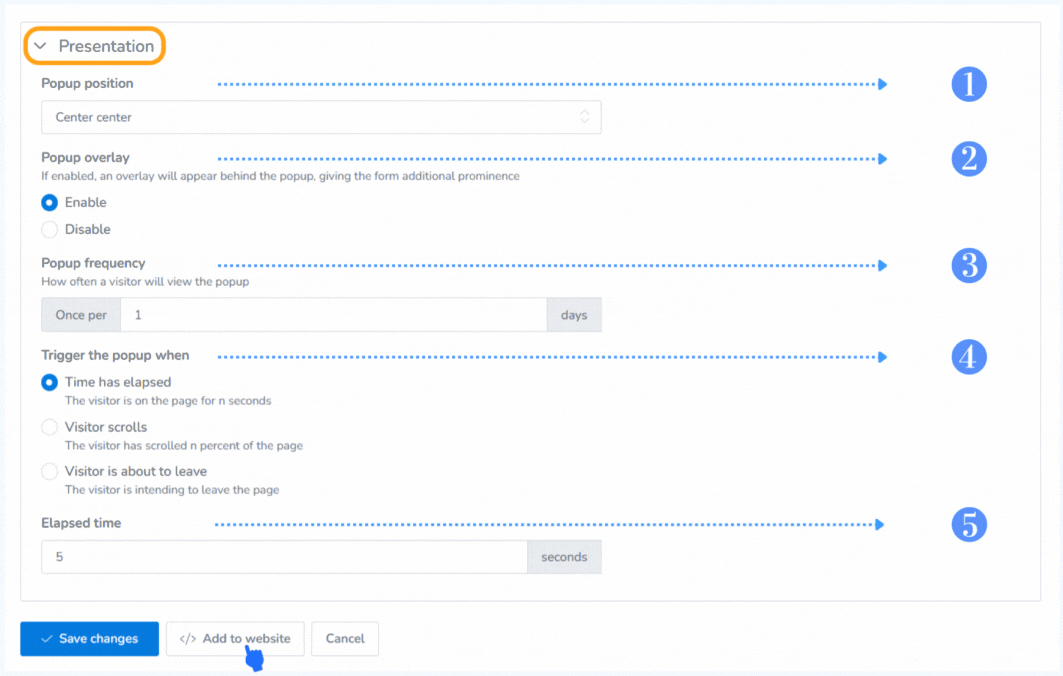
But, when creating a pop-up form, you will find a different section named “Presentation,” which will come right after the above section. Here, you will need to import some more information regarding this form. Check out the image below for a visual presentation of this section:
A brief description of this “Security” part:
- After clicking the dropdown menu of the Popup position, you can set your pop-up form to appear in three different parts of your website: top, center, or bottom-centric.
- Enabling the Popup overlay will transfer the background screen of your pop-up form with darkening (blurry) on your website.
- You can set your Popup frequency daily to determine how often a visitor will view the popup form.
- Also, you can Trigger the popup under three different conditions.
And the Elapsed time is related to your first condition (Time has elapsed) in the Trigger the popup sub-section. Also, note that you can find the Scroll amount option here if you select the second condition (Visitor scrolls).
Pro tip: If you want to test your pop-up form through a website on localhost, you have to set your popup frequency to “0”.
Thus, after customizing all these sub-sections, you can click on the Save changes, copy the code from the </> Add to website and place it in the HTML code of your website.
2Adding your created form to your website
So far, you have successfully created your form in MailBluster. Now you have to place the generated code you have copied from </> Add to website to your HTML page using any available Text editor (Notepad++, VS Code, Sublime Text, etc.). Also, you can place your copied code on your website created from WordPress. Both processes will be discussed below.
Through the HTML file of your website
To demonstrate, we have created a website. Using any Text editor (for example, VS Code), we place the generated HTML code inside the body of our website’s HTML code. Before doing this, we need to first add our website’s domain address/URL in the Allowed domains field of MailBluster Form creation dashboard. Then, click on </> Add to website and Copy the generated HTML code.
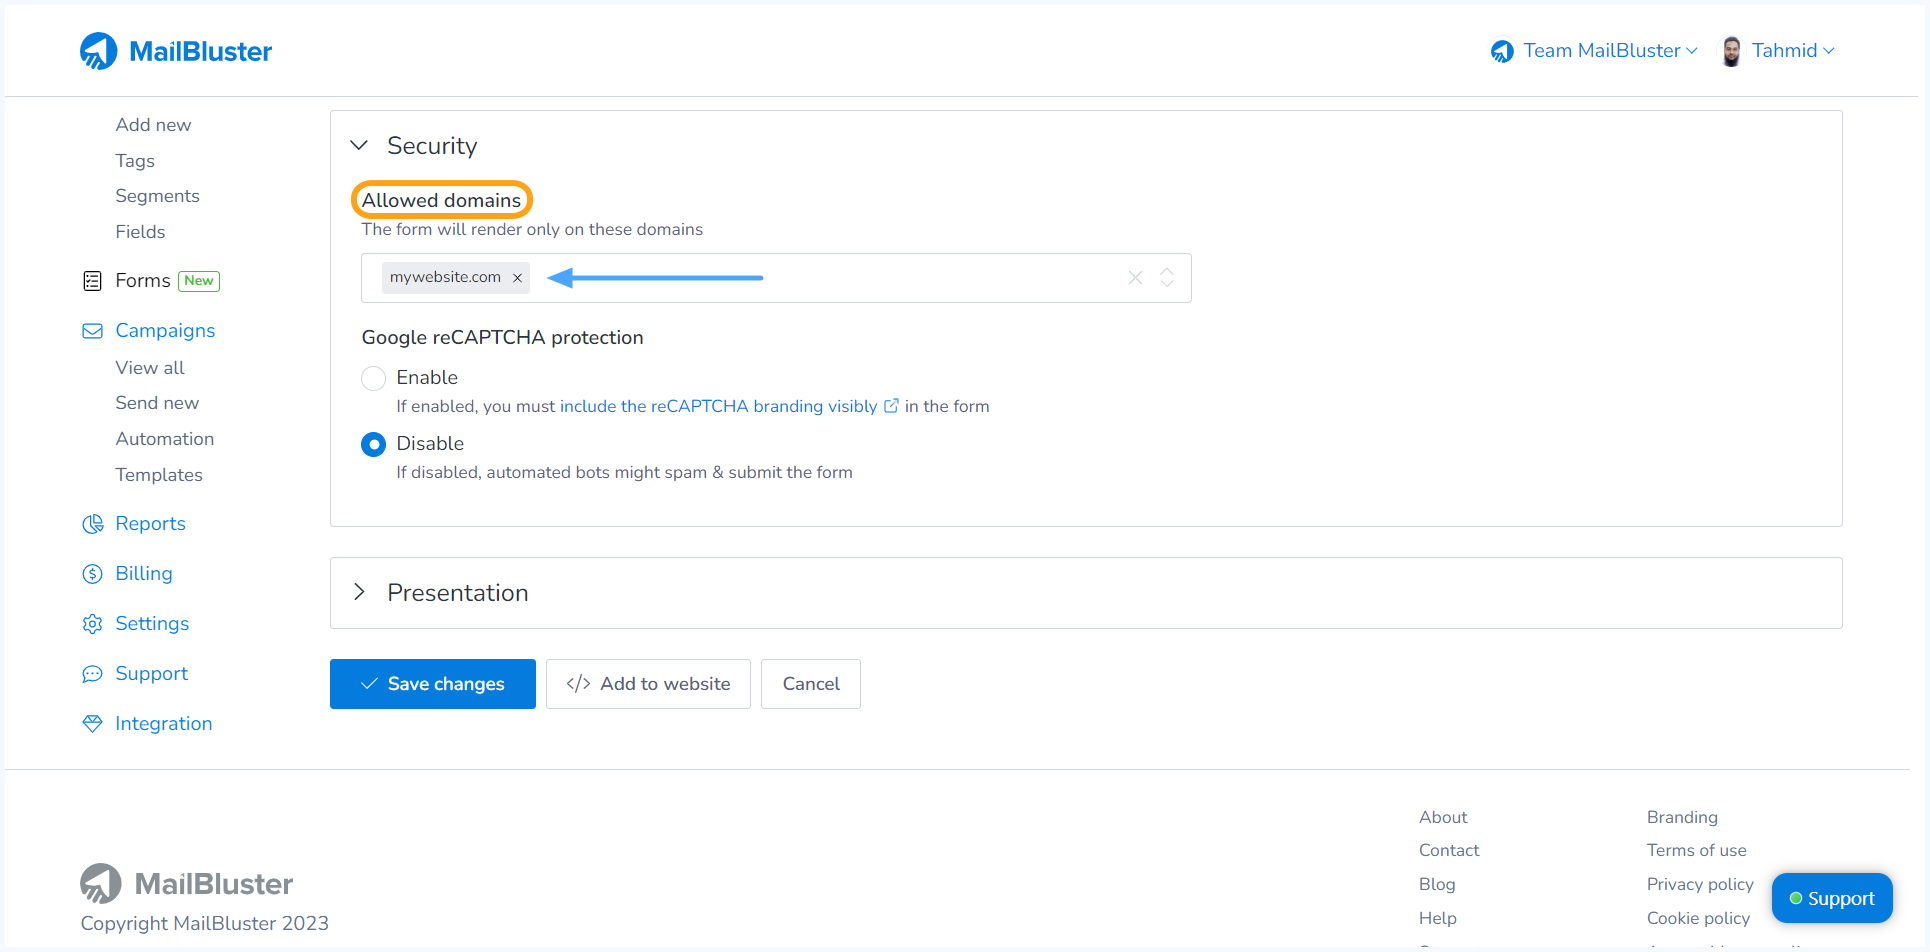
Note: Do not place your entire Website URL in the Allowed domains field. Just place your website domain without http or https, as shown above.
After completing these steps, we are going to paste this generated HTML code from MailBluster form to the body of our demo website’s HTML code. Both for inline and pop-up forms, the process will be the same as follows:

Note: The inline form’s position on your website depends on where you paste the generated HTML code into your website’s HTML code. But for pop-up forms, you can paste the generated HTML code anywhere in your website’s HTML code because it will appear on your specific webpage based on the form’s given conditions and settings.
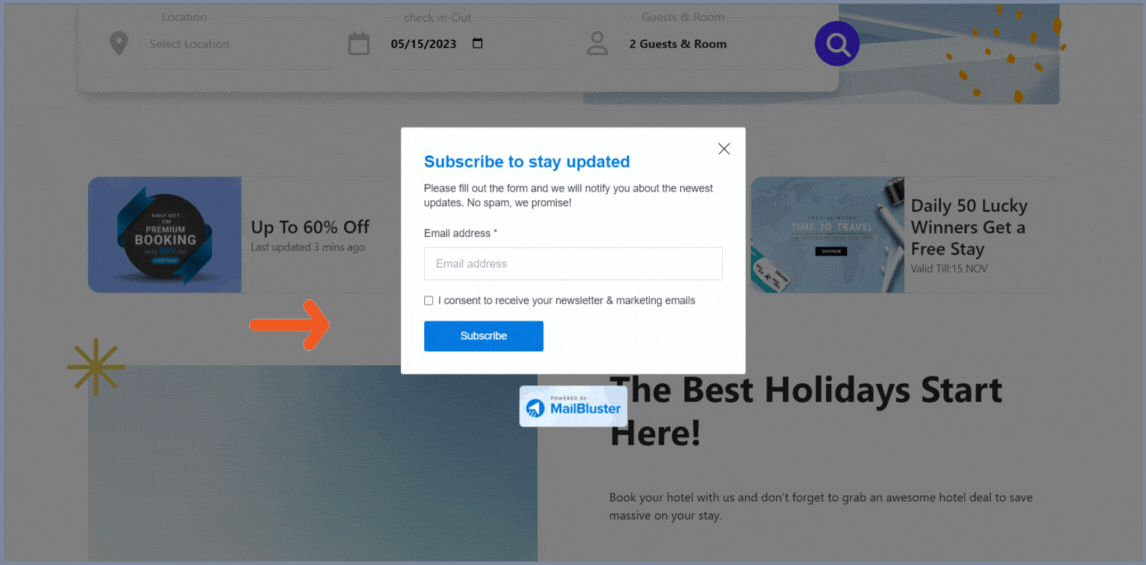
Therefore, we placed both the generated form codes in the exact location on our website’s HTML code, focusing only on the inline form’s position. After completing this step, we are about to experience the final result. Here, both our inline and pop-up forms will appear on our website as shown below:

Through Custom HTML of WordPress
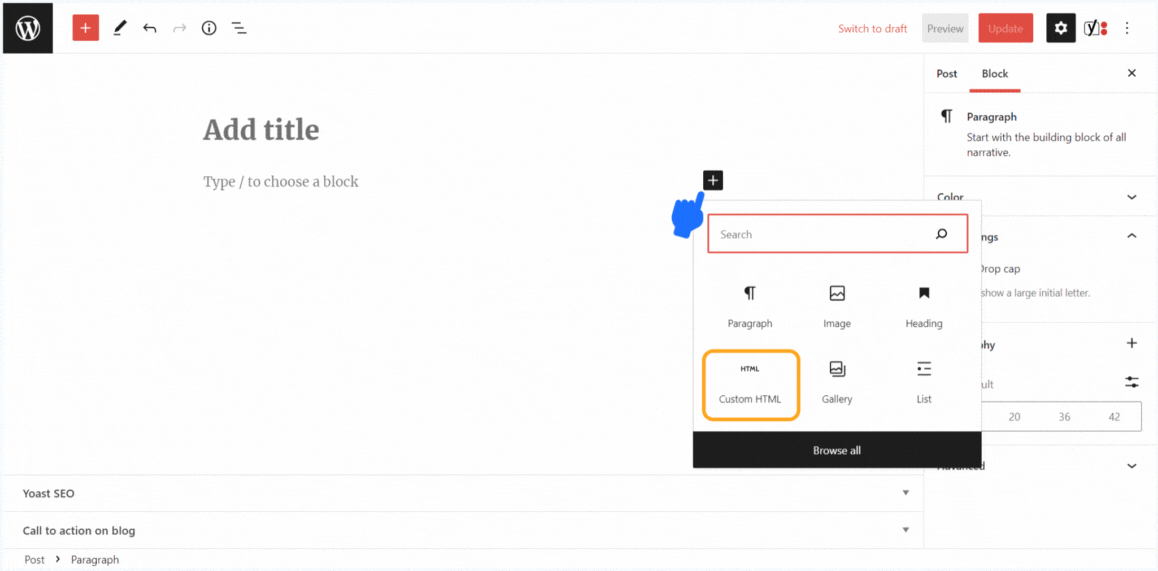
In WordPress, you have two options for adding a form to a ‘WordPress website’: either use the generated HTML code from the MailBluster Form or add the form using the MailBluster WordPress plugin. Below, you will find guidelines on how to embed your created form using WordPress Custom HTML:
First, you must go to the page where you like to place your form to be embedded. And then, click on the Plus icon to add a new element and click Custom HTML.
Then paste your form’s code in the Custom HTML and click Update in the top right corner.
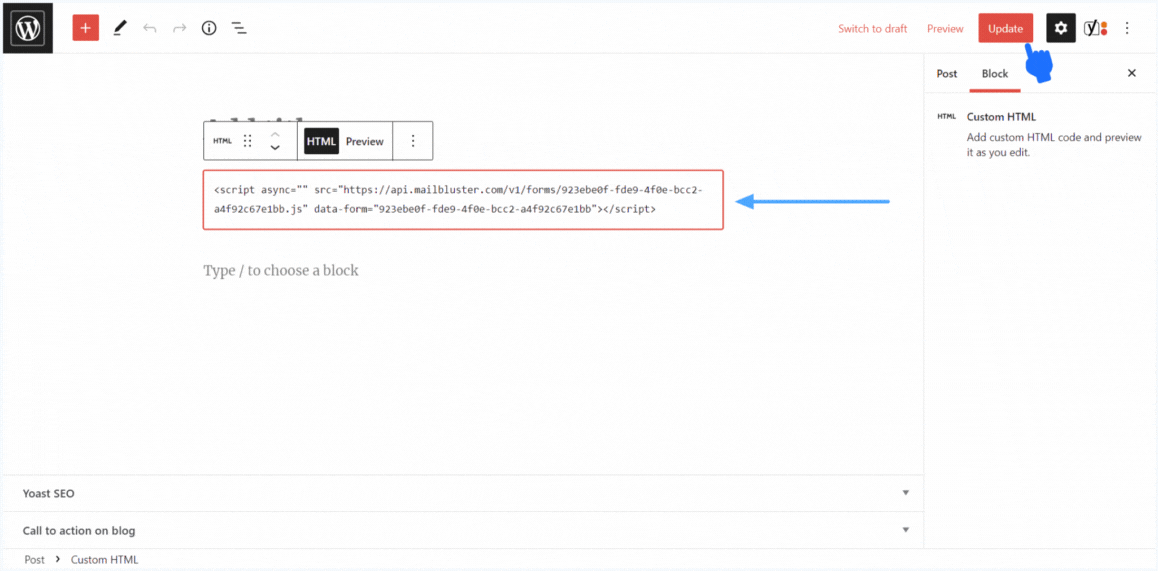
You are now done. Your customized MailBluster form will appear on your WordPress website. The result will be exactly the same as the output of the first method, where you added the generated HTML code to your HTML website.
Congratulations! You have learned to add your custom forms using the two methods discussed above. For any queries, you can reach out to us directly.
In summary
The forms are lovely and a powerful way to grow your lead list. Applying it will significantly turn your website visitors into subscribers. But remember, your form creation effort will be helpful when you create them properly. Using MailBluster, you can create your form with some easy steps. You need to forget about all the coding stuff, as we offer a simple drag & drop editor to design your form. Moreover, our tool will make your form both desktop and mobile friendly. Also, don’t limit yourself to creating forms. You can also send email campaigns and newsletters to your subscribers through MailBluster.