


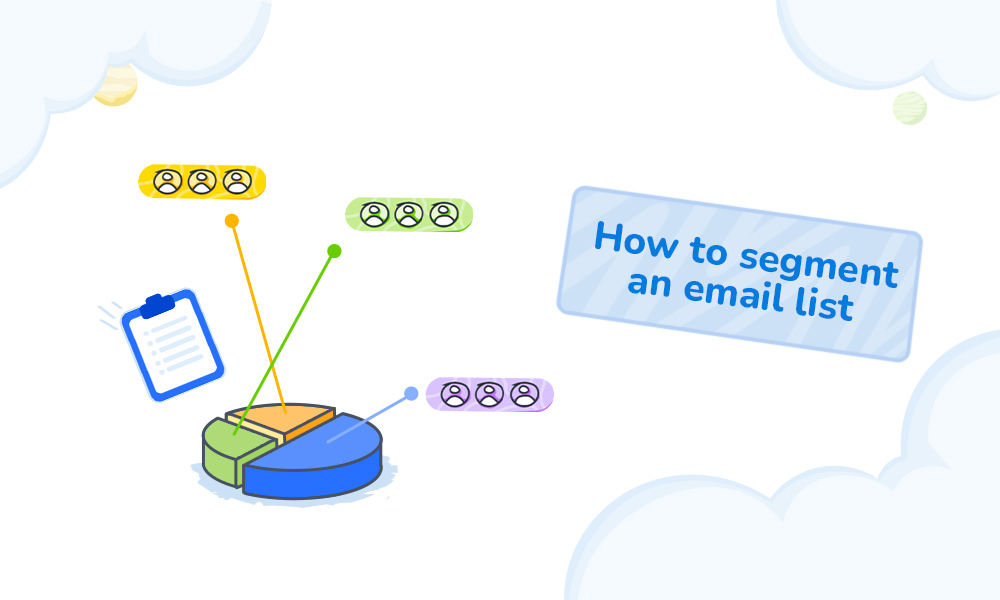
Looking to create an email segment list?
No hurry- email segmentation is no longer an unnerving task when MailBluster brings the simple steps to follow. Do you have a list of leads or users that need segmentation? MailBluster comprehensively segments your target customers and personalizes your email marketing based on buyer personas.
So, how can you build a segment list?
Identify the customer base to be used, find prospective customers, identify the most engaging ones by gender, location, age, or organization, and create a segmentation list based on these categories.
Now, how to do it with a tool? Find out the step-by-step guide for creating an email segmentation list.
Table of contents
- What is List Segmentation?
- Things to know: Building Segments for Email Marketing
- Email segment list: MailBluster segmentation step-by-step
- FAQs
- Wrap Up
What is email list segmentation?
The list segmentation involves maintaining separate email lists by industry (Welcome emails, transactional emails, etc.) and clustering them into several groups to send more personalized emails based on buyer persona.
Additionally, email marketing list management involves segmenting lists based on characteristics such as companies, organizations, and locations to identify more productive and active contact lists that eventually lead to conversions.
So, for example, you can send segmented emails based on –
- Company
- Location
- Active users
- Inactive users
- Most viewed products and more!
Things to know: building segments for email marketing
Segmentation is an inexplicable term in email marketing; there’s no doubt. When you build a segment, there will obviously be personalization or tailored content targeted to the group of customers. In statistics, personalization is described as an invaluable element for a business’s success, and three-quarters of business owners were surveyed. Personalization is indeed an essential part of segmentation in email marketing.
In addition, think about generic content and personalized segmented content.
- Your content is tailored according to the group of users on your customer lists.
- You send generic content to your whole marketing contact list.
Assume which one will be the most effective for sending. Between group and generic sending, you can determine which one is most effective for your segmentation email marketing.
So, how can you start segmenting your huge email list?
You can check the segmentation types
- Demographic: Income, profession, age.
- Behavioral: Page viewed most, purchasing behavior.
- Geographic: Location, area, country
- Psychographic: Subscribers’ interests, values & lifestyles
- Customer purchase history: Activity during customer purchases
These several components here show different parts of the segmentation types, where customer data, such as location or age, is collected. Also, dividing them into different parts of areas creates opportunities for the customers to get the product or service information based on their preferences. This also opens up a more elevated experience for the marketers on-
- Finding more prospective users
- Querying on active/inactive users
- Improving communication
- Getting return on investment and more!
For detailed ideas and strategies on segmentation, follow → Email segmentation ideas & strategies.
Let’s head to the segmentation part with MailBluster now.
Email segment list: MailBluster segmentation step-by-step guide
Finding ways to deal with MailBluster’s segmentation?
No worries! Whether you are an entry-level marketer or an advanced one, MailBluster brings an easy-to-follow and straightforward segmentation structure for you. Also, the segmentation feature includes three segment types! Interesting, isn’t it?
Find out how to segment email lists on MailBluster.
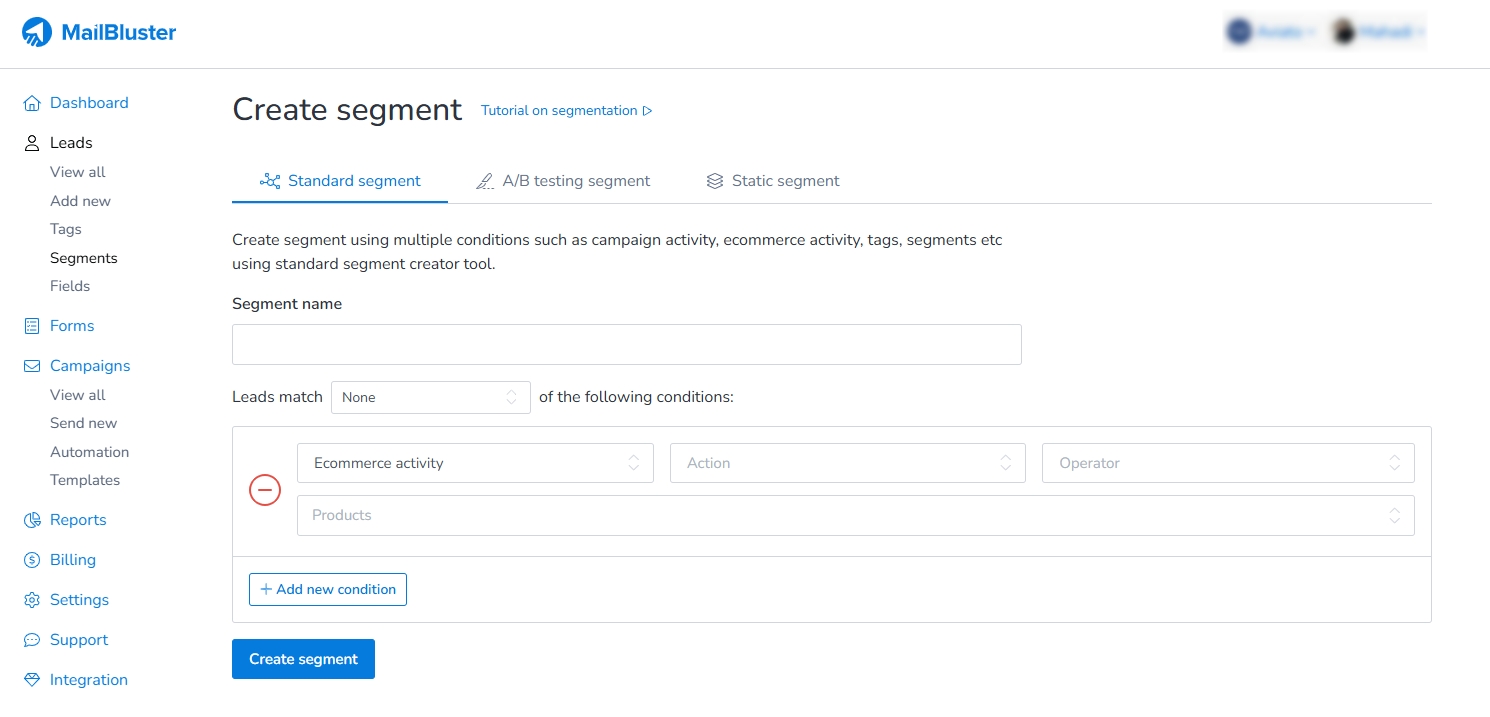
Standard Segmentation
Standard segmentation is a simple and traditional method of segmentation. You can create segmentation based on different conditions, such as campaign activity, ecommerce activity, tags, segments, and more. Each segmentation type includes specific steps to follow.
Campaign activity
The Campaign activity condition lets you separate the actions based on your selected campaigns. You can select more than two campaigns here to segment the email list.
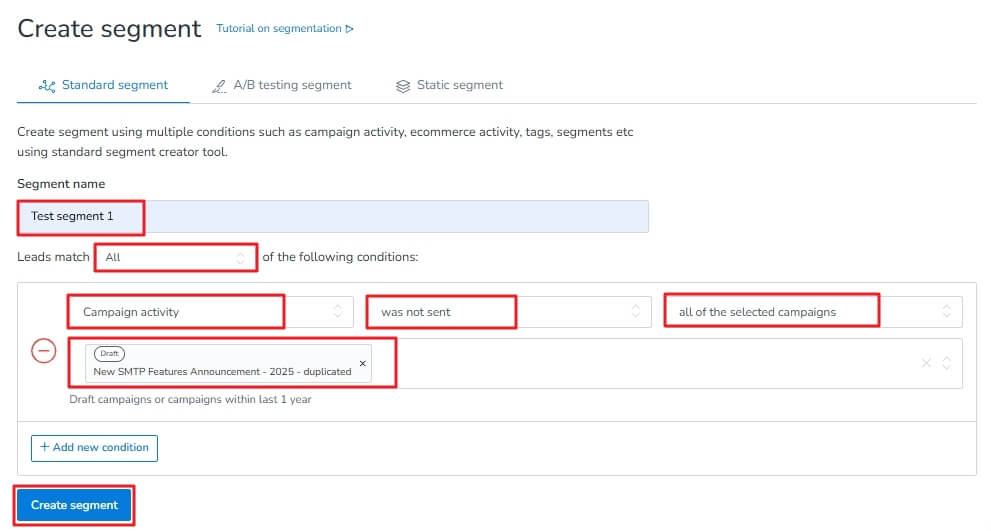
Step 1. First Name the segmentation
Step 2. Select Leads match from the drop-down
Step 3. Select the Condition activity from the next drop-down
Step 4. Select an Action that you need to implement for segmentation
Step 5. Select the Operator
Step 6. Select the Campaigns that you need to add
Step 7. Select Create segment to find out your segmented leads!
Date added
The Date added condition lets you find out the leads before, after, or between dates. You can select more than two campaigns here to segment the email list.
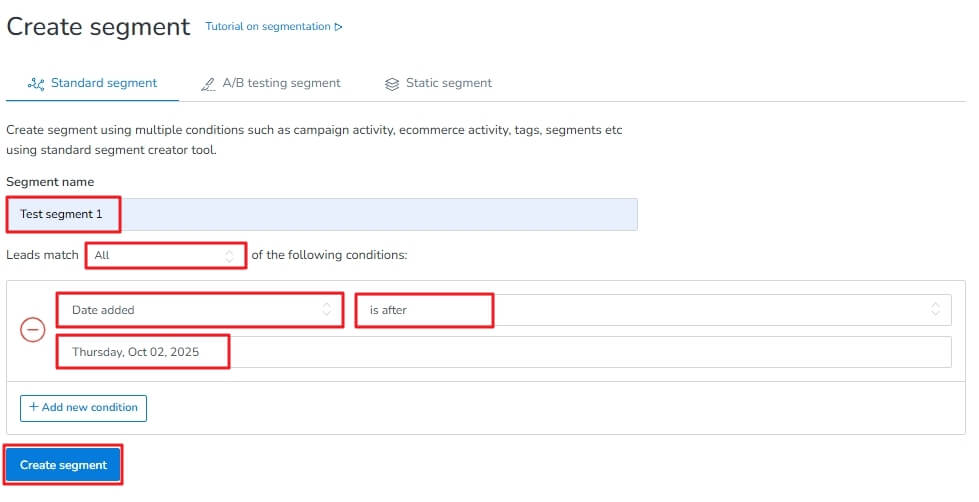
Step 1. First Name the segmentation
Step 2. Select Leads match from the drop-down
Step 3. Select Date added from the next drop-down
Step 4. Select the Operator
Step 5. Select the Date that you need to add
Step 6. Select Create segment to find out your segmented leads!
Ecommerce activity
The Ecommerce activity condition lets you find out the leads based on your product preference. You have 2 Actions here: purchased and did not purchase. You can select more than two campaigns here to segment the email list.
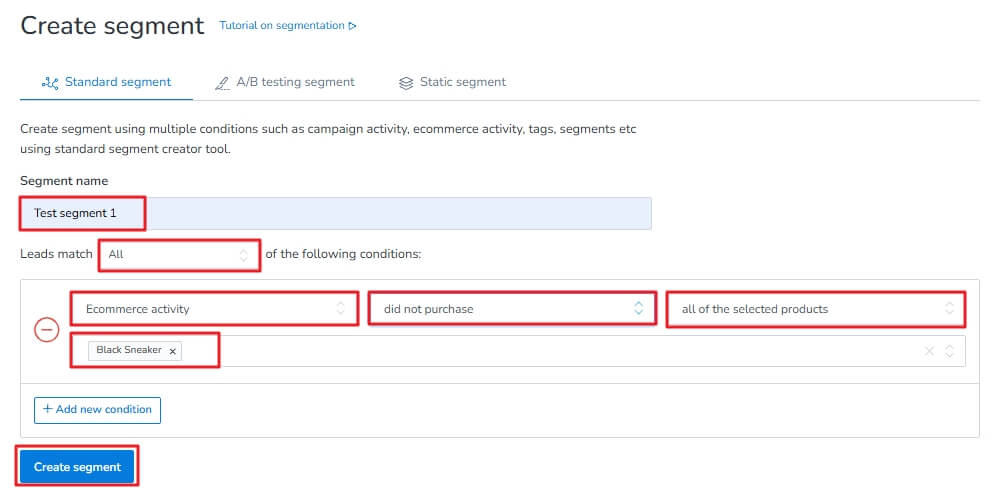
Step 1. First Name the segmentation
Step 2. Select Leads match from the drop-down
Step 3. Select the Ecommerce activity from the next drop-down
Step 4. Select an Action that you need to implement for segmentation
Step 5. Select the Operator
Step 6. Select the Products that you need to add
Step 7. Select Create segment to find out your segmented leads!
Tags condition
The Tags condition brings your leads into the category that you name. You have no Actions here. You can select as many tags as you want here to segment the email list.

Step 1. First Name the segmentation
Step 2. Select Leads match from the drop-down
Step 3. Select Tags from the next drop-down
Step 4. Select the Operator
Step 5. Select the Tags that you need to add
Step 6. Select Create segment to find out your segmented leads!
Segments condition
The Segments condition provides convenient segmentation of your already segmented leads. You can cut down on your segmented leads more by selecting 2 conditions and different Operators. You have no Actions here. You can select as many segments as you like to segment the email list.
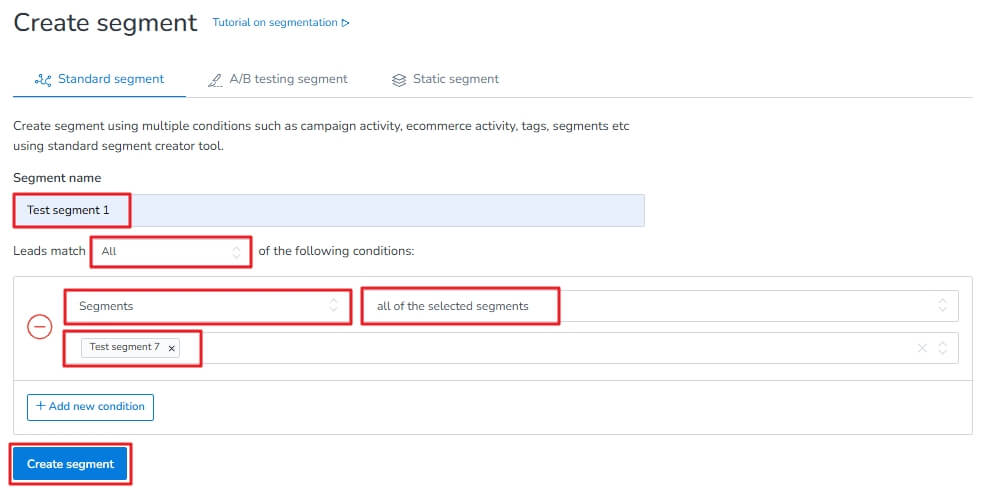
Step 1. First Name the segmentation
Step 2. Select Leads match from the drop-down
Step 3. Select Segments from the next drop-down
Step 4. Select the Operator
Step 5. Select the Segments that you need to add
Step 6. Select Create segment to find out your segmented leads!
Fields condition
The Fields condition lets you divide leads into different fields, like Gender, Location, Phone number, Company, and many more! You can select more than two campaigns here to segment the email list.
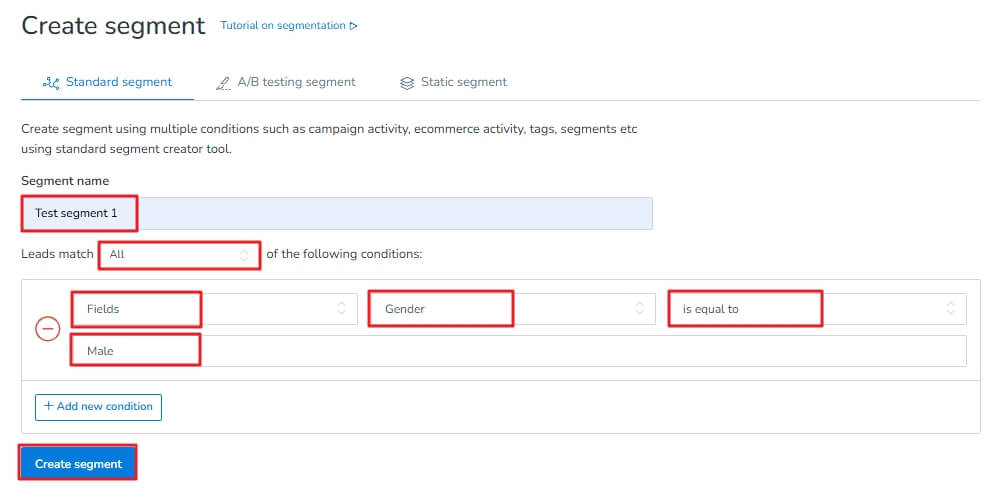
Step 1. First Name the segmentation
Step 2. Select Leads match from the drop-down
Step 3. Select Fields from the next drop-down
Step 4. Select a Field Name that you need to implement for segmentation
Step 5. Select the Operator
Step 6. Provide the Field value if you need to add
Step 7. Select Create segment to find out your segmented leads!
Double opt-in status
Double opt-in status extracts the leads from waiting or confirmed options. You can select multiple conditions here as well.
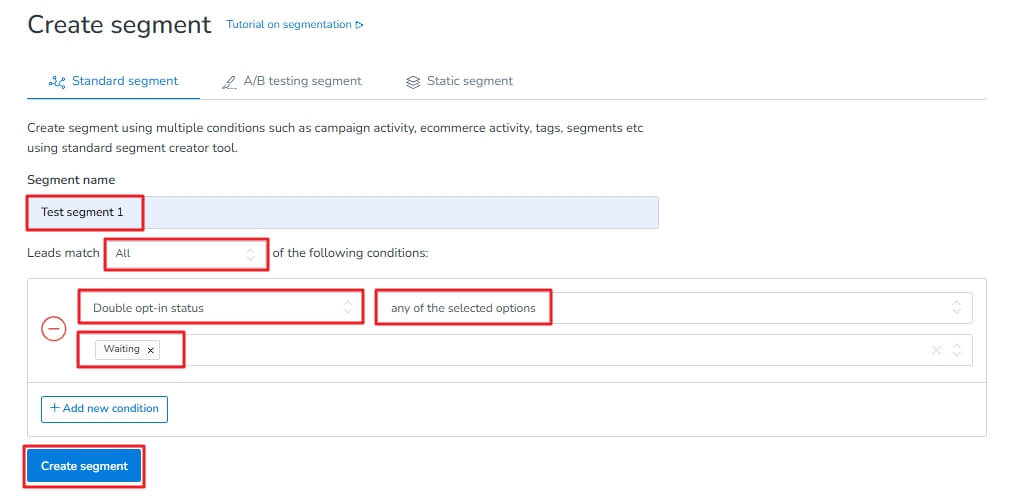
Step 1. First Name the segmentation
Step 2. Select Leads match from the drop-down
Step 4. Select Double opt-in status
Step 5. Select the Operator
Step 6. Provide options for Waiting, Confirmed, Failed (What you need to add).
Step 7. Select Create segment to find out your segmented leads!
A/B testing Segment
The A/B testing segment is an essential part of the segmentation feature in MailBluster. Here, you can slice your leads into two parts or more and conduct A/B testing right from the segmentation.
Note: You can select a maximum of 3415 leads from the number of leads option.
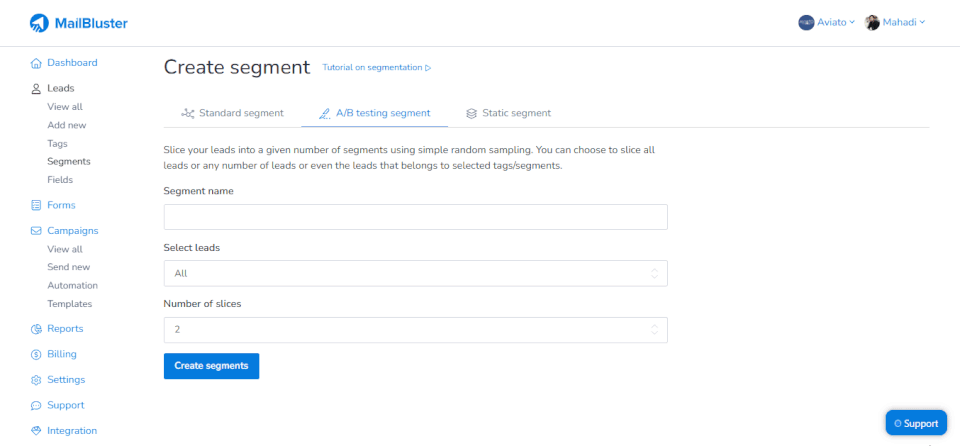
Step 1. Name your A/B testing segment
Step 2. Select leads, tags, or segments that you need
Step 3. Mention the number of leads or select tags from the list or segments, depending on your previous selection.
Step 4. Select the number of slices you need to add to the segmentation.
Step 5. Click Create segments.
Static segment
Static segment is the list of leads from the CSV file uploaded to the static segmentation upload box. You can follow the instructions in the CSV format and import the instructions shown on the right side of the static segment box.
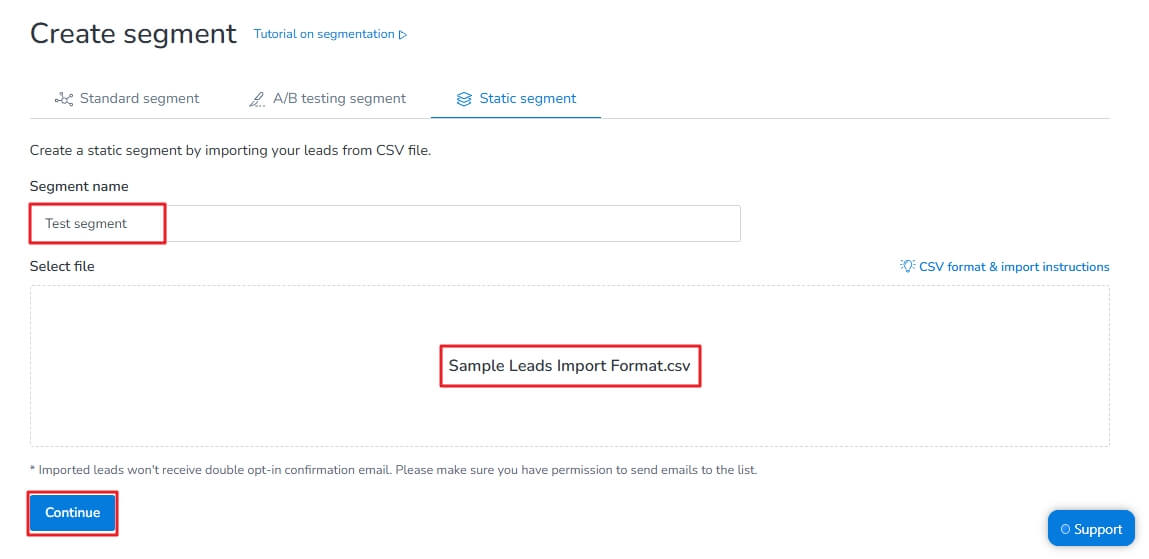
Note: You can upload maximum 10mb of CSV file
Step 1. Name your segment
Step 2. Select the CSV file containing First name, Last name, Email address, Time zone, IP address, Tags, Subscribe status
Step 3. Click Continue
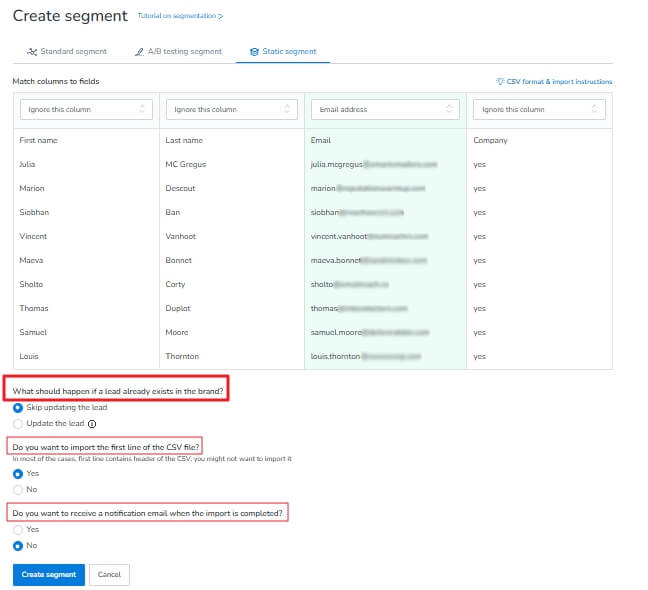
Step 4. Select and highlight Name fields, Email address, Subscribe, Time zone, IP address, tags, or the fields you need.
Step 5. Select the optional components if you need, such as First line import, already exists lead handling, Notification email, and click Create segment.
FAQs
Email marketing automation tools like MailBluster automate email list segmentation. Besides, some email marketing tools offer automation with segmentation, which you need to choose wisely.
4 types of segmentation are demographic, psychographic, geographic, and behavioral segmentation.
The main difference between a segment and a list is that a segment constantly changes its objectives, whereas a list is just a number of items that never change.
Wrap up
That’s a wrap on the email segment list. Segmentation is an essential part of email marketing and helps marketers gain more visibility and acceptance, and eventually satisfy the customer circle that could be a potential buyer. Use simple and easy-to-follow segmentation tools like MailBluster to boost your marketing expertise and see the results that bring more value to your brand.
For more segmentation-related blogs-
What is email segmentation?
Email Segmentation Ideas & Strategies
Email segmentation feature by MailBluster
A Complete guide to segmentation