A form is like a digital questionnaire or a way for people to share their information with you. It’s typically a box or a page where someone can fill in details like their name, email address, or other important information. Nowadays, Businesses use forms to collect email addresses or gather specific details from their customers who are interested in their products, services, or newsletters.
Is it possible to create a sign-up form in MailBluster? This is a common question, especially for users looking to collect detailed user information. A signup form is used to join or register for something, like a service, a website, or a newsletter. It typically collects various details such as name, email, and password for creating an account or gaining access to something.
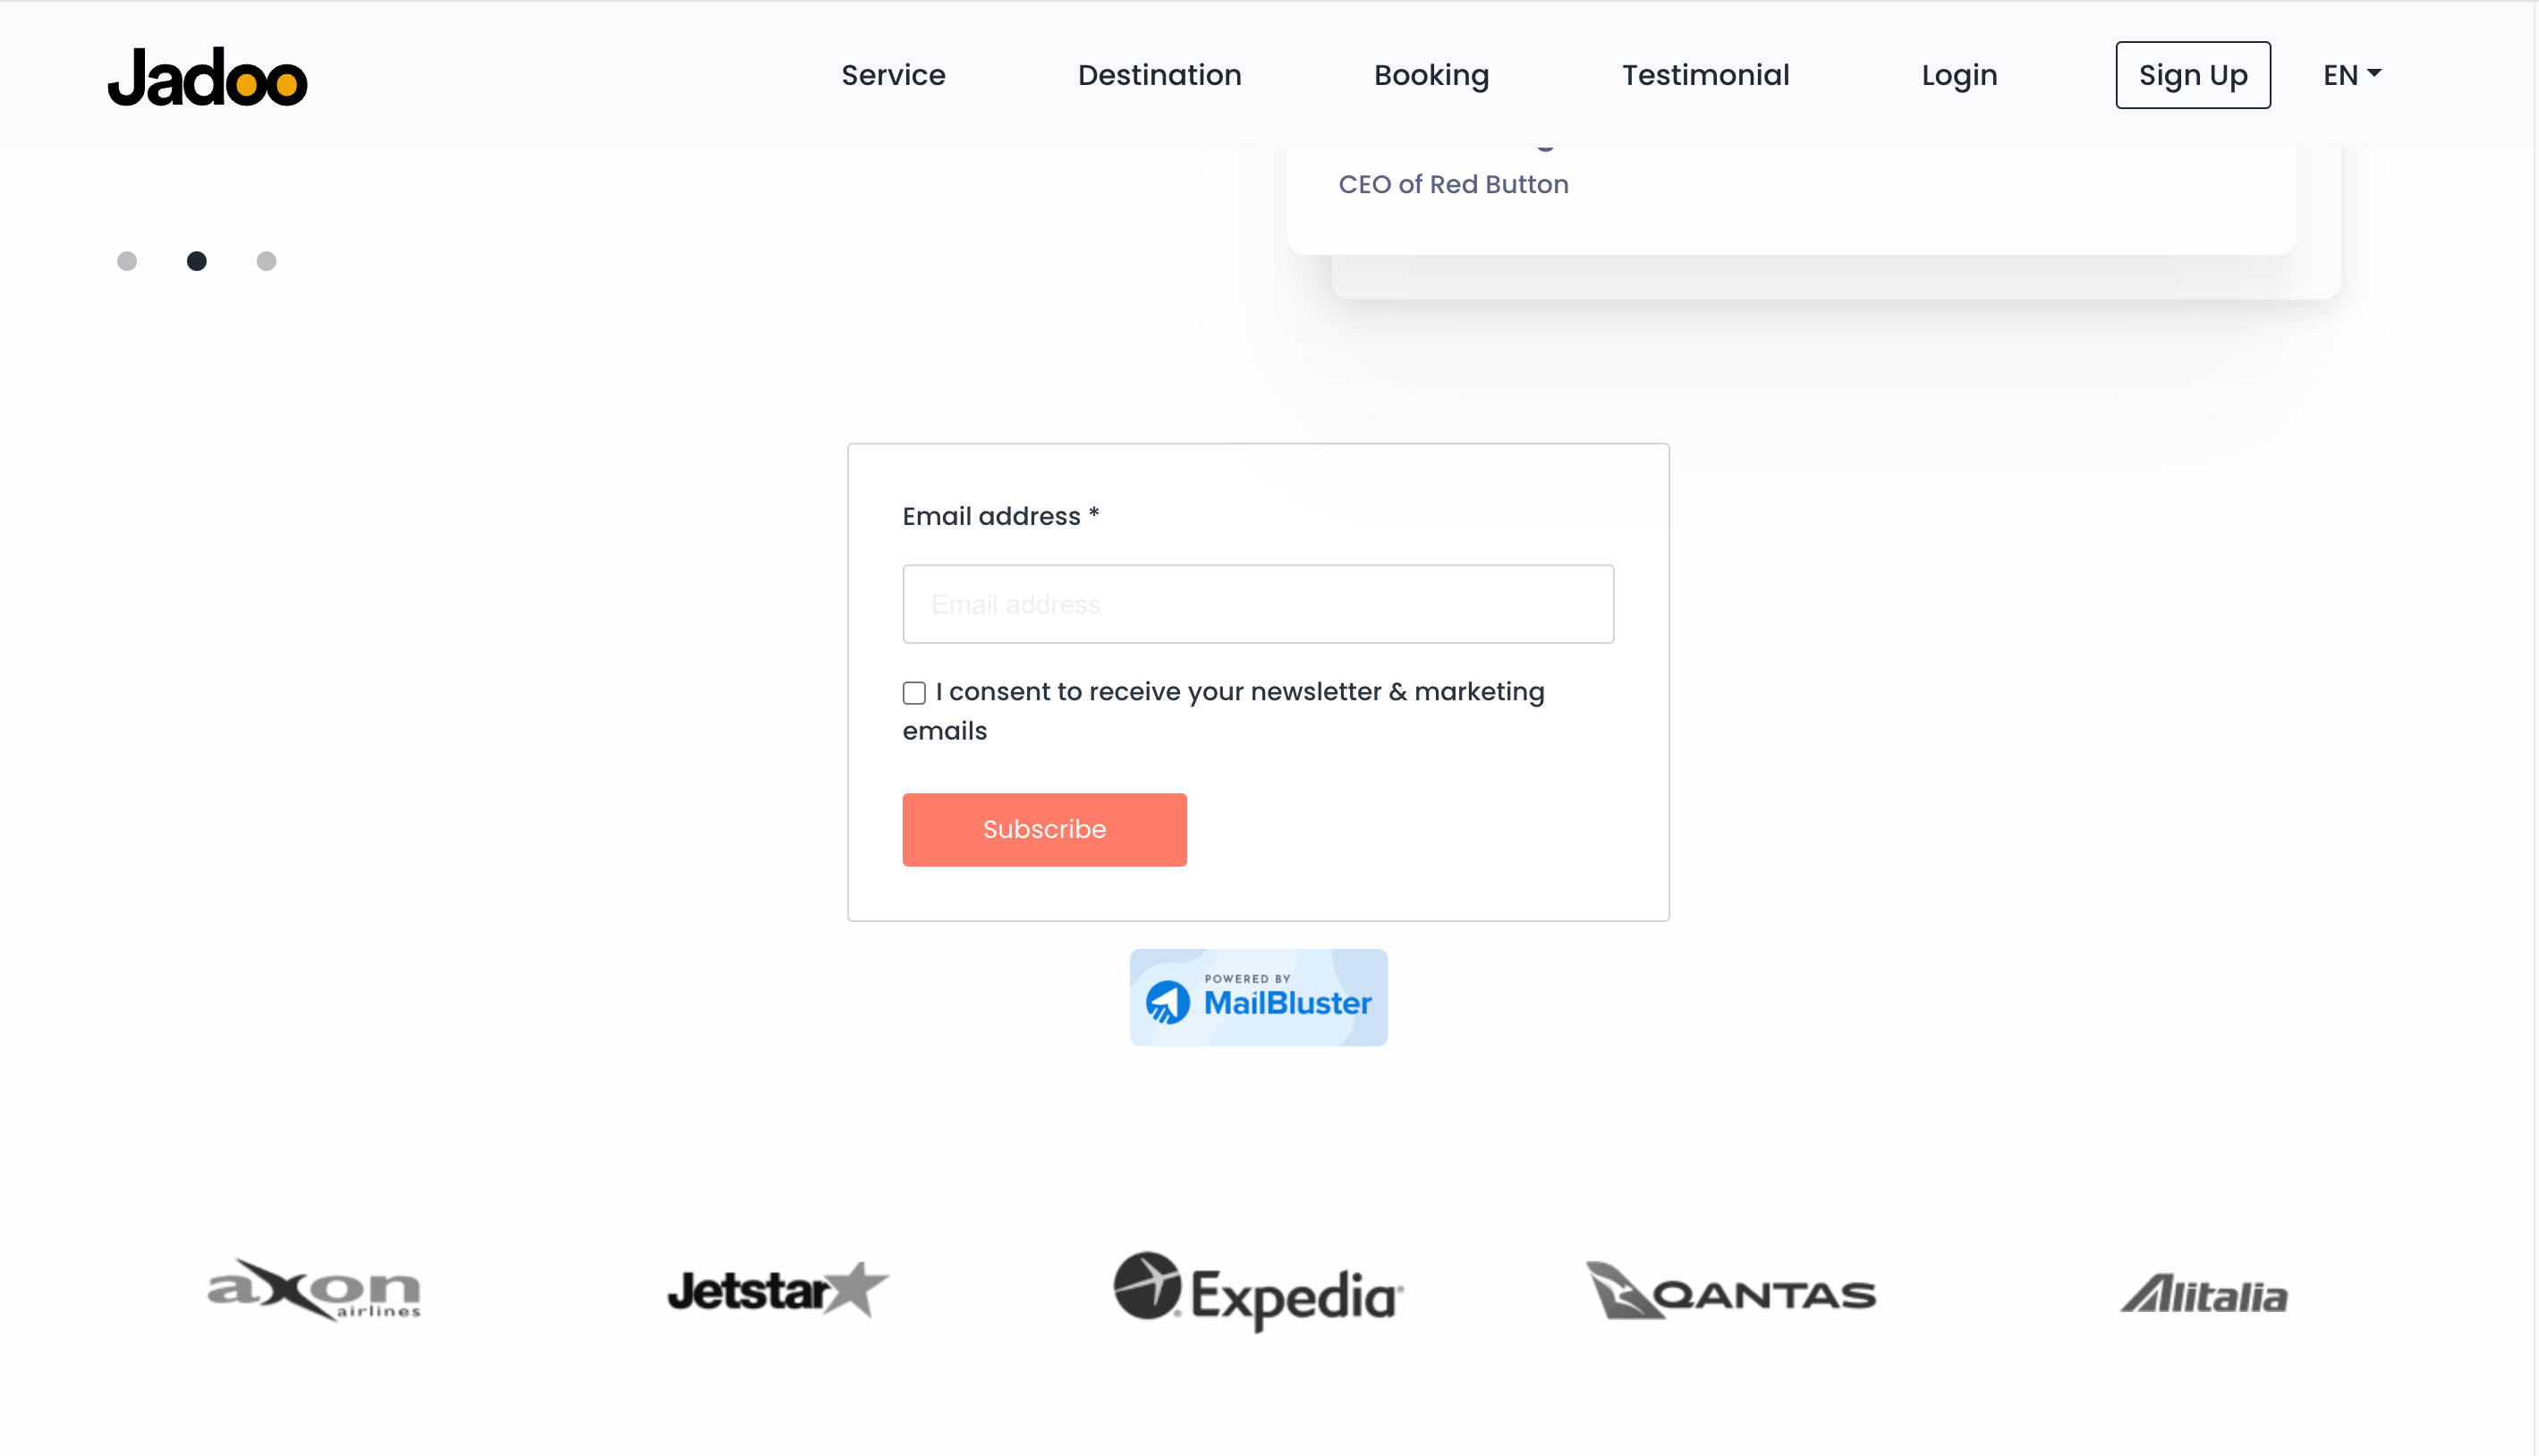
On the other hand, a subscribe form is specifically for joining a mailing list or receiving updates. It usually collects an email address and sometimes additional information, focusing on adding someone to a list to receive periodic information, newsletters, promotions, or updates.
MailBluster only supports subscribe forms, allowing you to create, design, and customize your subscribe form.
Please note: MailBluster does not support signup forms. You cannot create any signup forms using MailBluster.
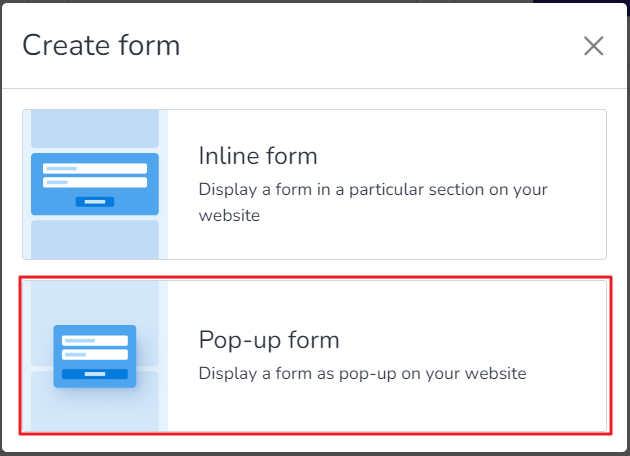
In email marketing, a Popup form might refer to a type of form that pops up on a webpage to collect information from visitors. These forms usually appear suddenly (or “pop up”) and can prompt users to subscribe to a newsletter, receive updates, or provide their email address for various purposes. They’re a way to capture attention and encourage interaction or subscription within a website or landing page.
An Inline form is a type of web form that is embedded directly within the content of a webpage, rather than appearing as a separate popup or on a different page. Inline forms are often used for collecting user information, such as email addresses, names, or other details, without disrupting the user experience. They are designed to be part of the natural flow of the webpage, making it easy for users to fill them out without leaving the current page or being interrupted by a separate window. Inline forms are valued for their seamless integration into webpages, which can help improve user engagement and conversion rates by making it easy and convenient for users to provide their information.
MailBluster provides both Popup Form and Inline Form. The following are the configuration settings for both forms.
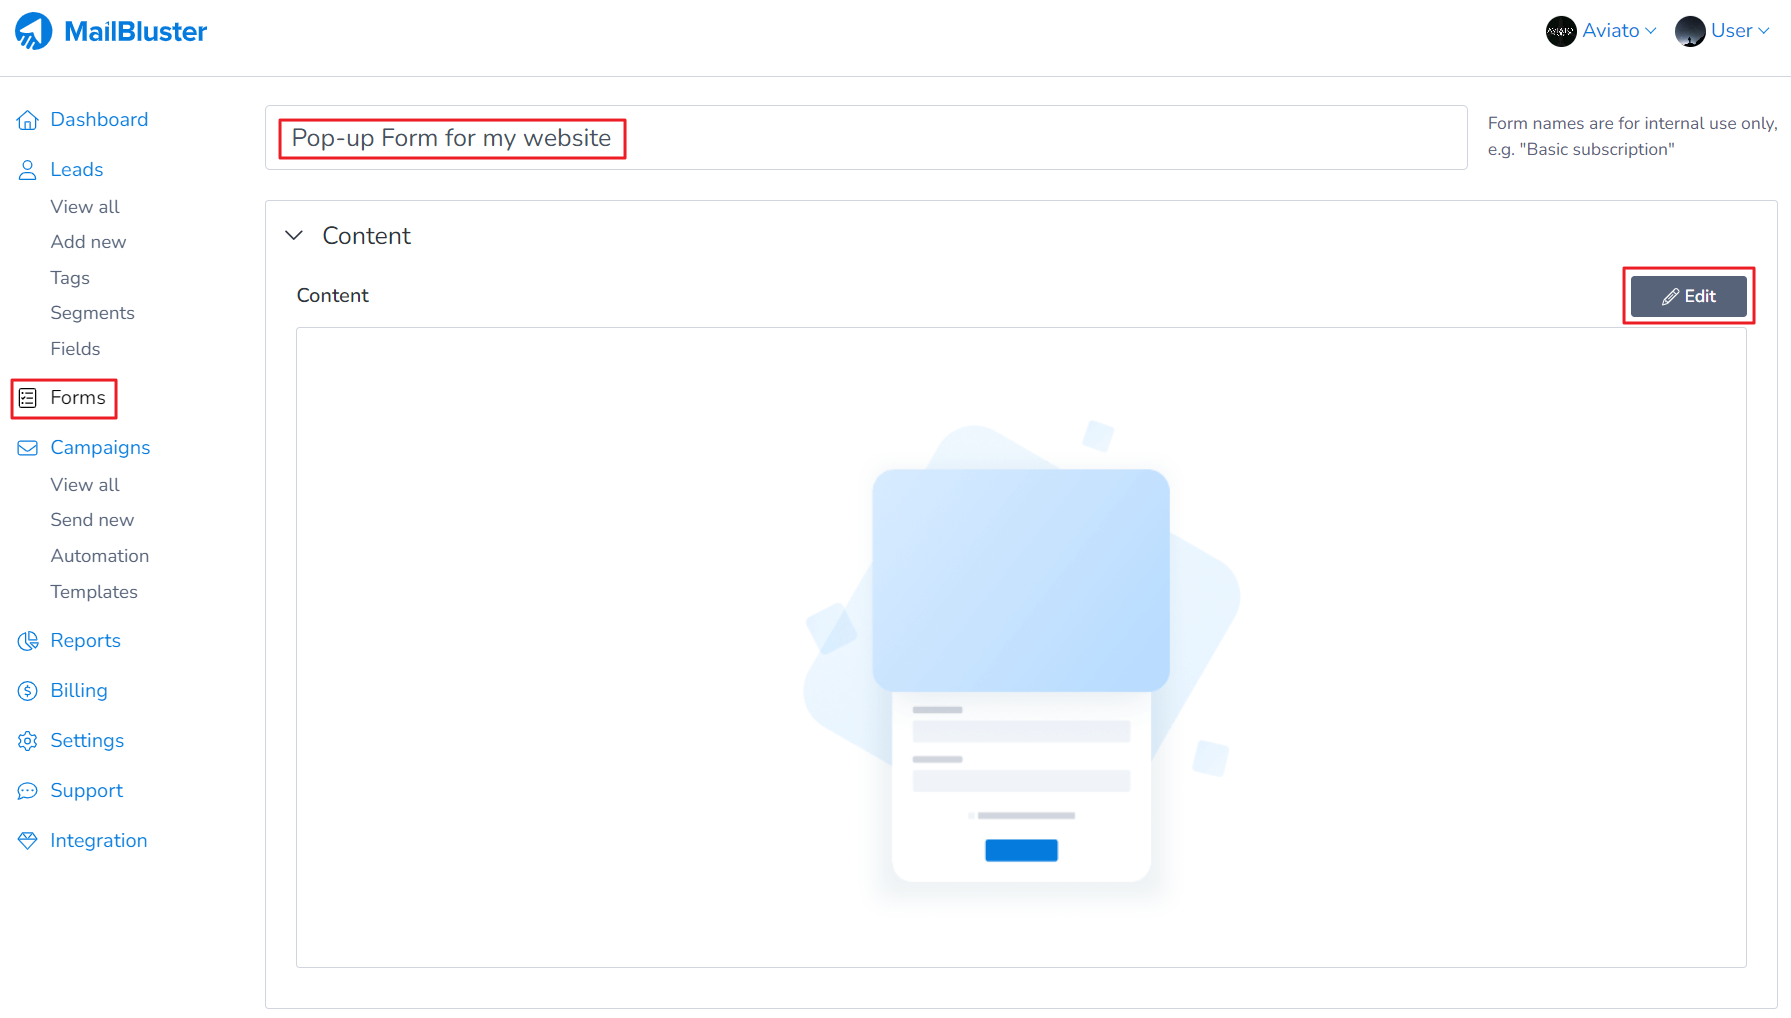
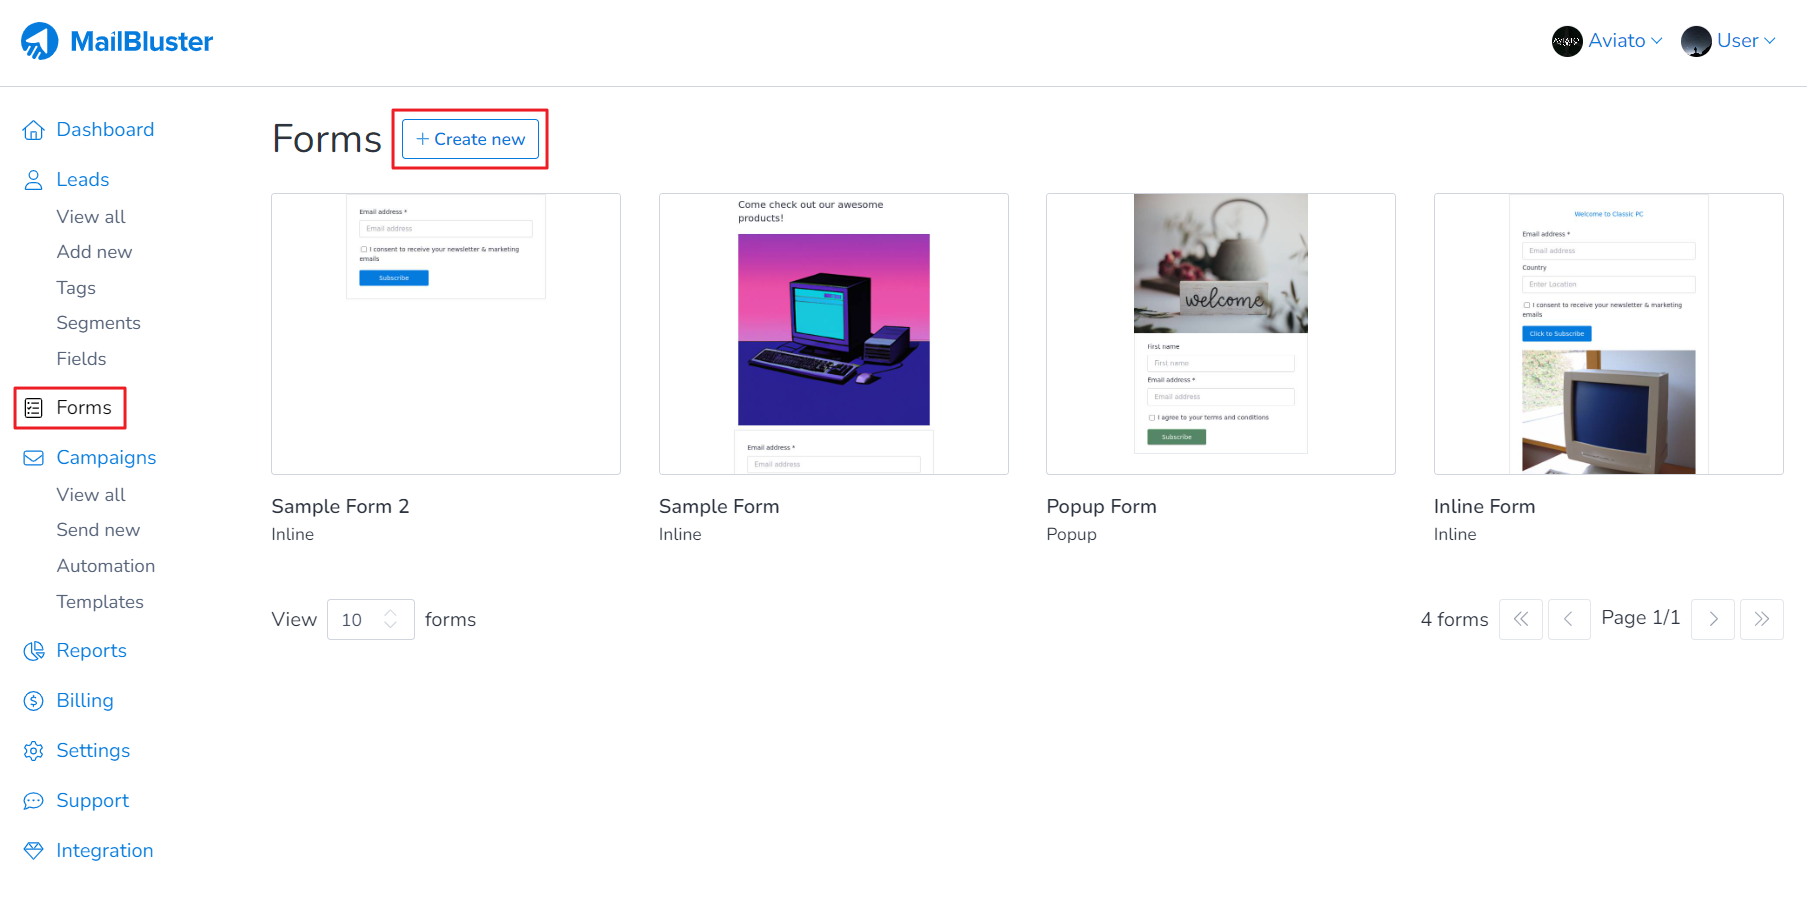
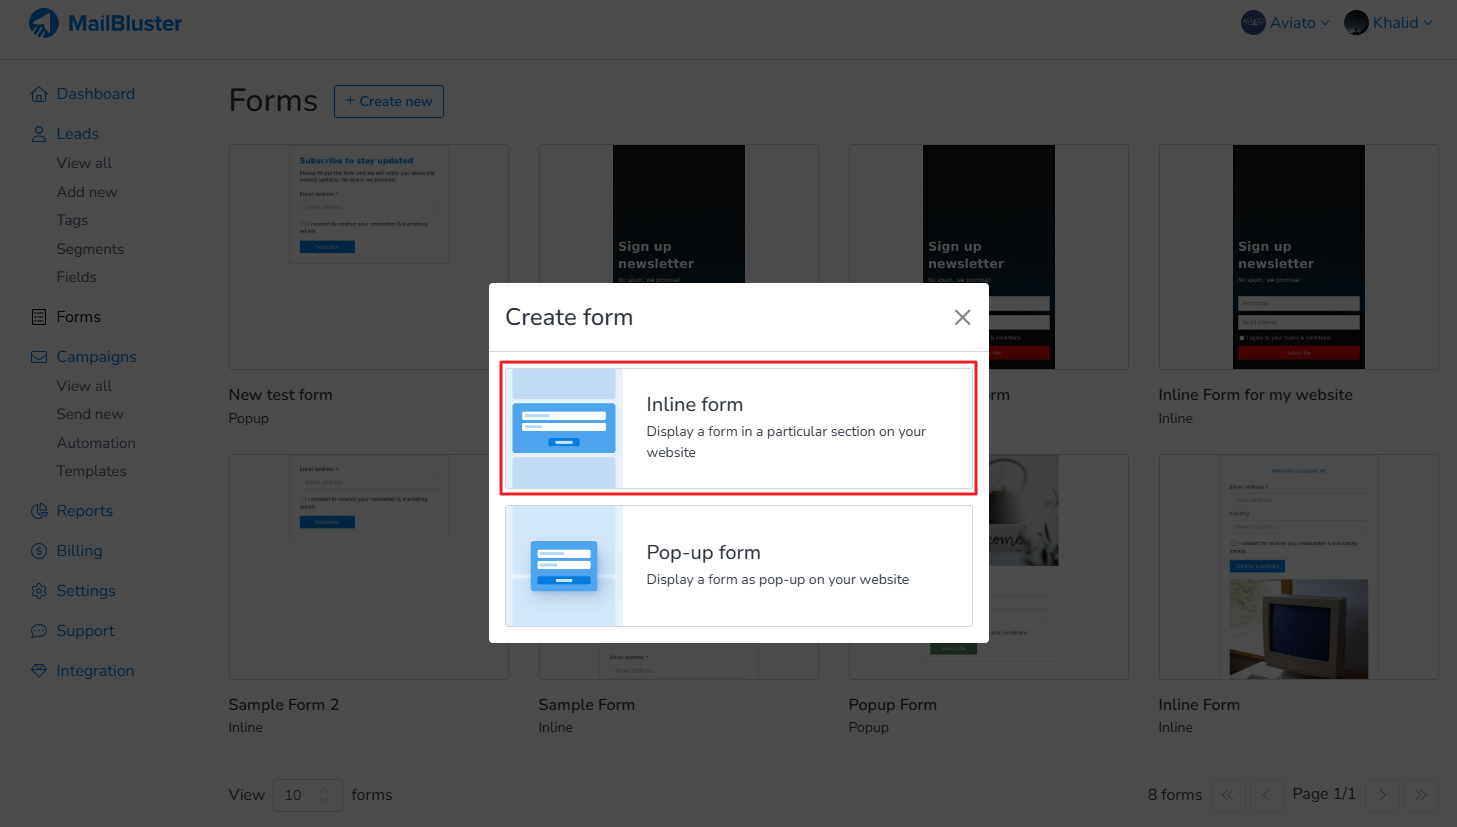
Here you will learn how to create Pop-up Form. First you need to go to Forms. Then Click on Create new.
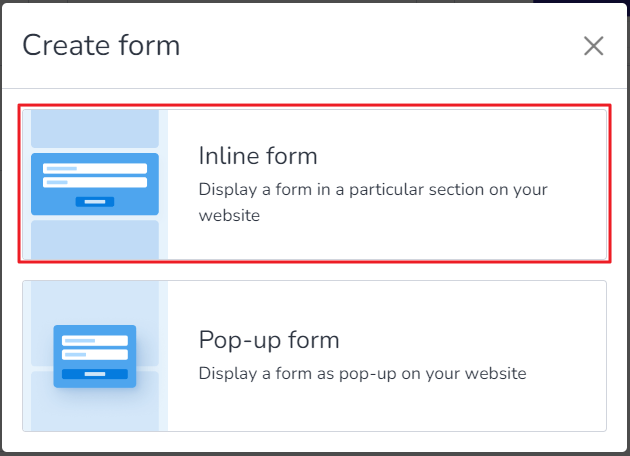
Select Pop-up form
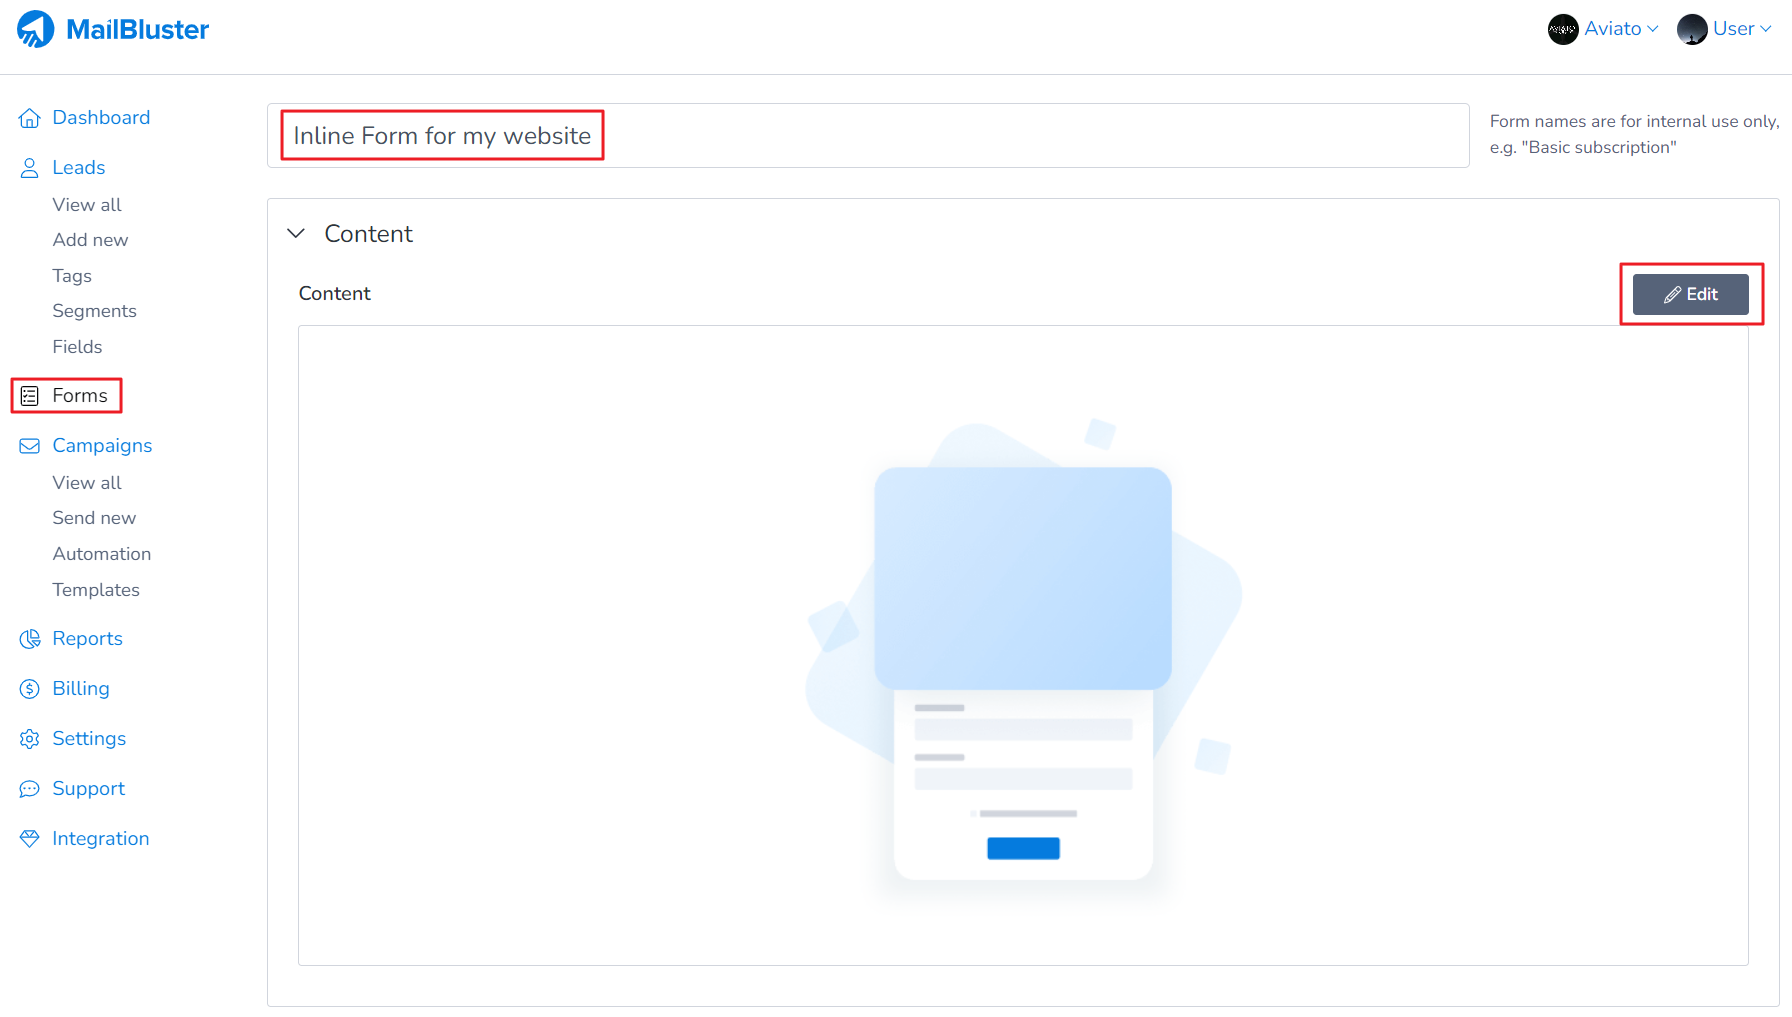
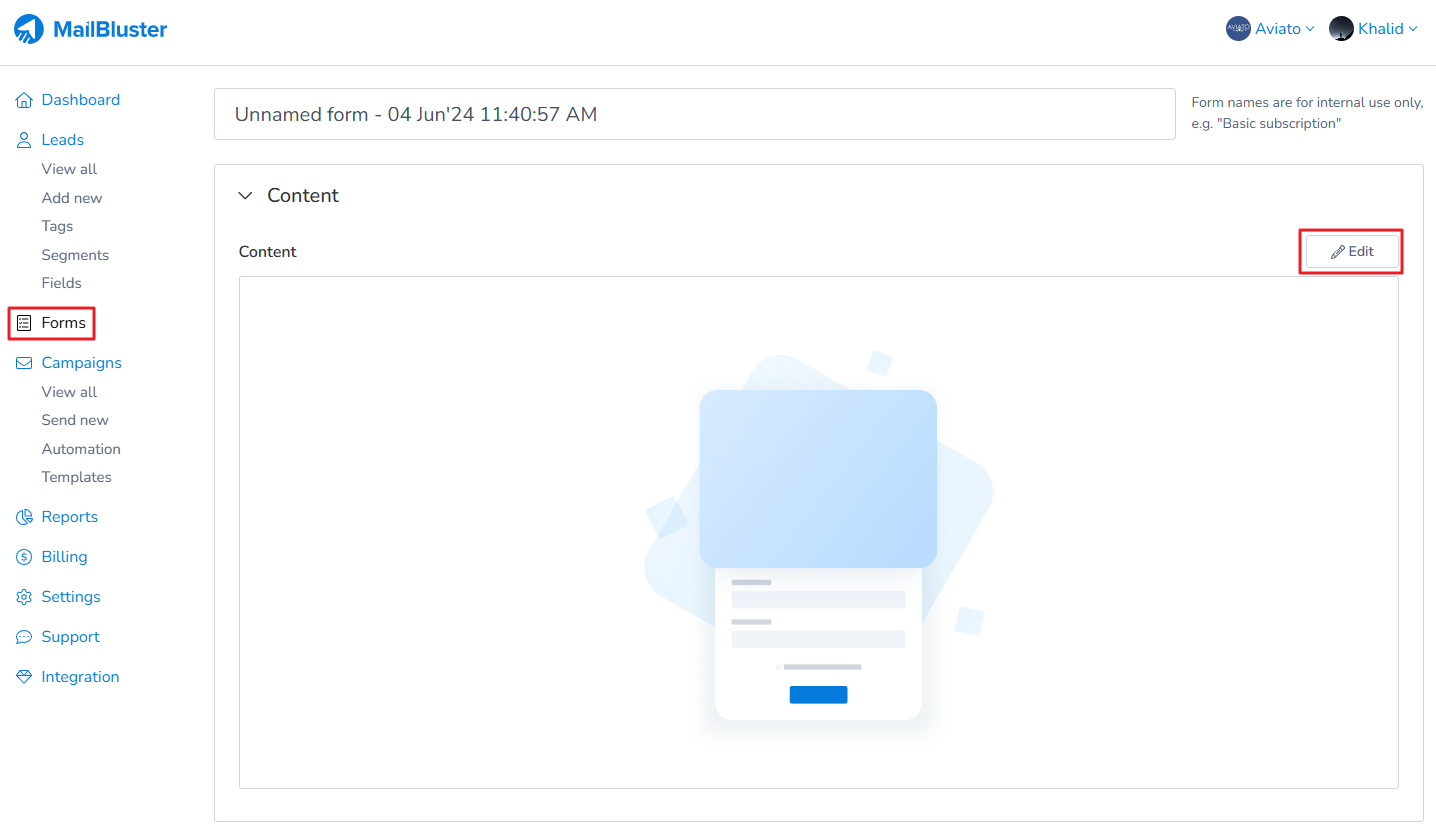
State the name of the form and then click on Edit.
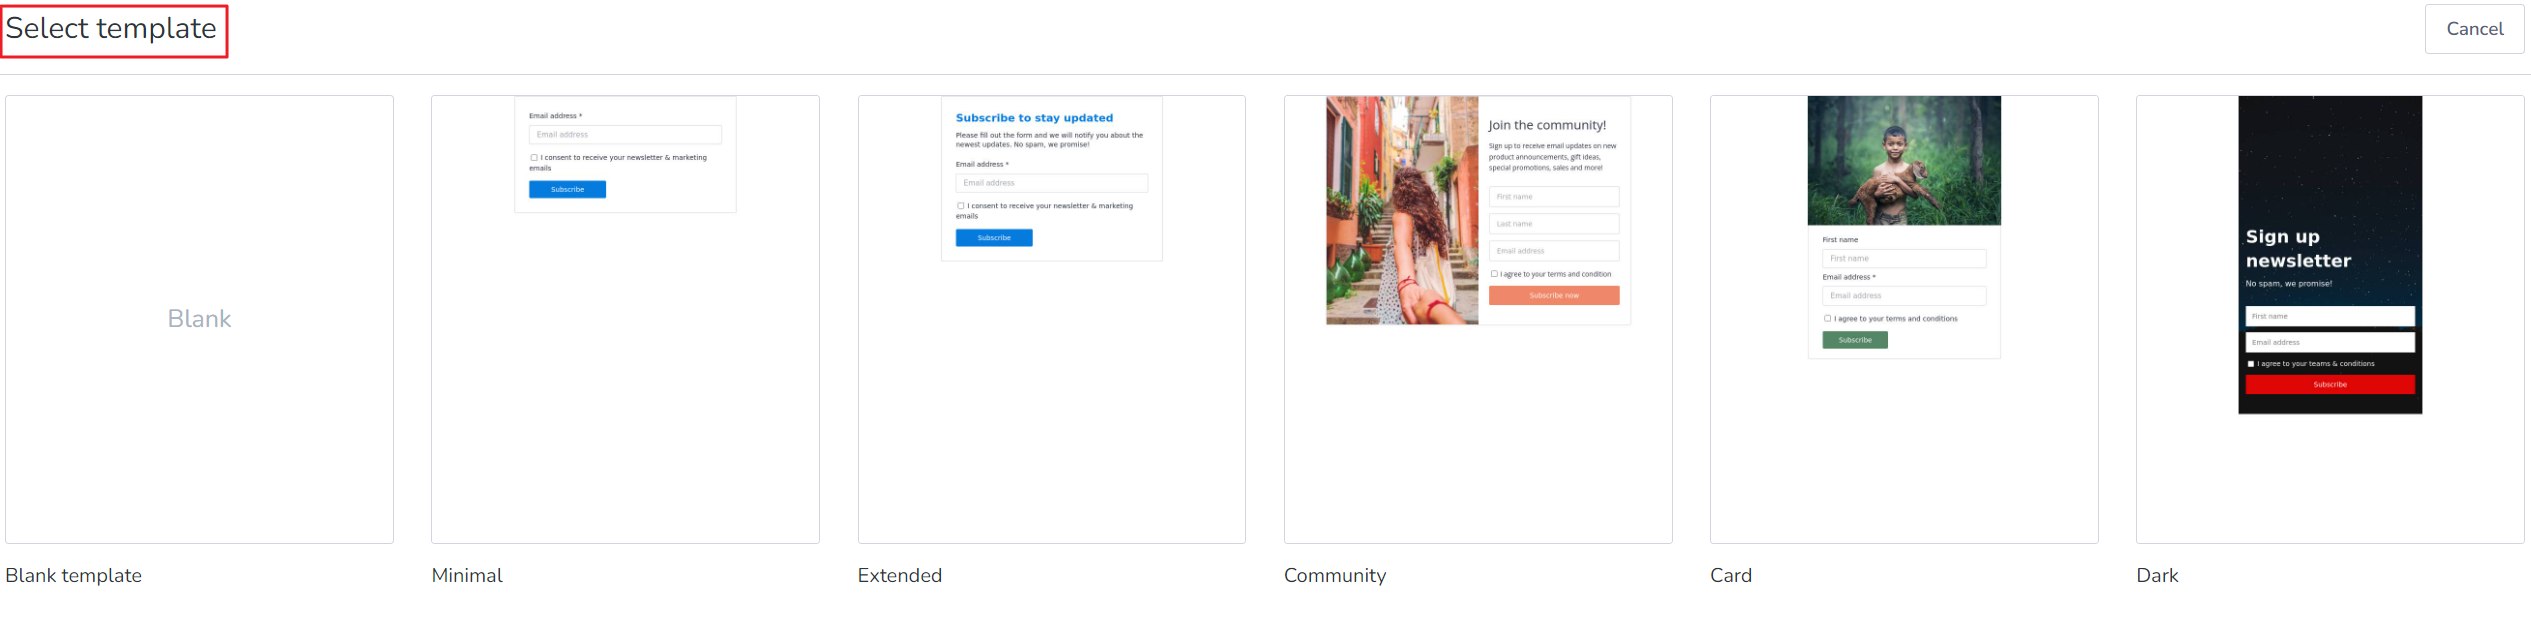
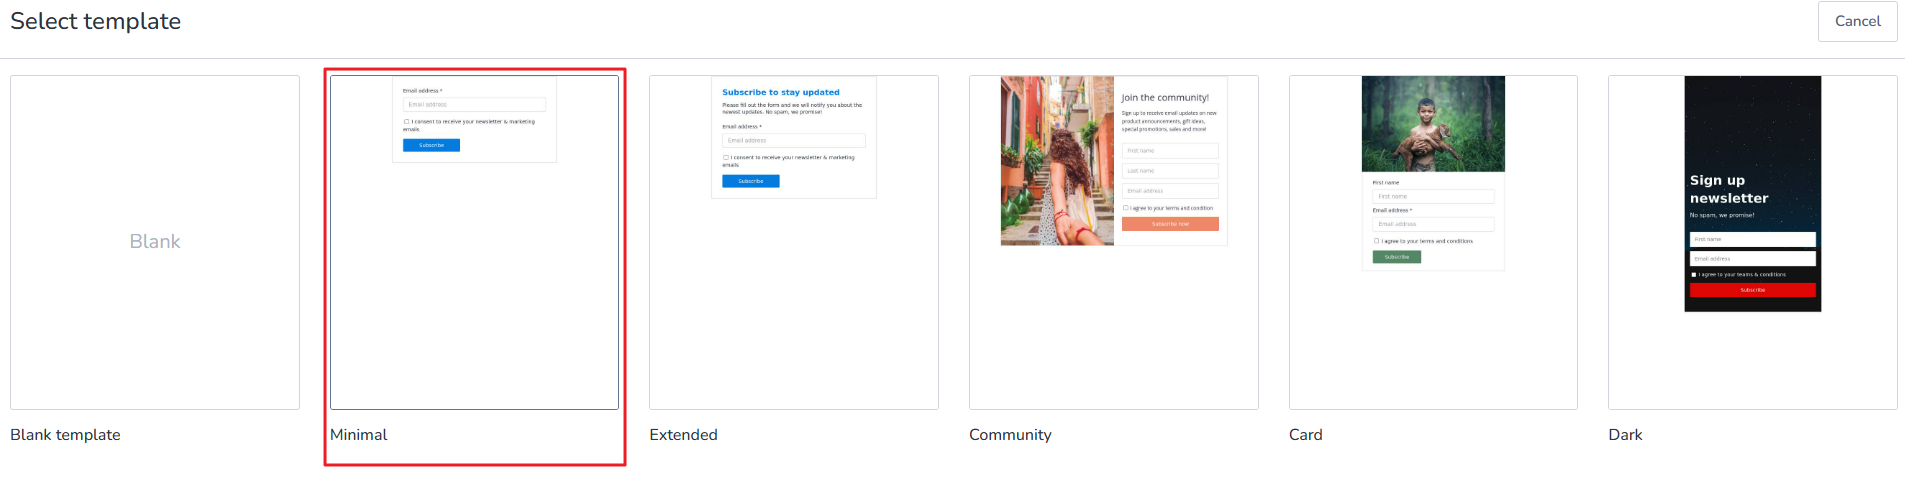
Either select a Blank template or a predefined template
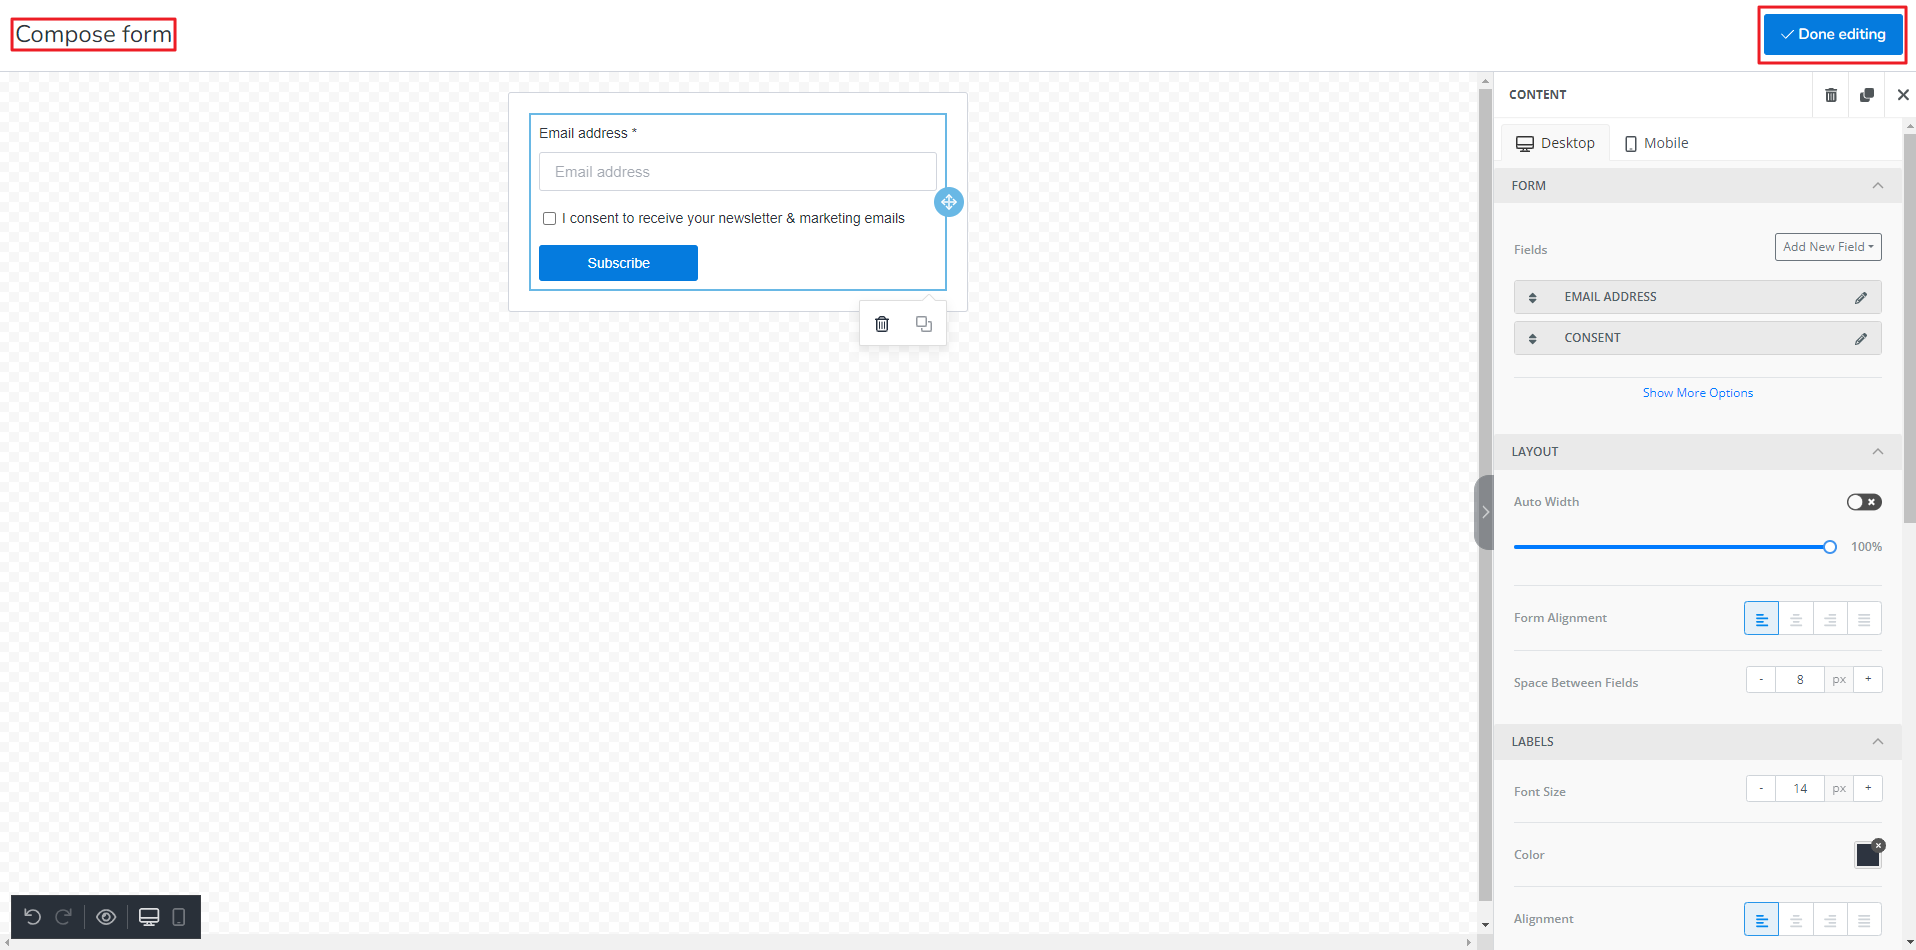
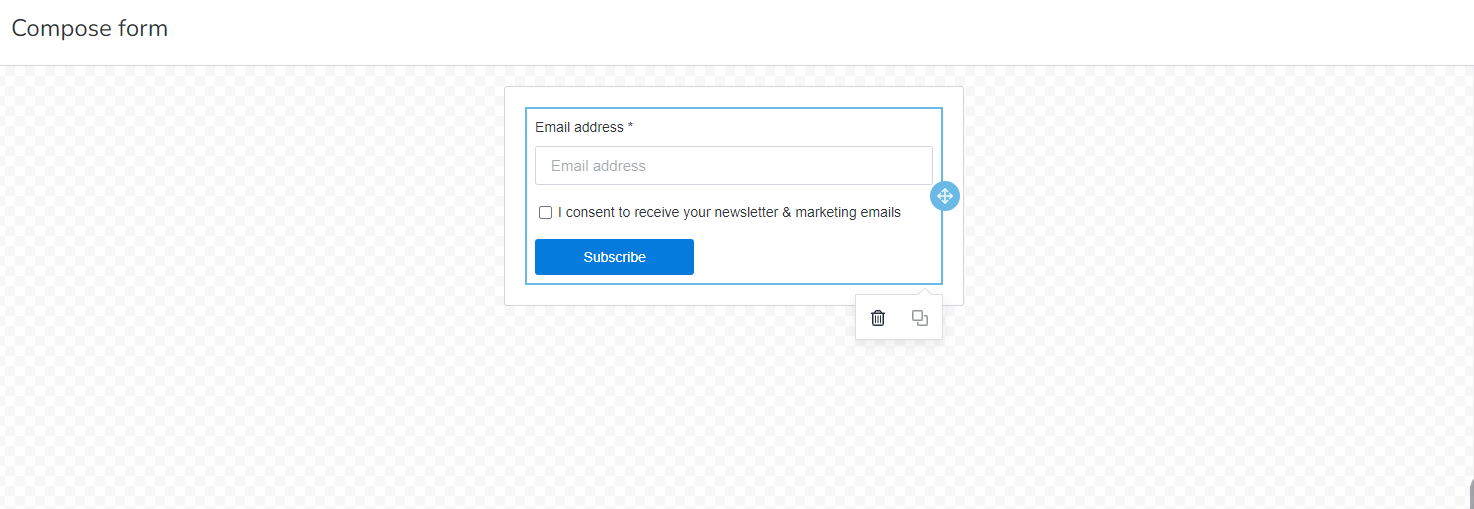
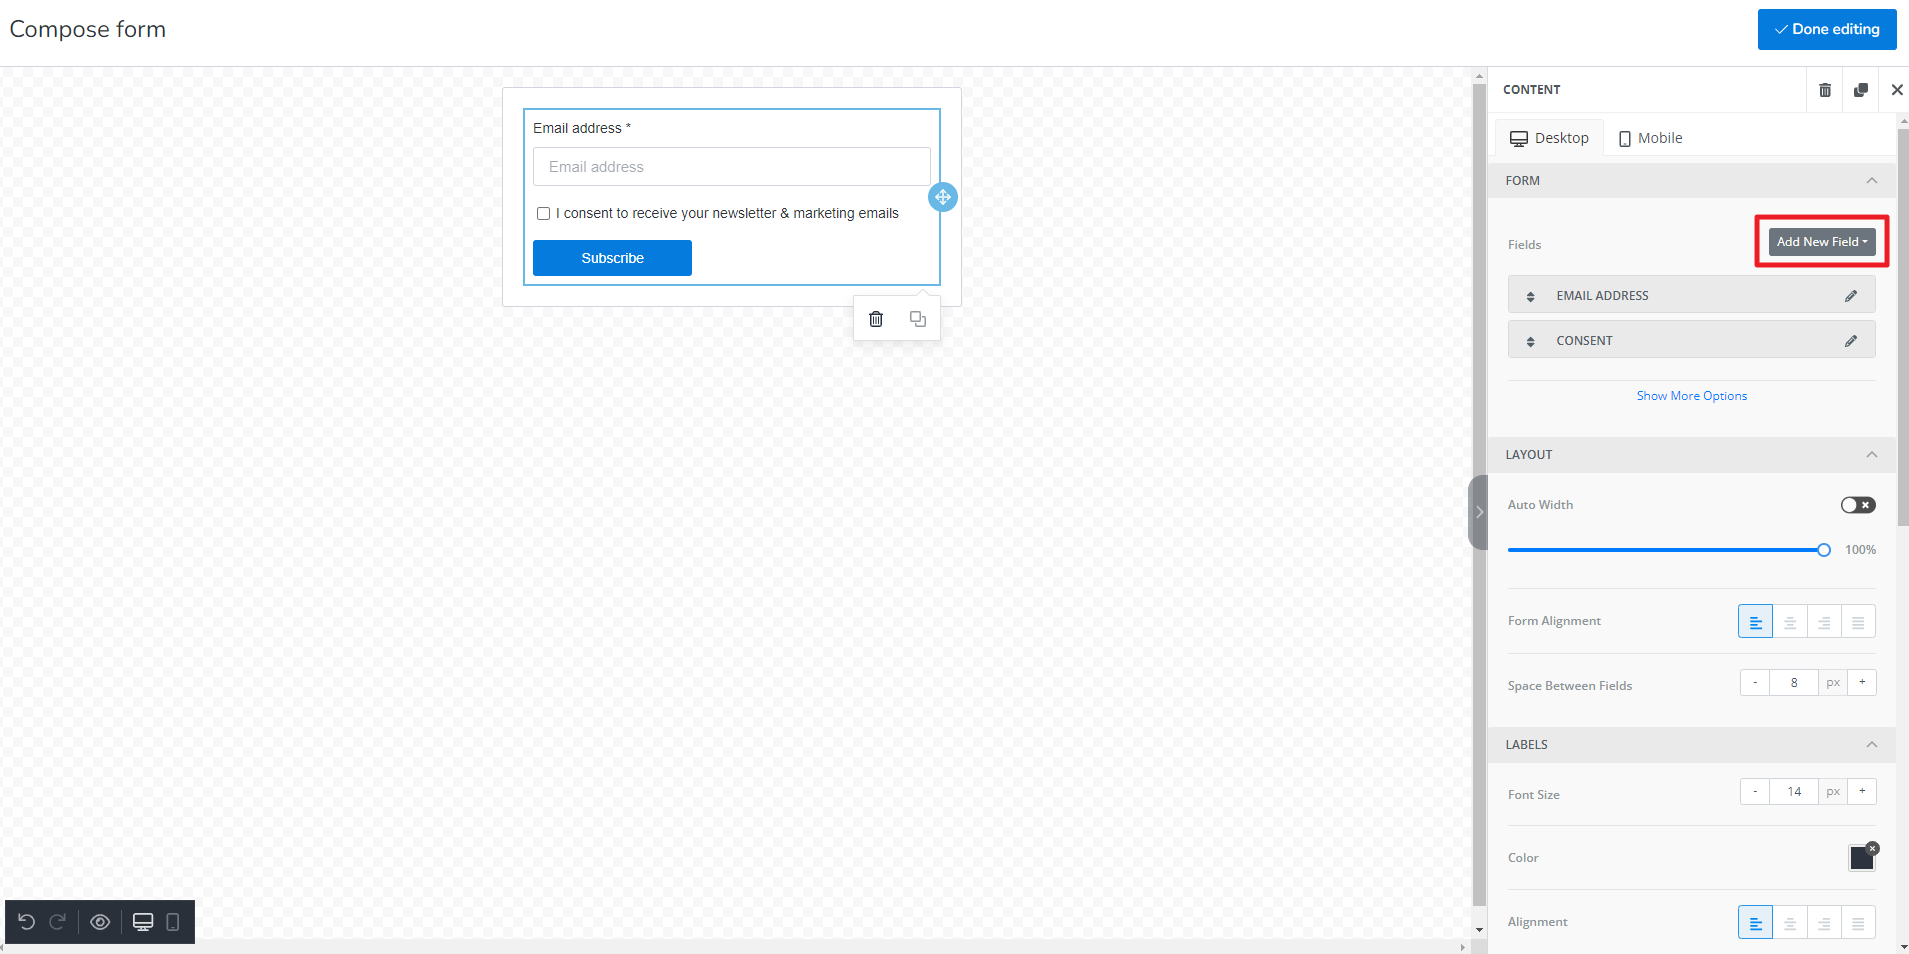
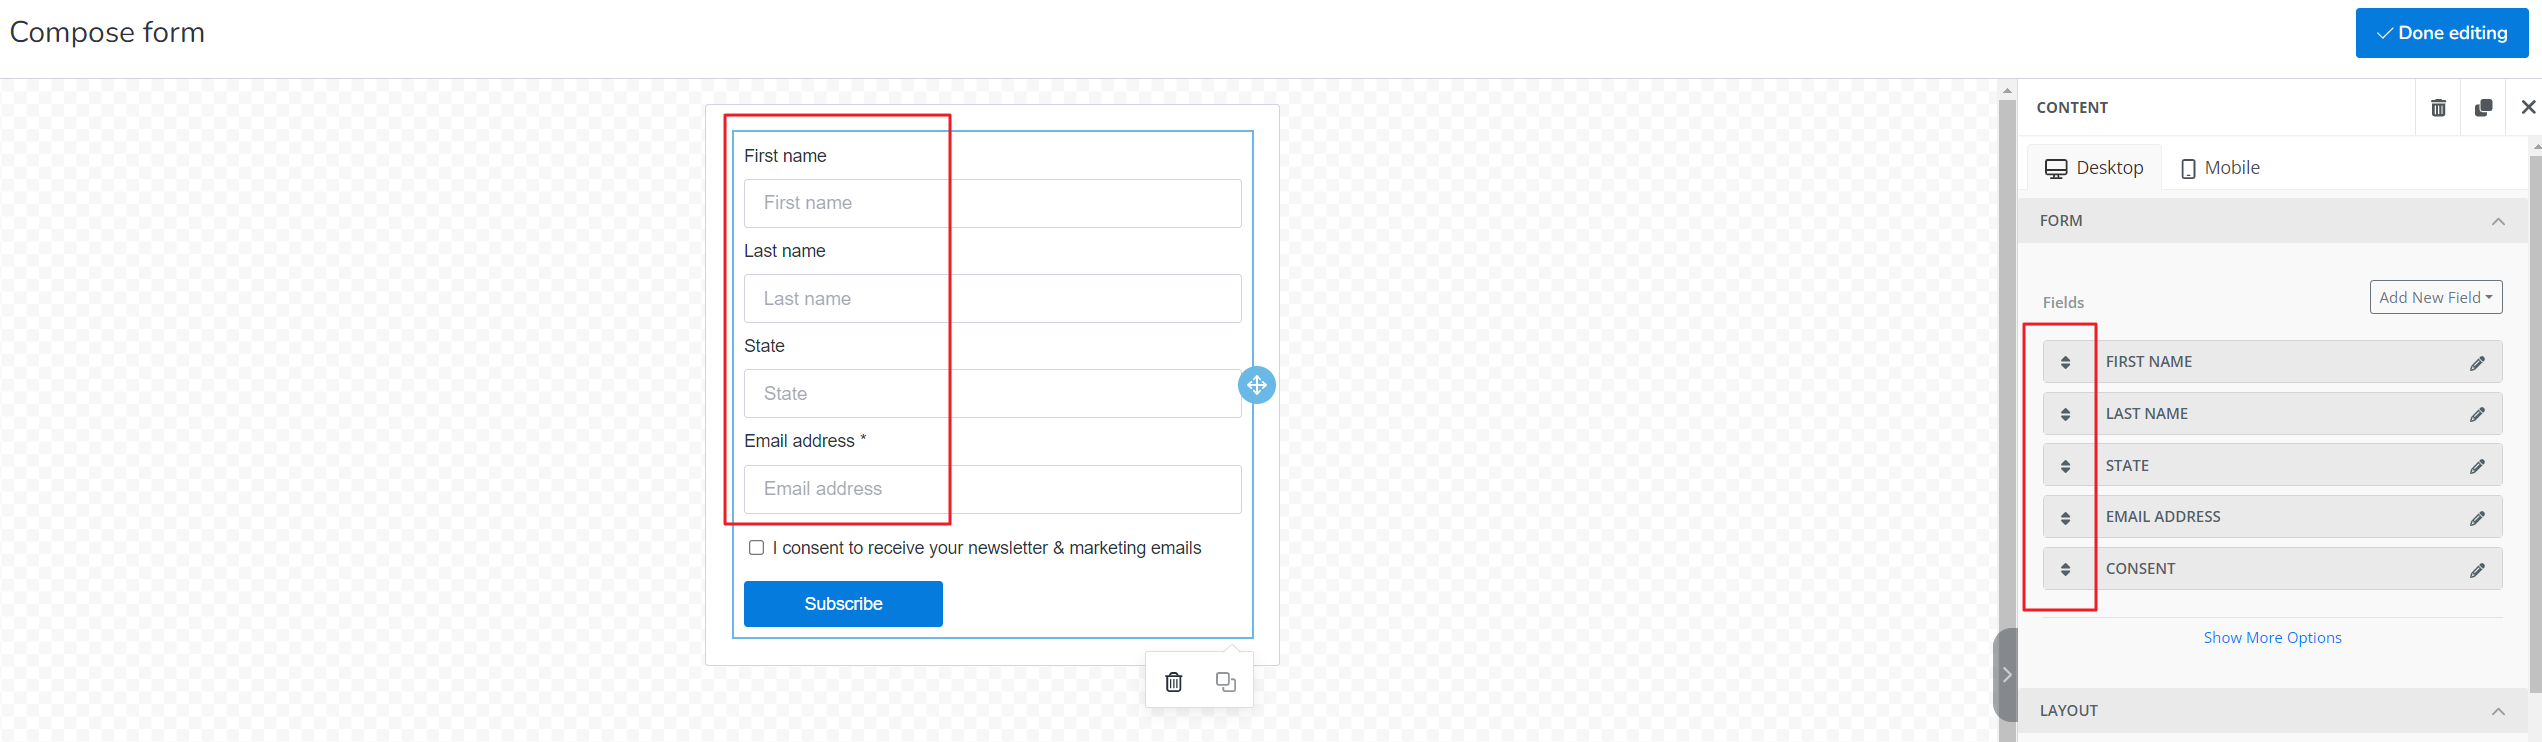
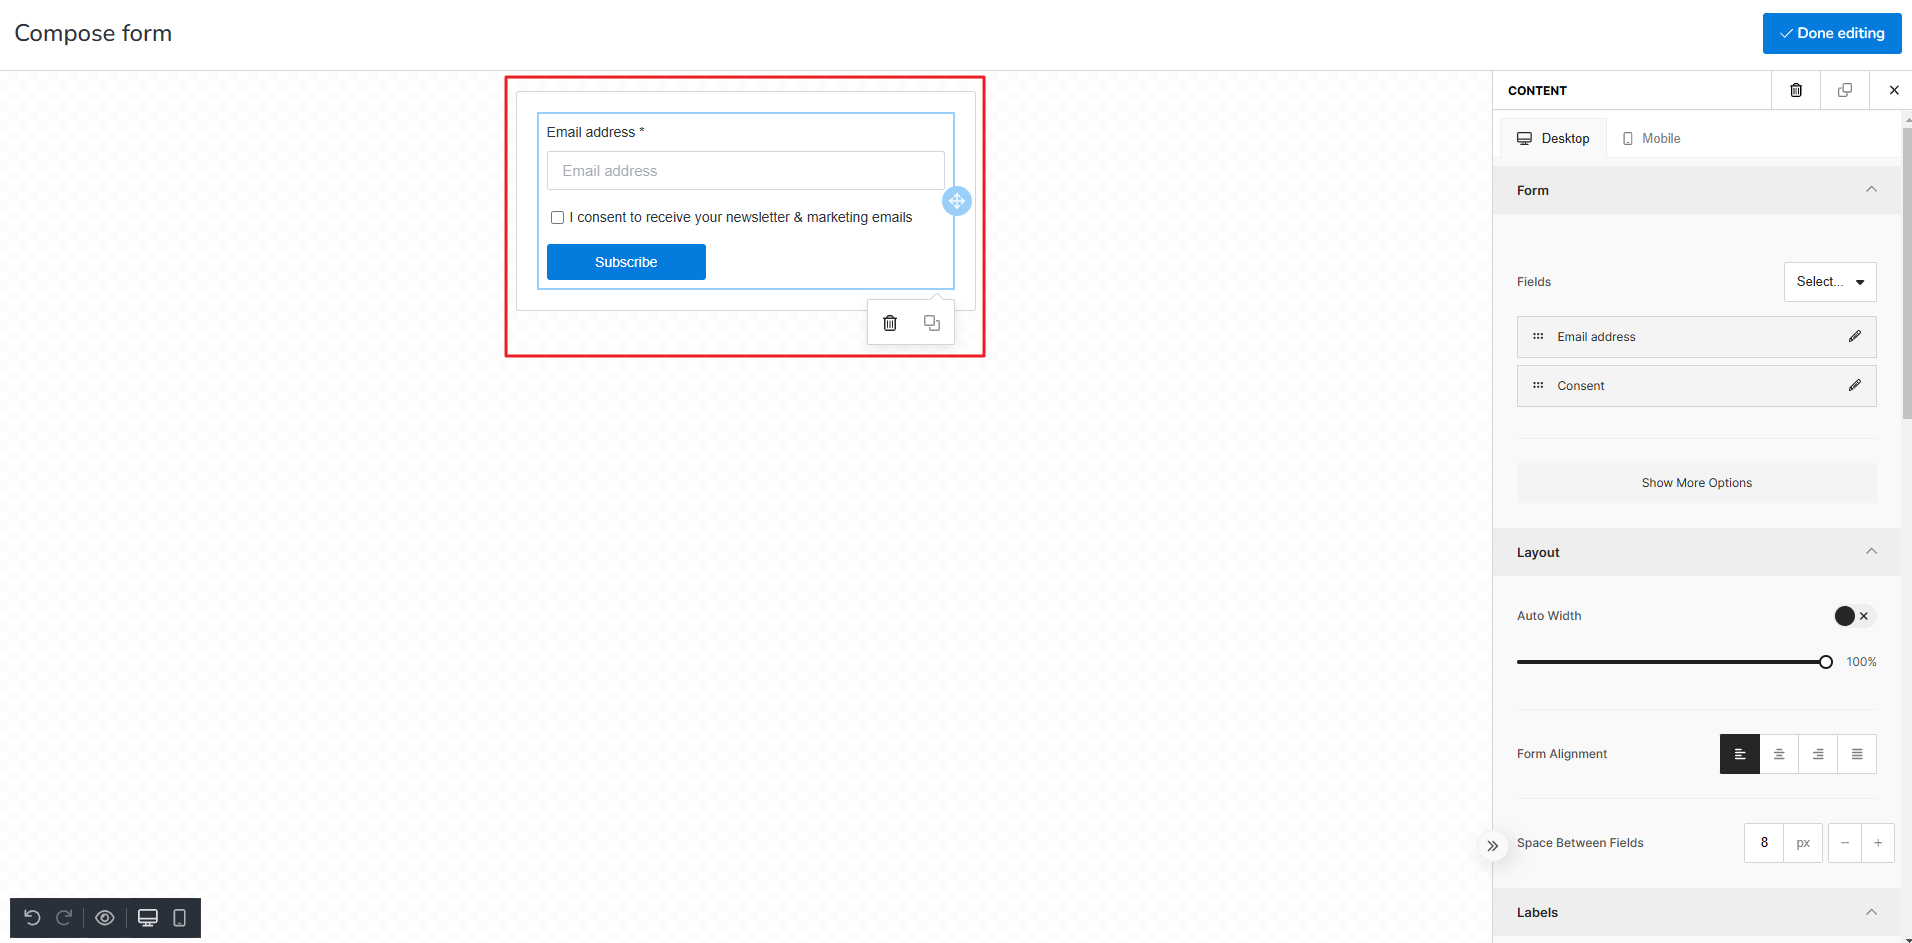
And then Compose form. After composing the form, click on Done editing
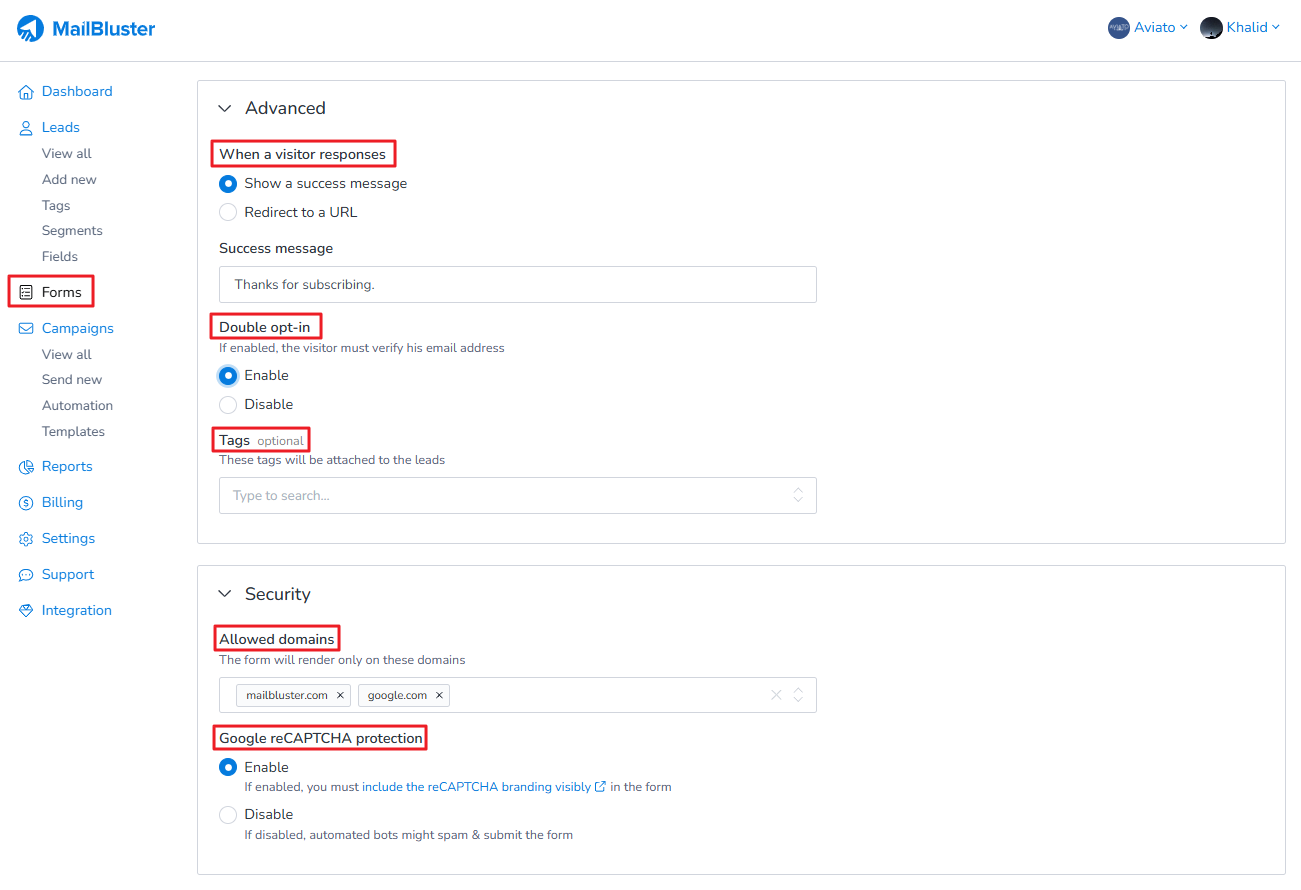
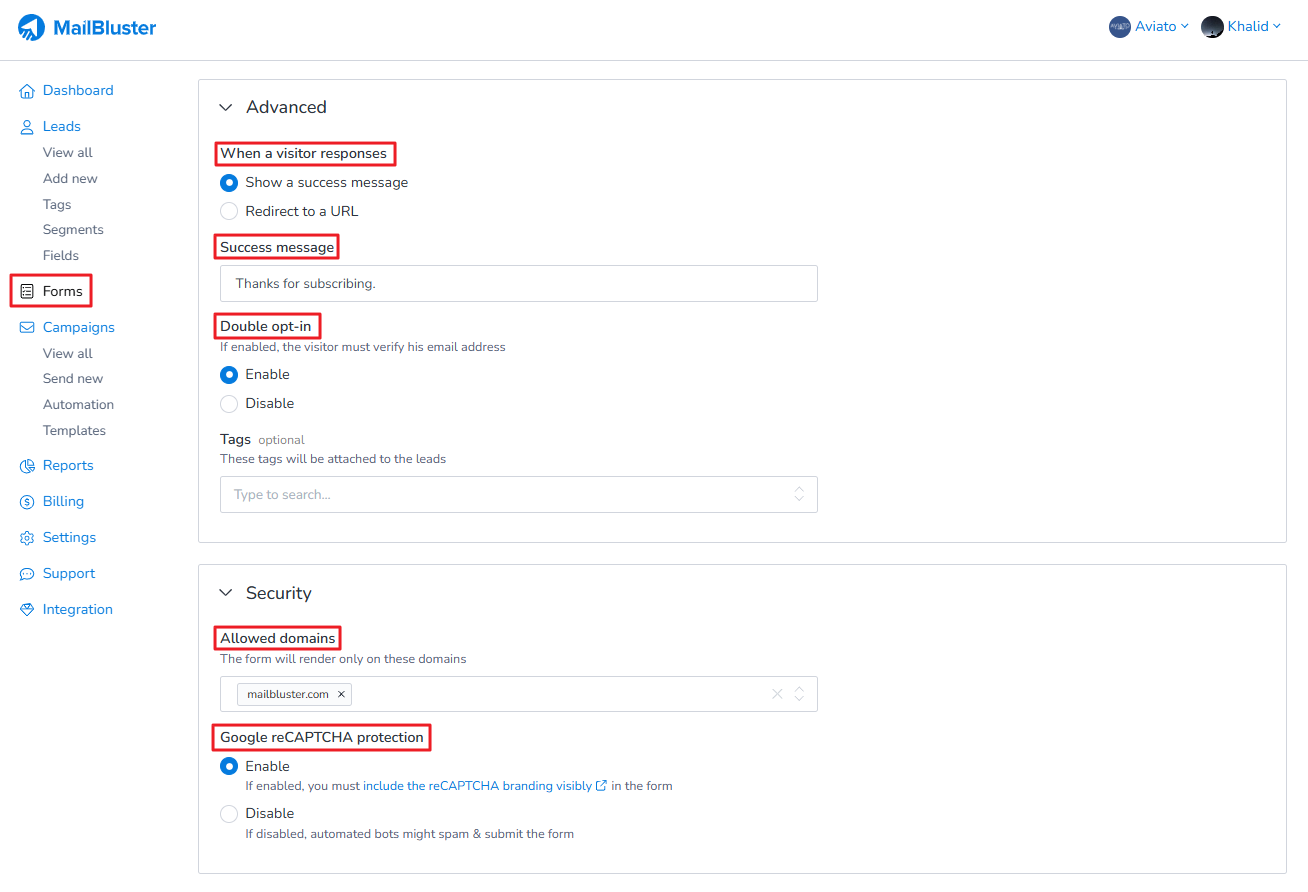
Now, setup these configurations for Advanced.
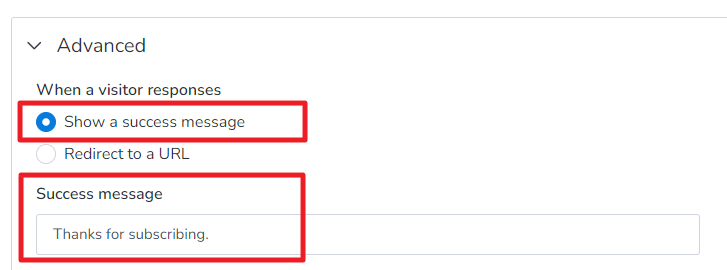
When a visitor responses: You can either set a success message or redirect to a specific URL after the user clicks subscribe button.
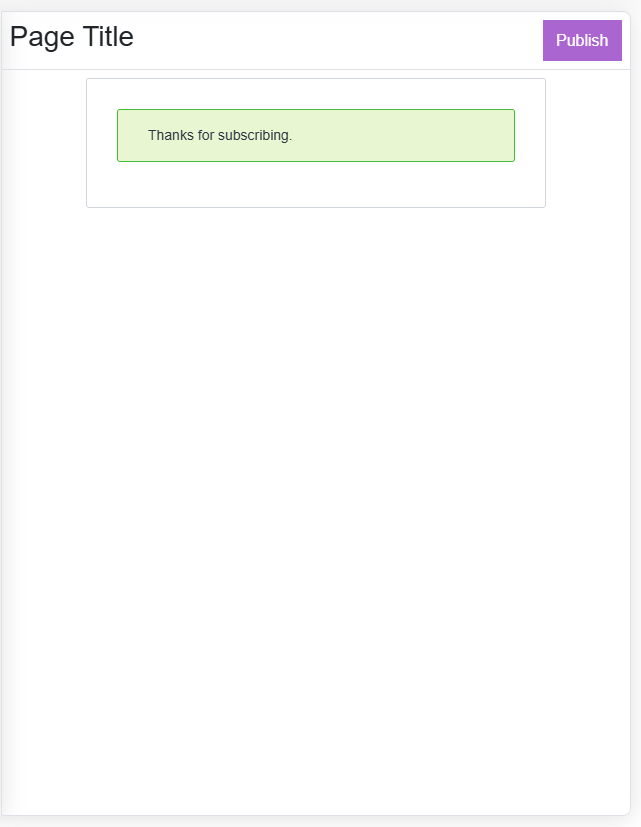
Success message: Set your success message so that a message pops up when user subscribes
Double opt-in: You can enable Double opt-in from this Form
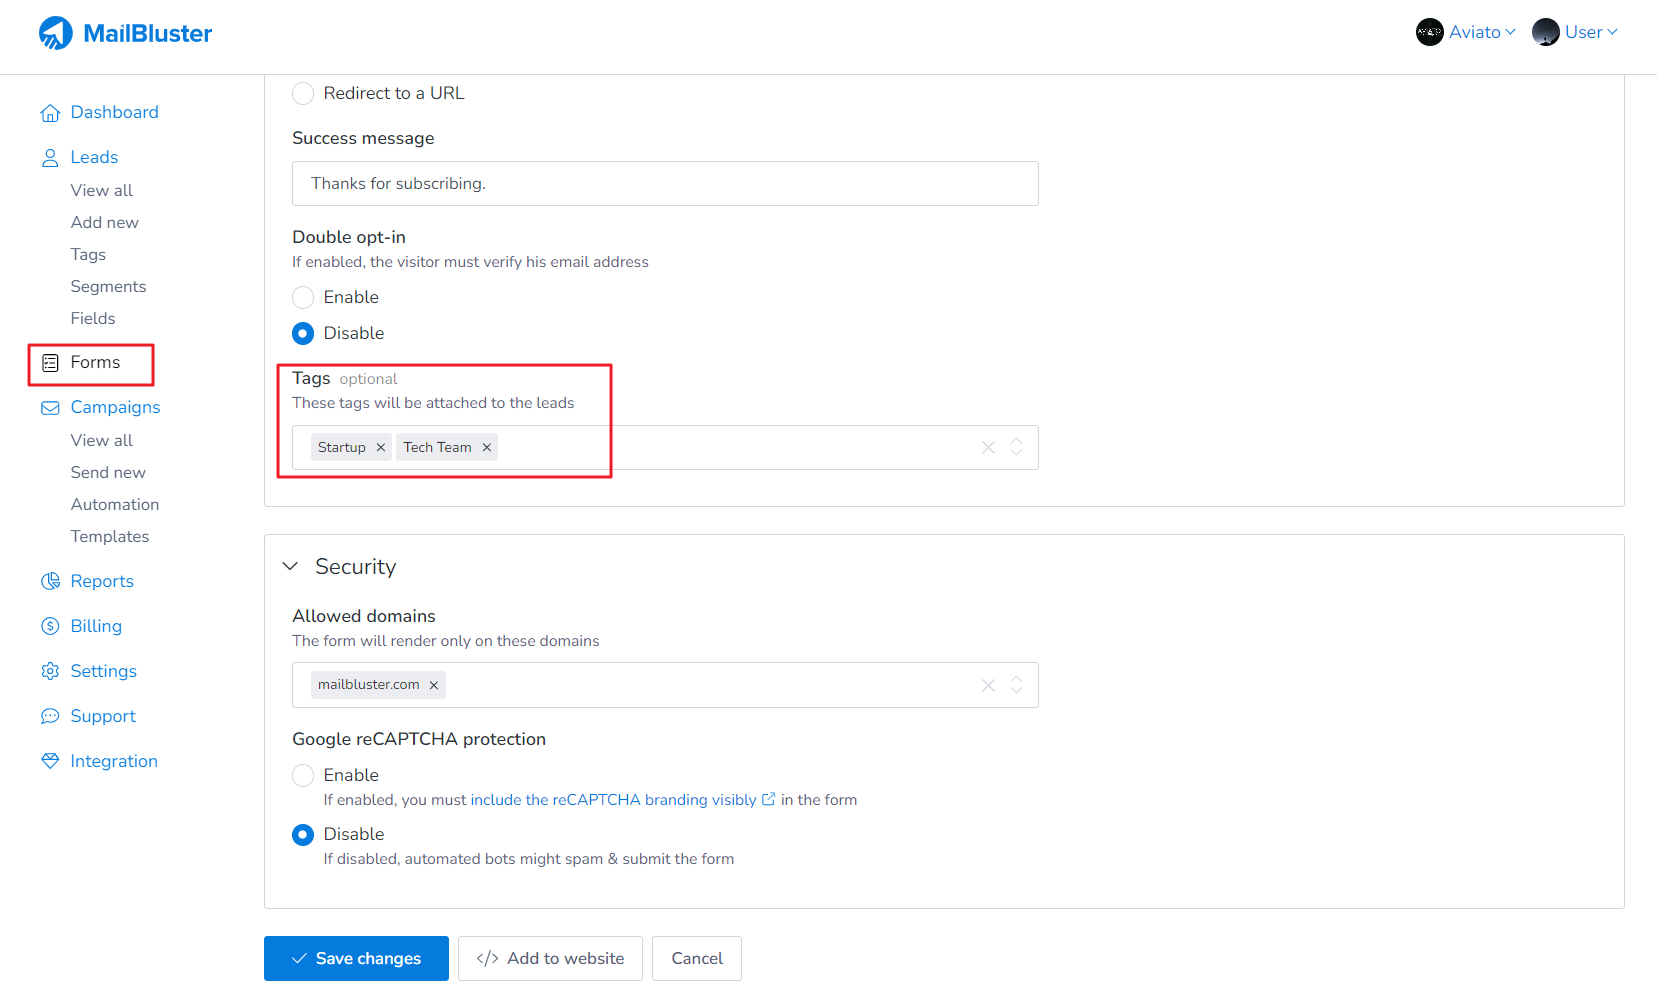
Tags: You can set single or multiple tags for each subscriber. This will be saved in Tags for each lead information.
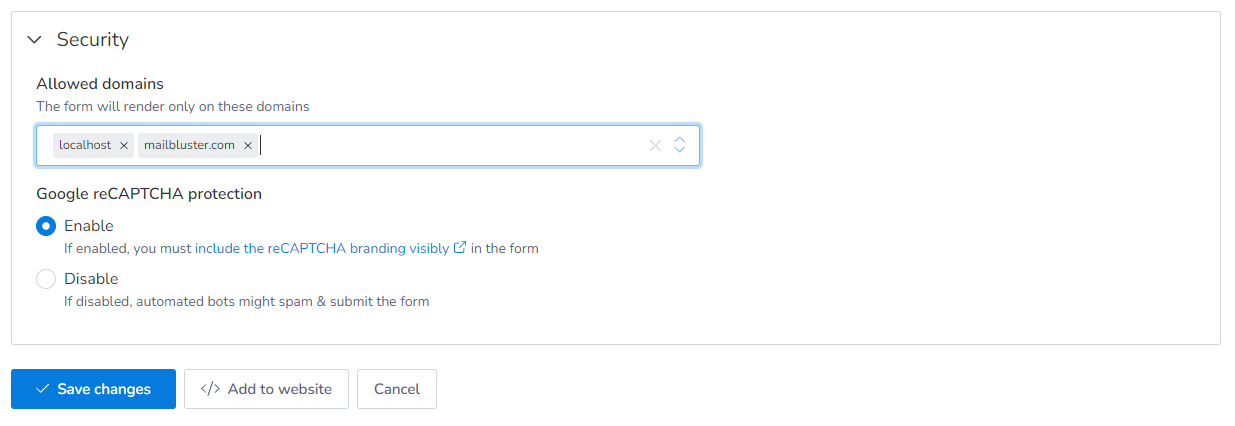
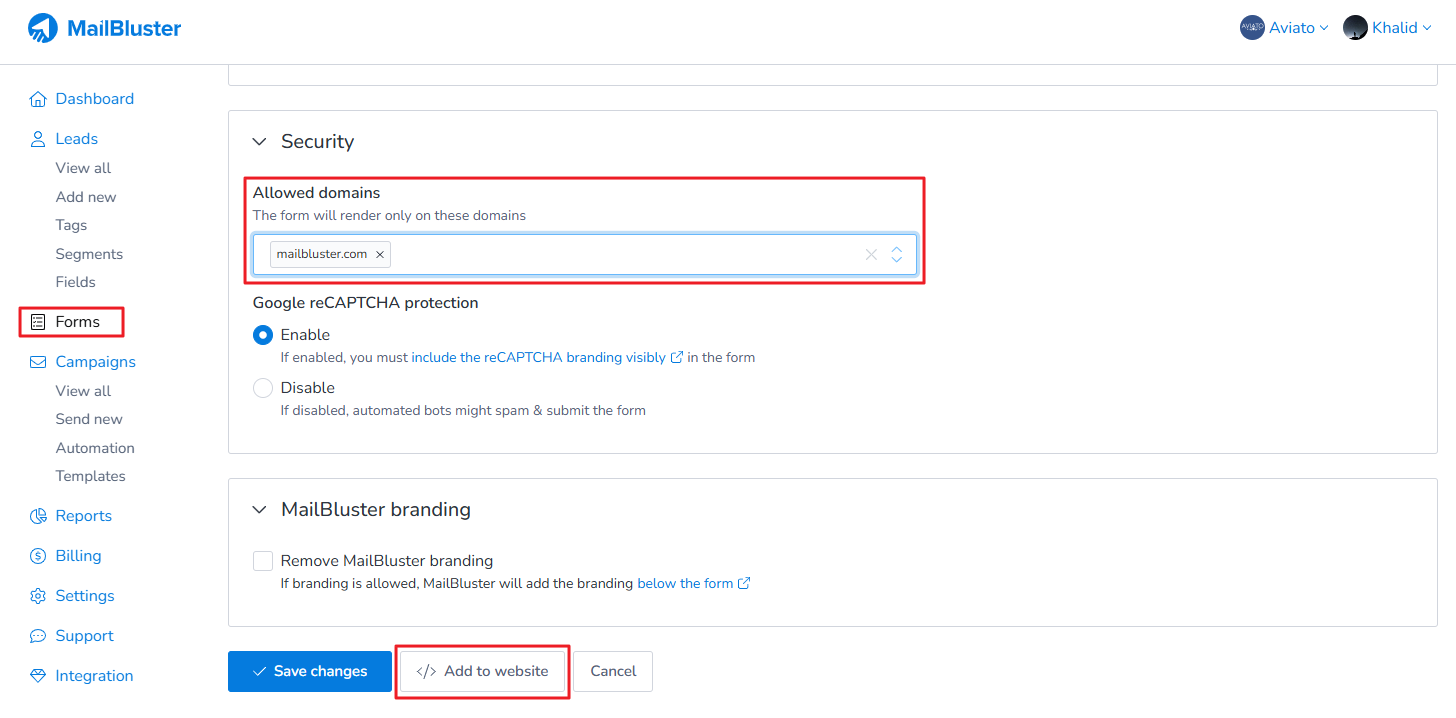
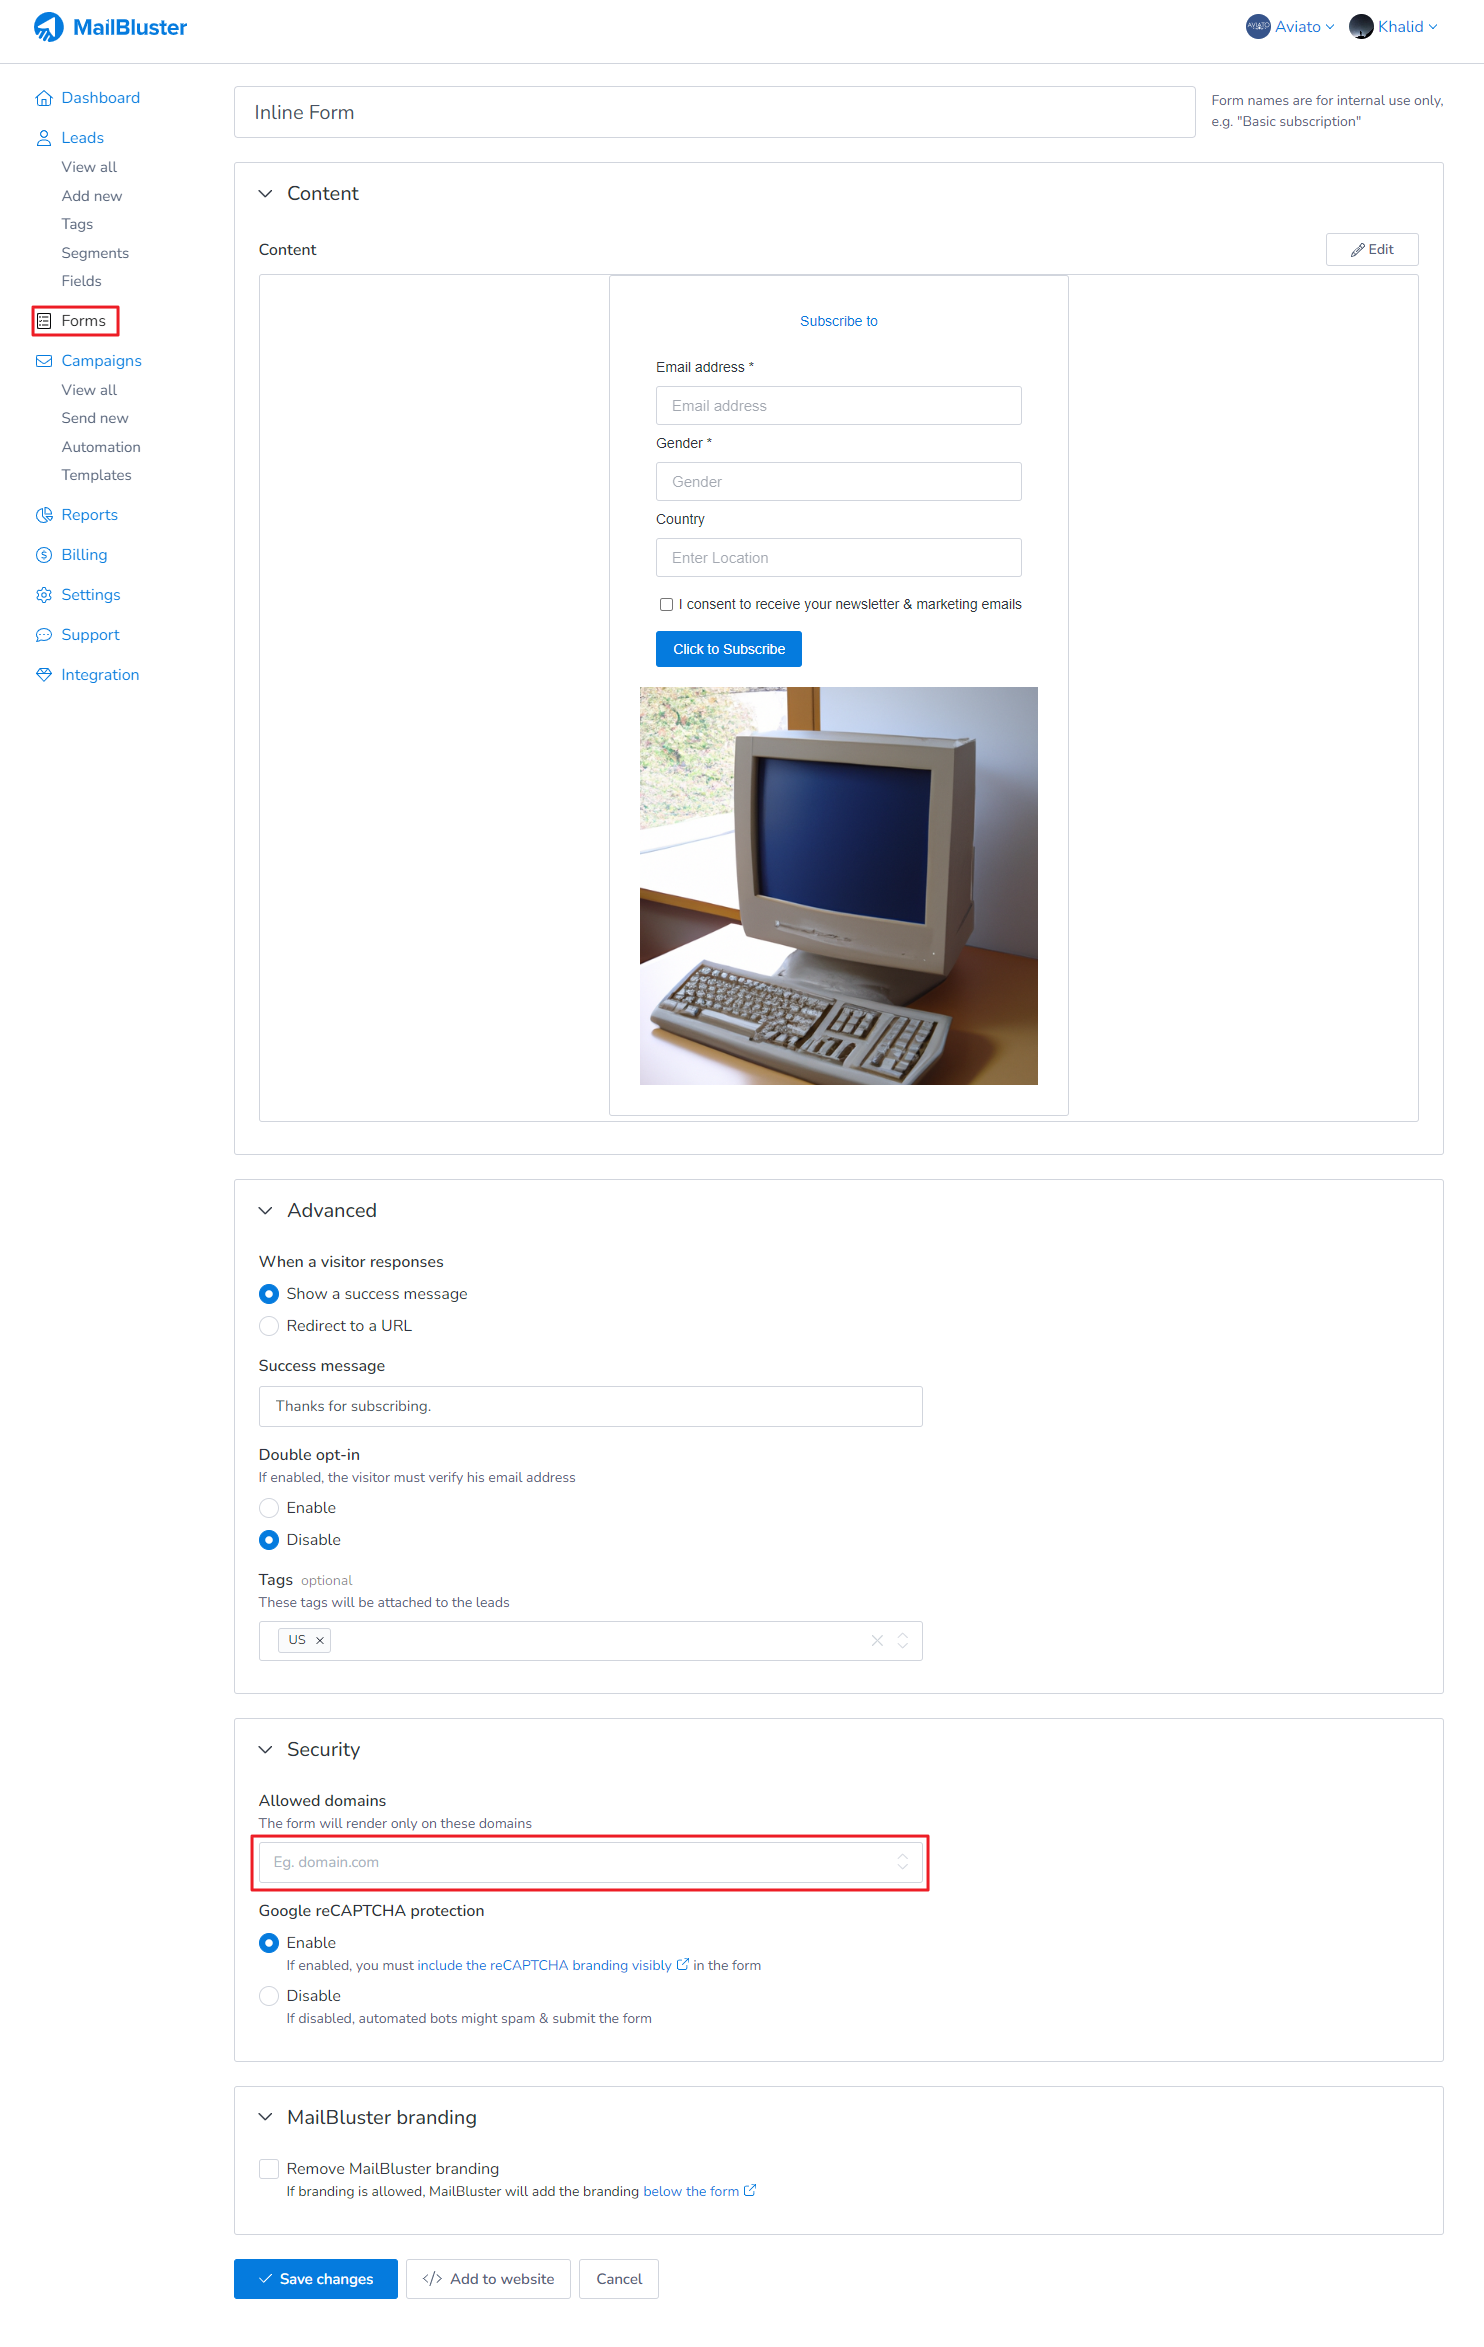
Allowed domains: Here you need to mention your domain name only without http or https. For example: mailbluster.com. If your website starts with www then you have to mention it like this: www.mailbluster.com.
Google reCAPTCHA protection: You can enable or disable Google reCAPTCHA for added security from Bots and Spams.
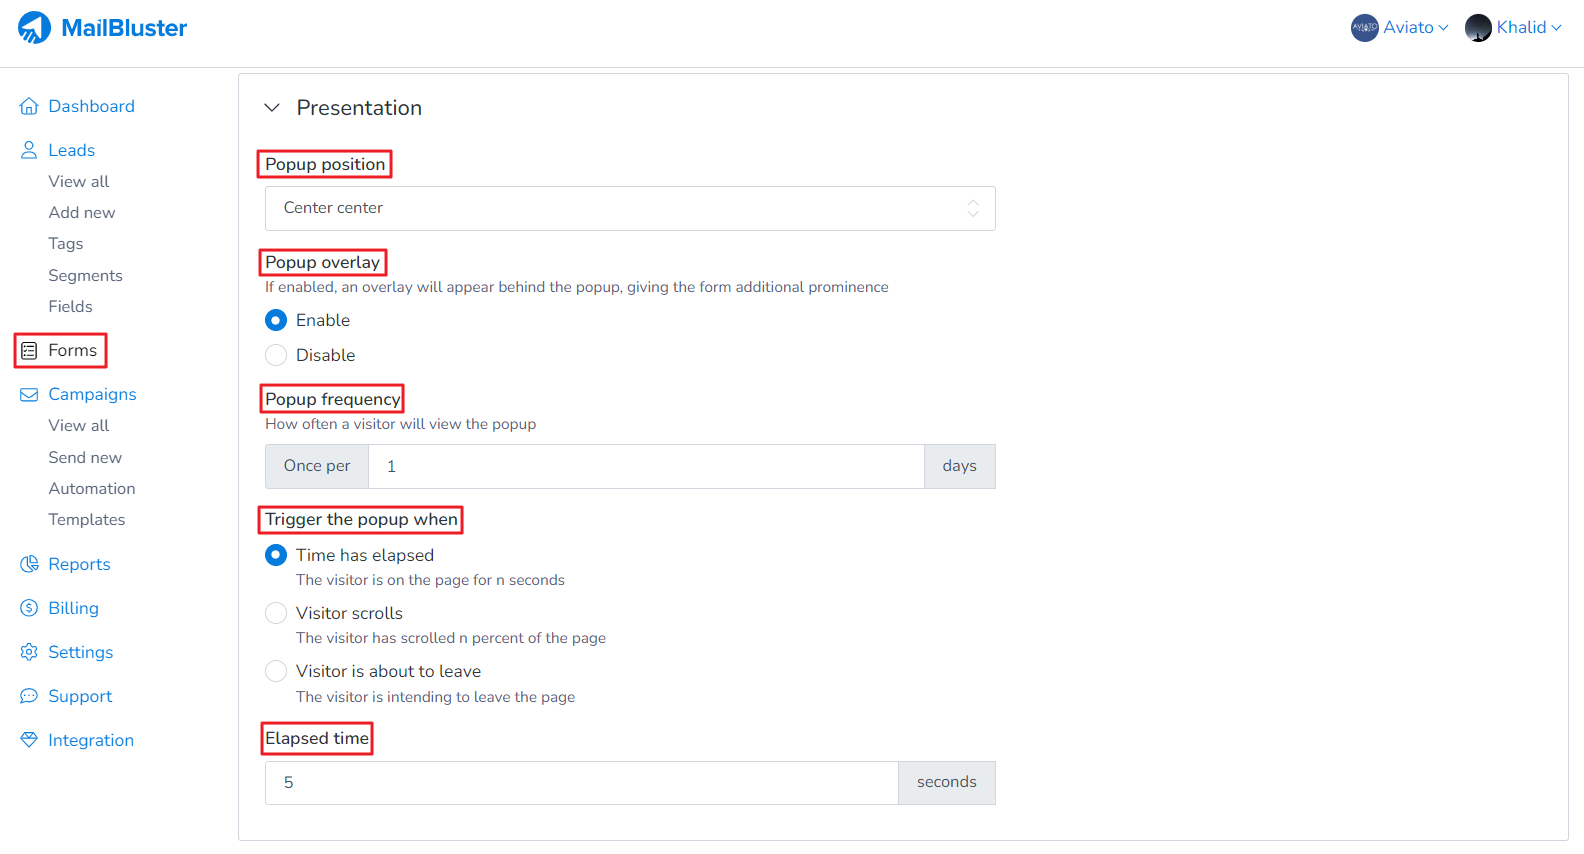
Now, set up these configurations for Presentation.
Popup Position: You can set the placement of your popup message according to your desired position.
Popup overlay: A background overlay will appear behind the popup message making form more noticeable.
Popup frequency: How often the popup will appear on screen
Trigger the popup when: You can set the condition of the popup when time has elapsed, visitor scrolls or when visitor about to leave
Elapsed time: Time duration set by the user in seconds
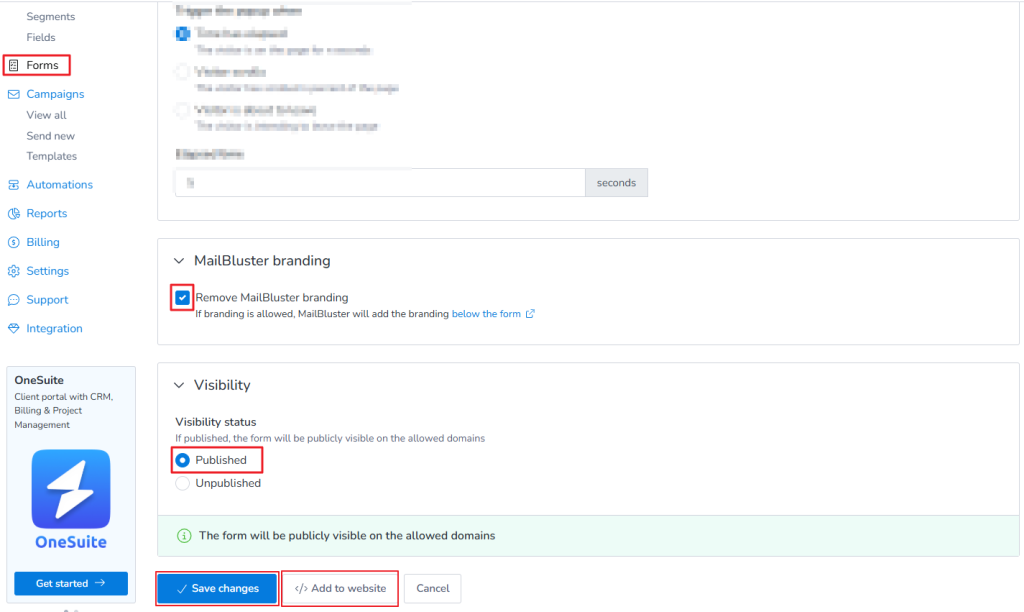
To make the form publicly visible on the allowed domains, you need to enable the published
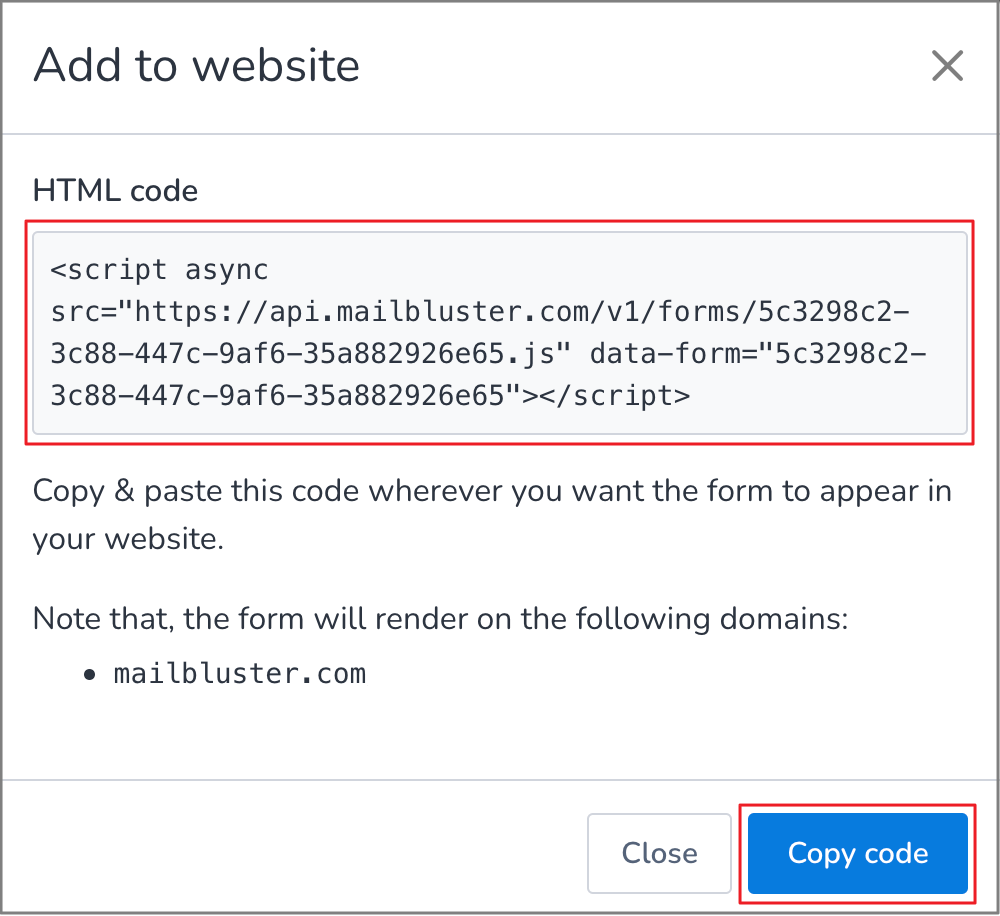
Tick on Remove MailBluster branding and then Click Save changes and then click Add to website.
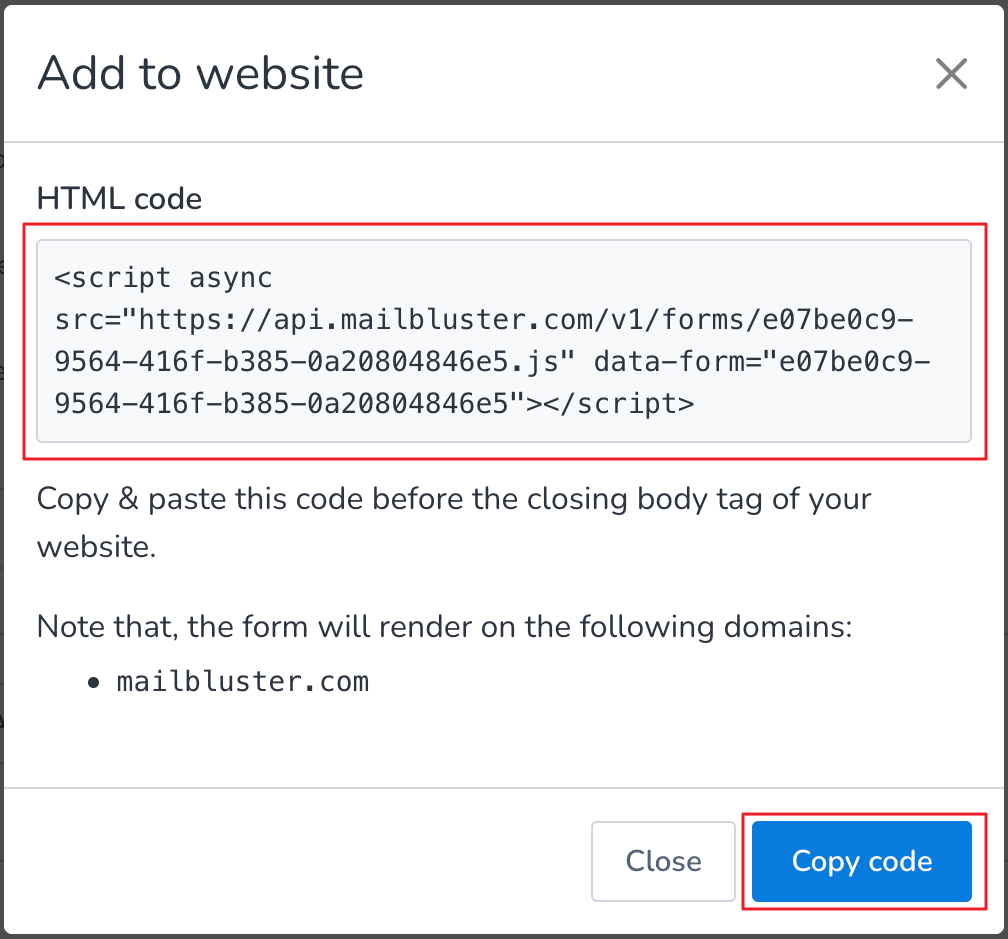
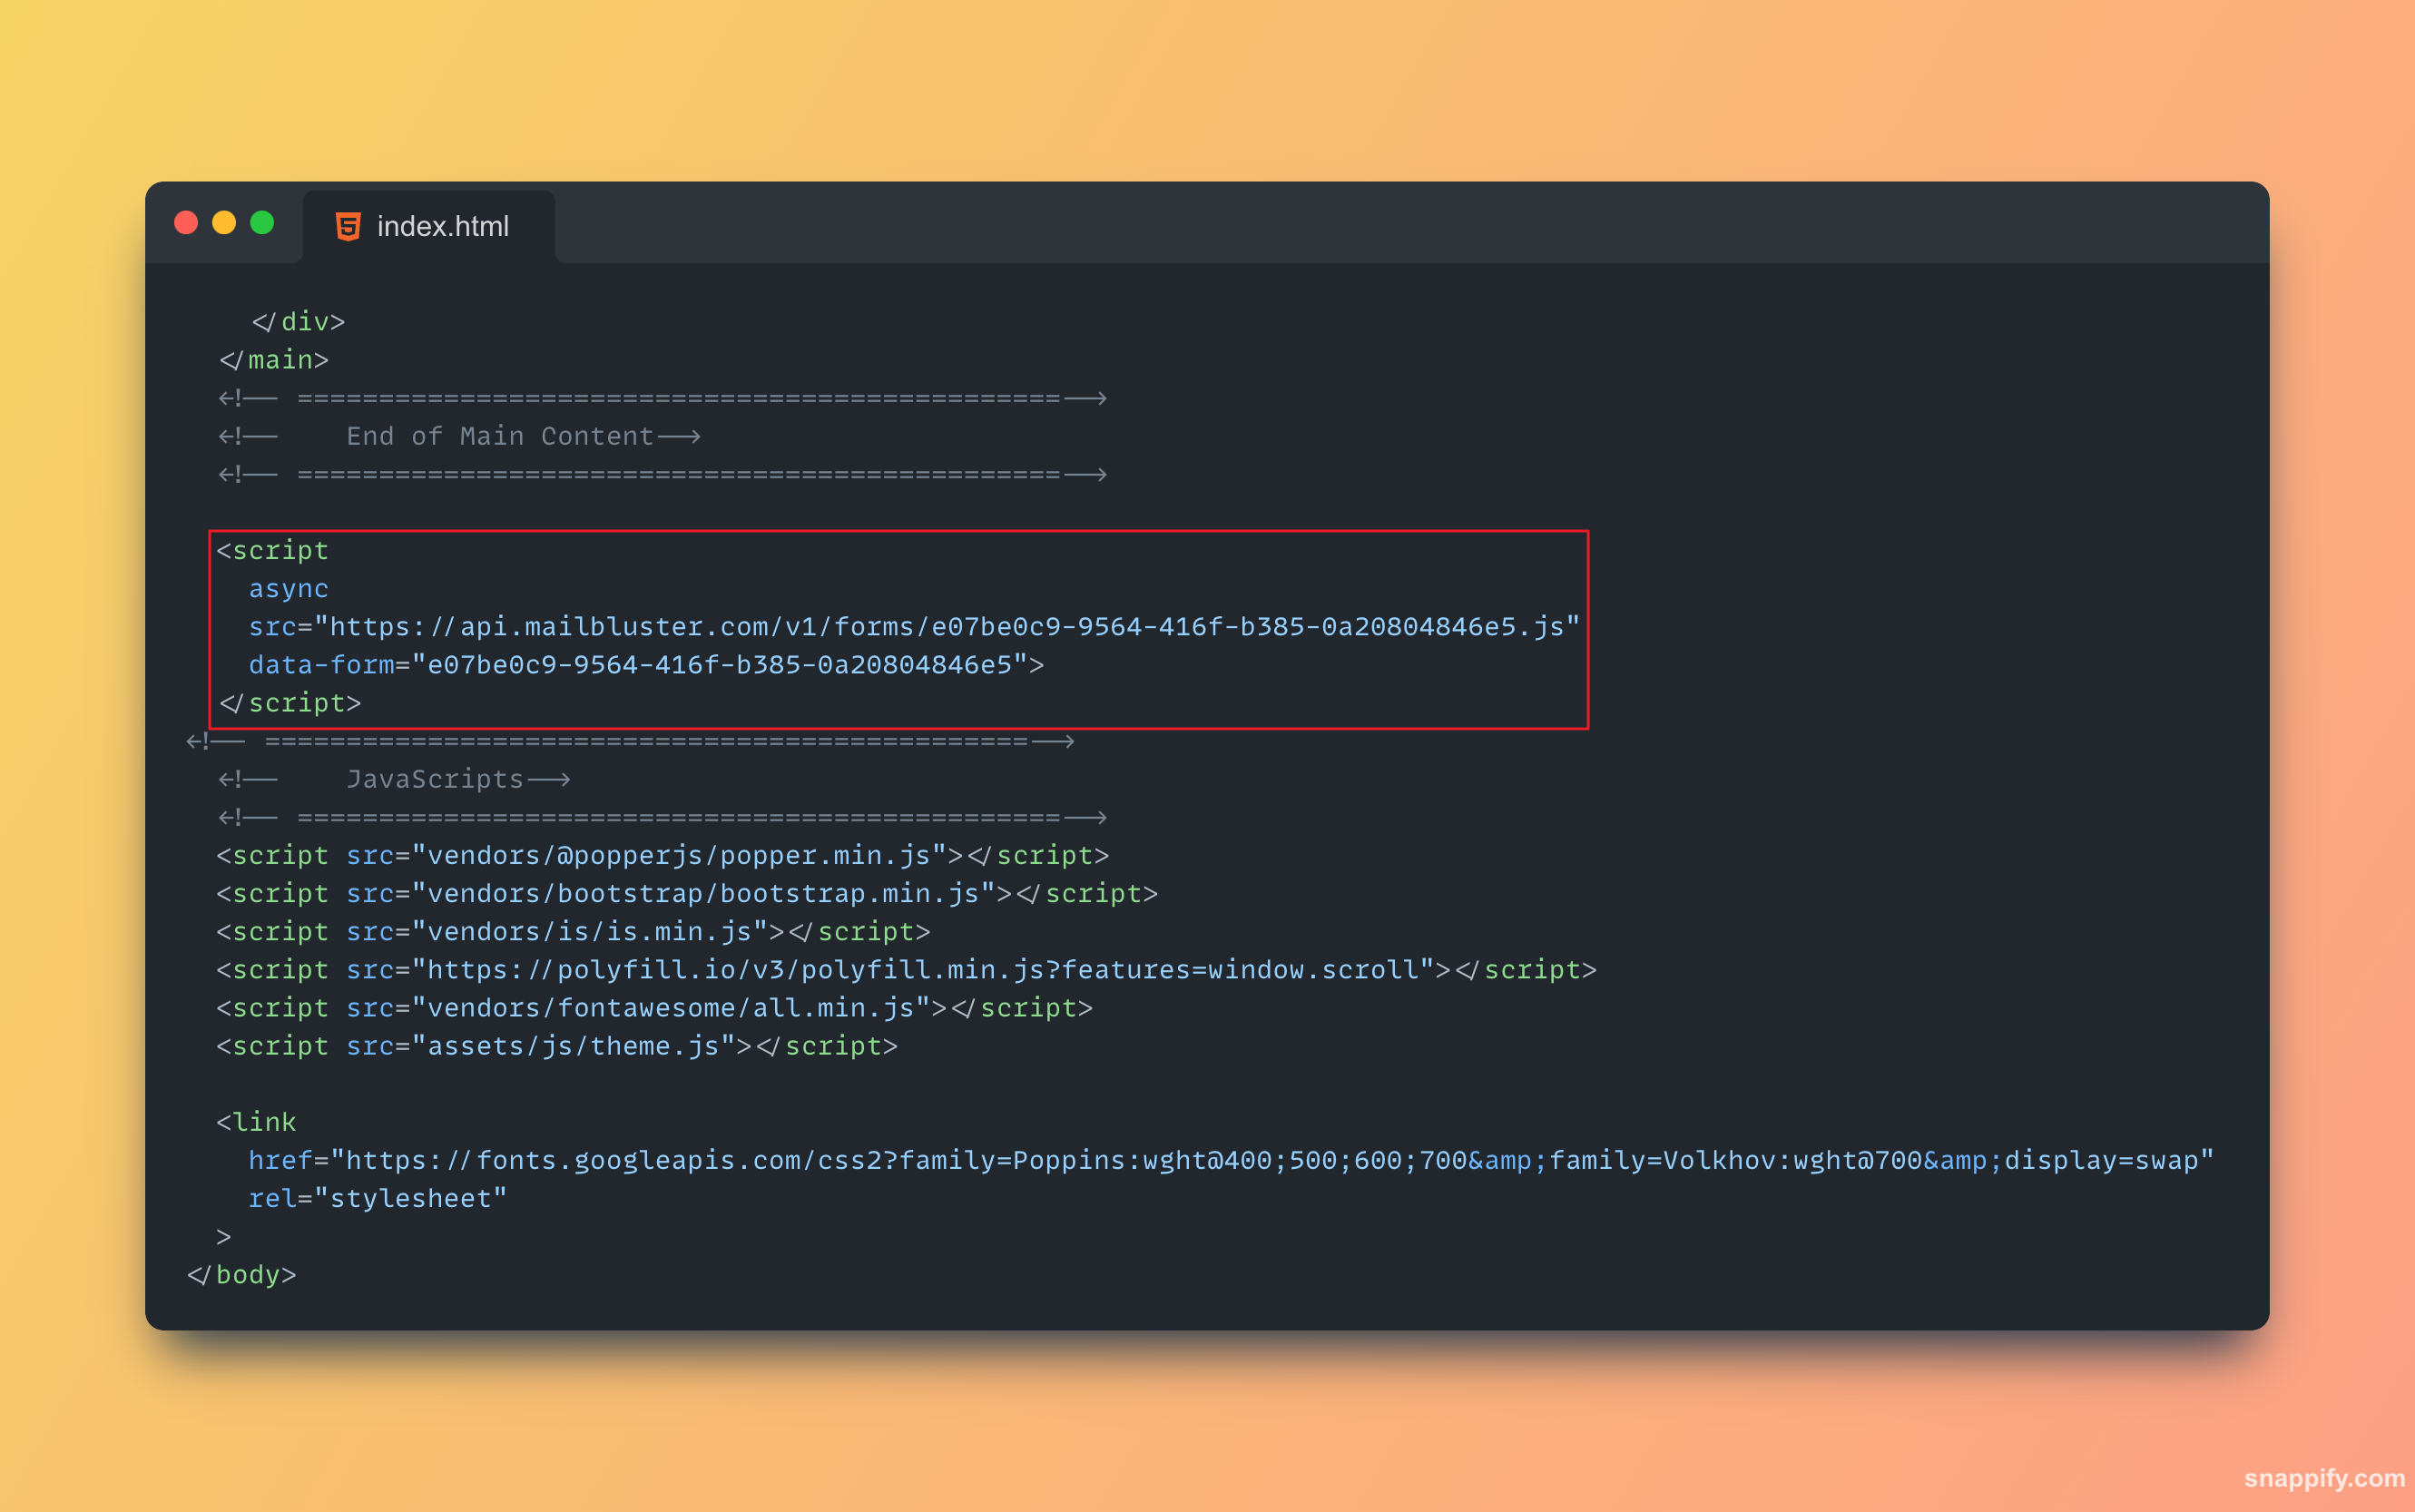
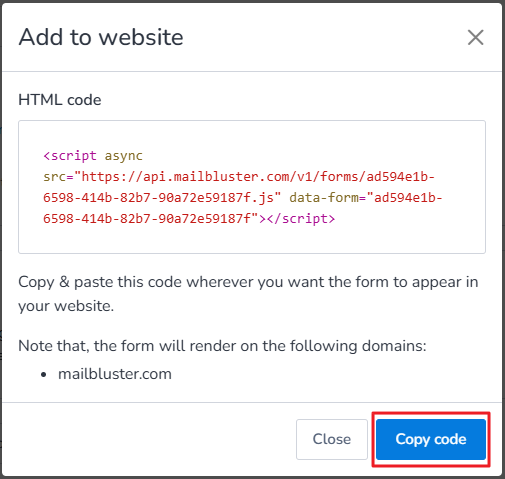
After clicking Add to website, click on Copy code and paste it in your website’s HTML page
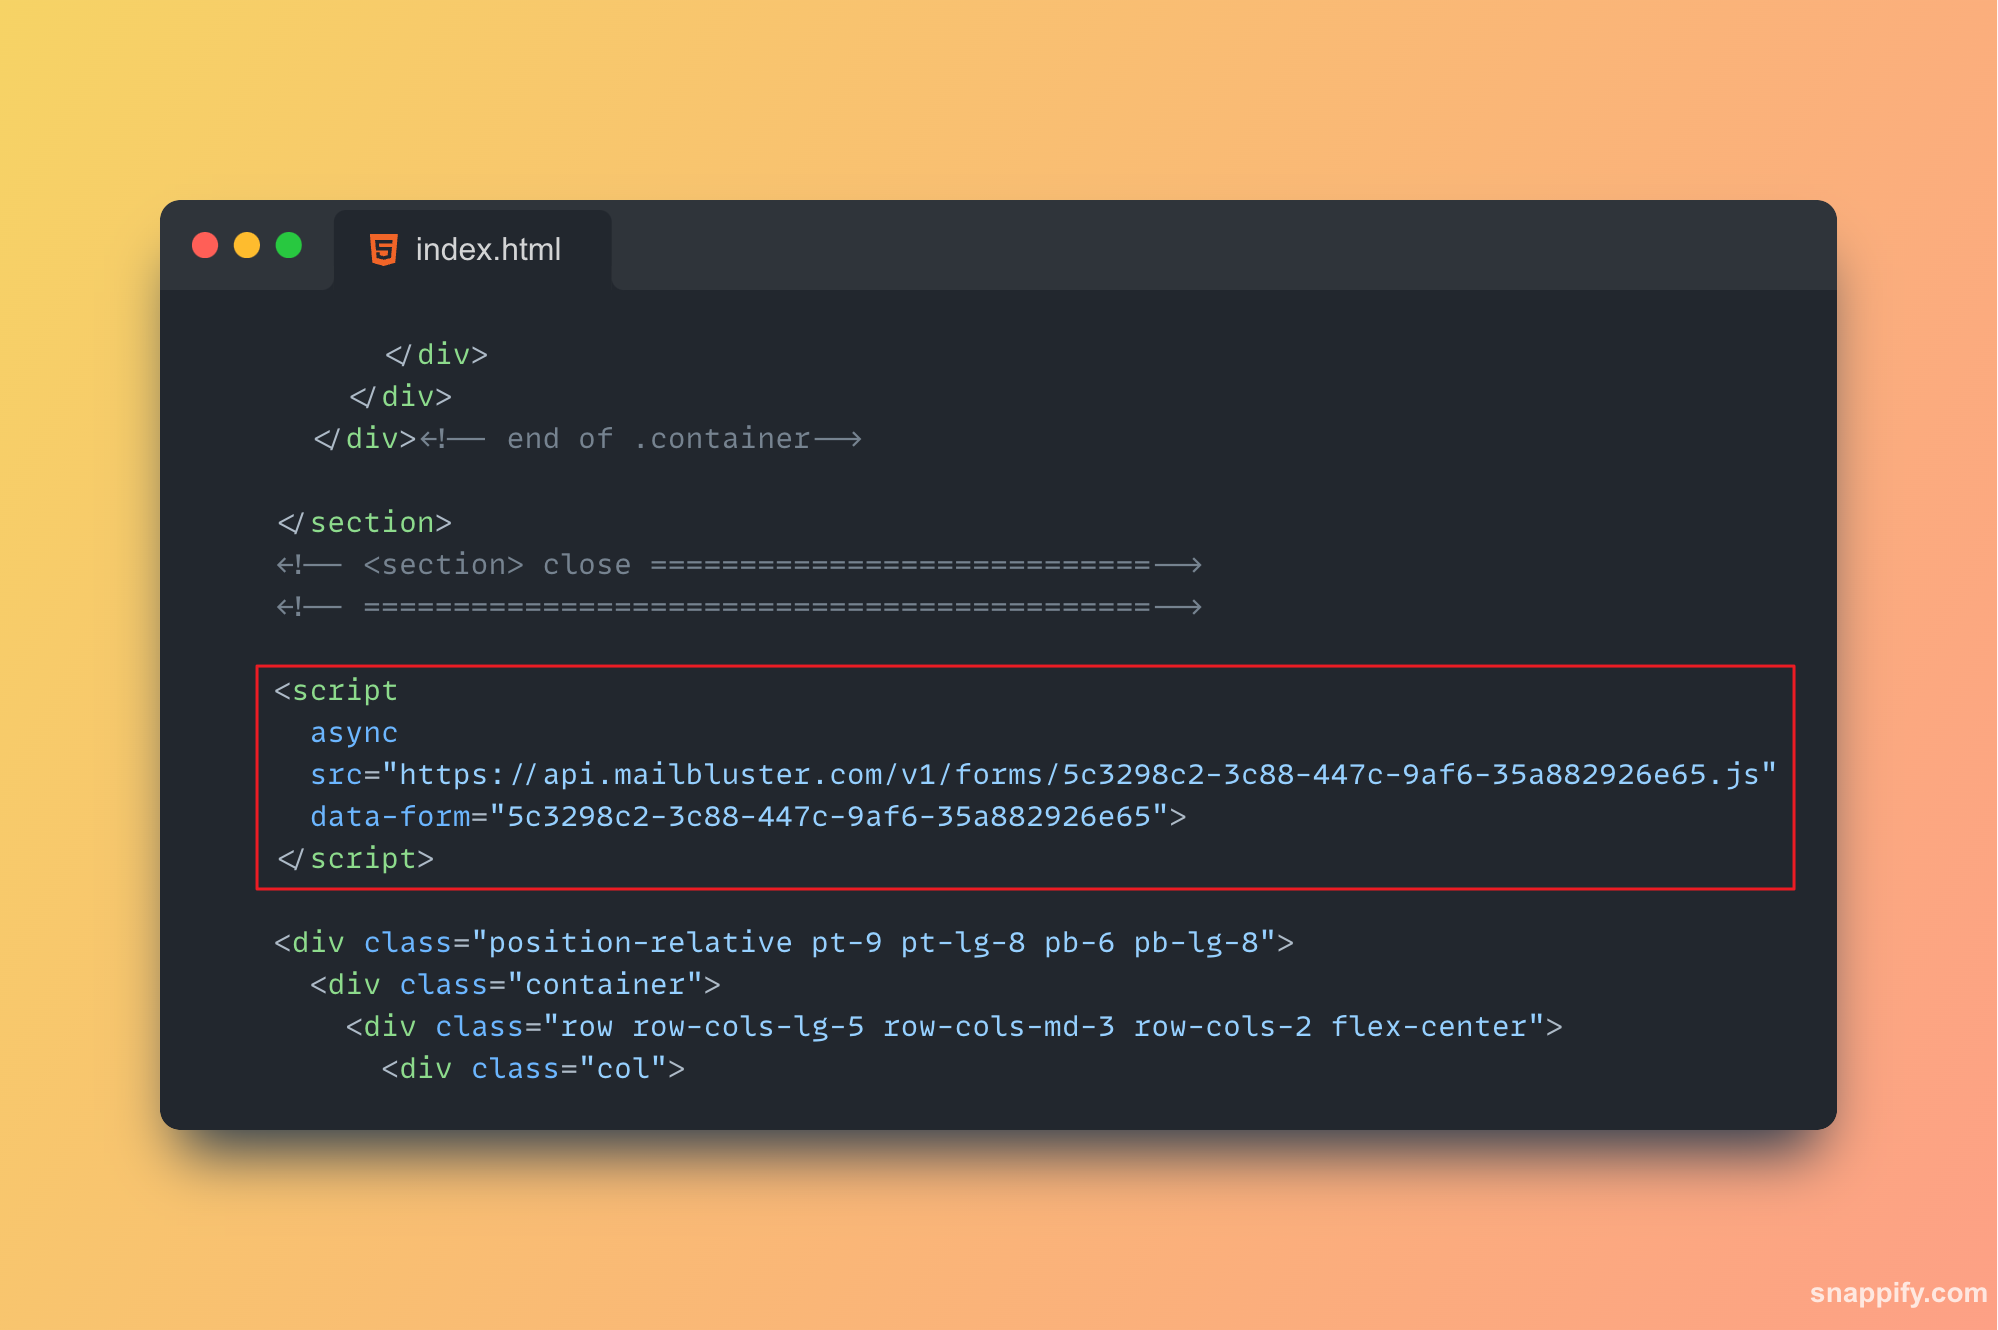
Paste the code inside the HTML file where you want to display the Popup Form
Please Note: Pop-up forms should go just before the closing body tag.
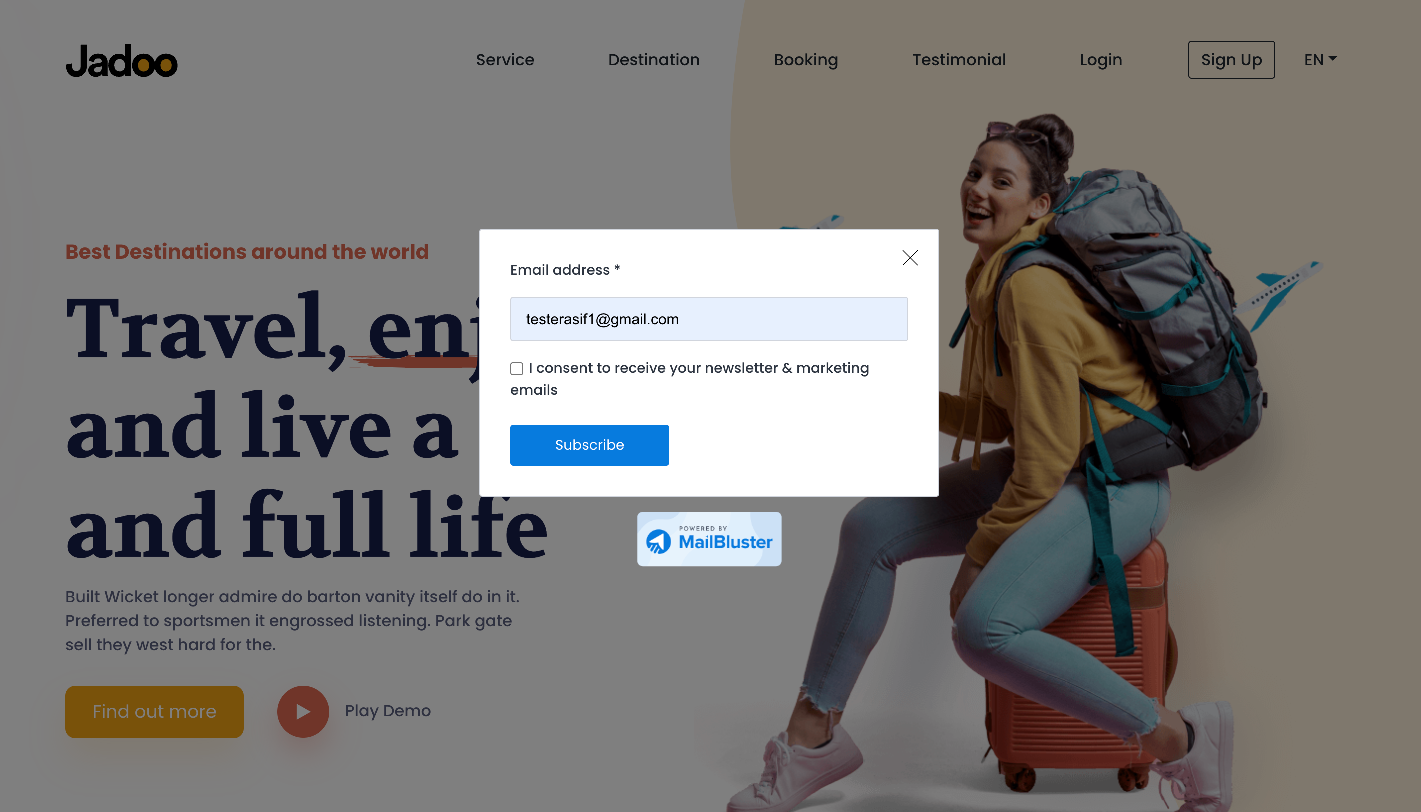
The Popup Form will be visible on the website like this
To create Inline Form, first you need to go to Forms. Then Click on Create new
Select Inline form
State the name of the form and then click on Edit
Either select a Blank template or a predefined template
And then Compose form. After composing the form, click on Done editing
Now, set up these configurations for Advanced.
When a visitor responses: You can either set a success message or redirect to a specific URL after the user clicks subscribe button.
Success message: Set your success message so that a message pops up when user subscribes
Double opt-in: You can enable Double opt-in from this Form
Tags: You can set single or multiple tags for each subscriber. This will be saved in Tags for each lead information.
Allowed domains: Here you need to mention your domain name only without http or https. For example: mailbluster.com. If your website starts with www then you have to mention it like this: www.mailbluster.com.
Google reCAPTCHA protection: You can enable or disable Google reCAPTCHA for added security from Bots and Spams.
To make the form publicly visible on the allowed domains, you need to enable the published
Tick on Remove MailBluster branding and then click Save changes and then click Add to website.
After clicking Add to website, click on Copy code and paste it in your website’s HTML page
Paste the code inside the HTML file where you want to display the Form
Please Note:Inline forms should go inside the body tag wherever you want to display the form.
The InlineForm will be visible on the website like this
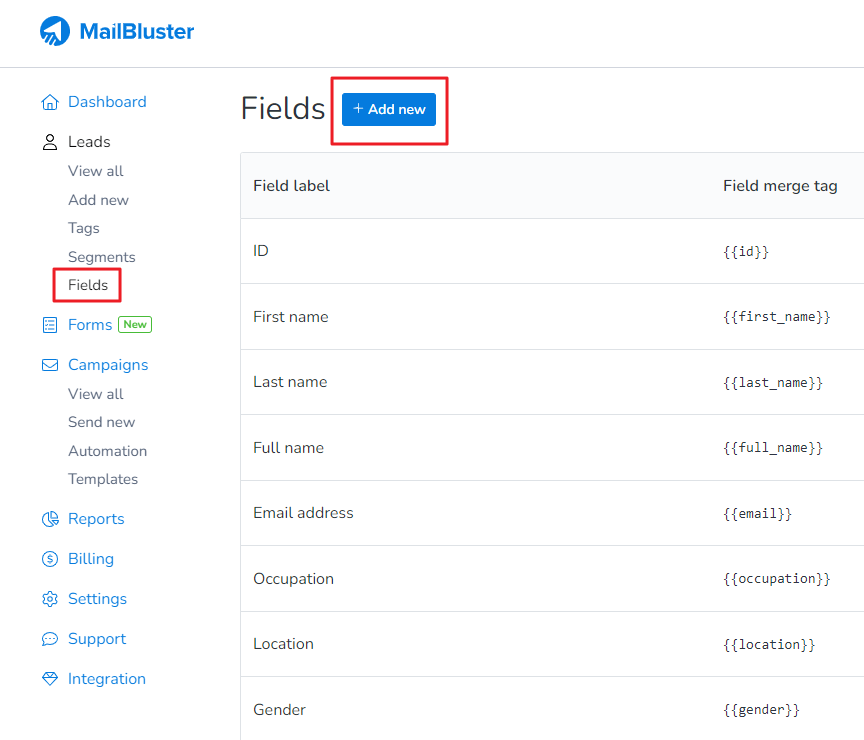
Custom fields are useful for collecting extra information from your subscribers, such as birthdays, preferences, or custom notes. Once added, these fields can be included in any subscribe form to capture additional data during sign-ups. They also help you segment your audience for targeted campaigns, ensuring your messages are relevant to each subscriber.
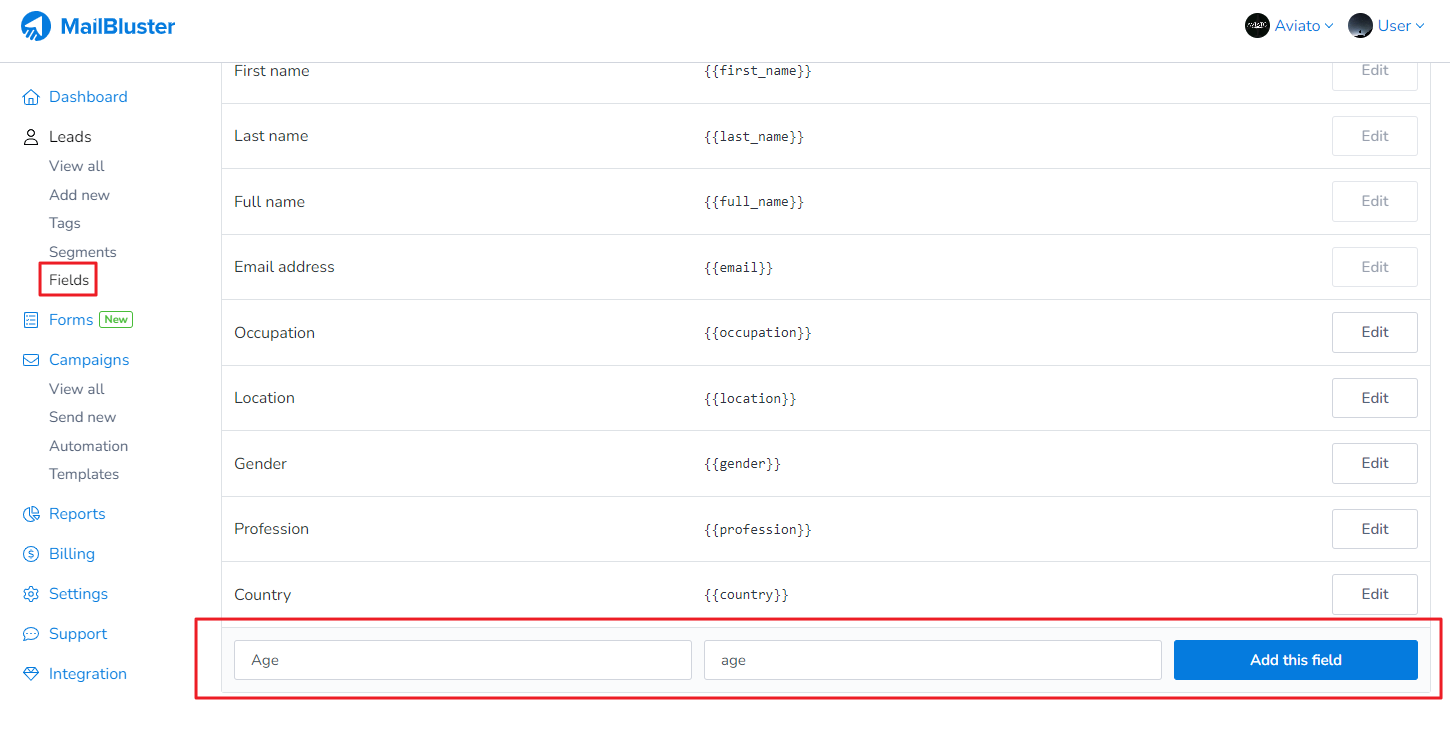
Before you want to add Custom Field to your Forms, you need to insert new custom field by clicking Add new as shown below.
Then type the name of the custom field and click Add this field
After adding any new Custom Fields, for example Age here, they will appear after clicking Add New Field in Forms editor. First, you need to select a sample template for your Form, you need to click on the selected area as shown below
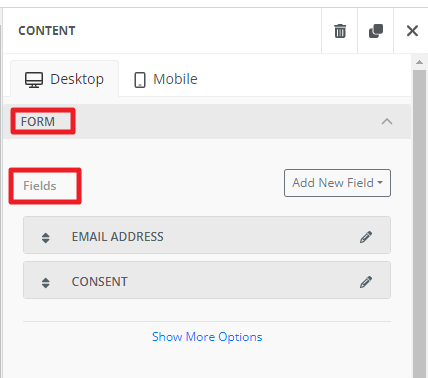
A content section will appear showing FORM section
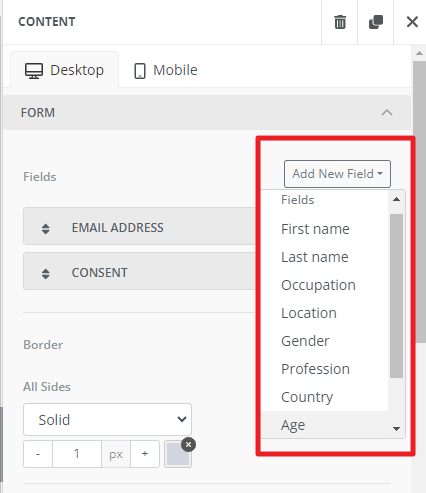
Click on Add New Field and a list of defined and custom fields will appear
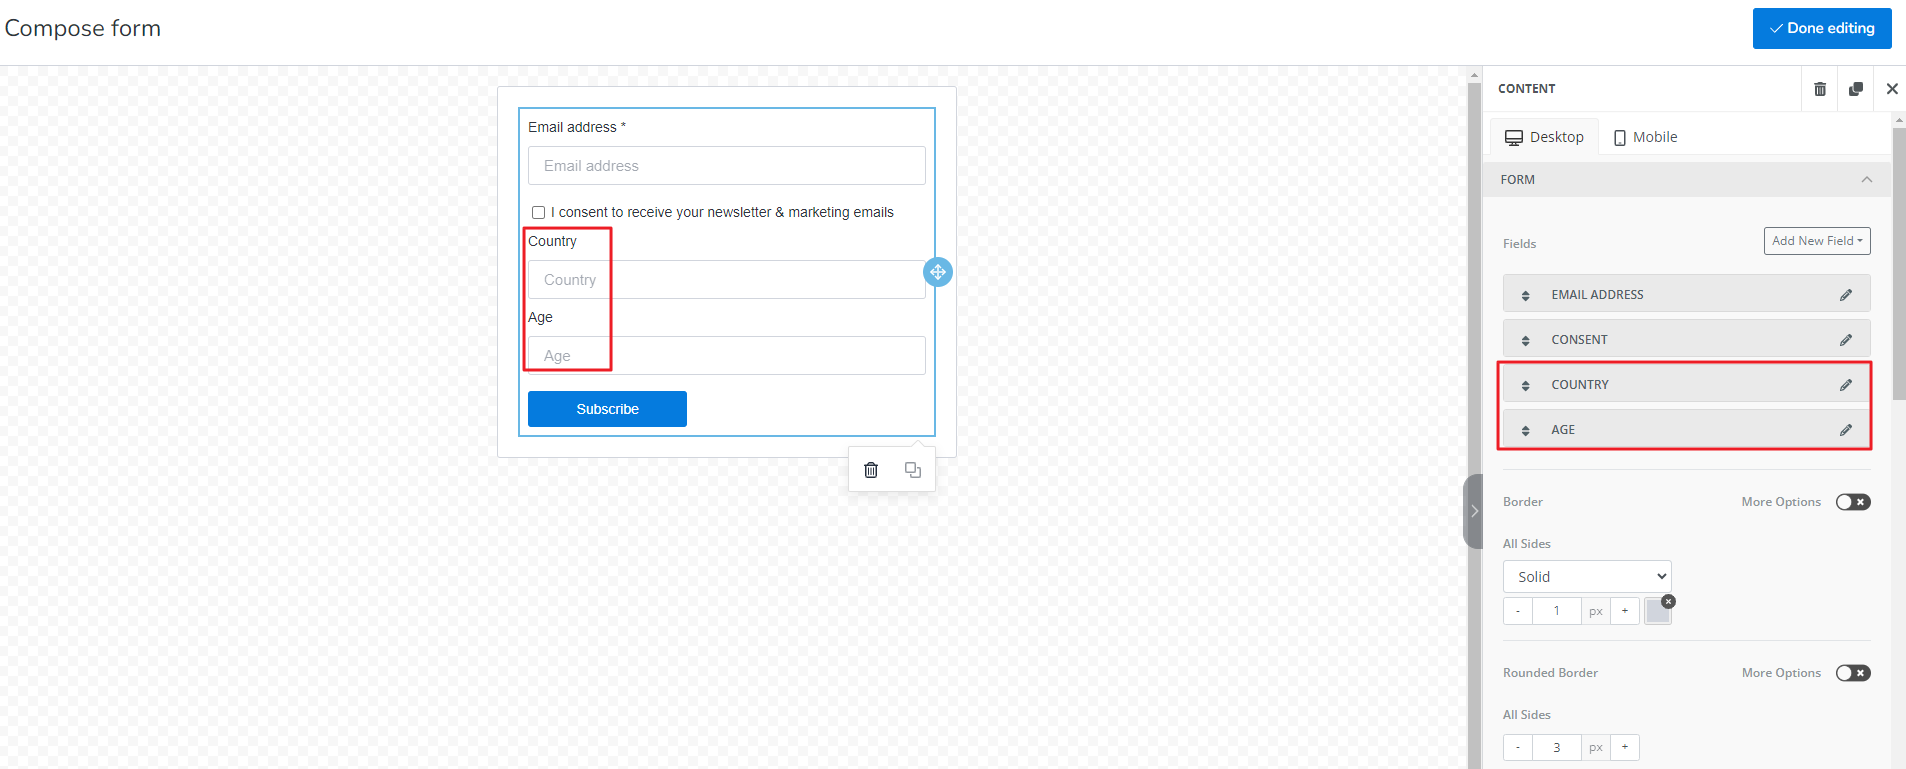
From here you will be able to select your previously defined fields like First name, Last name, or the custom fields like Country, Age etc
After selecting the custom fields, it will appear in Forms as shown below:
This is how you can add multiple custom fields in Forms.
MailBluster Form uses Google reCaptcha V3, which does not display a checkbox to confirm human interaction. Instead, it uses an advanced risk analysis engine and adaptive challenges to keep malicious software from engaging in abusive activities on your website. So, it will never display a checkbox, but it won’t compromise either.
You can place the Google Recaptcha checkbox protection from the Forms > Edit form page.
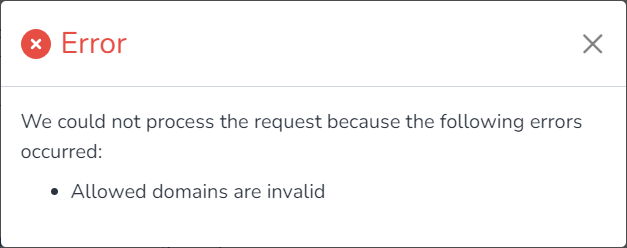
Here you will learn on how to resolve “Allowed domains are invalid” in Forms.
So, if you are getting this error message:
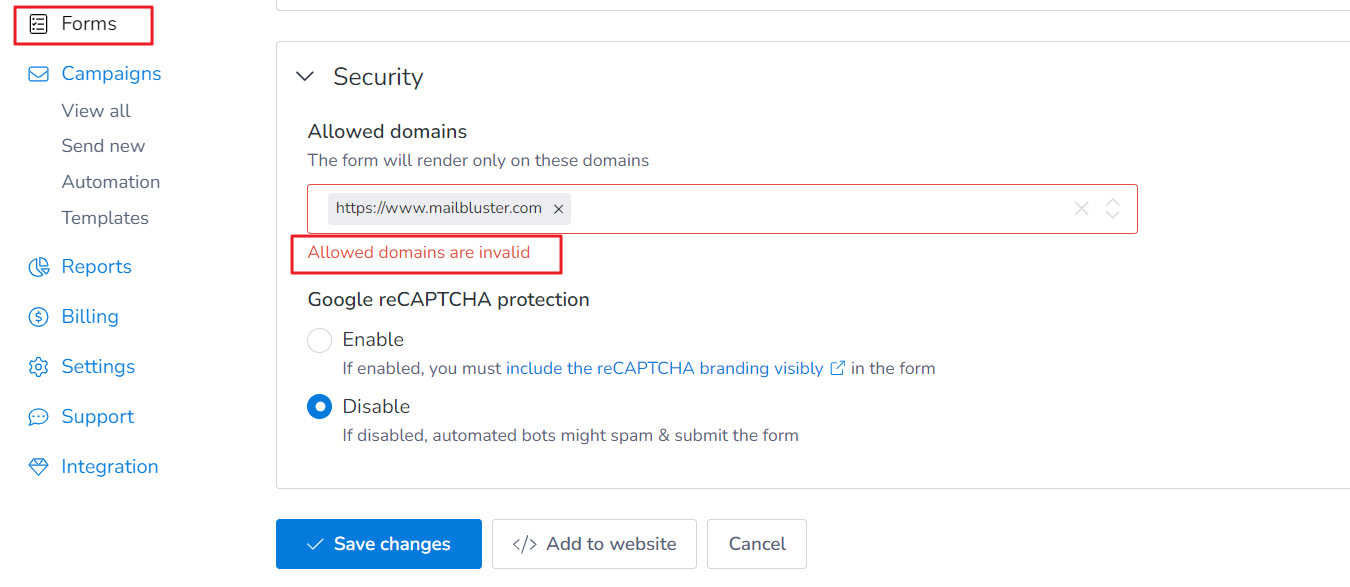
or, this one:
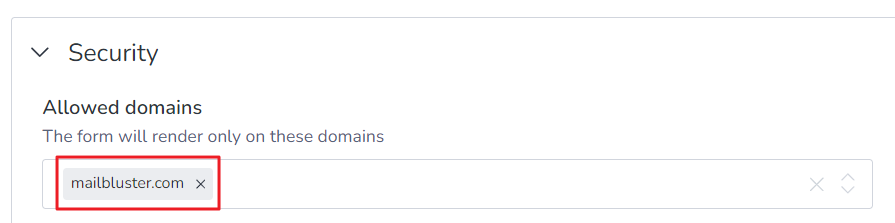
Then you should not place your entire Website URL in the Allowed domains field under Forms. Just place your website domain without http or https, as shown below and you are good to go.
Currently, MailBluster doesn’t support creating landing pages directly. However, you can easily connect MailBluster to a subscribe form using MailBluster’s Developer API from MailBluster API Documentation or by using Forms within the MailBluster app. For instance, when a user subscribes for the first time, they will receive a welcome message and be added as a Lead in MailBluster Leads section.
At this time, MailBluster forms does not offer a built-in feature to arrange form fields side by side. All fields are displayed in a vertical layout by default. While custom styling or layout options like horizontal alignment are not currently available within the Form builder, we are continuously working to enhance the flexibility and customization of our forms.
For now, users must follow the default stacked field arrangement provided by the system as there is no such side by side Adding Fields option in Forms right now.
Here you will learn how to generate simple shortcode from Forms in WordPress.
First you need to enter the name of the website in the forms where you want the form to be visible.
Then generate the HTML shortcode and click Copy code.
Finally, you need to navigate to the Edit page using any page builder, then paste your script into the Custom HTML code block where you want the embedded form to go.
Embedding a subscription form in WordPress using Elementor is easy with MailBluster. Here you will learn how to embed subscription form in WordPress using Elementor in MailBluster.
First, prepare the form in MailBluster that you want to embed on your website. In this example, we have already created an inline form, which we will use on a WordPress page. If you need detailed instructions on creating forms in MailBluster, please refer to this guide: How to create an Inline Form.
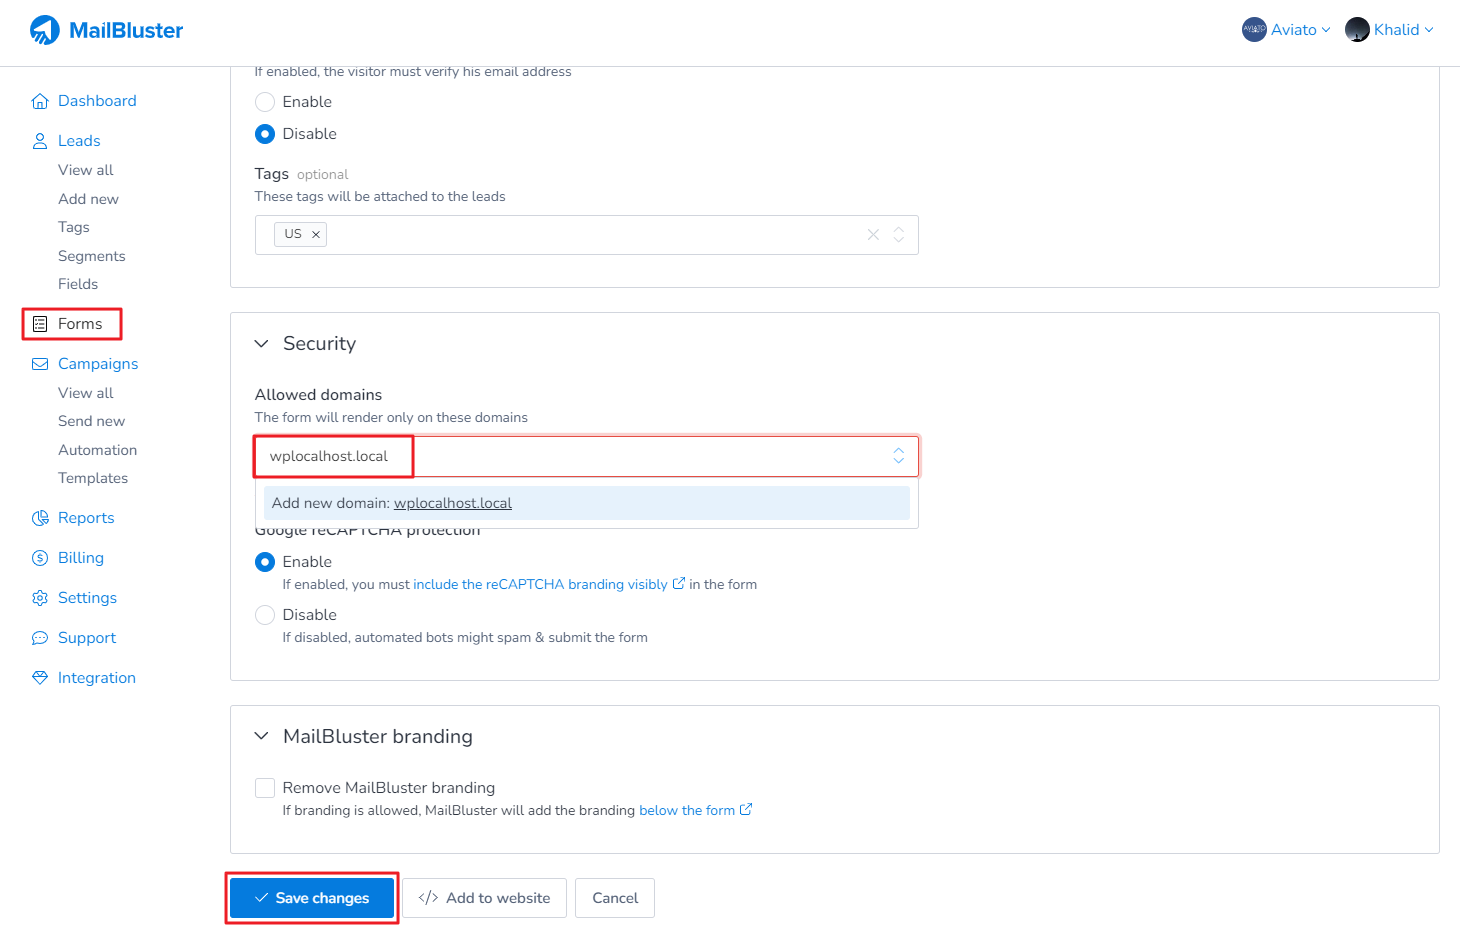
Now, in the Inline Form settings, go to the highlighted section labeled ‘Allowed Domains,’ and enter your website’s domain name there.
Copy the domain name only from your WordPress site without http or https as shown below (highlighted). For example: mailbluster.com. If your website starts with www then you have to mention it like this: www.mailbluster.com.
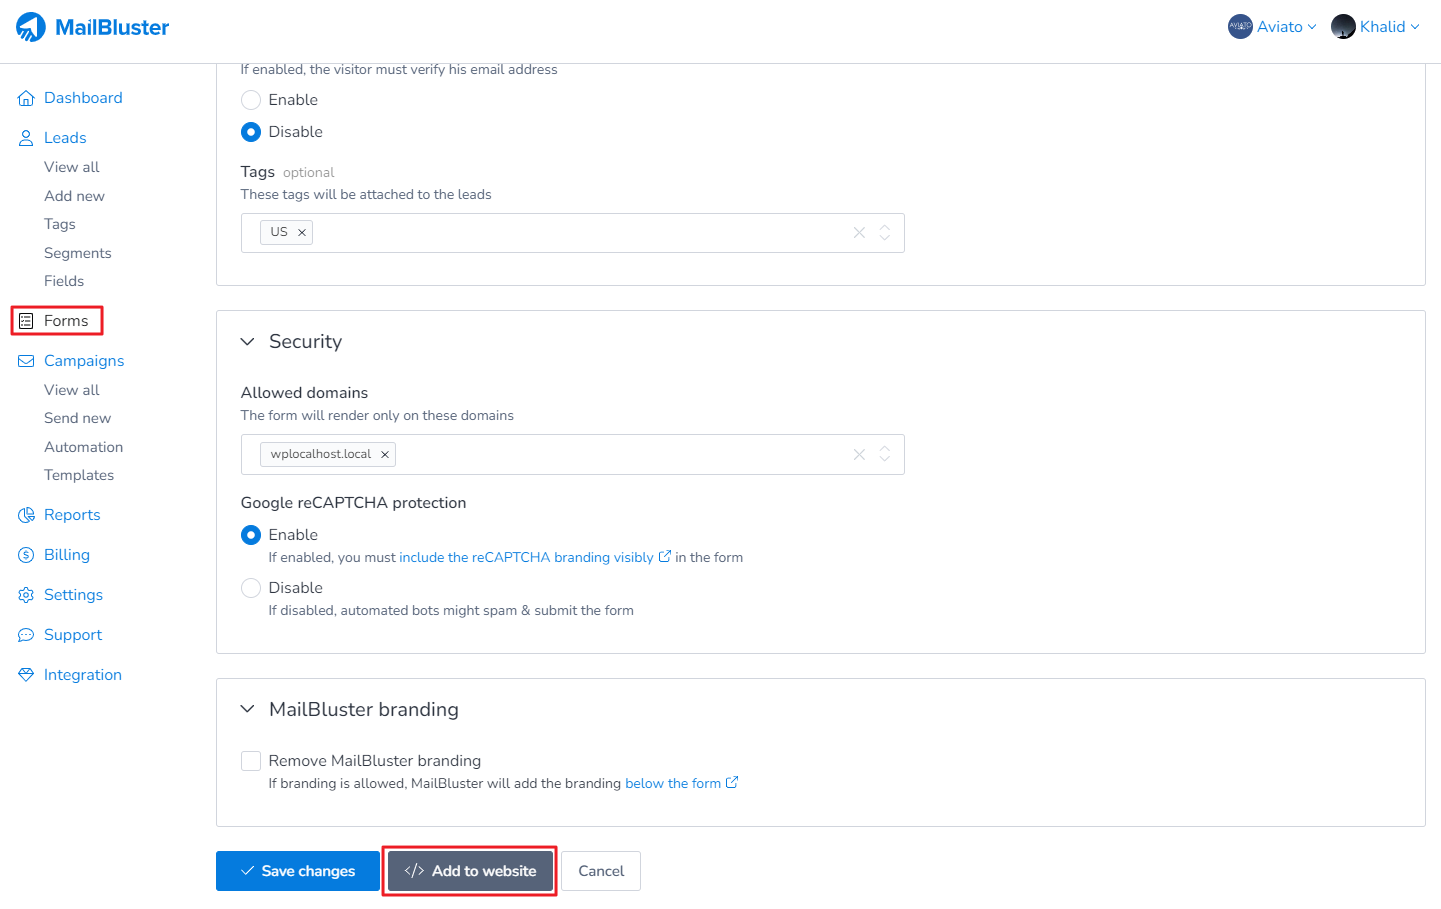
Paste the domain name in Allowed domains. Then click Save changes.
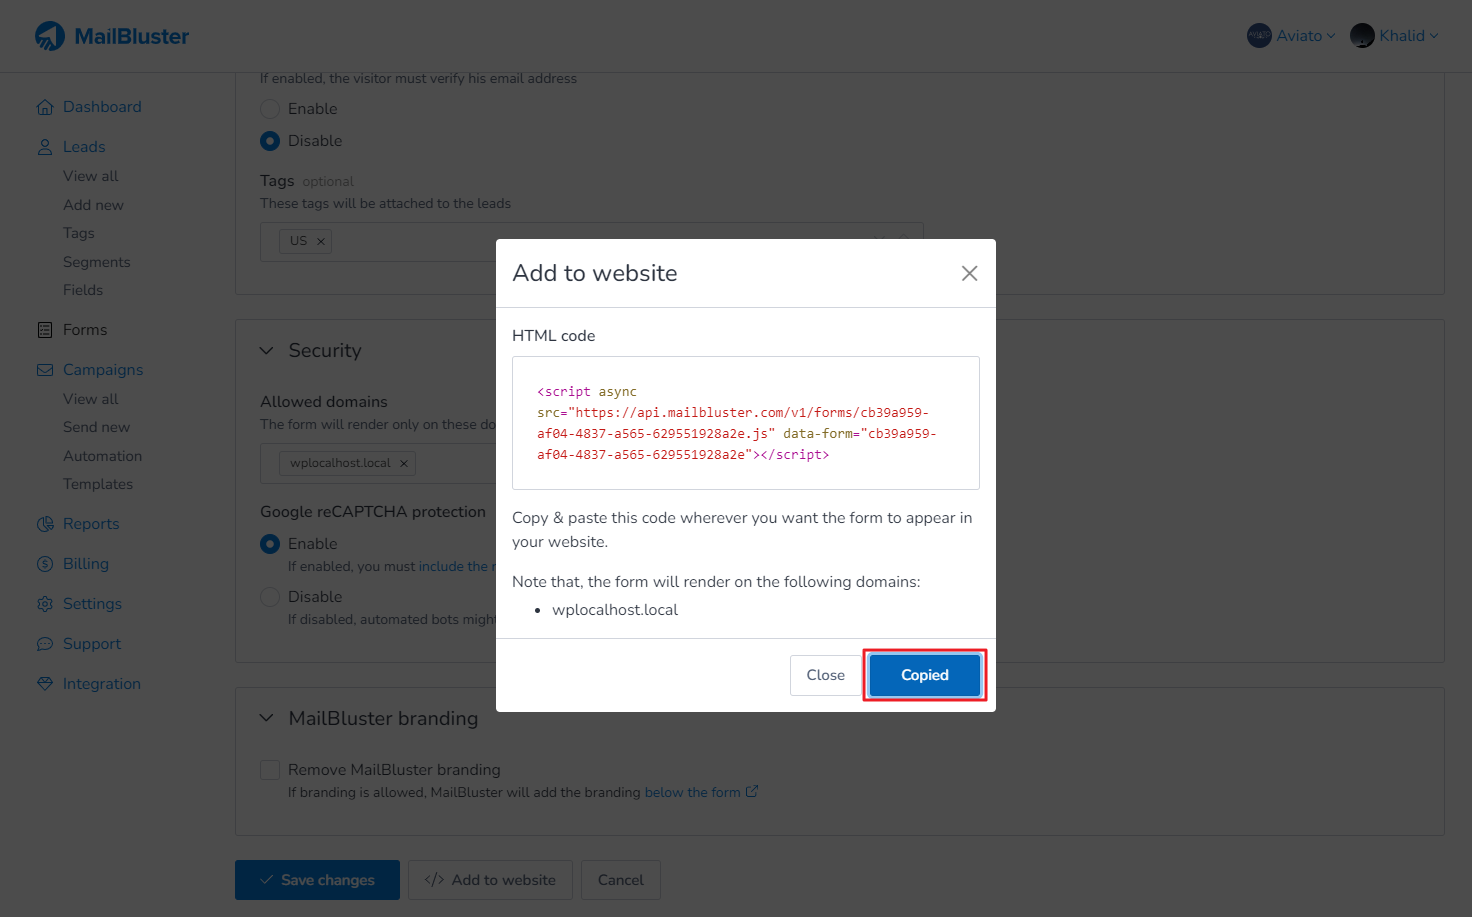
Now, click on Add to website.
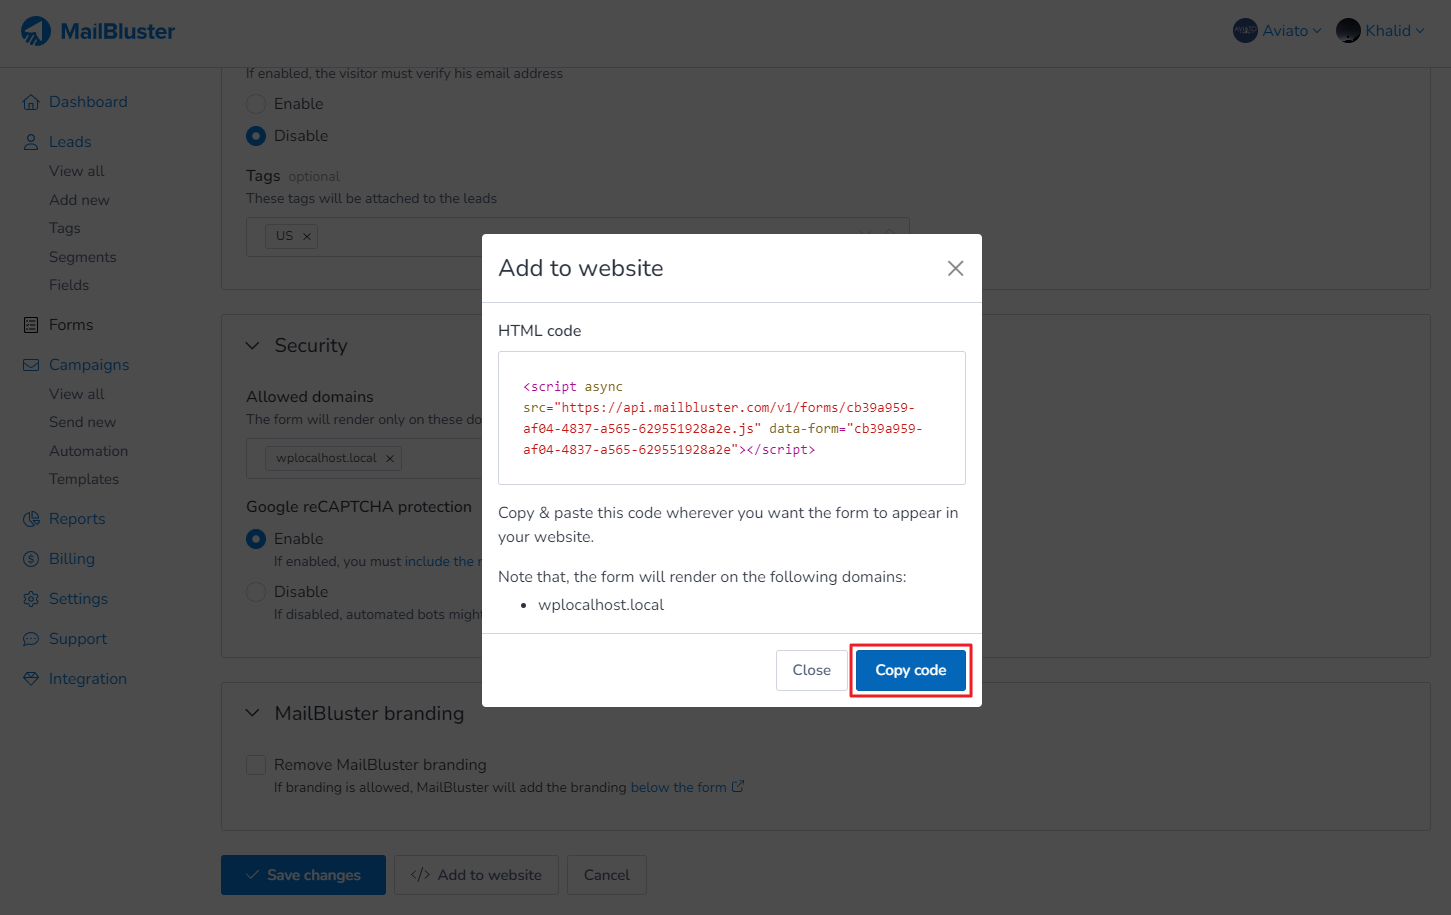
After clicking Add to website, click on Copy code and prepare it for your WordPress website.
Once the code is Copied, you will see the status as shown below.
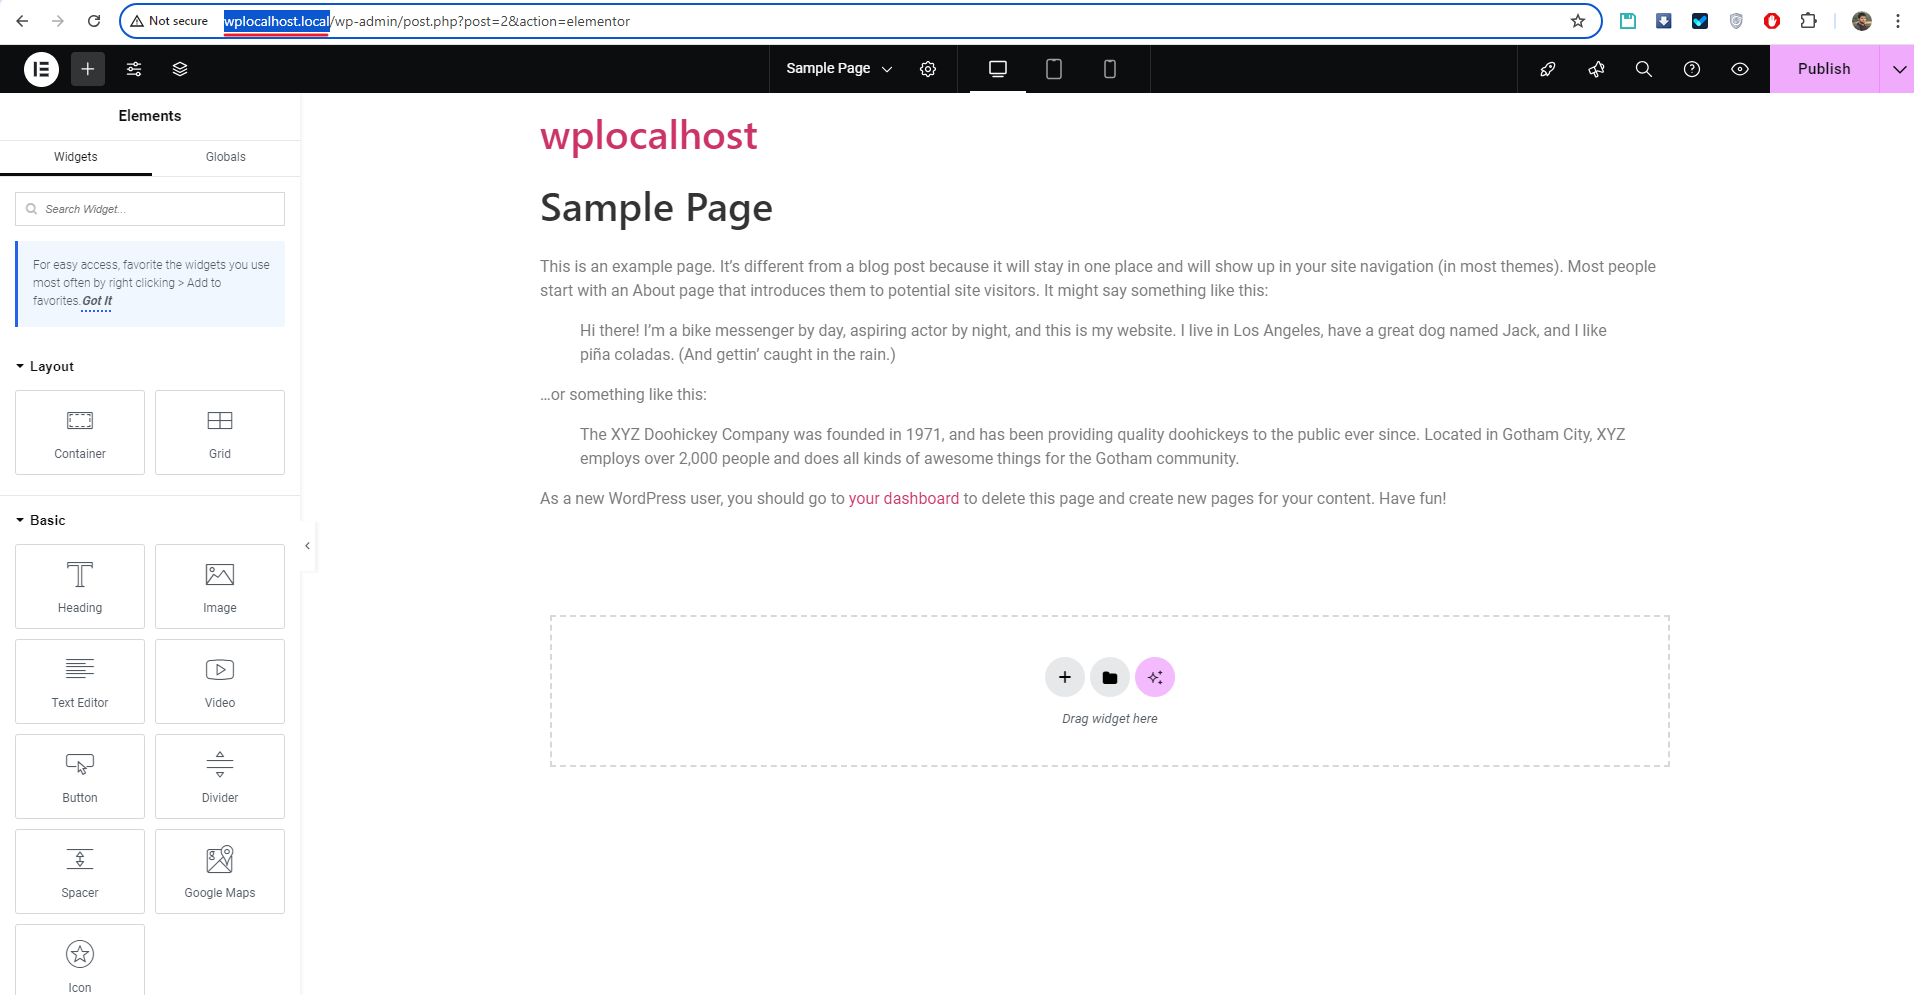
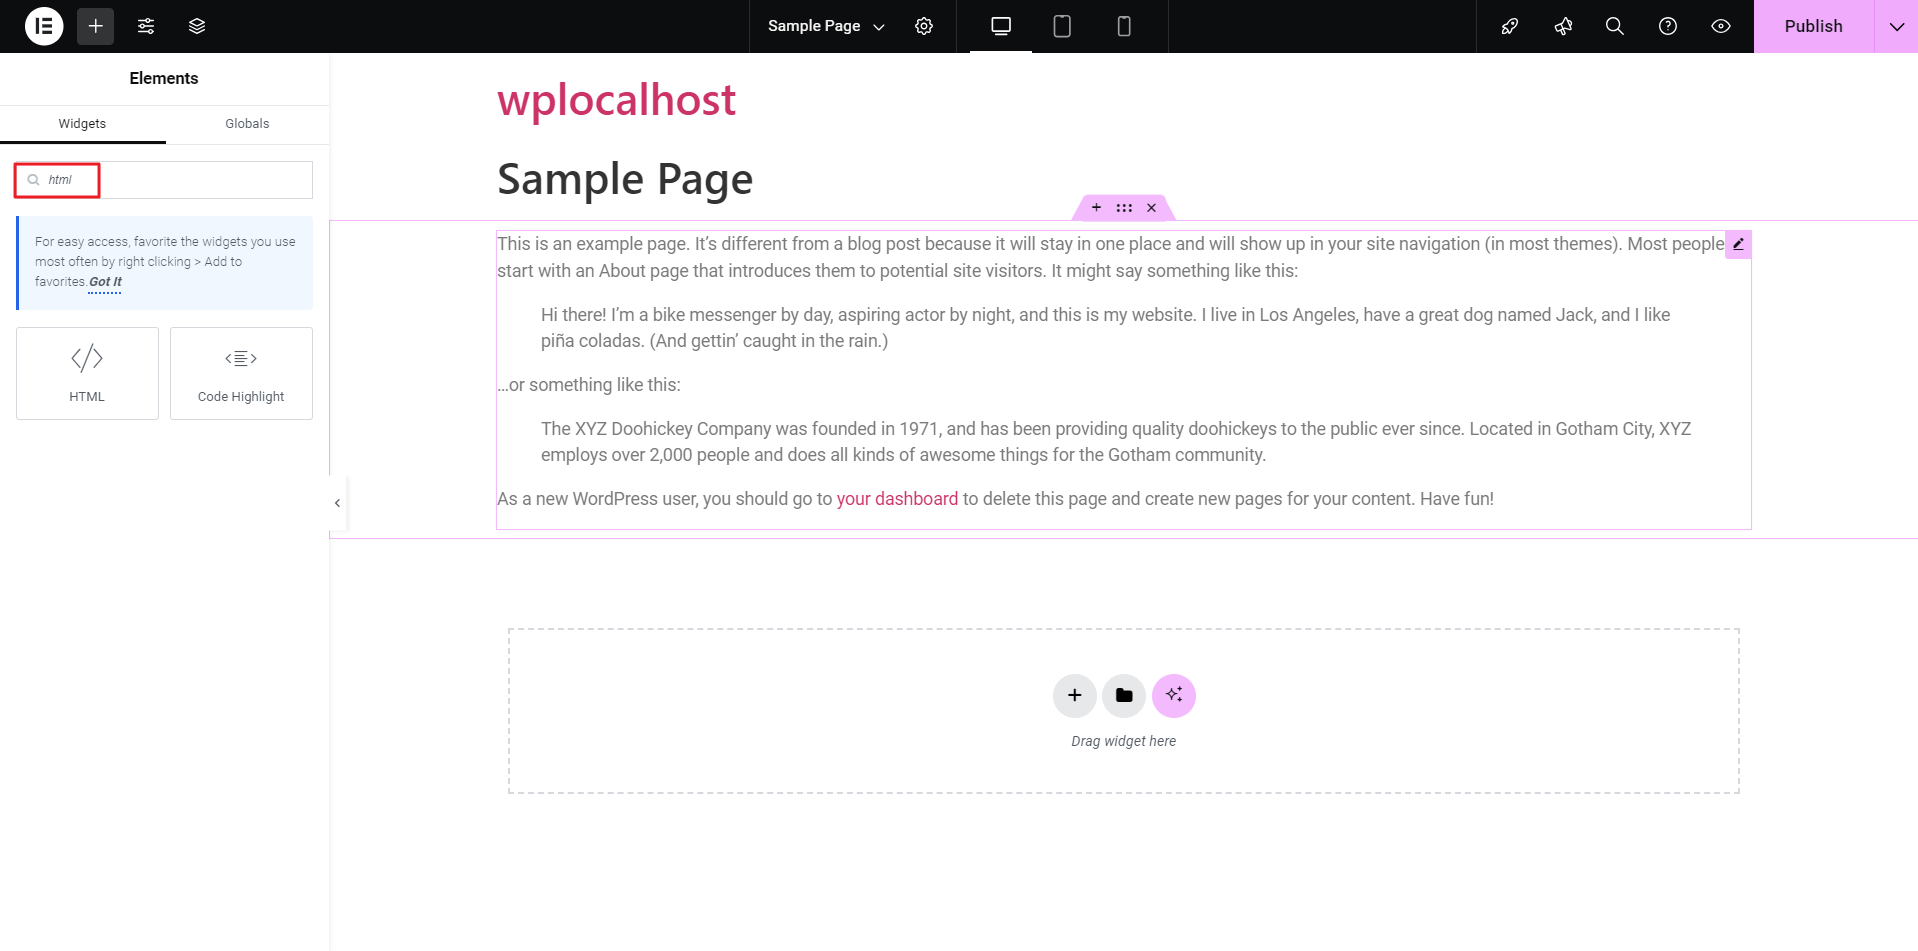
Next, navigate to your WordPress site. We assume that you have already installed the Elementor plugin, so the Elementor layout should appear as shown below. Type ‘html‘ on the search bar.
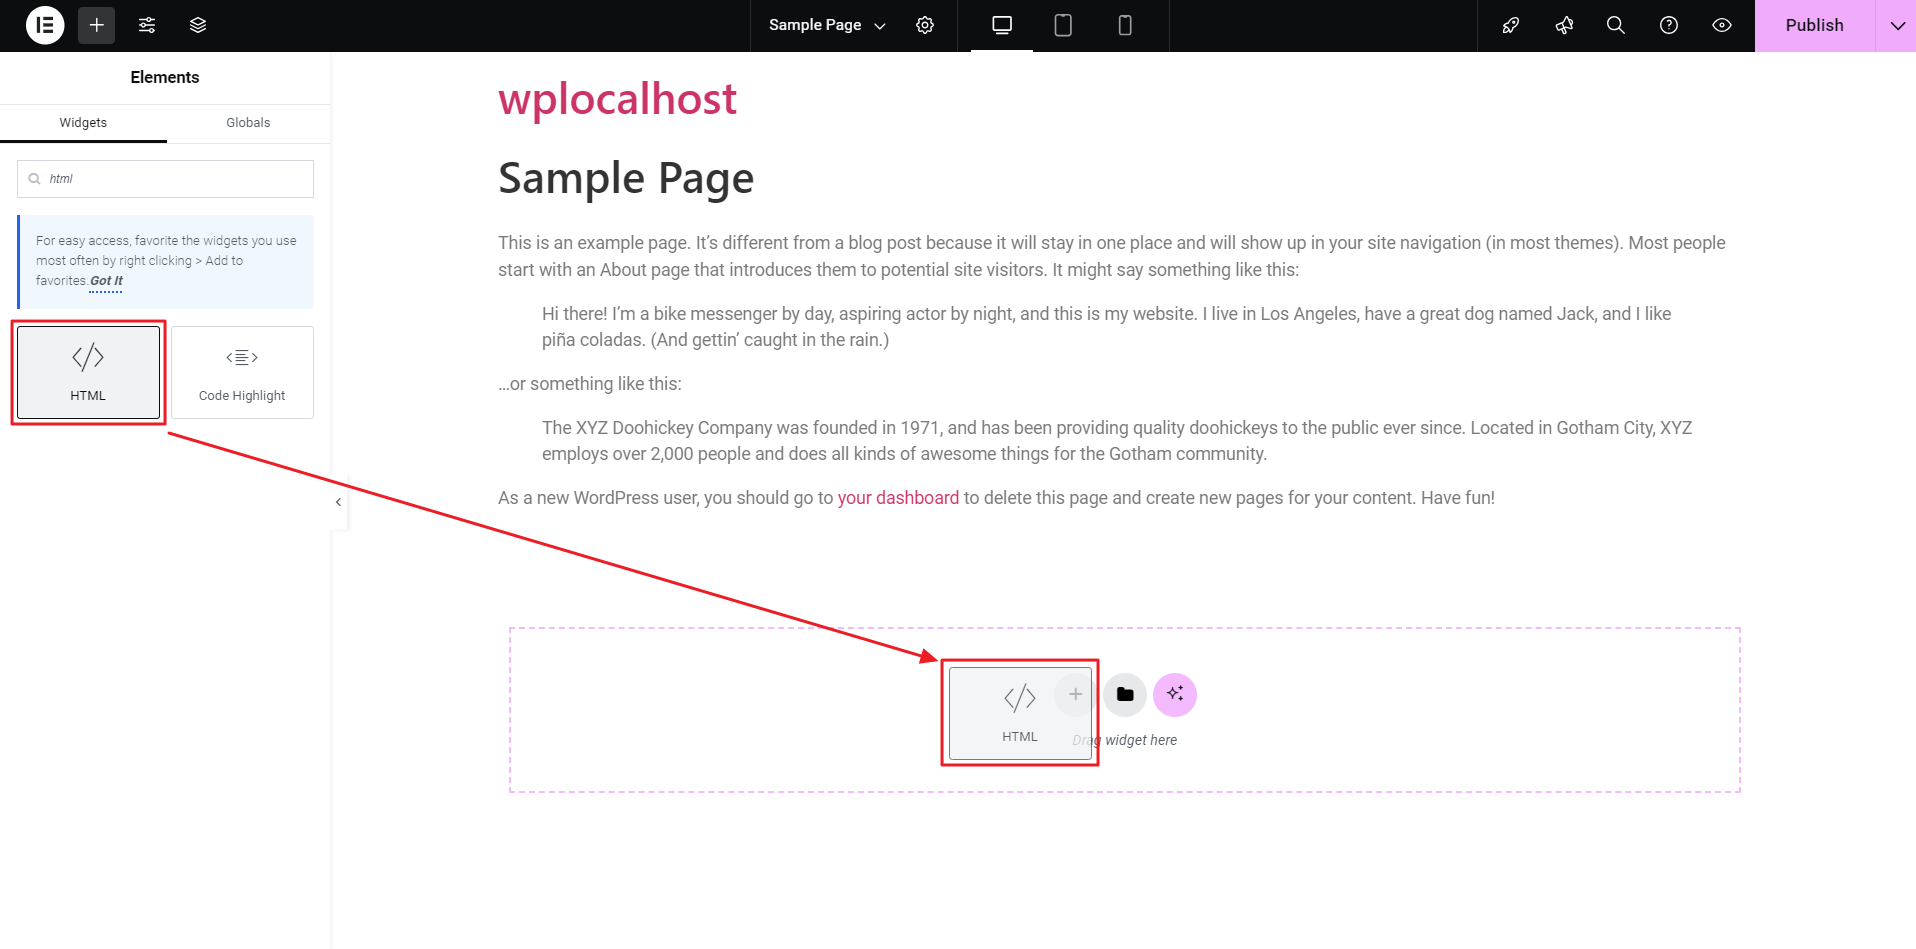
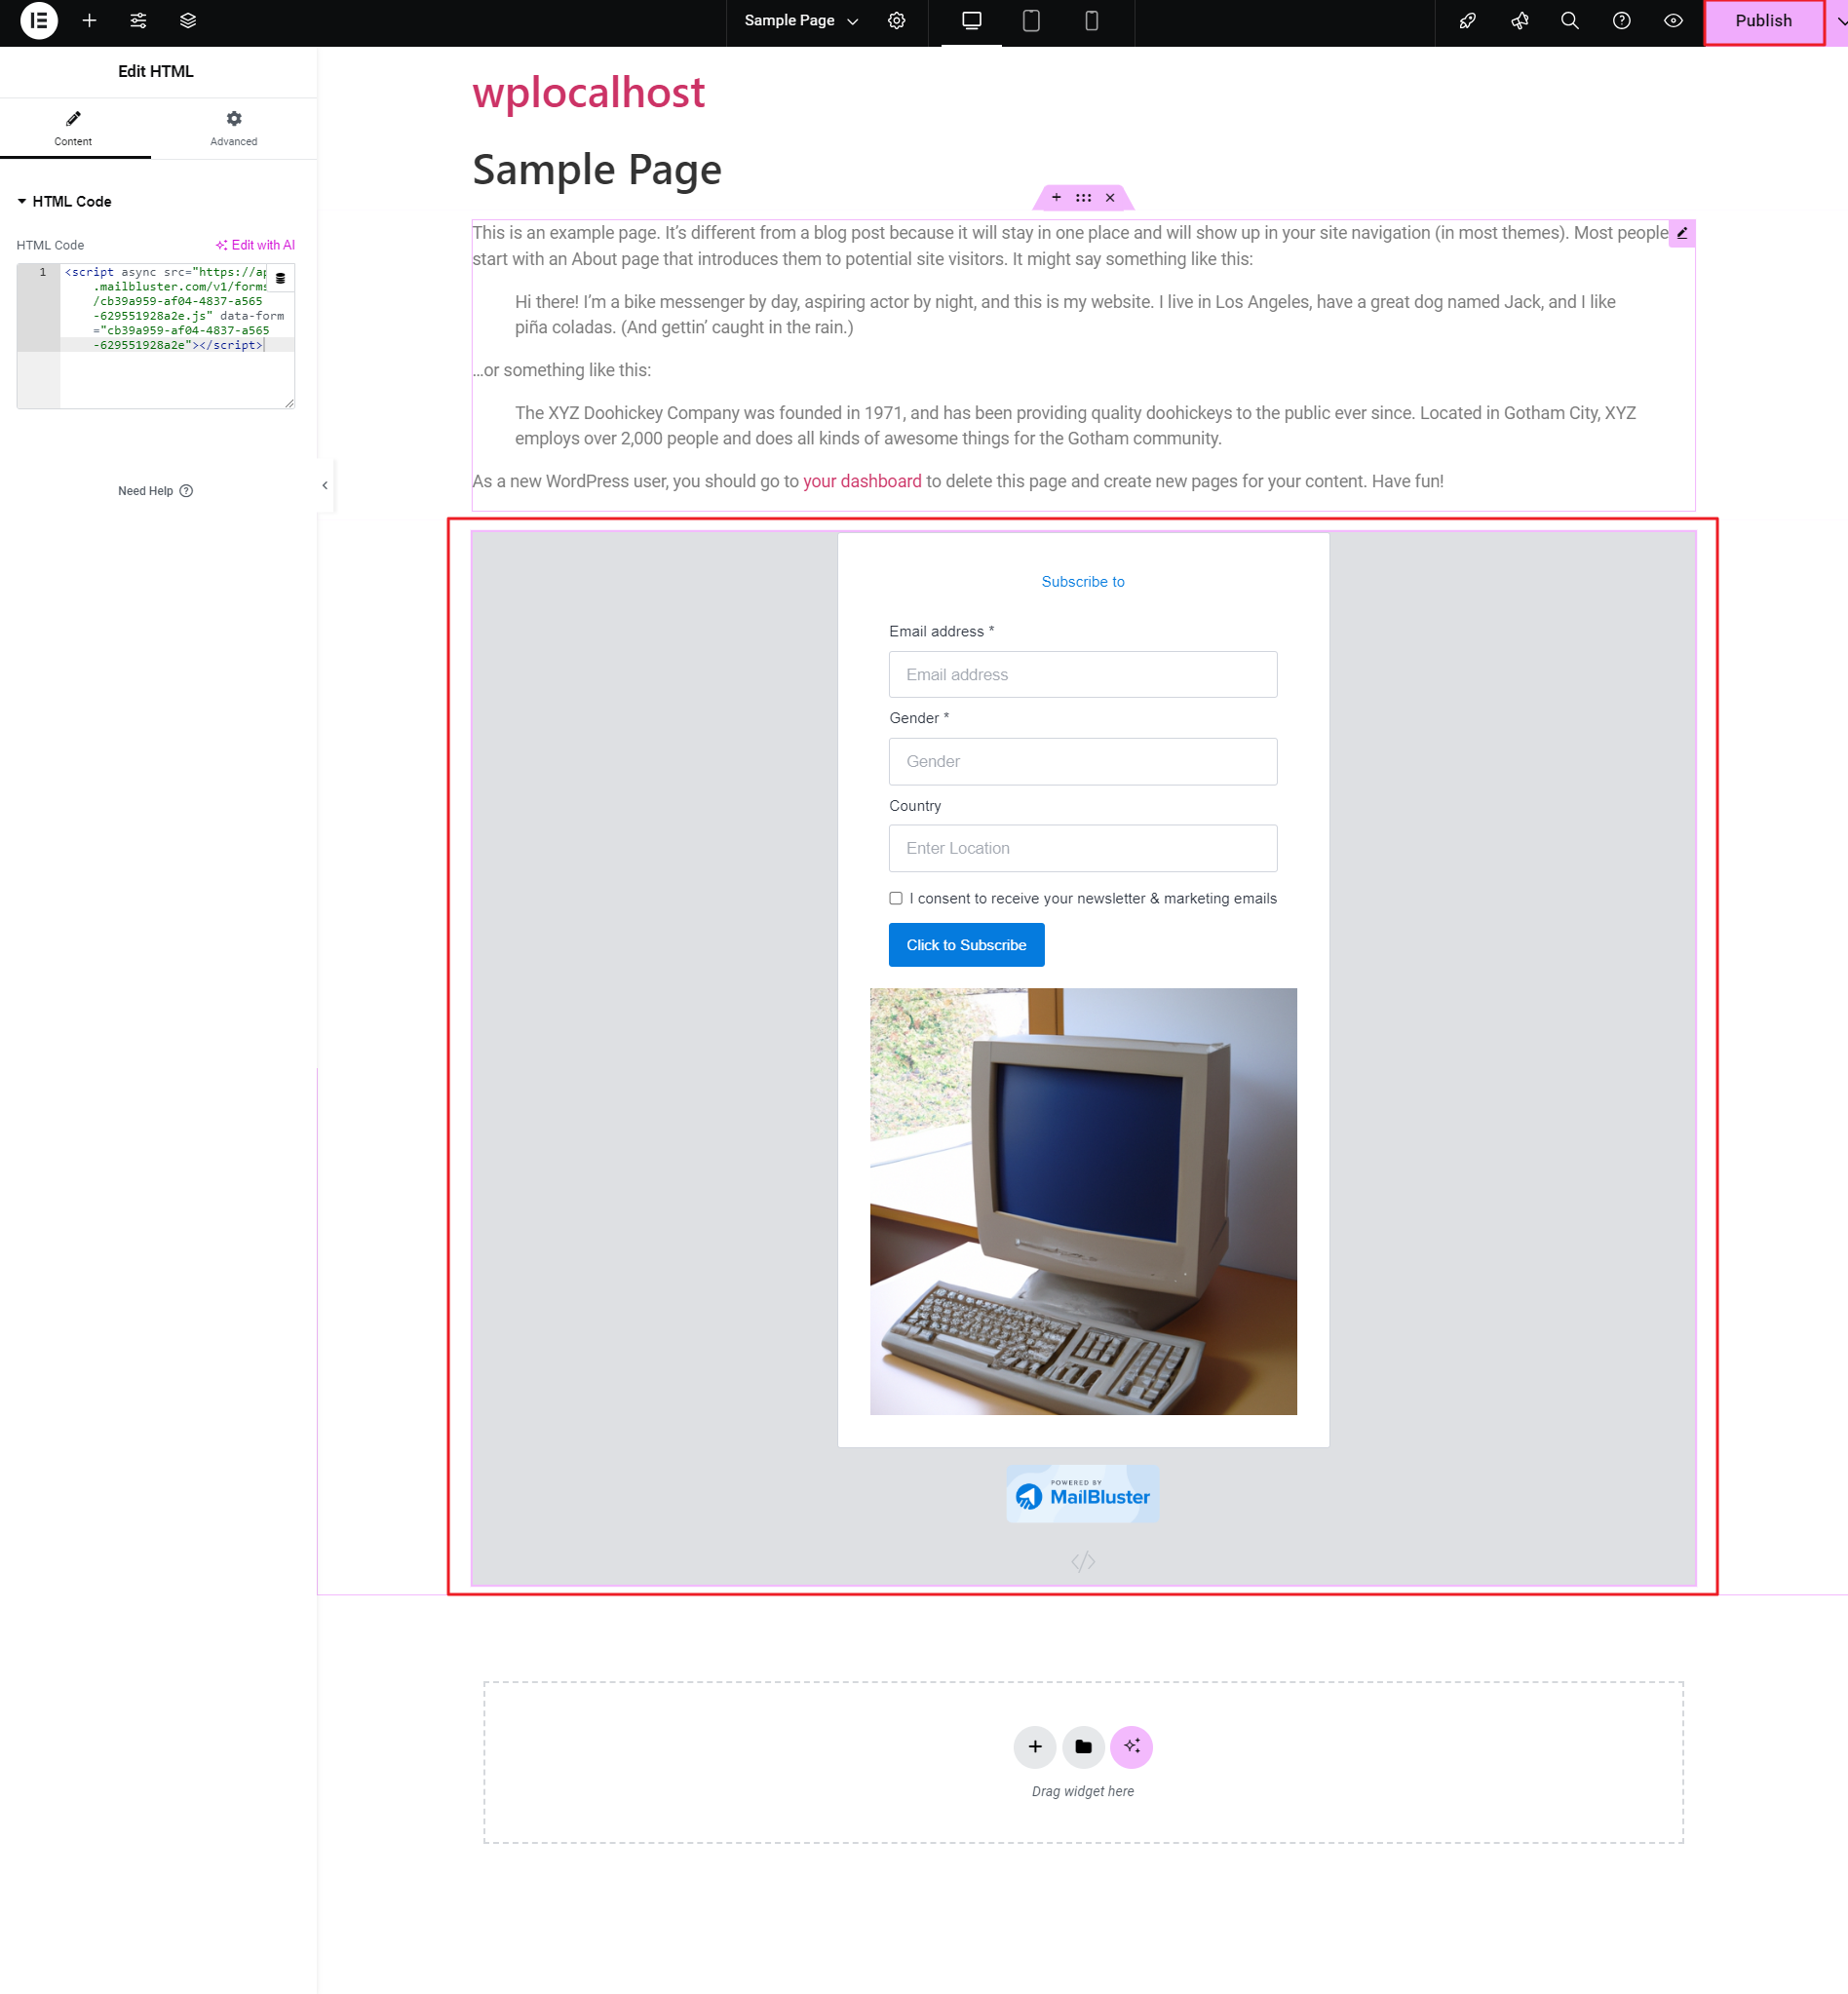
Drag and drop the ‘</> HTML‘ widget from the Elementor panel to the desired location on your WordPress page where you want to place the MailBluster form, as shown below.
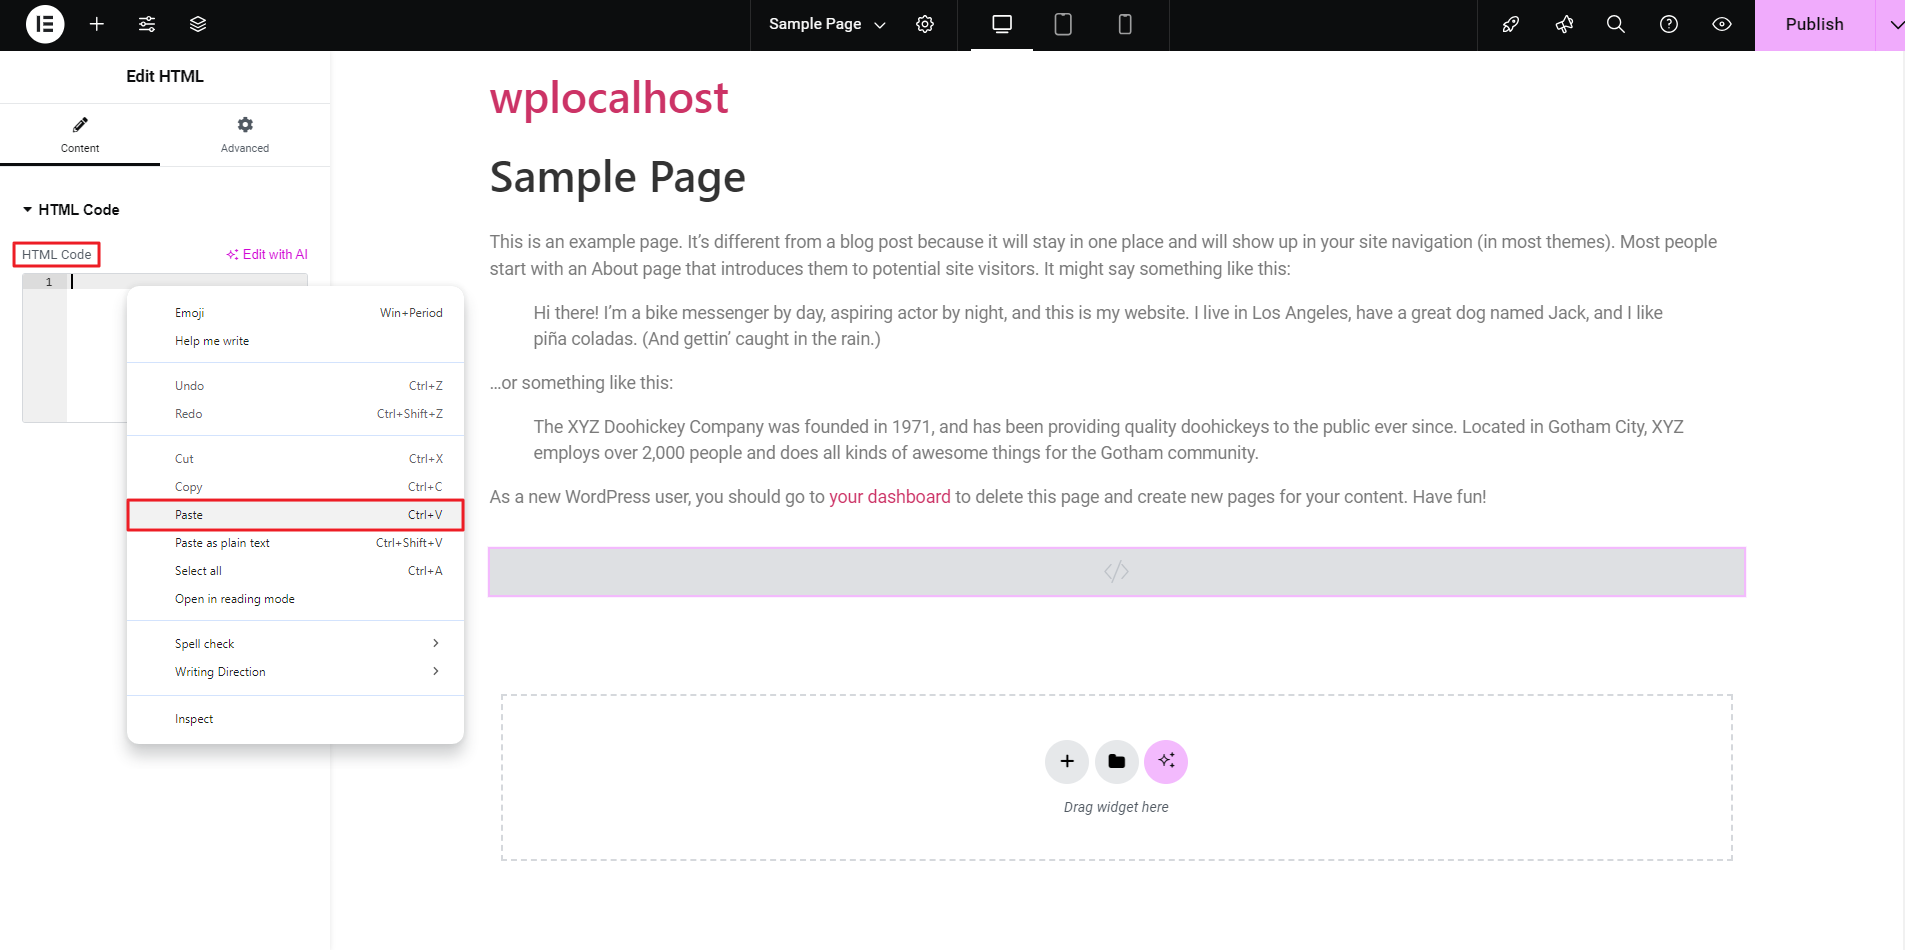
Now, paste the MailBluster form’s generated Code into the Elementor ‘HTML Code‘ field.
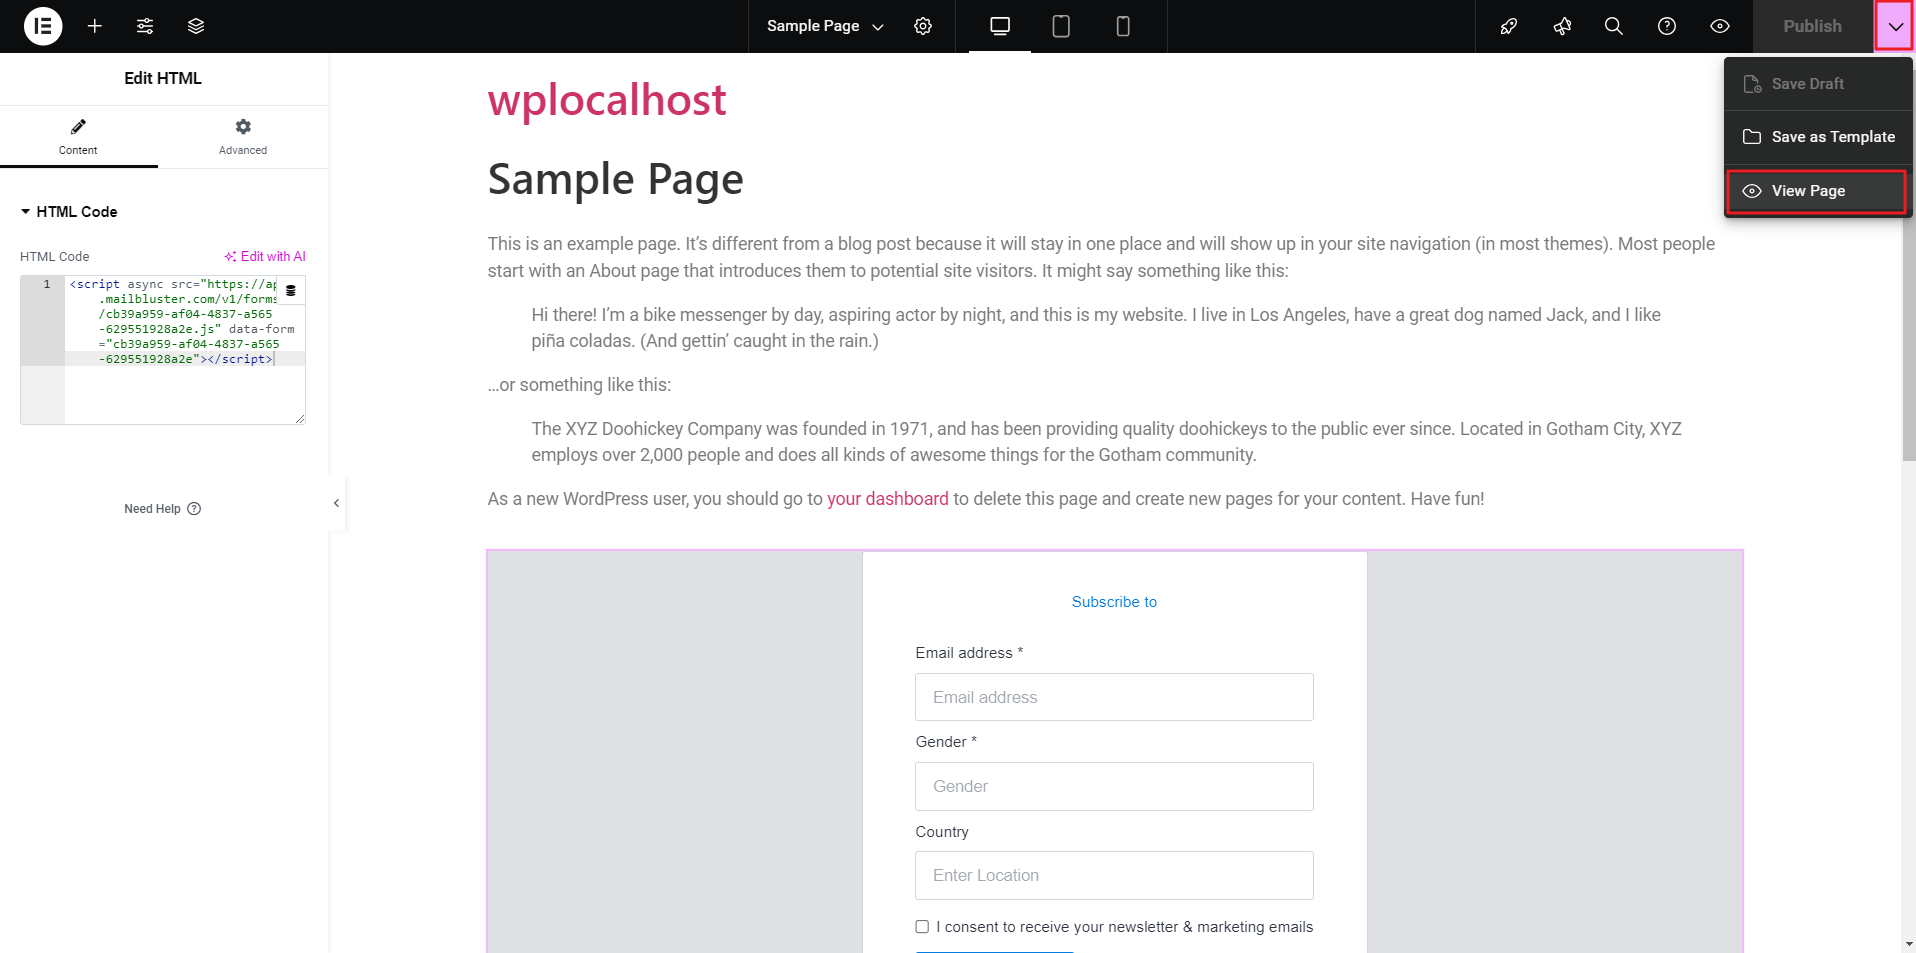
Once pasted correctly, the MailBluster Form will appear on the WordPress page as shown below.
You can now click on ‘ v ‘ for the dropdown list and click on View Page.
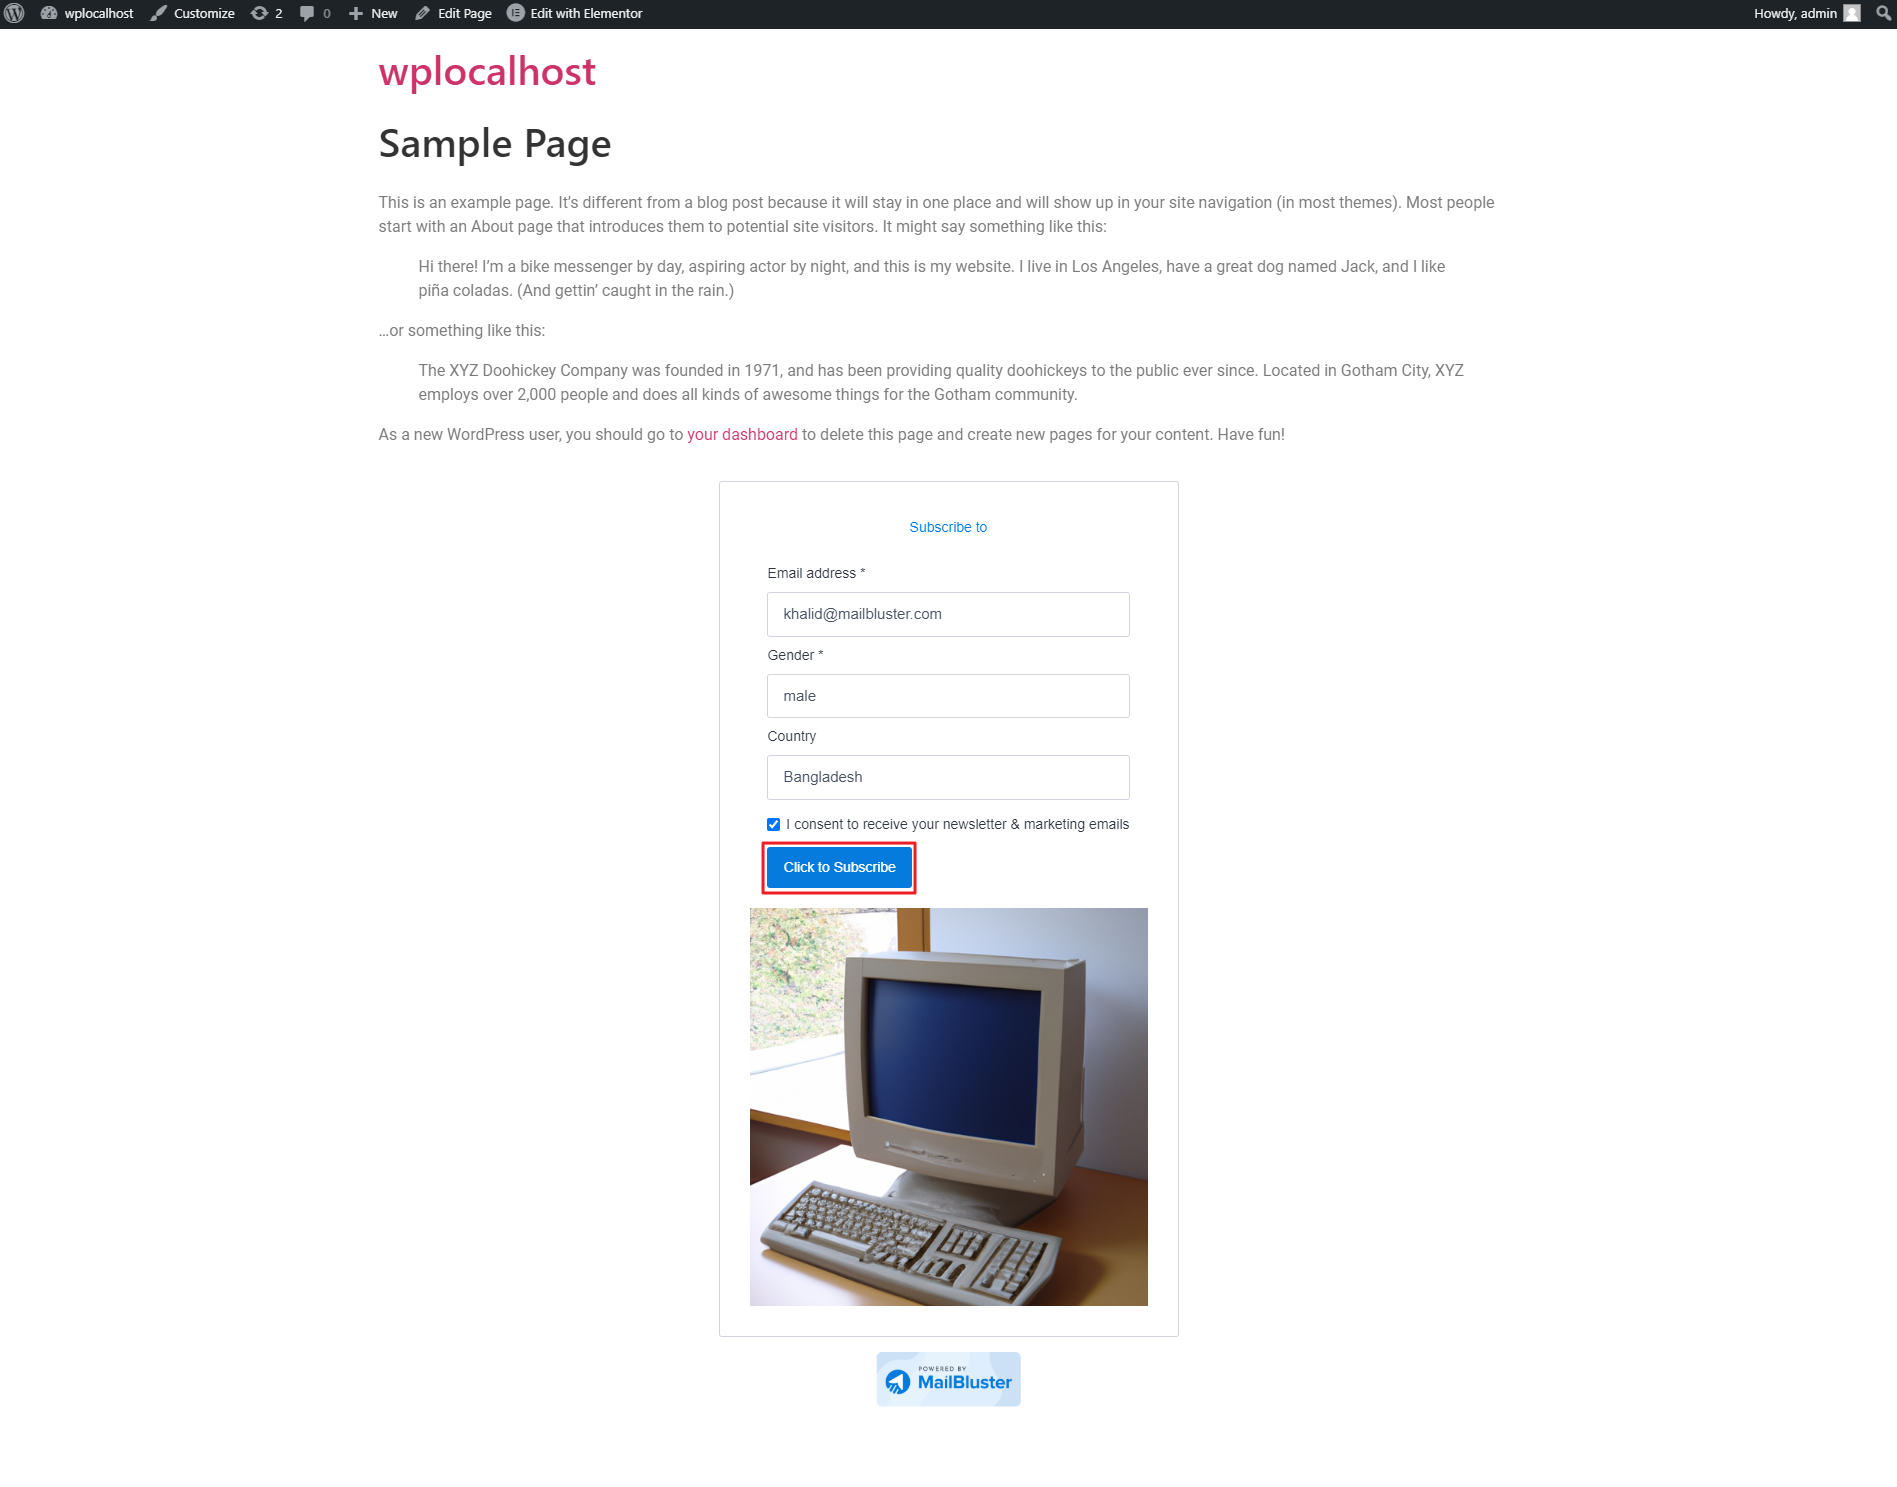
The website will now display the MailBluster form. Fill in the required details in the form. Then Click to Subscribe.
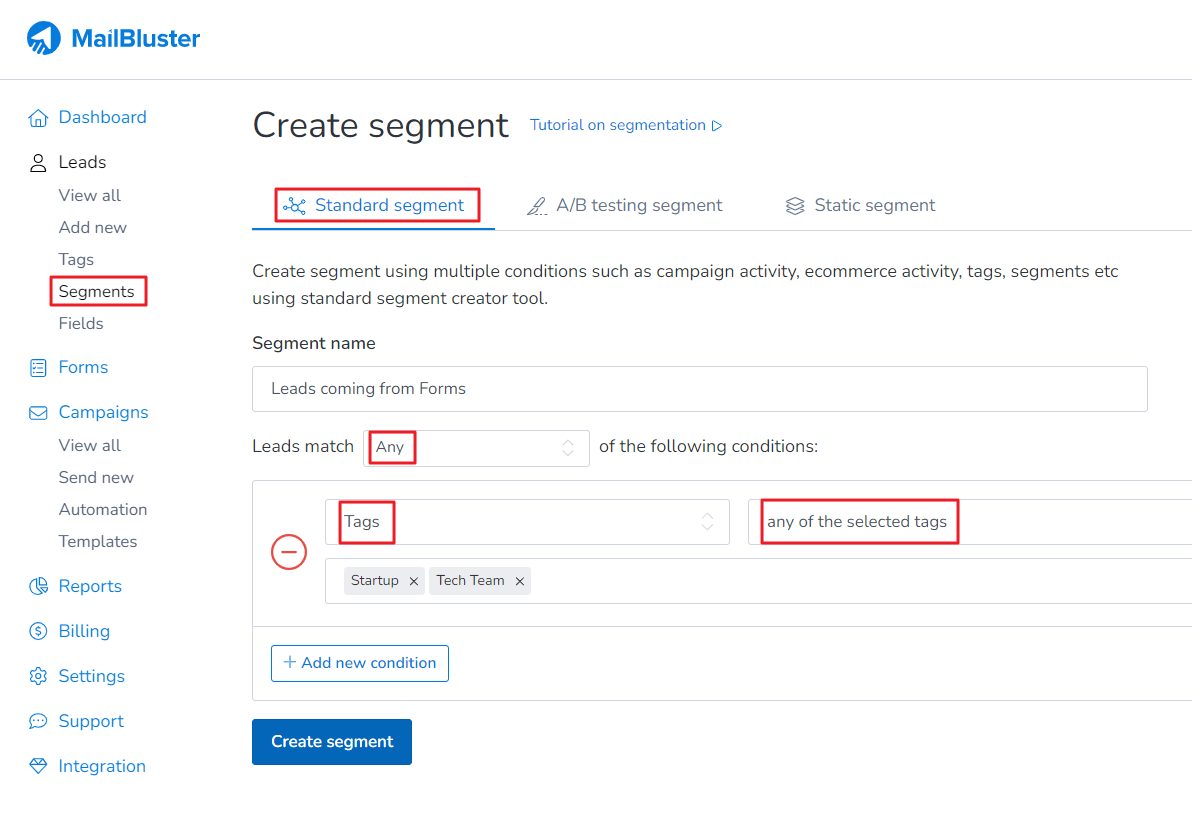
Forms cannot automatically add leads to segments in MailBluster. However, you can achieve a similar result by using Tags. When you add one or multiple tags to a form, all leads coming from that form will automatically be assigned to the selected tags. This allows you to organize and categorize leads efficiently, even if direct segment assignment isn’t possible.
And, then later create a Standard segment using those Tags:
Set up forms using a checkbox field to opt into segments in MailBluster is useful to let subscribers choose the categories they want to join. Here you will learn how to set up Forms using checkbox field to opt into segments.
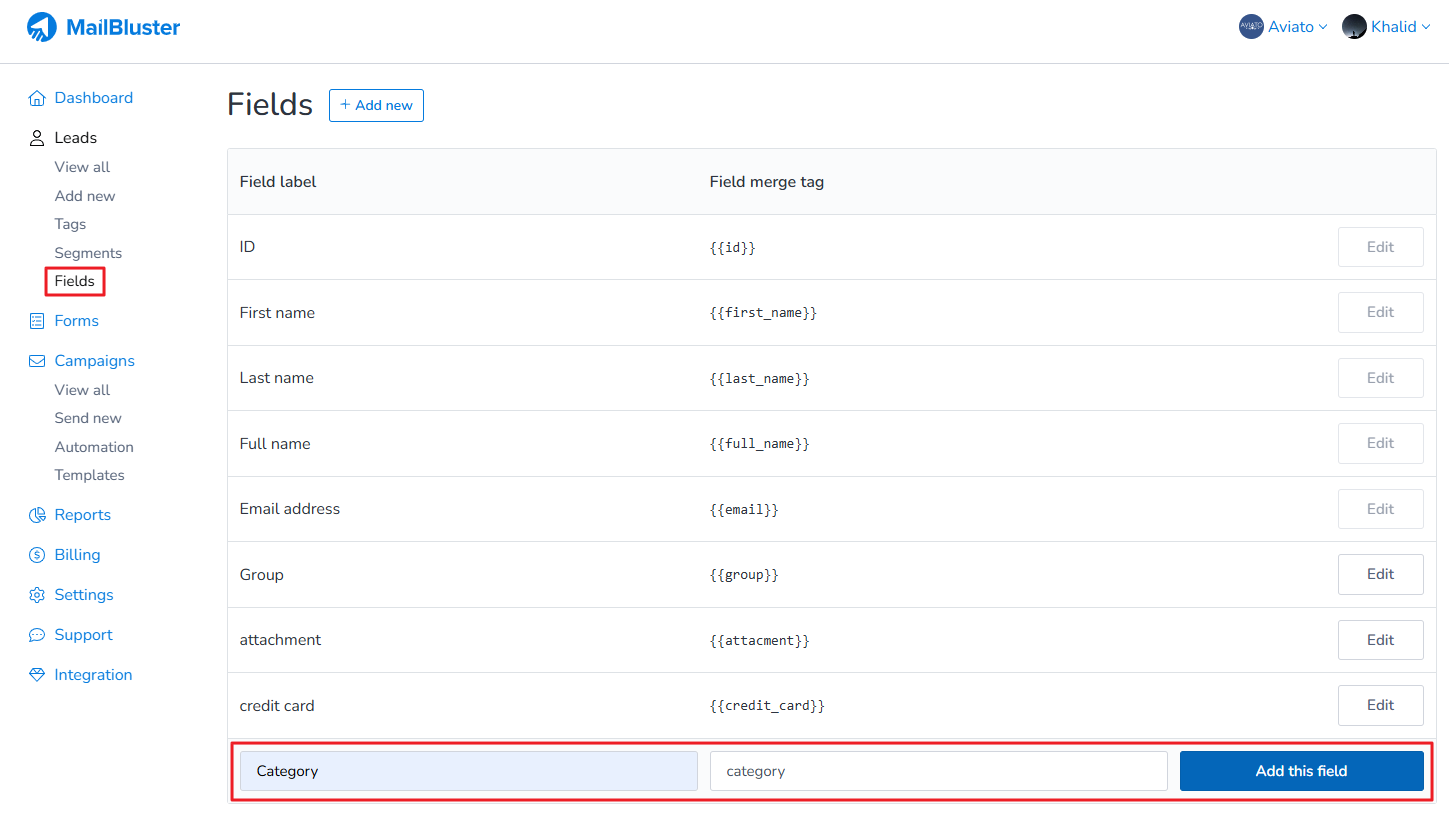
First you need to go to Fields. Then create a custom field for example “Category”. Click Add this field.
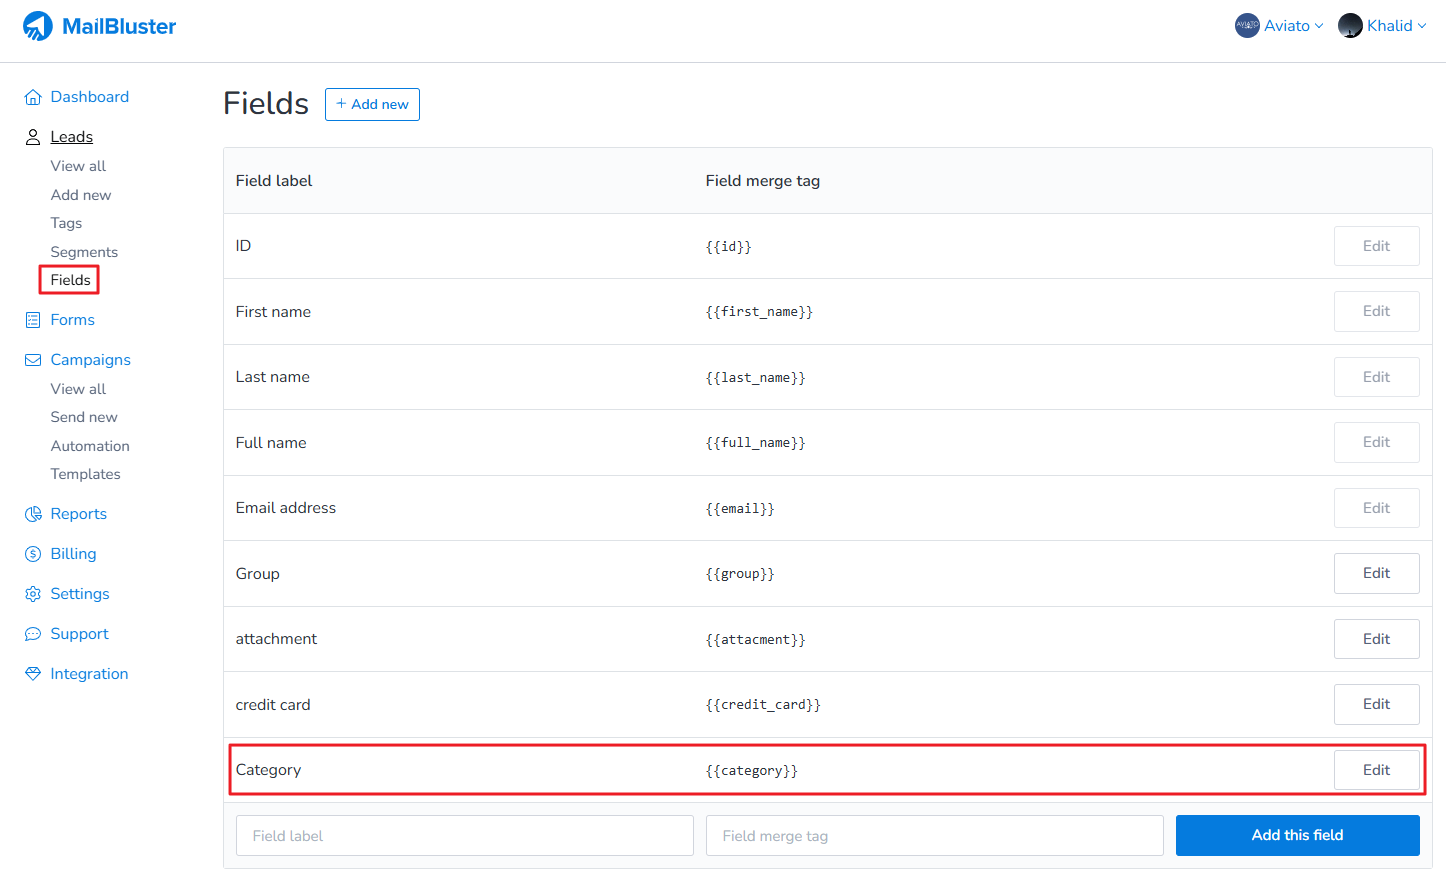
Here custom field “Category” has been created as shown below.
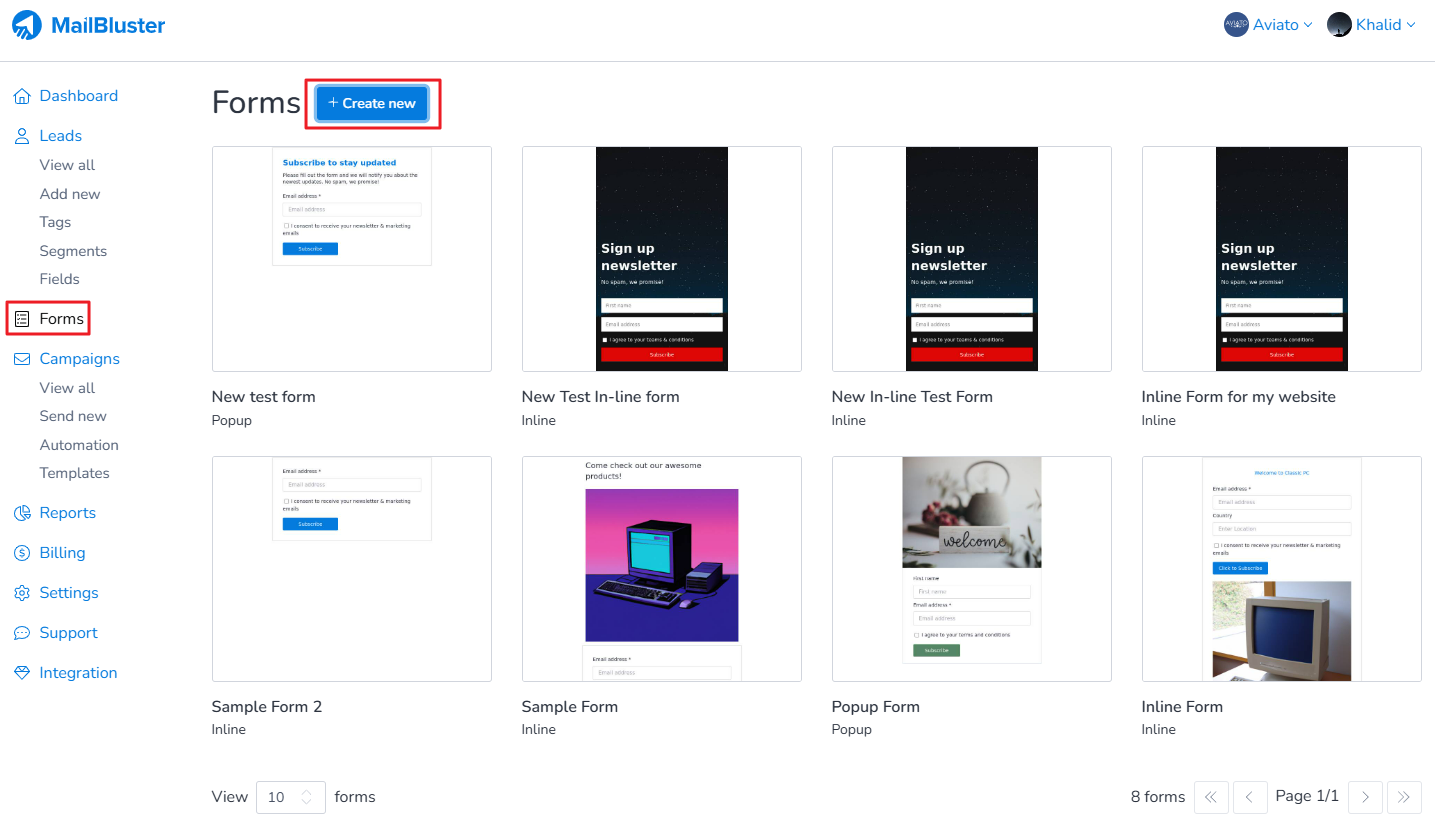
Now go to Forms and click Create new to create an Inline form.
Select Inline form.
Now click on Edit to edit the form.
Select template of your choice or you can select a Blank template. Here we selected Minimal template.
The template form is generated as shown below.
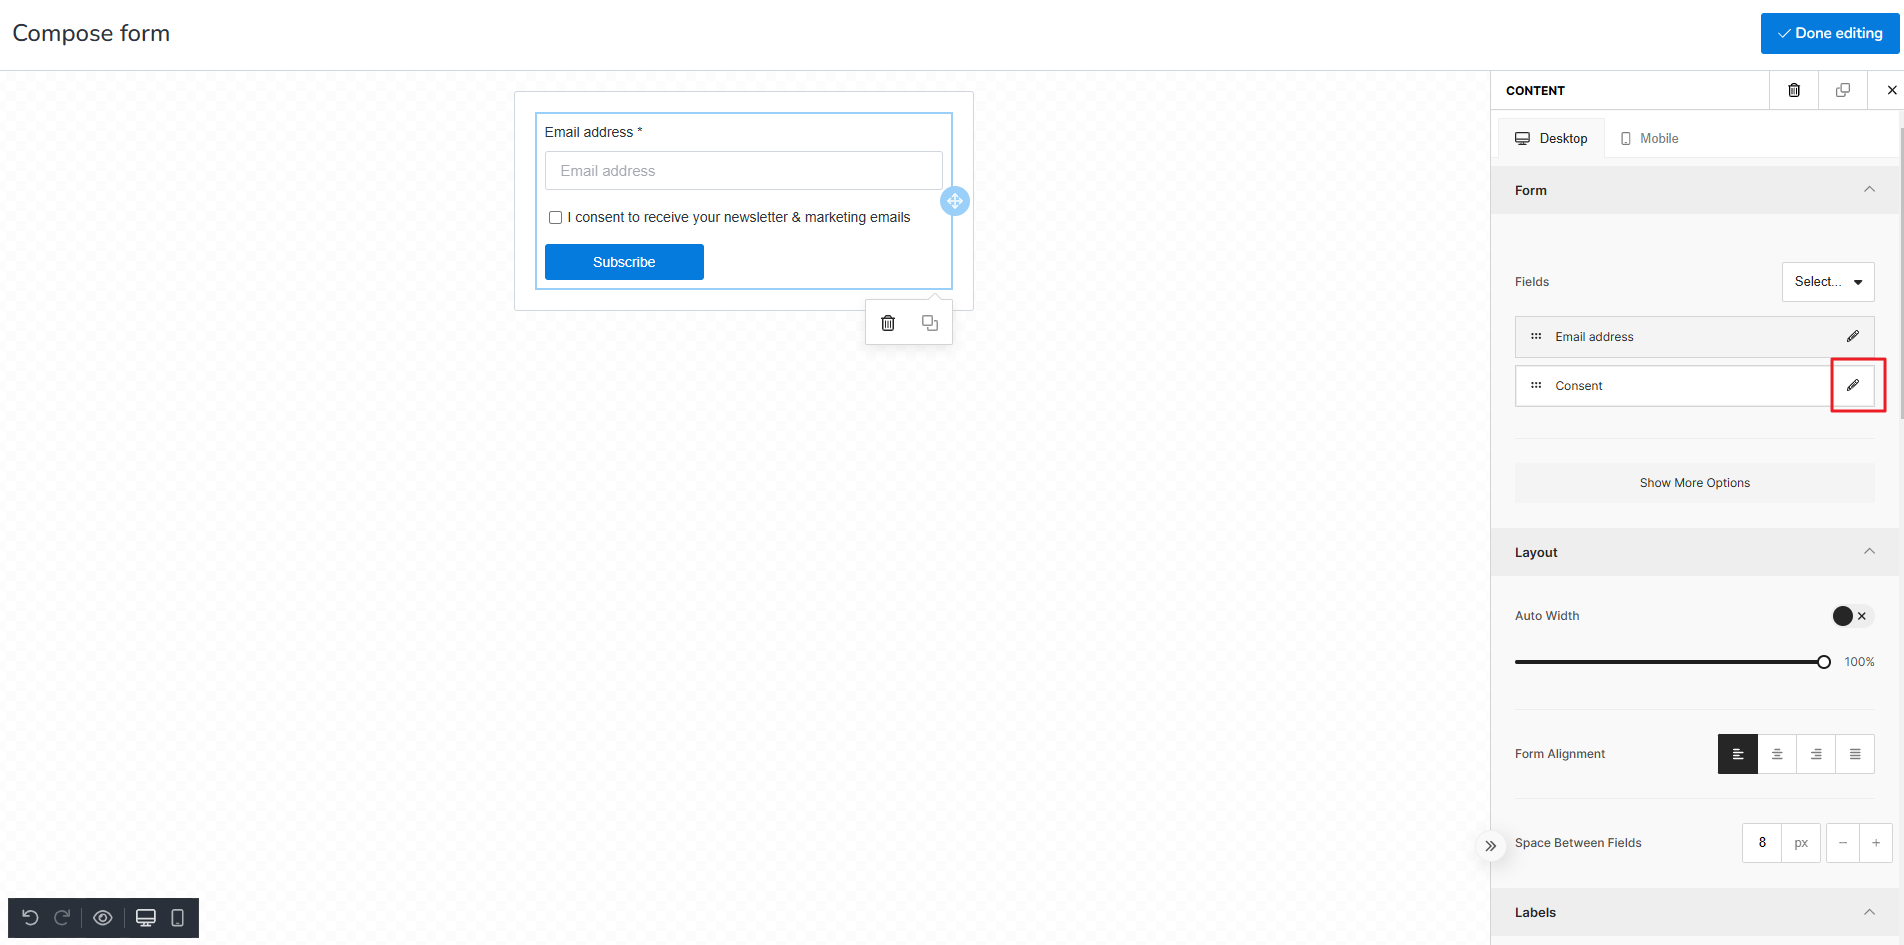
Click over Edit on Consent.
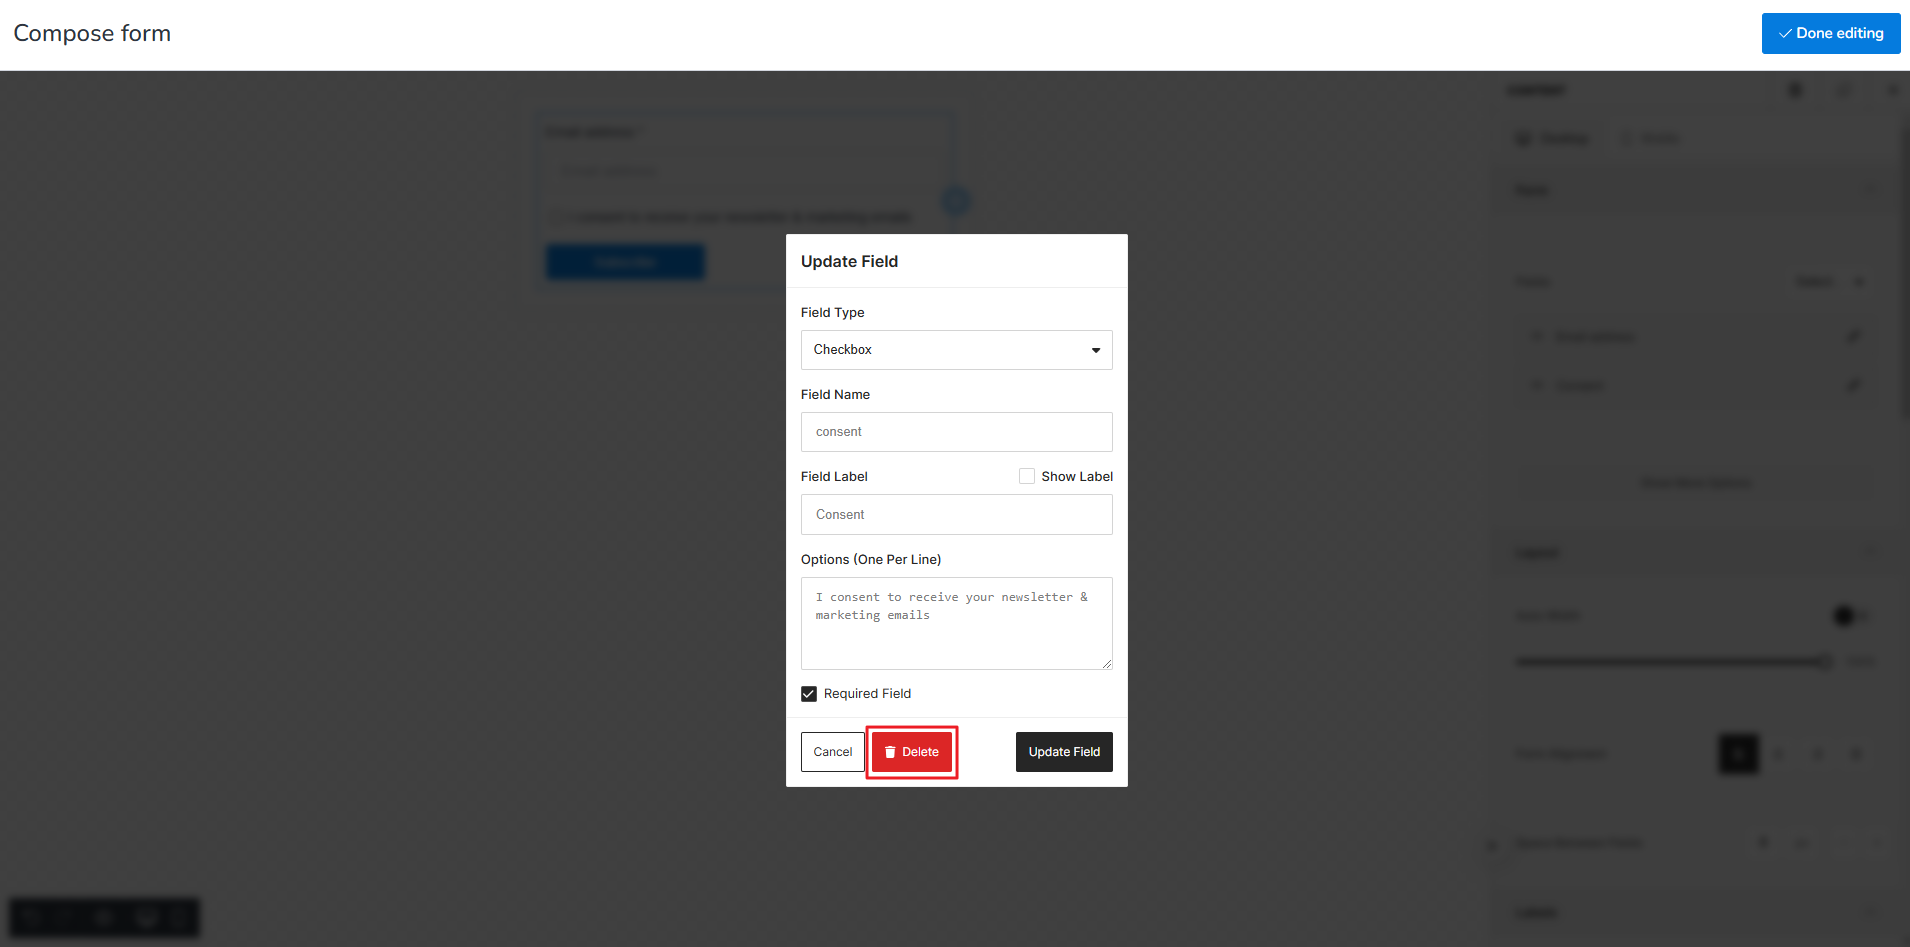
Update Field dialogue box opens. Click on Delete.
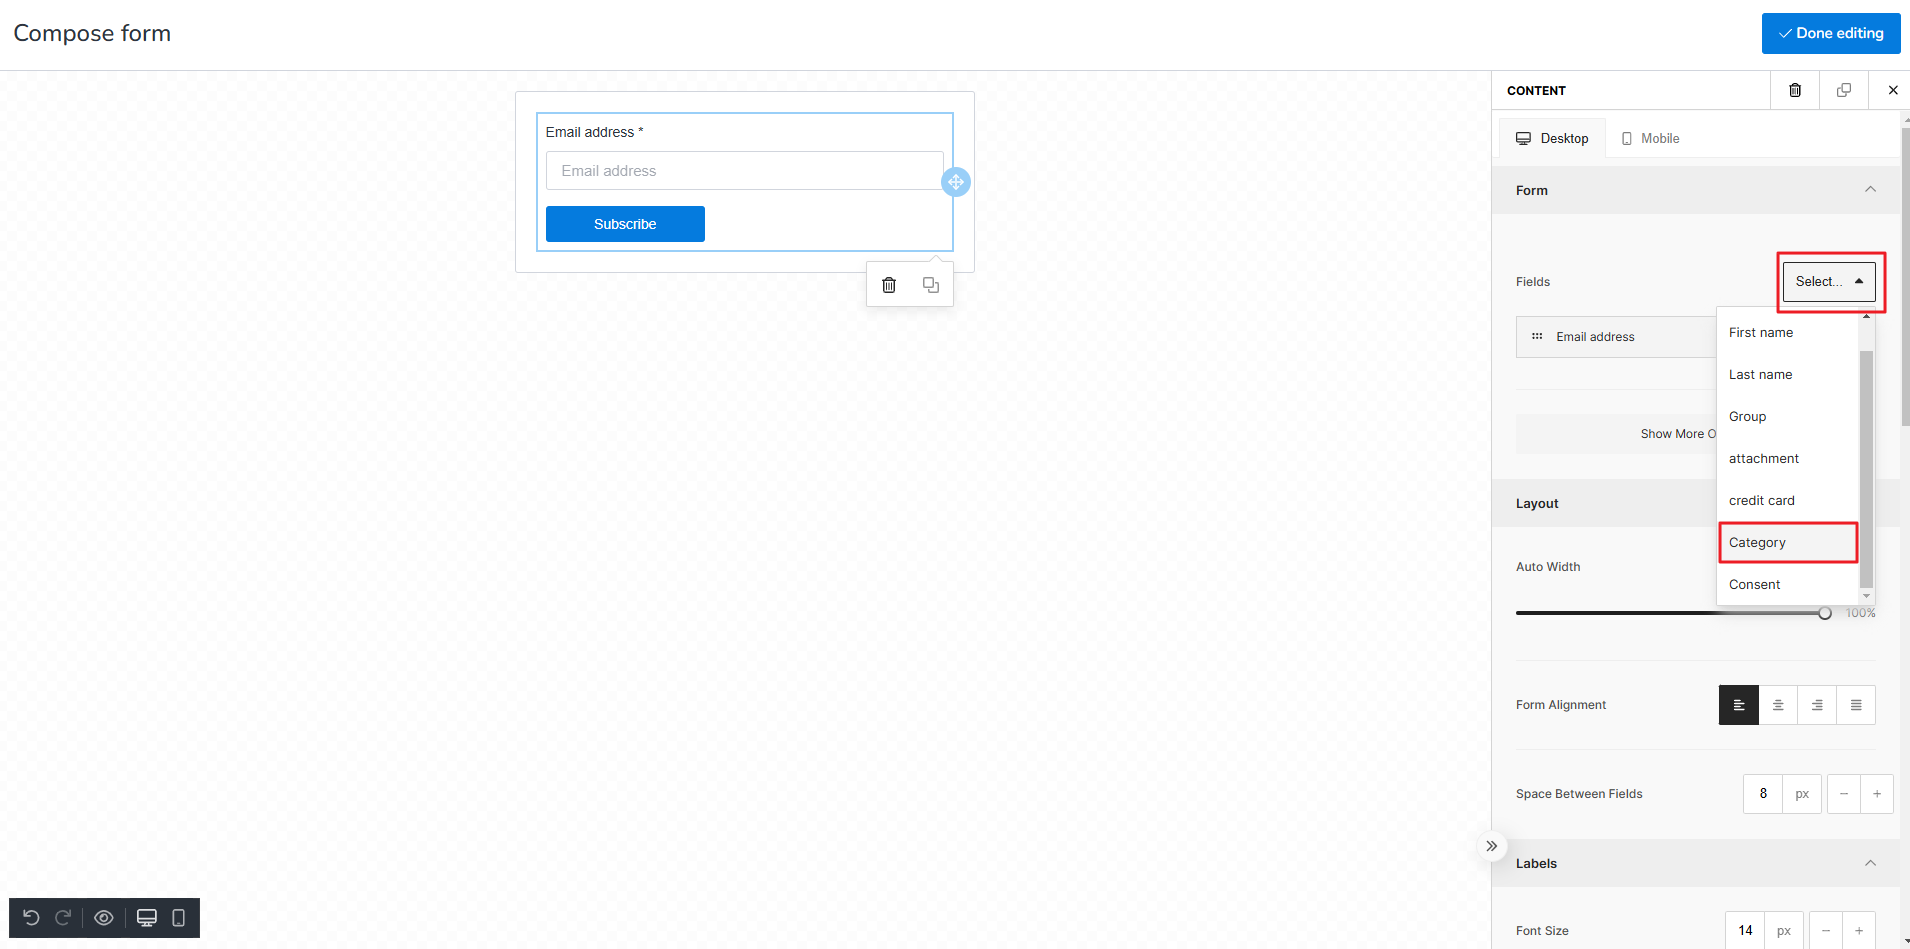
Now click on the drop-down Select box and the select the field Category.
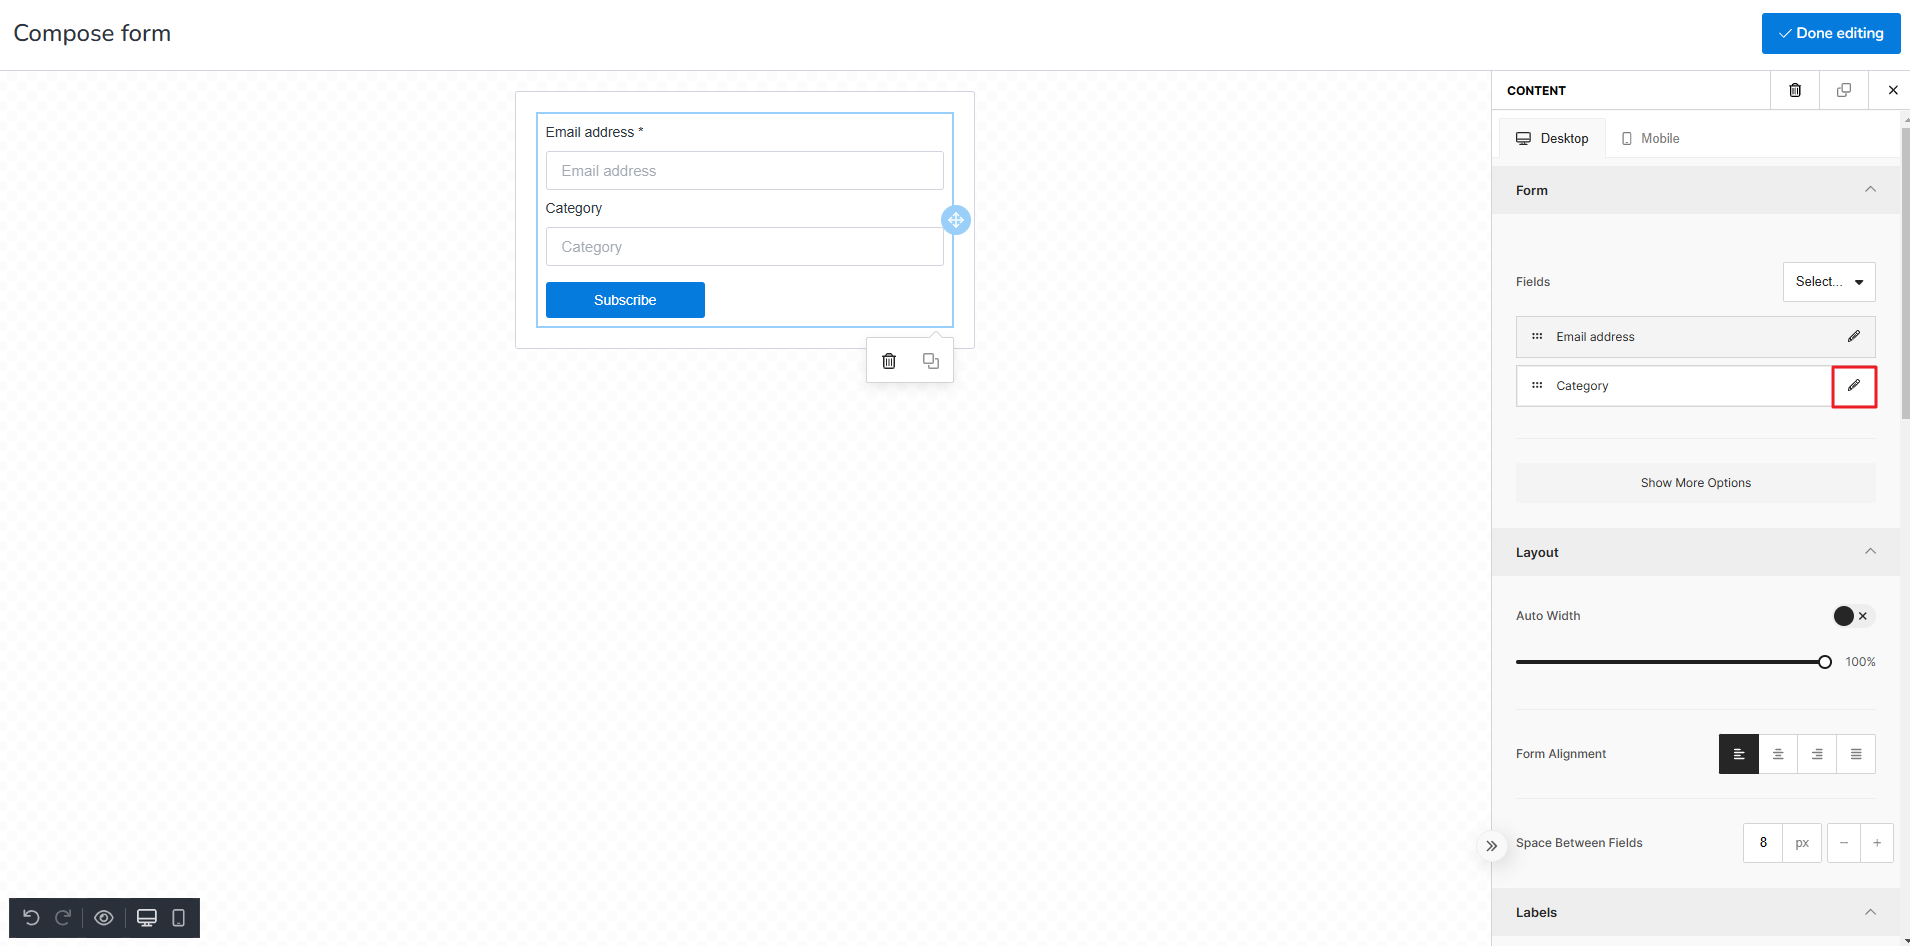
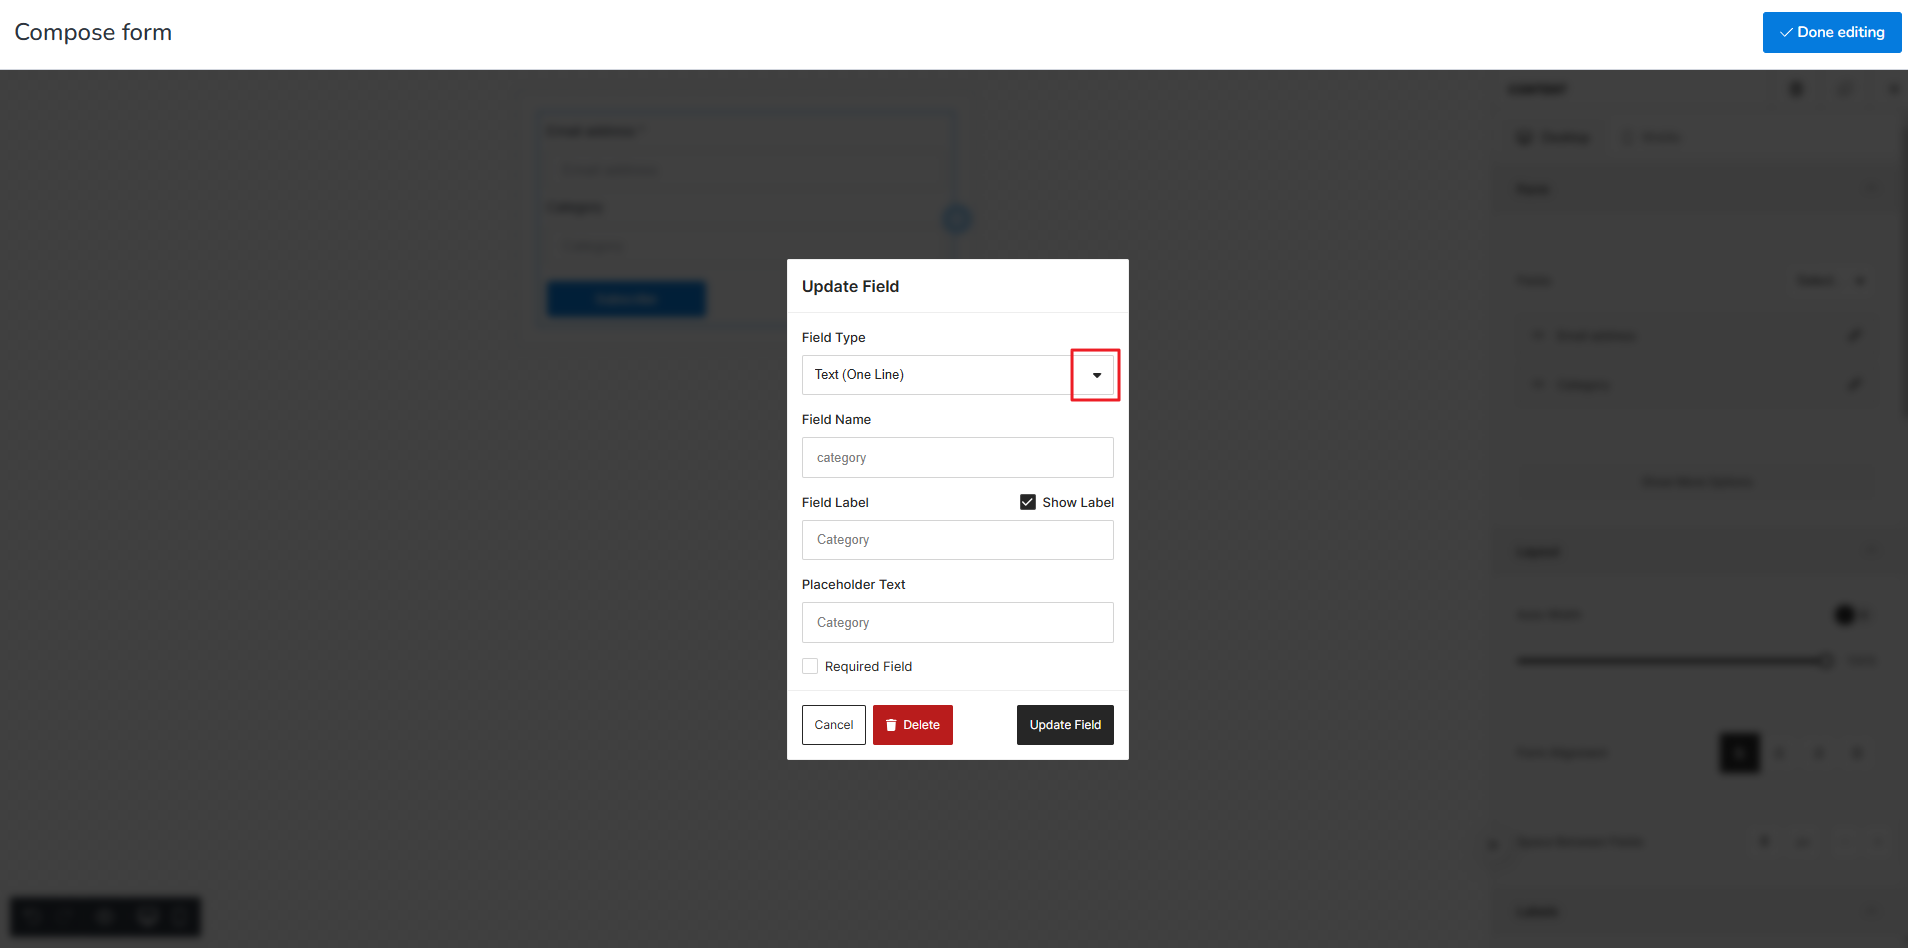
Click over Edit on Category.
Update Field dialogue box opens. Click on the drop-down Field Type.
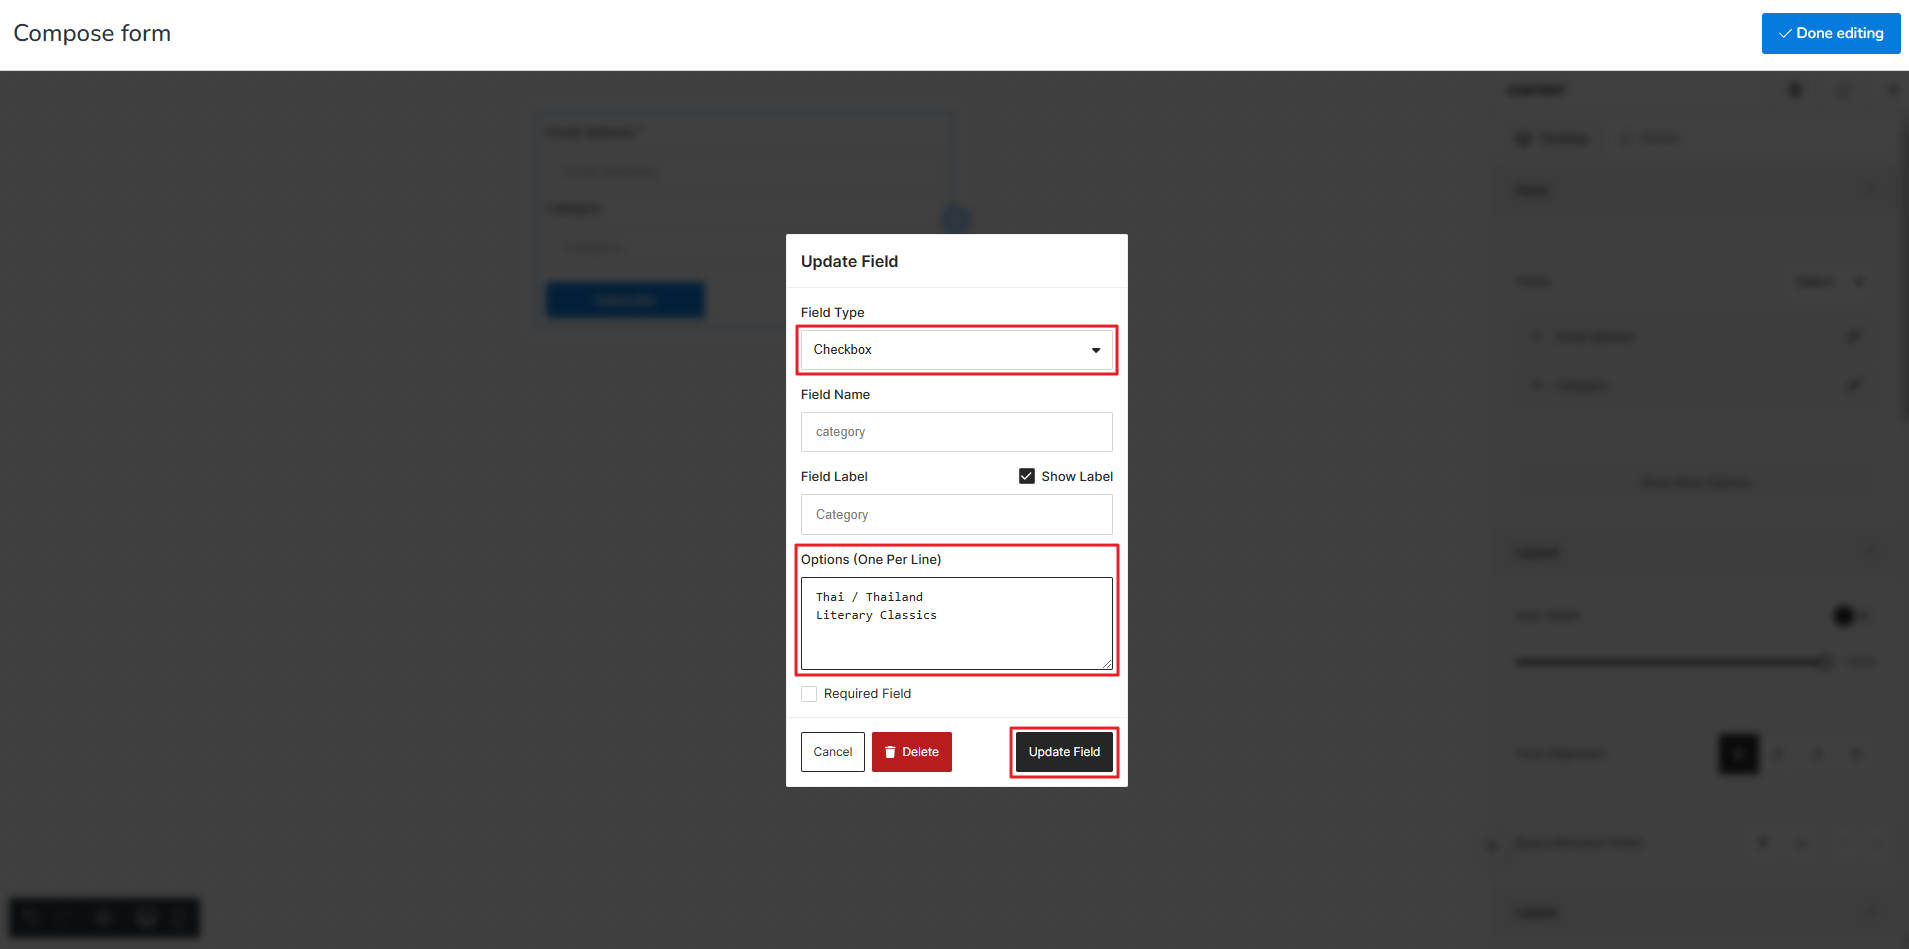
Select “Checkbox” under Field Type and write the text of your choice under Options (One per line). Then click Update Field.
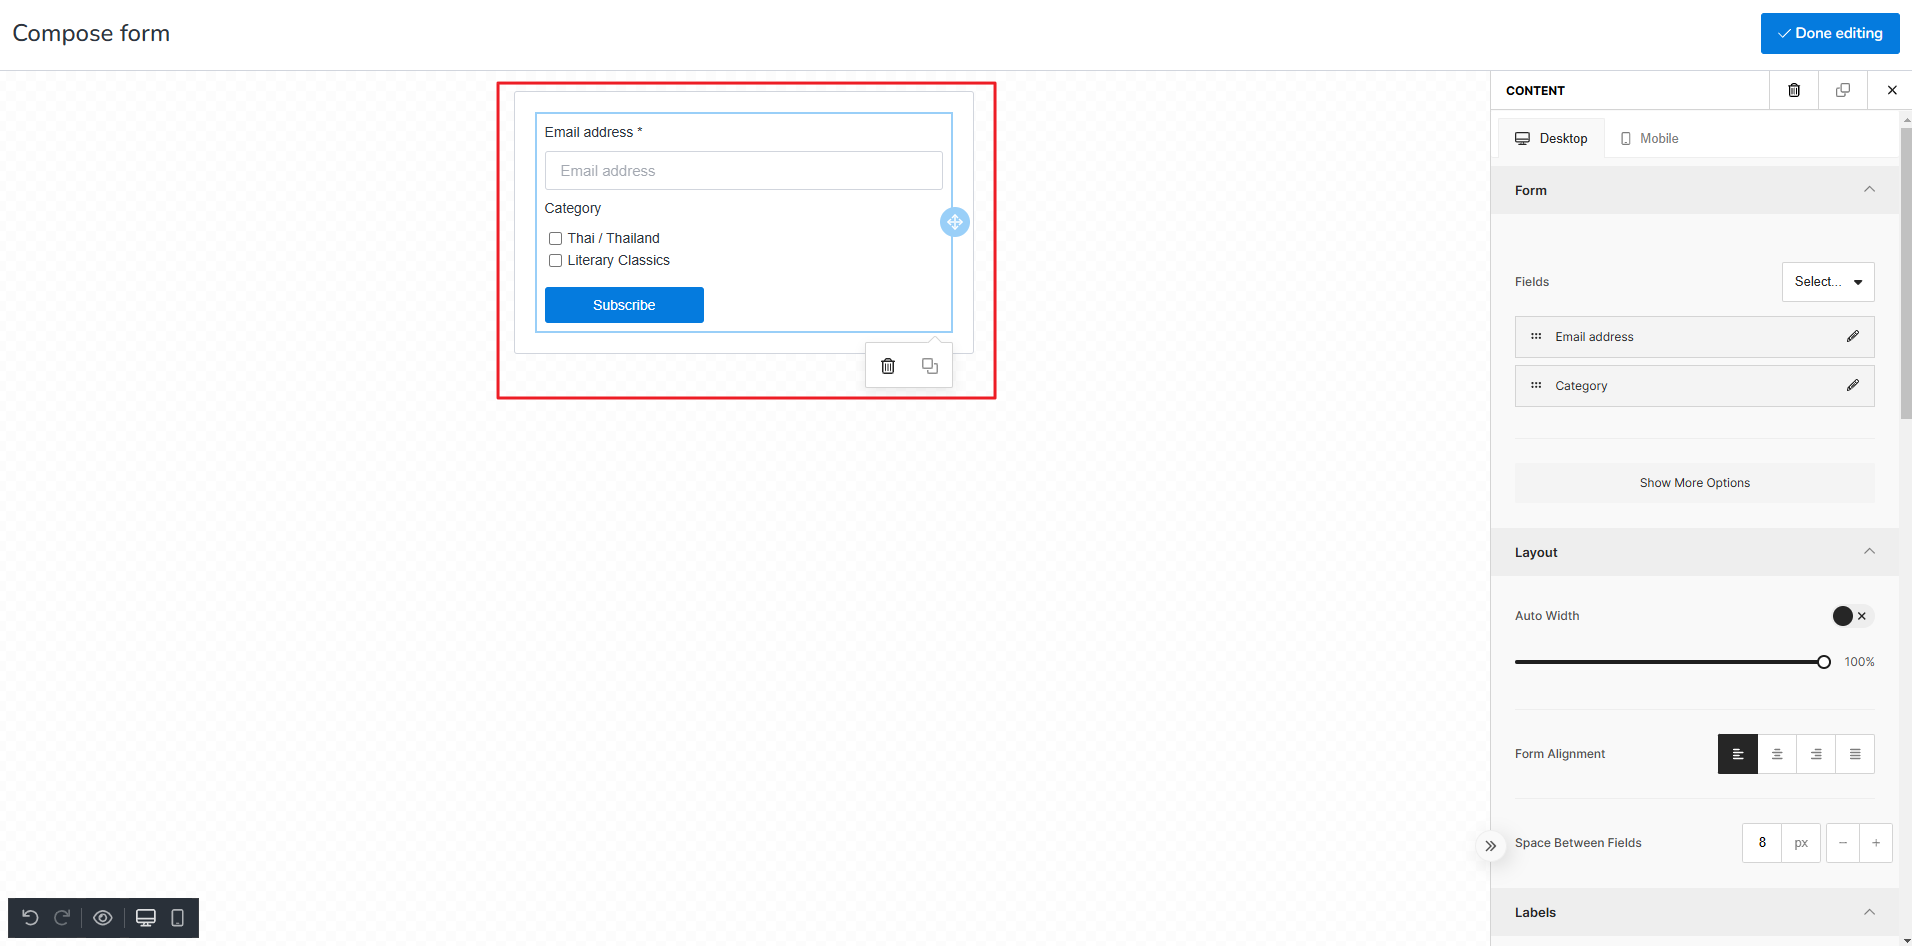
You will now notice that two new checkboxes have appeared under “Category” as shown below.
Click on Done editing.
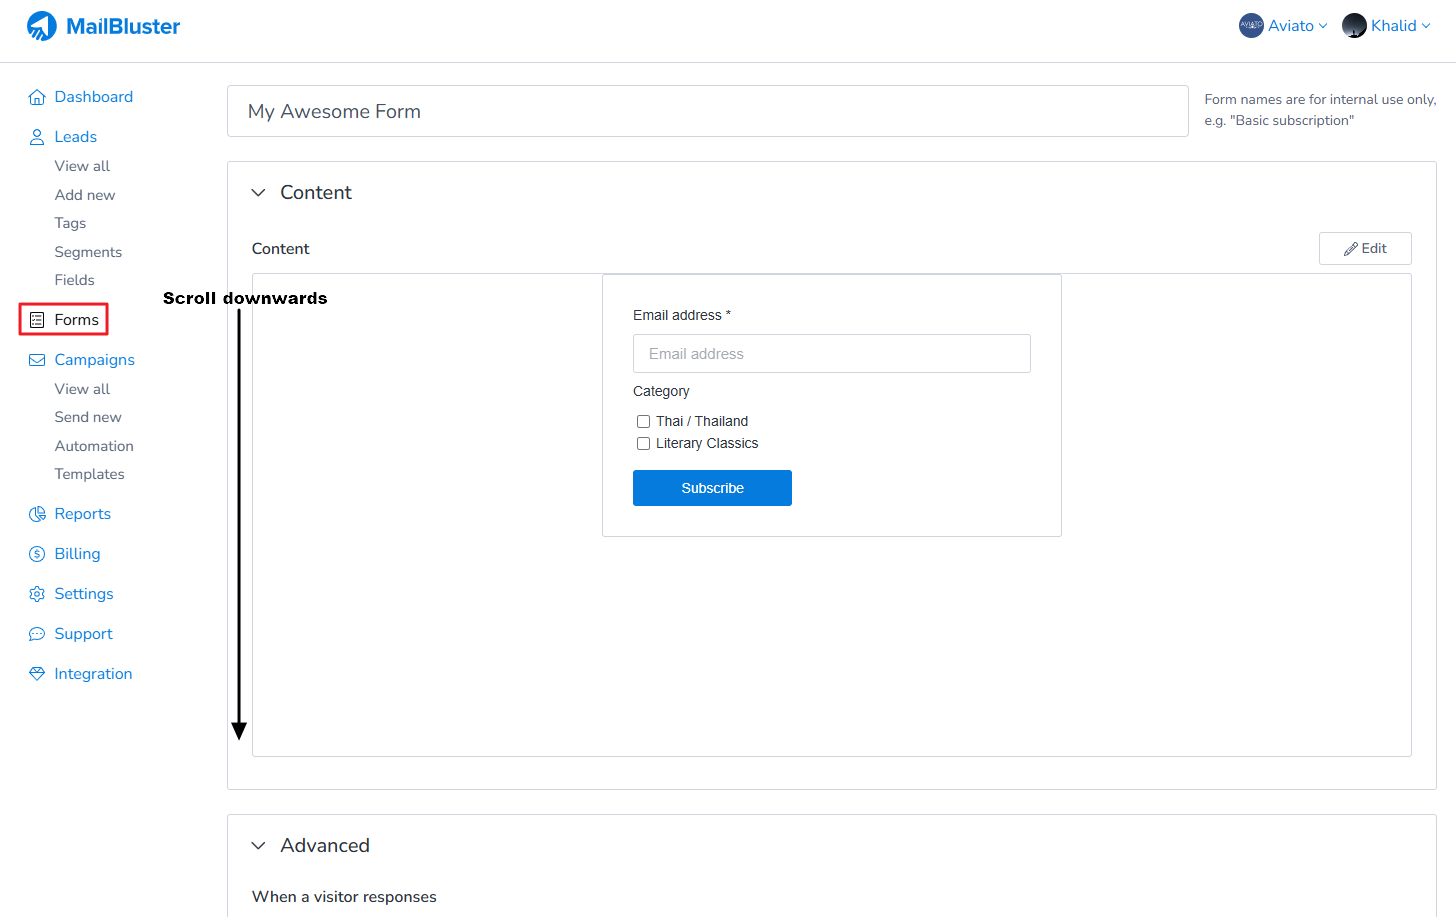
Now scroll downwards as shown below. You can rename the form as we did.
Click on Save changes.
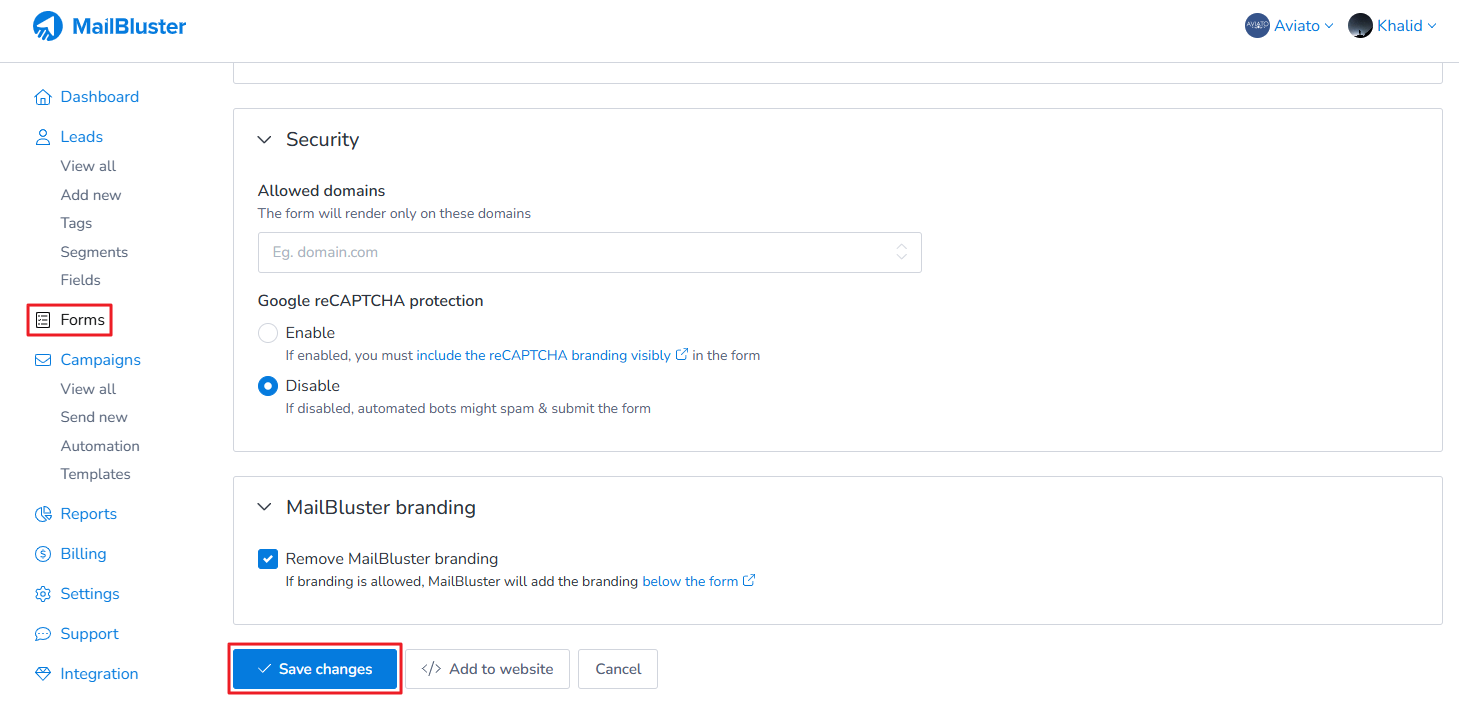
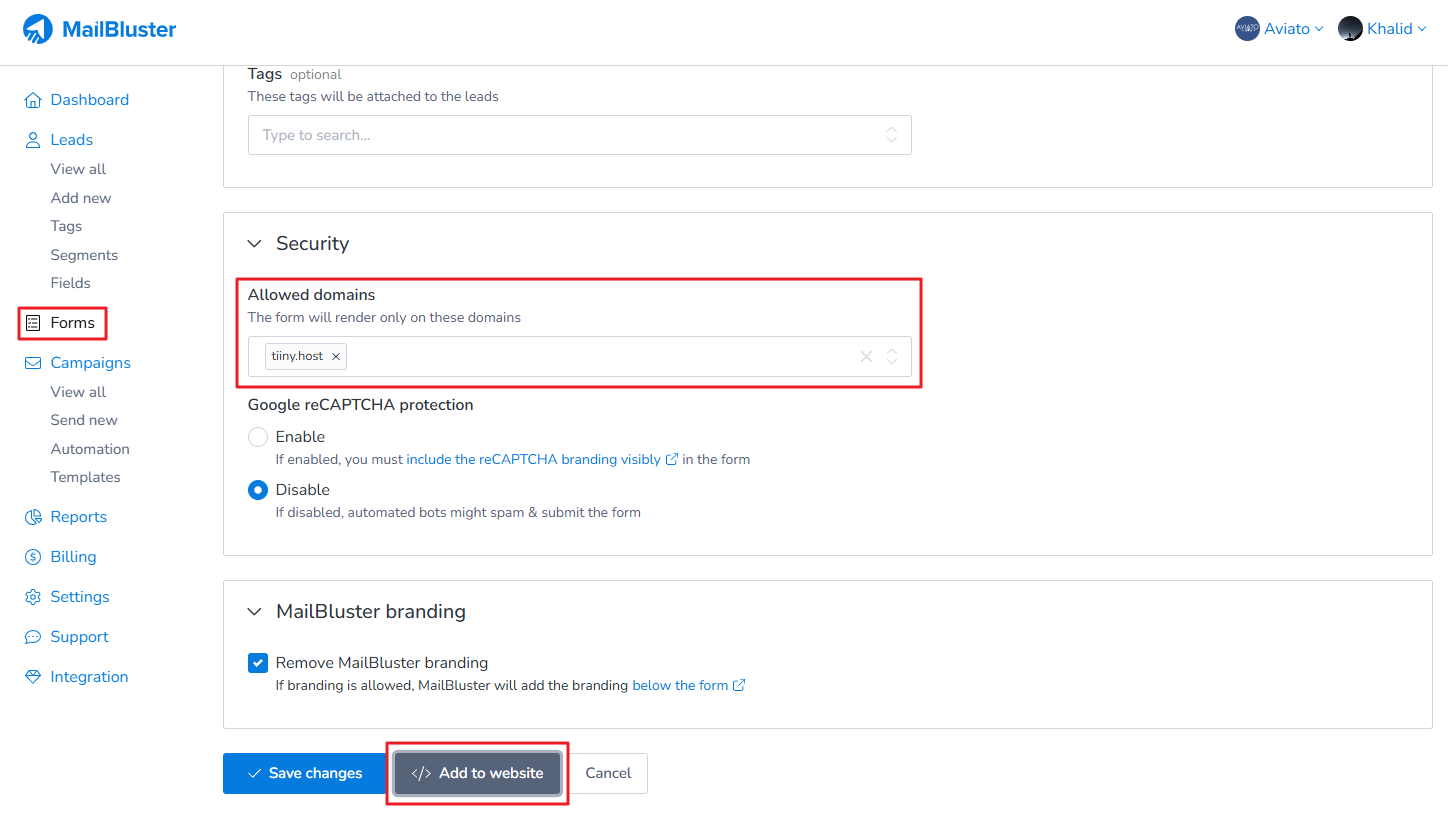
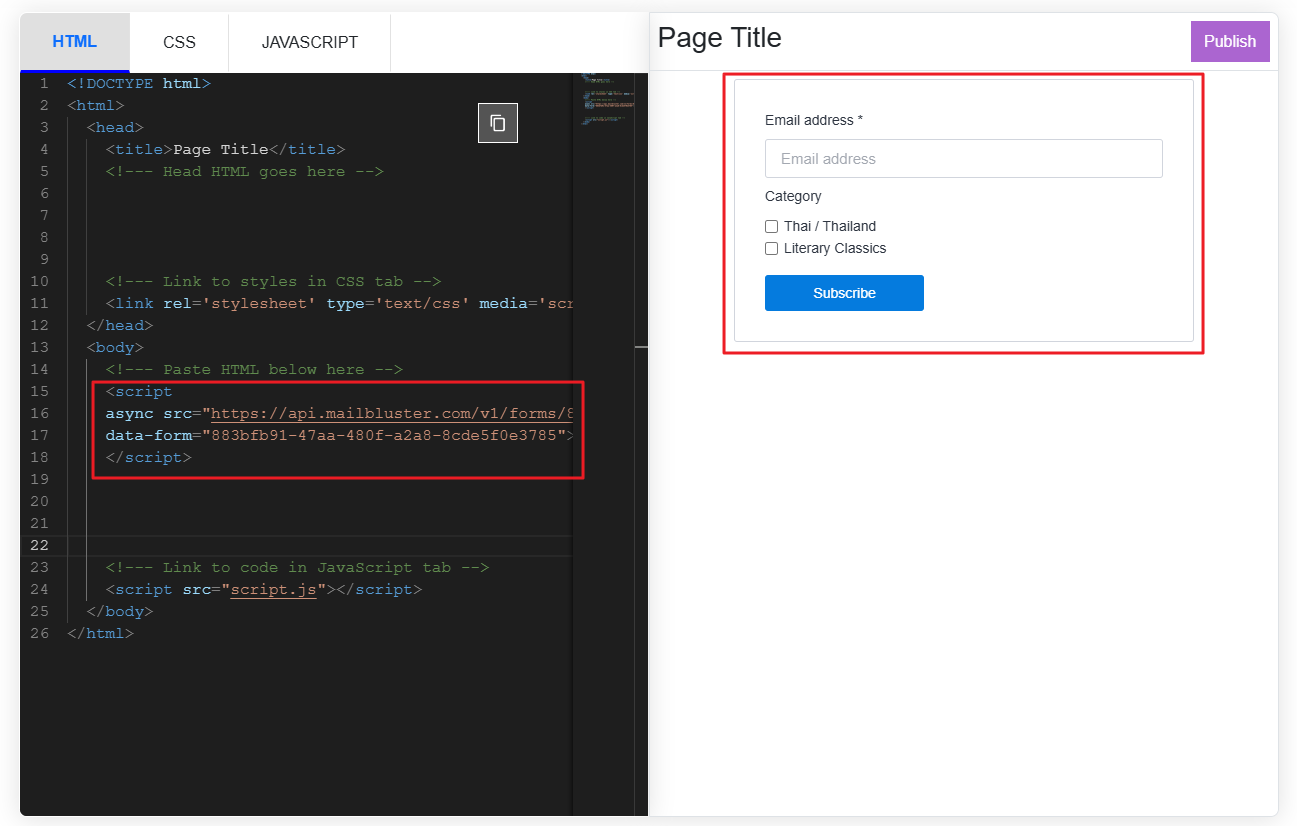
Write your domain name without https here in Allowed domains as shown below. Then click on Add to website.
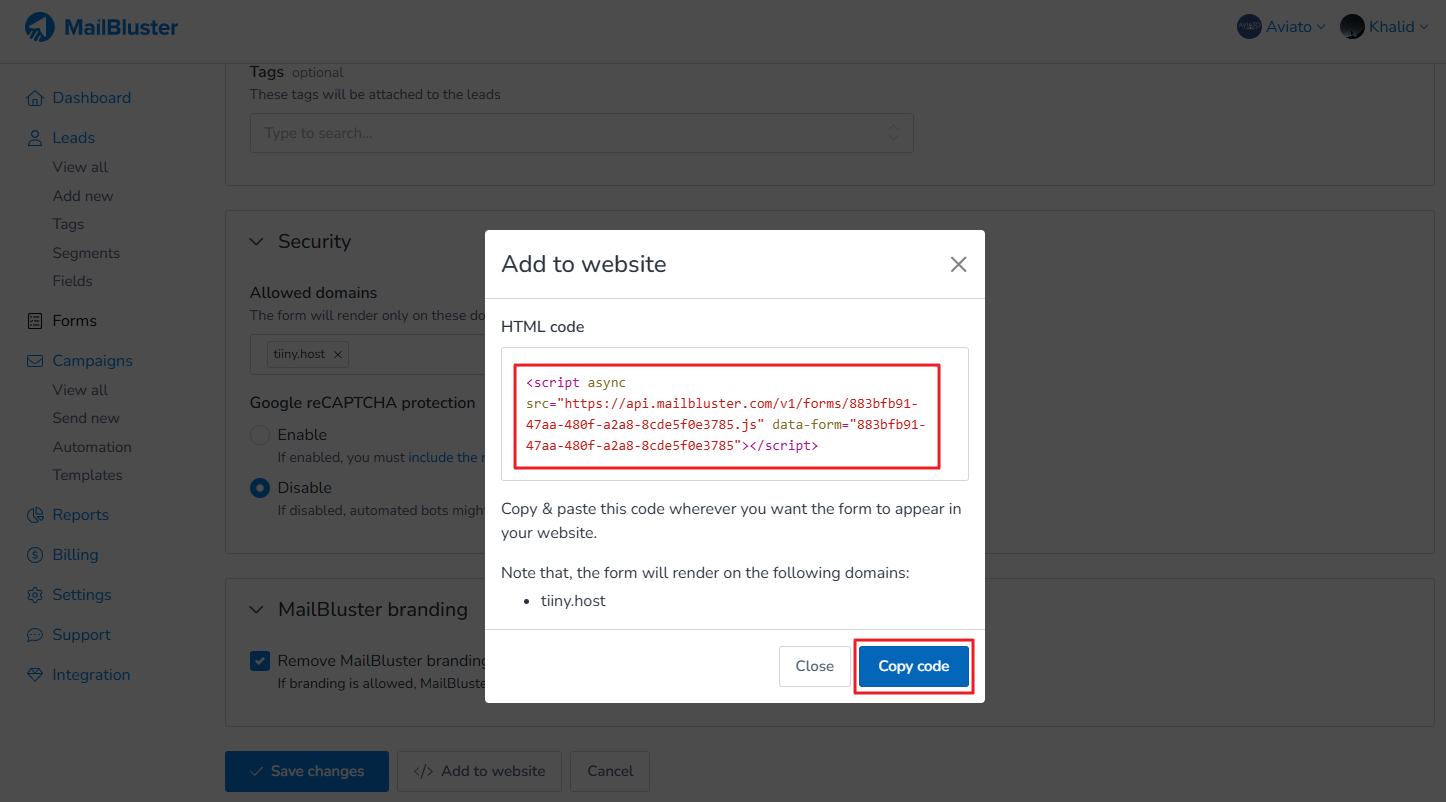
Add to website popup window opens. Click on Copy code.
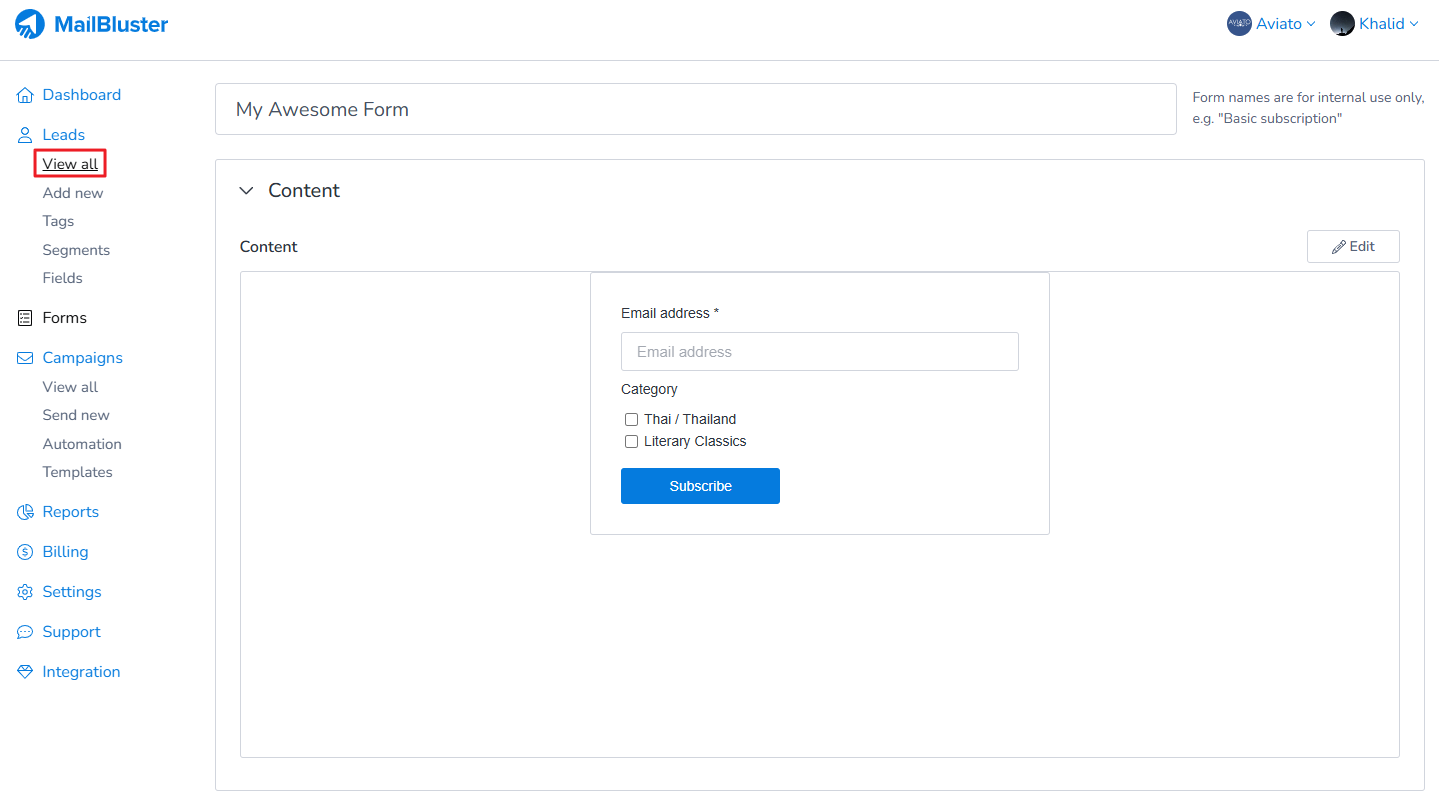
Now copy and paste the generated code to your website as shown below. This will generate your form in the website.
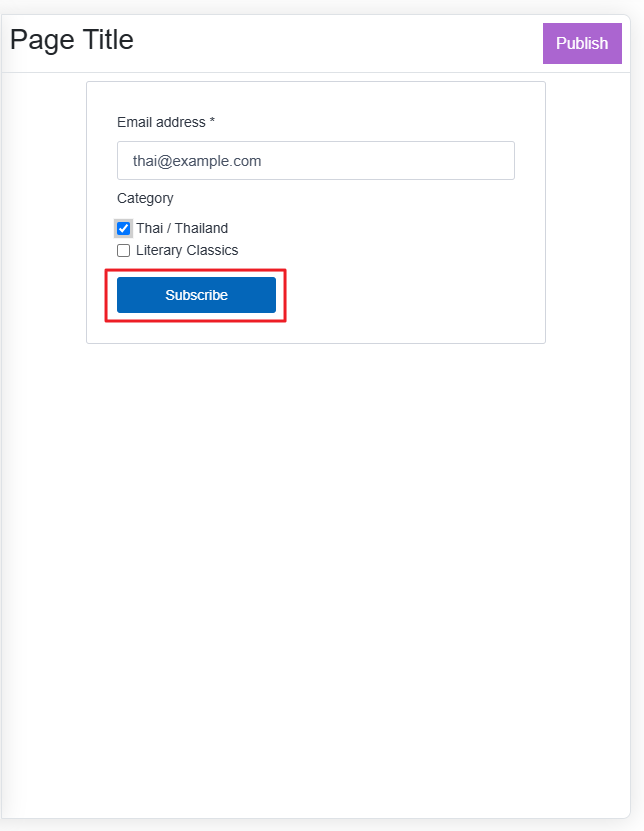
Now enter email address, click the first checkbox and hit Subscribe.
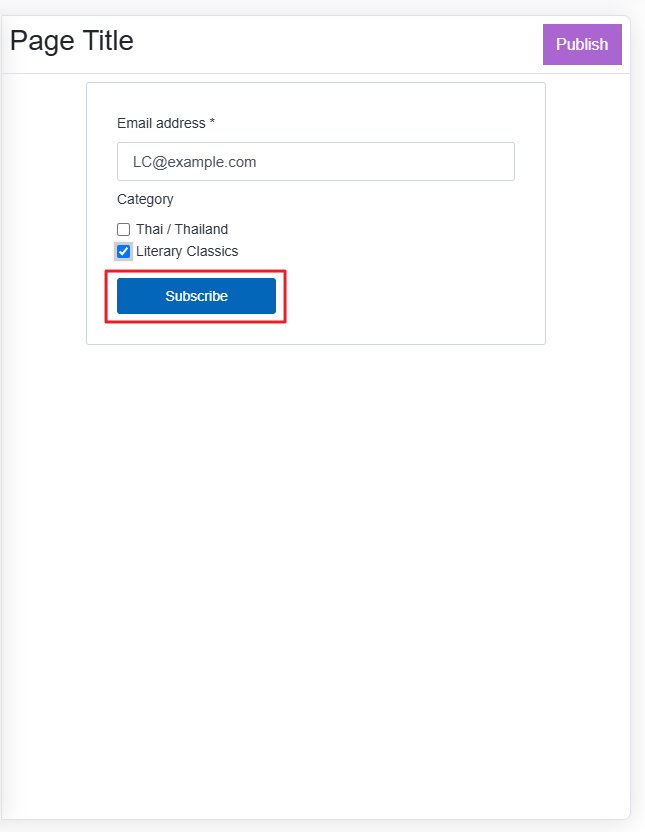
Then enter another email address, click the second checkbox and hit Subscribe.
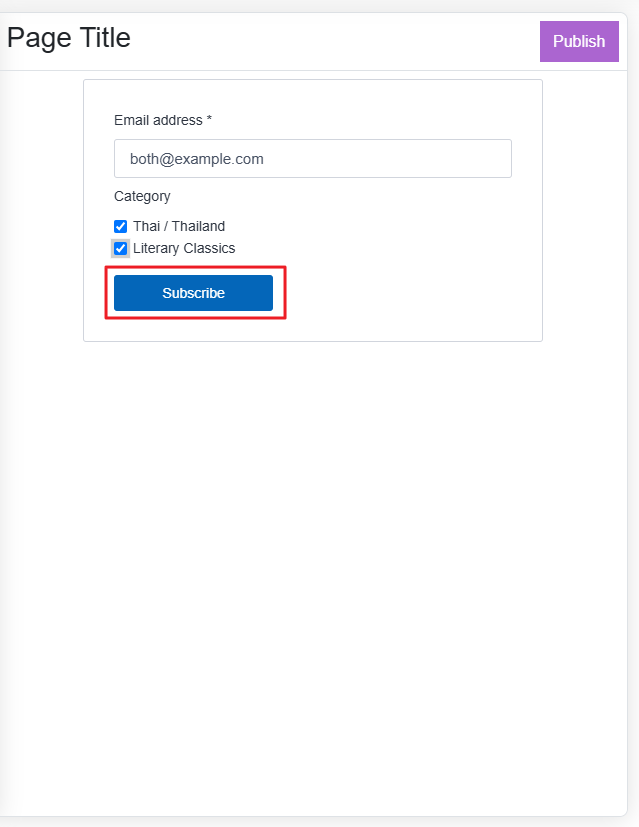
Then enter another email address, click on both checkboxes and hit Subscribe.
You will see success message for all the three options in your website.
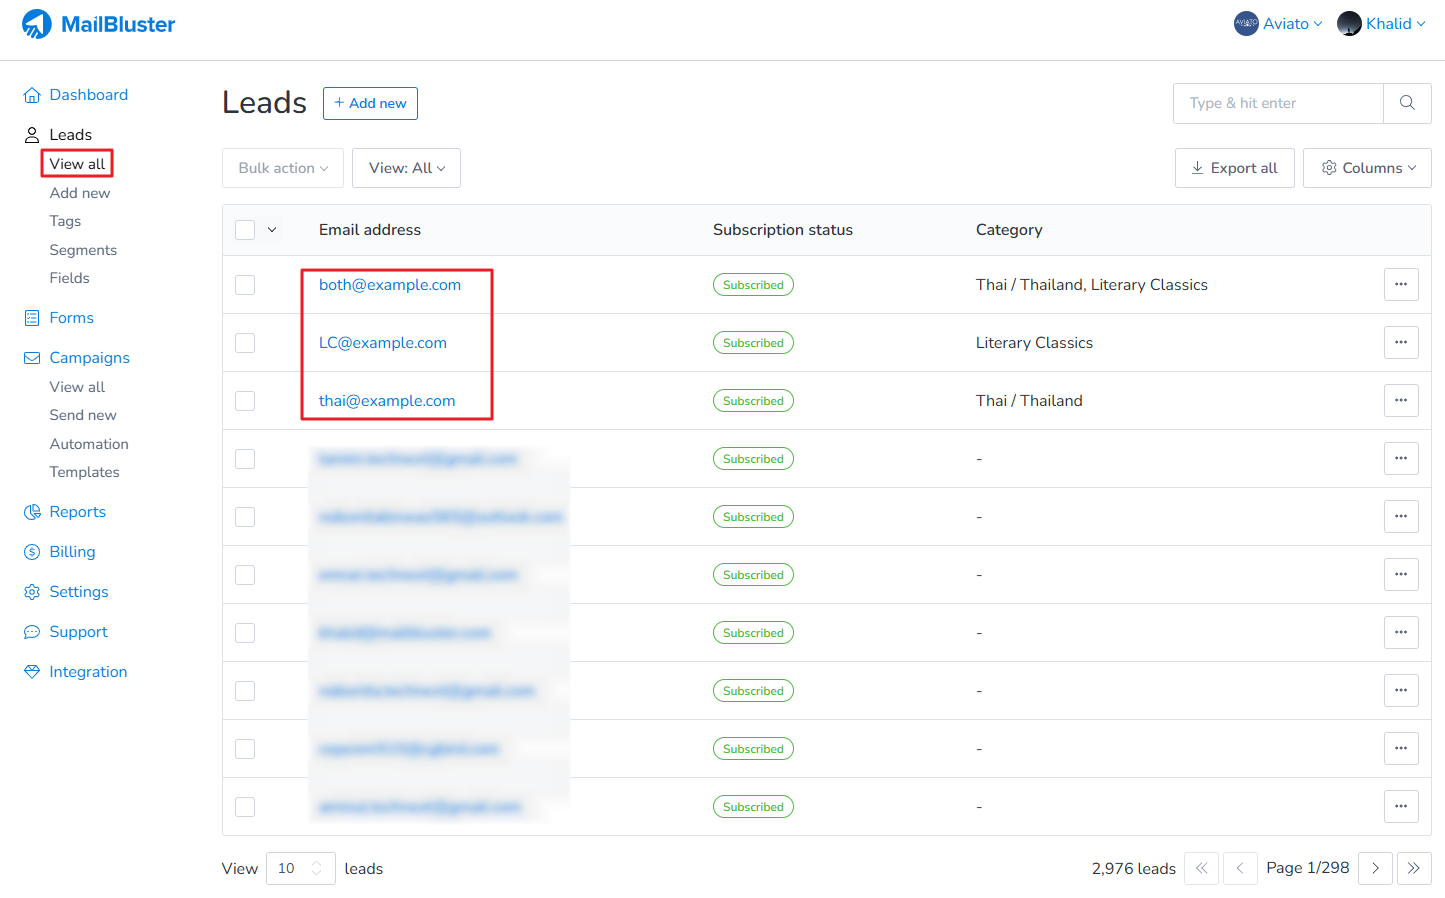
Now go to your Brand in MailBluster and click View all.
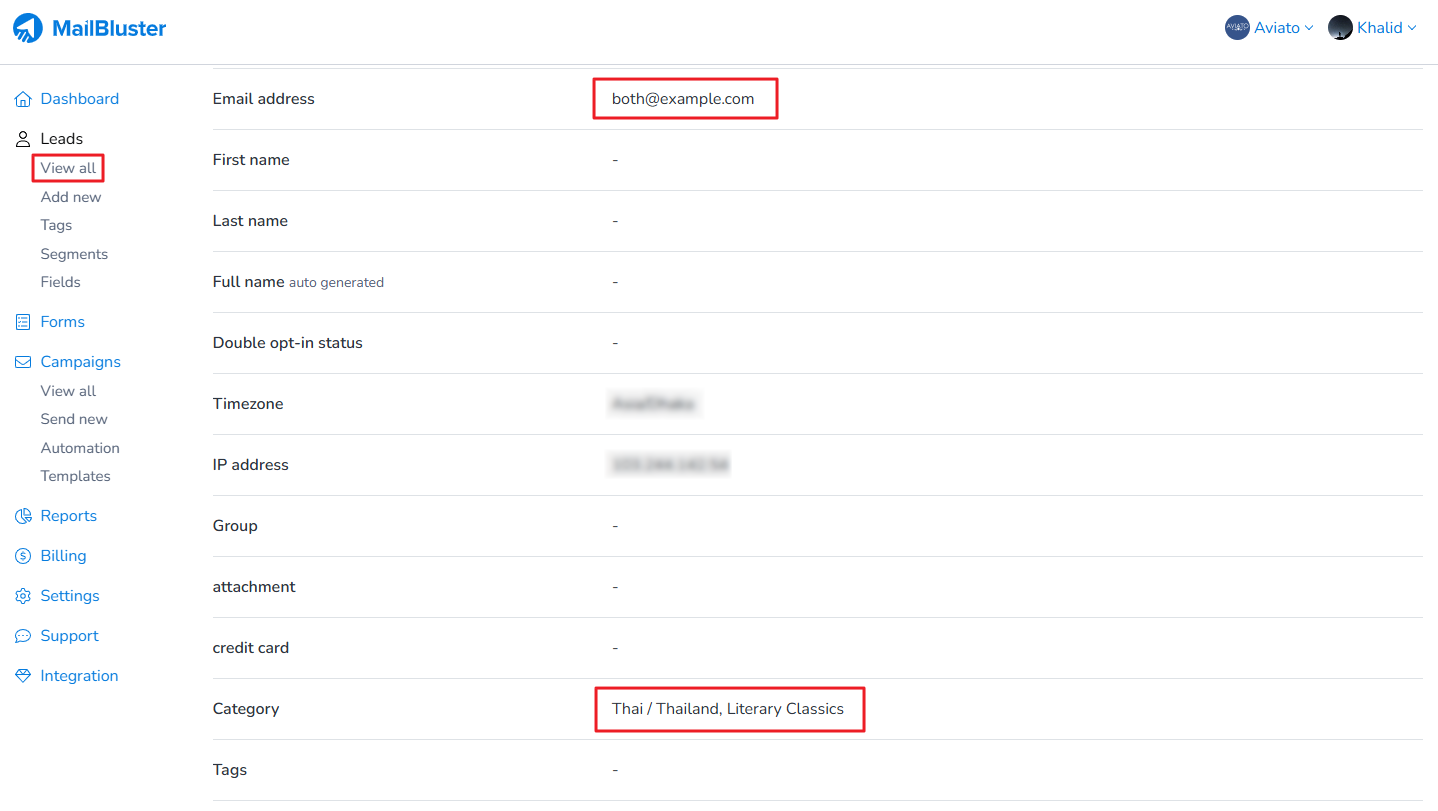
You will see three different email addresses has been added to Leads in MailBluster. Now click on each of the email address to check whether they are in respective category.
First email id stored is under its own category.
Second email id stored is under its own category.
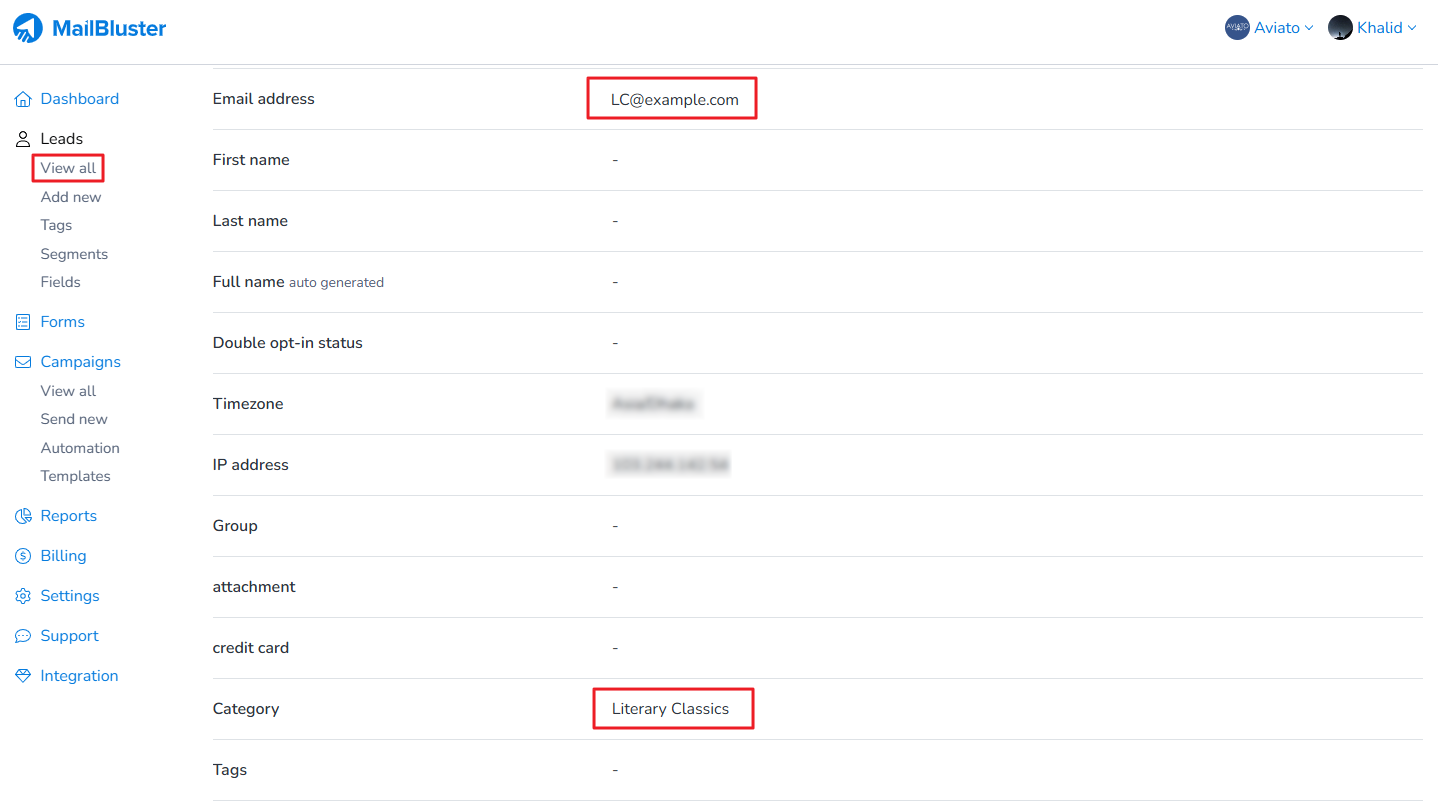
Third email id is stored under its own category.
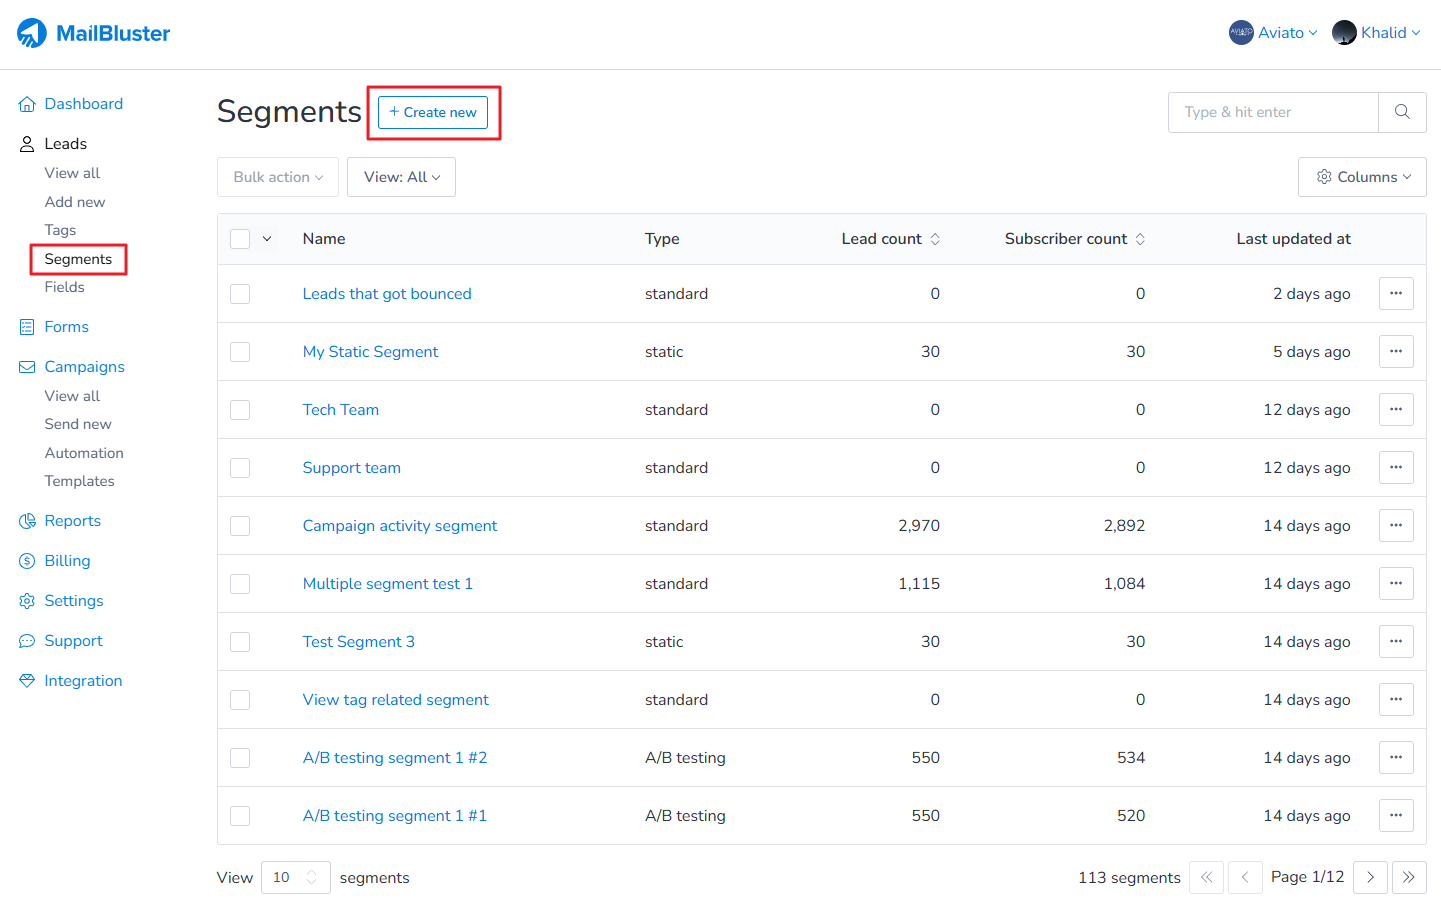
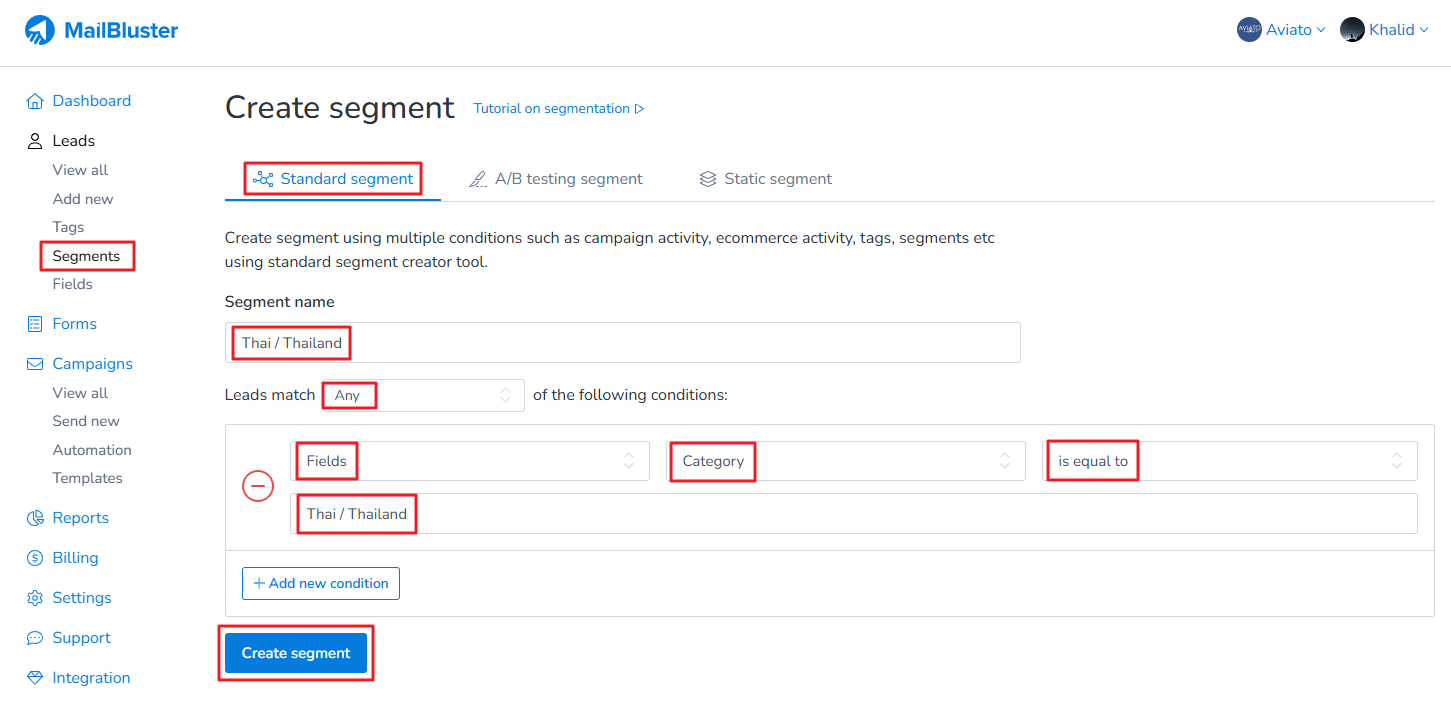
Now go to Segments and click on Create new.
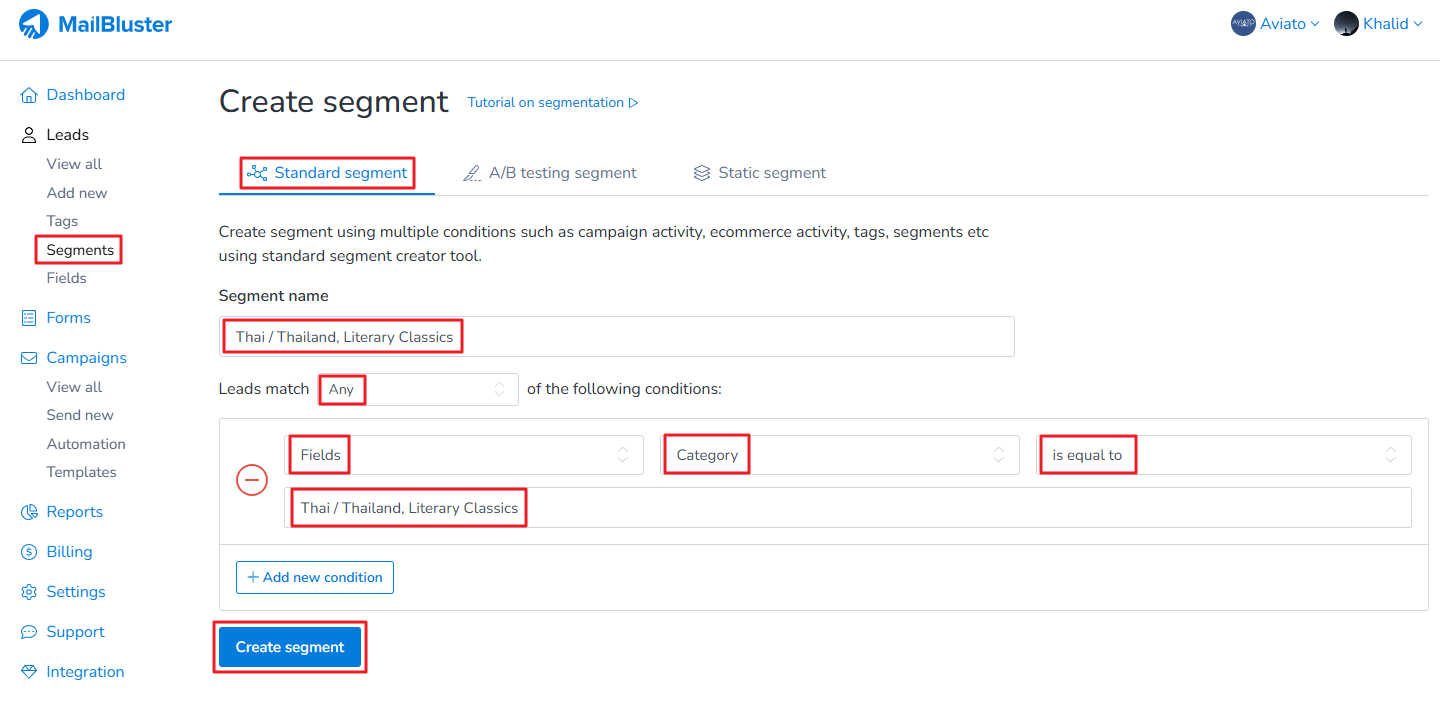
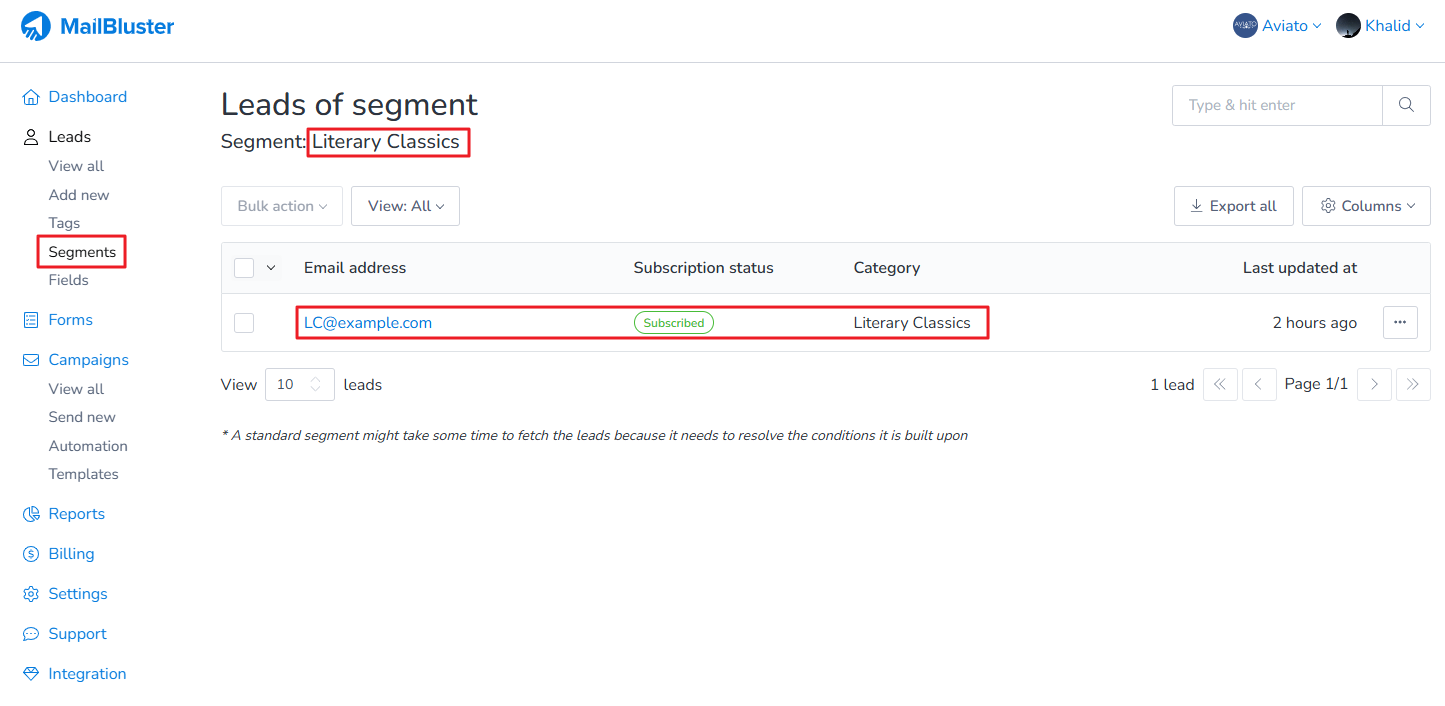
Create standard segment for first category using the following conditions.
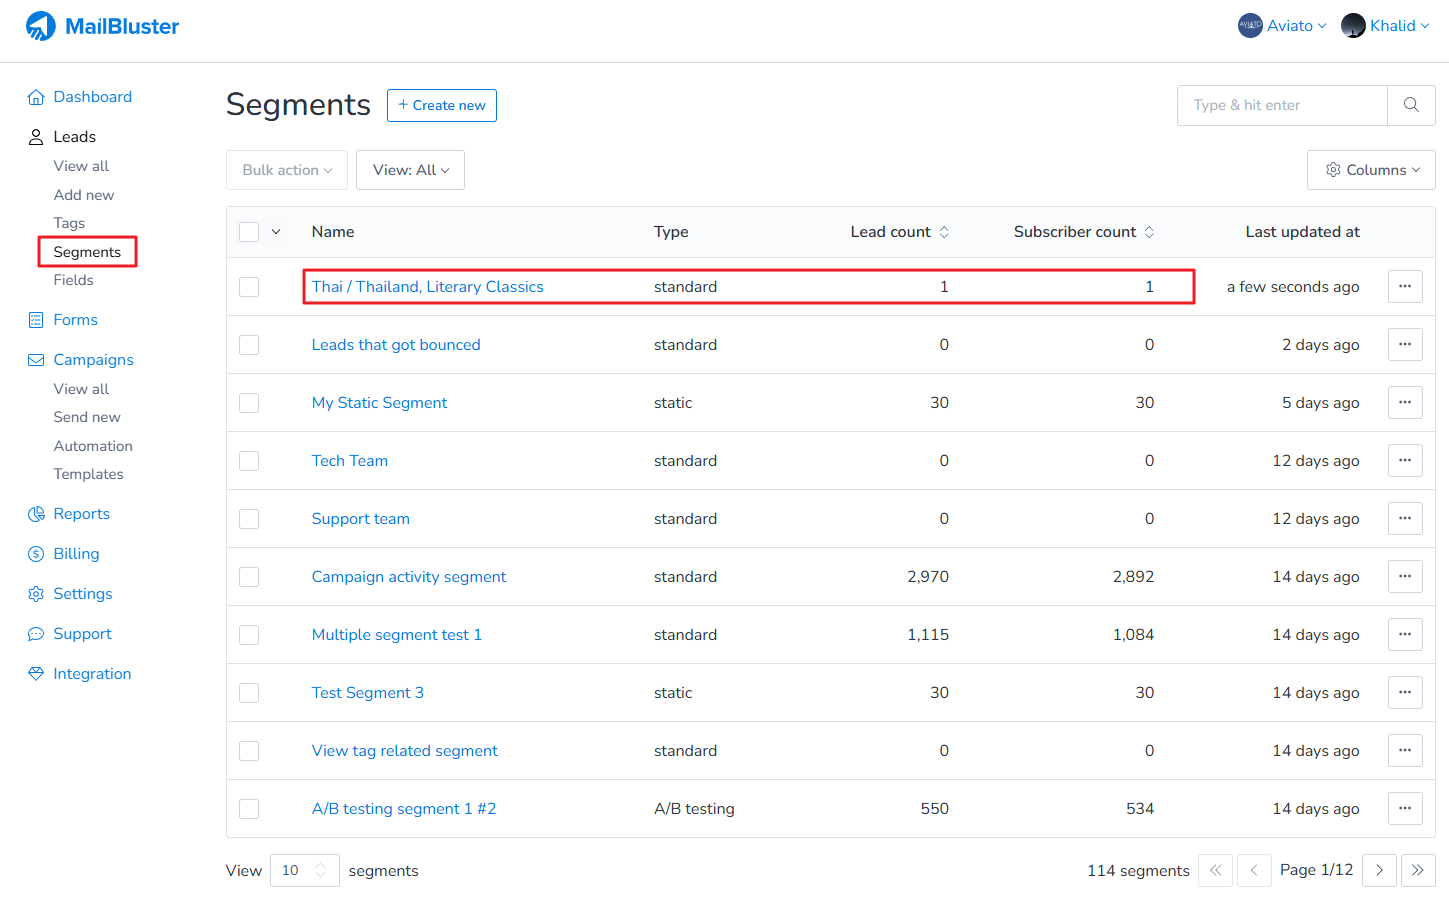
The standard segment is created using the first category. We named the segment same as the first category for understanding purpose.
Create standard segment for second category using the following conditions.
The standard segment is created using the second category. We named the segment same as the second category for understanding purpose.
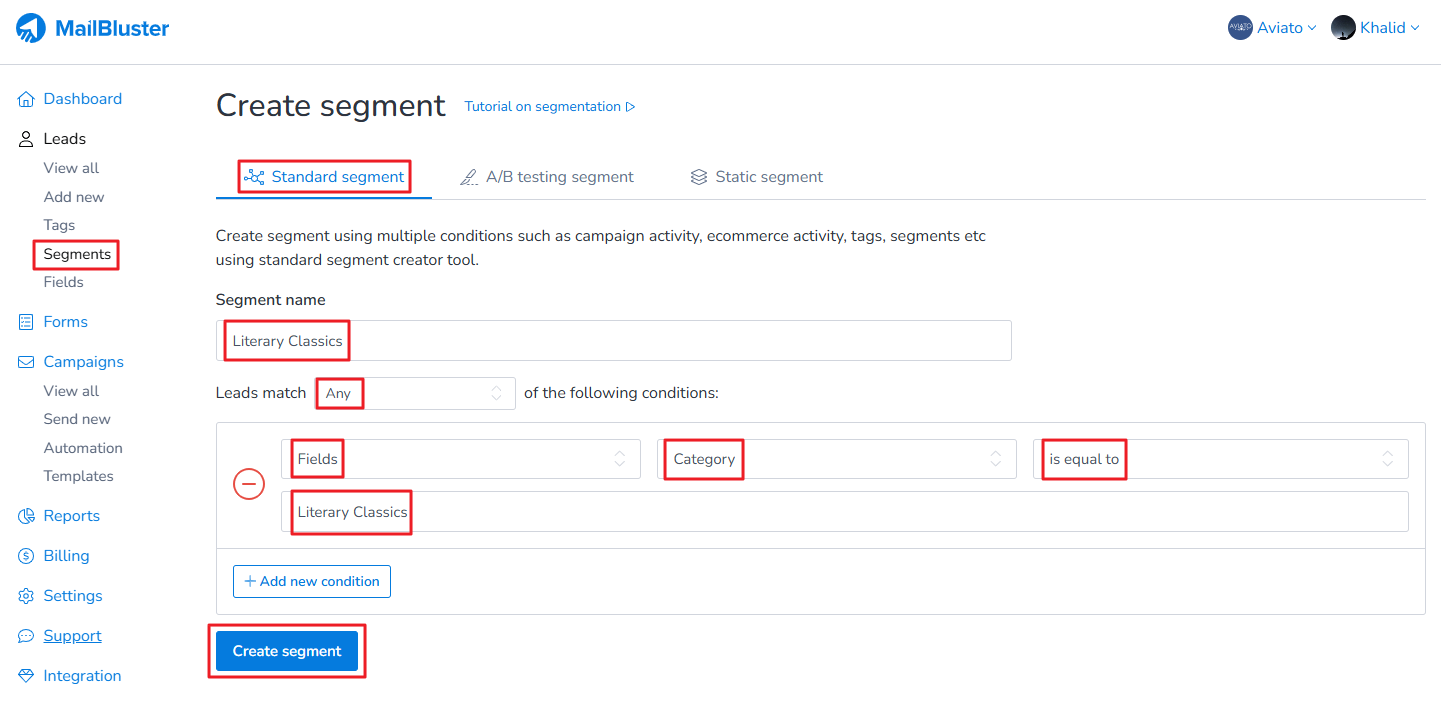
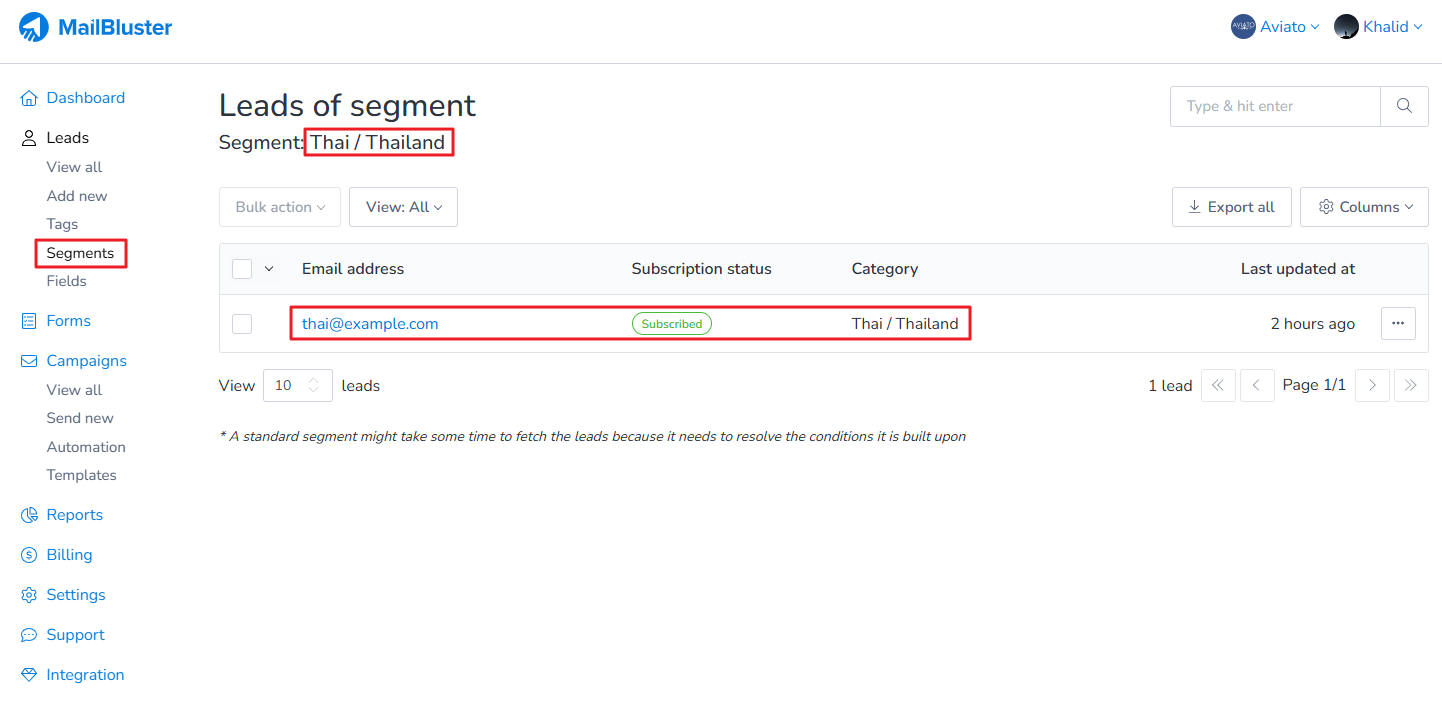
Create standard segment for third category using the following conditions.
The standard segment is created using the third category. We named the segment same as the third category for understanding purpose.
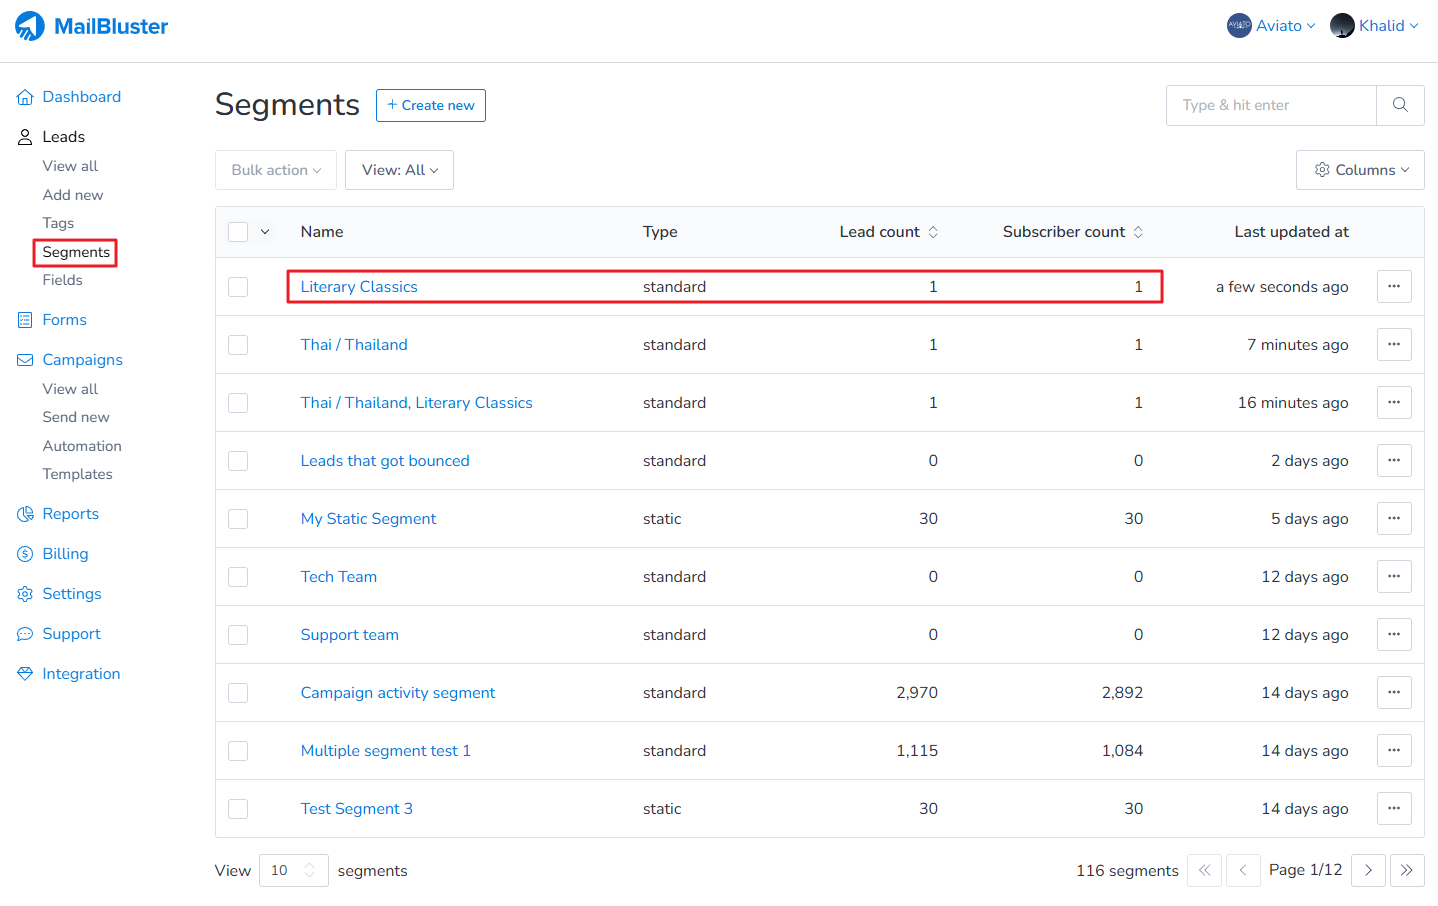
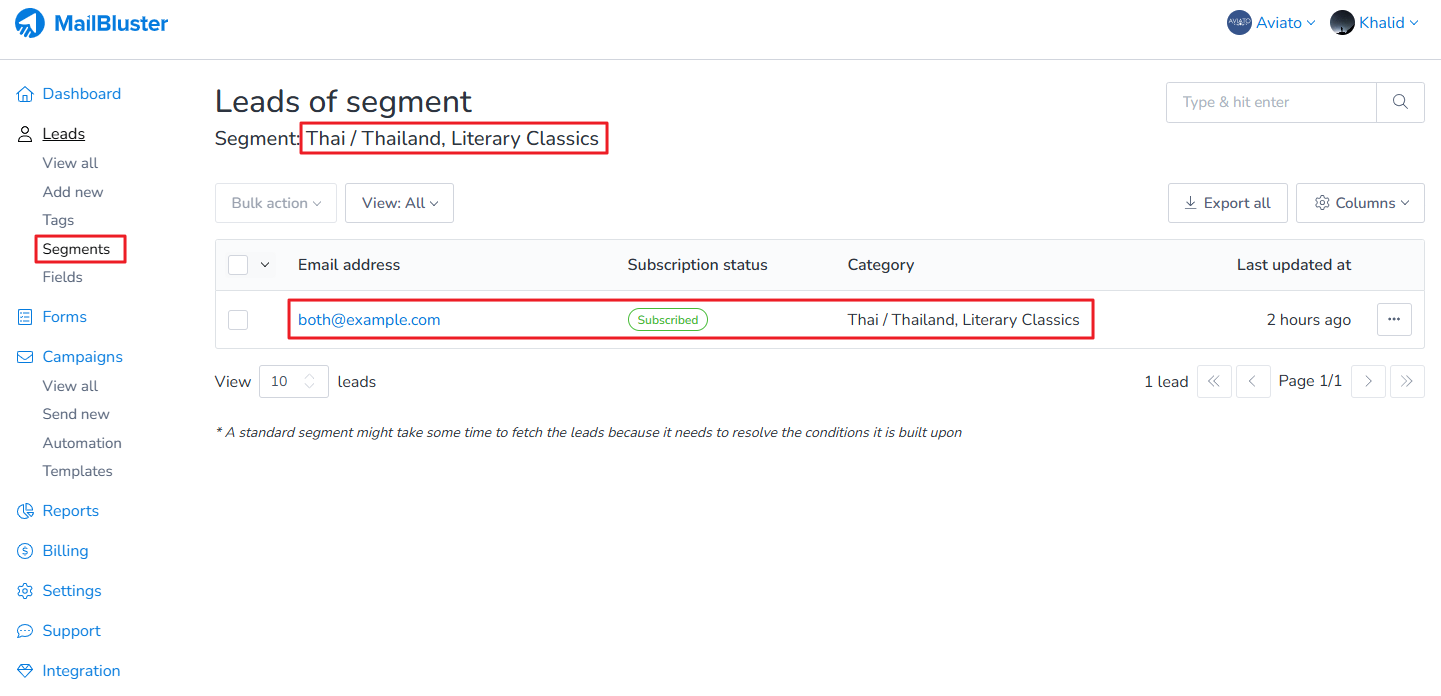
Now if we click on each of the above segment, we will see the lead (email id) under that segment in its respective category.
This is the lead (email id) under the second standard segment.
This is the lead (email id) under the third standard segment.
Get notified if subscriber refills form — can MailBluster do this? By default, MailBluster treats each email address as unique. MailBluster does not support duplicate leads. If a subscribed lead fills out the form again using the same email address, the lead’s existing information will be updated instead of creating a new entry.
While a success message will be shown (based on your preferences set under Forms > Advanced), MailBluster currently does not send a separate notification when an existing lead resubmits the form. So, there’s no built-in way to get notified specifically when a subscribed lead fills the form again.
Customize focused field borders in MailBluster to make your forms visually appealing and aligned with your website design. You cannot directly customize the border of focused fields using the built-in editors in MailBluster. However, you can achieve this by applying custom CSS to the form you’ve embedded on your website.
Note: This approach requires basic knowledge of CSS and web development to implement successfully.