A segment in leads or email IDs refers to a categorized group within your email list. It’s like creating smaller sections within your larger list based on specific criteria. For instance, you might have segments for people who opened a particular email, those who haven’t engaged recently, or those who purchased a certain product. Segments help organize your leads based on different behaviors or characteristics, allowing you to send more targeted and personalized messages to specific groups within your overall email list.
A Standard Segment in MailBluster is a predefined or custom group of leads created based on specific conditions or criteria (like location, behavior, tags, or custom fields). It helps you organize your contacts for targeted email campaigns, making it easier to send personalized content to relevant audiences without manually sorting leads every time.
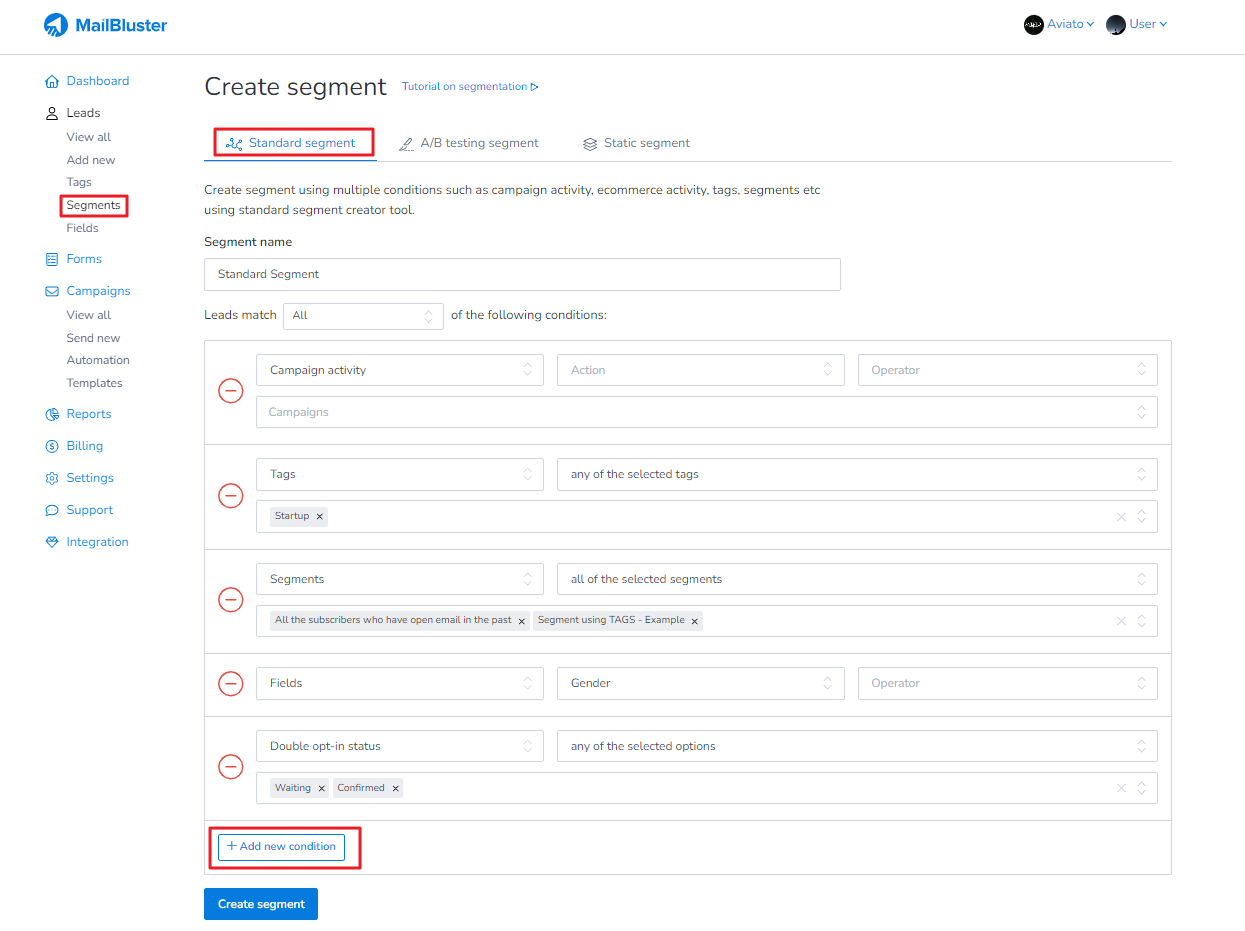
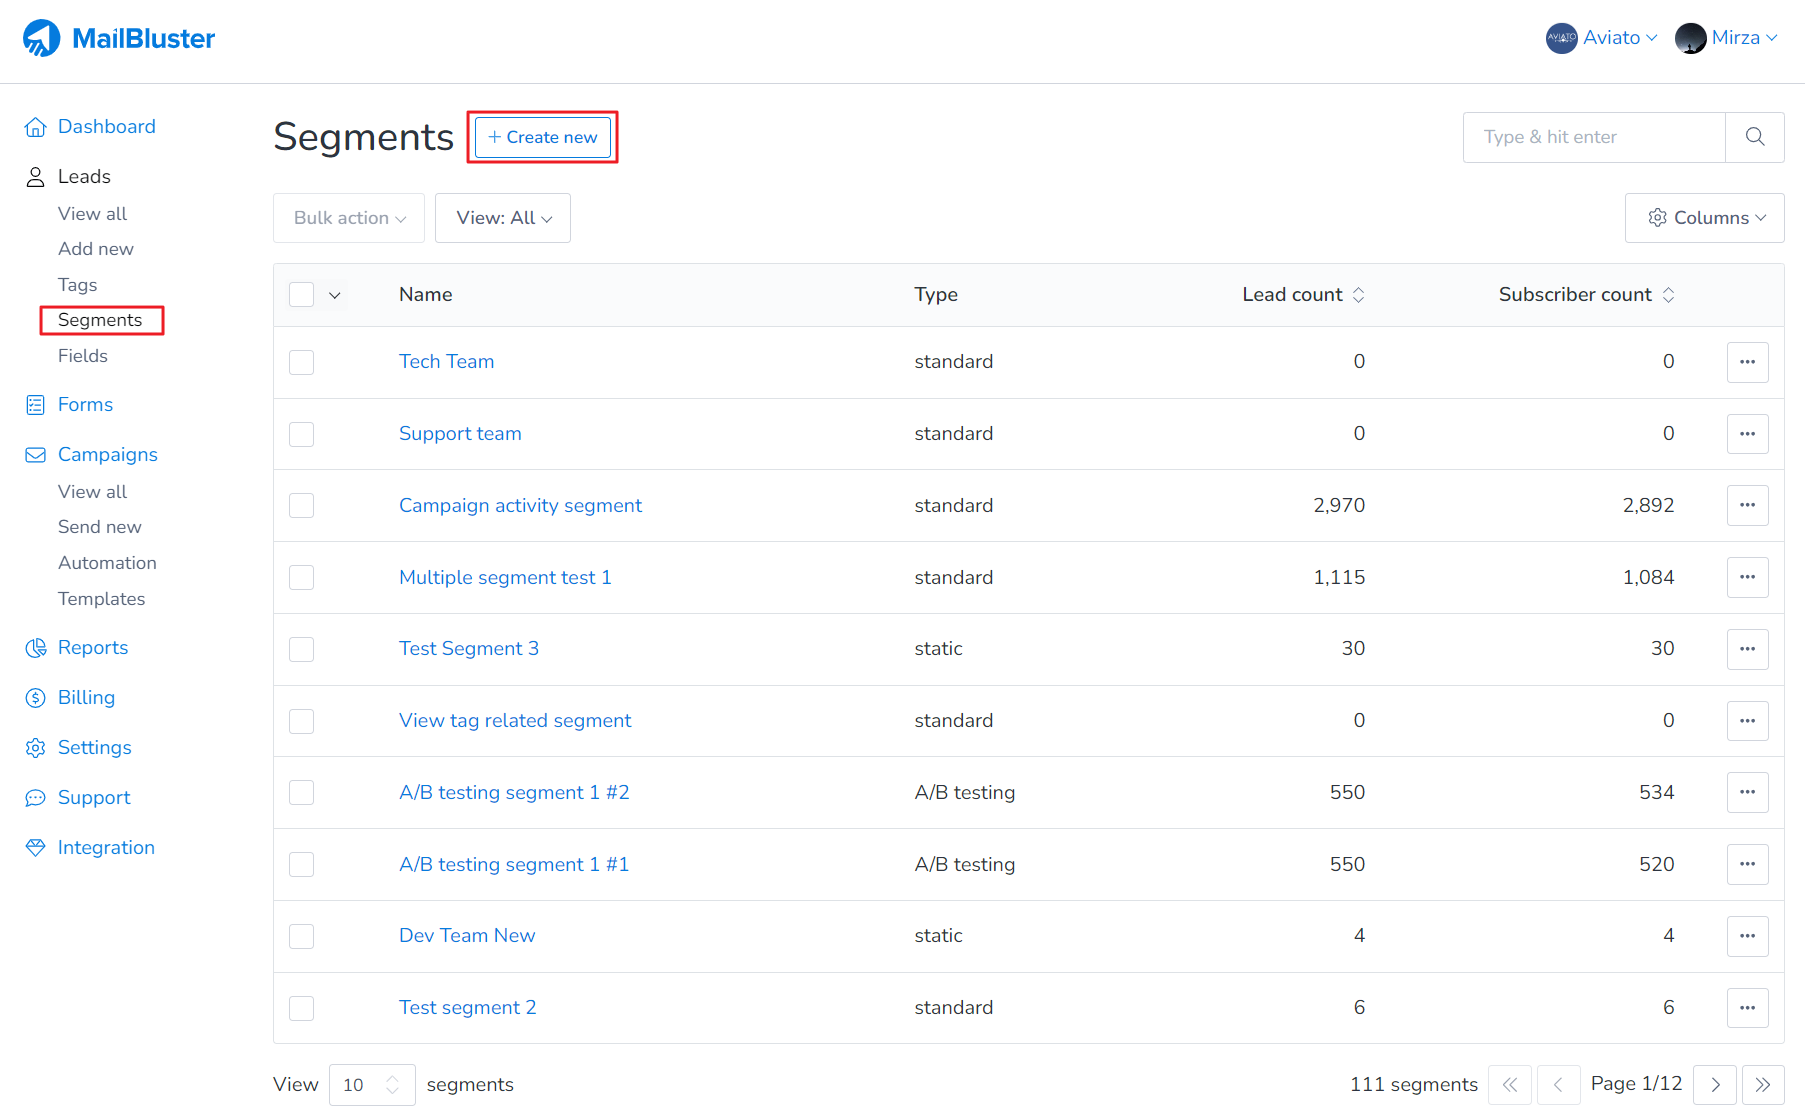
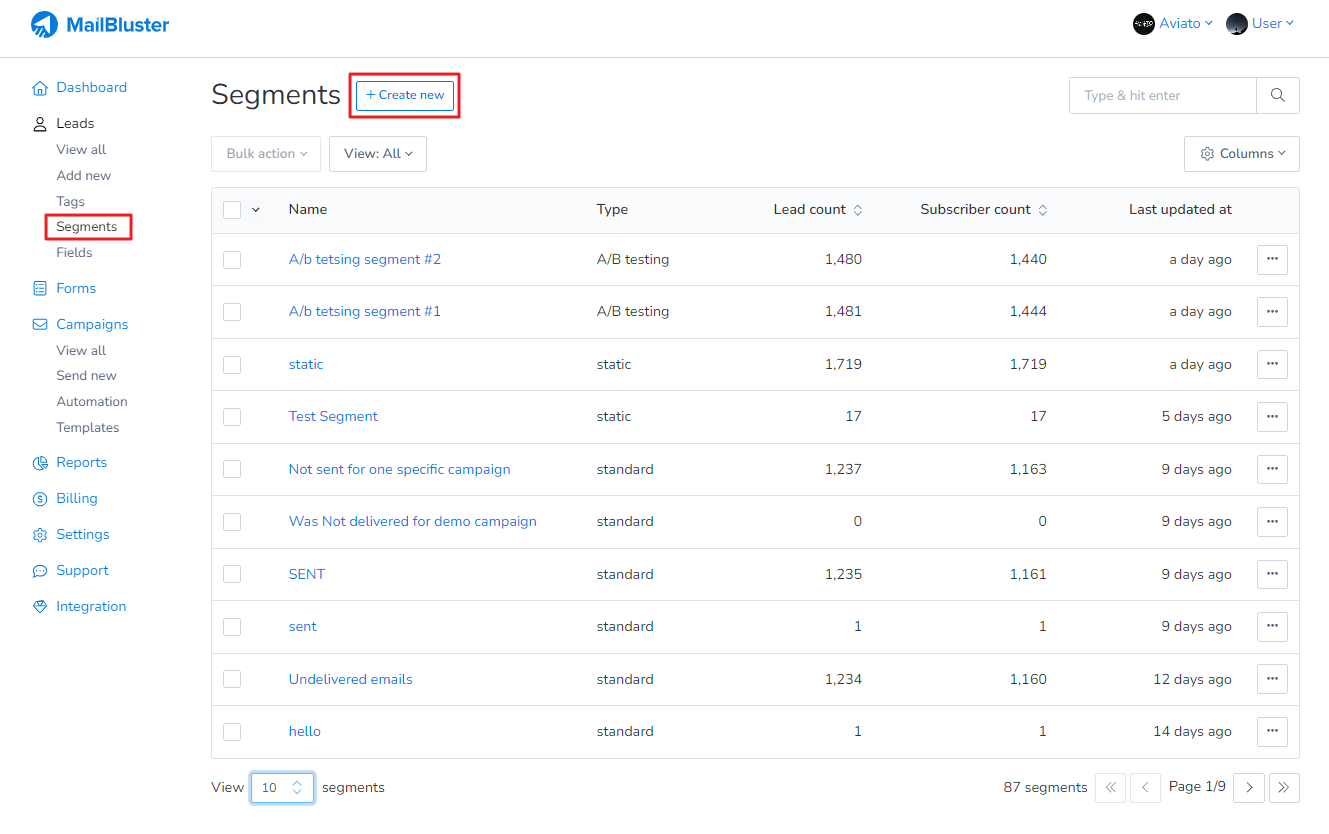
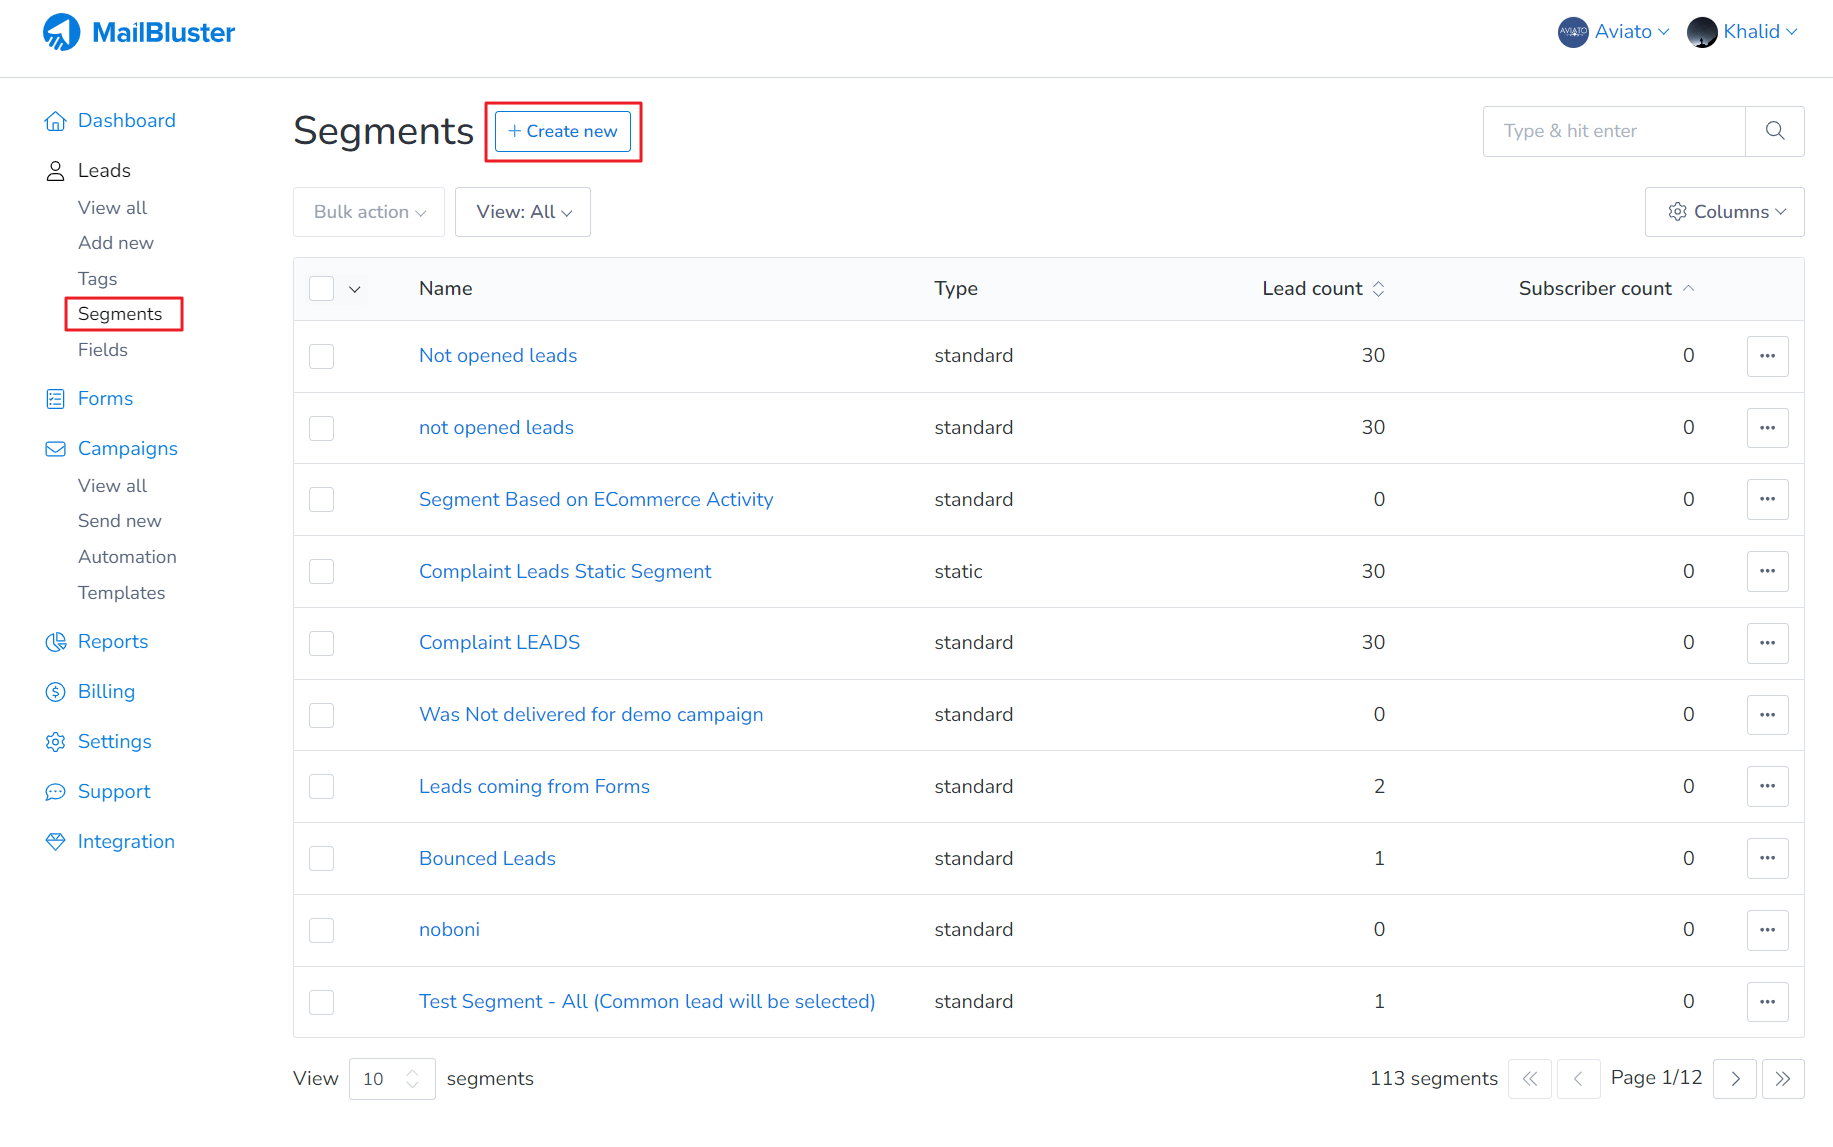
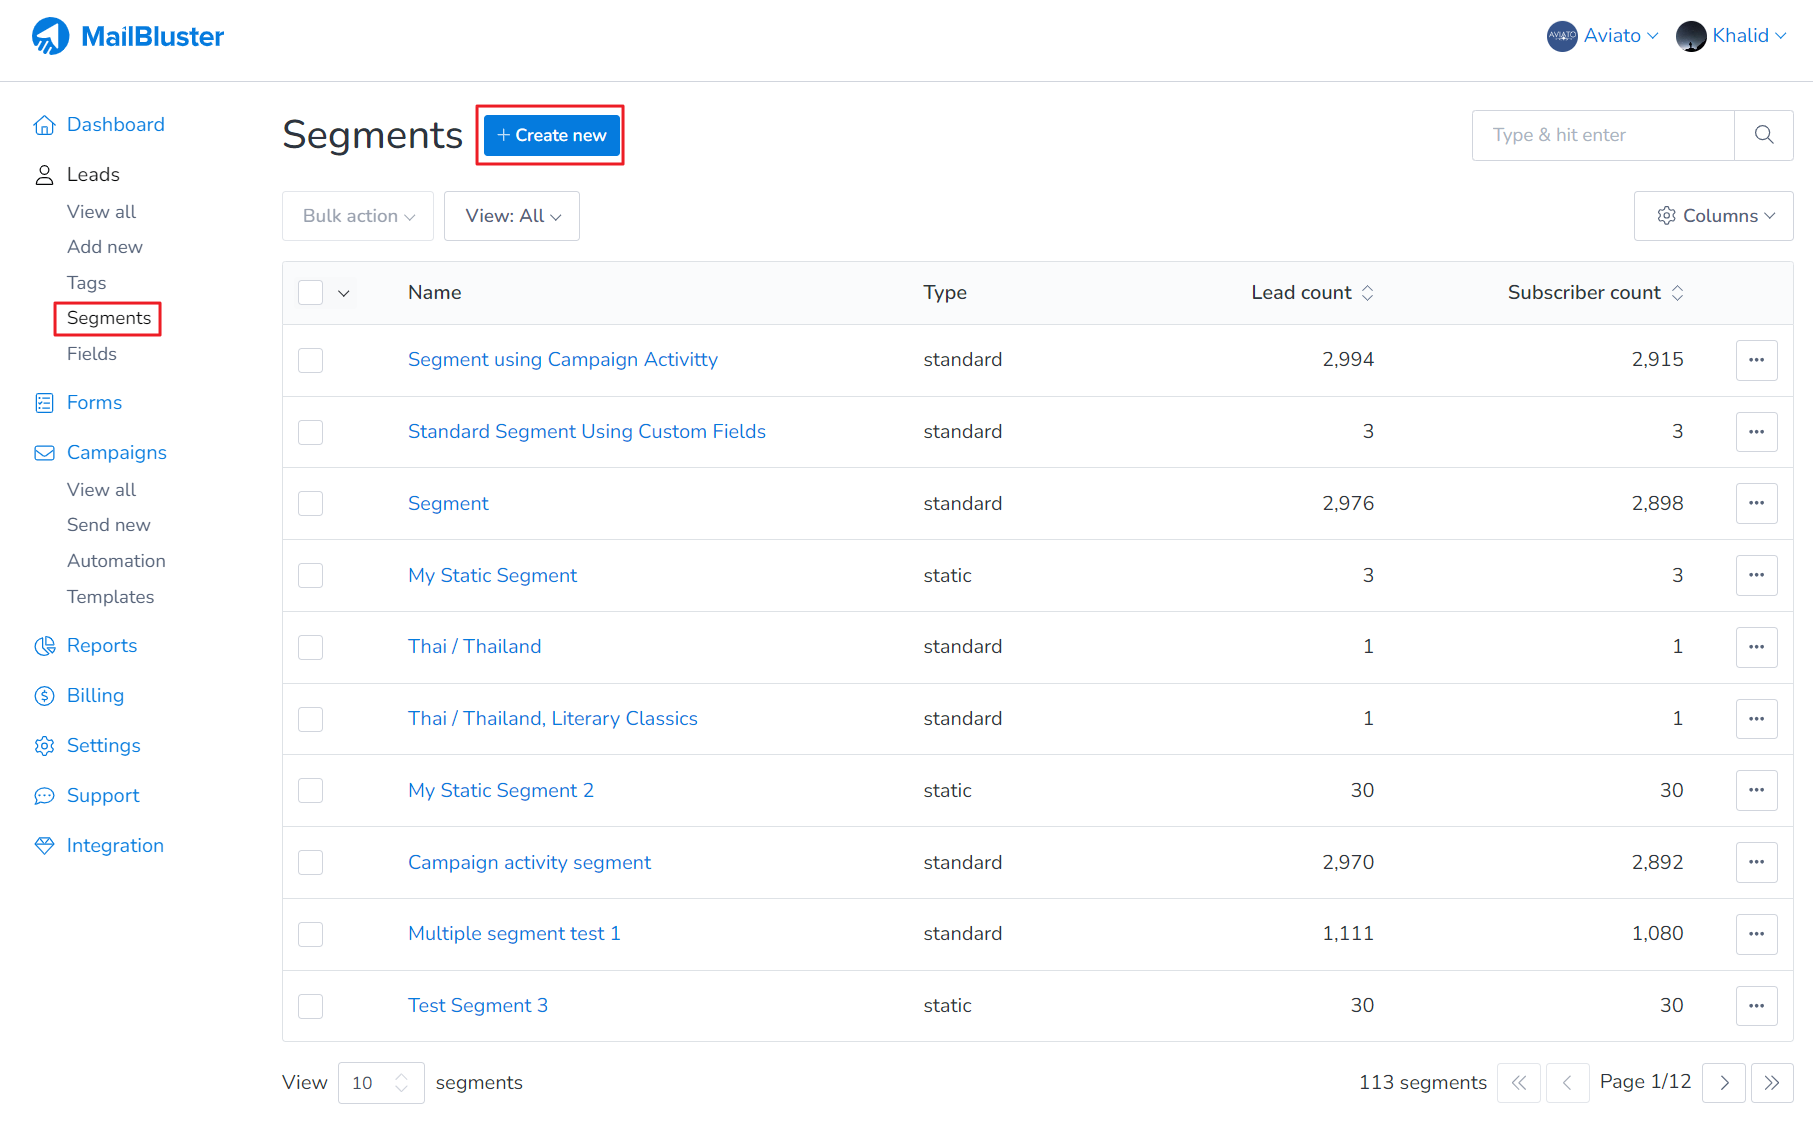
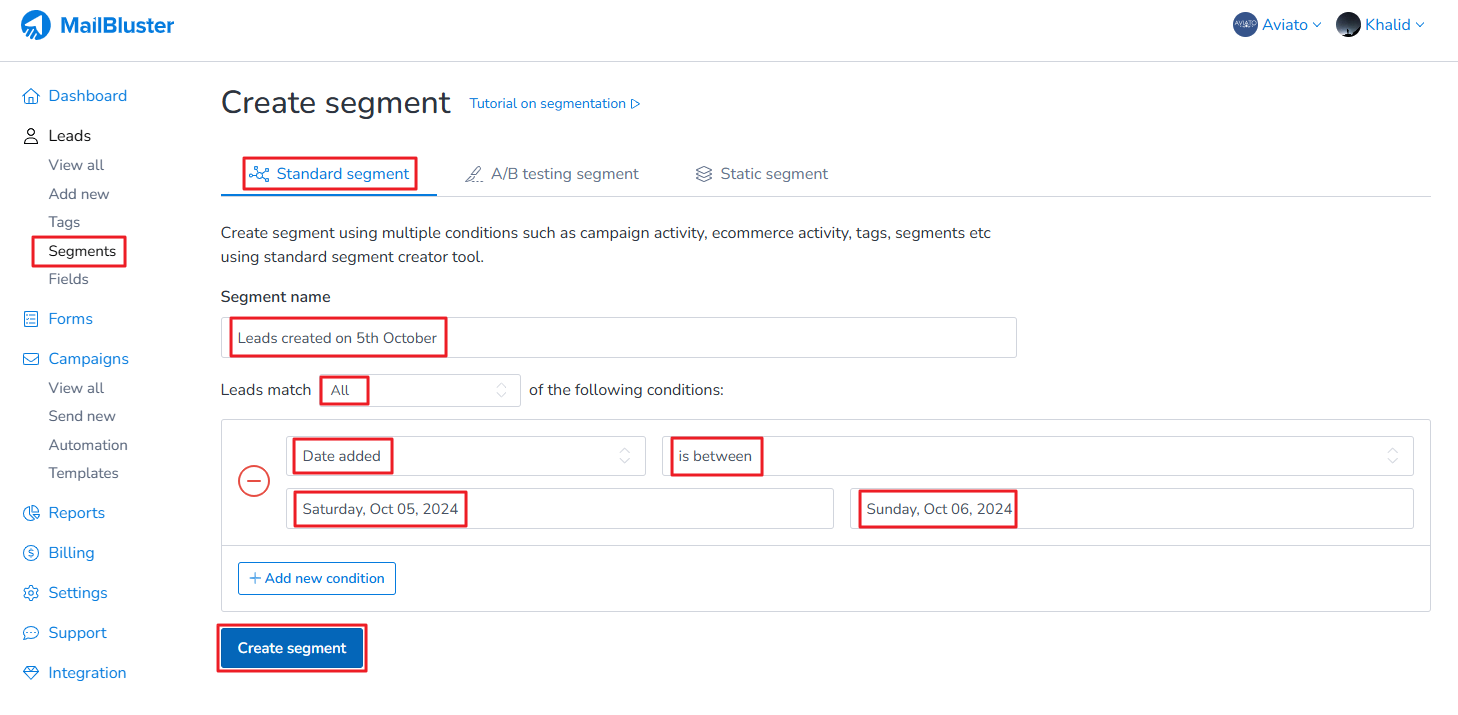
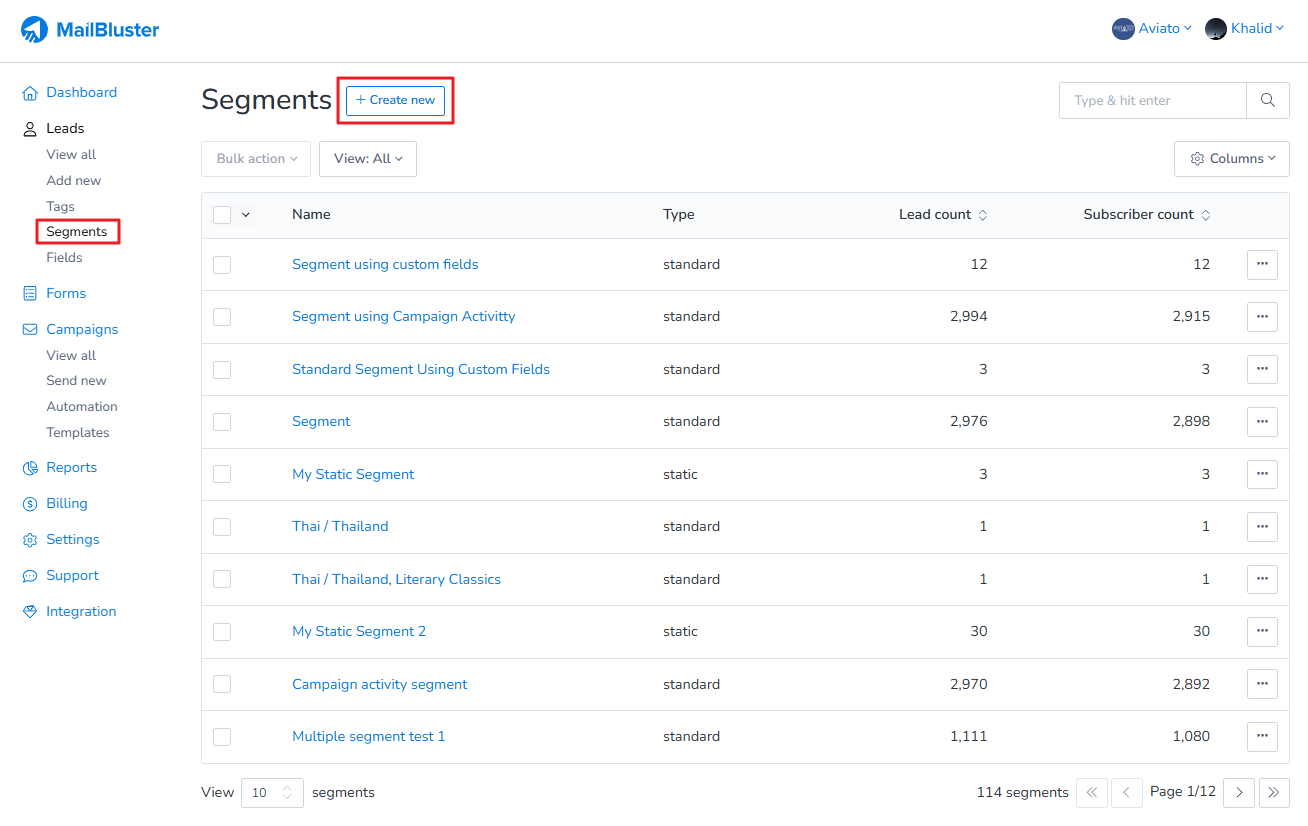
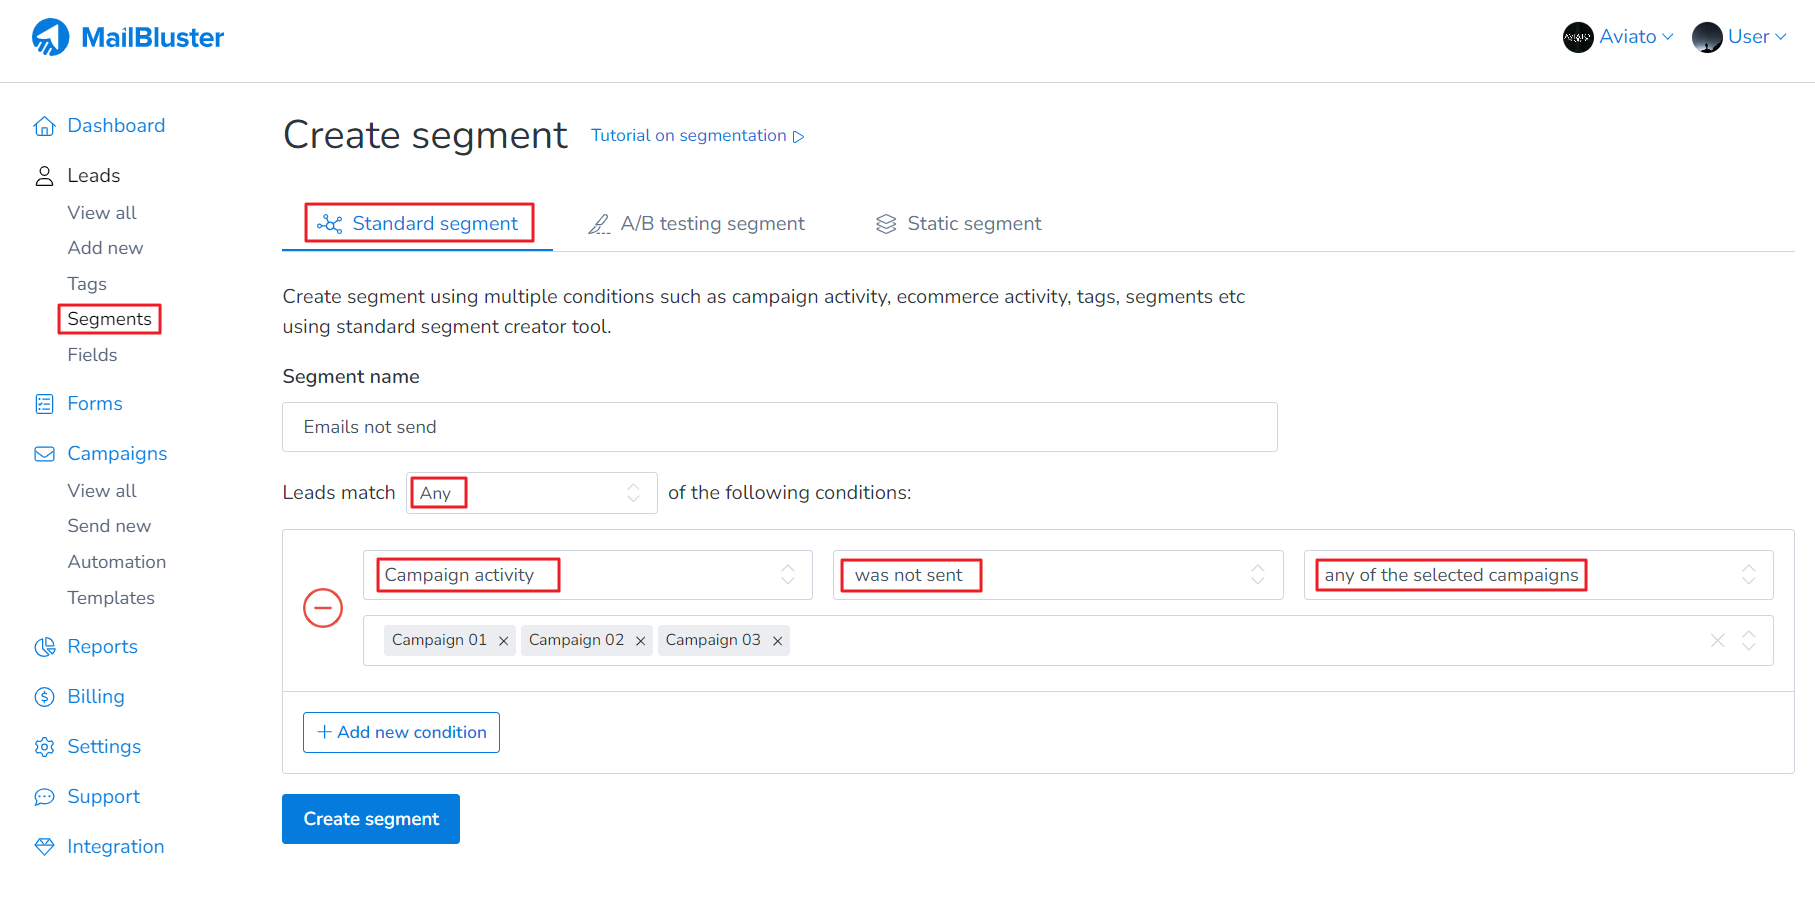
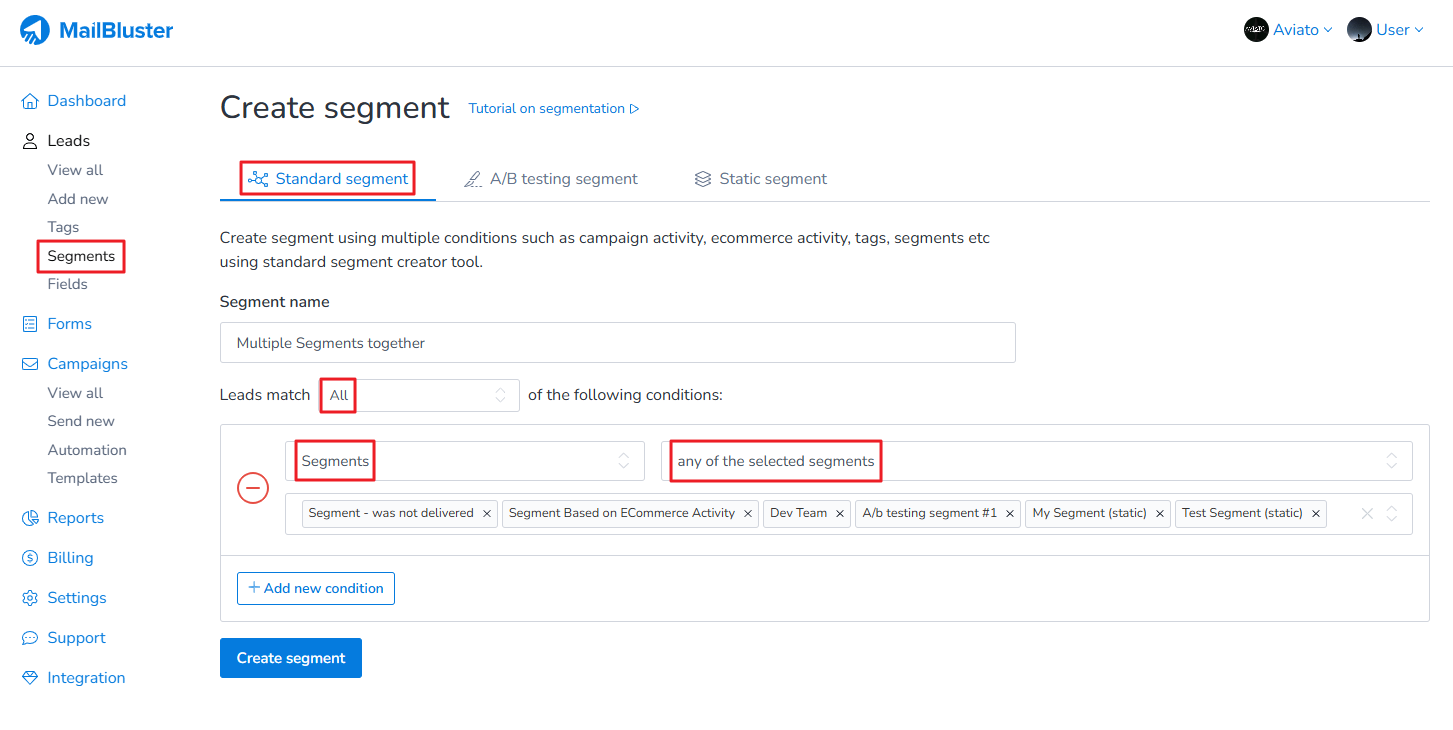
To create lead segments based on conditions like campaign activity, date added, tags, ecommerce activity, or subscriber status, use MailBluster’s Standard Segment feature. Define your conditions to filter leads accurately. You can create a standard segment by going to Brand > Leads > Segments > Create New > Standard Segment. These segments can combine multiple conditions, tags, and other segments, making lead management and targeted campaigns easier and more effective.
Here is an example of Standard Segment for all the leads with multiple conditions taken from MailBluster:
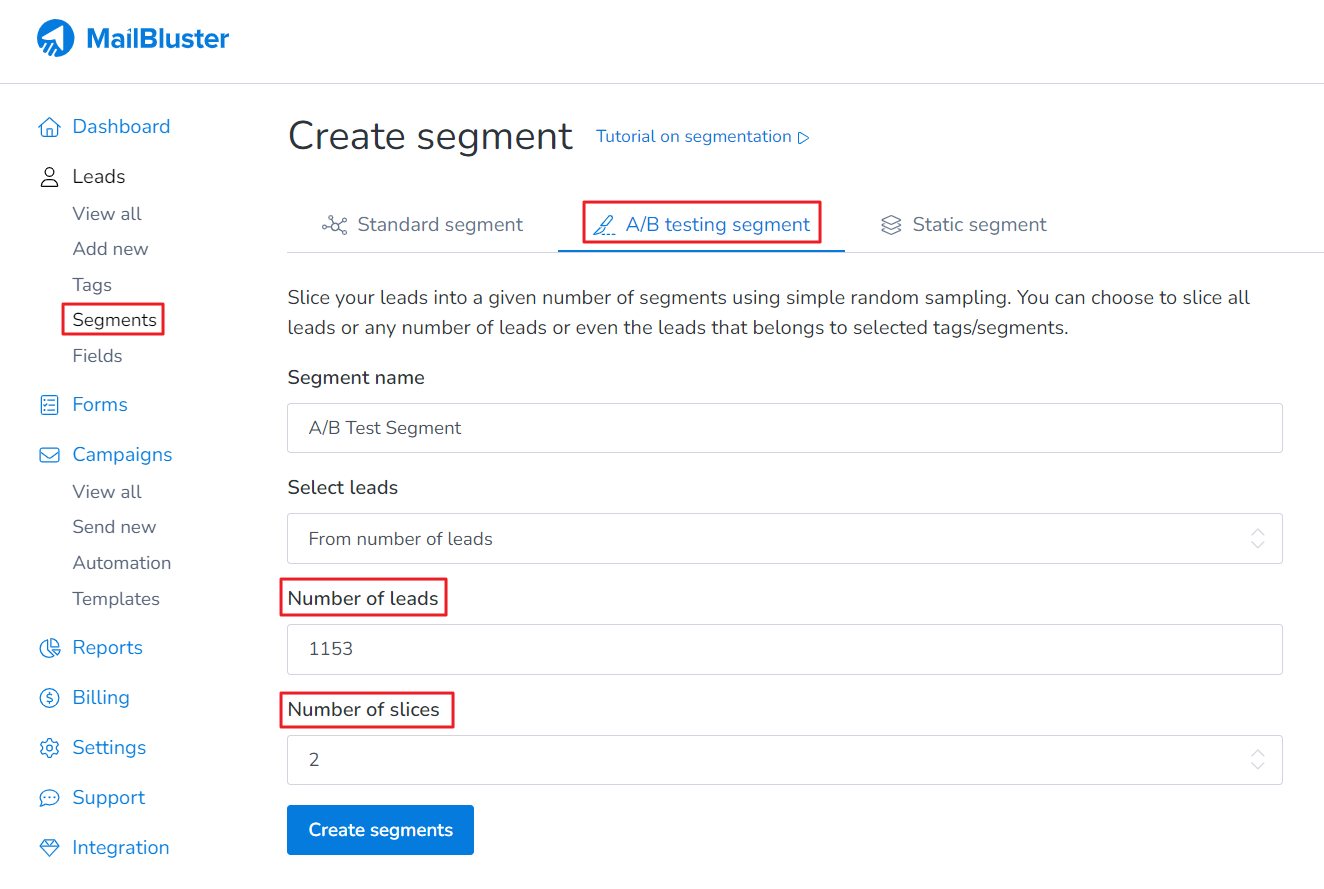
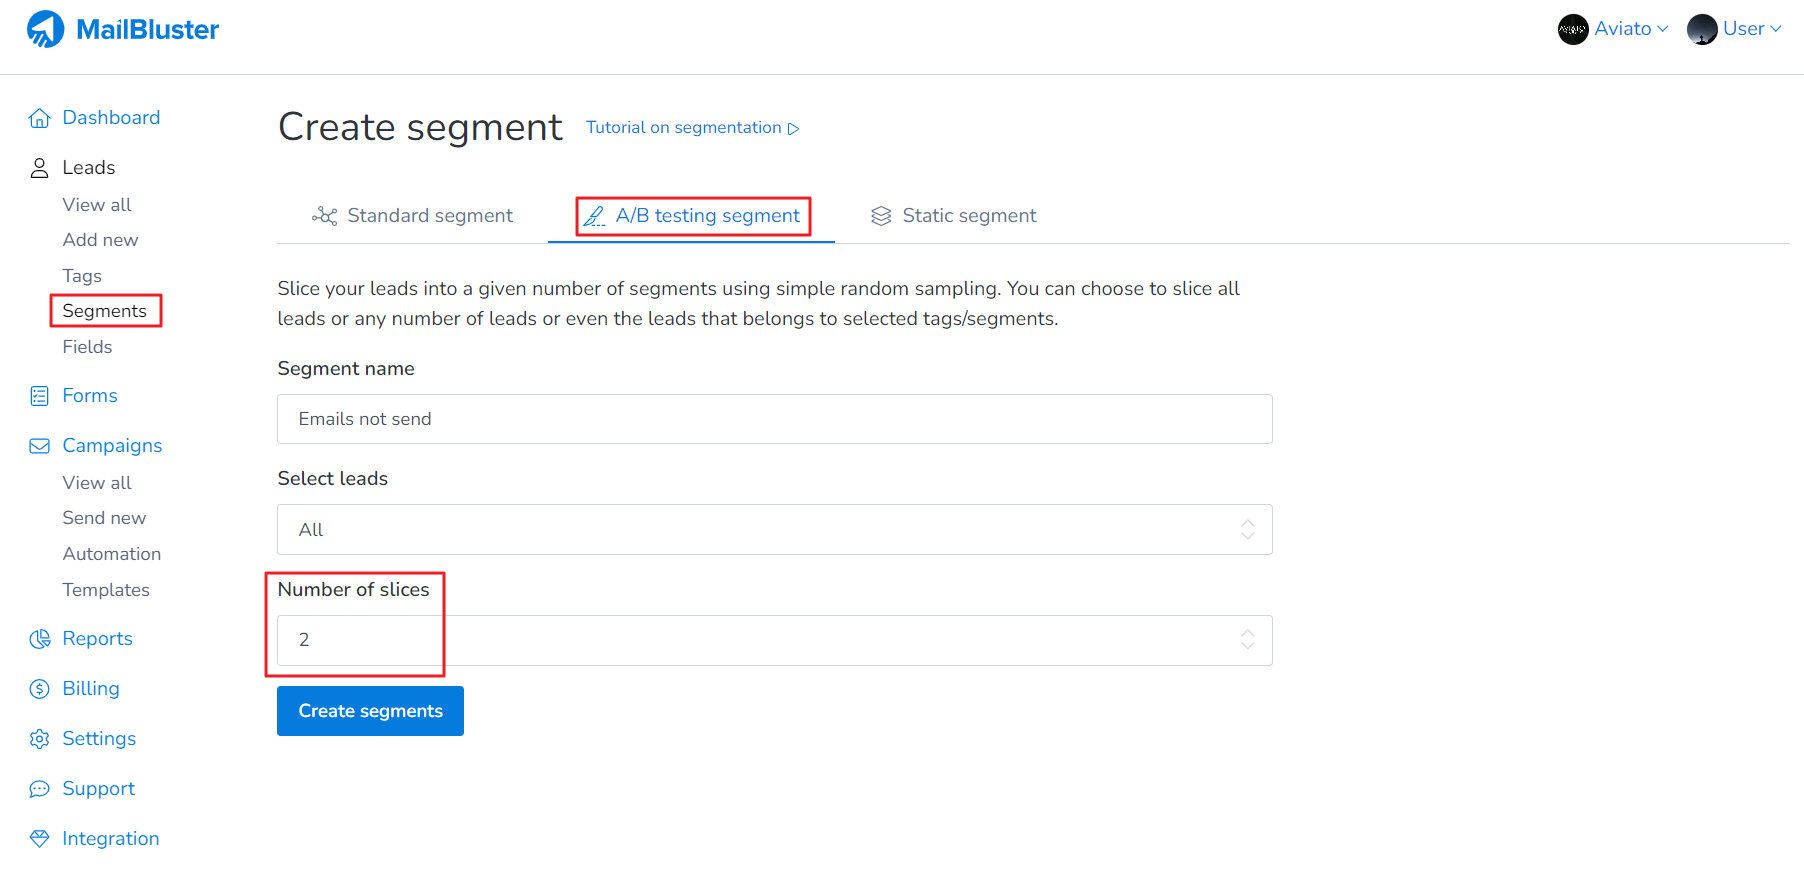
Learn how to create an A/B testing segment in MailBluster. If you want to slice your total recipients into multiple segments then you can use A/B testing segments, where each segment will contain, at most, your daily sending limit. To do so, go to Leads > Segments > Create segment > A/B testing segment page and create your segments as shown below.
After creating the A/B testing segment, it will split the leads into groups based on the number of slices you have set.
A static segment is a predefined group of contacts that does not change unless manually updated in email marketing. Unlike dynamic segments, which automatically update based on certain criteria or behaviors, static segments remain fixed until you manually add or remove contacts.
Static segments are useful for:
Targeted Campaigns: Sending specific campaigns to a particular group of contacts identified for a specific purpose.
Special Offers: Promoting offers to a selected list of loyal customers or a specific demographic.
Event Invitations: Inviting a specific group to events without changes over time.
Long-term Tracking: Monitoring the same group of contacts over time for analysis purposes.
These segments must be updated manually if any changes in the group composition are needed.
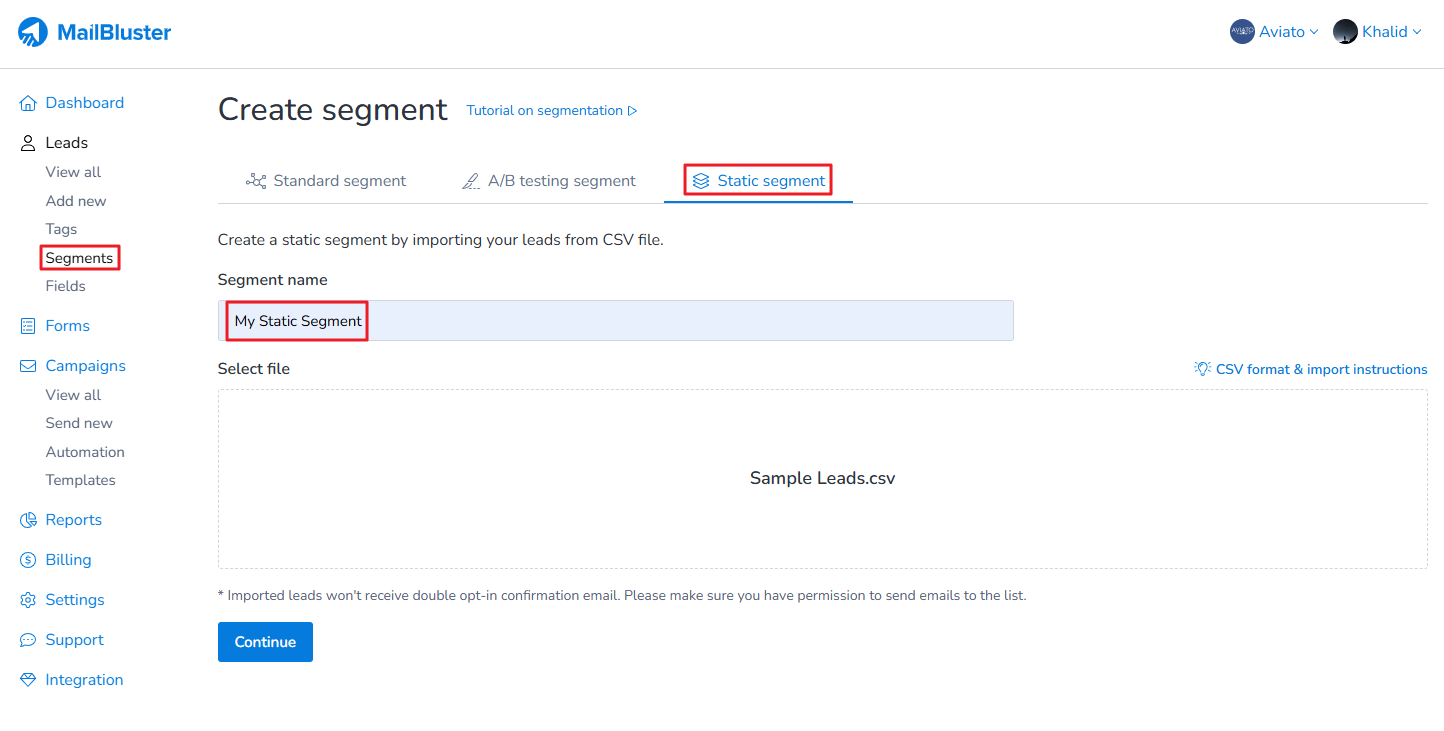
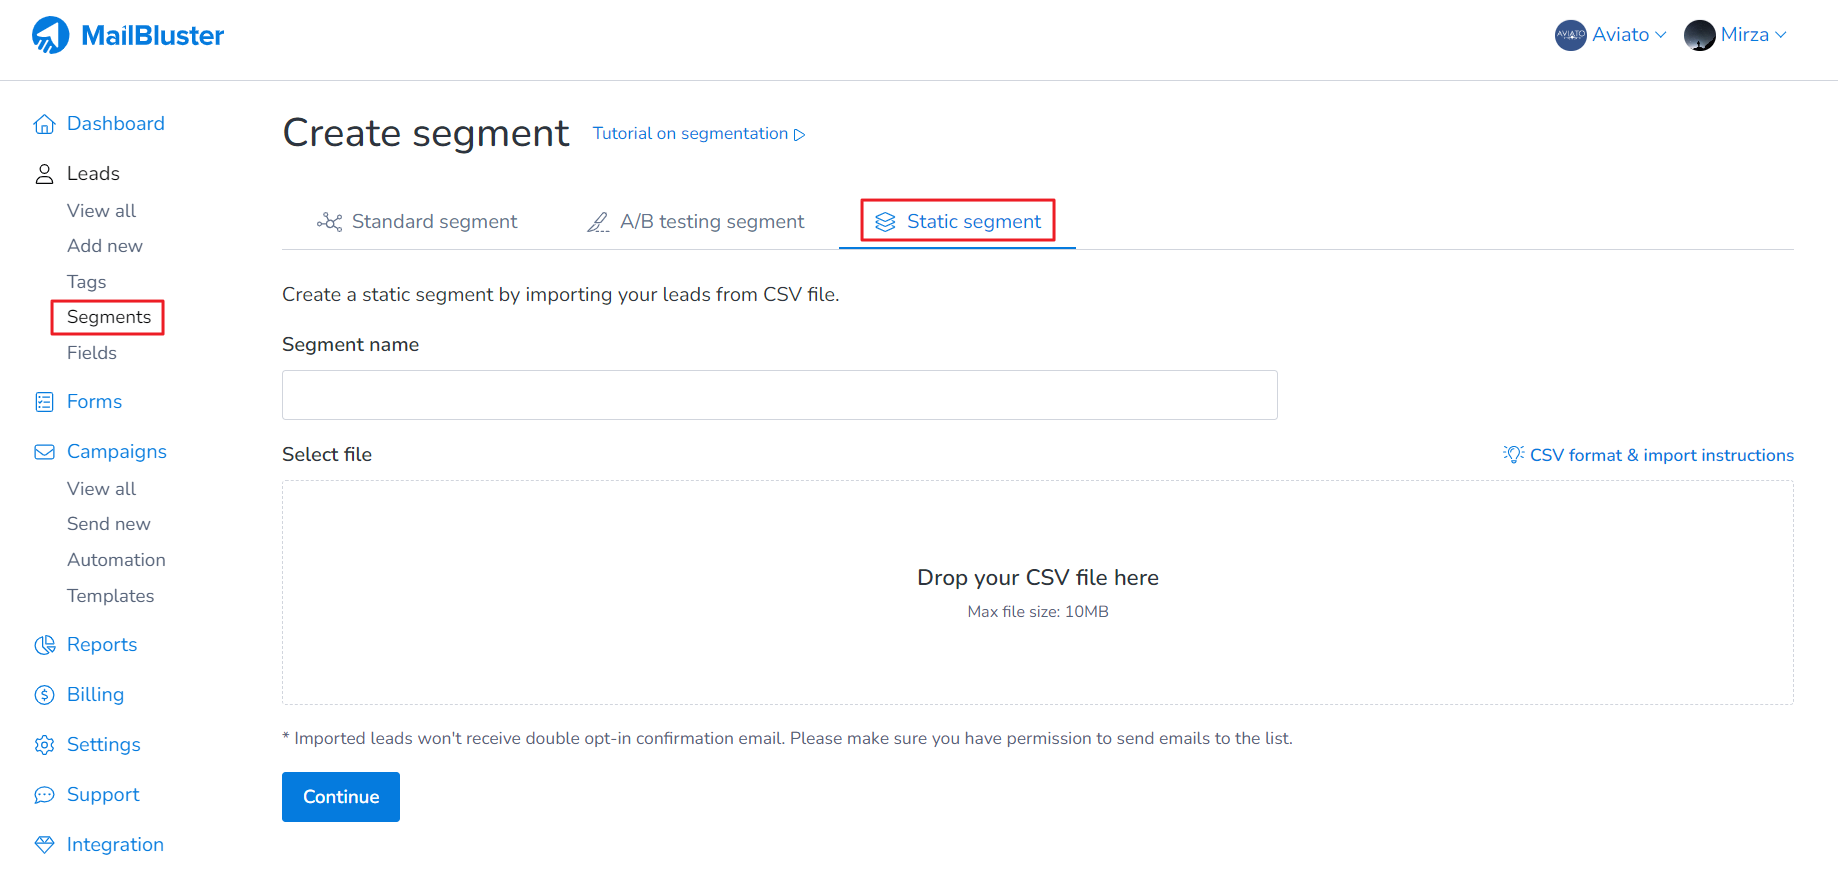
To use Static Segment in MailBluster, go to Leads > Segments > Create segment > Static segment page and create your segments as shown below.
Here, you will learn how to create a Static Segment. First you need to go to Brand > Segments and click Create New.
Then click on Static segment.
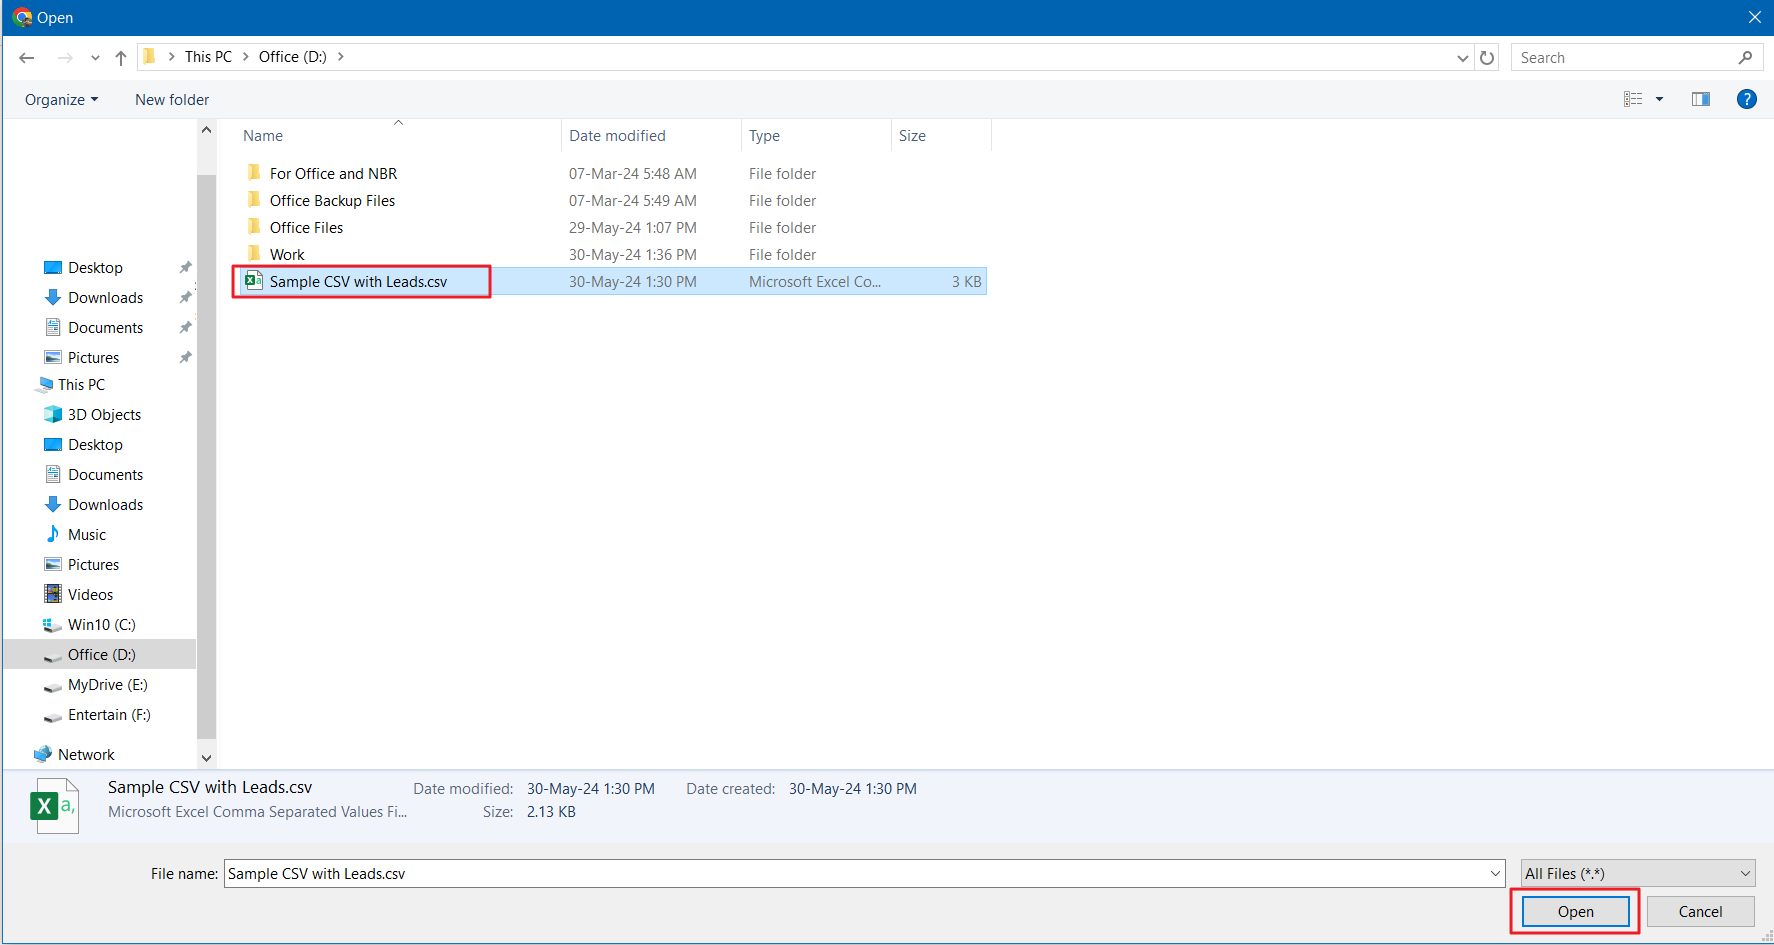
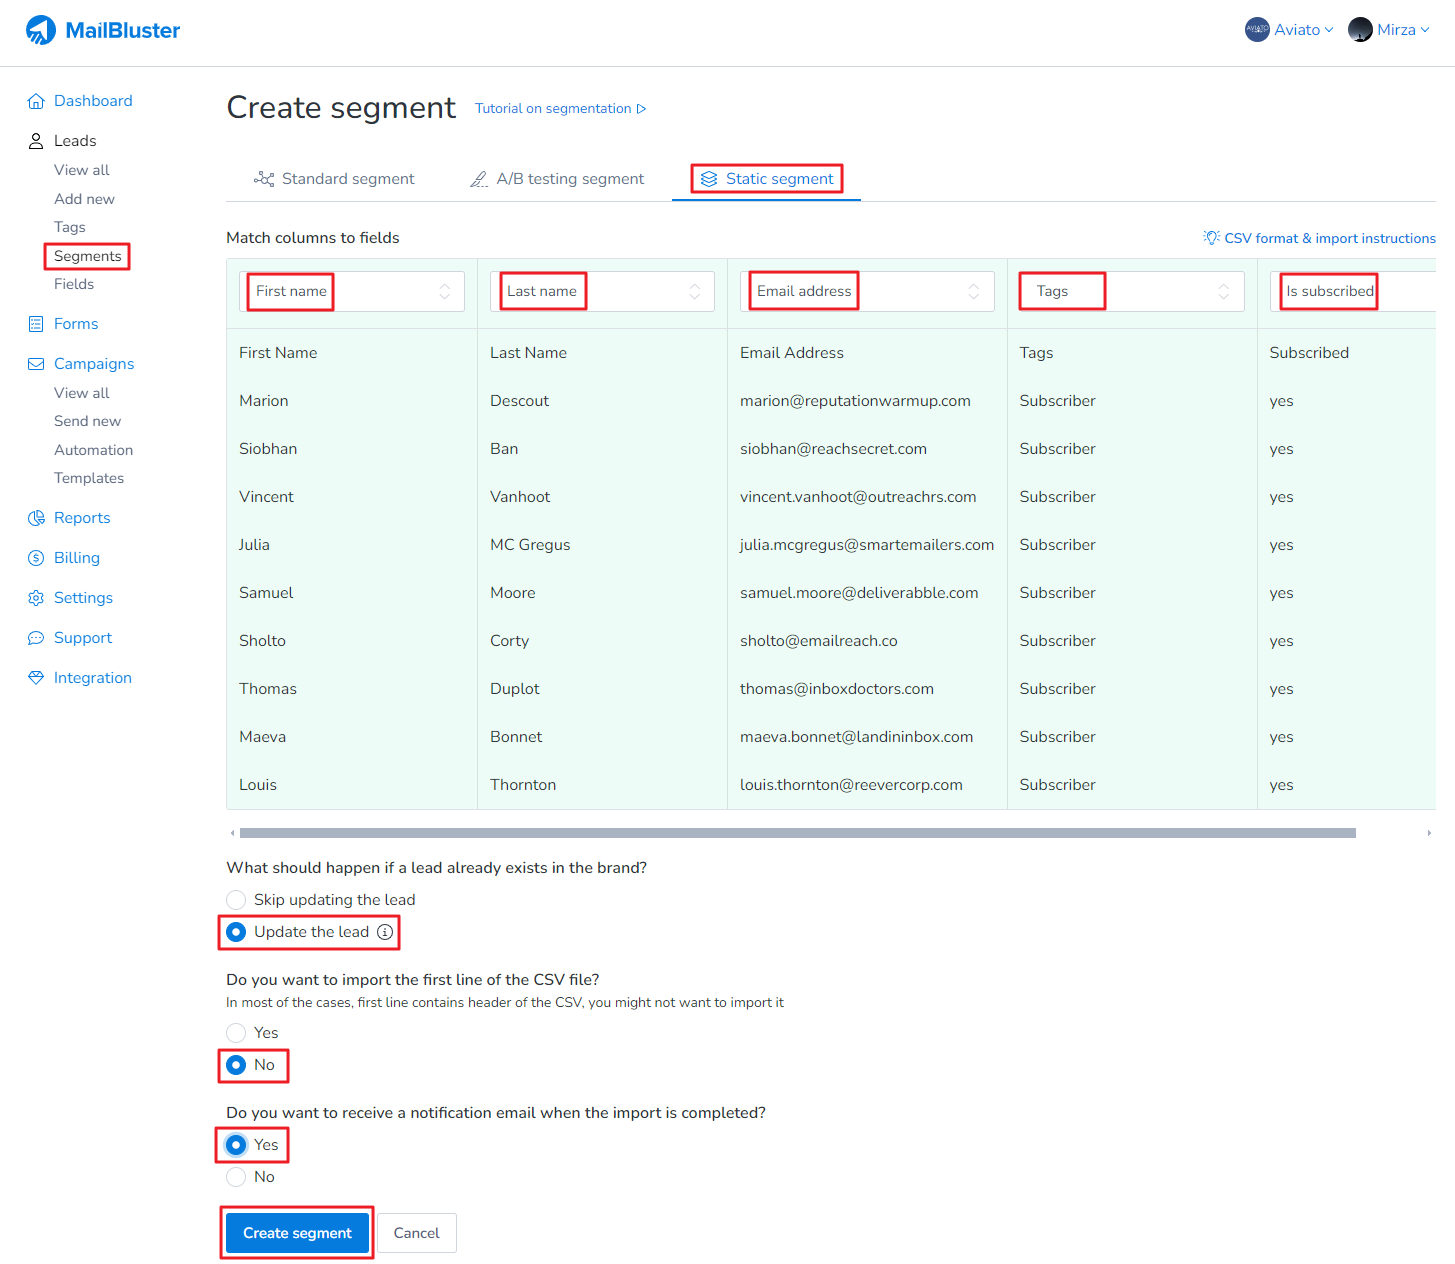
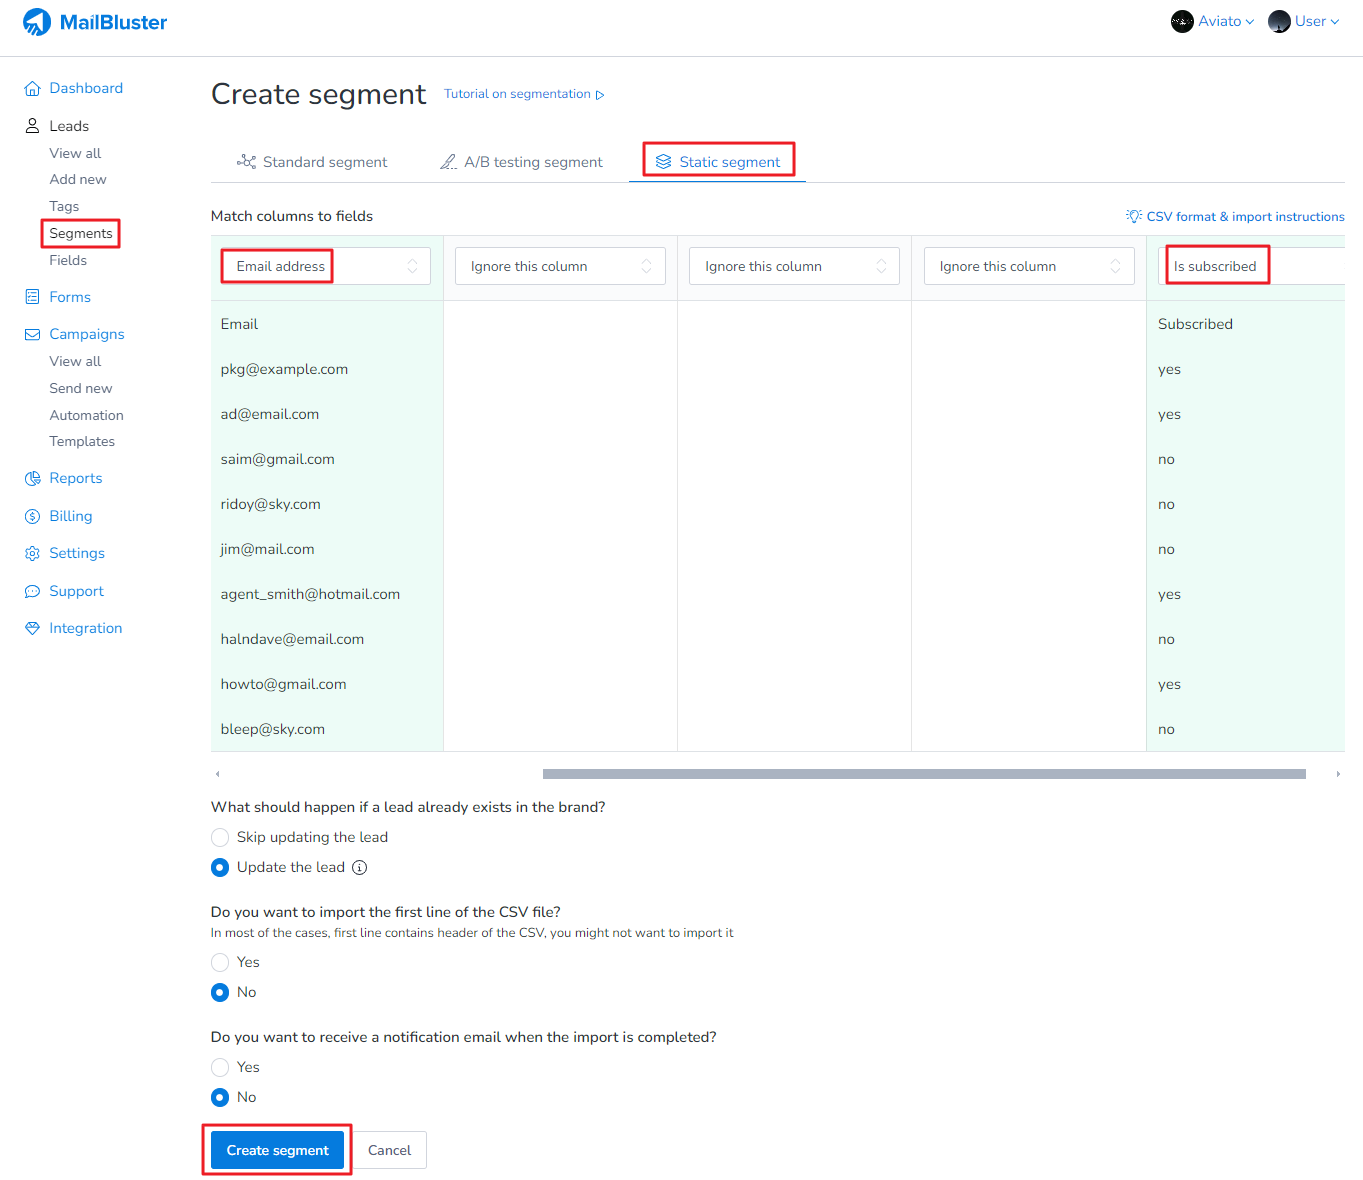
Then select the CSV file with First Name, Last Name, Email address, Tags and Subscribed status. Click Continue.
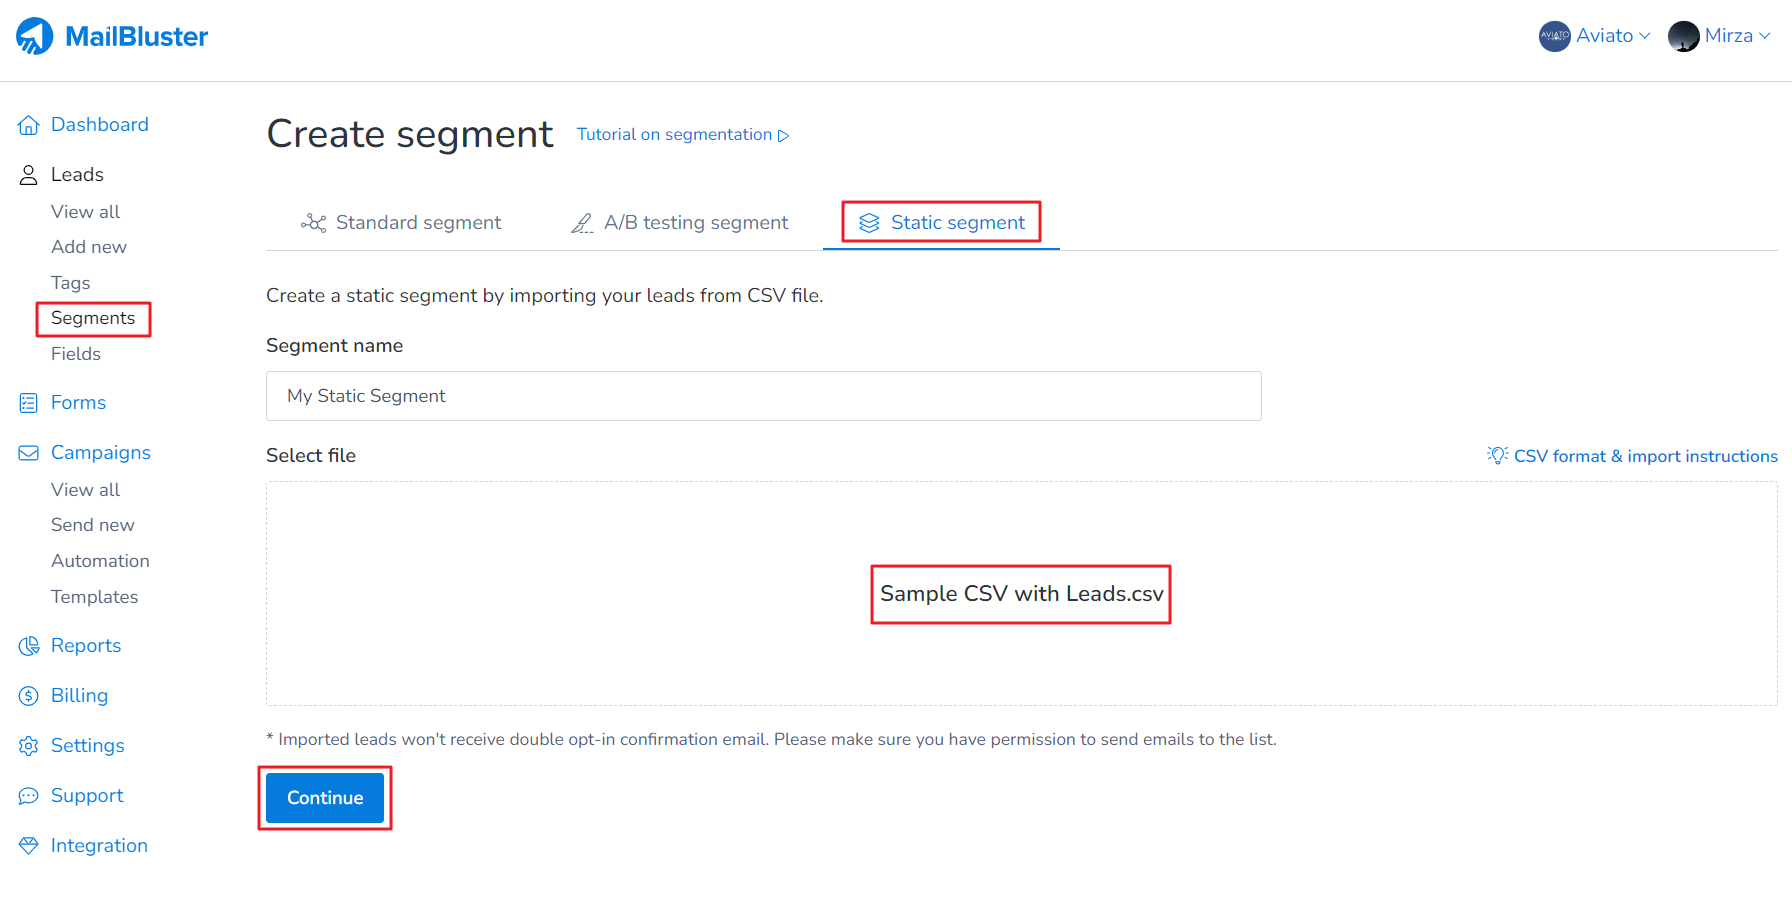
Enter the static segment name and notice that the CSV file is now been ready for import. Click Continue.
Match the First name, Last name, Email Address, Tags and Is subscribed with CSV File headers information shown below. Then select the following configurations. Finally click Create segment button.
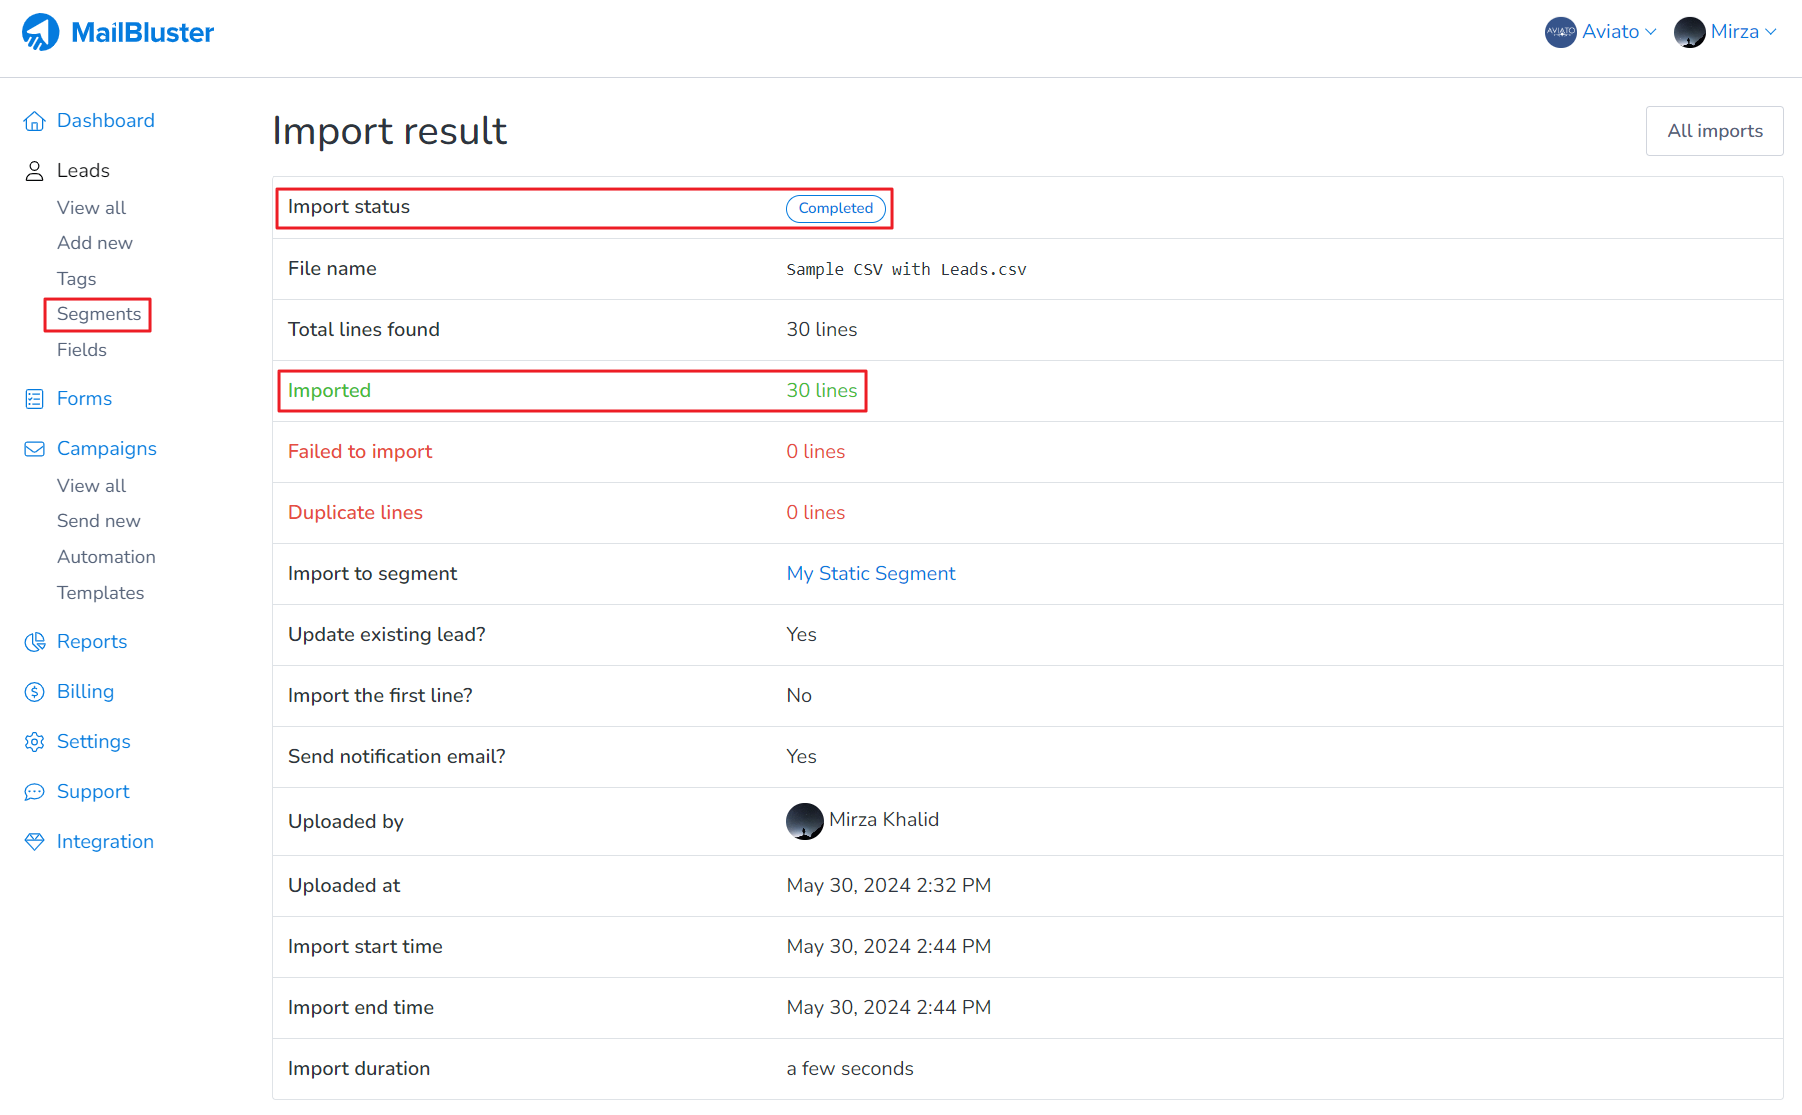
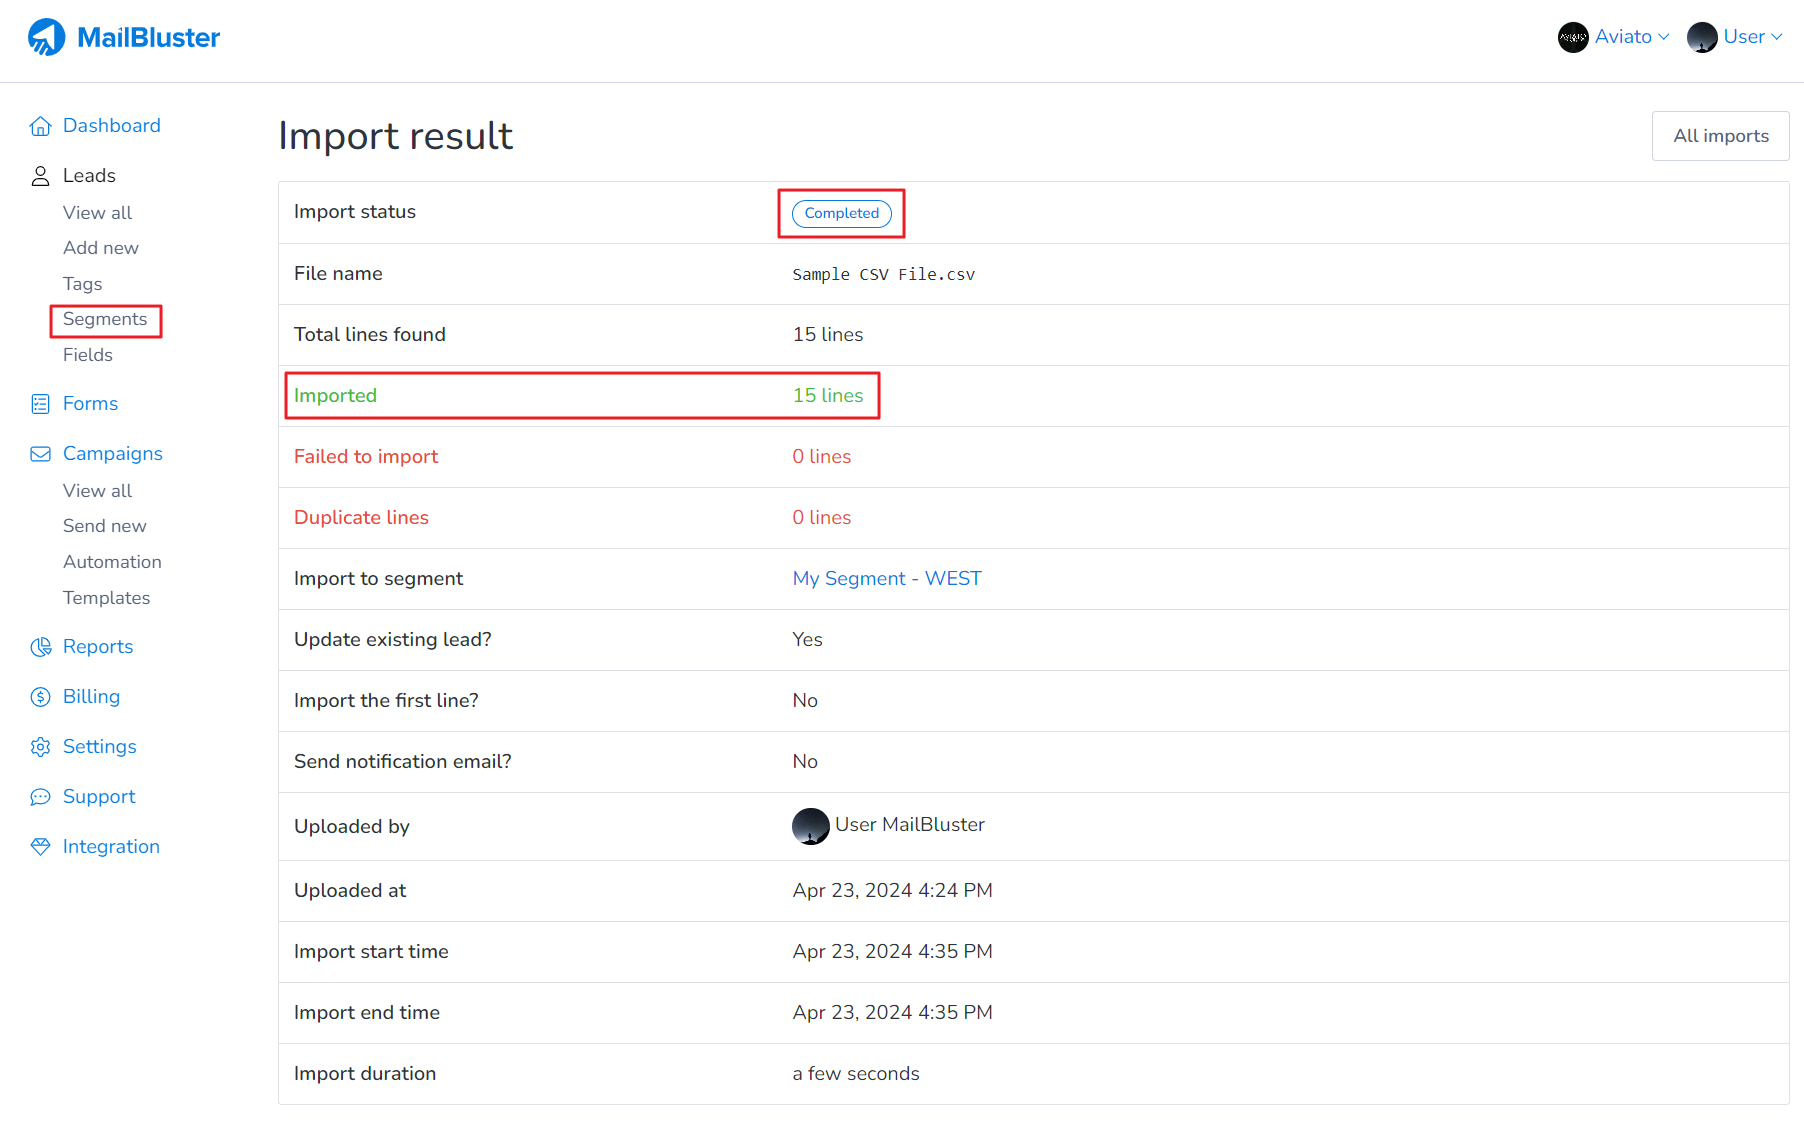
The CSV file containing the leads is imported successfully as shown below.
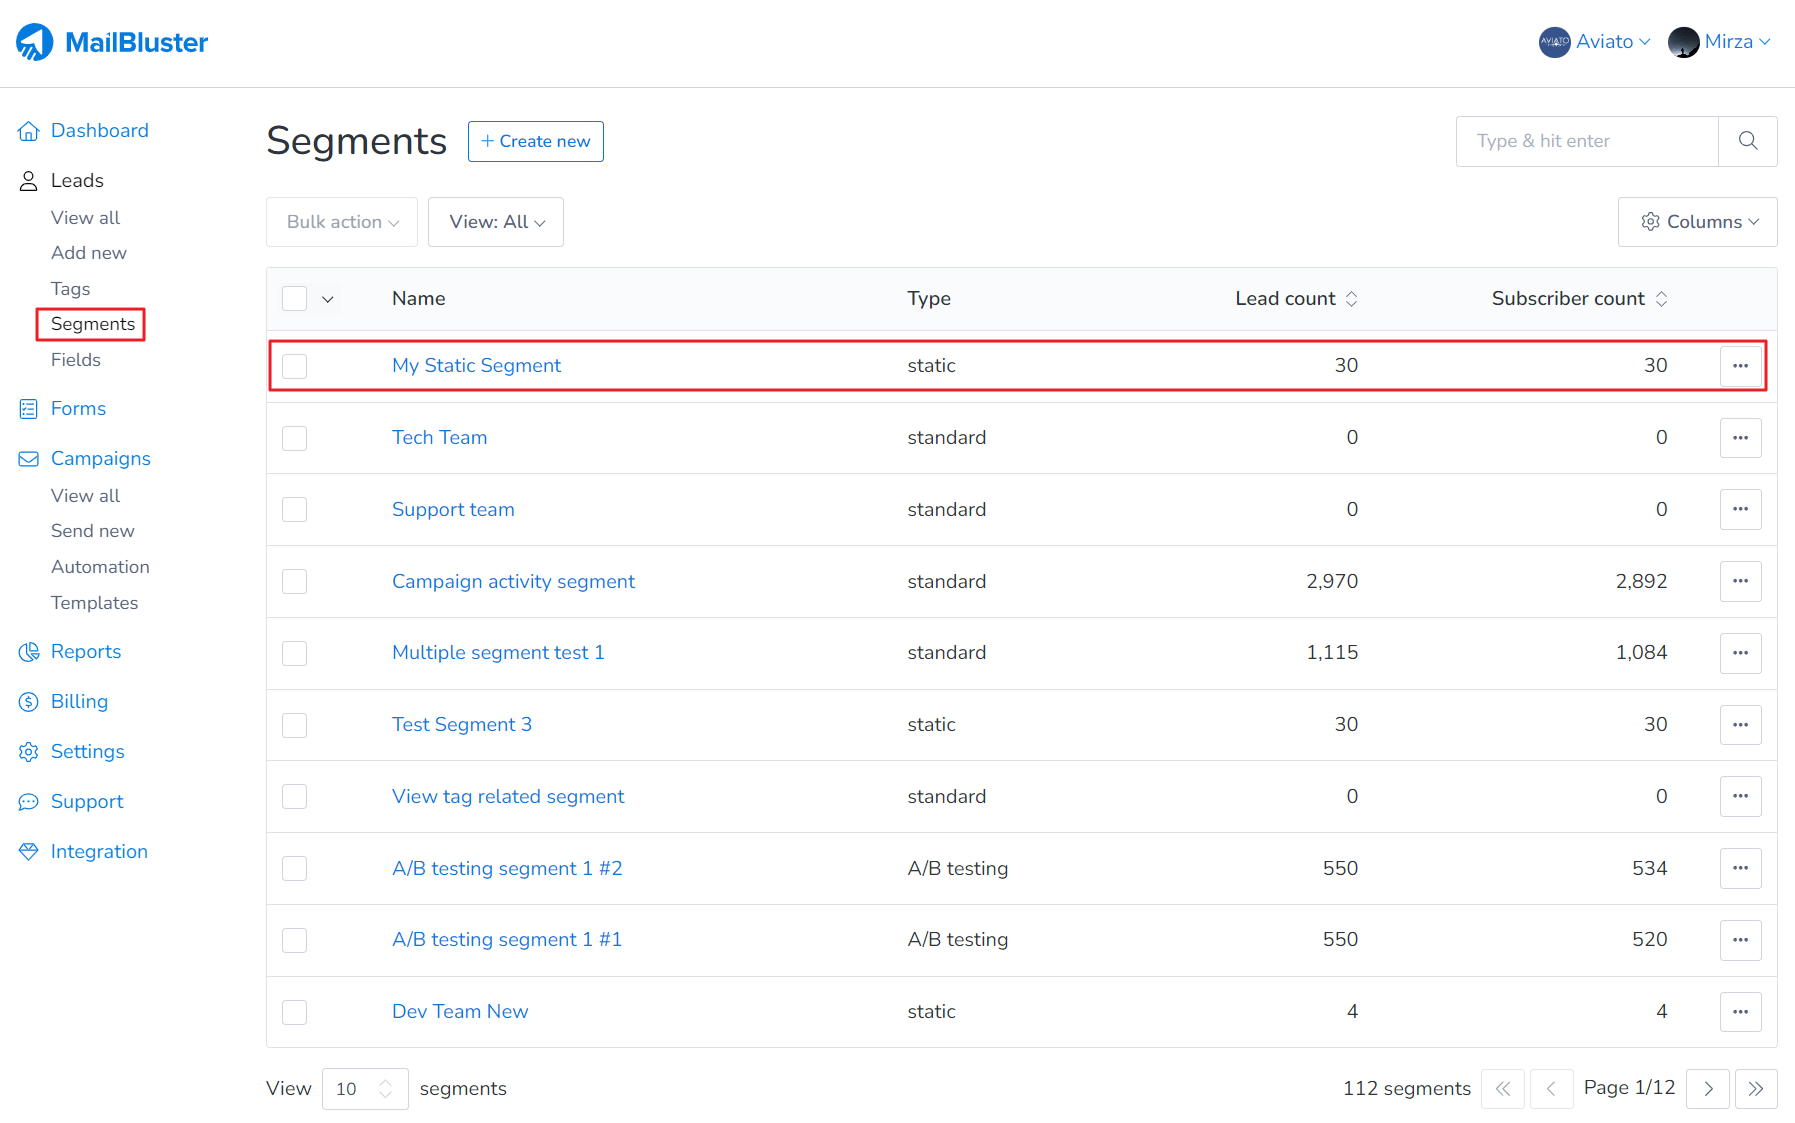
Now go to the Segments and you will see that the Static segment has been created.
Here we will discuss the Difference between Tags and Segments. A tag is a label assigned to leads to identify or categorize them as a group. By assigning single or multiple tags to leads (email addresses), you can organize them effectively.
Segments allow you to divide your leads into groups. Each customer or subscriber is different, and segmenting your leads helps you reach the right audience. Instead of sending the same email campaign to all leads, create variations tailored to different customer groups with Segments to improve your campaign performance.
Please note: You can create segments using tags in MailBluster, but not vice versa.
Here you will learn how to set a custom lead field’s type as date although the custom fields in MailBluster are designed for string data types. It is not designed for date and time. So you can only store text in the custom fields of MailBluster.
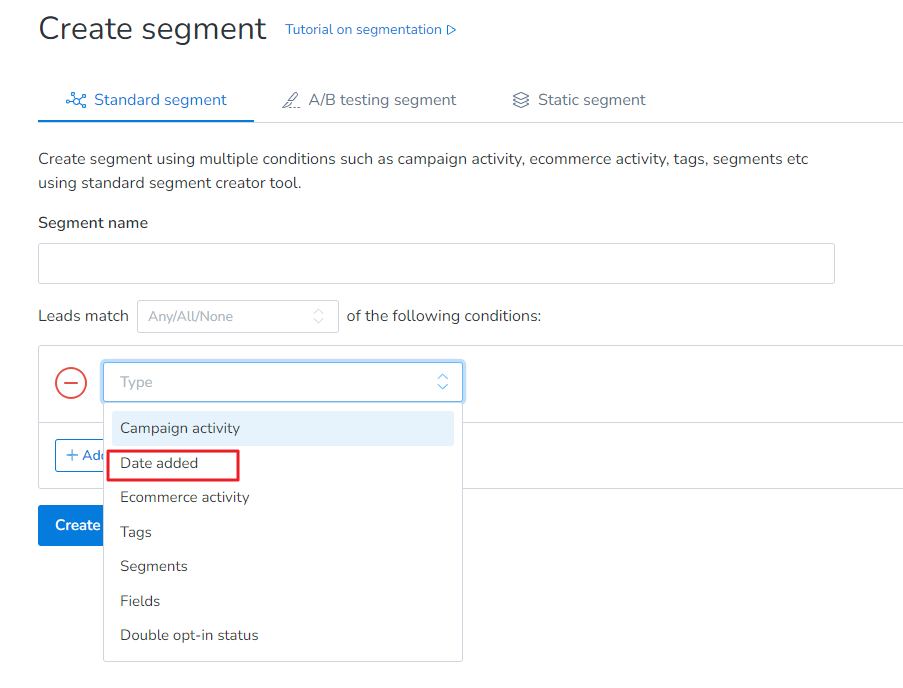
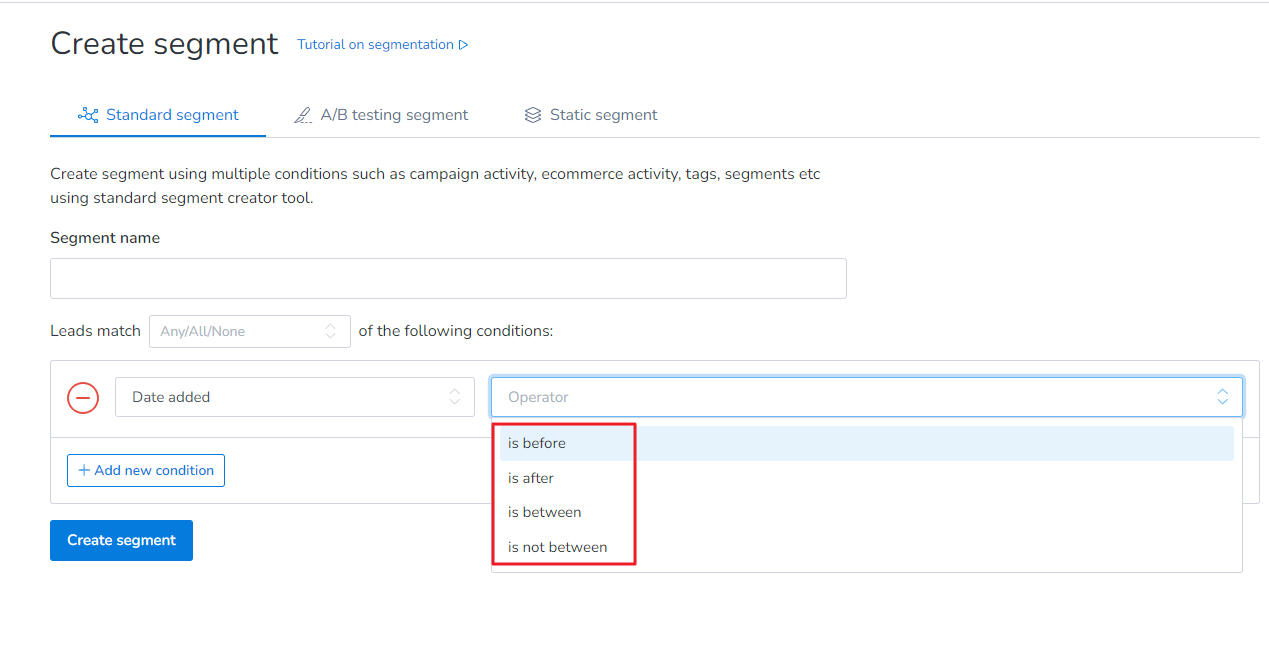
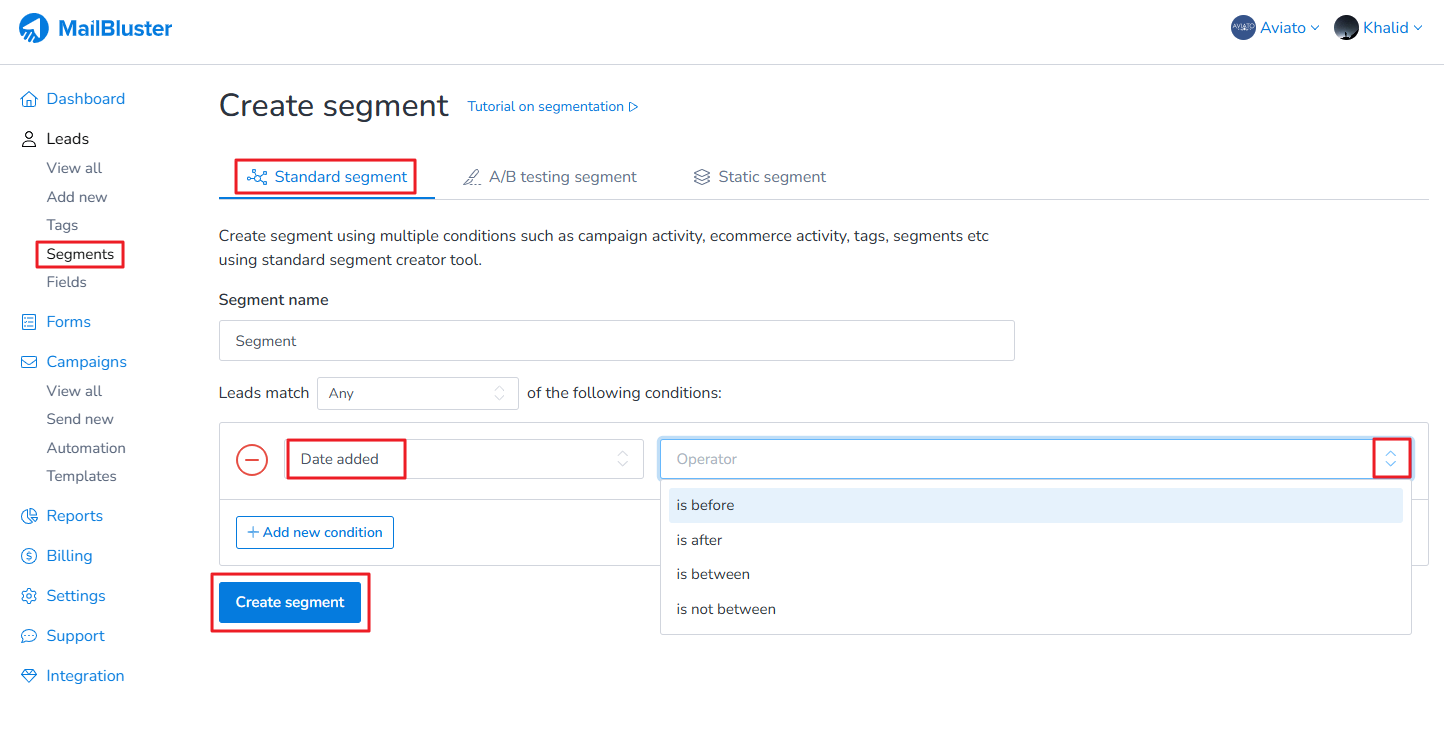
As for the Standard Segment, you can use Type as Date added:
These are the options you will get in the Operator:
You can set the conditions in the segment based on the lead’s adding date to MailBluster.
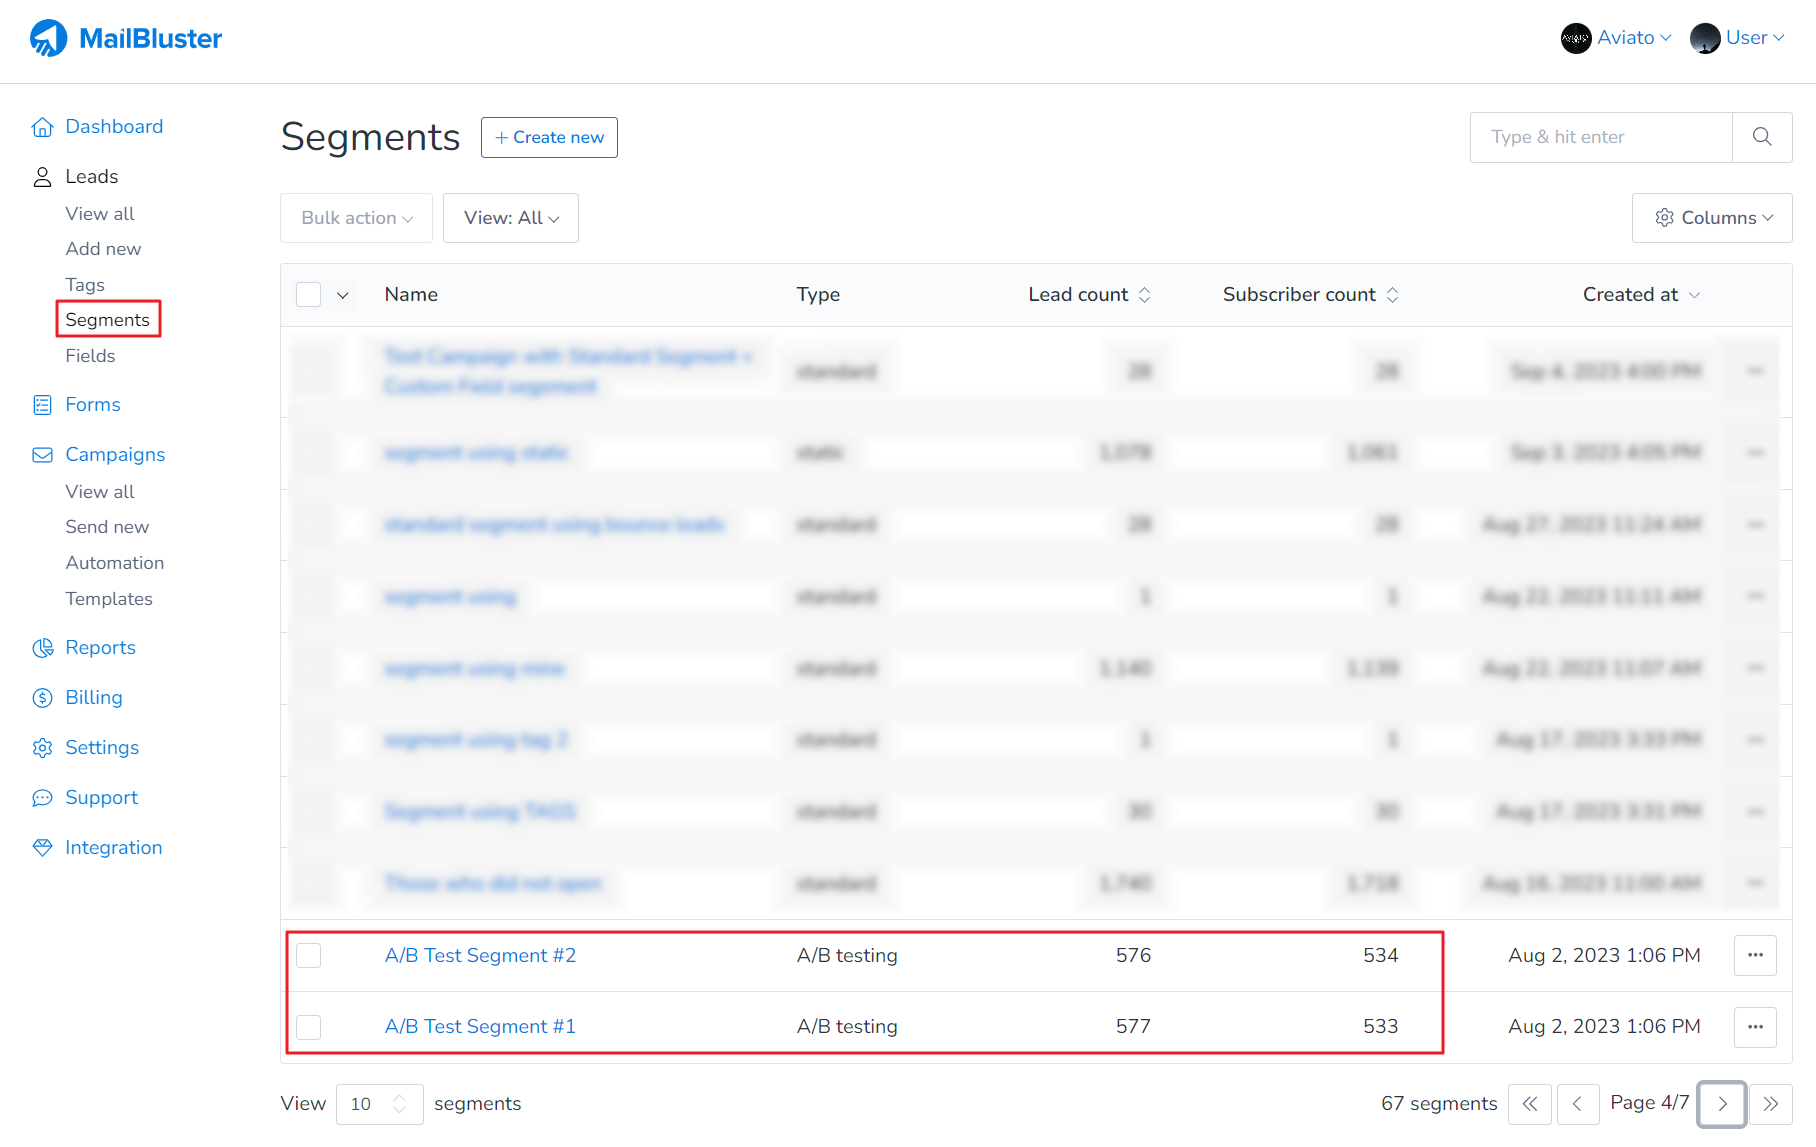
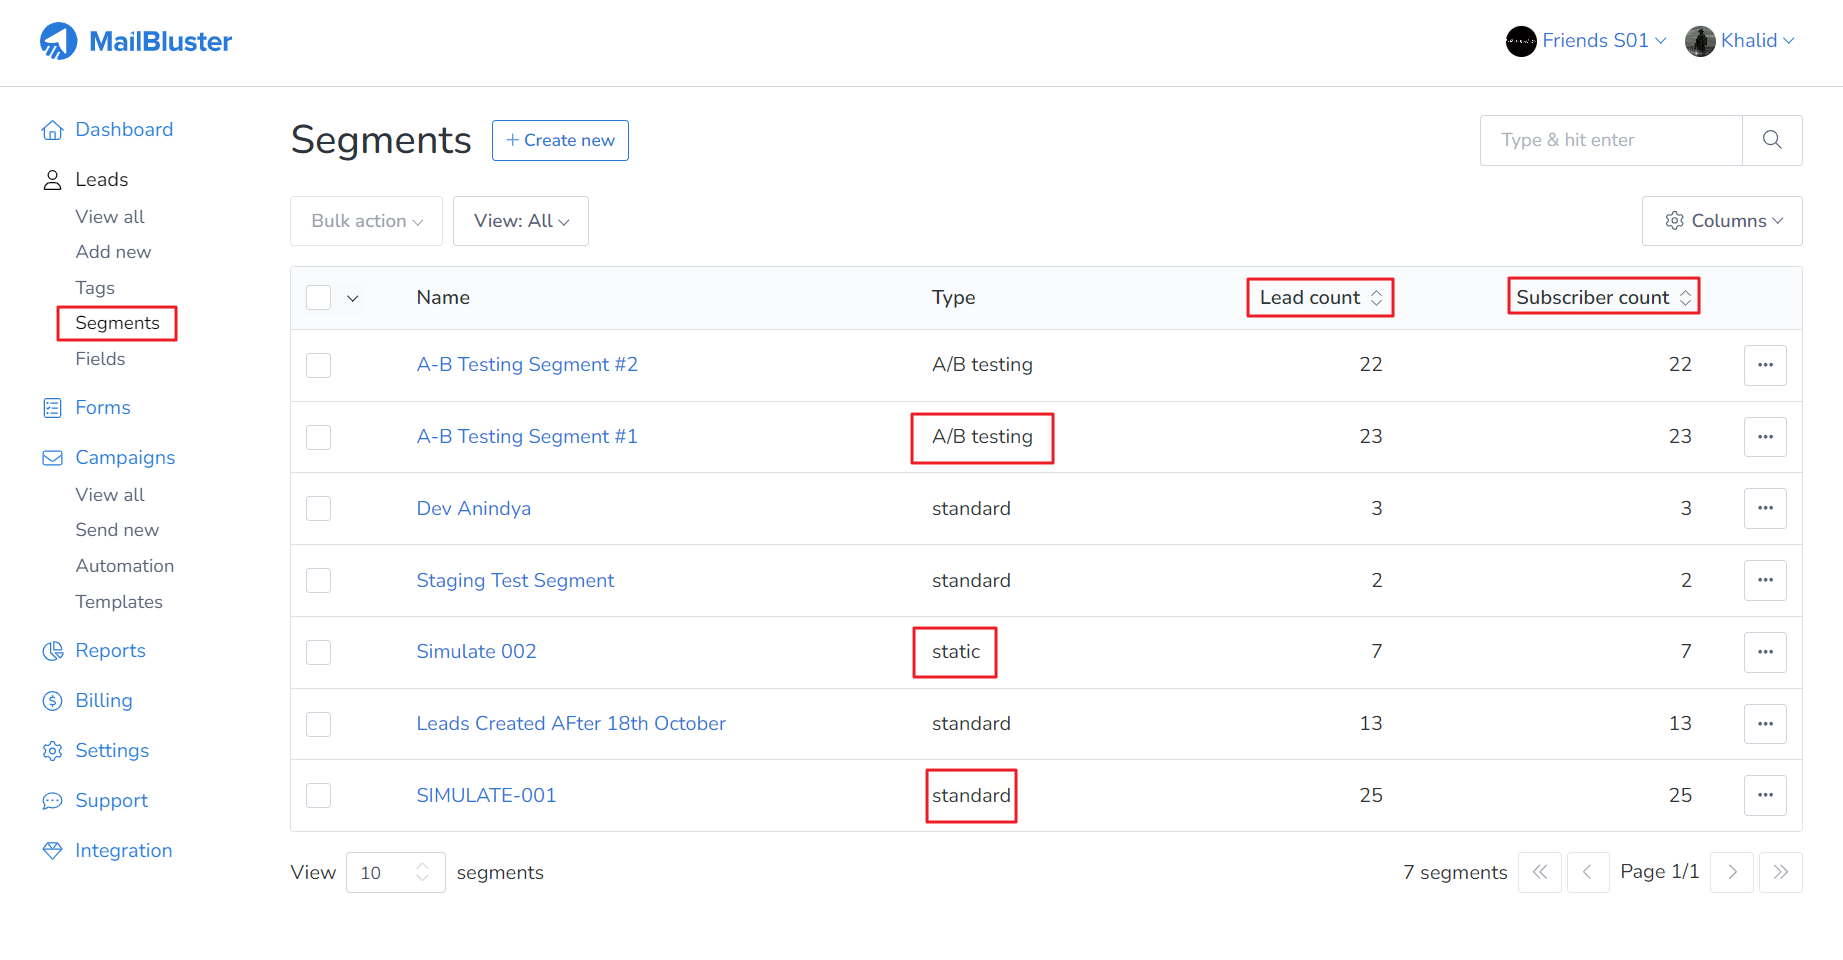
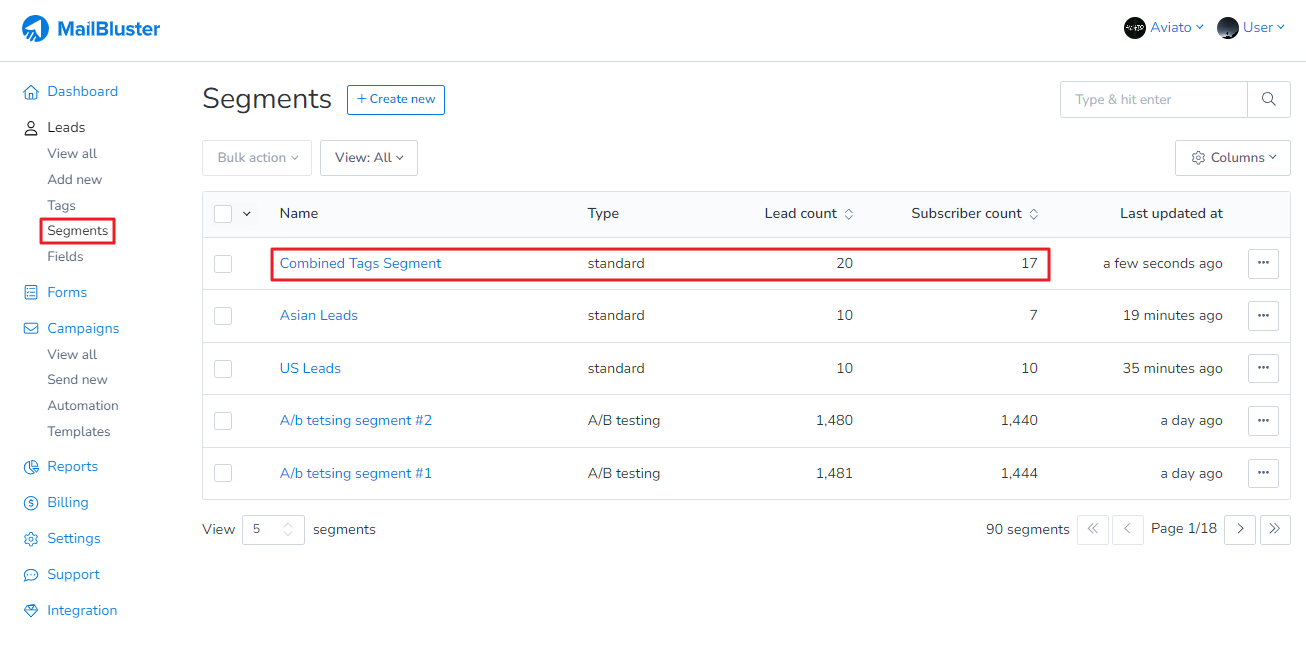
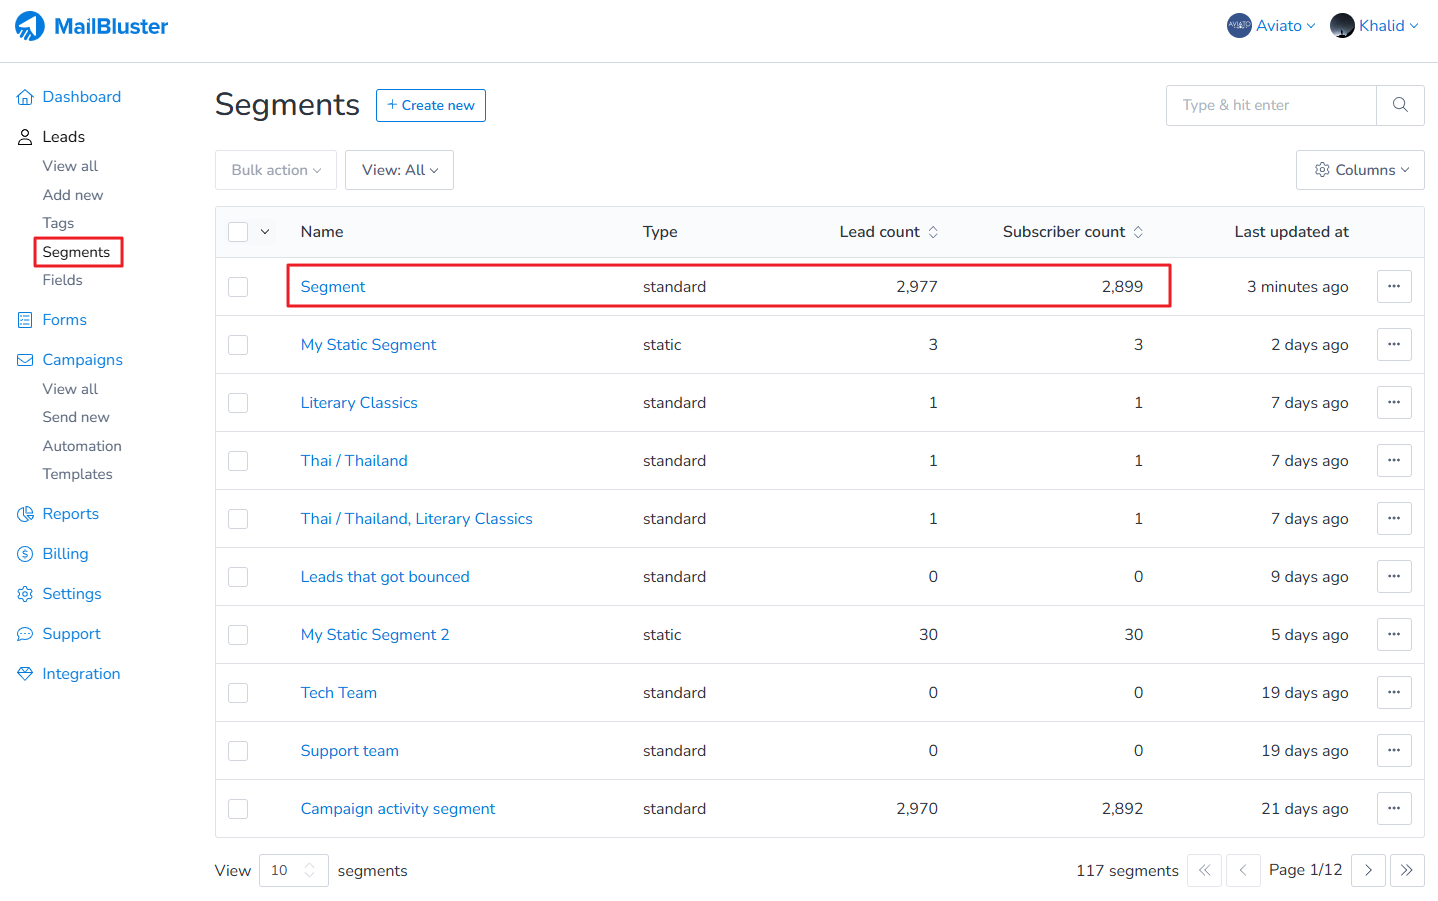
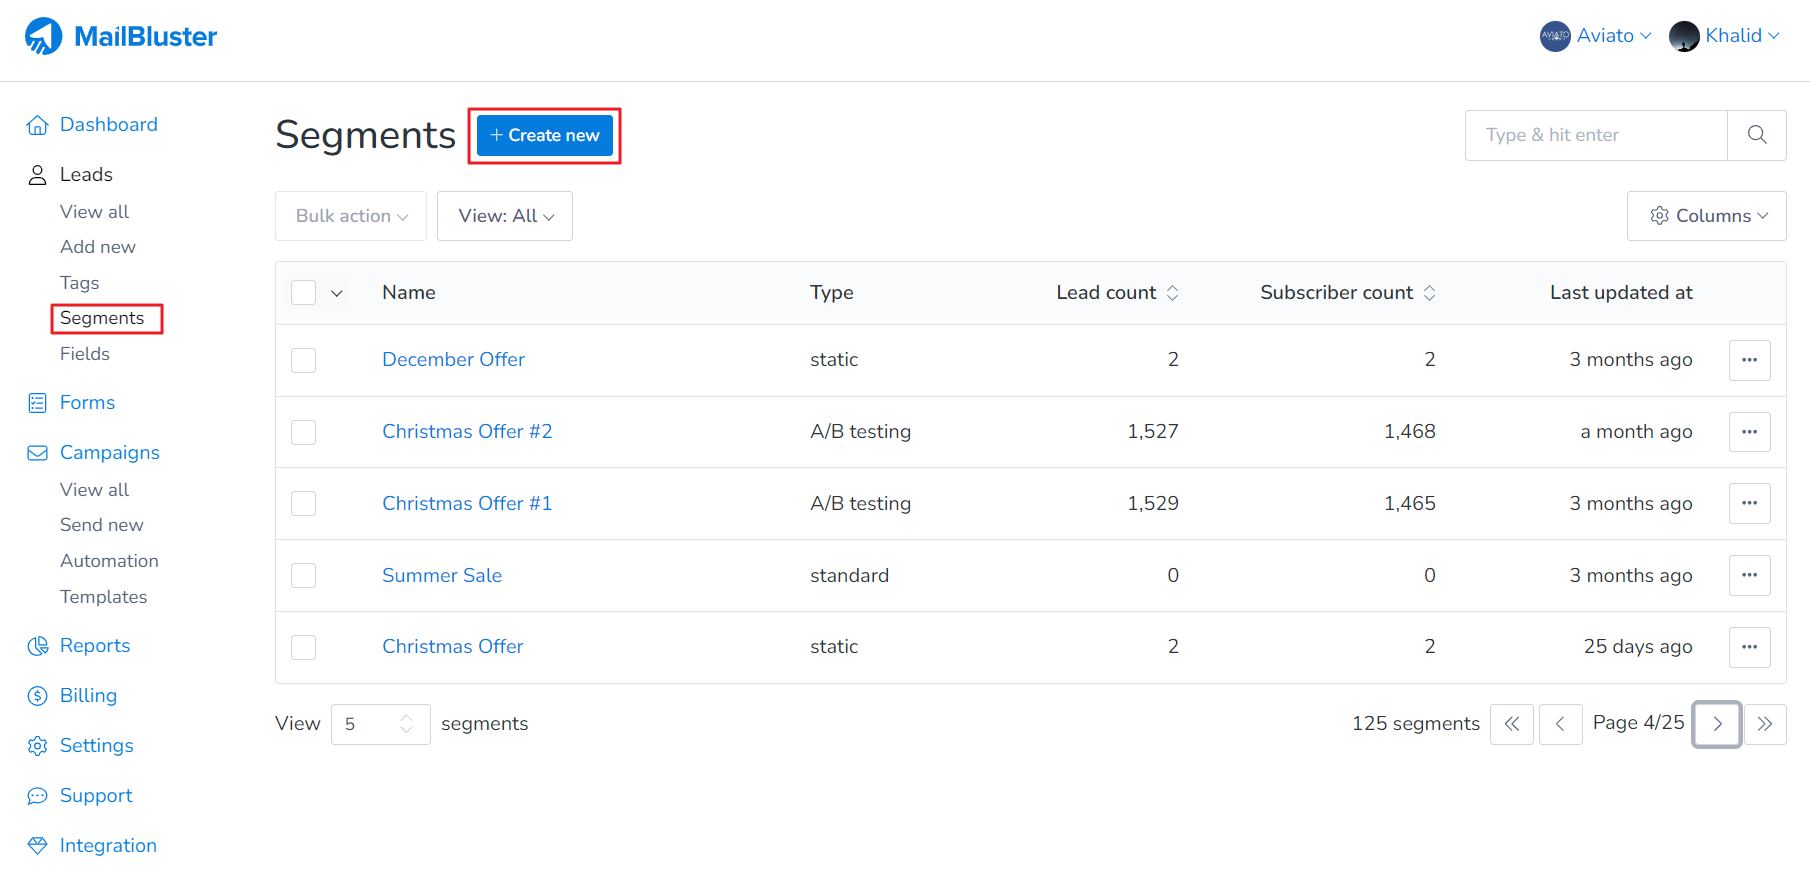
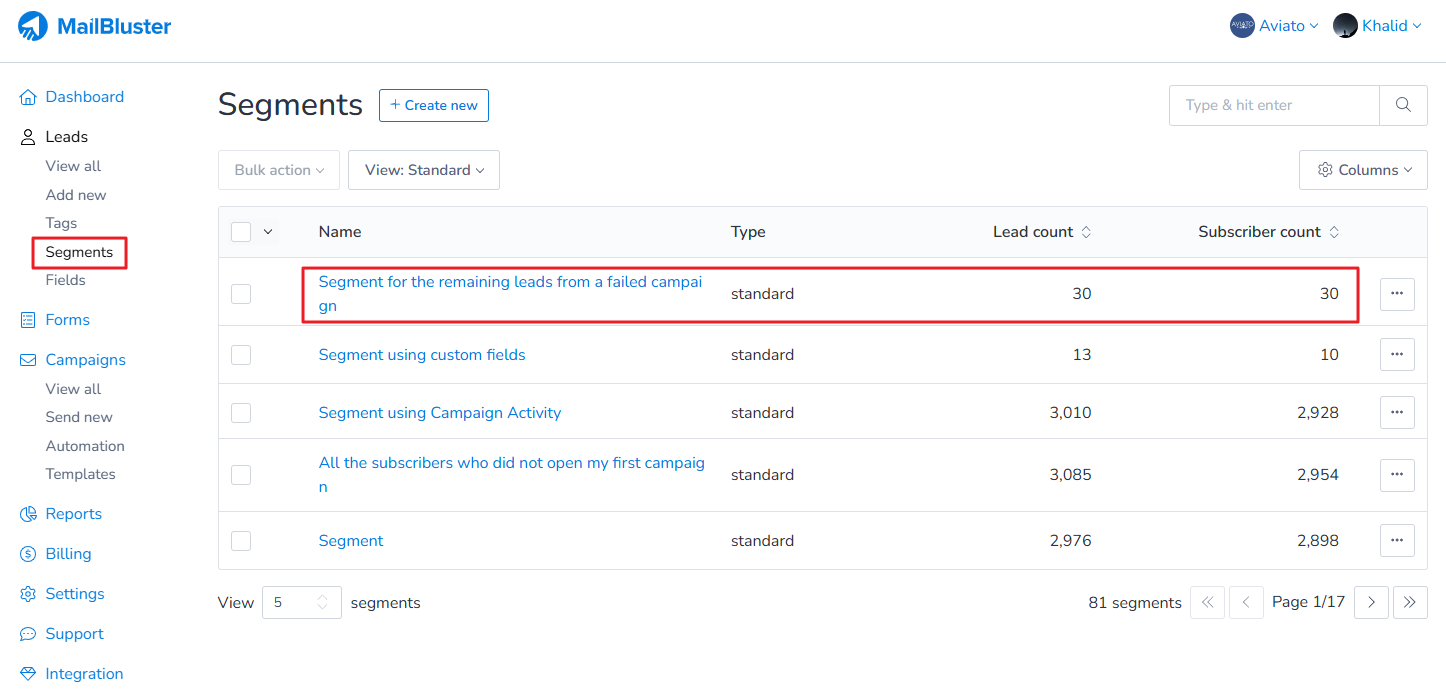
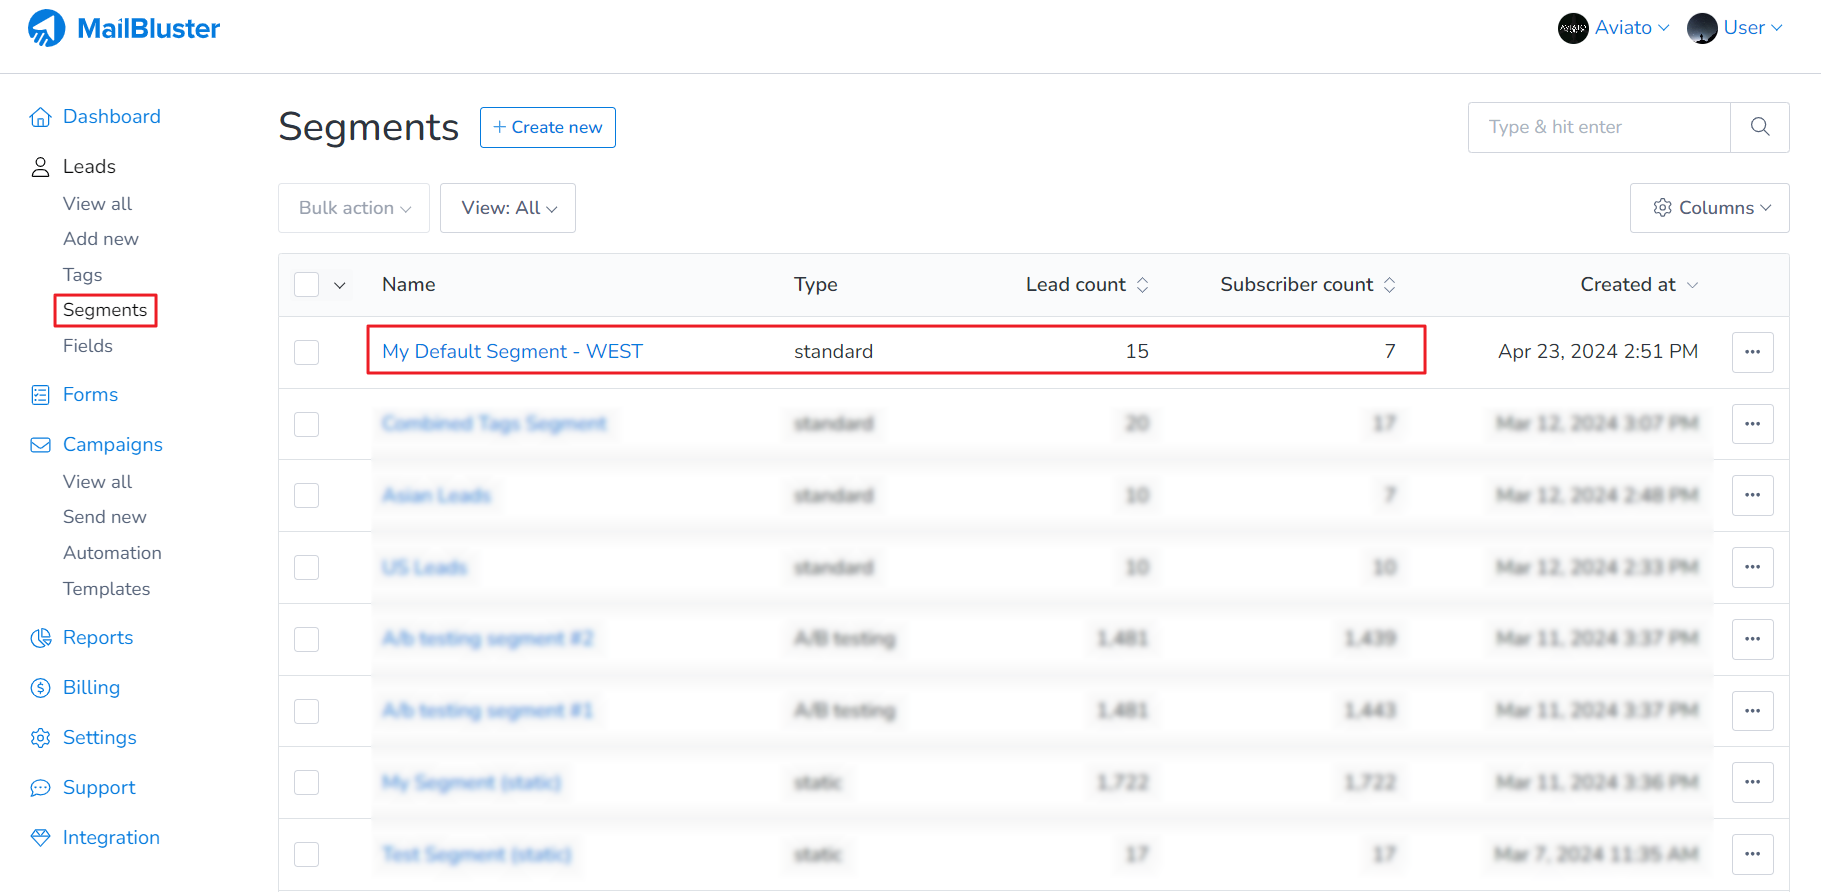
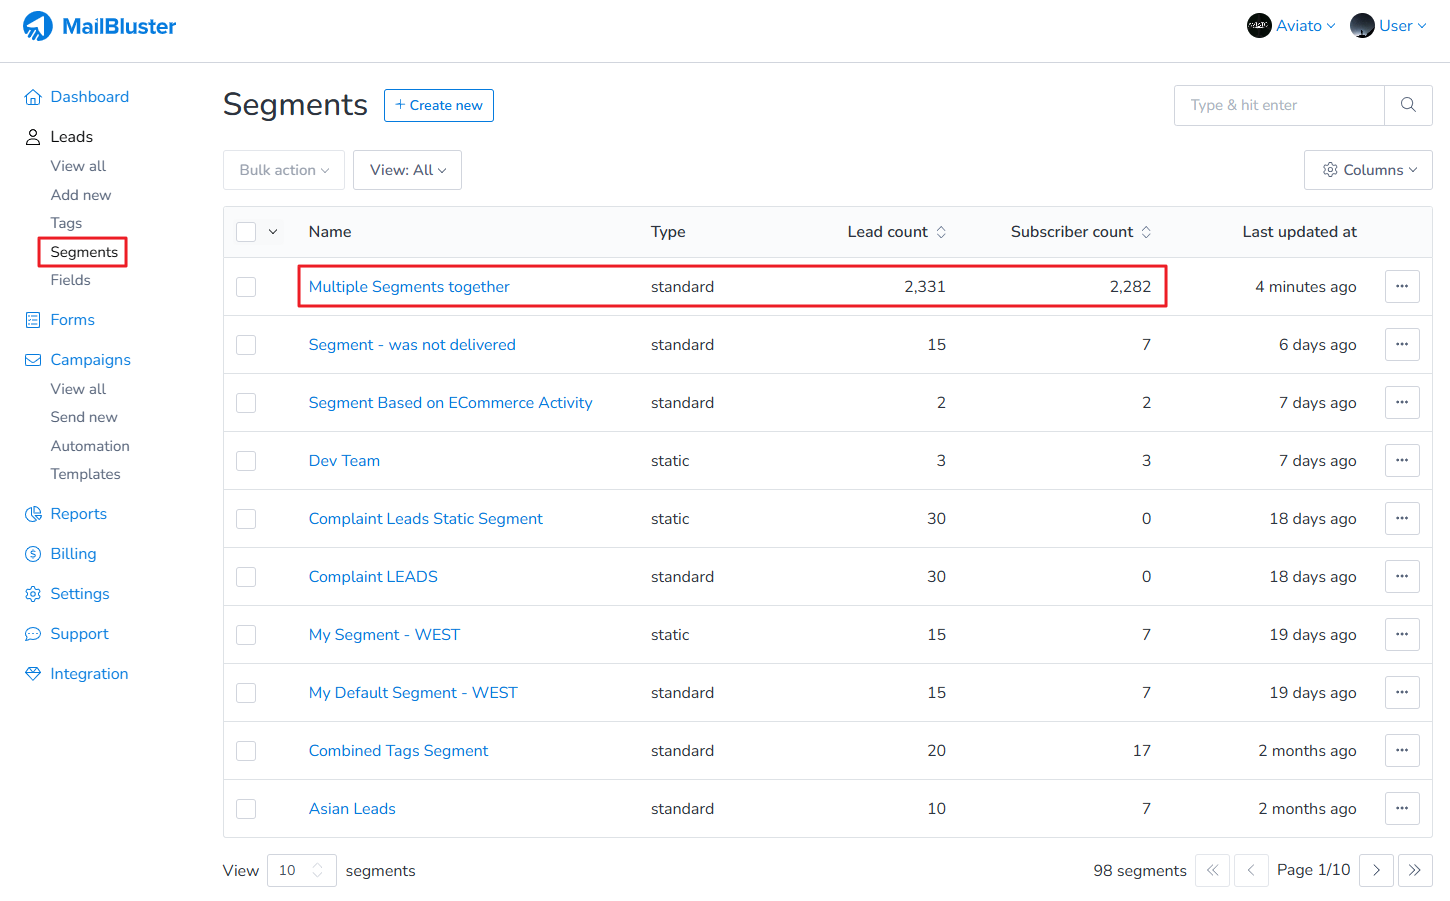
Lead Count is actually the total number of leads inside the particular segment, where as Subscriber Count is the total number of leads that are subscribed/registered to your Brand.
The following shows Lead count and Subscriber count for Standard segment, A/B testing segment andStatic segment.
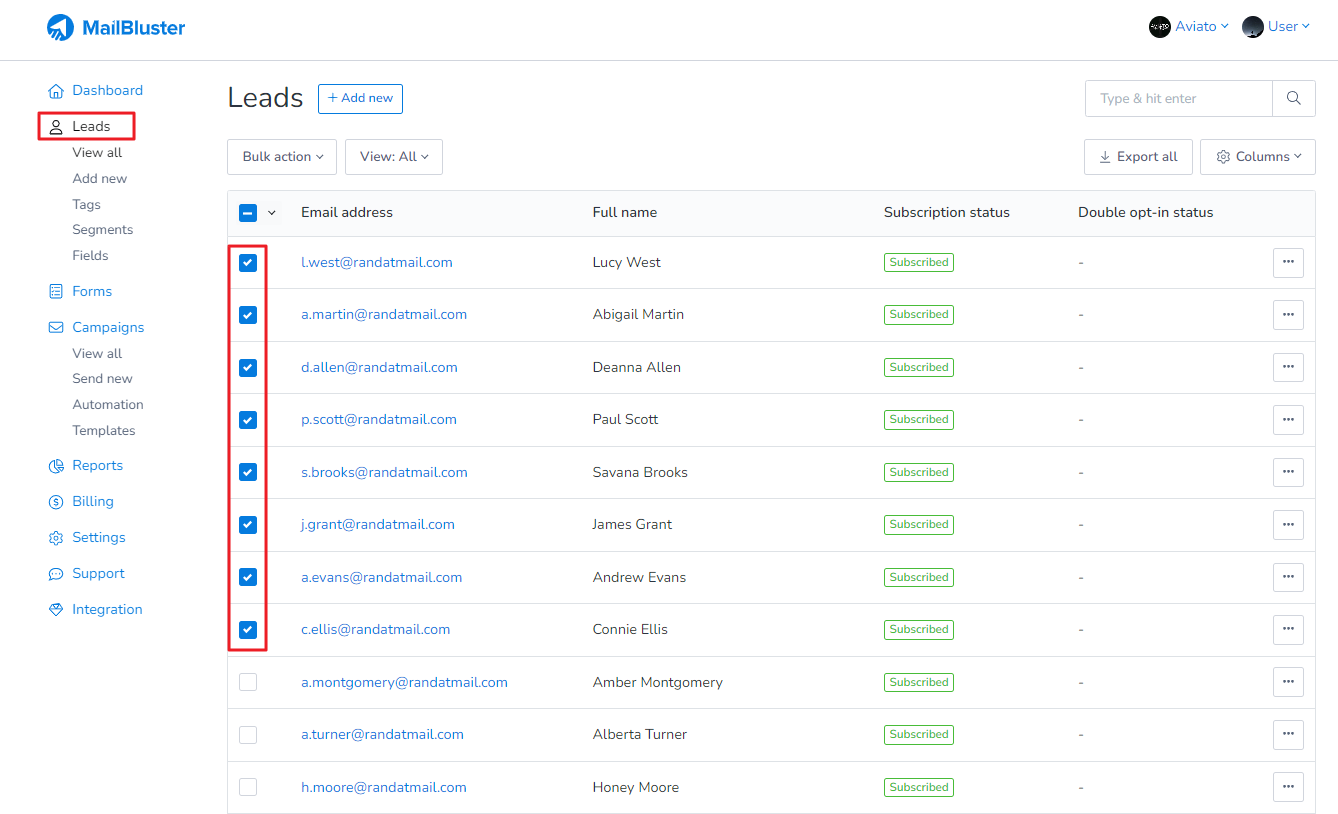
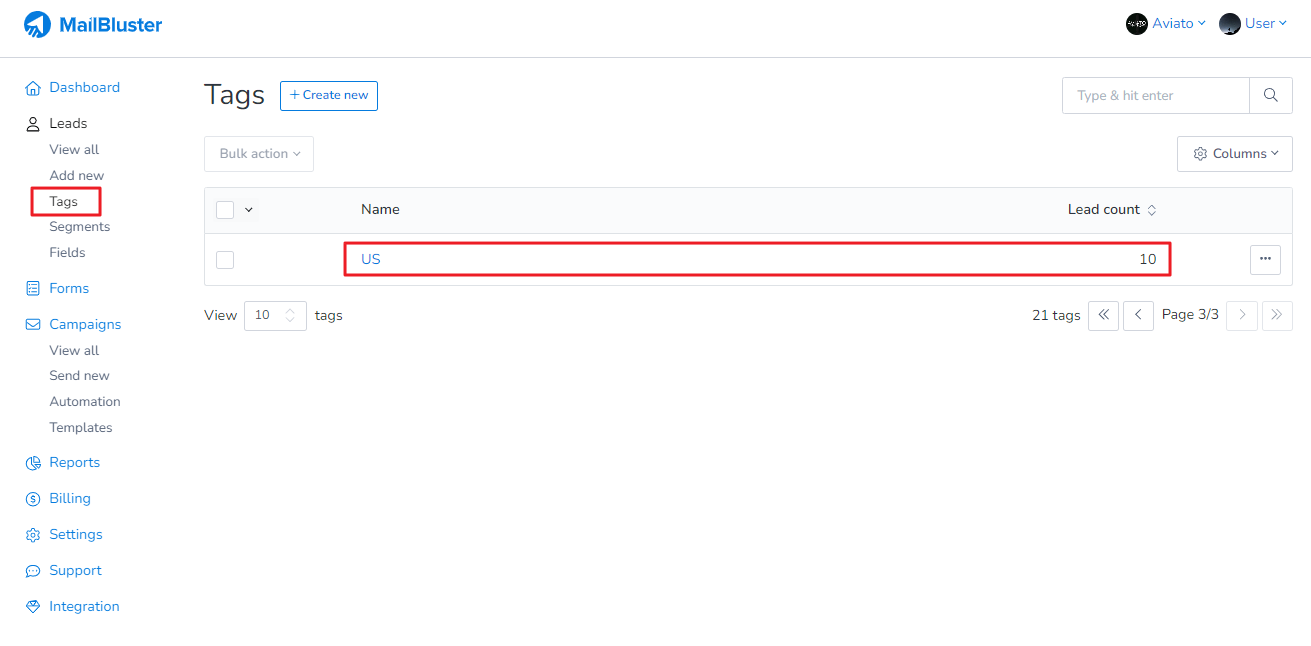
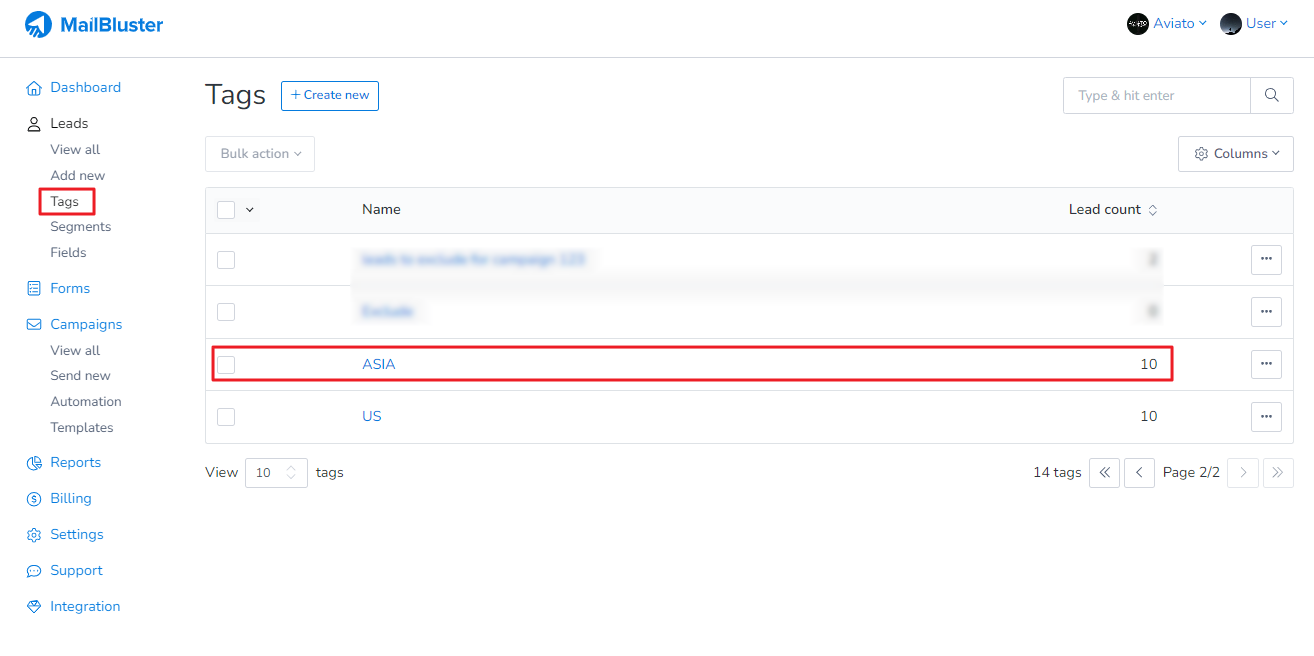
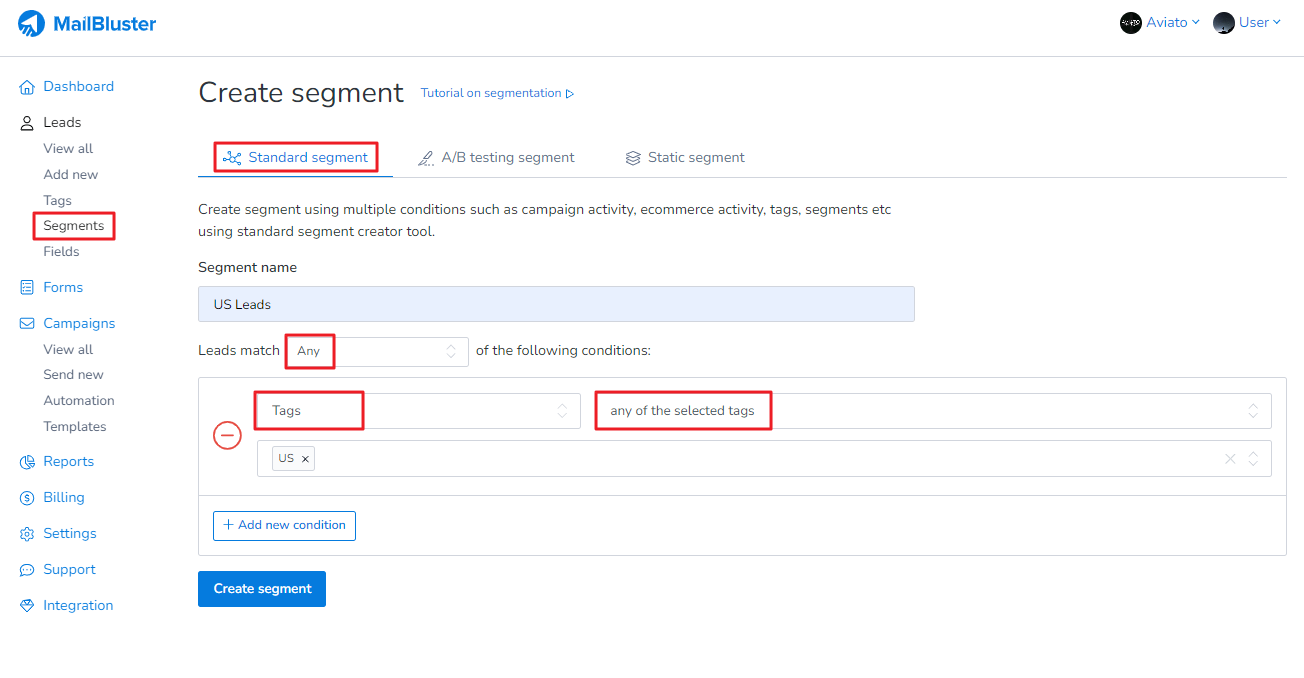
Here you will learn how you can segment leads based on tags in MailBluster. Suppose you have Leads from “US” and leads from “ASIA”. You can create TAGS with their respective location name or import leads based on each location.
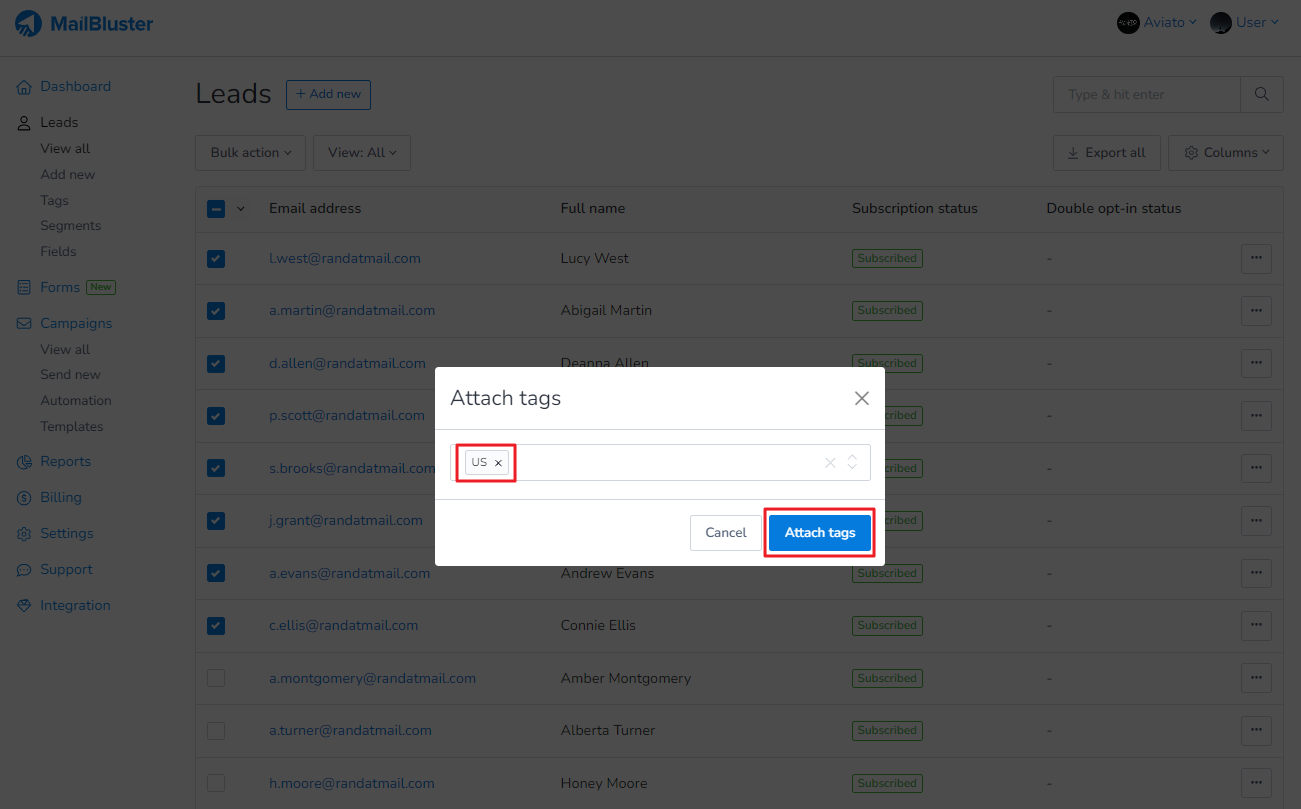
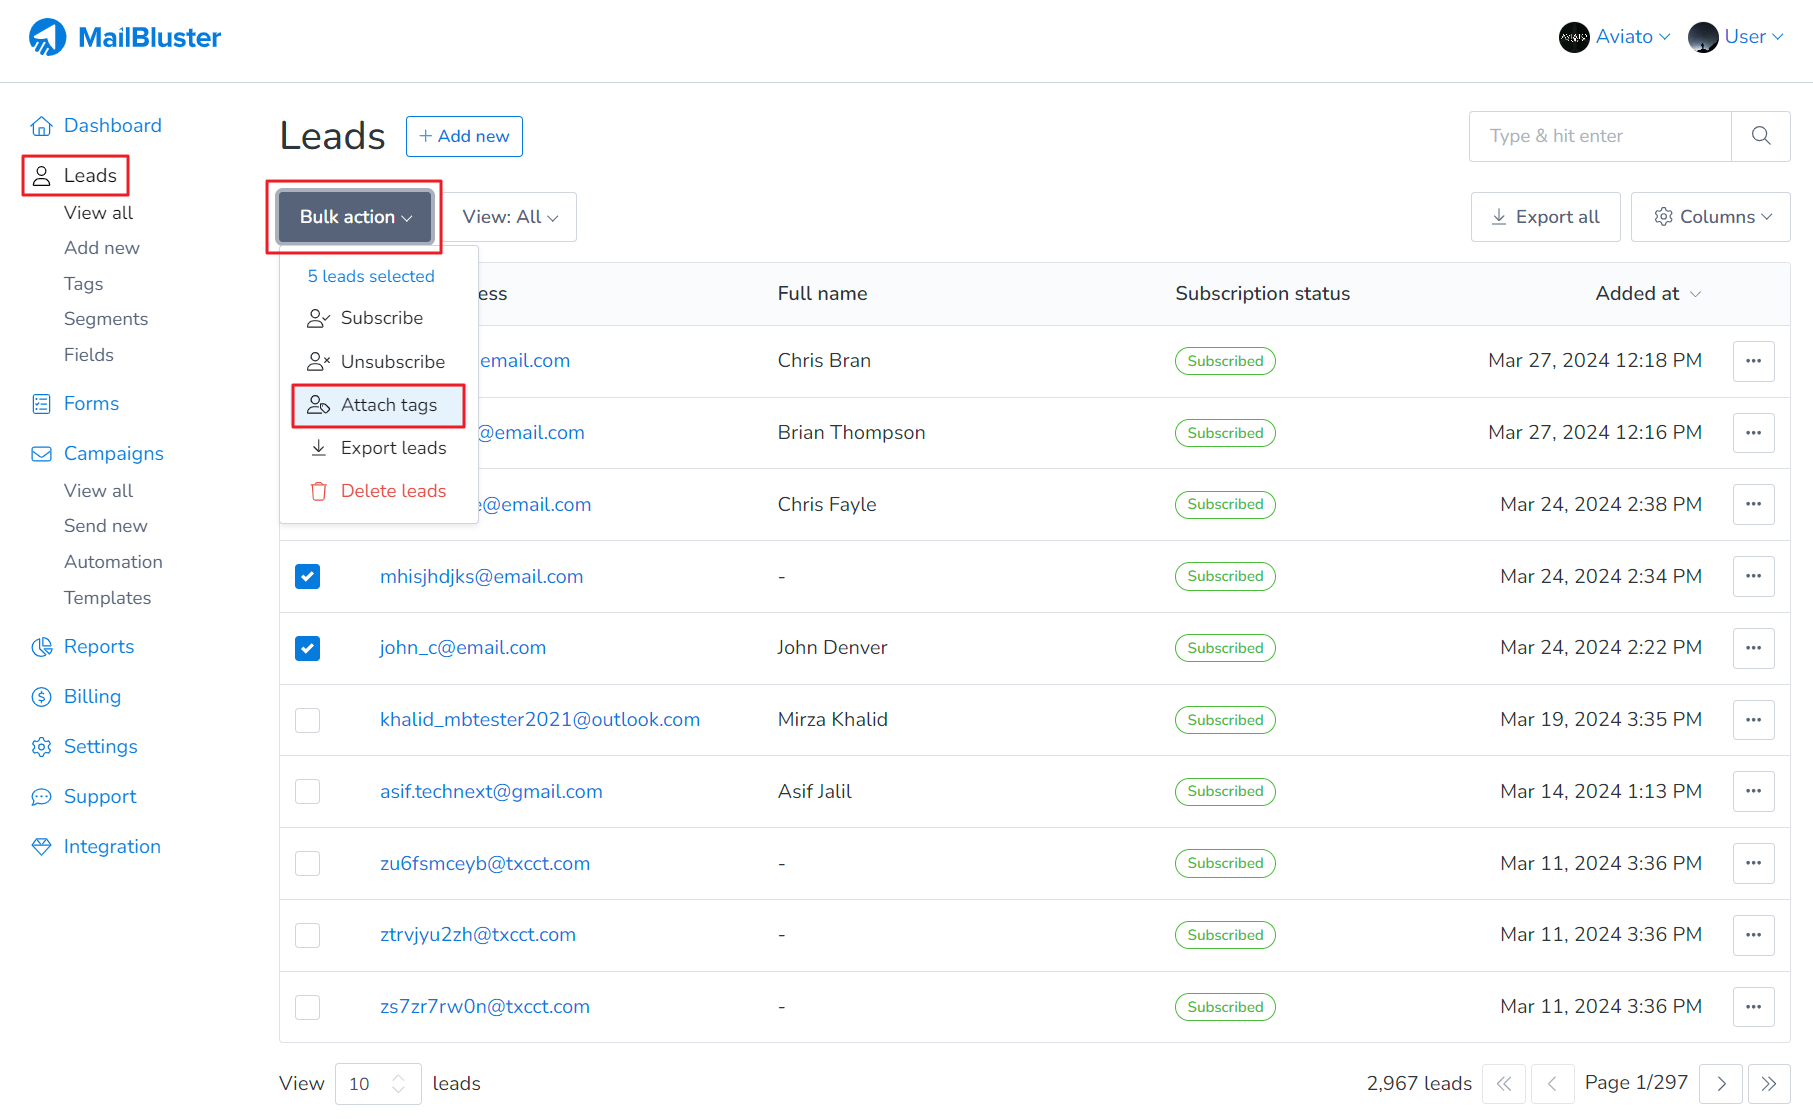
Here we have selected some leads and assigned them the TAG “US” as shown in the following screenshots.
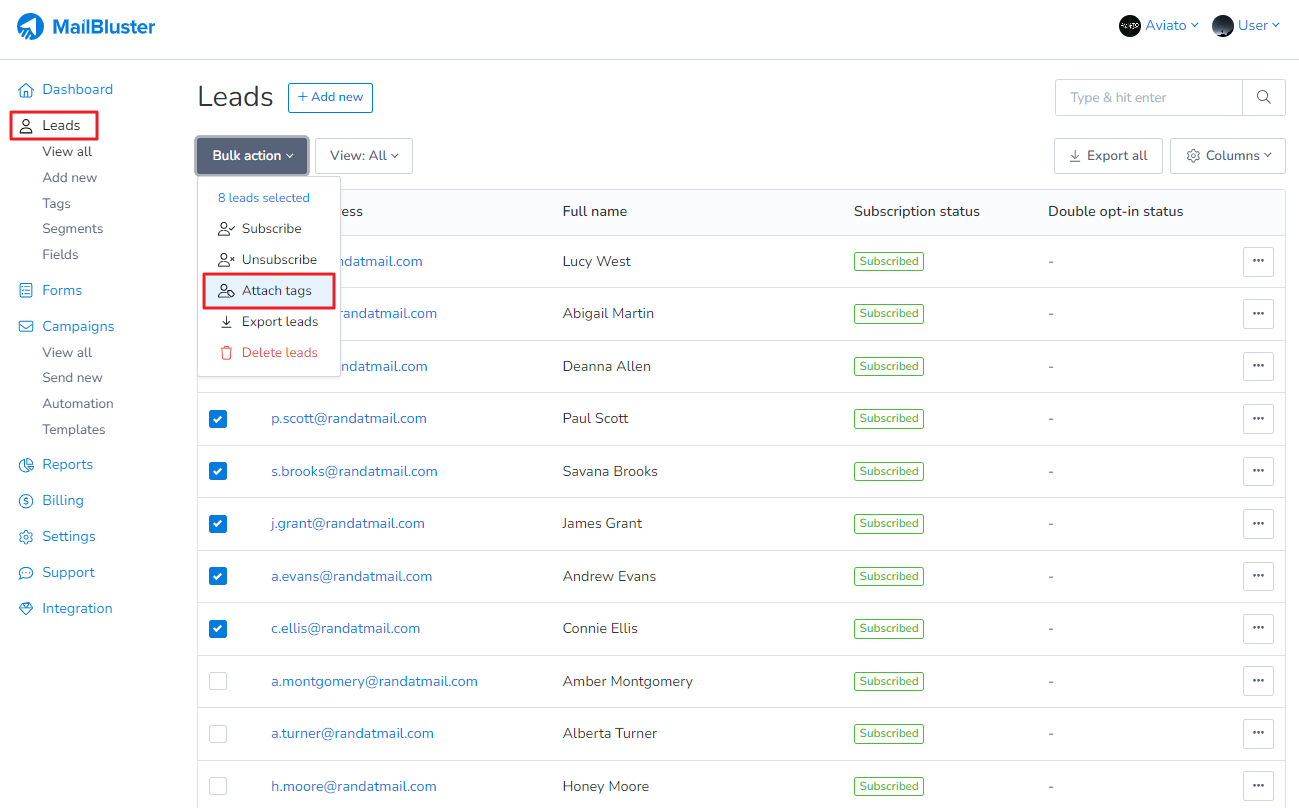
Click on Bulk action > Attach tags.
Select the already created tag “US” when Attach tags window pops up, click Attach tags.
The selected leads are now assigned to the tag “US”
Similarly we have created another tag “ASIA” for selected leads.
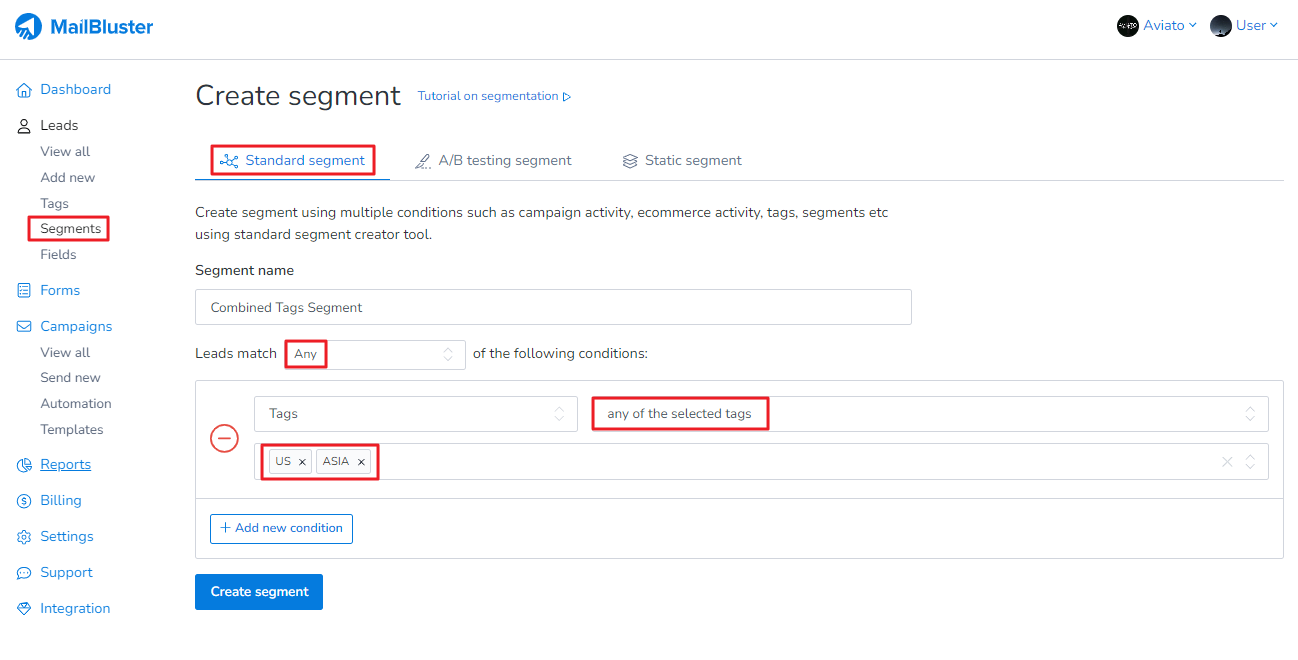
We have just completed bulk assigning Tags to our leads. Now, we can create Standard Segment from these Tags.
Go to Segments > Create new.
Select Standard Segment and use the following conditions shown below.
To clarify your understanding, I want to mention these:
All means: Common leads of the selected tags (intersection). Any means: Both common and uncommon leads of any of the selected tags (union). None means: No leads of the selected tags (Not).
Select multiple Tags “US” and “ASIA” which we have created earlier.
Click on Create segment and your Combined Tags Segment will be created which we will used in our campaign.
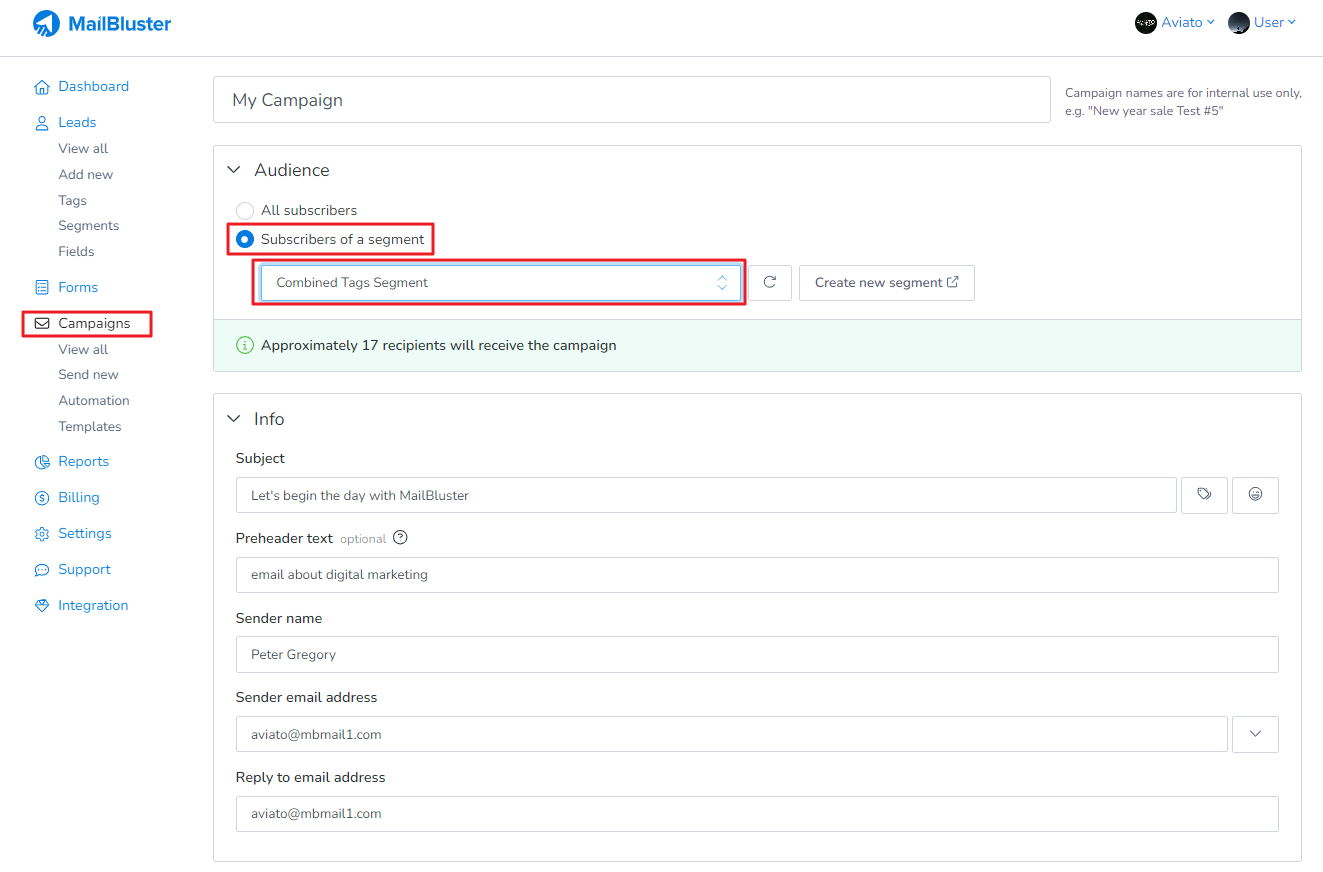
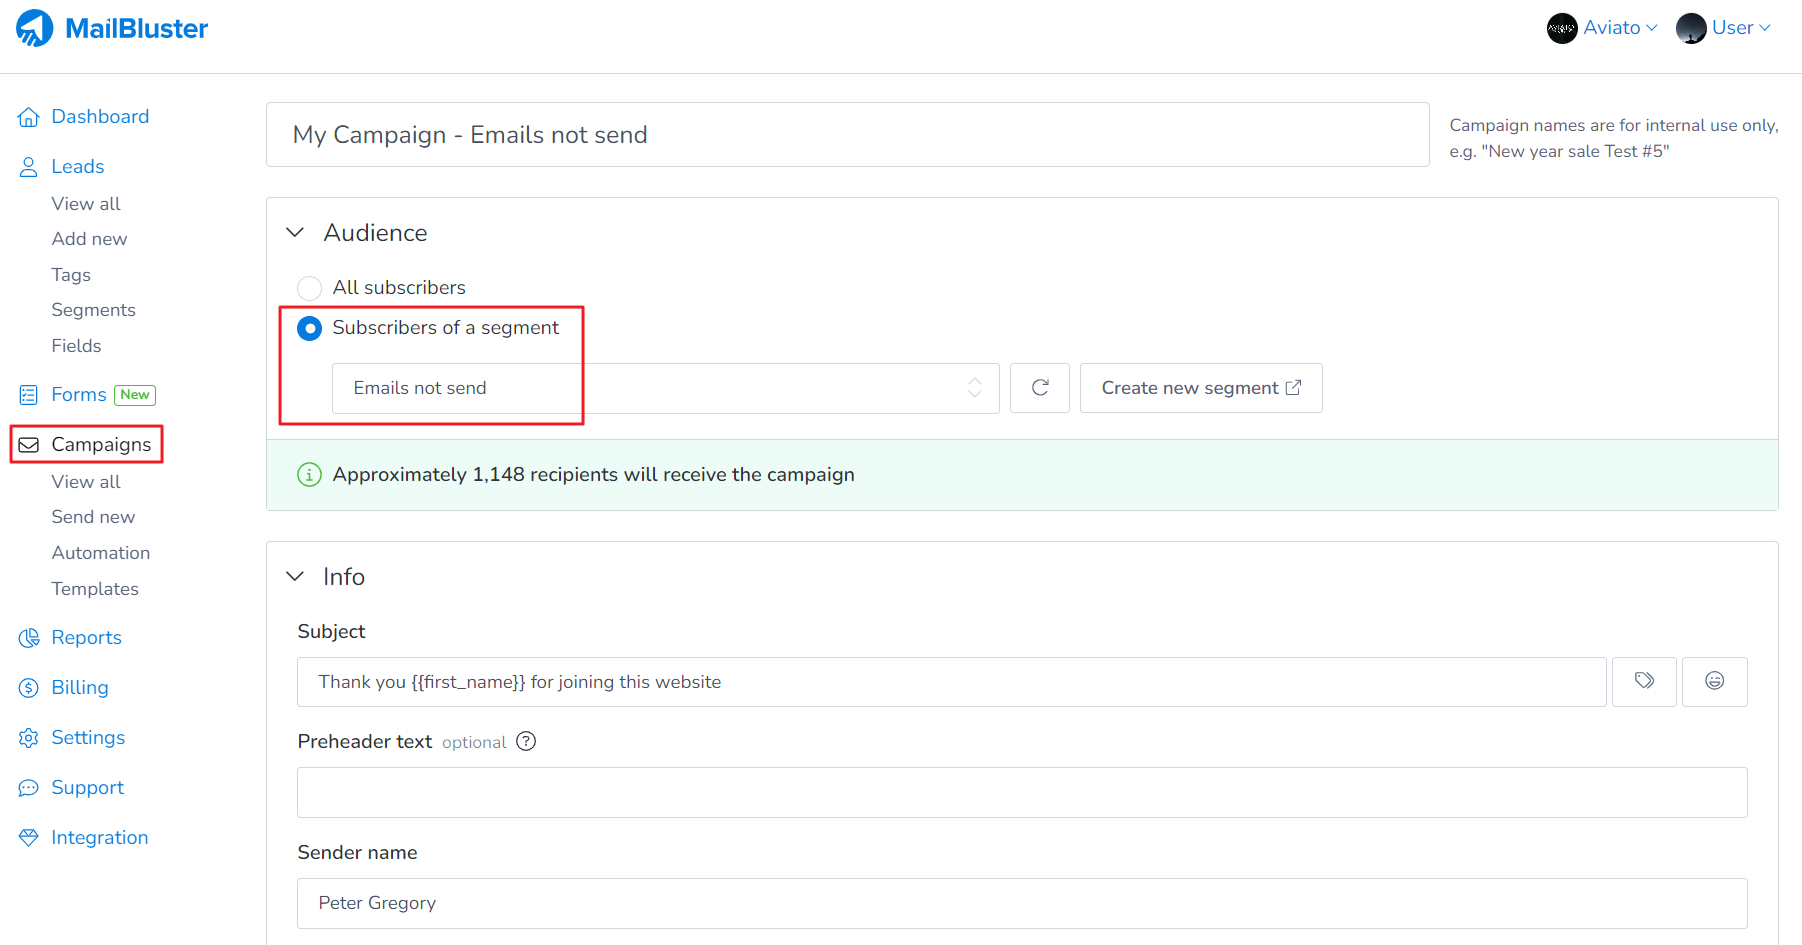
Now go to Campaigns and click Create new. In the Audience section, select Subscribers of a segment. And then select the segment we have just created “Combined Tags Segment.”
This is how you will segment leads based on Tags and send campaigns to those specific segments.
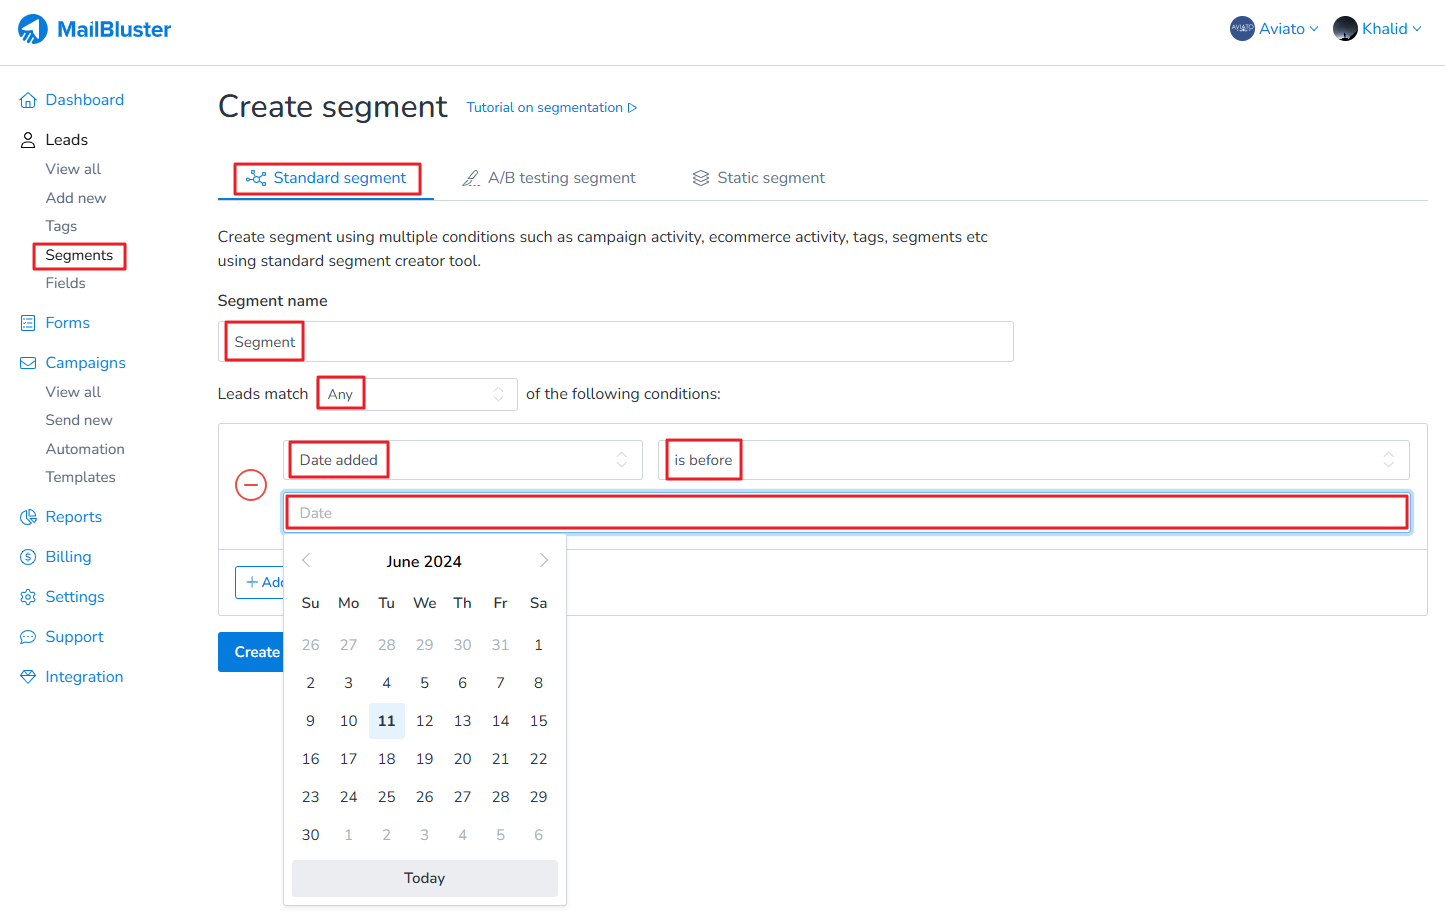
Here you will learn to create a segment leads based on date added, you need to use Standard Segment. First go to your Brand > Segments > Standard segment. Then enter Segment name, Leads match to Any. Select Date added and then Operator to is before / is after / is between / is not between.
The following is a standard segment with Date added conditions.
Here is an example where we created a sample standard segment with the following conditions:
Leads match: any of the following conditions
Date added: is before
Then we selected a specific sample date.
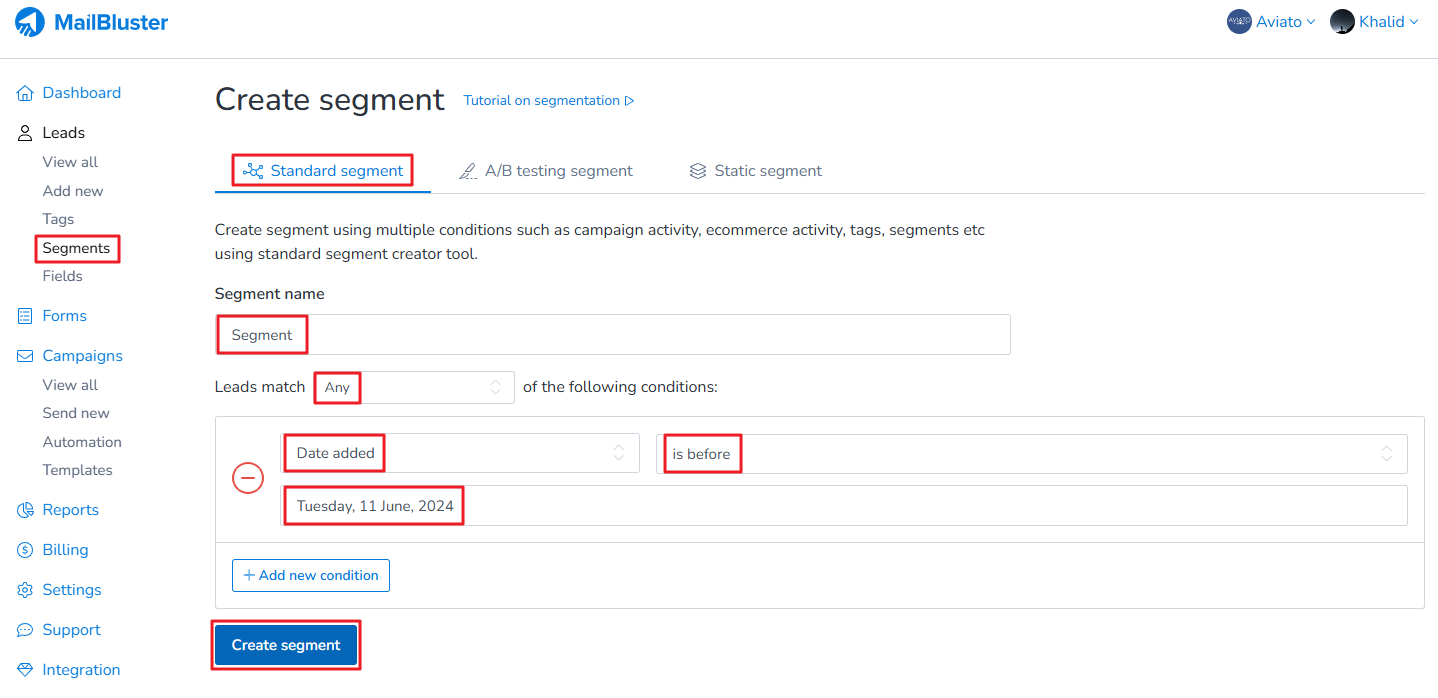
Once the conditions are set, we click on Create segment.
The following segment is created which shows all the leads that has been added before the following date.
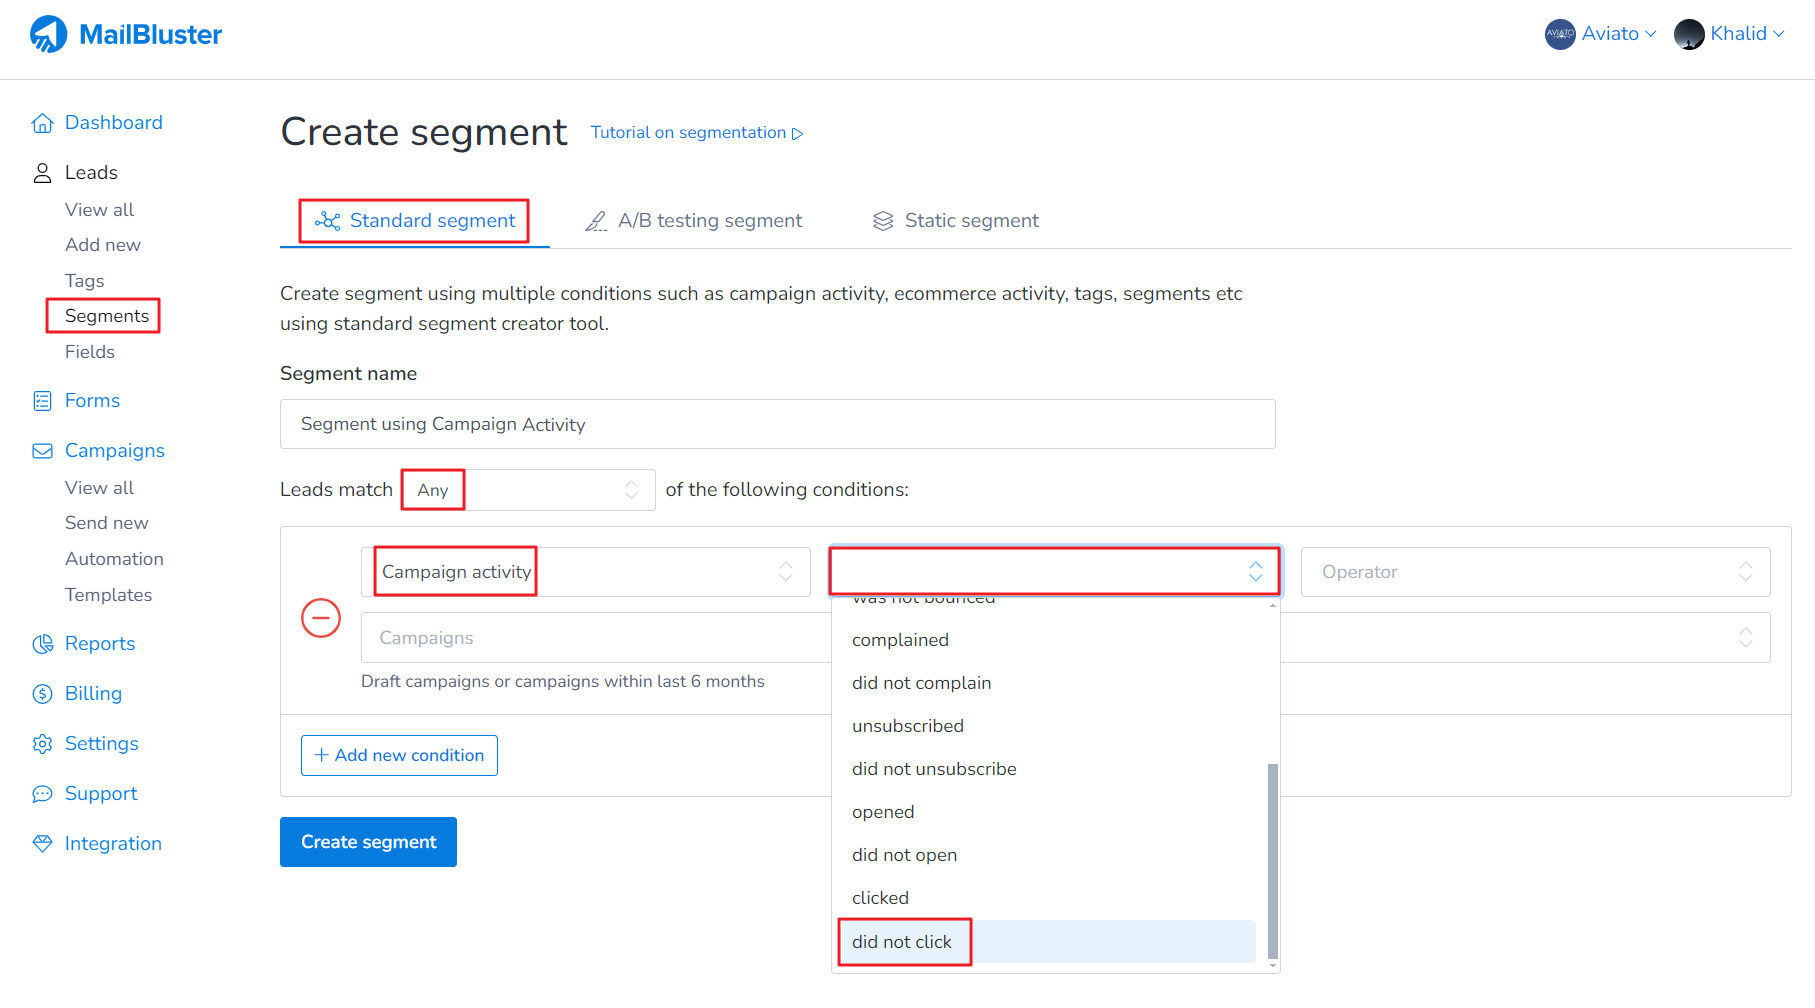
Here you will learn how to create a standard segment using campaign activity. First, you need go to Segments, then click on Create new.
Then select Standard segment, select Leads match conditions: Any/All/None which ever suits. Then select Campaign activity.
Select any of these conditions: was sent/was not sent/was delivered/was not delivered/was failed/was bounced/was not bounced/complained/did not complain/unsubscribed/did not unsubscribe/opened/did not open/clicked/did not click which suits your needs.
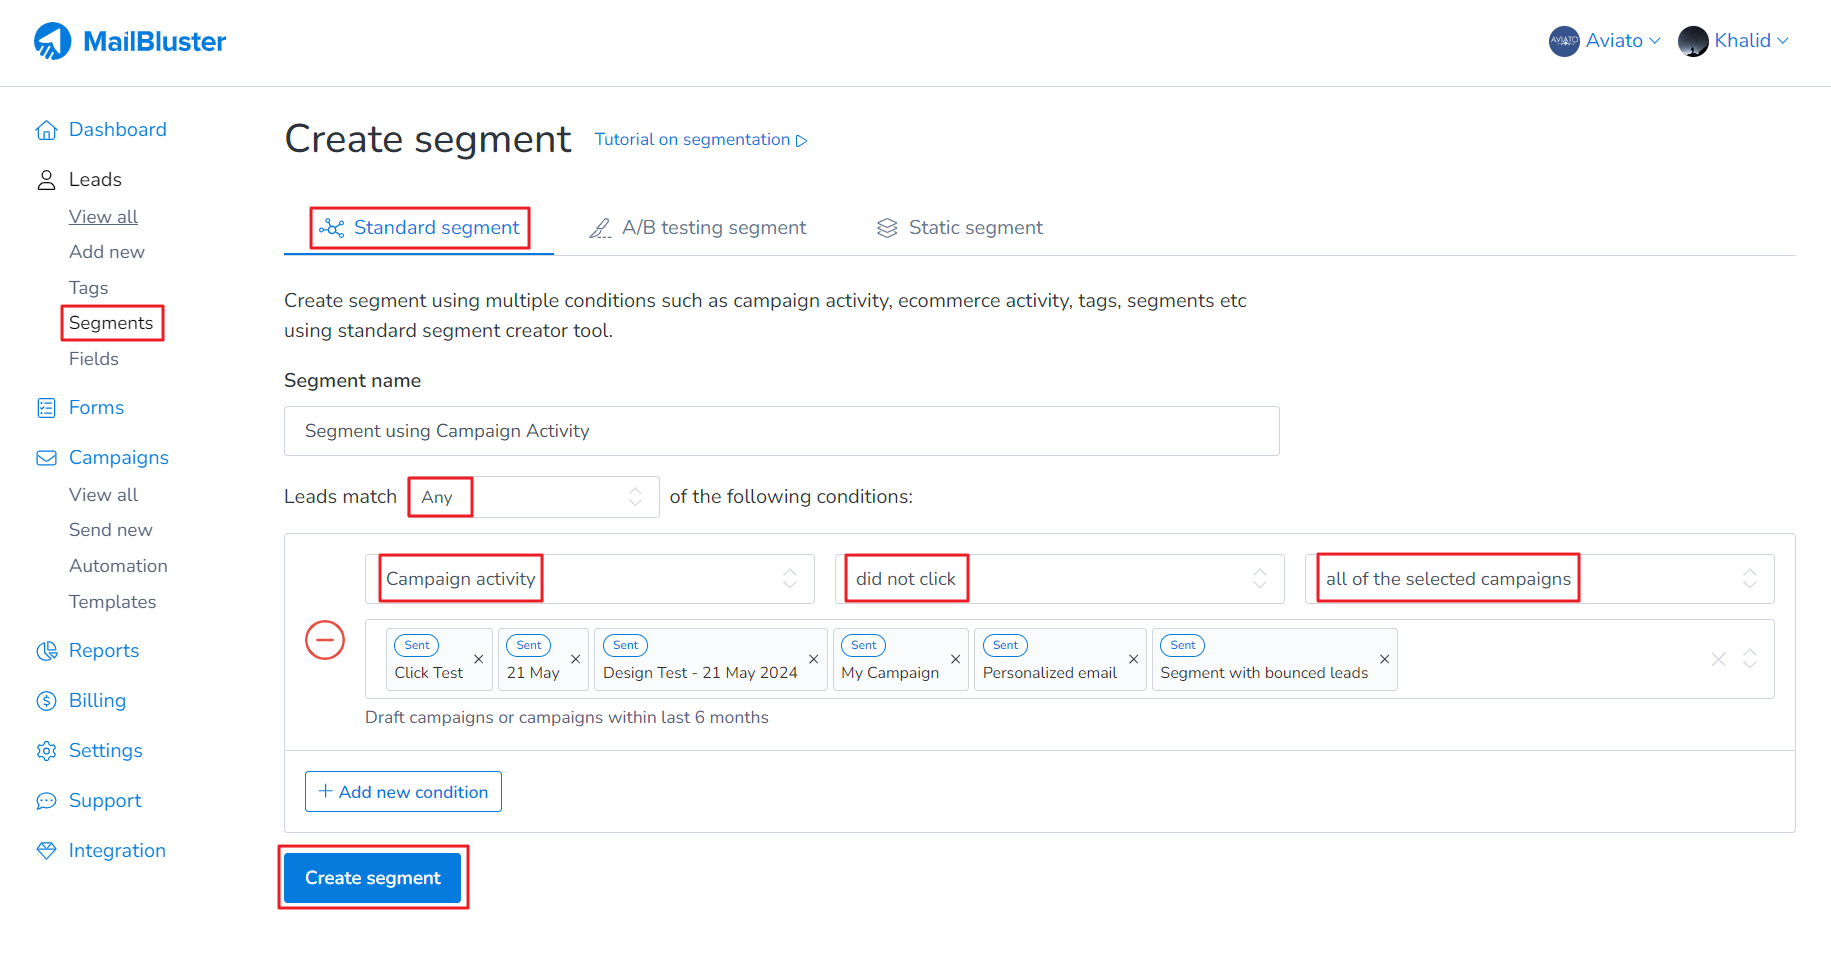
Select any of the options: any of the selected campaigns/all of the selected campaigns which suits you best. Then select the campaigns of your choice. Finally click on Create segment and you are done.
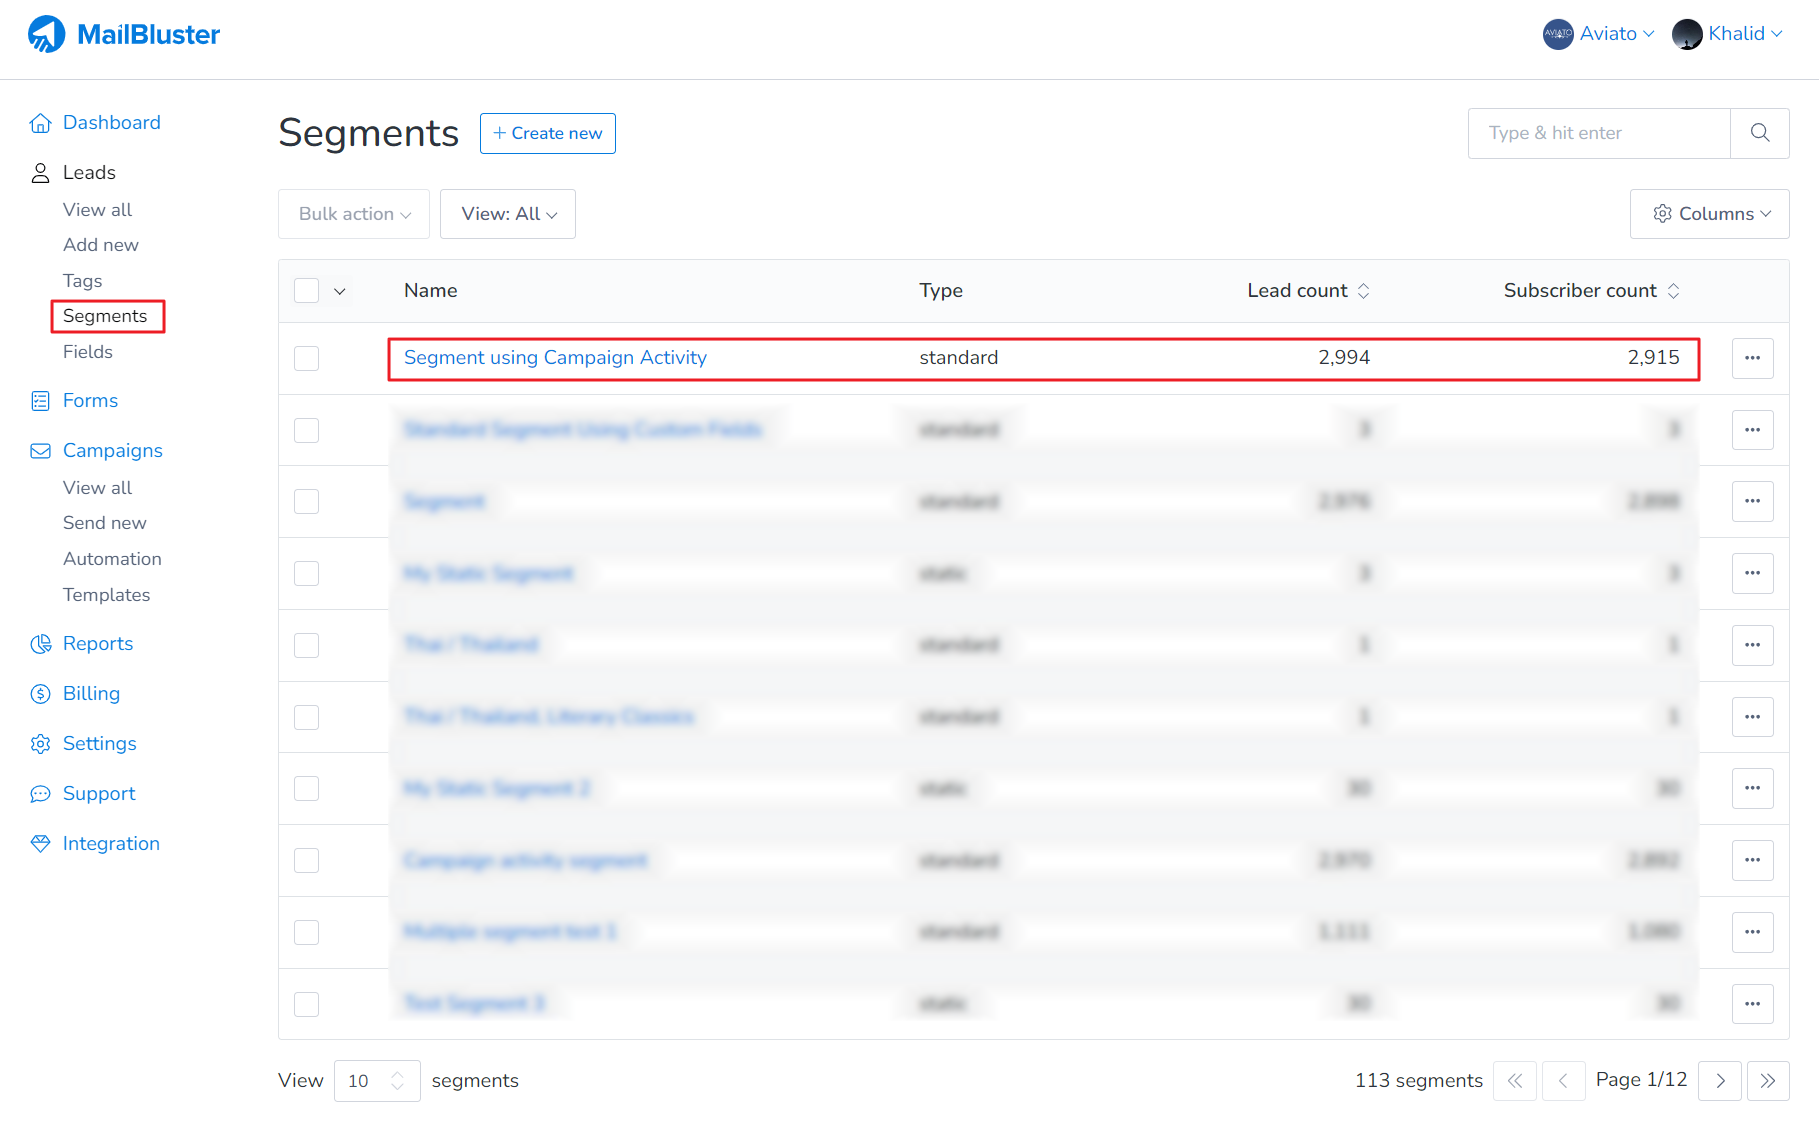
Your standard segment using Campaign Activity will be created showing the total Lead count and total Subscriber count.
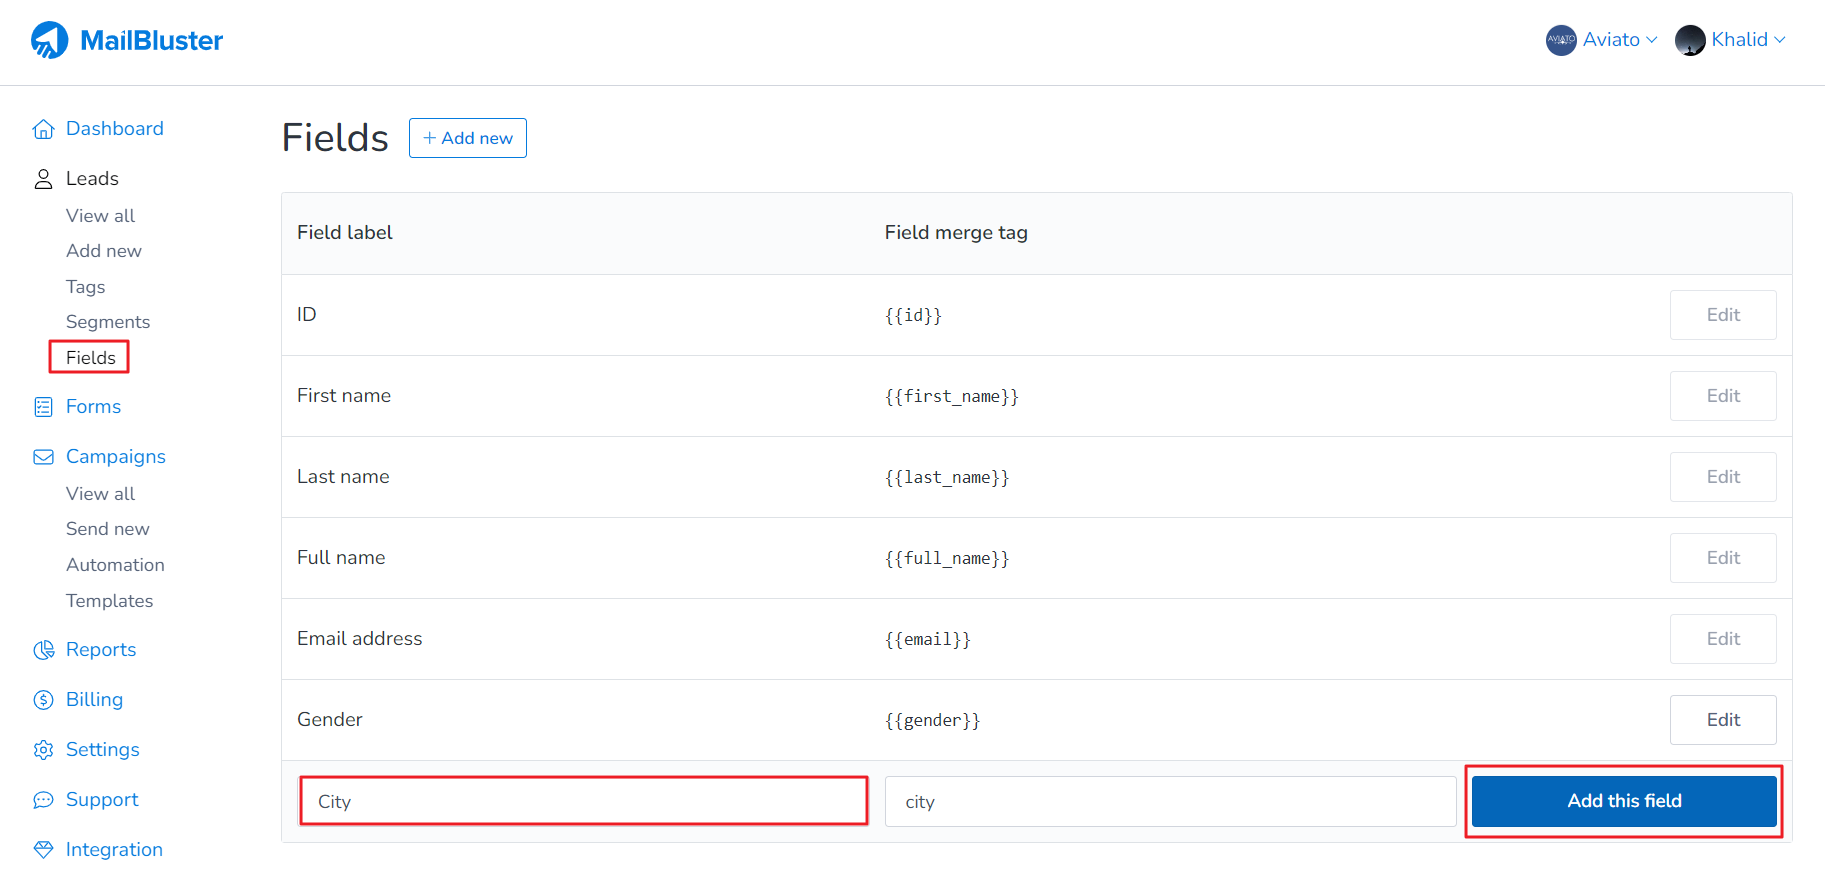
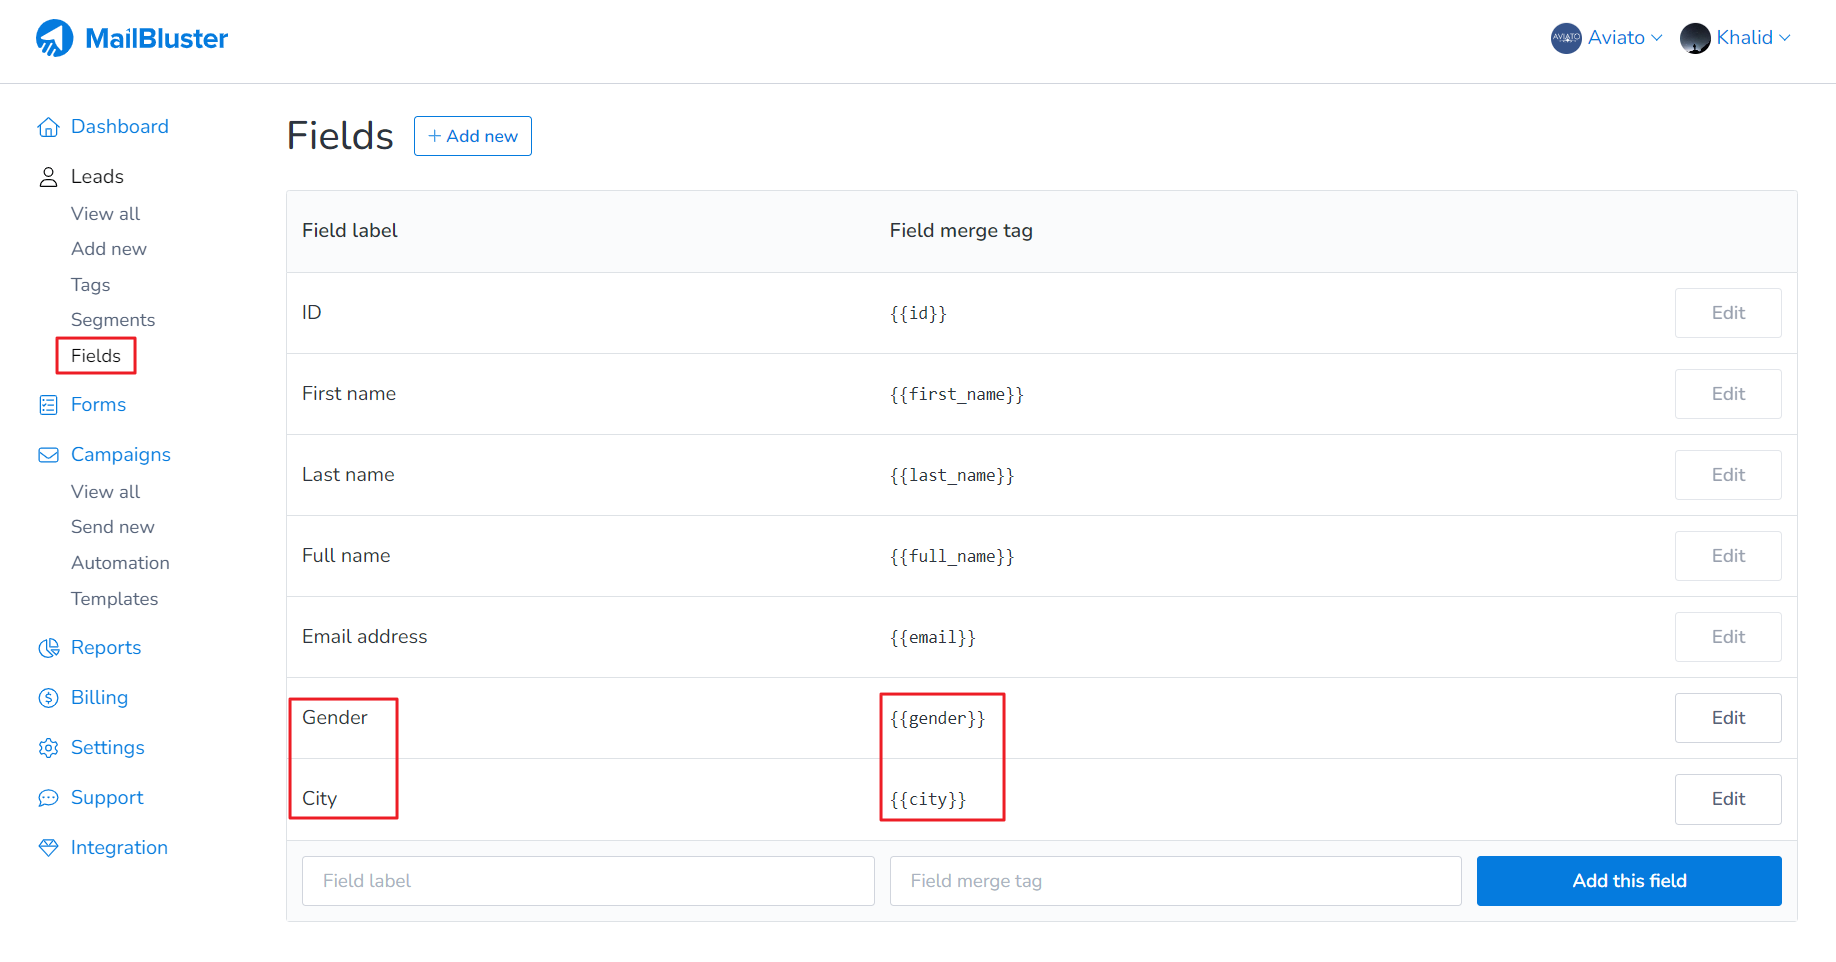
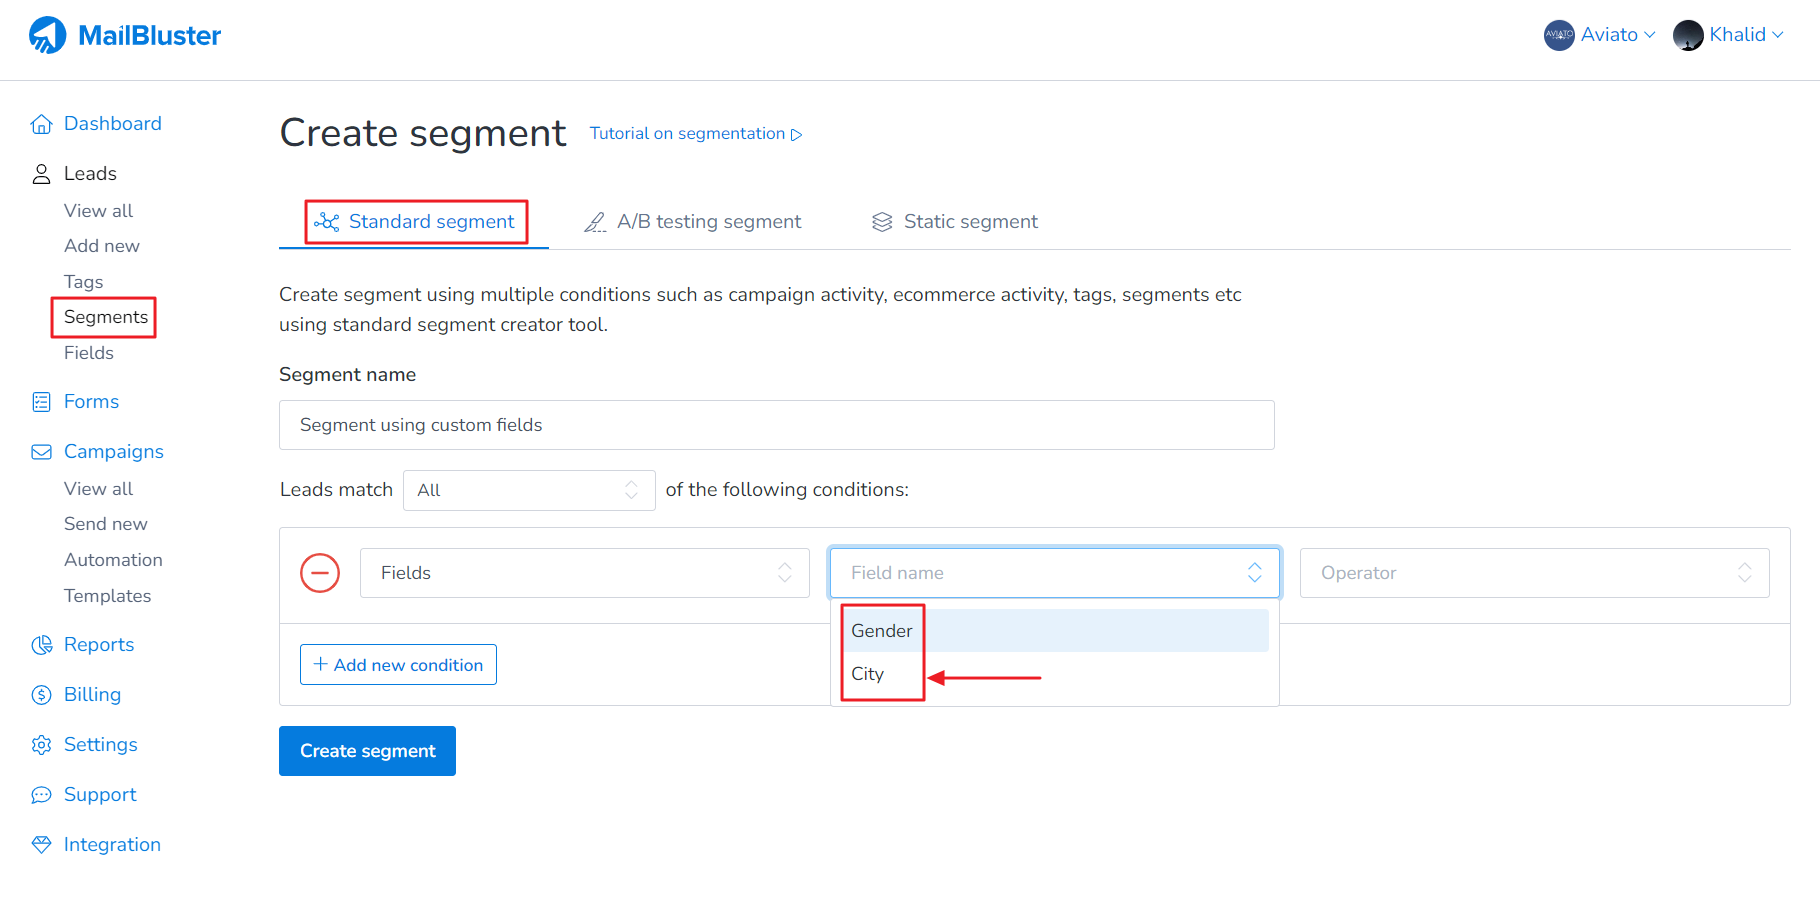
Before creating standard segment using custom fields, you need to check whether there are custom fields present in Fields under Leads. If not, then you need to create one as shown below.
Here, two custom fields are present here highlighted as highlighted. One is created earlier and the other one created just now. If you are under Pro plan of MailBluster, you can unlimited create custom fields.
Now go to Segments, and click on Create new.
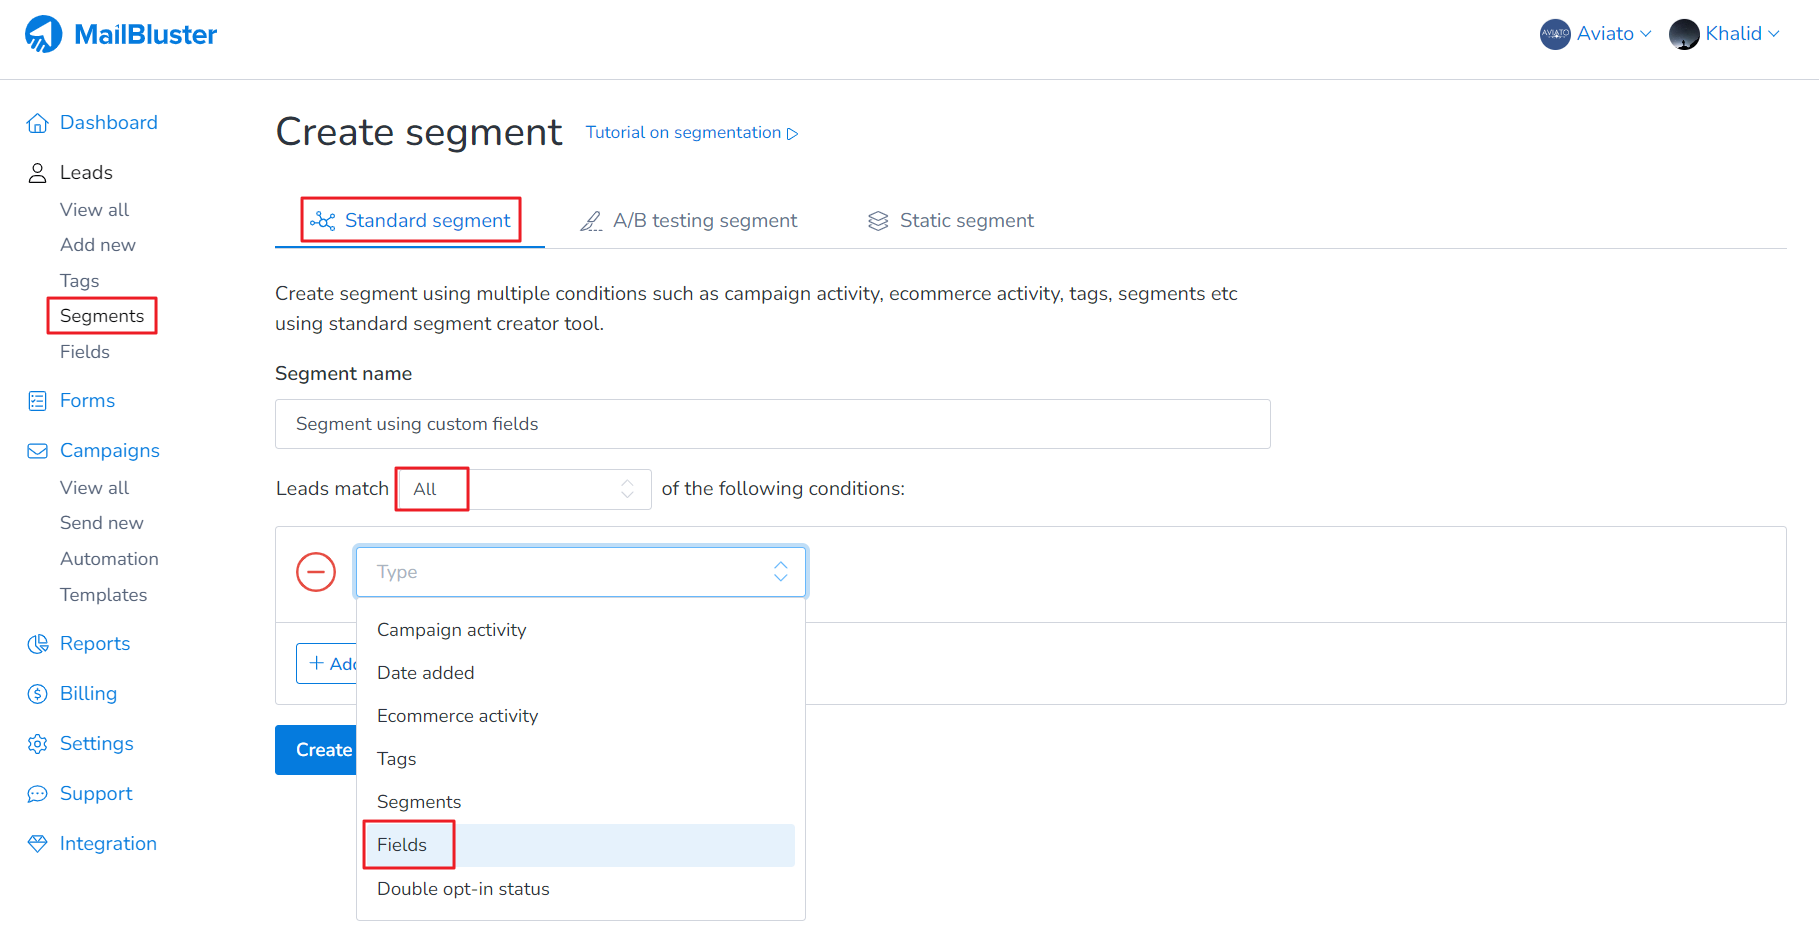
Select Standard segment, then click on Leads match All/Any/None of the following conditions whichever suits you best. Now select Type as Fields. This is the Custom Fields which is used for creating standard segment.
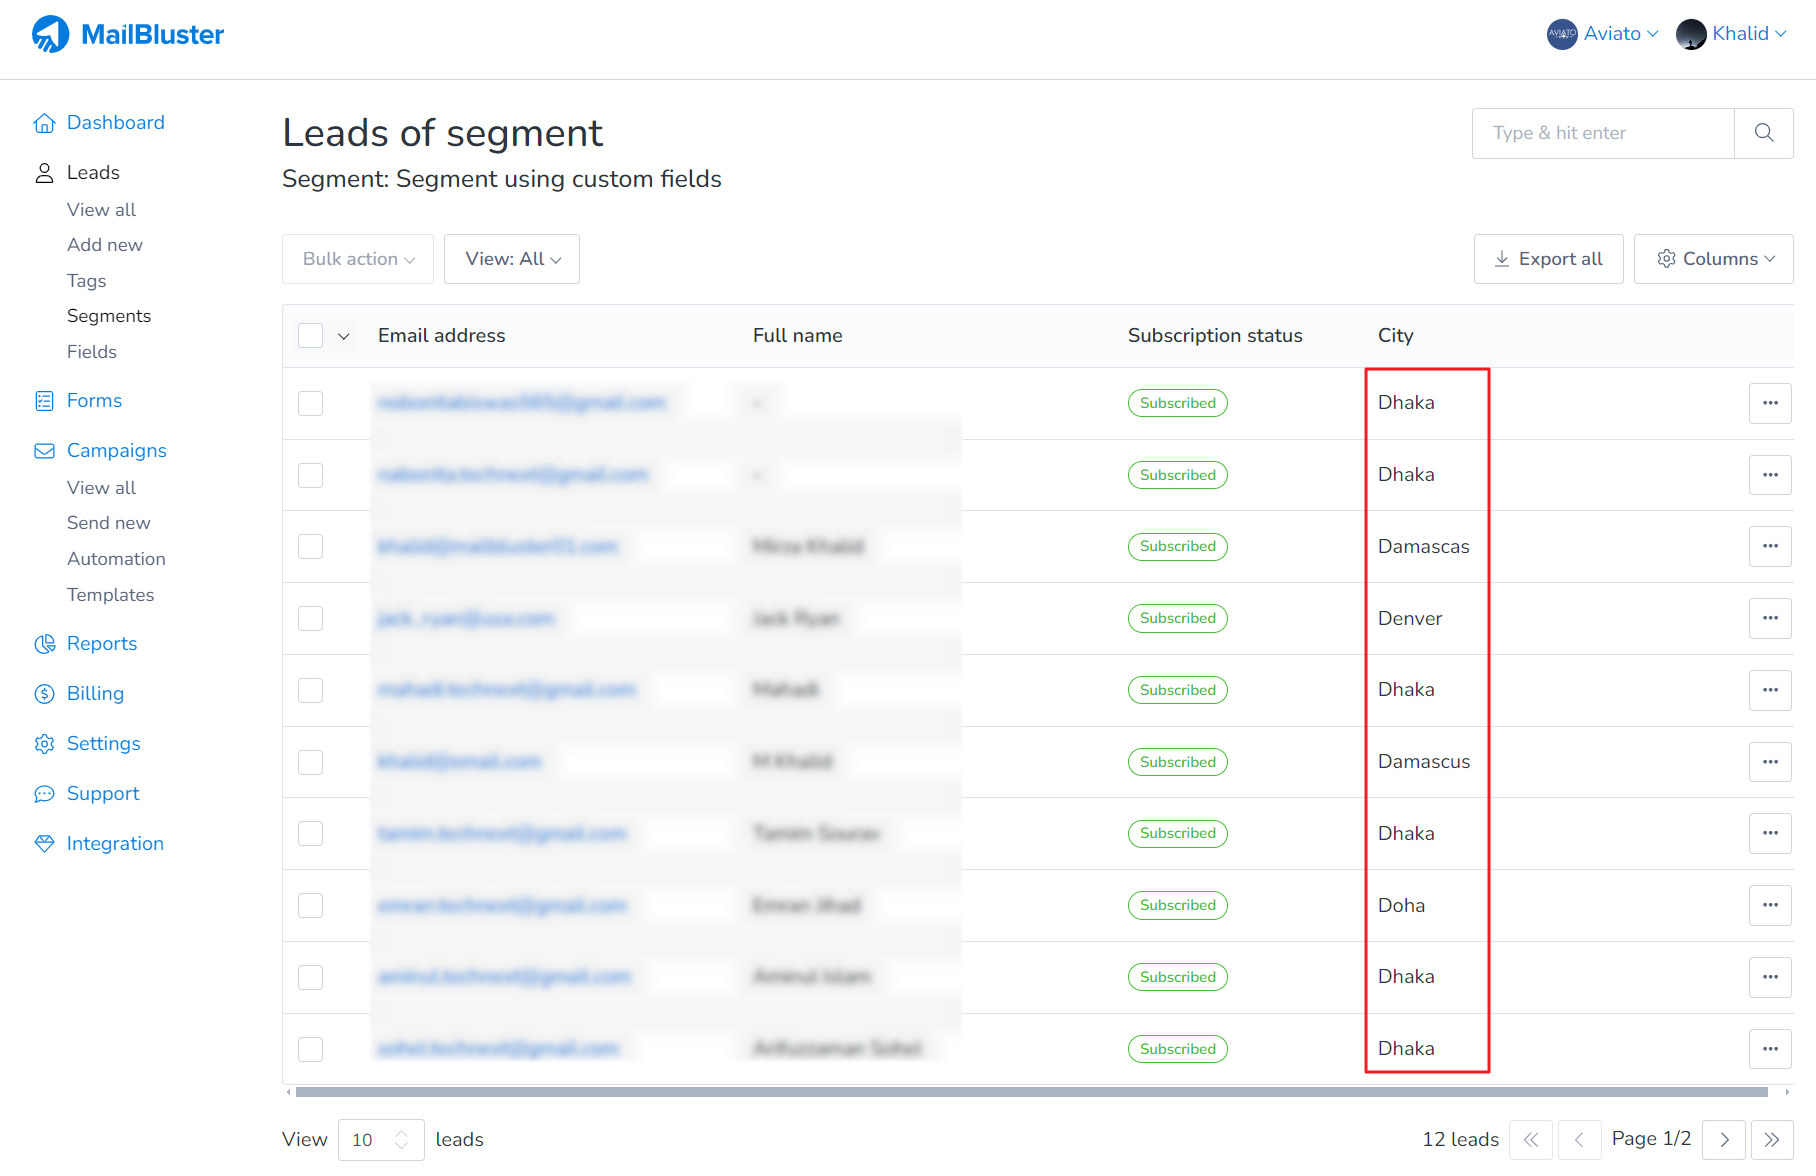
Now select the Field name. For demonstration we have selected our custom field City.
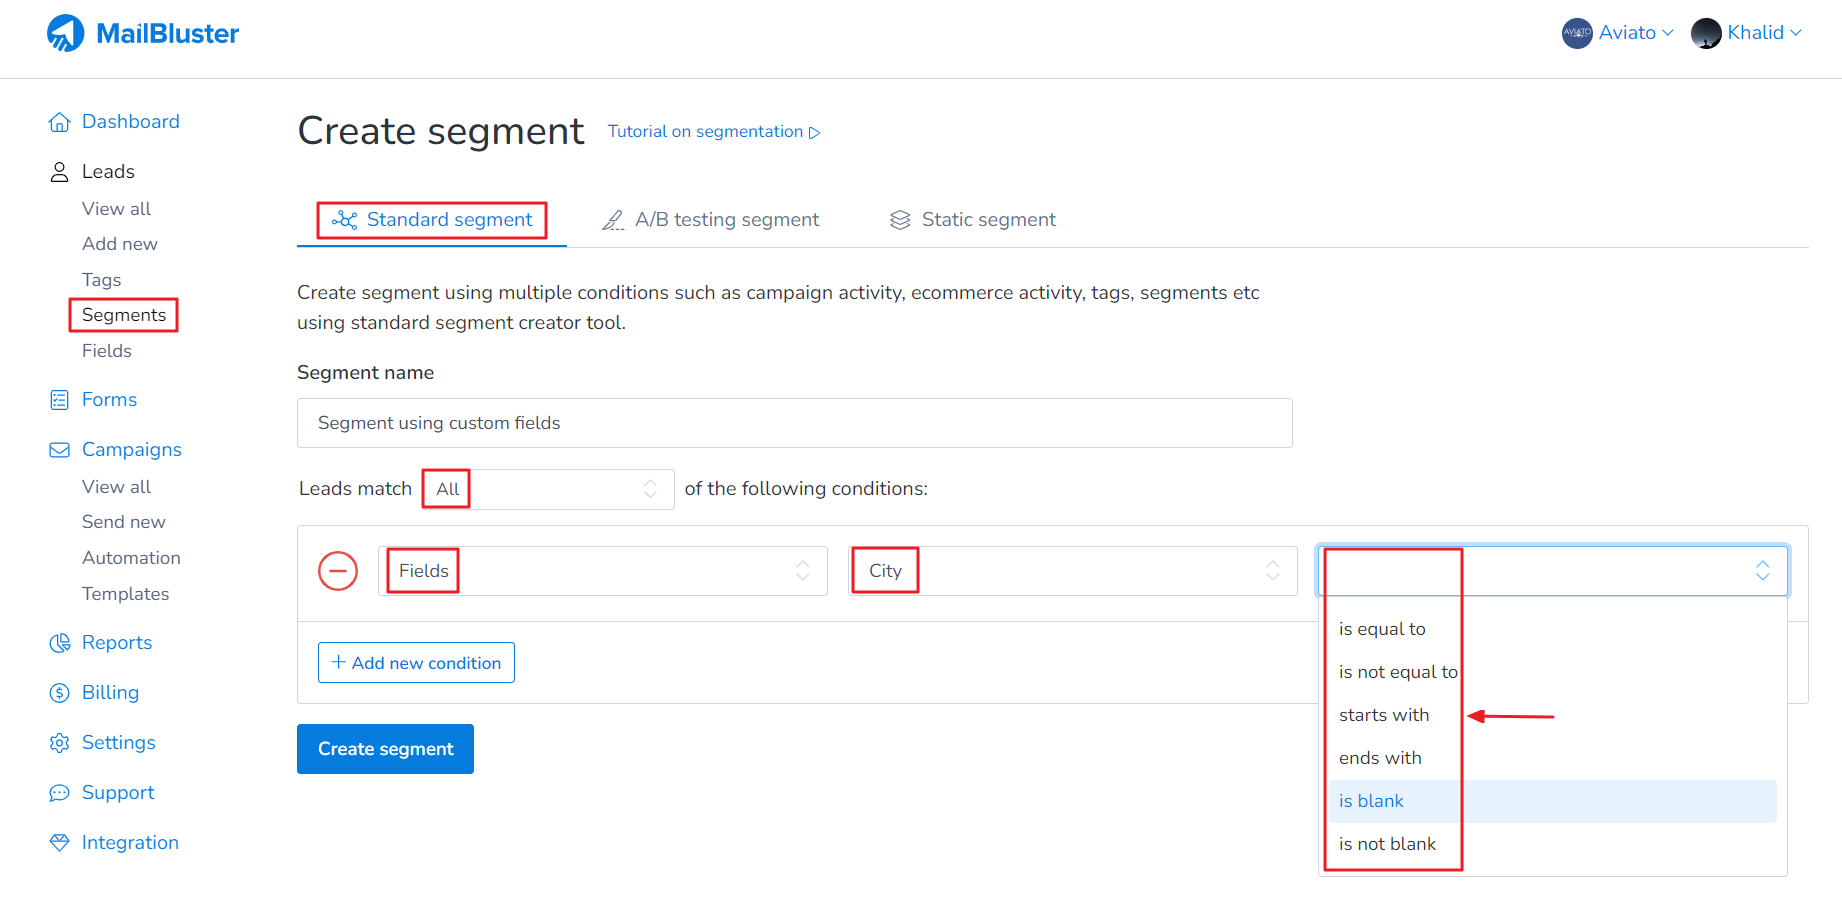
Now set the conditions as shown below. There are several options in Operator section. Here we selected “start with”.
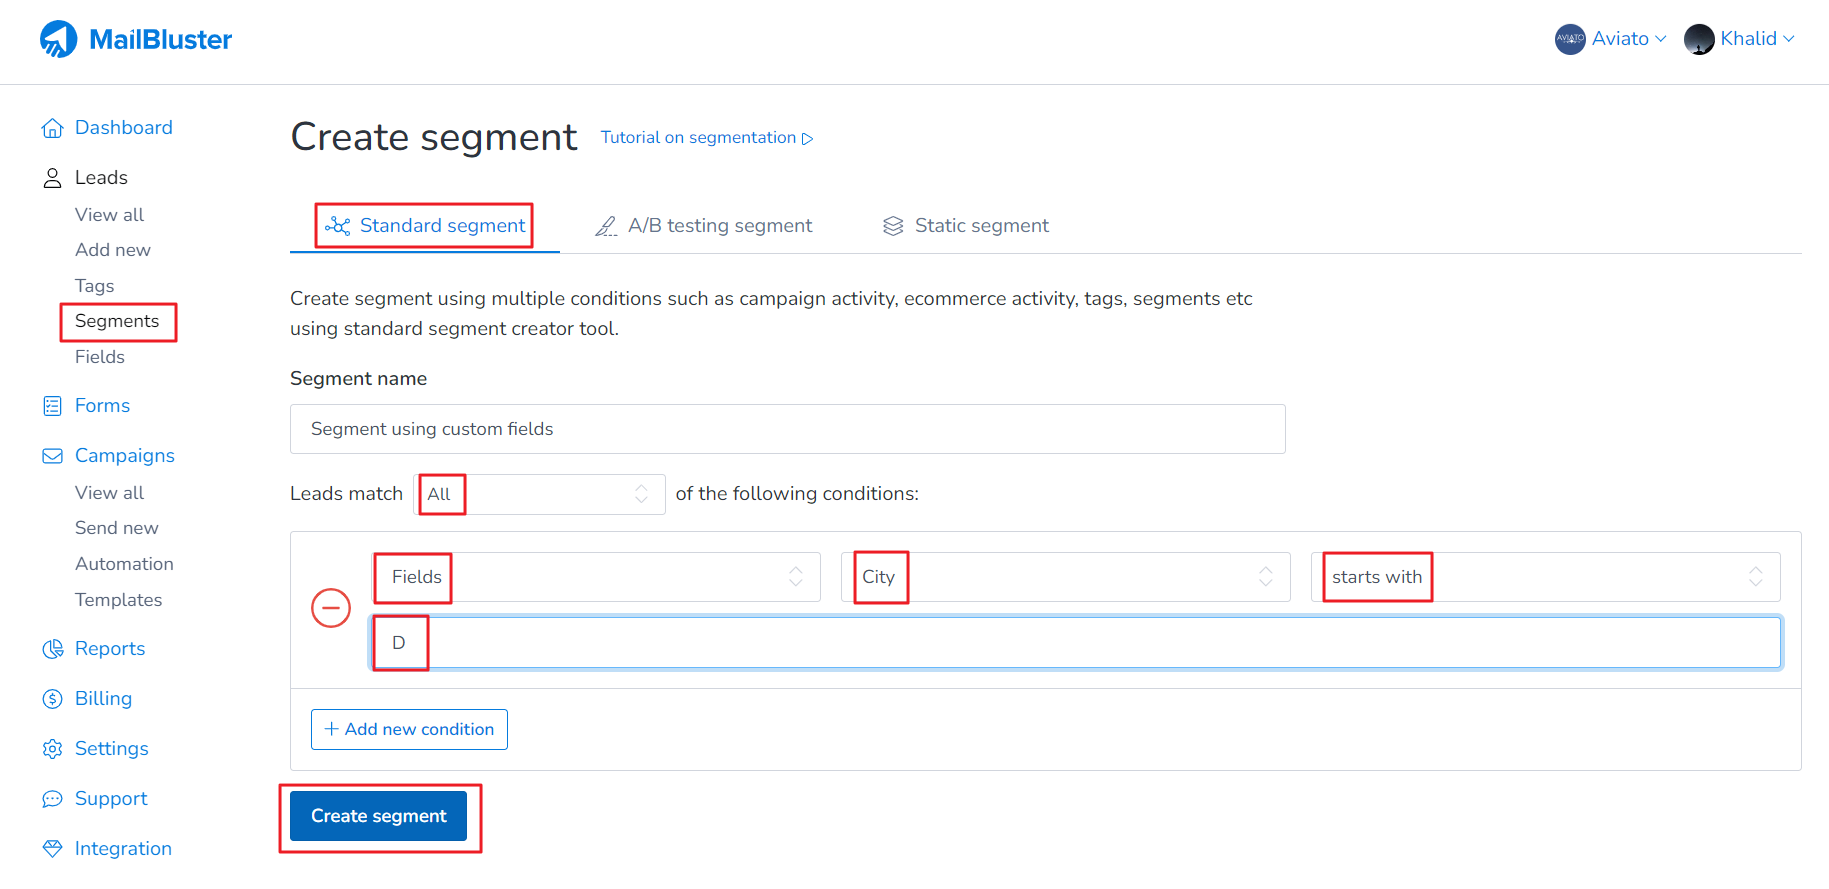
Once the conditions are set, we selected the letter D so that the condition becomes: “Custom field City starts with D”. Then you can more Add new condition. Finally click on Create segment.
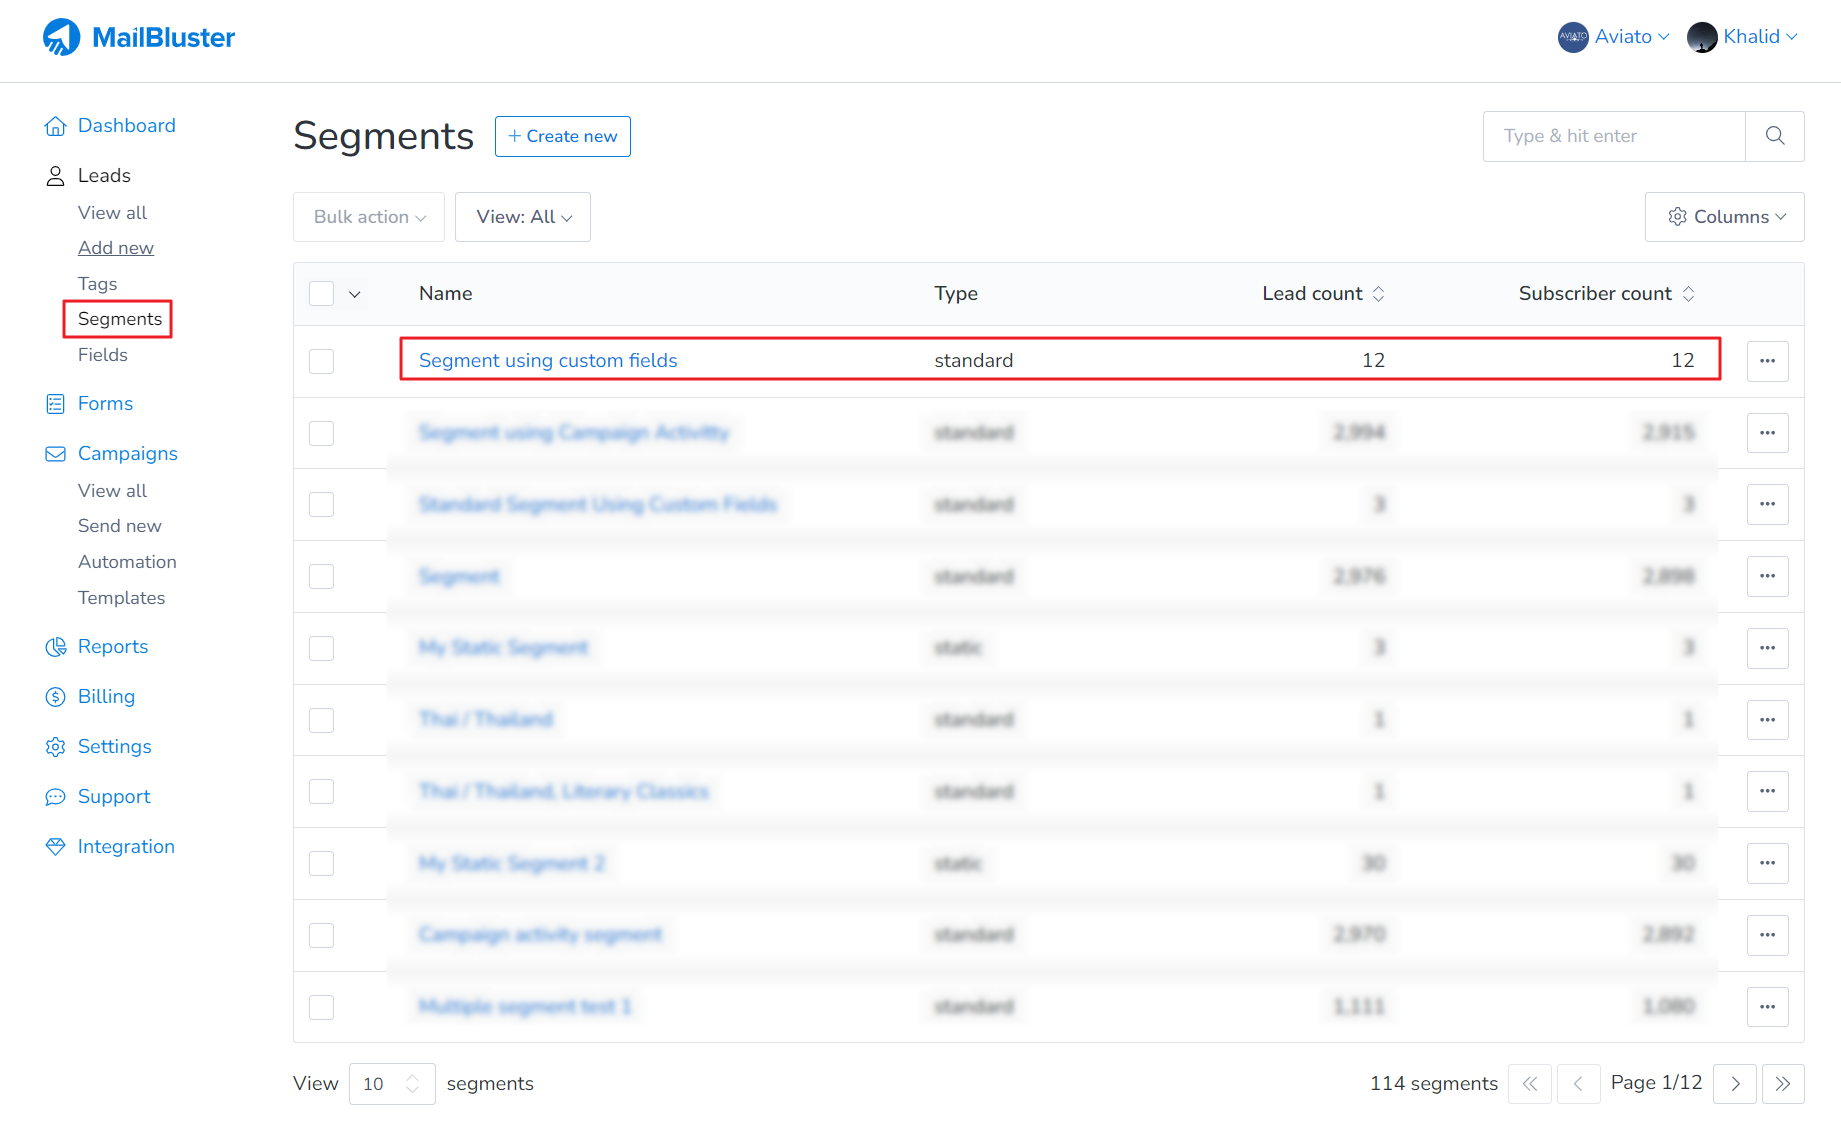
Now, the standard segment has been created and you will see the total Lead count and Subscriber count. Click on the Segment to see the leads.
Upon clicking, now we can see that the standard segment is showing leads which has a custom field named “City” starting with the letter “D”.
Please Note: MailBluster’s custom fields are designed to store only text (string) data and do not support date and time values. Additionally, segmentation does not support grouping multiple values using commas.
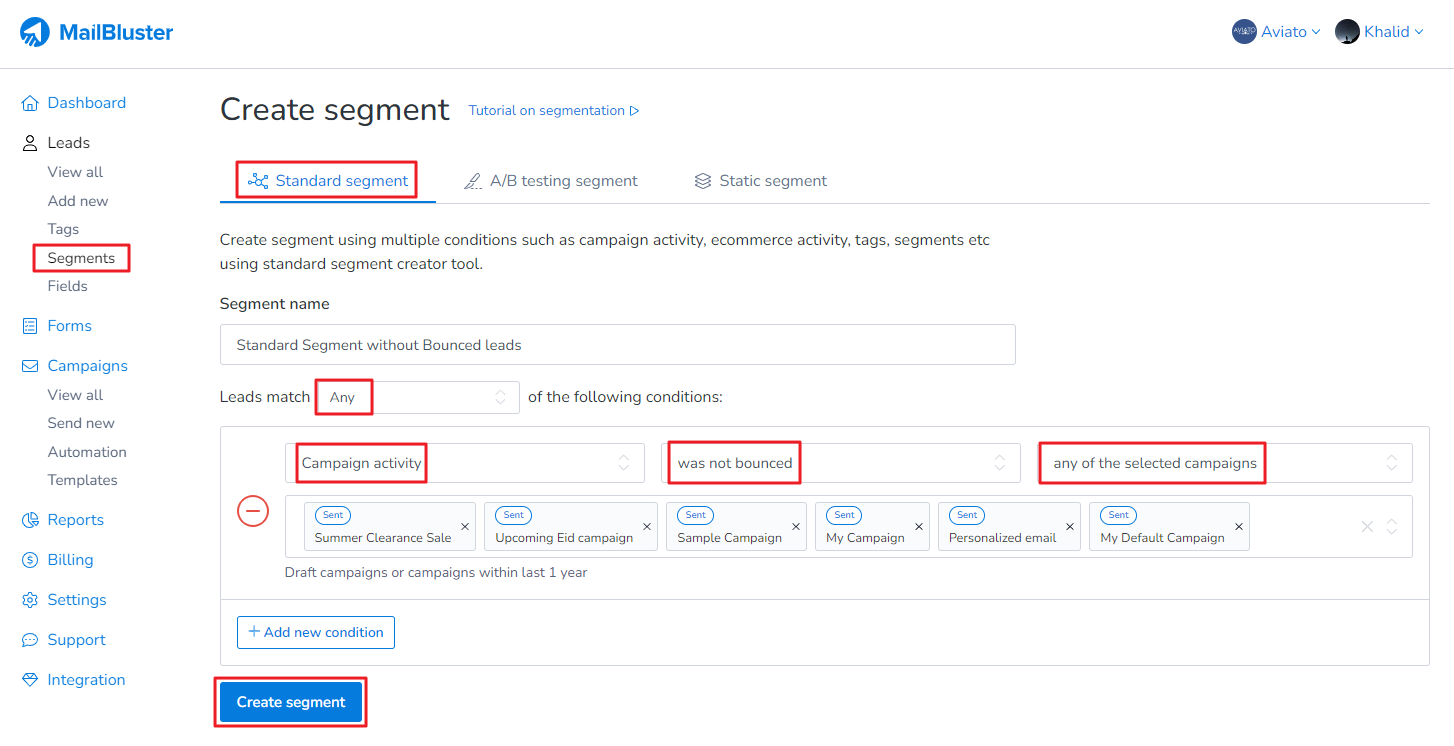
Here you will learn how to create standard segment without bounced leads. To do this, go to Segments > Standard Segment and create a standard segment using the following conditions.
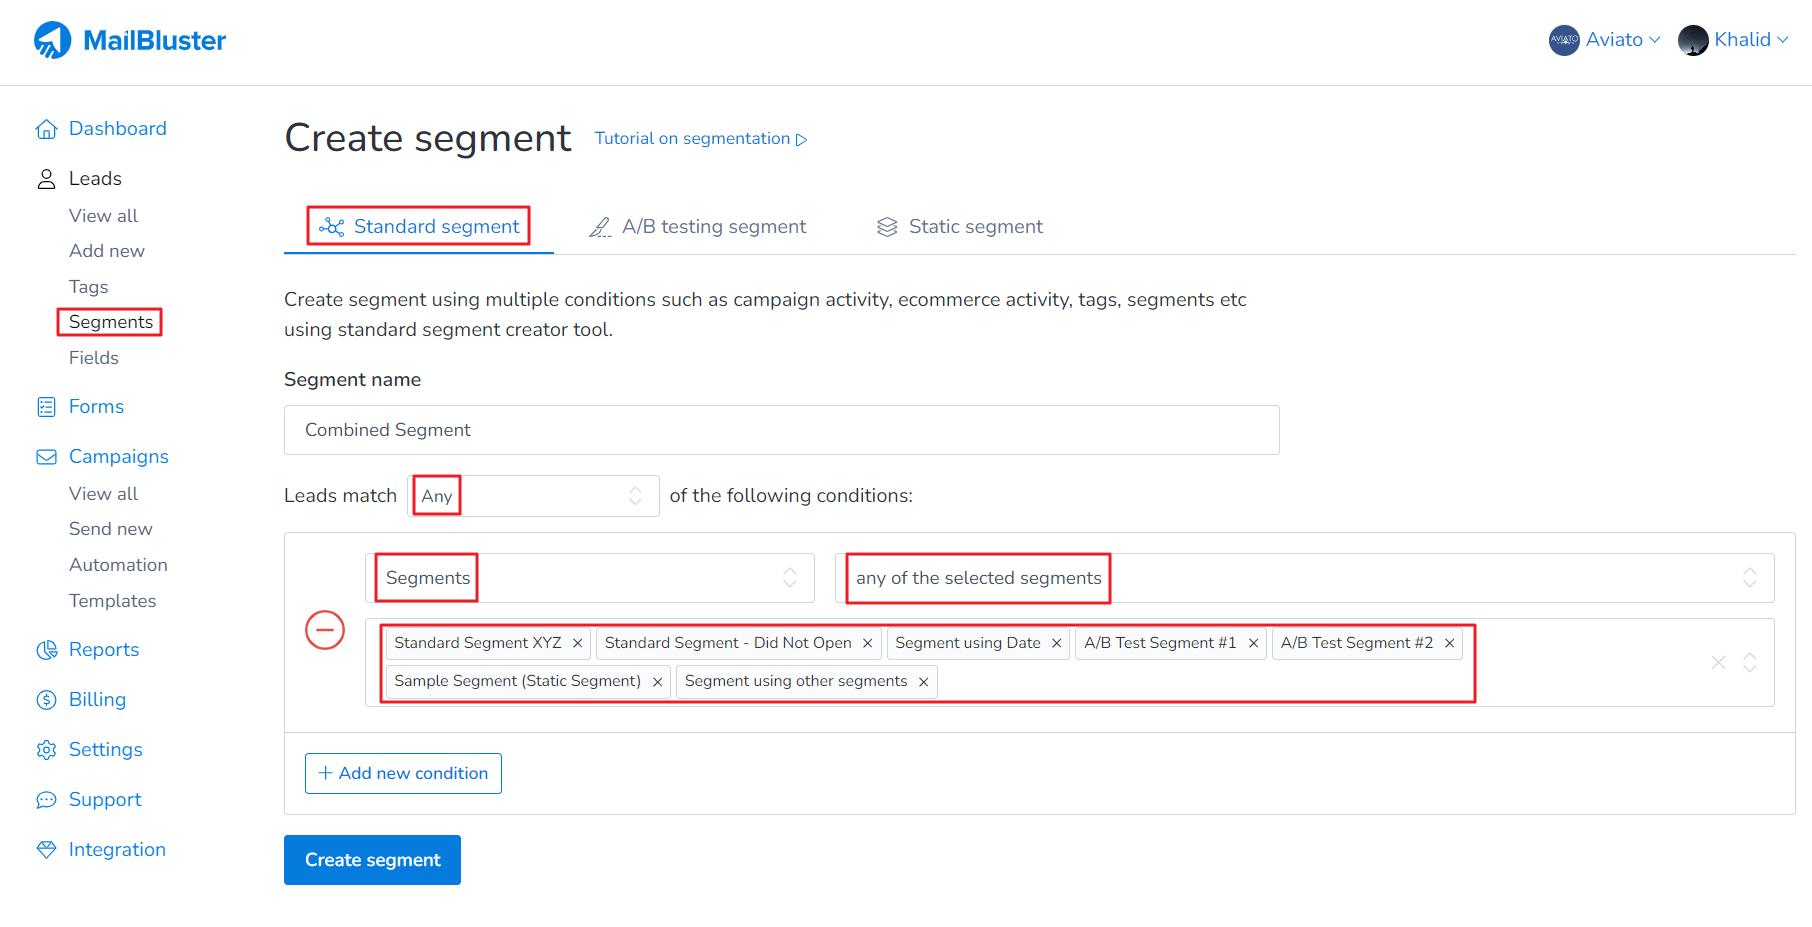
Here we will combine multiple segments into one segment. However, MailBluster does not allow duplicate leads (emails) within a brand. This means that if you have 10 segments, a lead can exist in multiple segments, but when you combine these segments into one, the lead will not be duplicated.
To combine multiple segments into one, go to the Segments > Create new > Standard segment page. Here is how it might look:
Here we will try to explain why standard segment is not updated instantly. Basically, the count in a standard segment is not always synced in real-time. It gets updated when you open or update the segment. However, the target audience for a campaign will be updated accurately, as it is calculated based on the segment conditions.
You may notice that the standard segment count appears different initially, but if you open or update the segment, the count will refresh. Also, MailBluster will use the updated recipient list when sending a campaign. While the displayed segment count might sometimes appear different, the campaign will still be sent to all recipients who match the segment conditions.
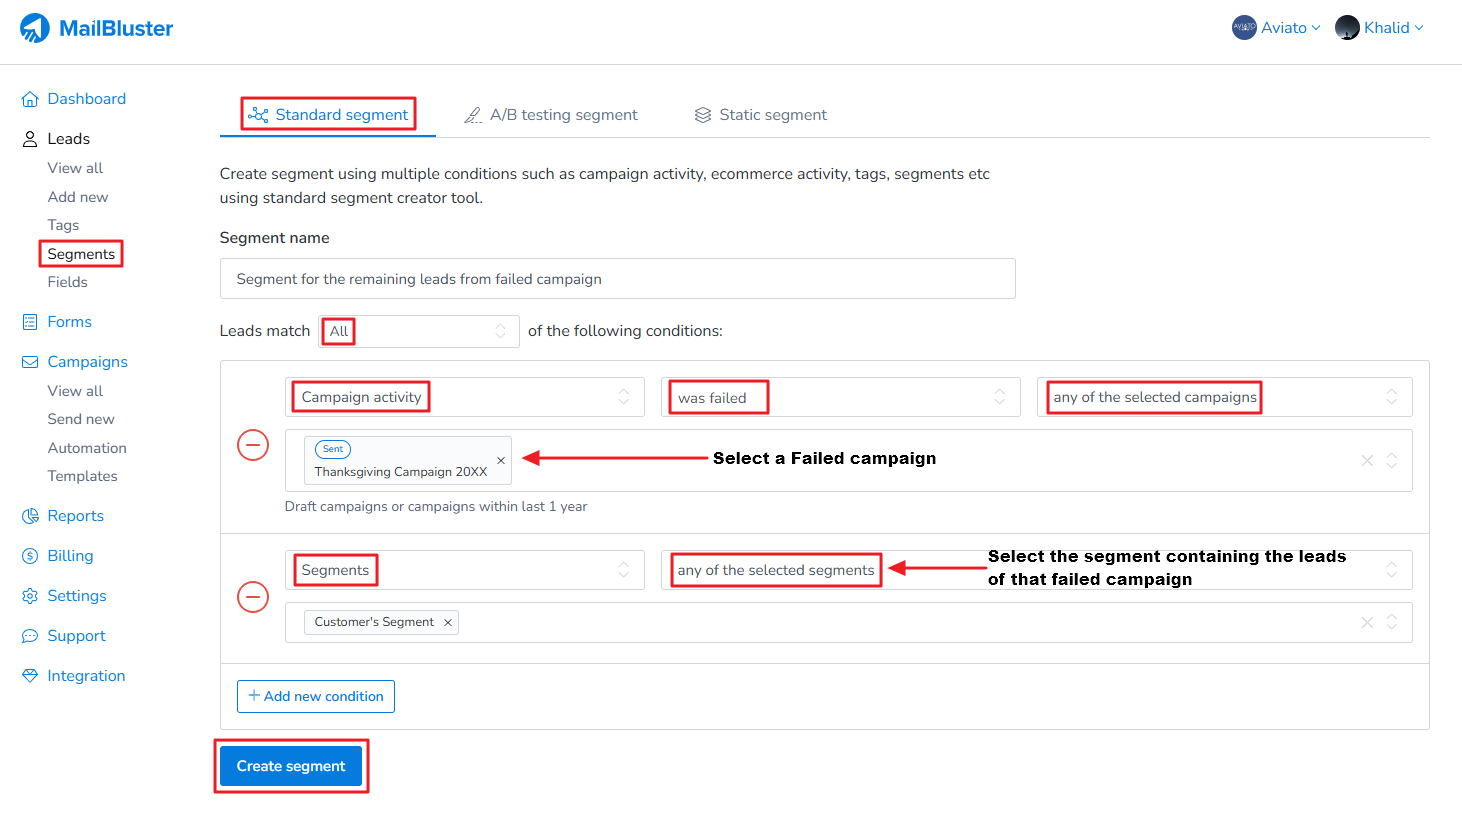
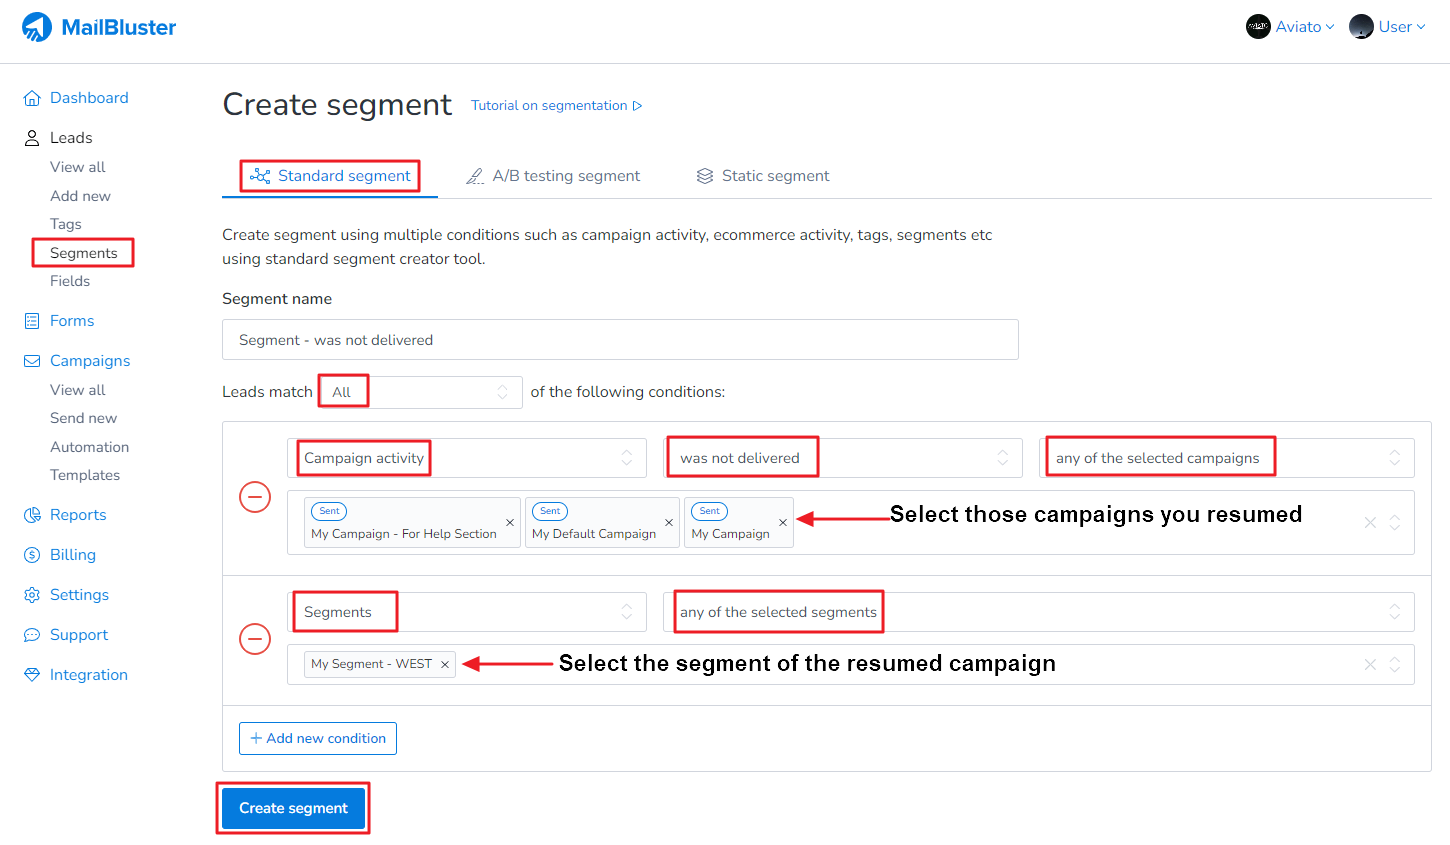
Here you will learn how to resend an email to failed campaign leadsby creating a targeted segment. This guide walks you through identifying the remaining leads from a failed campaign using specific conditions within a Standard segment. Once the segment is defined, you can launch a new campaign to these leads the following day.
To get started, you first need to create a Standard segment. To do this, navigate to Segments > Create new in your dashboard.
Then select Standard segment, and use the following conditions highlighted in red markings. Then click on Create segment.
After clicking Create Segment, that standard segment containing the remaining leads from a failed campaign will be created.
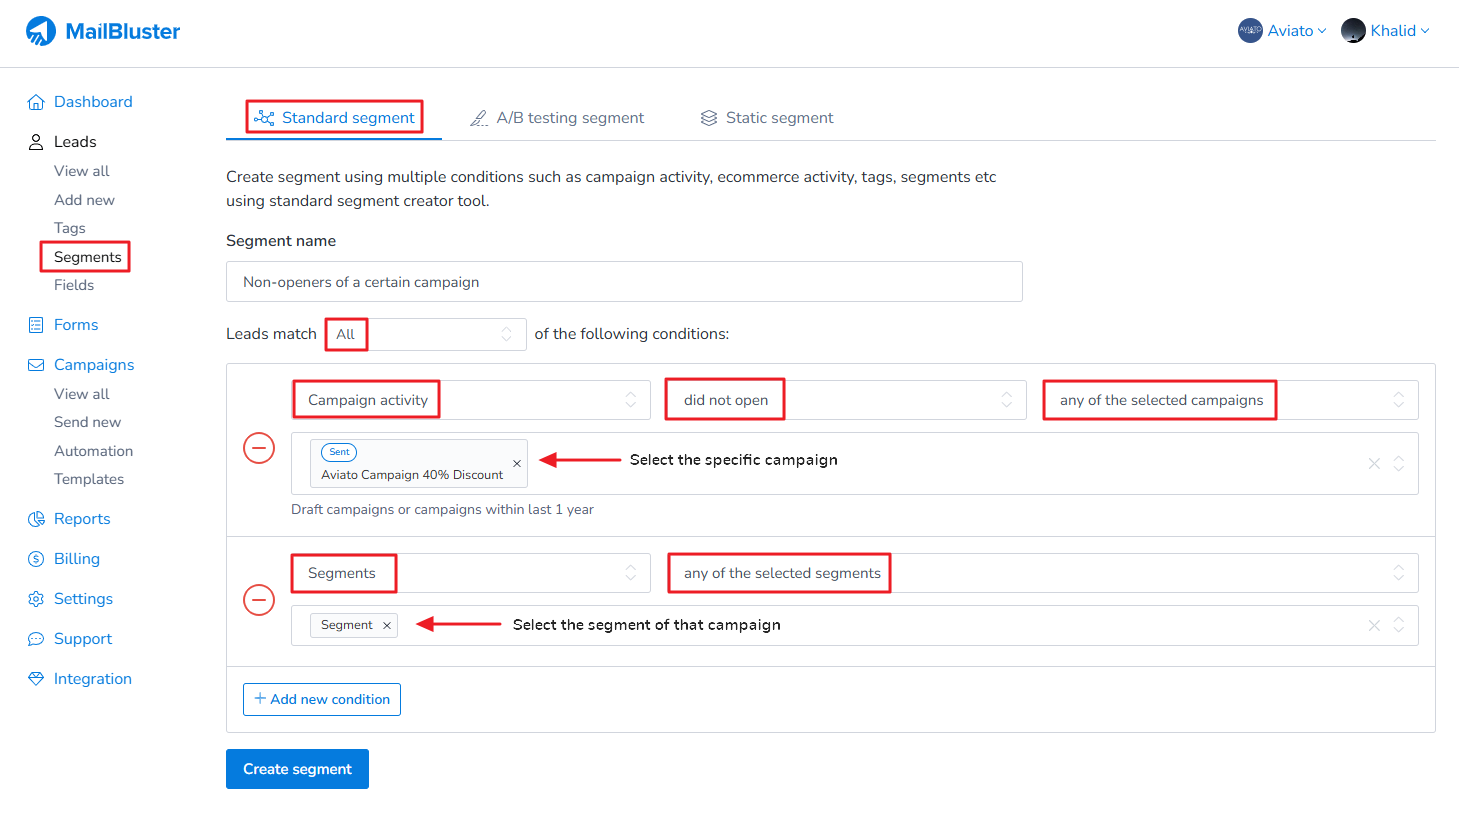
MailBluster offers a Standard Segment feature that allows you to target subscribers who didn’t open a specific campaign and this is useful if you want to resend email campaign to non-openers, that is those who missed it.
First, you need to navigate to the Segments tab. Then click on Create new. Set the conditions to target the subscribers who did not open a specific campaign as shown below.
You can do this by selecting Leads match: All, Campaign activity: did not open, and selecting Operator as any of the selected campaigns. Then add another condition by selecting Segments and any of the selected segments.
Then click on Create segment to start the process.
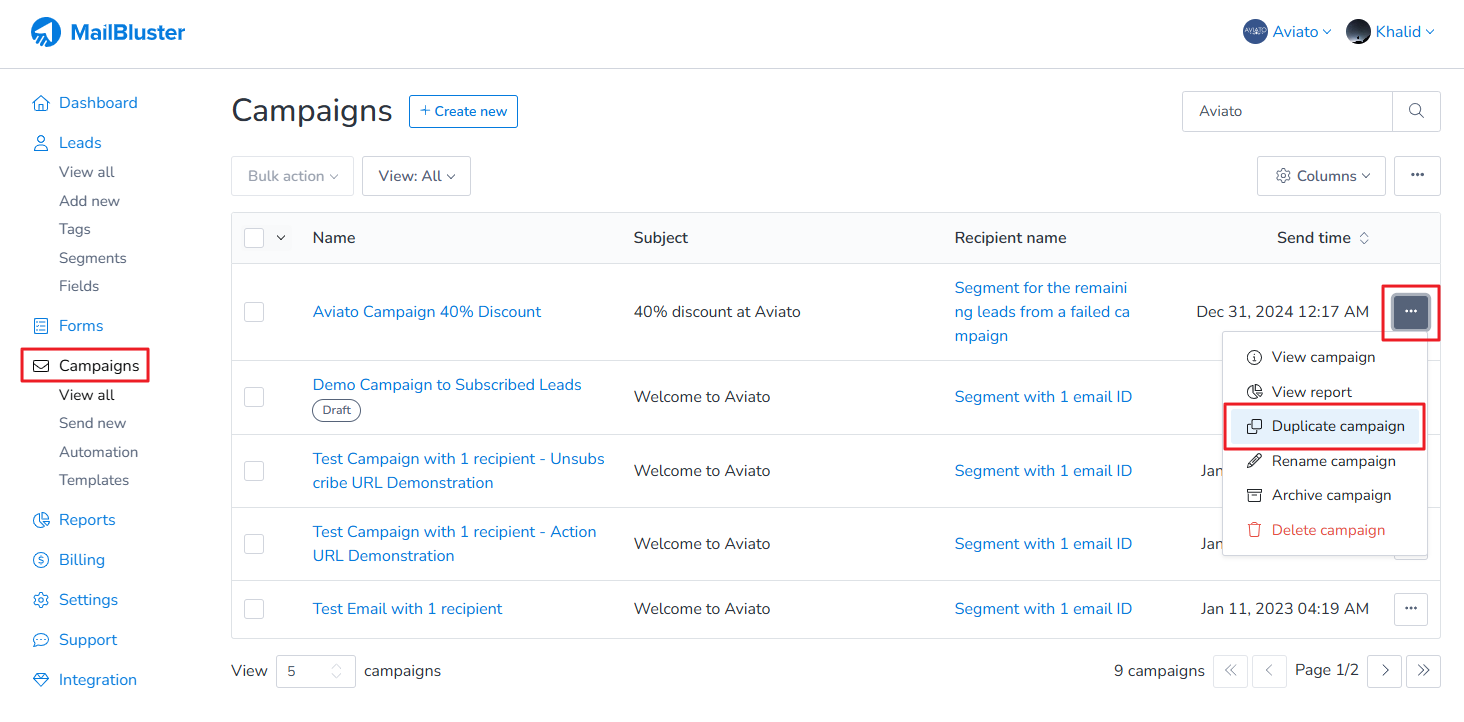
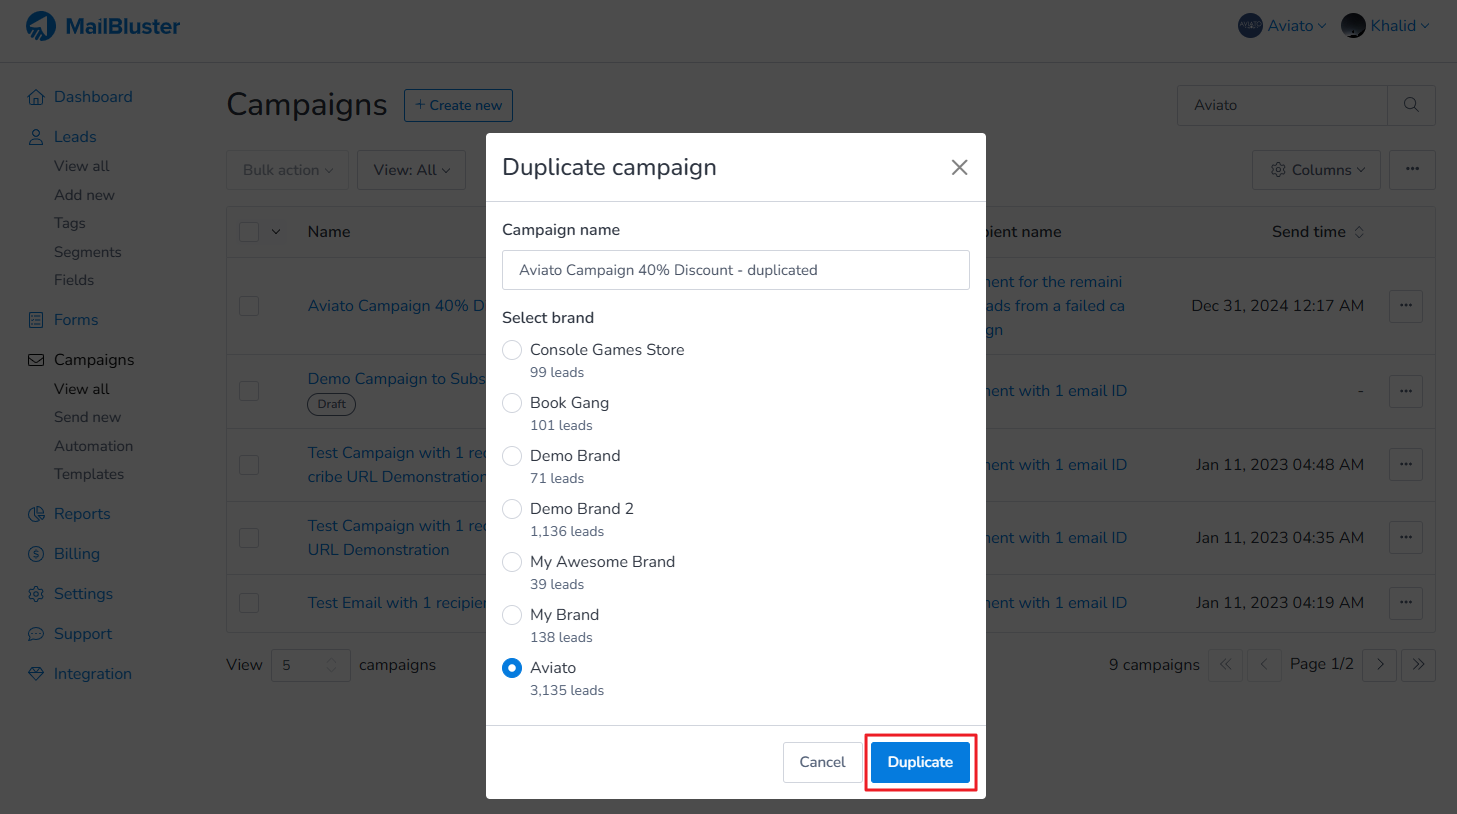
Now, you can now use this segment to resend the campaign to the subscribers who didn’t open it. Simply duplicate the campaign you want to resend and send it to the segment you just created.
Click on 3-dot ellipses and then Duplicate campaign.
Select the brand for which you want to create the campaign. Click Duplicate.
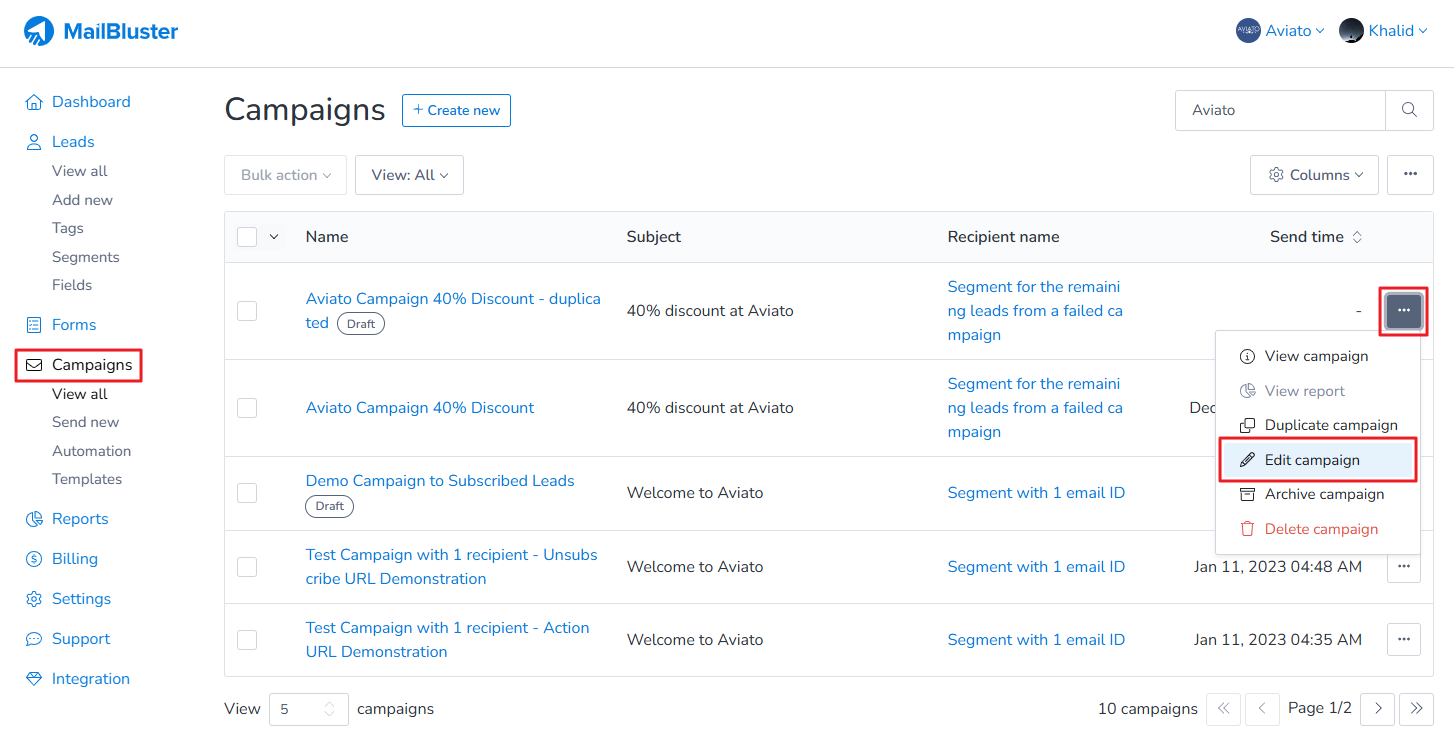
Now, click on the 3-dot ellipses of the duplicated campaign. Then click Edit campaign.
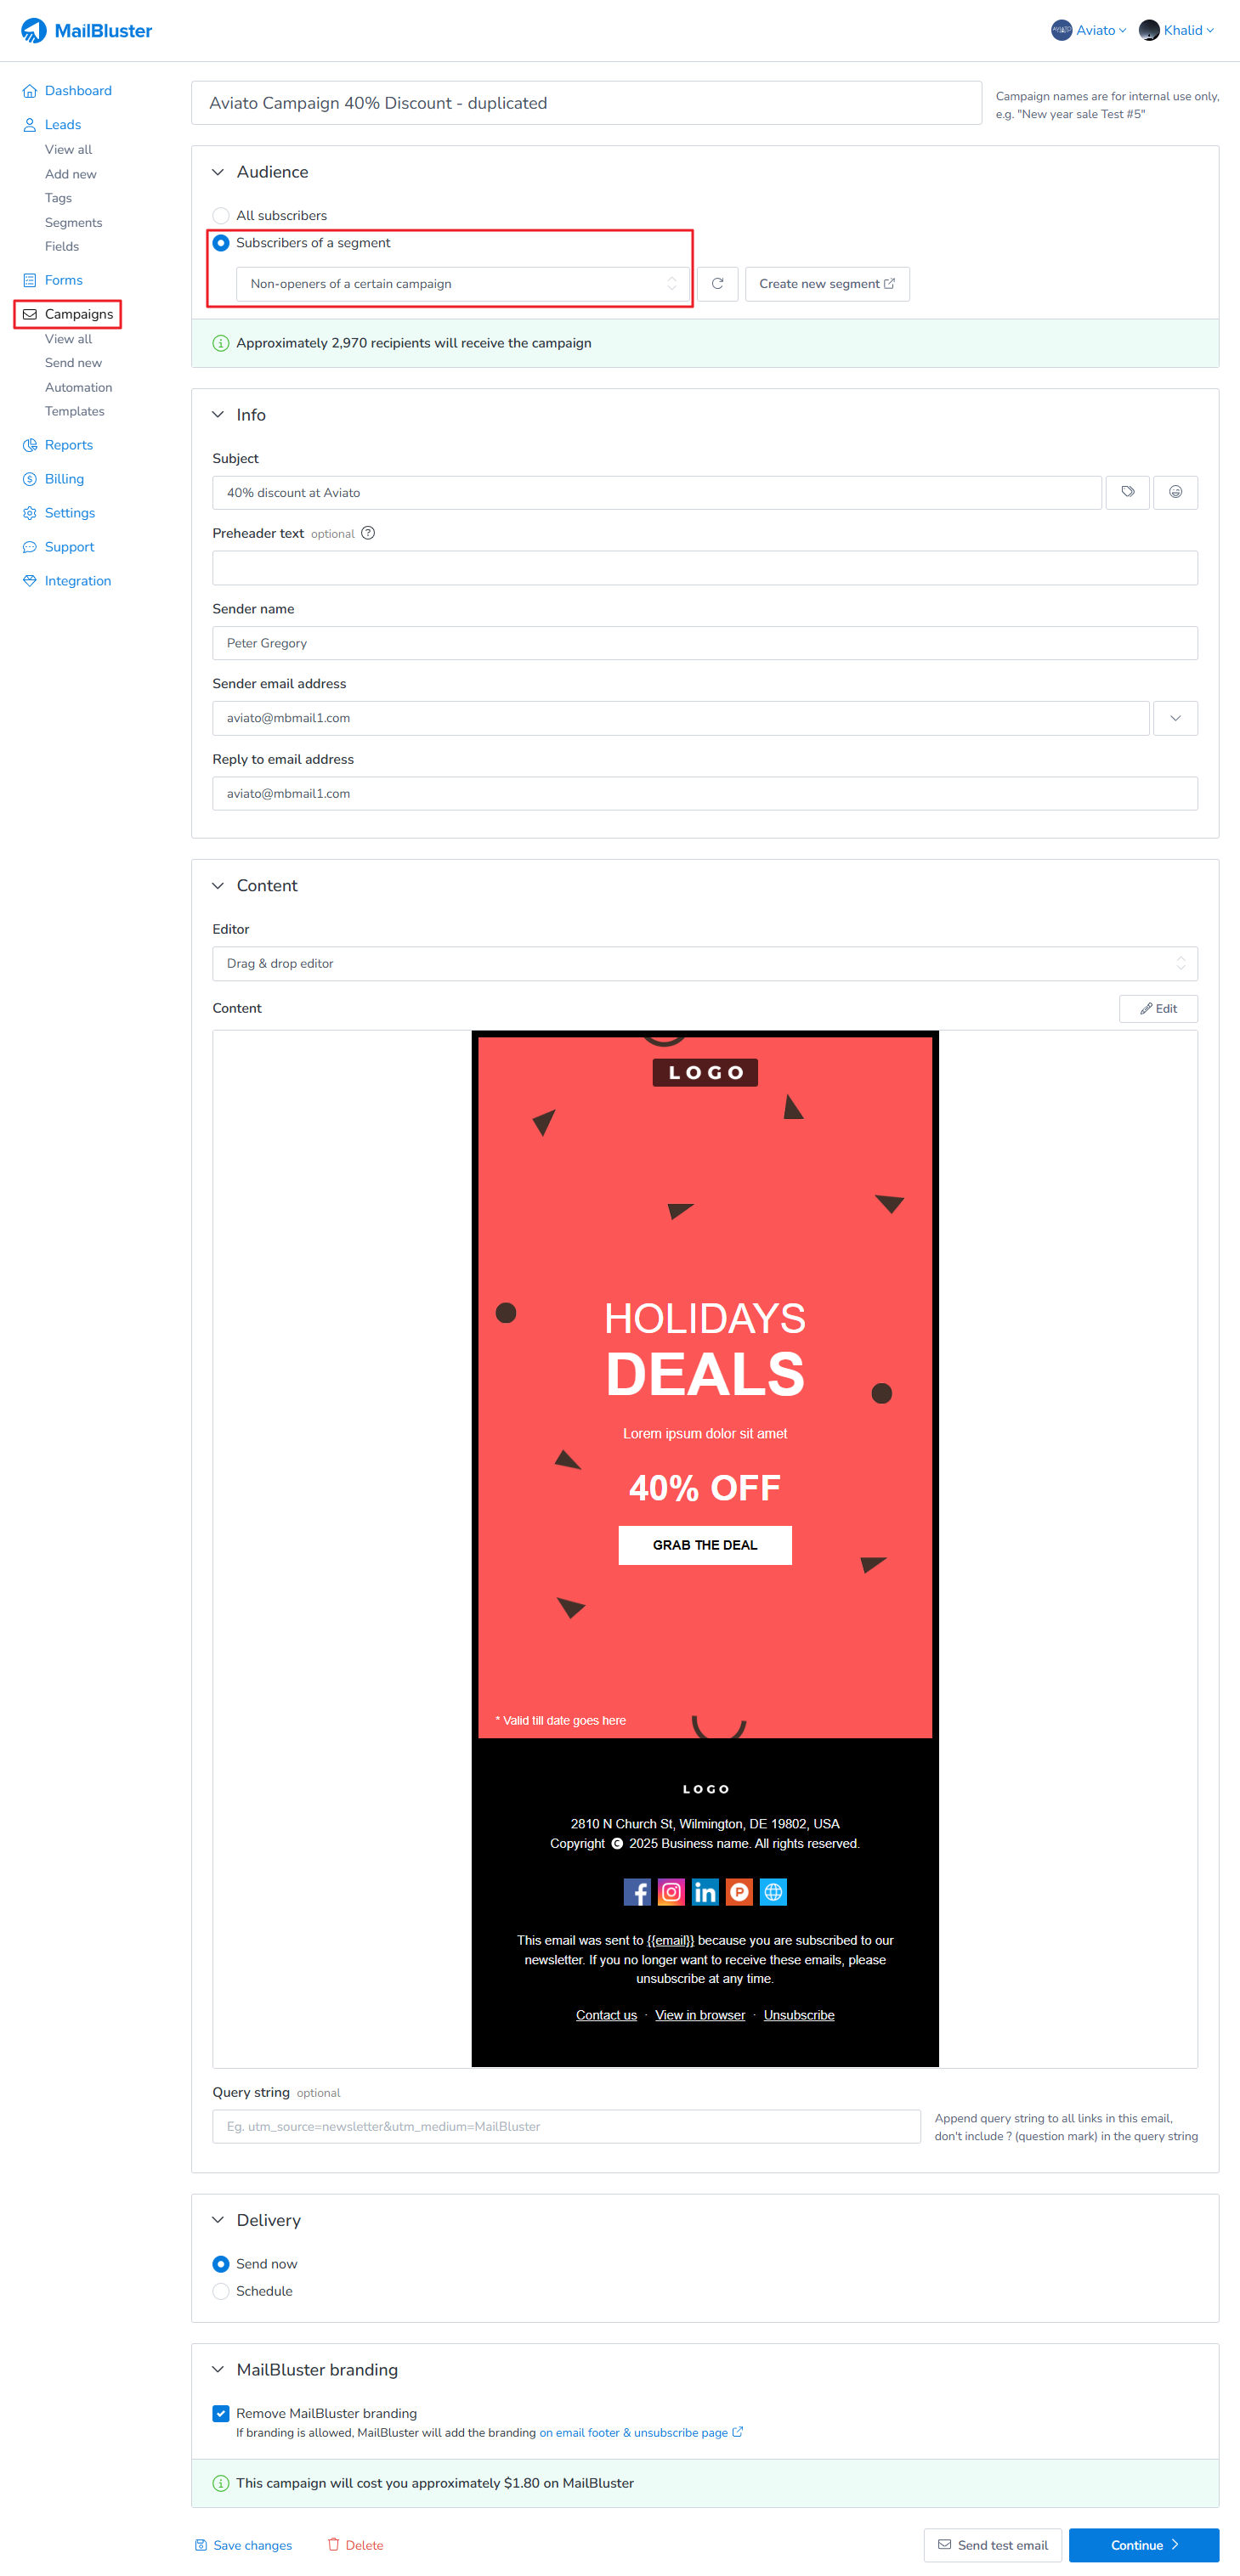
Now, you will just need to select the segment you just created it and then send the campaign to your subscribers again as before.
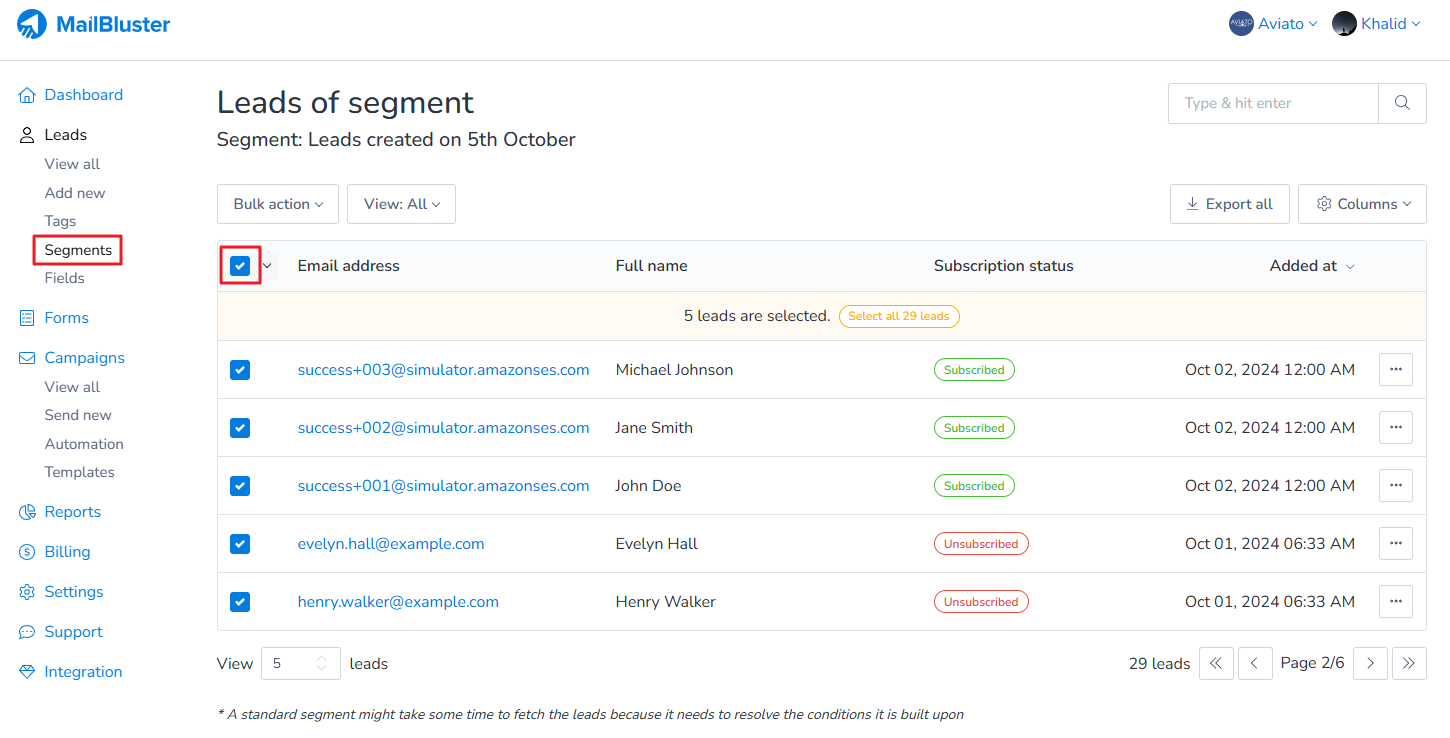
Here you will learn how to delete all leads that were imported on a specific date. You can create a segment with the leads added on that specific date, then go to the segment and bulk delete the leads from there.
Here is how you can do. First create a Standard Segment from Segments >Create new > Standard segment using the following conditions:
After you create the segment, click on the segment.
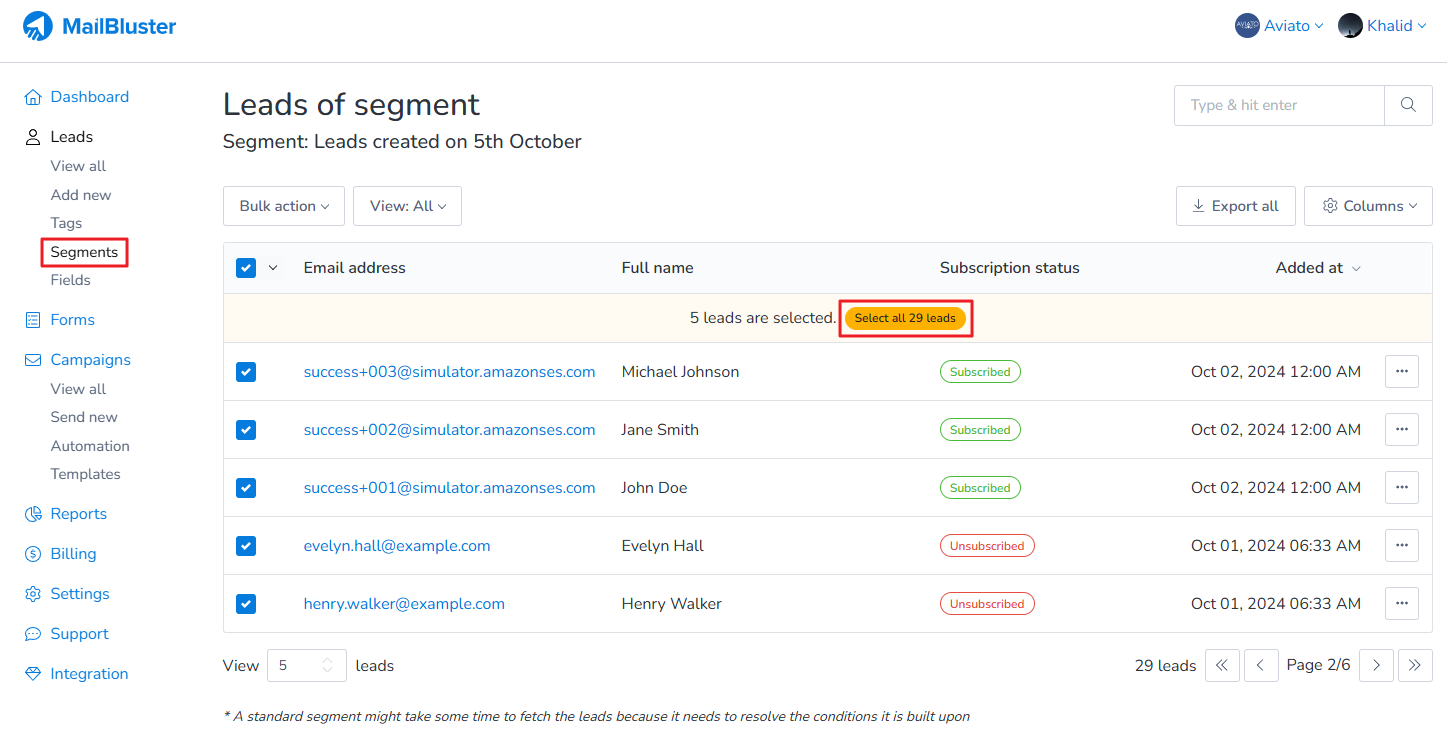
Click/Tick on the checkbox. Some leads are selected.
Then click on Select all leads. This will select all Subscribed and Unsubscribed leads.
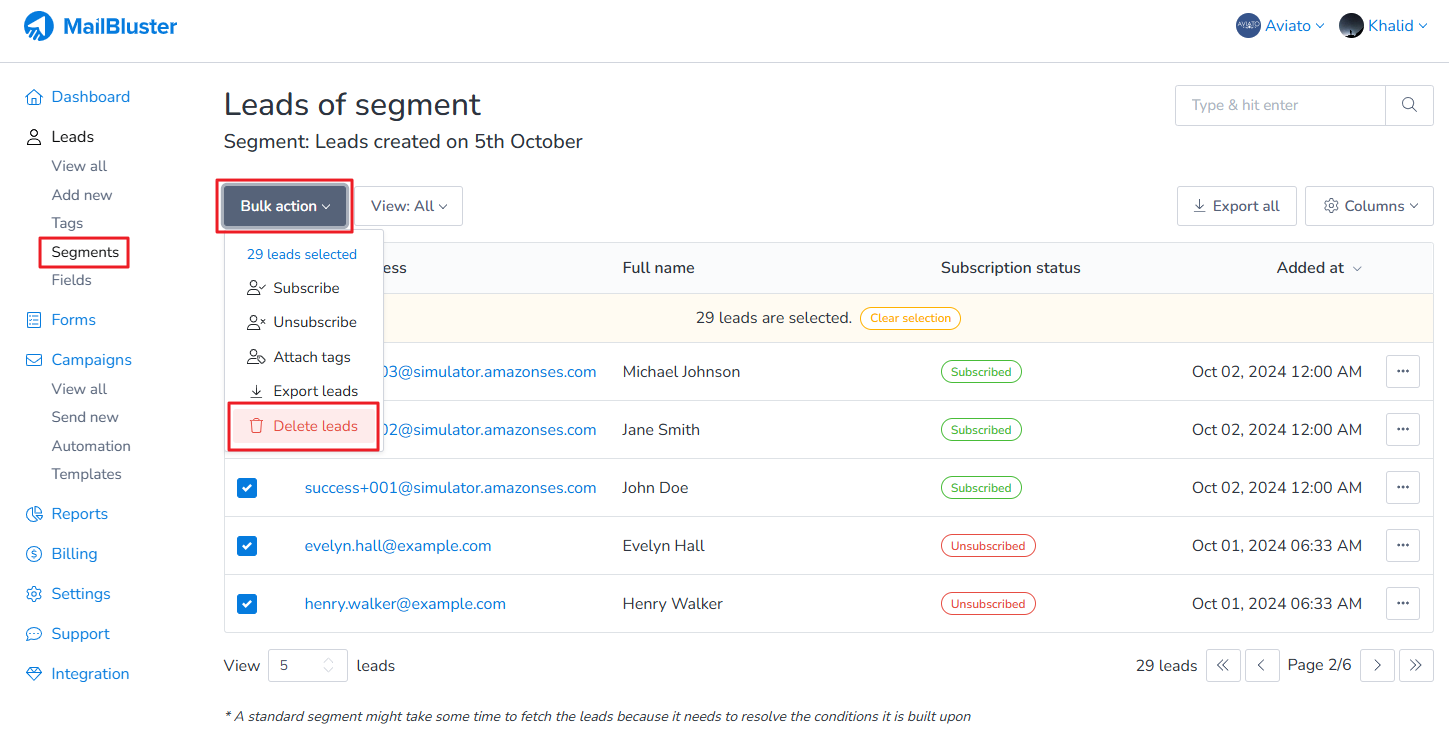
Click on Bulk action. Then click Delete leads.
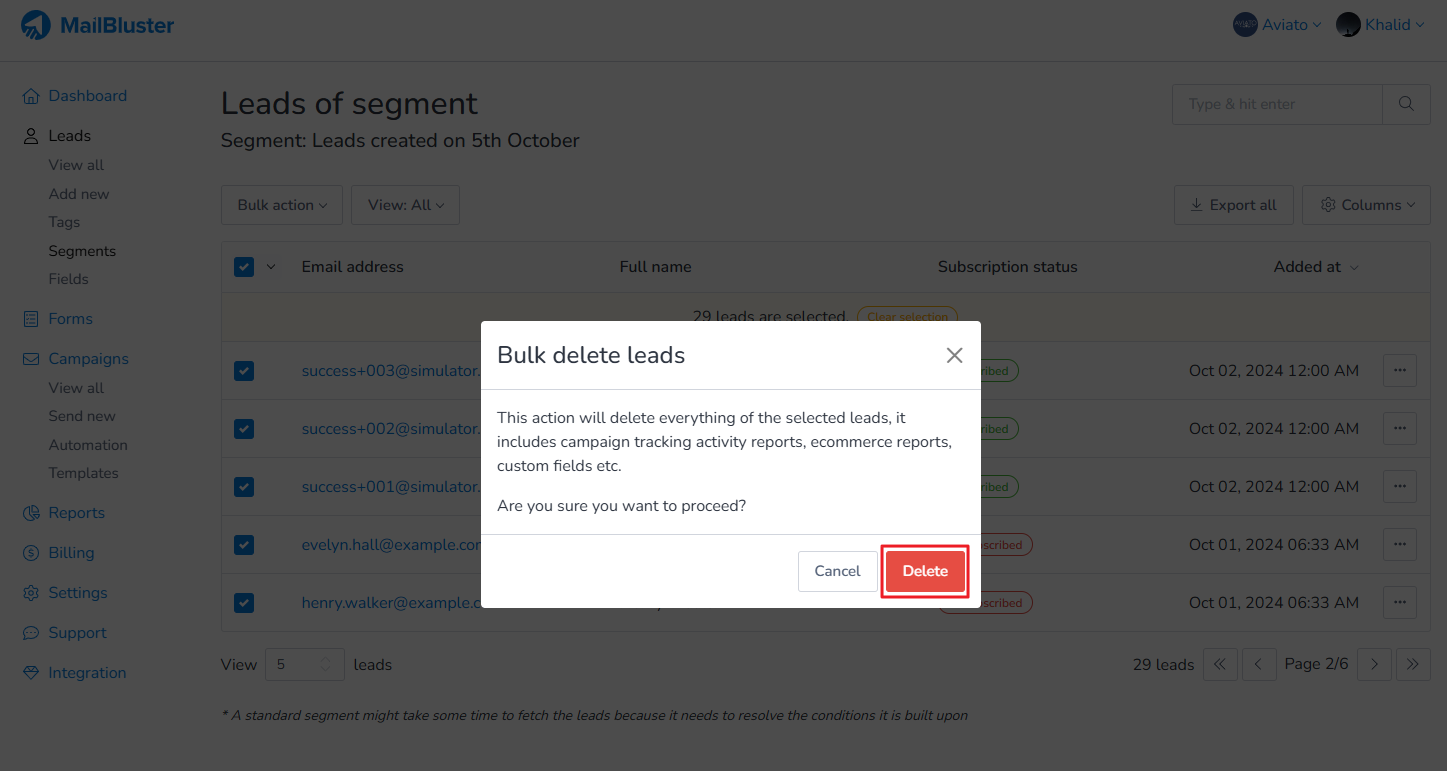
A confirmation dialogue box will appear. Click on the Delete button.
You will then get a notification at the bottom left corner of your screen that your leads have been deleted successfully.
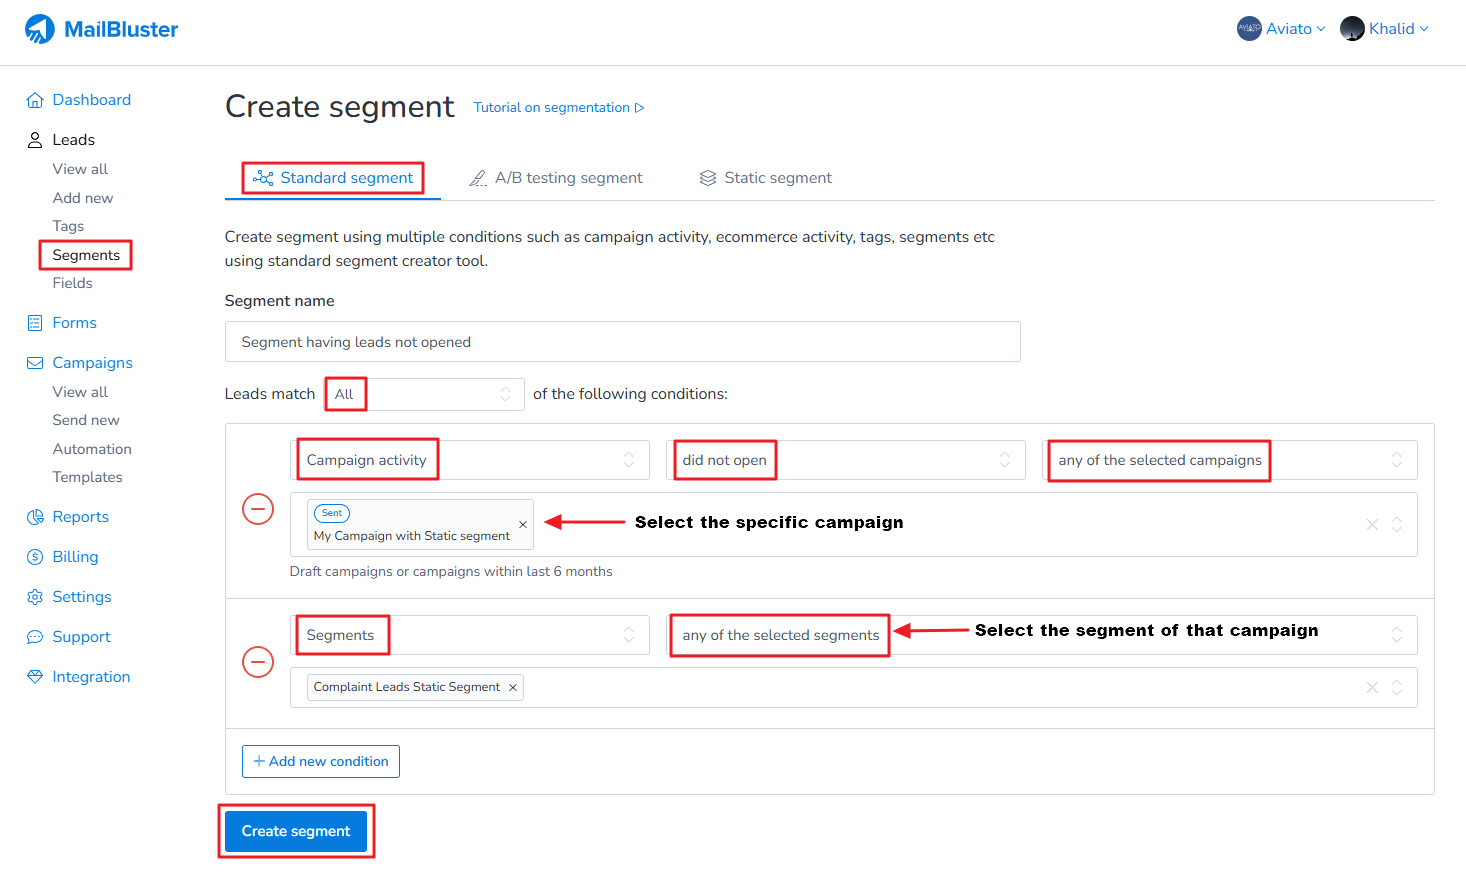
Here you will learn how to remove unopened leads who haven’t opened your emails. You can identify leads that haven’t opened or viewed your specific campaign by creating a Standard segment and then deleting the leads in that segment.
To find those leads, first go to Leads > Segments > Create New > Standard Segment.
Then use the following segment conditions shown in the screenshare below:
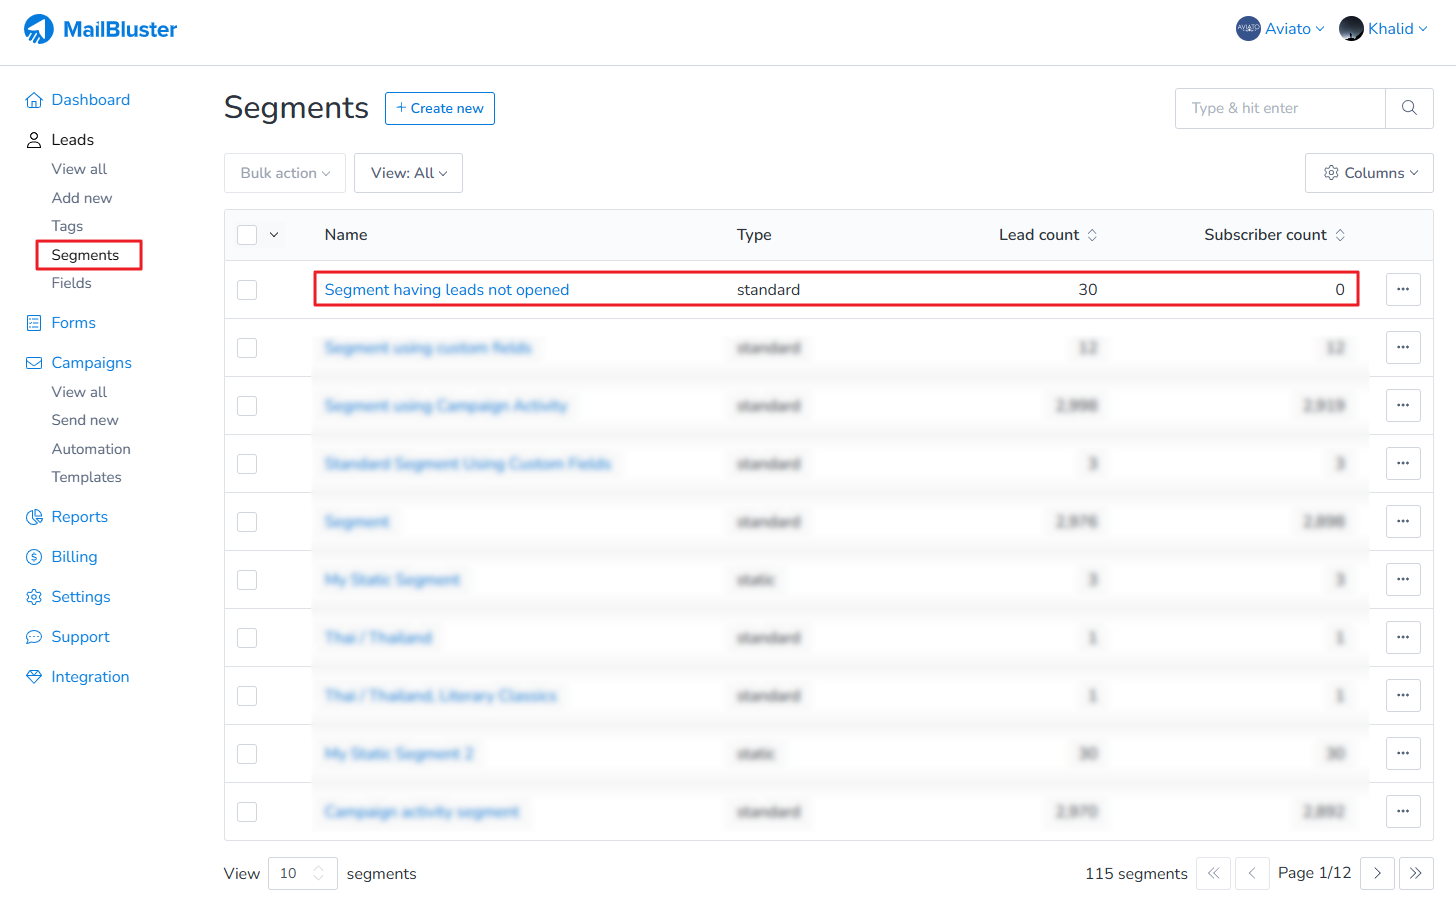
A Standard Segment with leads that have ‘Not opened’ your specific campaign will be created. Then, click on the segment named ‘Segment having Leads not opened.’ You will see a list of email addresses ‘leads‘ under that segment.
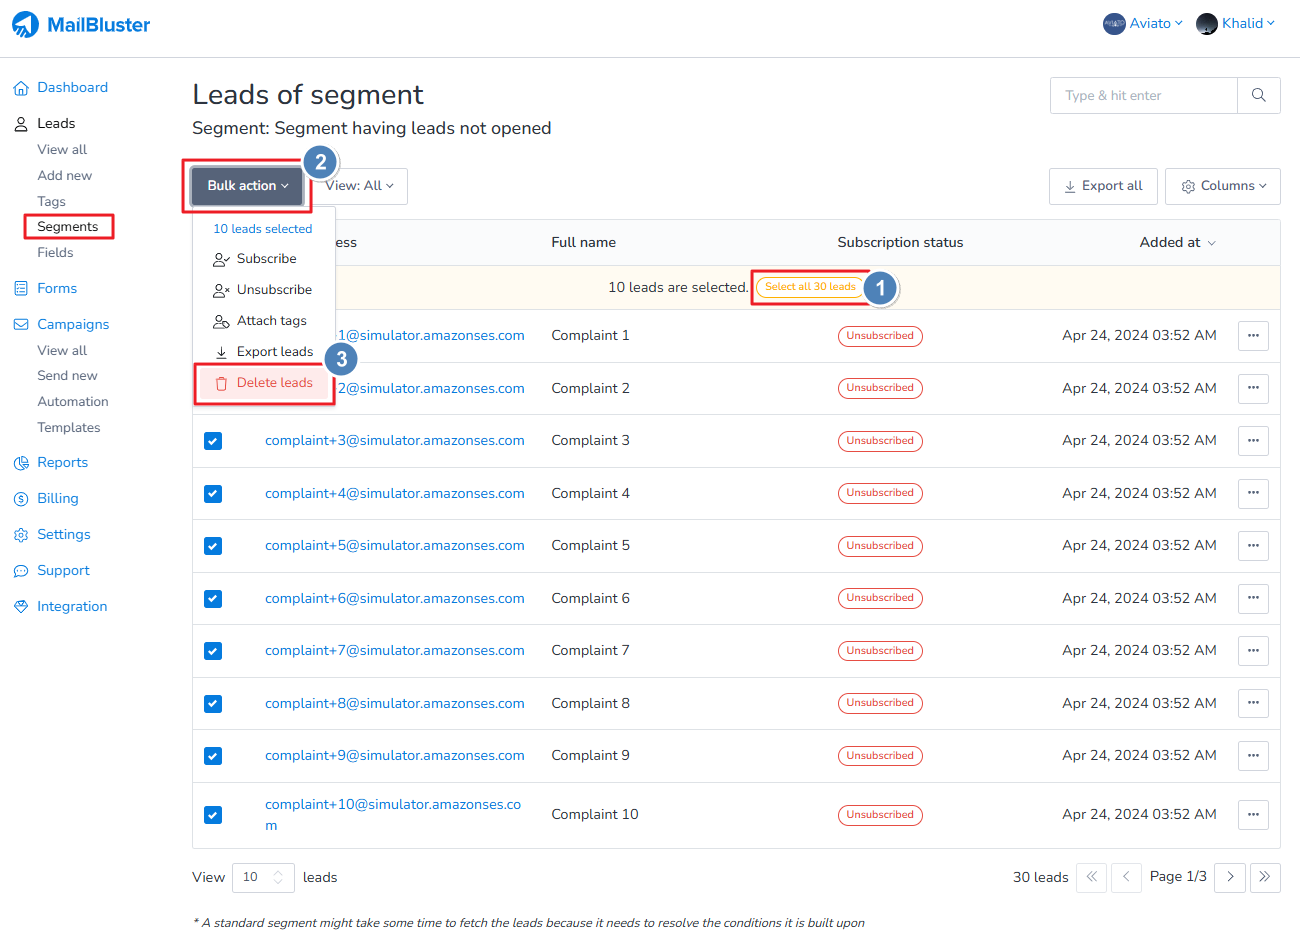
Now, click on ‘Select all leads’ and click on Bulk Action>Delete leads to delete all the leads as shown below:
Here you will learn how to create a segment and send emails to that specific segment. Follow these steps to complete the process effectively.
1. You can use tags and static segment to form a group of leads.
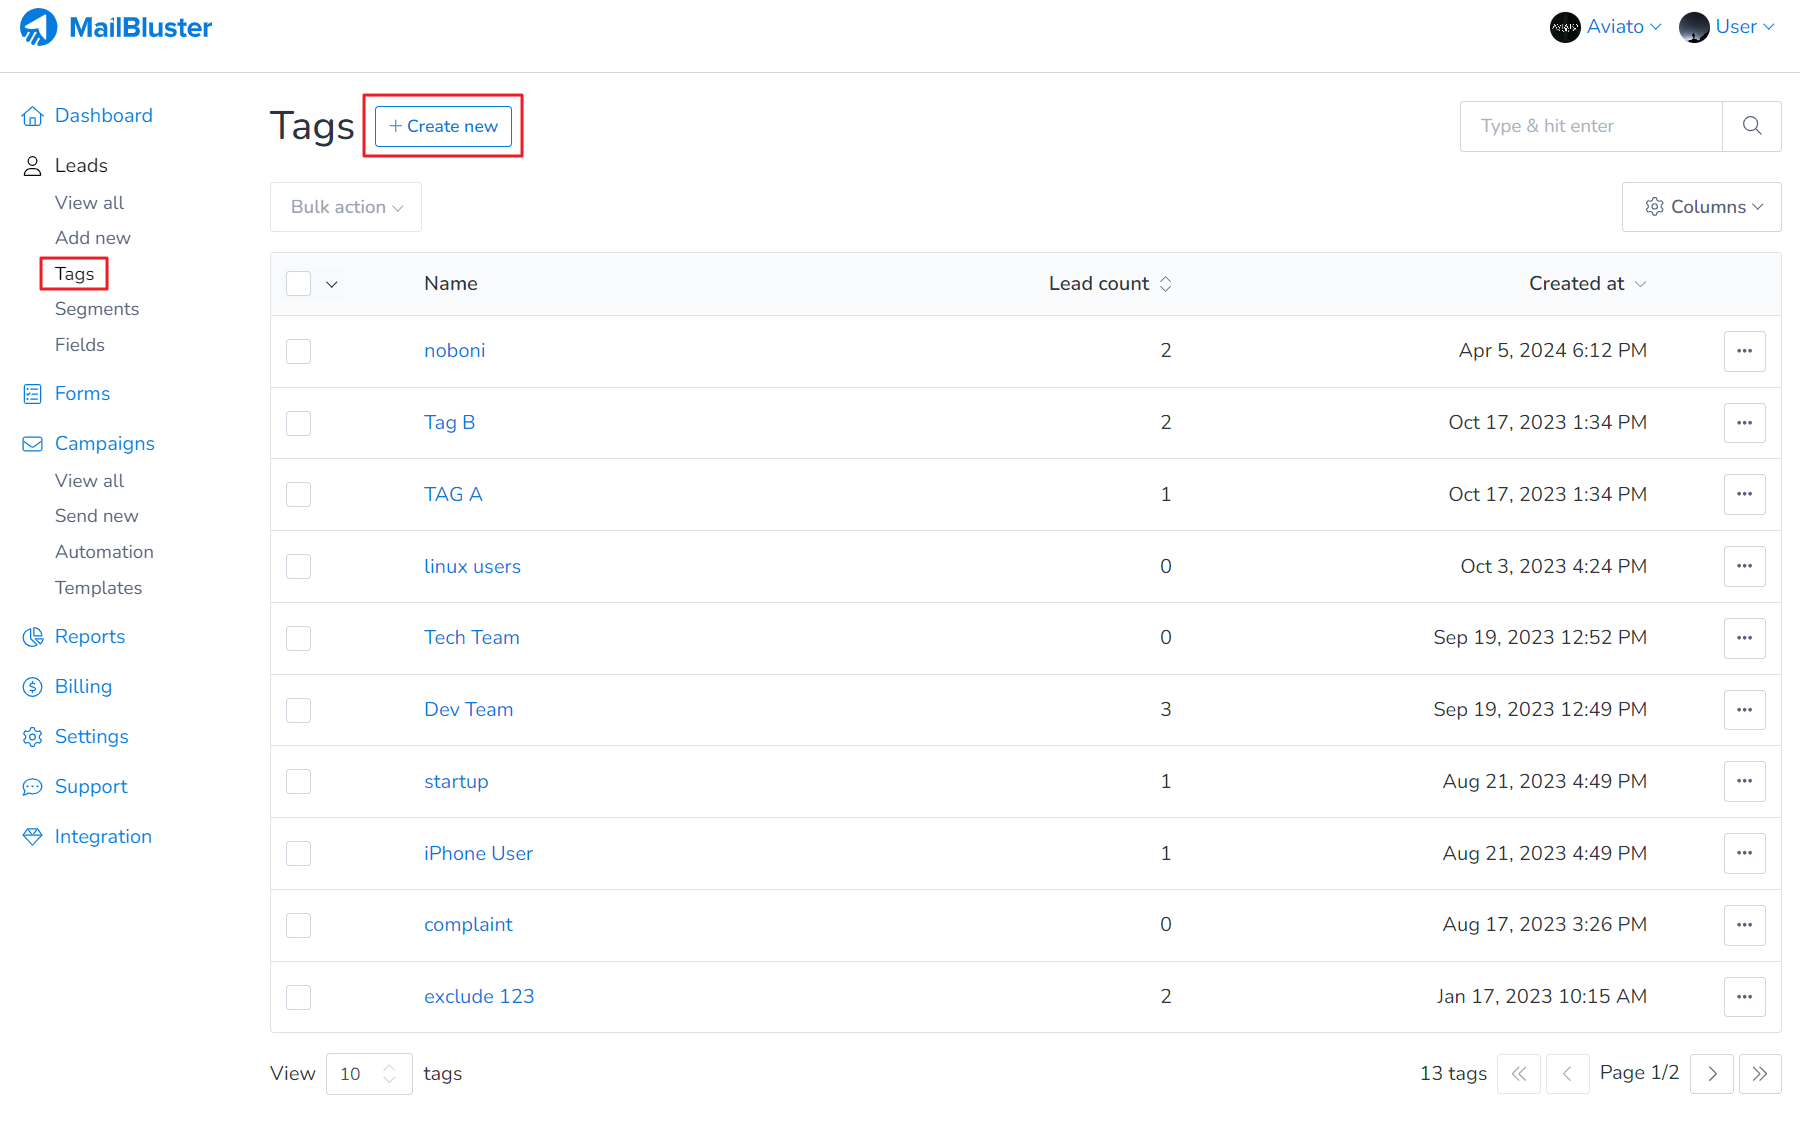
Here we have used Tags in MailBluster. First click on Create new.
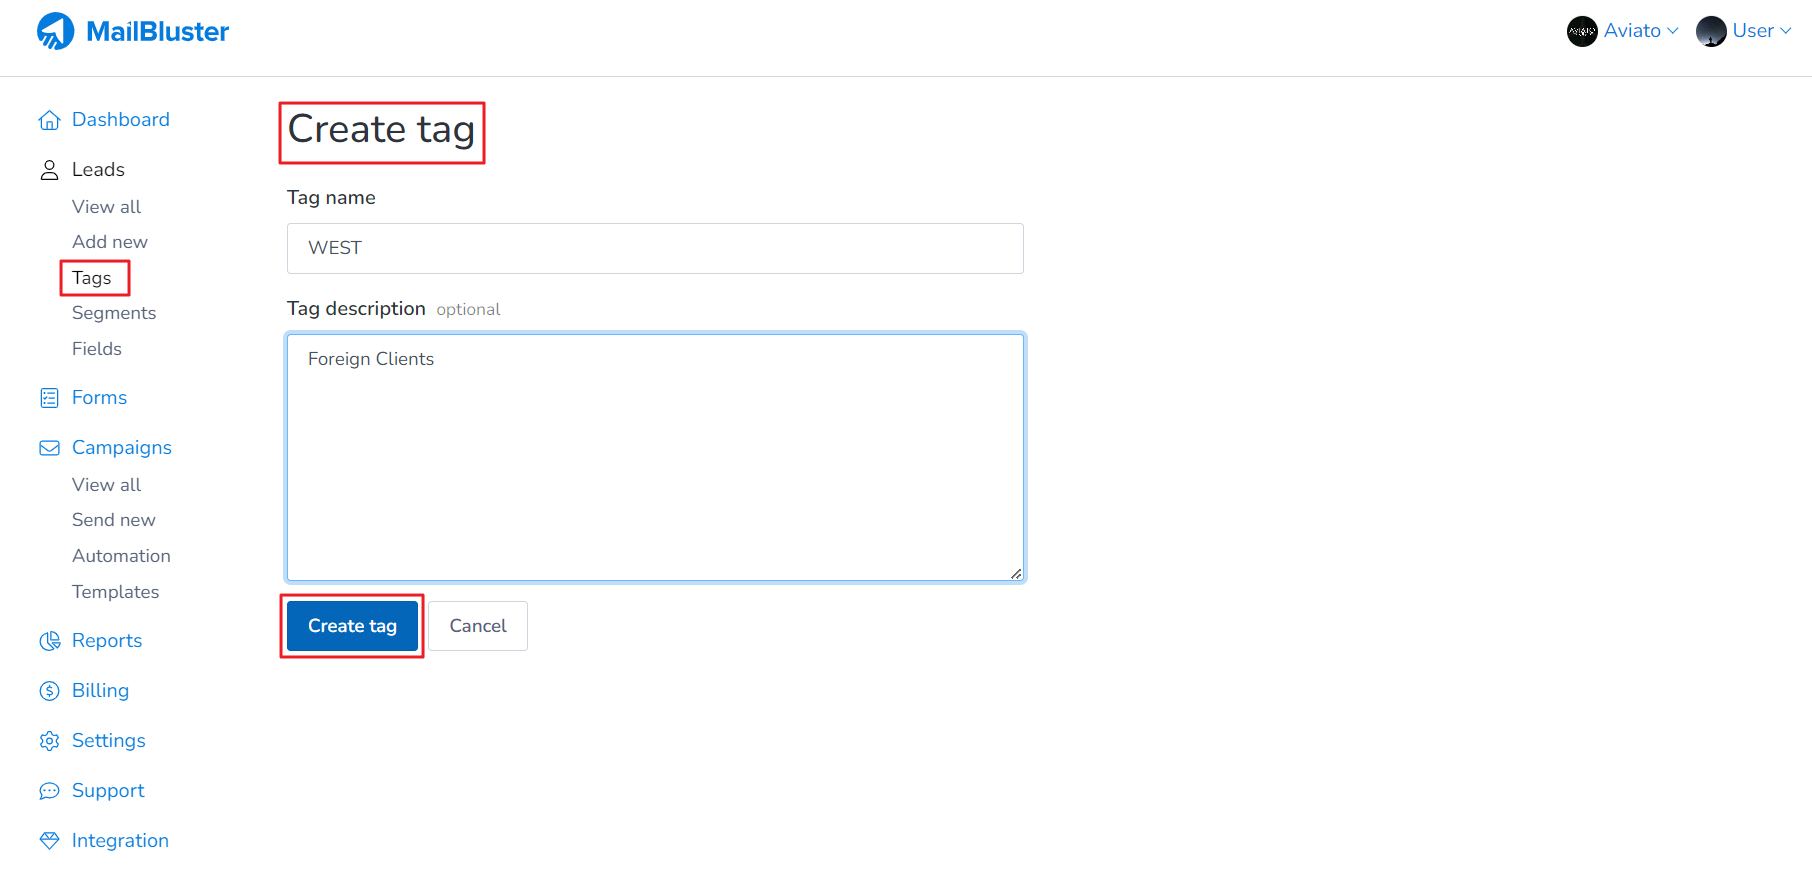
Then Create tag with any suitable name. We used here “WEST” as an example.
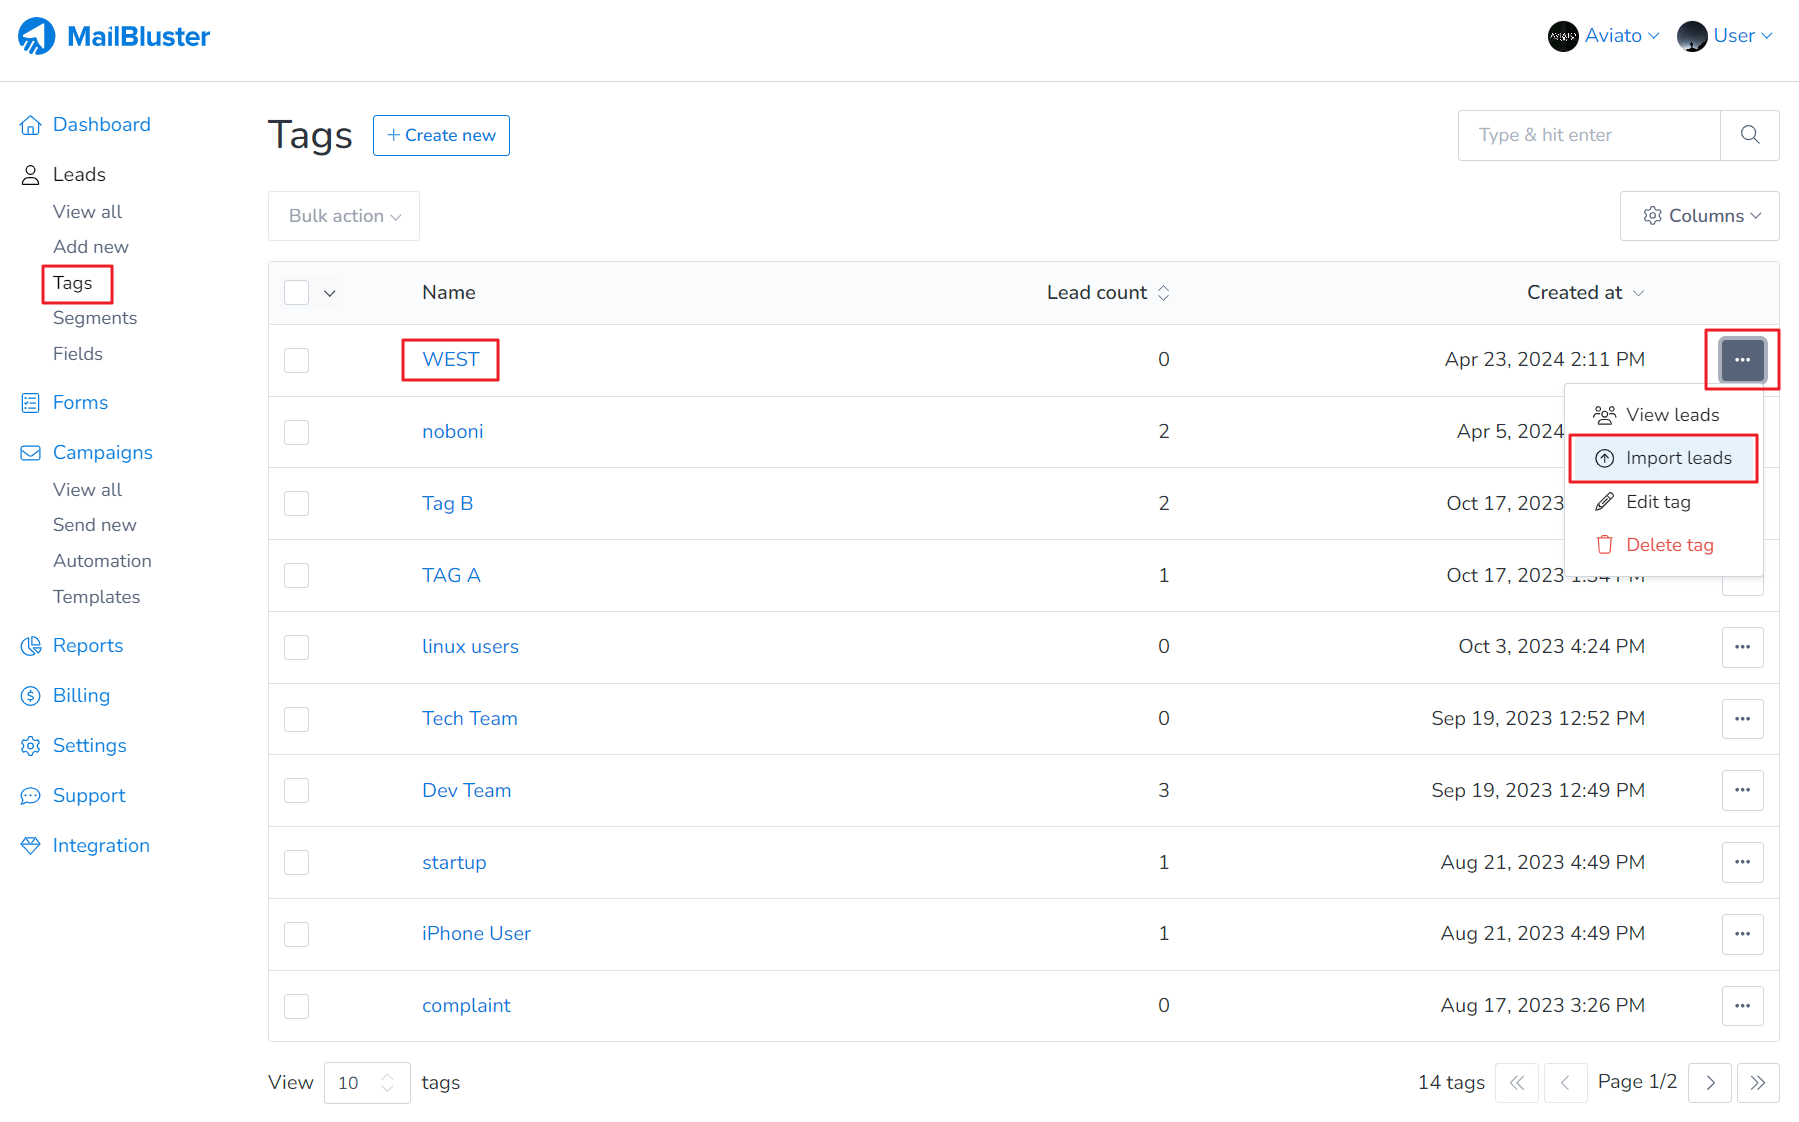
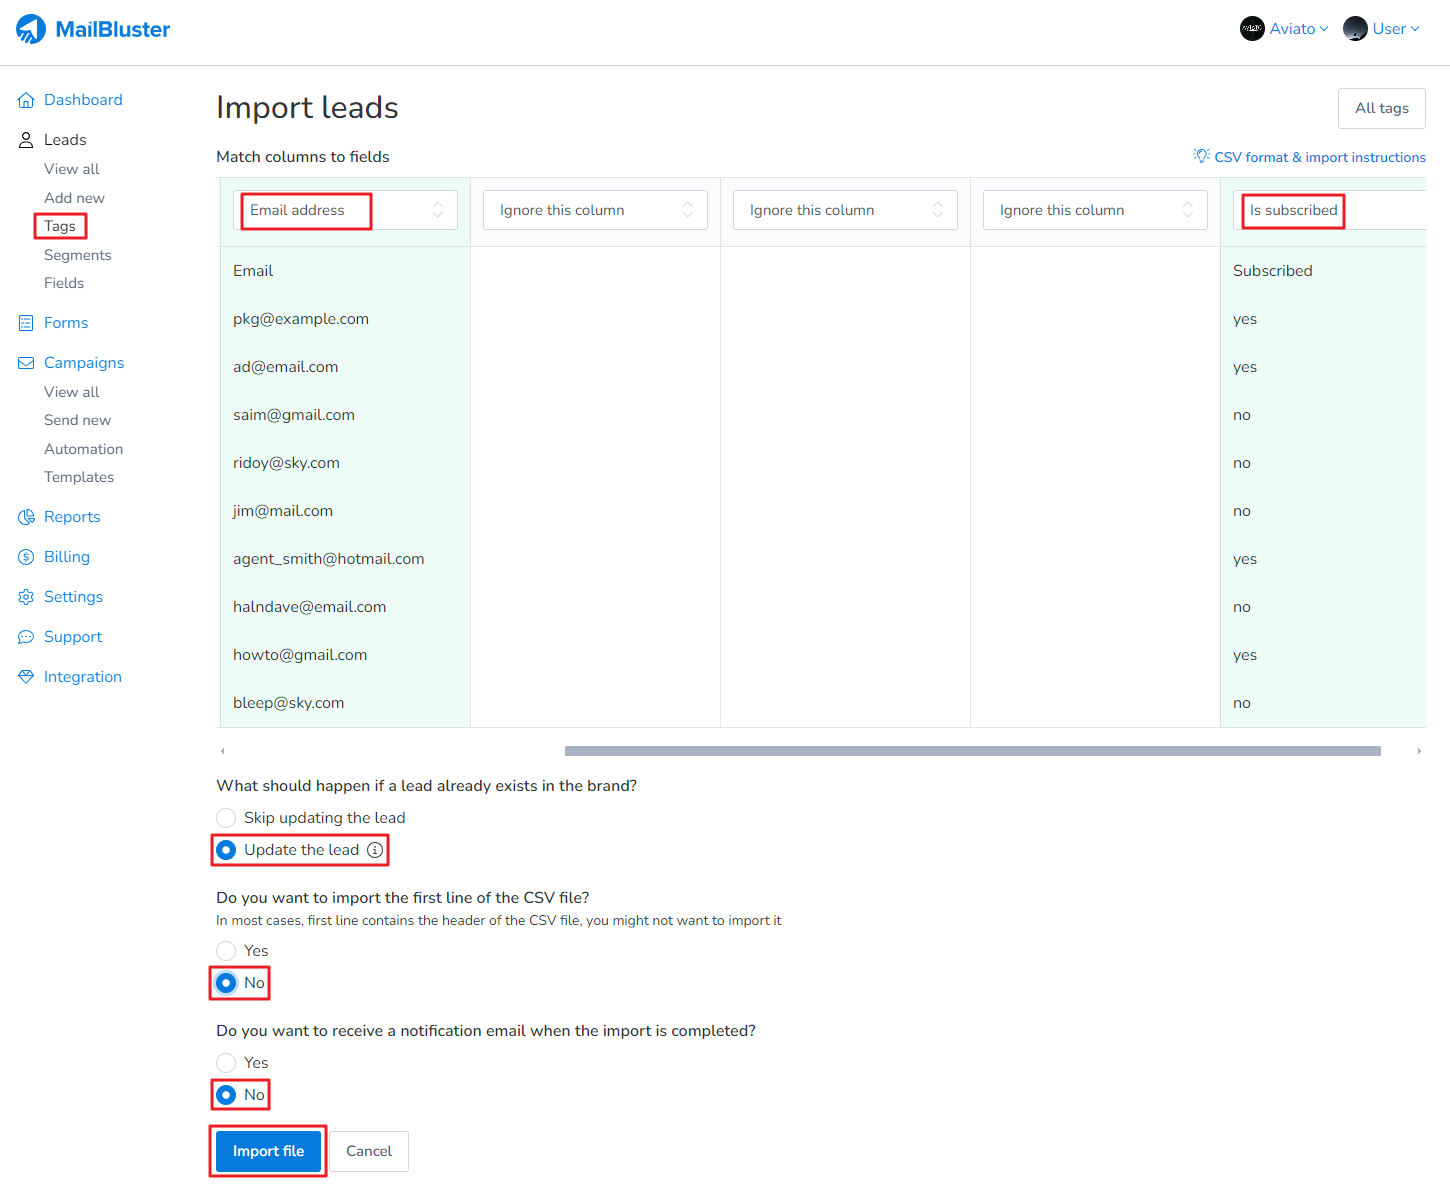
Once the tag is created, click on 3 dot ellipsis and then click Import leads.
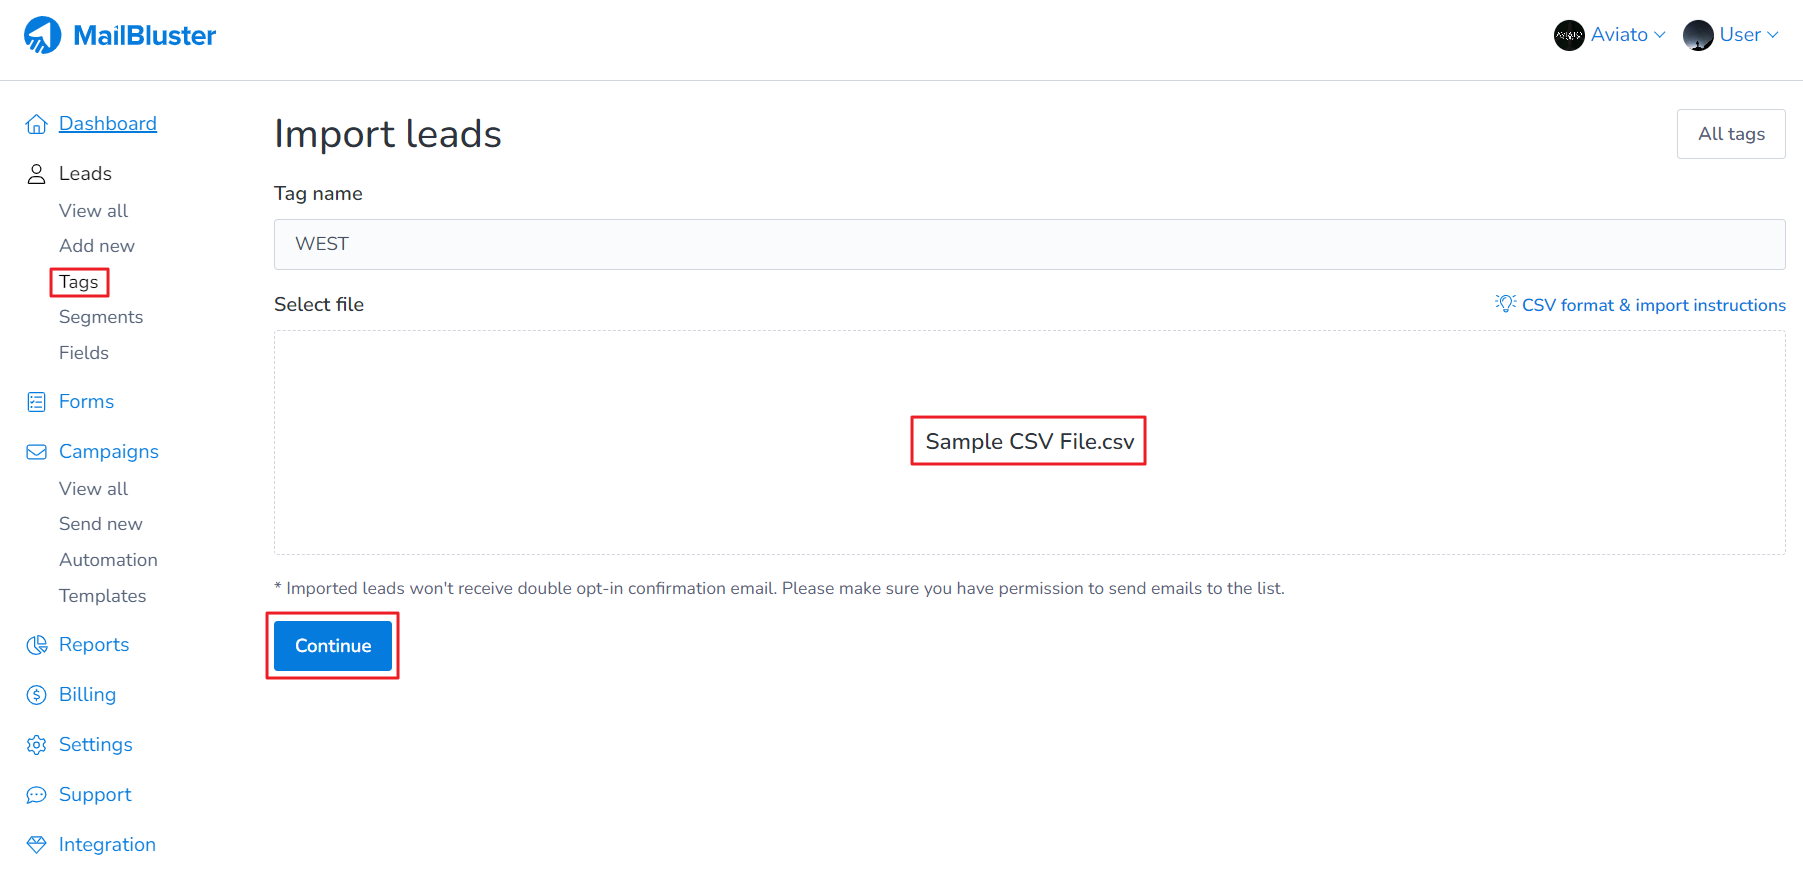
Import a CSV file containing Leads (name, email address, subscribe status) under that tag name.
Highlight the respective fields according to its heading as shown below with the following configuration. Then click Import file.
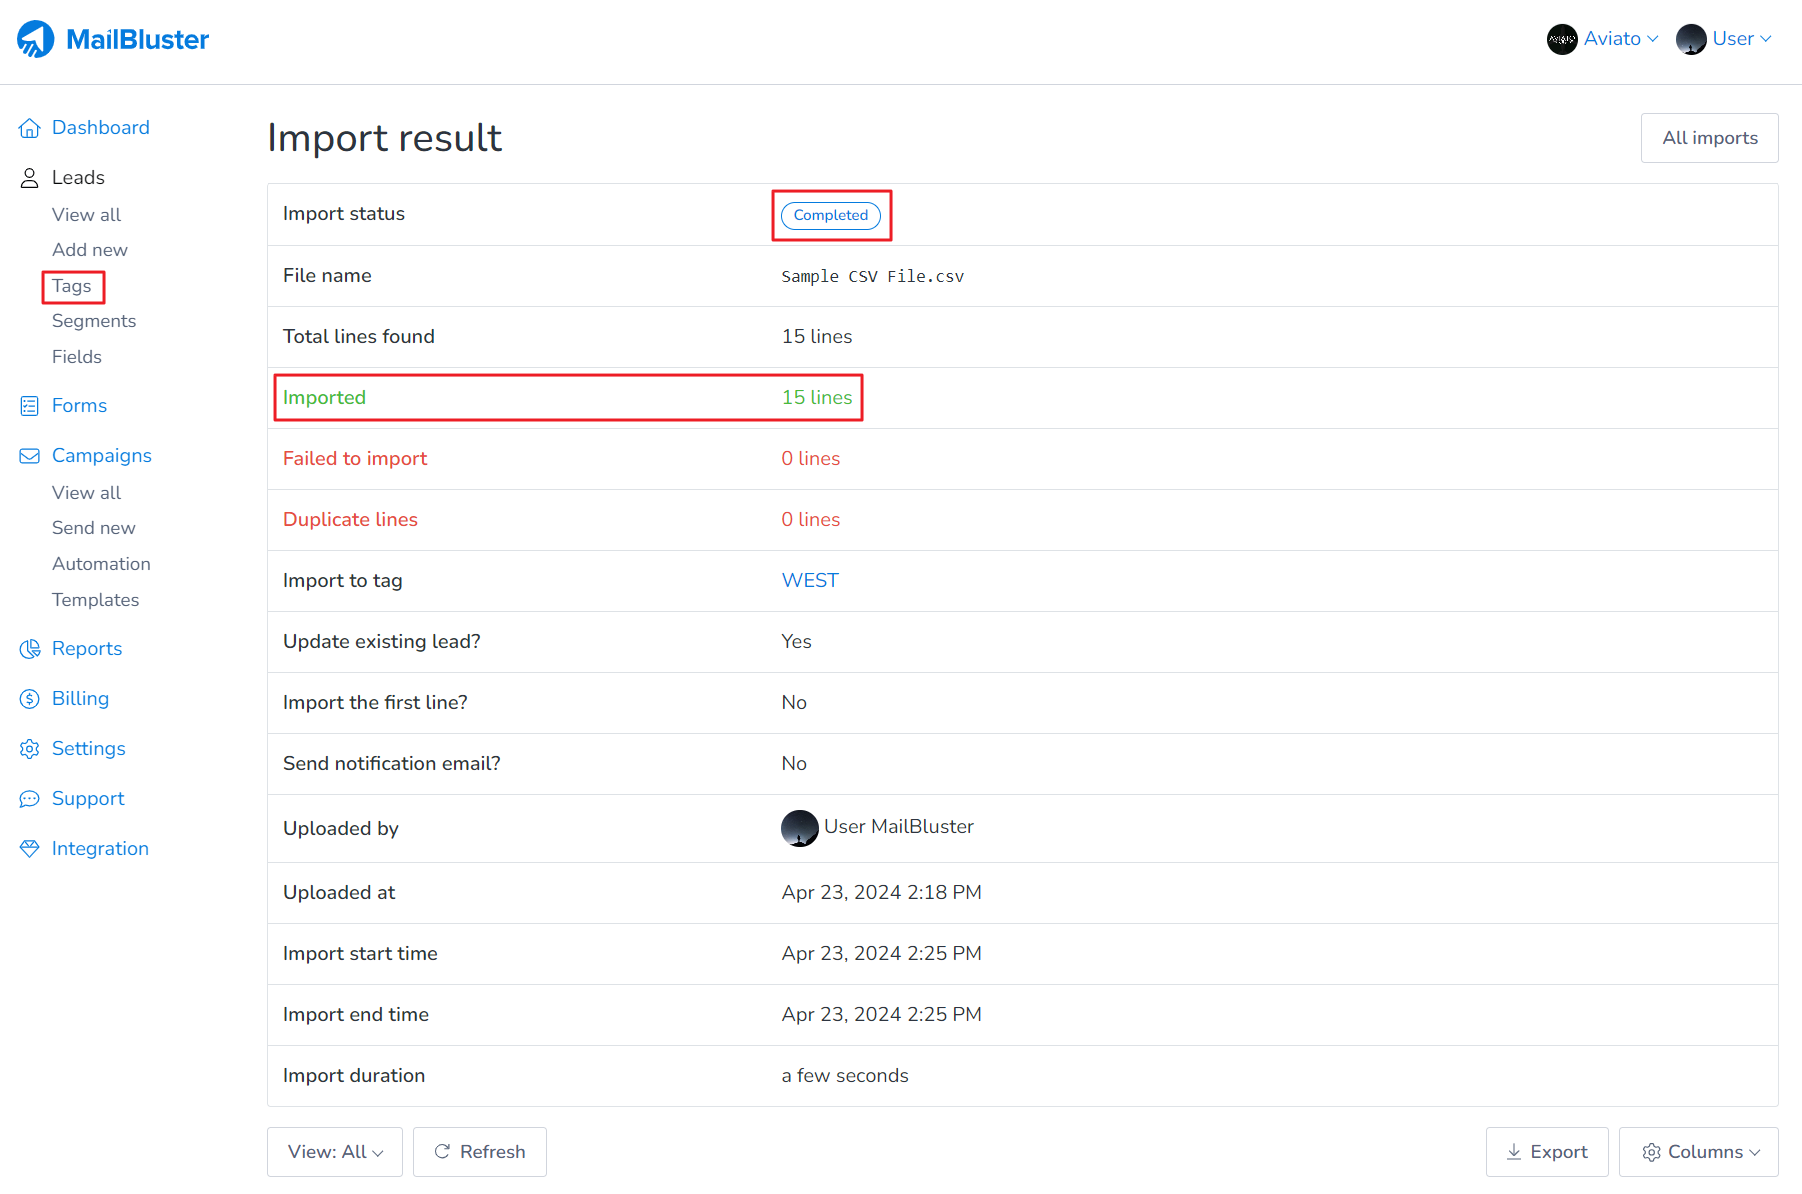
Once the leads are successfully imported under the tag “WEST”, you will be see the status “Completed”.
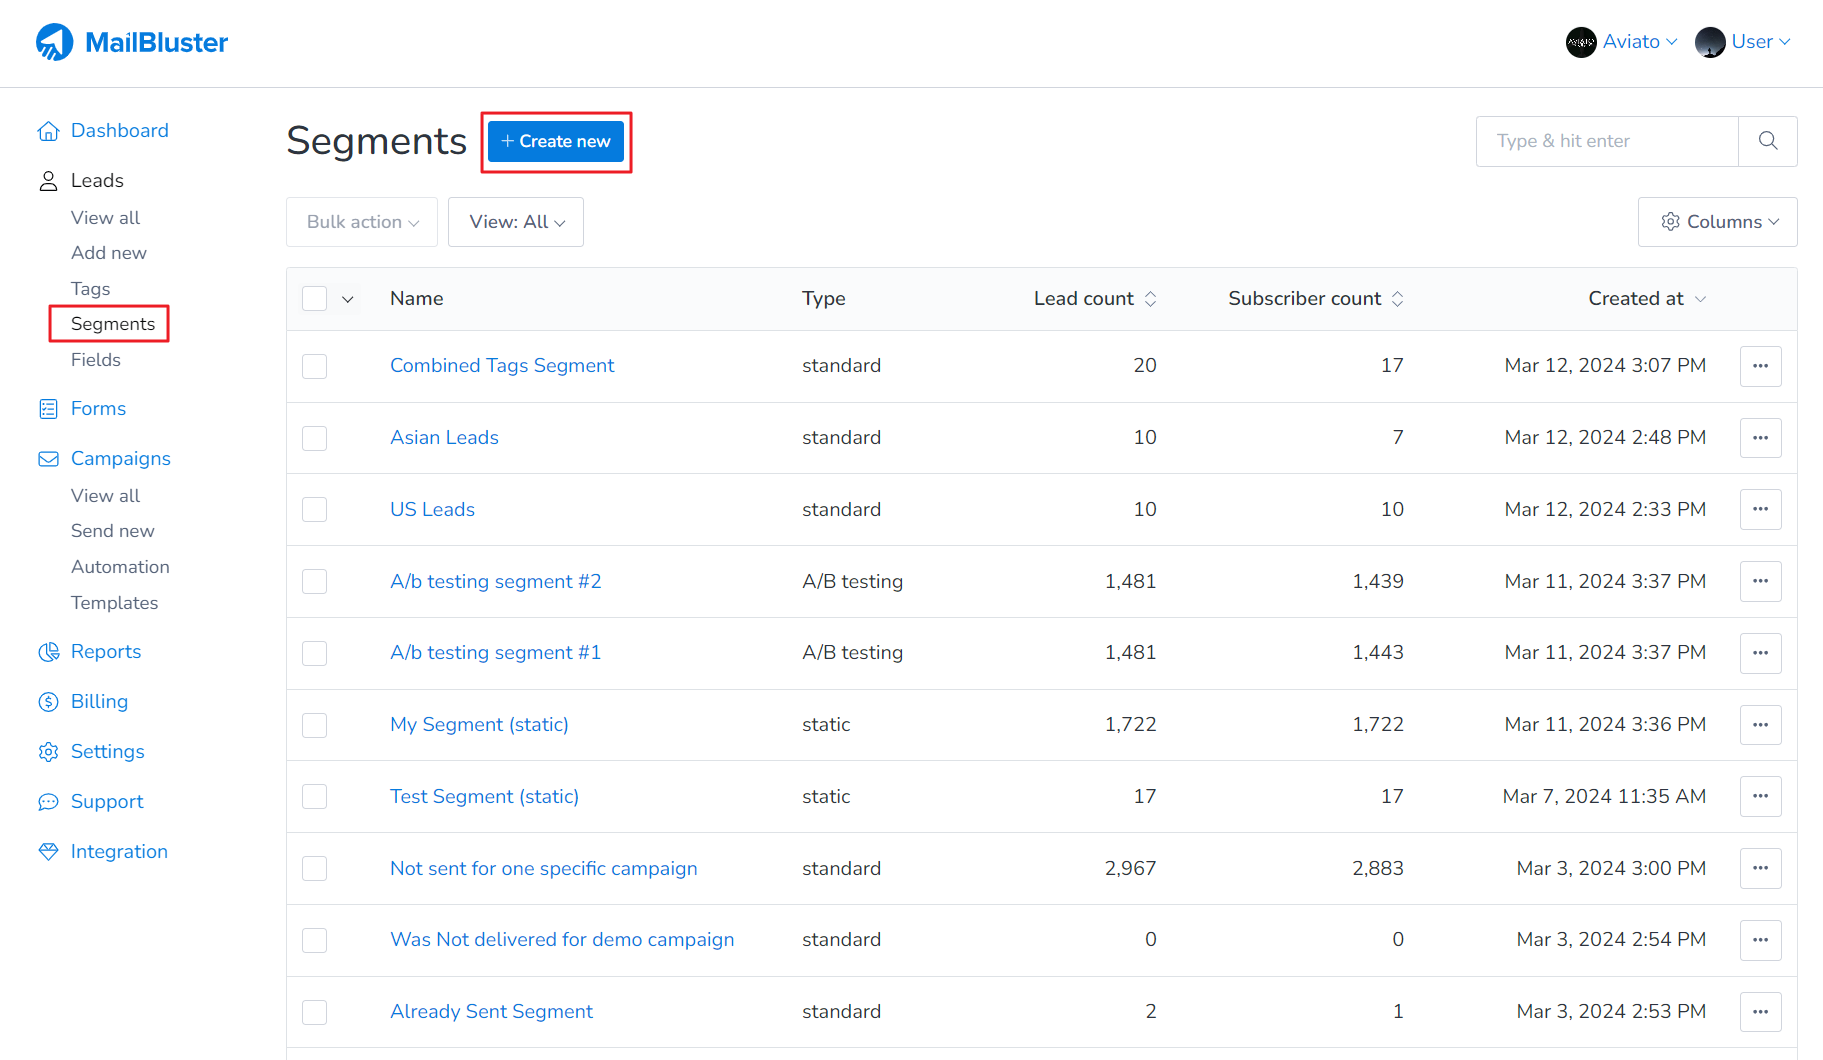
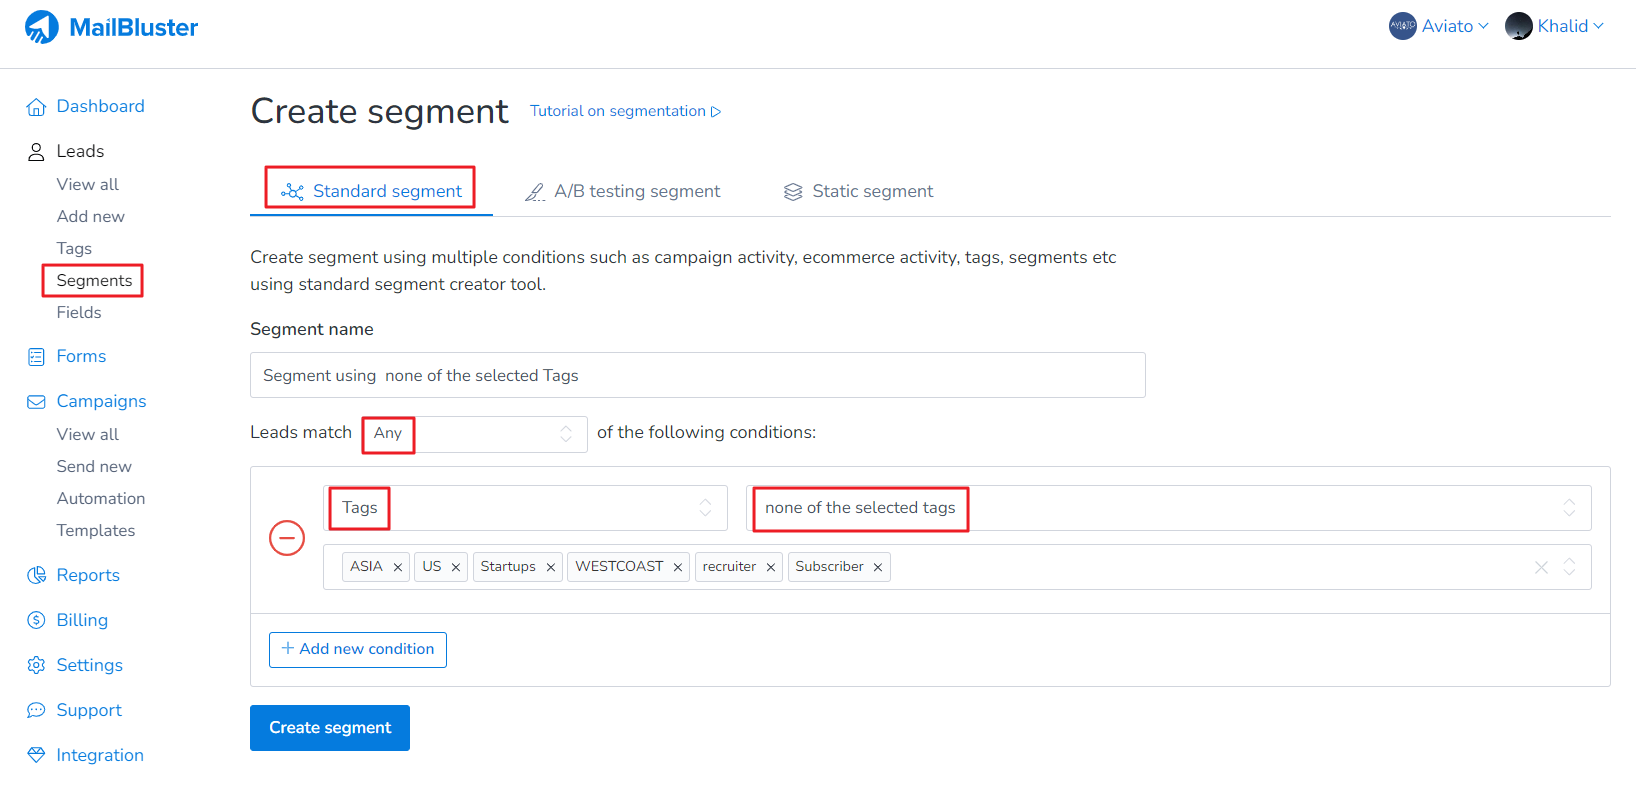
Now go to Segments, and click Create new.
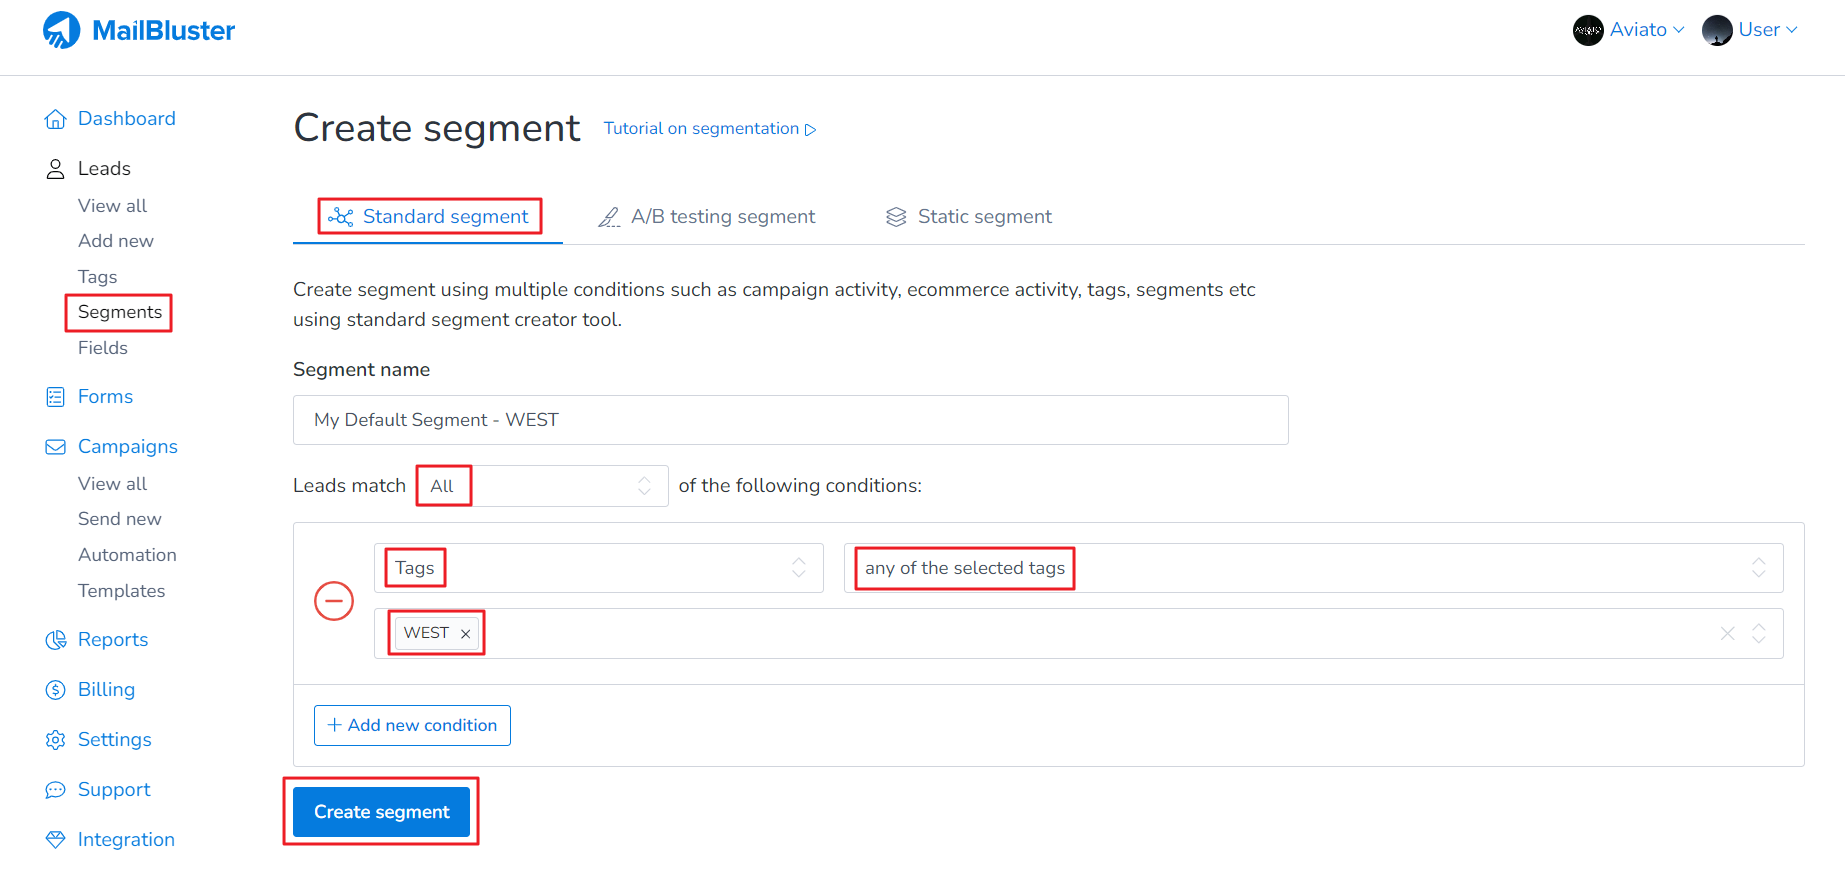
Select Standard segment and then set a segment name with the following configuration. Make sure you select Tags in Standard segment.
The standard segment with Tag “WEST” has been created. It is showing Lead count (total leads under the selected Tag) and Subscriber count (those who subscribed to your Brand). Be sure to note down the segment name so that you can select it from campaign creation menu easily.
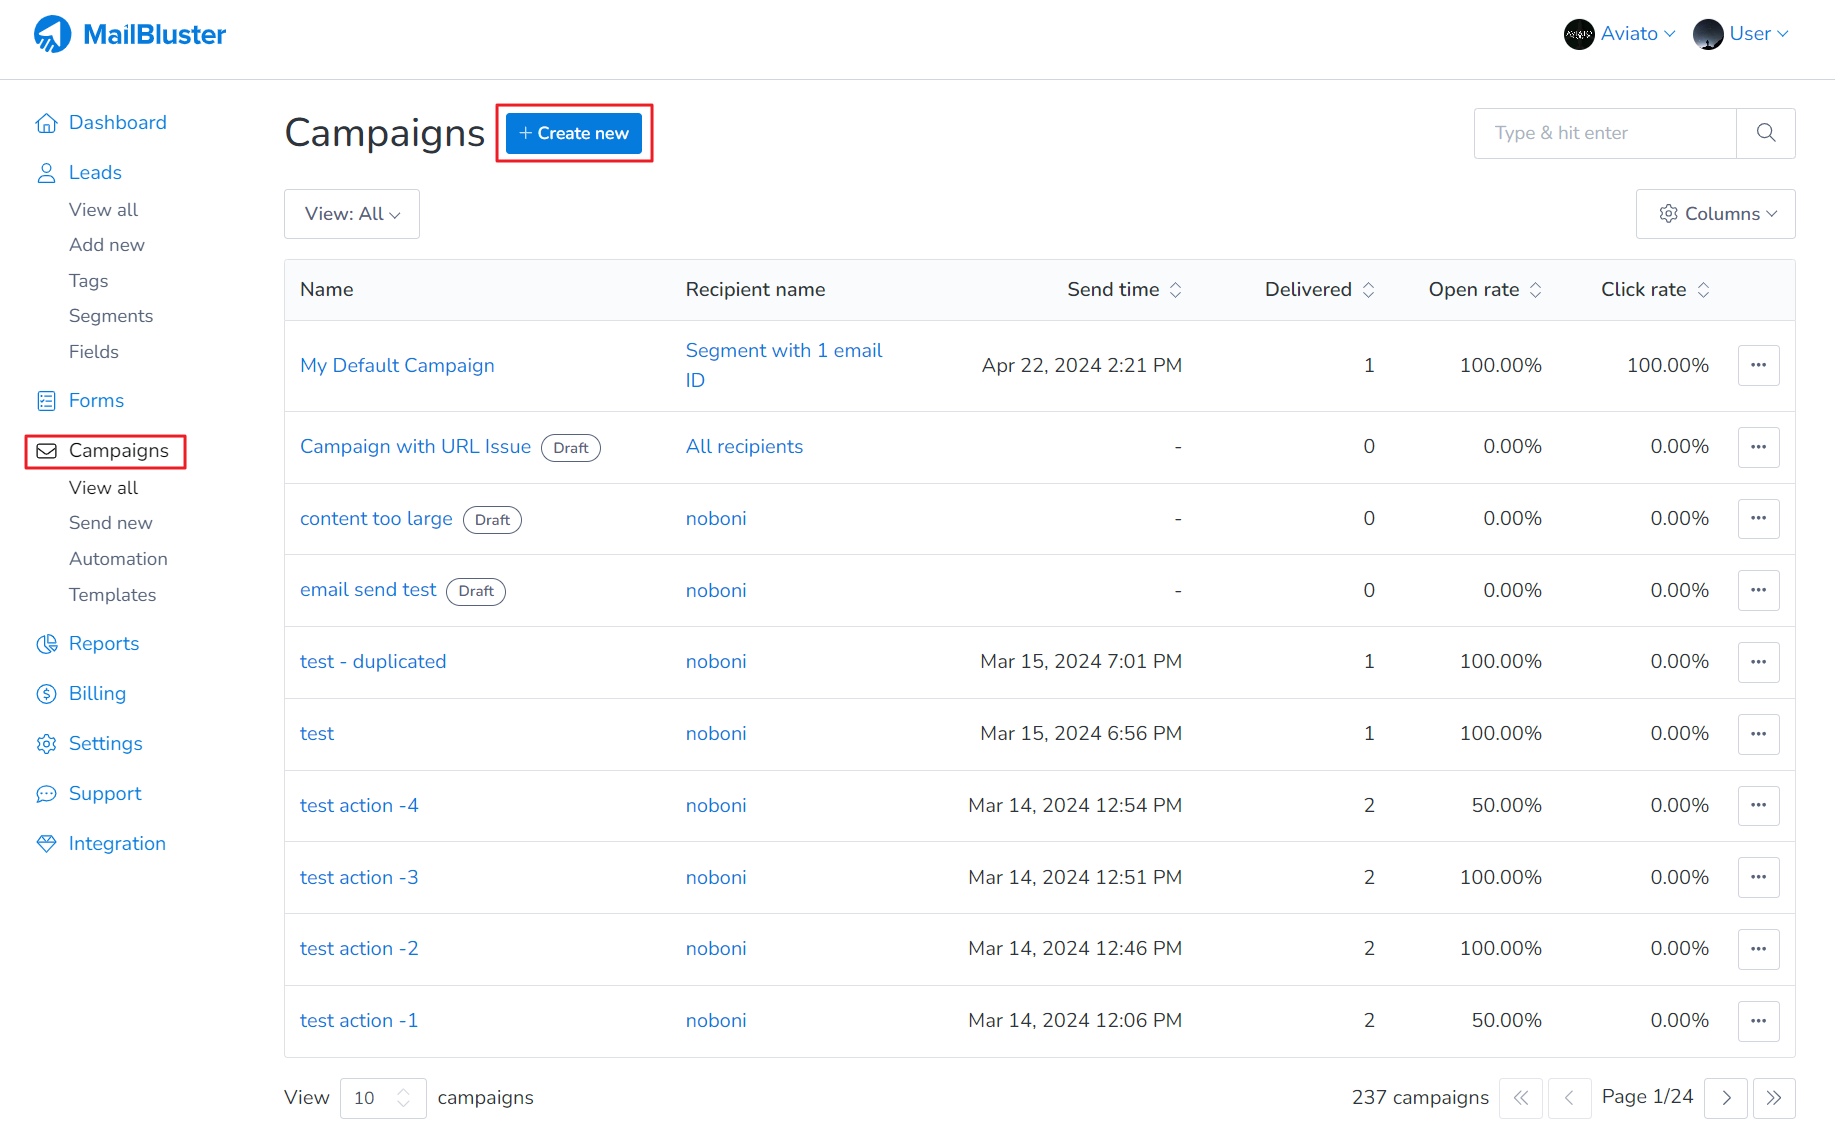
Now go to Campaigns, and click on Create new.
Set a suitable campaign name, and now finally select Subscribers of a segment. Select the segment you have just created earlier using Tag “WEST”. Now you will be able to send campaign to this segment.
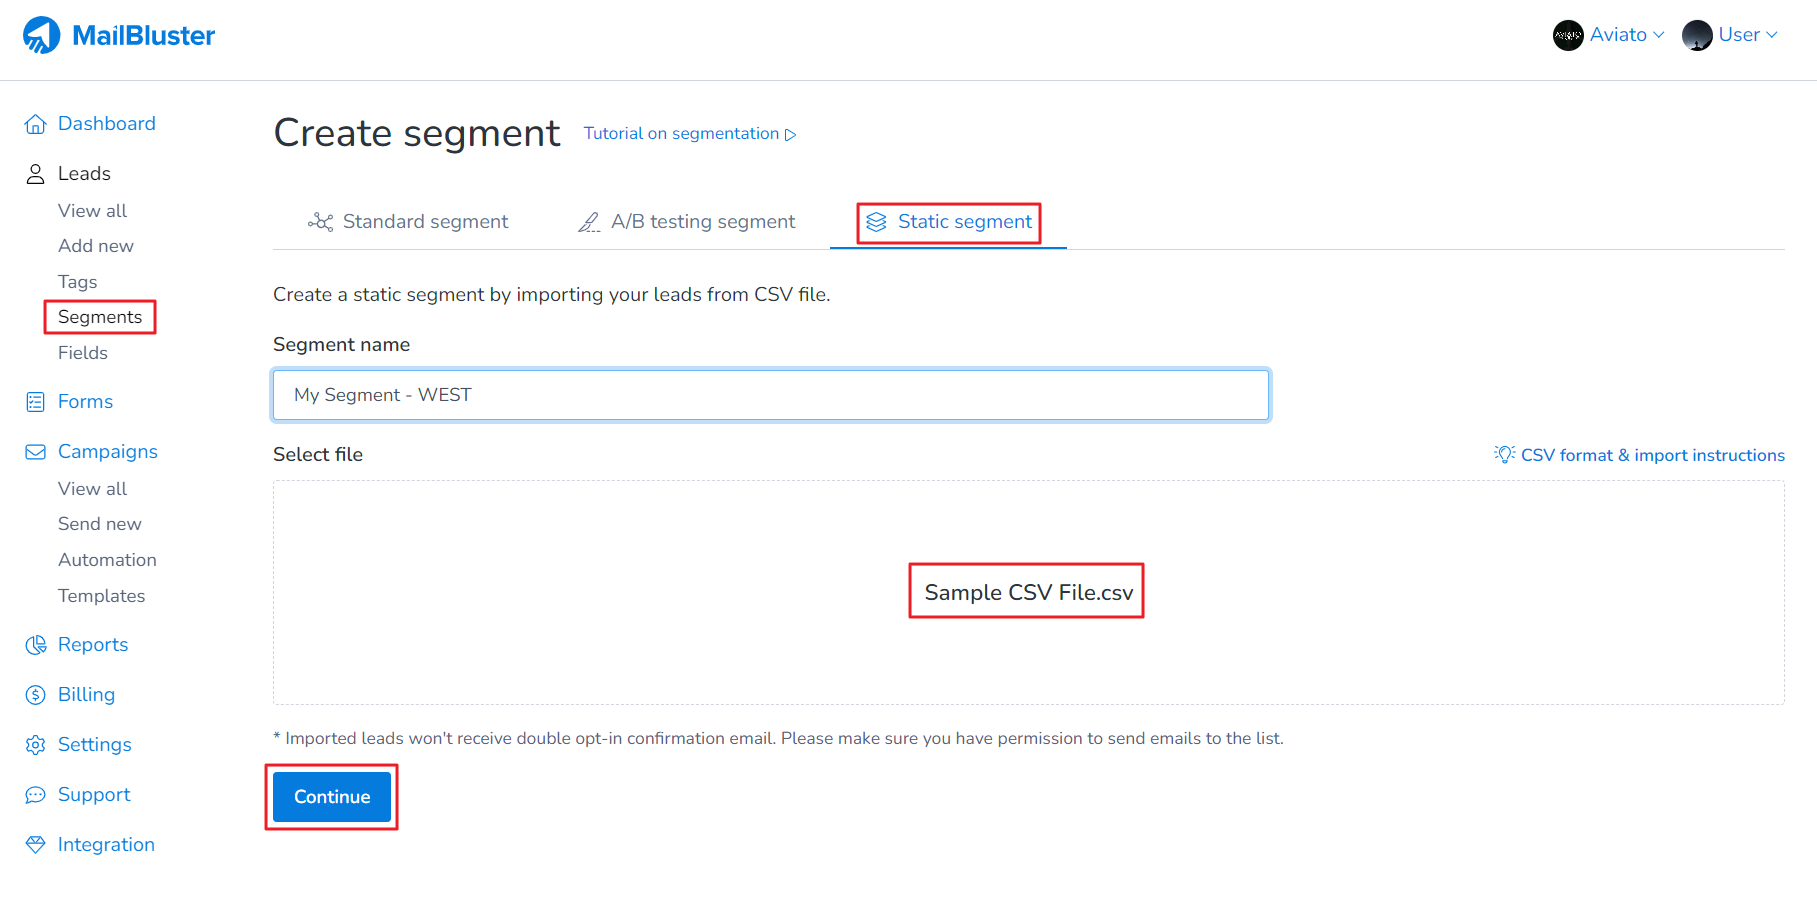
2. If the leads are not yet added to your Brand, you can import them into a static segment as shown below and send the campaign to that segment.
Go to Segments and click Create new.
Make sure you select Static segment. Here we use a sample name “My Segment – West”. Then upload the CSV file containing Leads (name, email address, subscribe status). Click Continue after you drag and drop the CSV file.
Highlight the respective fields according to its heading as shown below with the following configuration. Then click Create segment.
You Static segment will be created once the leads are successfully imported with the status “Completed”.
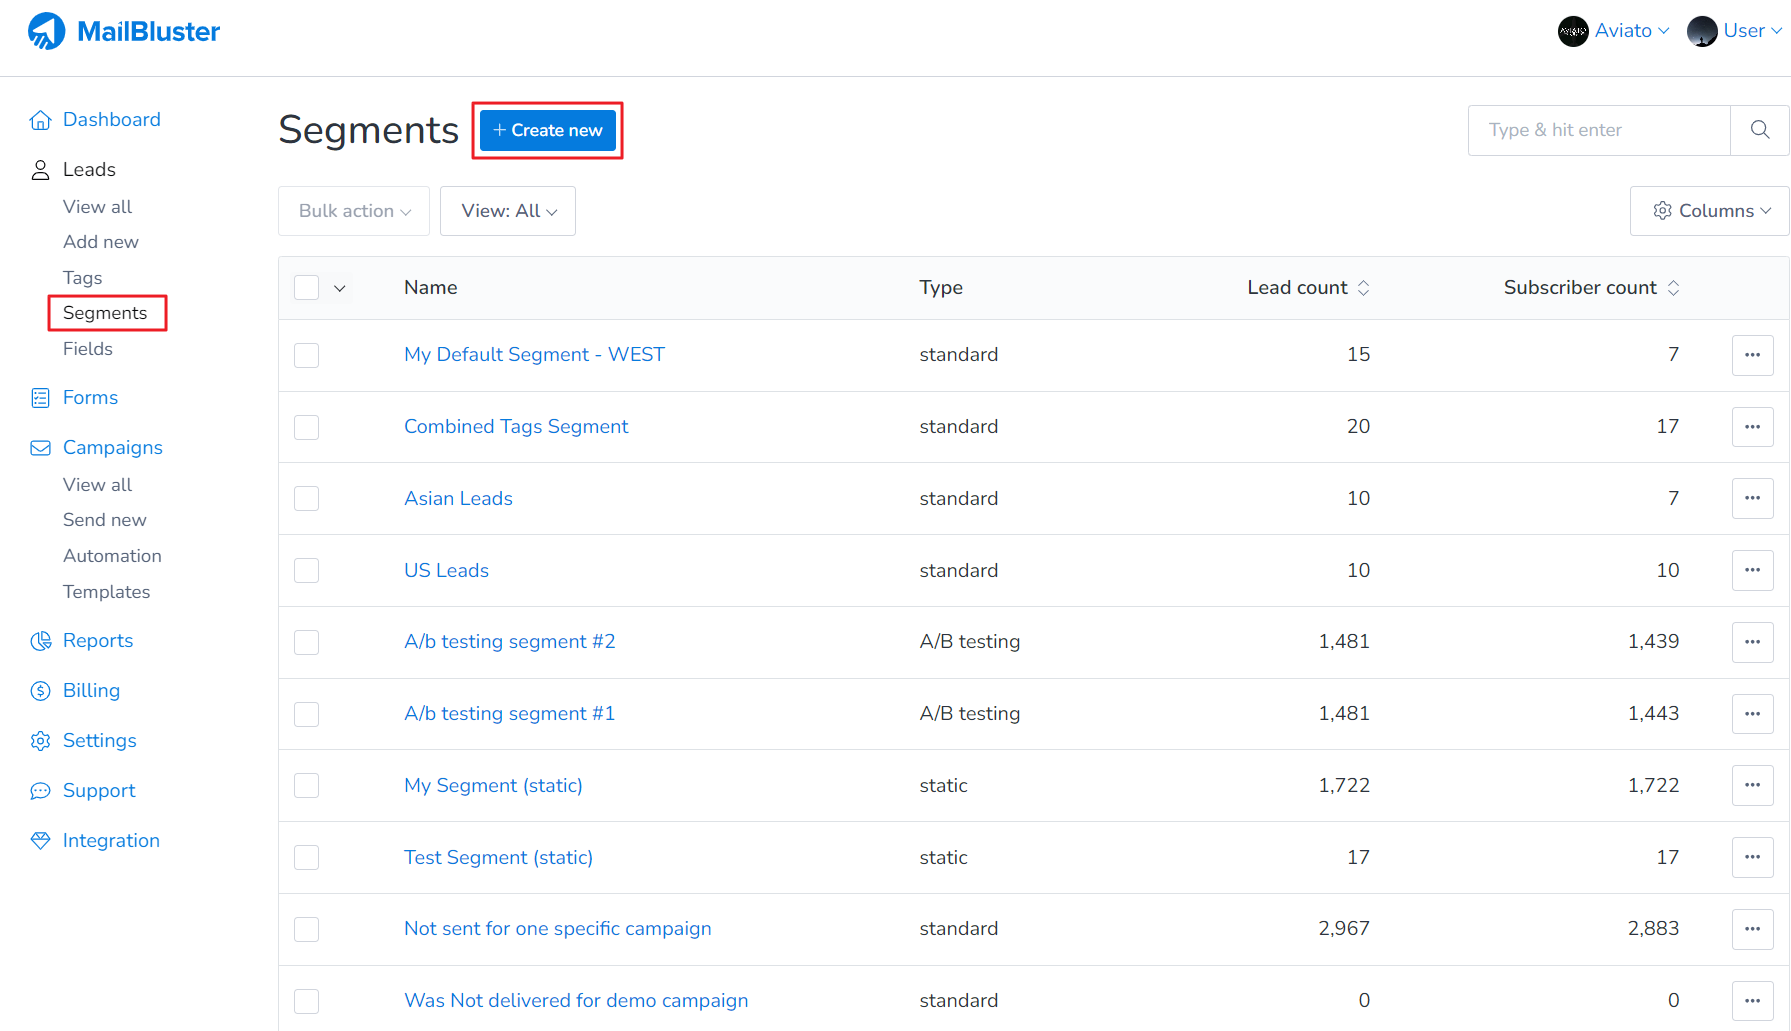
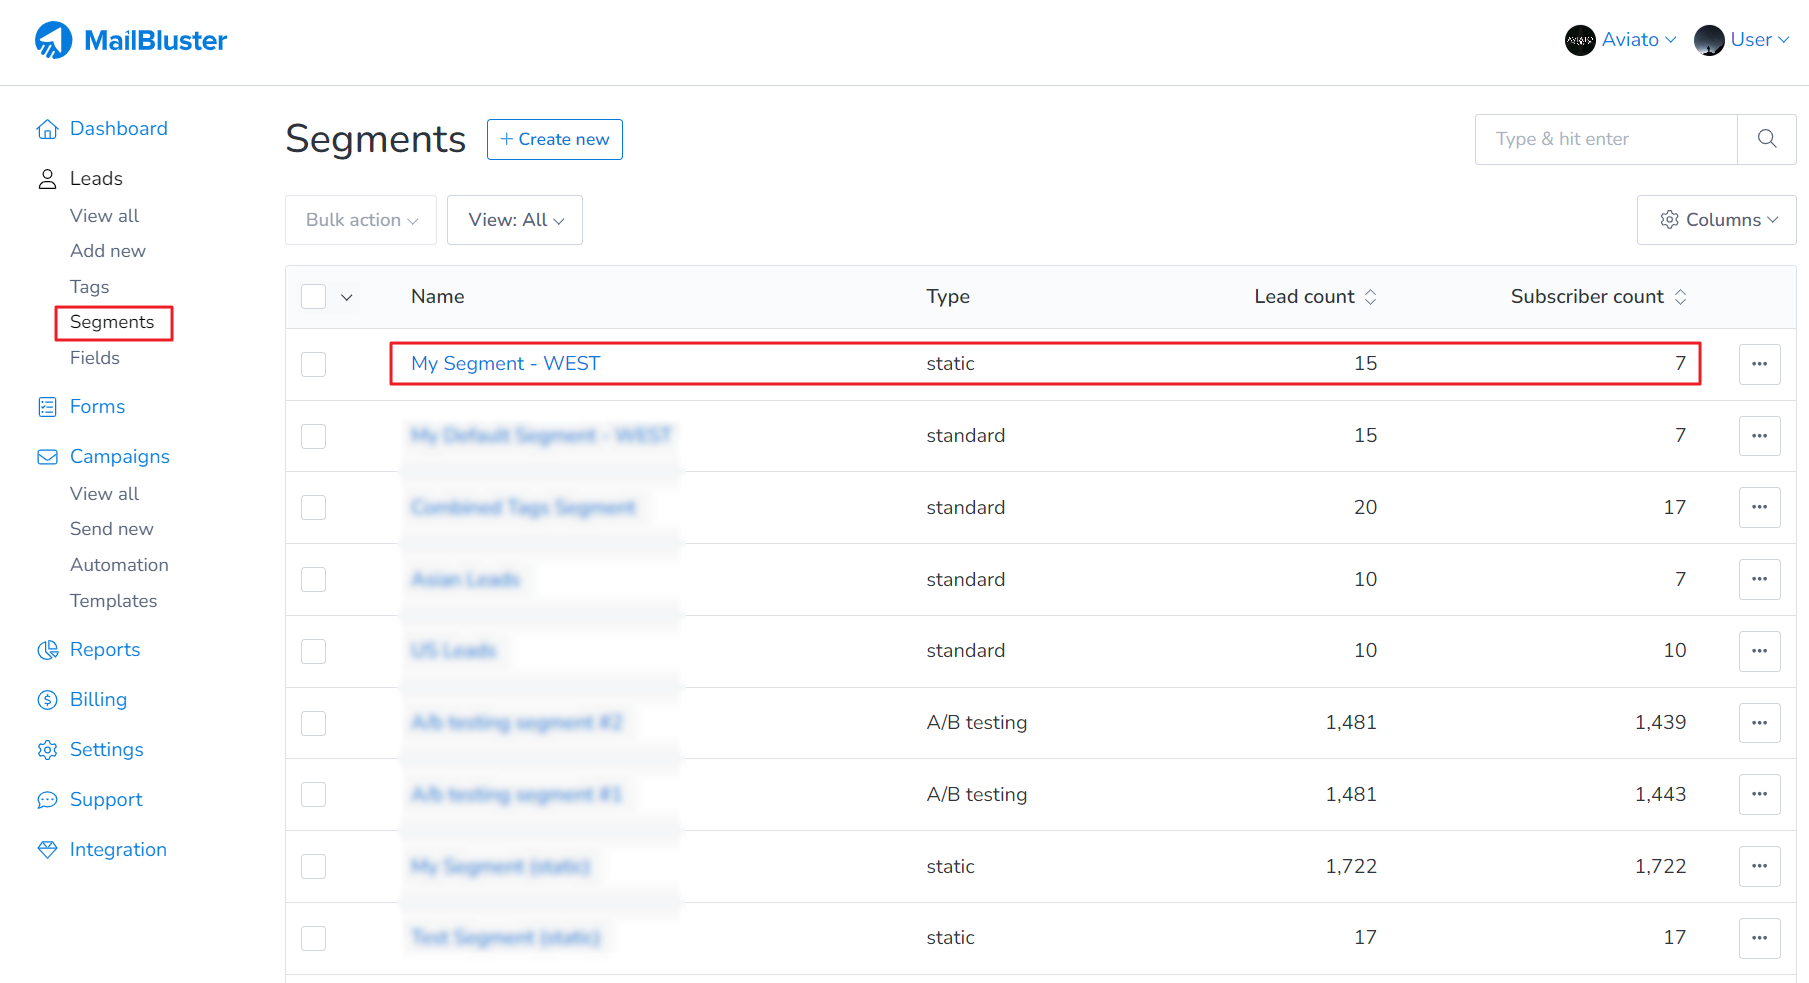
You will see the Static Segment “My Segment – WEST” under Segments with Lead count (total leads under the selected Tag) and Subscriber count (those who subscribed to your Brand).
Now create a campaign as before and select that Static Segment “My Segment – WEST” a shown below.
3. If your leads are already added to your Brand, you can attach tags to them. Then, based on these tags, you can create a standard segment and send the campaign to that segment as mention earlier in 1.
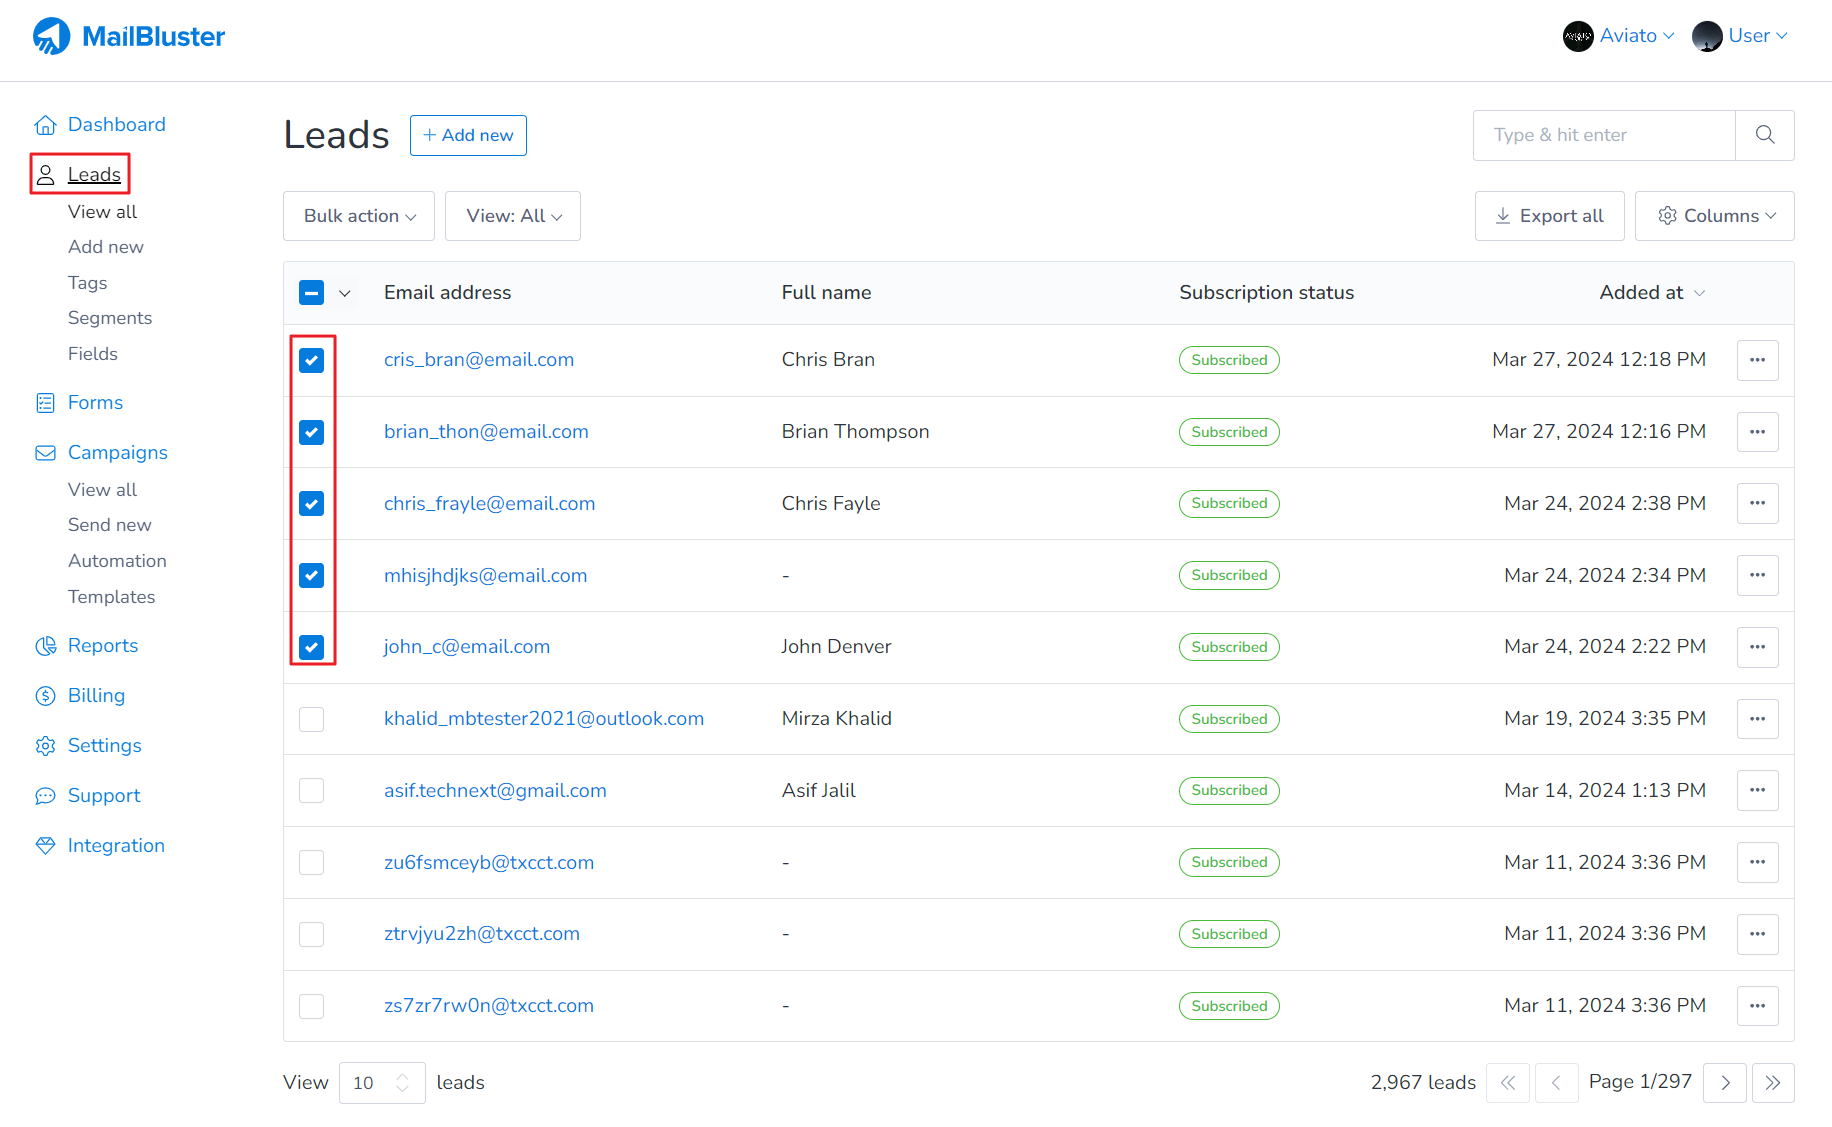
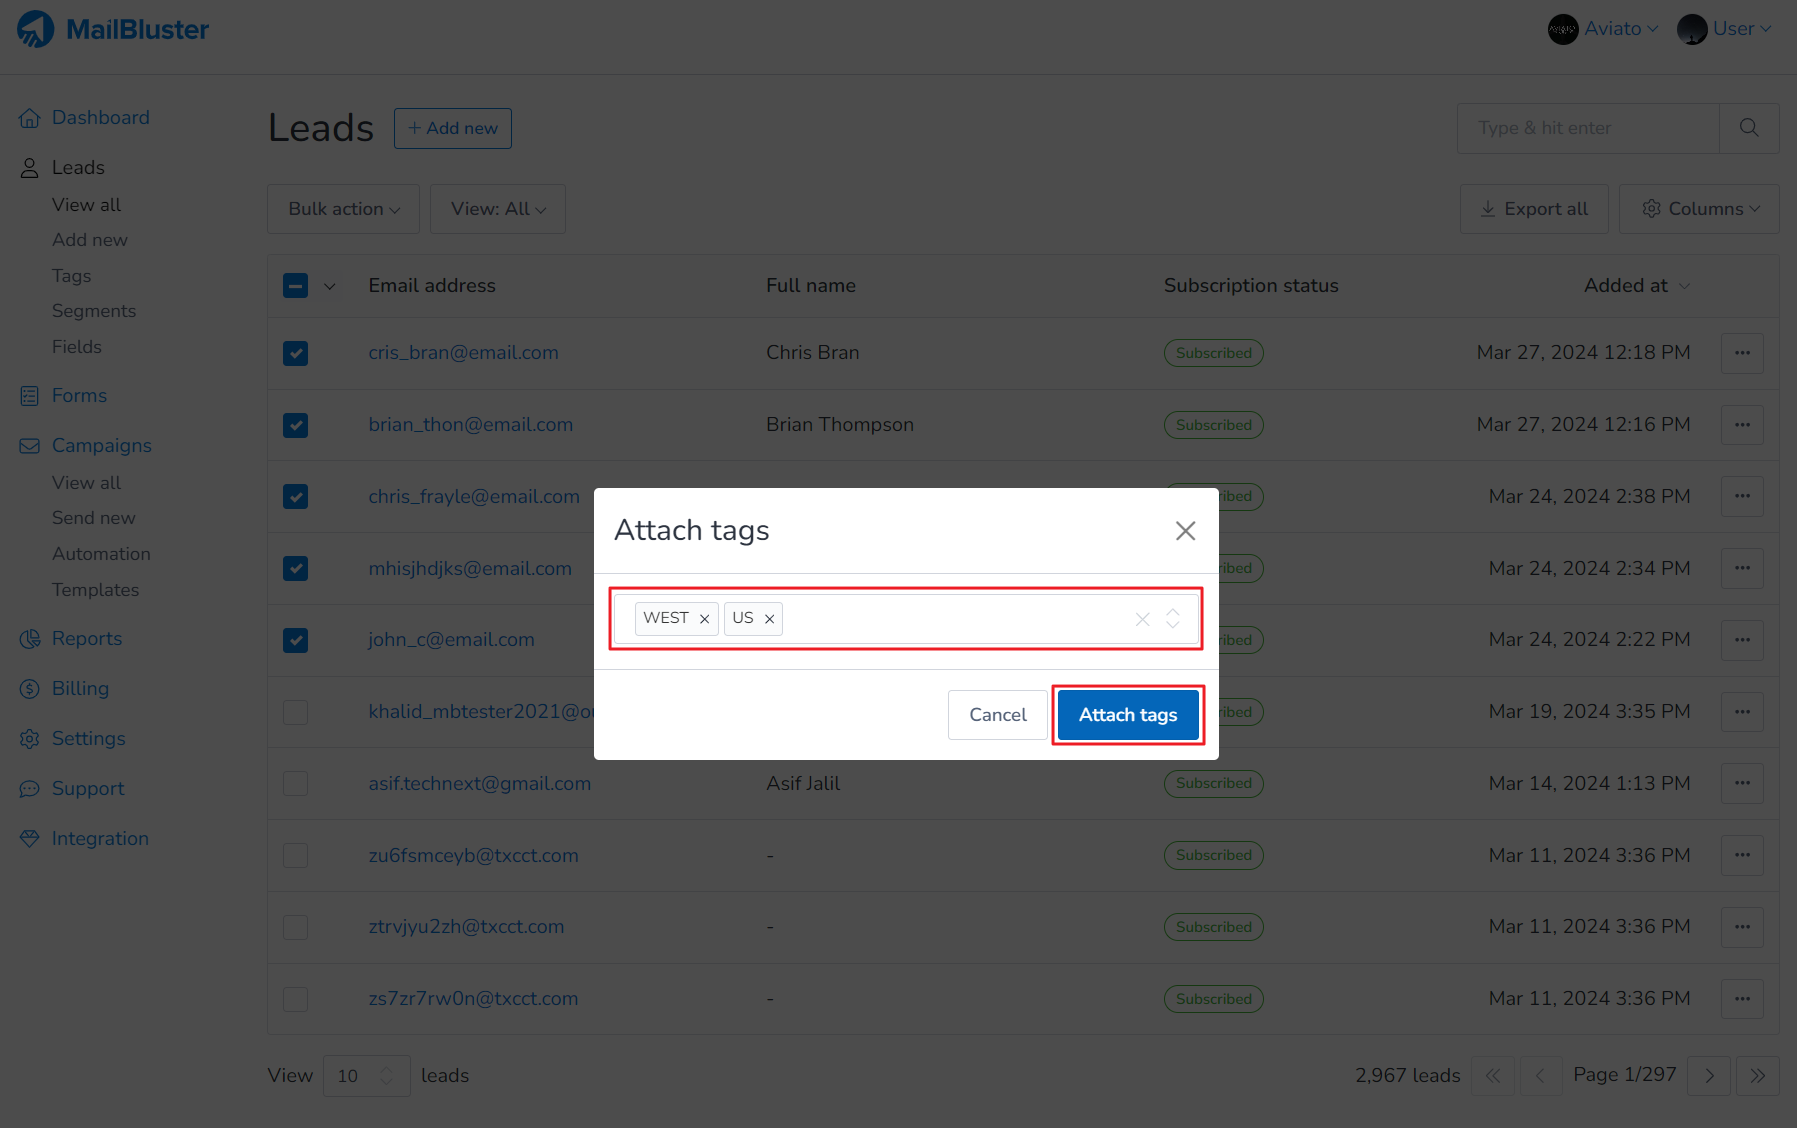
Here is how you can add Tag to your Leads. We have already created Tag name “WEST”. So now we just need to assign the Tag to our selective leads. Just go to Leads. Select the desired leads by clicking the check boxes as shown below.
Click on Bulk action and the click Attach tags.
A popup screen will appear to select one or multiple tags to assign to the selected leads. Here we selected multiple tags “WEST” and “US”. Now click Attach tags.
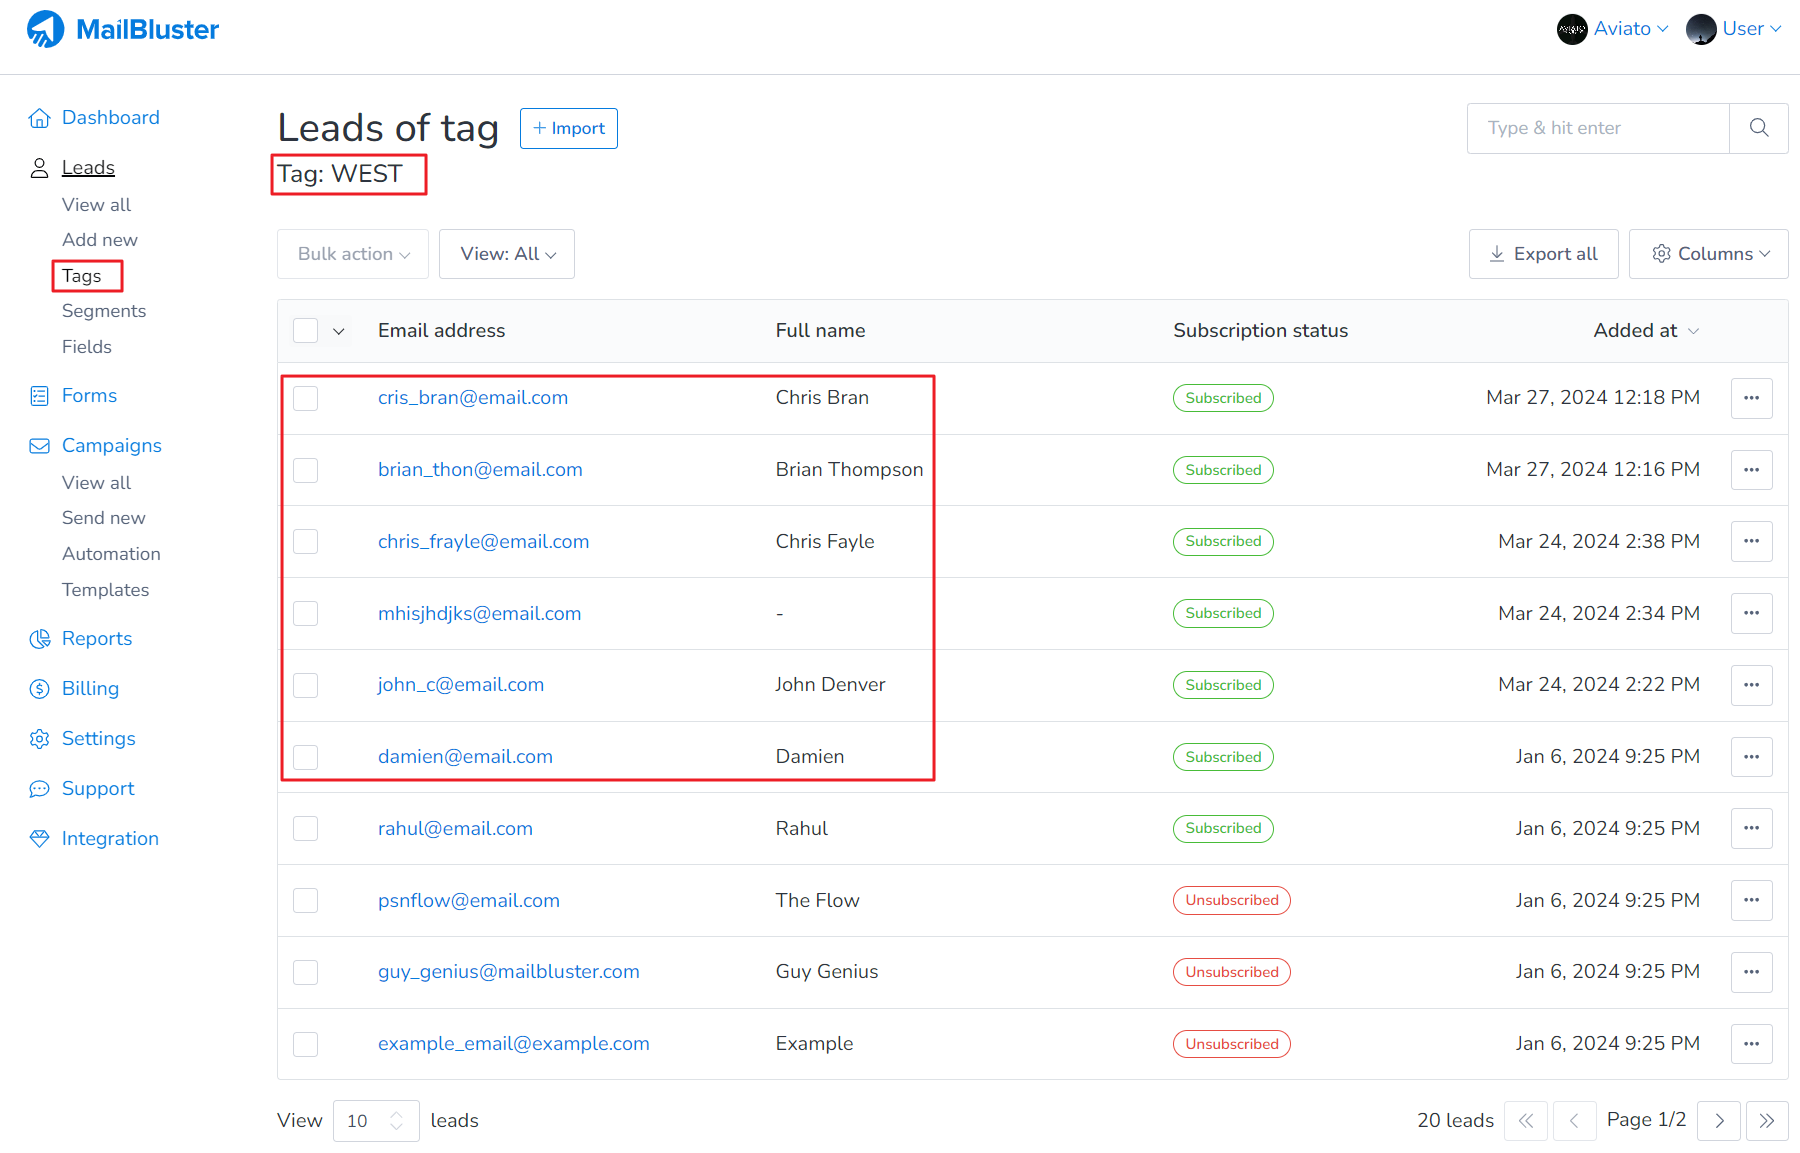
Now if you go to Tags and click on WEST, you will those leads are under this tag successfully.
Here you will learn how to create a standard segment for untagged leads. As you already know you can’t directly view leads that are not part of any tag. However, you can create a standard segment (group of leads) for those not attached to any tags by following the conditions below:
After sending 50,000 emails within 24 hours, AWS will not allow you to send any more emails that day. Please note, that, it could be more than 50,000 emails/24 hours based on the limit set by AWS. So, MailBluster will eventually fail to send the rest and mark the campaign as failed. It will not try to send the remaining emails automatically since it’s a part of the manual campaign (not Automation). What you need to do is find the remaining emails (leads) of the failed campaign using the conditions shown below for the Standard segment and send a new campaign to that segment on the next day.
Segment Conditions:
Creating a new campaign using the above Standard Segment conditions:
To avoid such situation like campaign failed issue due to AWS daily sending limit, you can slice your total recipients into multiple segments using A/B testing segment where each segment won’t contain more than your daily sending limit. To do so, go to Leads > Segments > Create segment > A/B testing segment tab and create your segment as shown below.
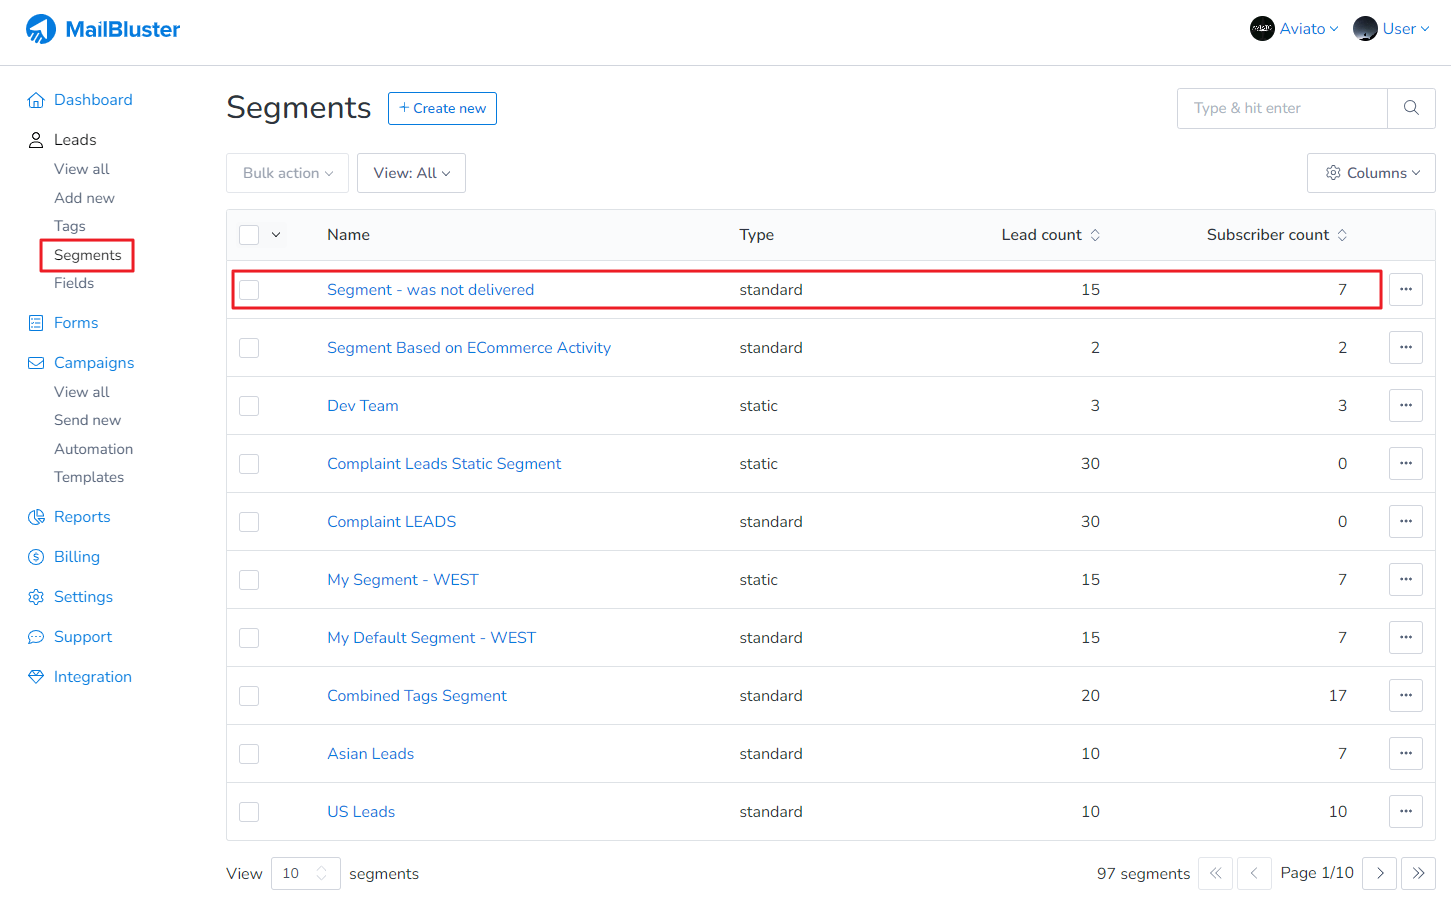
Here you will learn how to send campaign to undelivered leads in your previous campaign. First, create a standard segment for the undelivered emails based on the following conditions mentioned in the following screenshots:
The standard segment is created containing leads whose emails are undelivered.
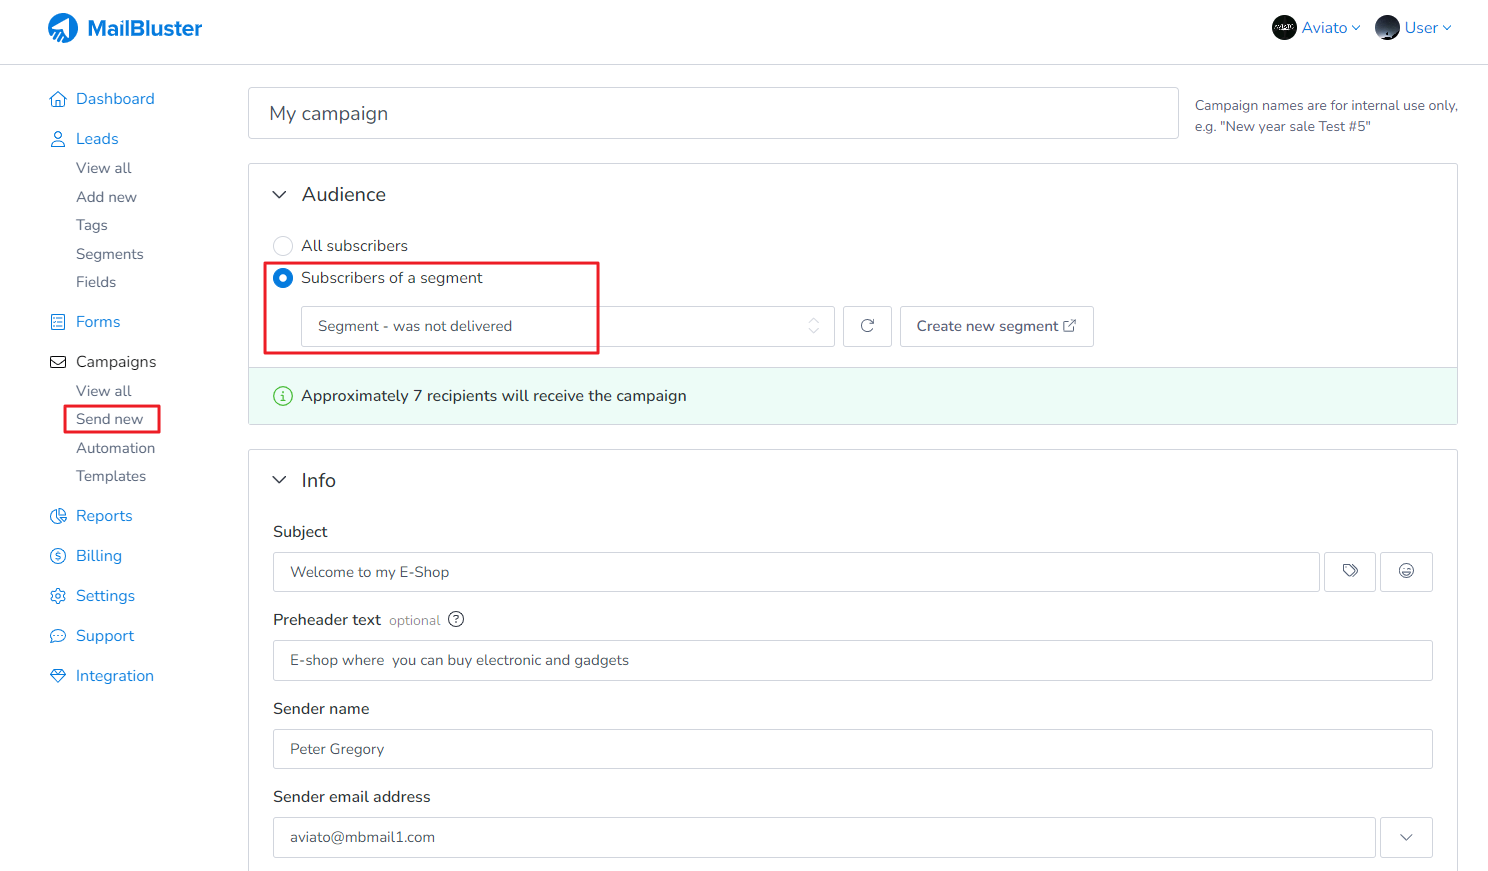
After creating the standard segment, select the new segment so that you can send your email campaign to that specified segment, which contains undelivered leads, as shown in the screenshot below:
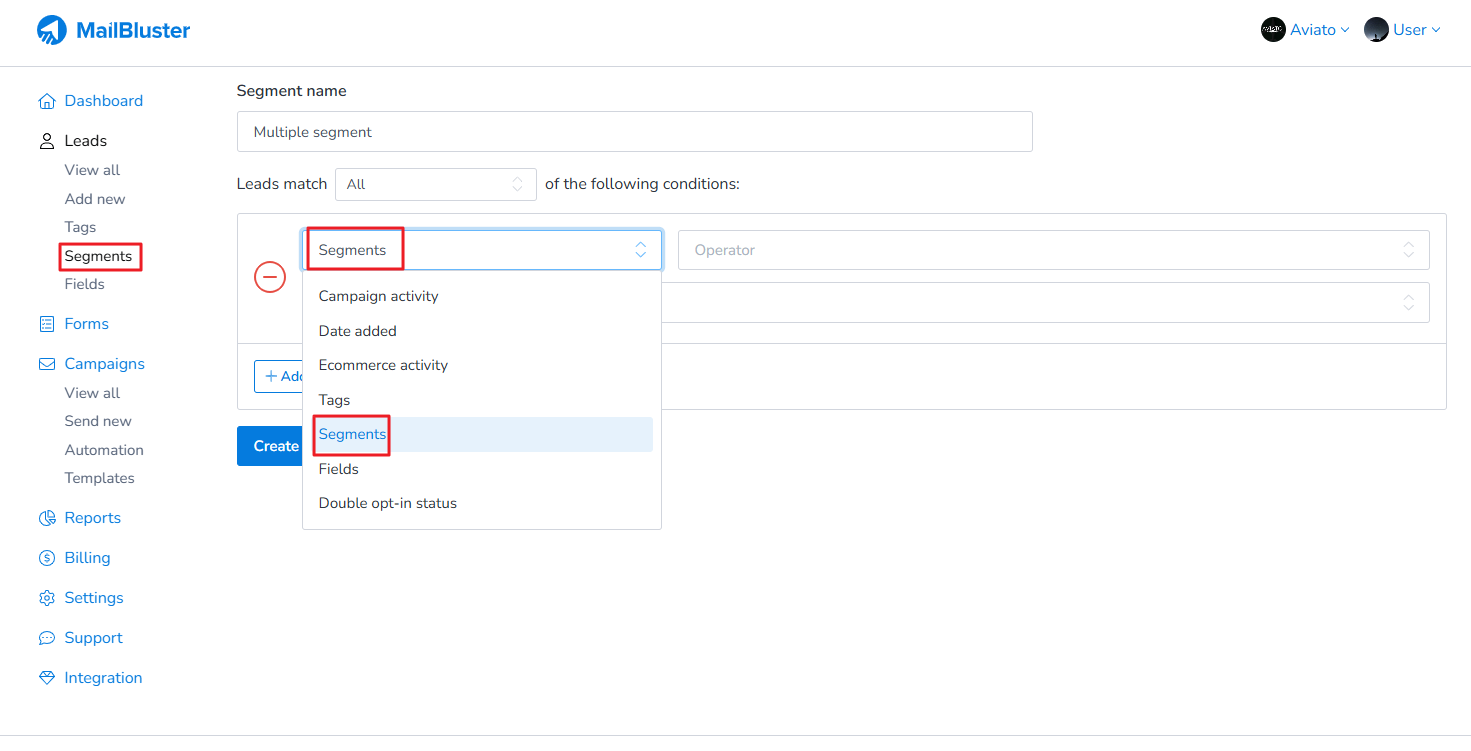
It’s not possible to send campaign to multiple segments at a time. However, you can easily create a new segment, which combines the leads of multiple segments with the help of Standard Segment.
First, you need to create a Standard Segment. Click on Segments and then Create new.
Select Standard segment and then enter a segment name. Also, select Segments from the dropdown list.
Be sure to select Leads match: Any/ All, and Segments: any of the selected segments. Then select the multiple segments. After that click Create segment.
Once the segment is created, it will show the lead count and subscriber count of the combined multiple segments.
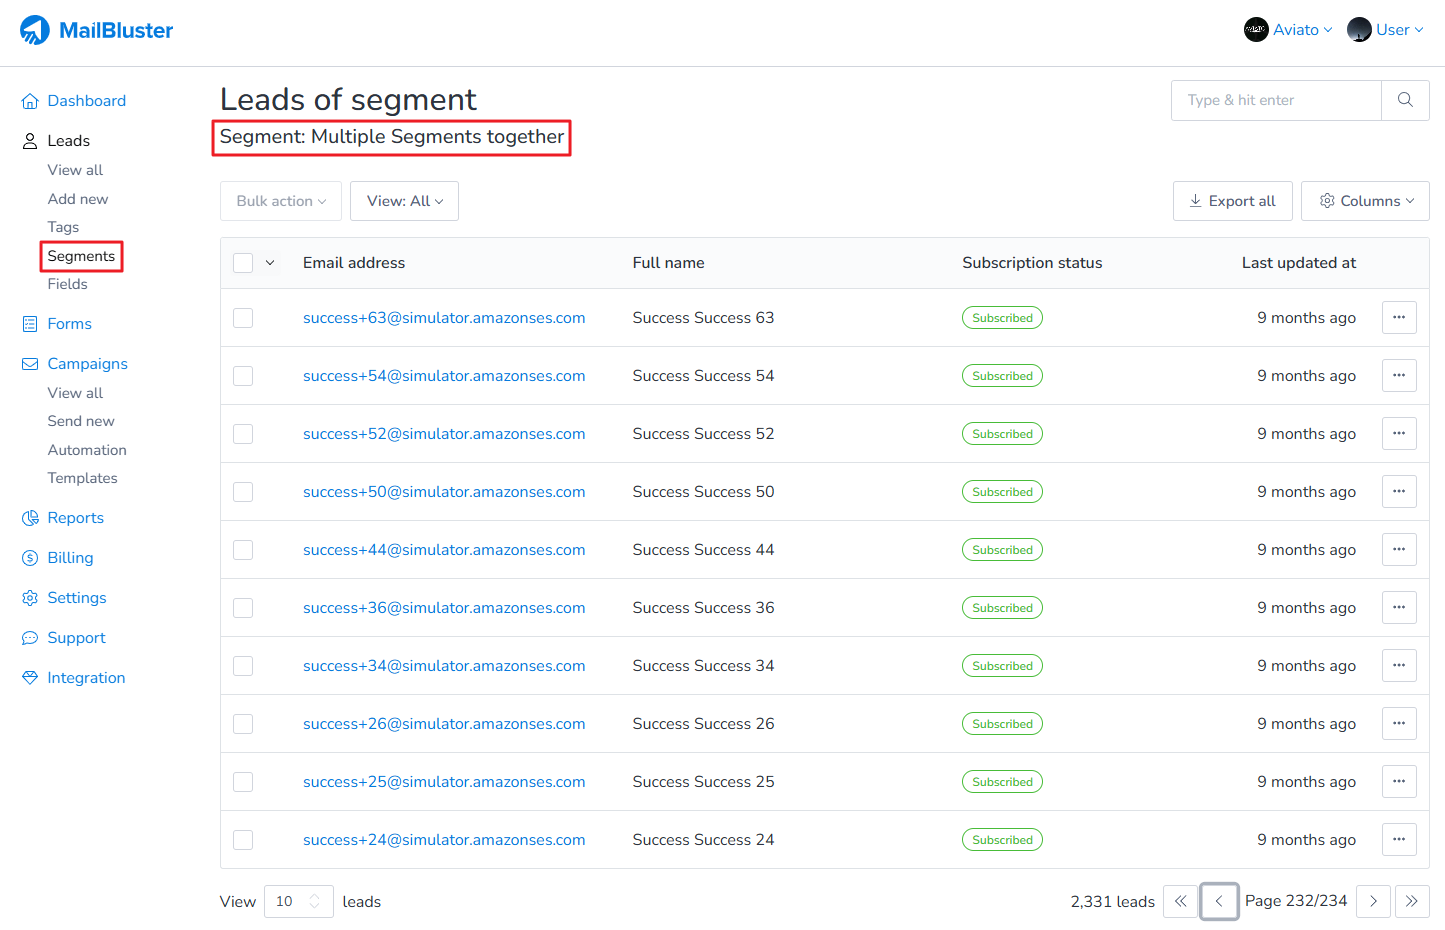
When you click on the created segment, it will consist all the leads of the combined multiple segments.
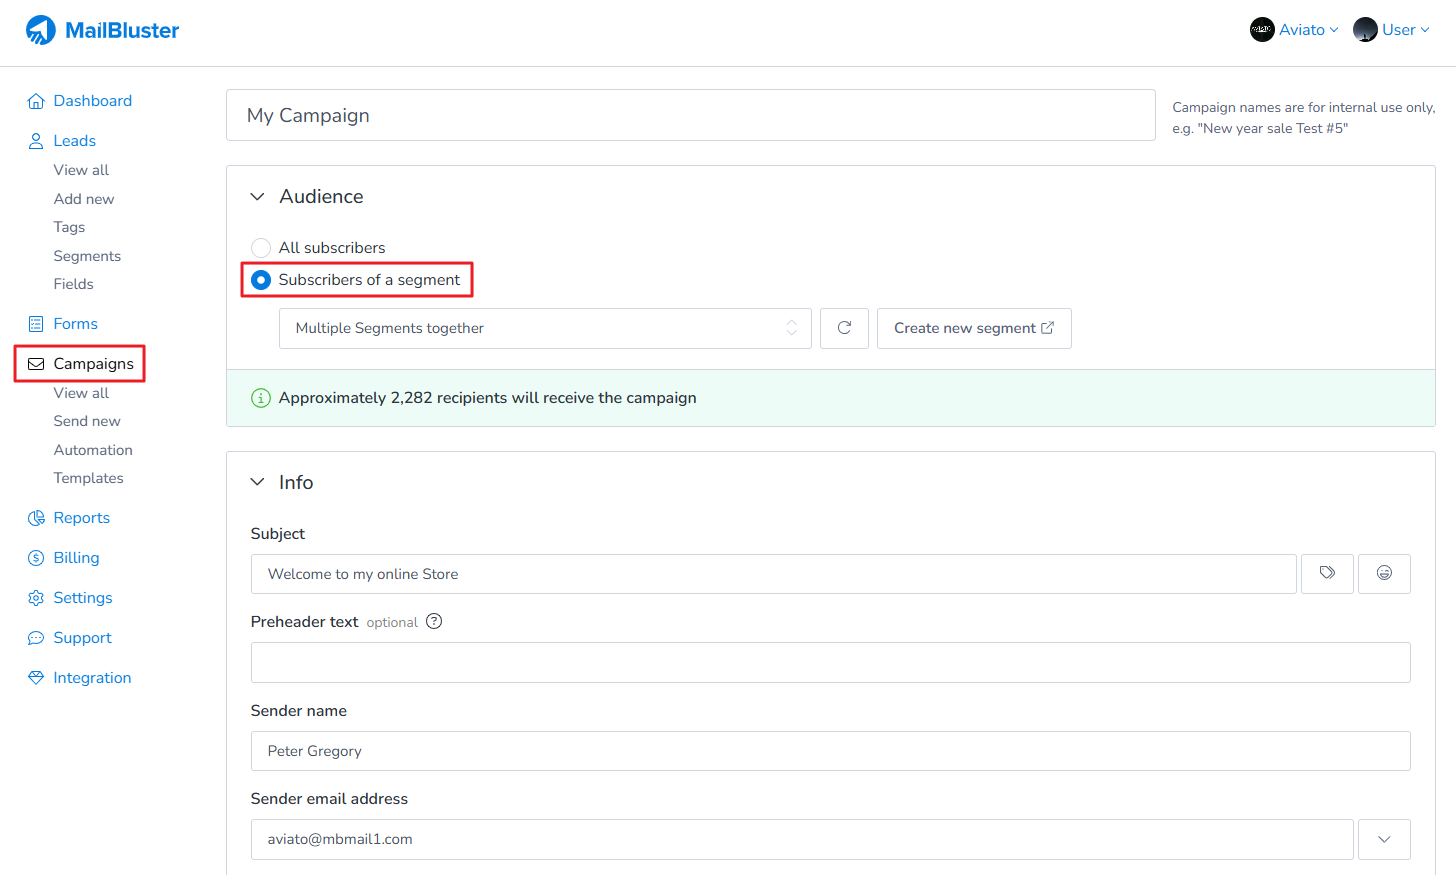
Now create an email campaign and select the newly created combined segment.
Currently, creating a standard segment using built-in fields (e.g., email addresses ending with me.com, icloud.com, mac.com) is not supported. Standard segments can only be created using custom fields.
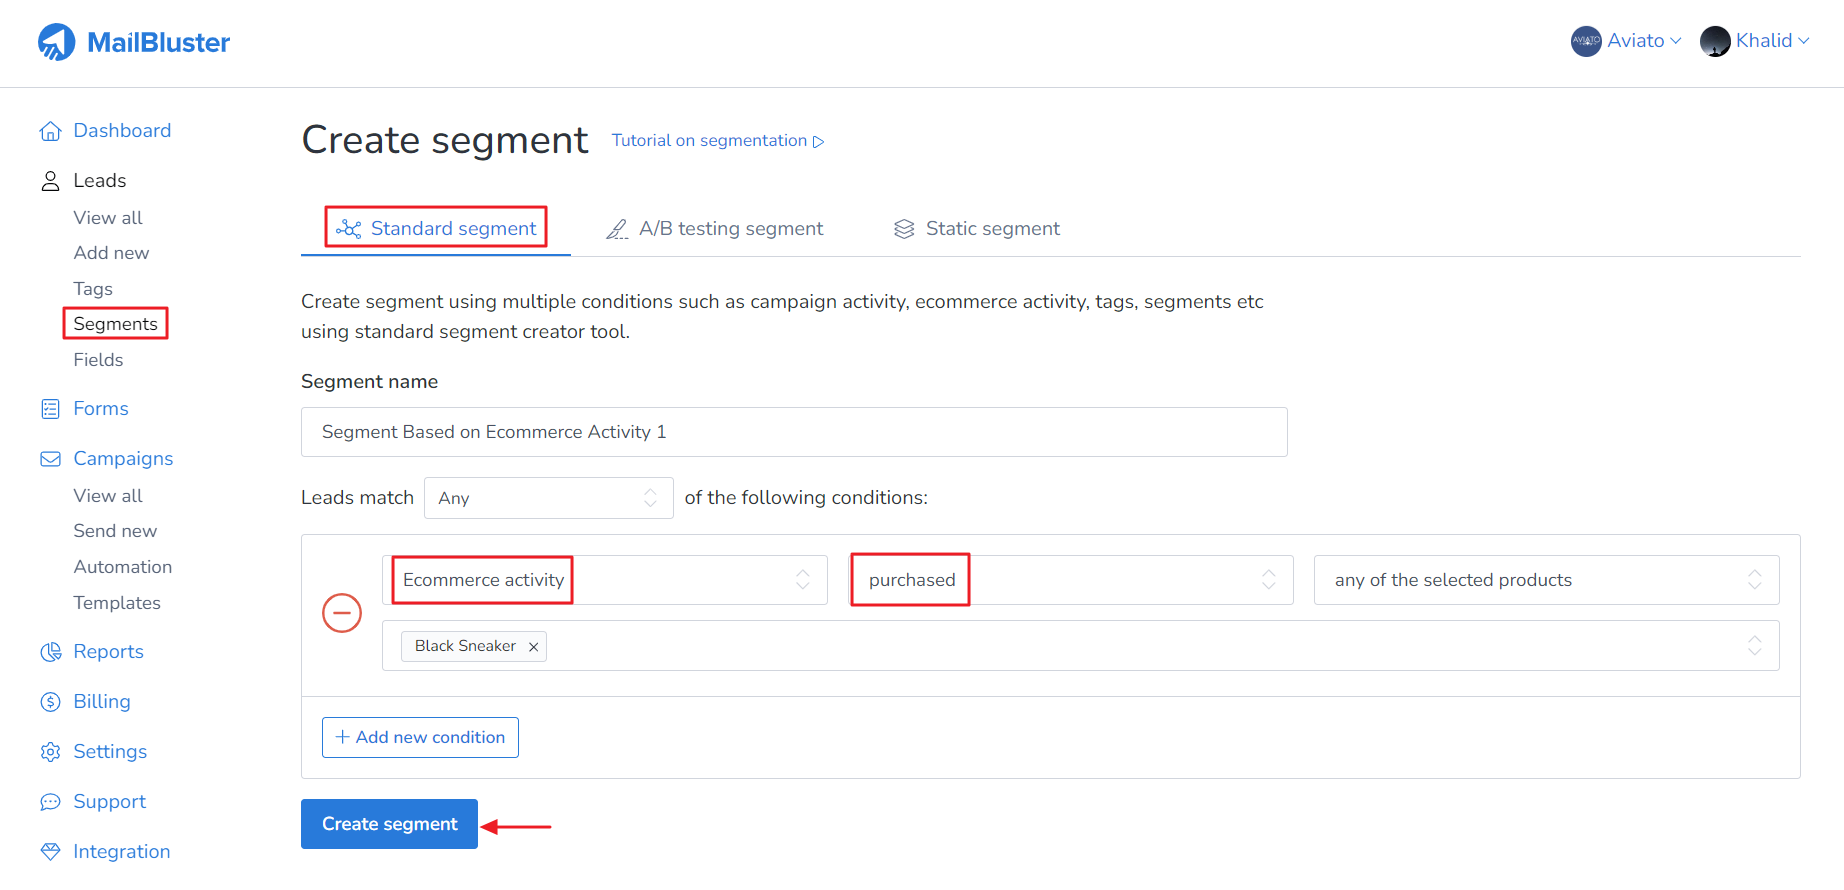
Here you will learn how to create a segment using the condition present as ‘Ecommerce activity‘ under Standard Segment.
You need go to Segments > Standard segment then use the respective conditions as shown below.
The following shows the Standard Segment with the condition ‘Ecommerce activity’ and ‘purchased.’
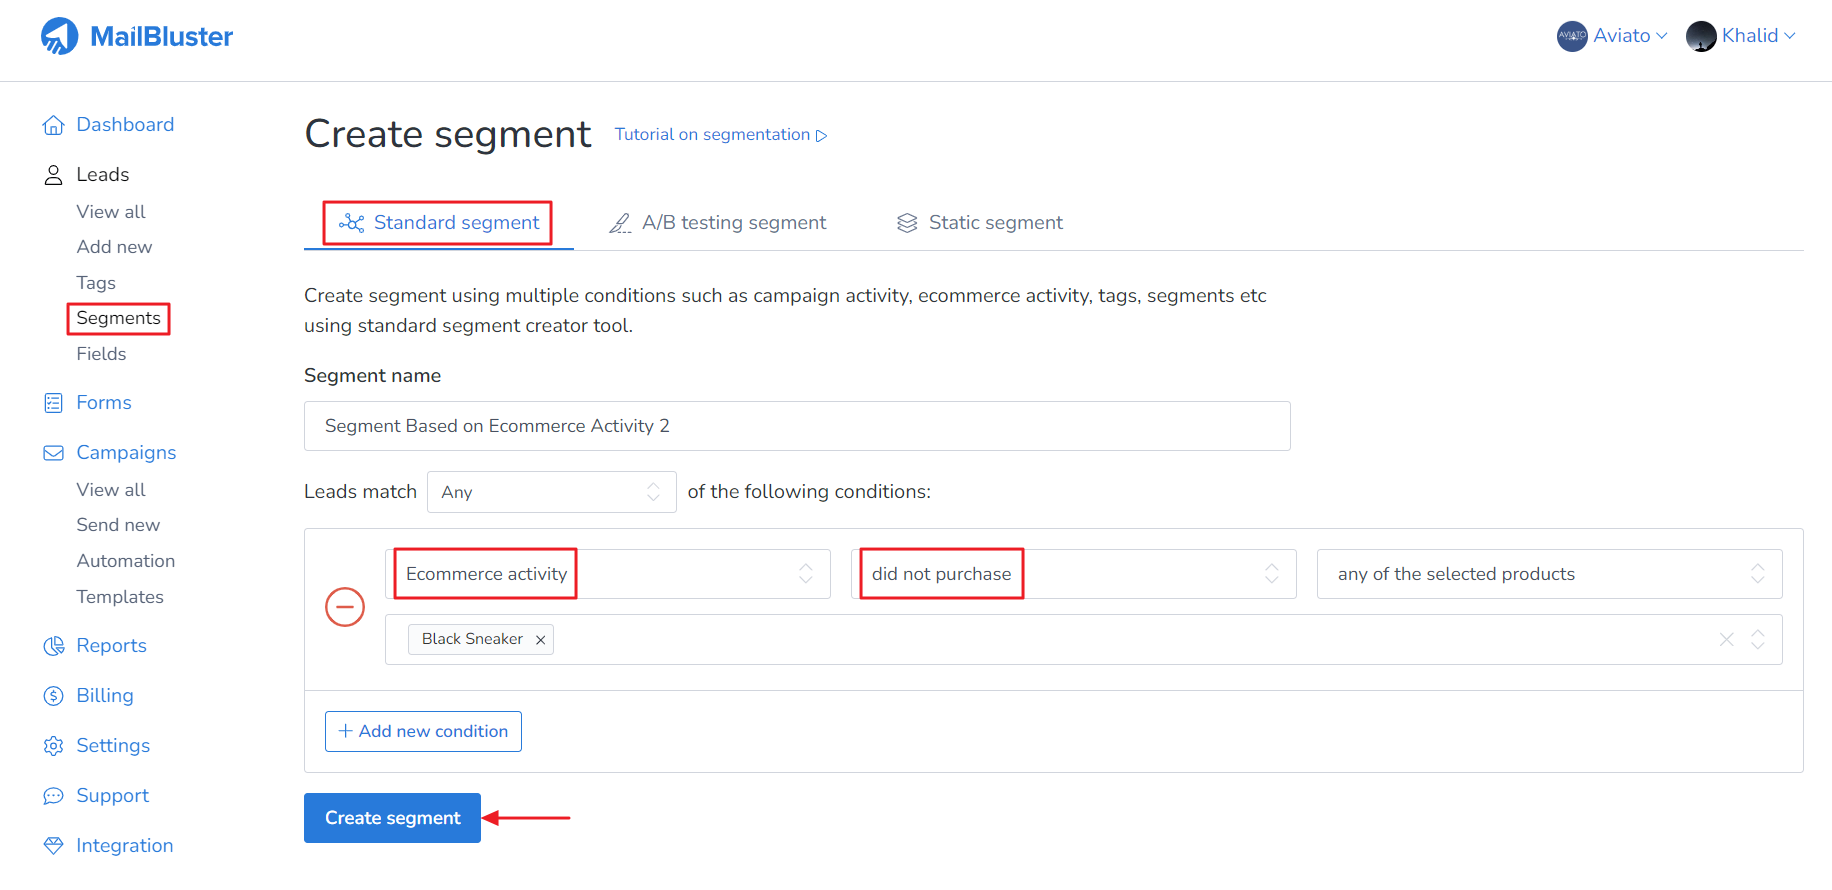
This is another Standard Segment with the condition ‘Ecommerce activity’ and ‘did not purchase.’
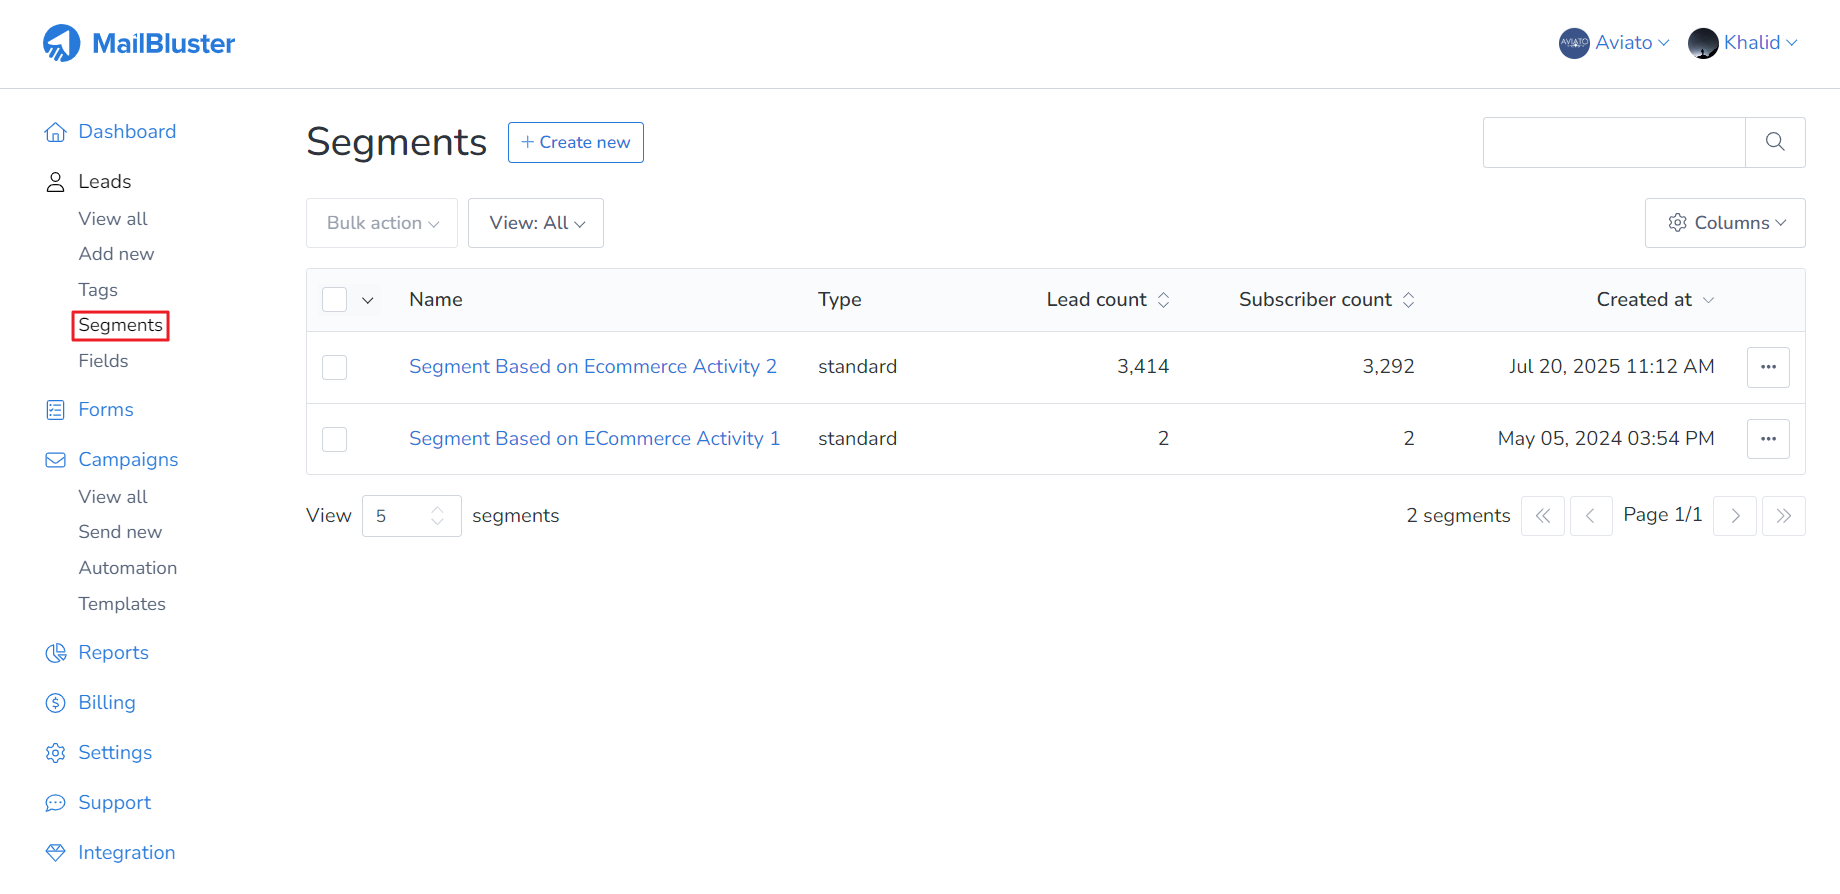
After clicking Create segment, the segment will be created and it will show ‘Lead count’ and ‘Subscriber count.’ You can click on the respective segment to view the leads.
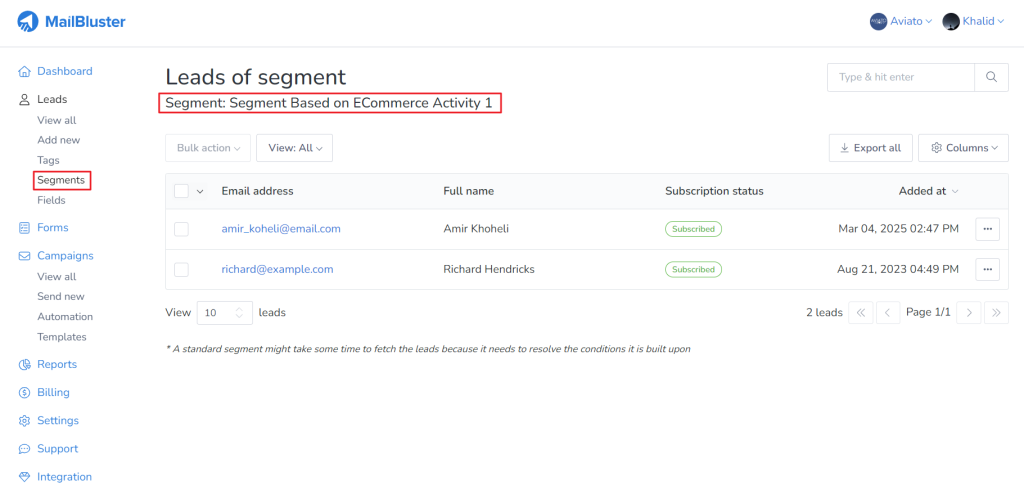
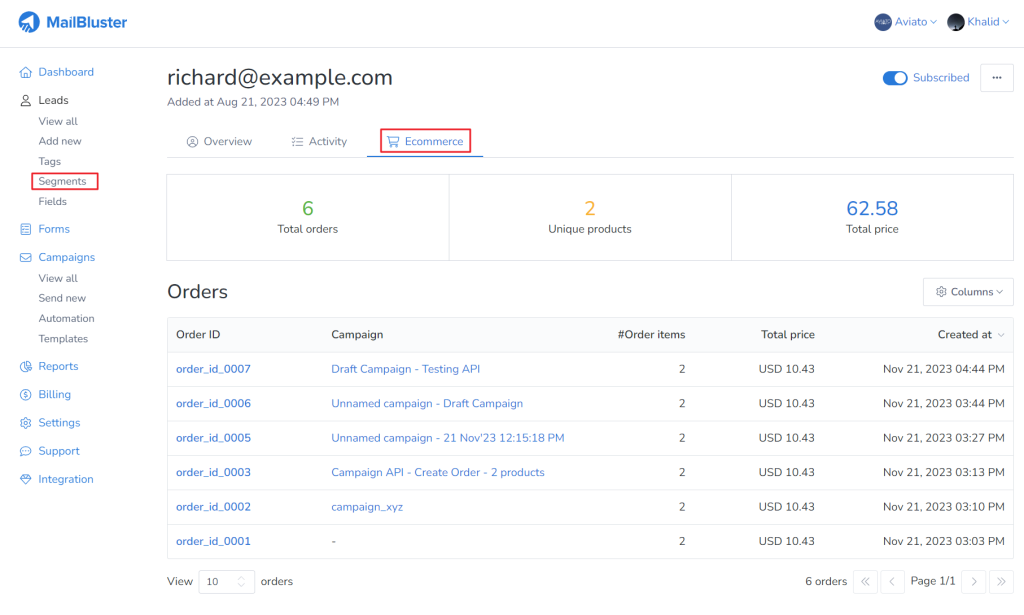
Here we have clicked on Segment Based in ECommerce Activity 1 to see the leads (email IDs) who have purchased products, i.e. made ecommerce transactions.
If you click on each of thelead > Ecommerce, you will see their Ecommerce activity – order ID, which campaign it was associated with, total price paid by the lead as shown below.
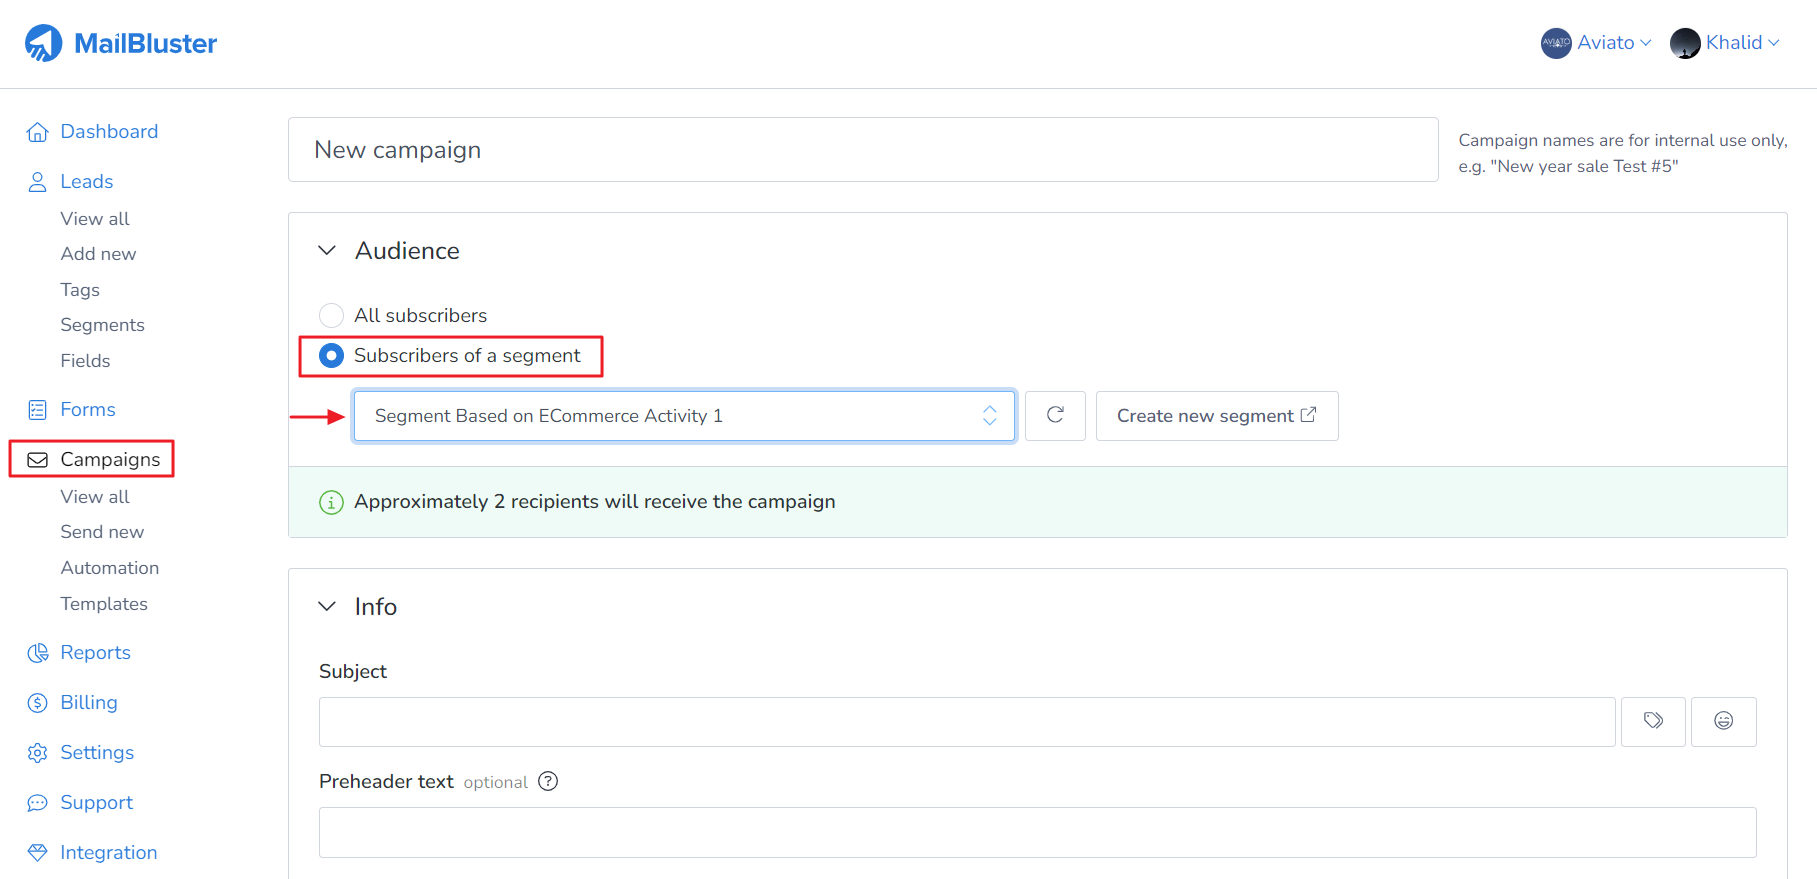
This is how a segment is created using the ‘ecommerce activity’ condition. You can now use this segment to send your desired campaign as shown below.
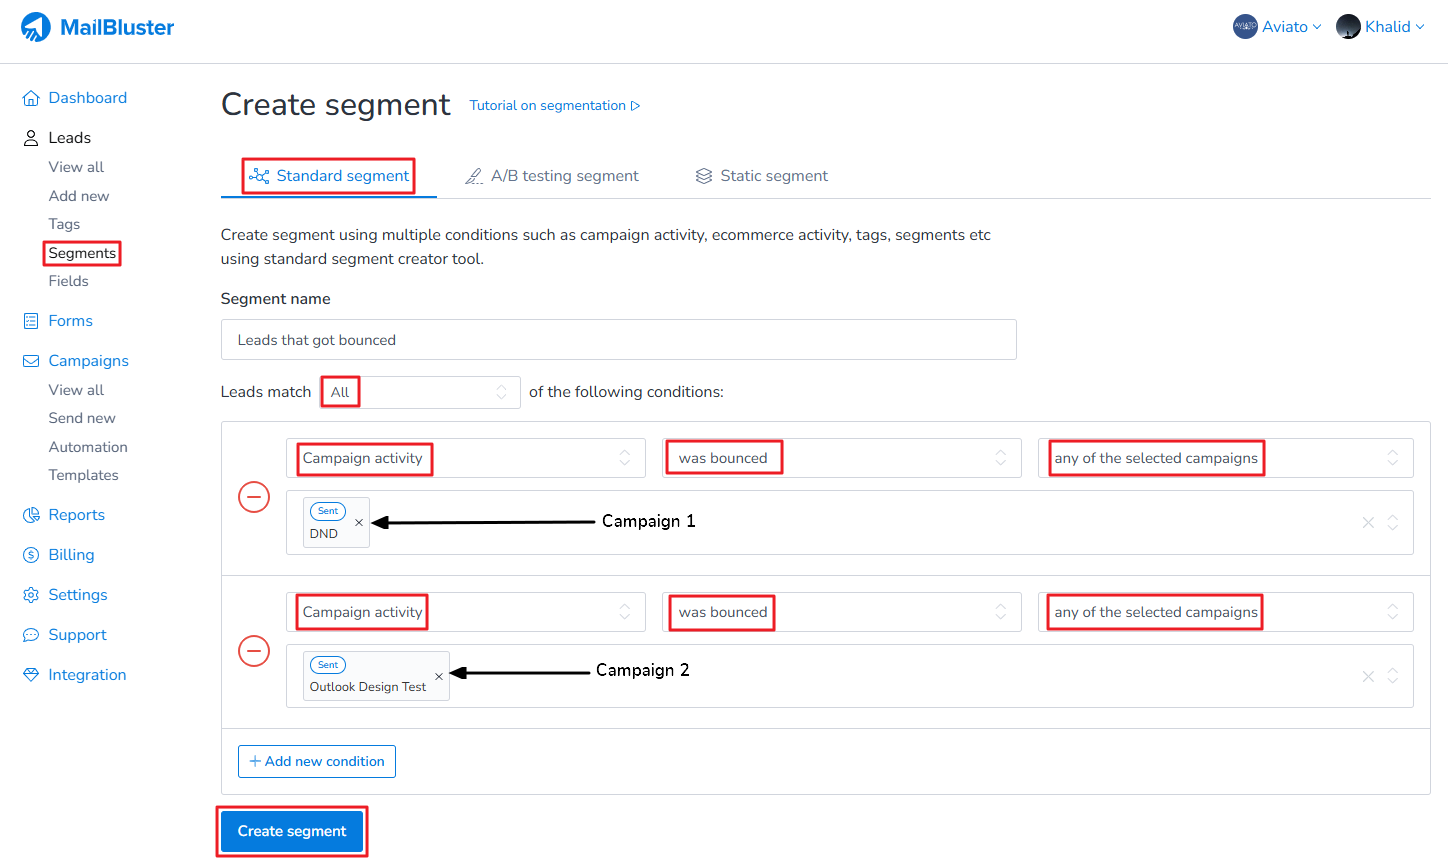
Here you will learn how to remove repeated bounced leads to clean your email list. You can’t create Standard segments for leads that have bounced in more than one campaign in MailBluster. For now, MailBluster allows you to create Standard segments of bounced leads for specific campaigns only. You need to specify the name of the campaign to find those leads, such as by creating a Standard Segment and setting the conditions as shown in the screenshot below:
After creating the segment, you can delete the leads in this segment later by following this guide: Removed Bounced Leads
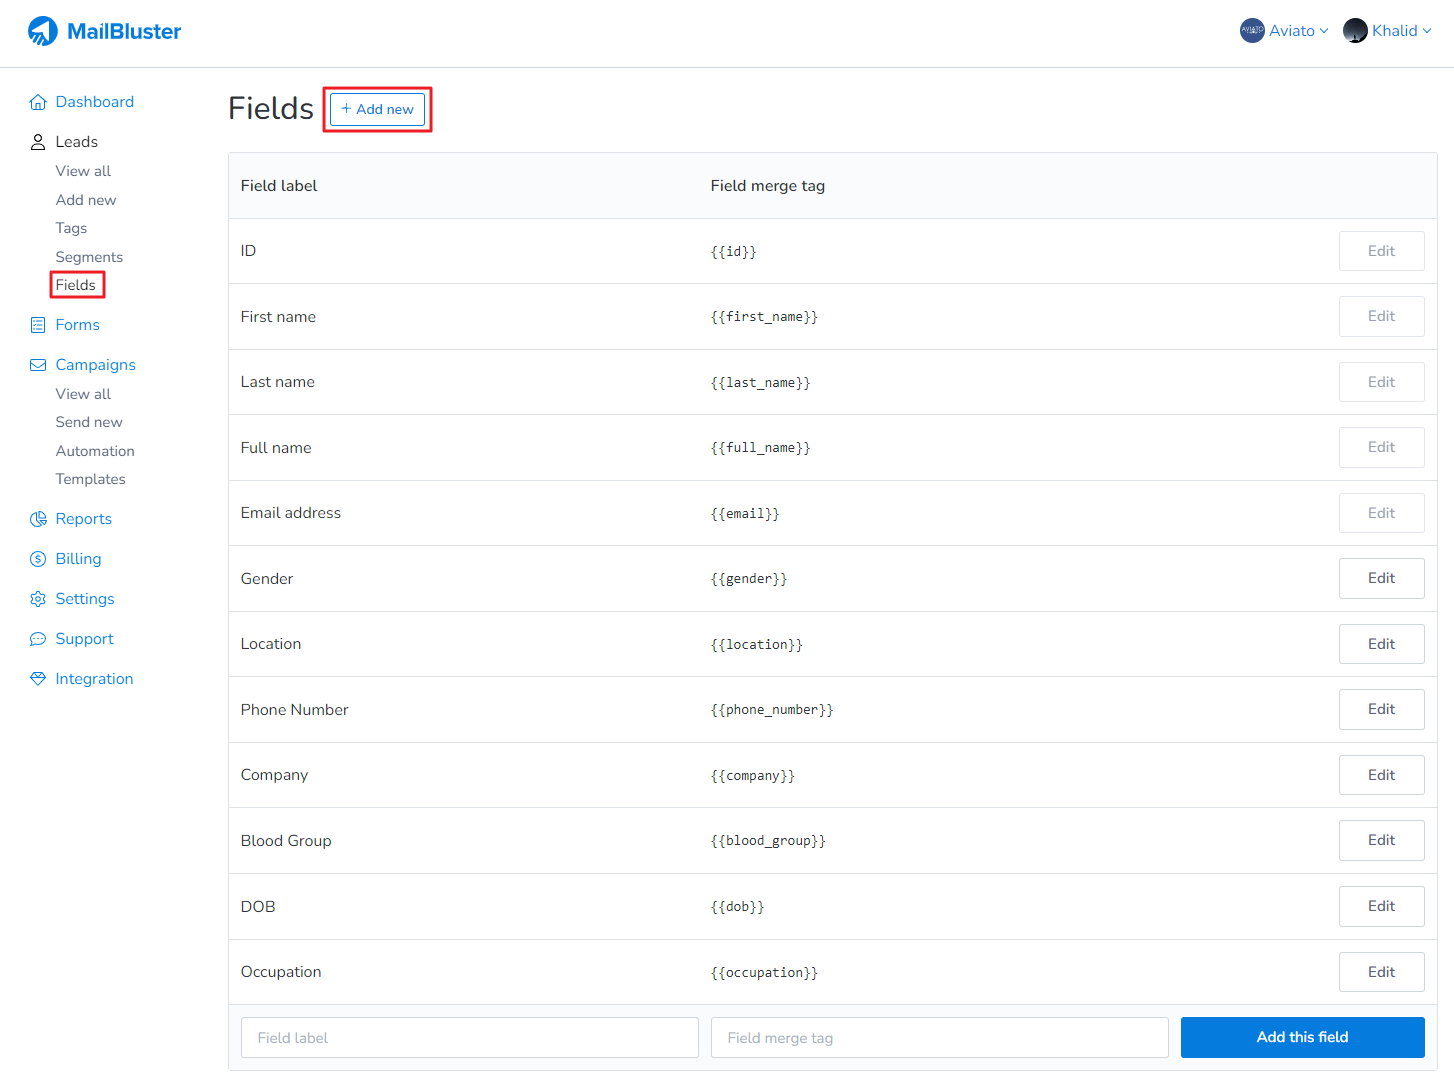
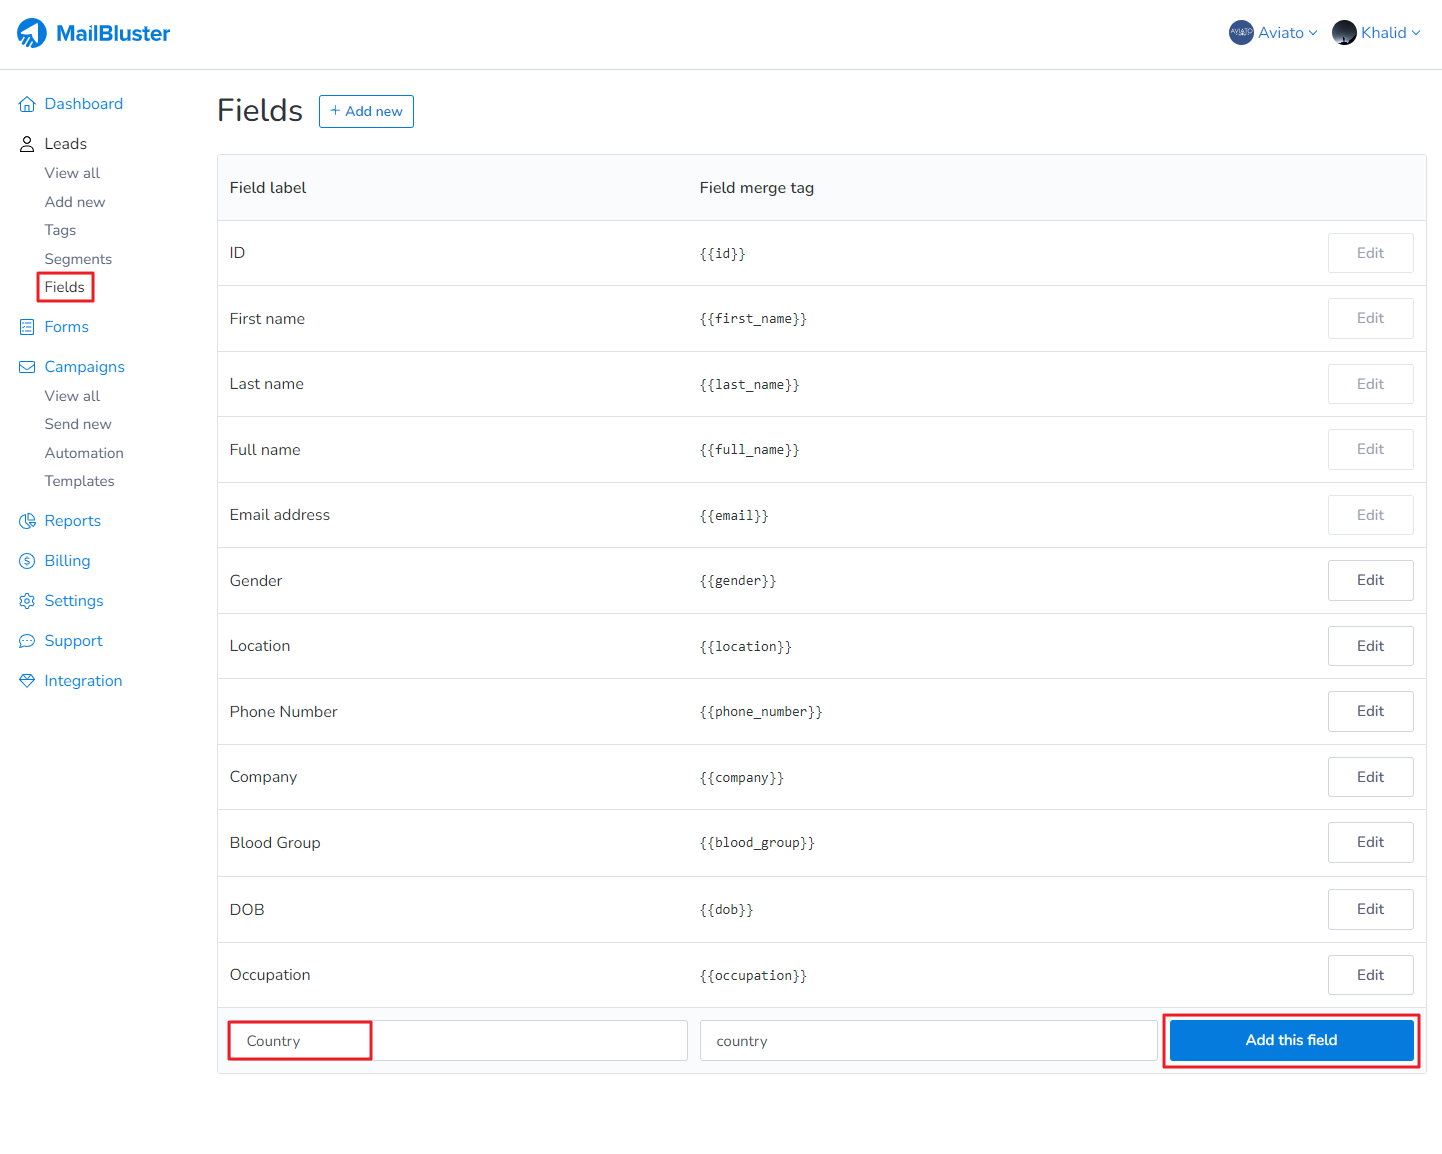
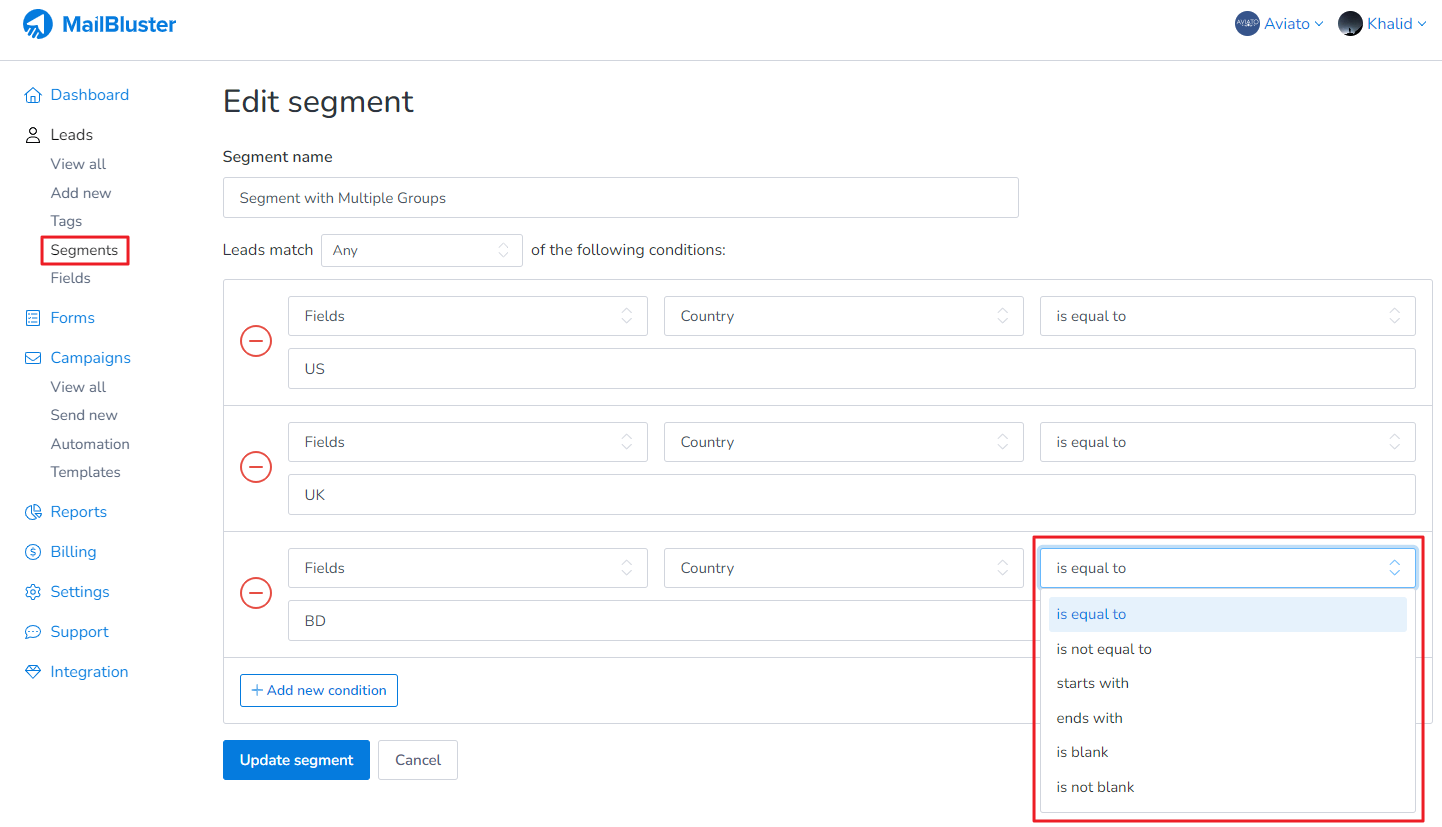
Here you will learn how to create standard segment with multiple custom field conditions. First, go to Fields and then click on + Add new.
Type in the custom field information, especially the Field Label, and the Field Merge Tag will be generated automatically.
Here we created a Field label Country and MailBluster generated the Field merge tag {{country}}. You can use this merge tag Country in your email subject and email content.
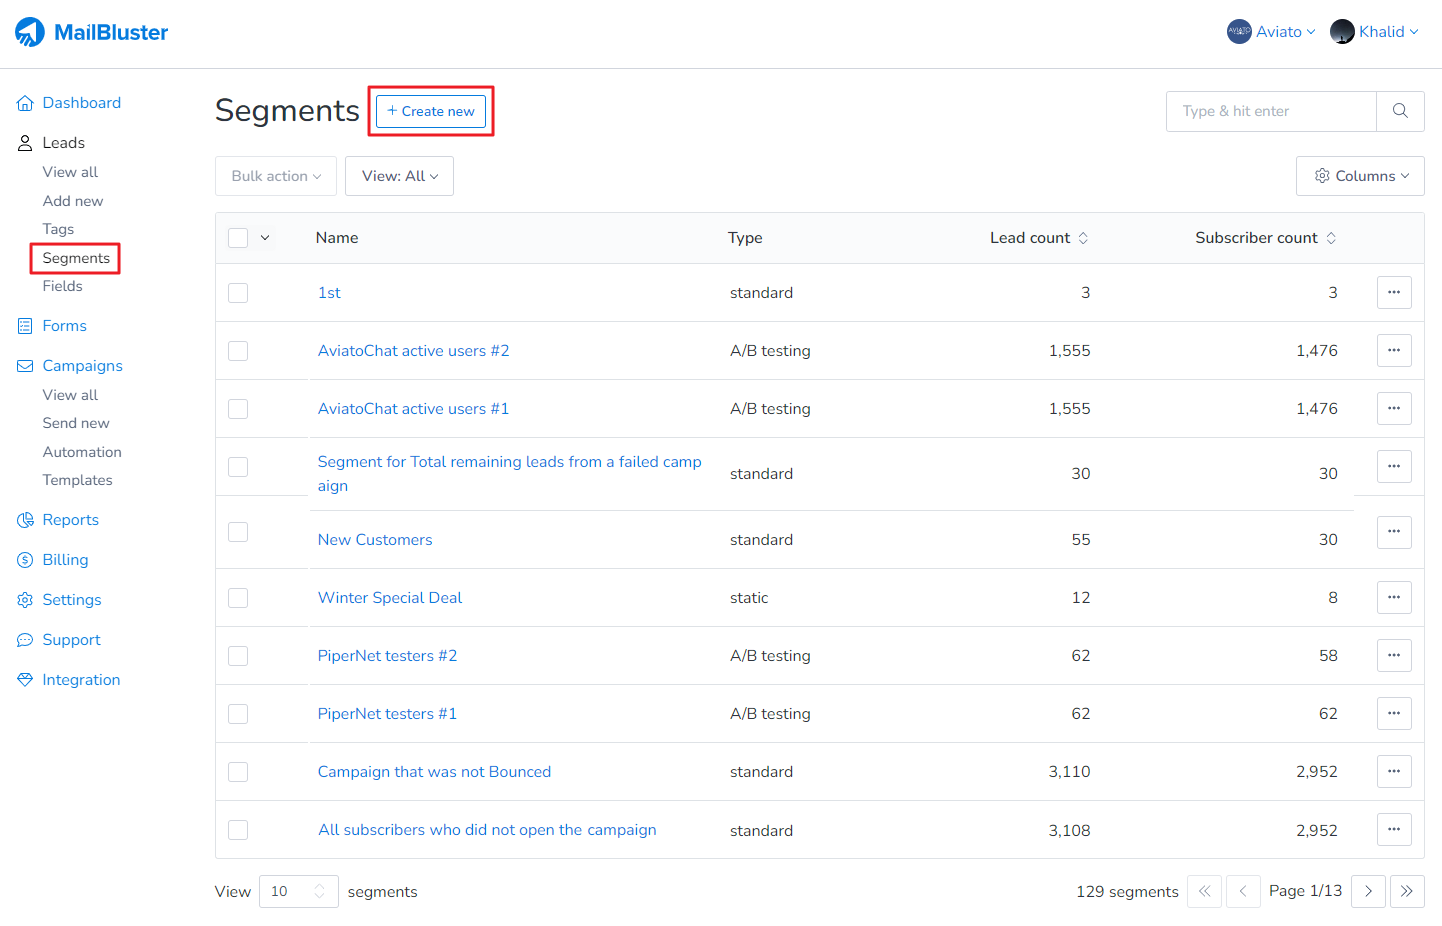
Now, go to Segments and click on Create new button.
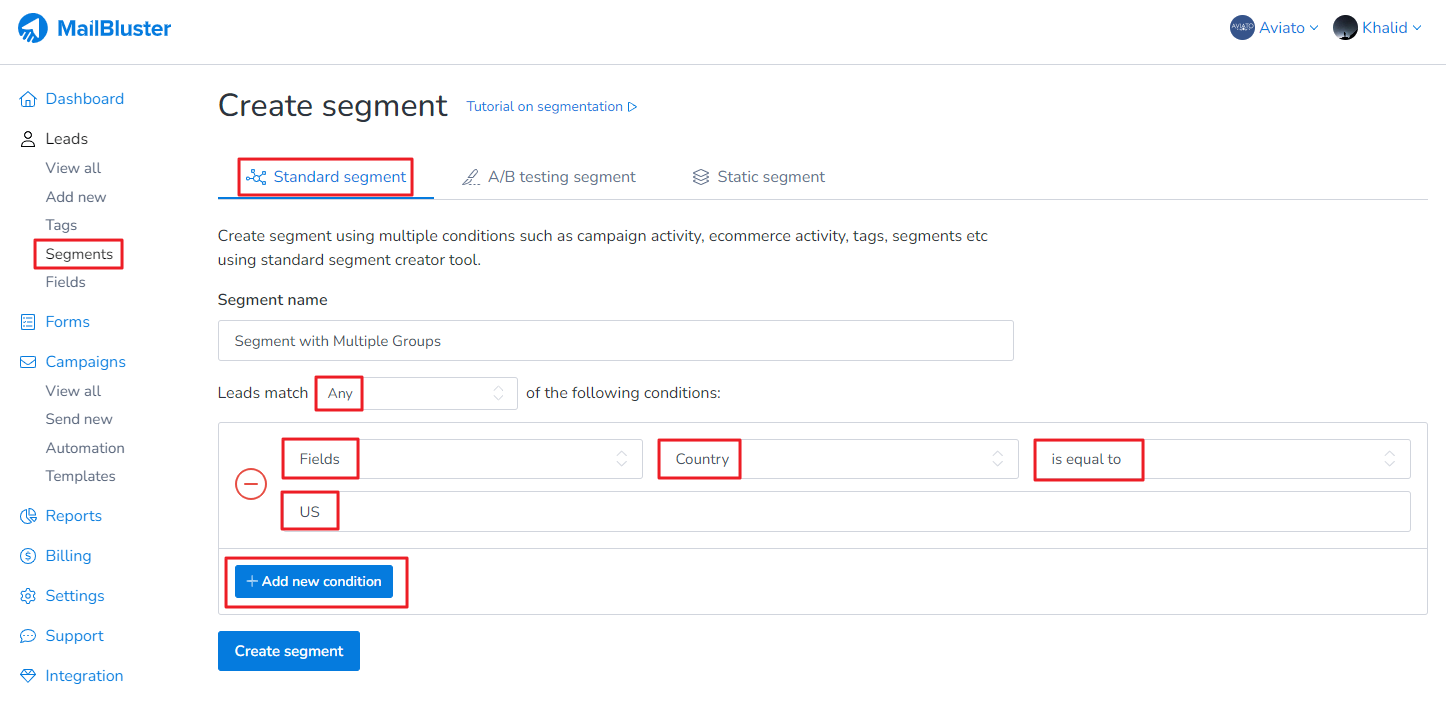
Select ‘Standard Segment‘ and apply the following conditions. For this demonstration, we will select ‘Fields‘. Once set, click the ‘Add New Condition‘ button.
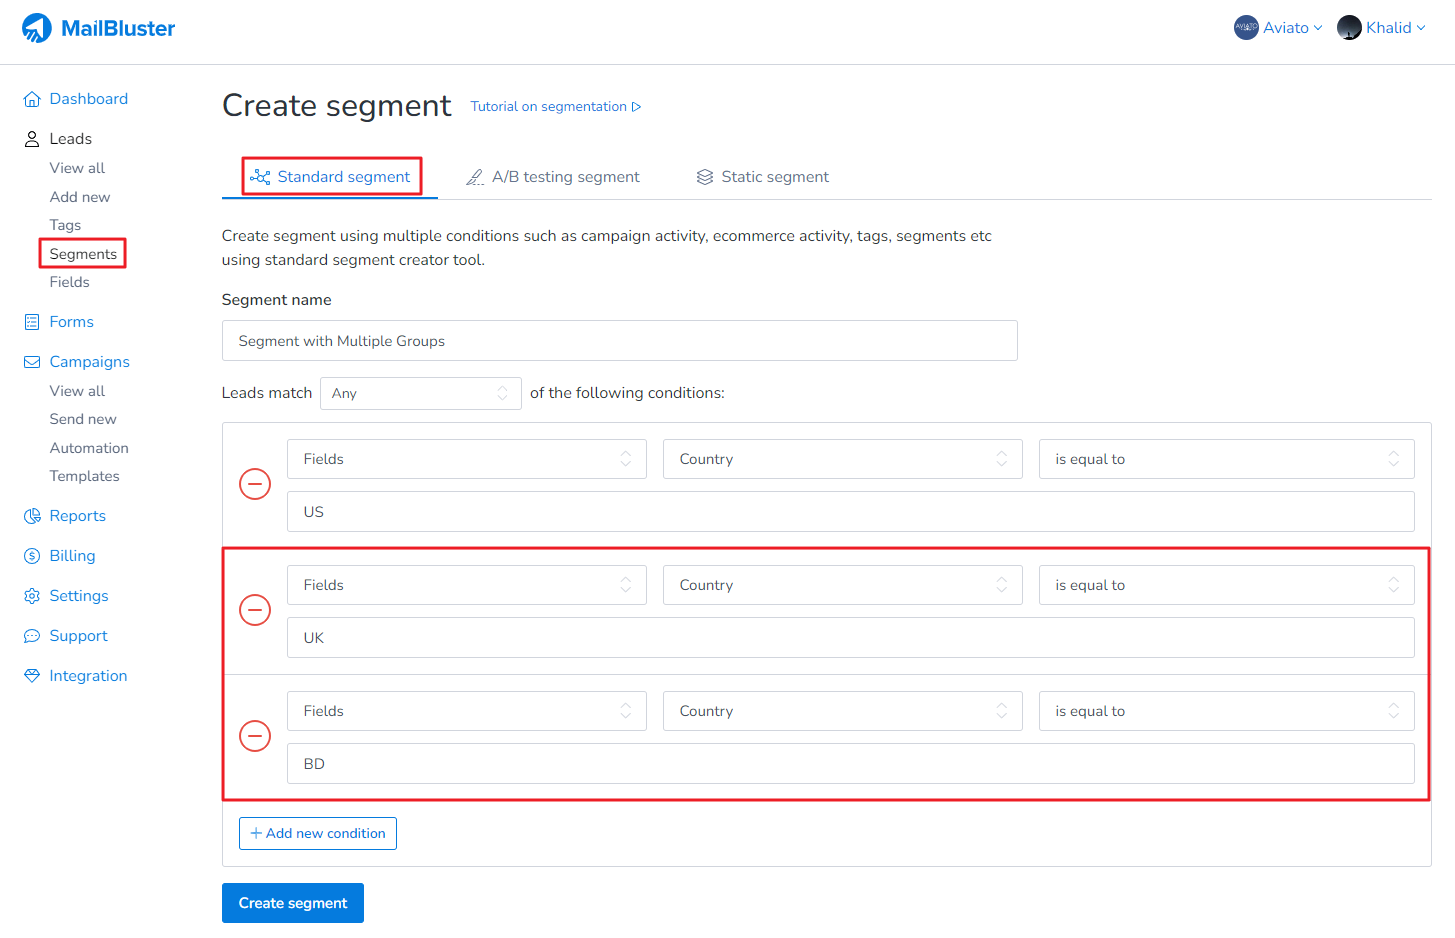
After clicking ‘Add new condition,’ add more conditions highlighted below similar to those in the first condition tab.
If you click on the Fields condition tab, you will find the following options as shown below. You can use it according to your needs.
After filling in all the necessary conditions for the Standard Segment, click ‘Create Segment‘ and MailBluster will generate your segment with leads.
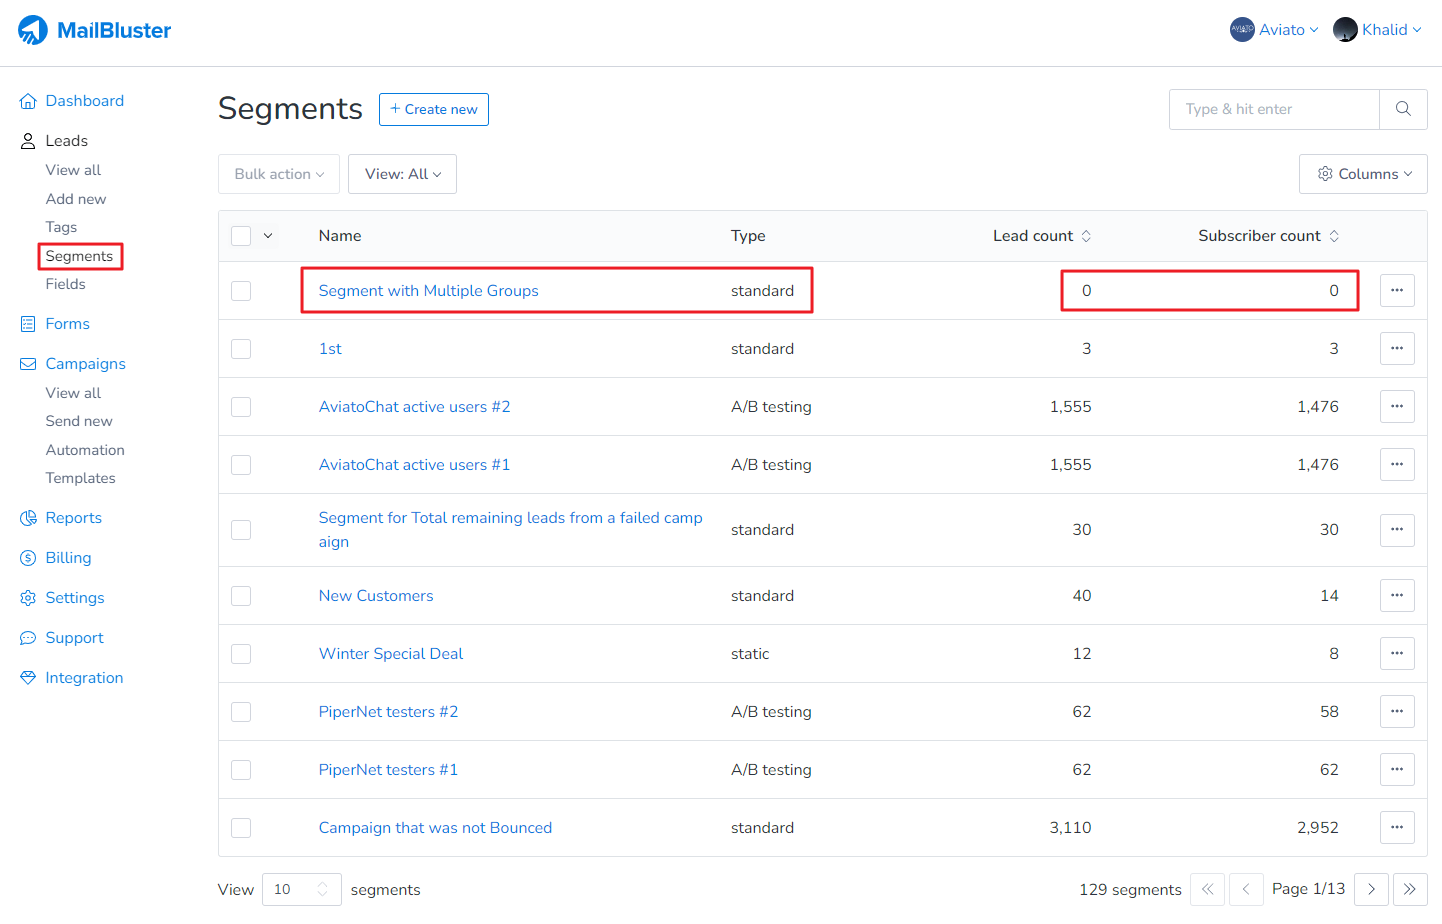
As you can see, the segment has been created, and it will initially show Lead count of 0 as well as Subscriber count of 0 for a few seconds. Please wait for a moment while the leads populate under the segment.
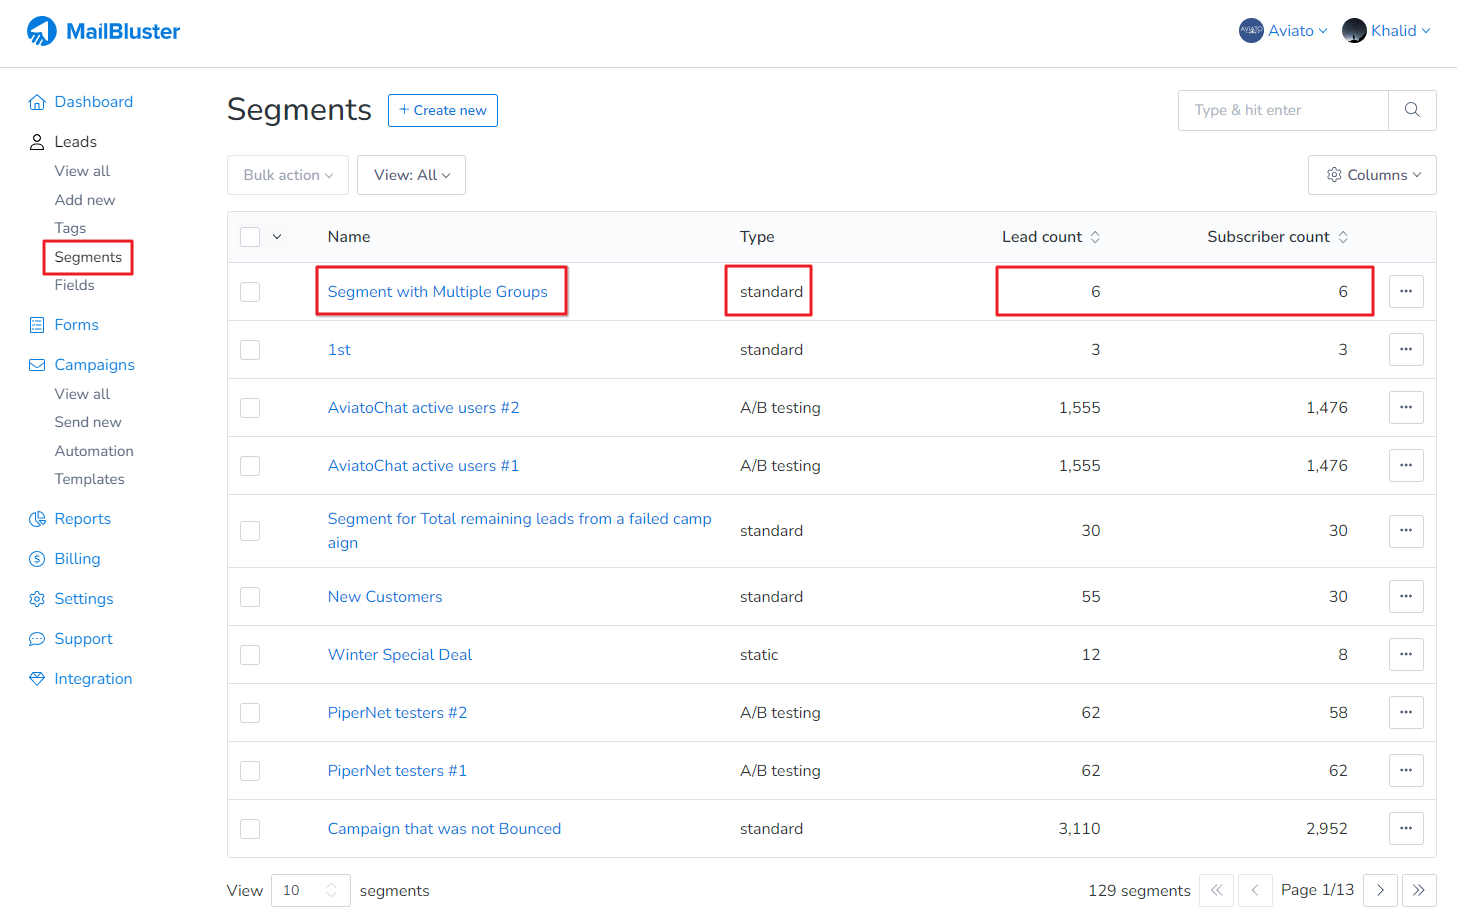
Now, the segment has been created, and both the Lead count and Subscriber count are showing values. That means your standard segment is properly configured.
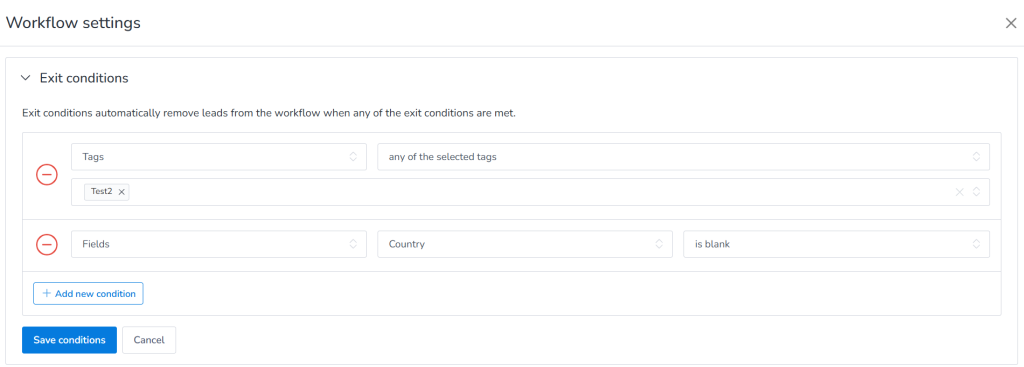
Exit Conditions let you automatically remove leads from an automation workflow when they meet specified conditions.
Once a lead meets an exit condition, MailBluster immediately removes them from the workflow, and they will not receive the remaining automation emails.
To Configure Exit Conditions:
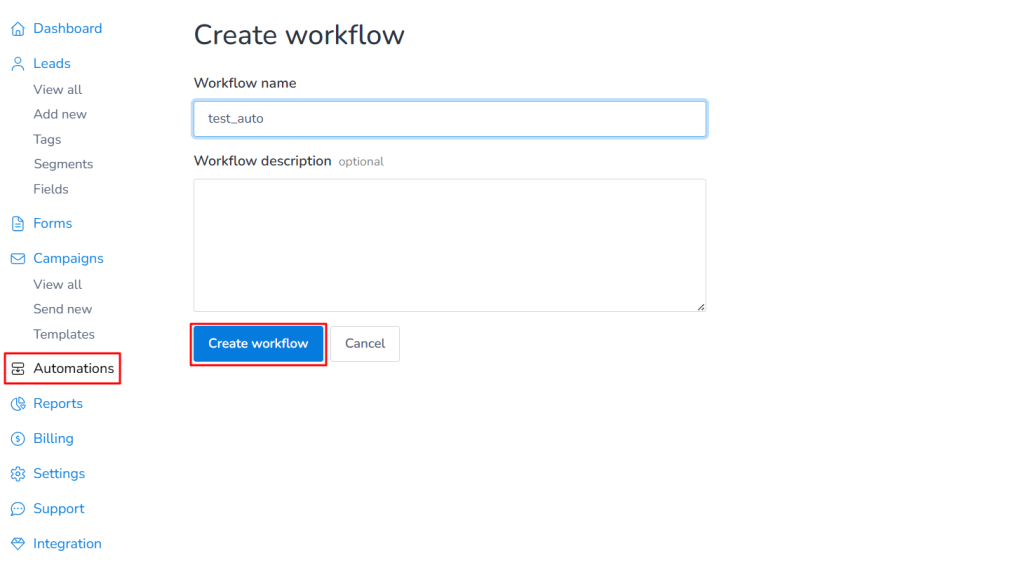
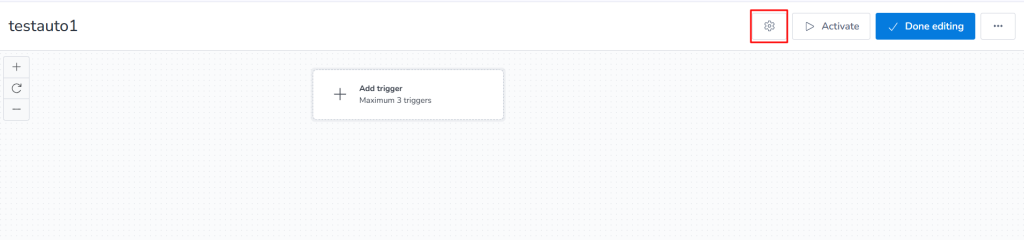
1. Go to Automations and click Create New. Enter a name for your automation workflow.
2. Open the workflow, then click the Settings icon in the top-right corner.
3. In the Exit Conditions panel, click Add Condition, configure the condition(s) based on your requirements, and then click Save to apply the changes.
Once a lead meets any of the configured exit conditions, MailBluster automatically removes them from the workflow, and they will no longer receive the remaining automation emails.