If you’re using MailBluster and need to access individual lead data, the first step is to obtain the lead hash. A lead hash is the MD5 encrypted value of your lead’s email address, and it’s required for making secure API requests. To obtain the lead hash, you can use any trusted MD5 generator tool available online. For example, visit MD5 Hash Generator, input the email address of your lead, and the tool will generate the corresponding MD5 hash—this becomes your {lead_hash}
Then, you will need to send a GET request to read the specific lead to this API endpoint: https://api.mailbluster.com/api/leads/{lead_hash}
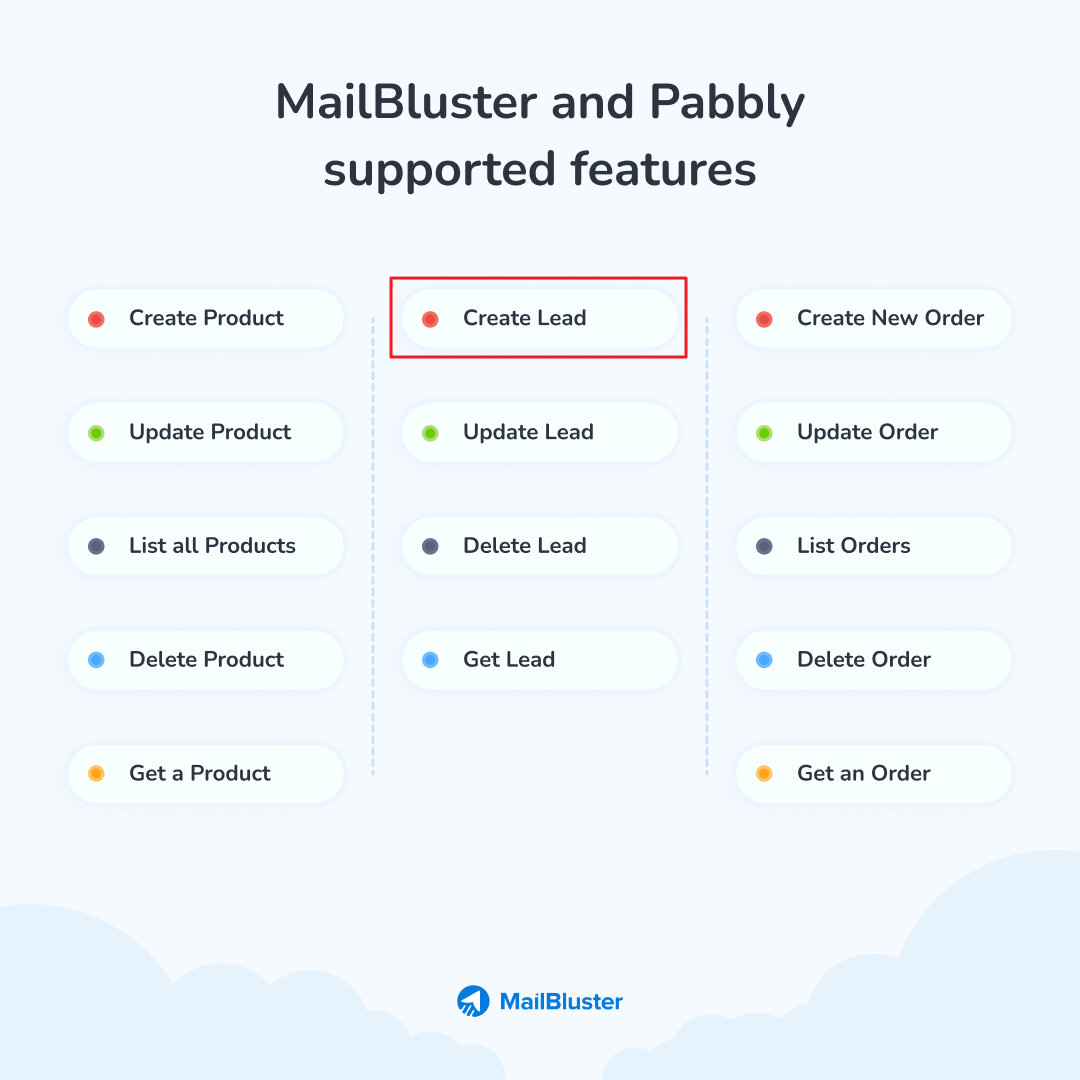
You can find information on the MailBluster Developer API by visiting the MailBluster documentation site. Navigate to the Developer API section under Resources > API Doc, where you’ll find detailed guides, API endpoints, usage examples, and other resources needed for integration. This documentation provides all the necessary information for developers to effectively use the MailBluster API, enabling management of leads, fields, products, and e-commerce activities from outside your MailBluster account. The API’s simple and intuitive design allows you to manage four key aspects of the platform: Leads, Fields, Products, and Orders.
Here you will learn how to resolve CORS error while using MailBluster Developer API
A CORS error occurs when you make a request from an HTML form submission or an AJAX call. This happens because anyone can intercept the request and view the secret API key, which is why CORS restrictions exist.
If you are getting CORS errors, it means you are calling the MailBluster developer API directly from your frontend. Instead, you need to call the MailBluster developer API from your backend.
To resolve this, send the request from your backend using languages like PHP, Node.js, Python, Ruby, etc. You can test this with Postman or a similar API testing tool to ensure it works as expected.
Calling the MailBluster developer API from the frontend will not work due to CORS errors and the associated security risks. Exposing your API key publicly can lead to major security issues.
Always make API calls from your backend to keep your API key secure. This approach will prevent CORS errors and protect your API key from being exposed.
You cannot update multiple leads using MailBluster DeveloperAPI. Only single lead can be added at a time. Same goes for update and delete while using the Developer API.
If you want to import/update more than one lead at a time, then you need to use the MailBluster main app.
If you’re looking to send bulk emails using developer API, it’s important to know that MailBluster’s Developer API does not support sending emails, including bulk emails. However, it allows you to manage your leads, products, and e-commerce activities from outside your MailBluster account.
The API is specifically designed to control Leads, Fields, Products, and Orders. In simple terms, the Developer API is intended for collecting leads from the client’s website and managing related data. It is not capable of sending emails.
If you’re looking to connect website forms to MailBluster, there are three simple ways to do it—whether you’re using a custom website or WordPress. These options let you capture leads from your website and send them straight into your MailBluster mailing list automatically.
Here are three easy methods to connect website forms with MailBluster:
1. Using MailBluster developer API
If you have website/application, you can use MailBluster developer API to connect MailBluster with your brand. You need some technical knowledge to use the MailBluster Developer API. For details, checkout MailBluster Developer API Documentation.
2. Using MailBluster WordPress Plugin.
If your app/website is built using WordPress, you can use MailBluster WordPress plugin to create a subscribe form and add it to your page/post. WordPress Plugin for MailBluster allows the site visitors to become subscribers through a subscribe form which will automatically add them to the MailBluster mailing list without doing anything manually.
MailBluster forms allow you to collect lead data directly from your website and add it to your lead list. MailBluster offers two types of forms:
1.Inline Form: This form displays in a specific section of your website where you choose to place it. For instance, you can position it at the top, middle, or bottom of your site. The inline form is permanently displayed in the location you select.
2. Pop-up Form: This form appears as a pop-up while visitors browse your site. You can configure the pop-up’s timing and choose its position—left, center, or right—at the beginning, middle, or bottom of the page. The pop-up form will display based on your configuration, including position, frequency, and trigger conditions.
Both forms can be effective depending on your creation strategy, website layout, and marketing approach. However, to achieve success, it is crucial to create your form correctly. Here, MailBluster can be your best companion.
If your app or website is built using WordPress, you can take advantage of the MailBluster WordPress plugin. Simply install the WordPress plugin on your WordPress site.
The MailBluster WordPress Plugin provides basic functionality, such as the ability to create simple forms. These forms enable site visitors to easily subscribe, automatically adding them to your MailBluster mailing list without any manual intervention.
Please Note: The plugin and its basic forms are not designed for checkout and do not include e-commerce functionality.
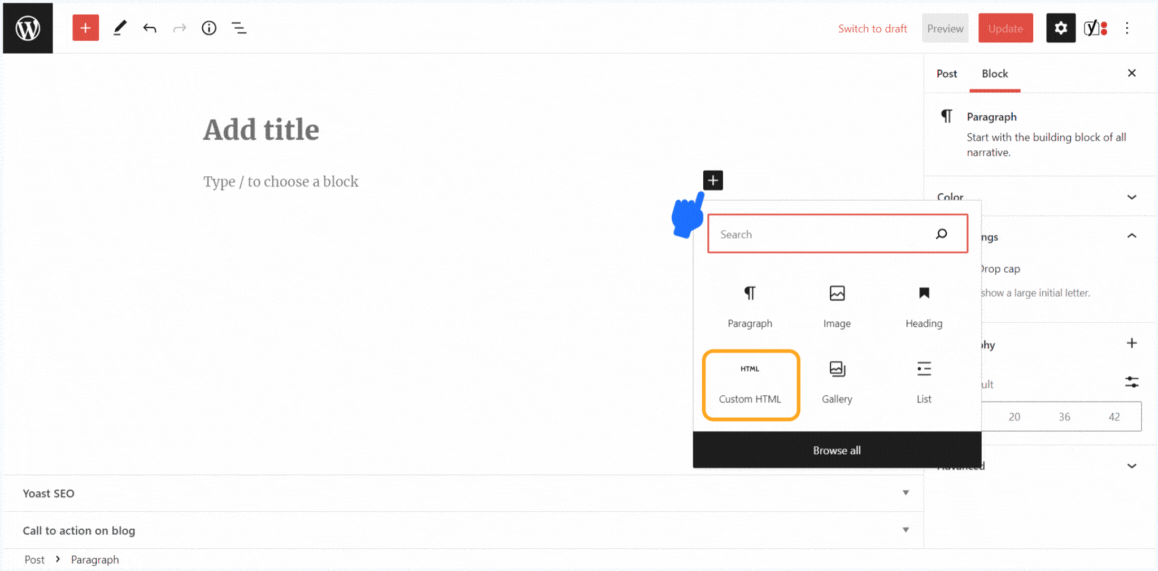
If you want to embed form in WordPress, you can easily do it using the Custom HTML block in the WordPress editor. This method lets you add your own form code anywhere on a page or post. Here’s how to embed form in WordPress step-by-step:
Go to the page where you want to embed your form.
Click on the Plus icon to add a new element.
Select Custom HTML.
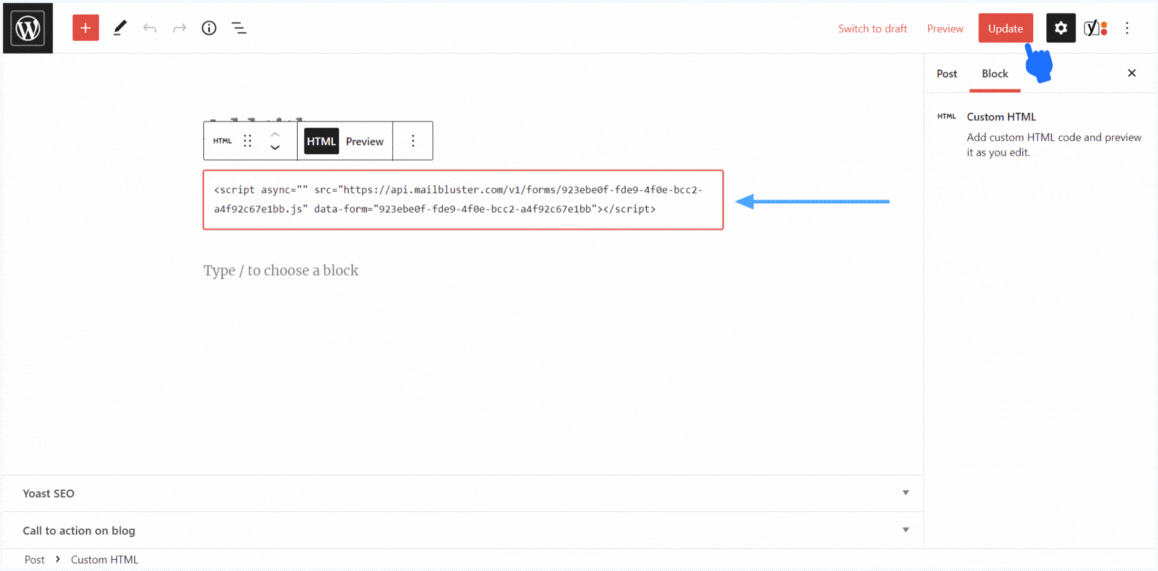
Paste the HTML code from your MailBluster Form into the Custom HTML block.
Click Update in the top right corner.
You are now done. Your customized MailBluster form will appear on your WordPress website. This is how you can add the generated HTML code to your HTML website.
Here you will learn how to create and connect WordPress Forms using MailBluster WordPress Plugin.
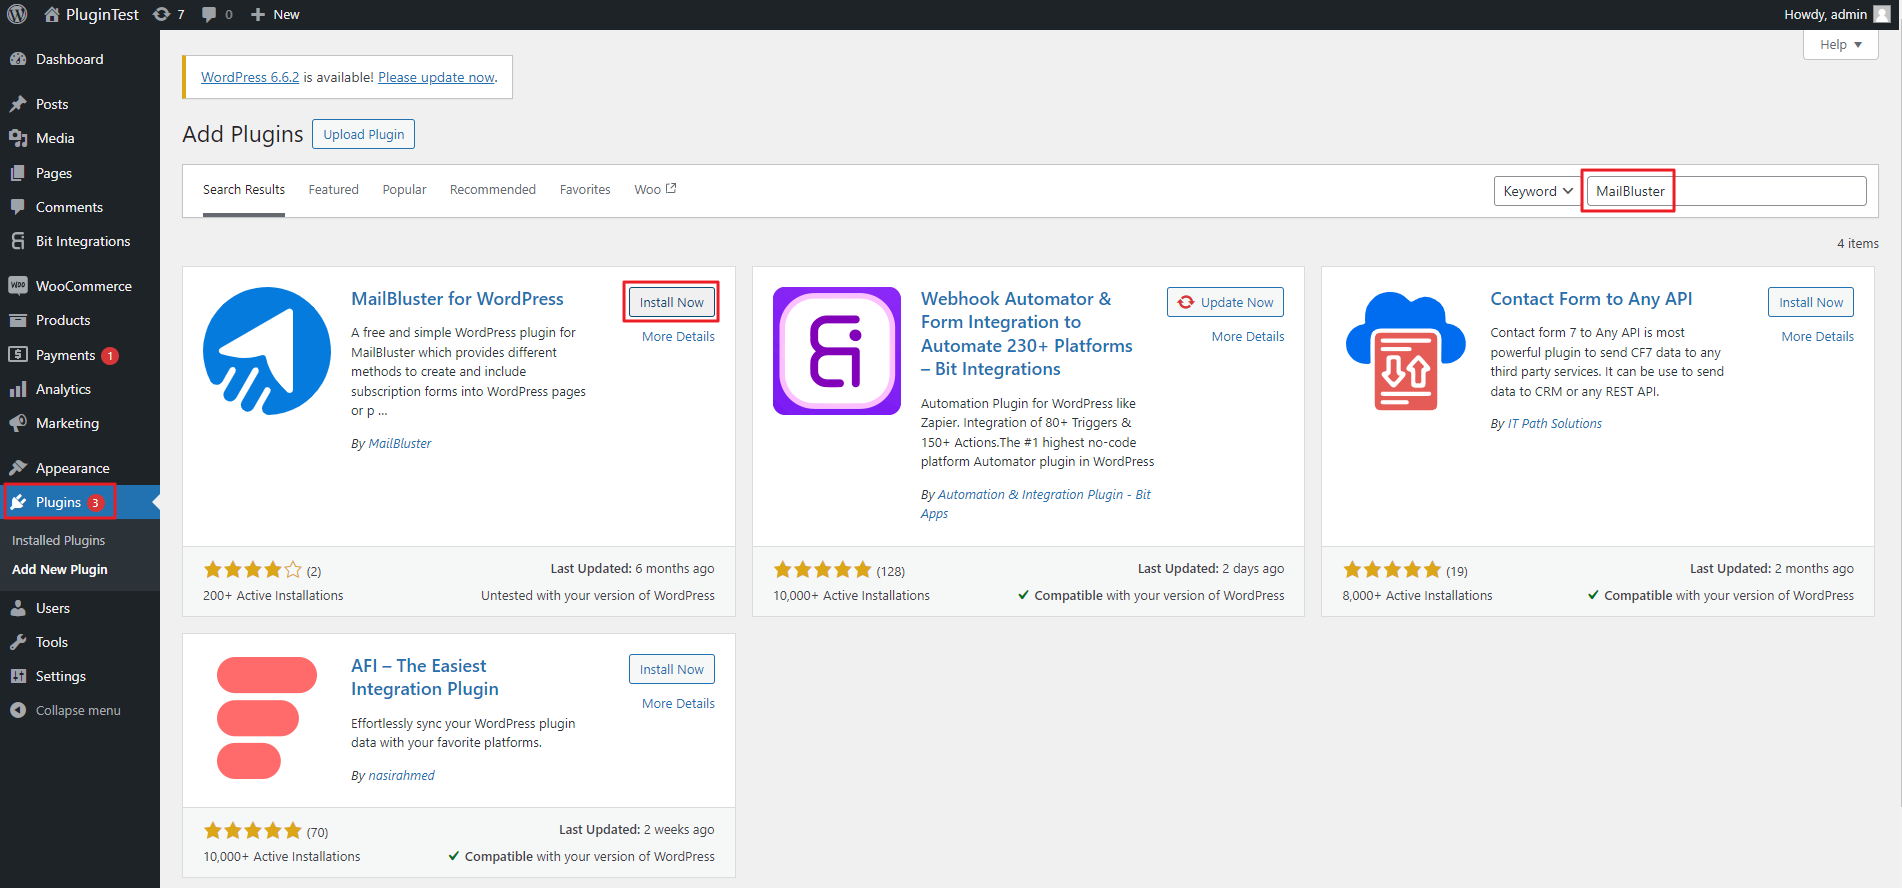
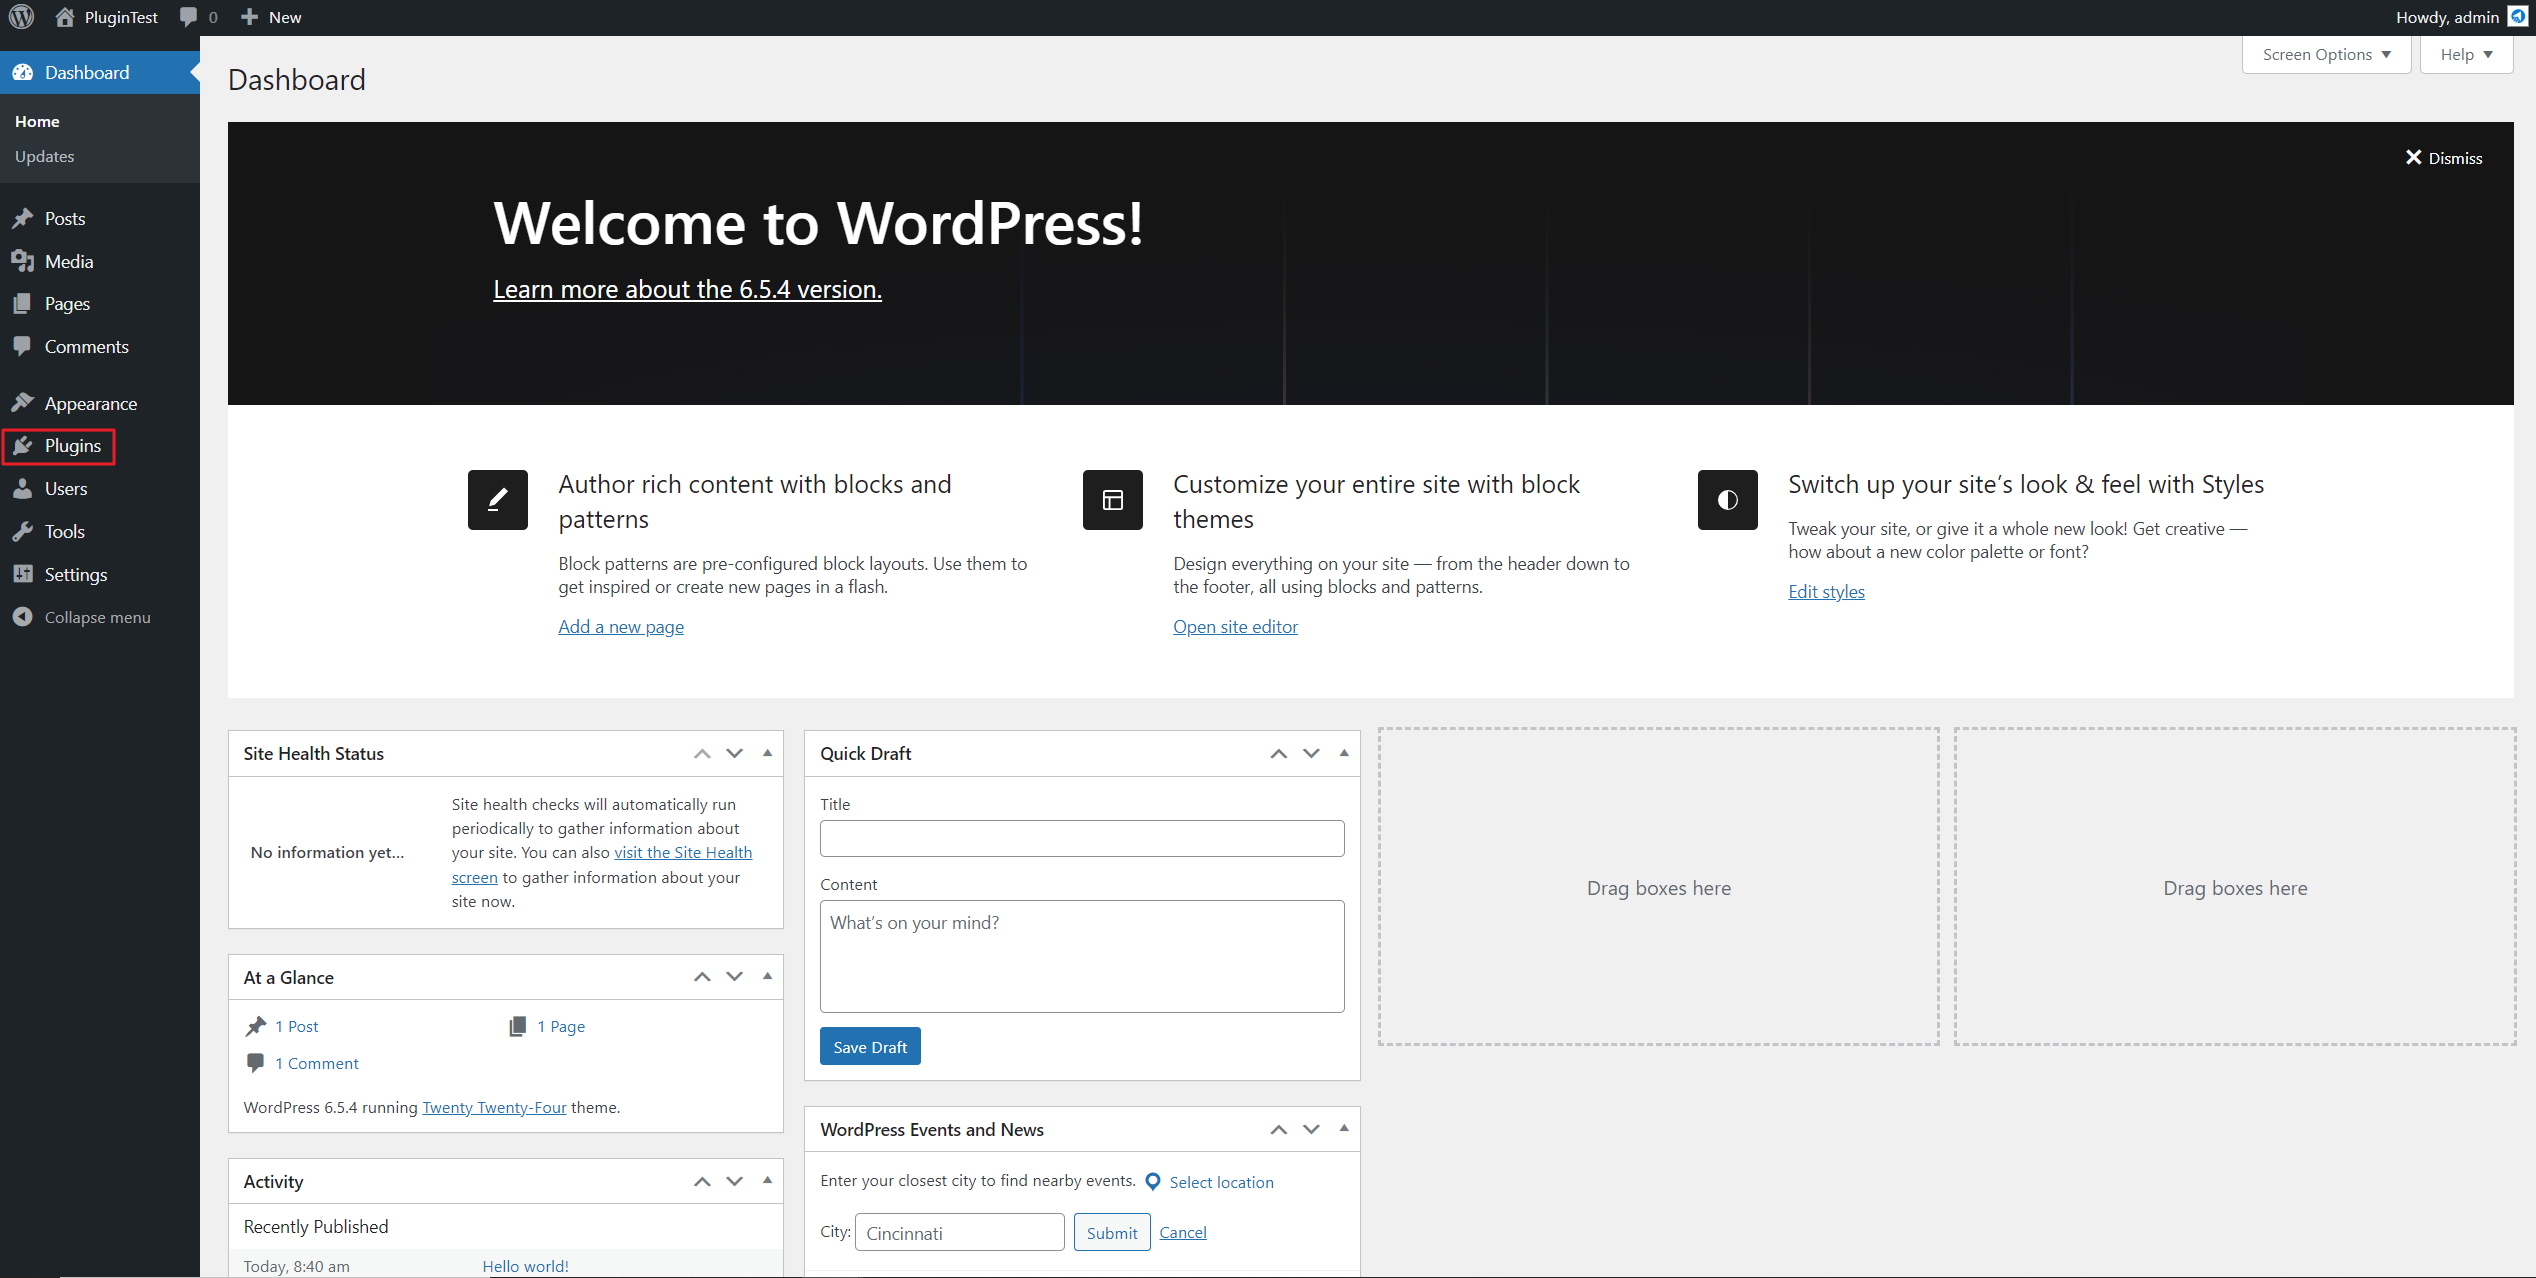
First, go to the admin panel of your WordPress site. Click on “Plugins,” then type “MailBluster” in the WordPress plugin search bar.
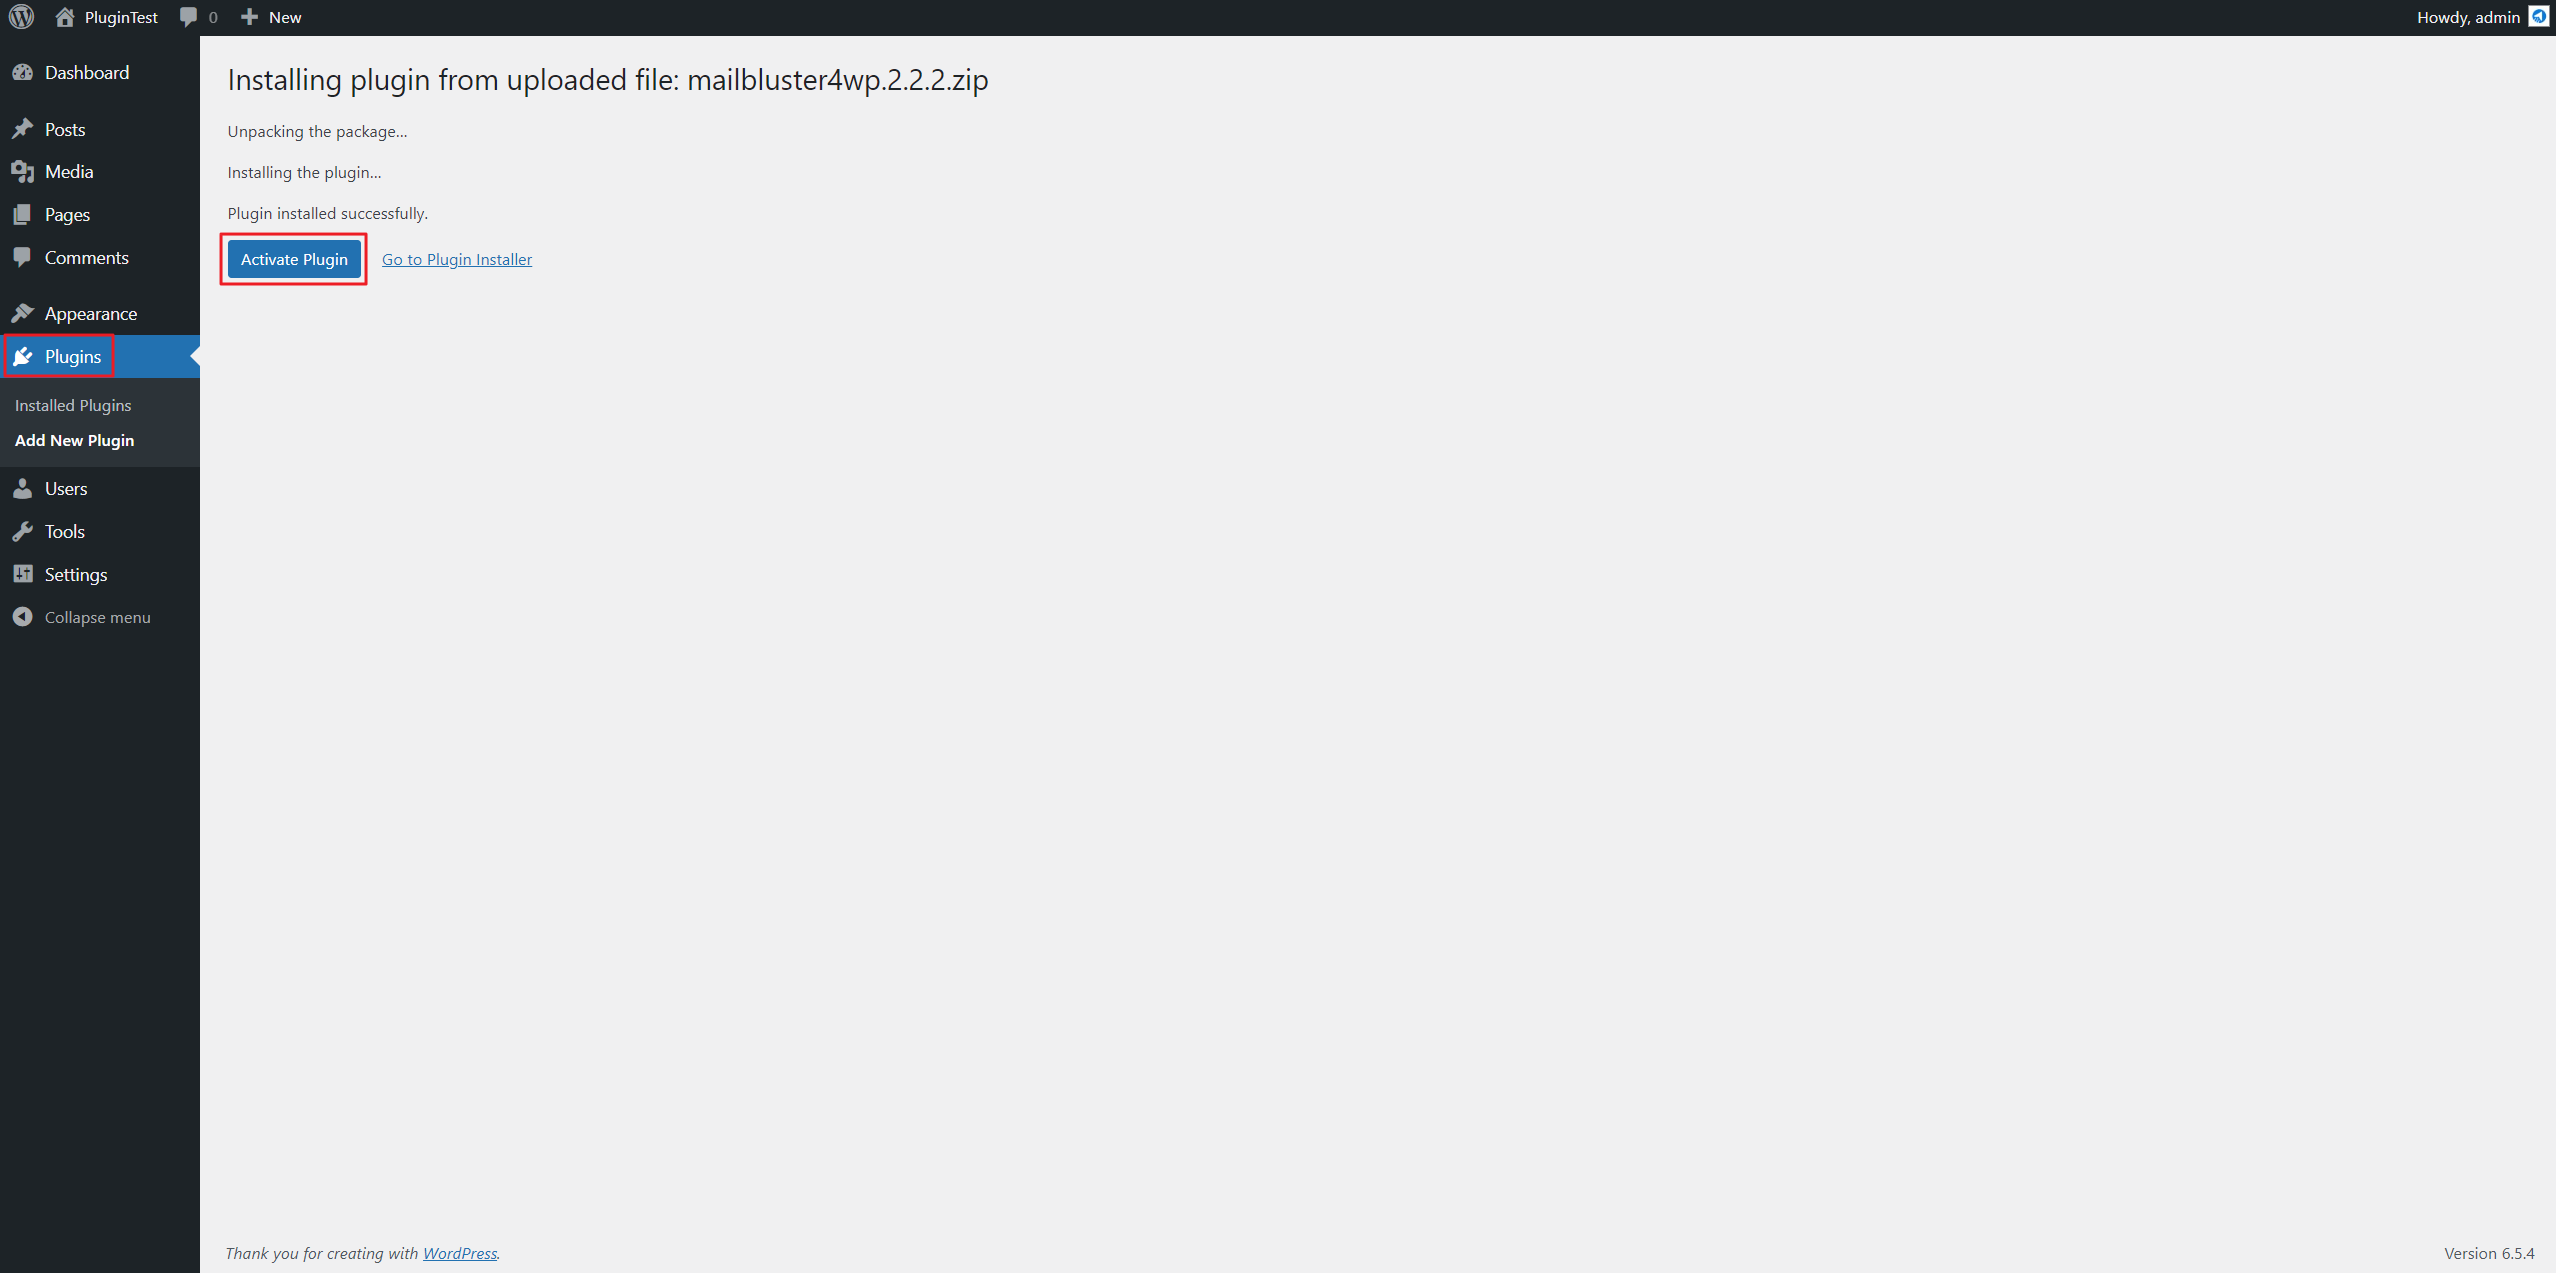
Then click Install Now.
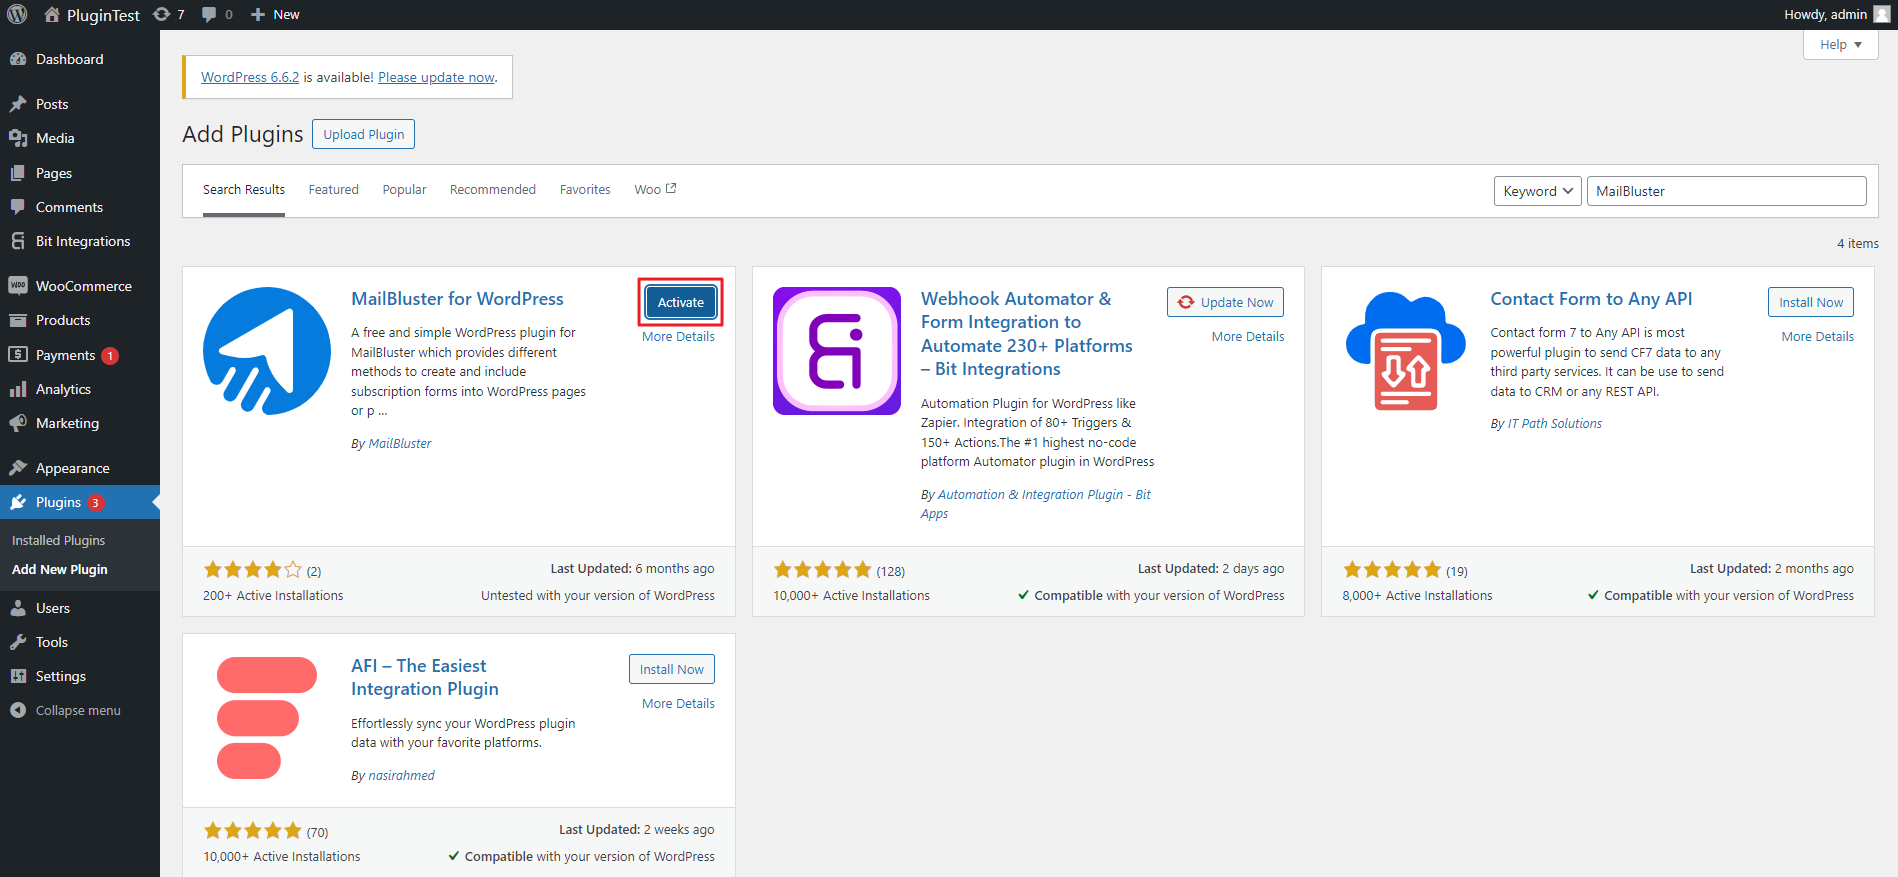
After the plugin installation is completed, click Activate Plugin button.
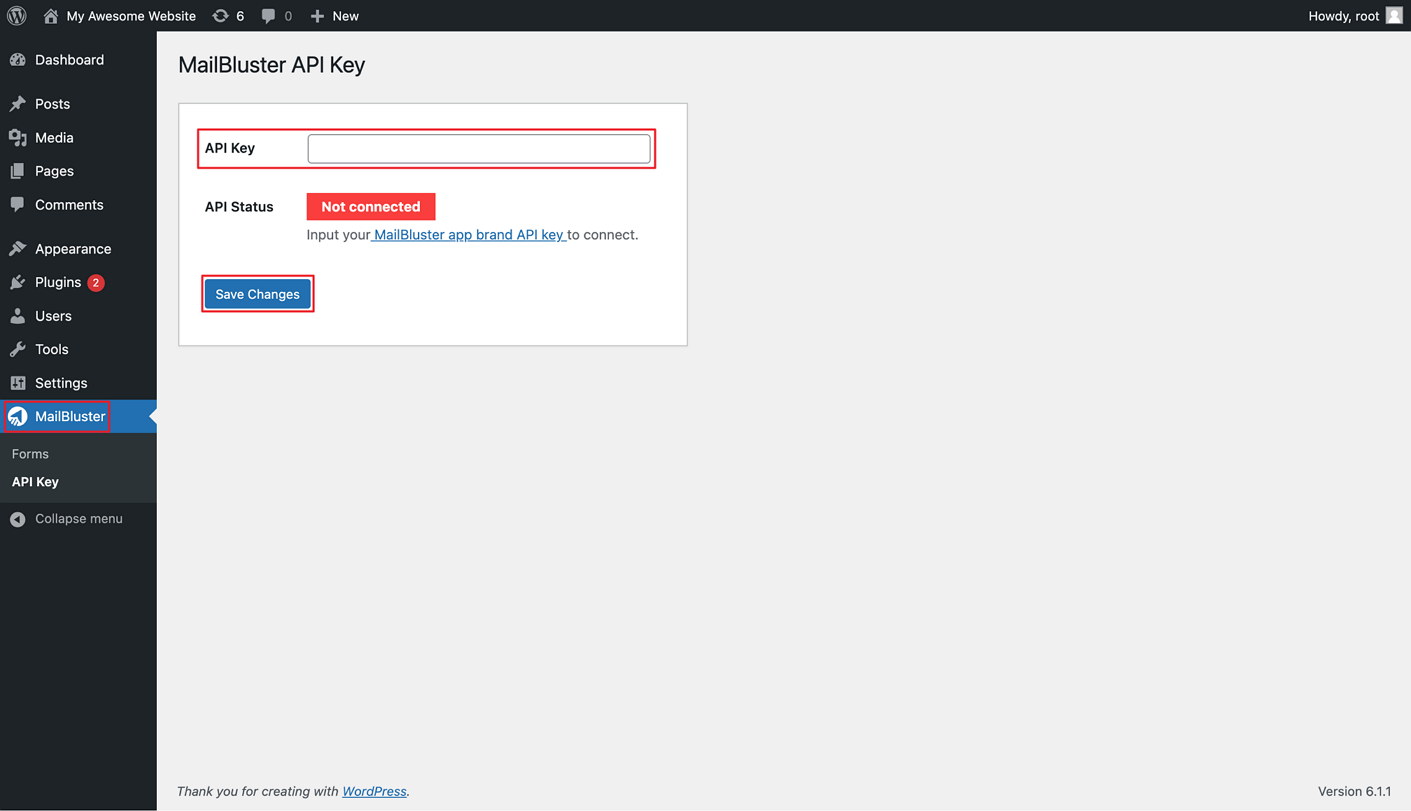
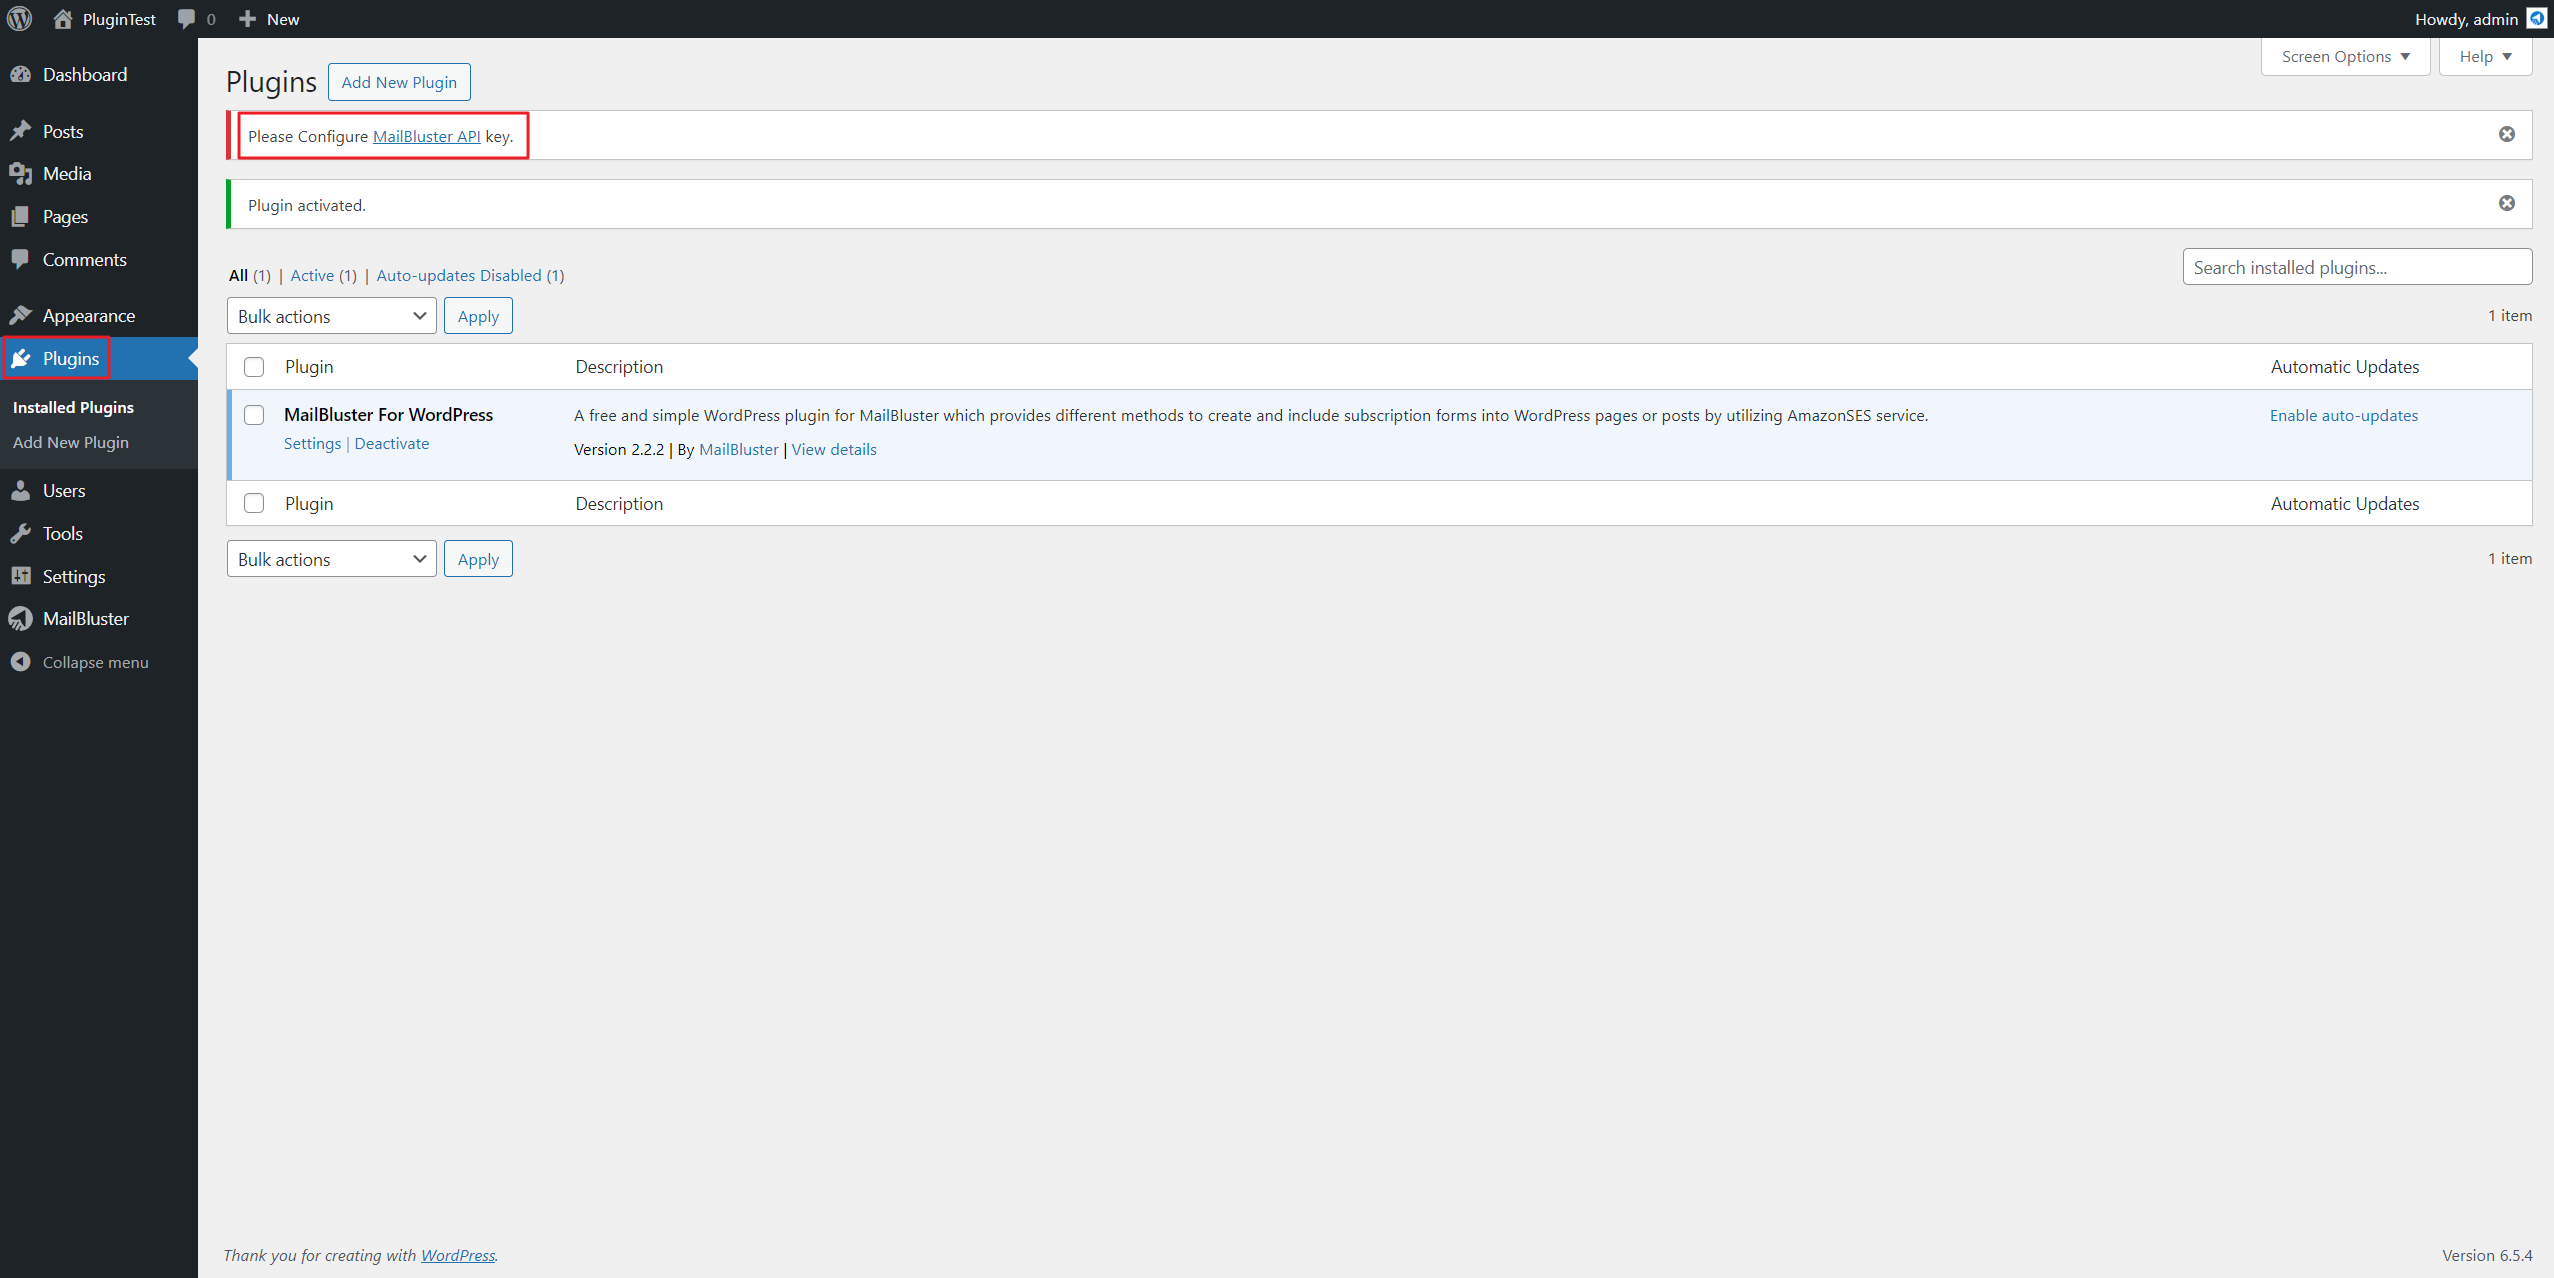
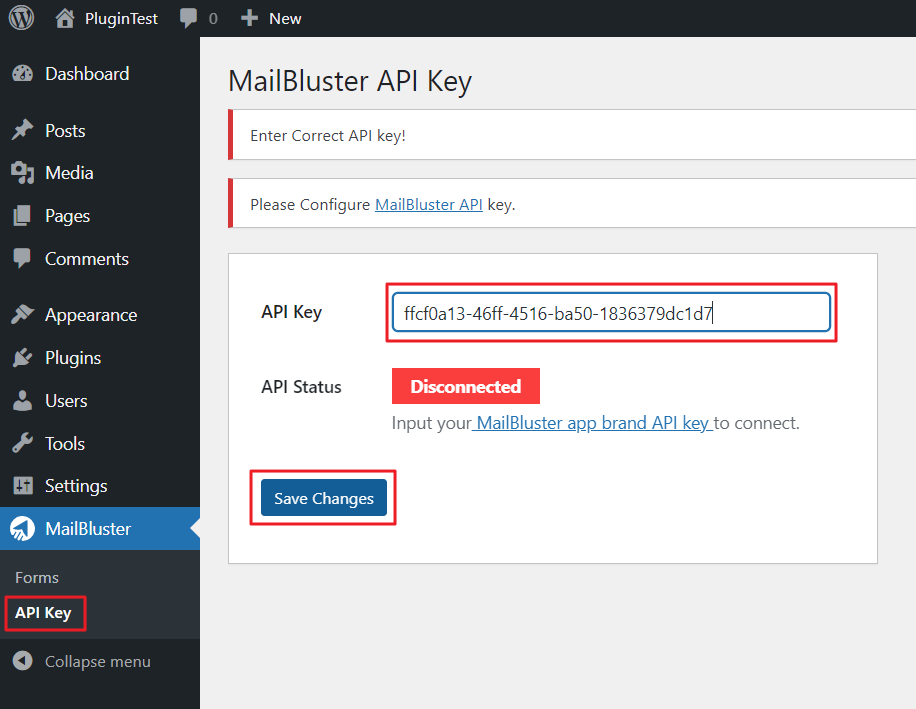
Now you need to configure MailBluster API key after the Plugin has been activated. Click on MailBluster API key as shown below.
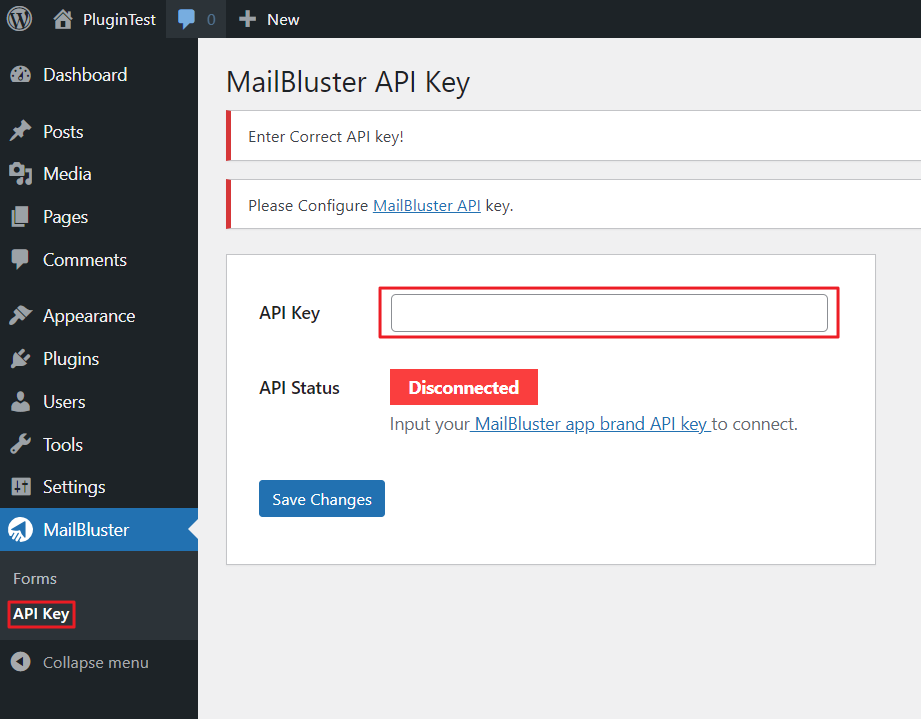
It will take you to the MailBluster API Key settings page where you need to insert the API Key to connect with the main MailBluster app.
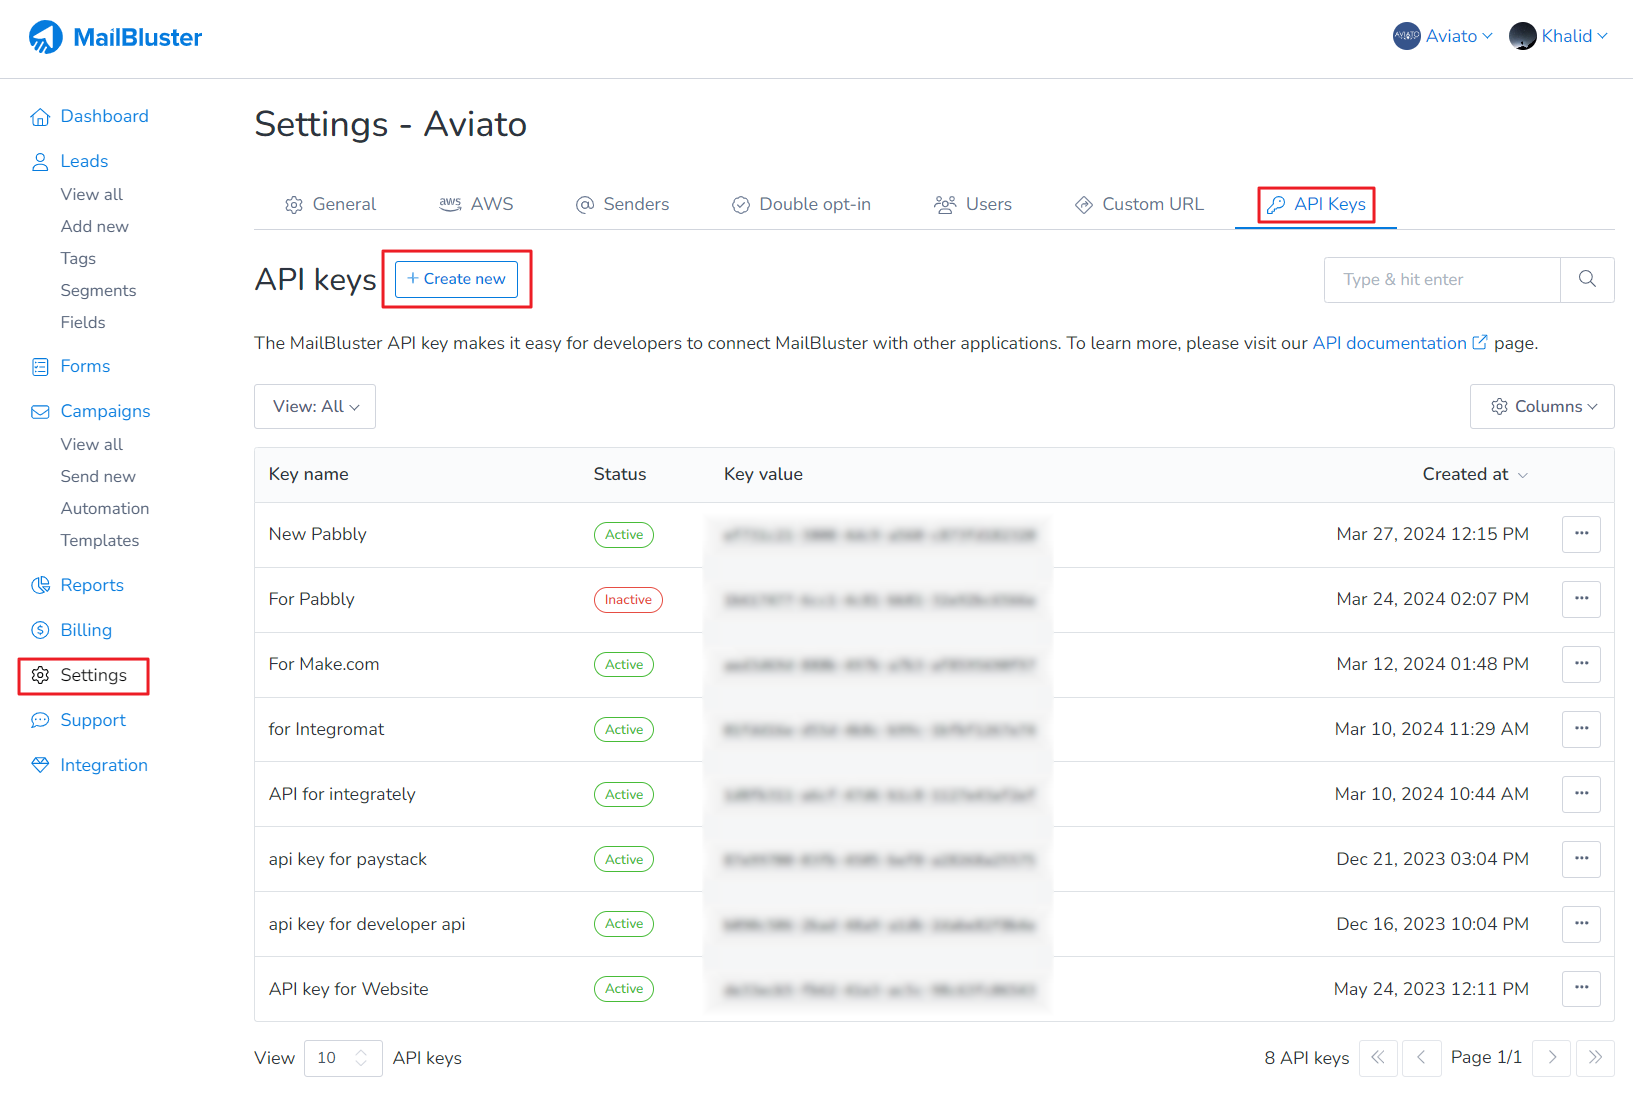
Sign into MailBluster, then go to your Brand > Settings >API Keys and then click Create new.
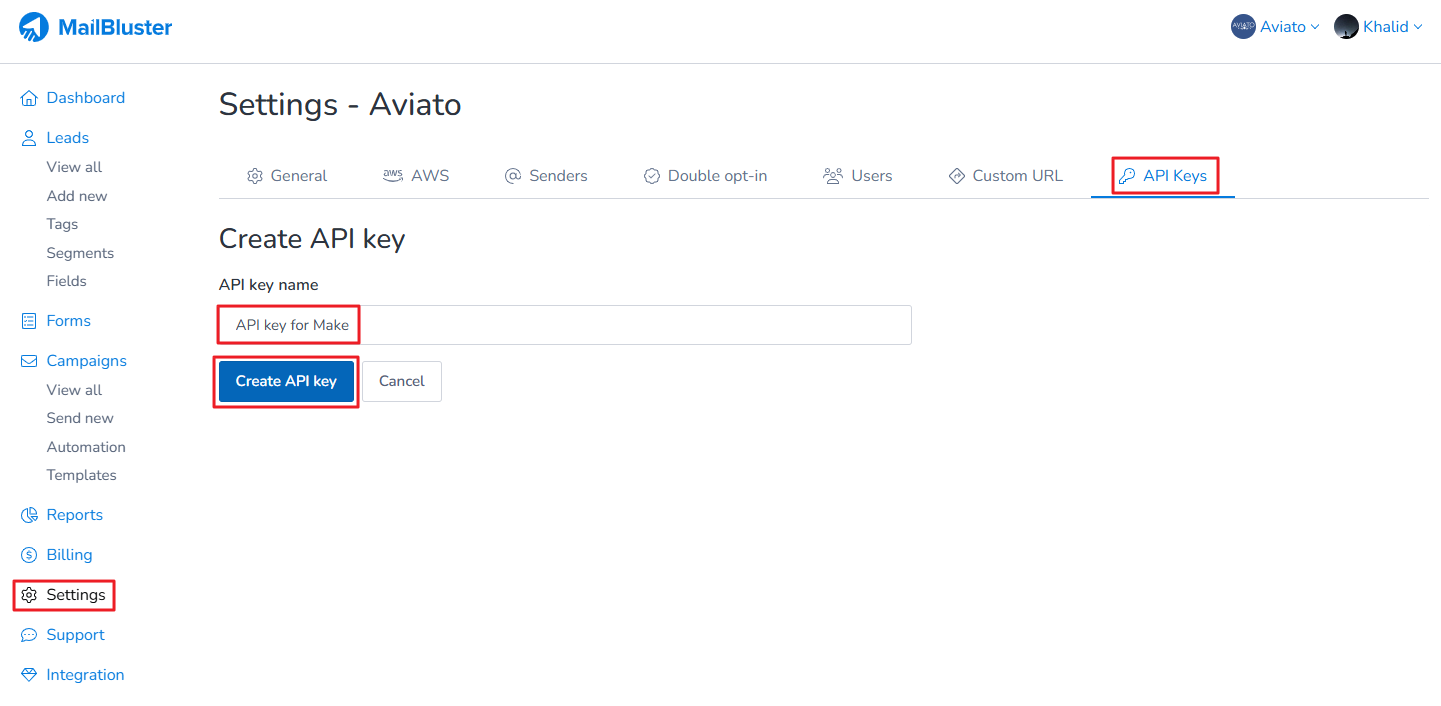
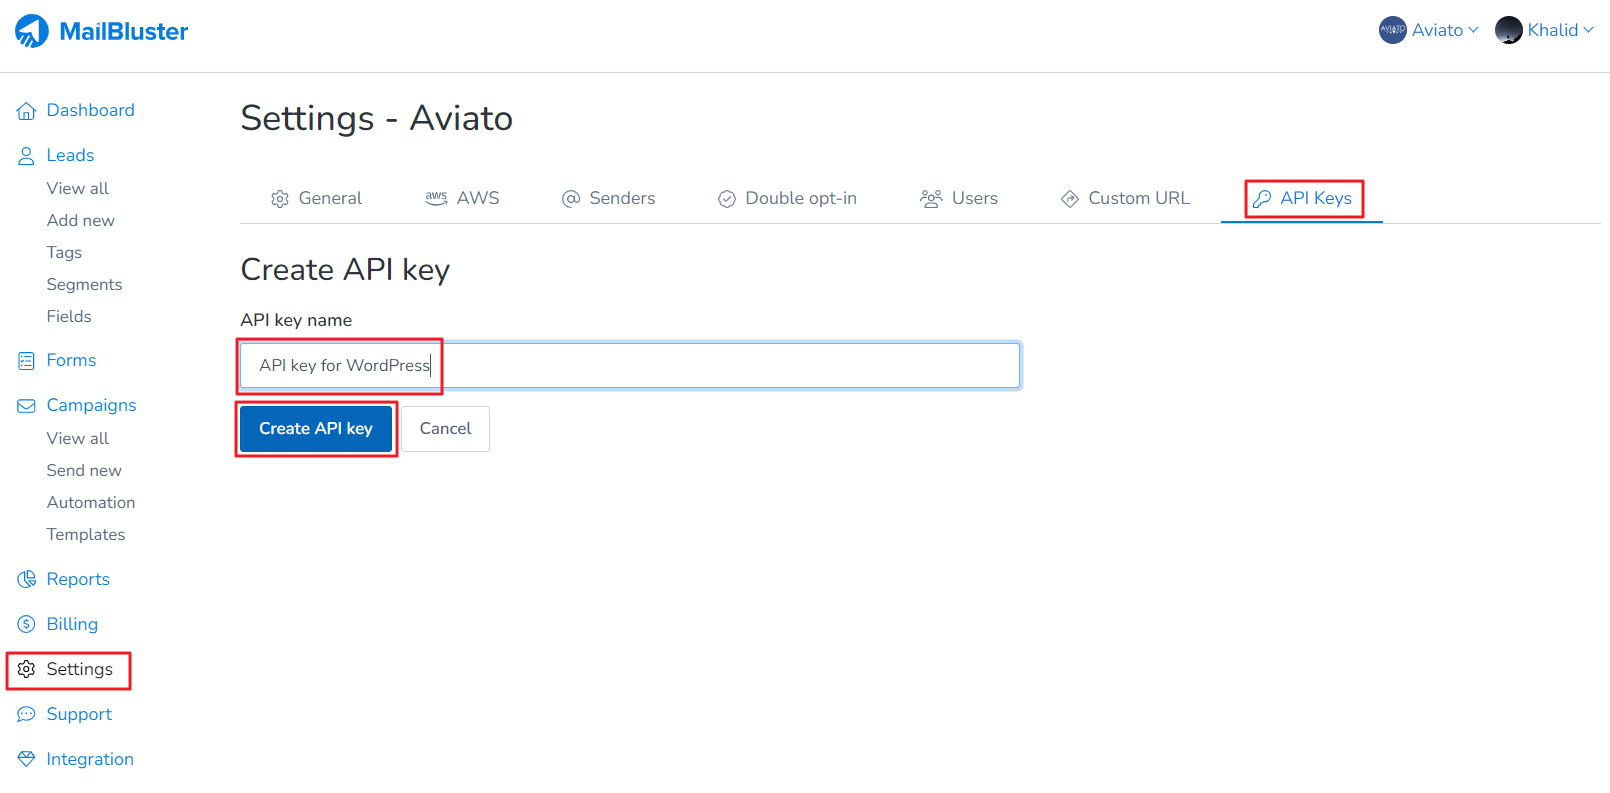
Now enter API key name, for example, API key for WordPress, and then click on Create API key.
API key value will be generated. You need to copy the key value of this API key.
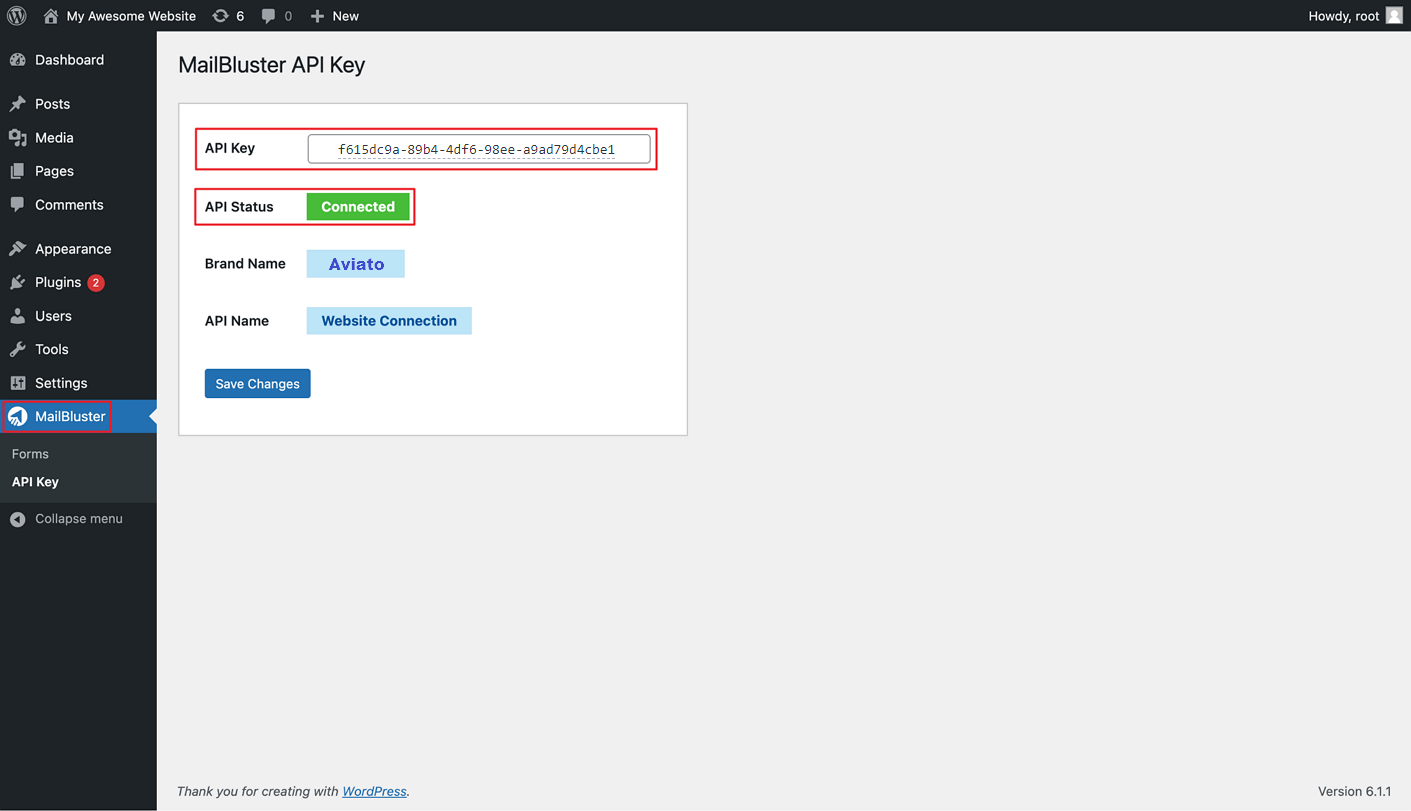
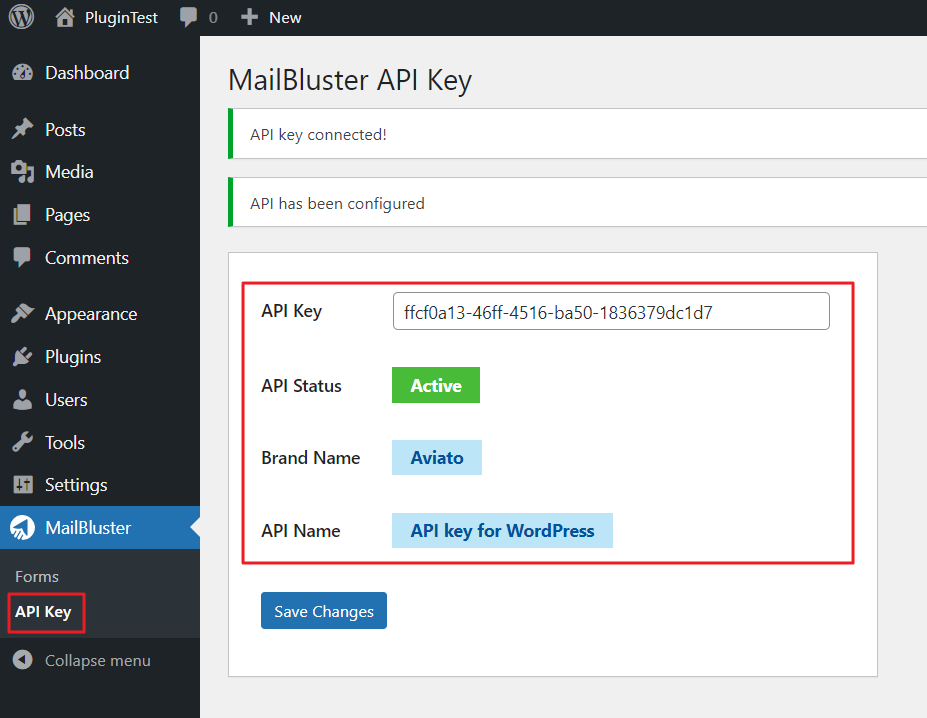
Paste the API key value and click Save Changes.
Your MailBluster Brand is now connected to your website through this API Key. Make sure API Status remains Active. You will also notice which MailBluster Brand is connected to this API key.
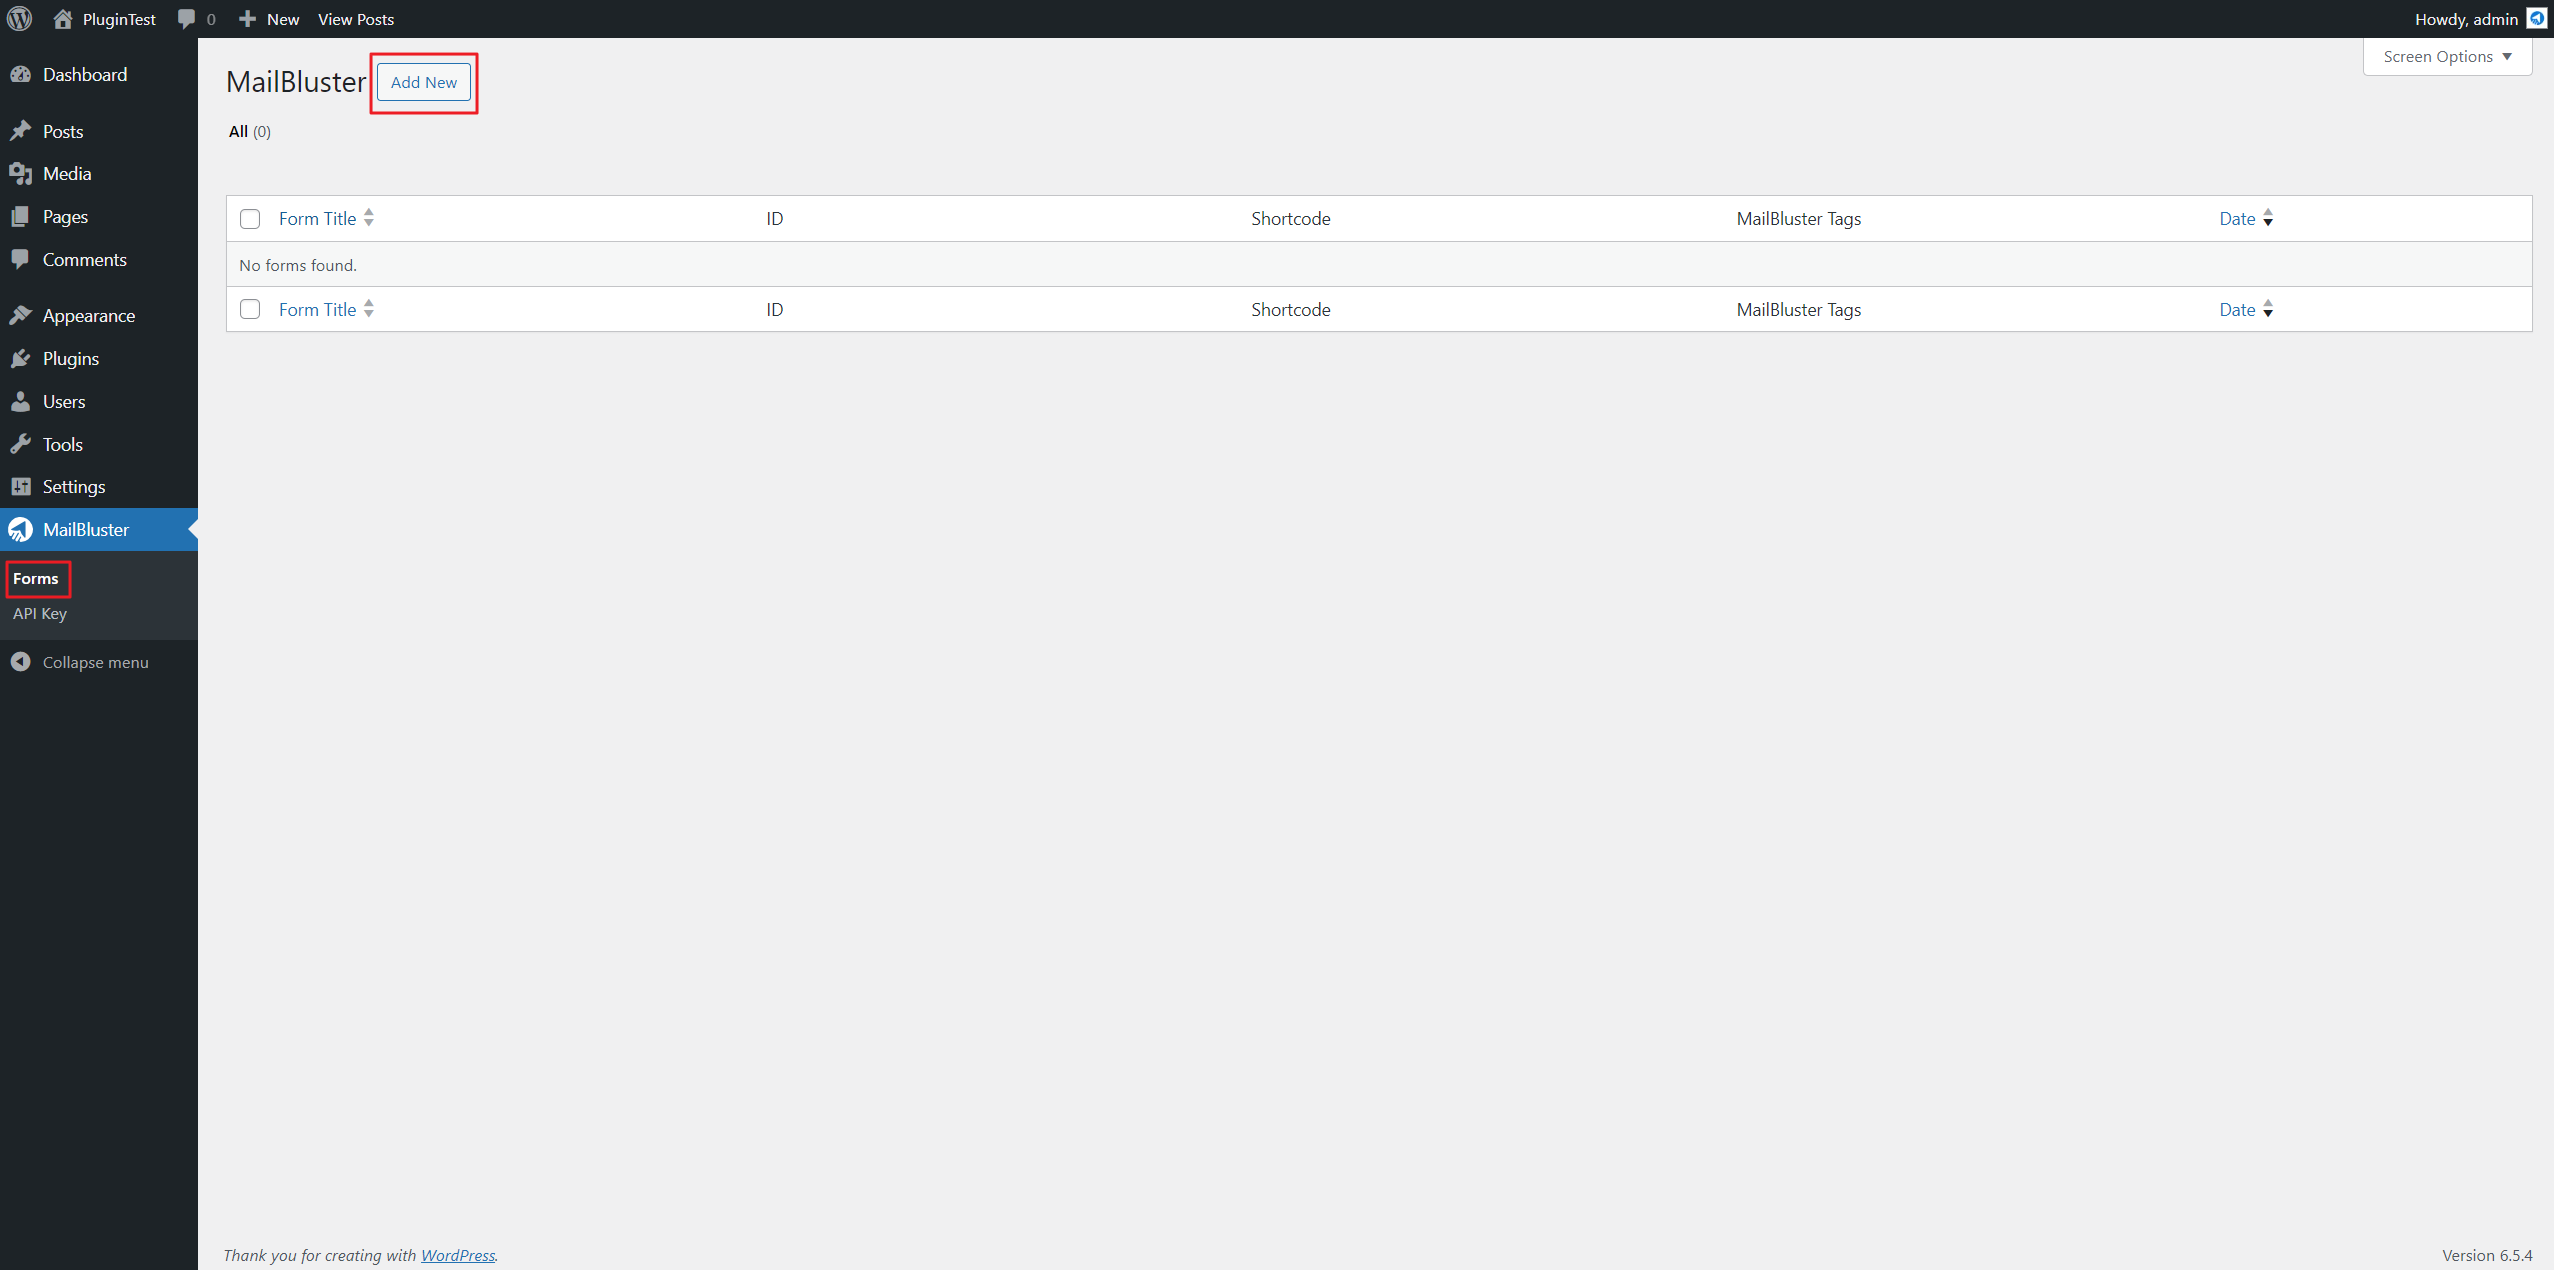
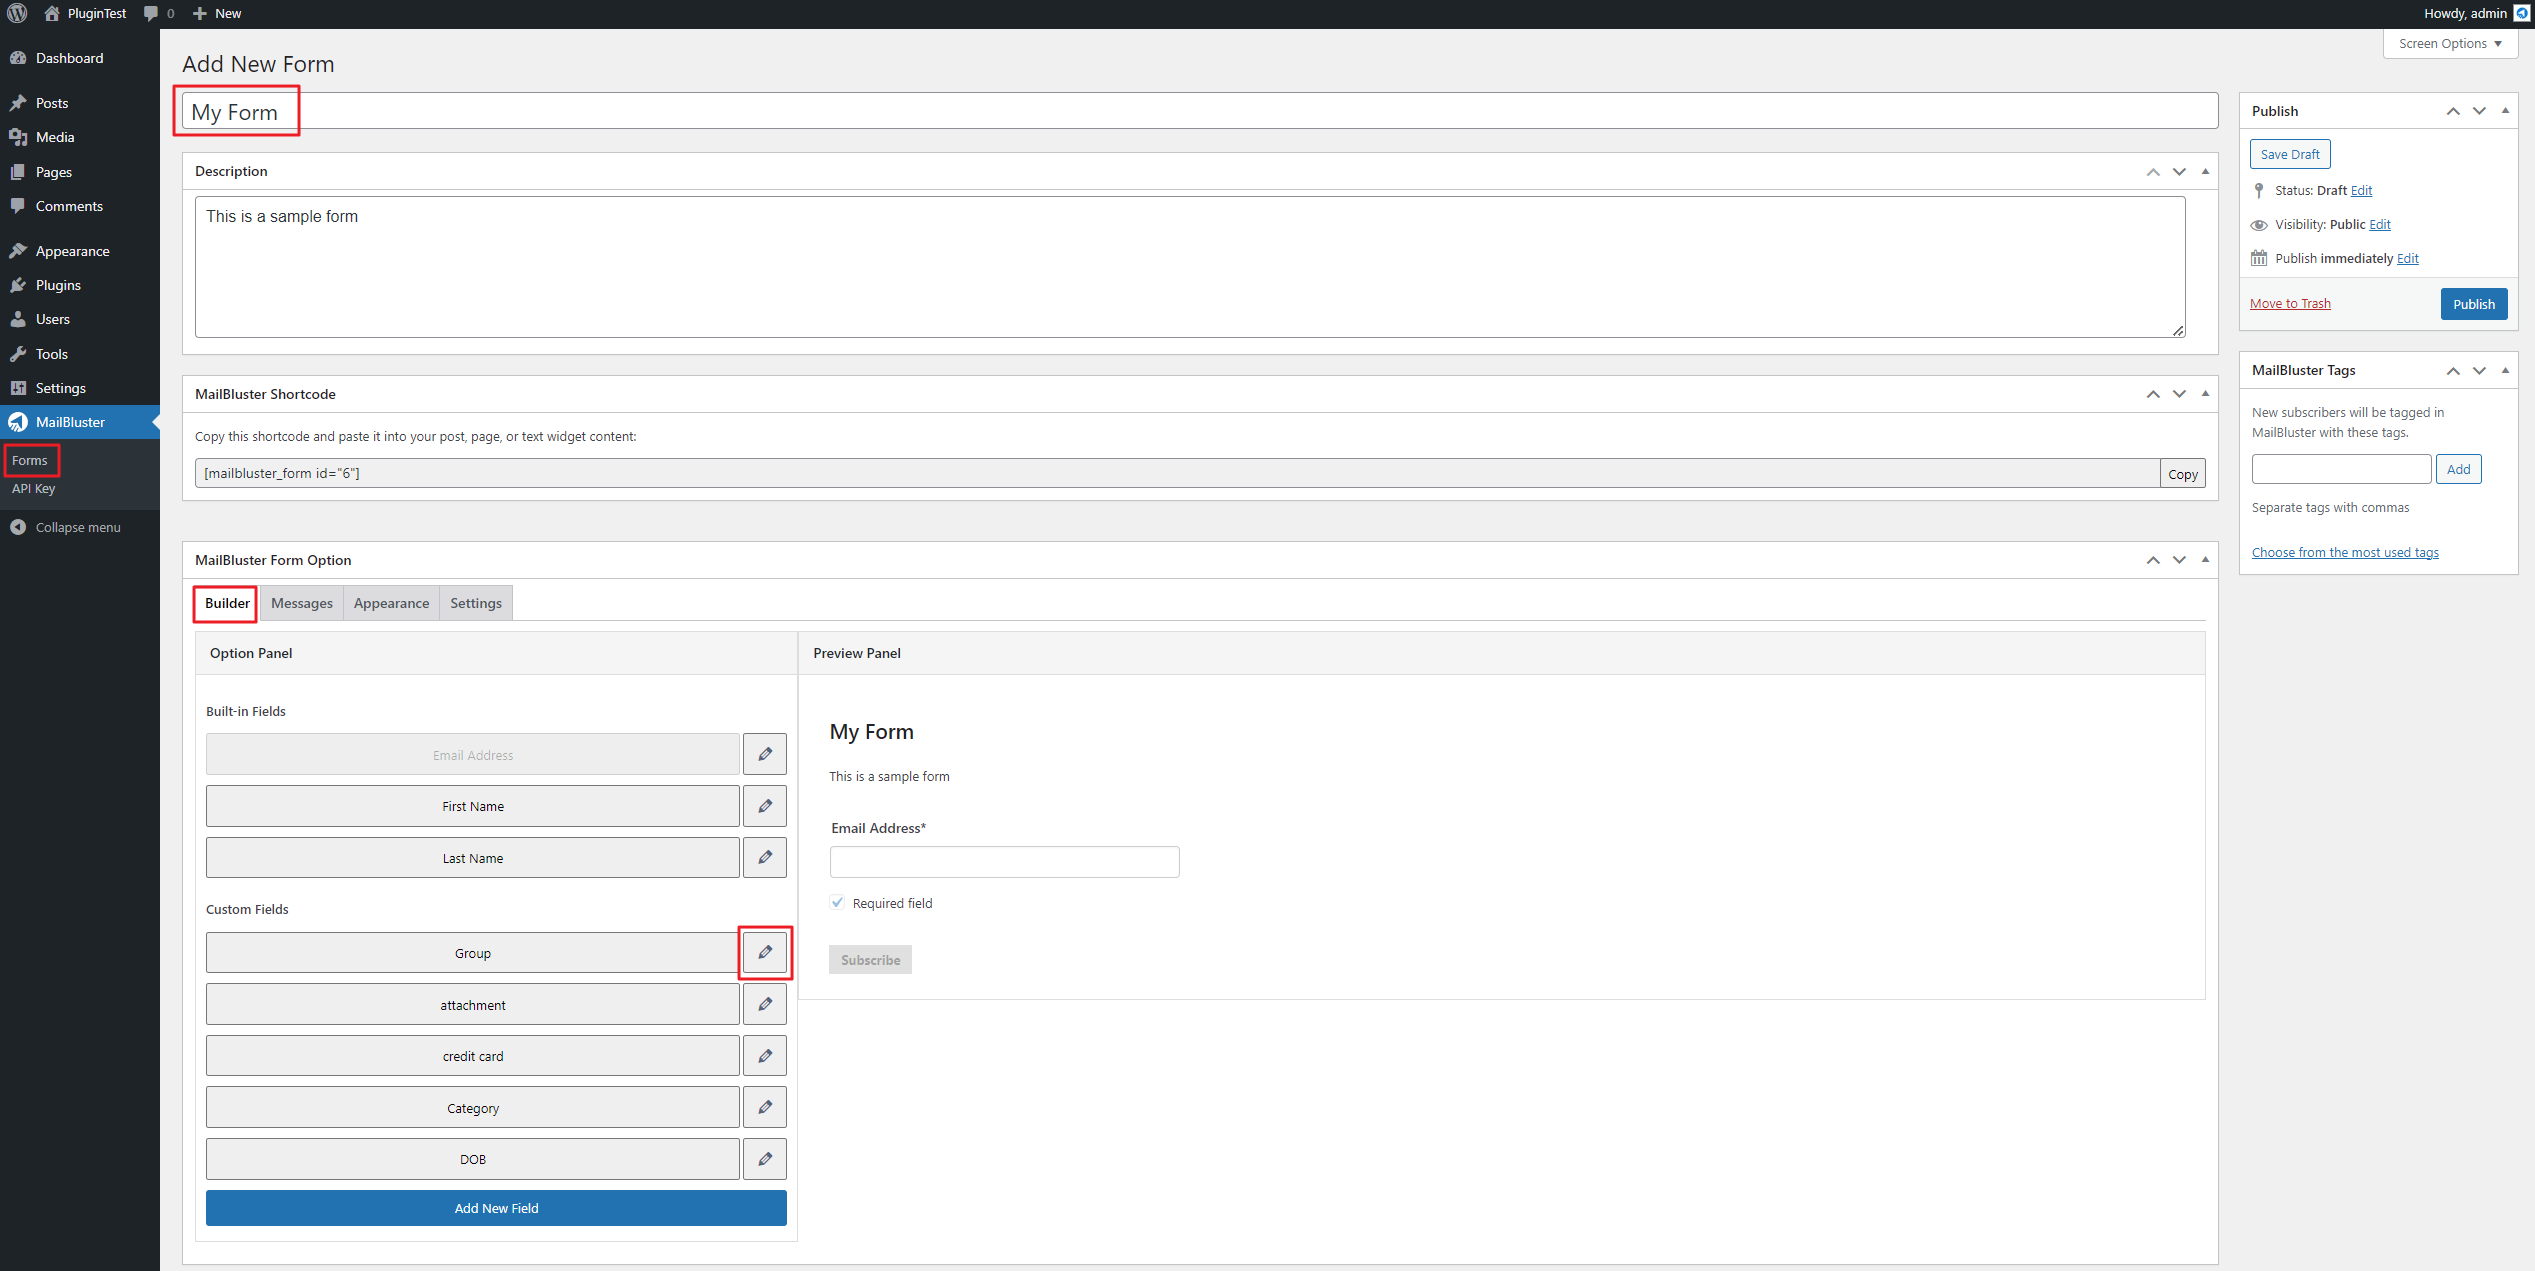
Now click on Forms and click Add New button.
Write down the Form name, Description and Builder settings to edit the Form.
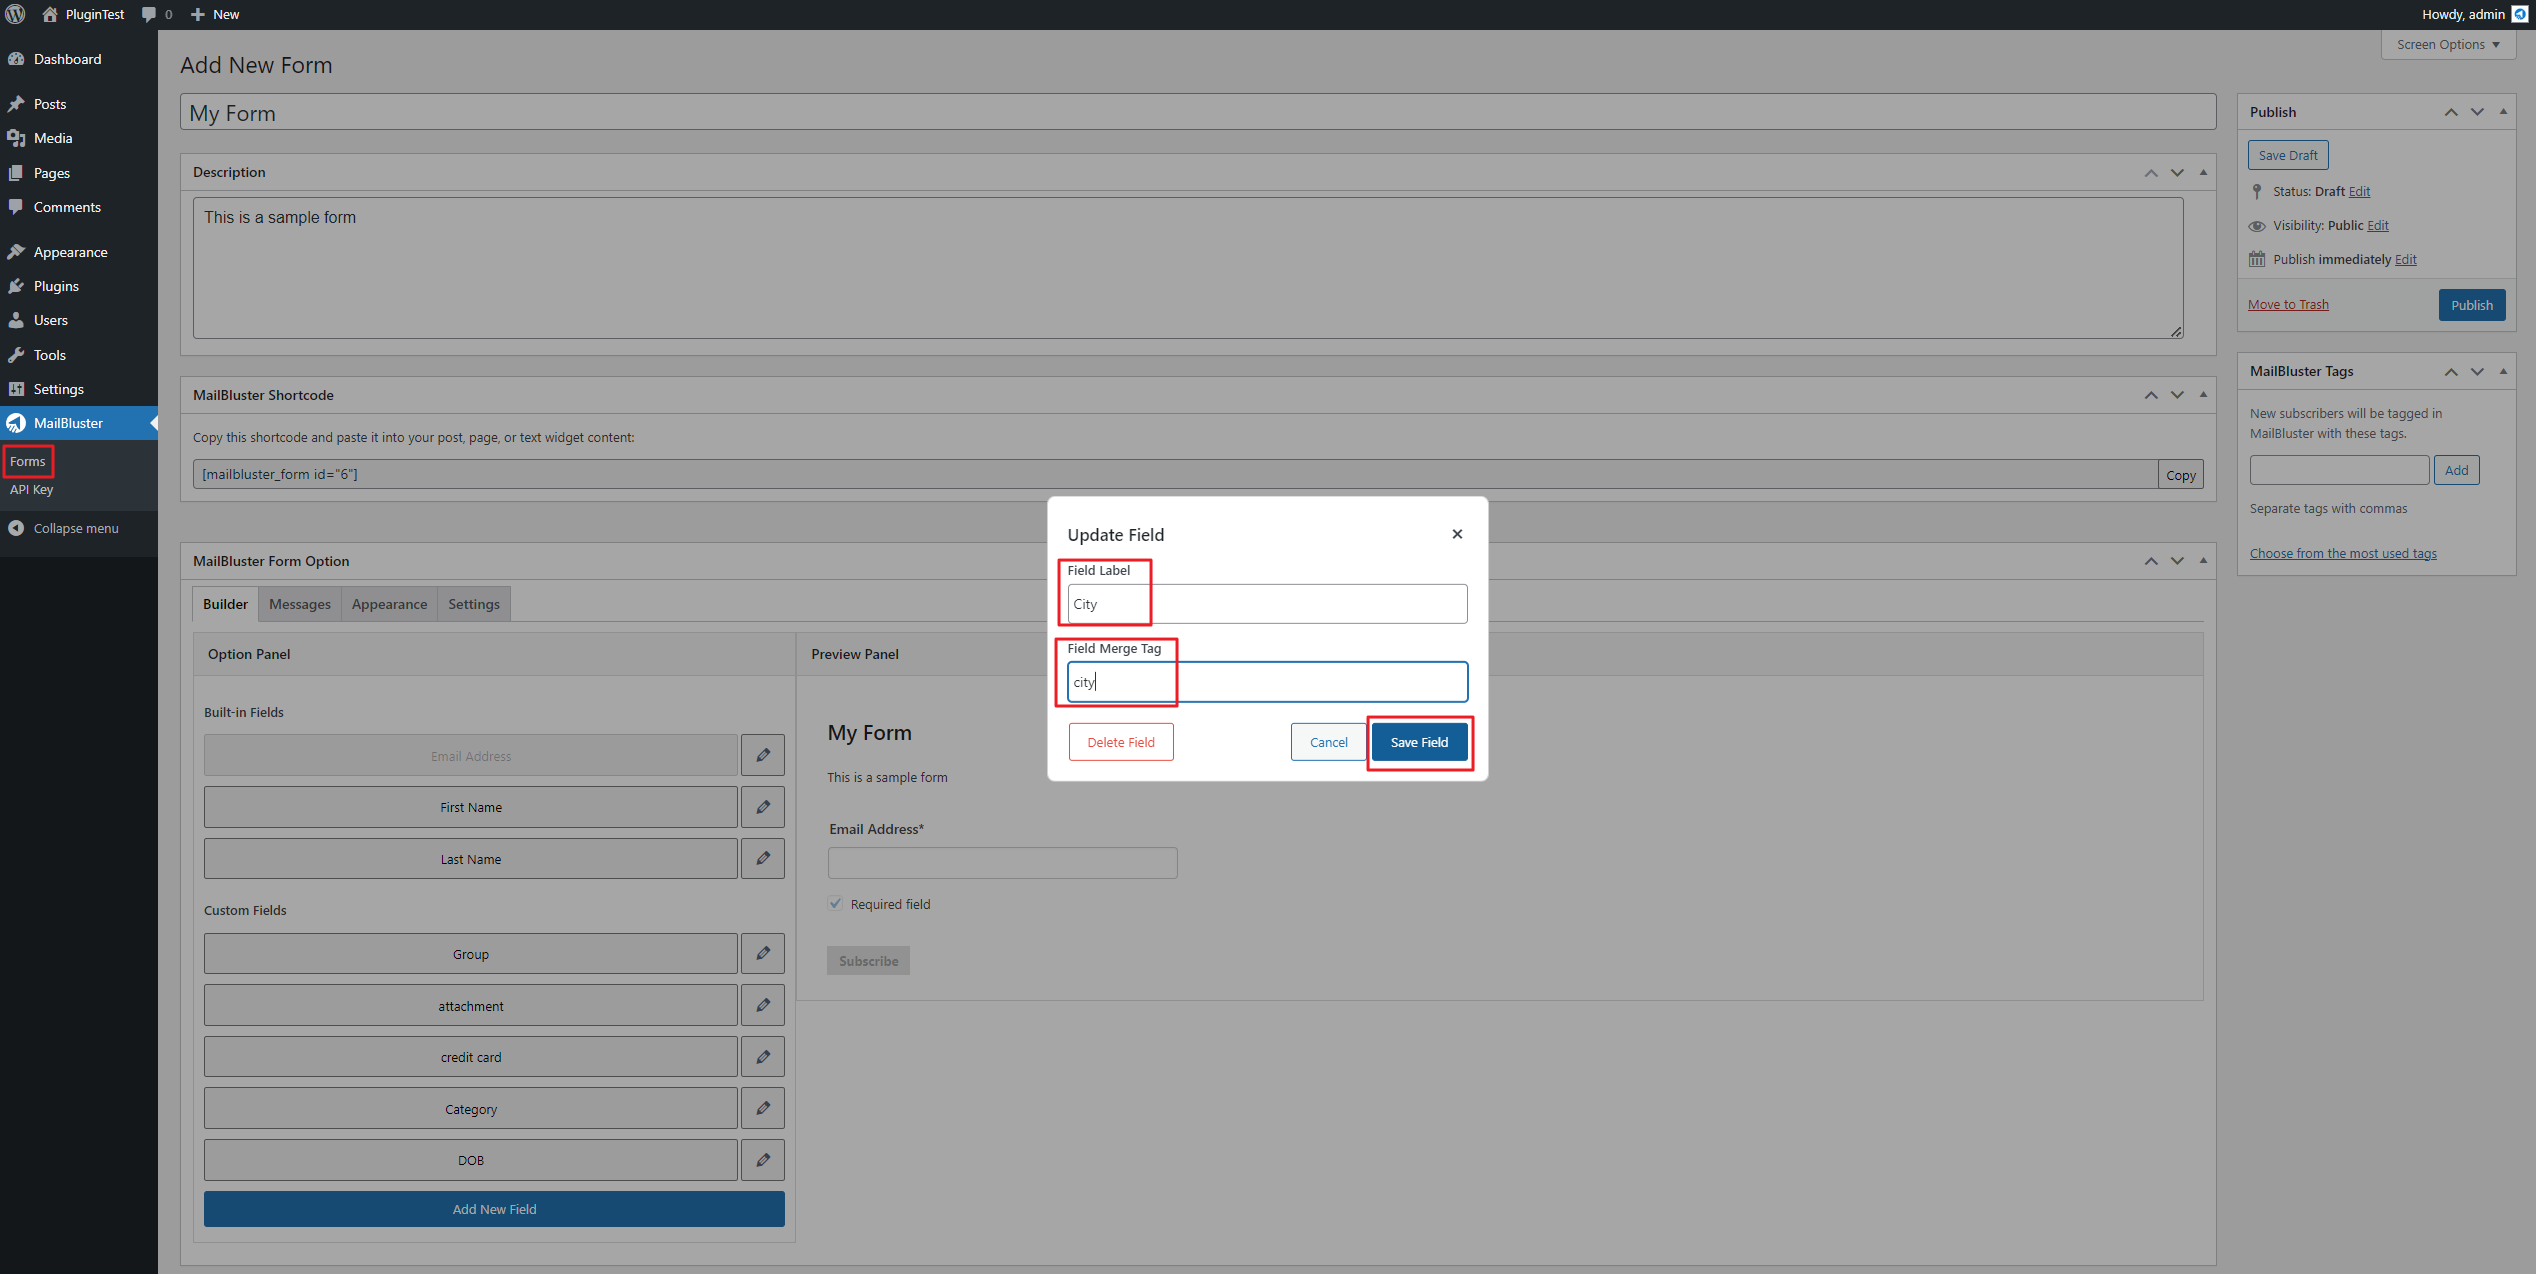
Here we are updating the field; we replaced it with ‘city’. Then click Save field.
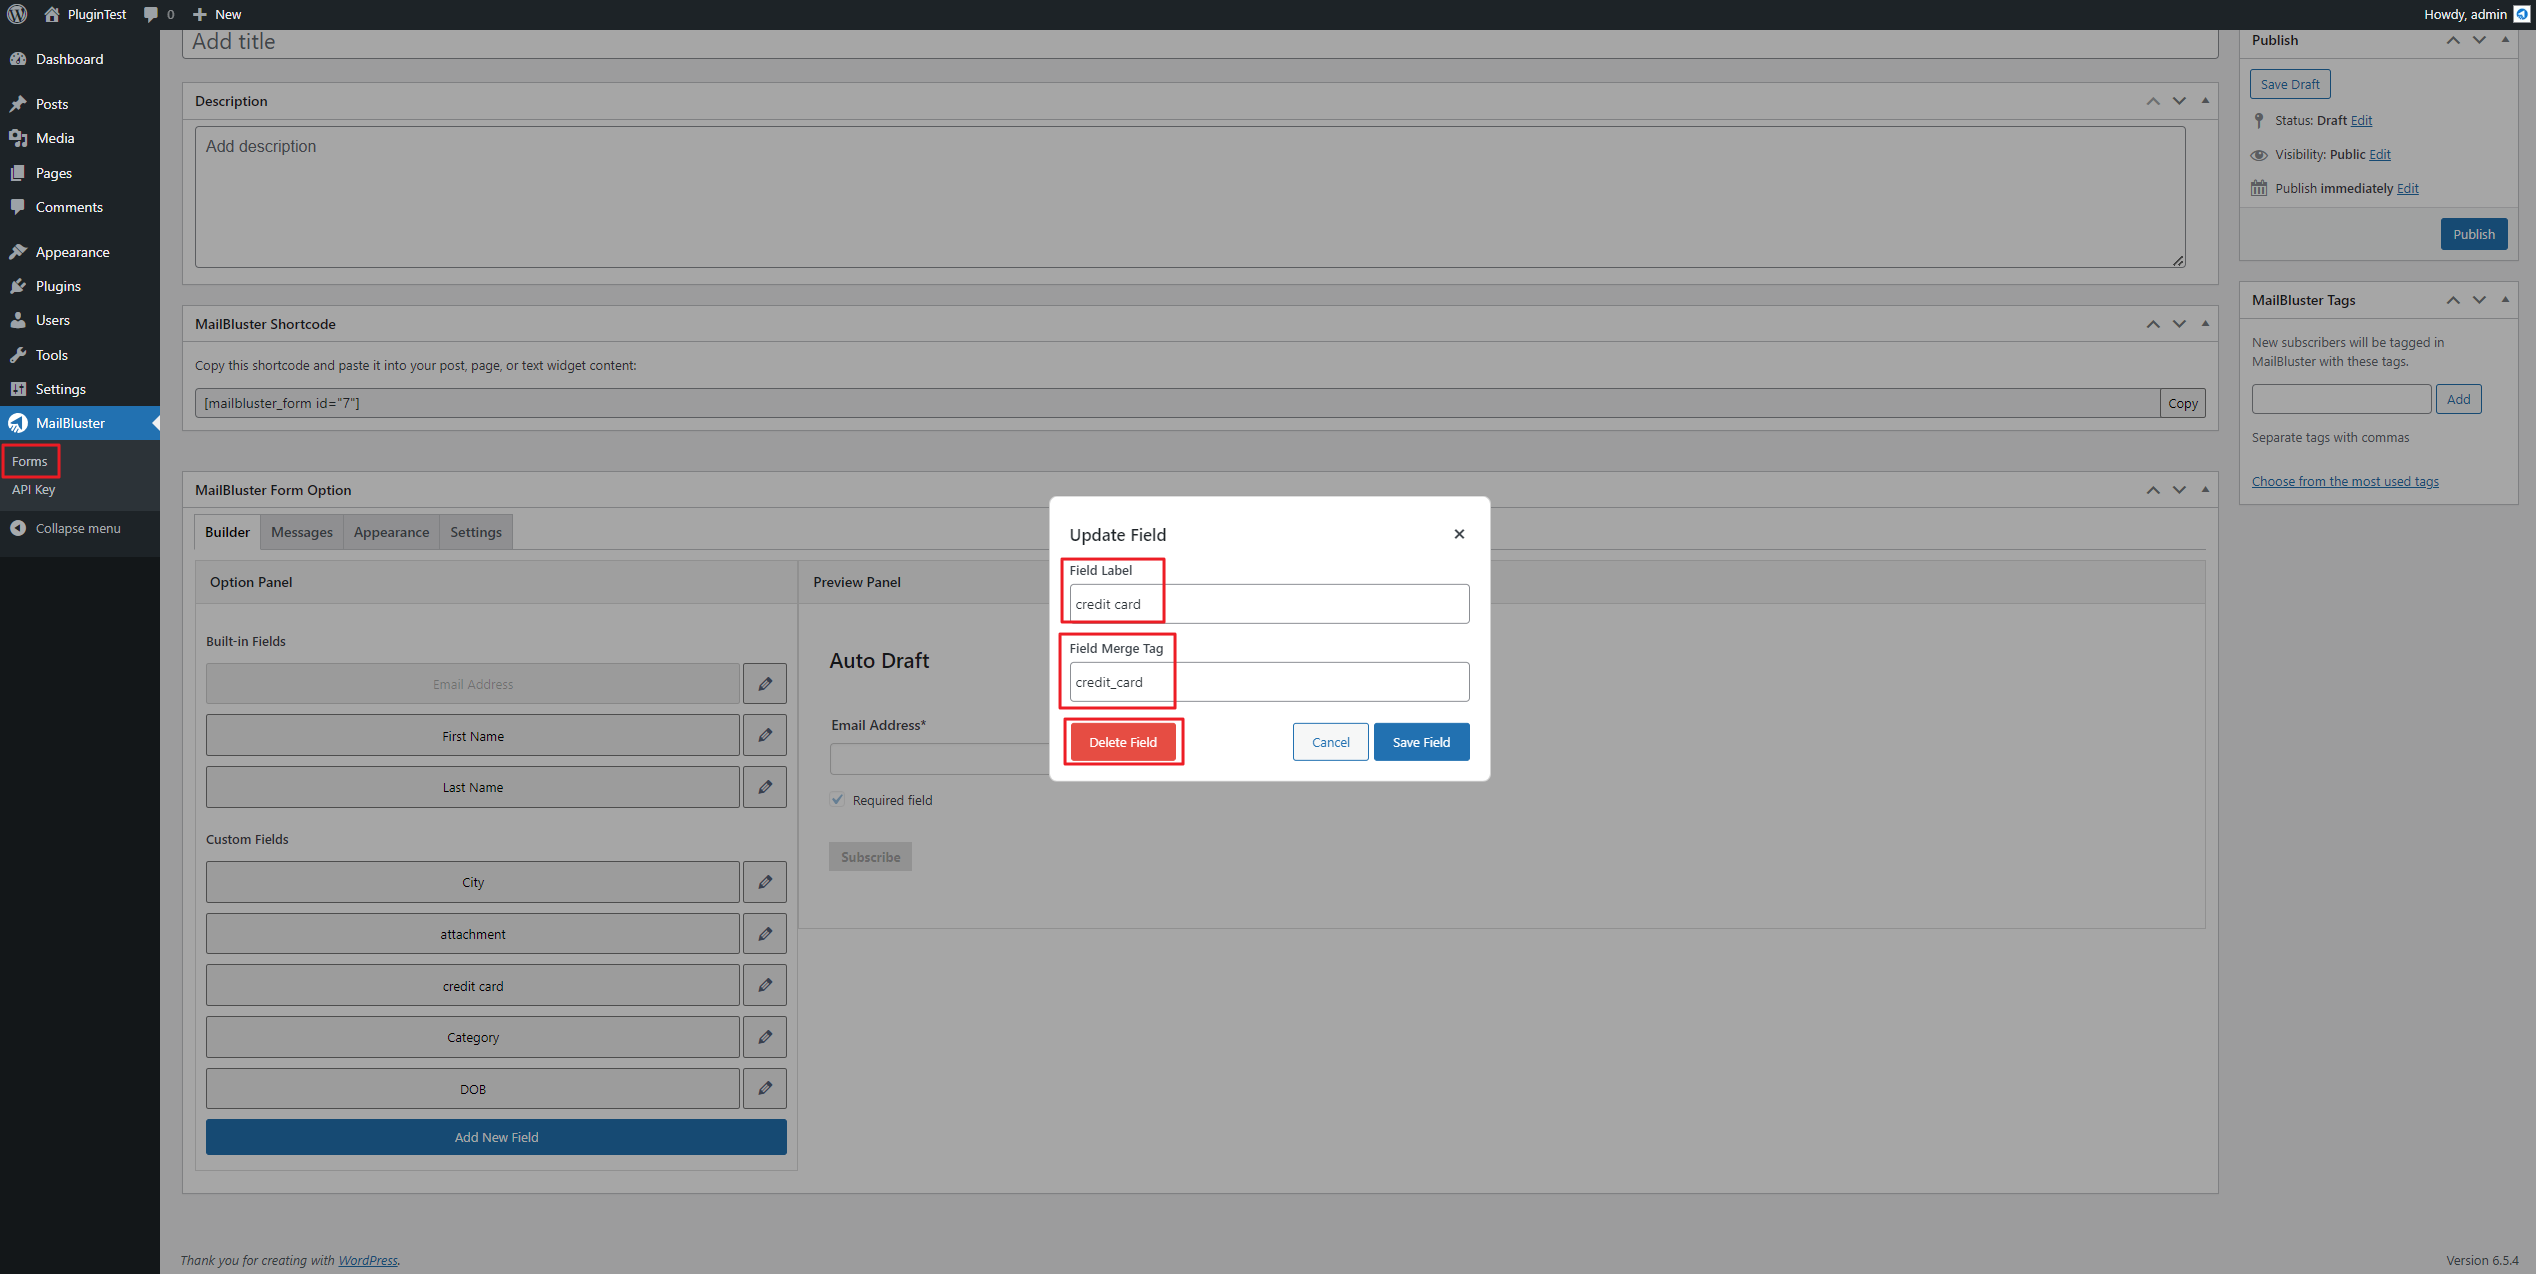
Here we are deleting/removing the “credit card” field and adding another field. Click Delete field to delete any current field.
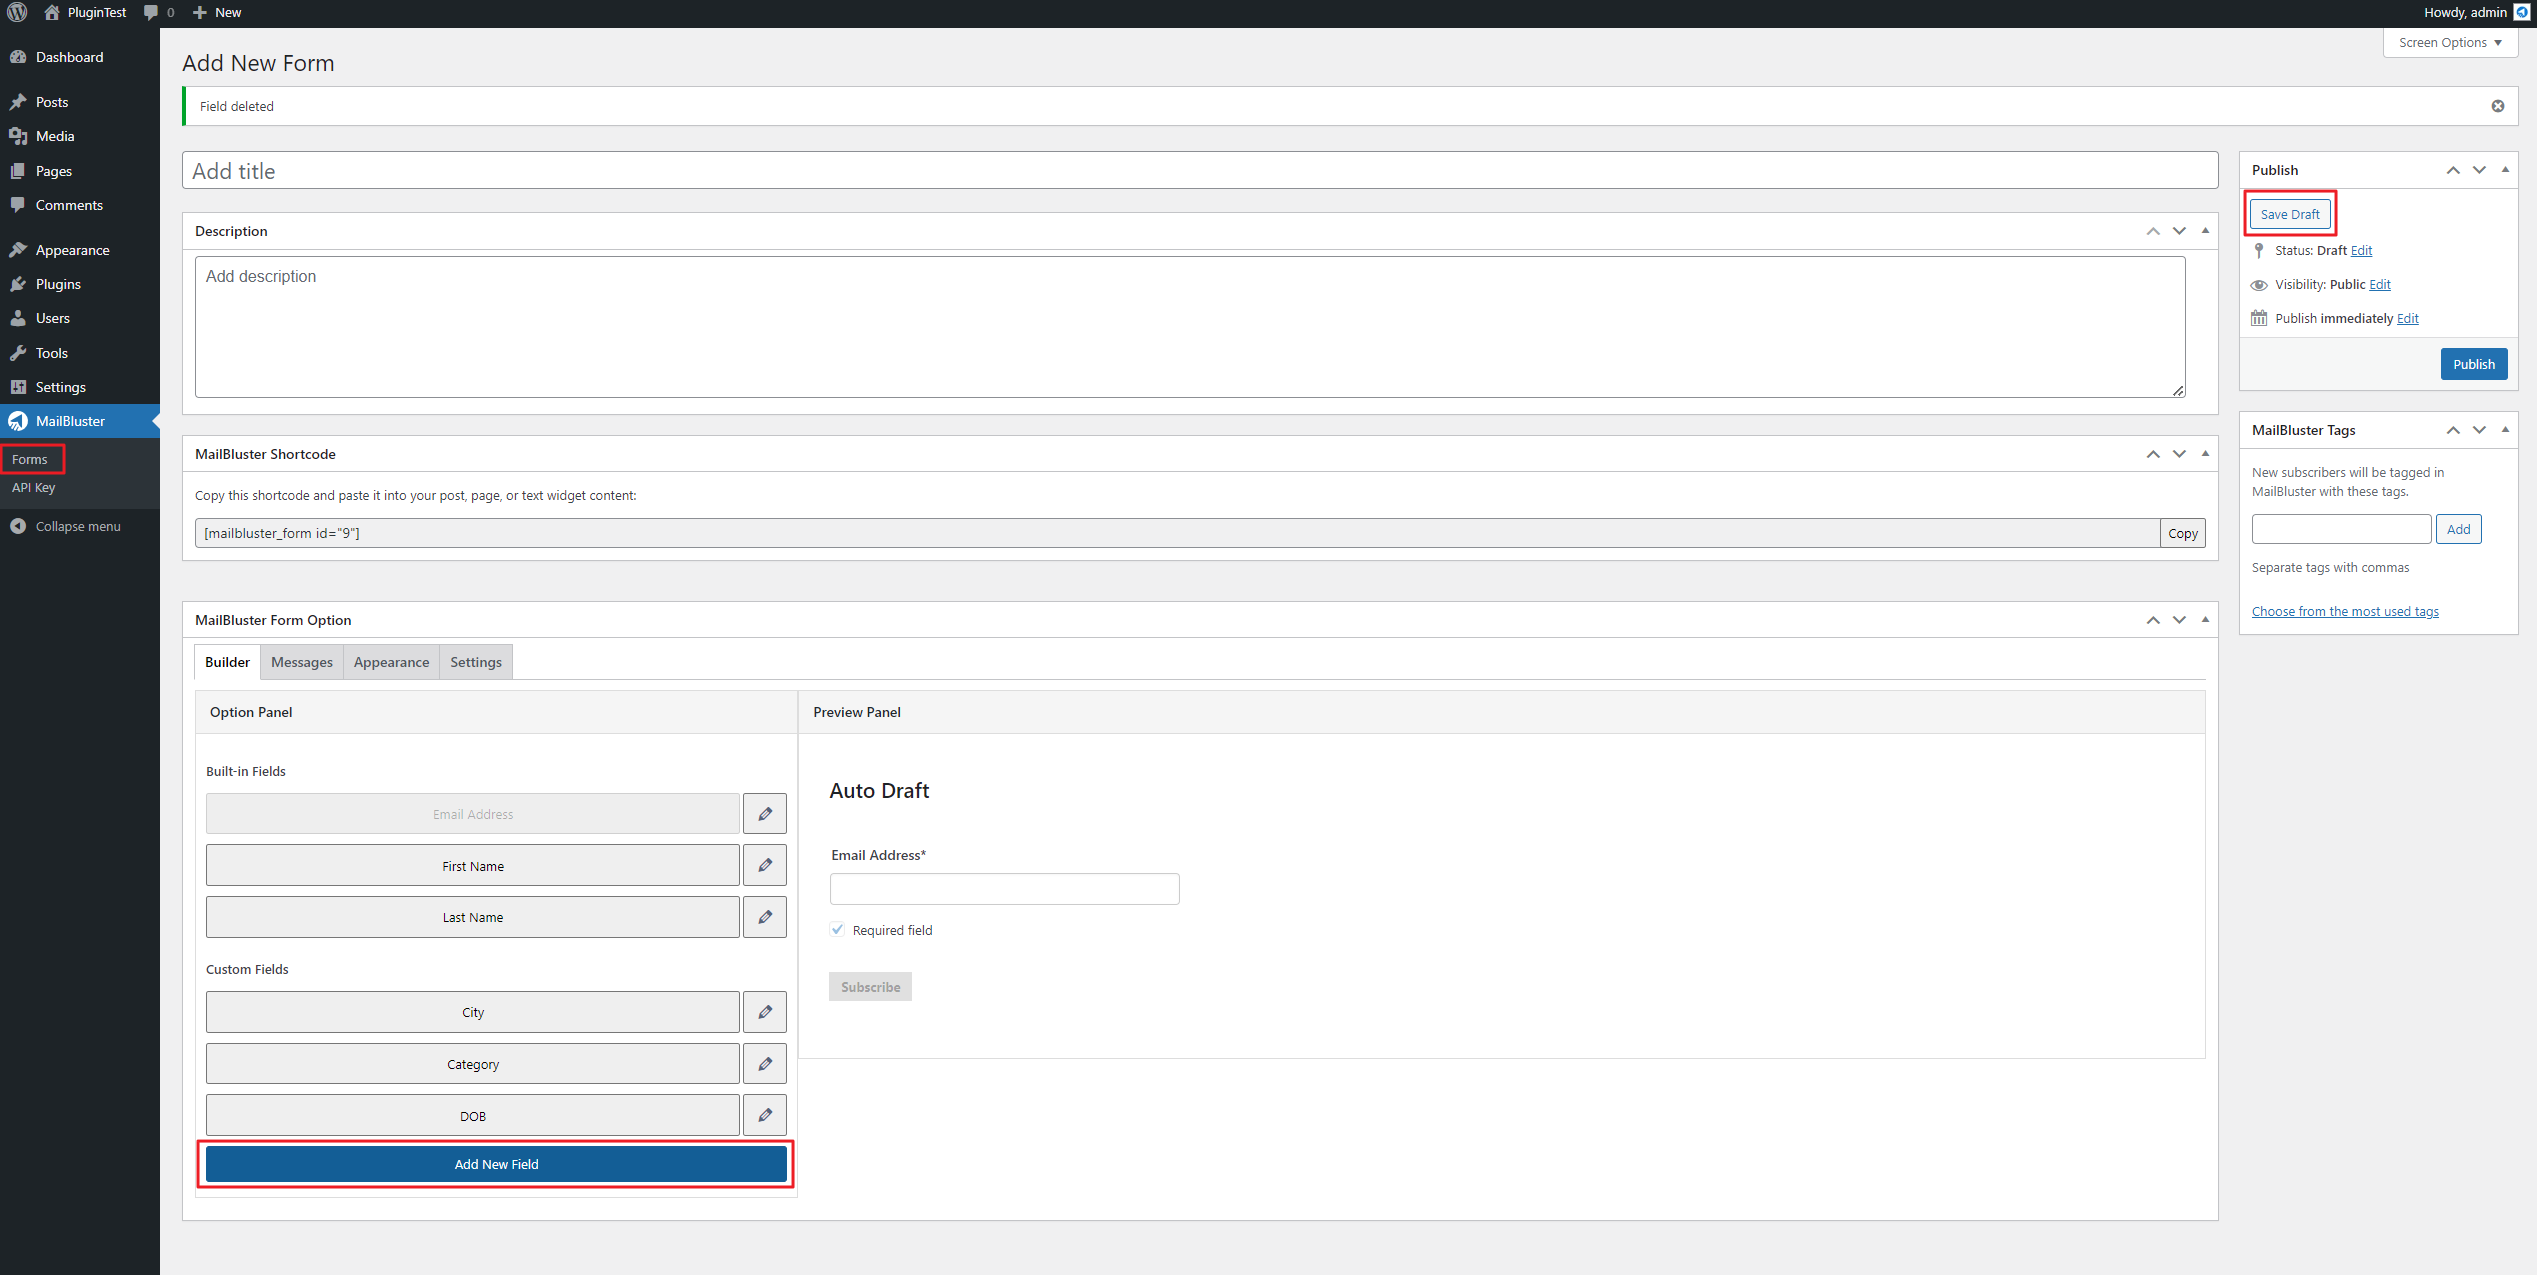
Now go to Forms and customize your form accordingly. Click AddNew field. Be sure to click Save Draft to save your progress.
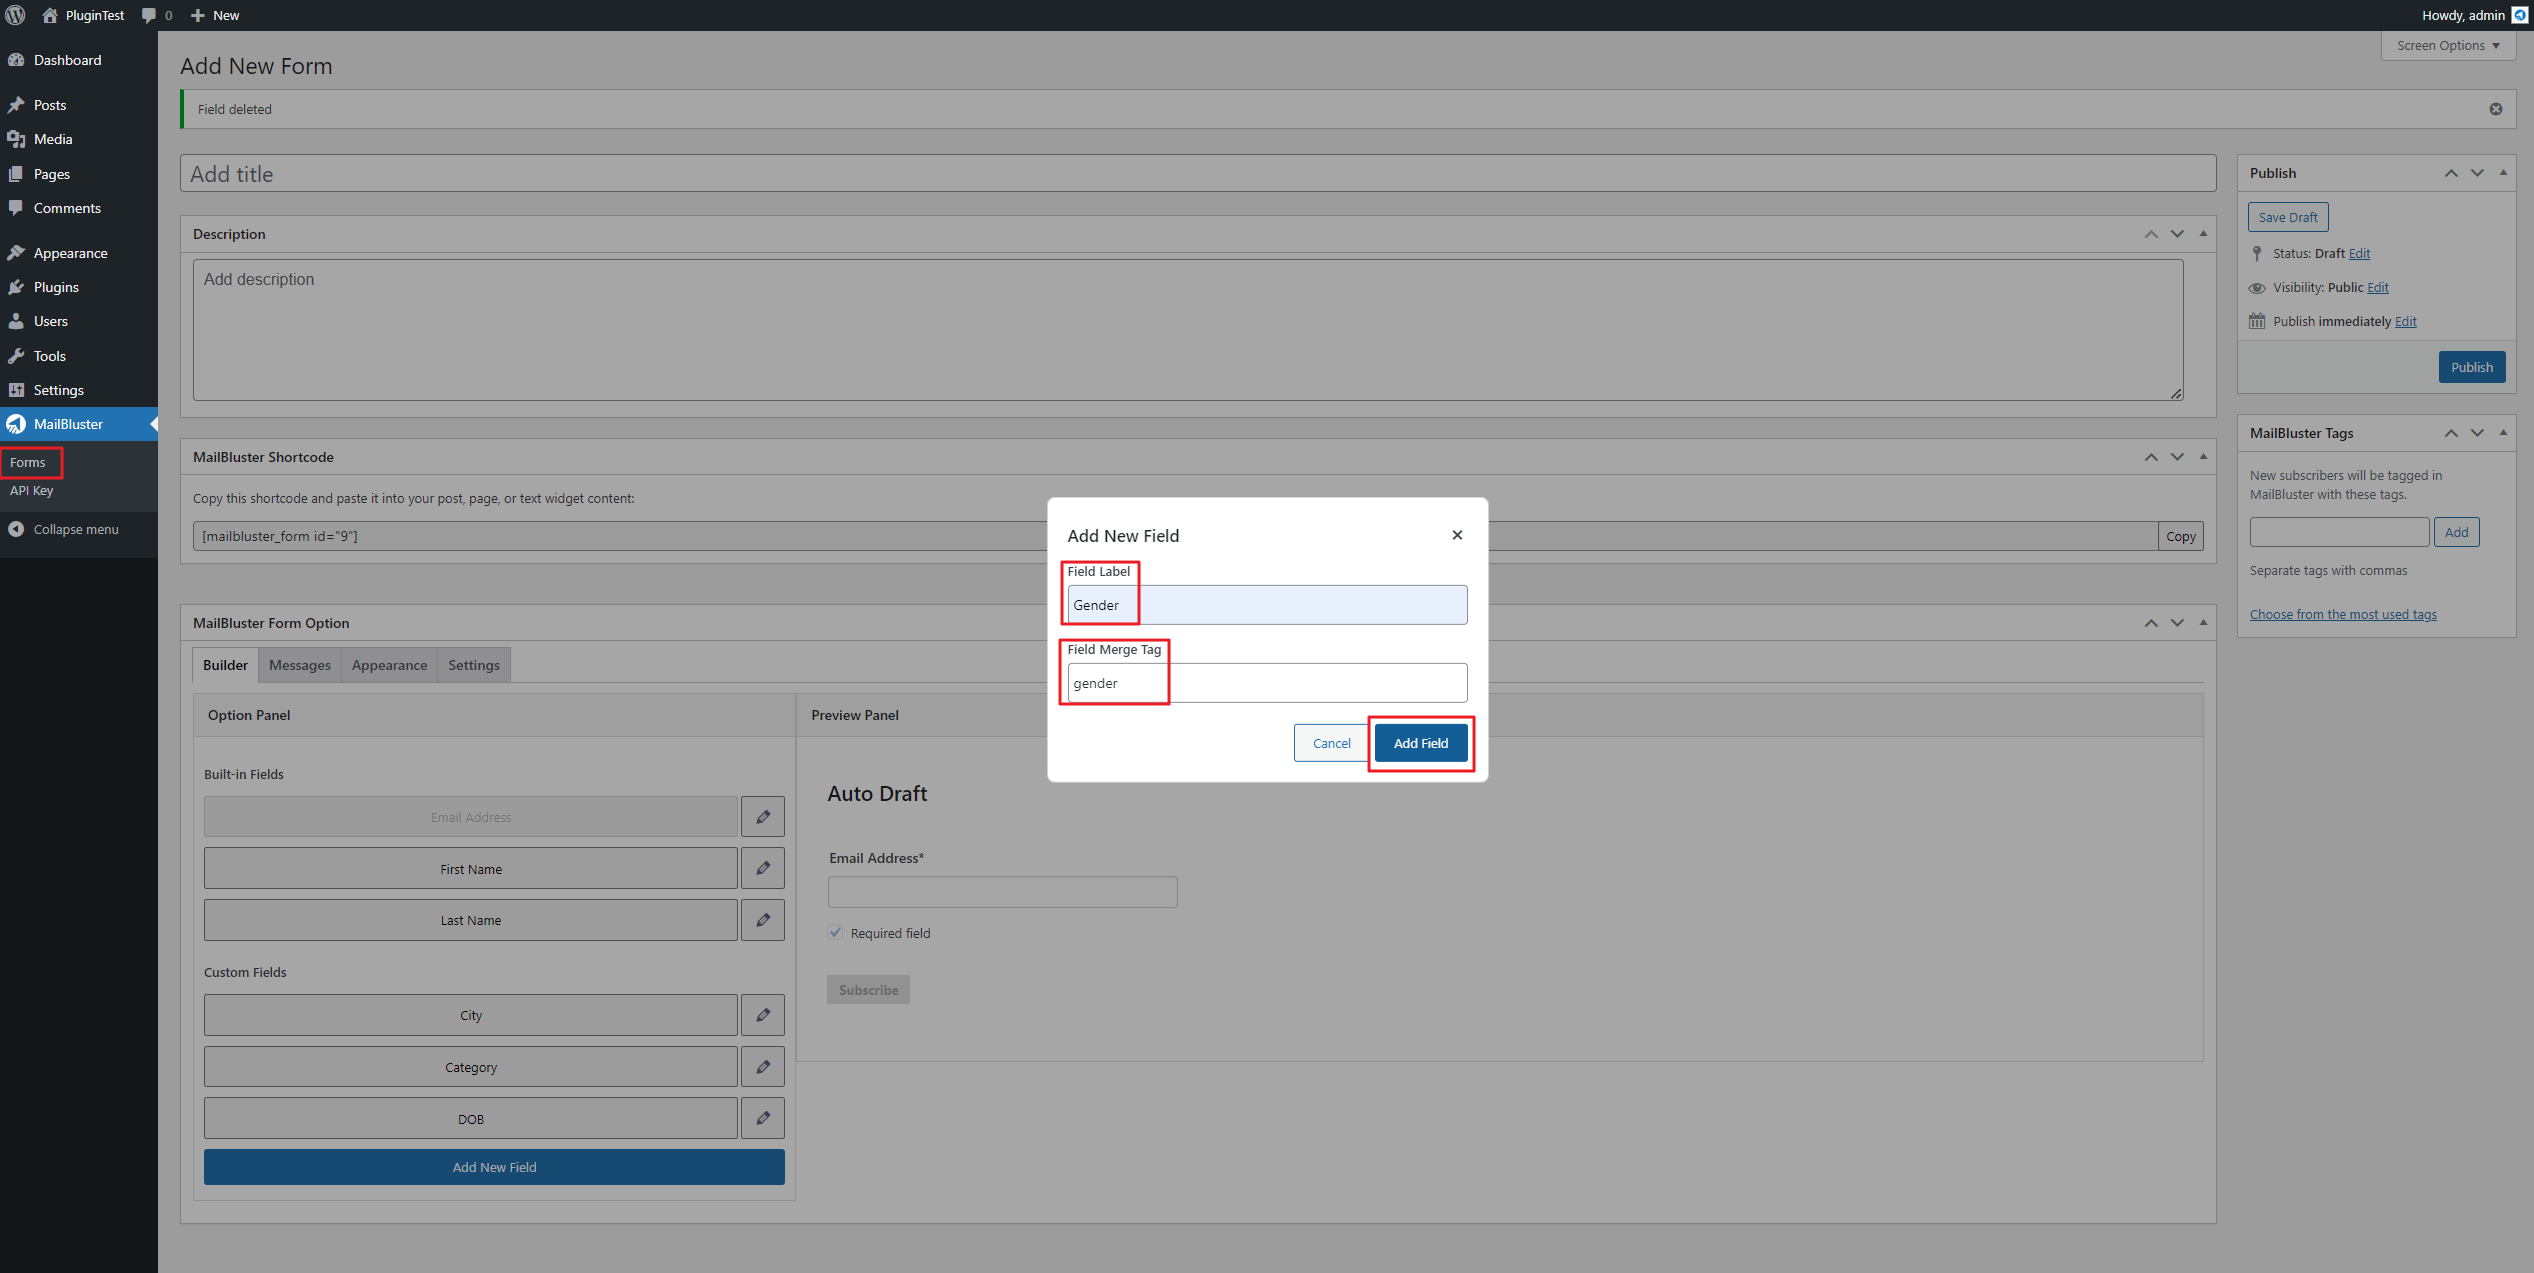
Add a new Field Label ‘Gender,’ and its Field Merge Tag ‘gender’ will be generated automatically. Then click Add Field.
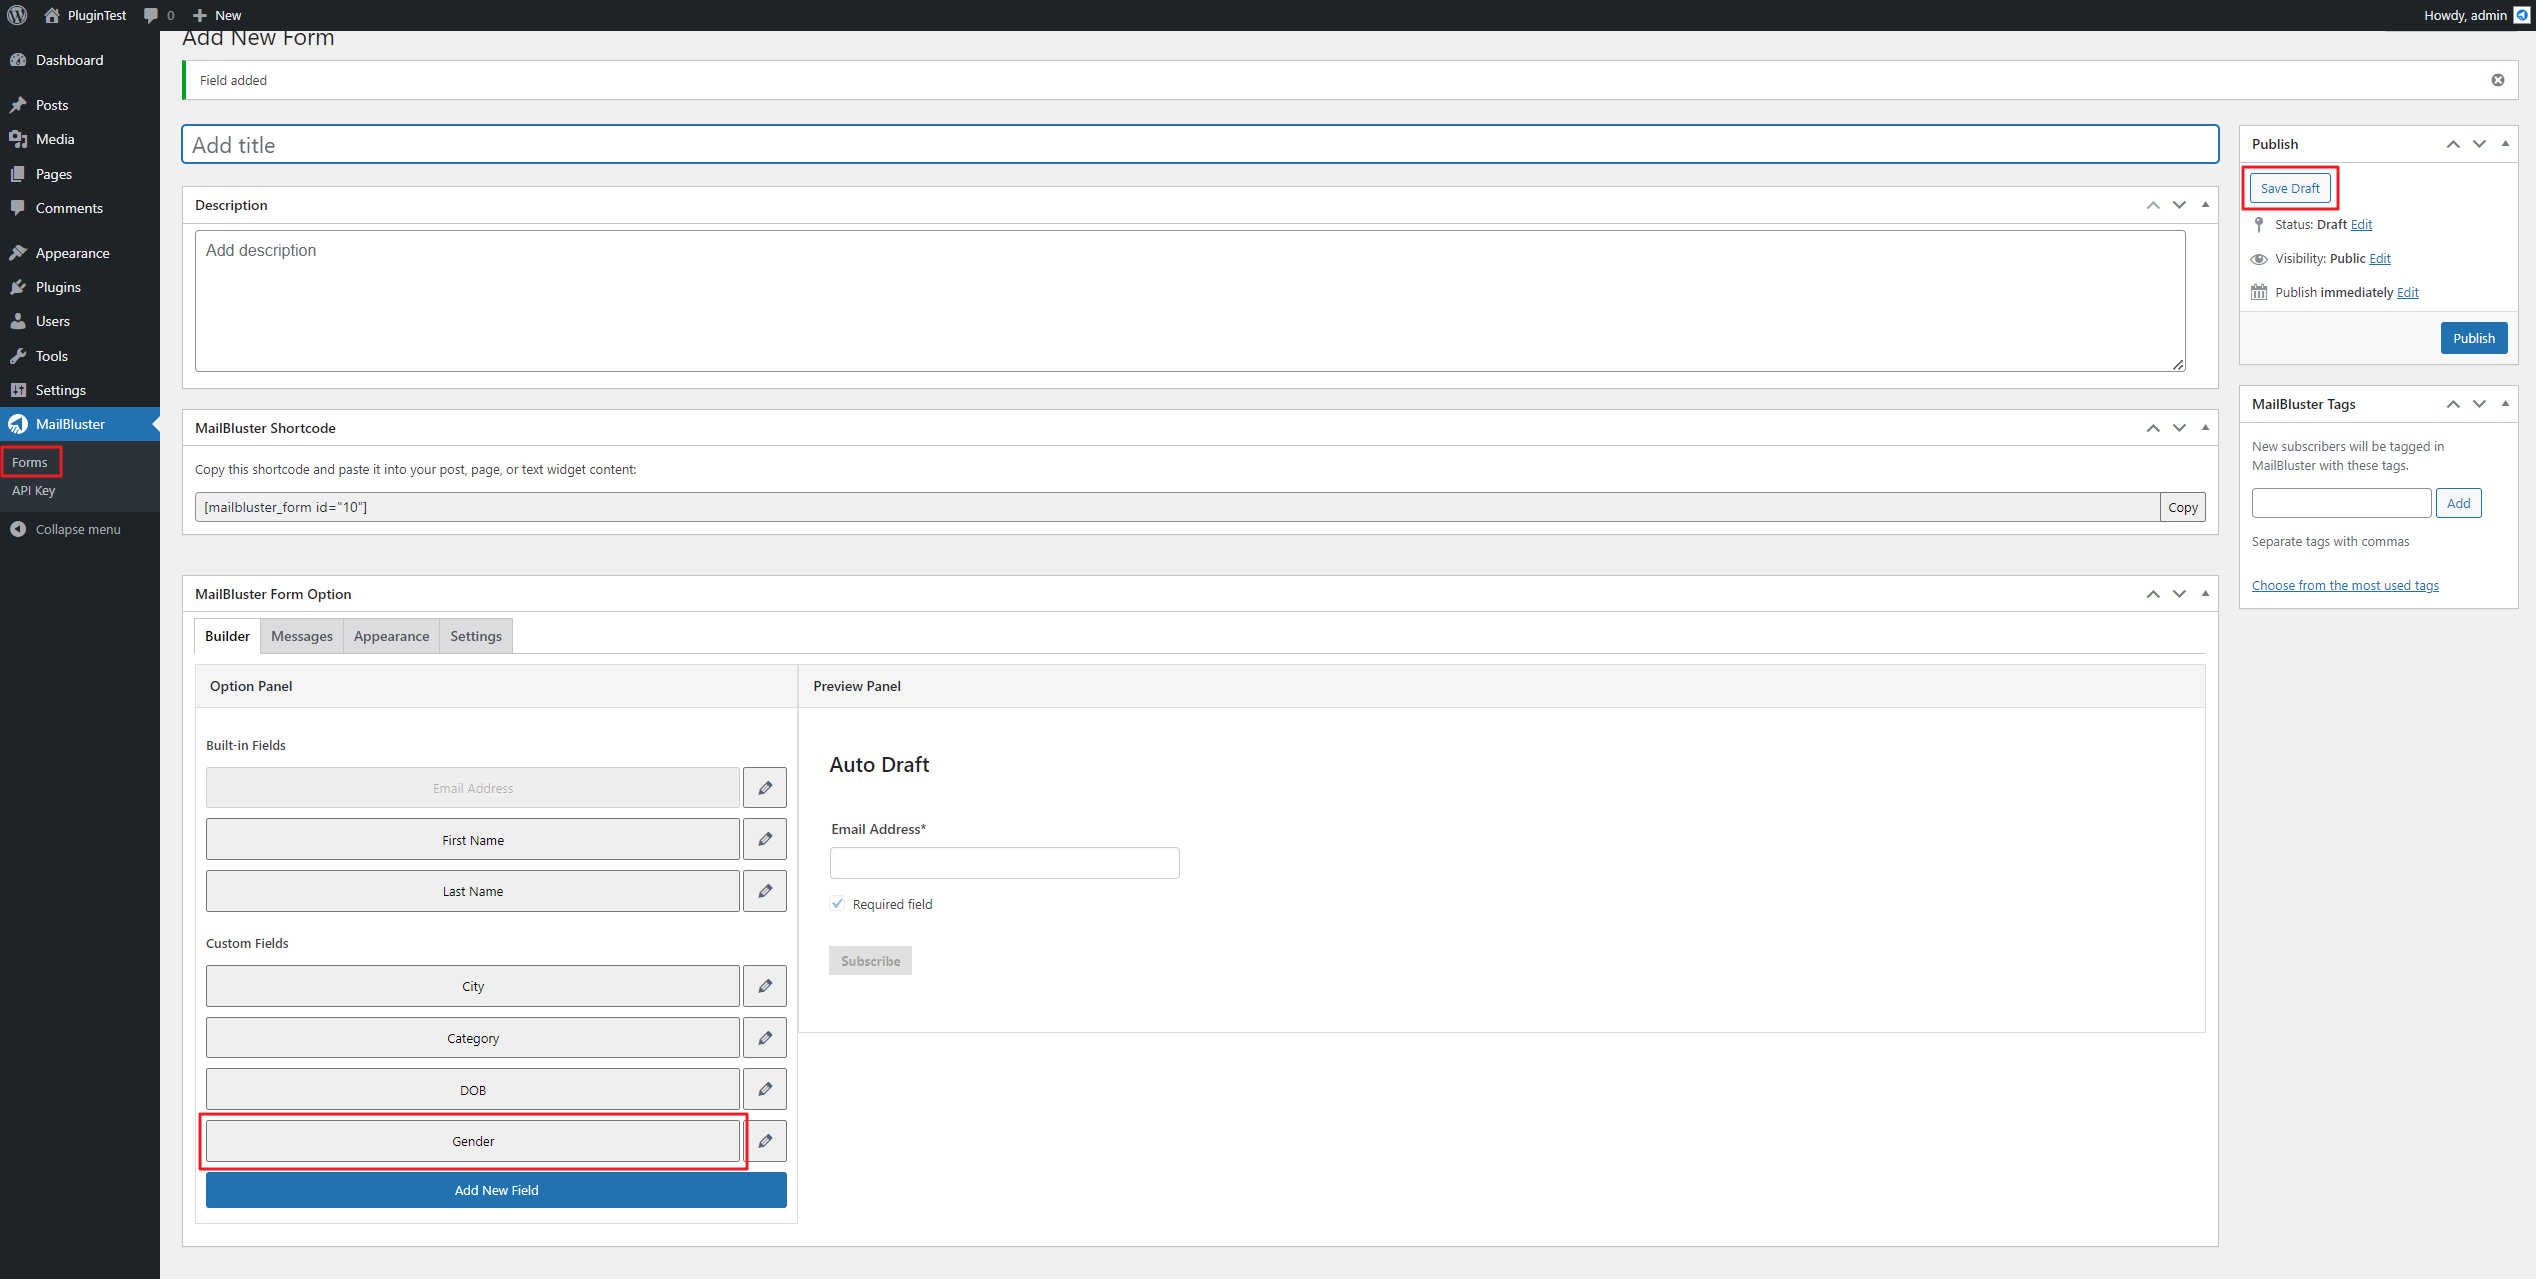
‘Gender’ field has been created. Click on Gender to add to Preview Panel. Now click Save Draft.
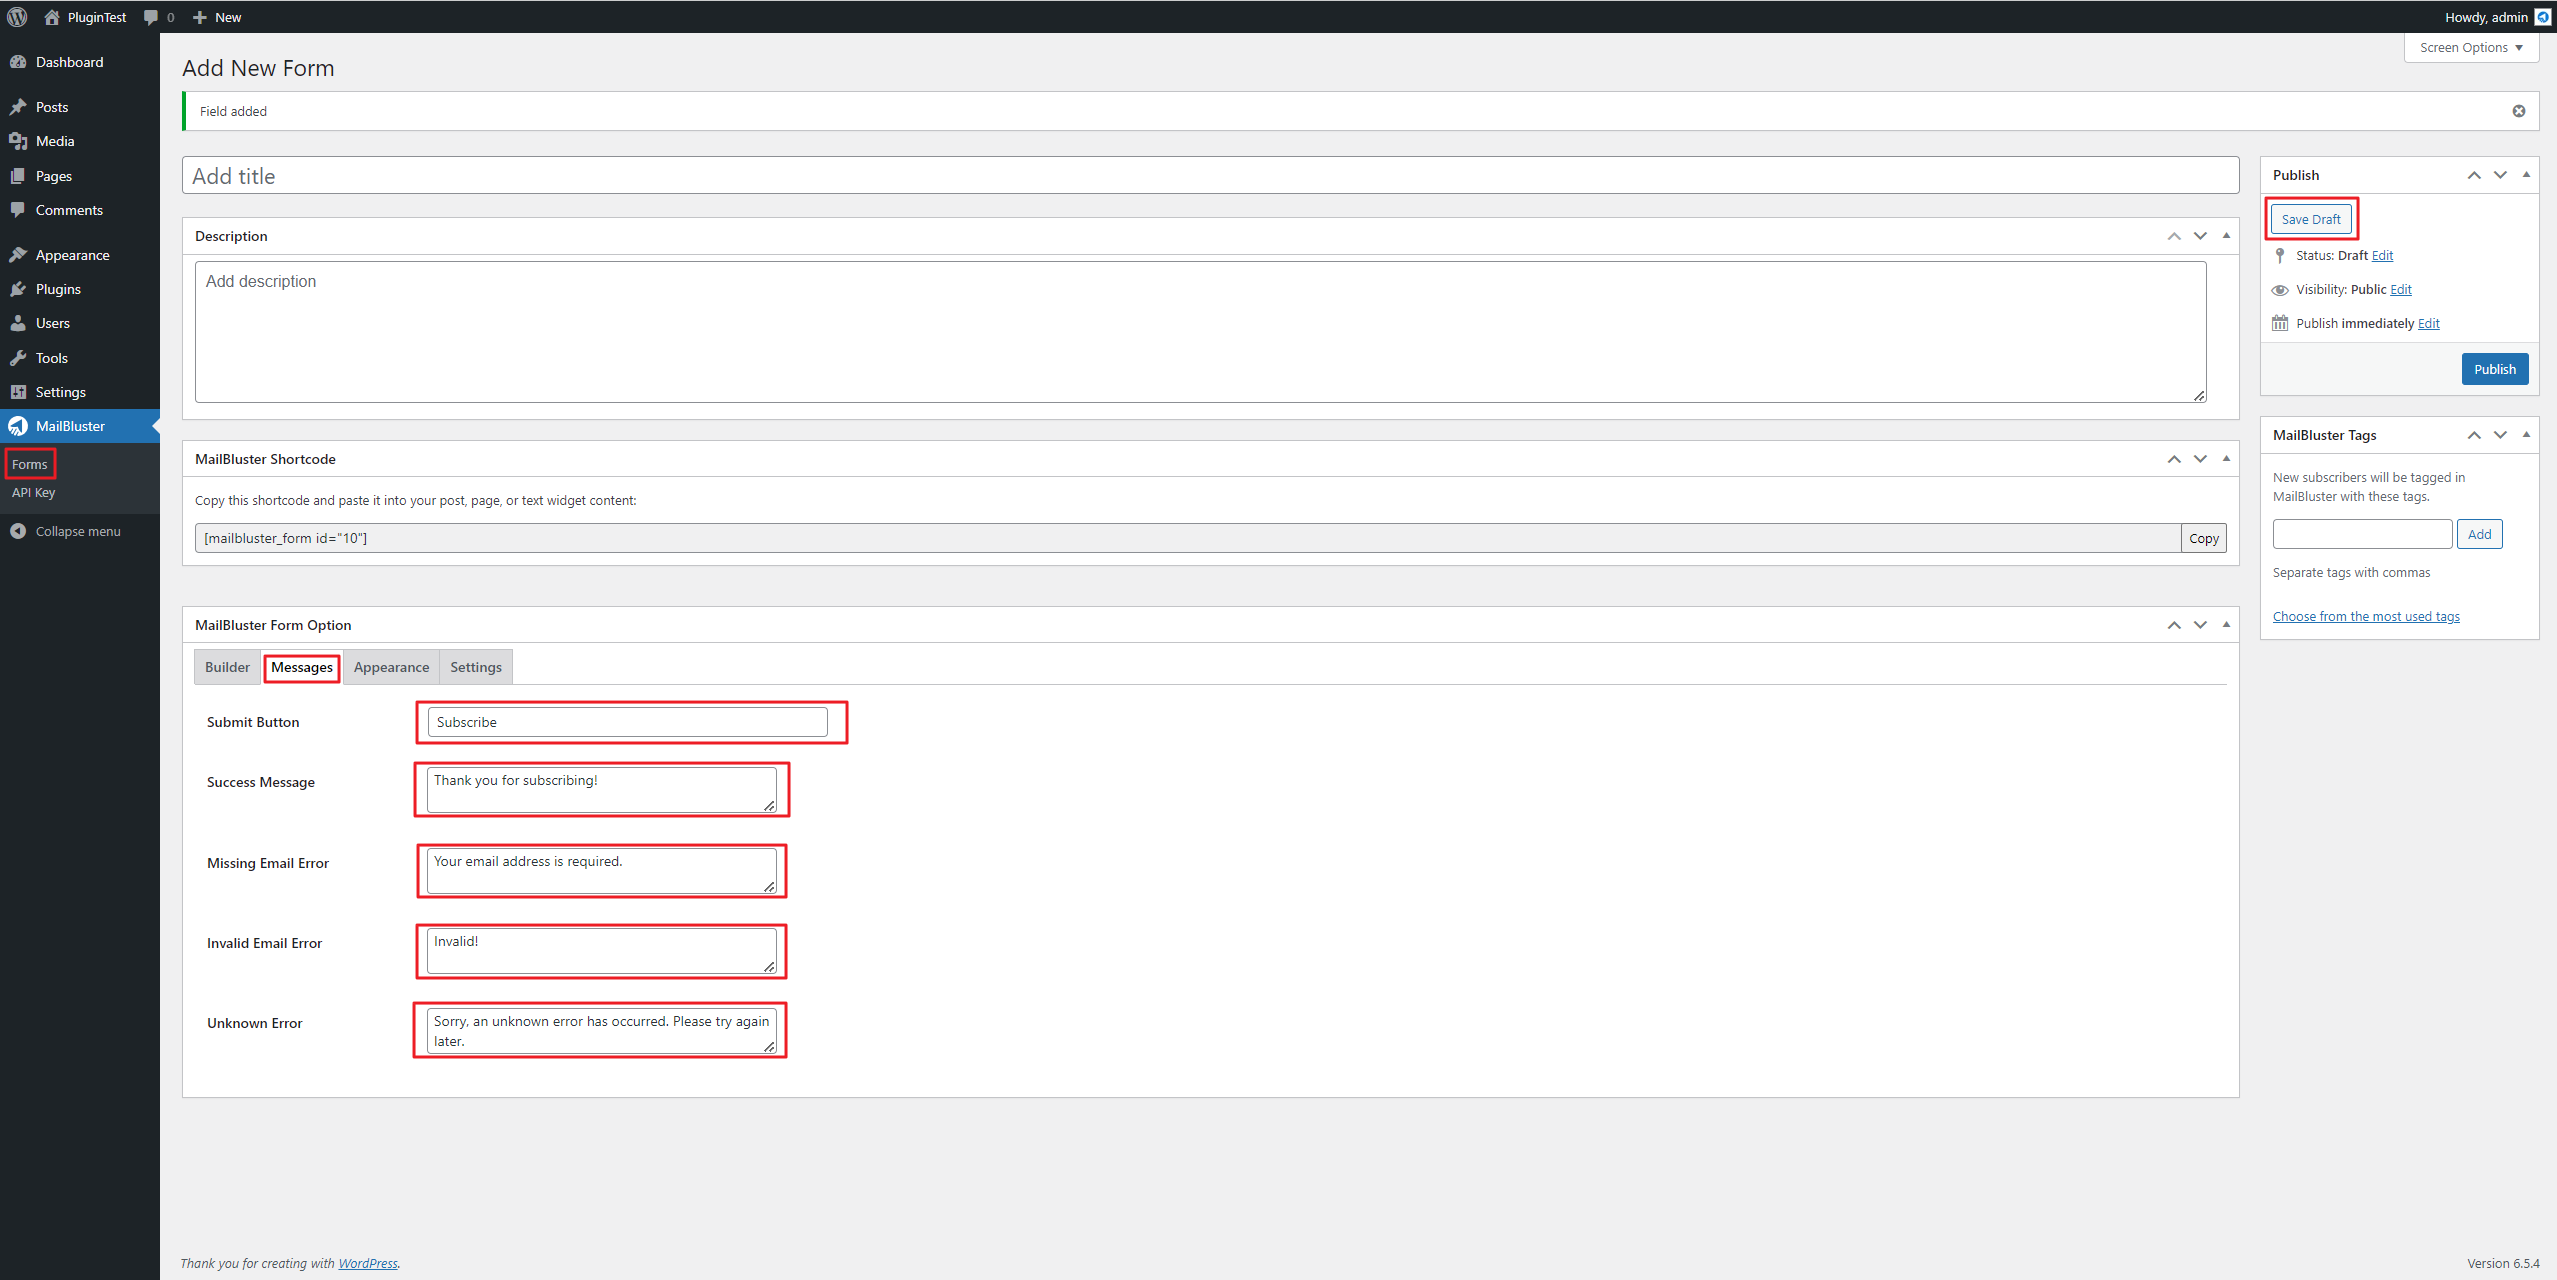
Click on the Messages tab to write your desired messages as shown below.
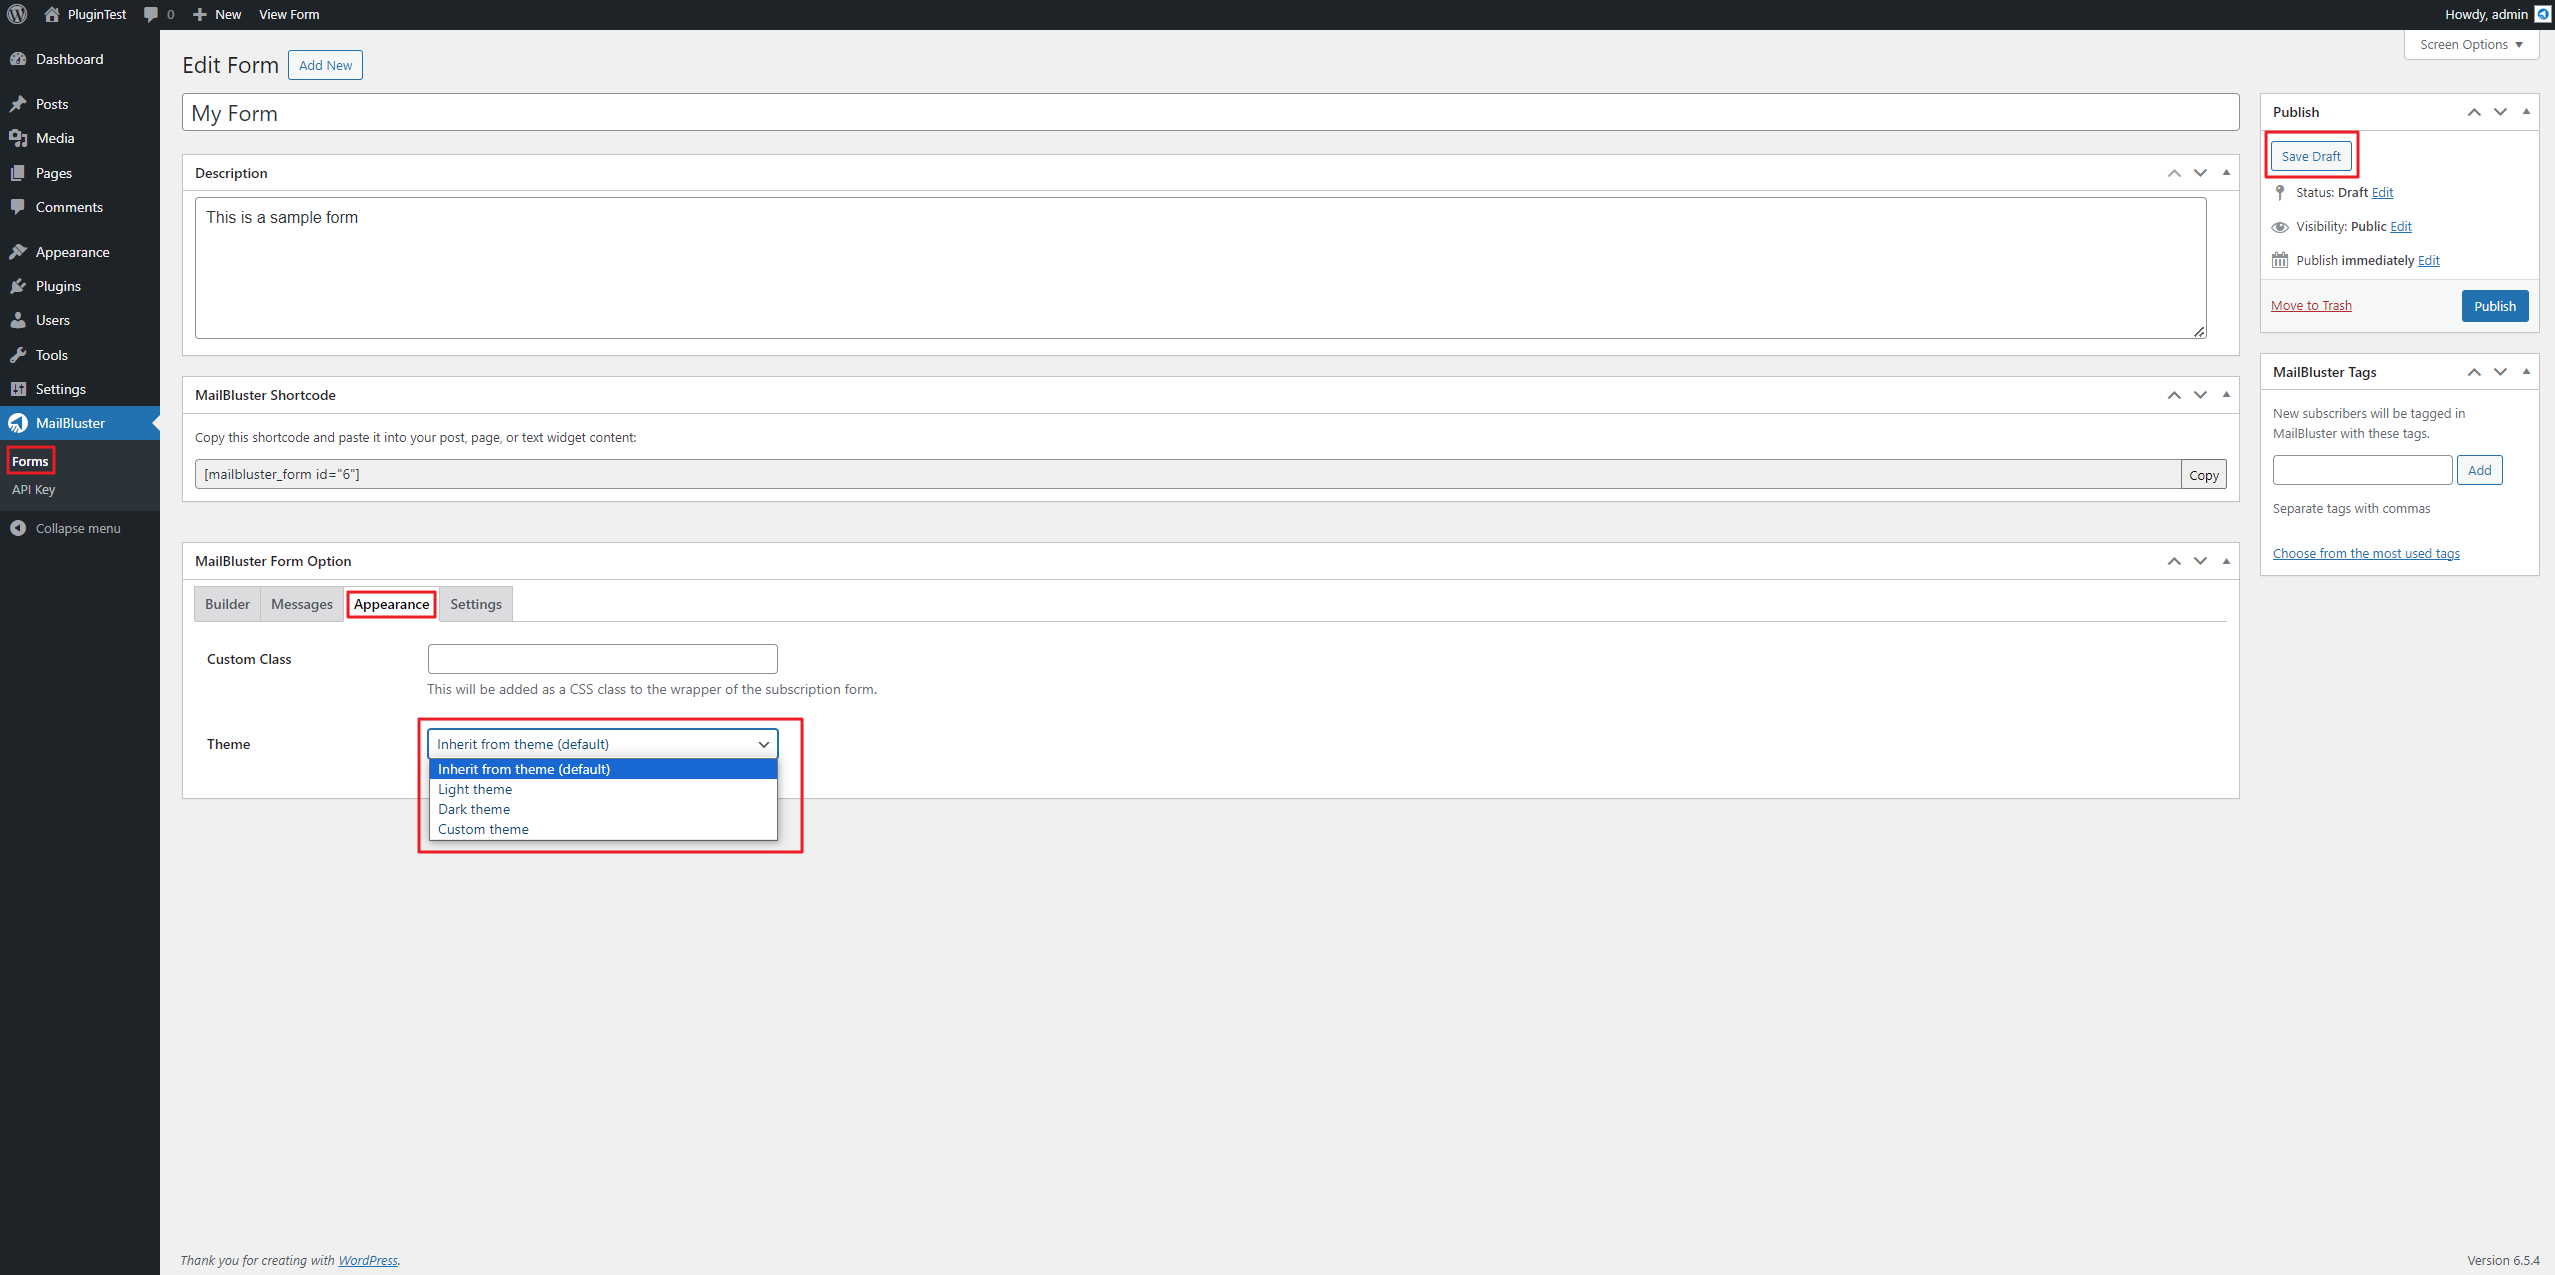
Click on the Appearance tab to change the design of the form. Hit Save Draft every time your change any settings.
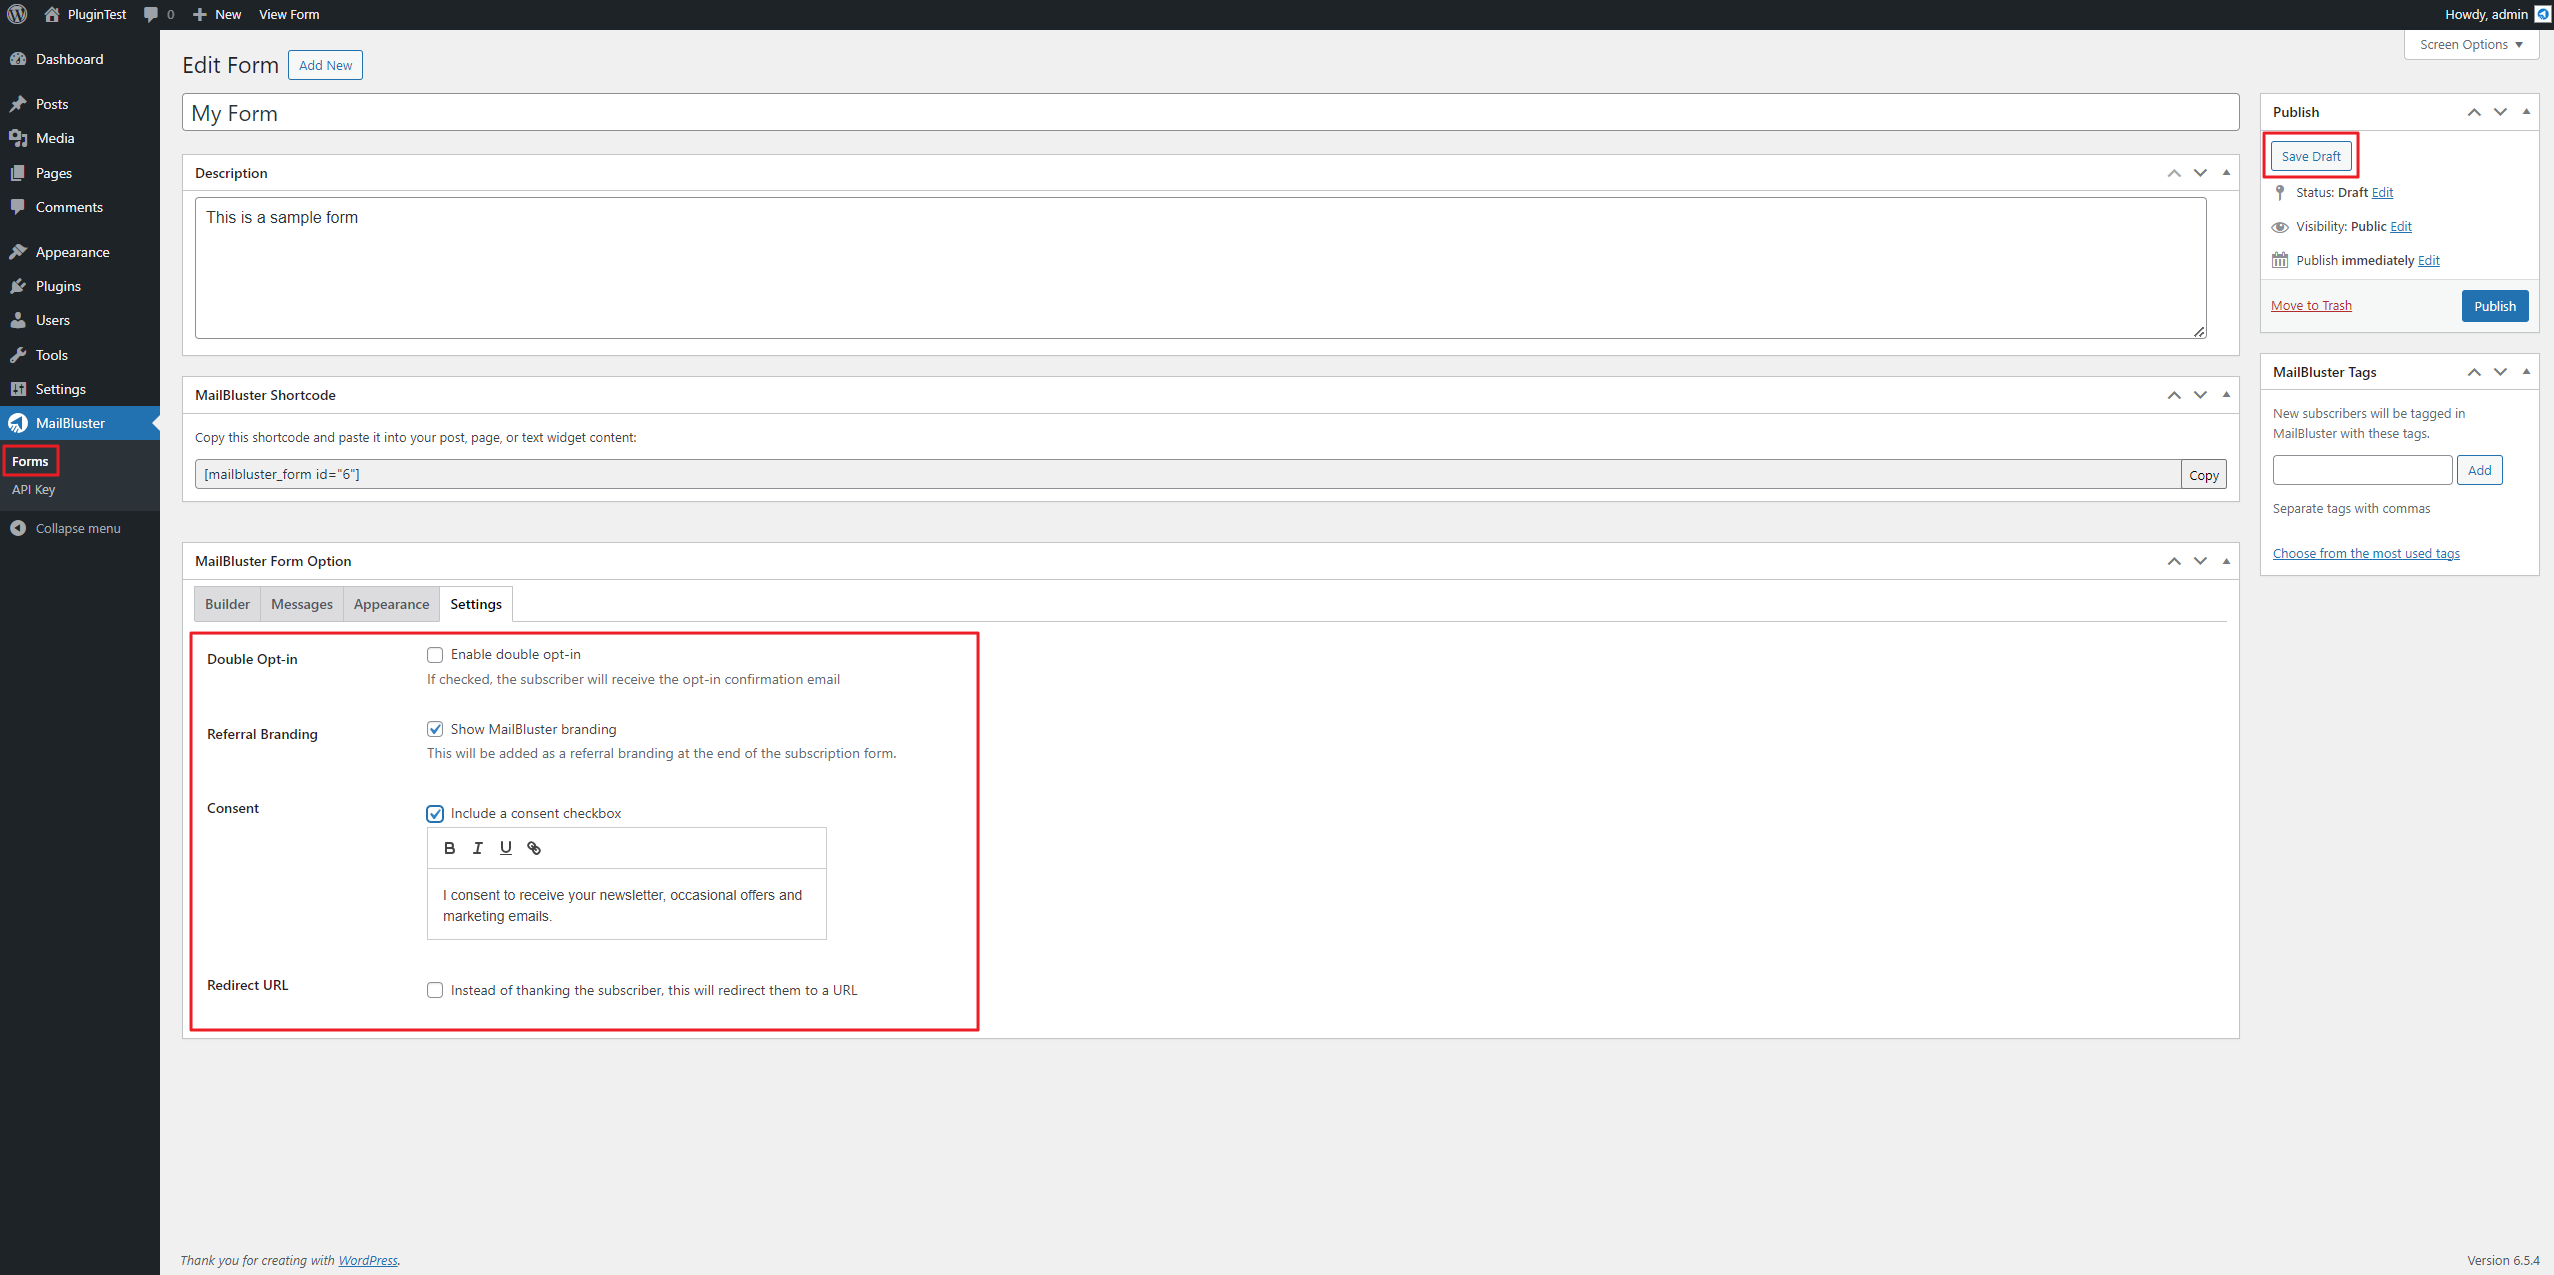
Click on the Settings tab to enable Double Opt-in, show MailBluster branding, add a consent checkbox, and set a Redirect URL according to your needs. Be sure to click Save Draft to save your settings.
Now click on Forms, click Publish and the copy the MailBluster Shortcode as shown below.
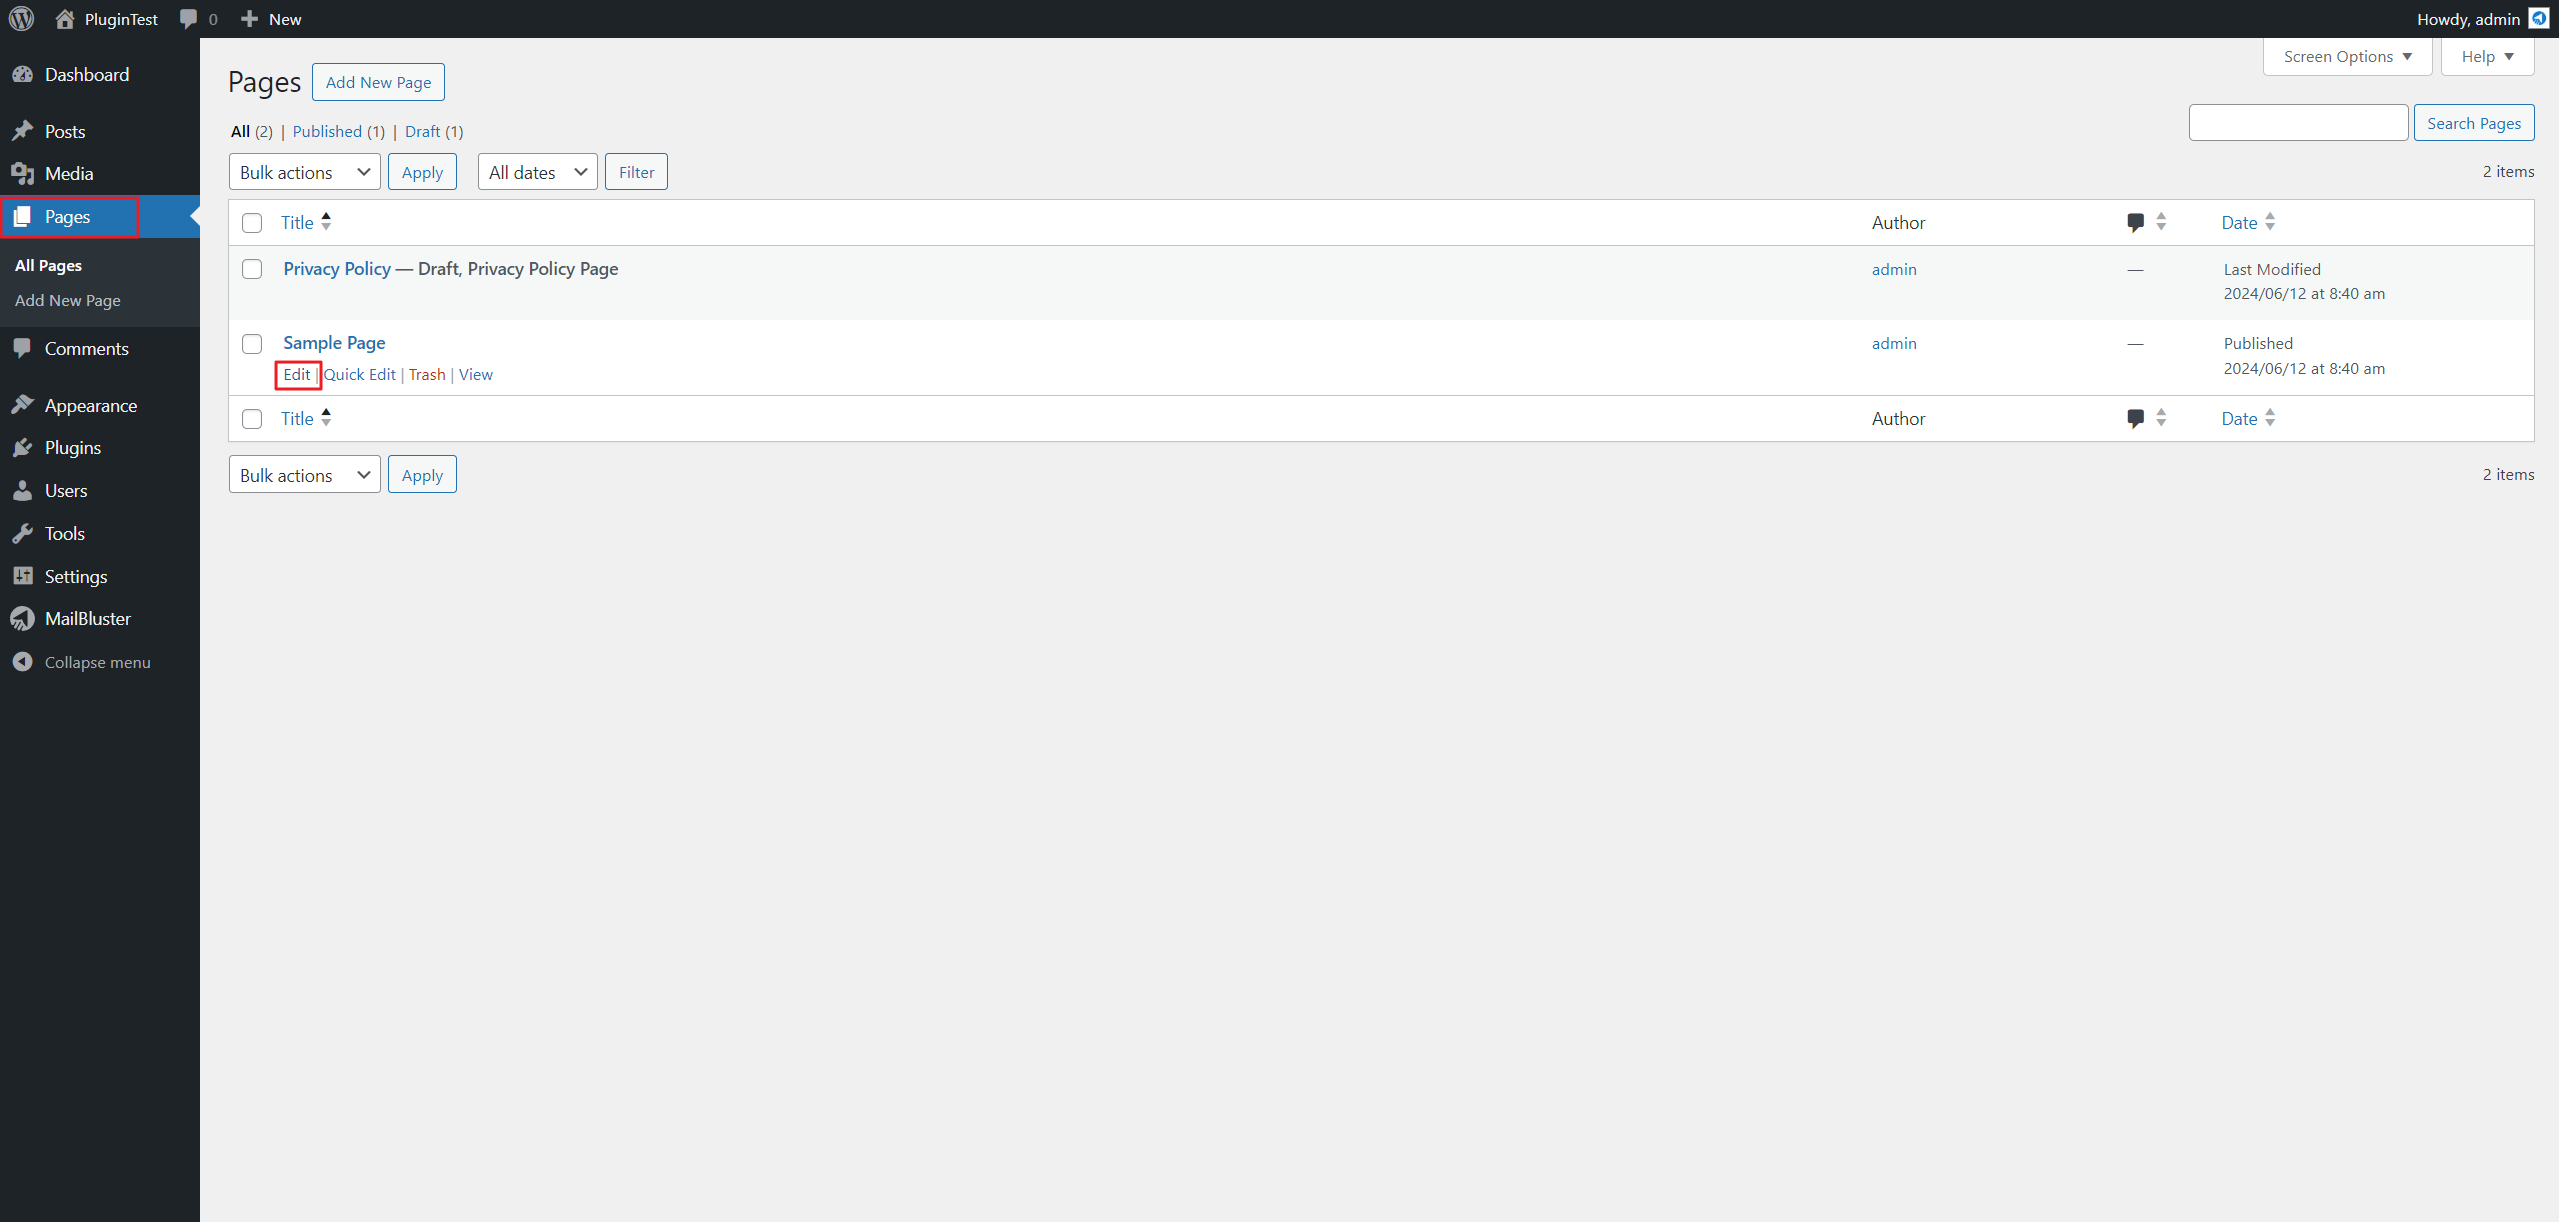
Now go to Pages and select your desired WordPress page. Click Edit.
Click the ‘+‘ symbol and drag and drop the Shortcode [/] into the WordPress page editor.
Now paste the MailBluster Shortcode under this [/] Shortcode field.
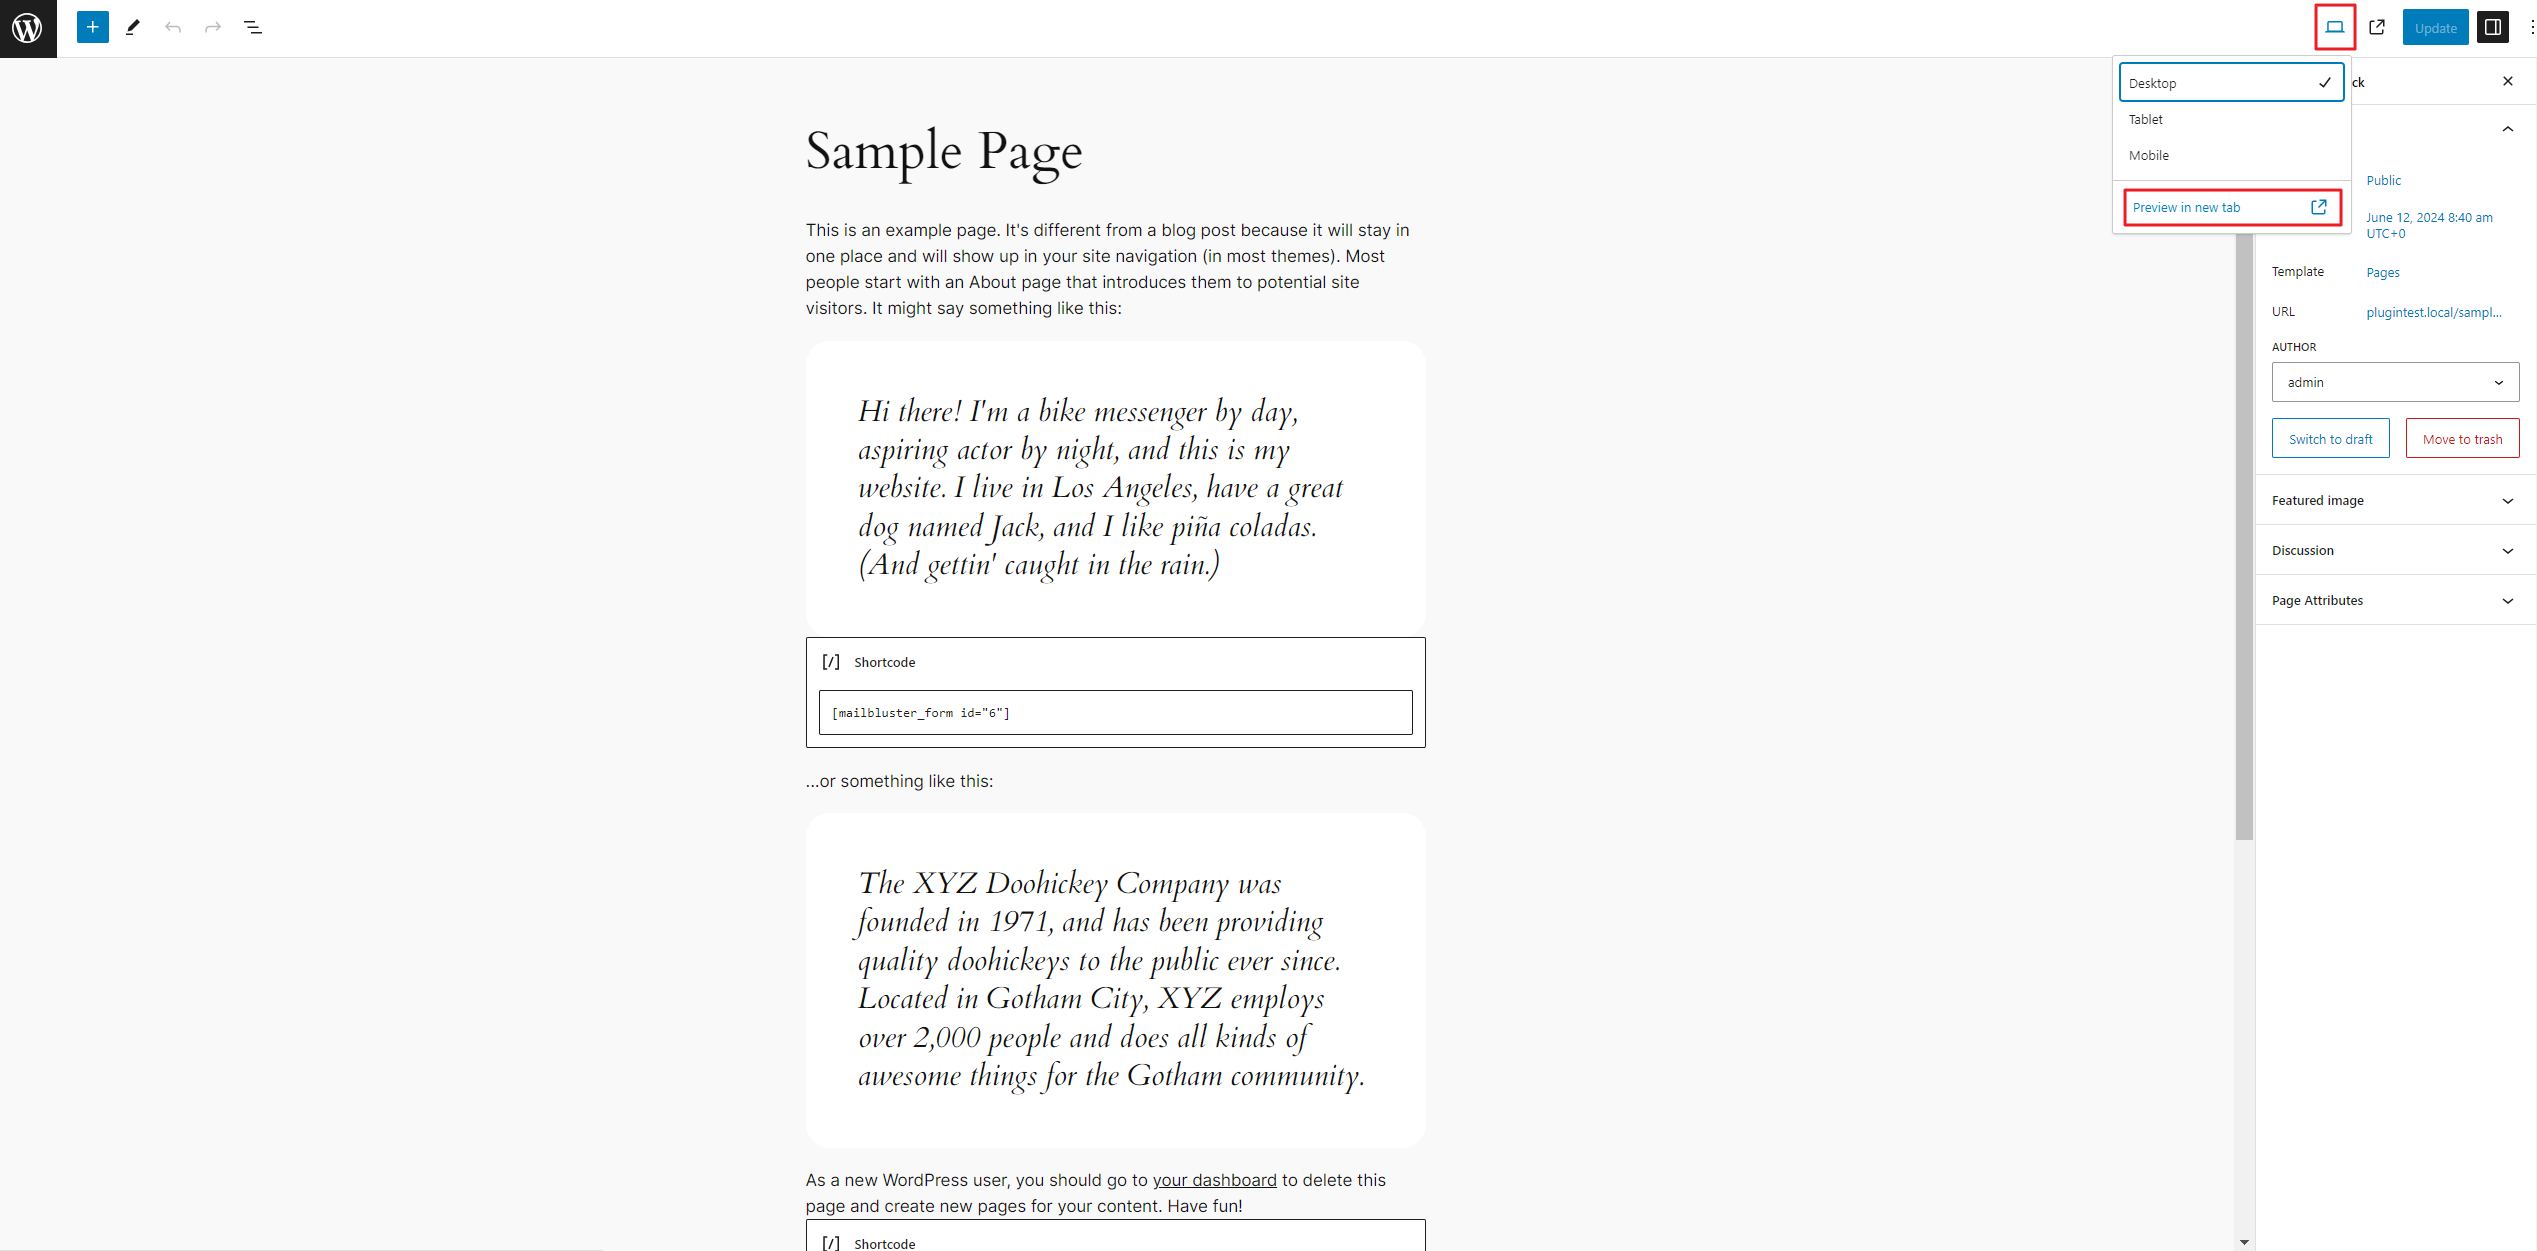
Now click on the Preview button and select Preview in new tab.
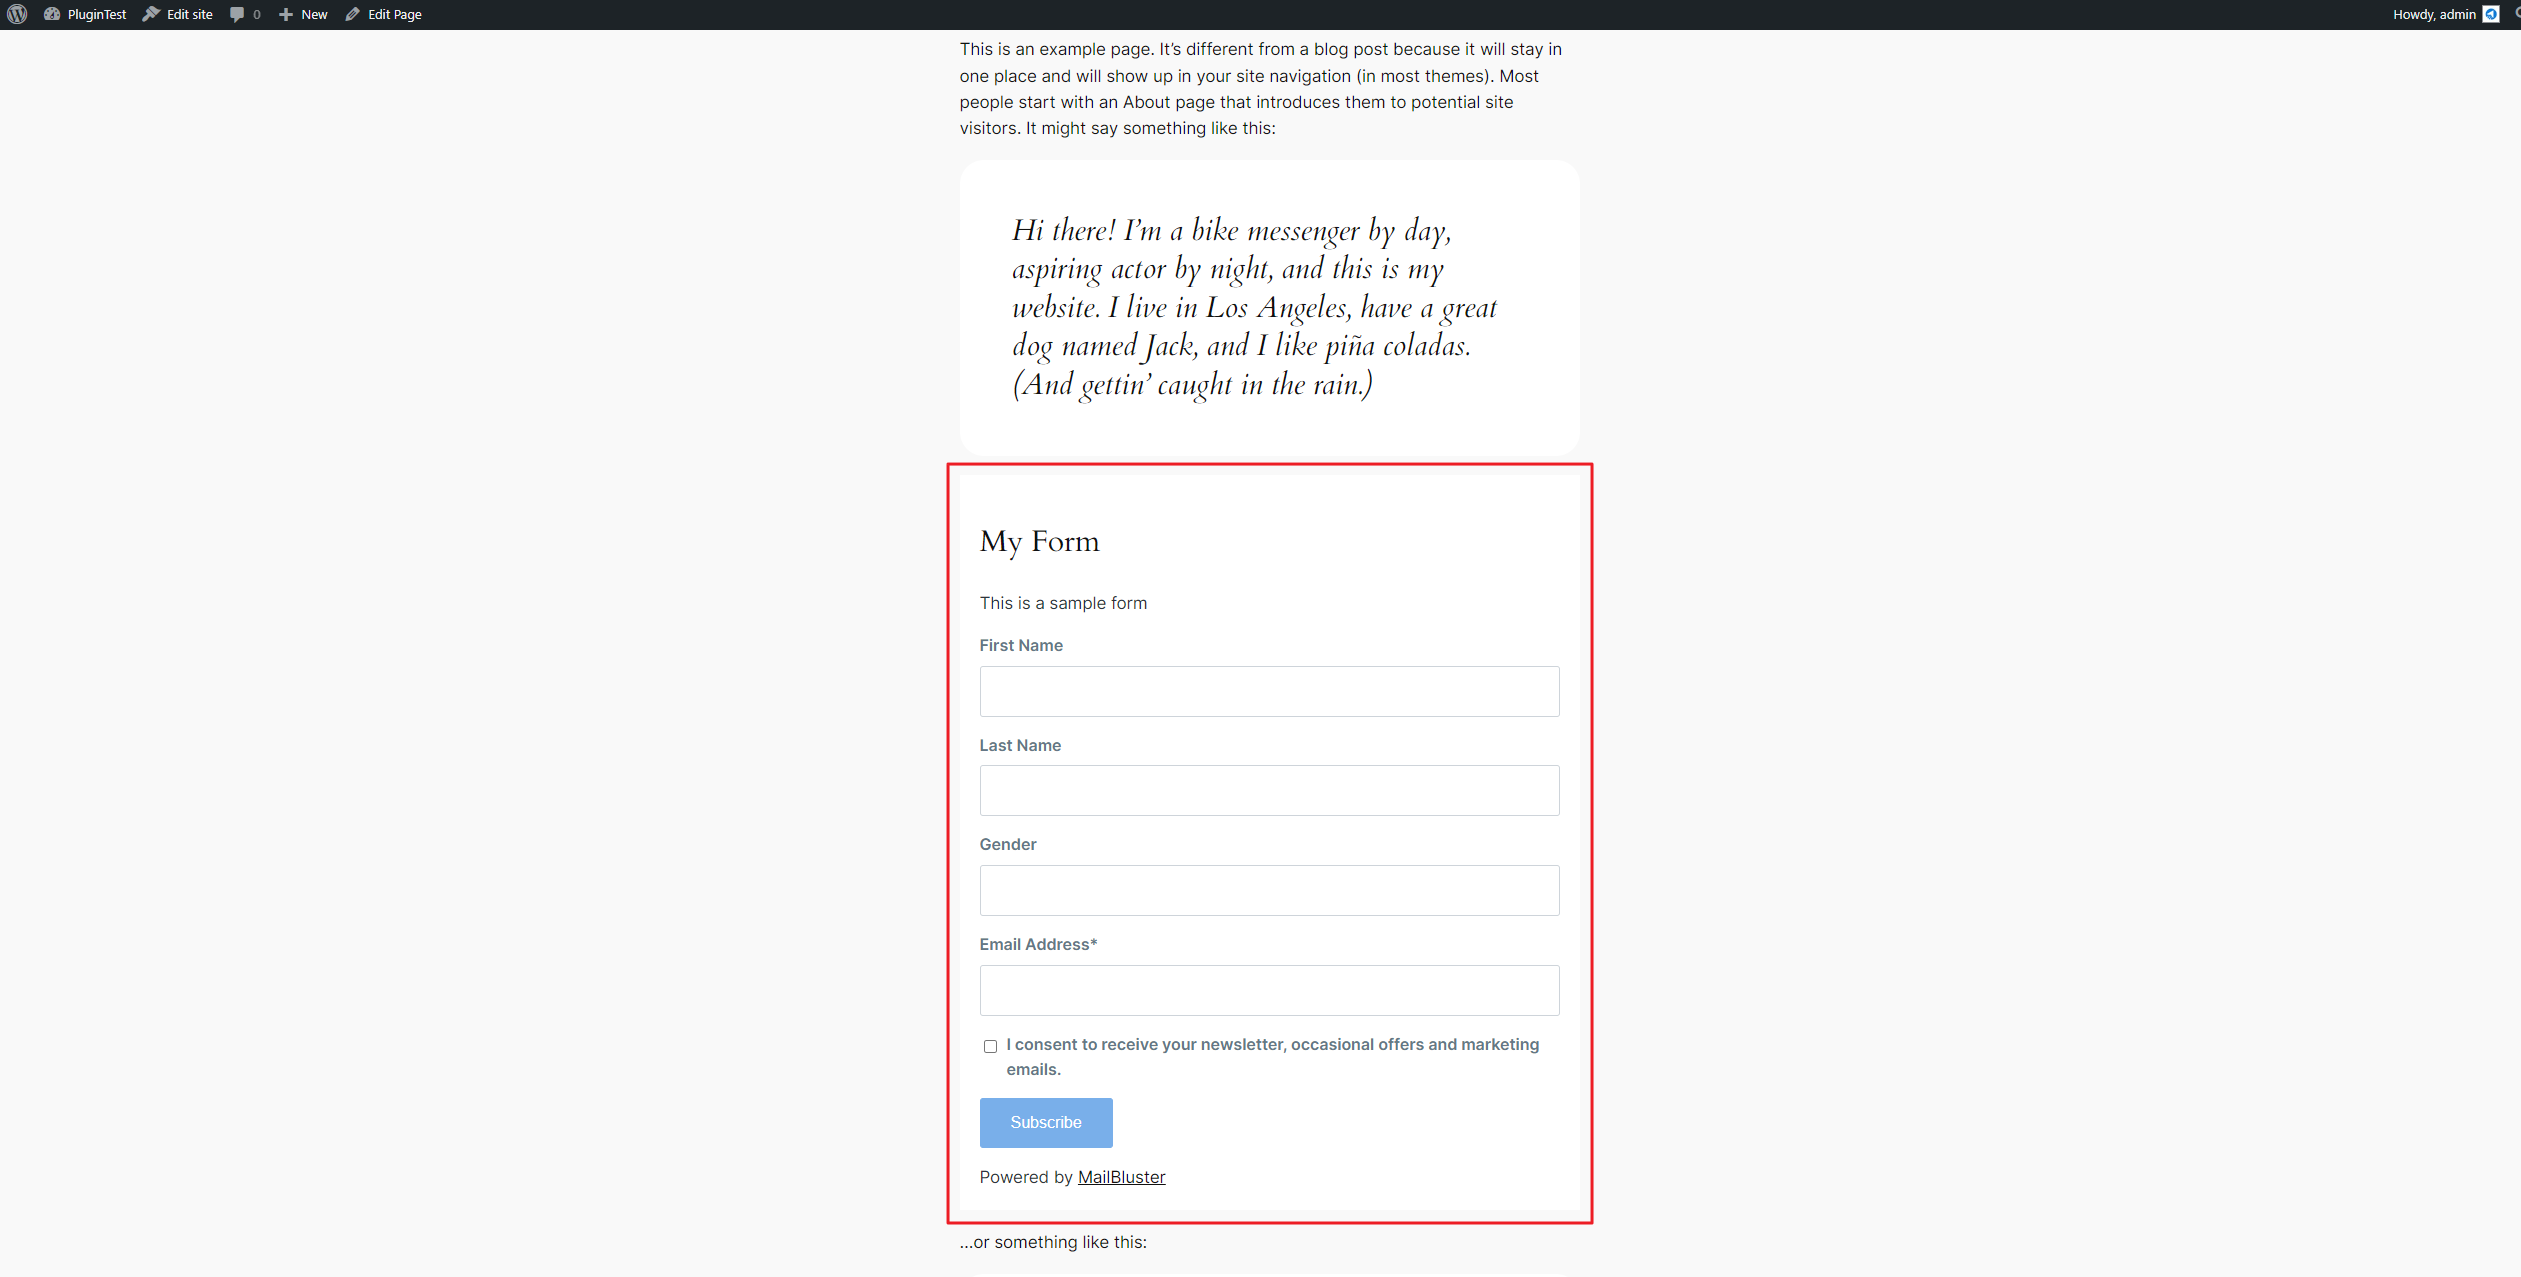
You will now see the Form made by the MailBluster Plugin.
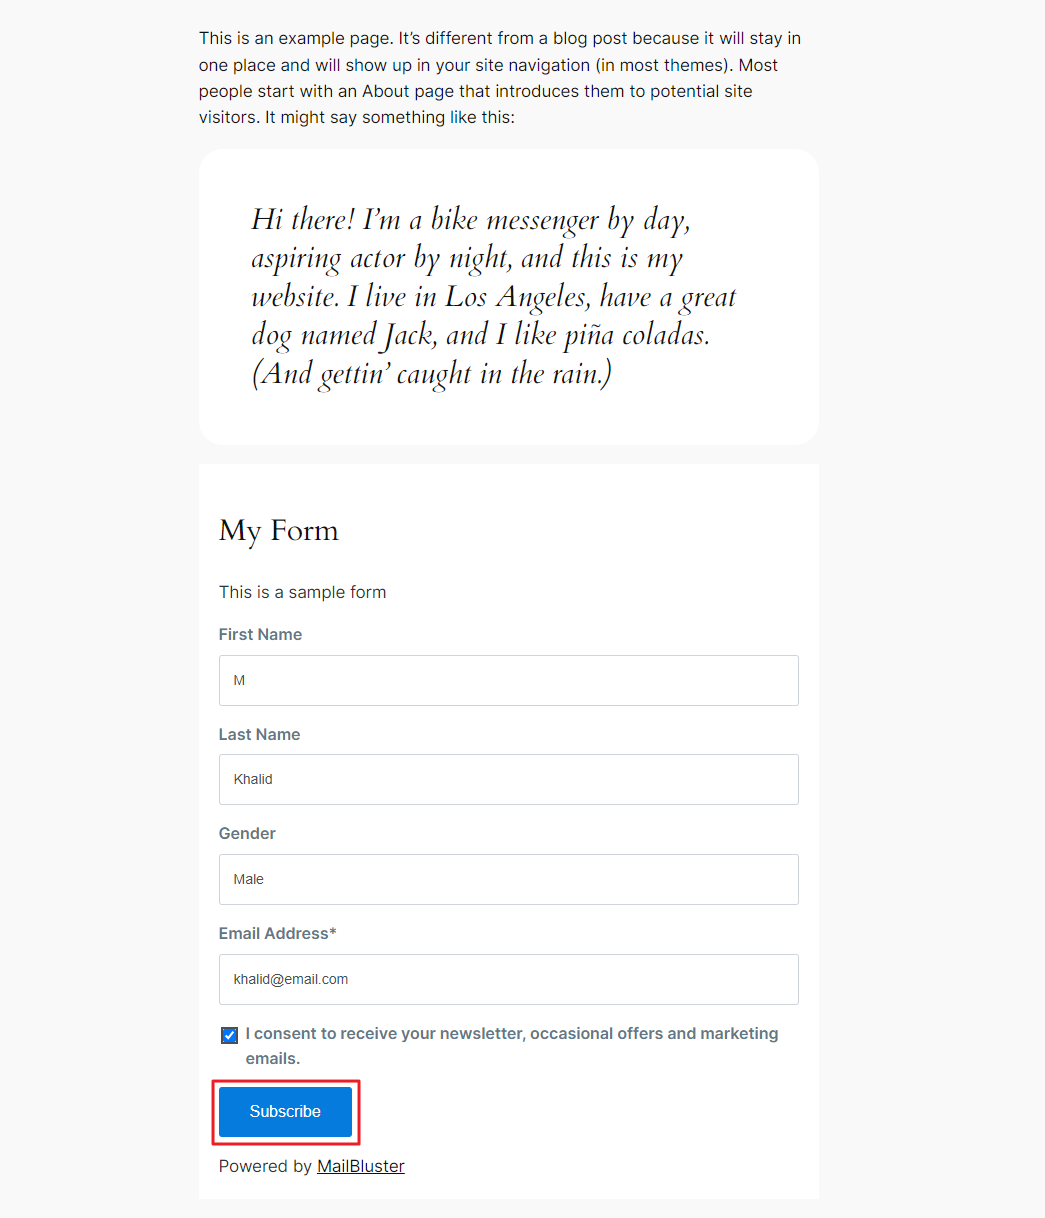
Fill up the form and then click Subscribe.
The confirmation message will appear as set in the configuration settings earlier.
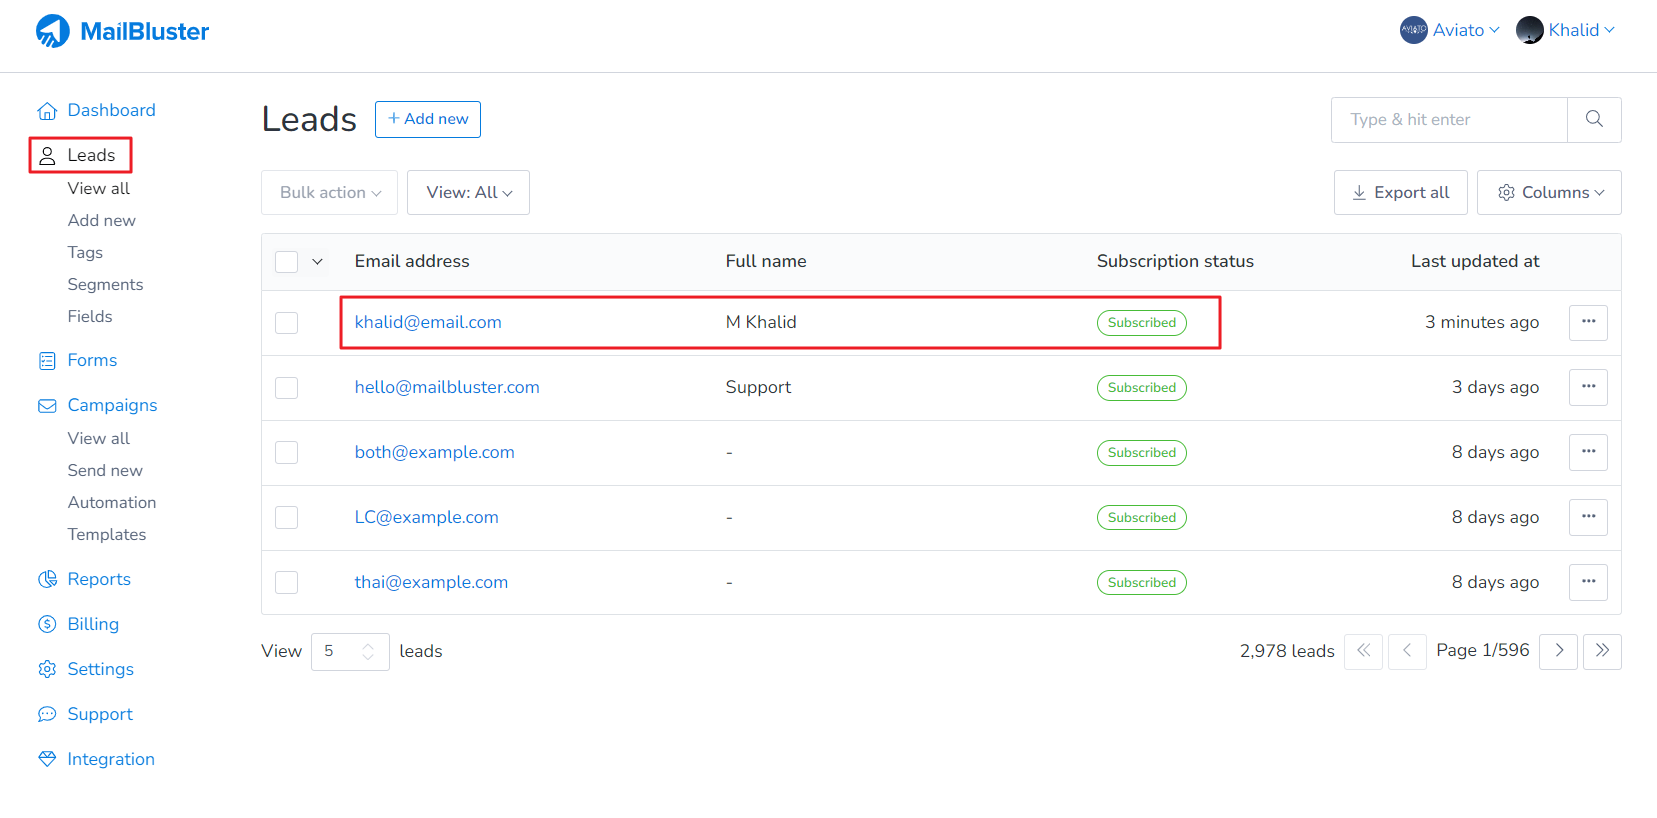
Sign into MailBluster > Brand and then go to Leads section. As you can see, the email ID, name, and subscription status are added to the MailBluster app from the WordPress Form page.
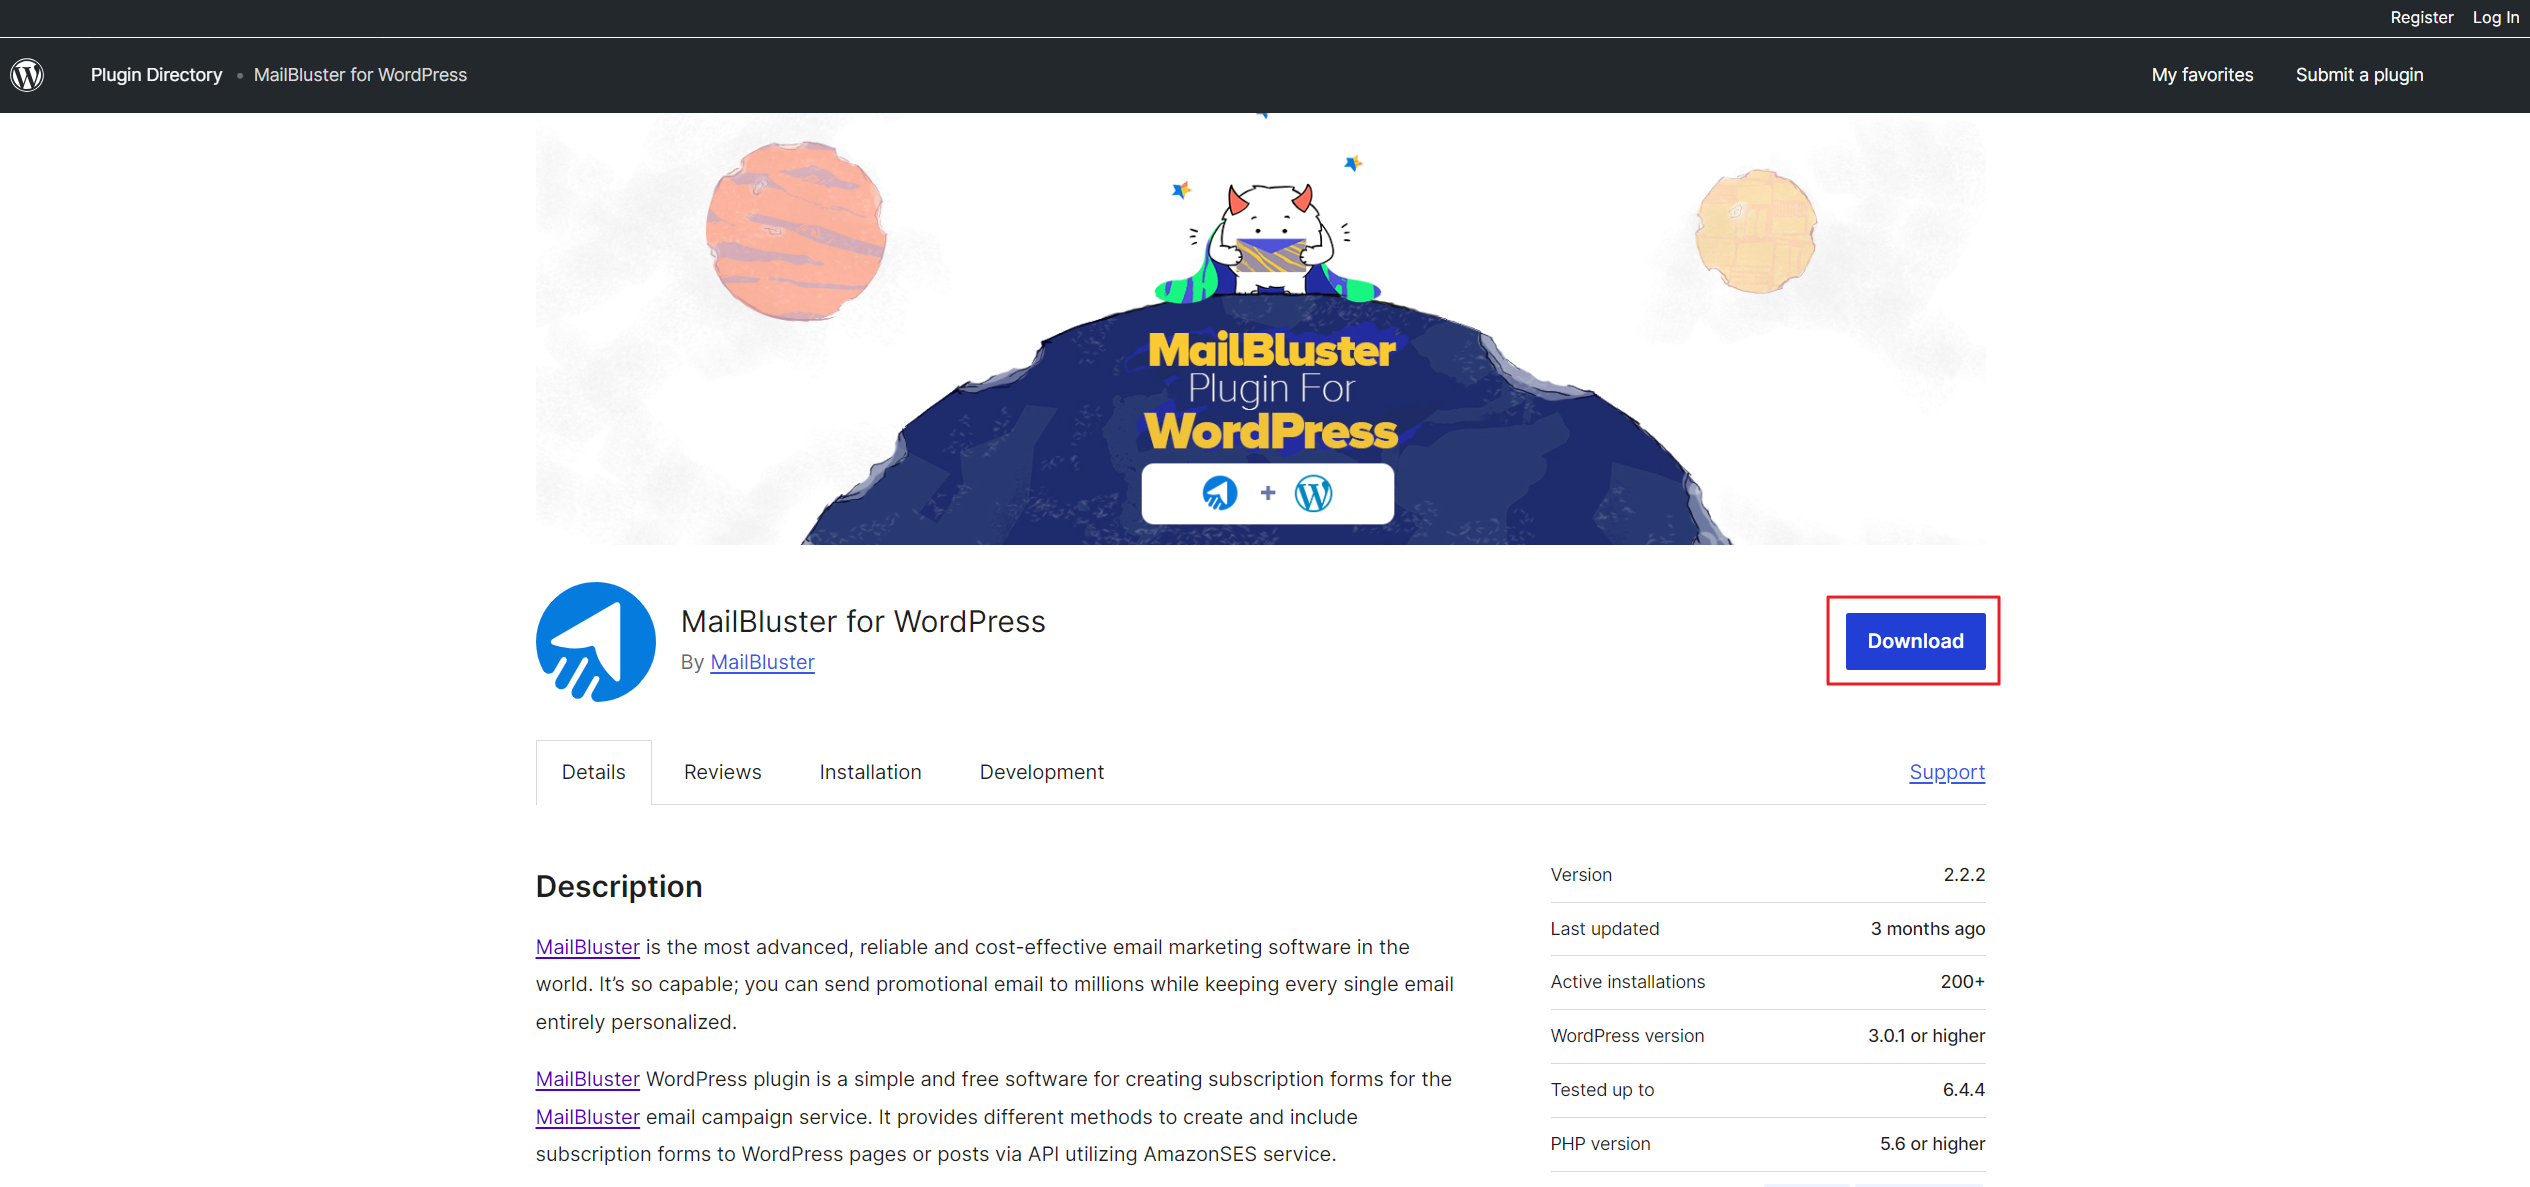
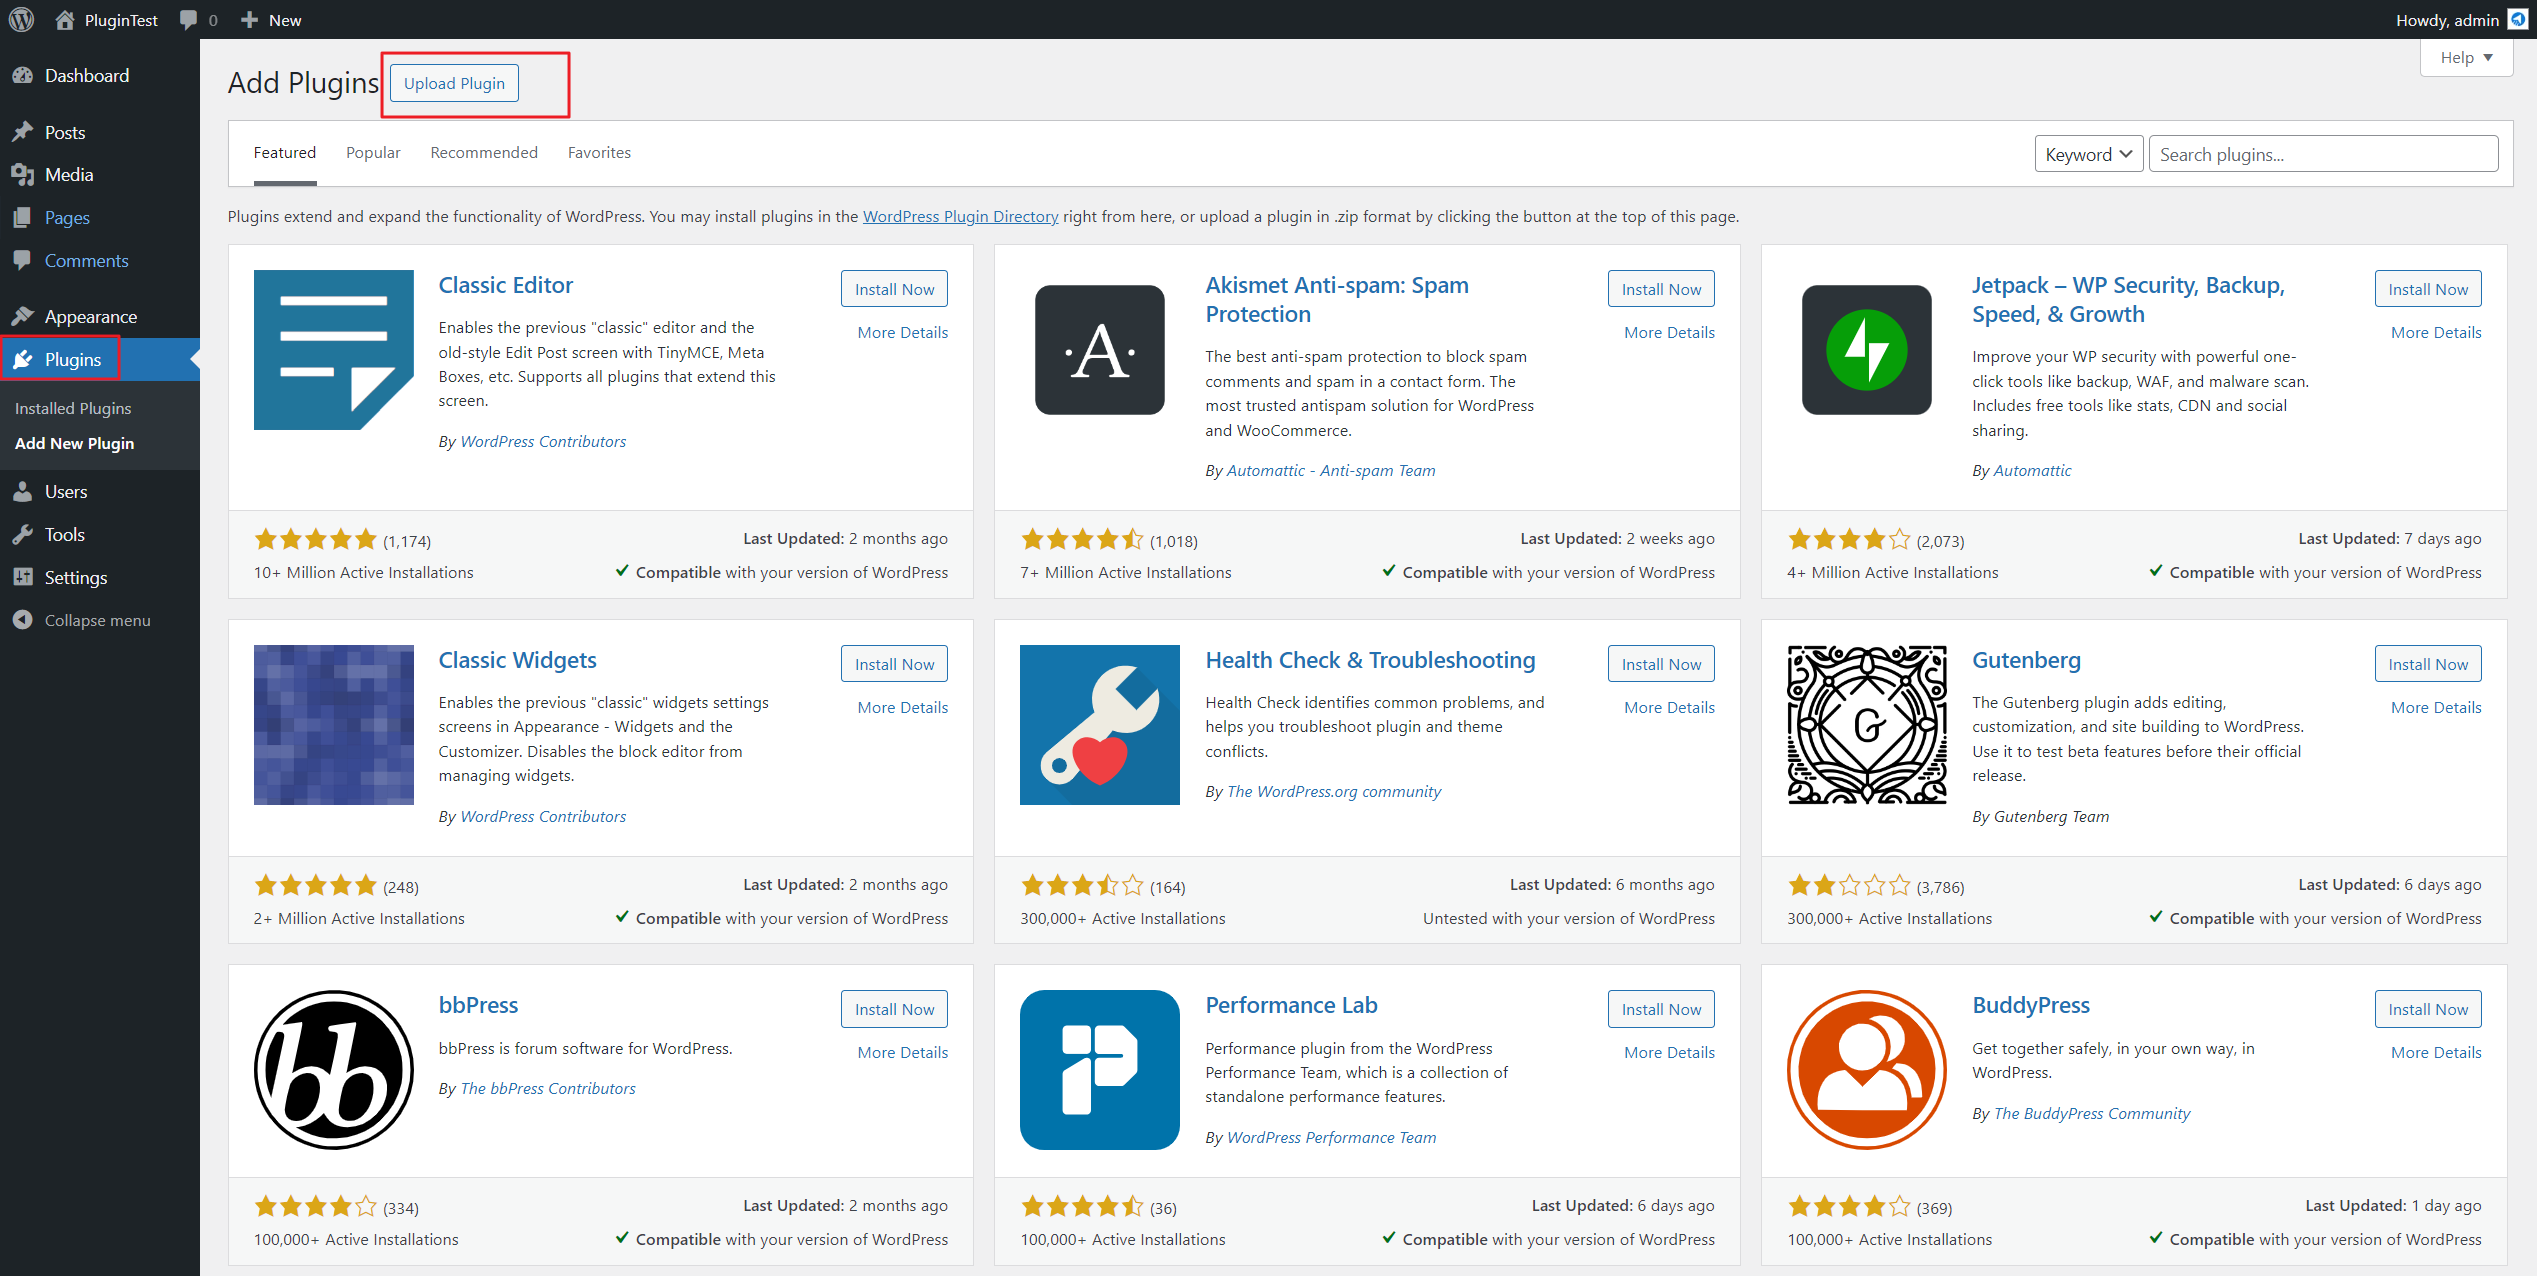
Here you will learn how to download and install WordPress Plugin for MailBluster. First, you need to go to WordPress site and search for MailBluster for WordPress plugin. Download the MailBluster for WordPress Plugin as shown below:
Now signin to your admin panel of your WordPress site and click on Plugins.
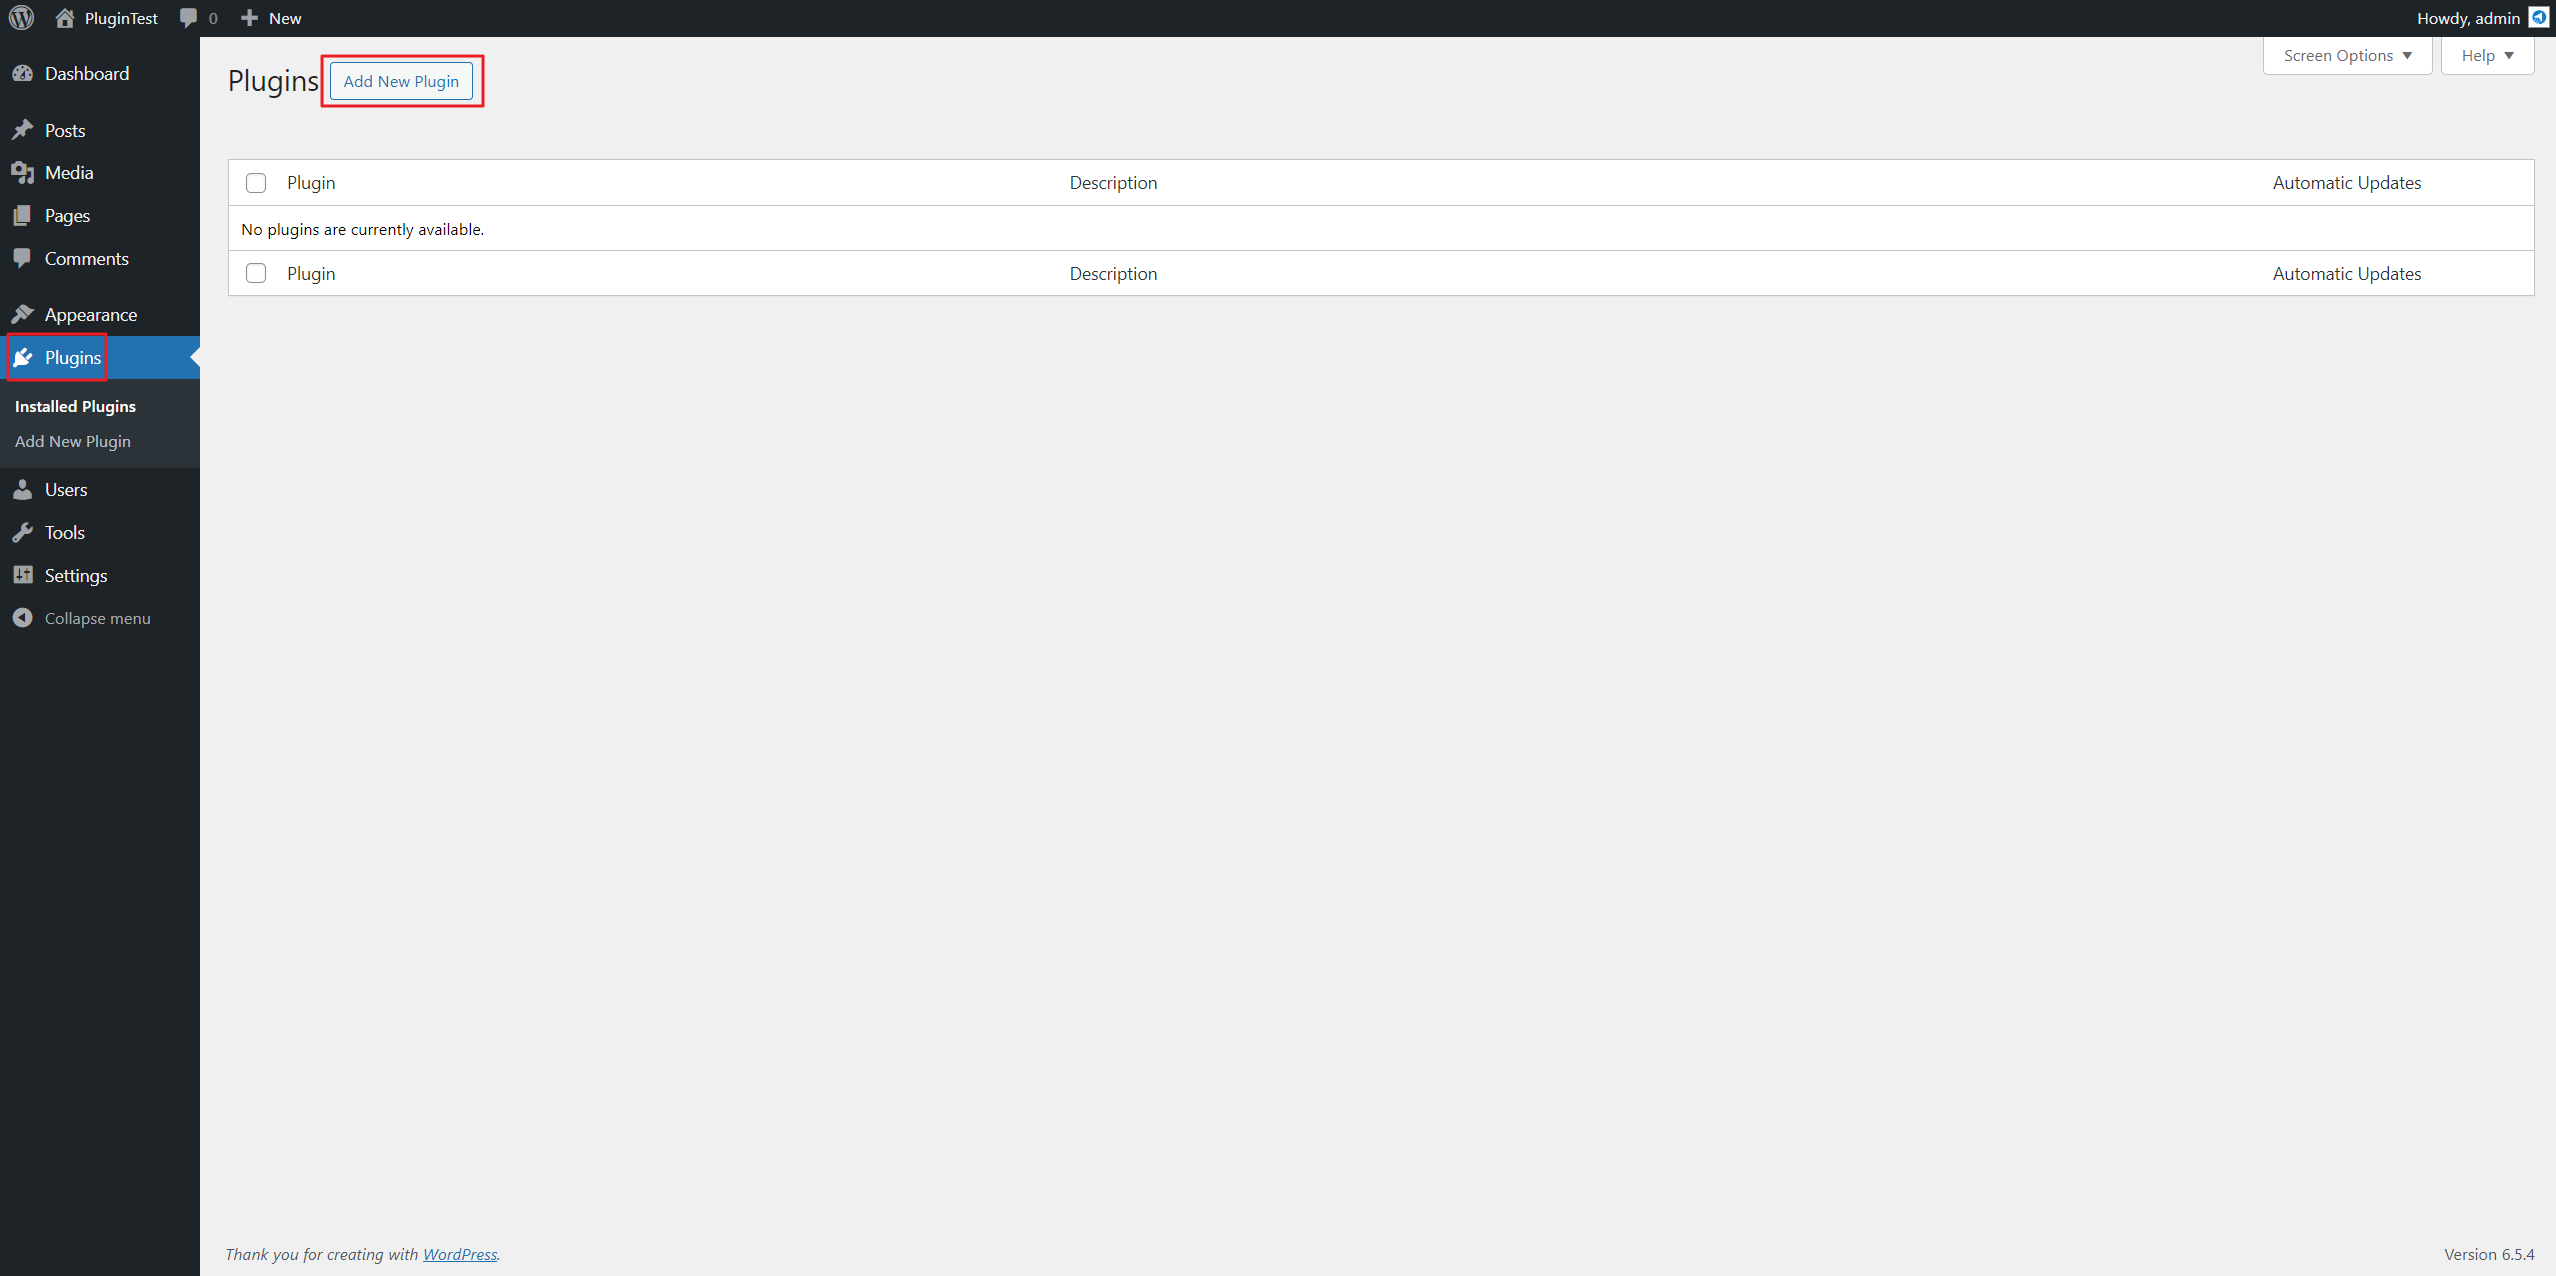
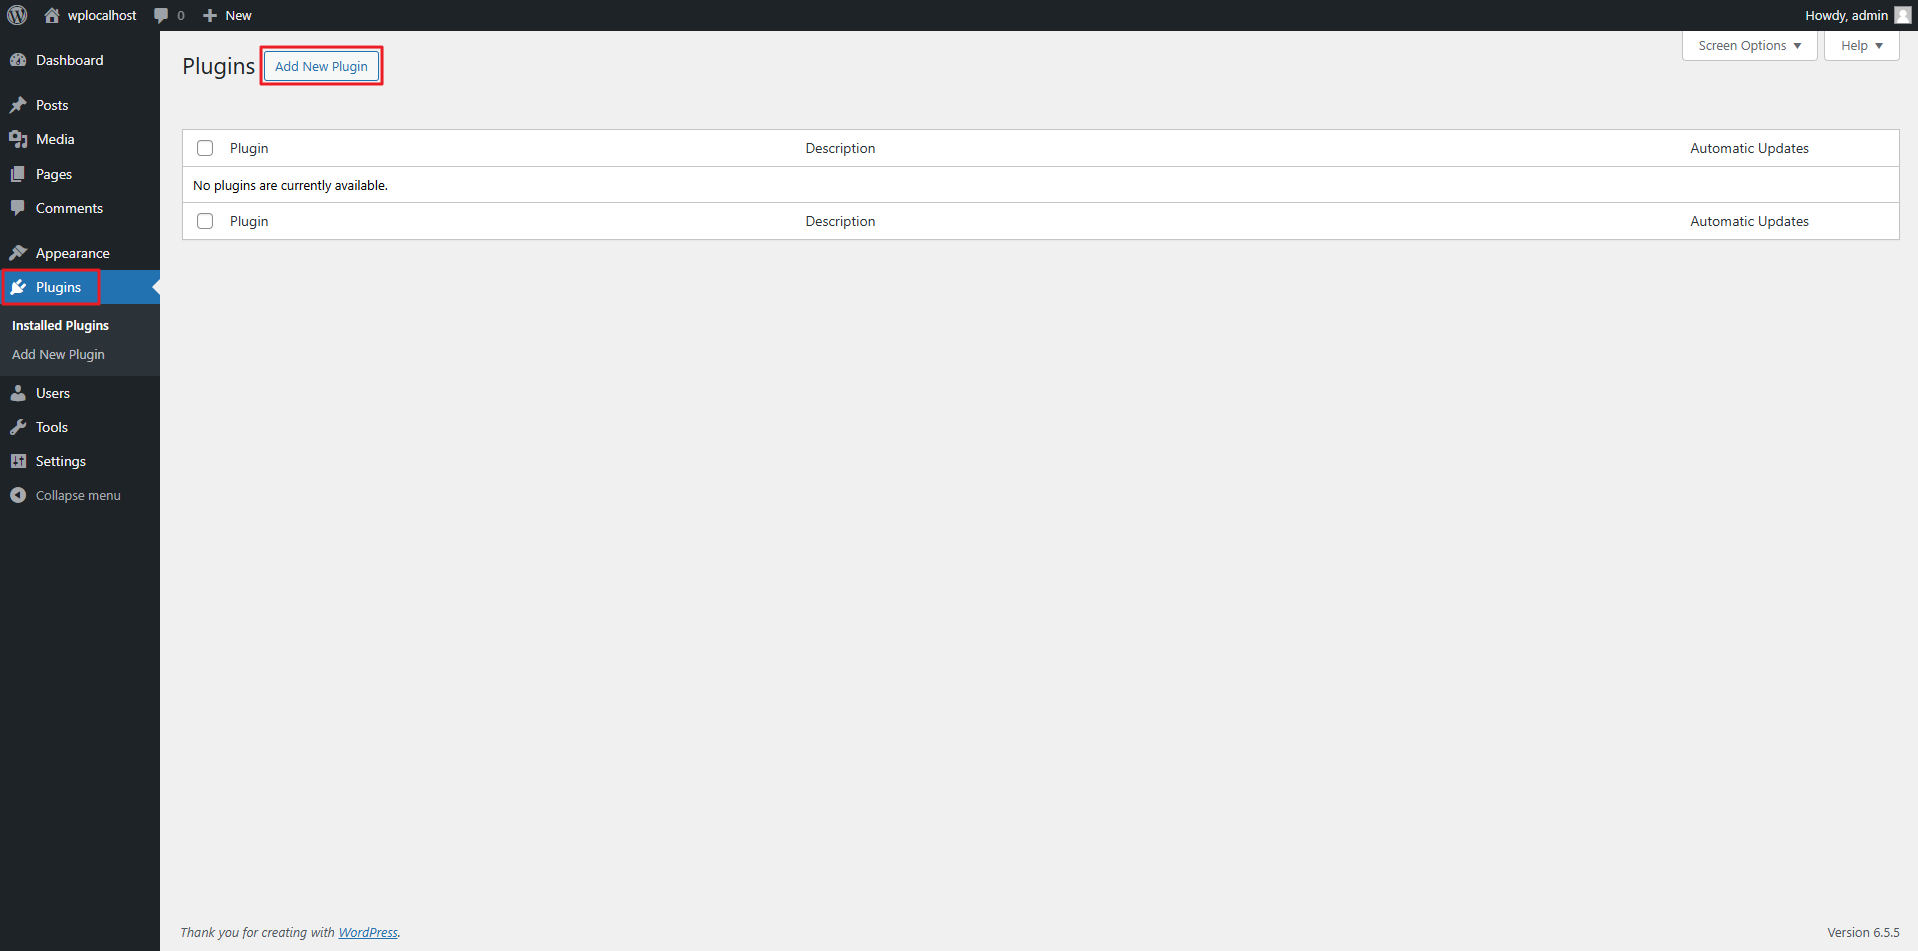
Click on Add New Plugin.
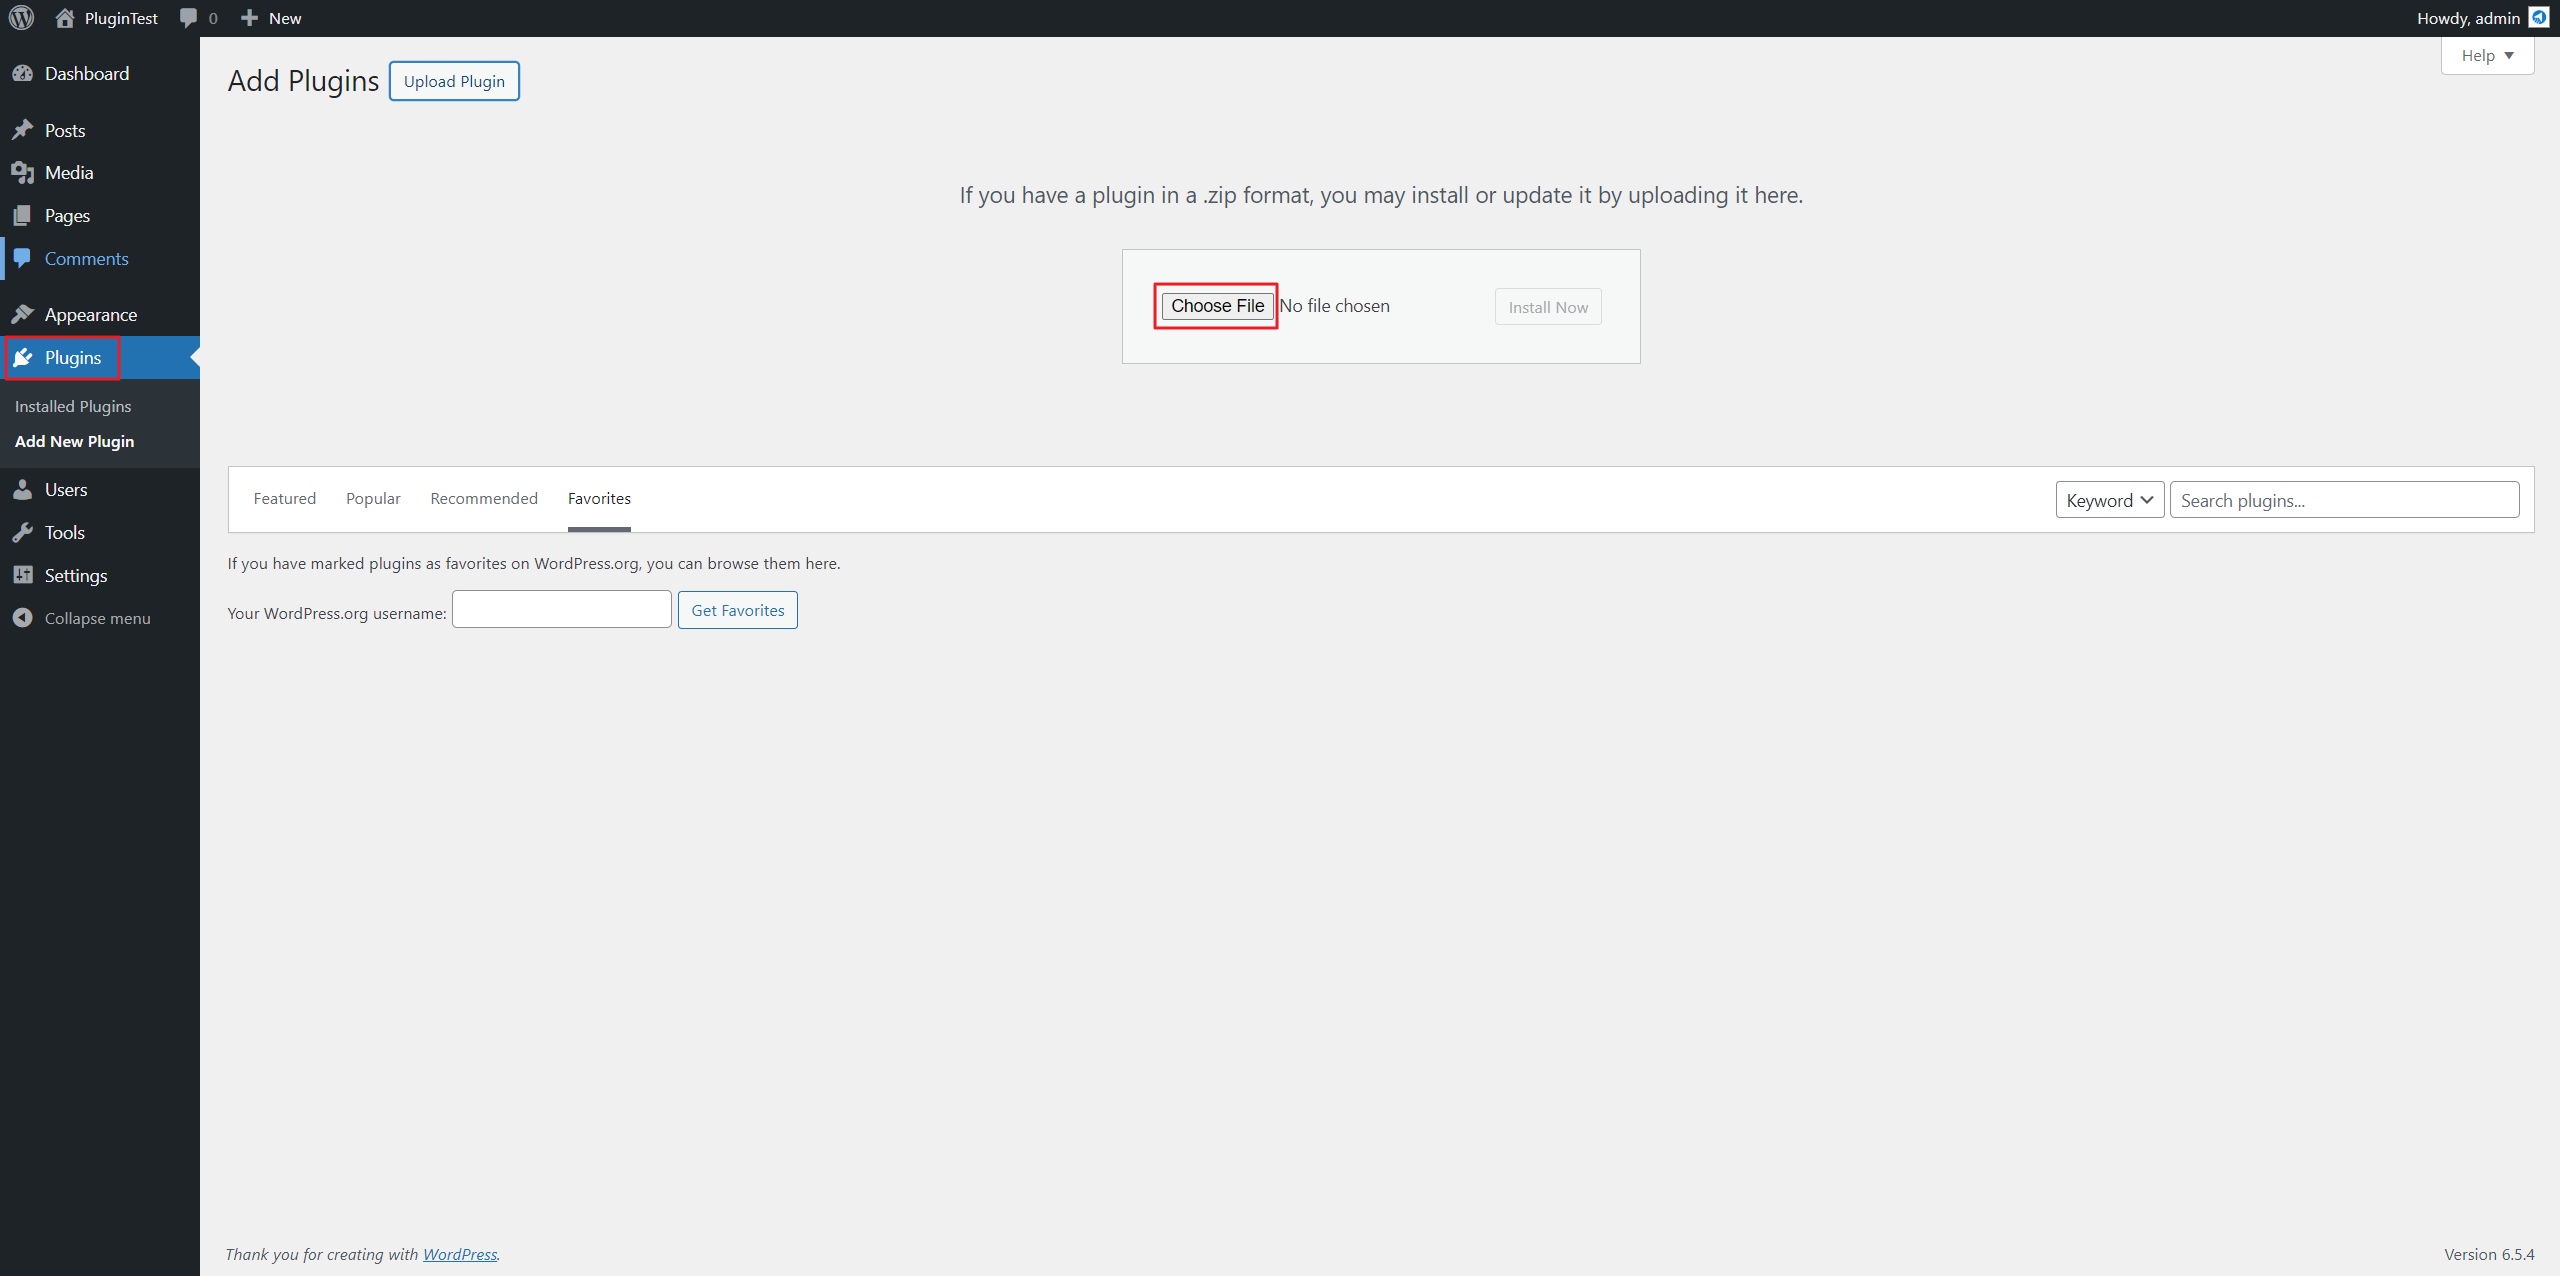
Click on Upload Plugin button in WordPress Admin page.
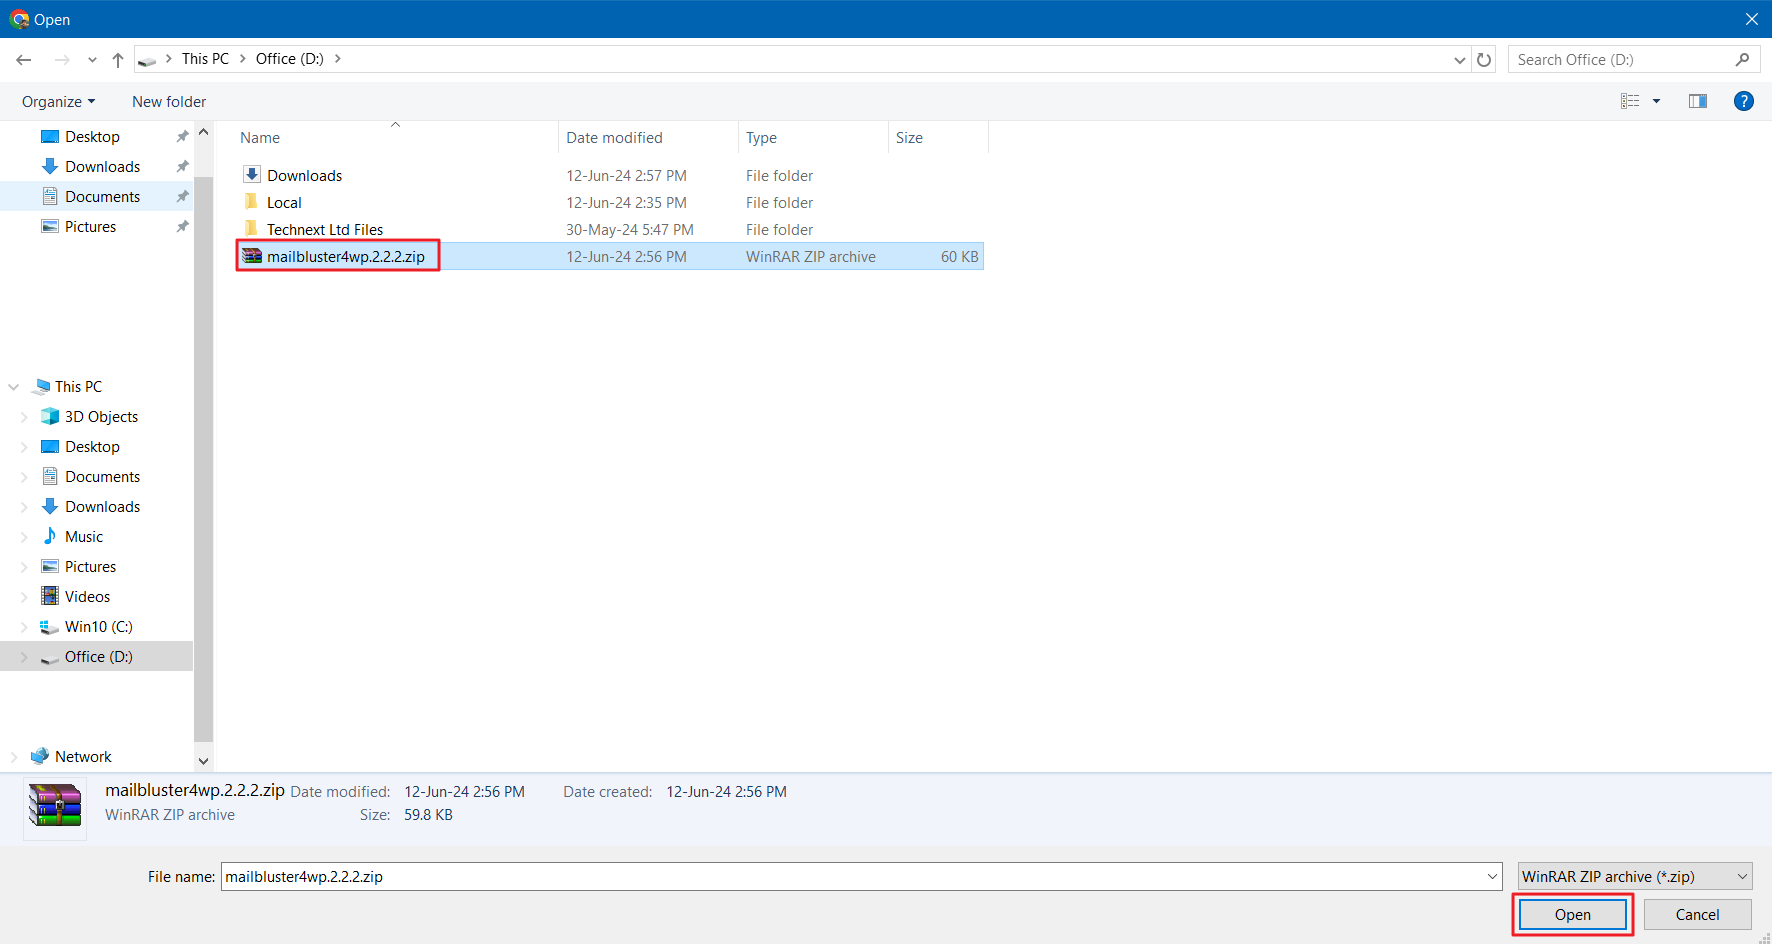
Select Choose File button and insert a CSV extensionfile.
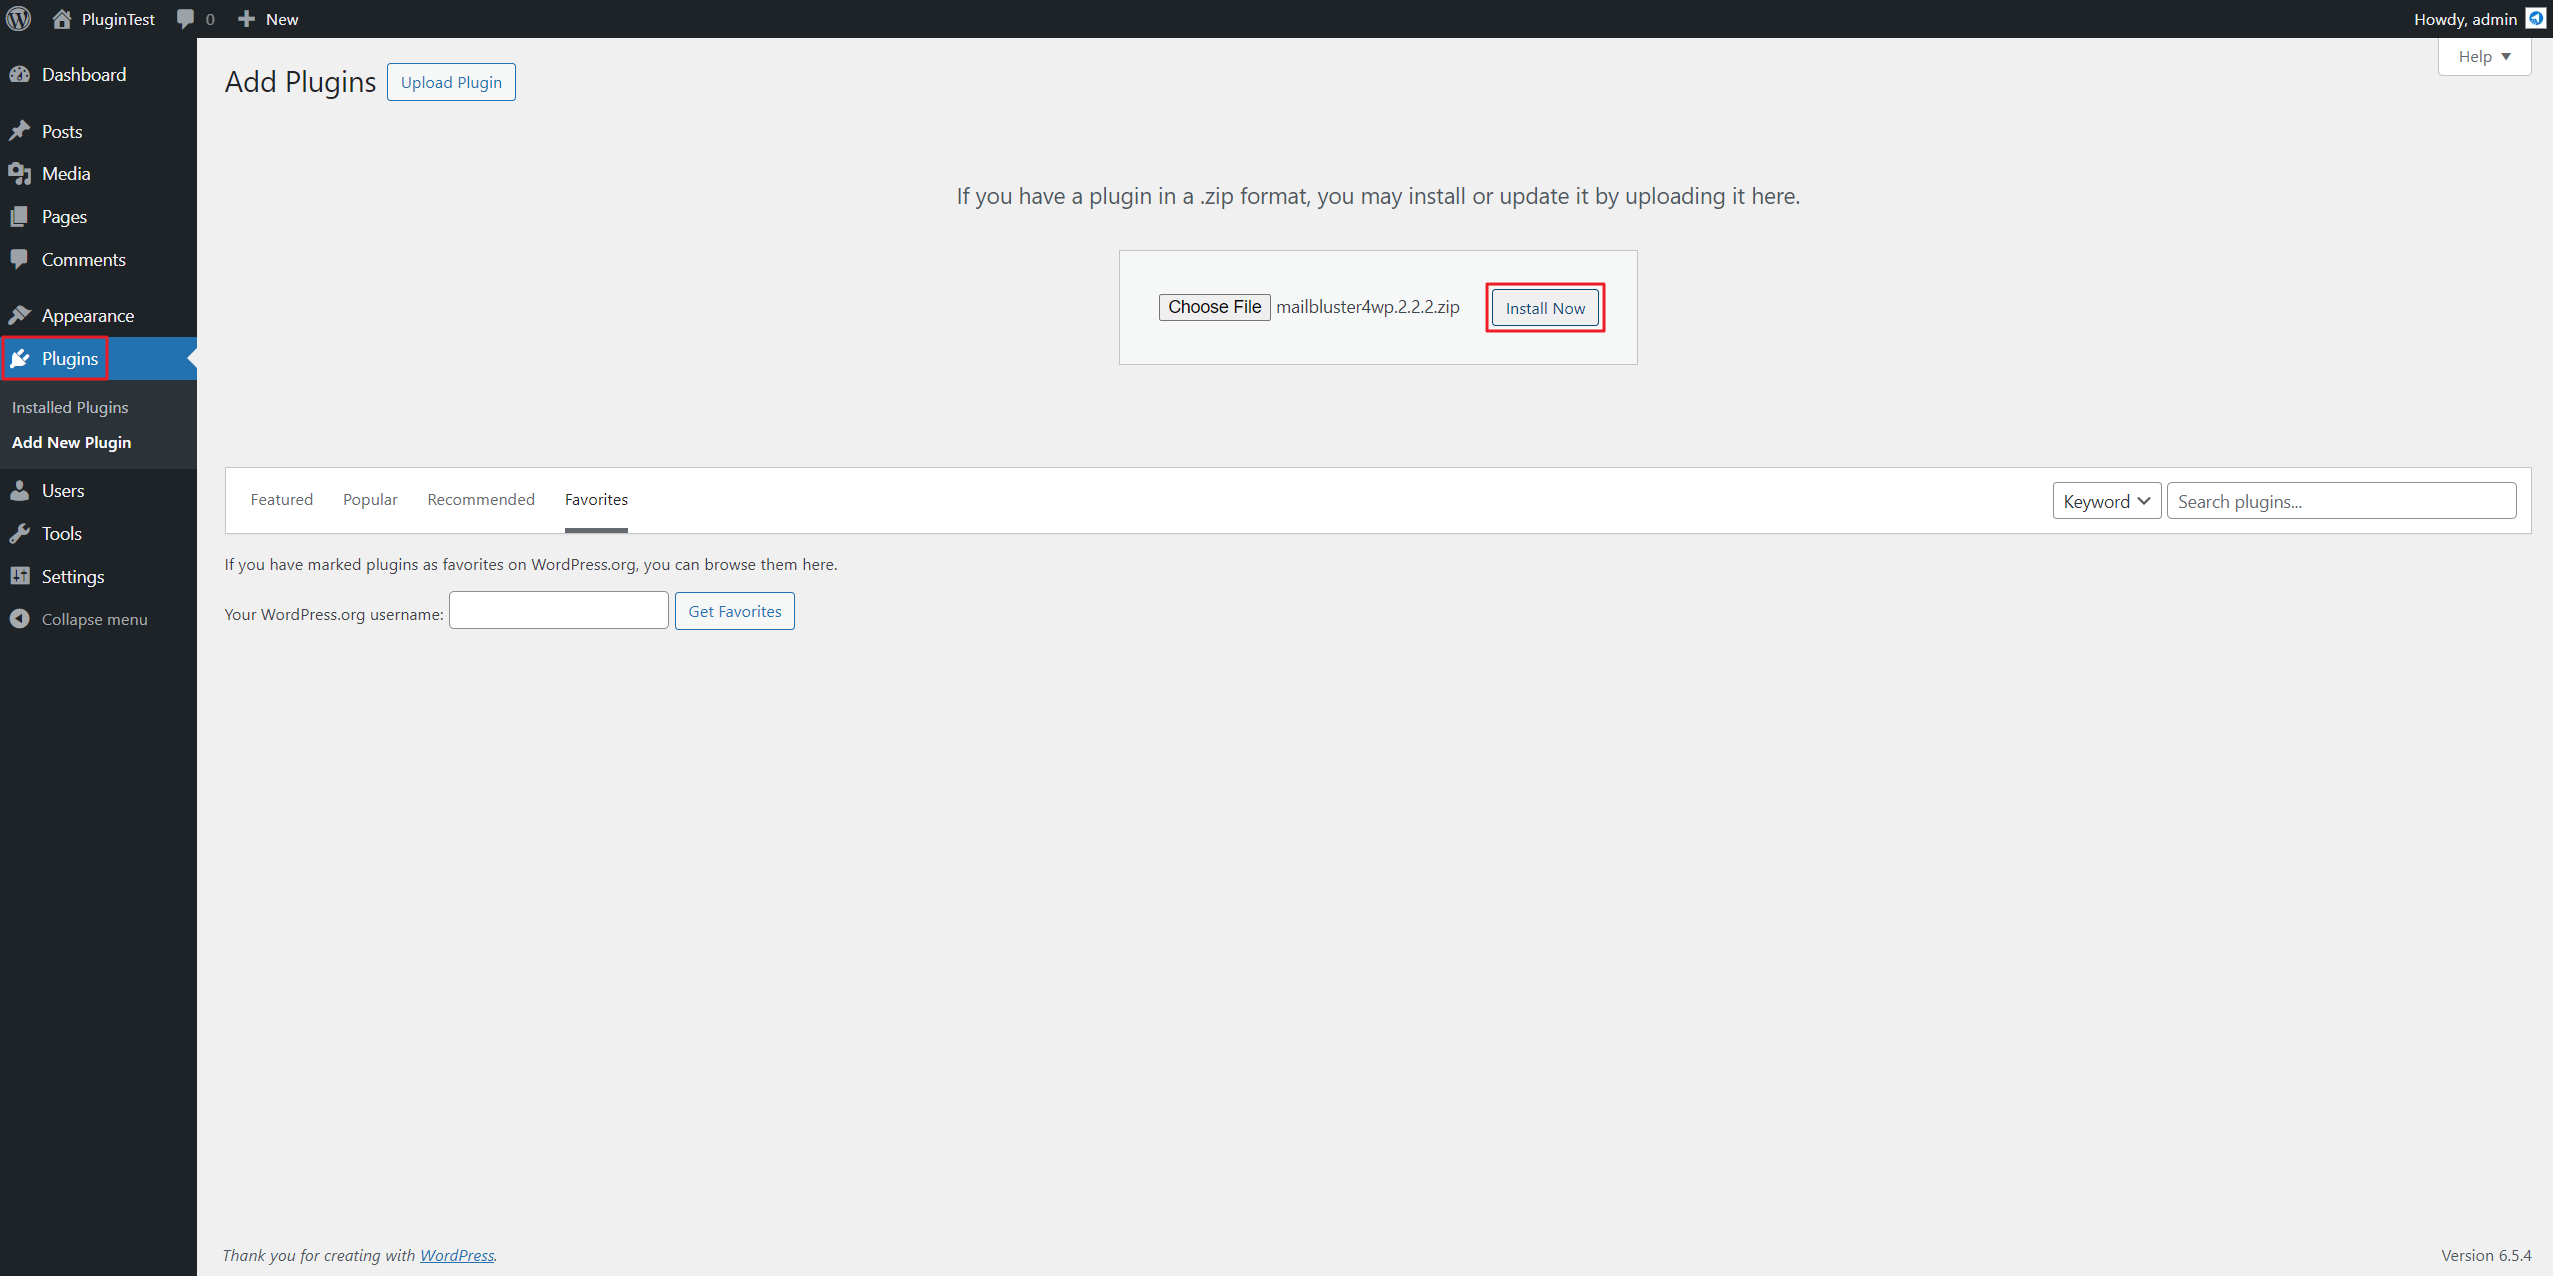
Select the downloaded zip file of the MailBluster Plugin.
Now, click Install Now button.
After the plugin installation is completed, click Activate Plugin button.
Now, sign in to MailBluster and navigate to Brand > Settings > API Keys. Copy the API key from there and paste it into the MailBluster Plugin for WordPress. You can also refer to this guide on Generate API key from MailBluster if needed.
WooCommerce integration with Mailbluster allows store owners to automate email marketing, improve customer engagement, and drive more sales directly from their WordPress site. WooCommerce is a popular open-source e-commerce plugin for WordPress that enables users to create and manage online stores with ease. In this guide, we will not discuss how to set up WordPress, as you already own a domain and have deployed your WordPress site. Instead, you will learn the step-by-step process for setting up a seamless WooCommerce integration with Mailbluster, helping you streamline your marketing efforts.
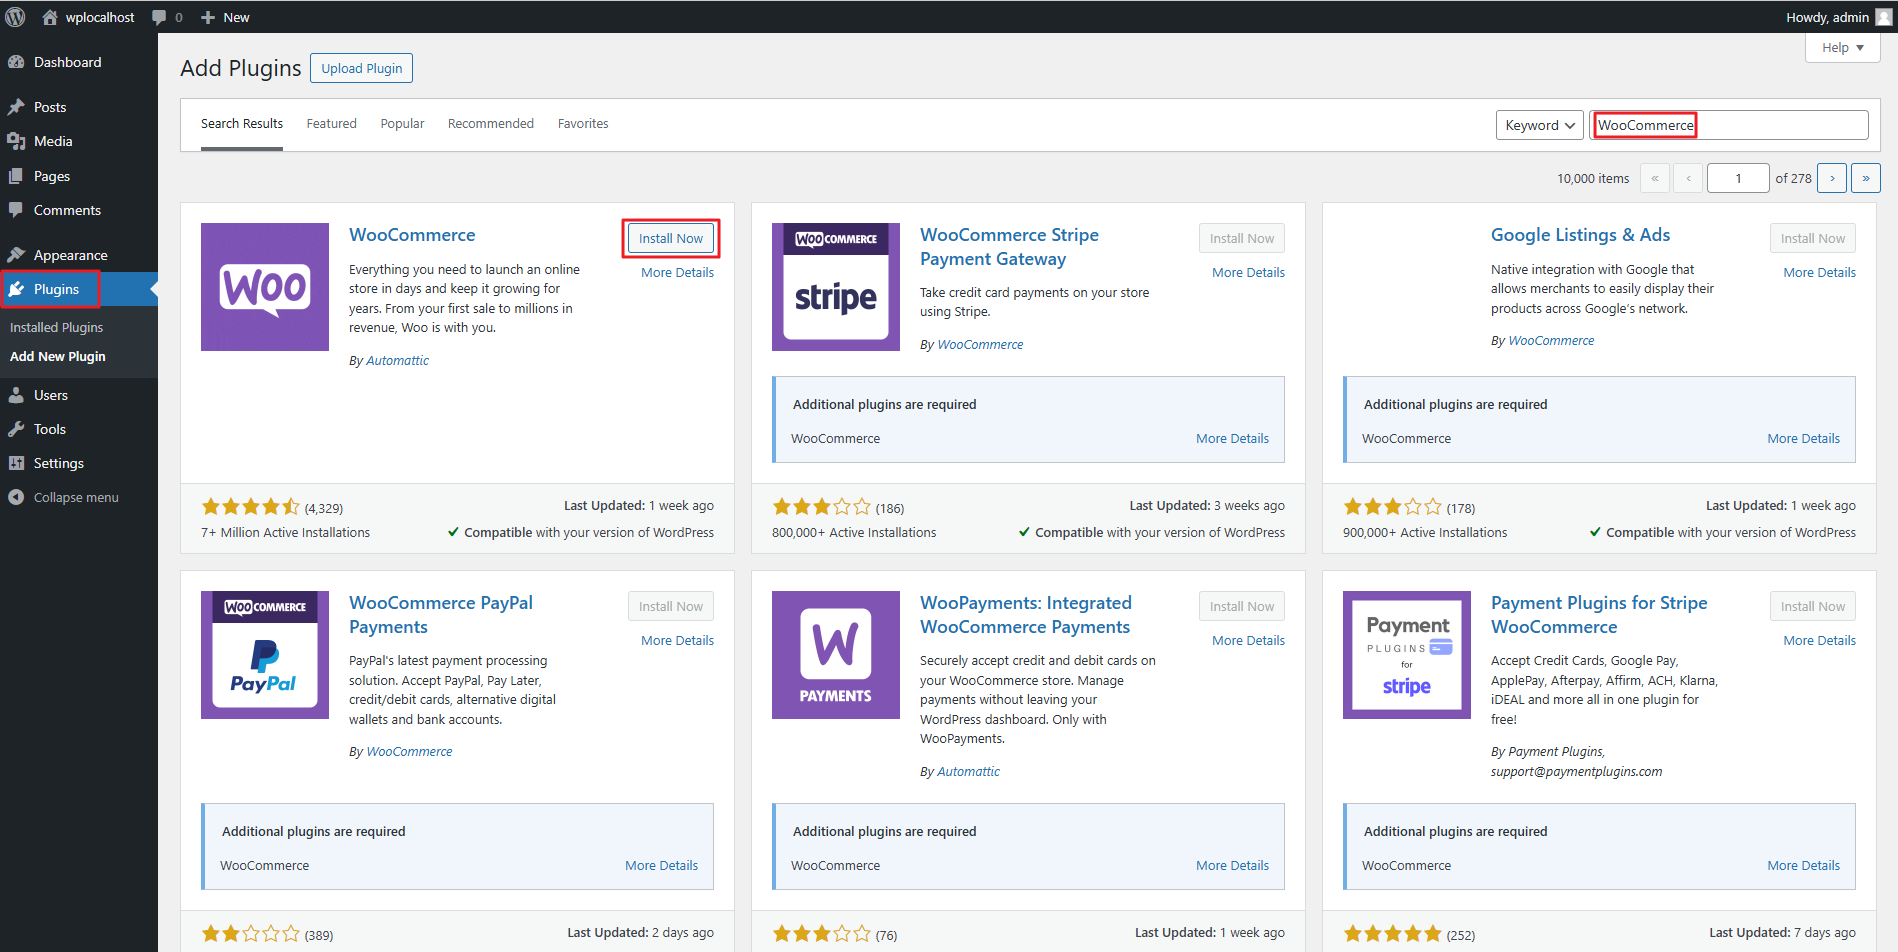
First, you need to go to your WordPress Admin panel, then Plugins and click on Add New Plugin.
Type WooCommerce in the Keyword field. Then click on Install Now button.
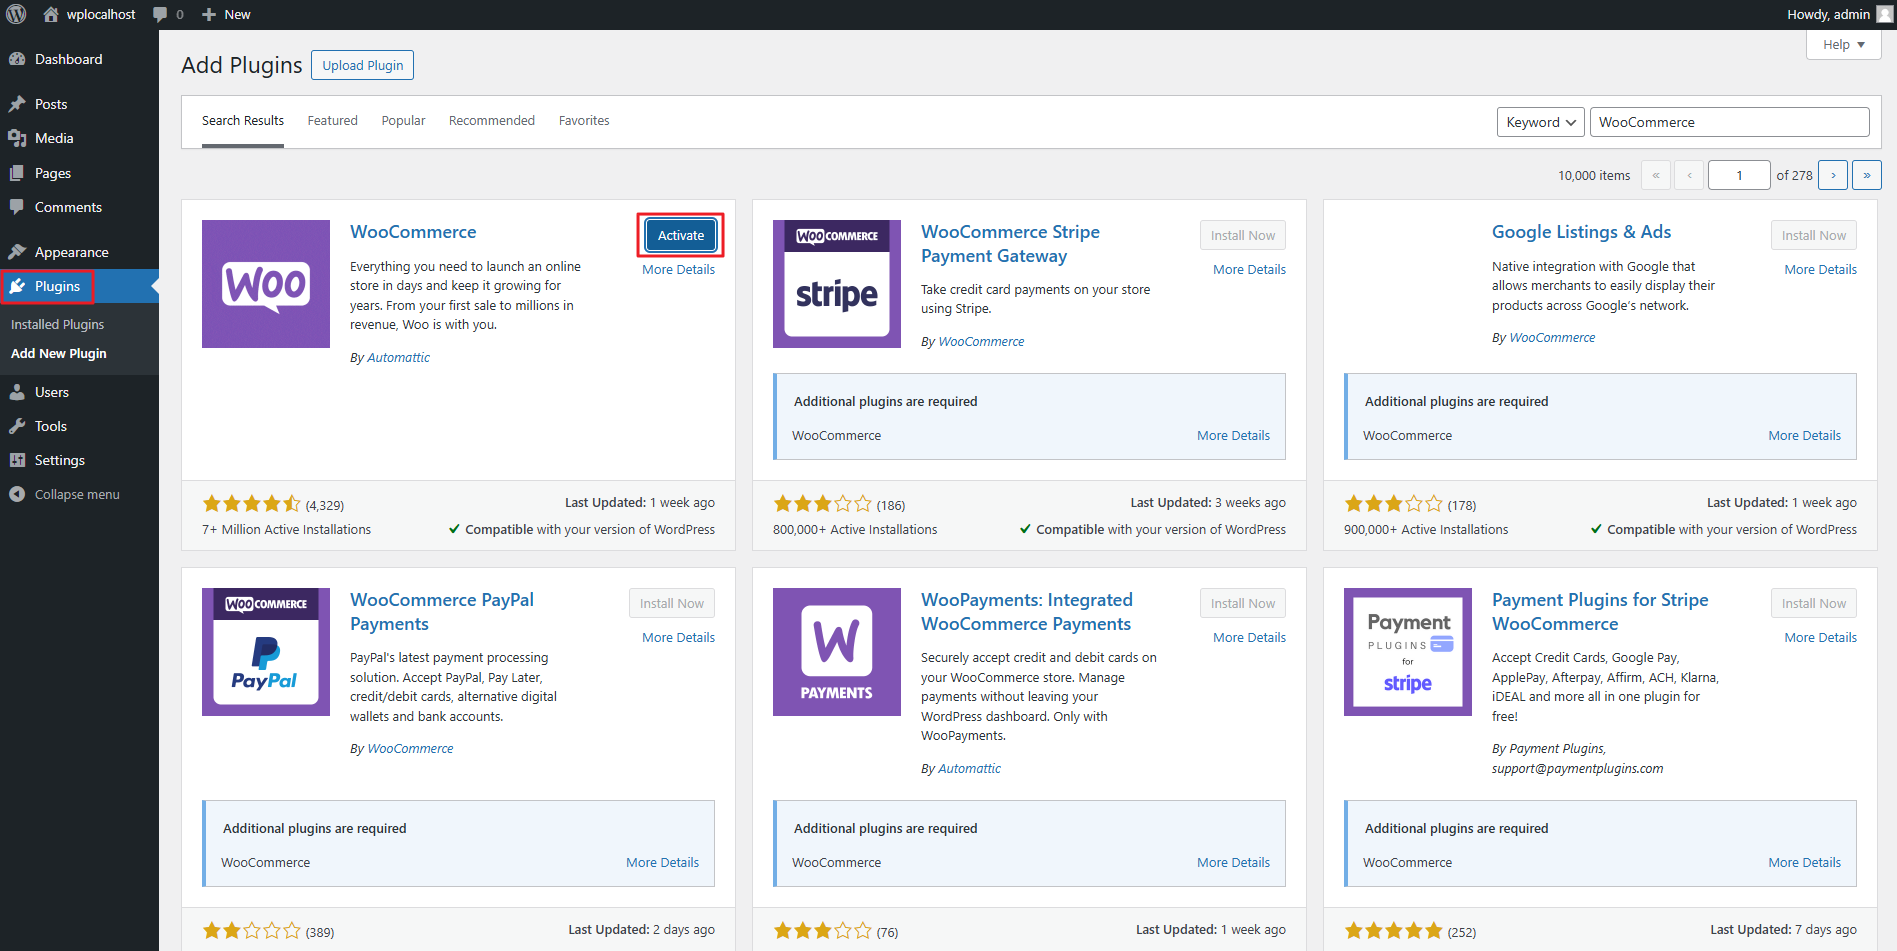
After installation, click on Activate button.
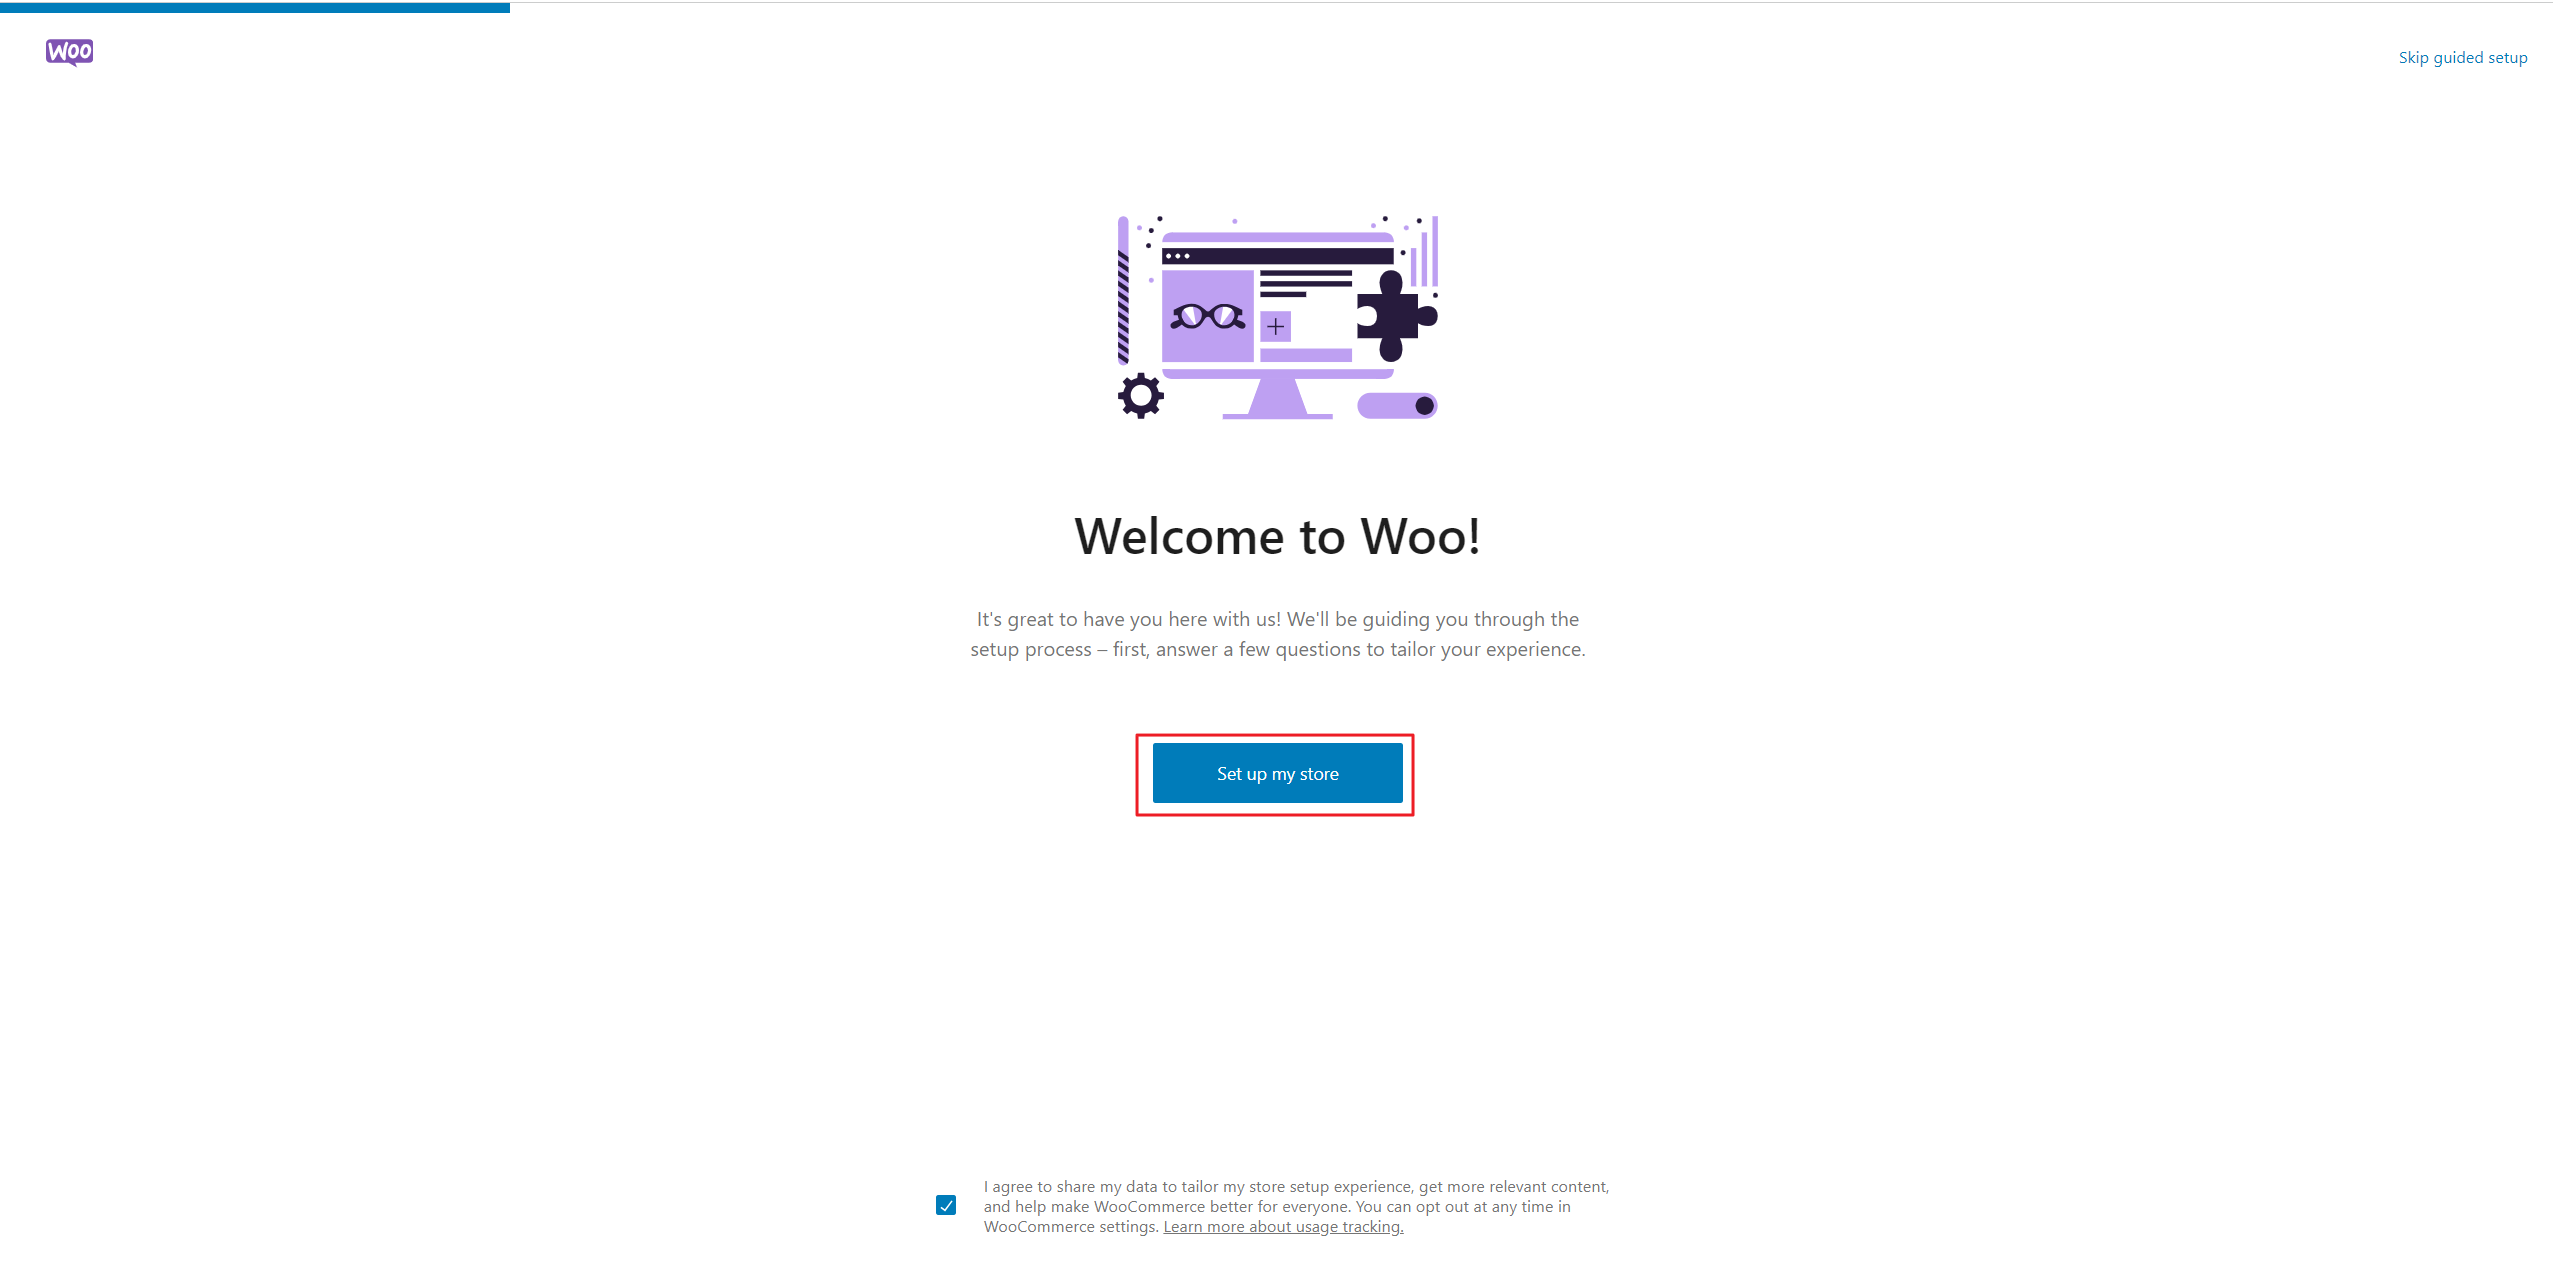
The WooCommerce page will open, and you need to set up your WooCommerce store by following the wizard after clicking ‘Set up my store.’ We will not go into details on how to set up WooCommerce, as we are focusing on integrating MailBluster with WooCommerce. We assume that you have already set up your WooCommerce store.
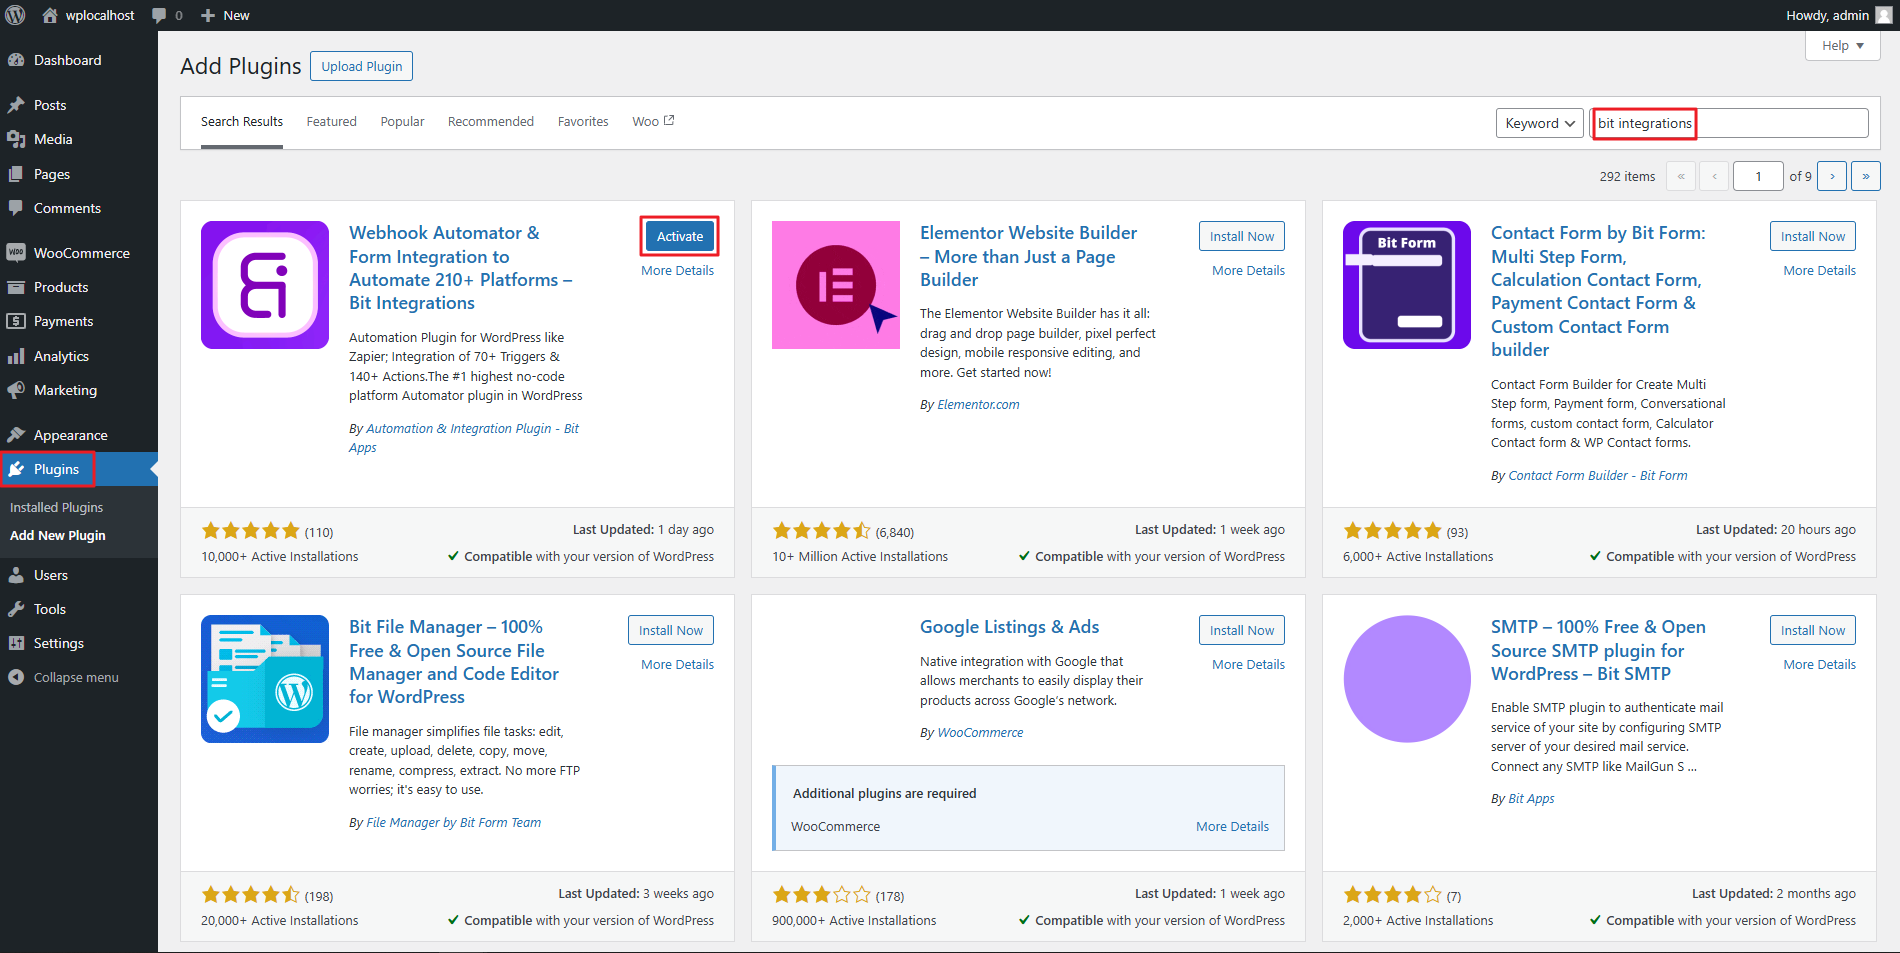
After setting up WooCommerce store, you need to again go to your WordPress Admin panel. Then click on Plugins. Type bit integrations in the Keyword field. Then click on Install Now button.
We are using this 3rd party tool called Bit Integrations because it is designed to help users integrate and automate various software applications and services. It’s particularly useful for streamlining workflows by allowing different applications to communicate with each other and perform automated actions based on specific triggers.
After installation, click on Activate button.
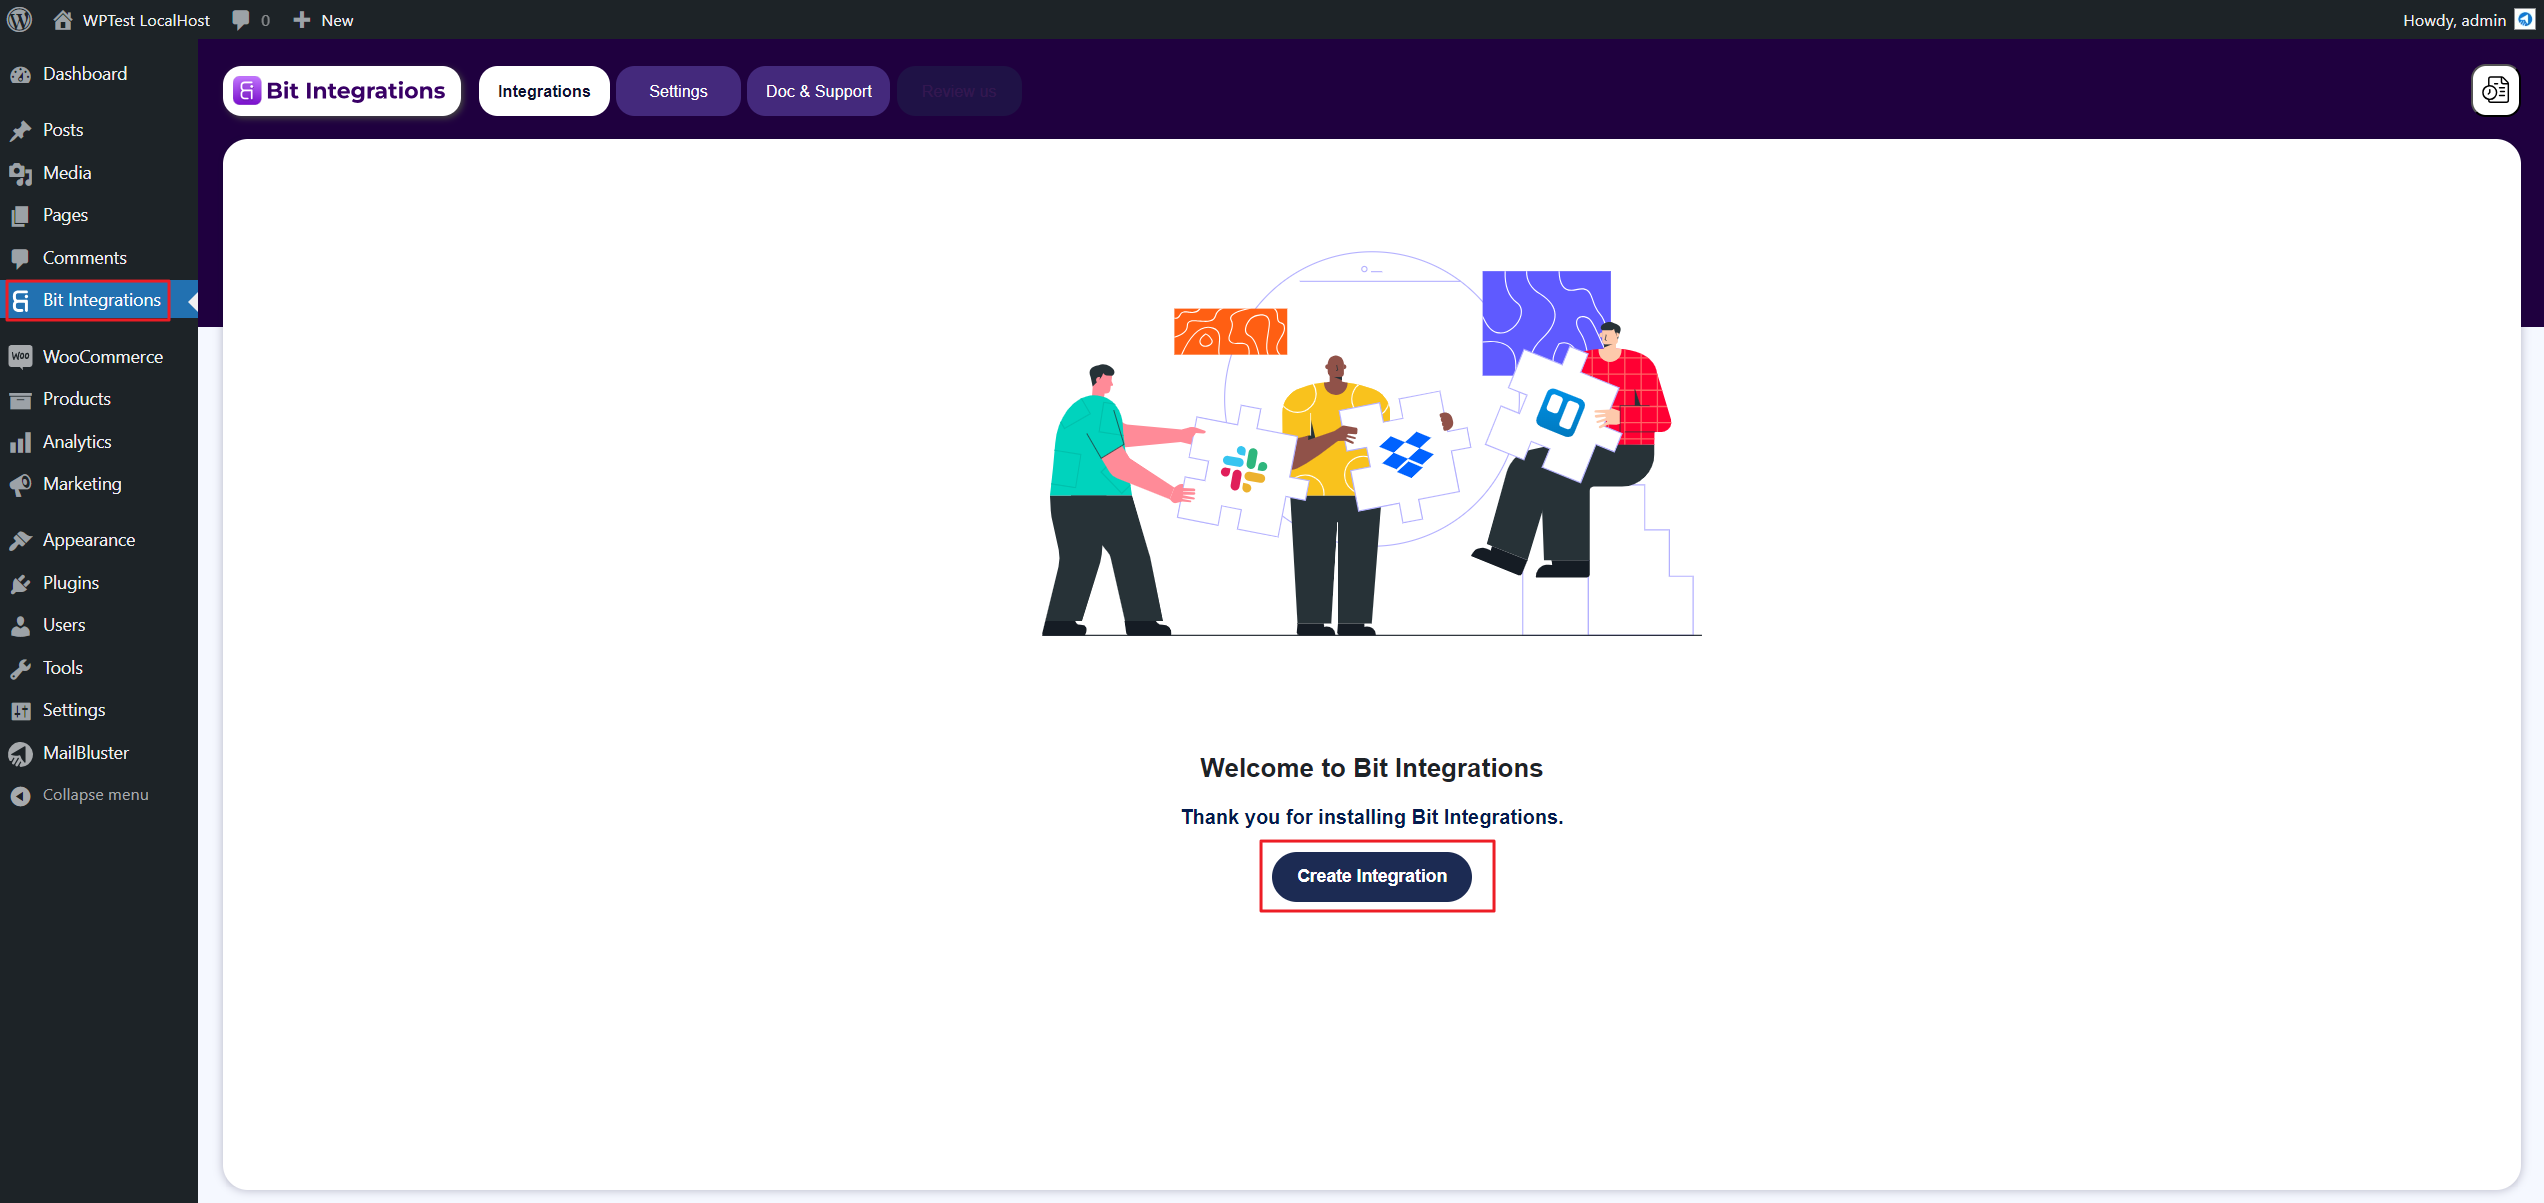
A new option will appear on the left side of WordPress menu name Bit Integrations. Just click on it and then click on Create Integration.
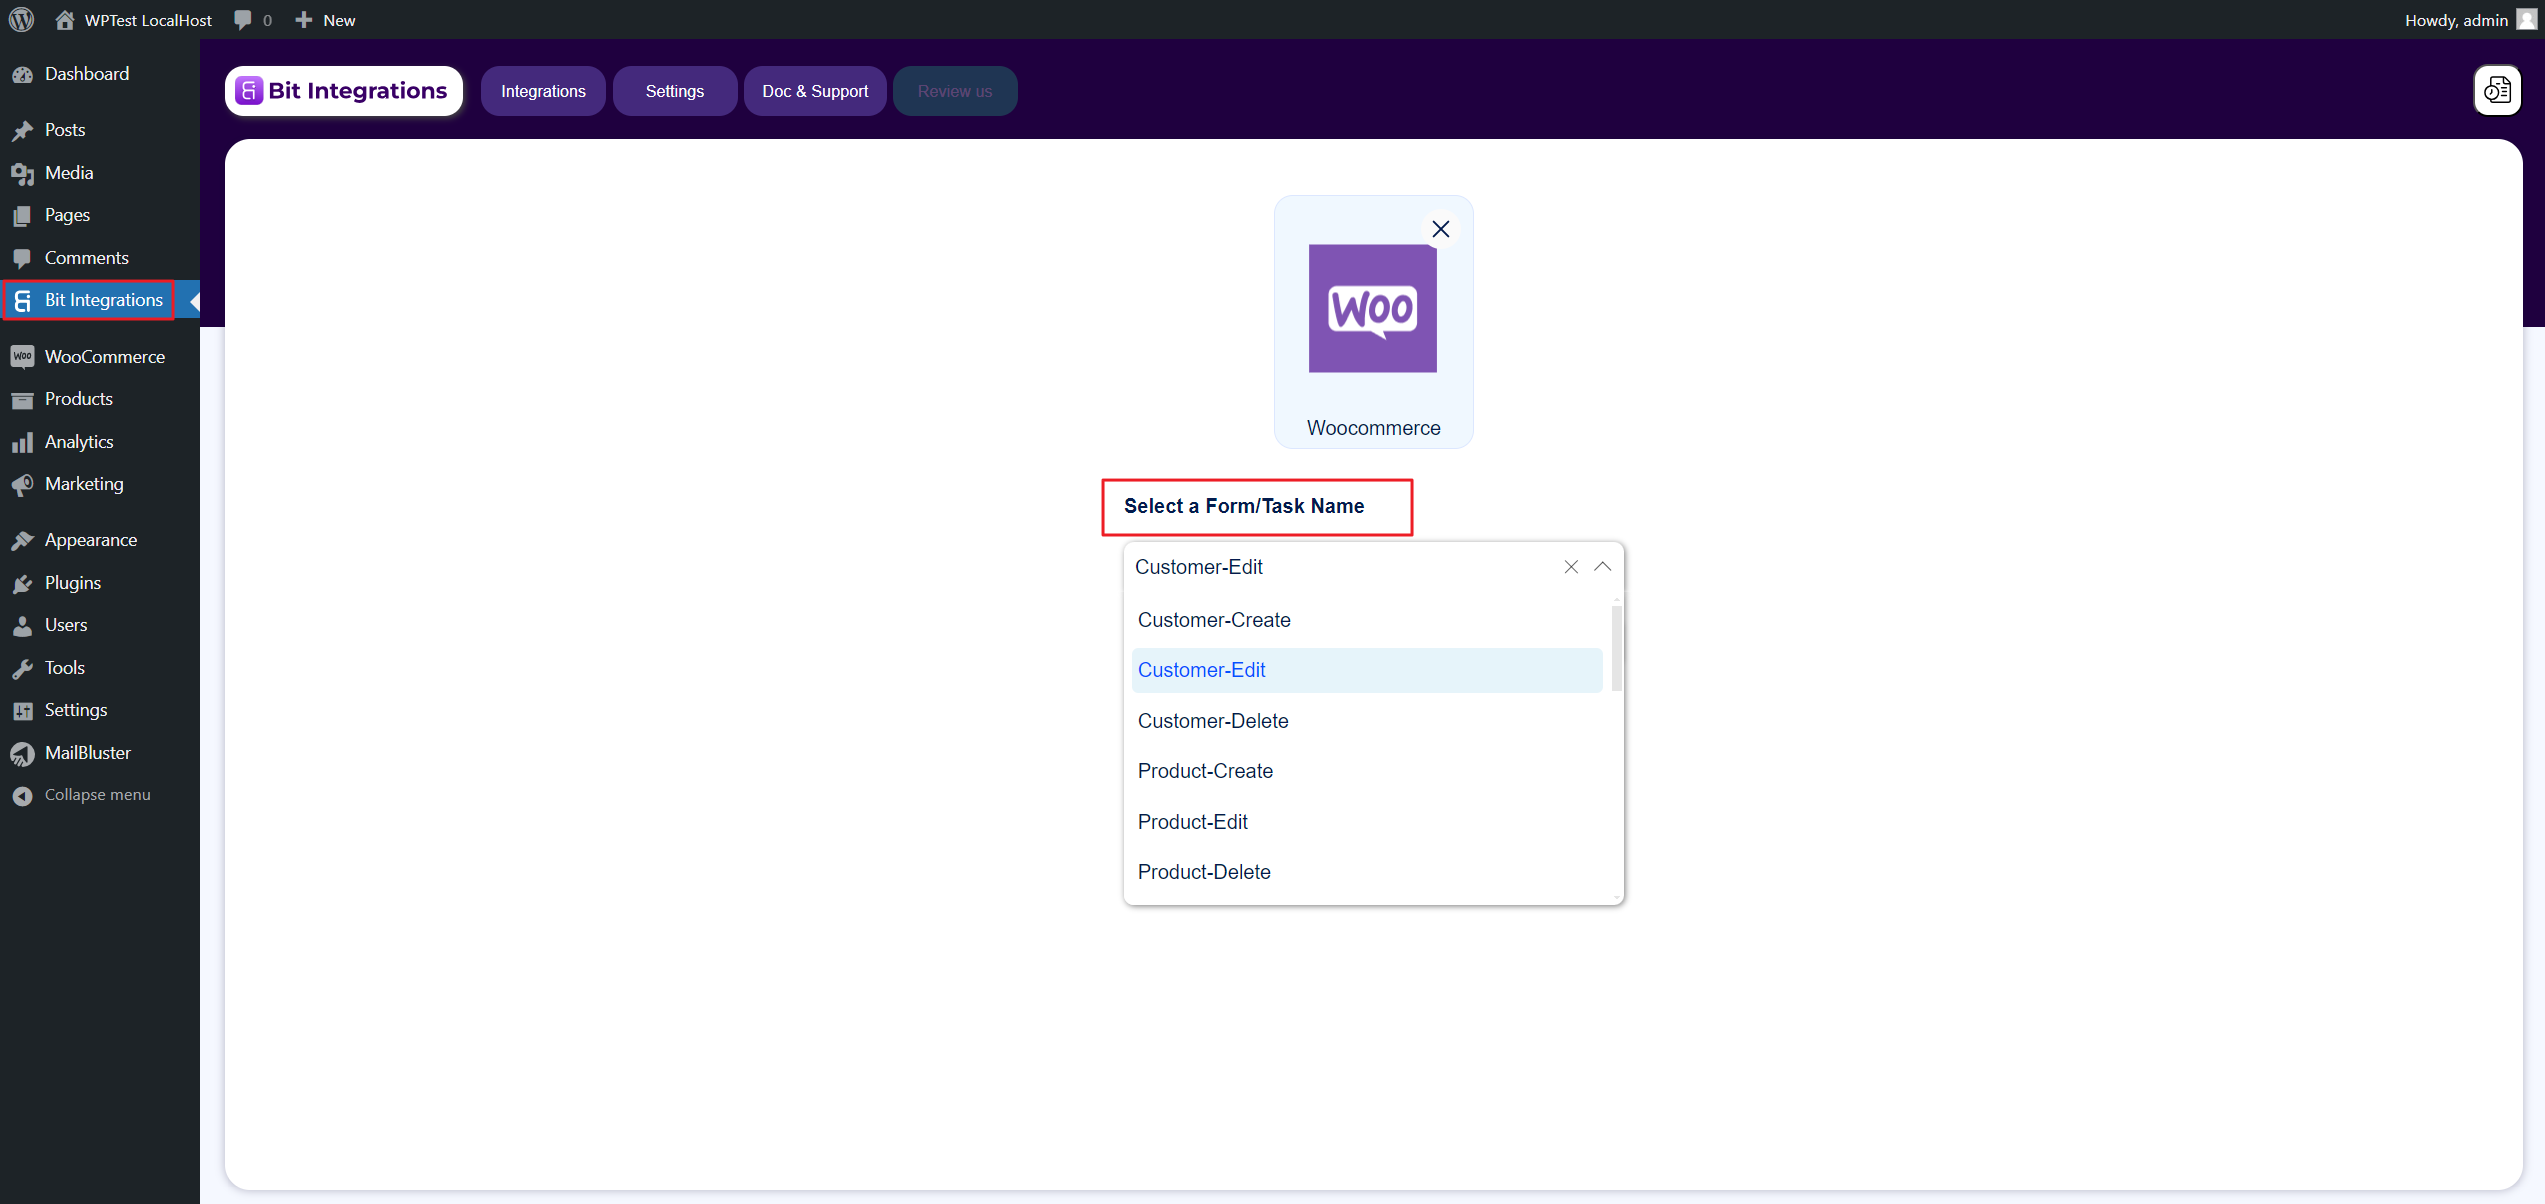
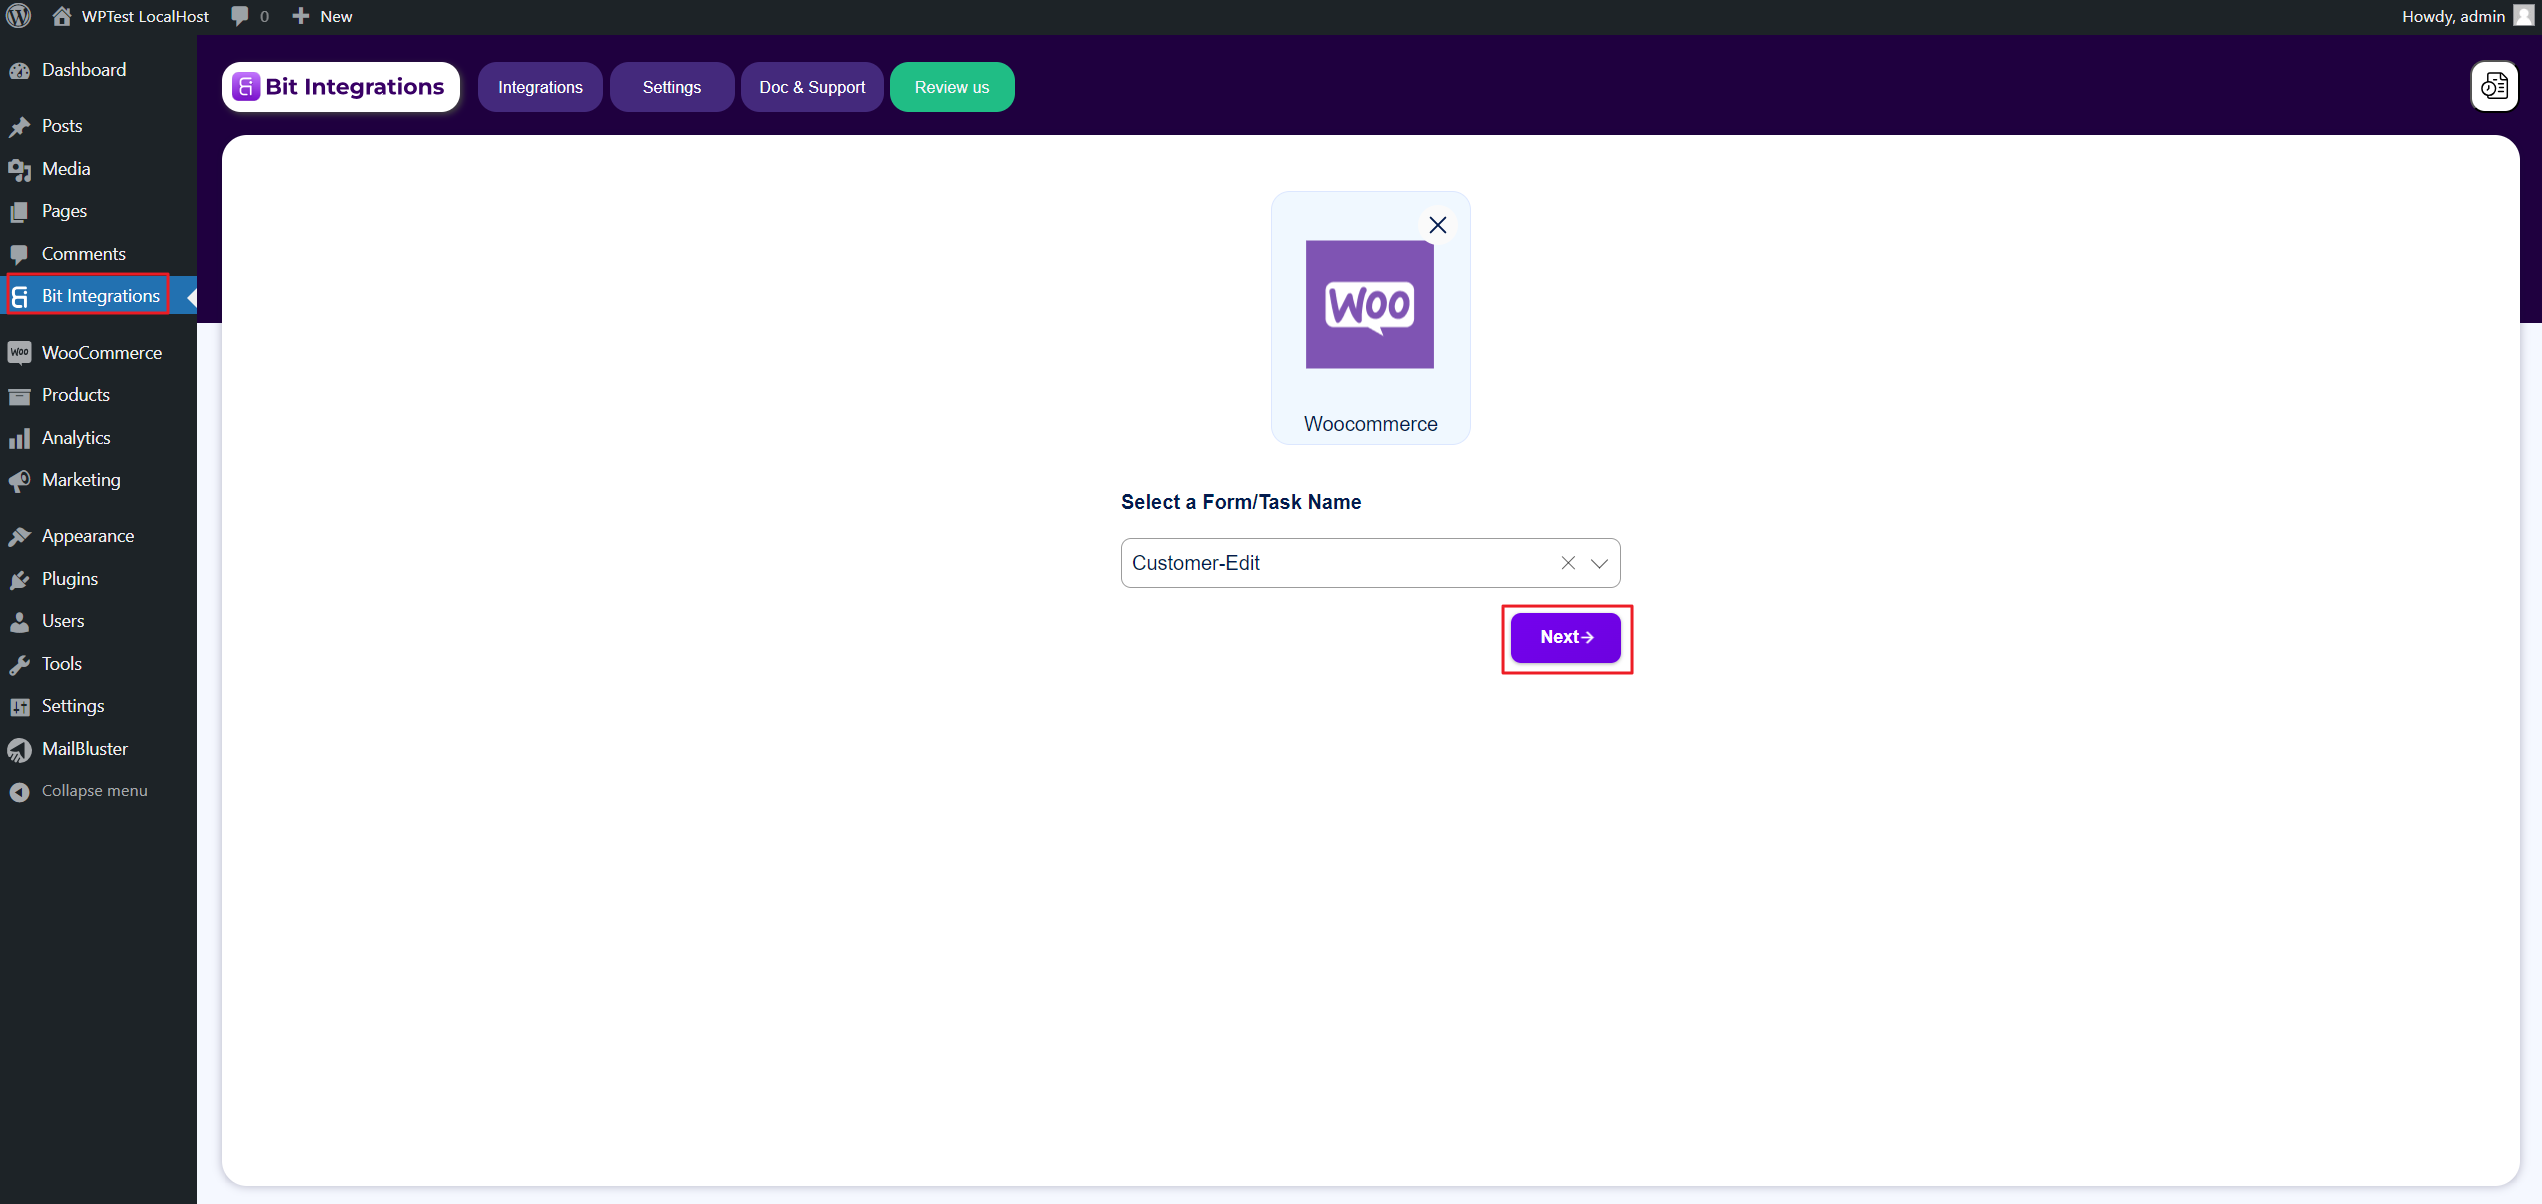
Click on the Please select a Trigger field and type ‘Woo’. WooCommerce will appear. Click on the Woocommerce.
Now you have to Select a Form/Task Name from the dropdown list. Here we selected ‘Customer-Edit‘
After selecting Task Name, click the Next button.
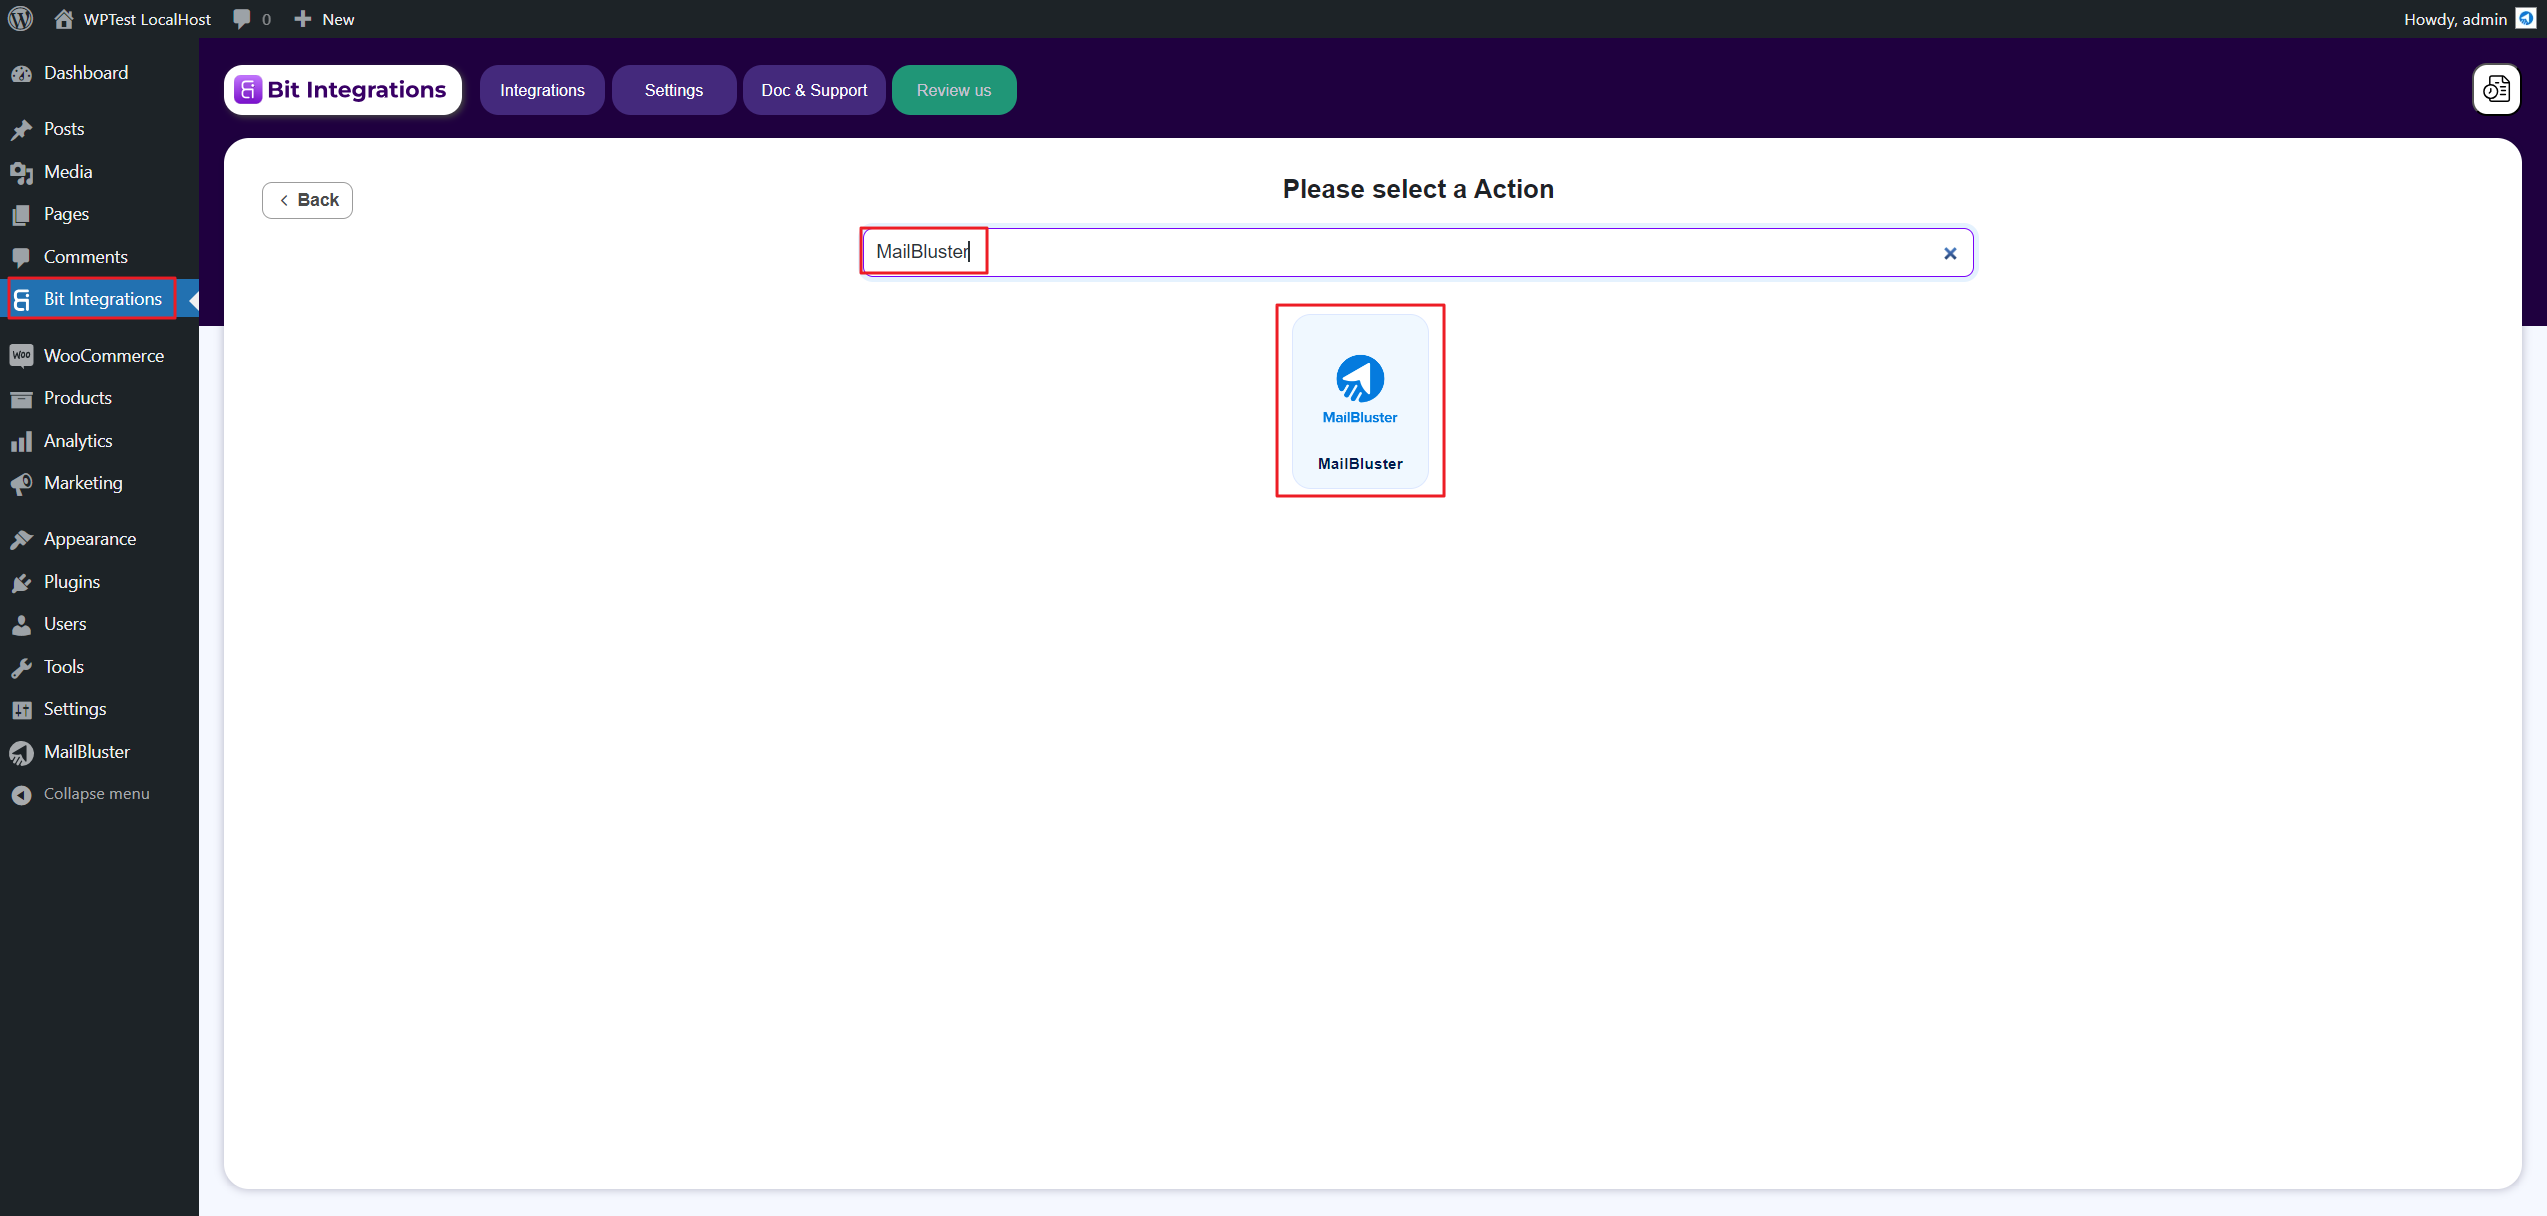
Now you have to go to Bit Integrations again from the WordPress menu on the left side. Click on it and then Please select a Action field appears. Type ‘MailBluster‘ and click on MailBluster.
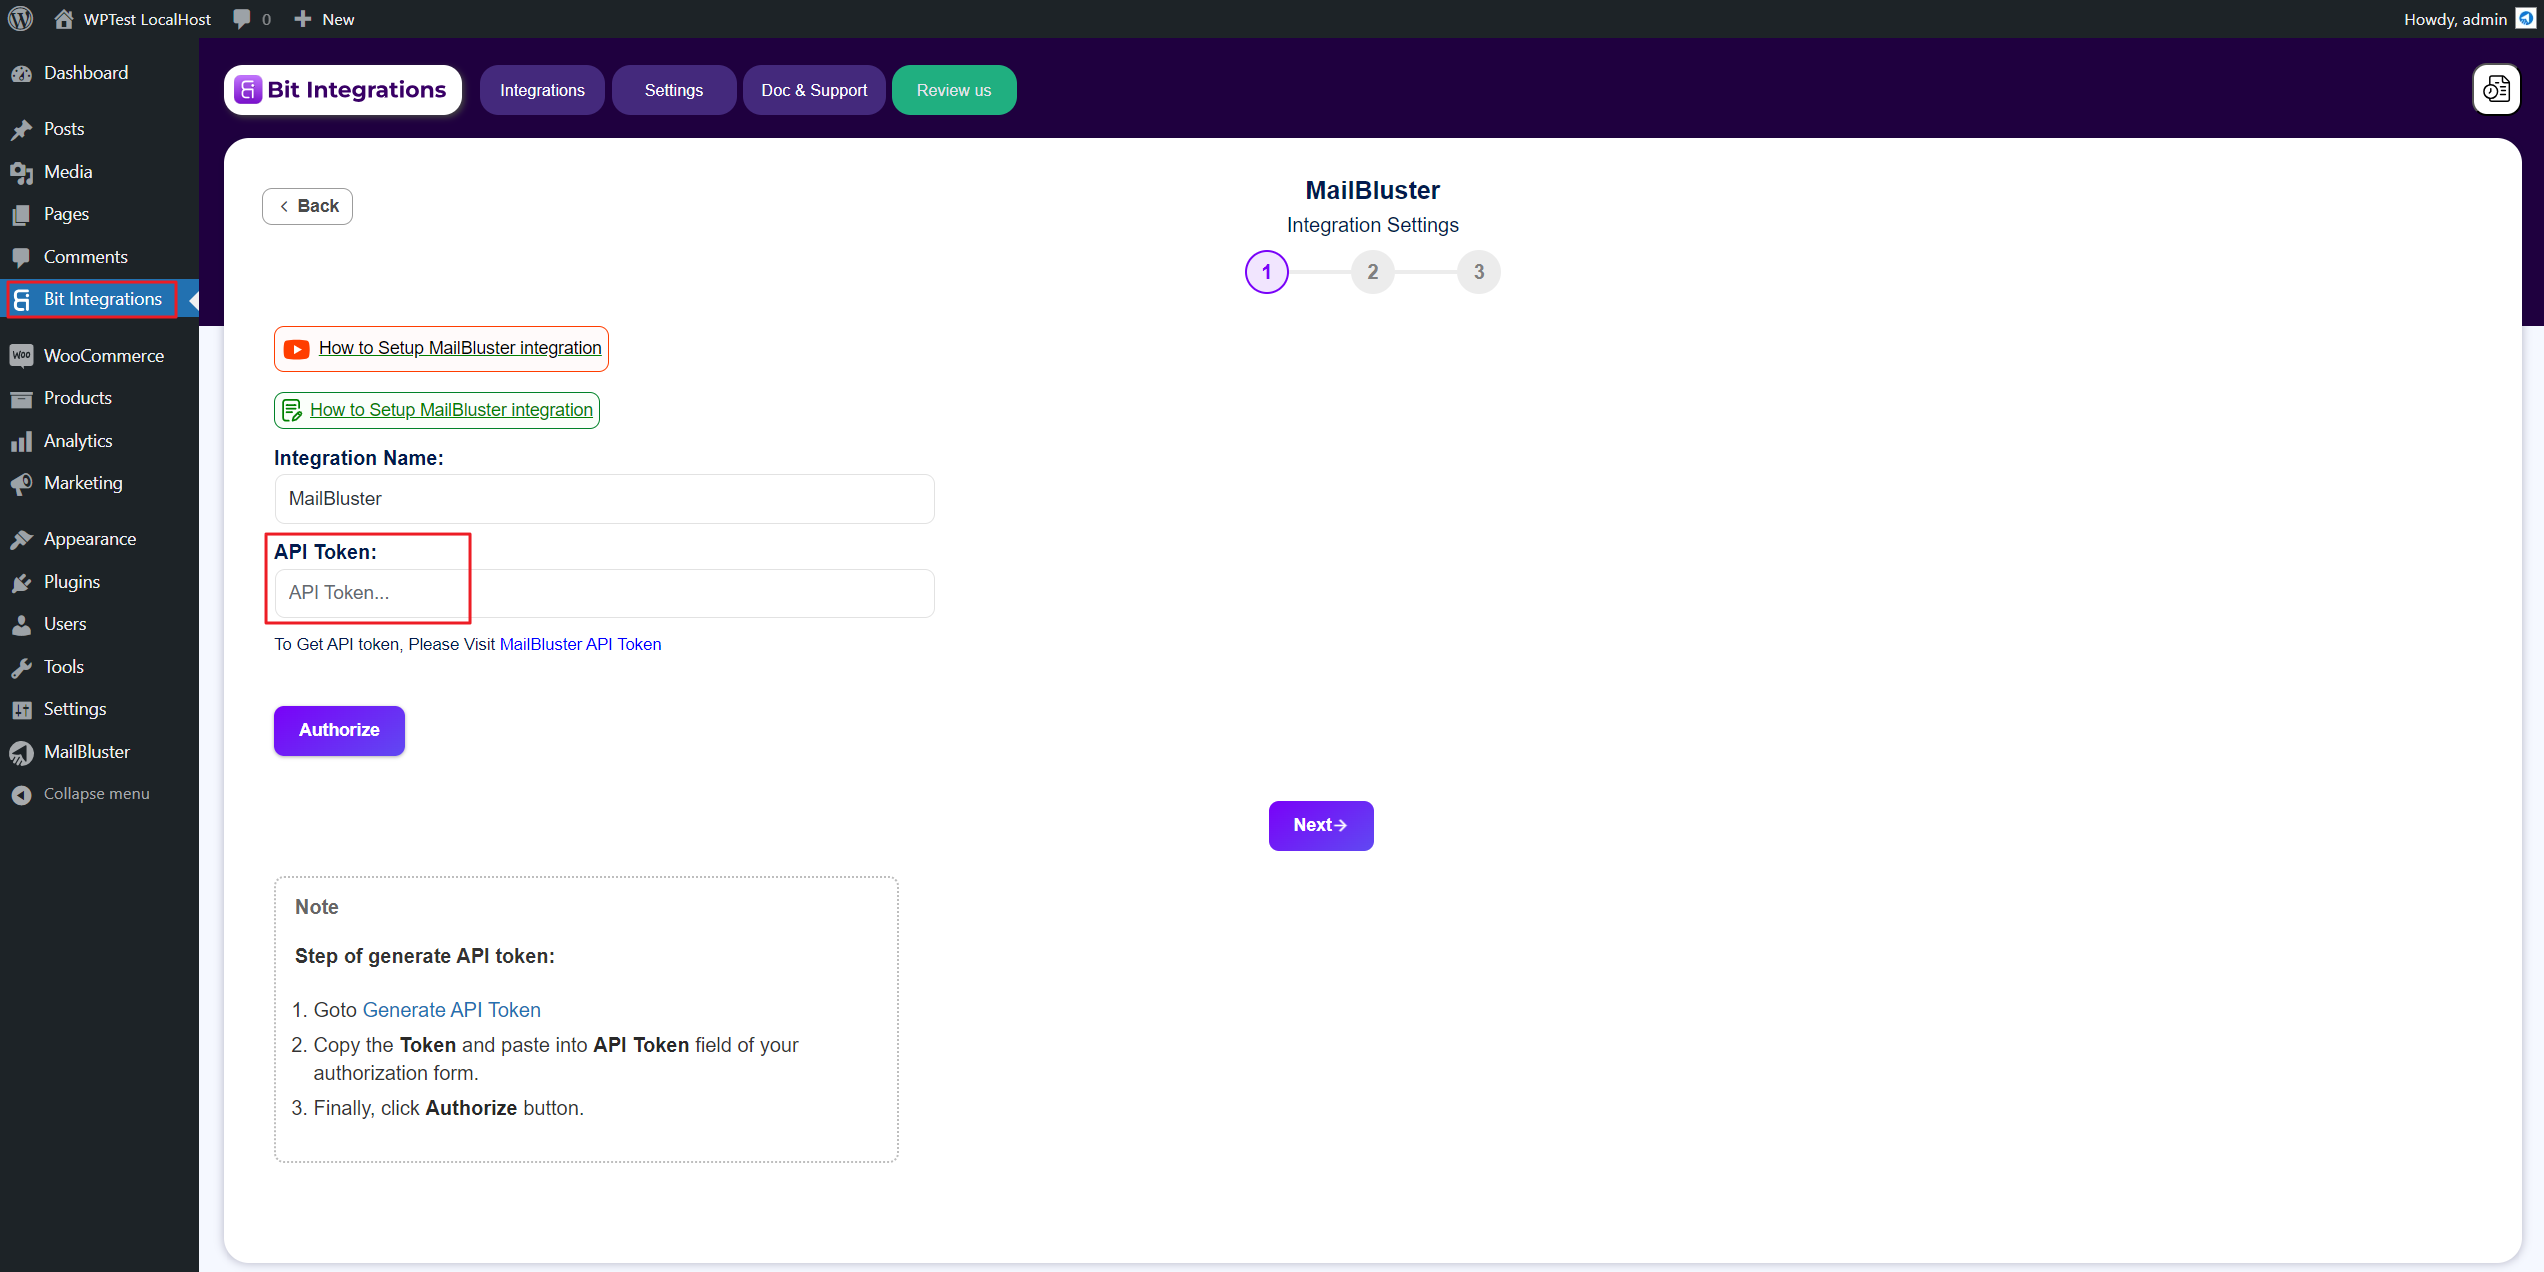
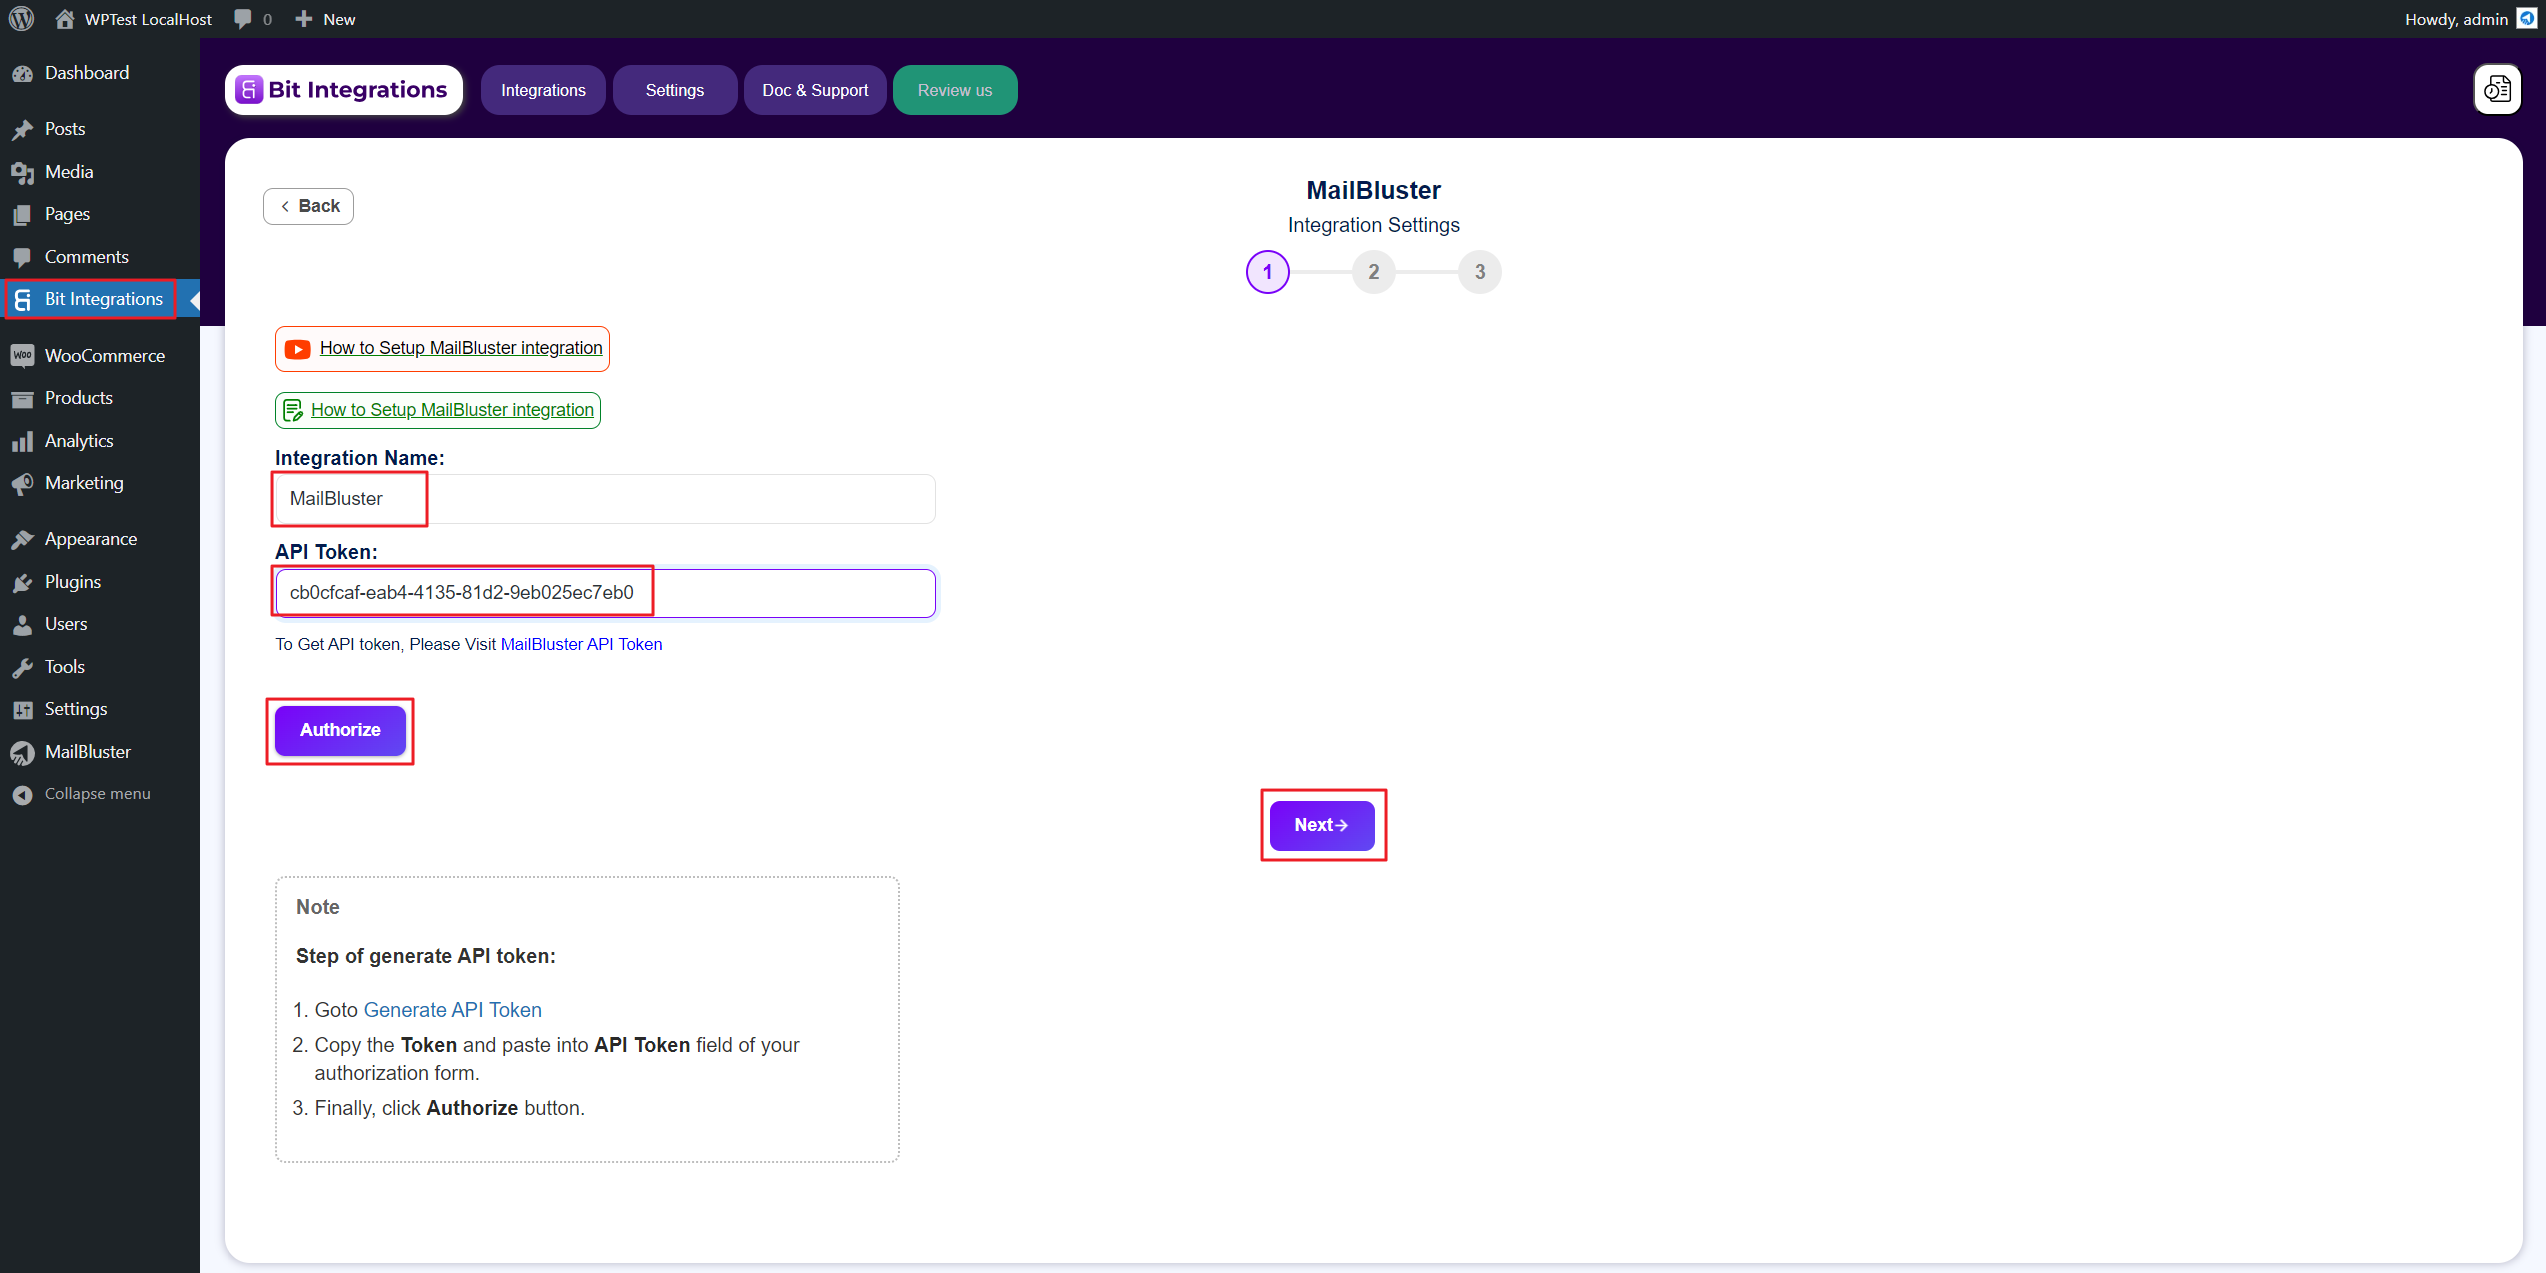
You will be asked to enter the API Token which you will need it from the MailBluster app.
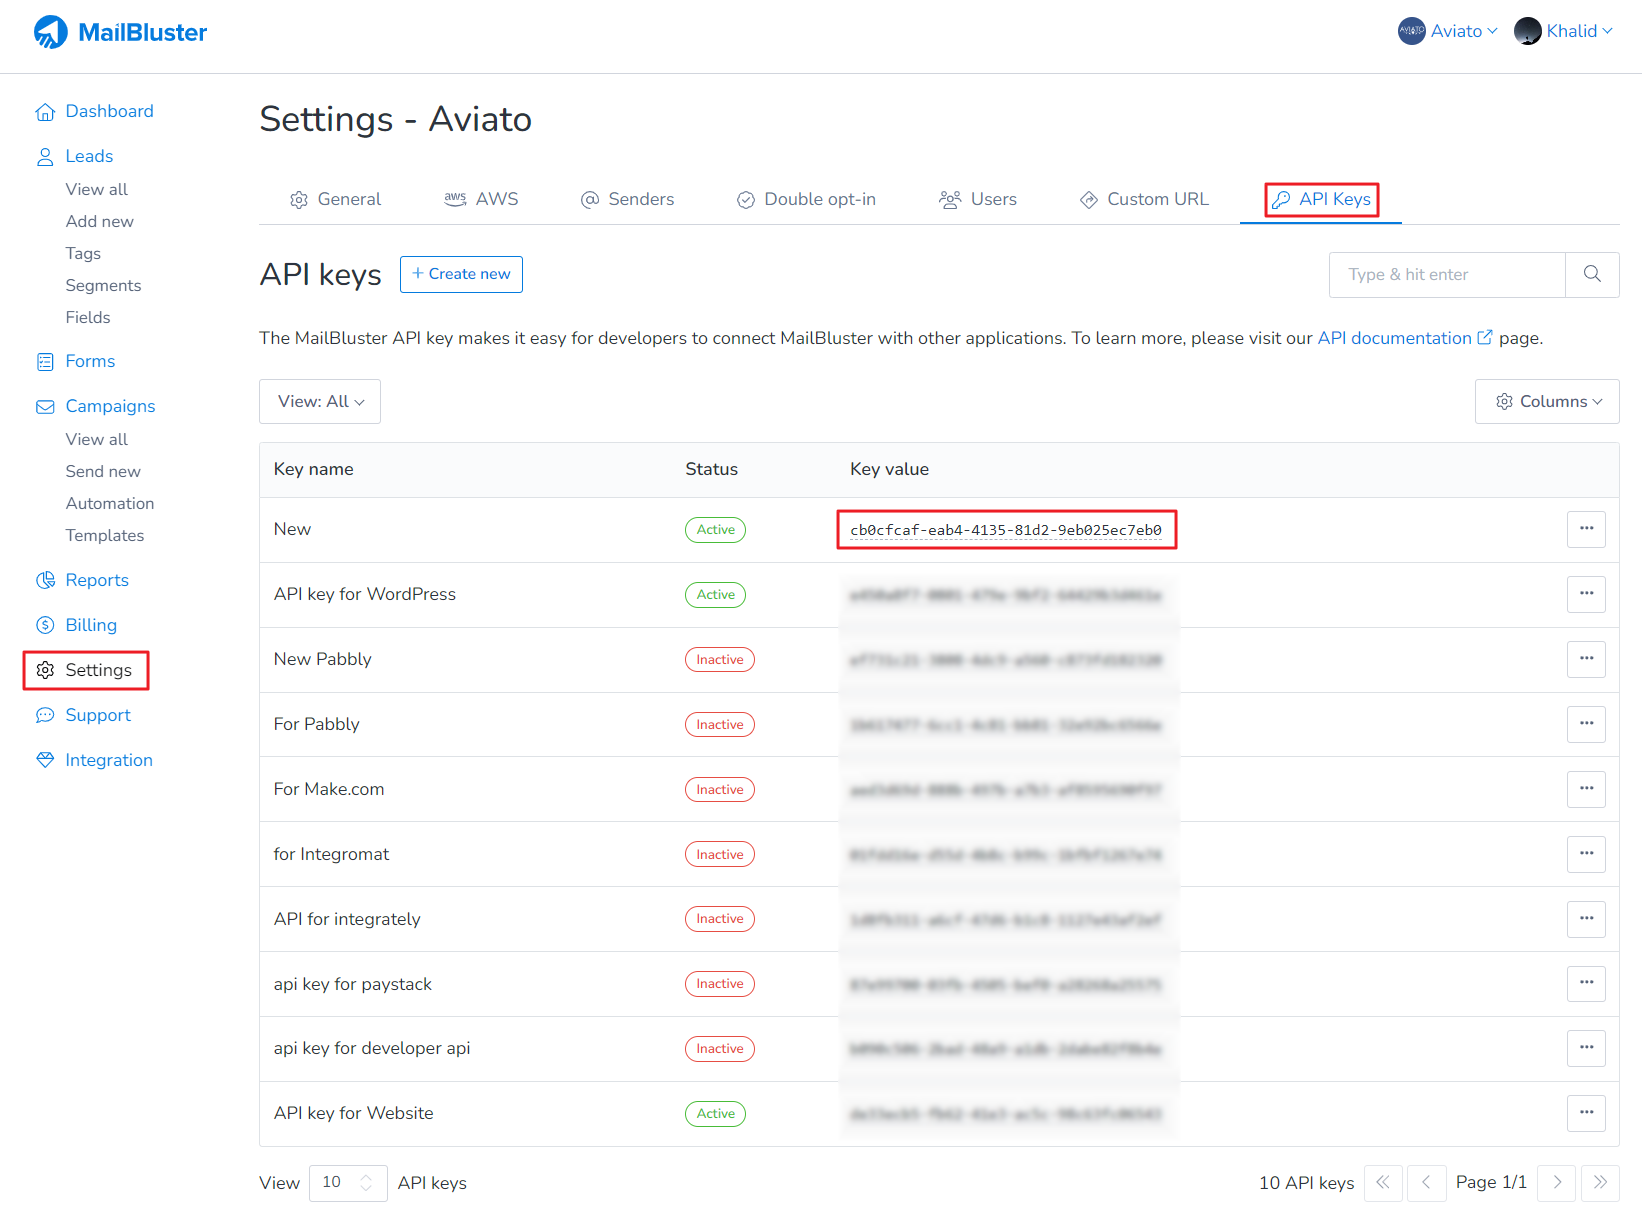
Since we have discussed on how to create API key, here we are just showing how to obtain and copy the API key from MailBluster. Just go to your Brand > Settings > API Keys and copy the Key value of the API.
After copying the key value of the API Key, go to you previous WordPress Admin panel session and then Bit Integrations and paste the API Token as shown below. Click the Authorize button and then click Next button.
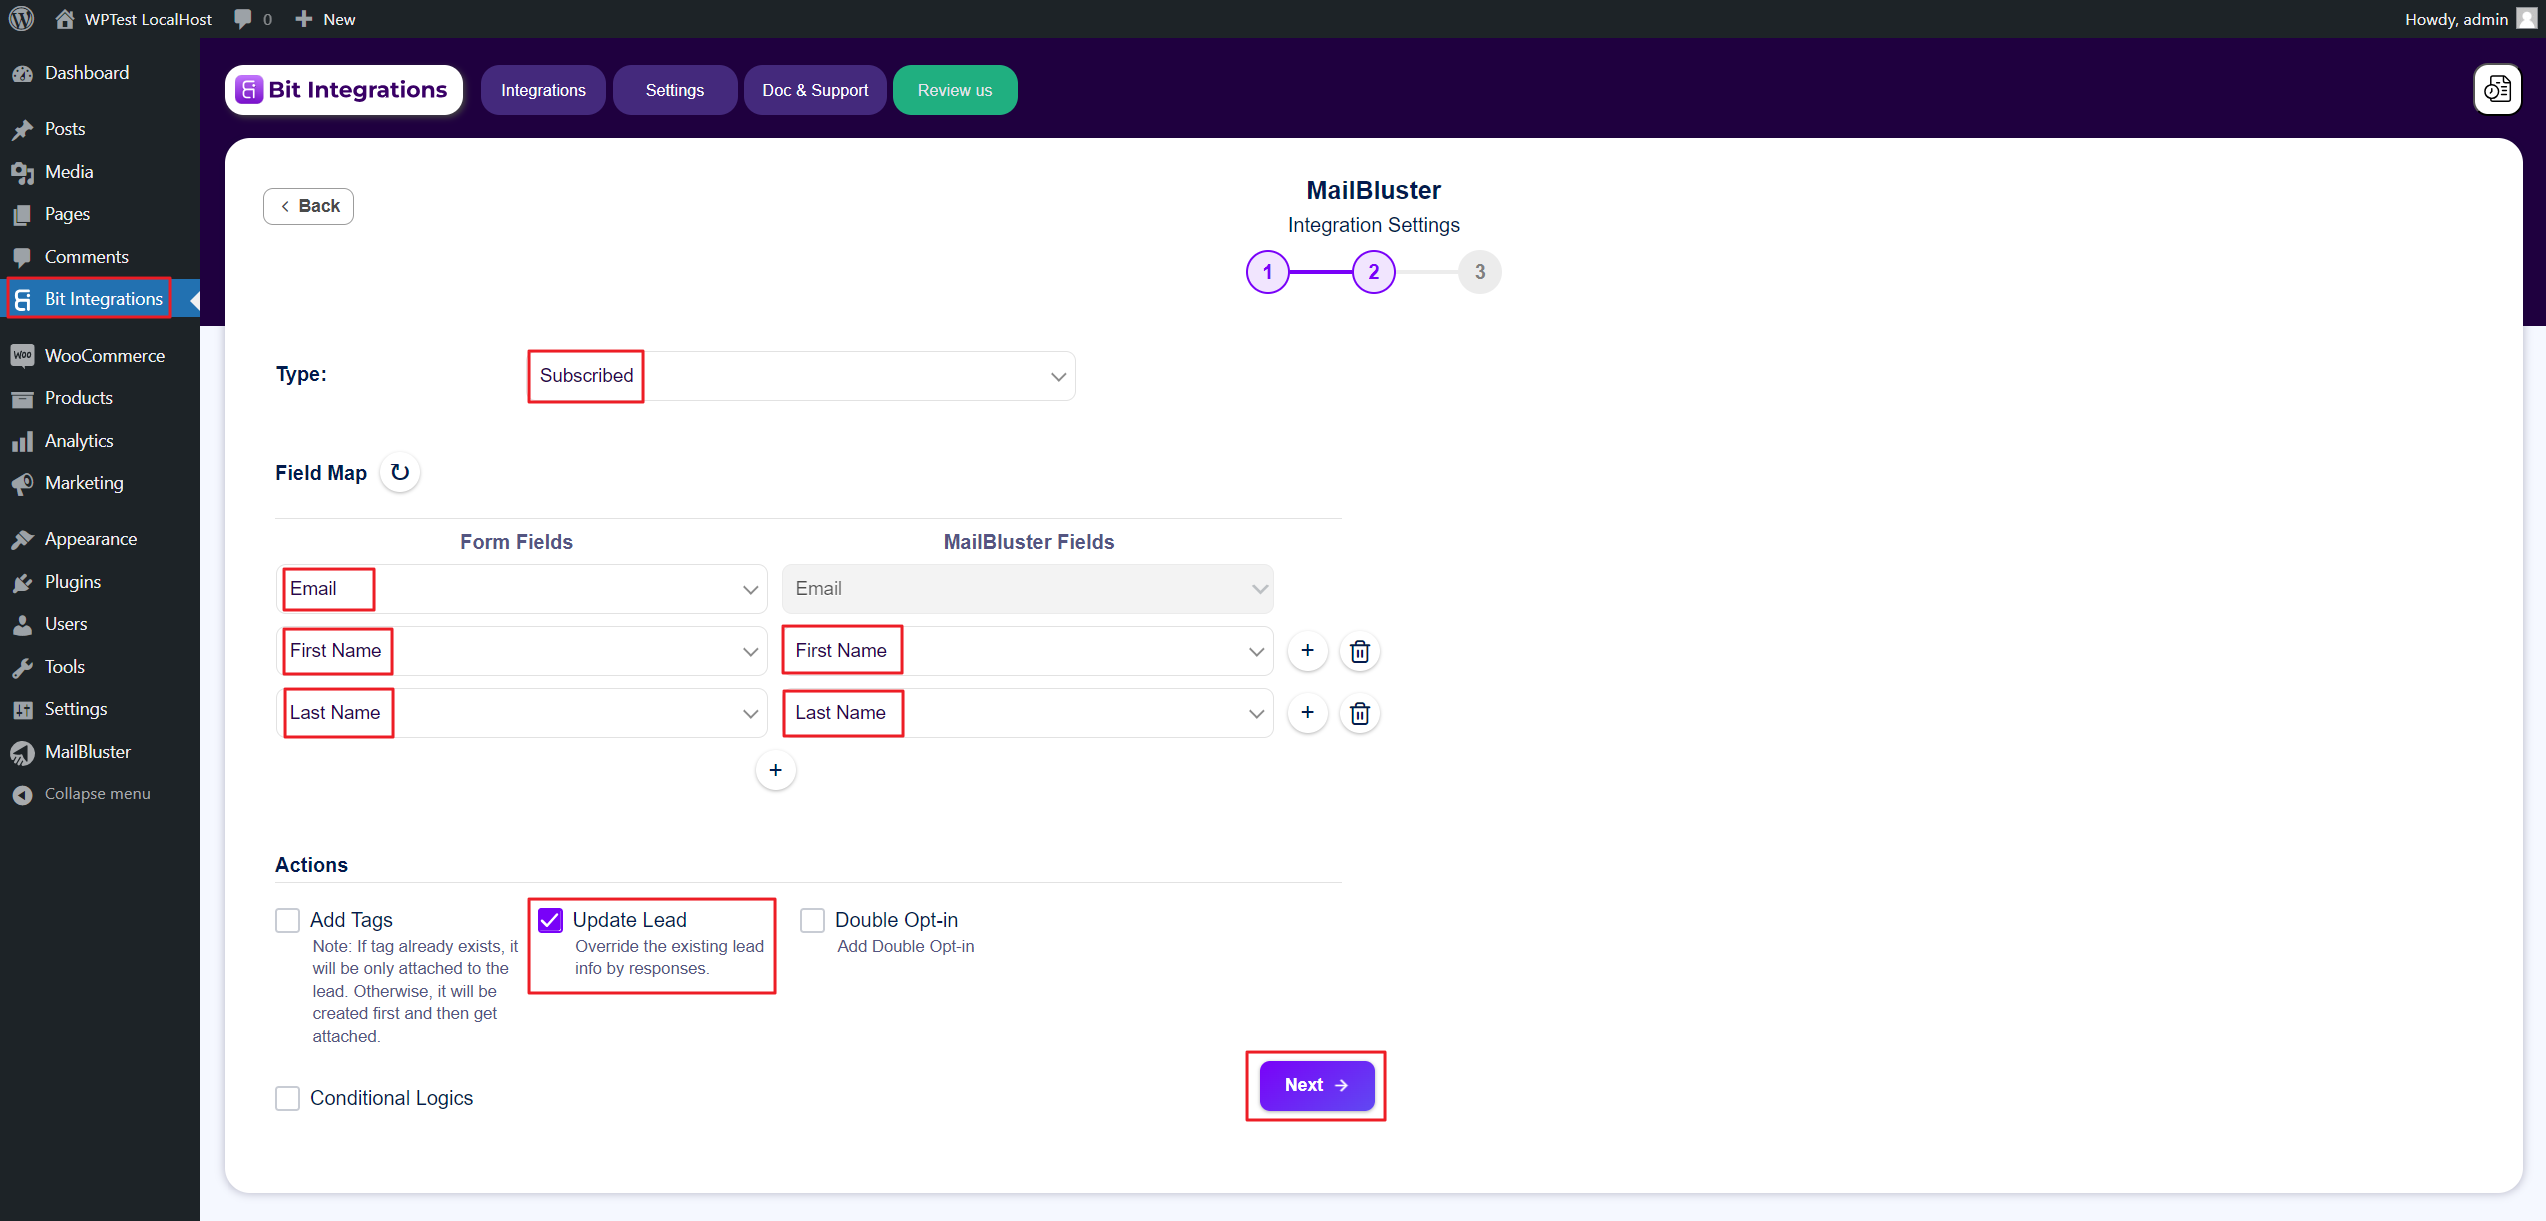
Select Type Subscribed and then highlight the Form Fields with MailBluster Fields from Field Map as shown below. Then click the Next button.
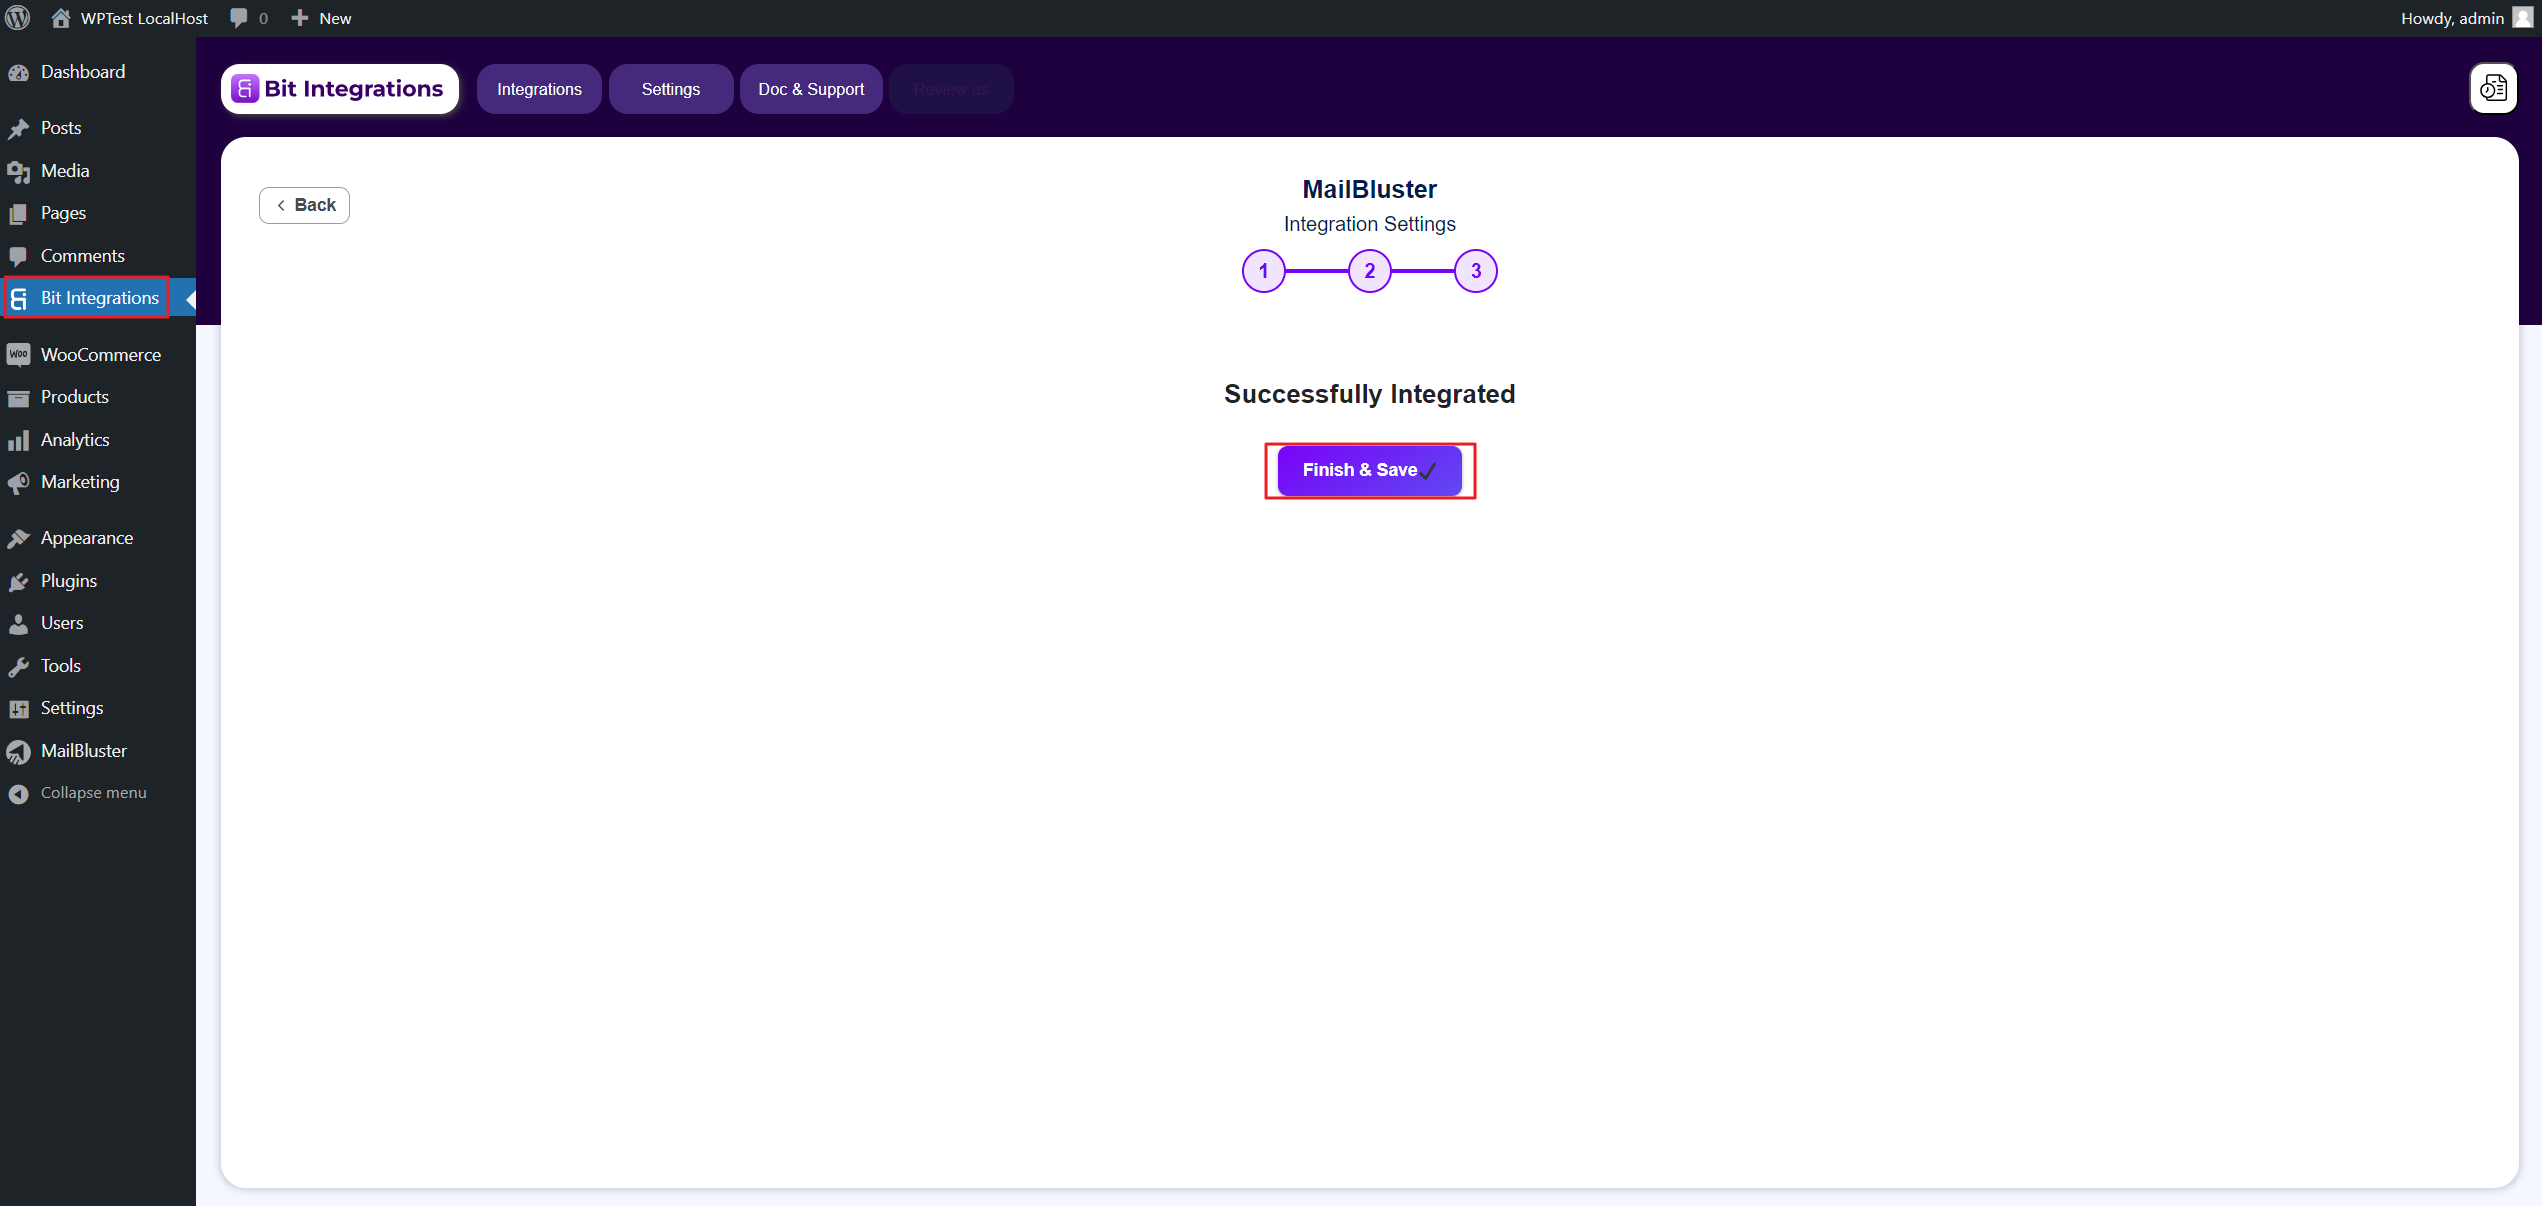
Bit Integrations will give a confirmation that the Integration has been successful. Click on Finish & Save.
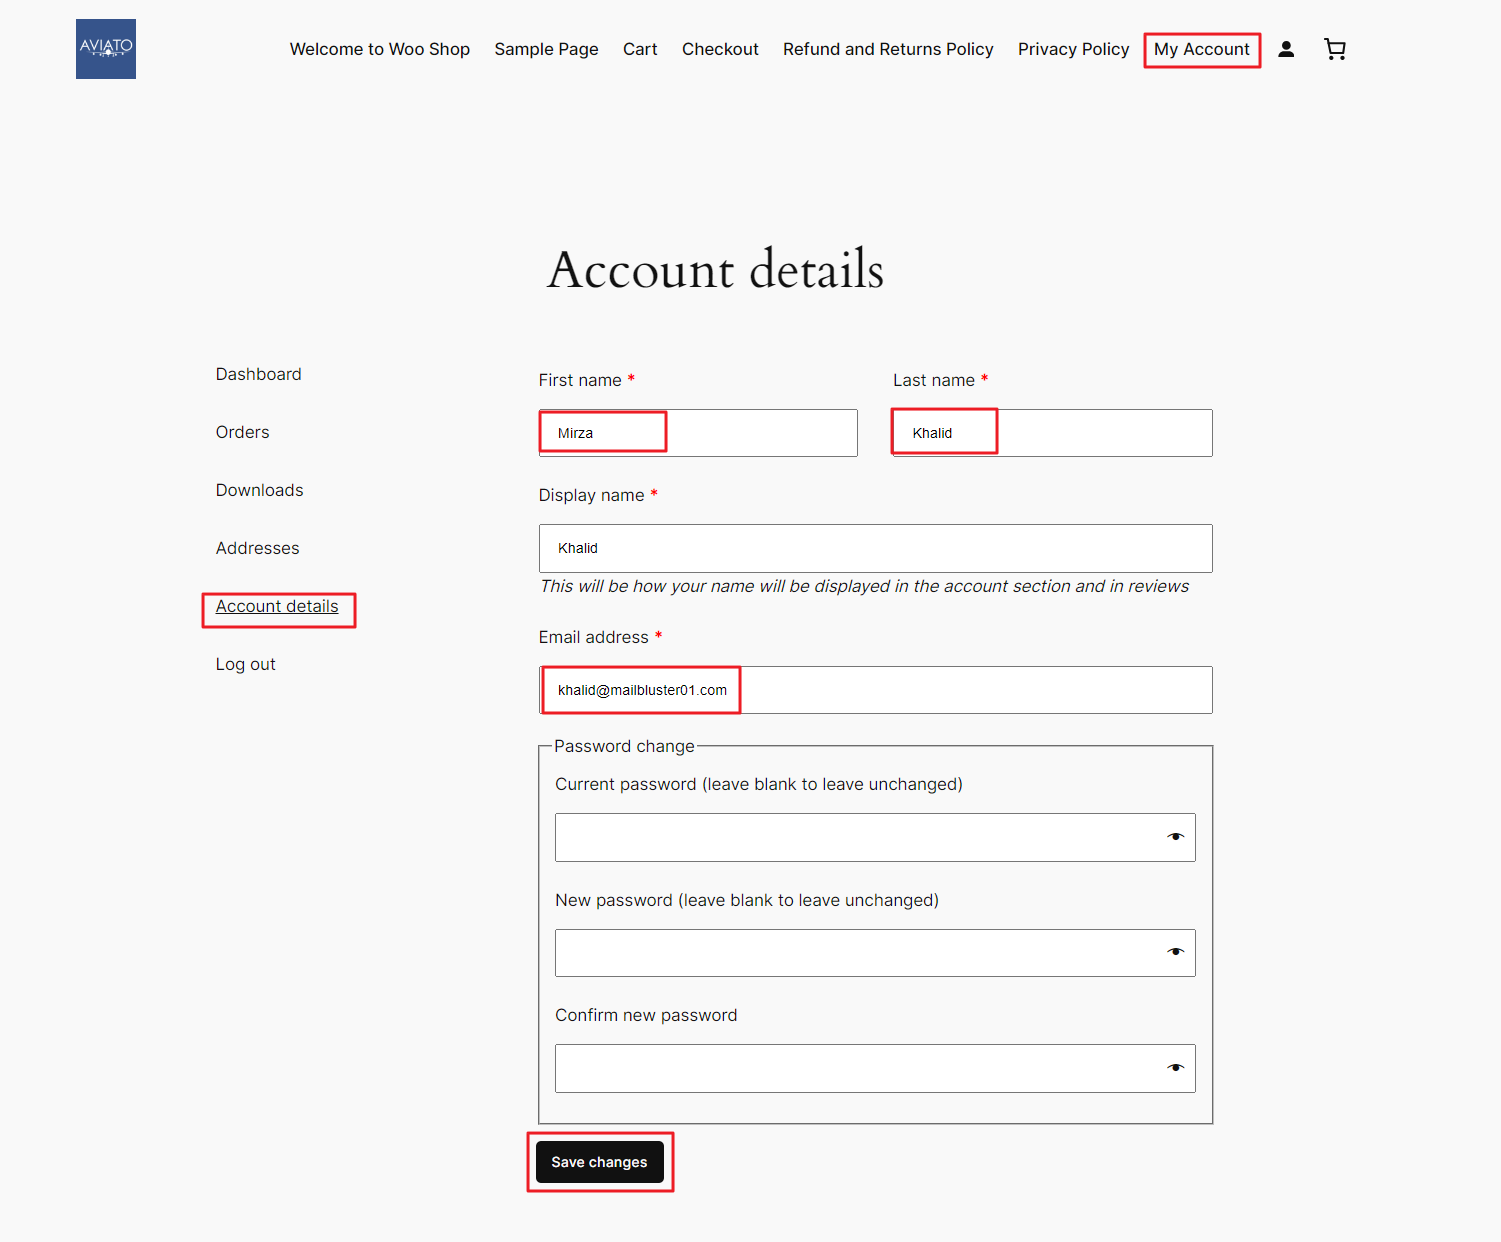
Now go to your WooCommerce site and click on My Account > Account details. Enter the details as shown below and click Save changes. It will give a confirmation like ‘Subscribed successfully’.
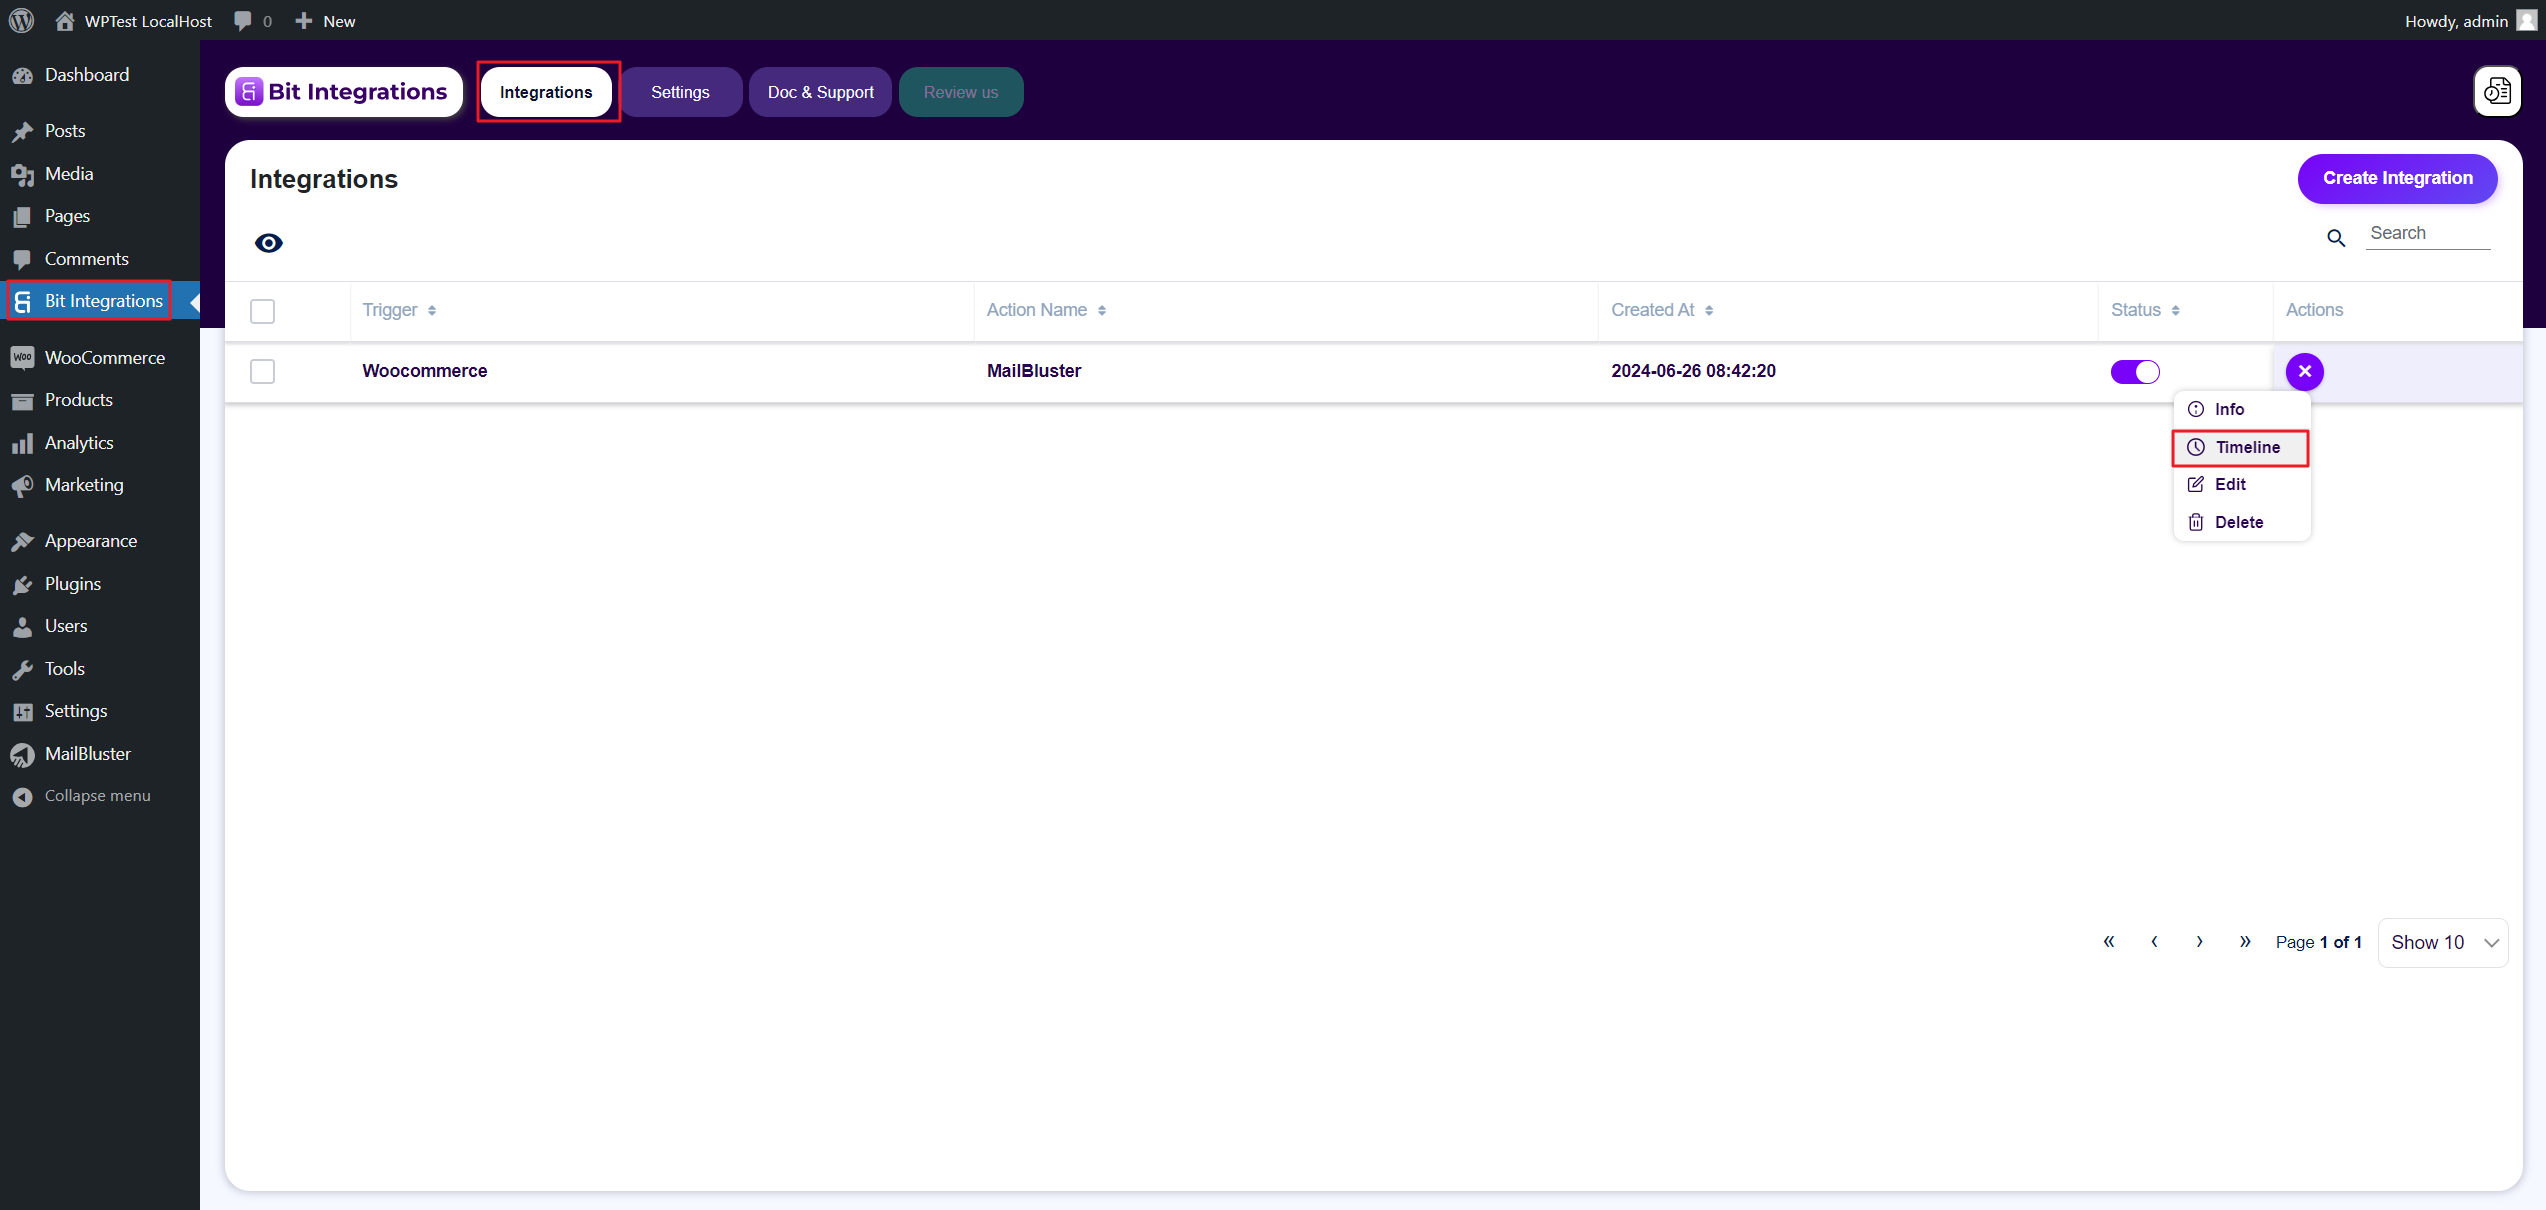
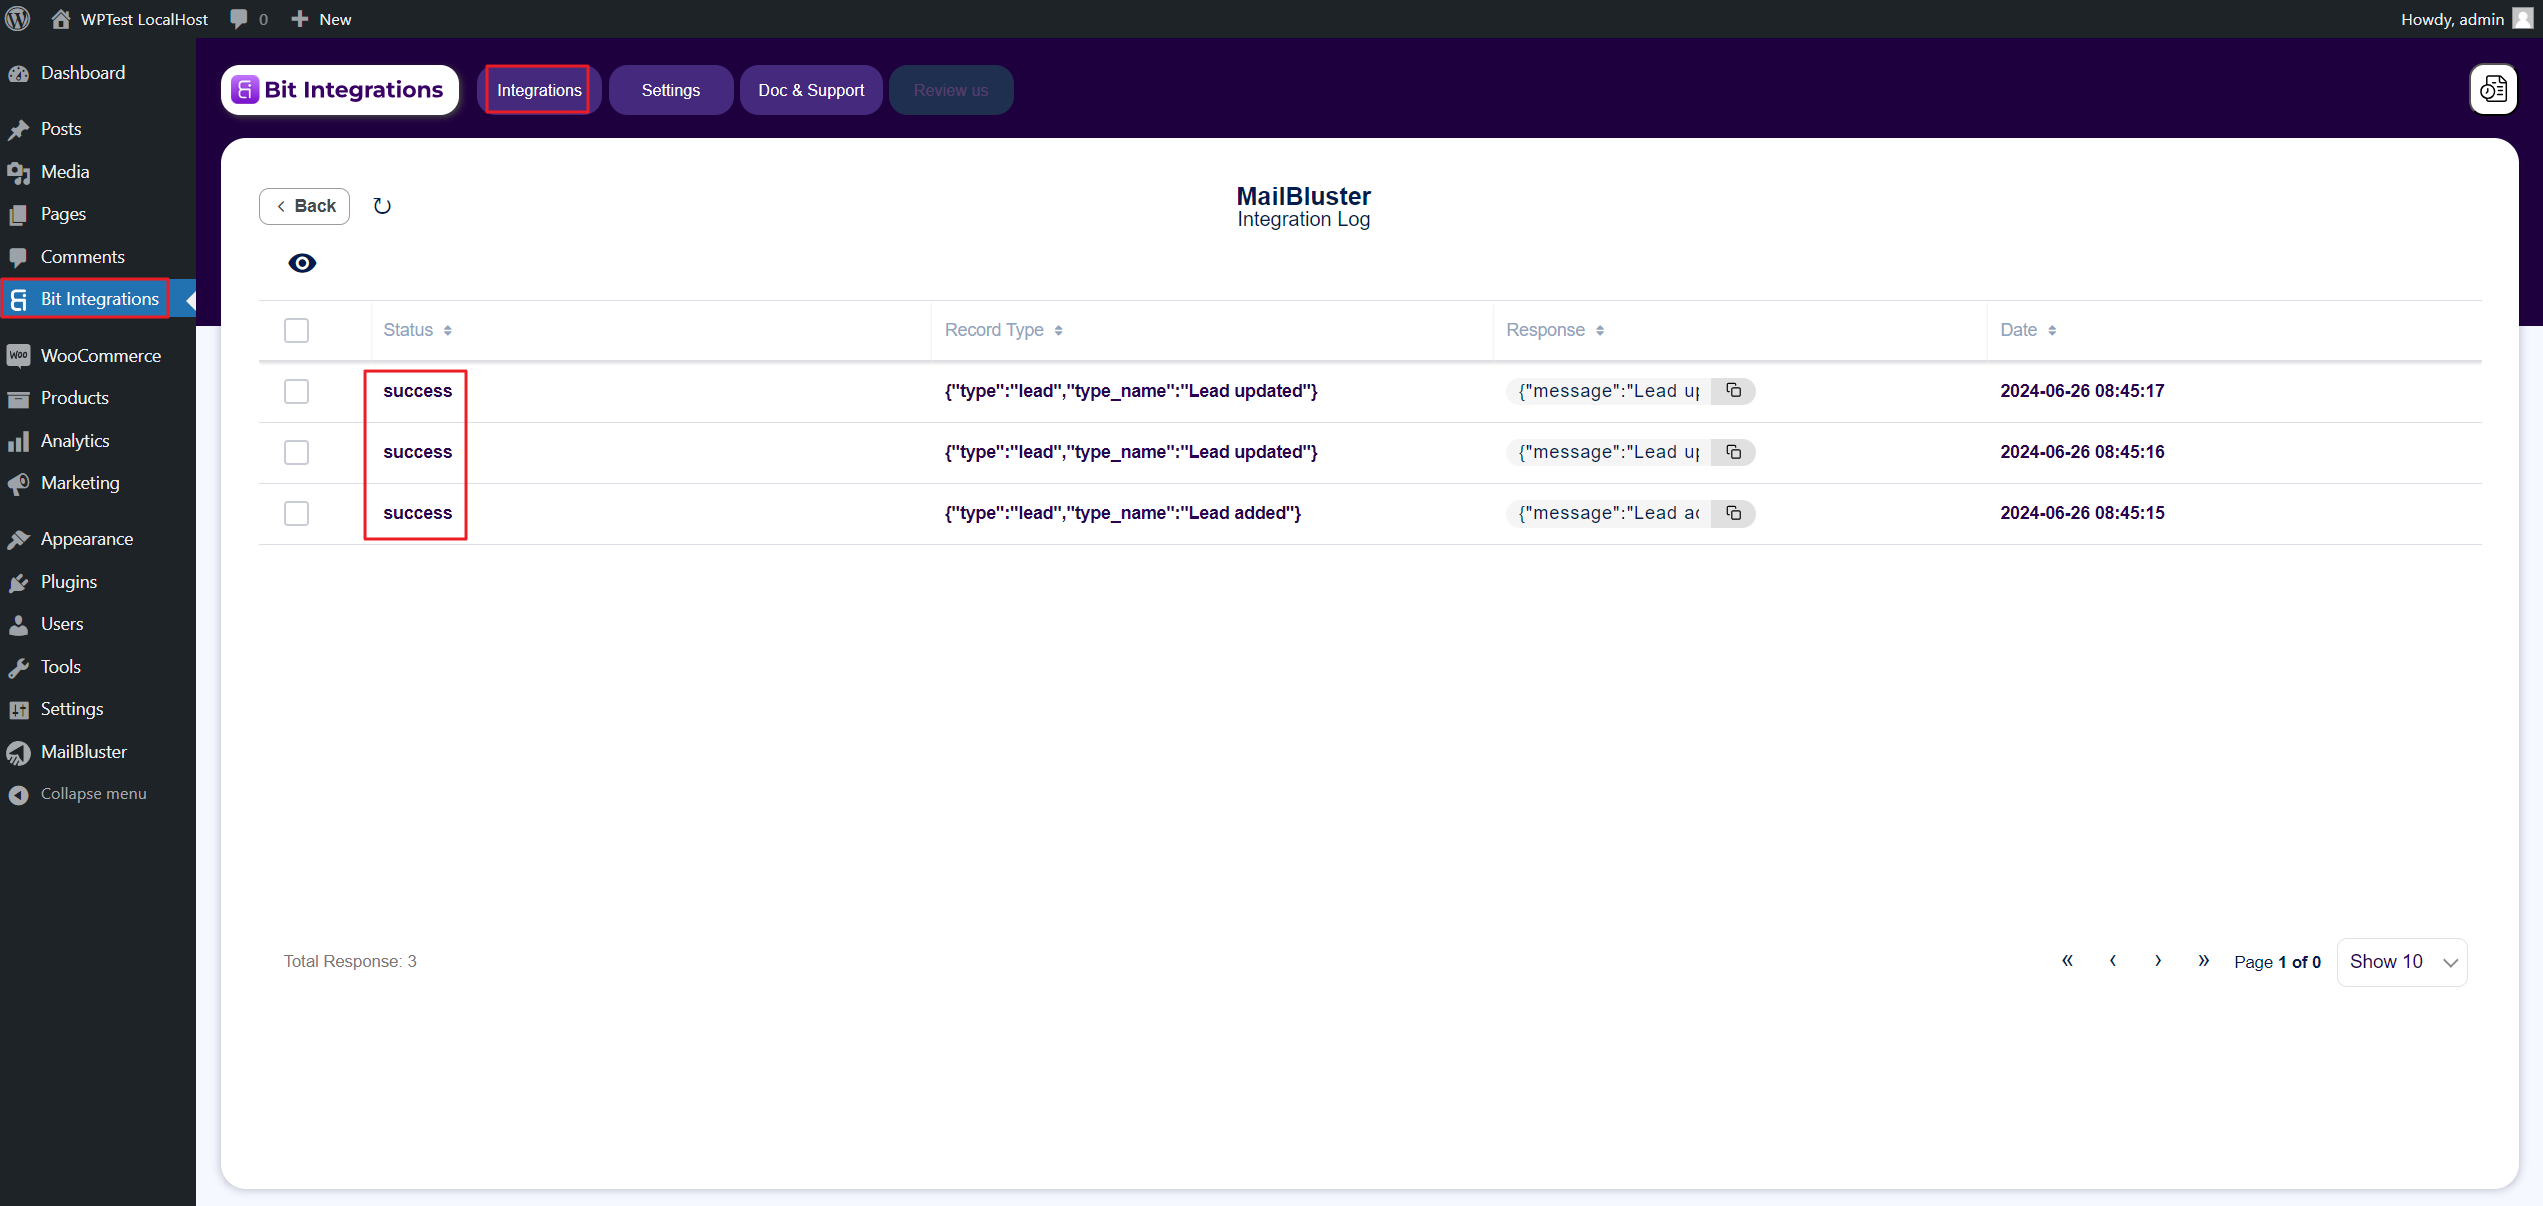
Now go to WordPress Admin Panel of your website and then click Bit Integrations. Click on the 3 dot ellipsis and then click Timeline.
You will see the Integration log showing Status as ‘success‘ for the newly entered lead information earlier.
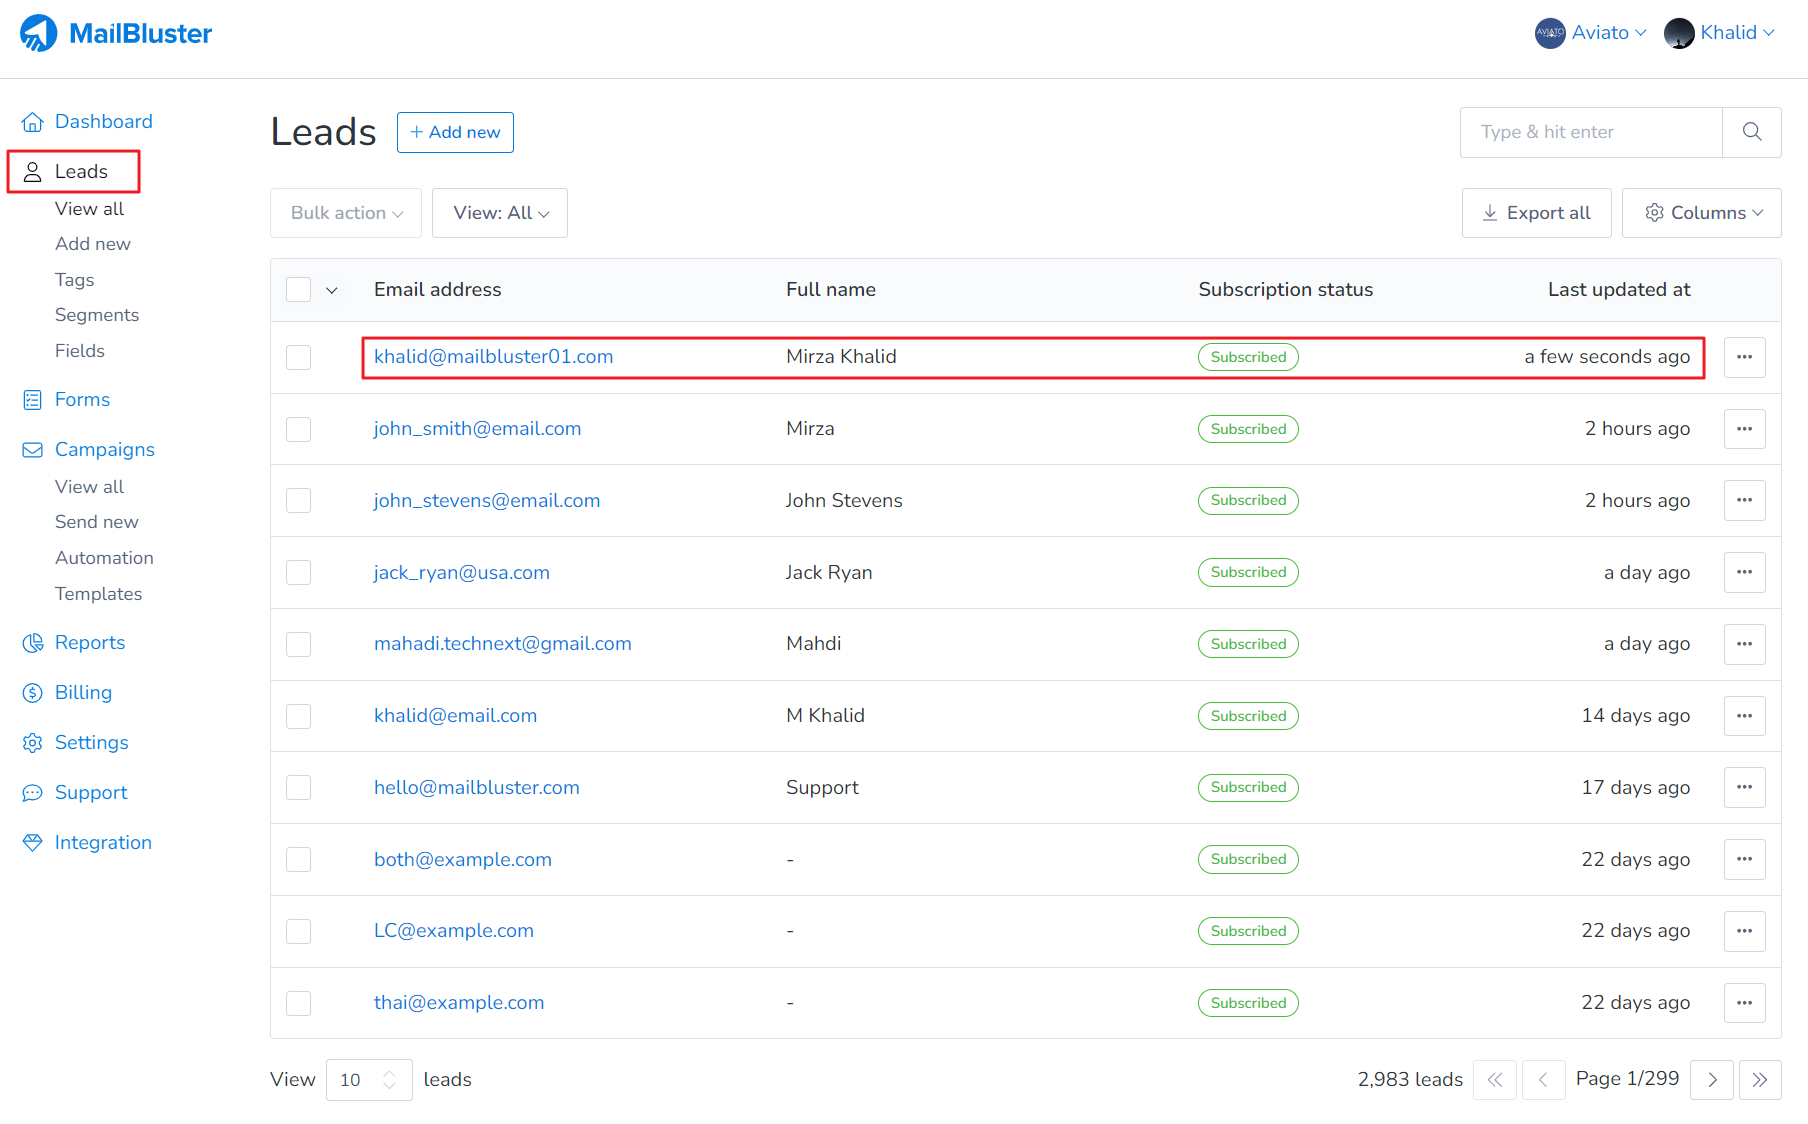
Now, if you go to MailBluster, then your Brand>Leads, you will notice that the lead information has been added to the Leads section from your WooCommerce Store site successfully.
Pabbly integration with MailBluster makes it easy to automate email workflows and save time by connecting multiple apps without any coding. Pabbly is a powerful automation platform that links tools like Google Sheets, MailBluster, and many others to streamline repetitive tasks. The automation process in Pabbly typically involves two main components: a Trigger and an Action.
Let’s walk through the steps to set up a working Pabbly integration with MailBluster, helping you simplify and automate your email marketing tasks.
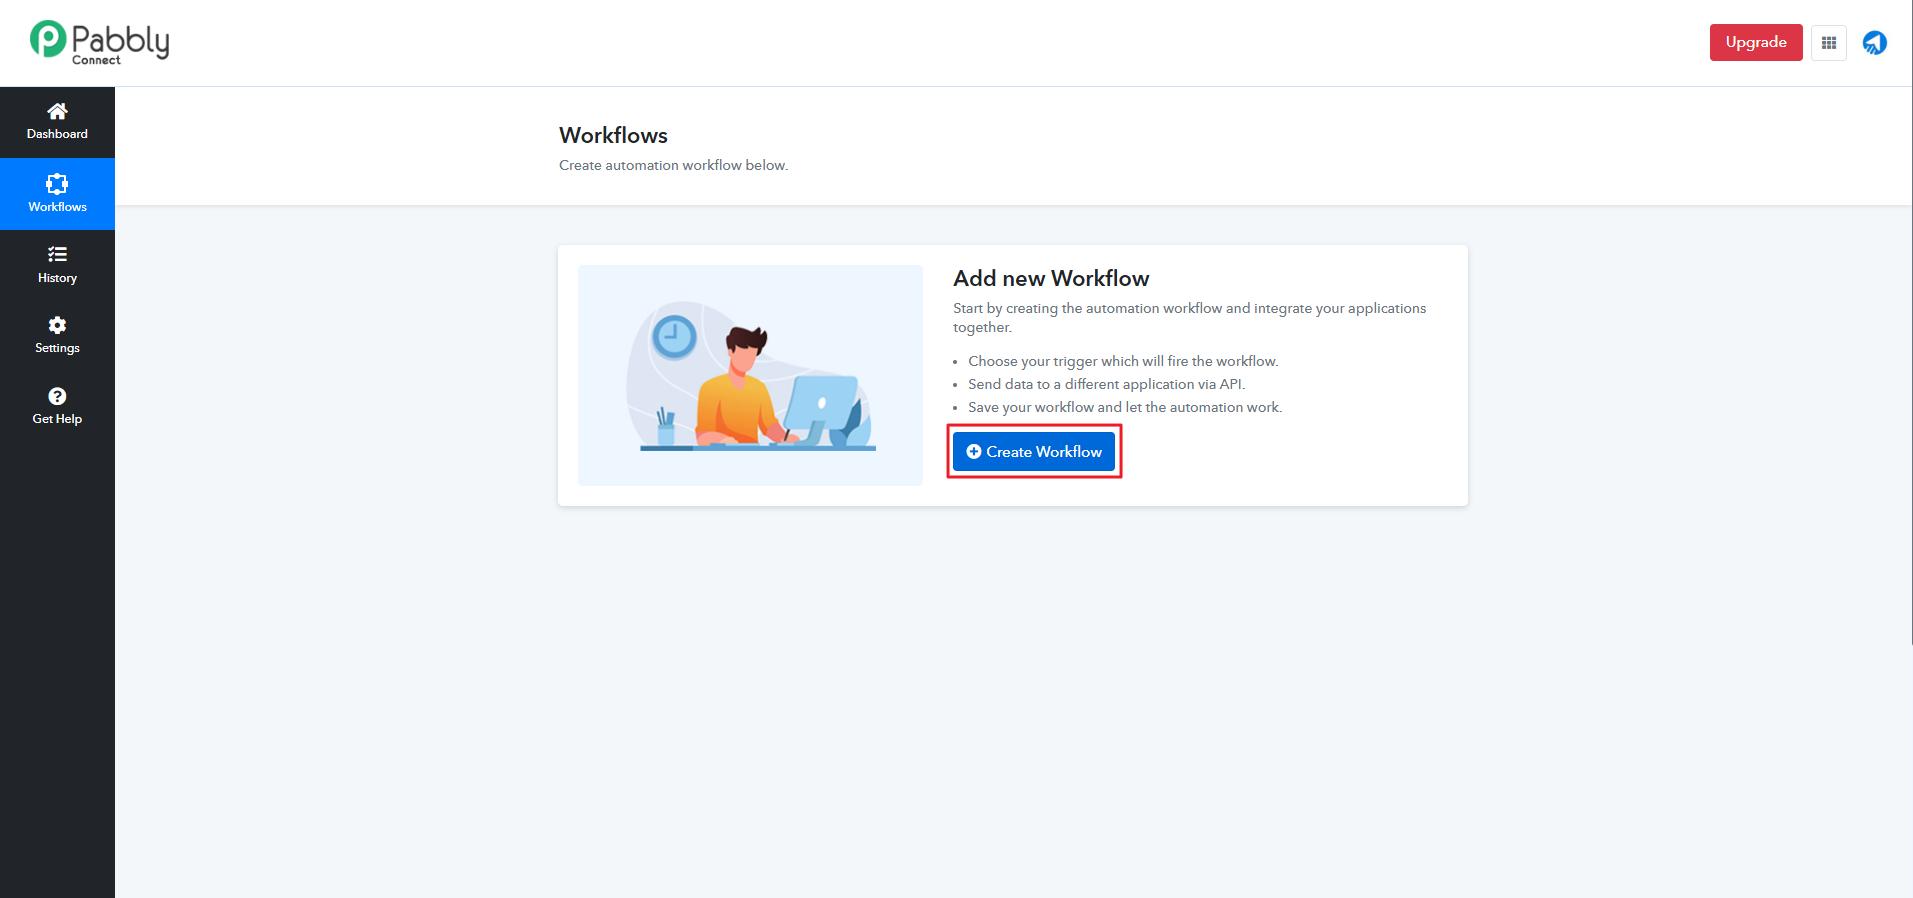
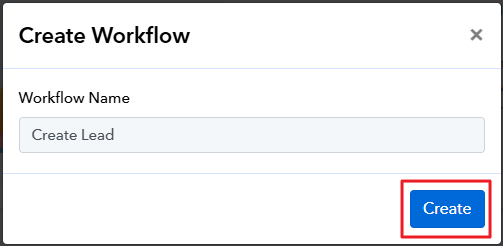
First, click on Create Workflow.
Enter the Workflow Name.
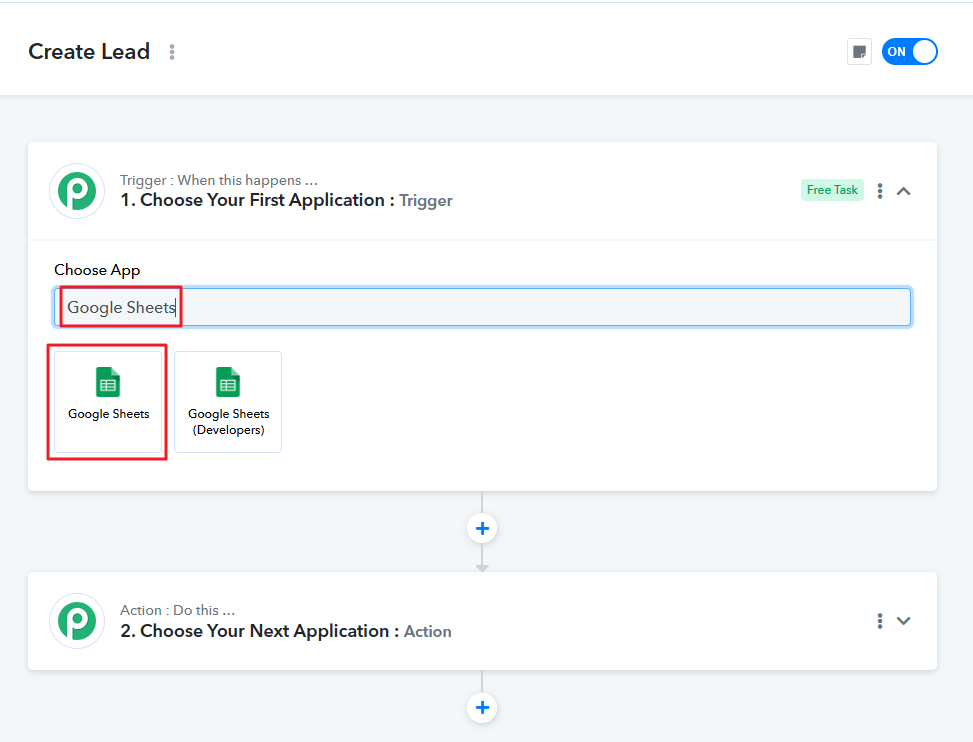
Select Google Sheets from Choose App.
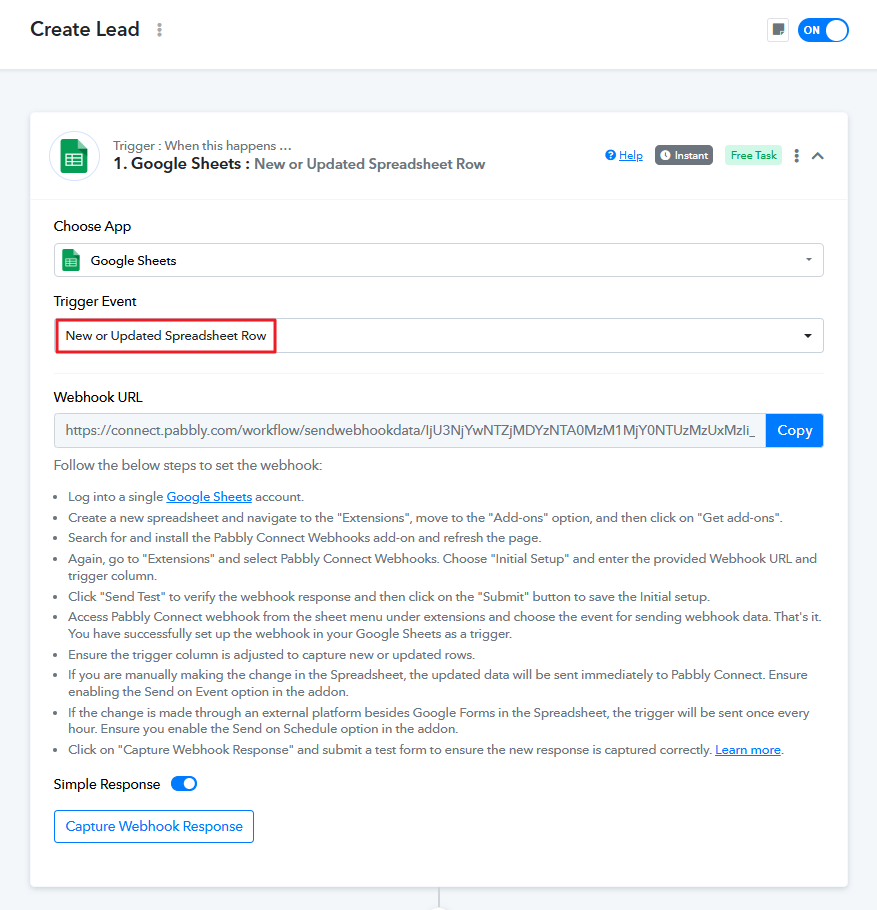
Then select New or Updated Spreadsheet Row from Trigger Event.
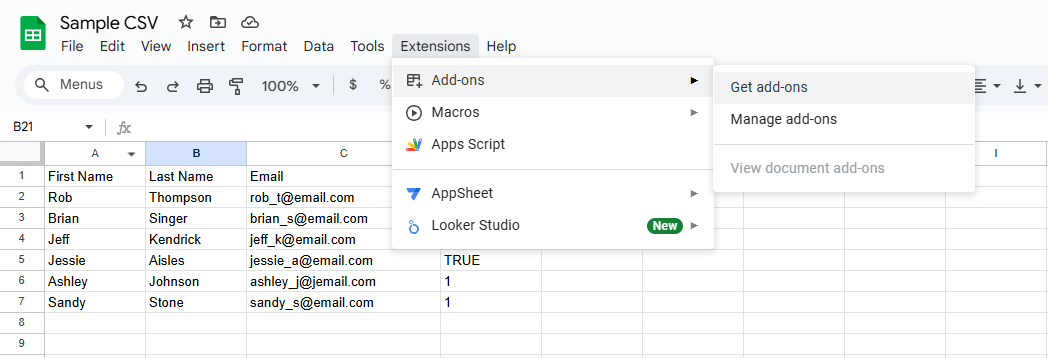
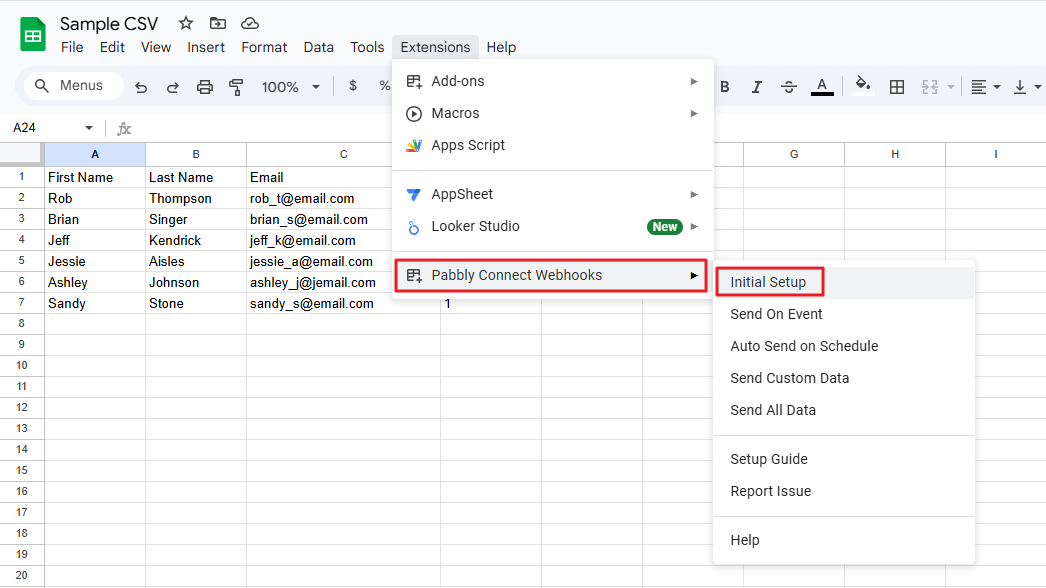
Now go to Google Sheets > Extensions > Add-ons > Get add-ons.
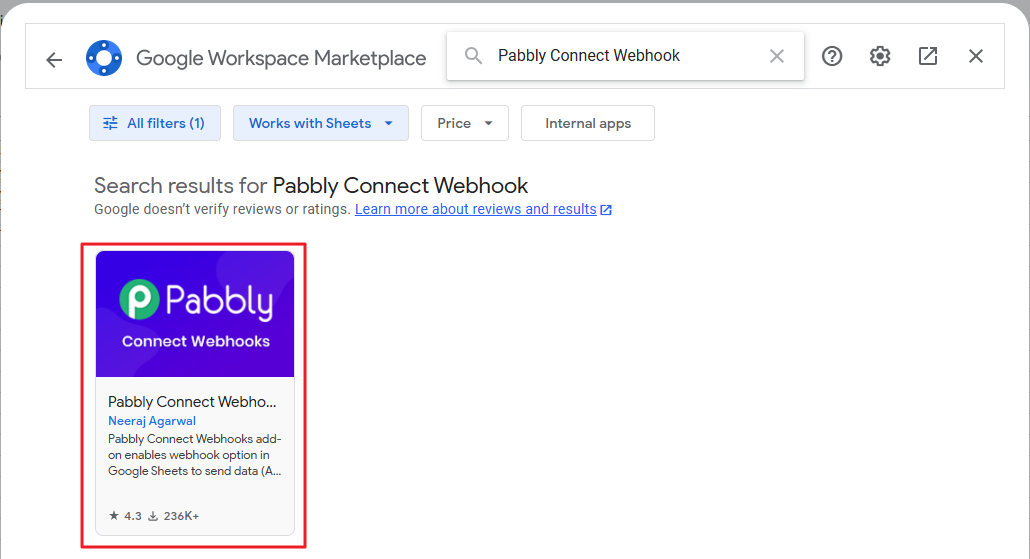
Type inside the search bar Pabbly Connect Webhook. Click on the Pabbly Connect Webhooks.
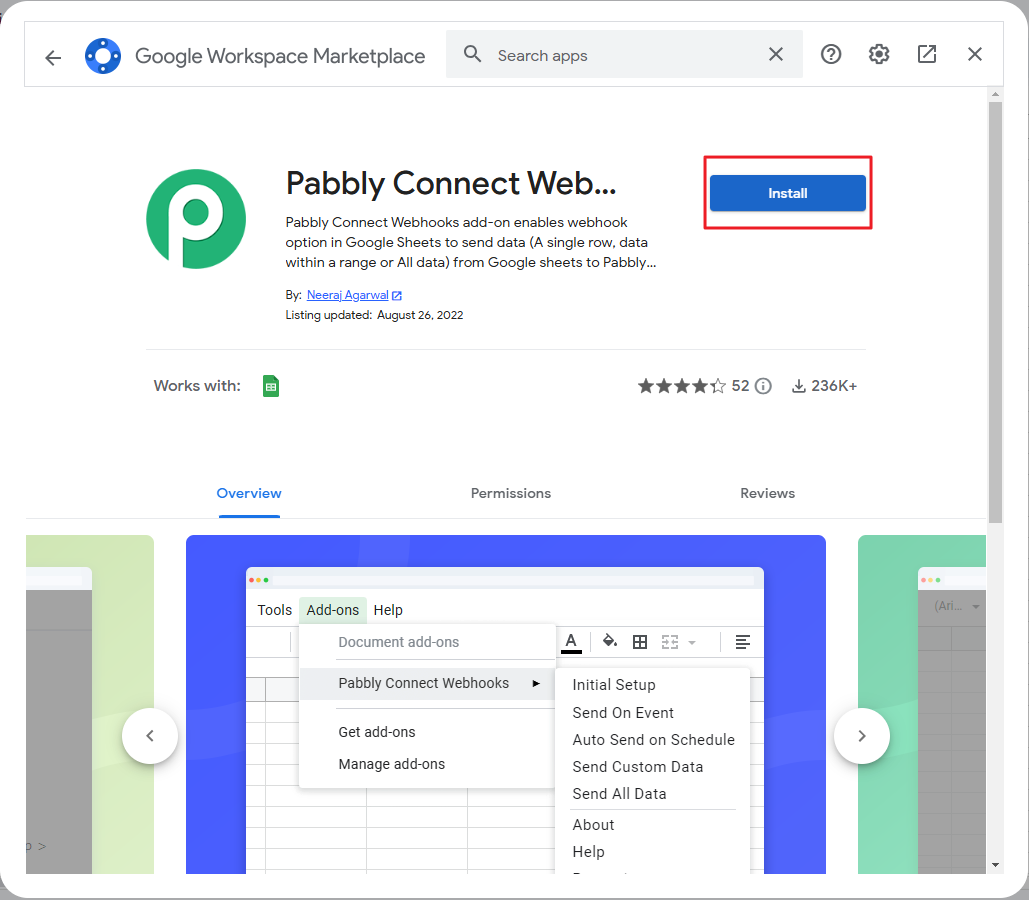
Install the add-on by clicking Install.
Then go to Extensions > Pabbly Connect Webhooks > Initial Setup.
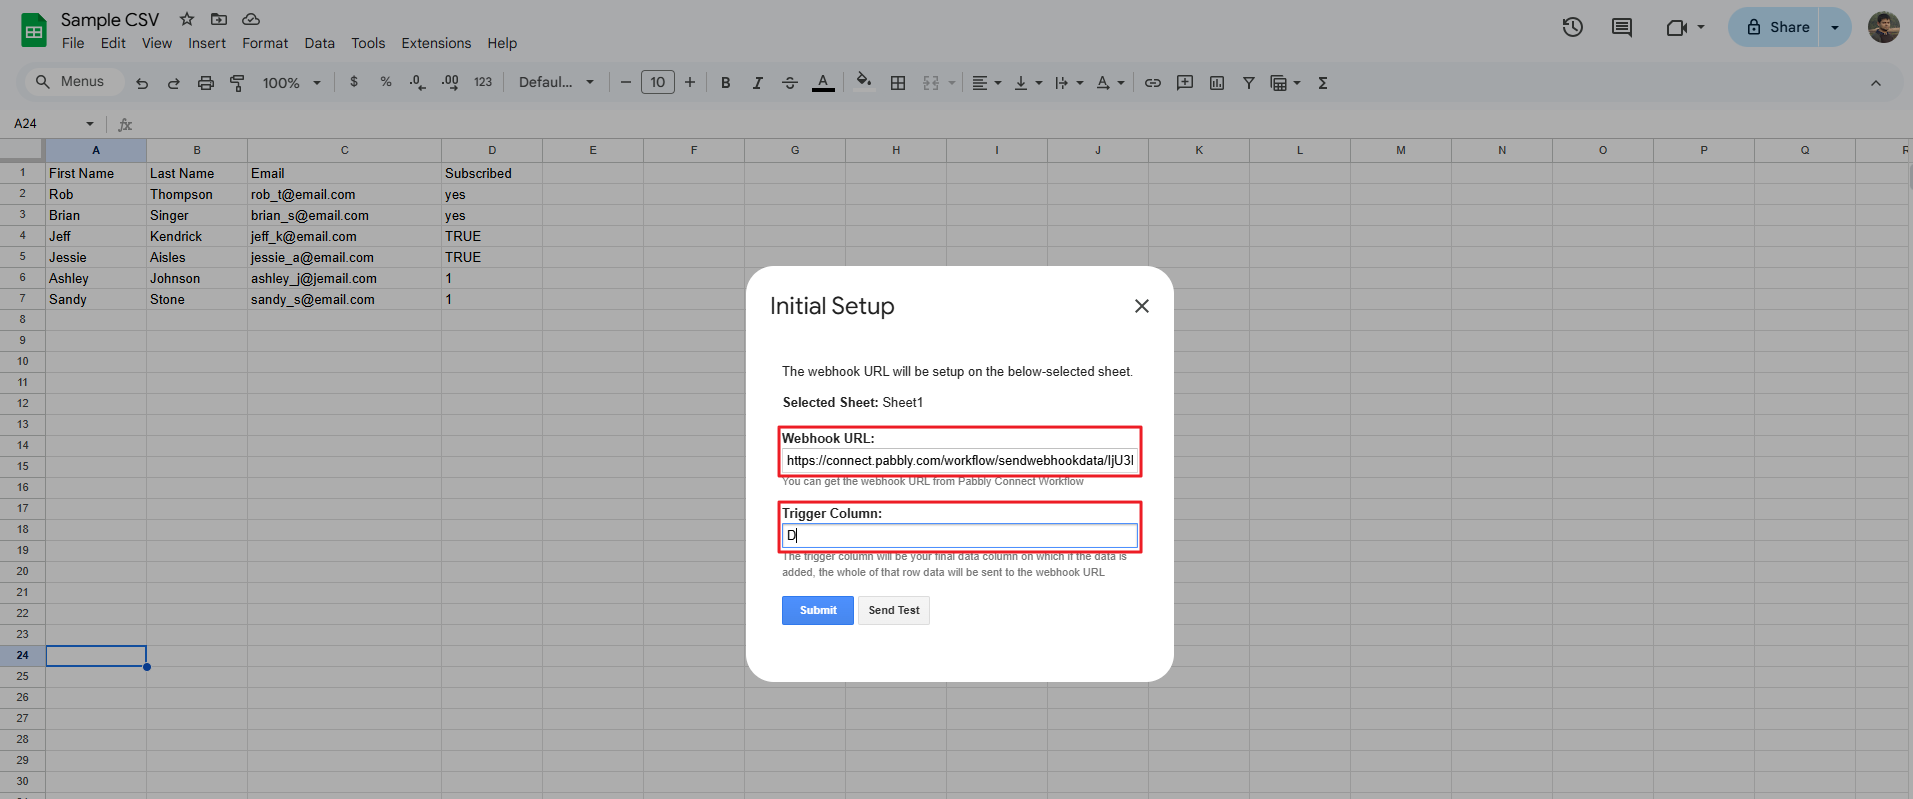
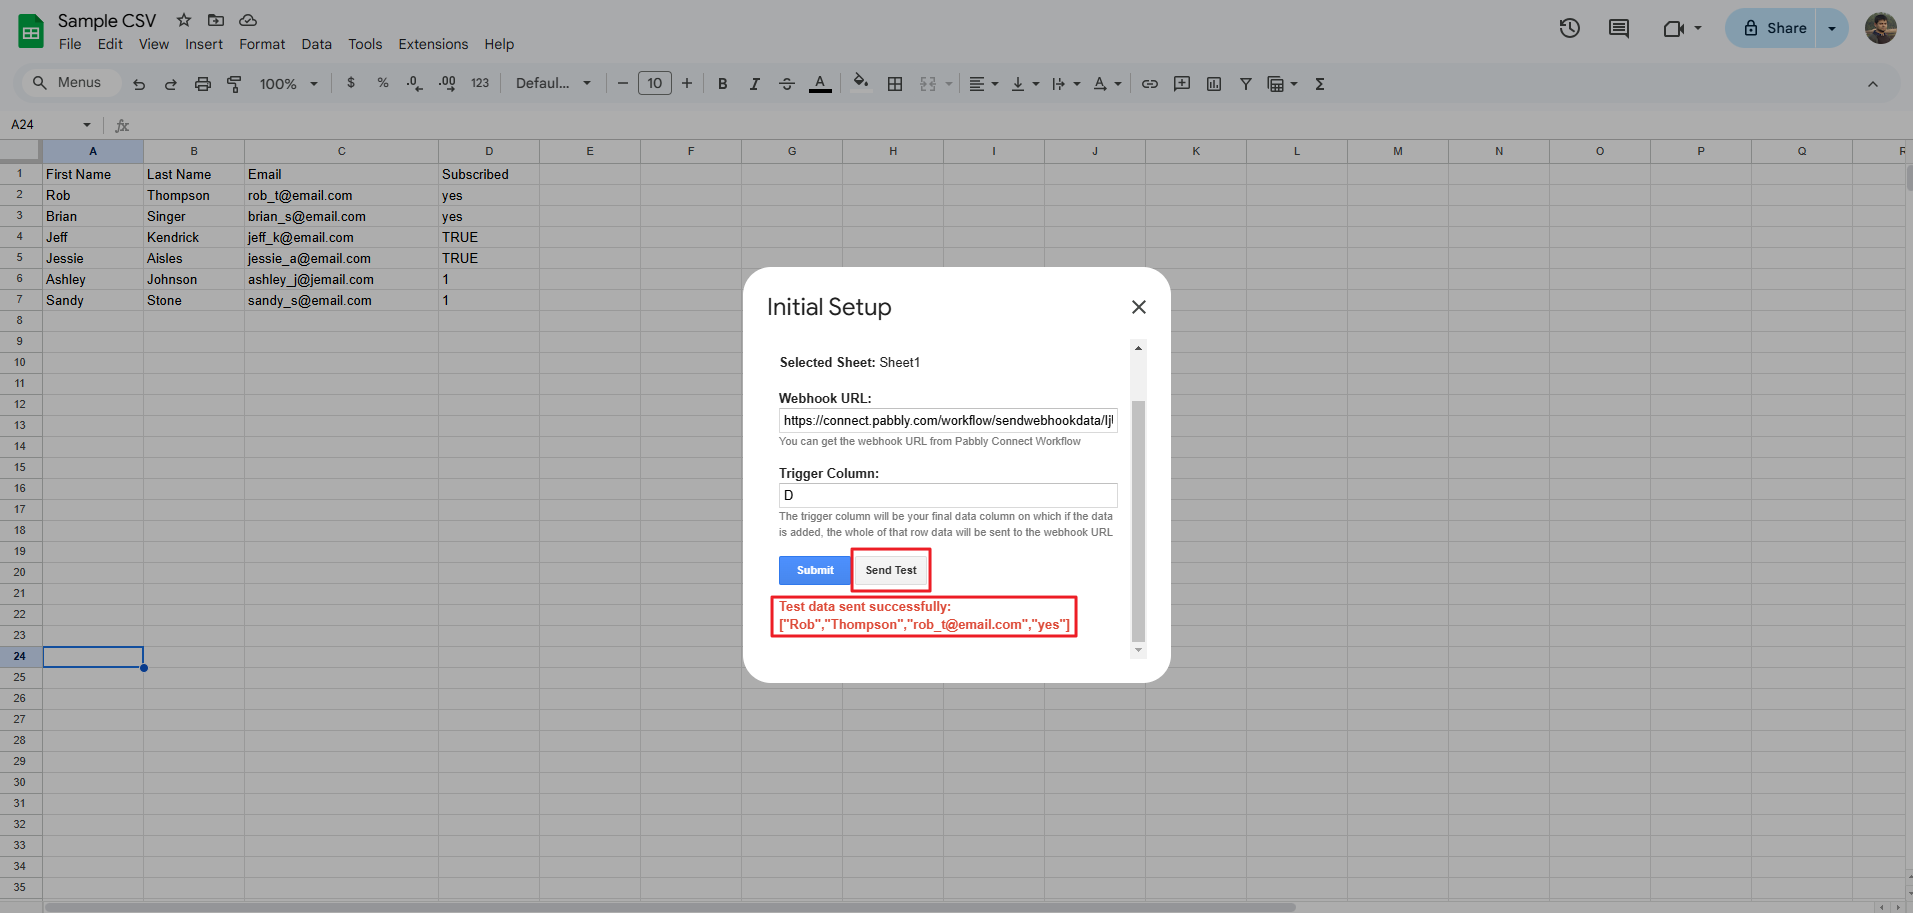
Go to Google Sheets and click on the Copy button from Webhook URL.
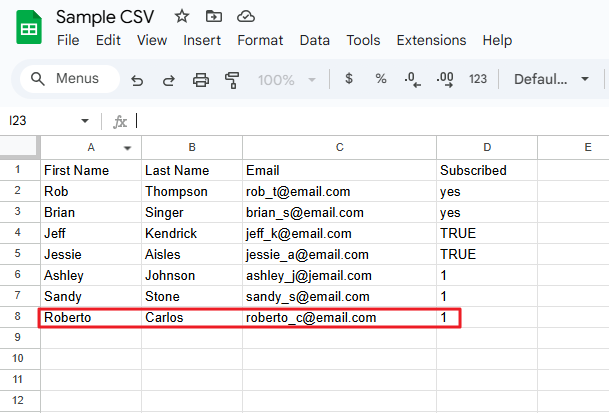
Now paste the Webhook URL and write the final data column in the Trigger Column. Here we wrote D according to the Sample CSV file as shown below.
Now, click Send Test and check for “successful” message.
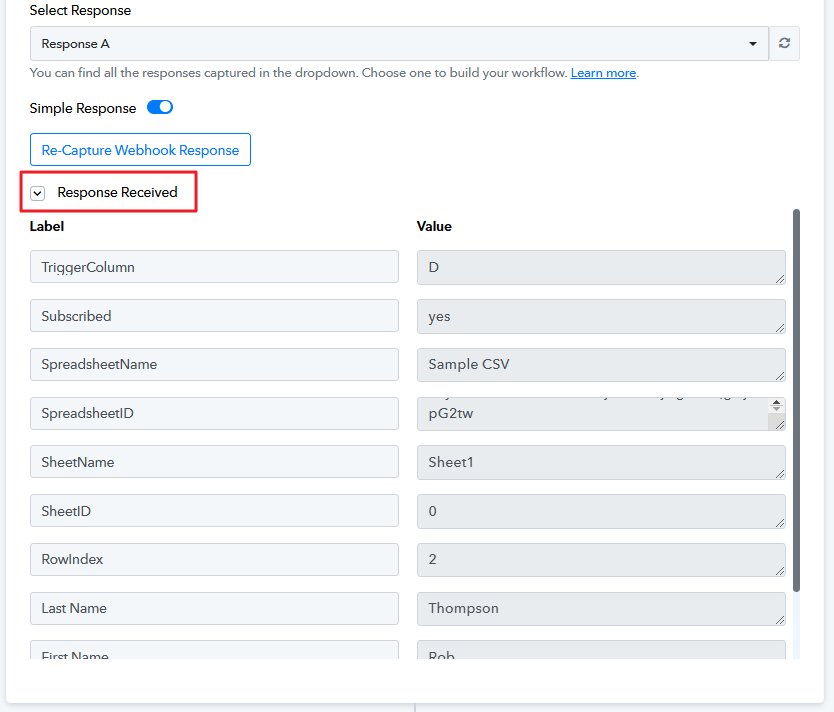
Also, click on Response Received. You will notice that the fields are all populated.
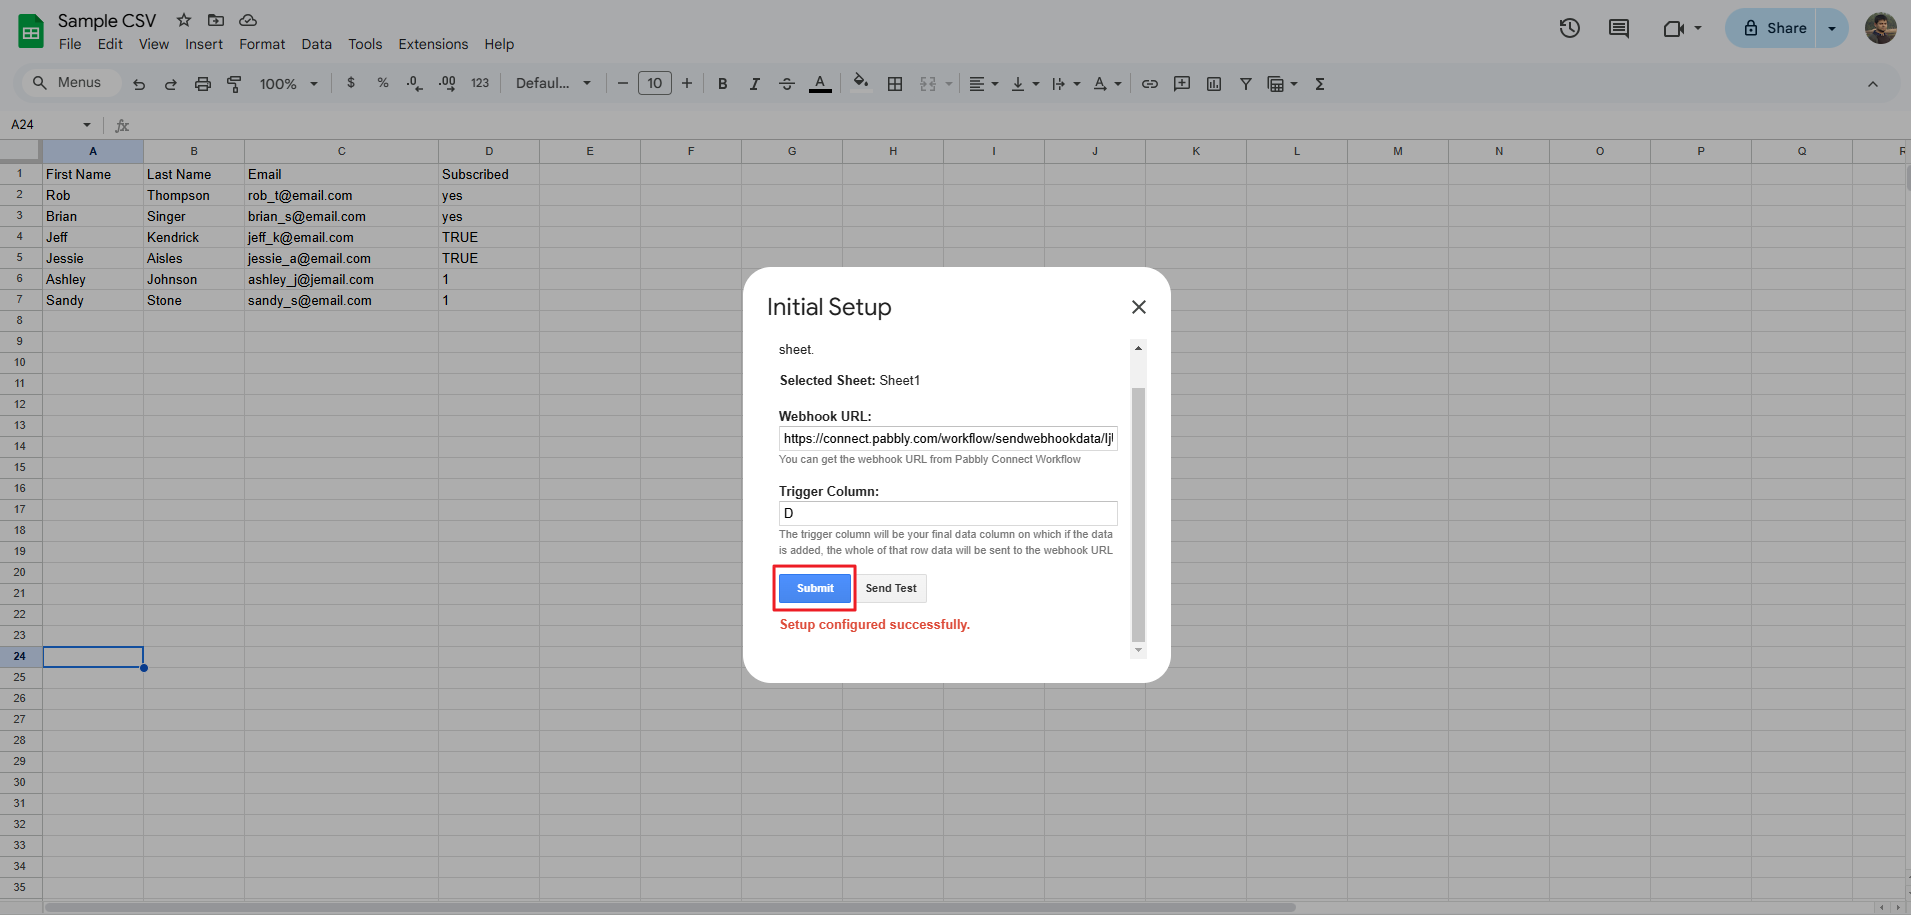
Click on the Submit button. You will get a notification message “Setup configured successfully”.
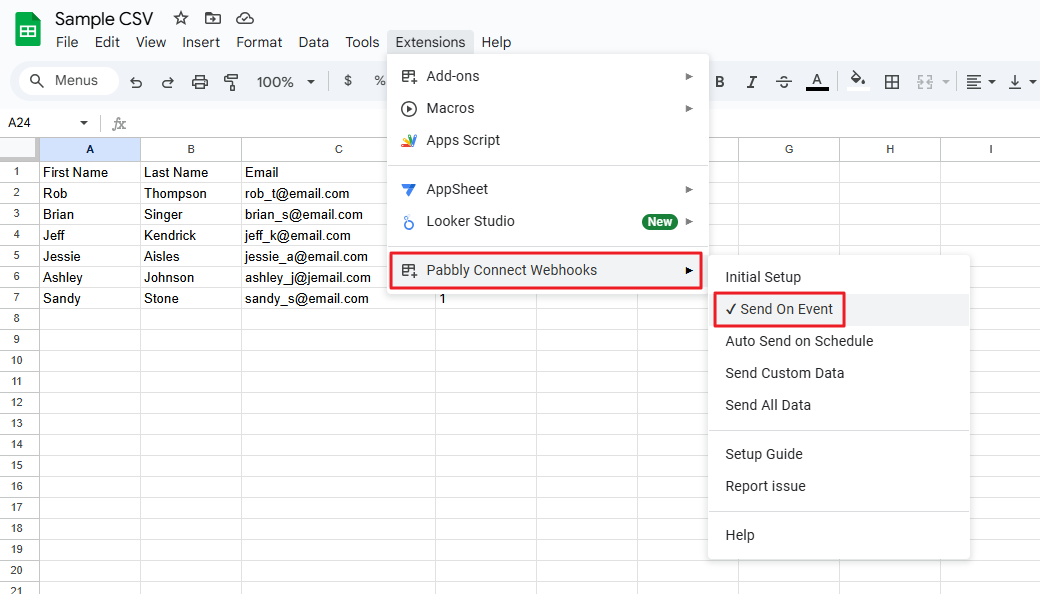
Now close the Initial Setup window and click on Pabbly Connect Webhooks > Send On Event.
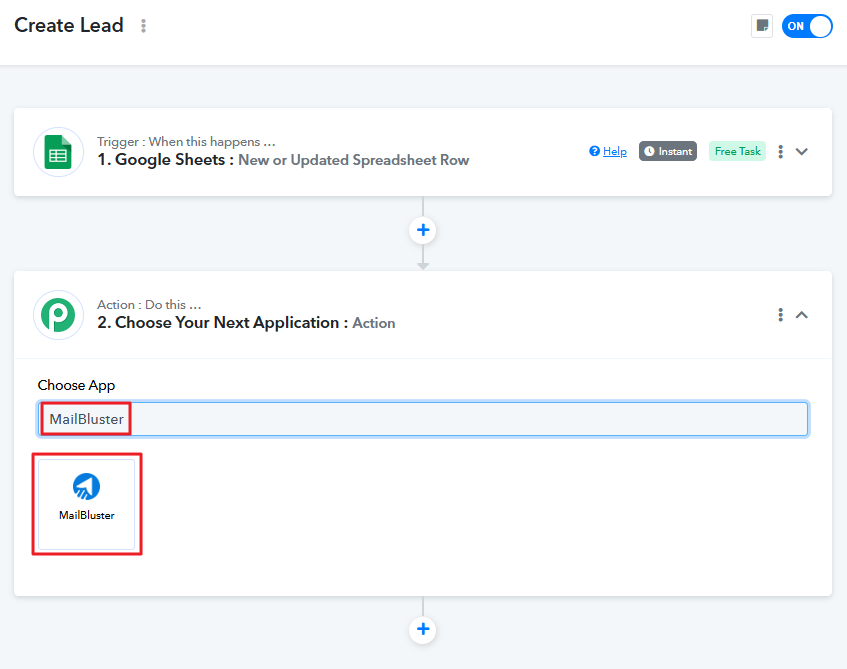
Now, it’s time to connect the MailBluster app. Go to Pabbly again and Choose Your Next Application : Action.
The trigger module collects the data, and in the action module, this data is submitted to MailBluster each time the workflow executes. At this step, connect MailBluster to add leads to the automated process.
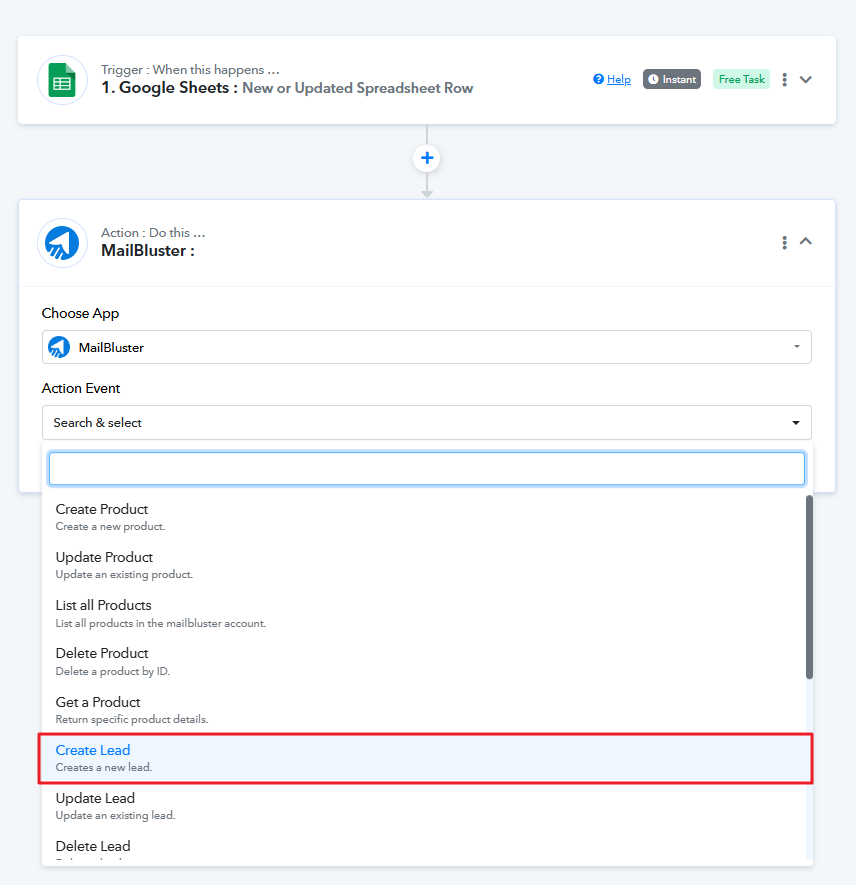
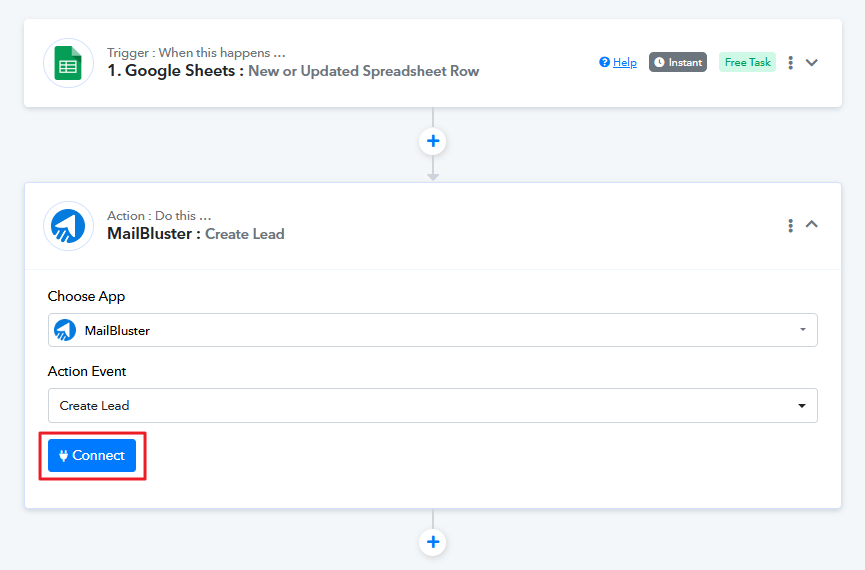
After selecting MailBluster, select the Action Event: Create Lead.
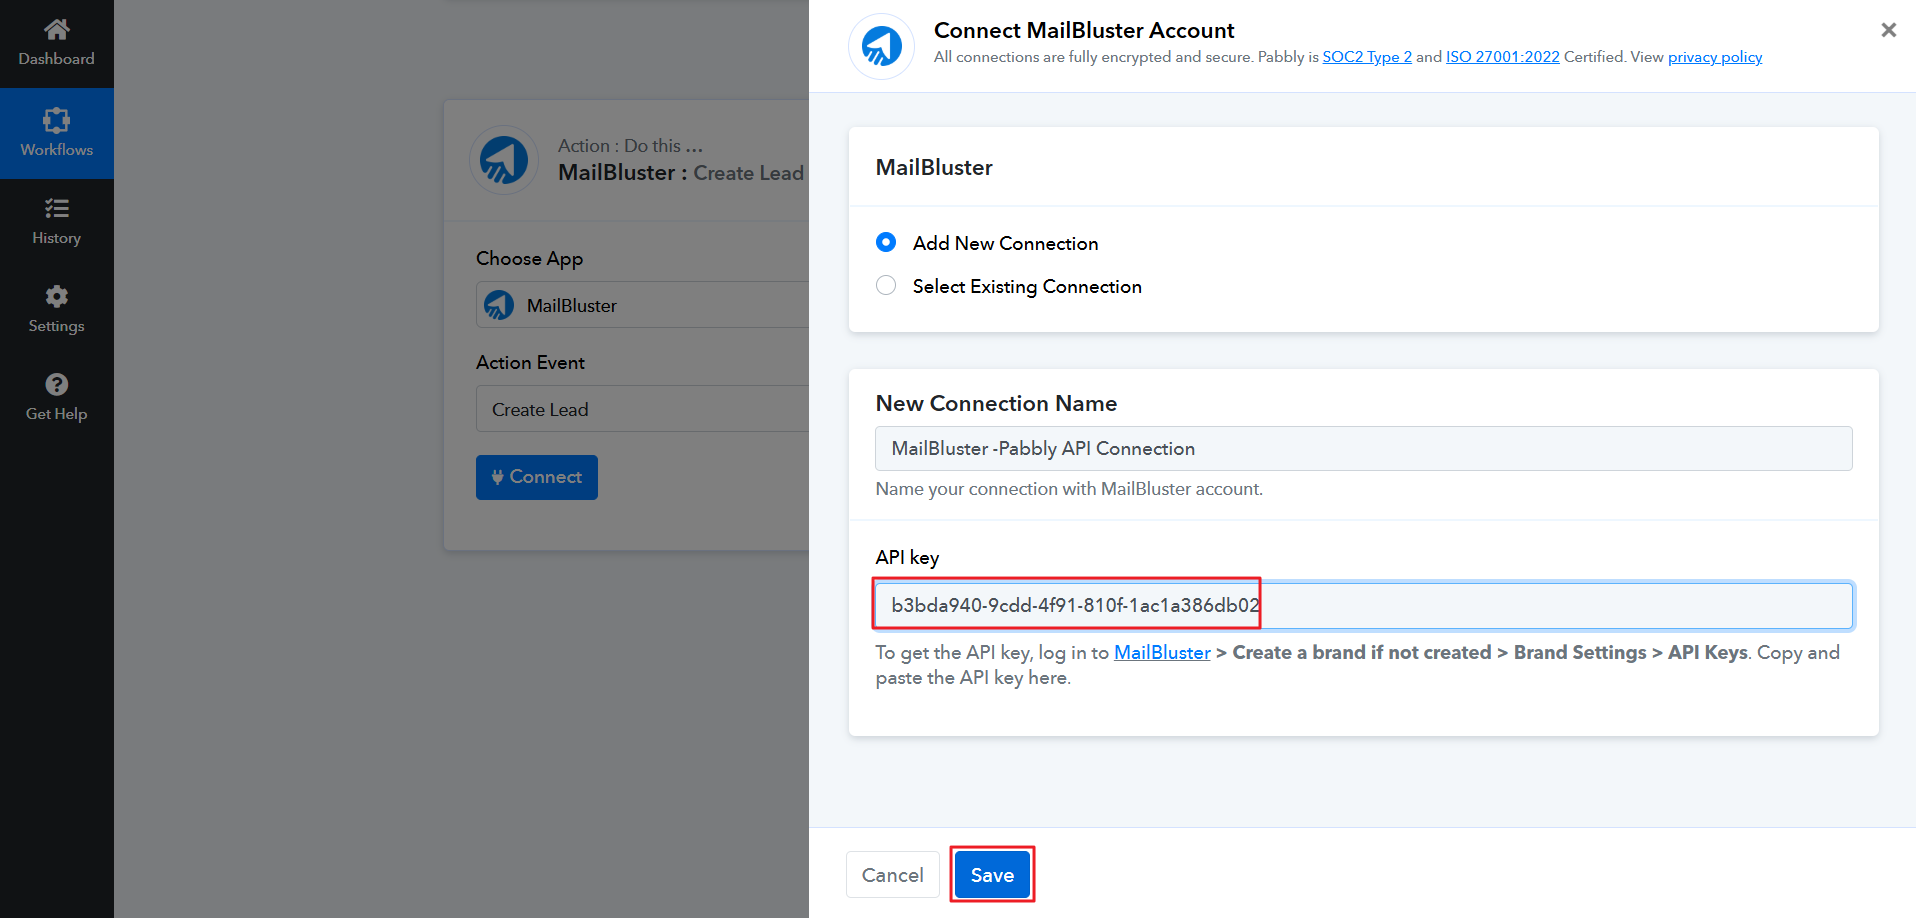
Click on the Connect button.
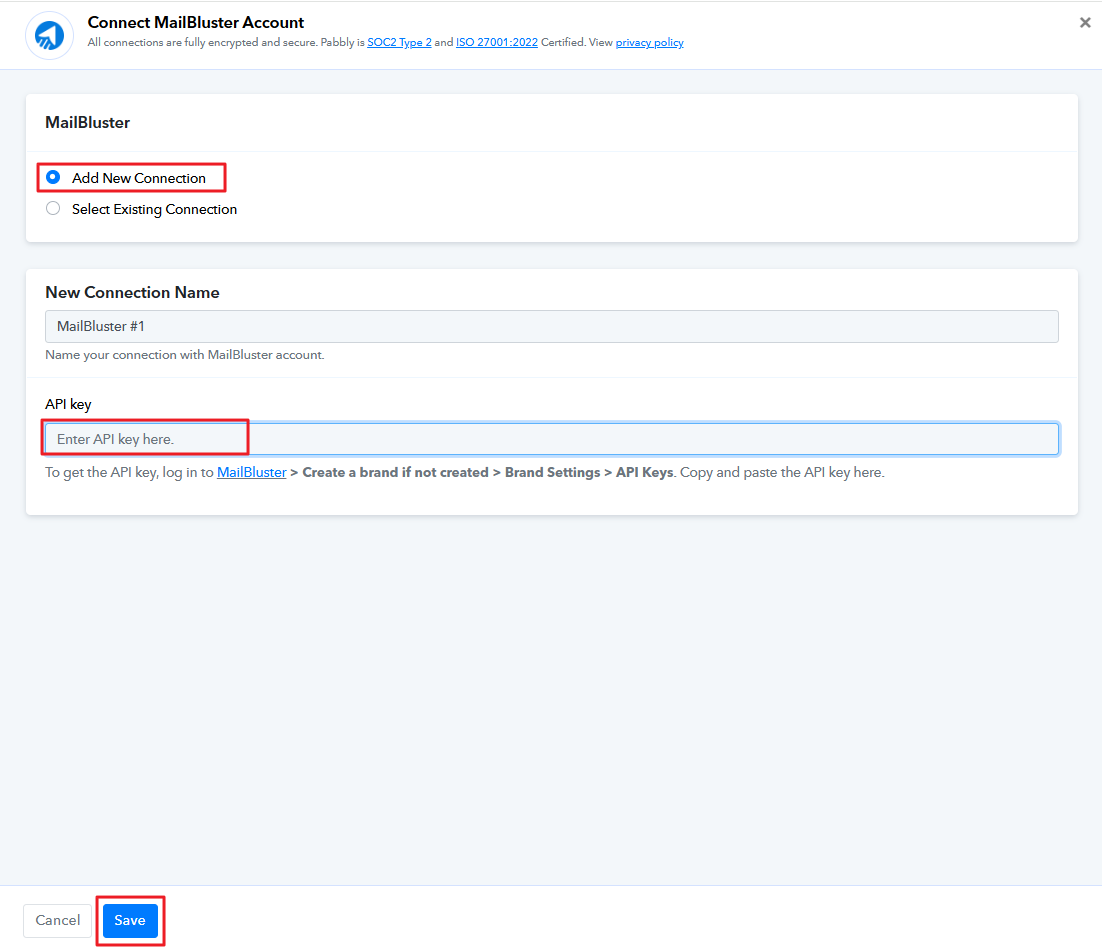
Select Add New Connection, copy the generated API key from MailBluster, and paste it into the API Key field in Pabbly. Then click Save button.
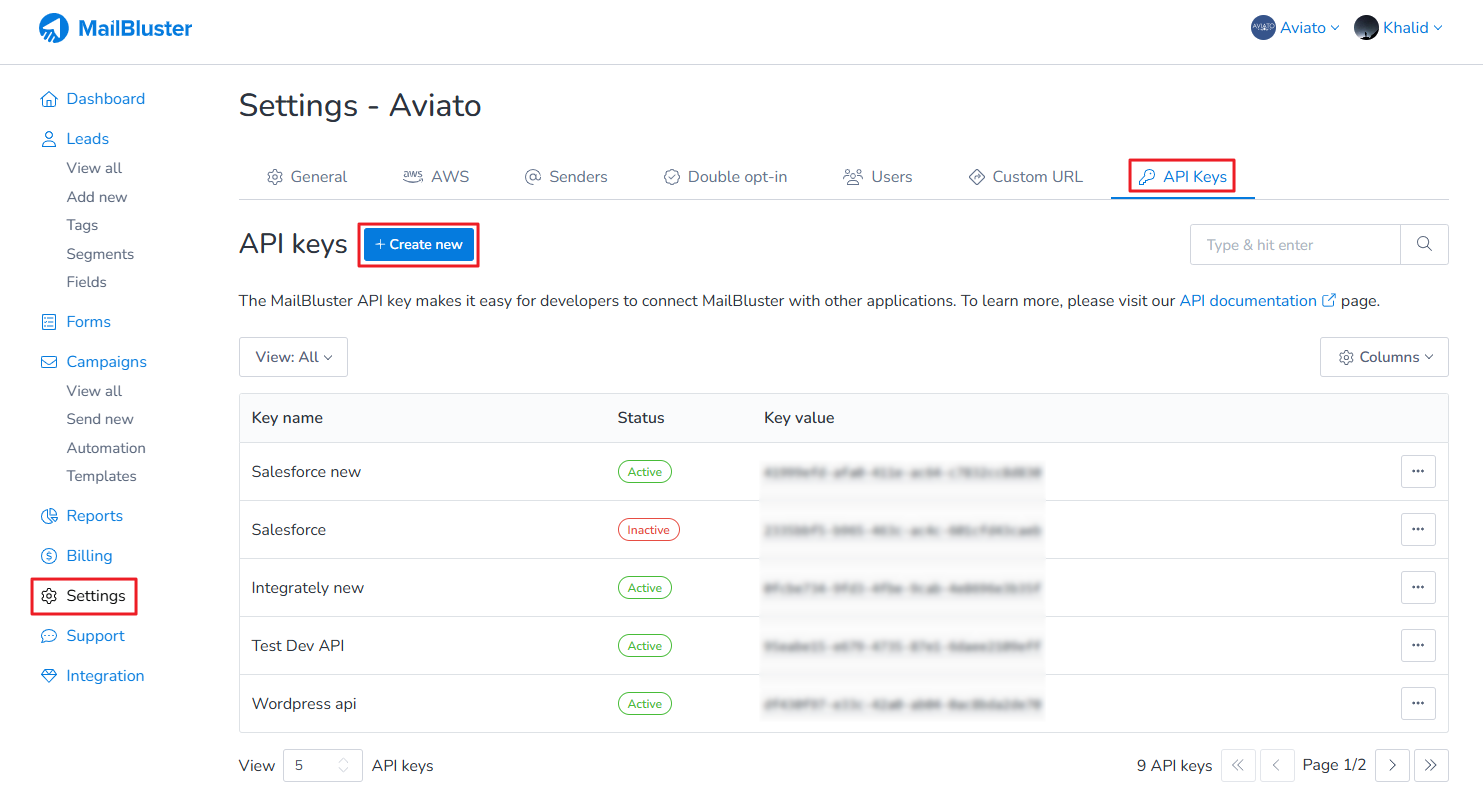
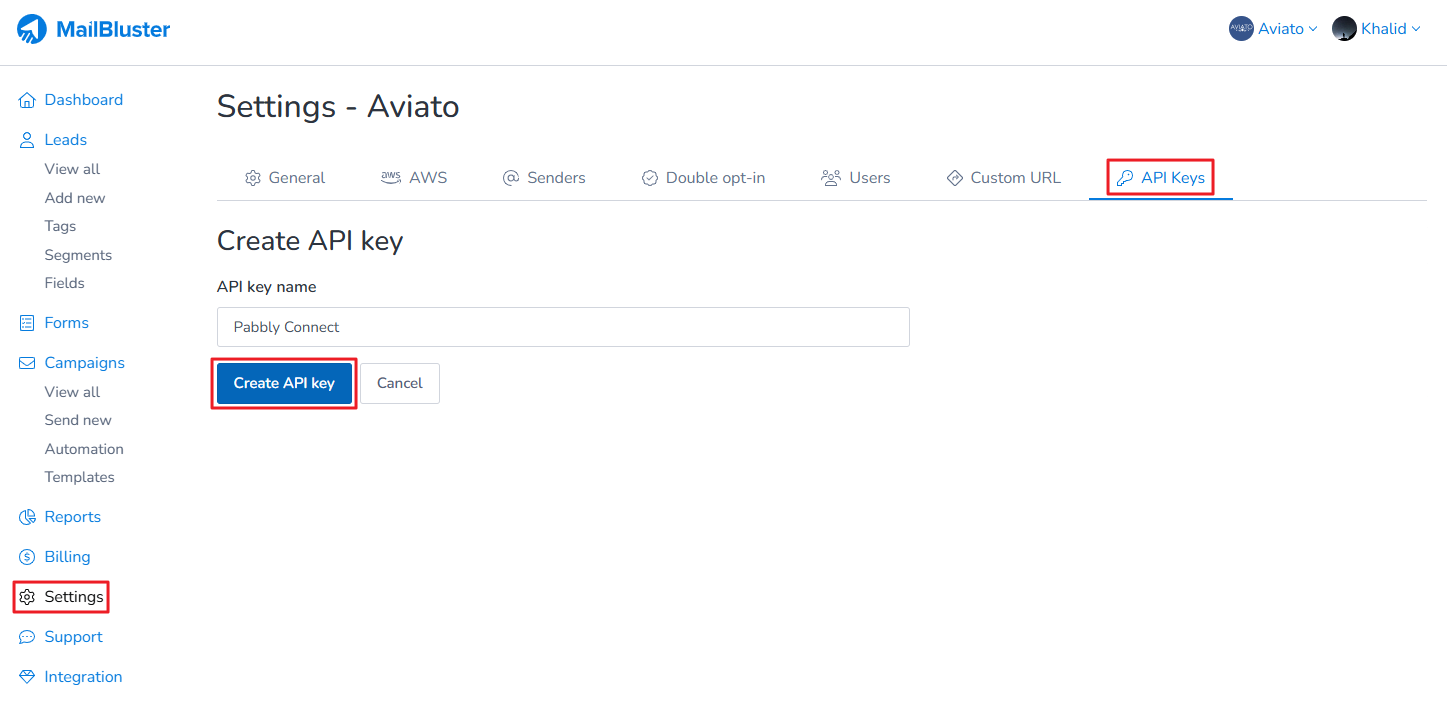
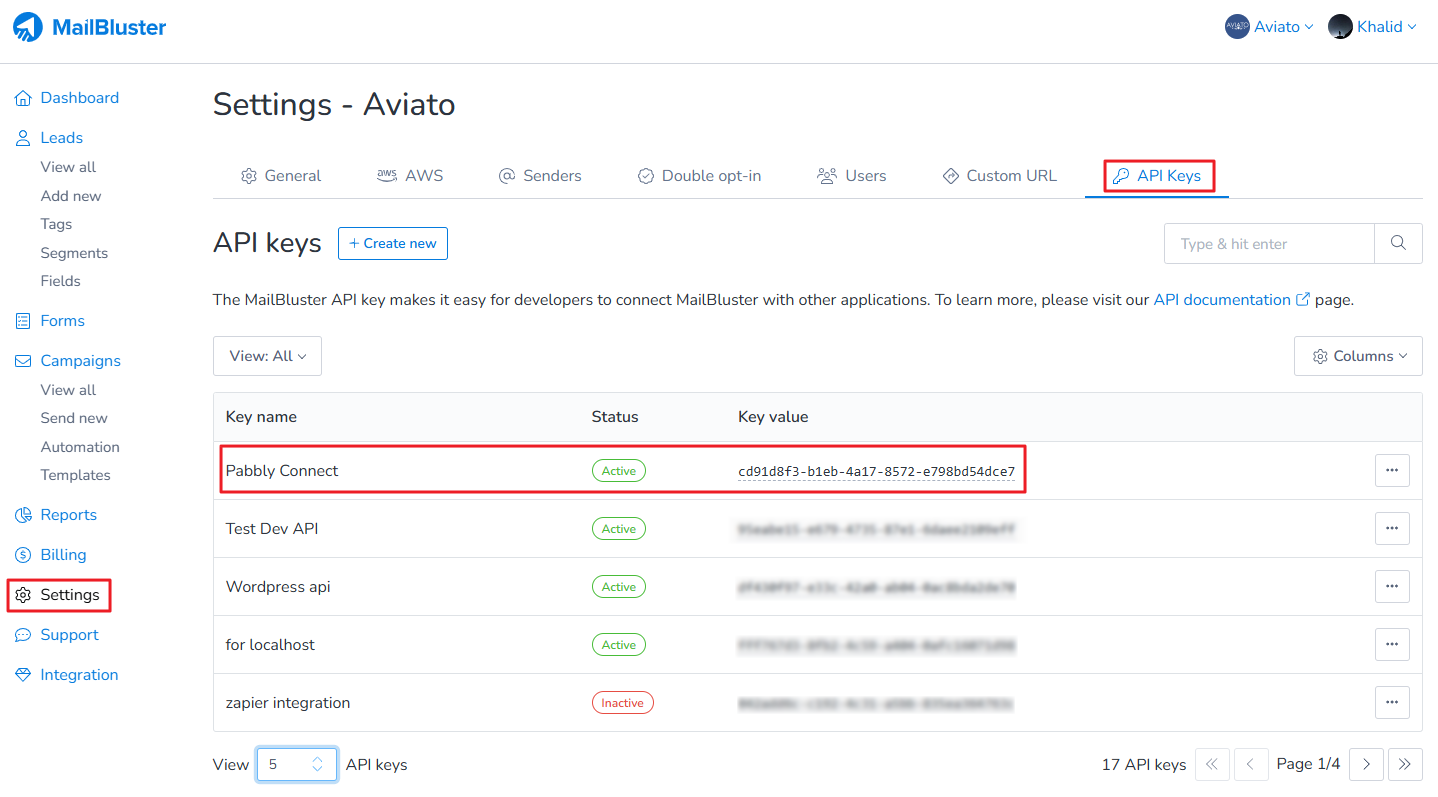
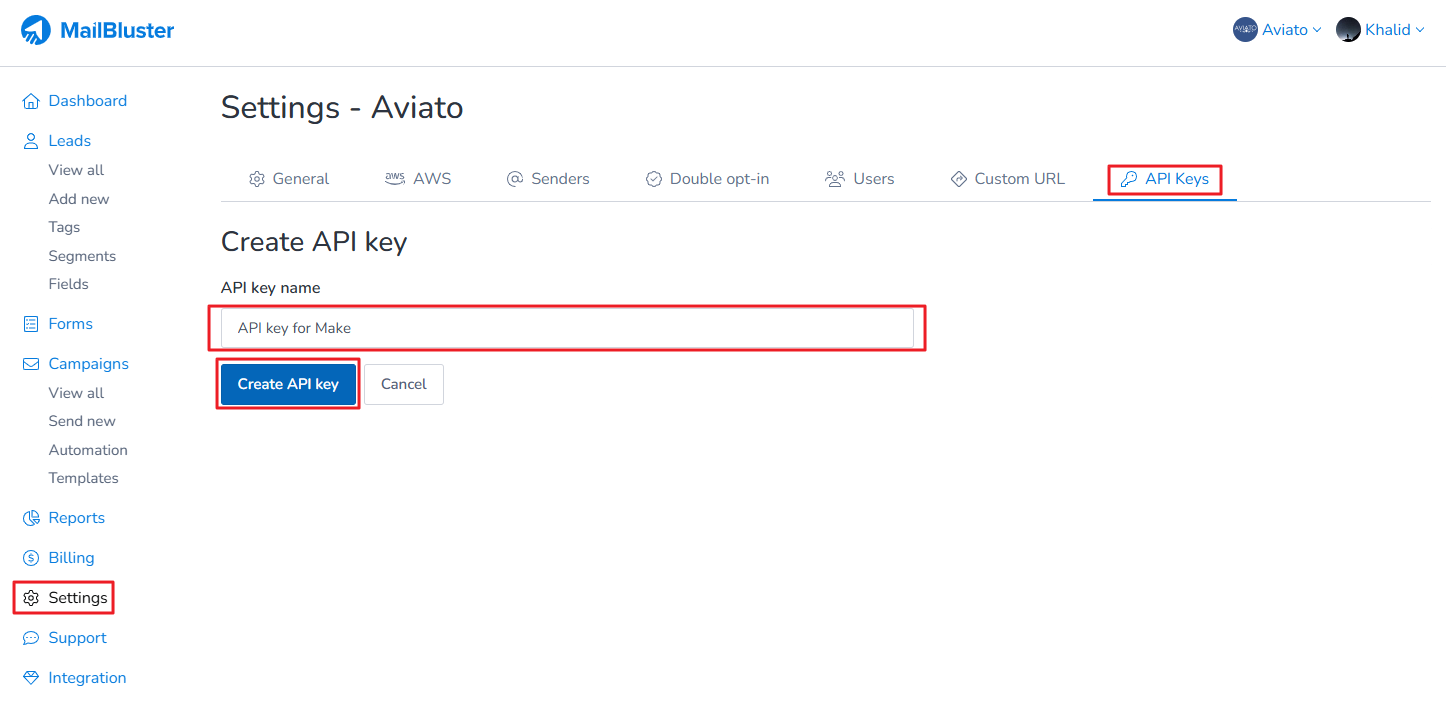
You need to Create API key from MailBluster. Sign in to your MailBluster account, then go to Brand > Settings > API Keys and select Create New. On the API Keys tab, Create new, name your API key and click Create API Key.
Once the API key is created, copy the Key value, paste it into the API Key field in Pabbly, and click Save.
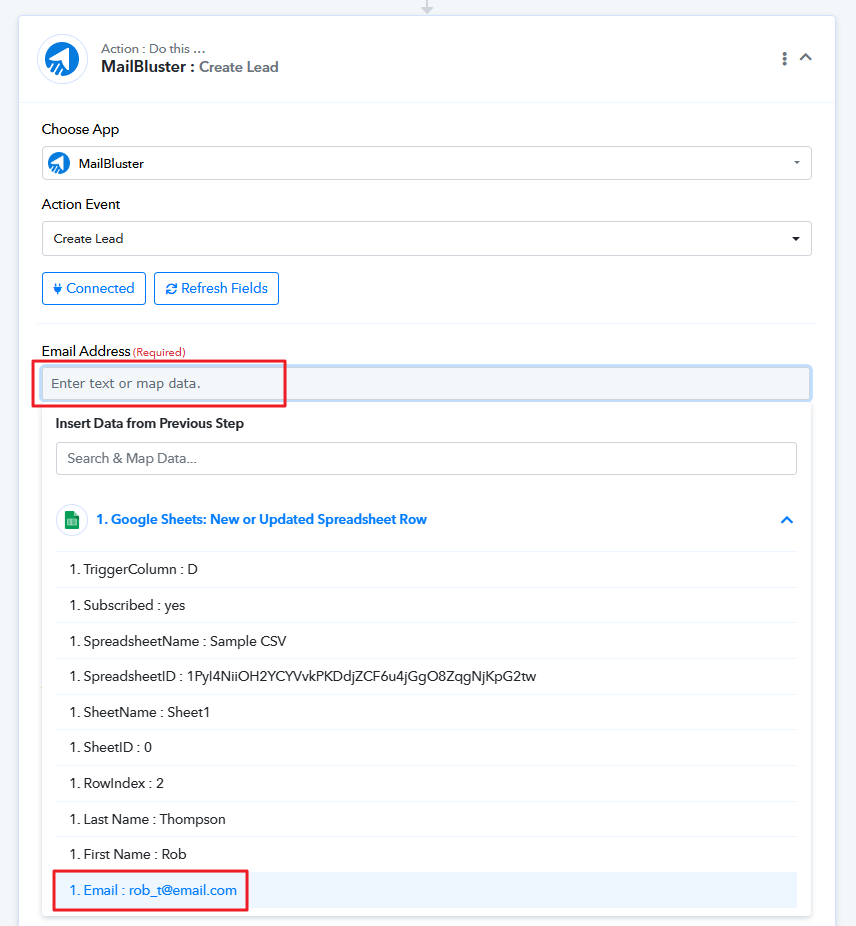
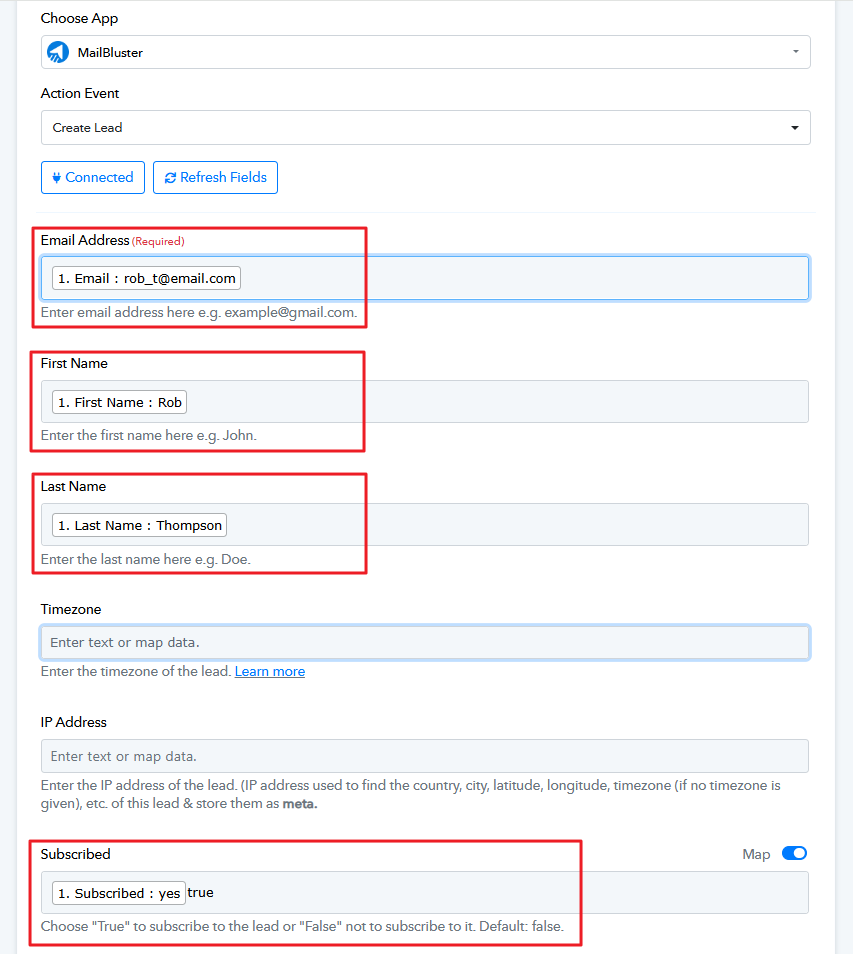
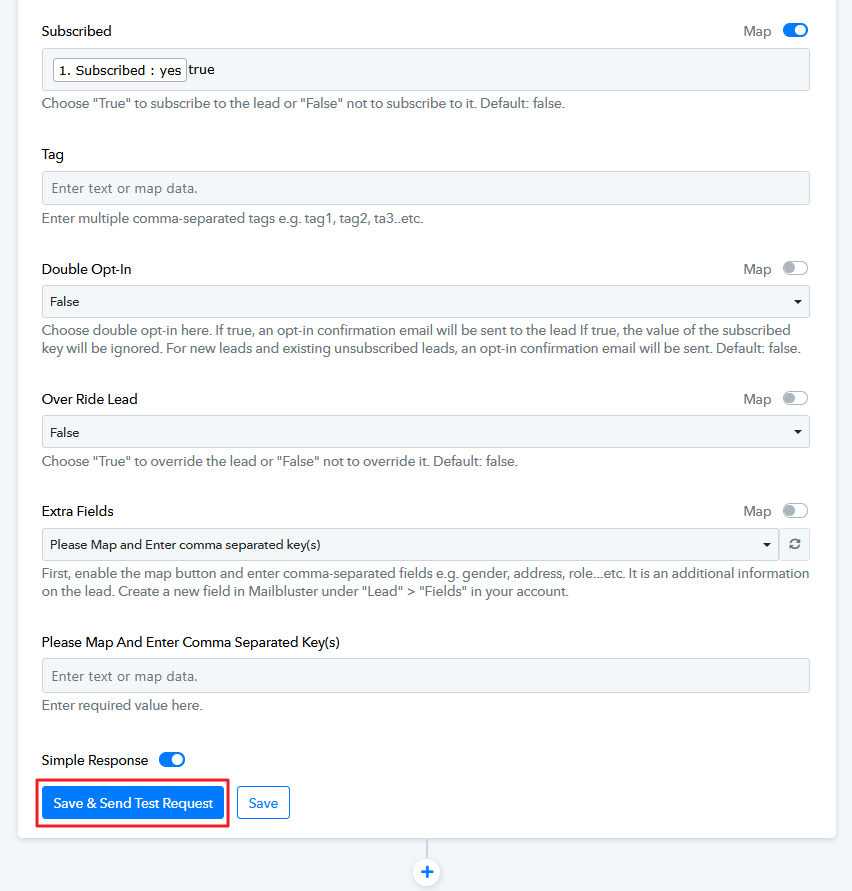
Now, map data by highlighting Email address as shown below.
Similarly, map the data by selecting First Name, Last Name, and Subscribed. This mapping is necessary to retrieve data from the corresponding columns in Google Sheets.
Click Save & Send Test Request. This will save the values you entered above and send the data to the selected app for processing. A response will be received once processing is complete.
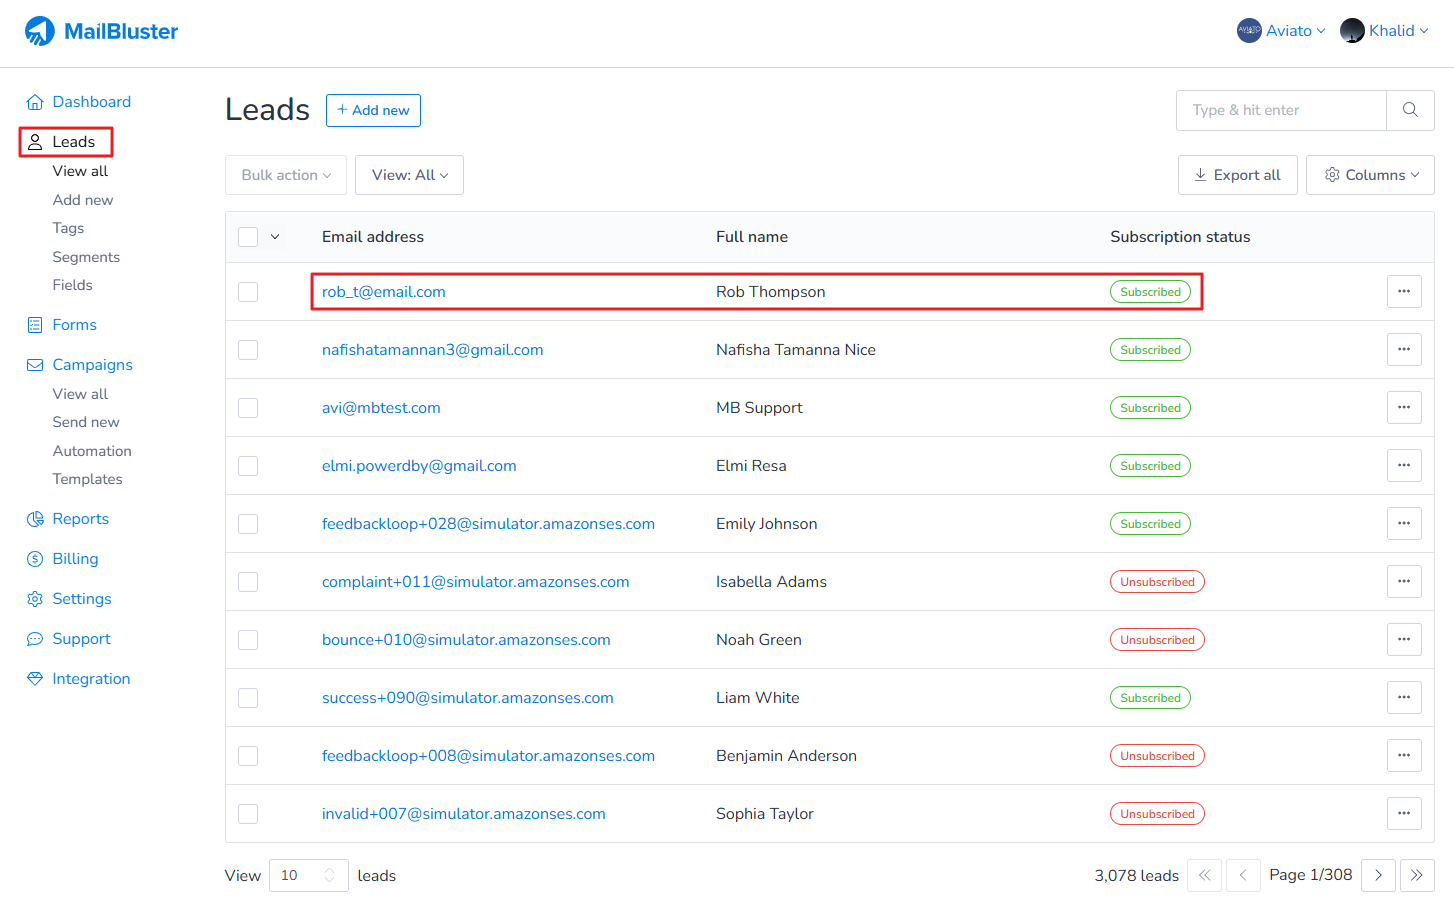
Now, go to MailBluster, and in the Leads section, you will see that the email address has been added to Leads.
Go to your Google Sheets and add a new lead to test if it is automatically added to the MailBluster Leads.
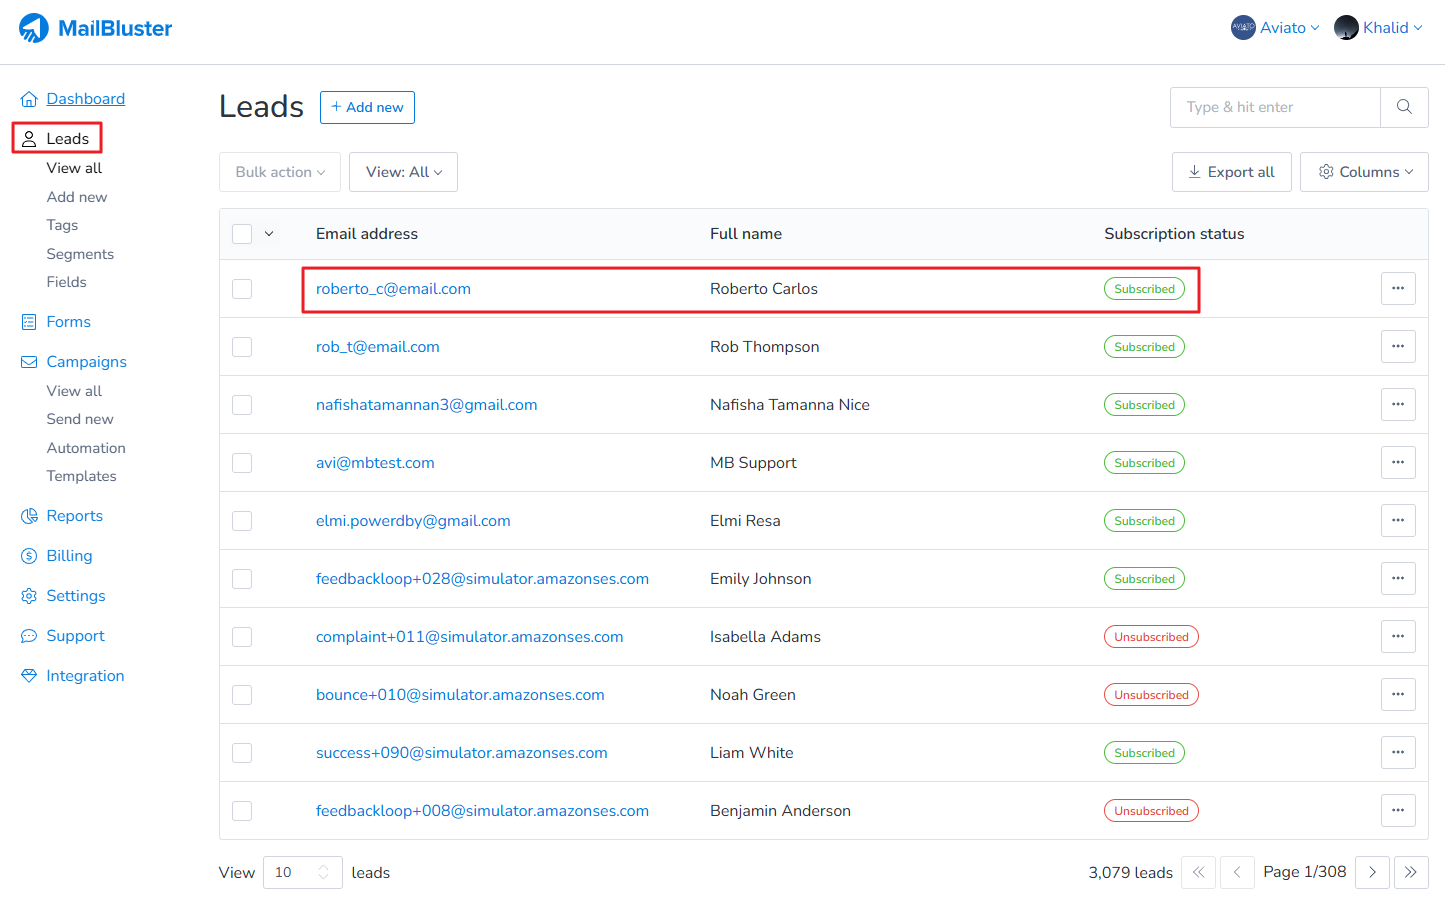
As you can see, the lead above has been successfully added to the Leads section in MailBluster automatically.
As you can see, we have focused on connecting Google Sheets with MailBluster to streamline the automation process using Pabbly. Similarly, you can achieve this with the following options.
If you’re looking to make integration with MailBluster simple and code-free, this guide is for you. Make (formerly Integromat) is a visual, no-code automation platform that allows users to connect and automate tasks across various apps and services. It enables users to create workflows, known as scenarios, that streamline processes and remove repetitive tasks without requiring any programming skills.
Make operates with a system of triggers and actions to execute workflows from start to finish. A trigger is an event that initiates the workflow, telling Make when to begin running each step in the automation. Following a trigger, actions are the tasks Make carries out in response. By combining triggers and actions, ‘Make’ lets users build flexible, multi-step workflows that connect tasks across different applications seamlessly.
As you can see, we are going to demonstrate on how to connect MailBluster with ‘Make’ using Google Sheets. Similarly, you can accomplish this with the follow options as well.
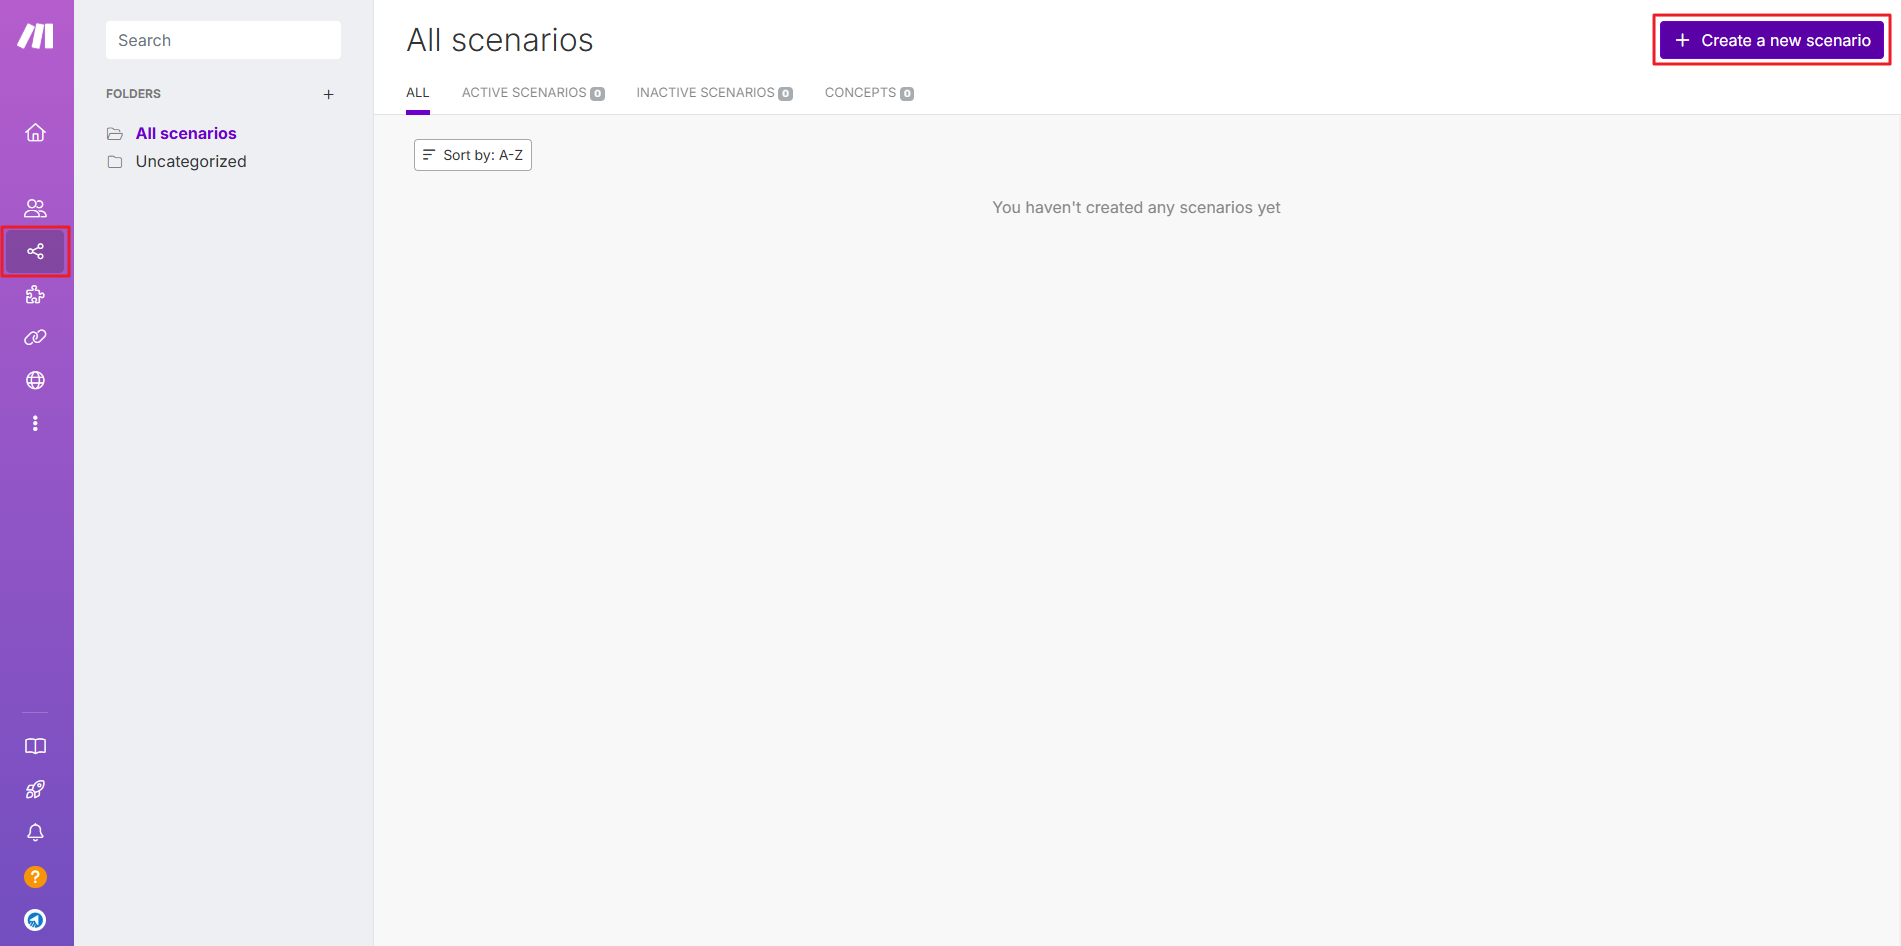
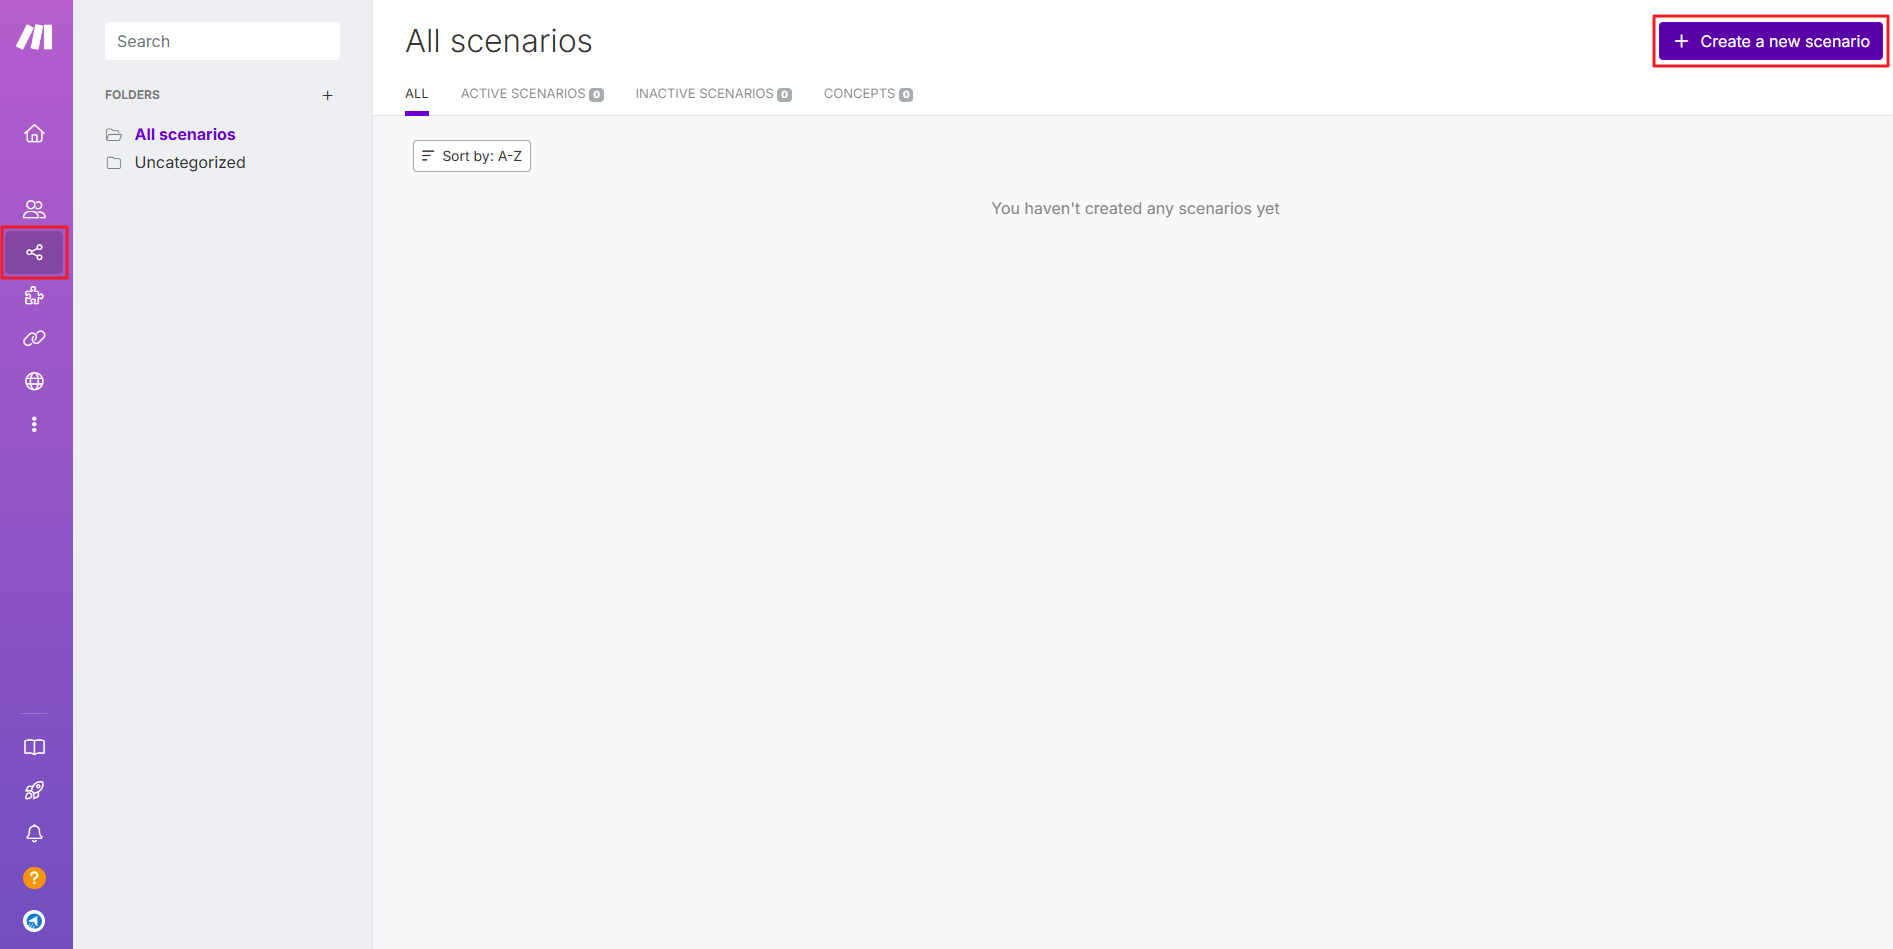
Sign in to you Make account, and click on Create a new scenario.
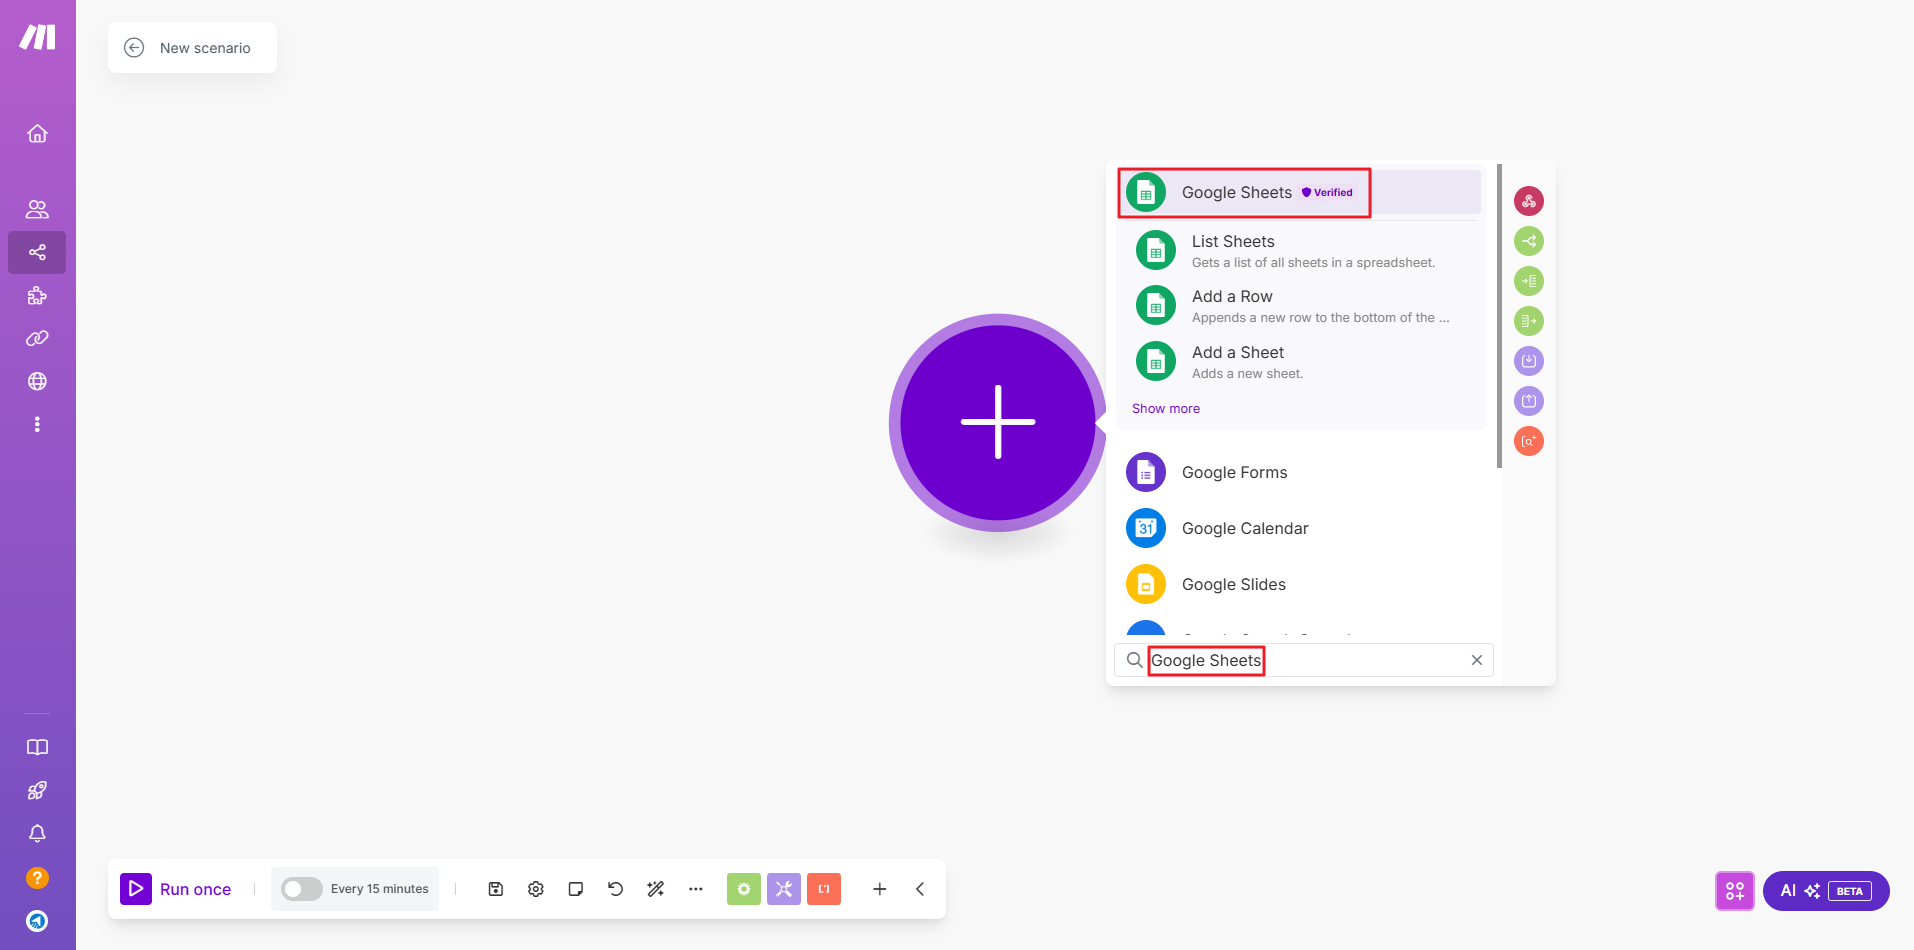
Select Google Sheets by clicking the ‘+‘ sign, then type ‘Google Sheets’ on the search bar. Select Google Sheets from the list as shown below.
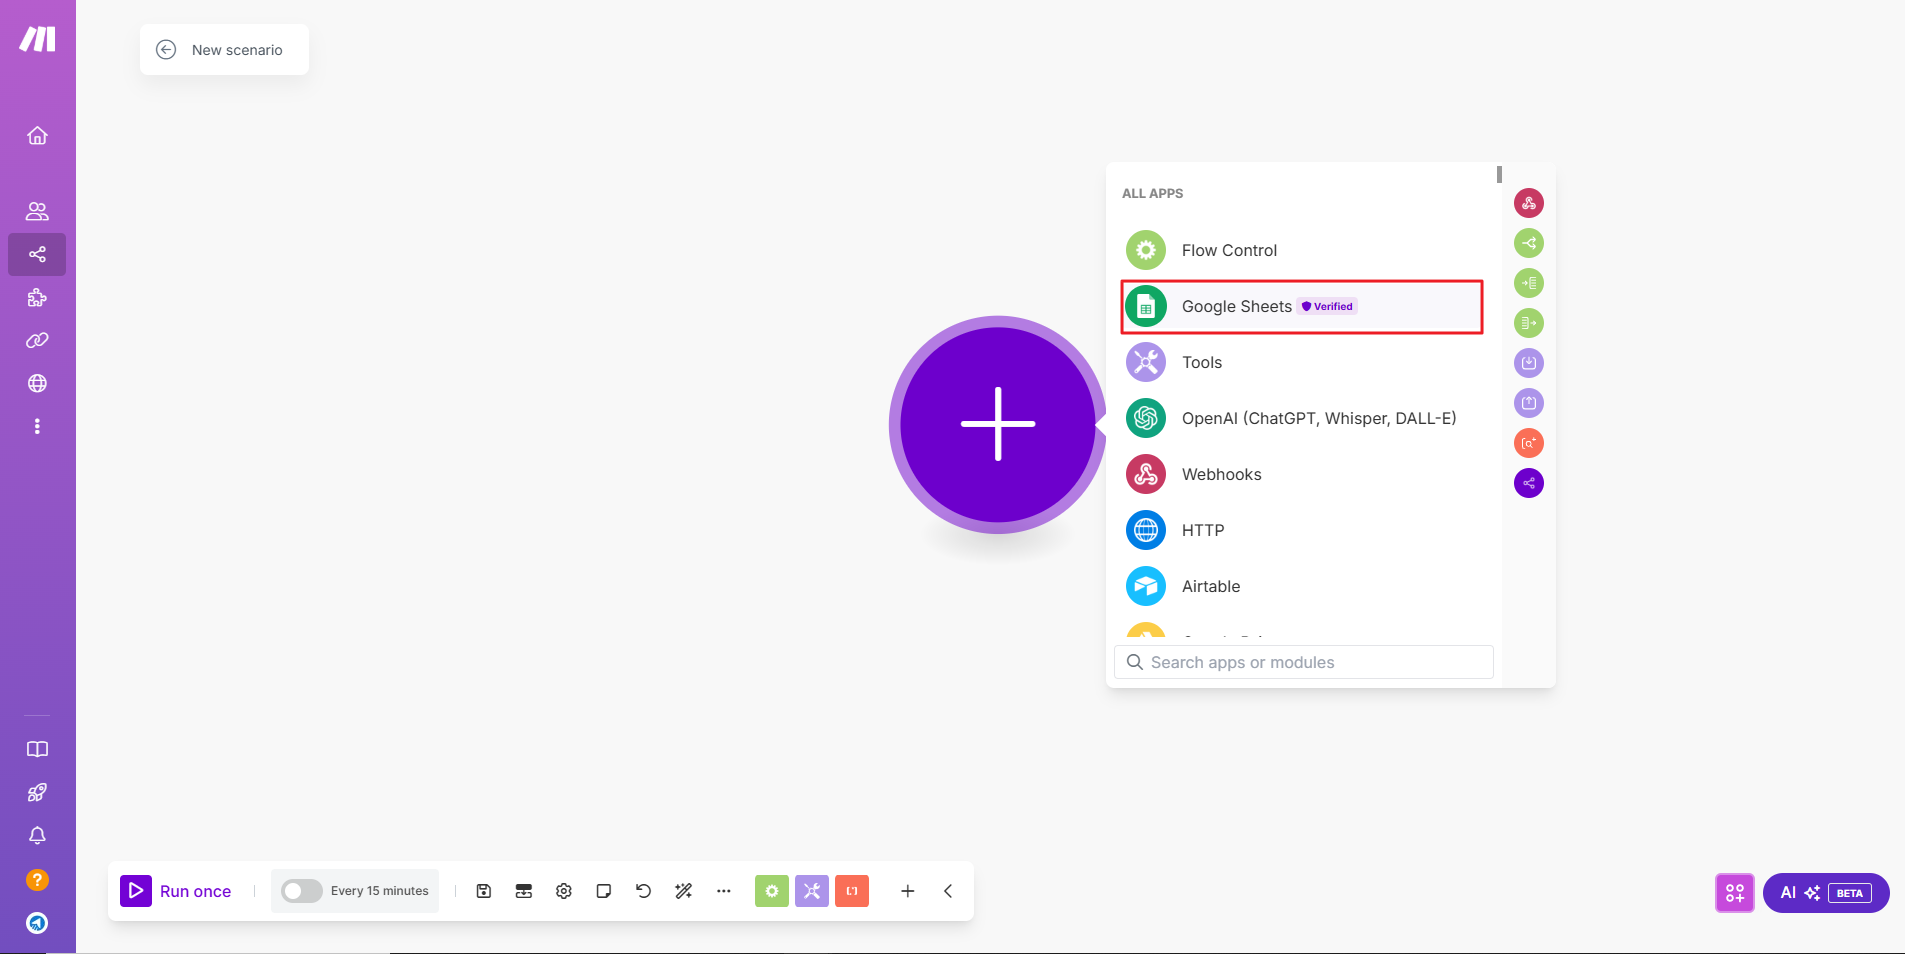
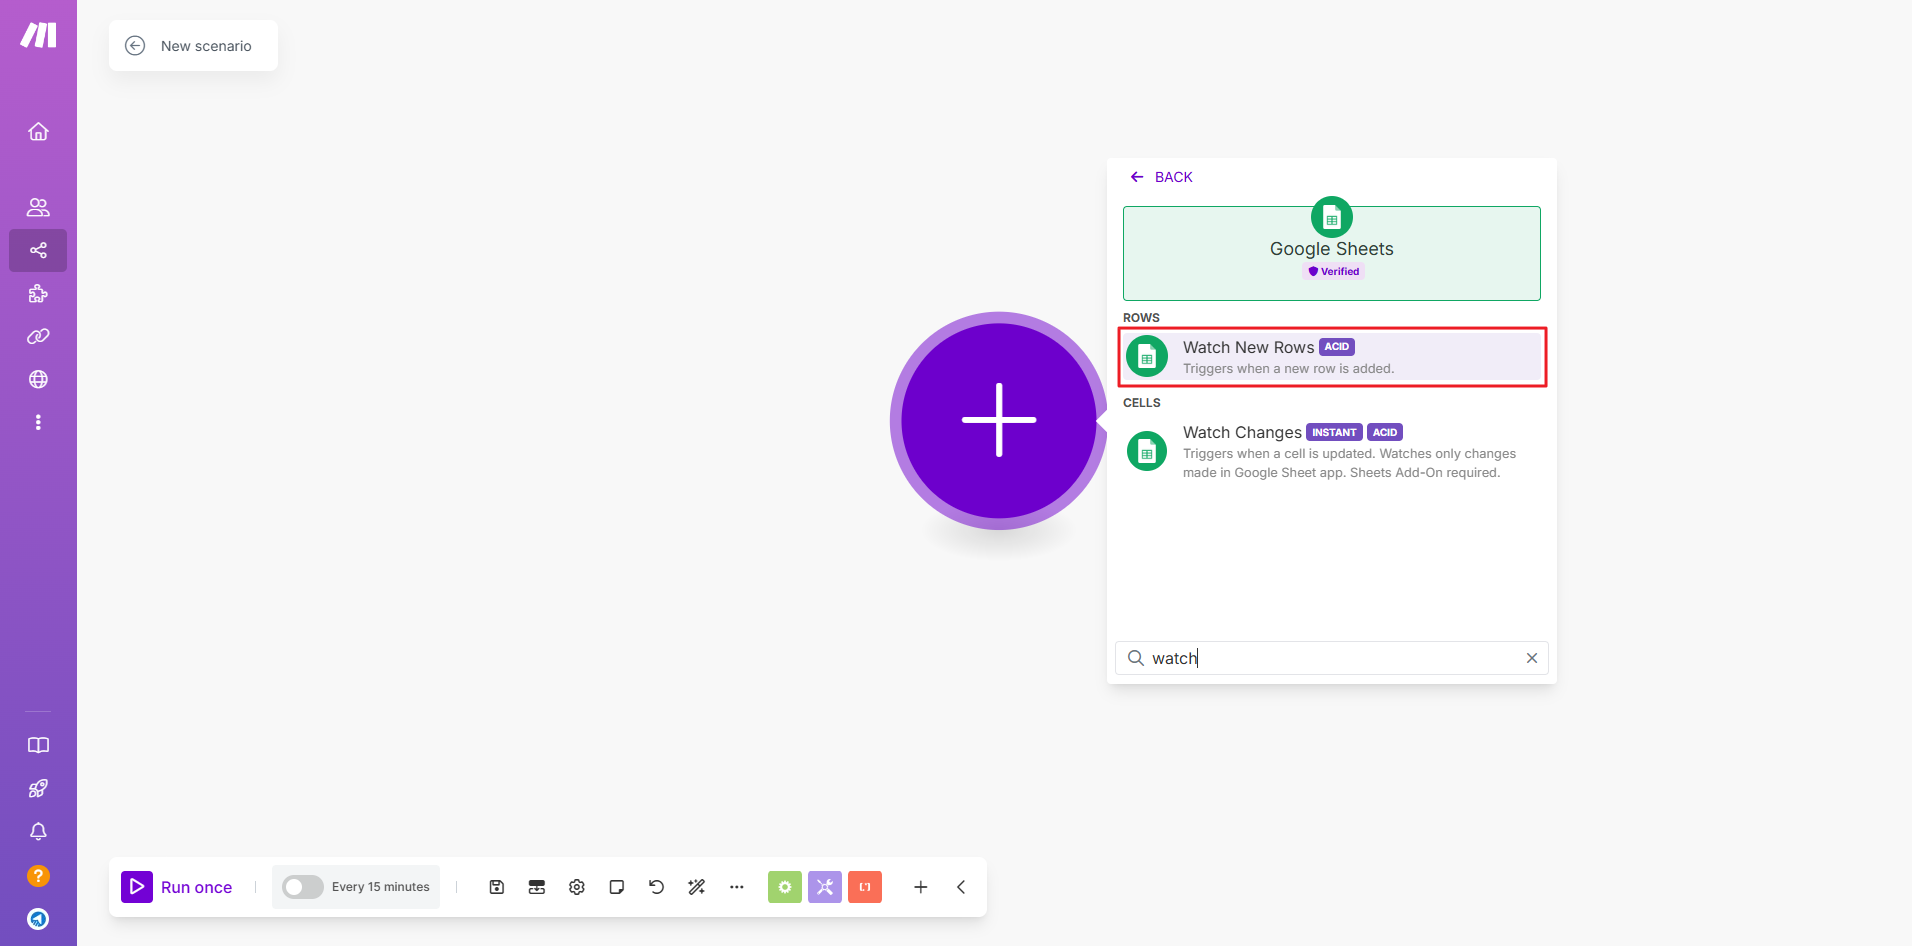
Now, scroll down and select Watch New Rows or type ‘watch’ in the search bar and select Watch New Rows.
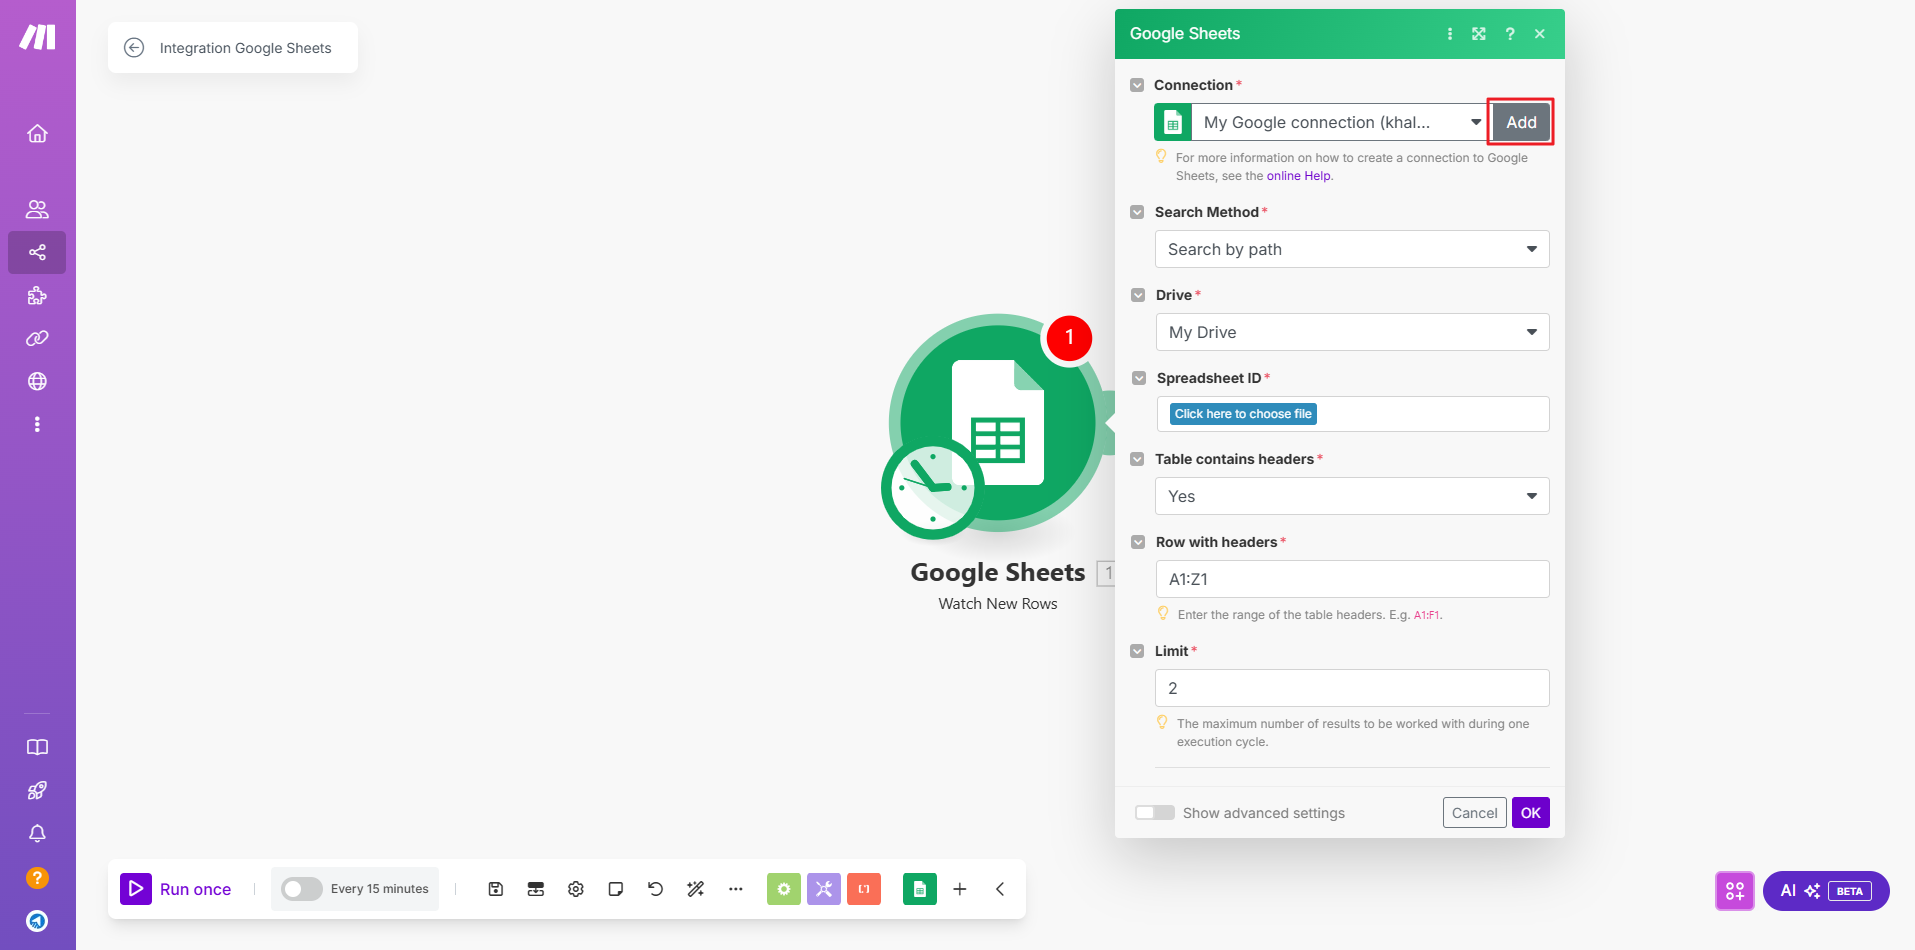
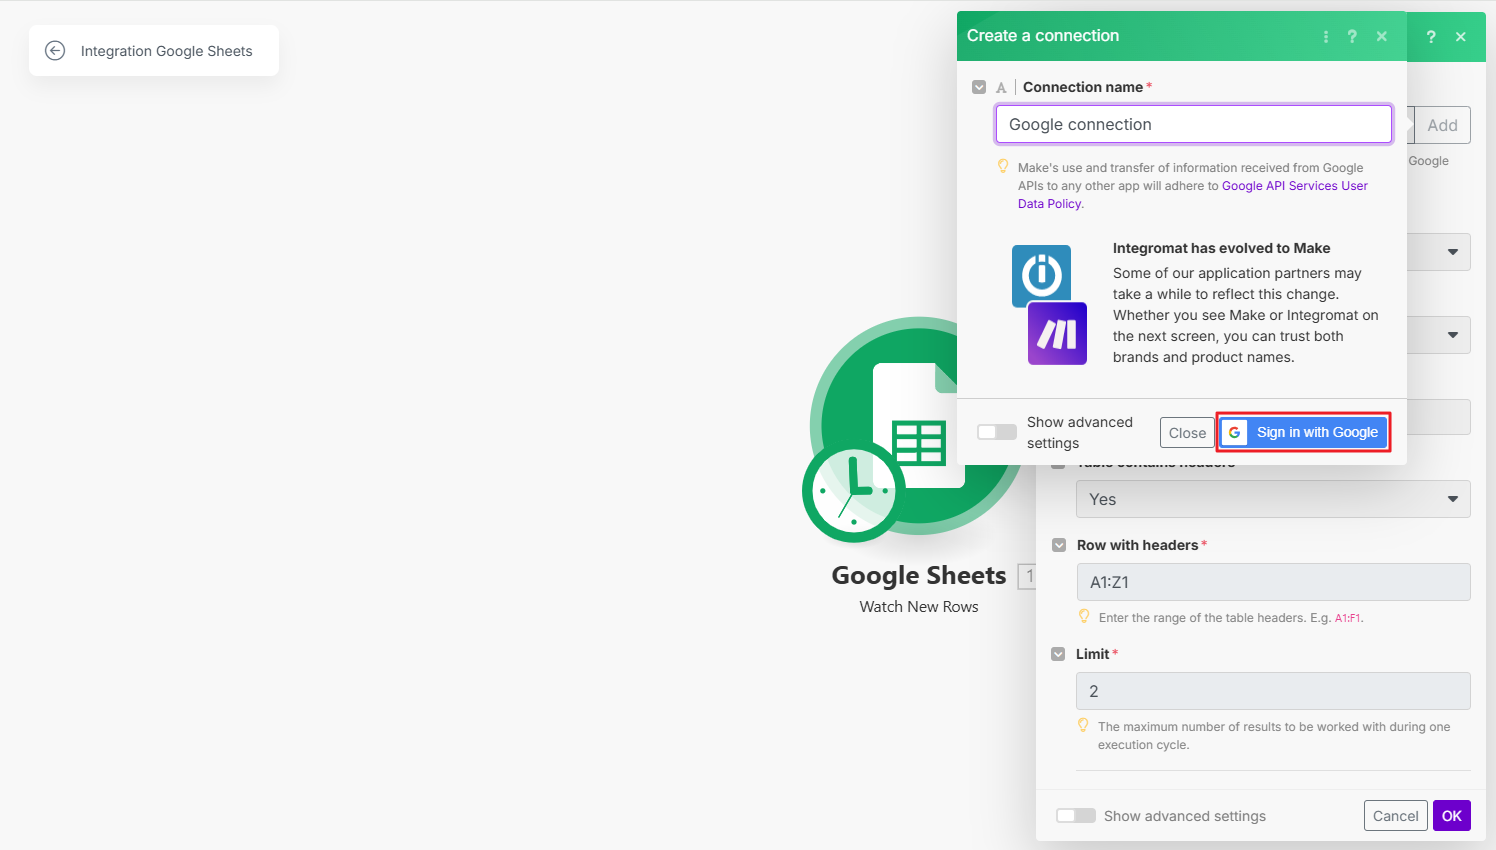
Under Connection, click on the Add button.
After clicking Add, then enter Connection name and click Sign in with Google.
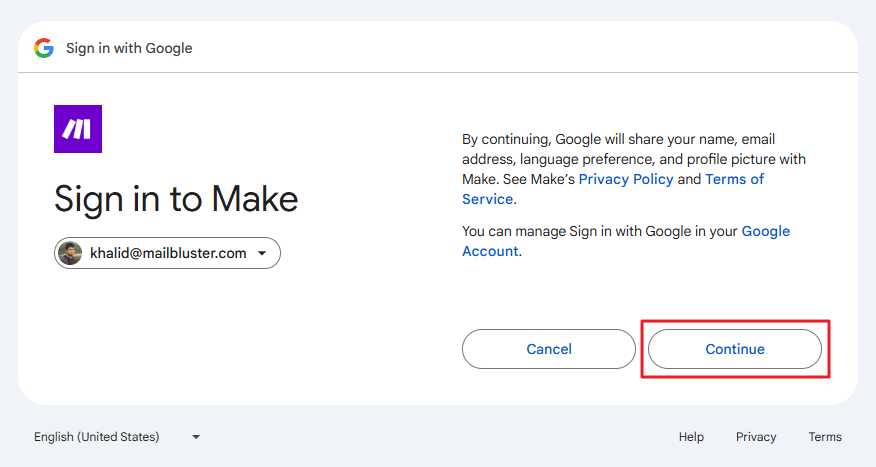
Click Continue in the Google popup screen.
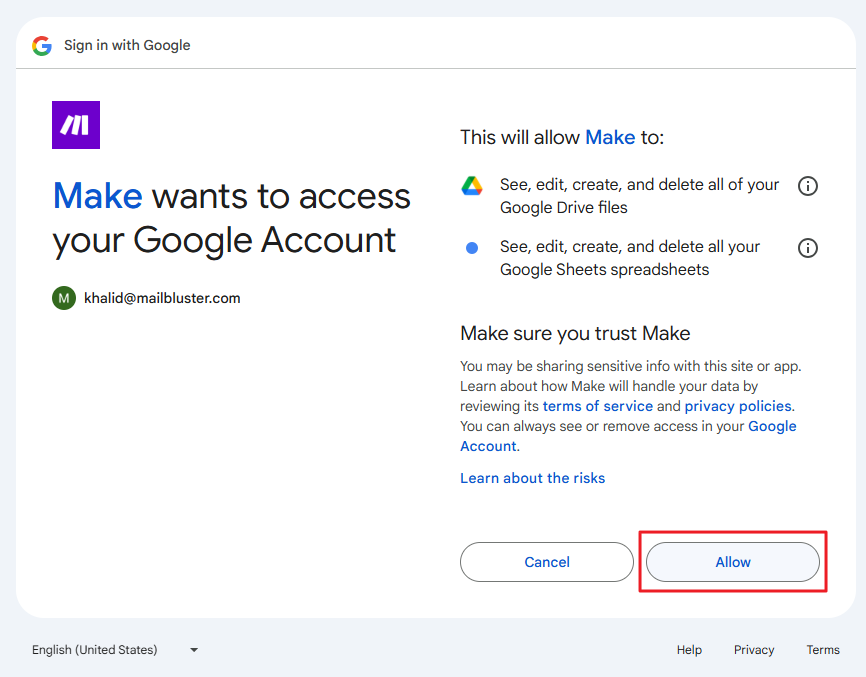
Give permission to Make by clicking Allow.
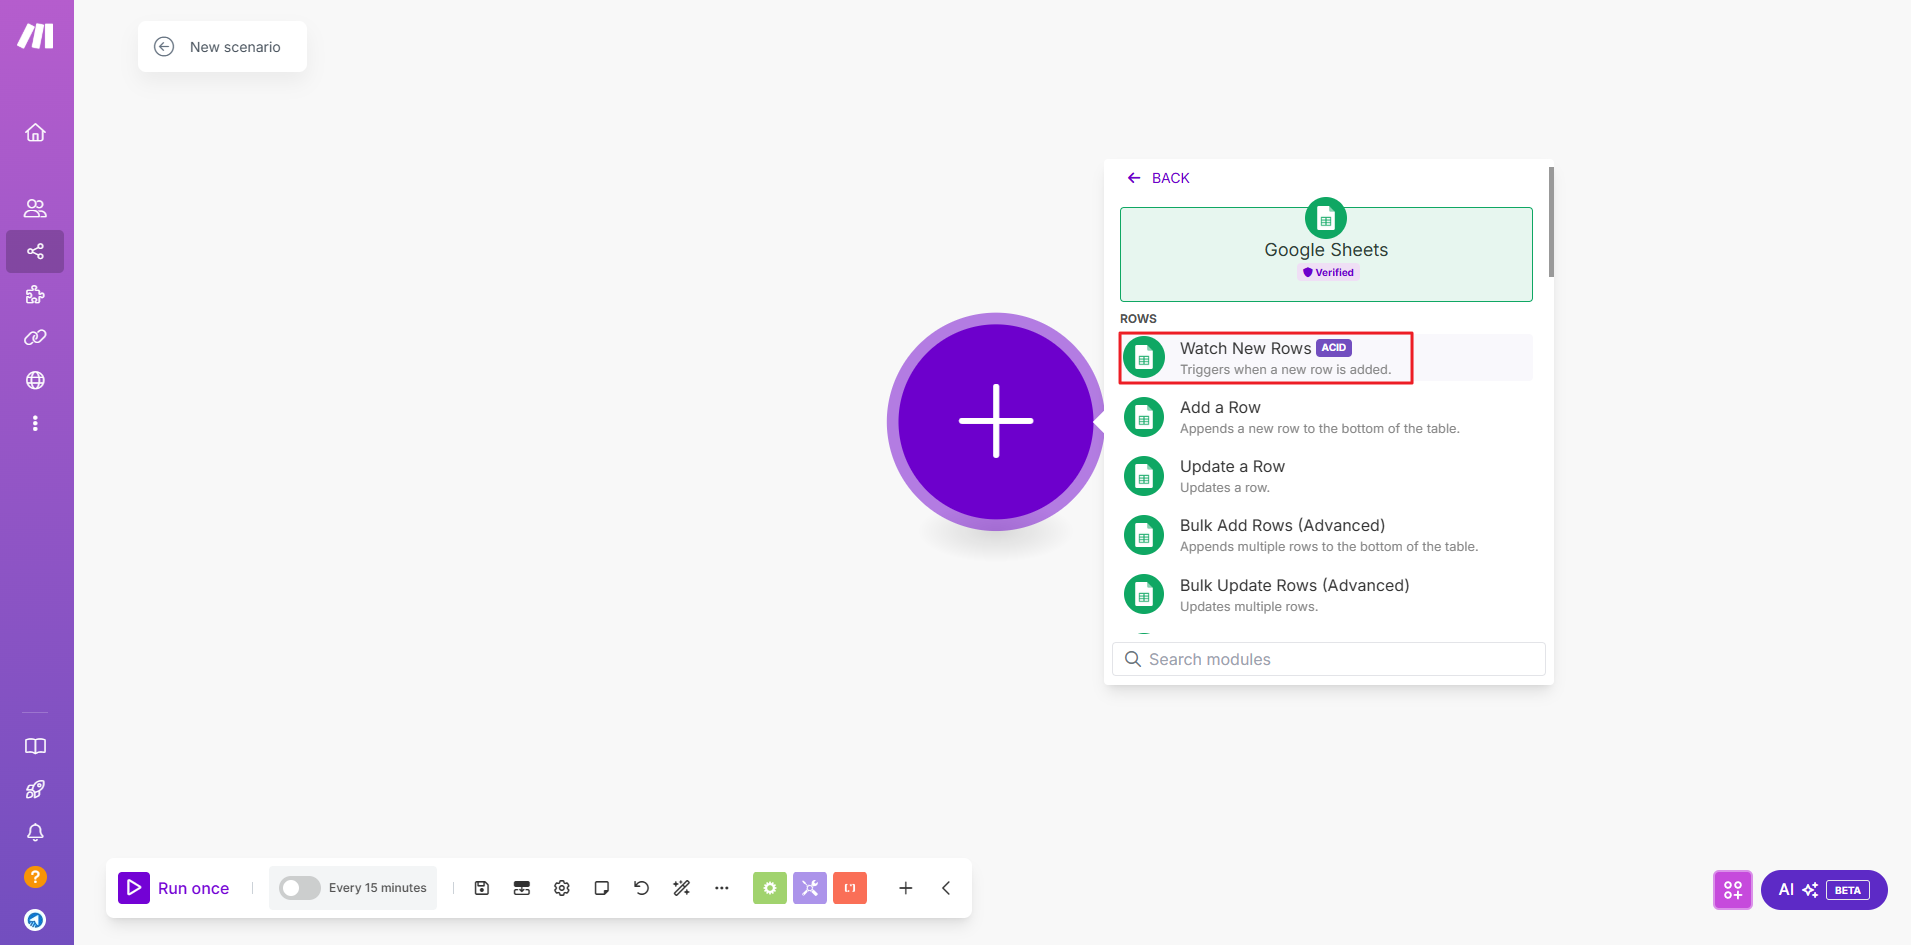
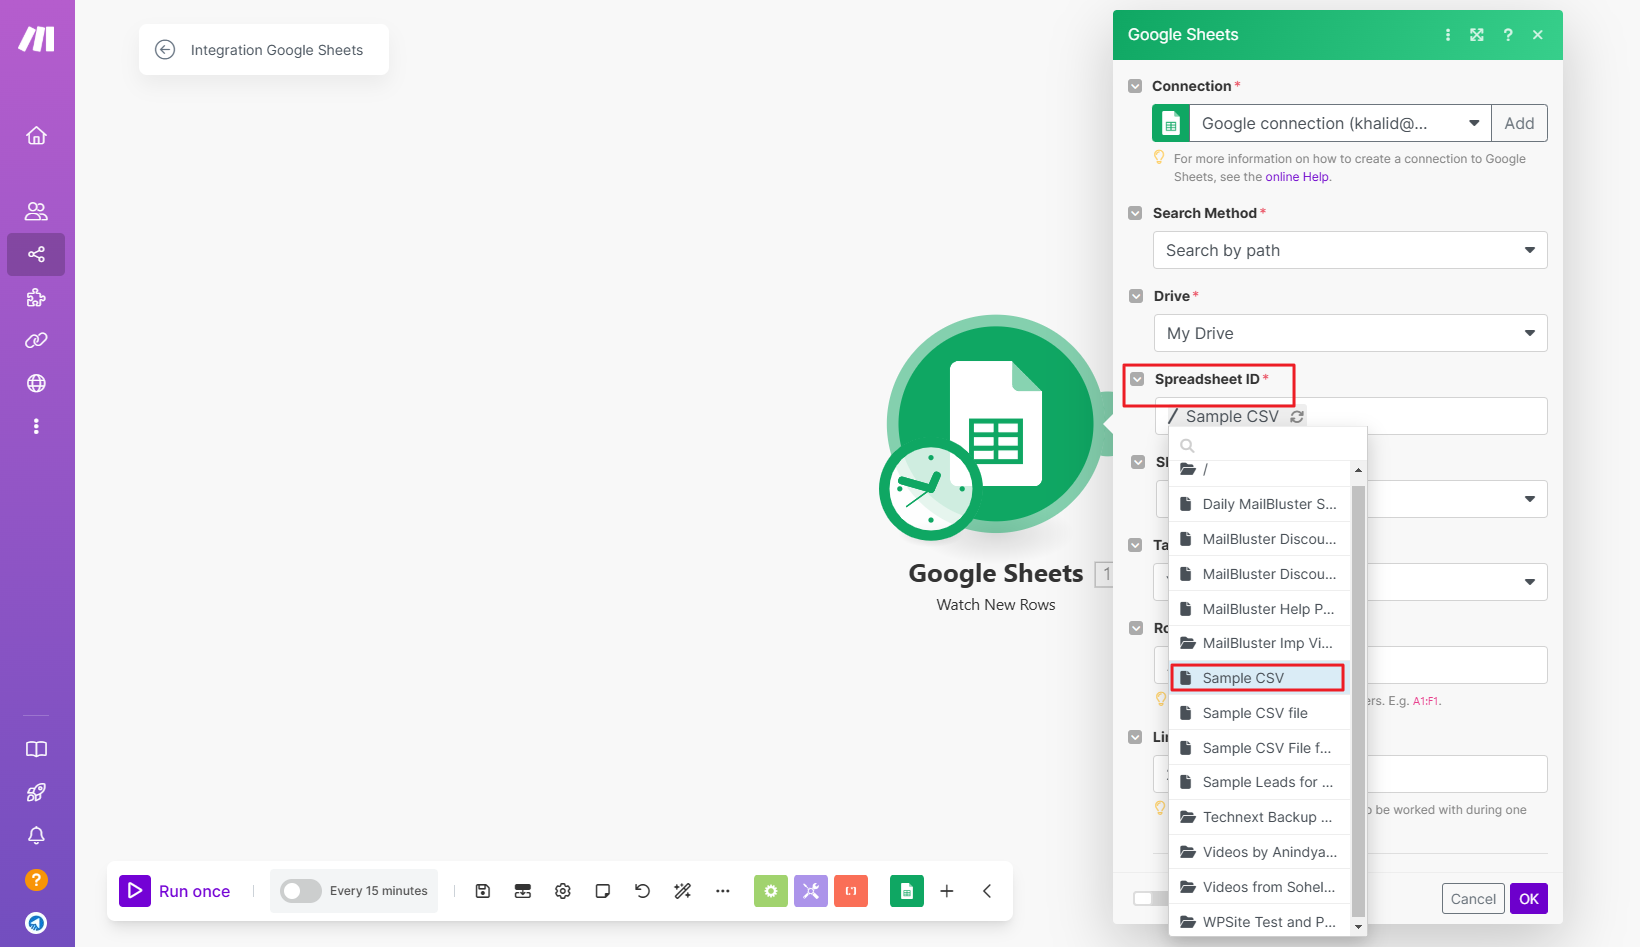
Now, select the CSV file from Spreadsheet ID. Here we have selected a Sample CSV file.
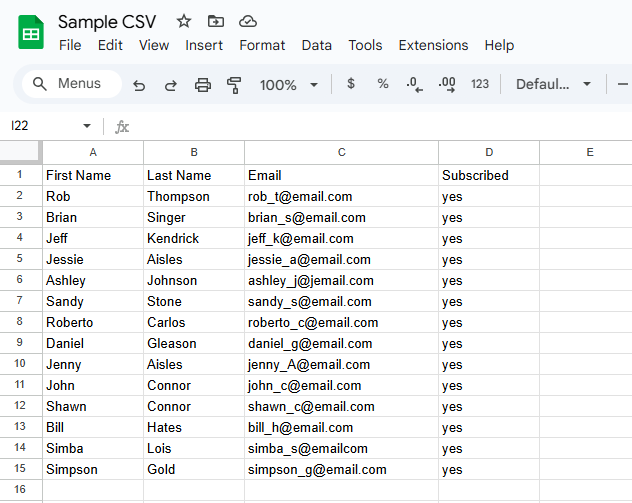
This is the Sample CSV File containing all the dummy names, leads and subscribed status.
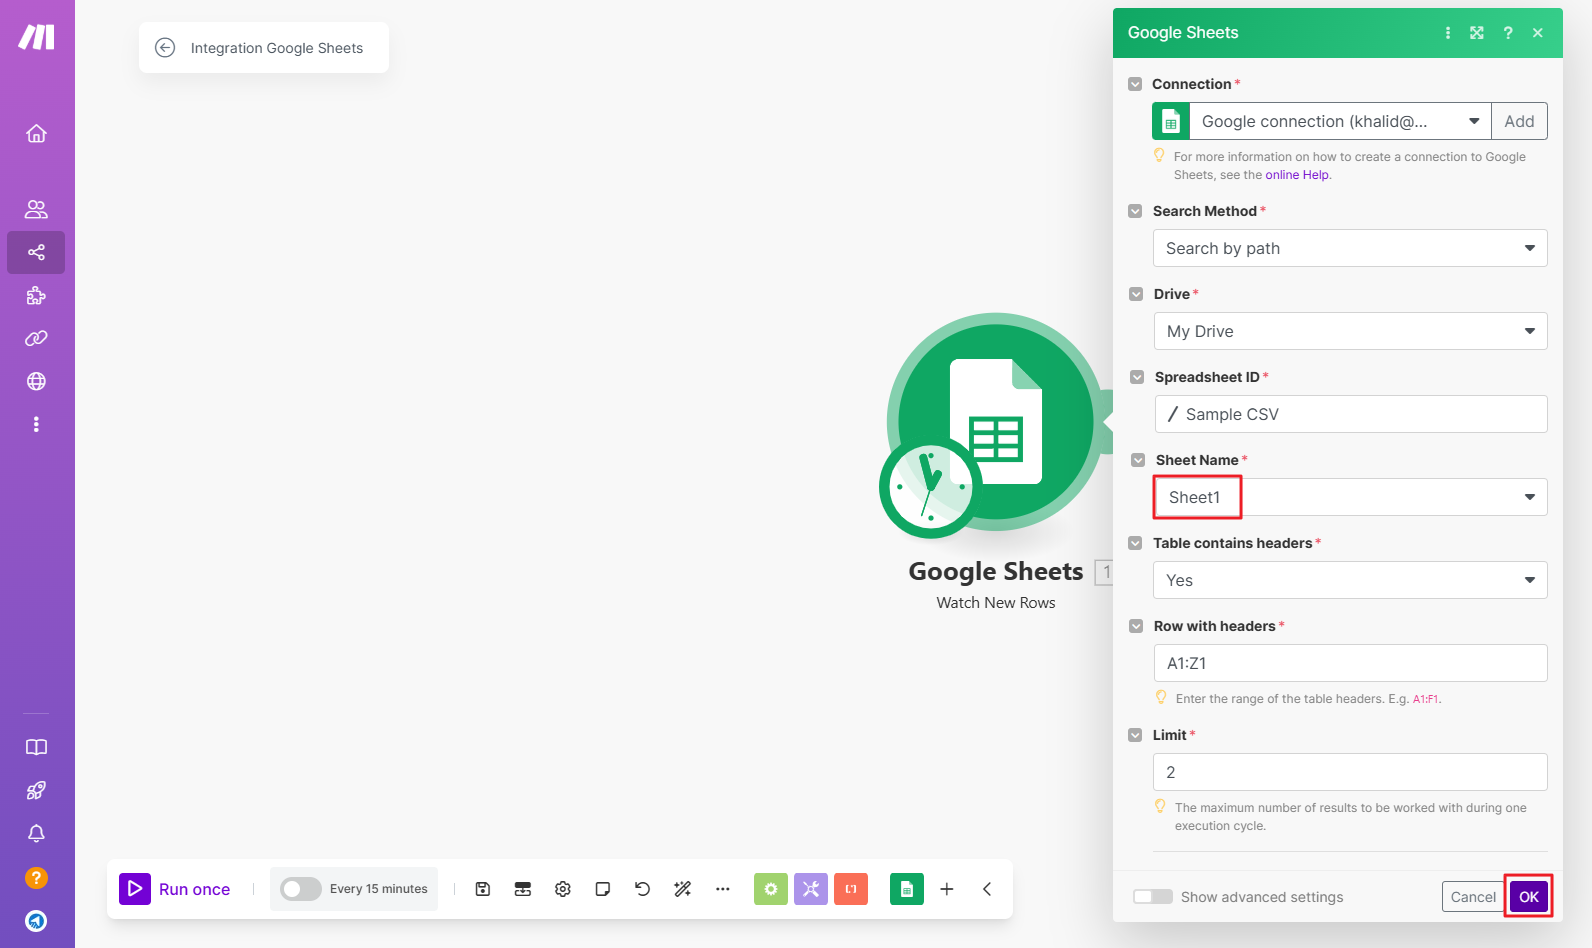
Click on the Sheet Name and select Sheet1. Then click on OK button.
Select All on the pop up box of Choose where to start. Then click OK button.
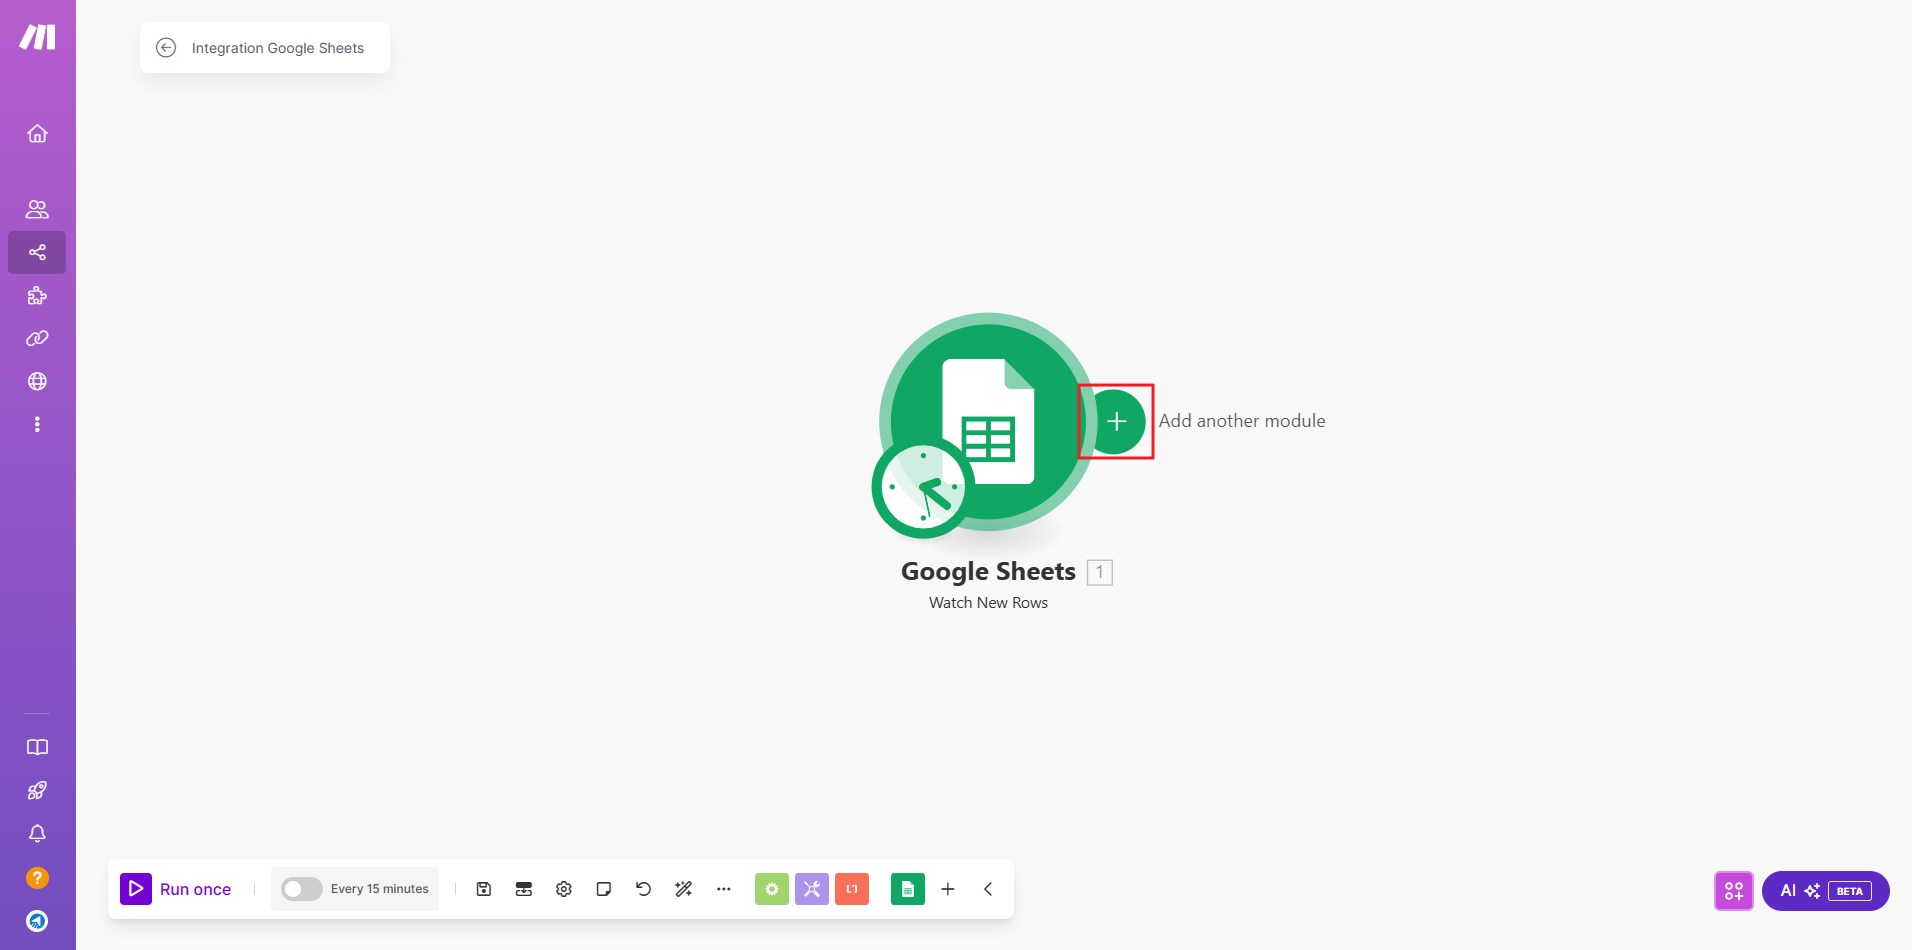
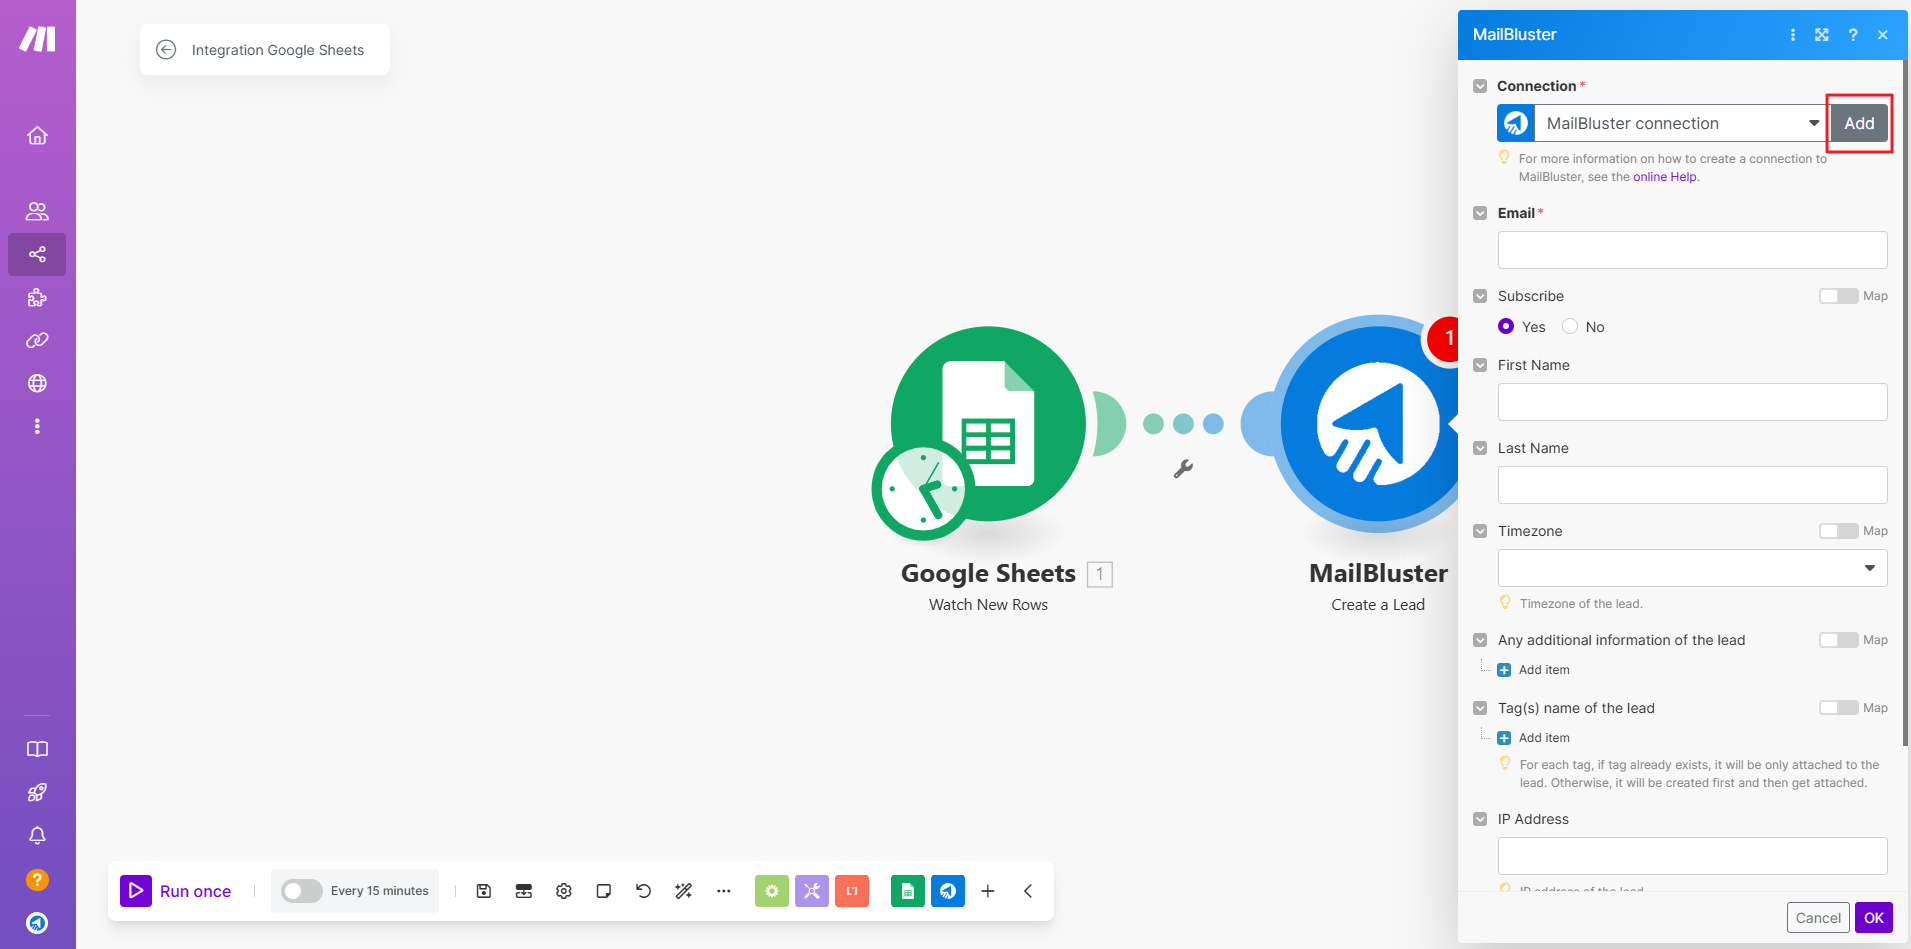
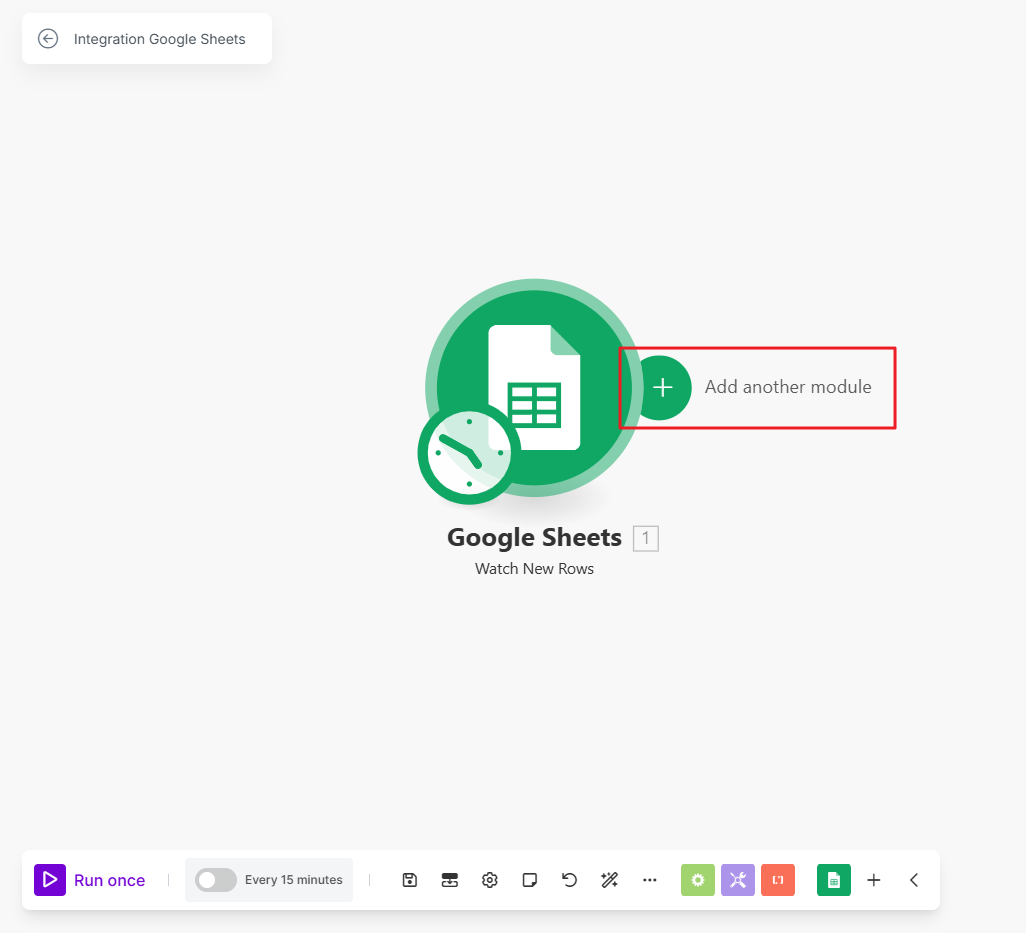
Now, it’s time to connect MailBluster with Make. Click on Add another module. Then type MailBluster in the search bar.
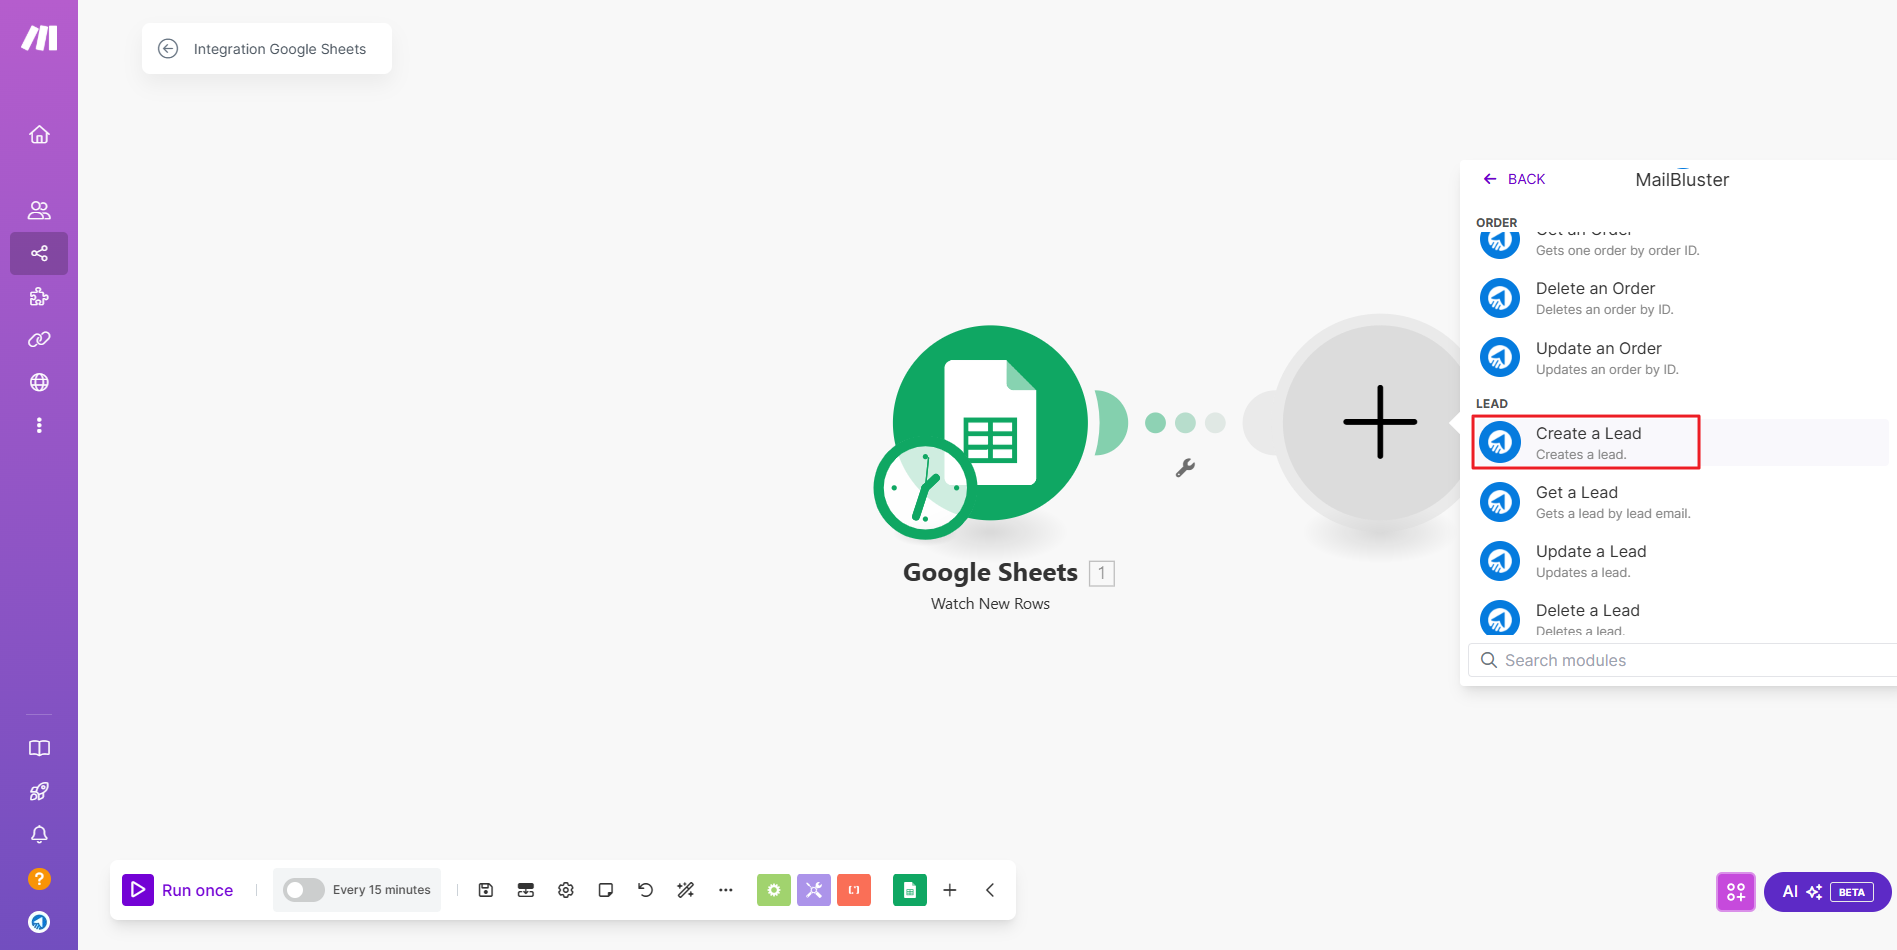
Type MailBluster and select MailBluster from the search bar.
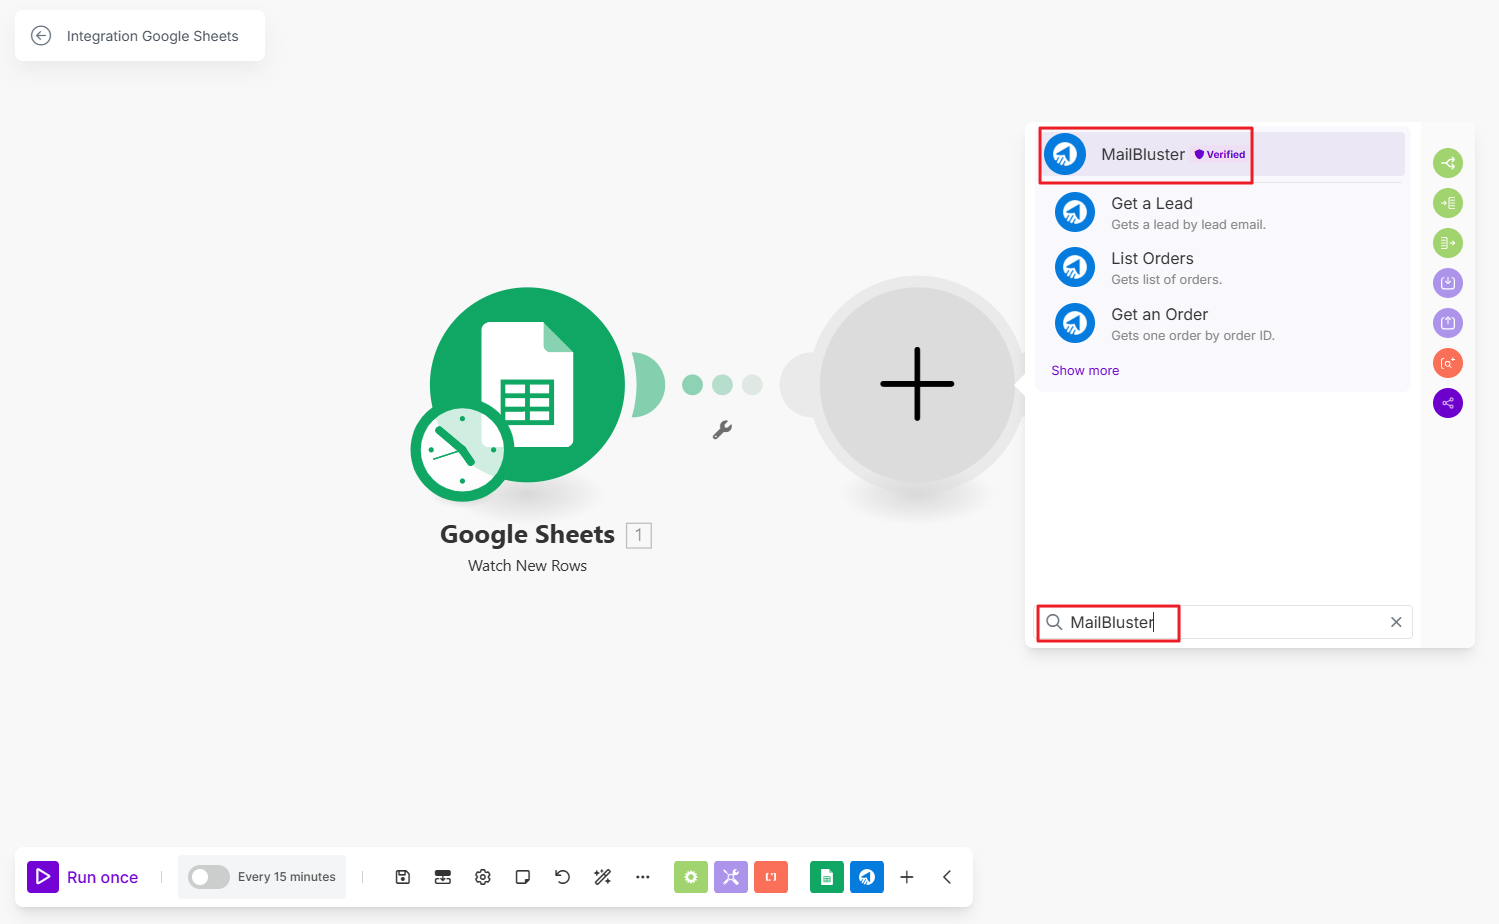
Then select Create a Lead
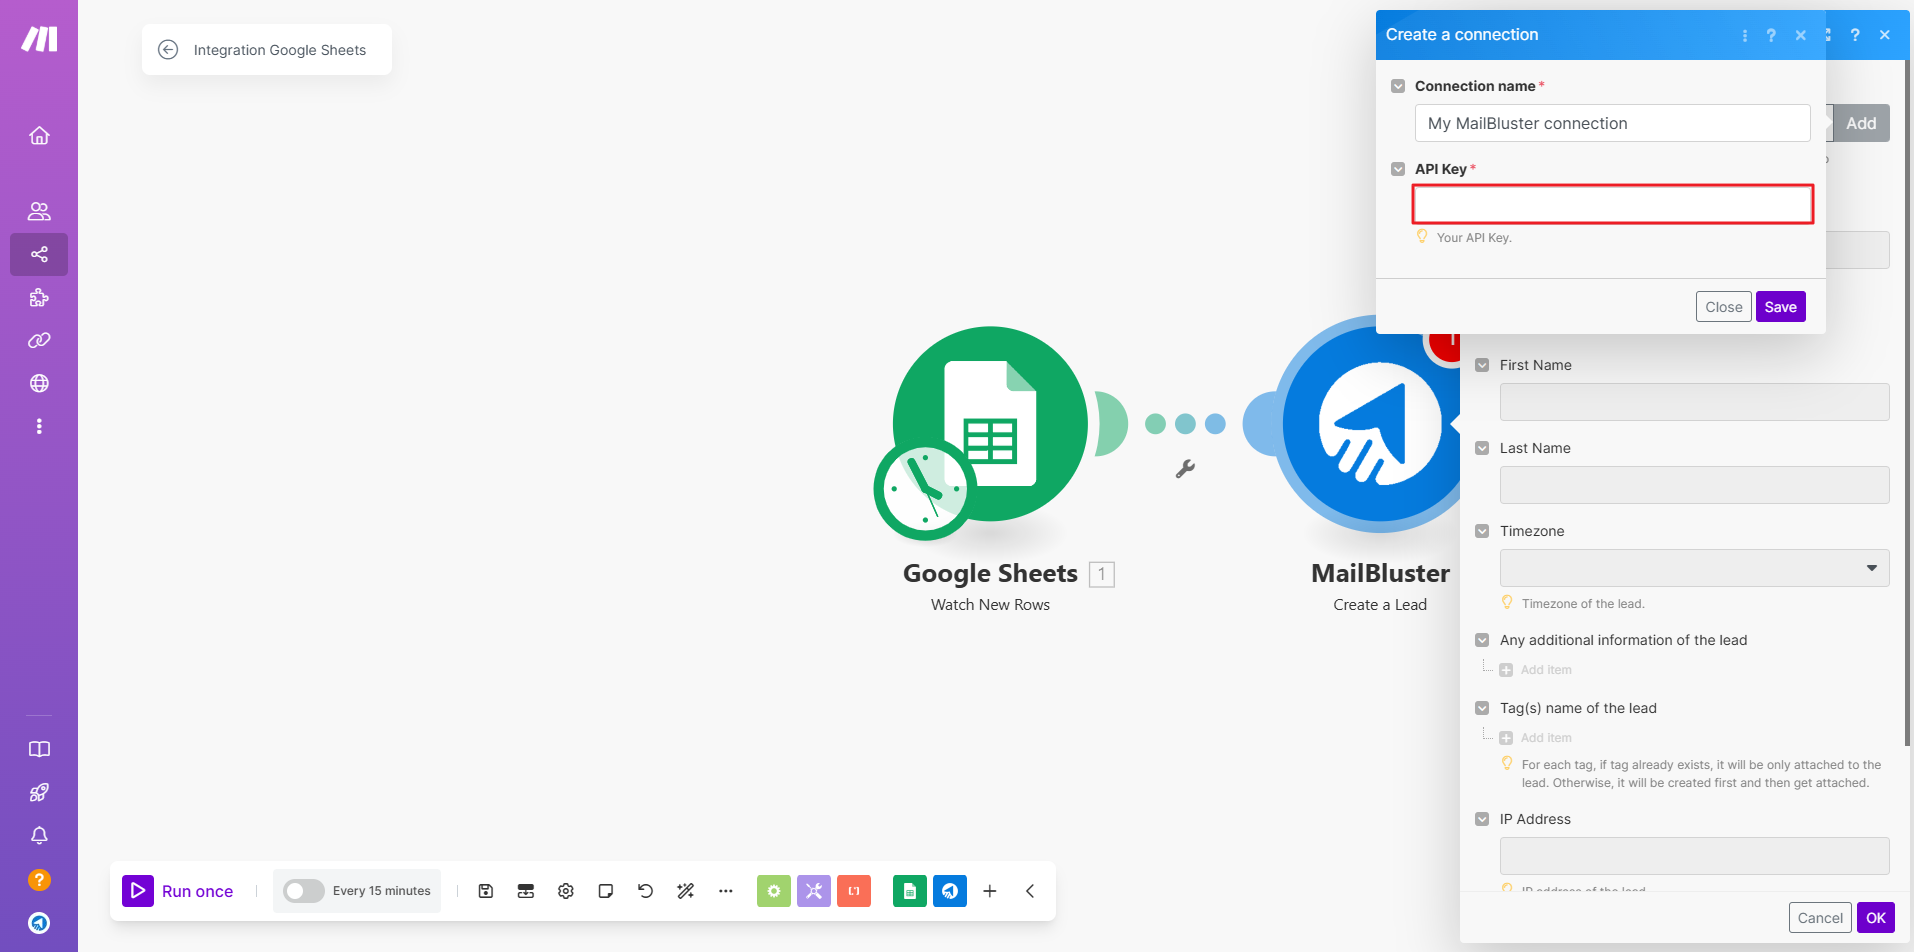
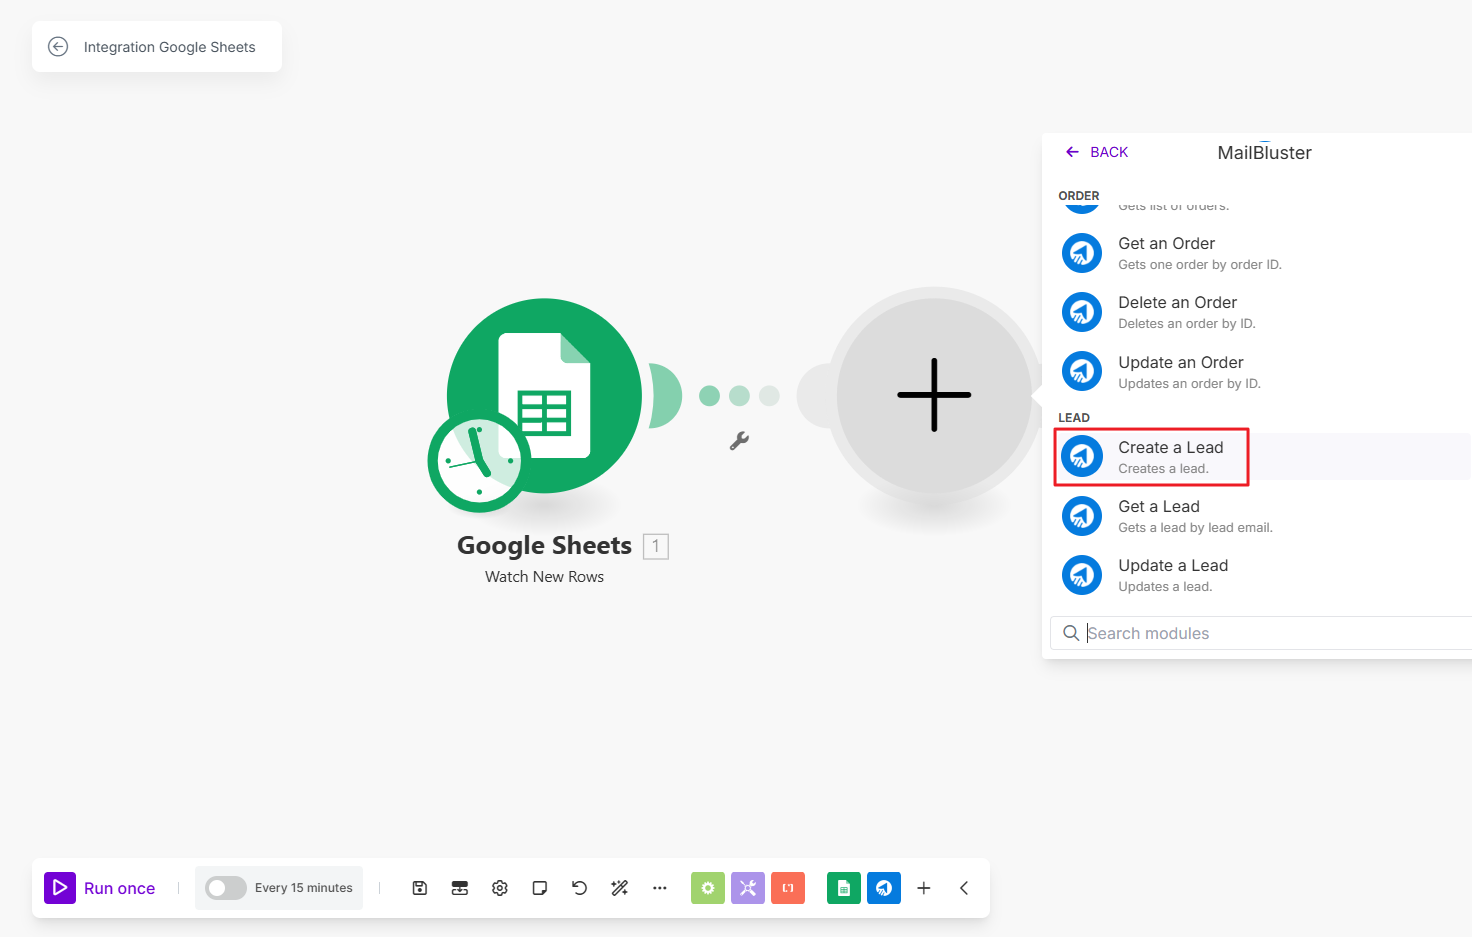
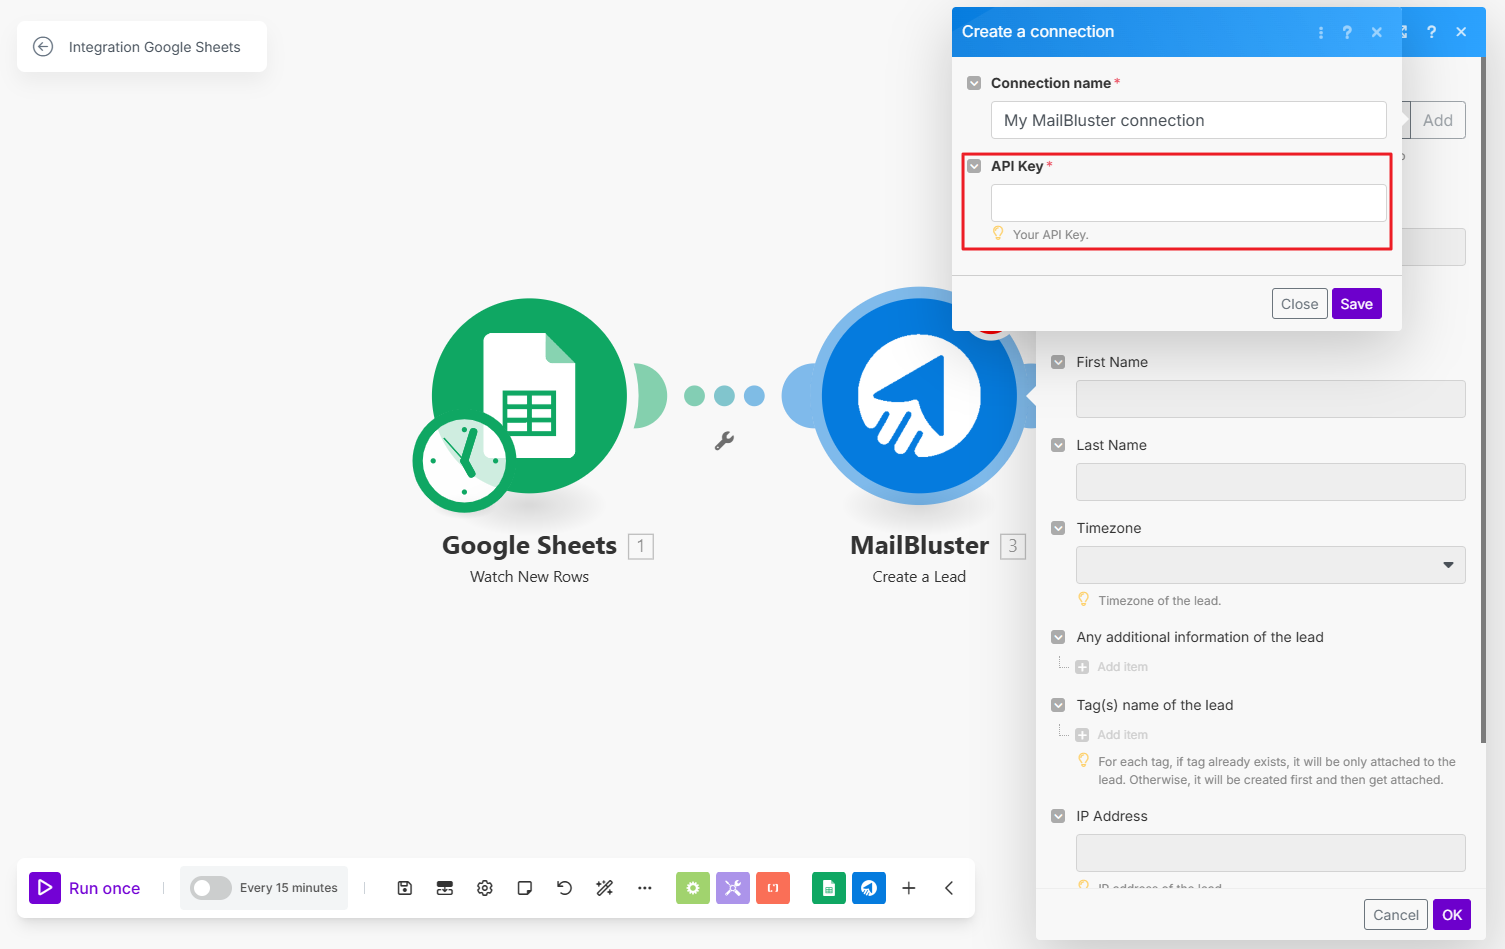
Under Connection, click on the Add button.
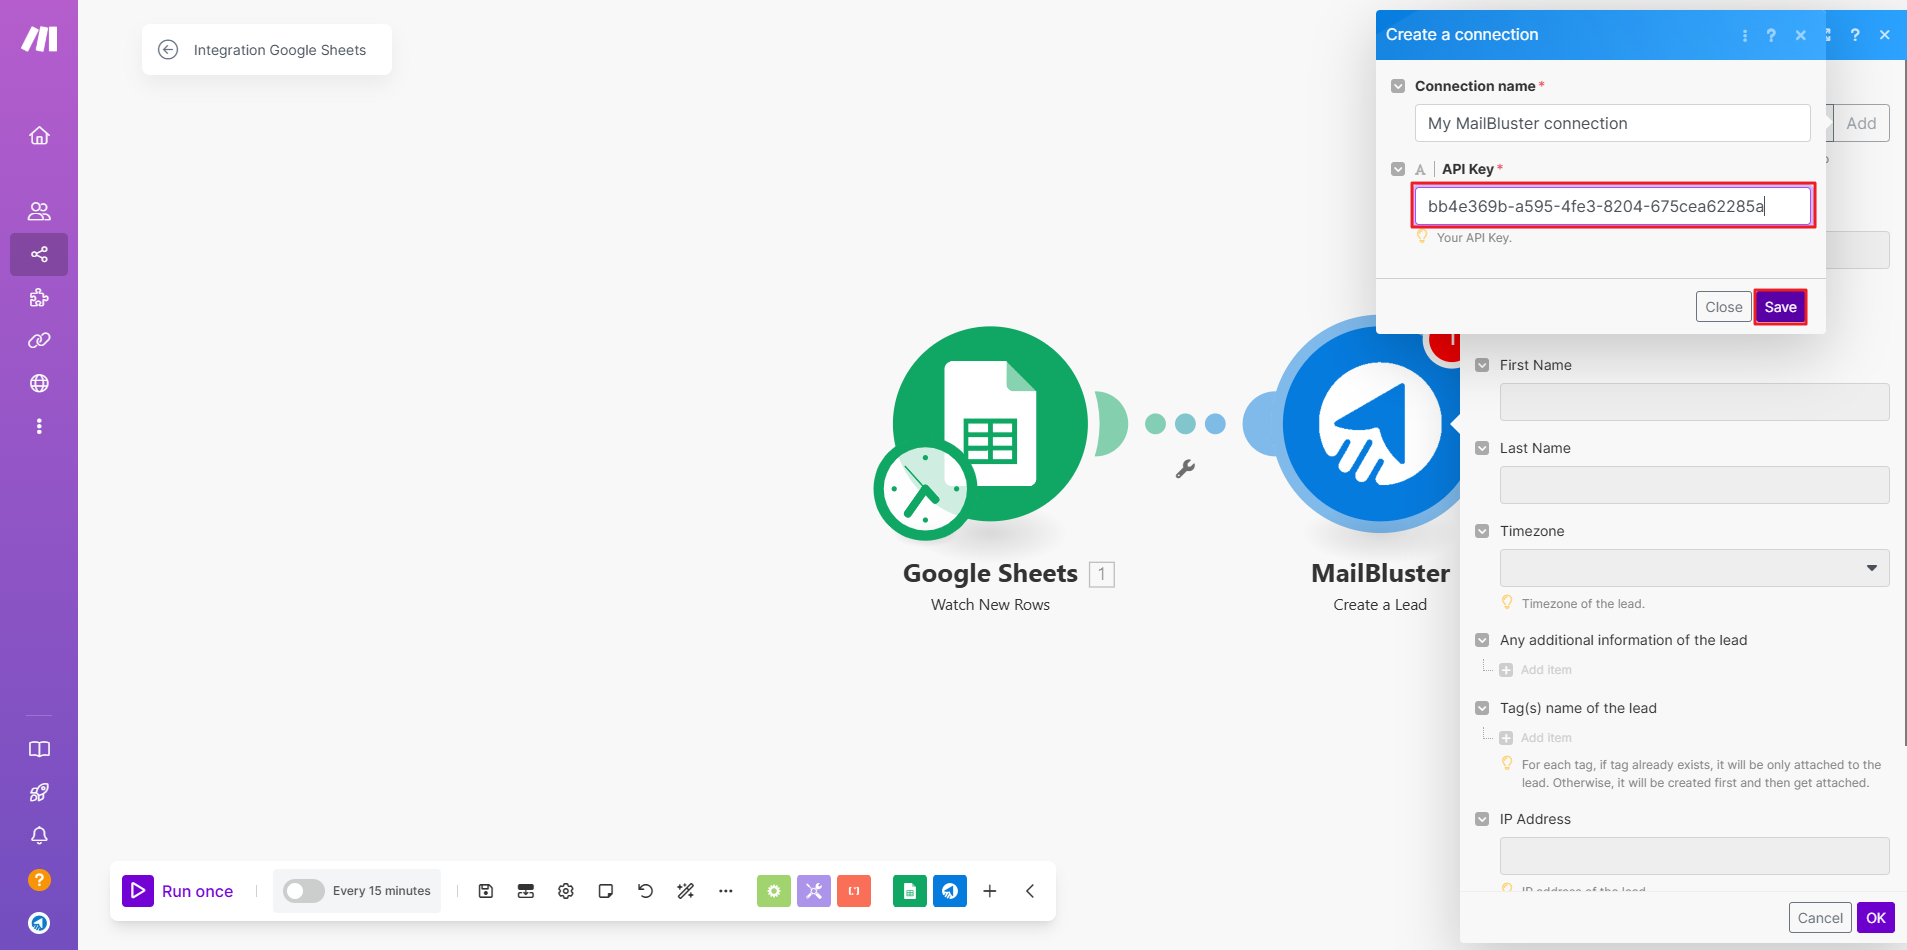
Enter the Connection name and you need to place the MailBluster API key from MailBluster.
Create an API key from MailBluster as shown below.
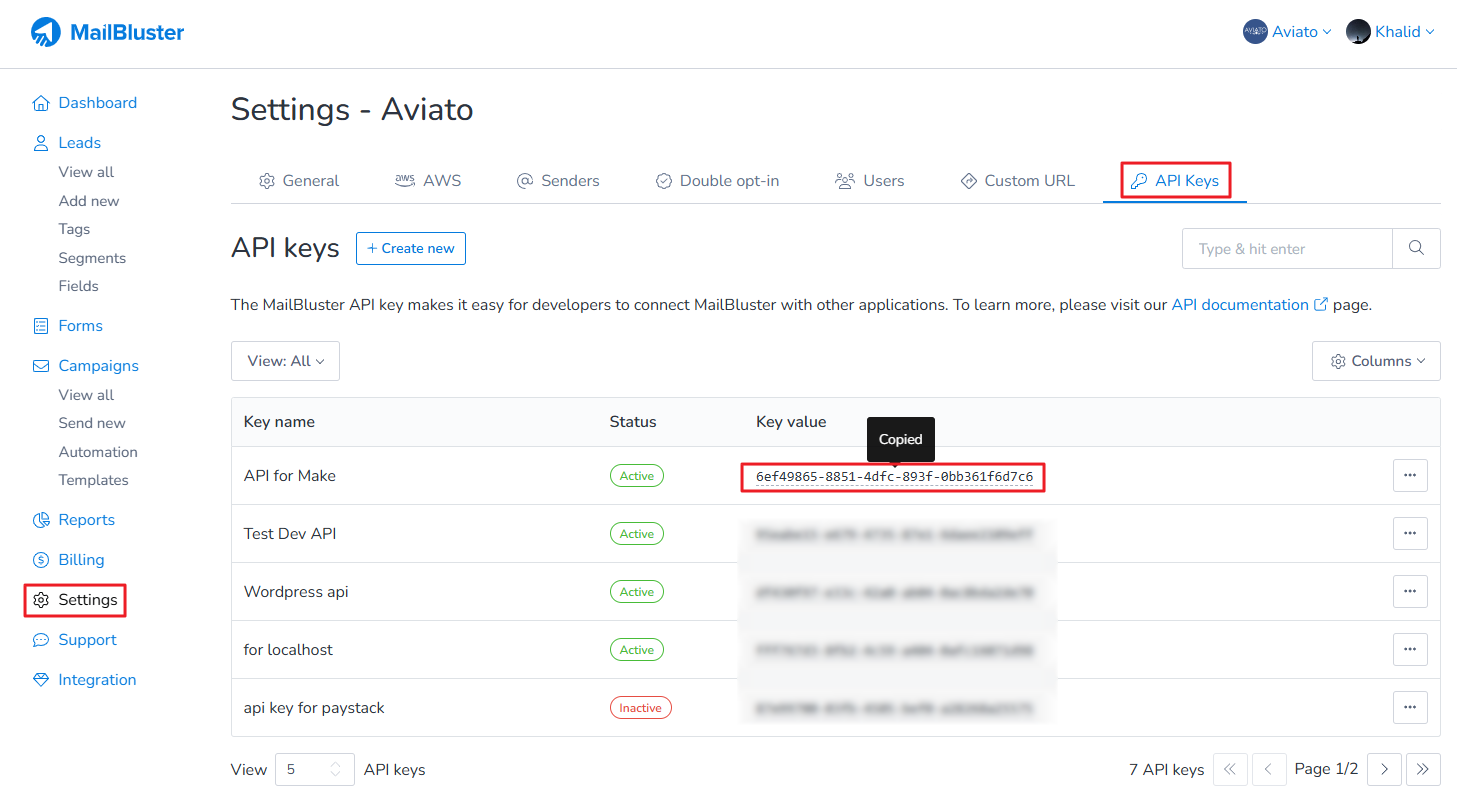
Now, copy the API key from MailBluster by clicking on the API key value.
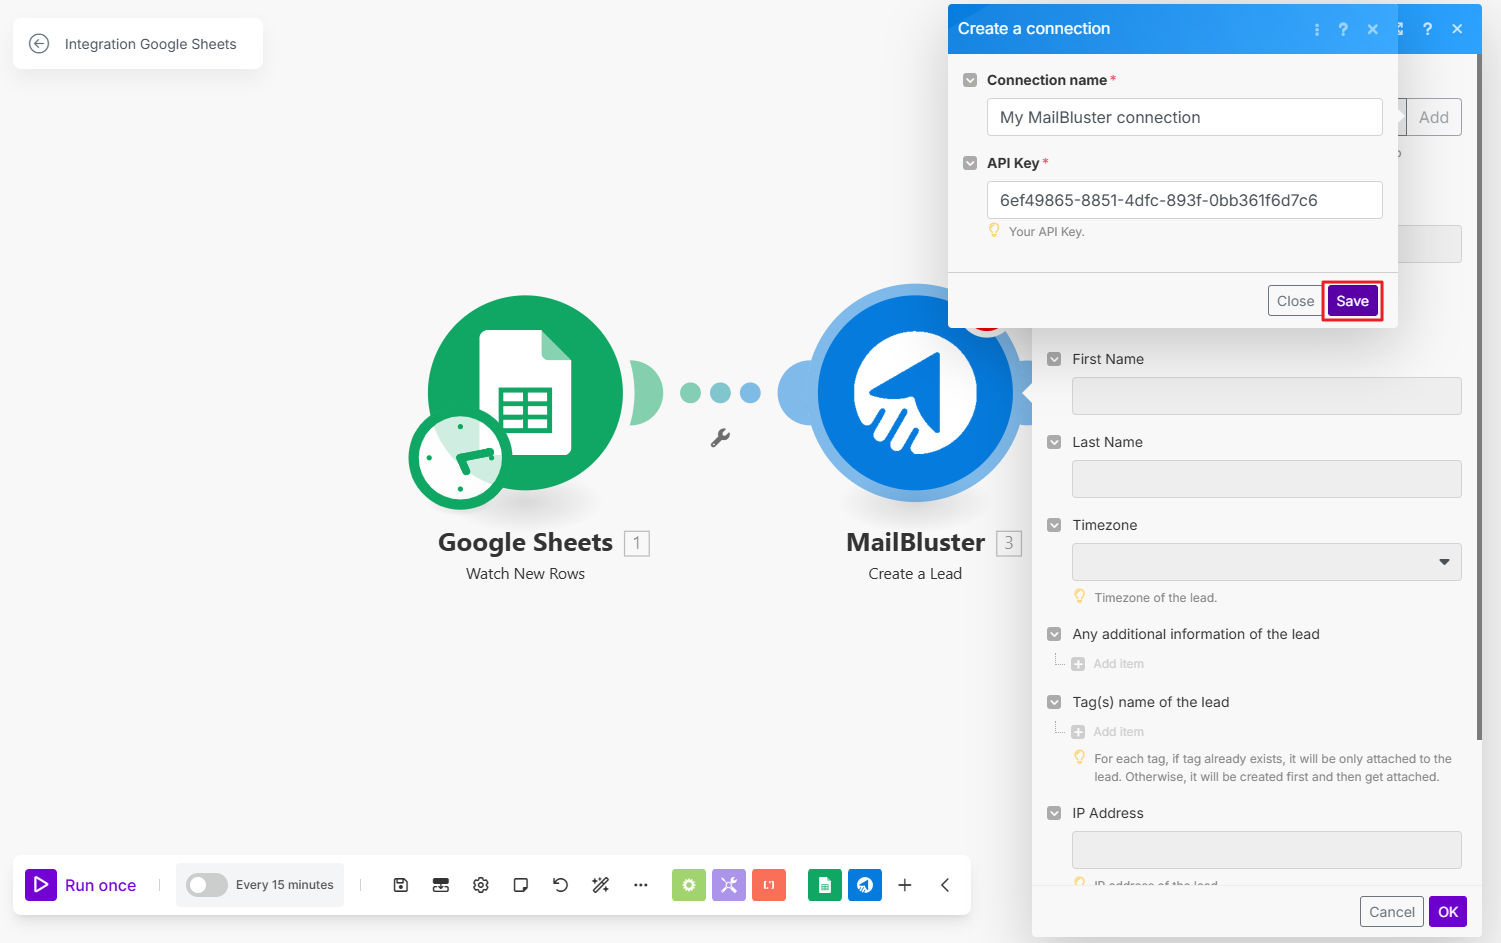
Paste the API key inside Create a connection > API Key. Then click Save button.
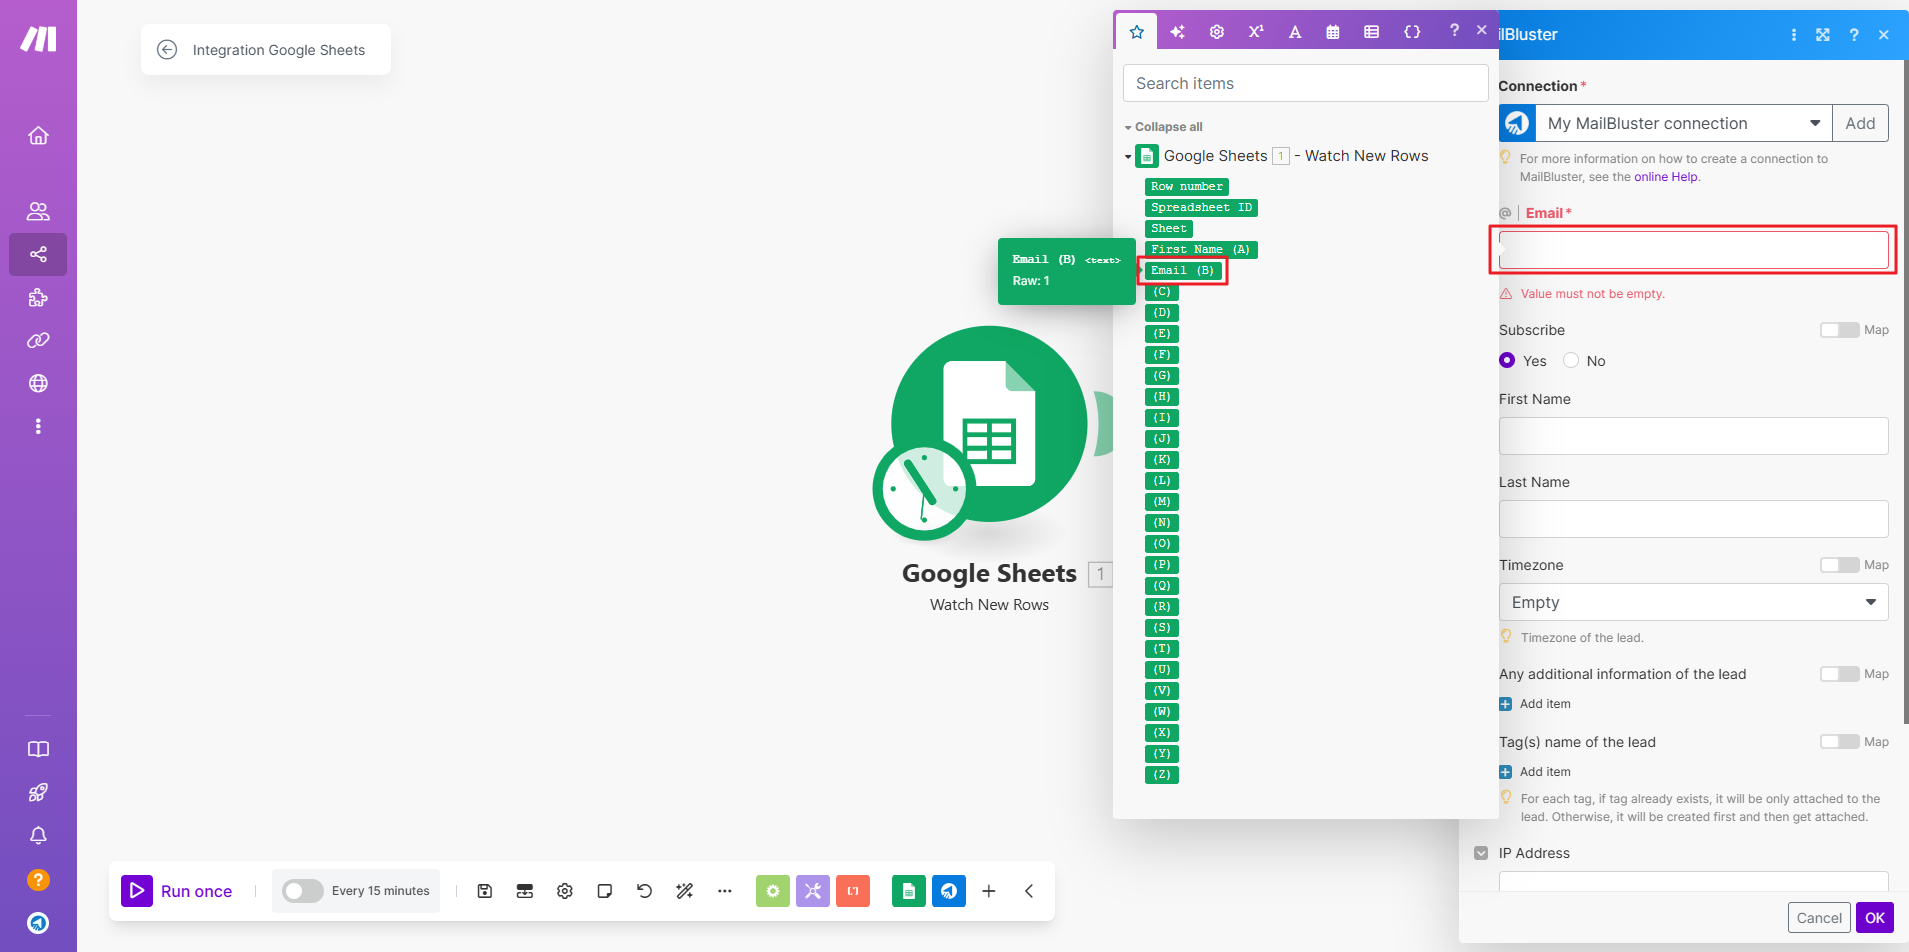
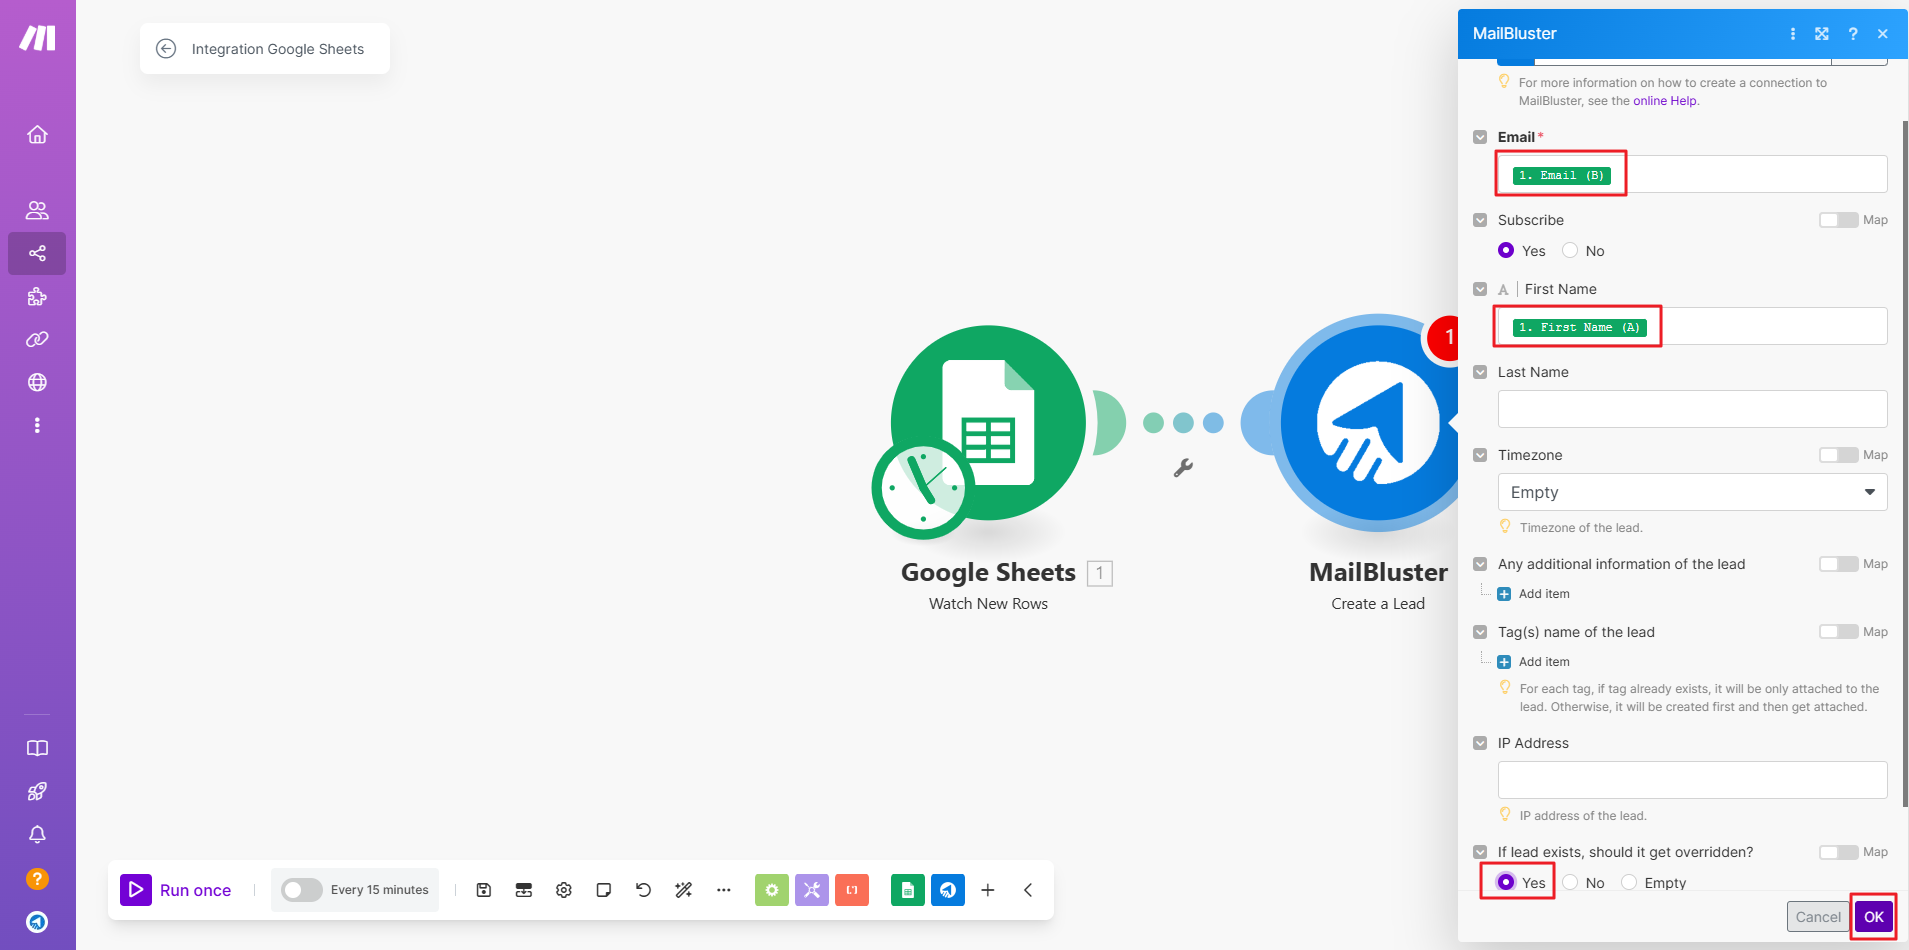
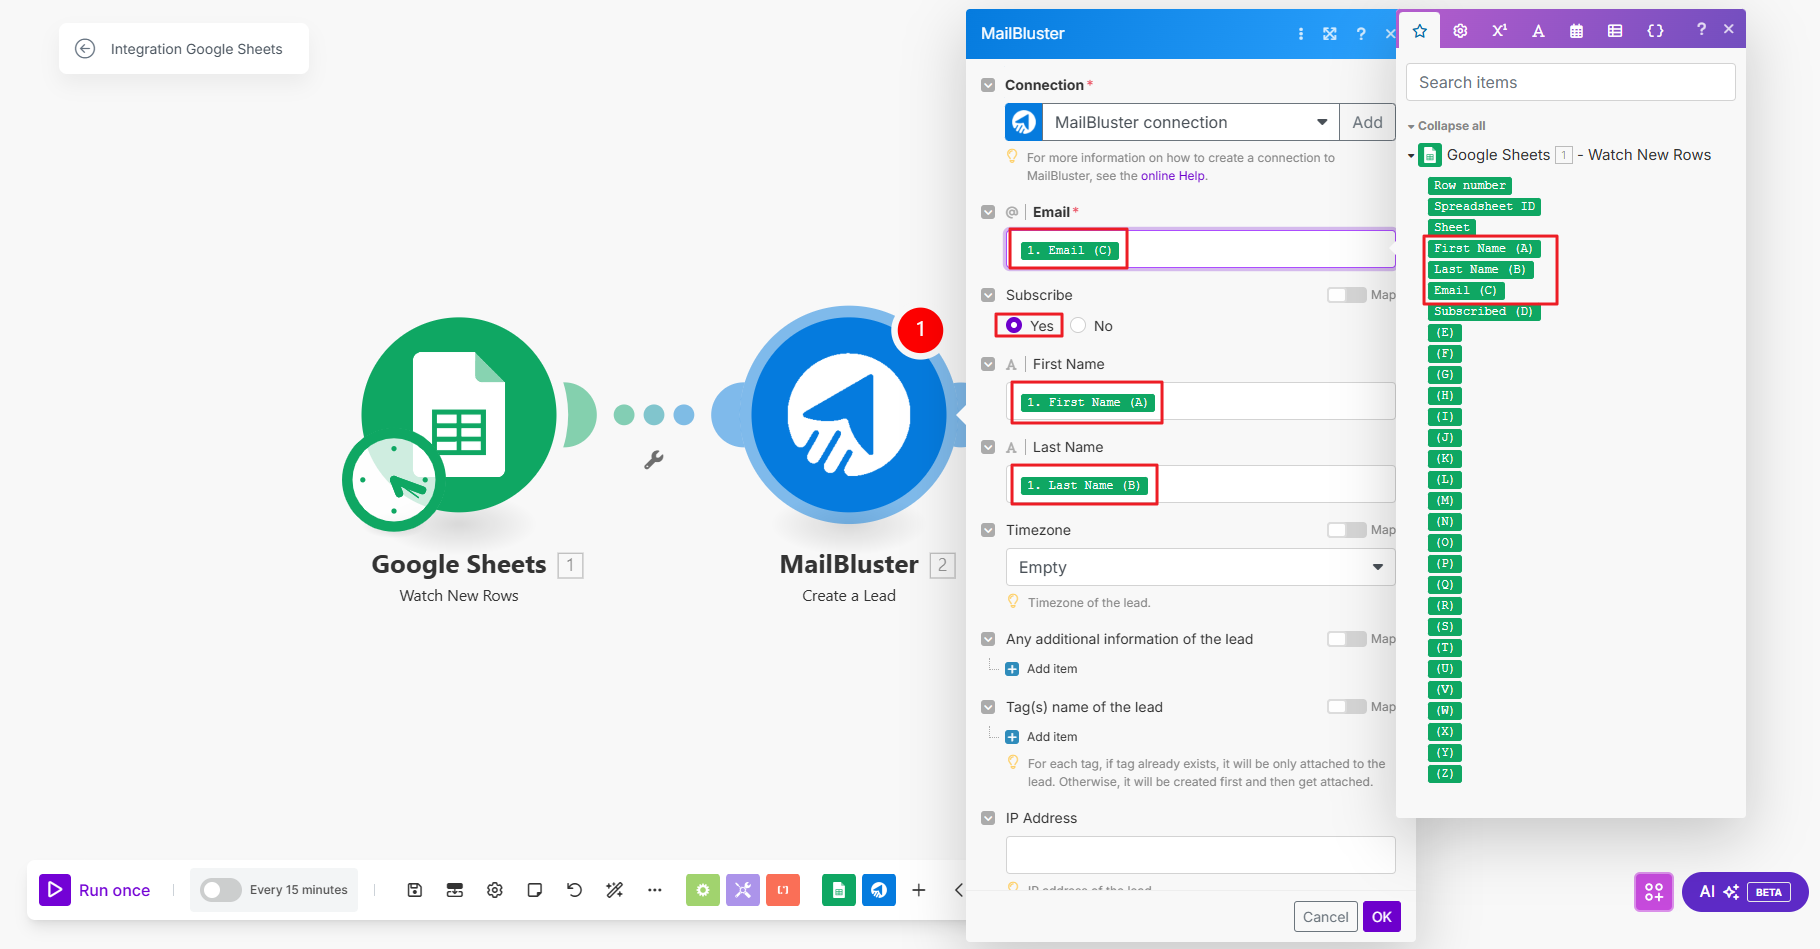
Drag and drop Email, First Name and Last Name from the popup.
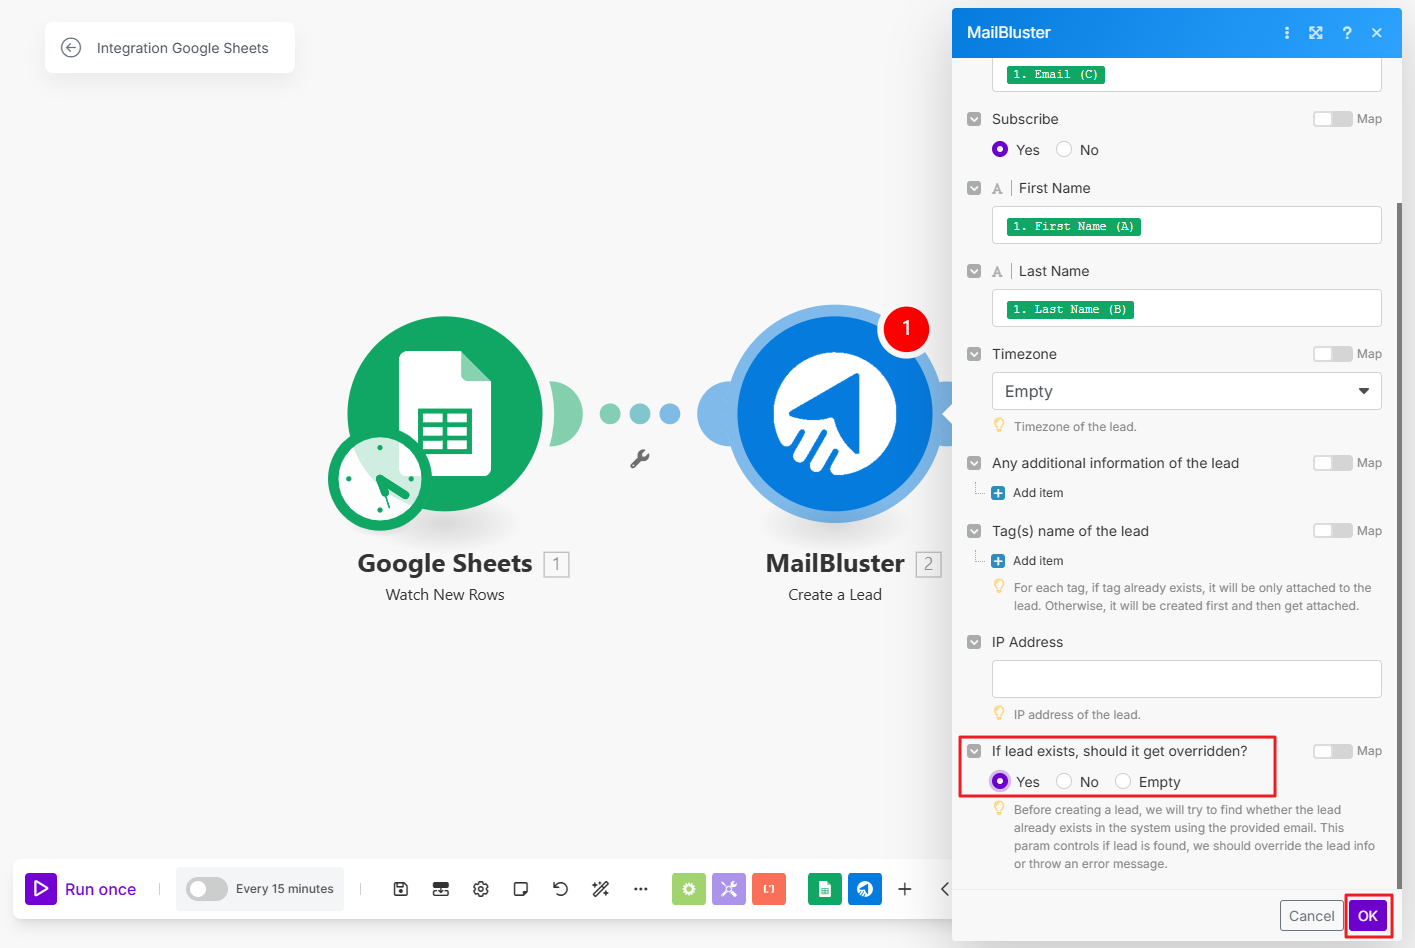
Then select Yes for the option ‘If lead exists, should it get overridden’ and then click OK button.
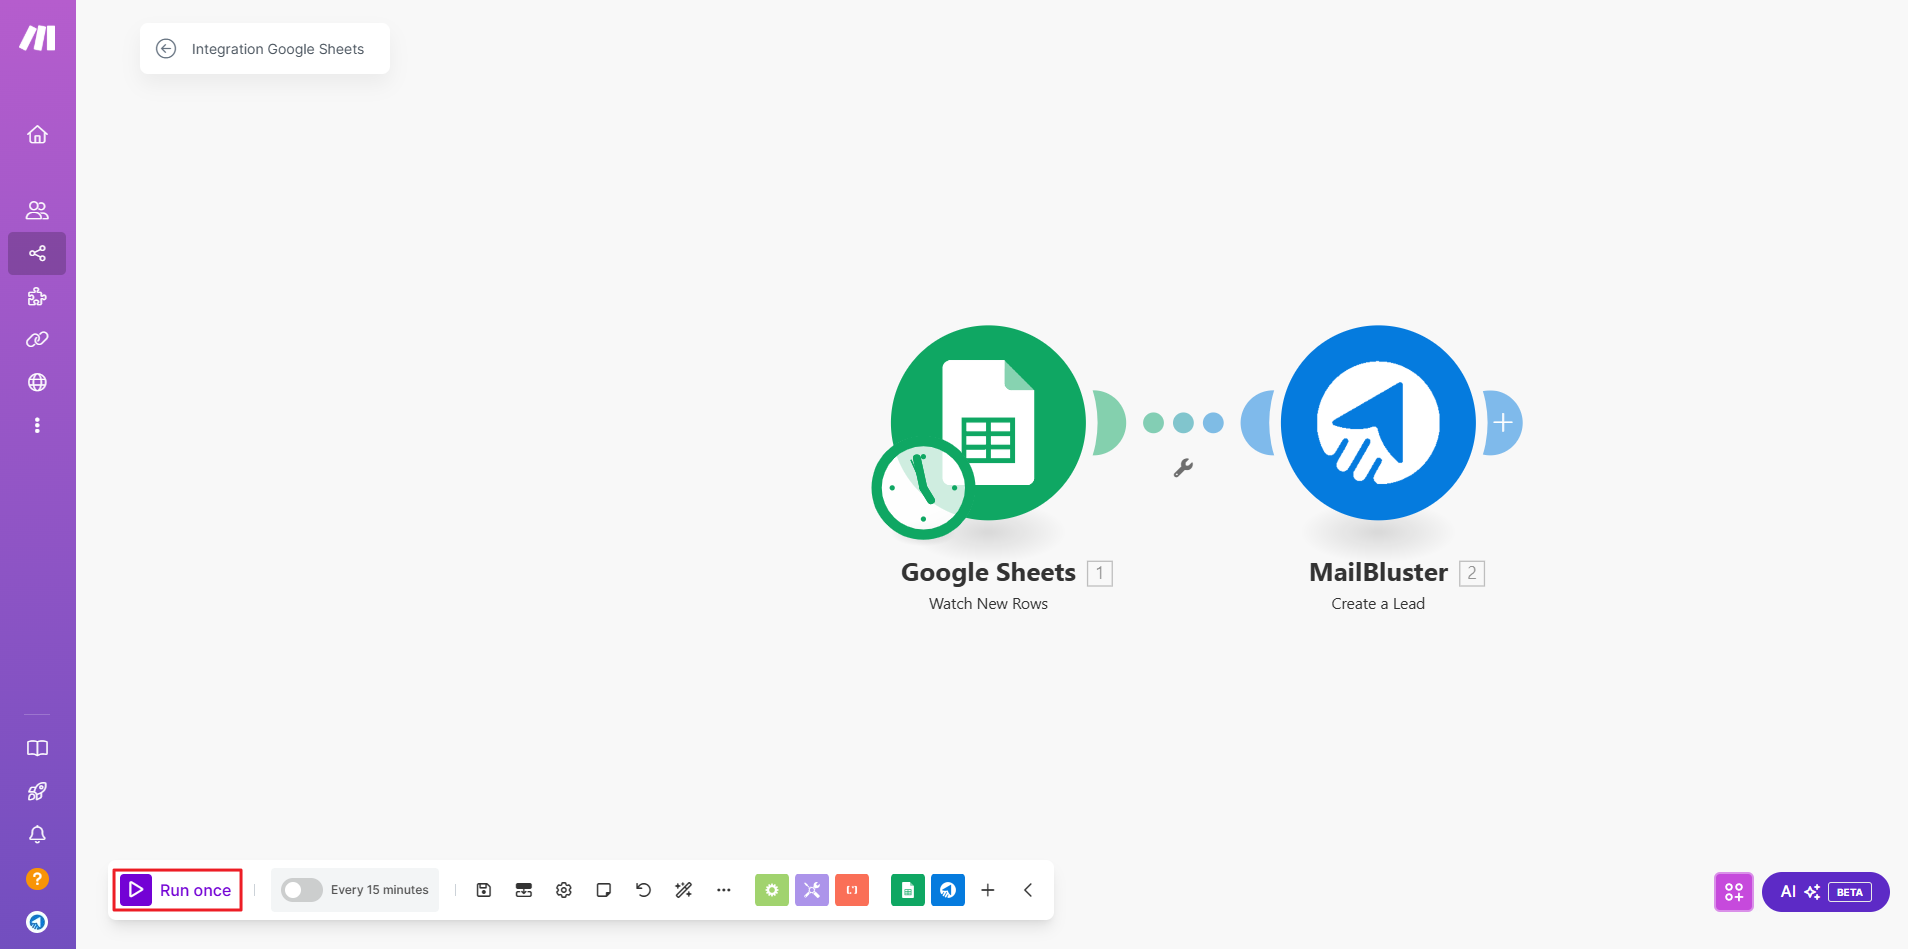
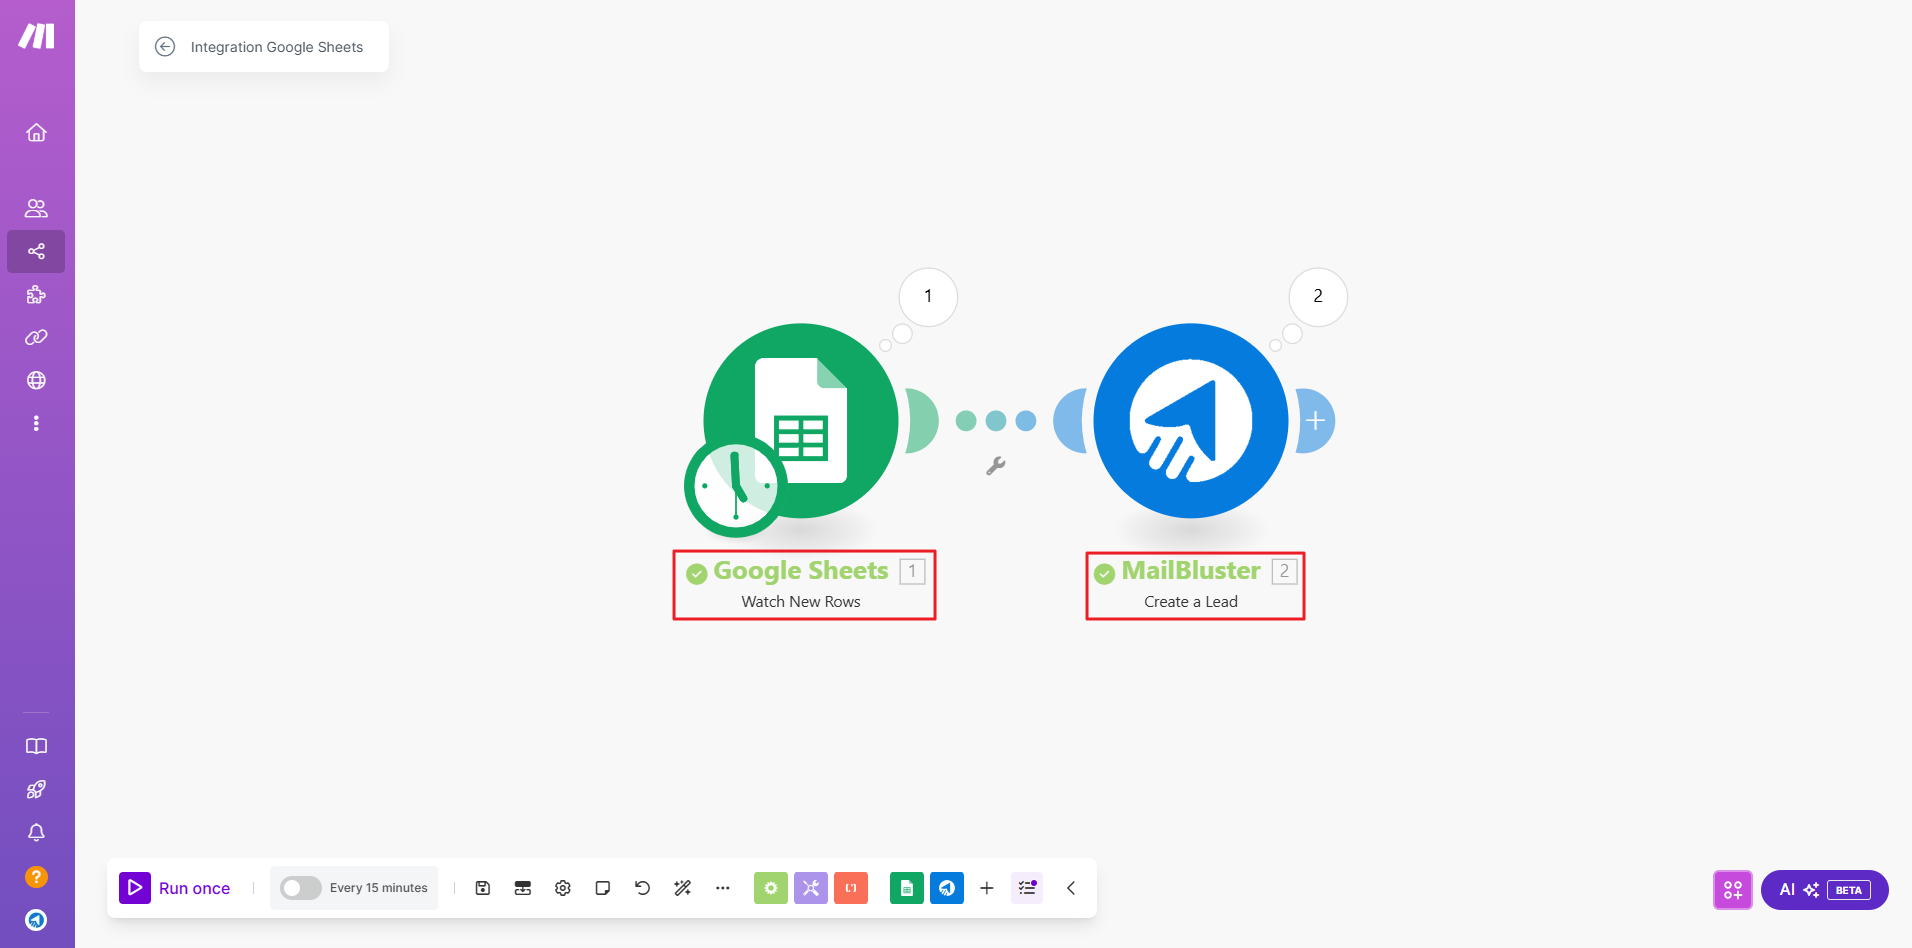
Click Save to save the process and then click Run once. You can see at the bottom left corner that a process will run.
If successful, you will see a message saying ‘The scenario run was completed’ and both Google Sheets and MailBluster font will turn green as shown below. You can also schedule the scenario to run at a specific time. Click on ‘Scheduling,’ and a schedule settings box will appear. If your Google Sheet is updated with new leads, the scheduled run will ensure the automation process stays up to date.
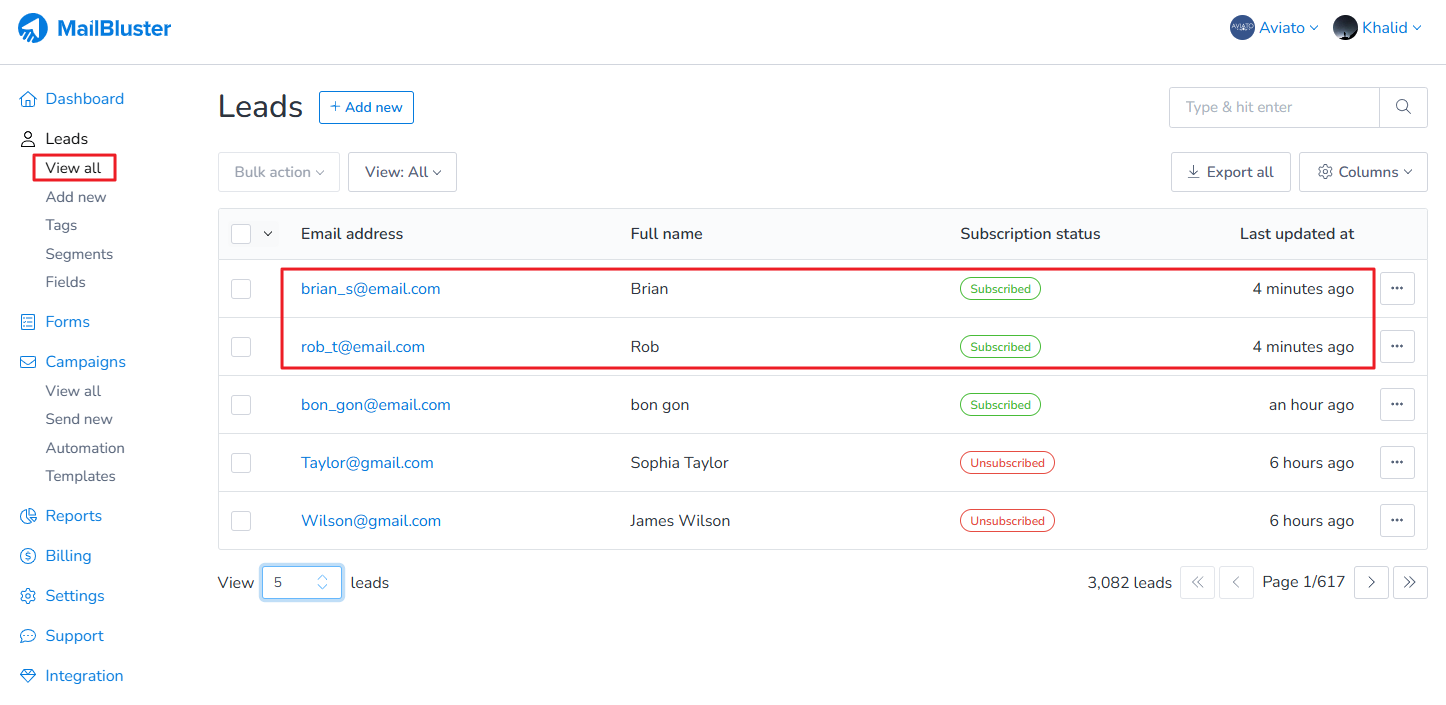
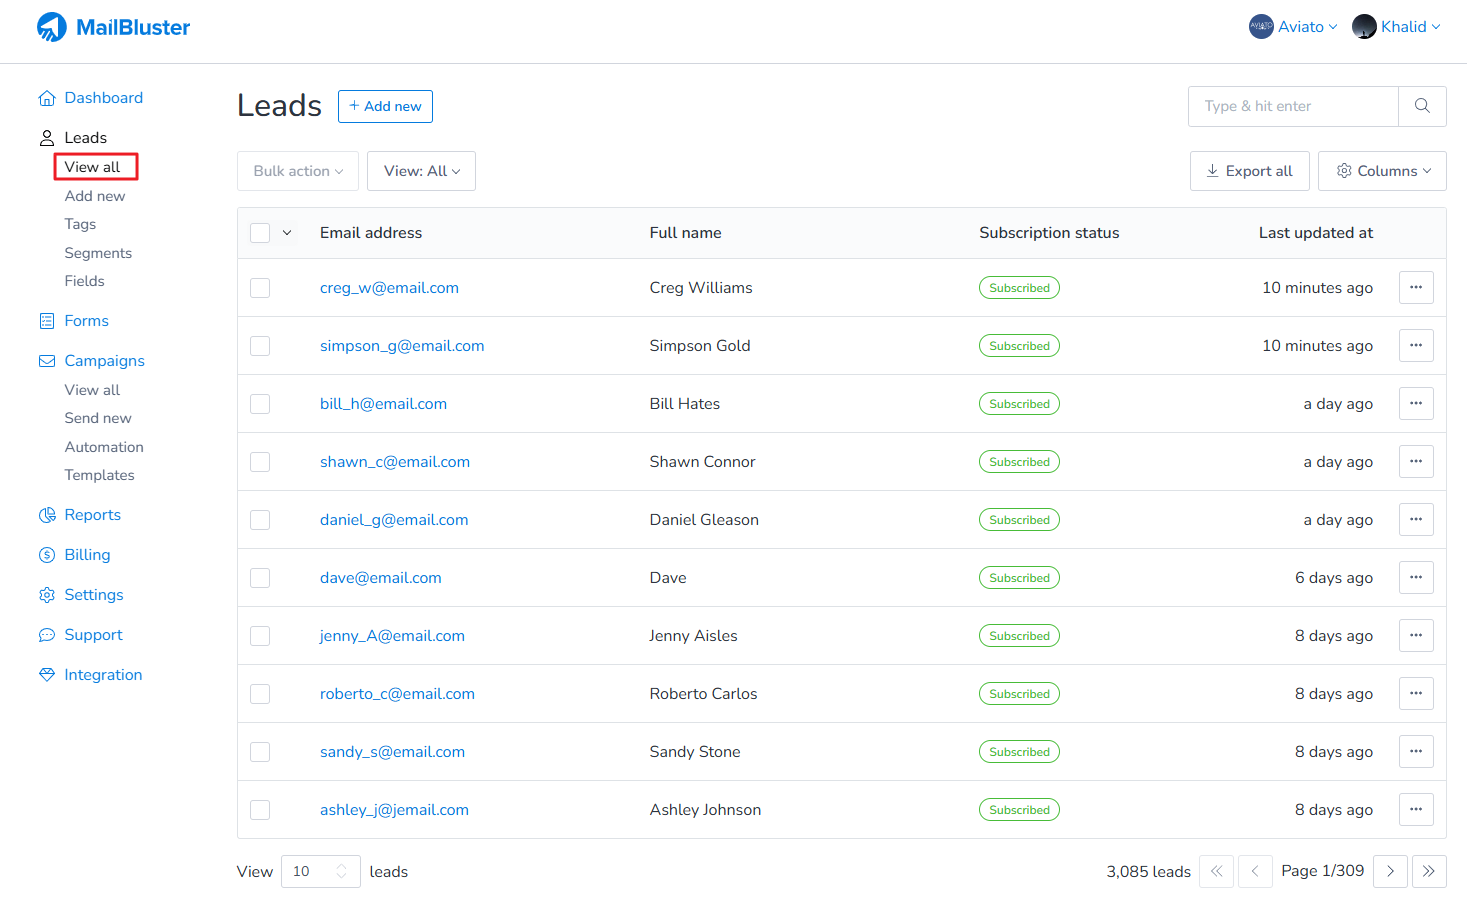
Now, if you go to MailBluster and check the Leads section, you’ll see that the leads from the Sample CSV file have been automatically added.
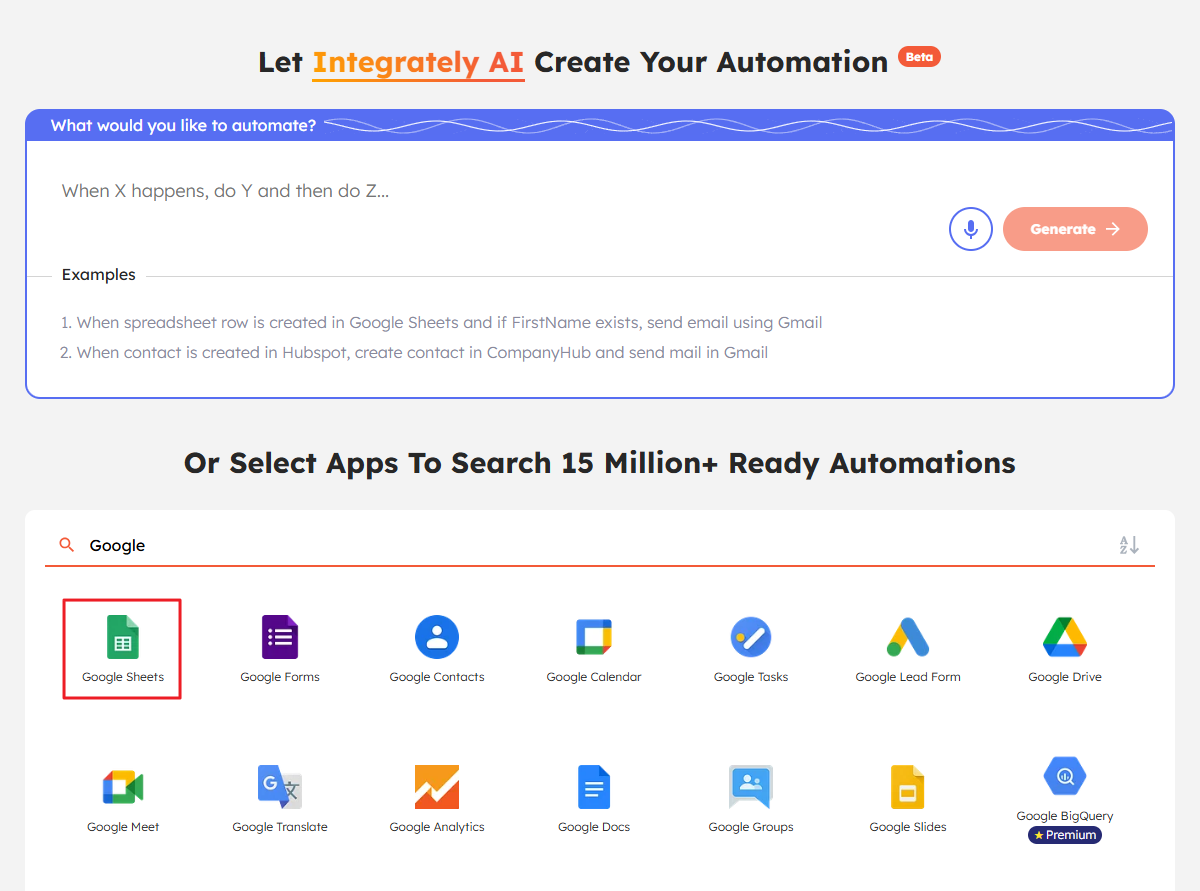
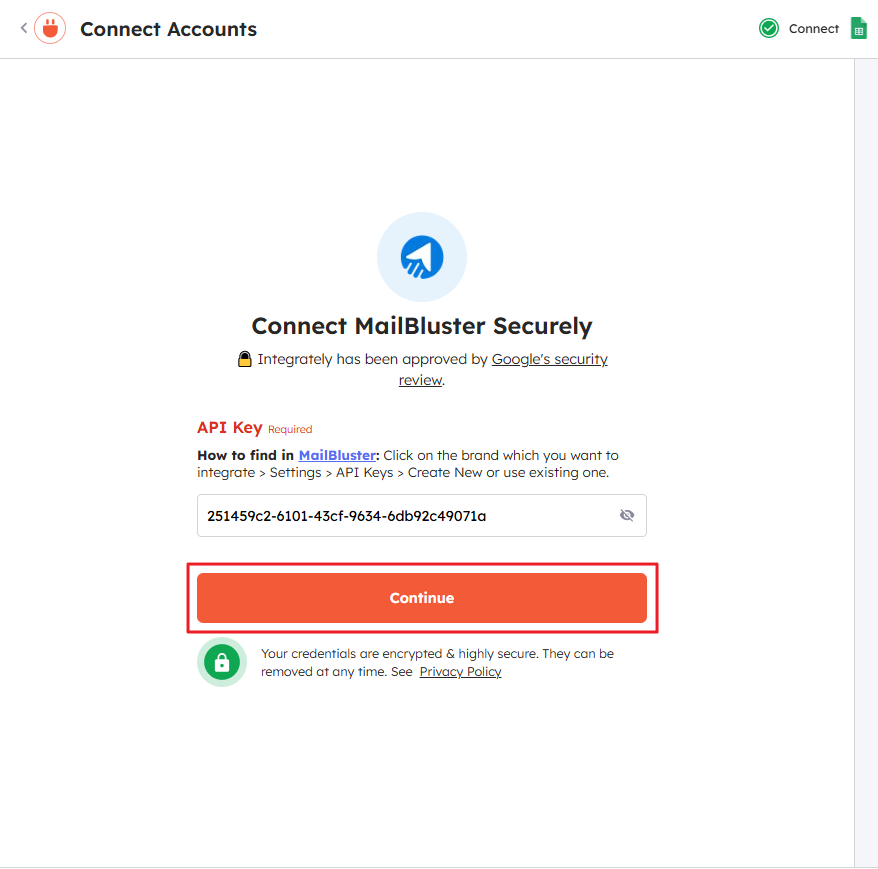
If you’re looking to set up an Integrately integration with MailBluster, this guide will walk you through the process step by step. Integrately is a cloud-based automation platform designed to connect apps and services to streamline workflows and reduce manual effort. It enables users to automate repetitive tasks by creating “automations” between different applications without needing to write code. Integrately is an alternative to tools like Zapier and Make, offering simple and intuitive workflows with a large catalog of pre-built integrations. Integrately is ideal for businesses and individuals looking to save time, improve efficiency, and eliminate the need for repetitive manual tasks.
Sign in to Integrately with your credentials or use Continue with Google.
Type “Google” and select “Google Sheets” from the list of apps.
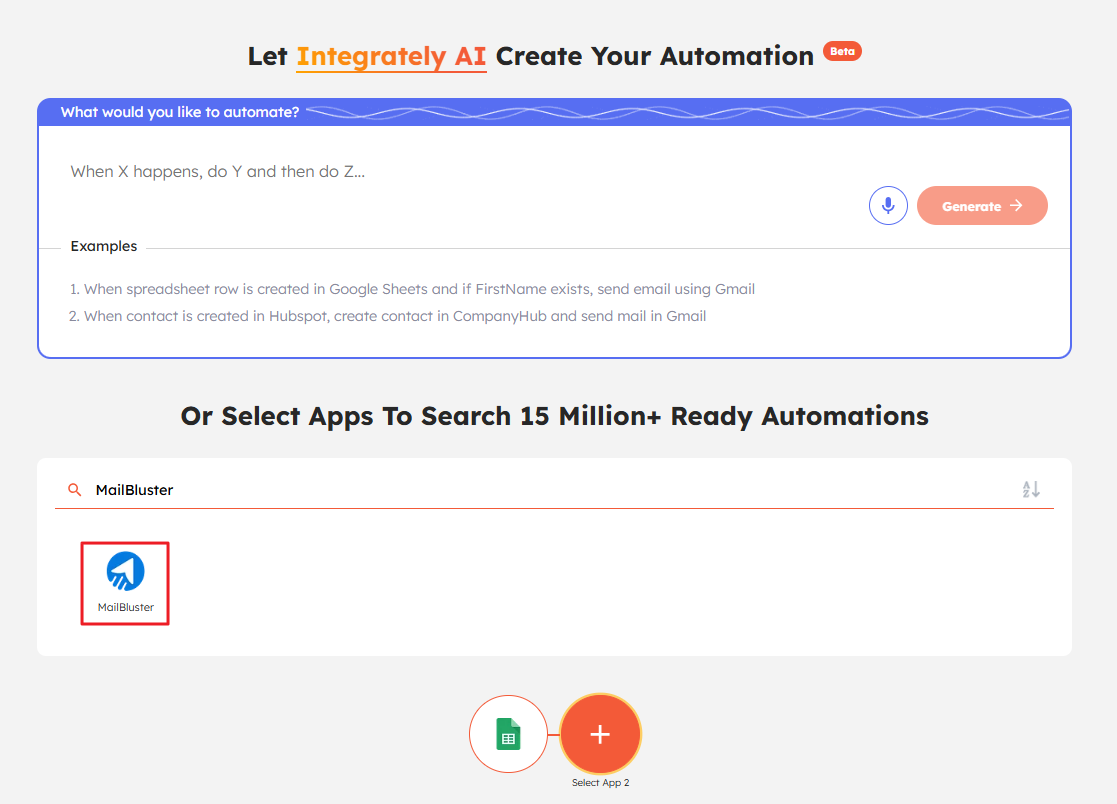
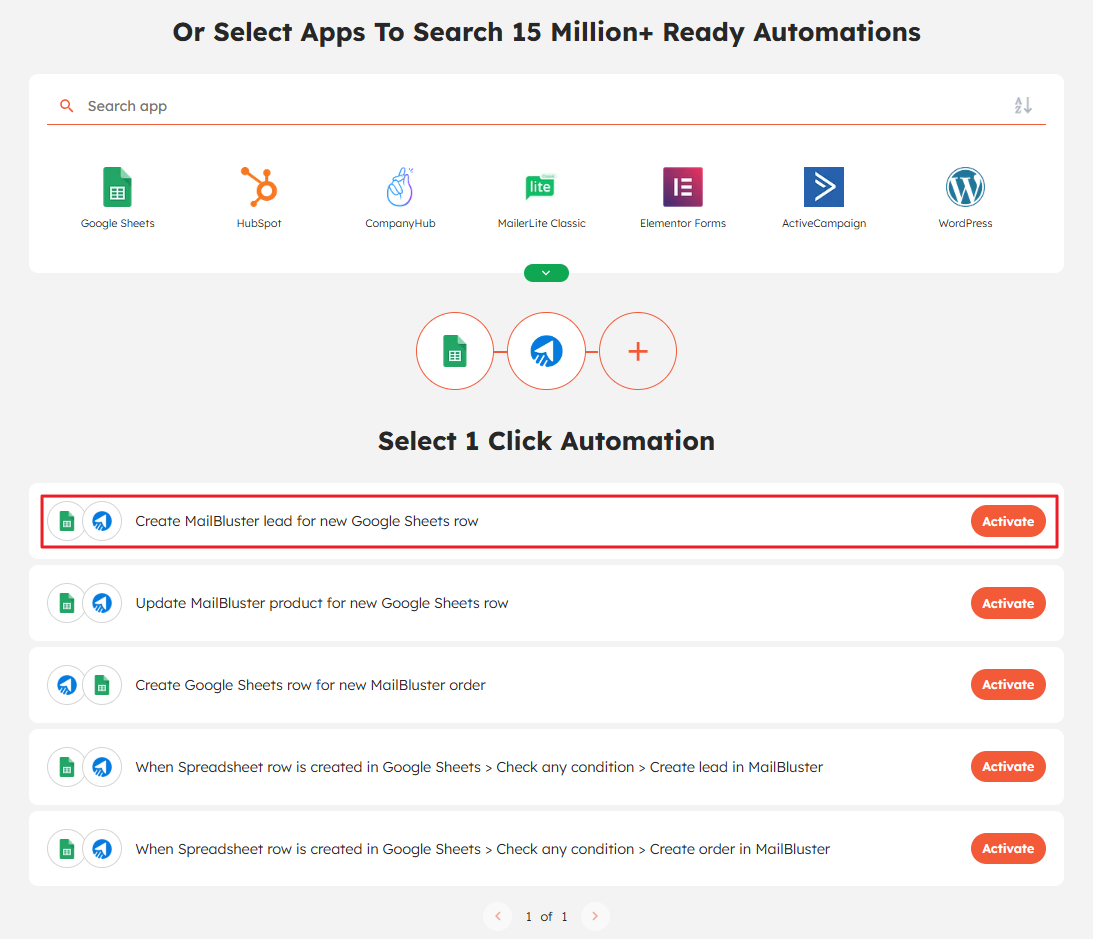
Now, select the second app (App 2) “MailBluster” by typing MailBluster in the search bar.
Now, click on Activate for “Create MailBluster lead for new Google Sheets row.”
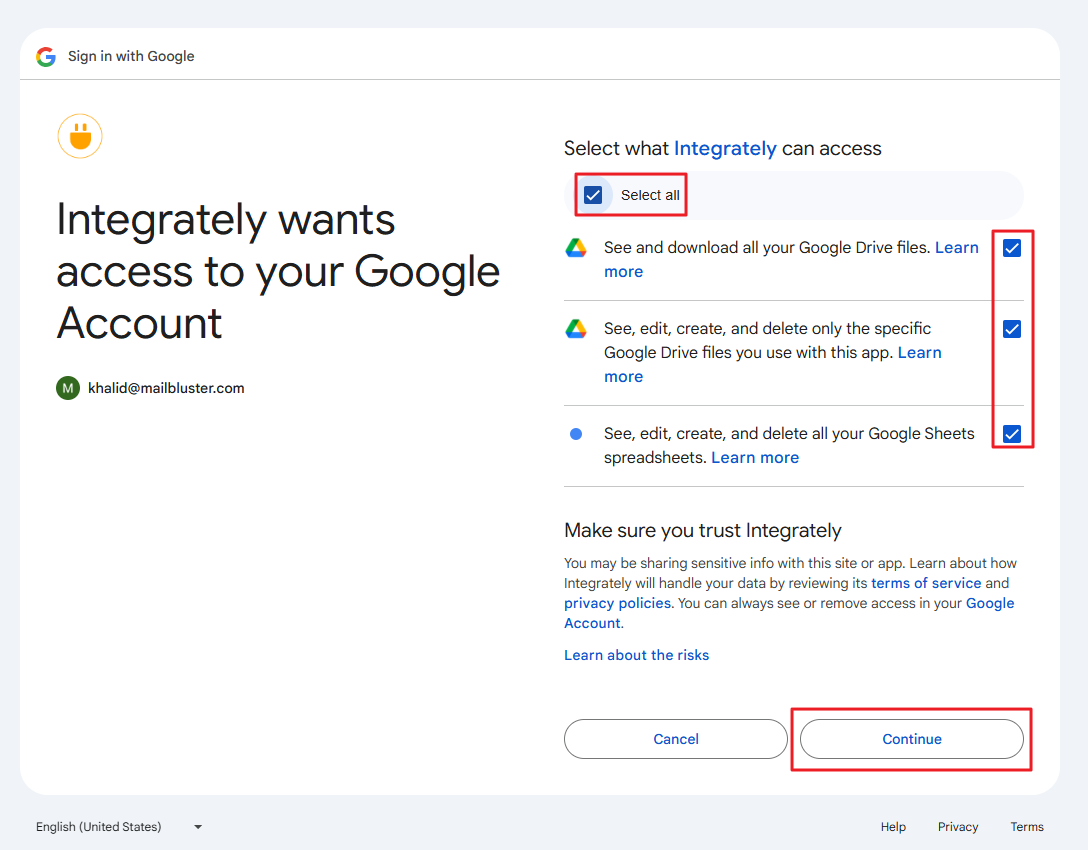
Sign in to Google to access Google Sheets.
Give all permissions to Integrately by clicking the checkbox “Select all” and then click Continue.
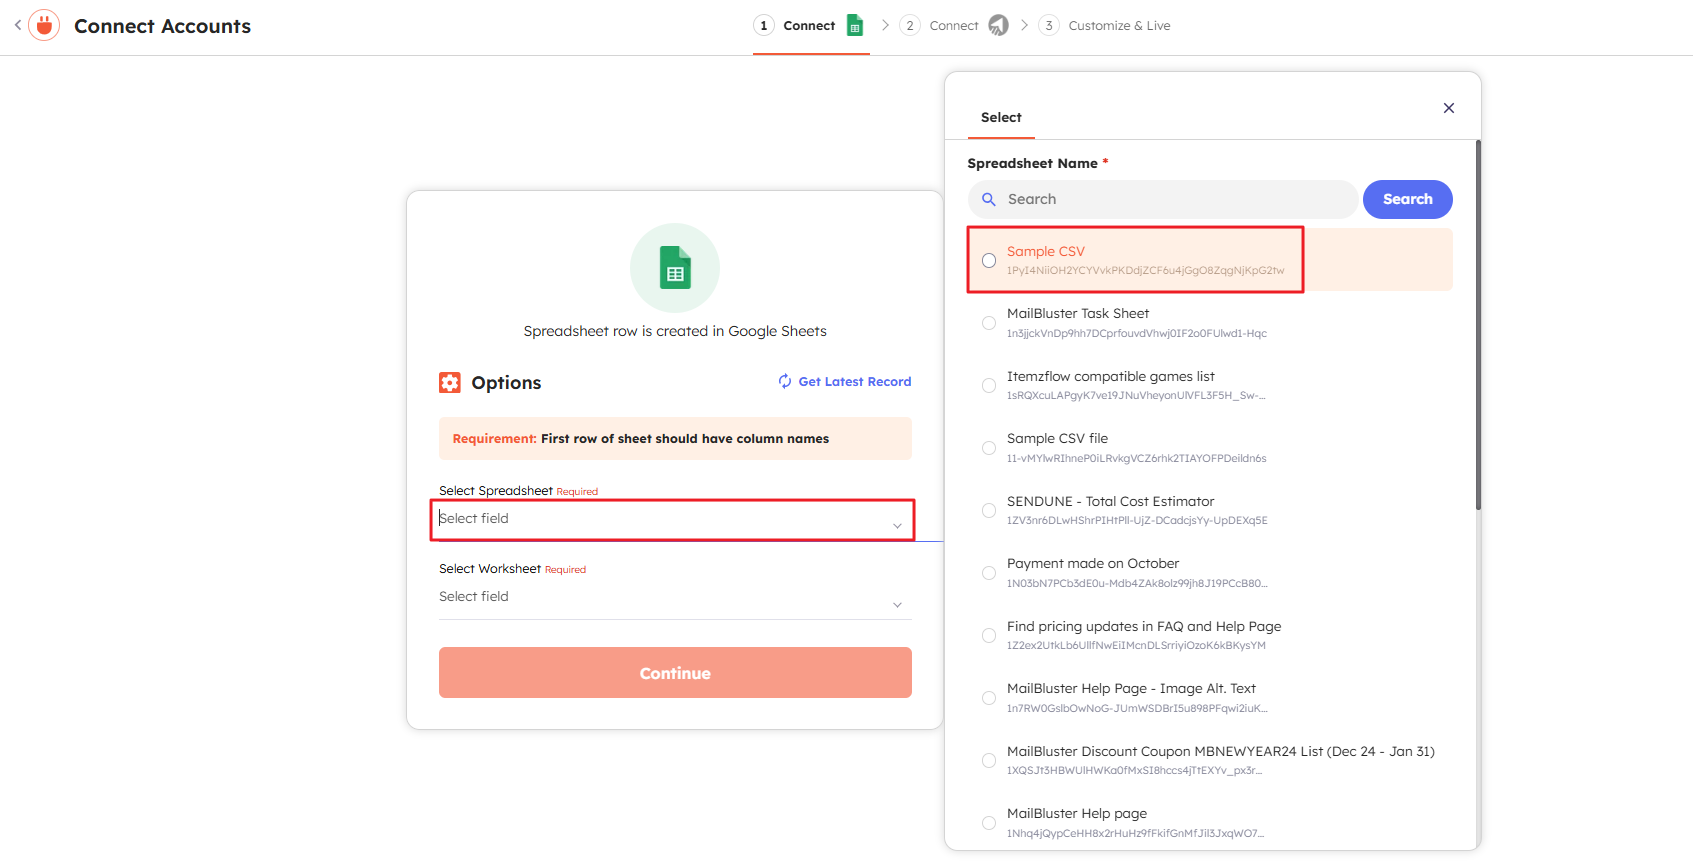
Under Select Spreadsheet, click on the field and select your desired CSV file. Here we selected a Sample CSV file made from Google Sheet.
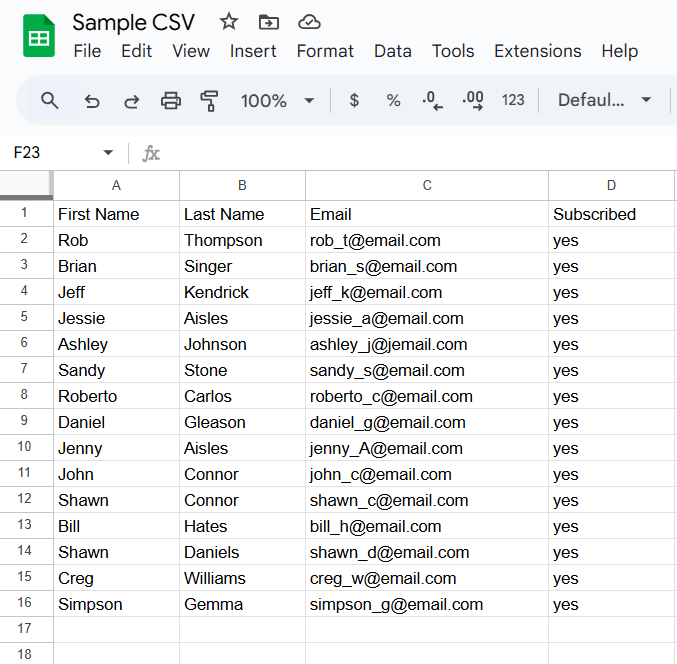
Simply go to your Google Sheet and make sure it contains in this format: First name, Last name, Email and Subscribed as shown below.
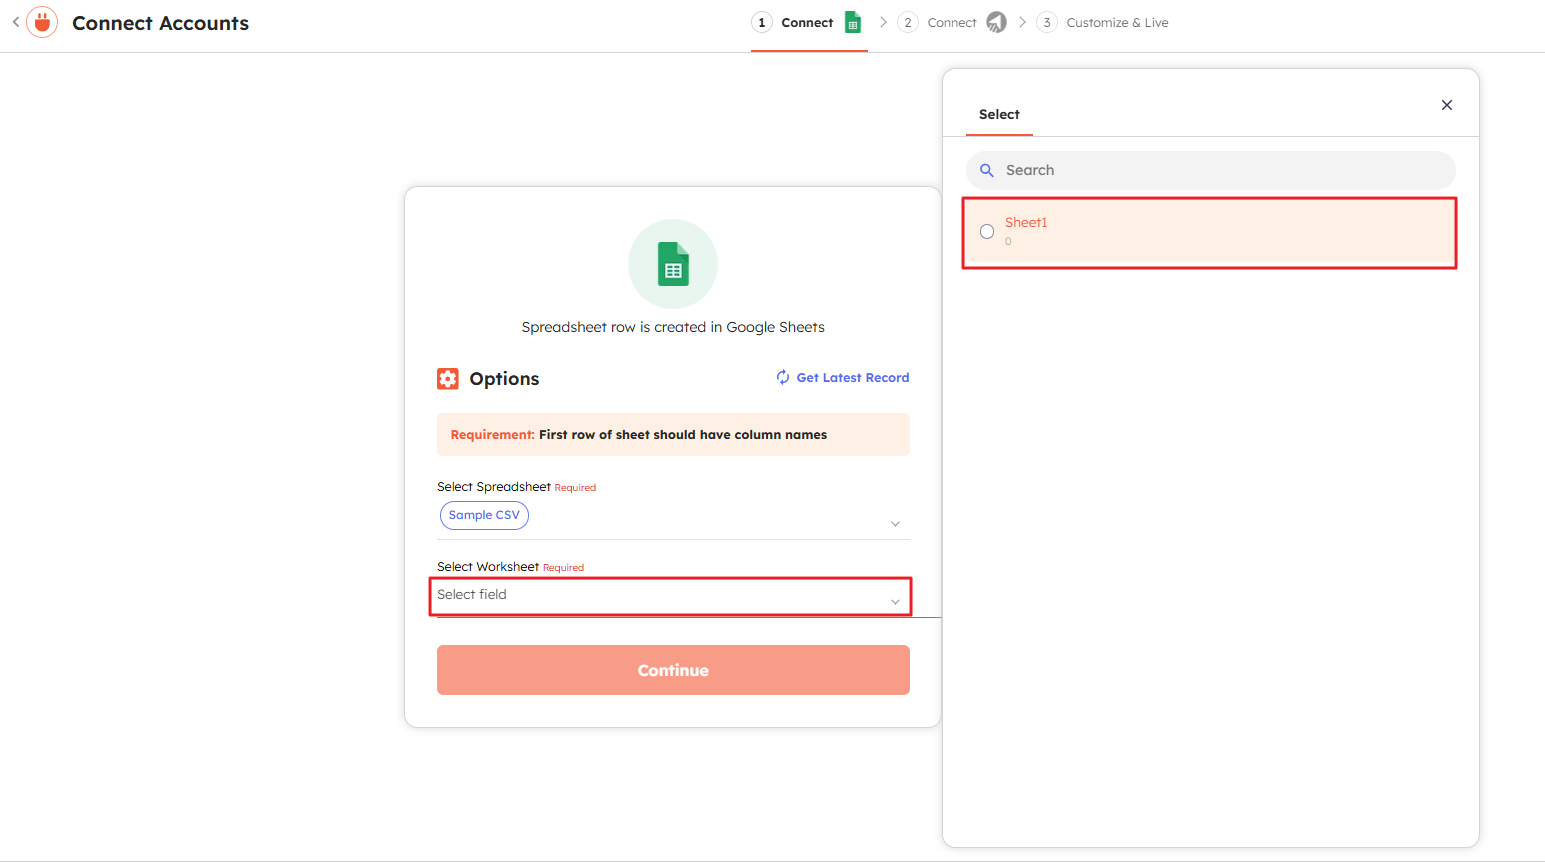
Then Select Worksheet > Sheet1 and click Continue.
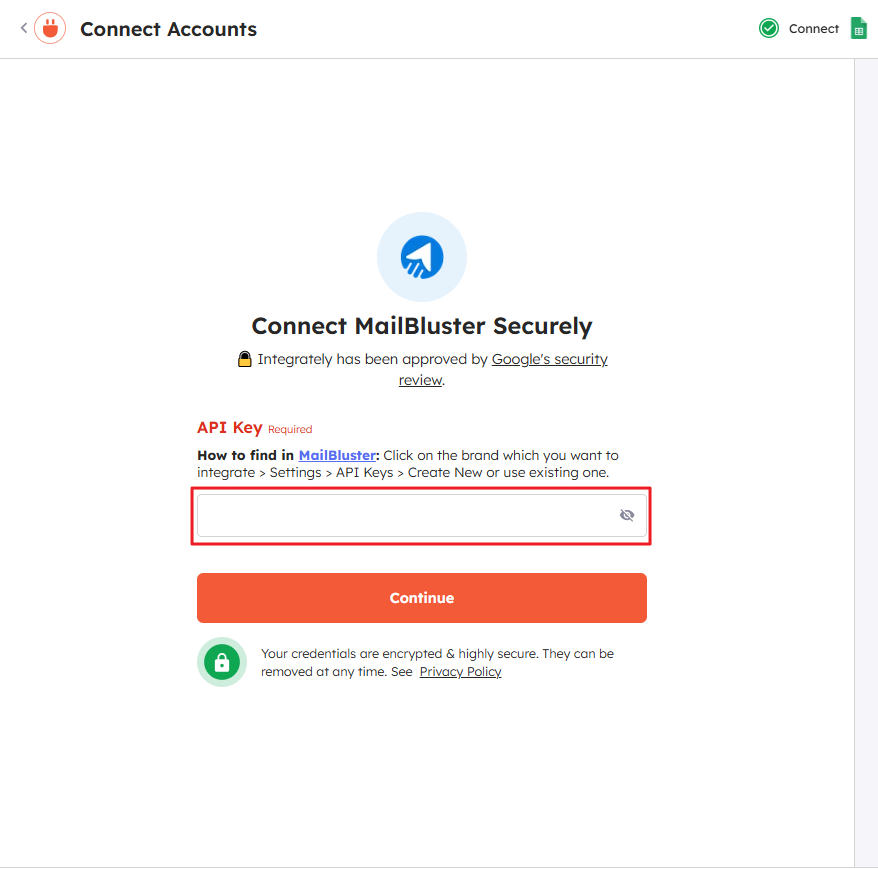
Now, Integrately will request you to connect the second app which is MailBluster. You need the API key to connect MailBluster with Google Sheet.
Sign in to MailBluster then go to Brand > Settings > API Keys and generate a new key by clicking Create new.
Enter the API key name. Then click Create API key to generate.
Copy the generated API Key value by clicking Copy.
Paste MailBluster API key in Integrately then click Continue. Wait for the Authentication successful message to appear.
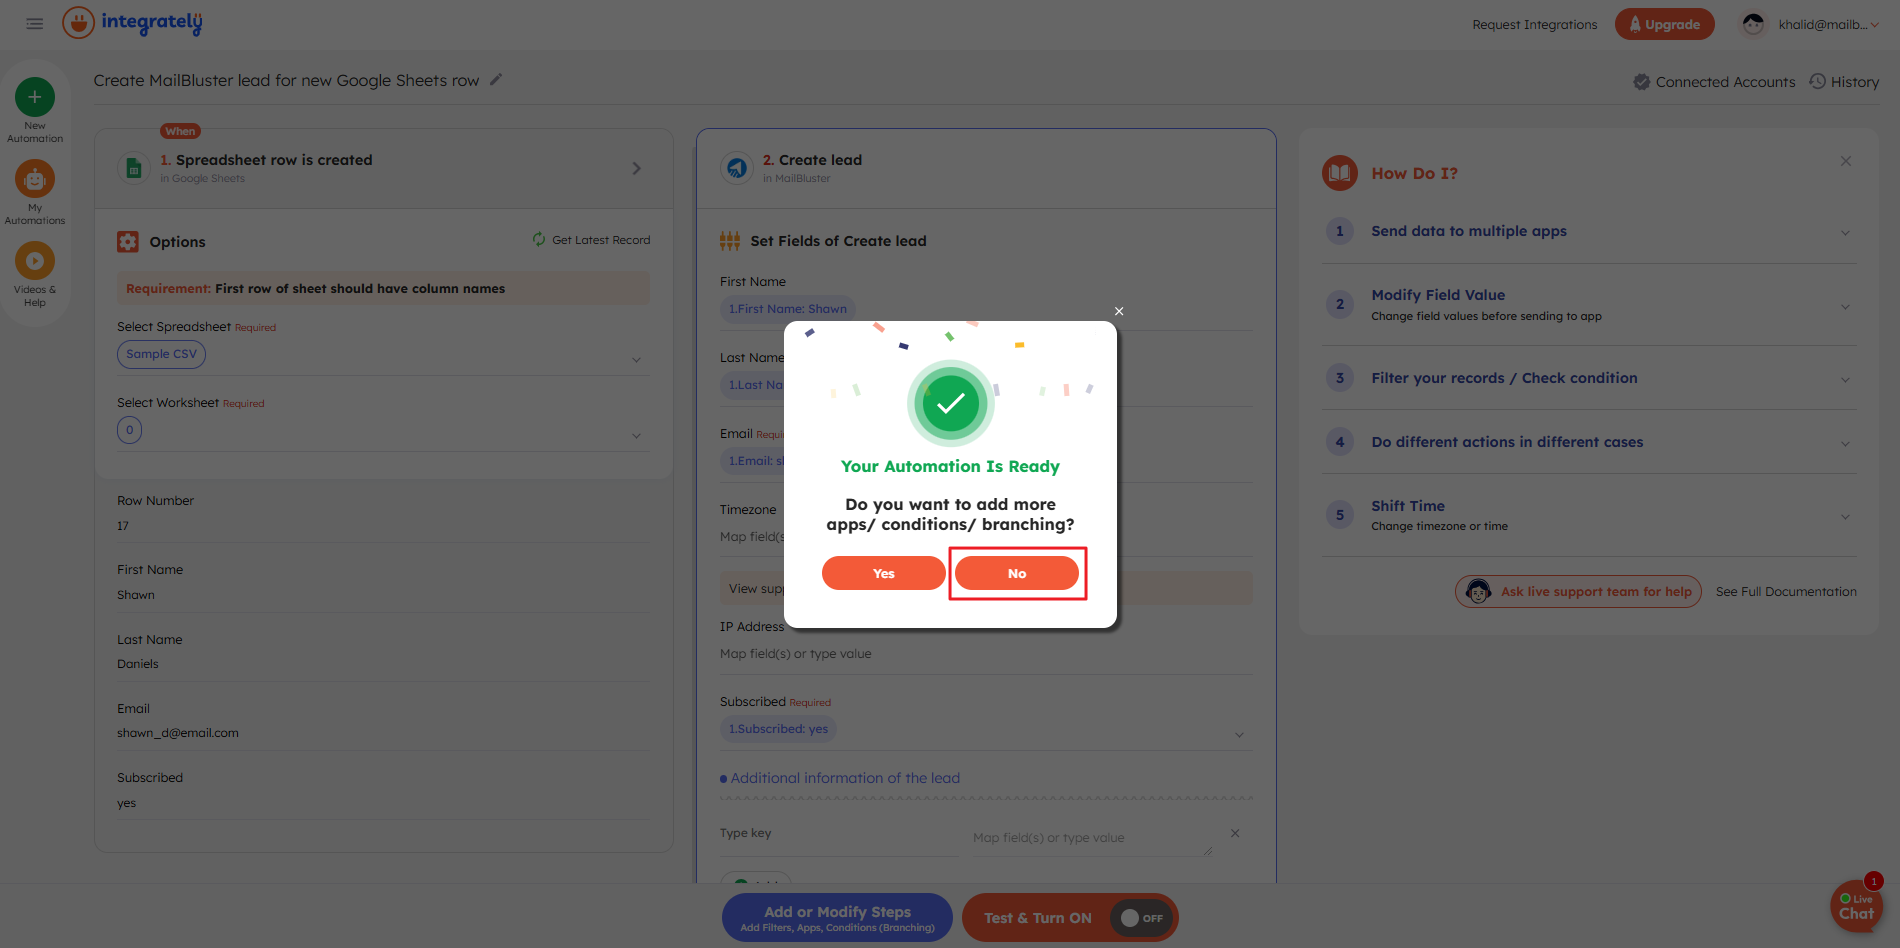
Your Automation is Ready message pops up. If you want to add more apps, conditions or branches then click Yes otherwise click No.
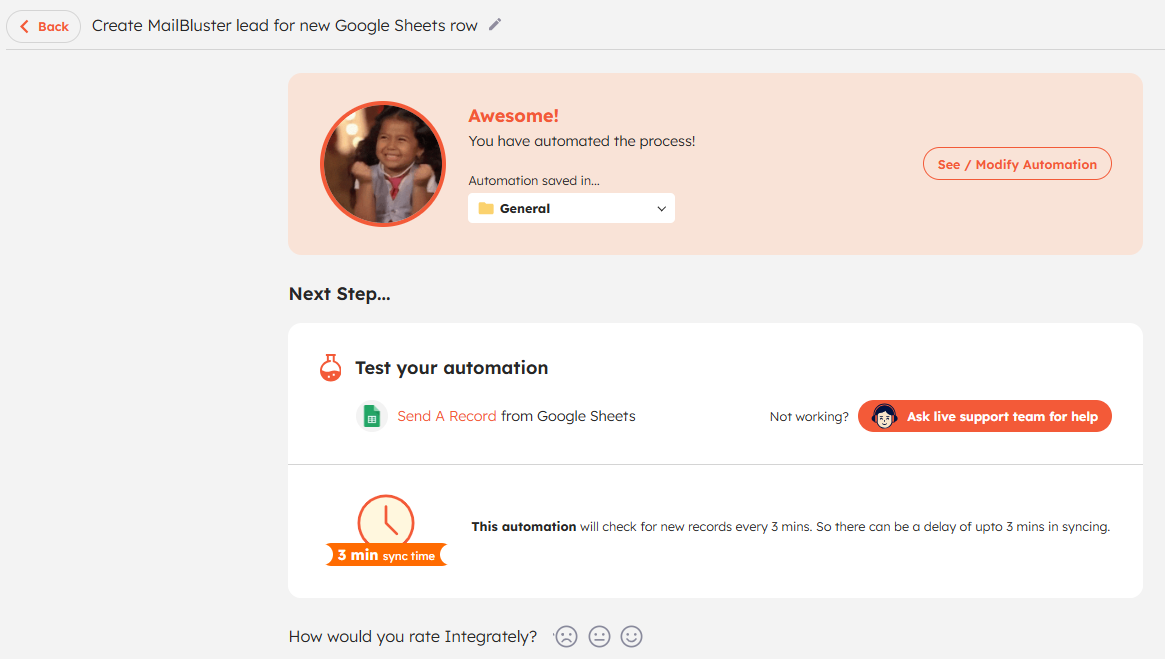
The following message: You have automated the process! will appear if everything is done correctly showing that the whole automation process has been configured successfully.
Now you are all set. Simply go to your Google Sheet and enter these information under First name, Last name, Email and Subscribed.
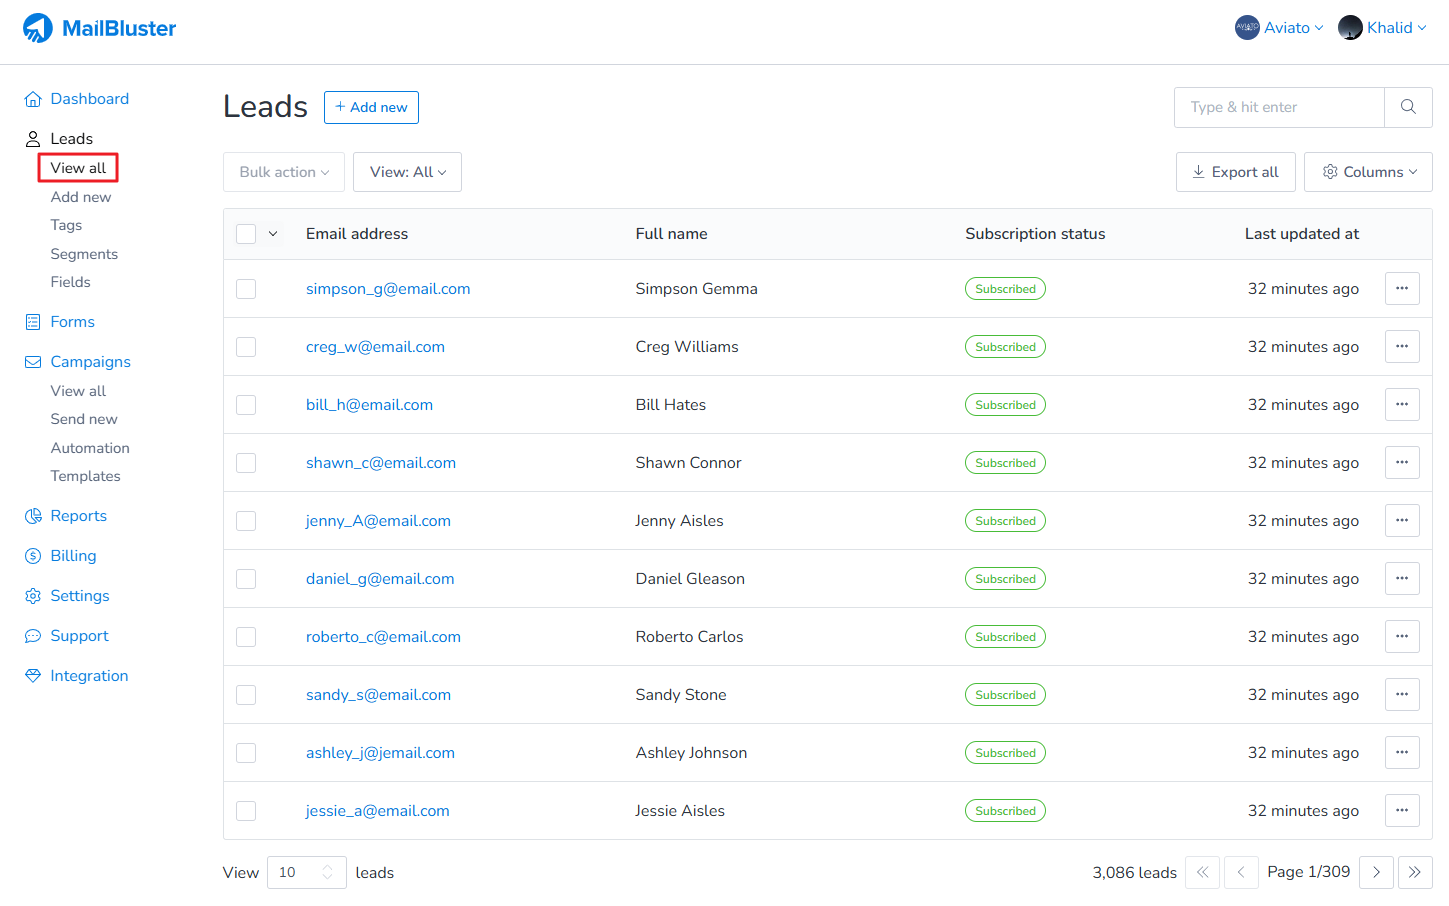
Then go to MailBluster > your Brand > View all. You will now notice new leads has been added to MailBluster automatically from Google Sheets.
Integrating Zapier with MailBluster is straightforward, though it requires using a few external apps. Since Zapier currently does not have a dedicated MailBluster app in its repository, an alternative app must be used to complete the integration process.
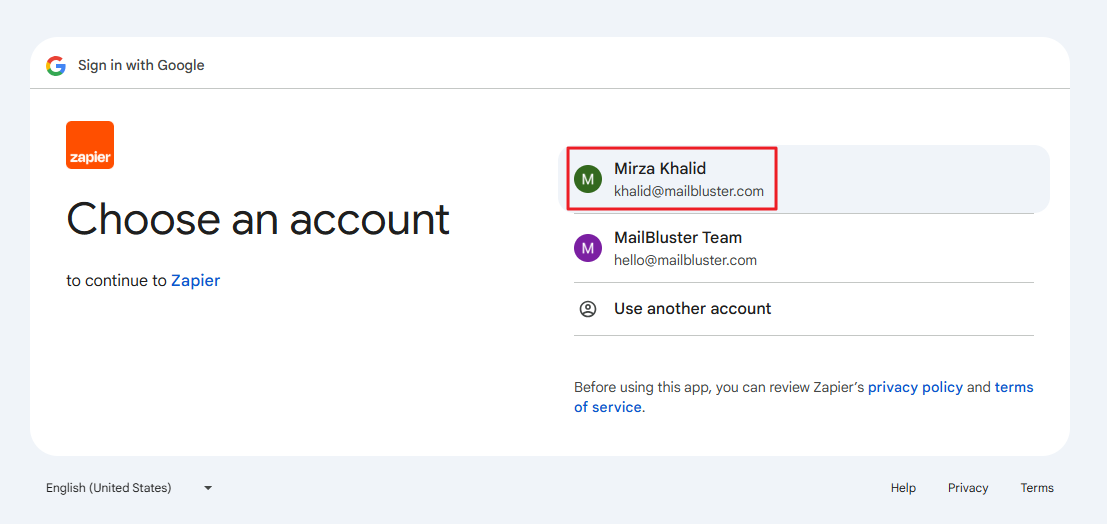
To begin the Zapier integration with MailBluster, first you need to start by signing up or logging in to Zapier using your Google account or personal email.
Here, I used my own email account to sign in to Zapier.
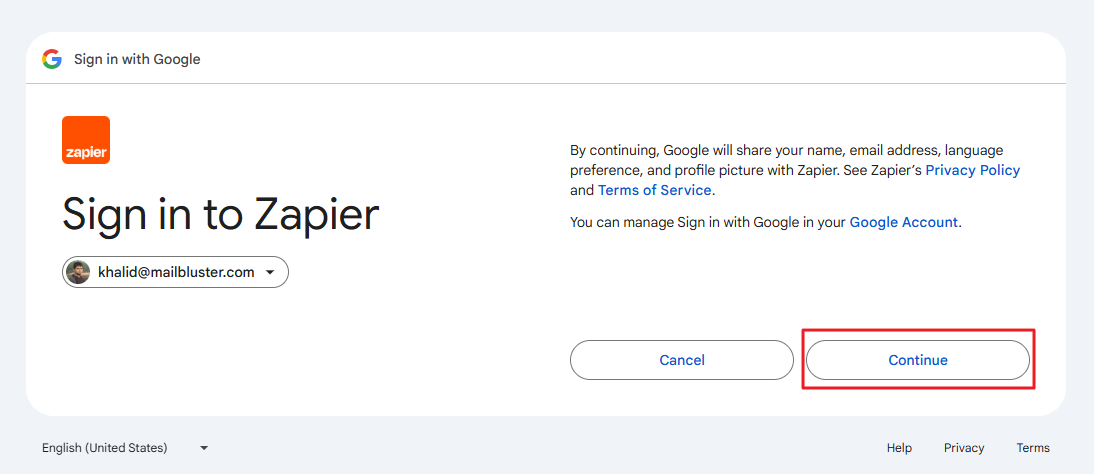
If you sign in with Google account, then you need to accept the agreement by clicking Continue.
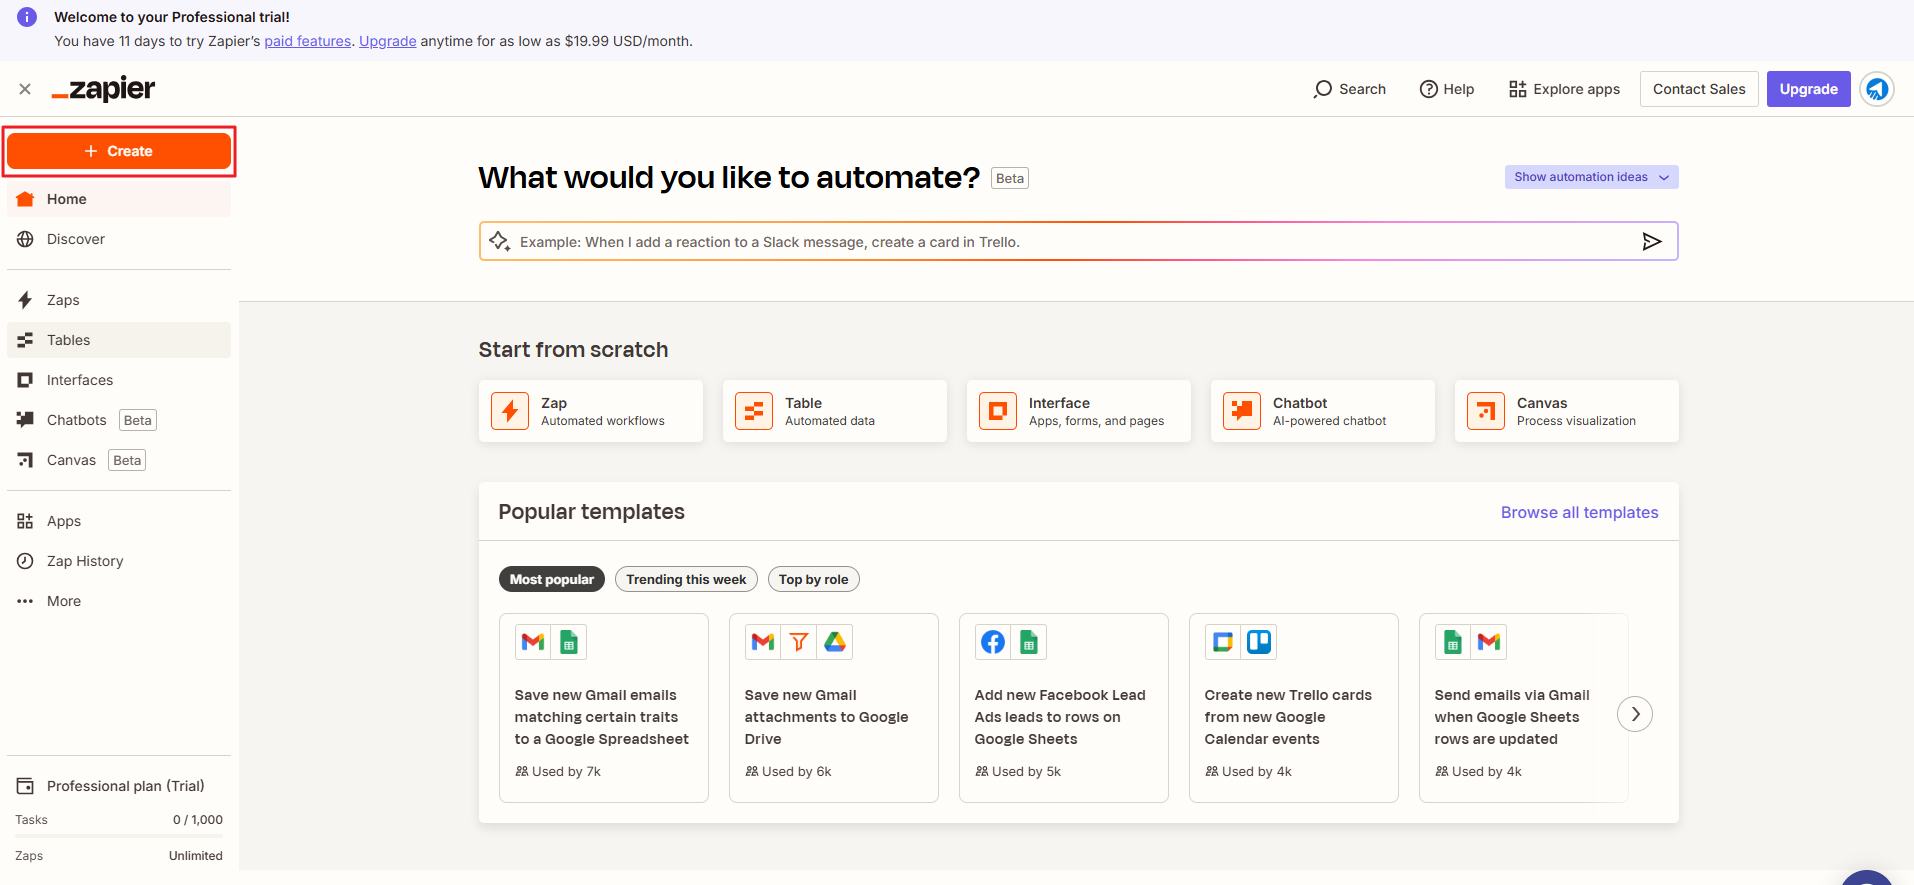
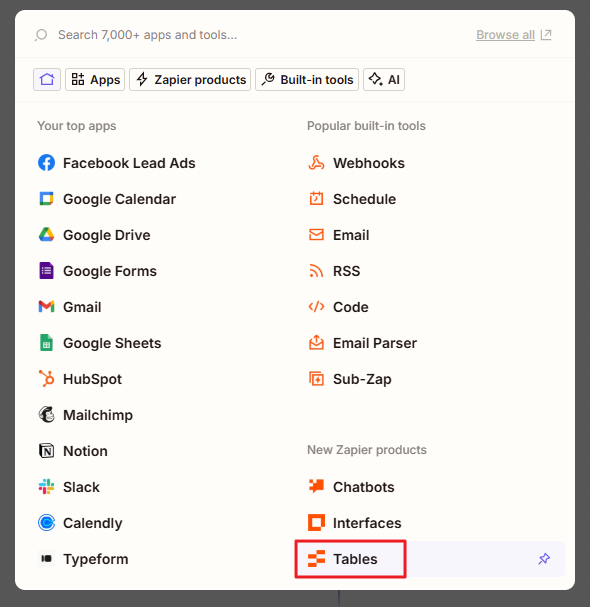
Click on the Create button.
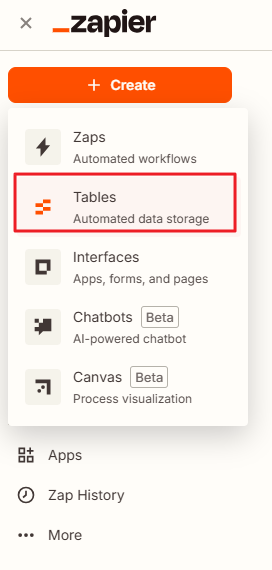
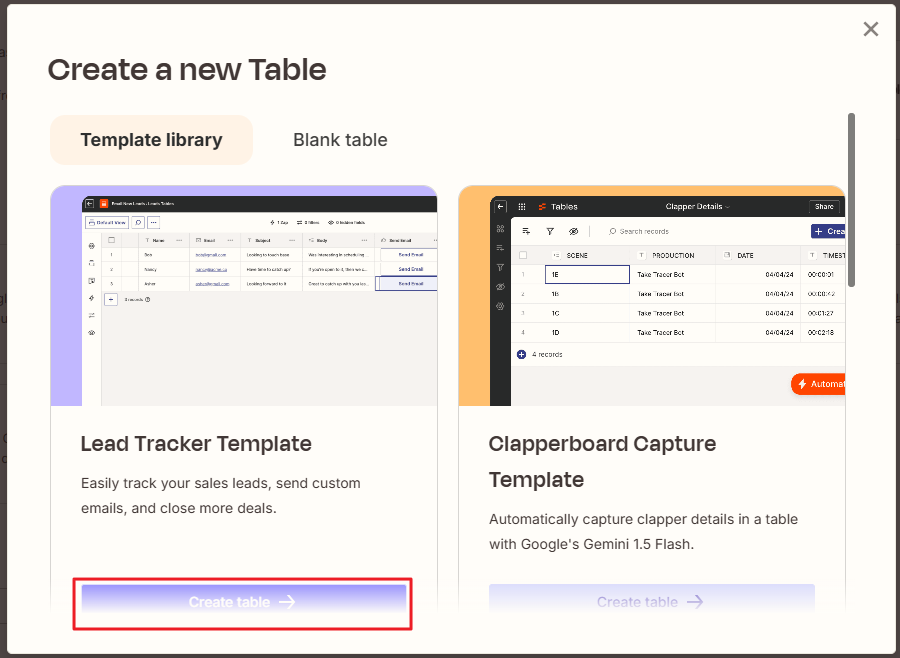
Then select Tables.
Now, Create a new Table by clicking on Create table.
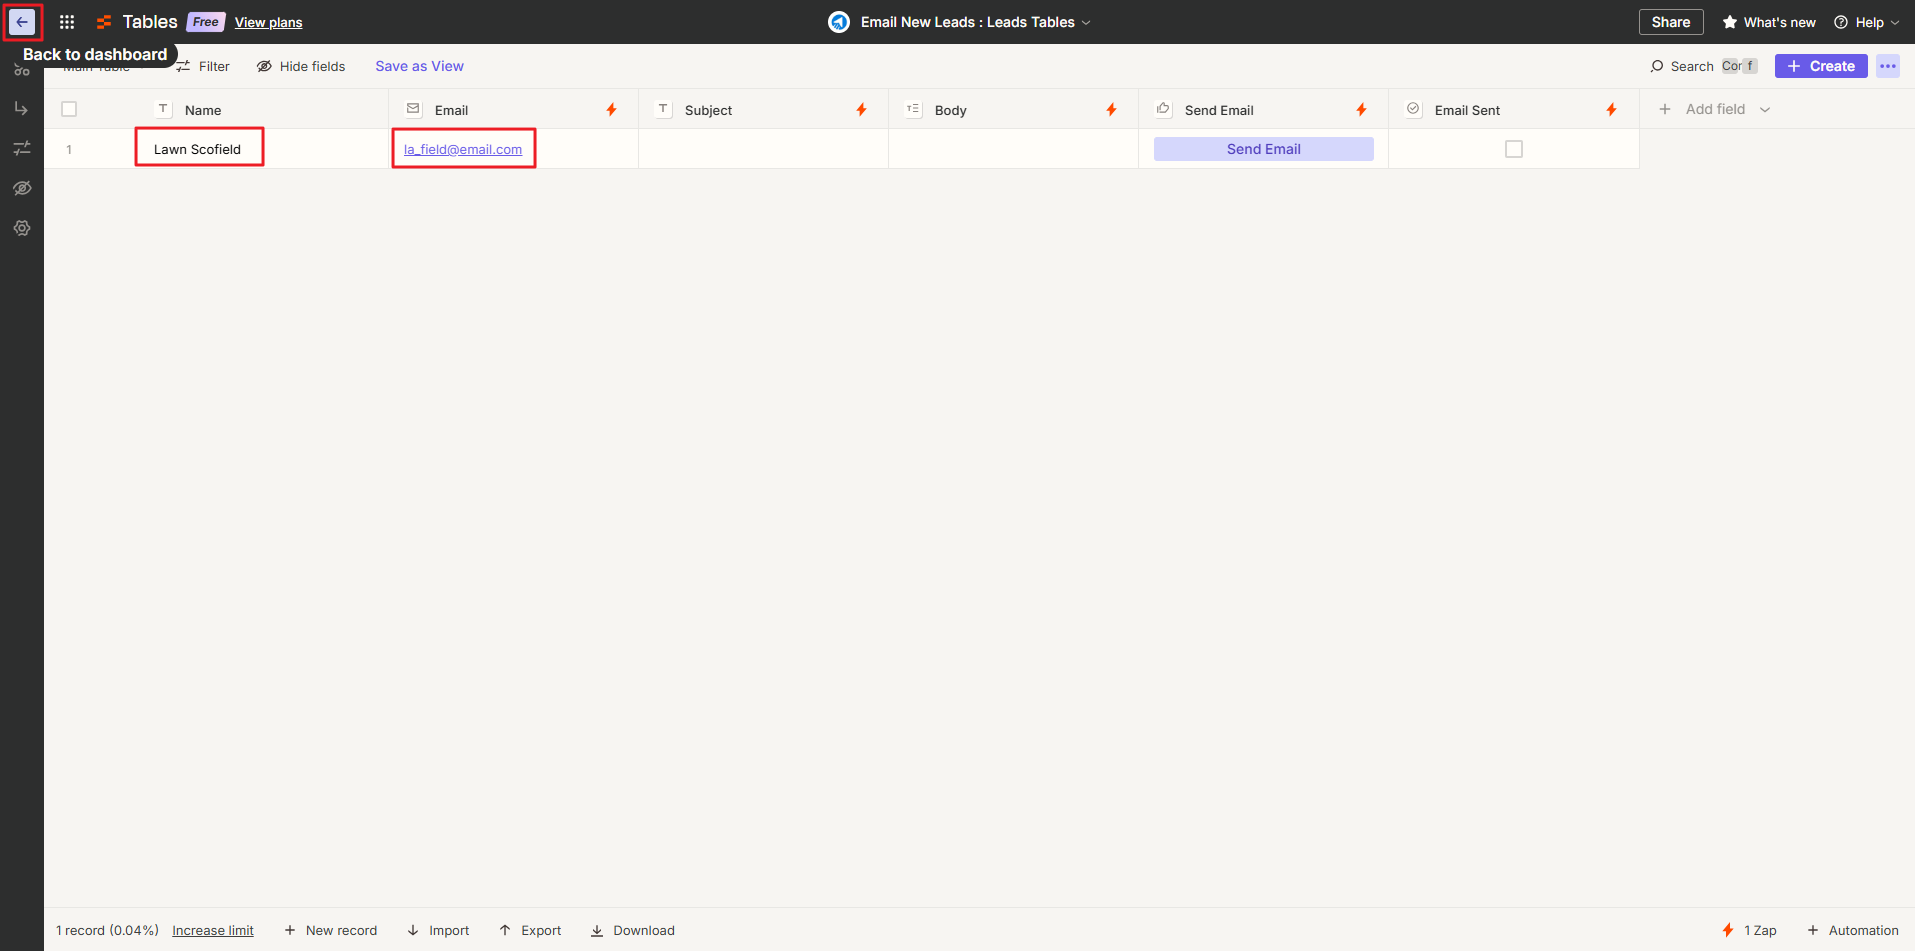
Now, add a lead by entering lead information like Name and Email. Then click the ‘<-‘ back button as shown in the screenshot below.
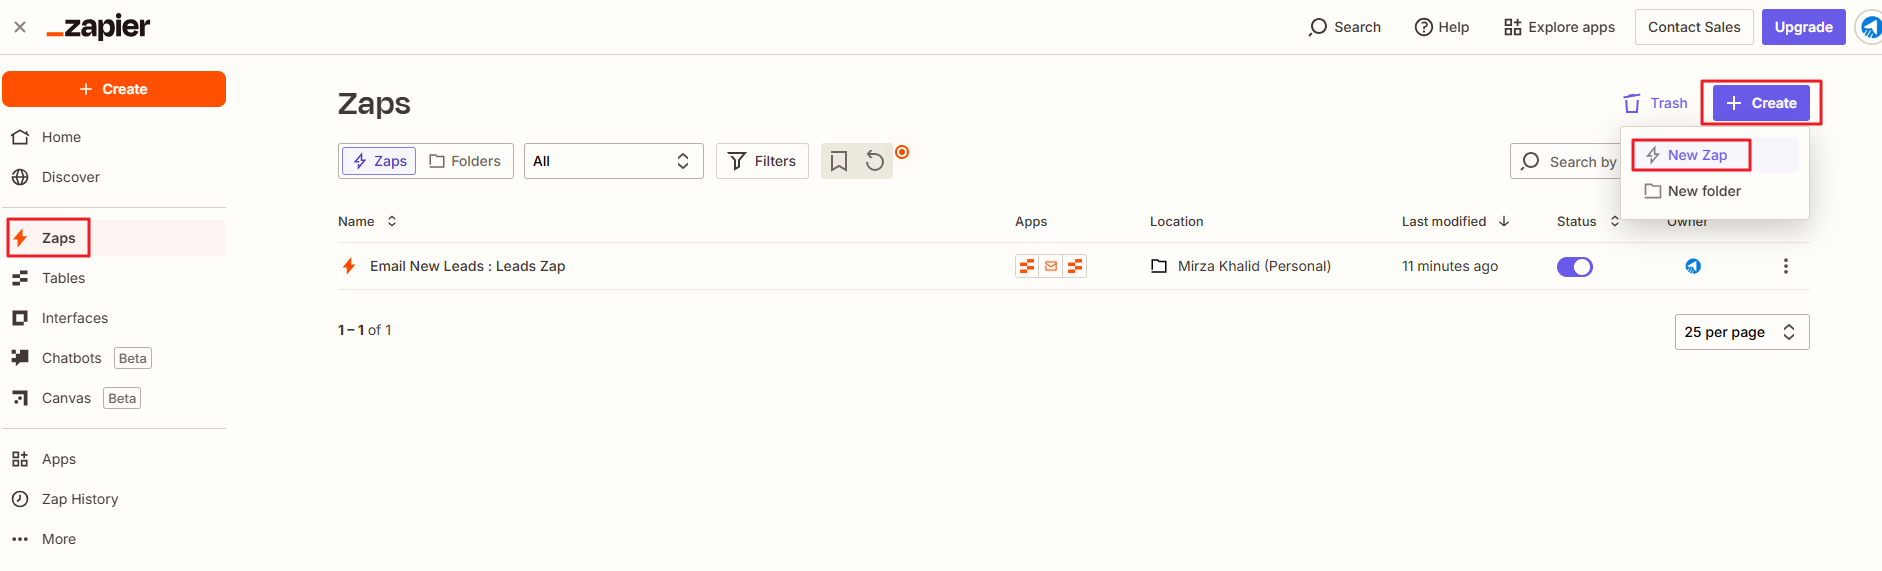
Click on Zaps, and then click Create > New Zap.
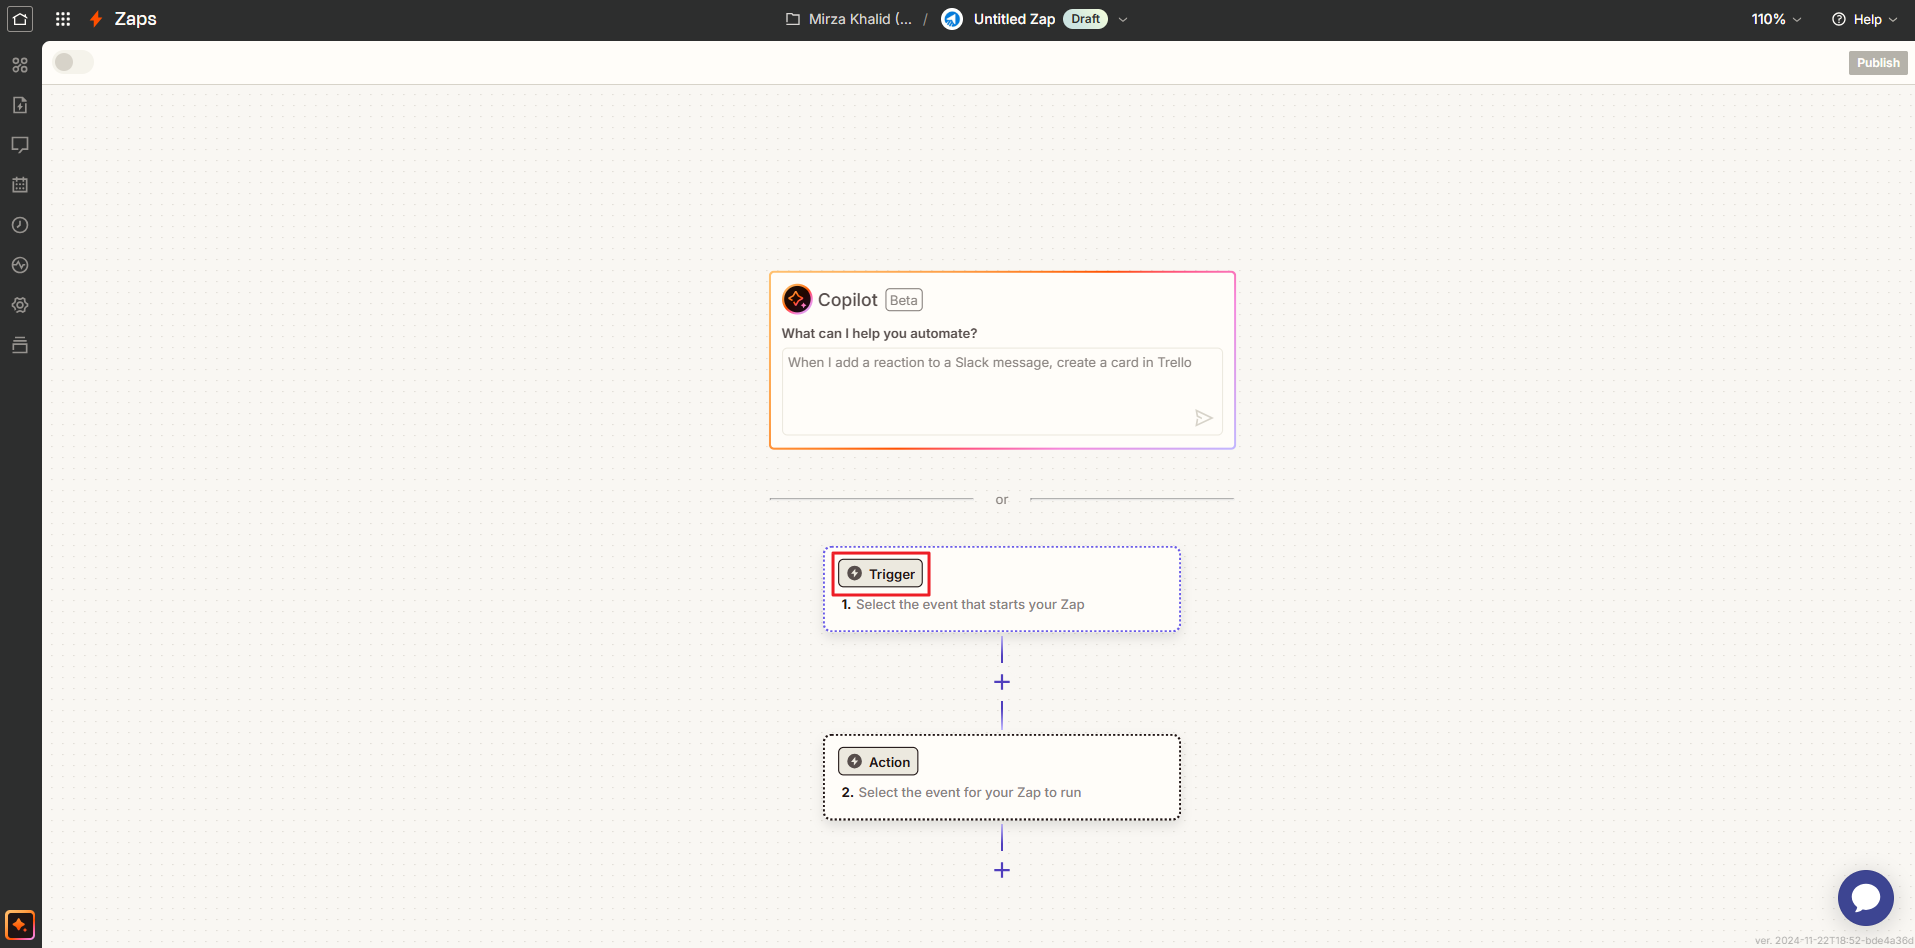
In the Zaps window, click on Trigger to add the Zapier Table.
Select Tables and Zapier Tables will be selected.
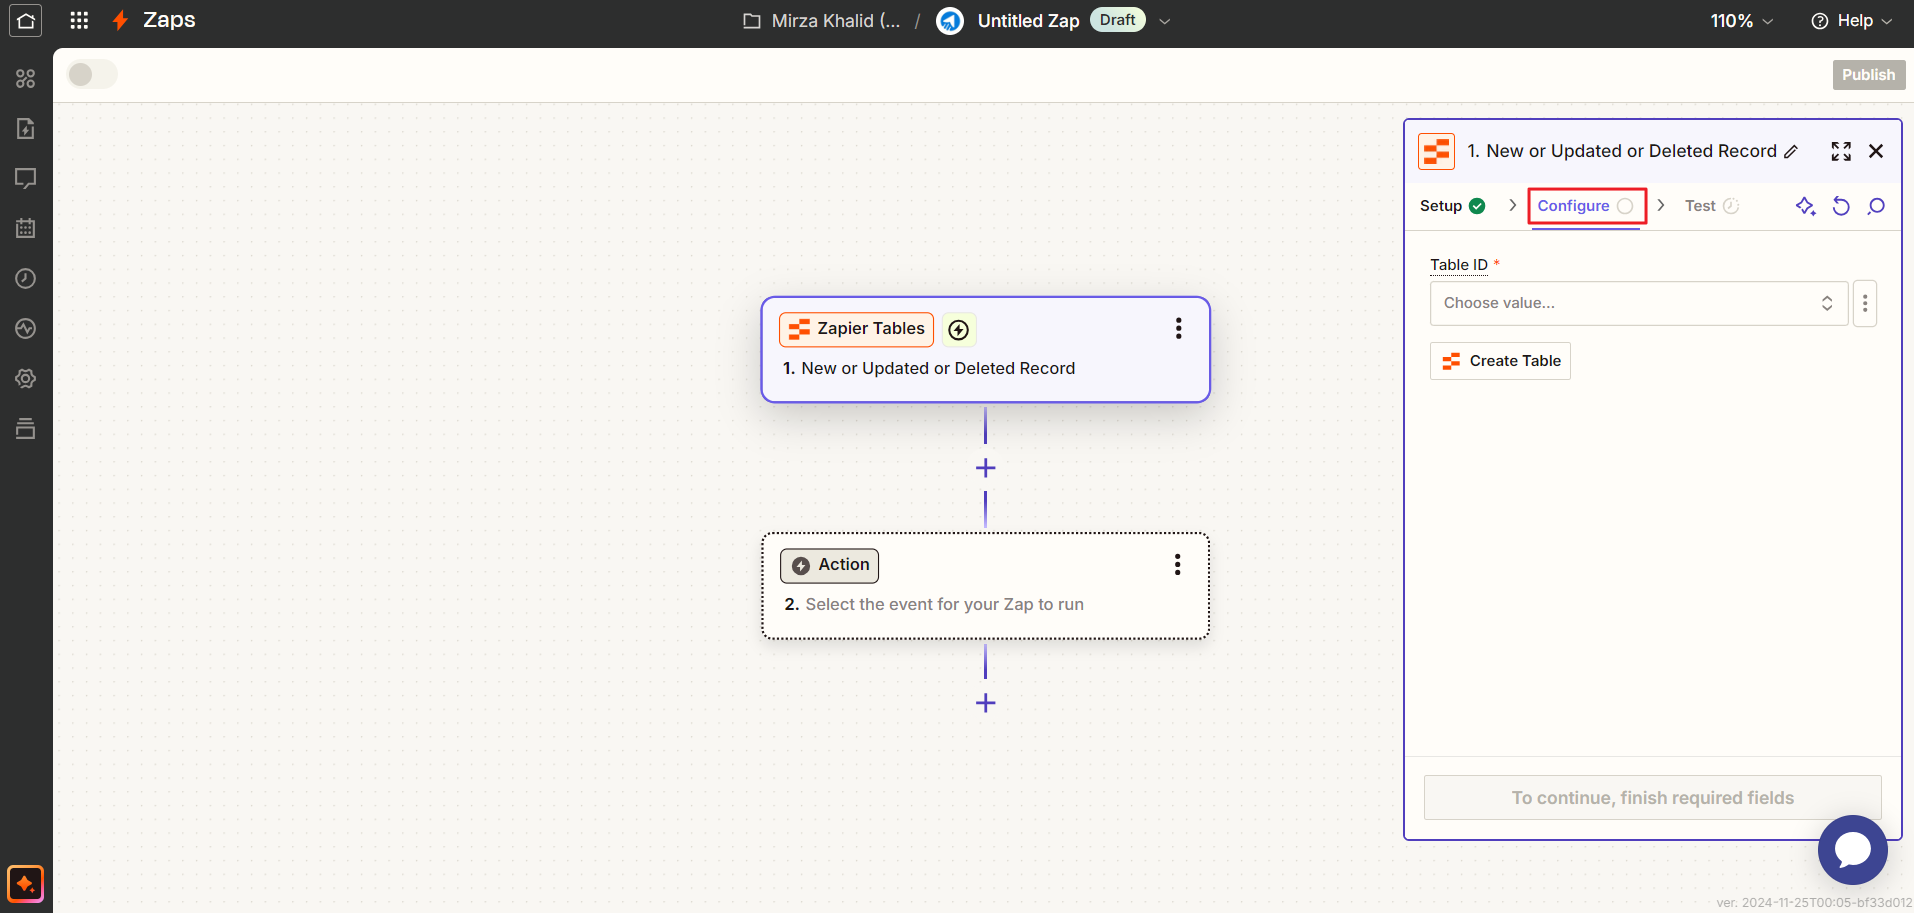
Once Zapier Tables is selected, click on Trigger event and select “New or Updated or Deleted Record” and then click Continue.
Click on Configure. Then Choose value… for Table ID.
Select the highlighted [Table] Email New Leads: Leads Tables and then click Continue.
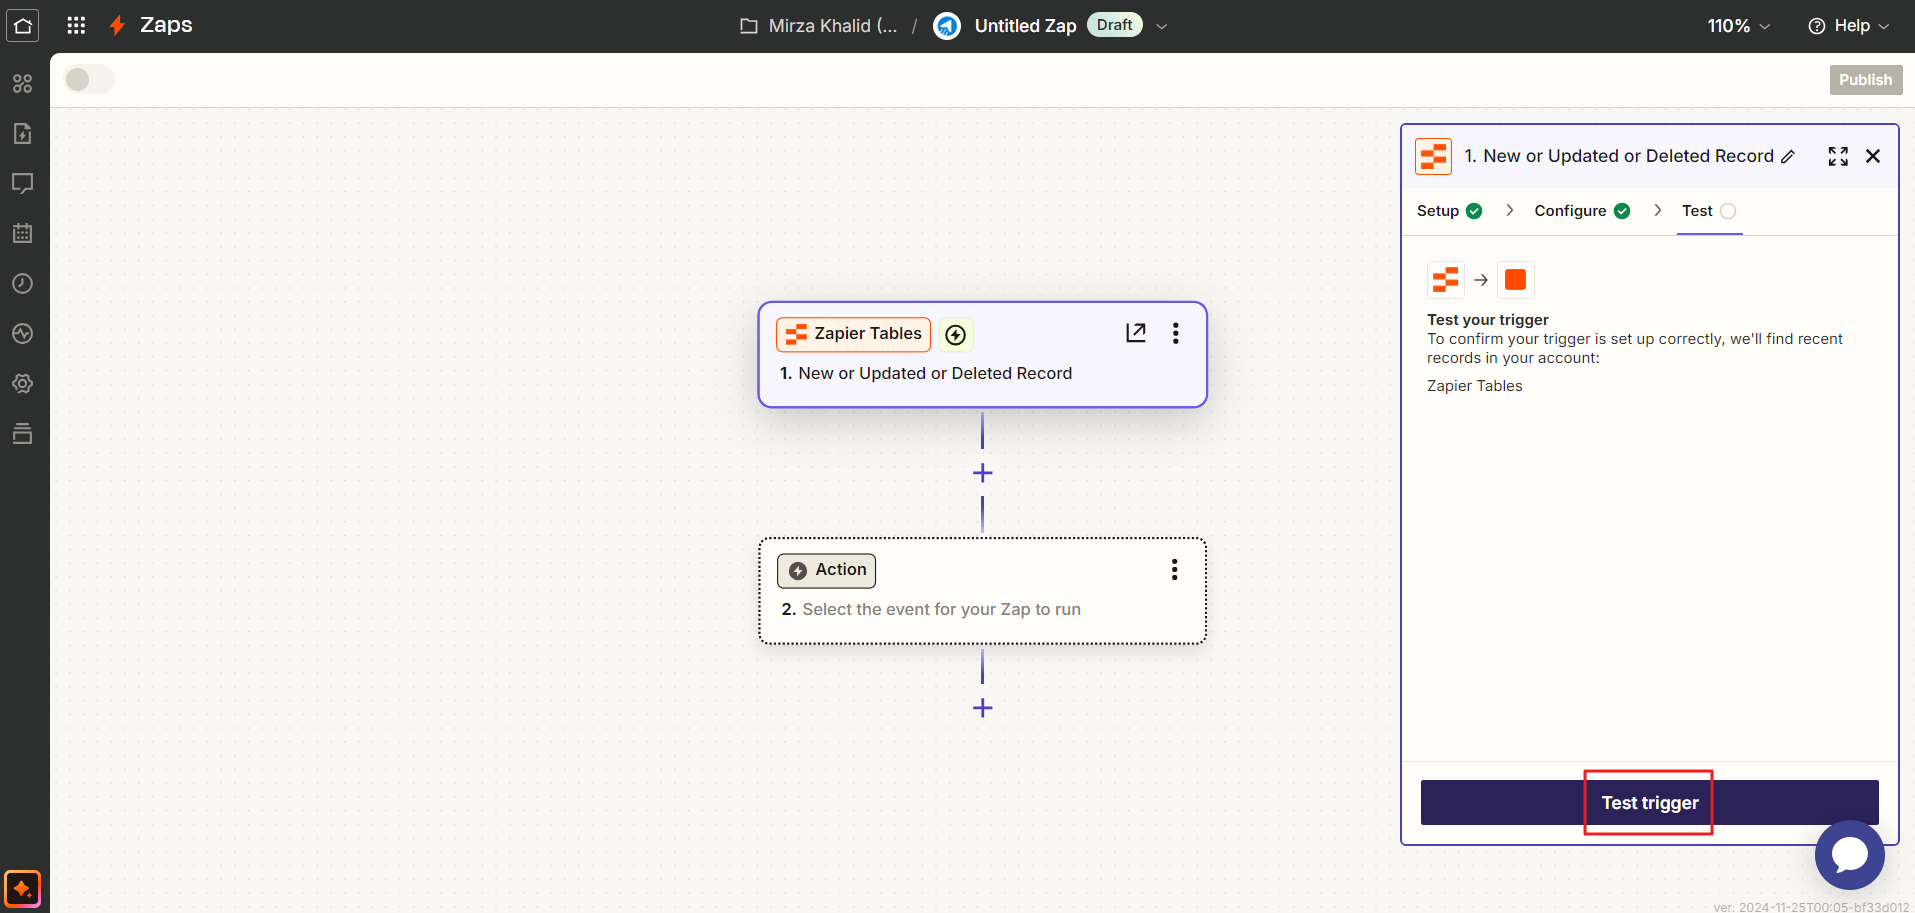
Now click on Test trigger.
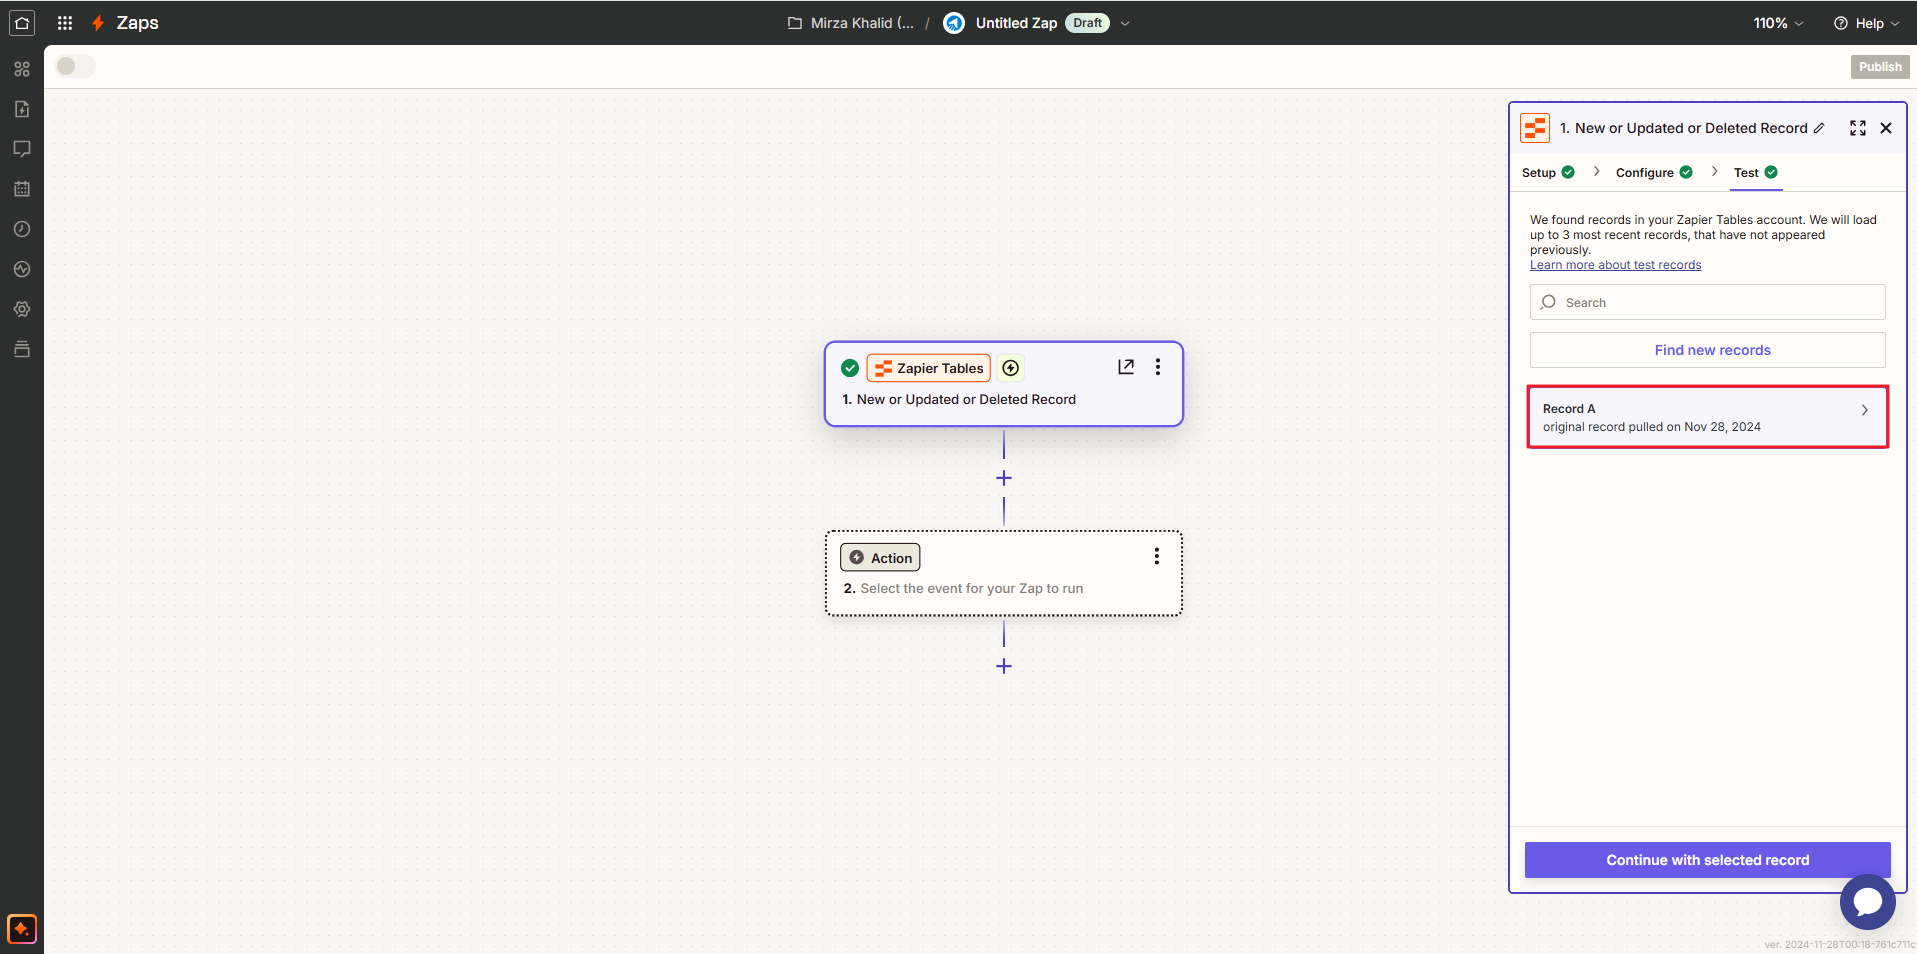
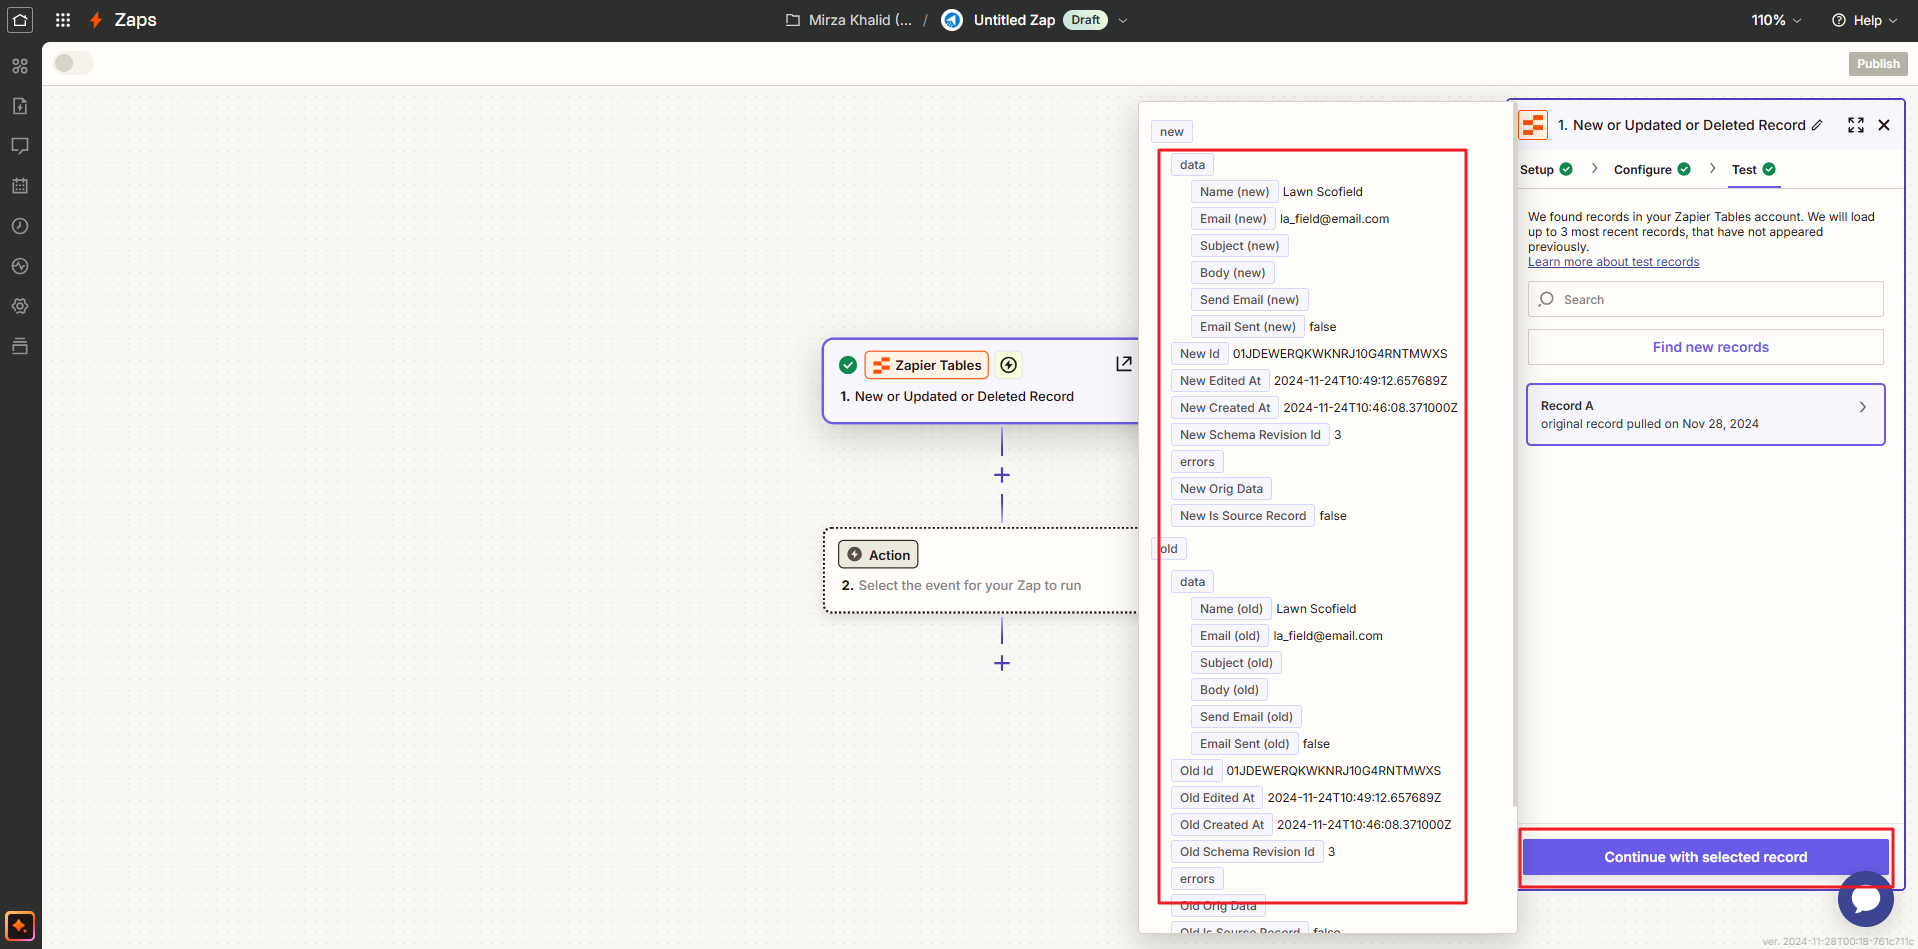
Click on Record A.
Then scroll through the popup window and click “Continue with selected record“, you will now be able to add the Action app.
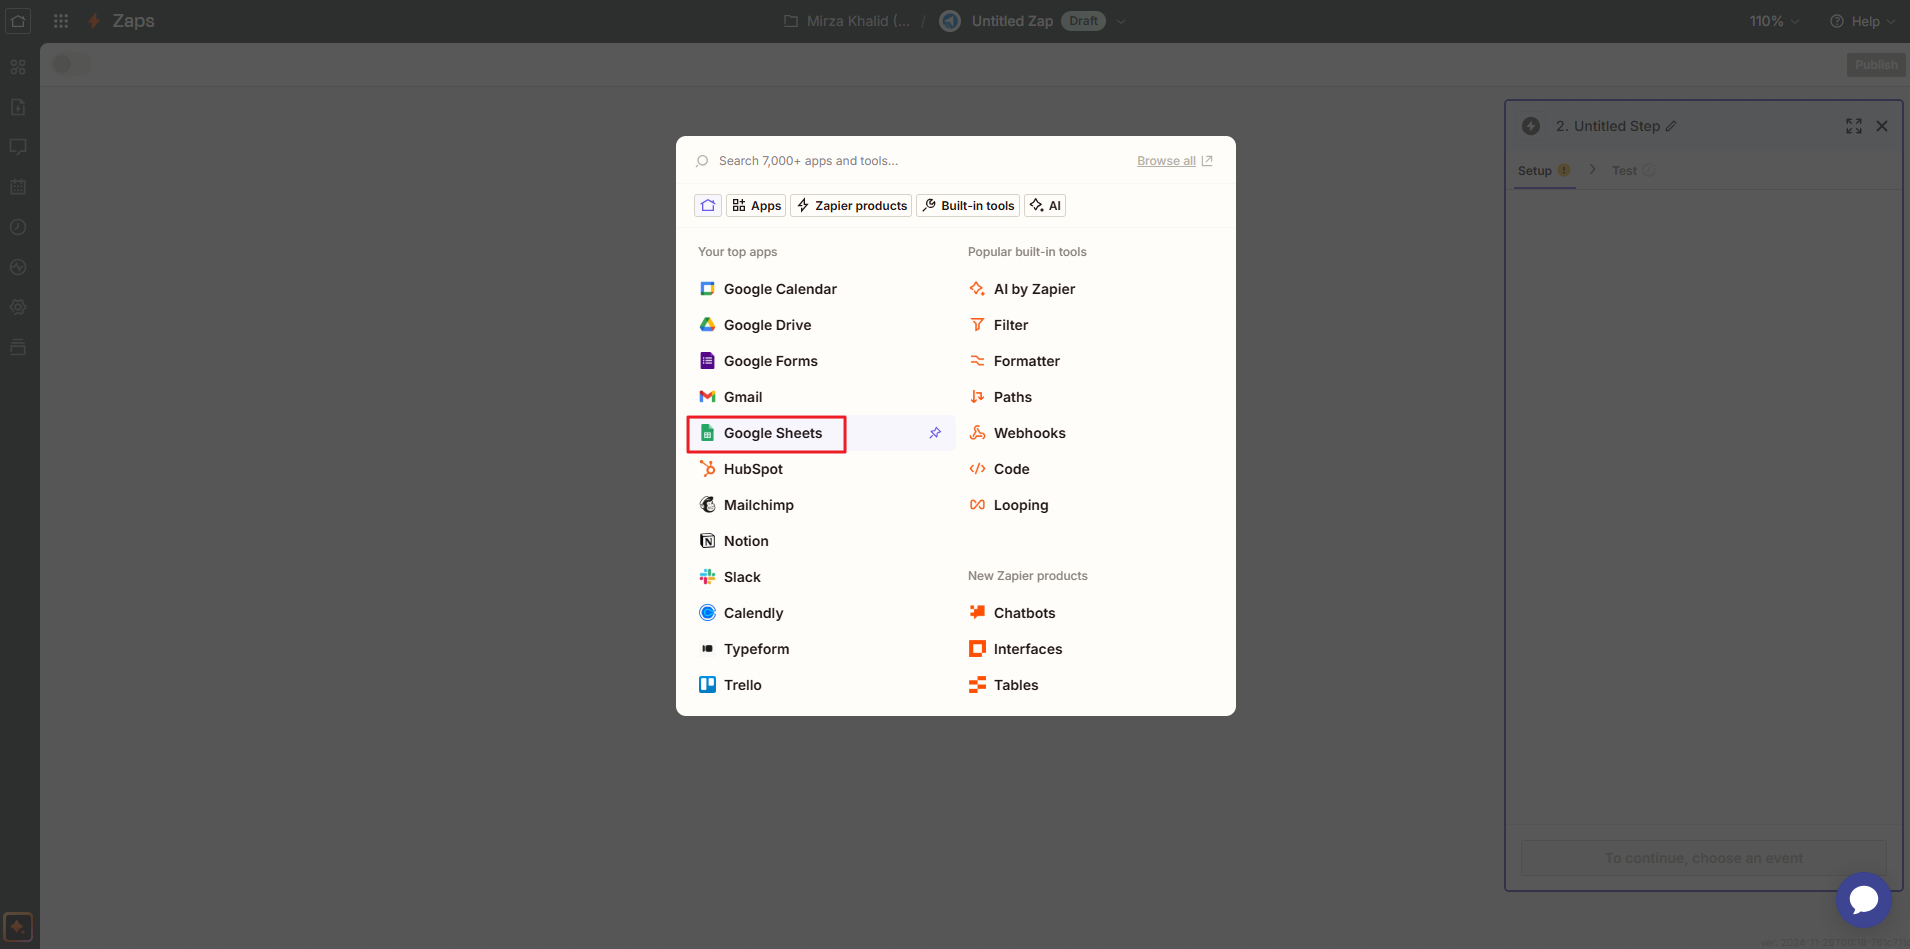
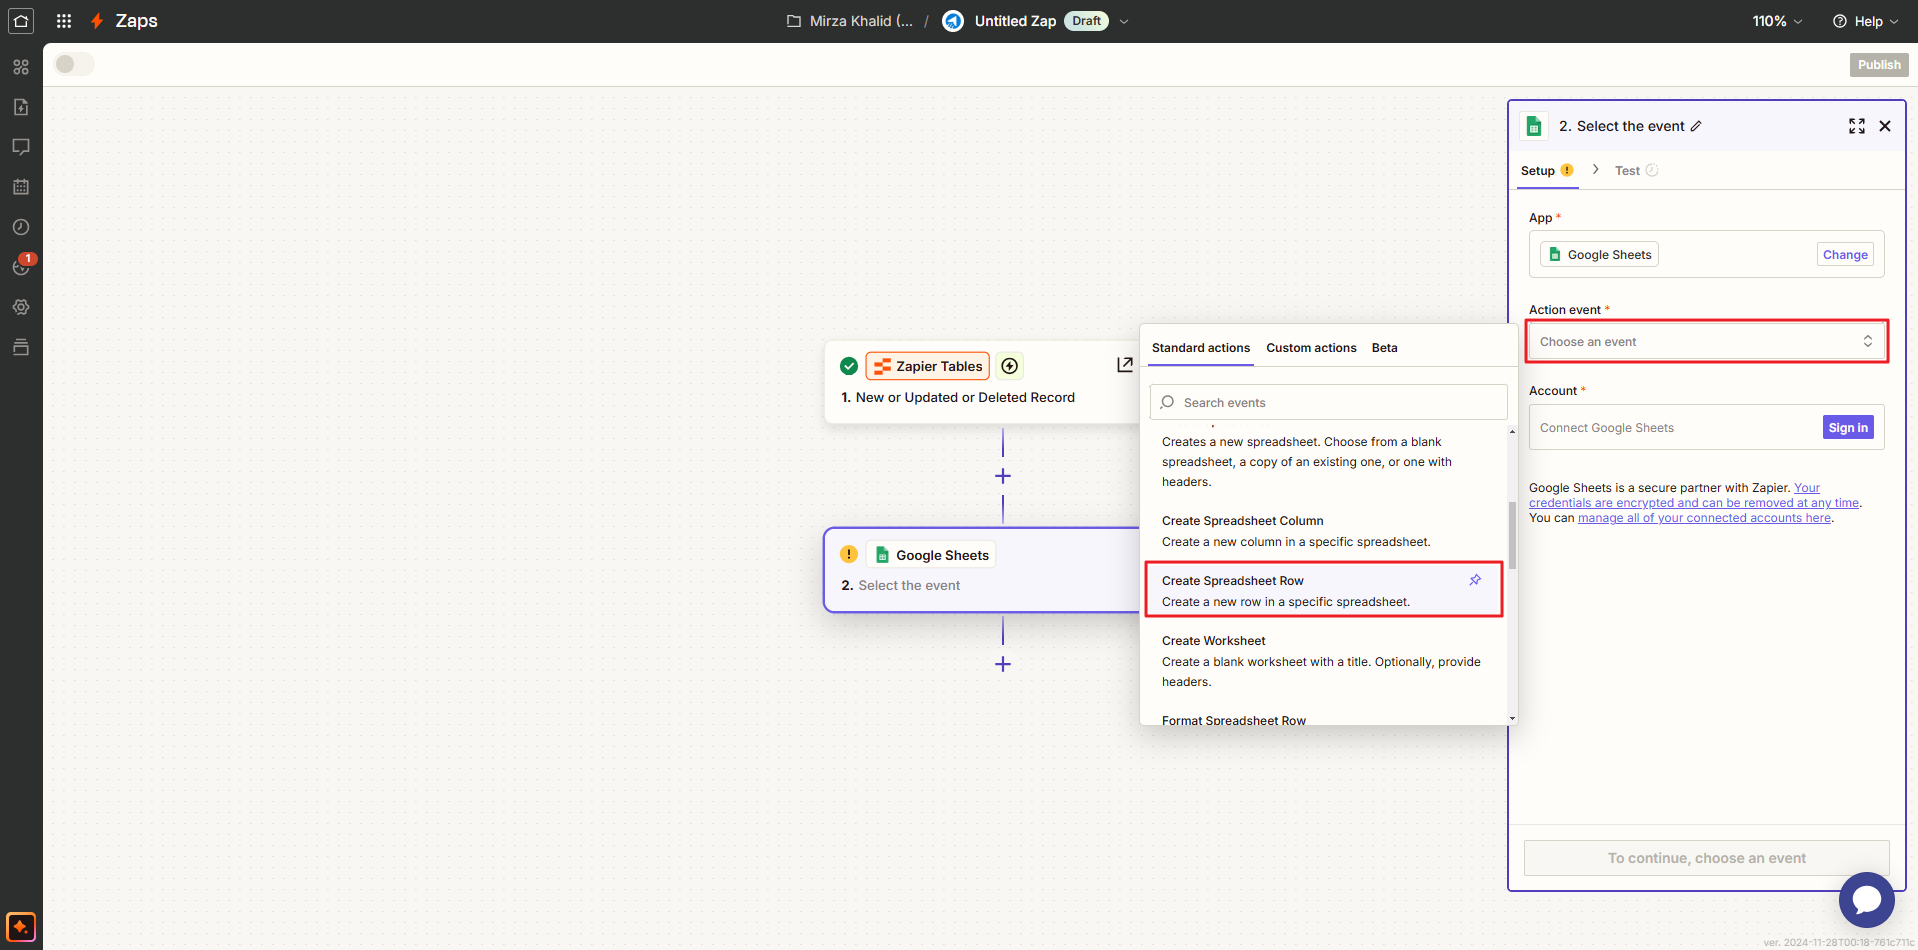
Select Google Sheets from the pop up window.
After clicking Google Sheets, a flow chart windows will open. Click on Choose an event under Action event and then scroll downwards to select any of the desired options. Here we have selected “Create Spreadsheet Row.”
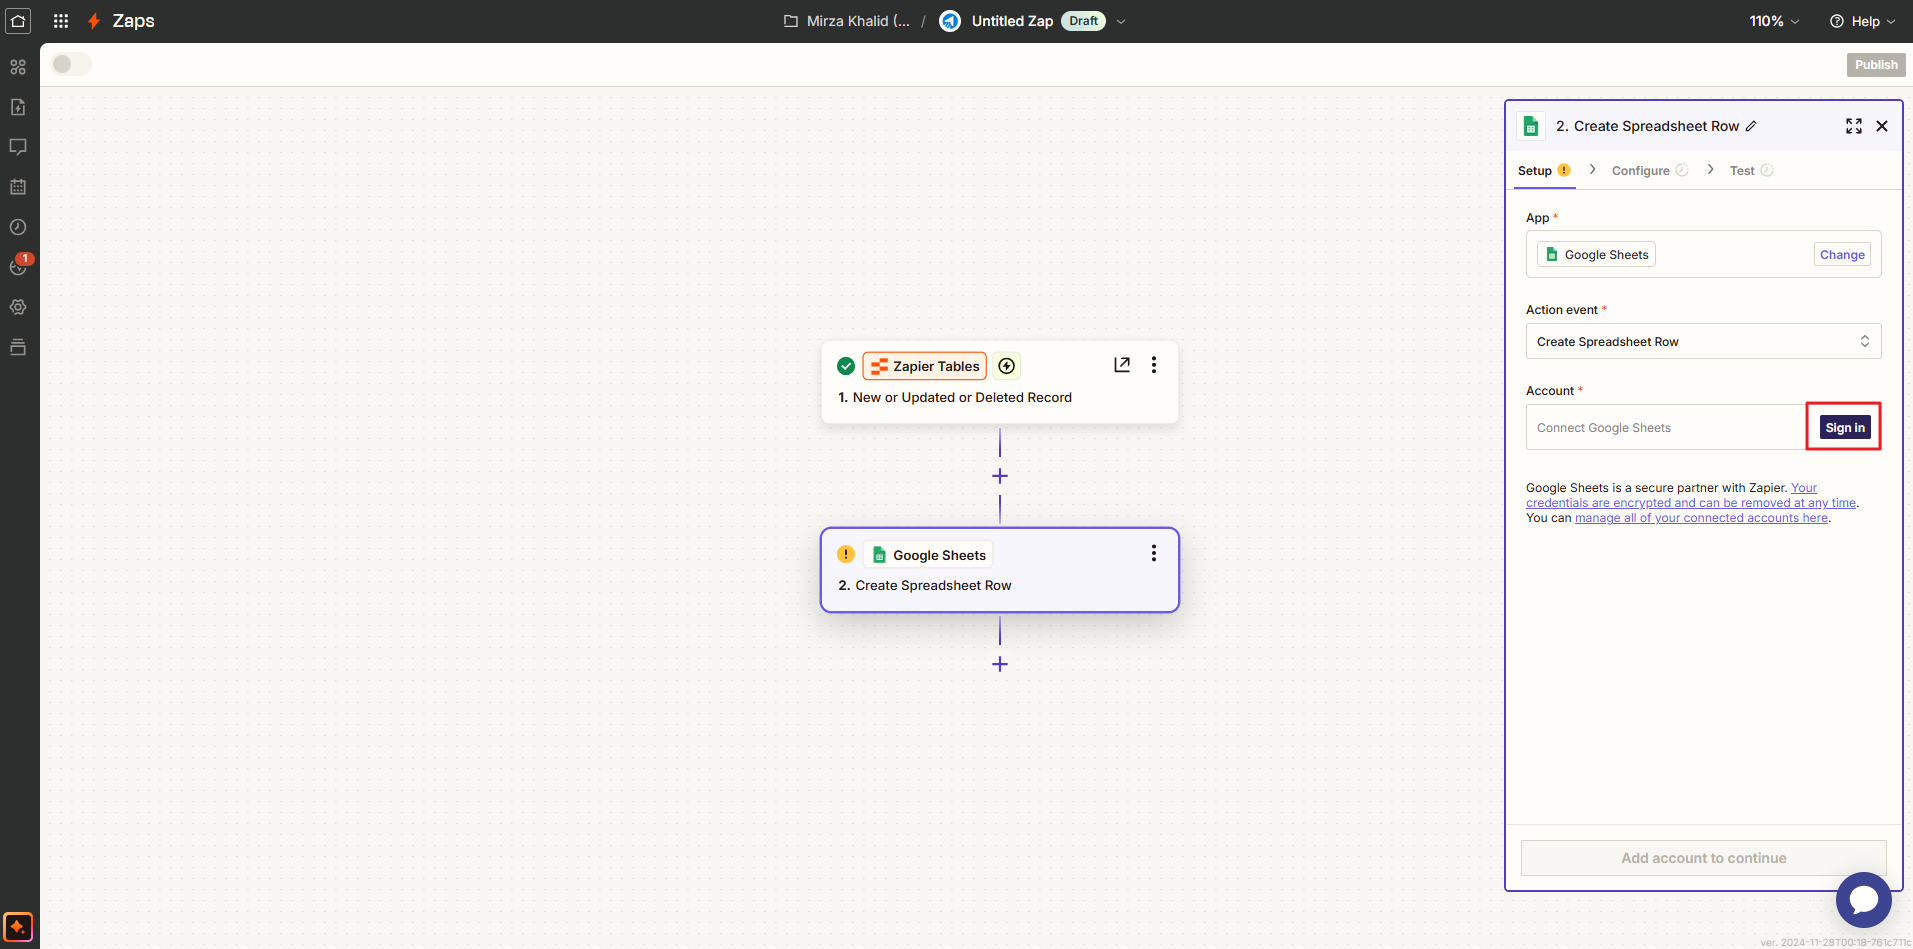
You need to sign in to your Google Account by clicking Sign in to let Zapier access Google Sheets.
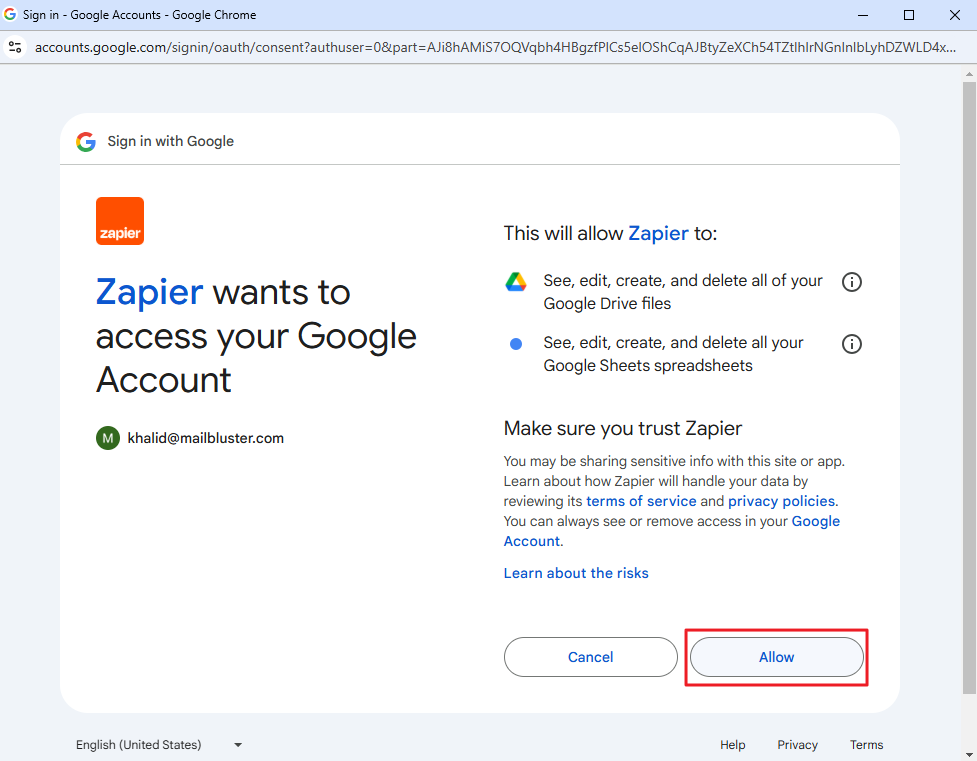
Once signed in, you will need to give permissions by selecting Allow.
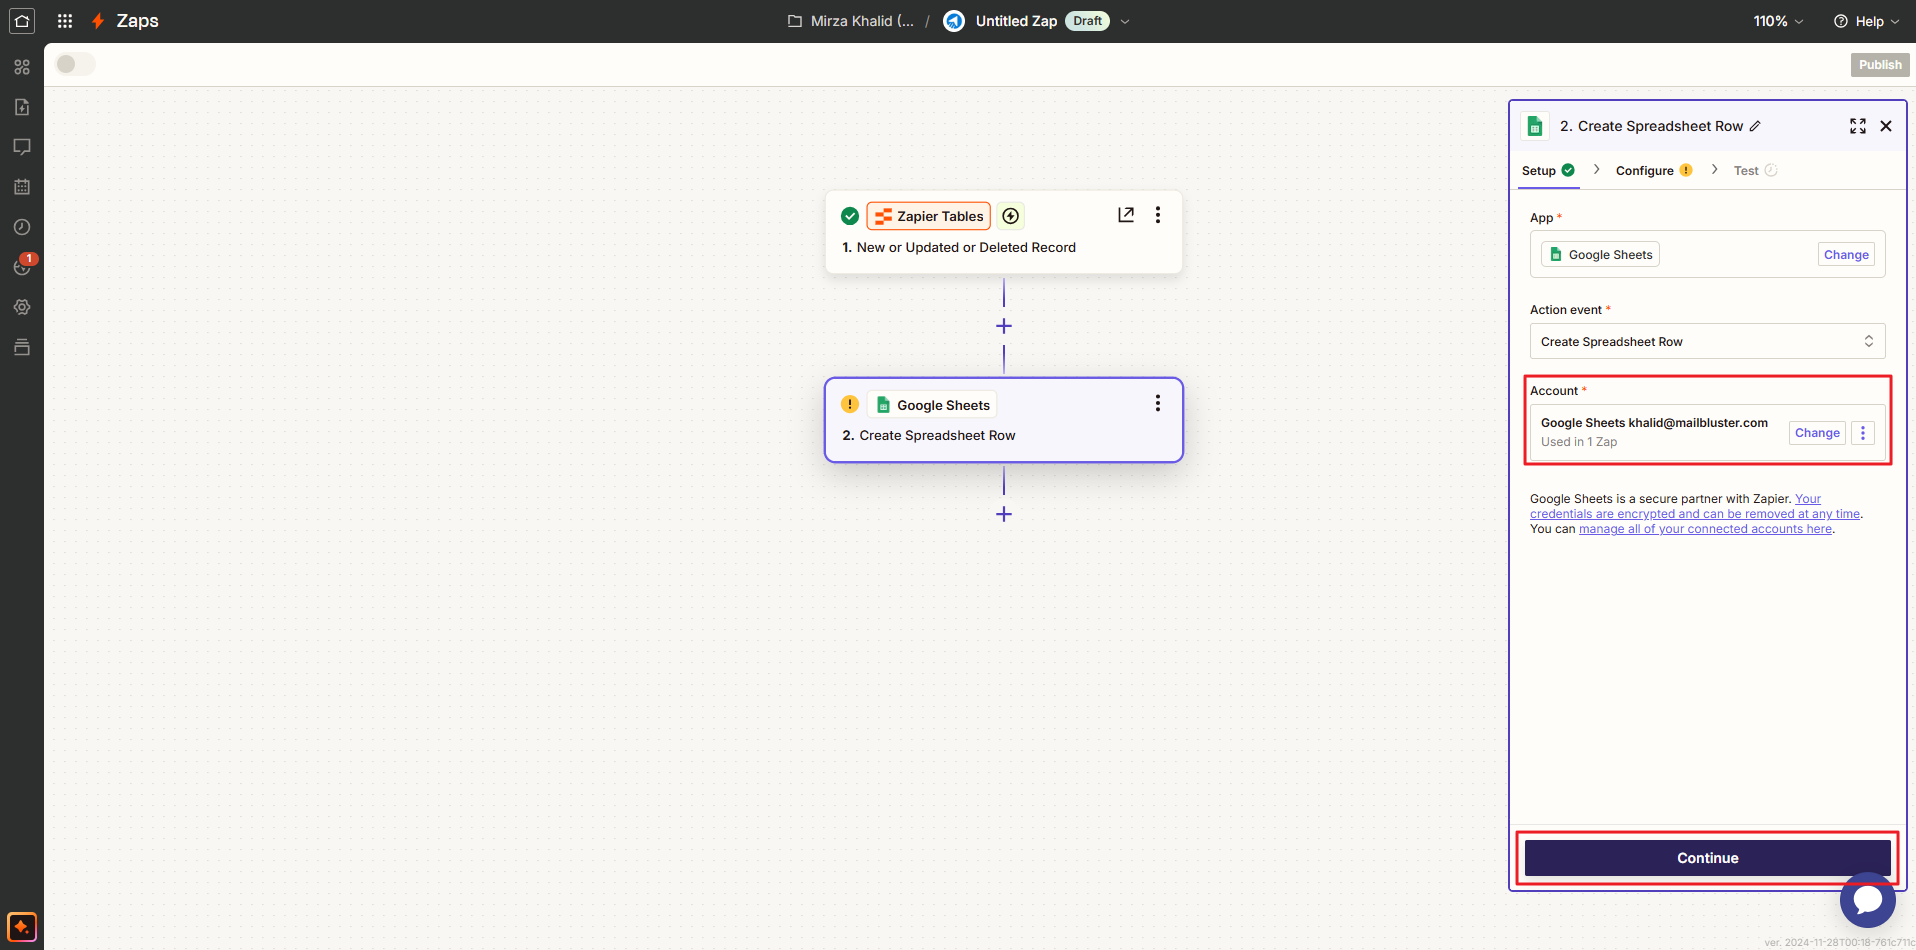
Your Google Sheets will be selected under Account. Click Continue.
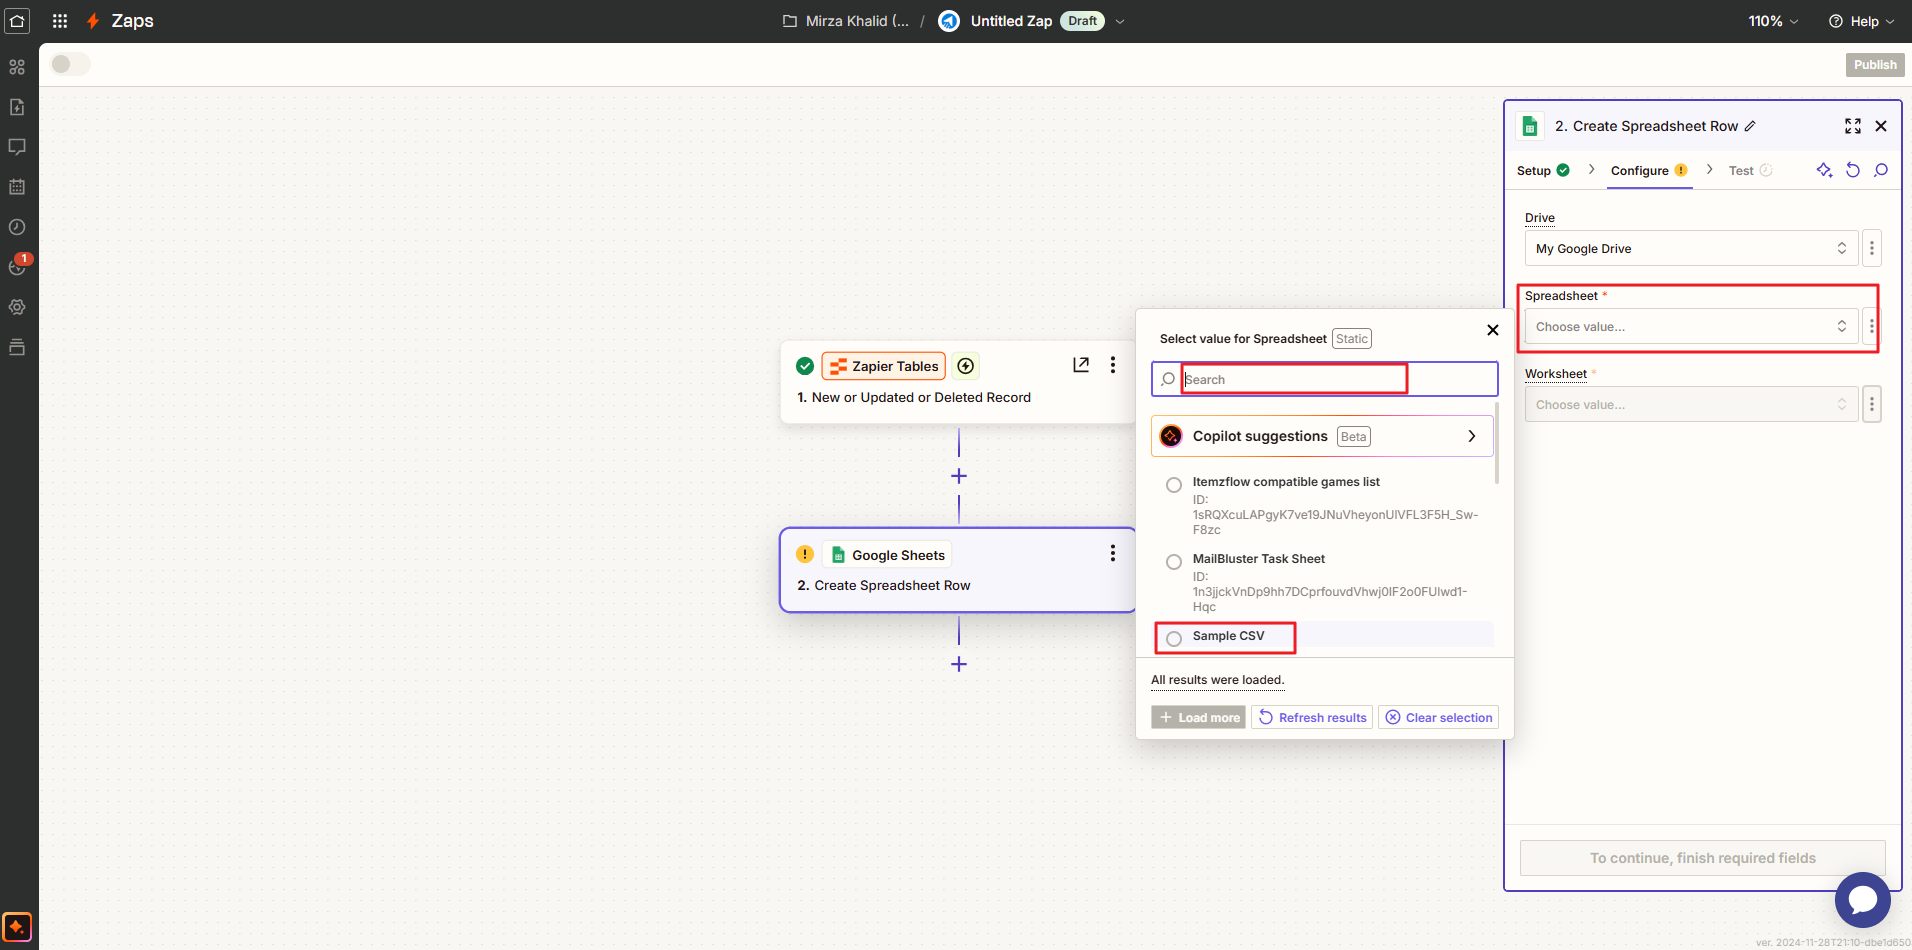
Select ‘My Google Drive’ as the Drive, and select ‘My Google Drive’ as Select value for Drive.
After selecting Google Drive, select Spreadsheet, then select your CSV file. Here we selected Sample CSV file which is stored in our Google Drive.
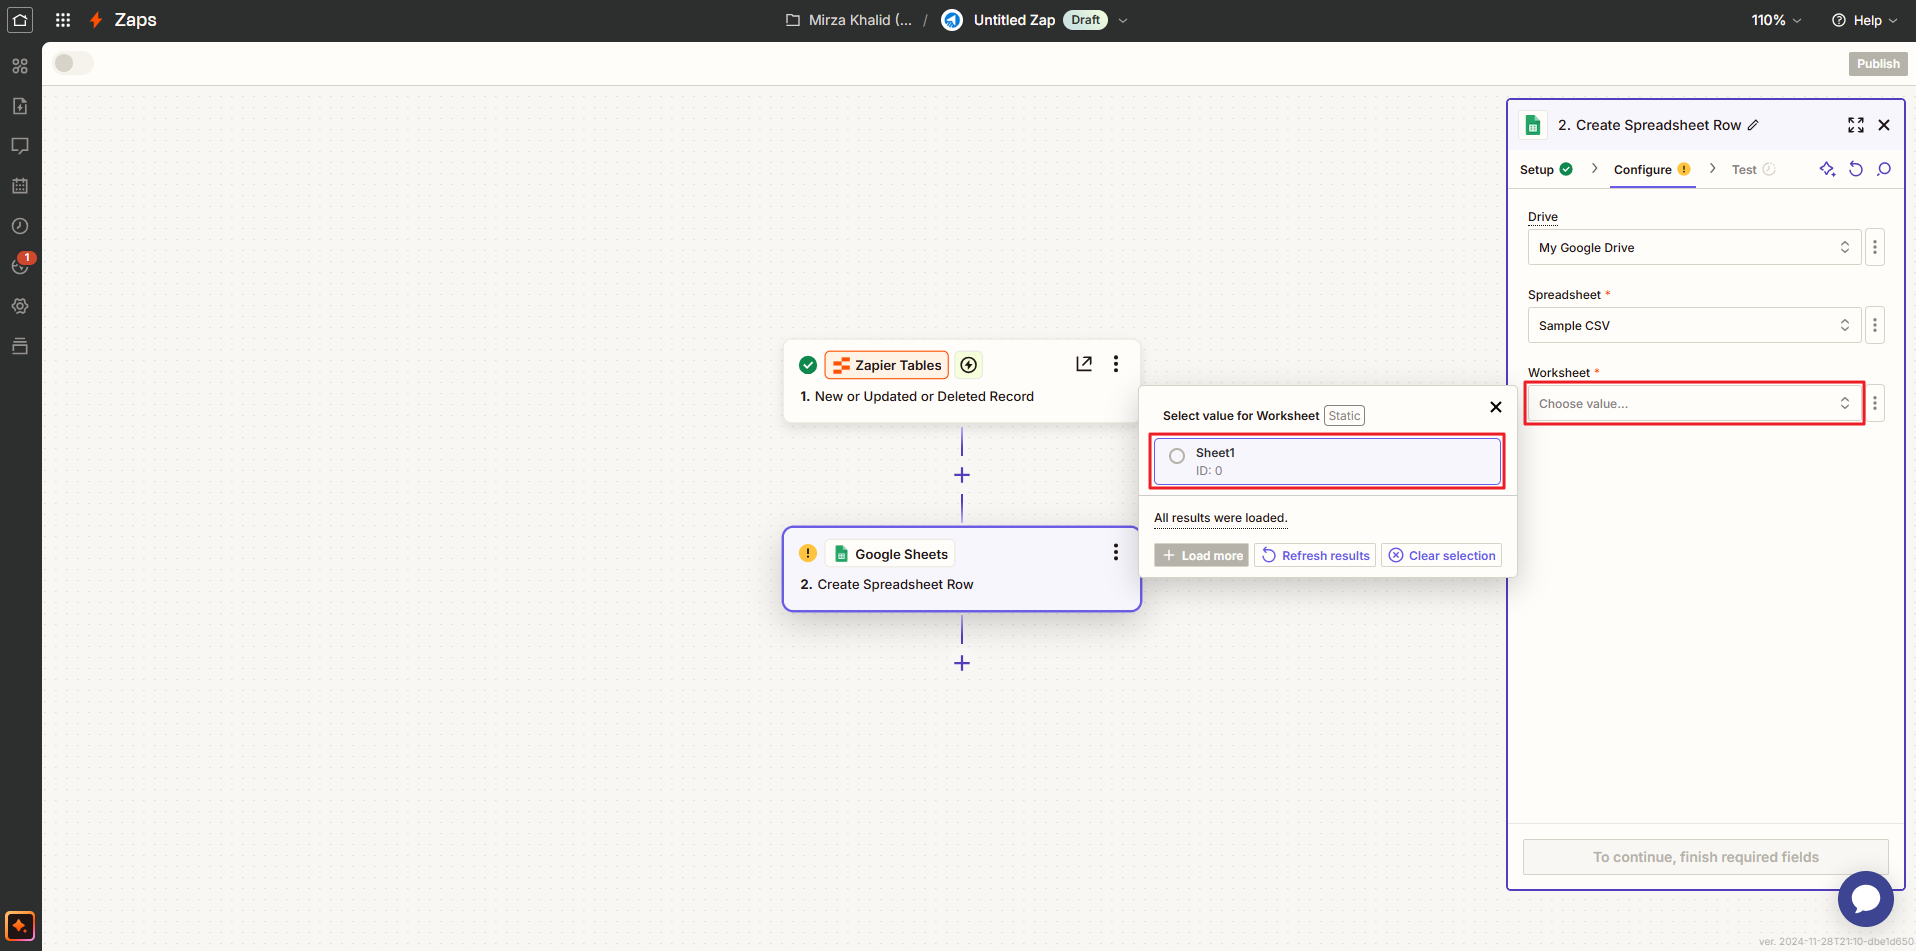
After selecting the CSV file, select Worksheet, then Sheet1 as Select value for Worksheet.
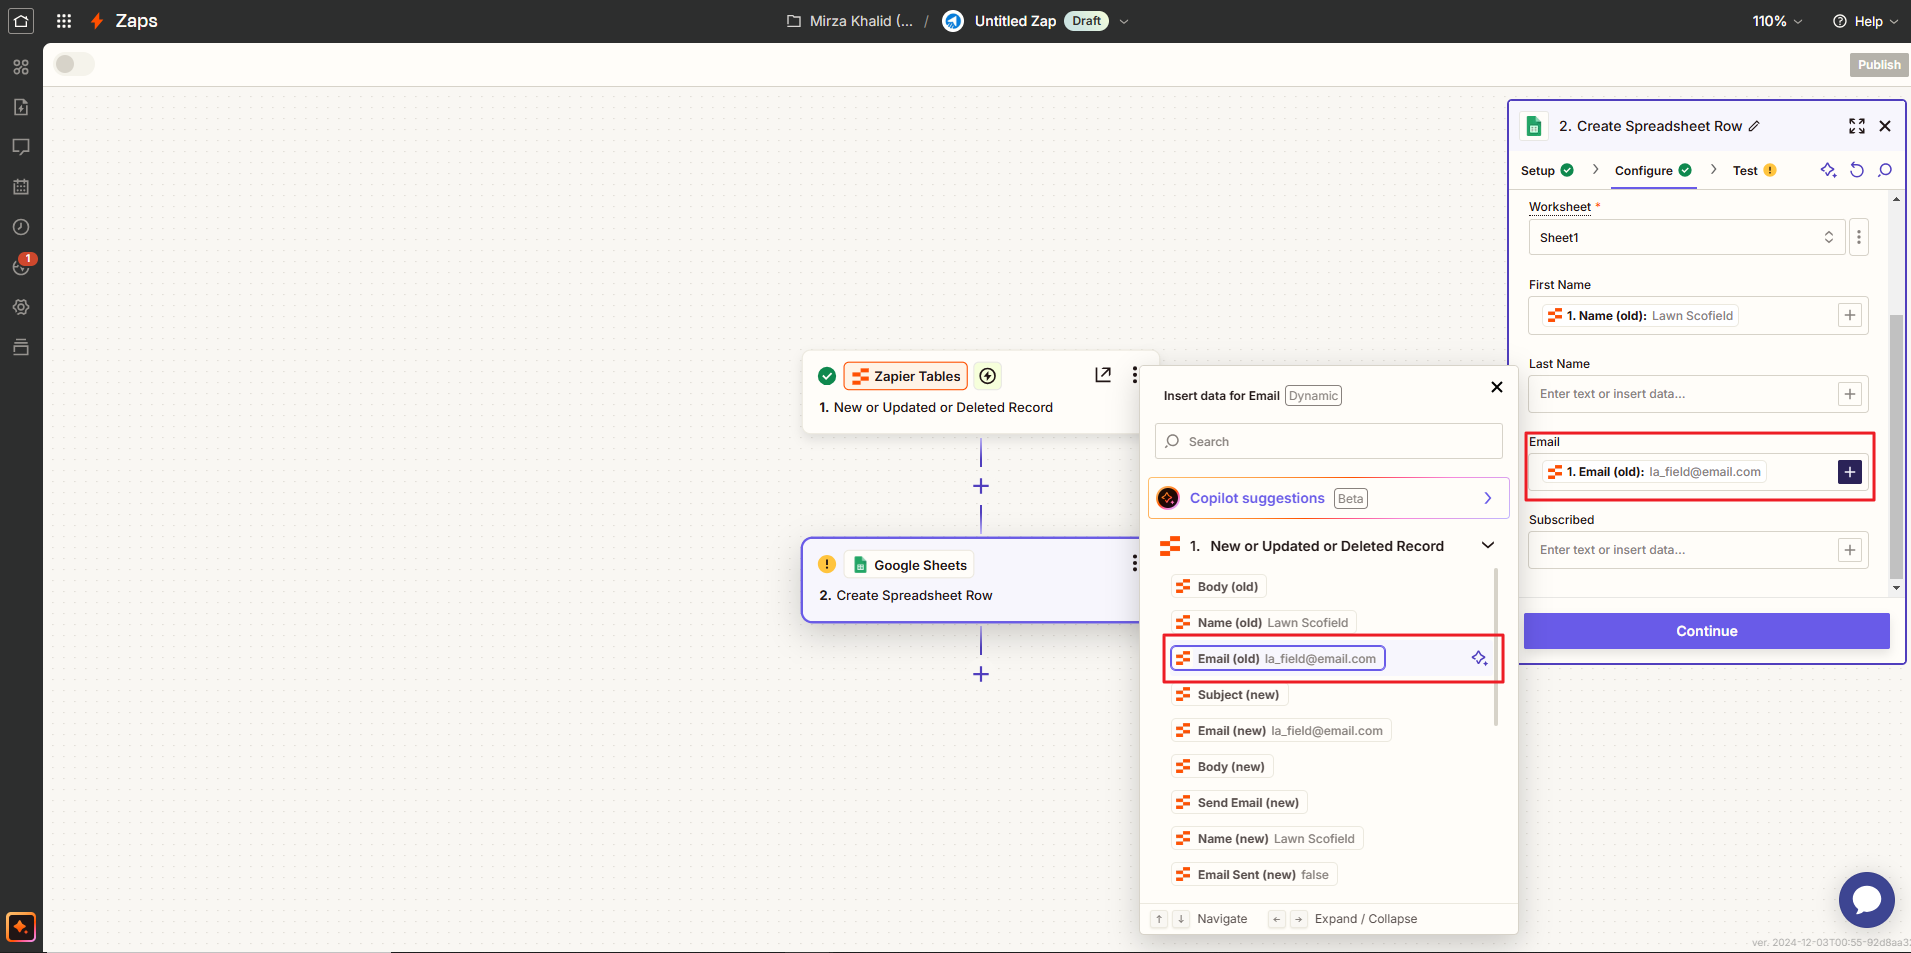
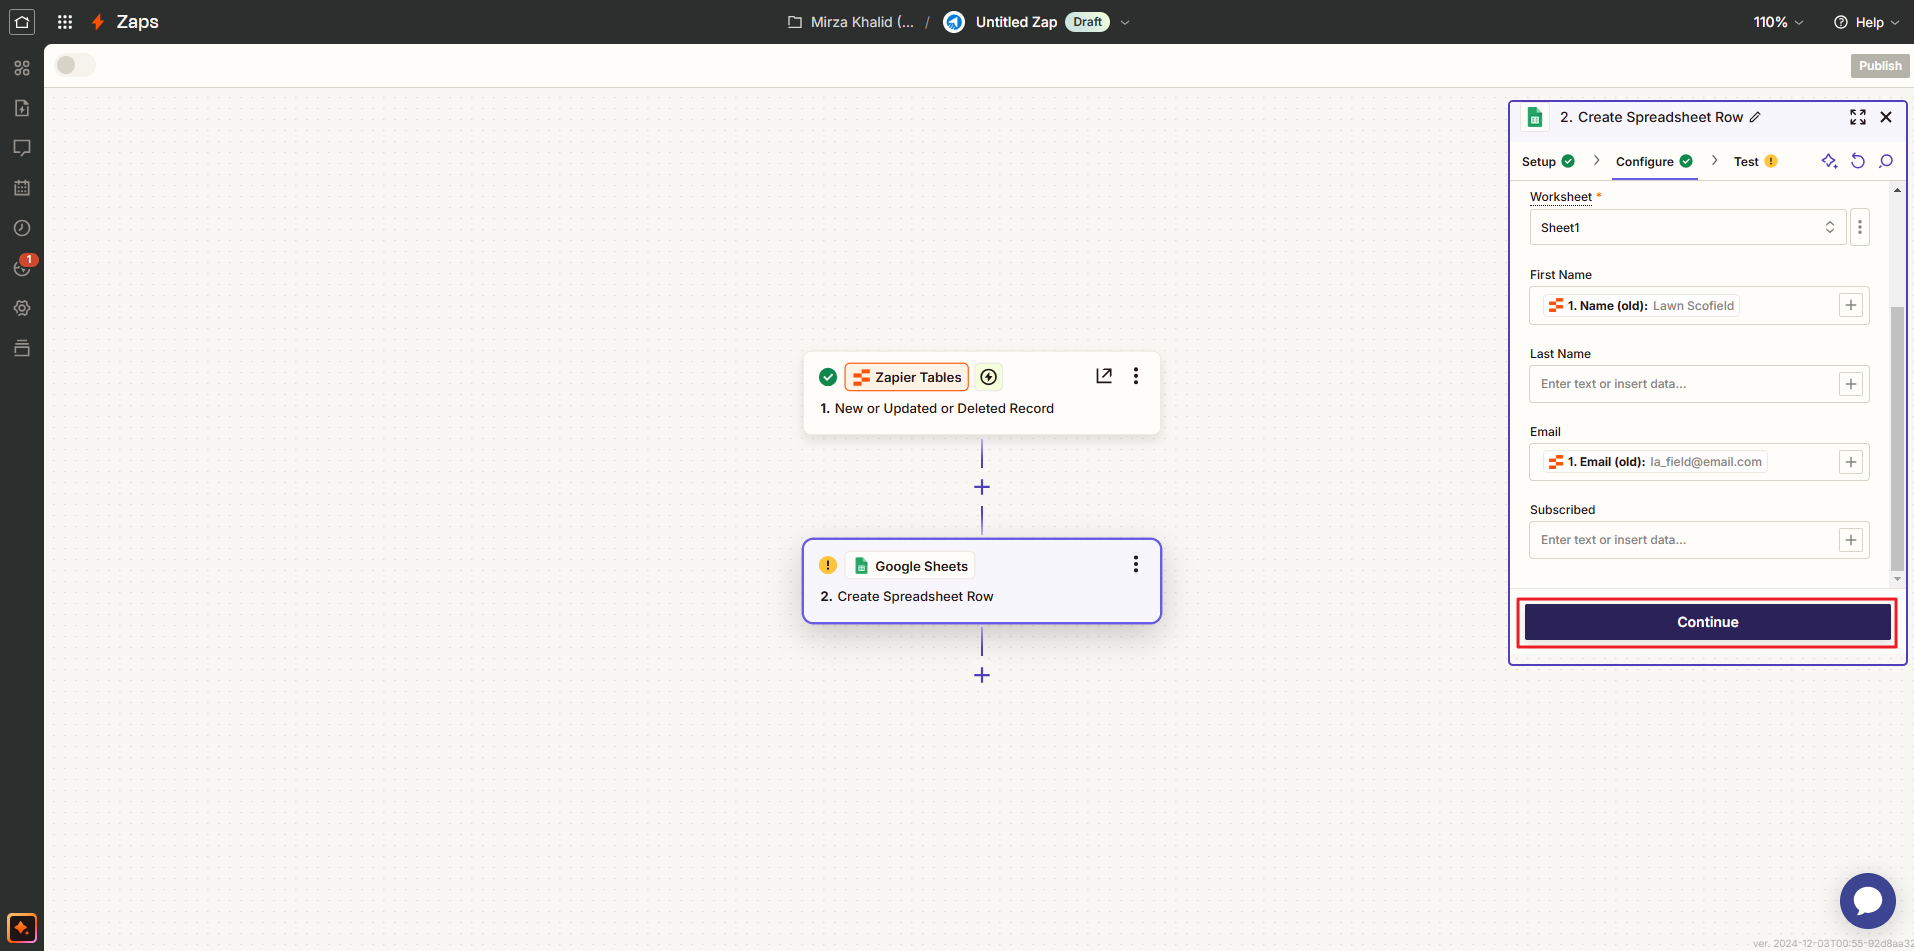
Highlight the First Name of the CSV File with the Insert data forFirst Name as Name (old).
Then highlight the Email of the CSV File with the Email as Email (old).
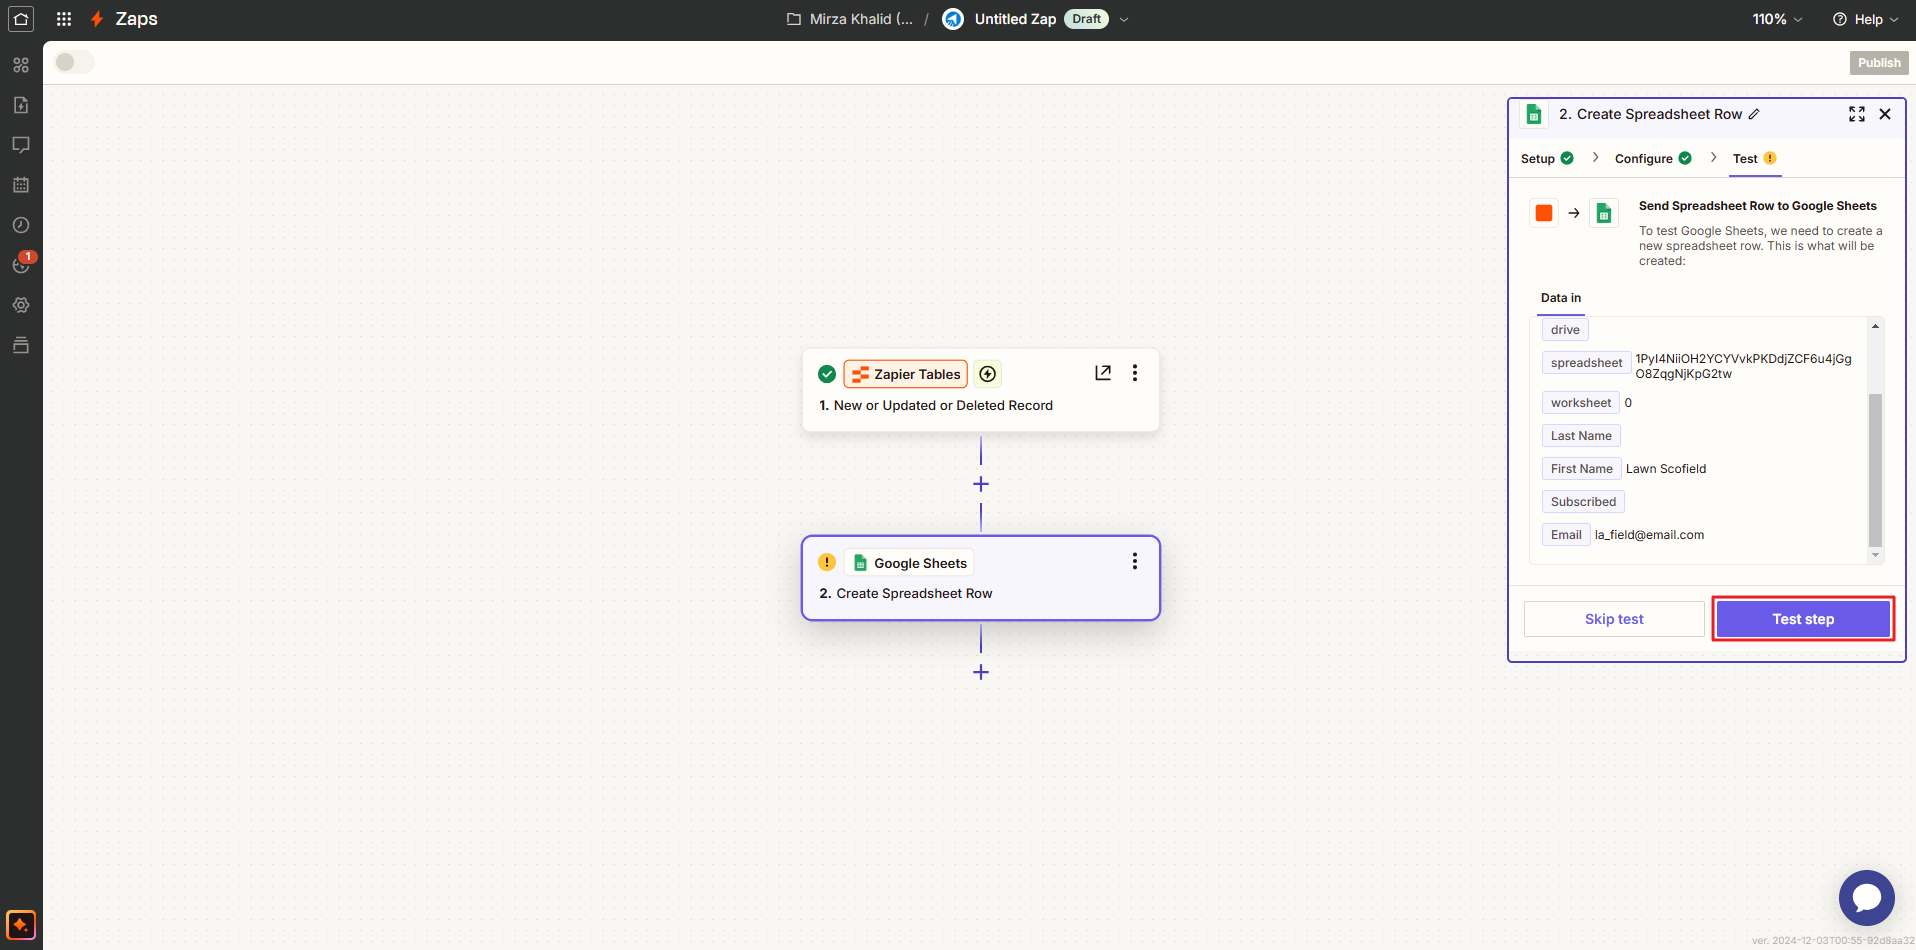
Now click Continue.
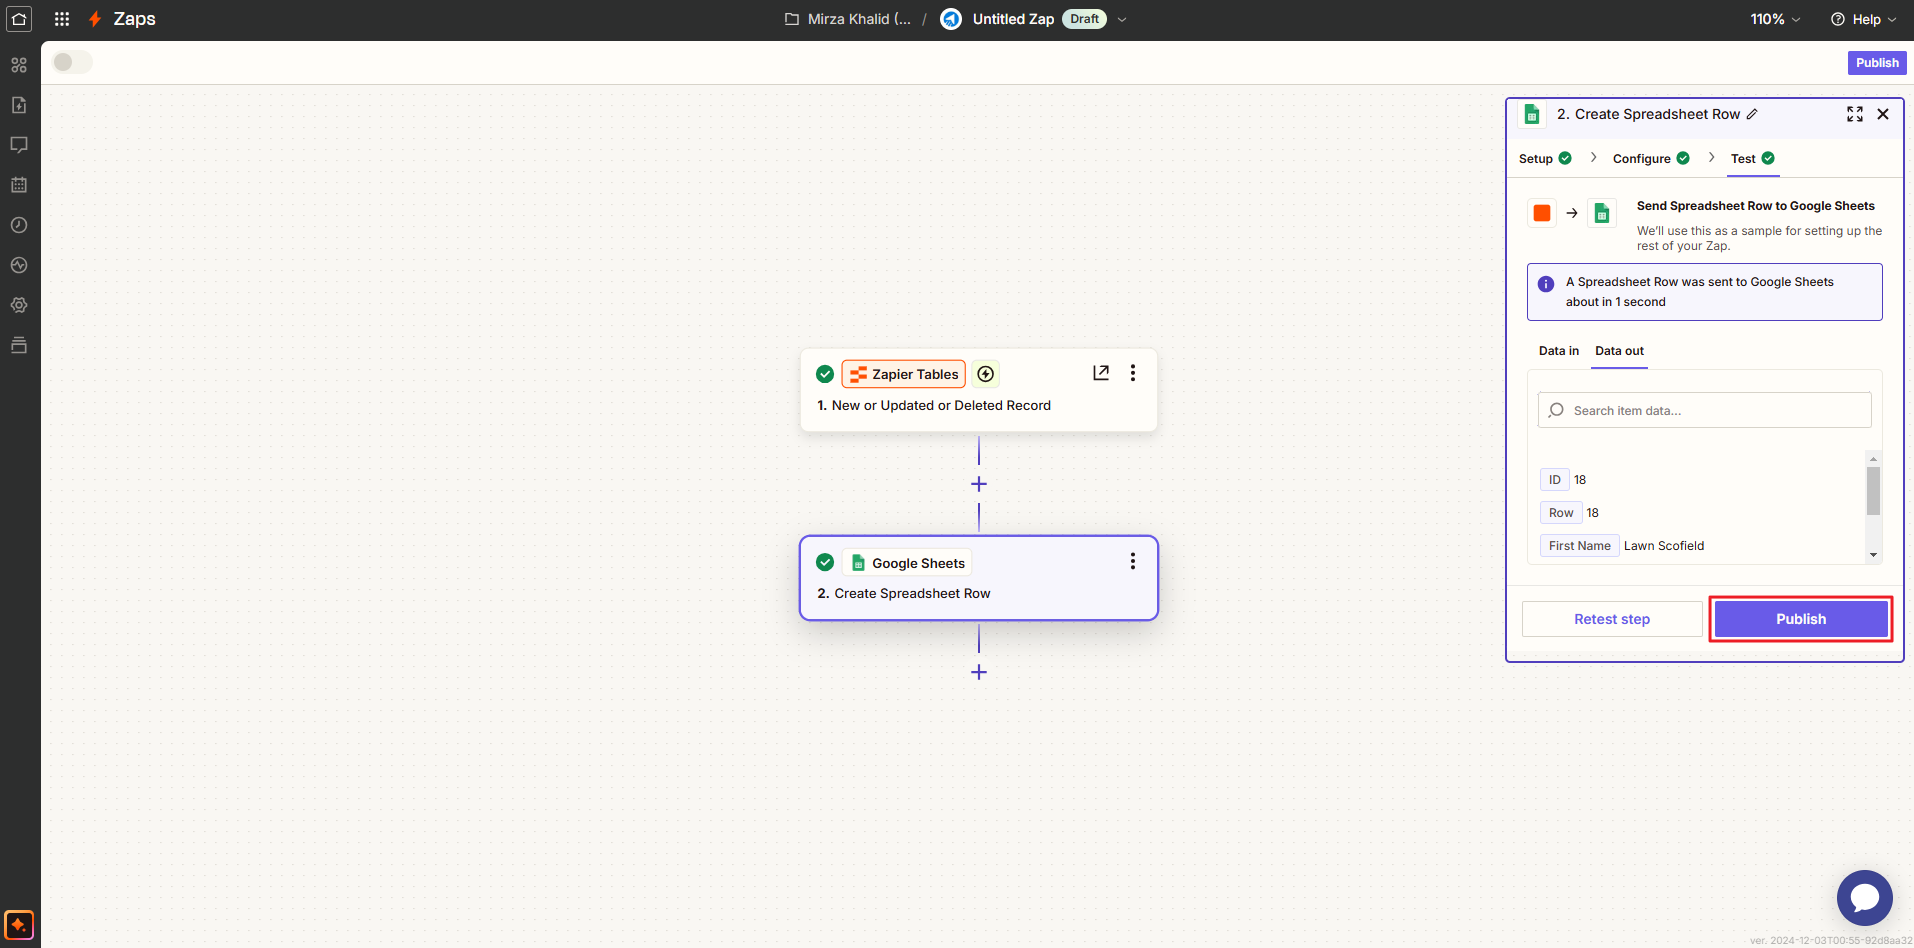
Then click Test step.
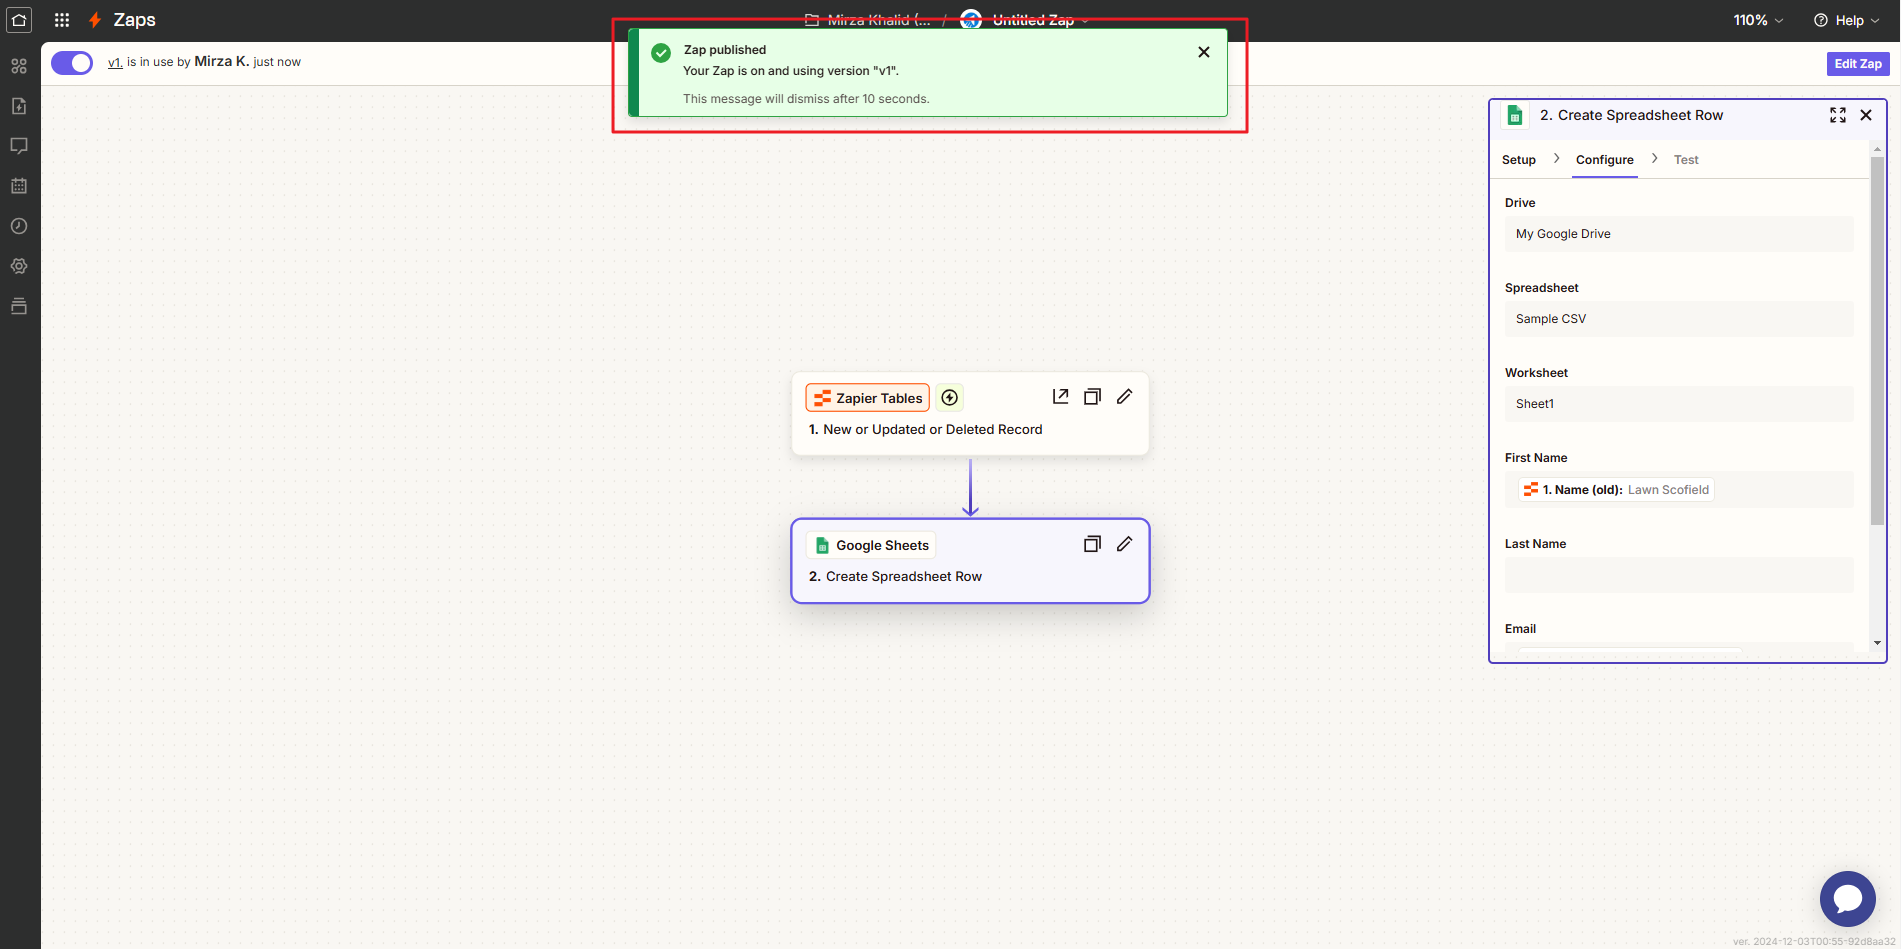
And, finally click Publish to integrate the lead into Google Sheets.
You will get a notification ‘Zap published.’
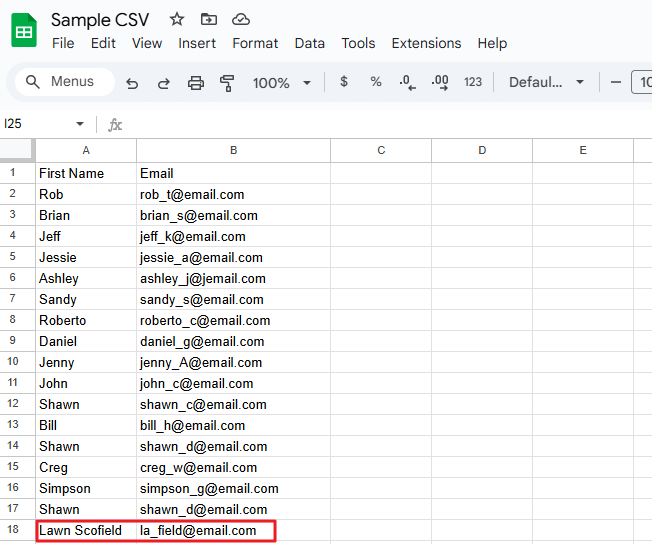
The Lead that you have entered in the Zapier table earlier will be added to the CSV file.
Now it’s time to use the third party app Make. The integrated Lead needs to appear on MailBluster Leads.
Click on Create a new scenario in Make after signing in.
Select the Google Sheets on Trigger Module by clicking on the ‘+‘ and connect the Google Sheets.
Select Watch New Rows under Google Sheets.
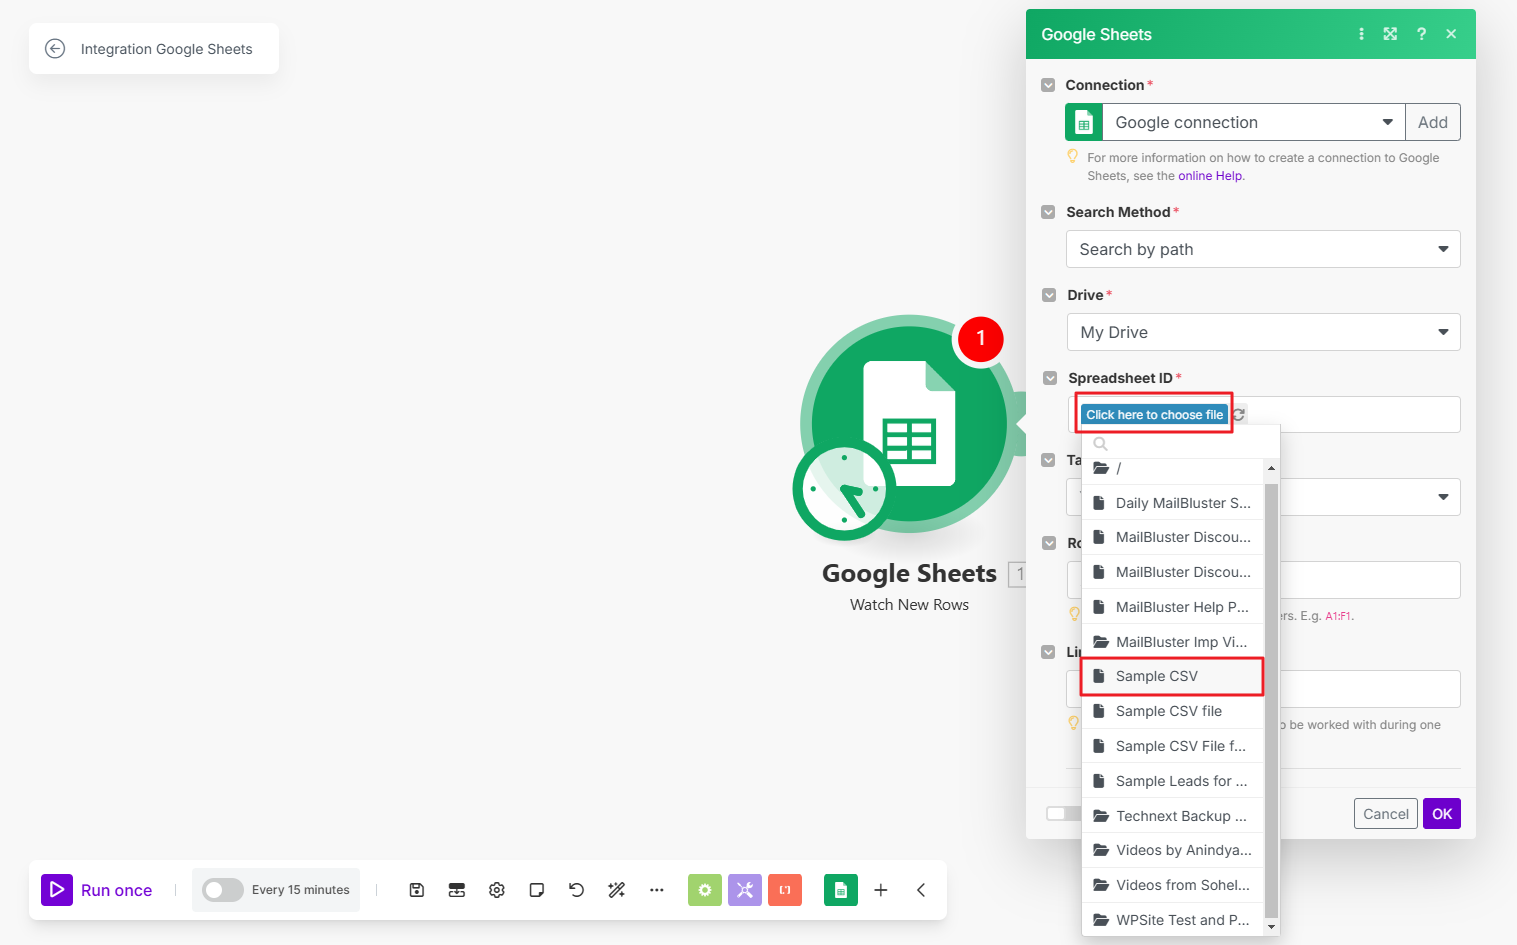
Click under Spreadsheet ID – ‘Click here to choose file.’
Now, select the Sample CSV file from Spreadsheet ID.
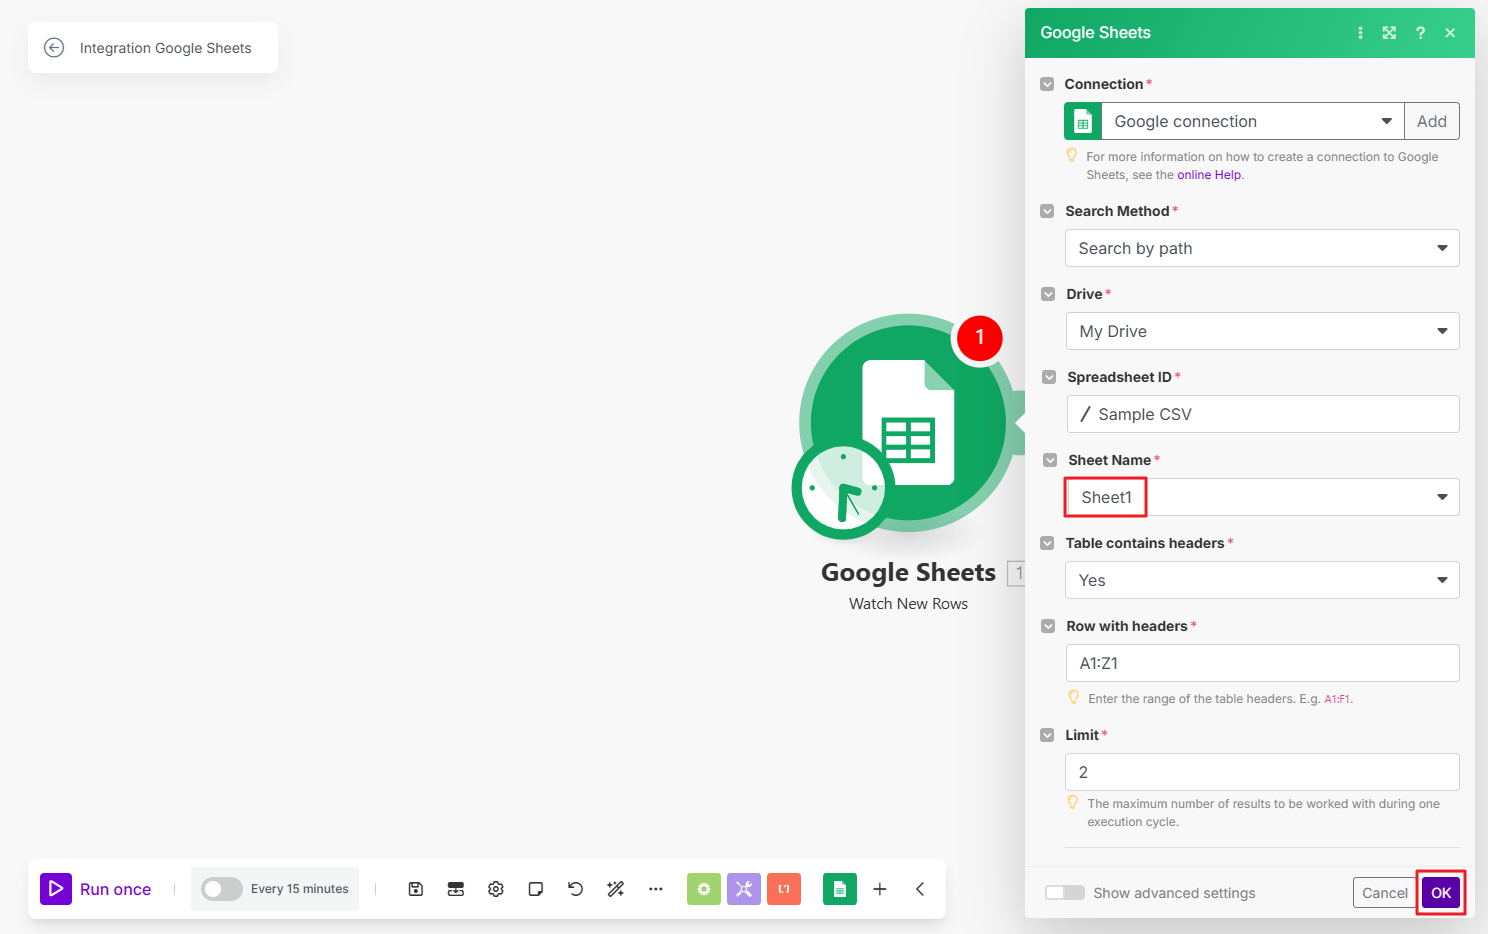
Select Sheet Name as Sheet1 and then click OK button.
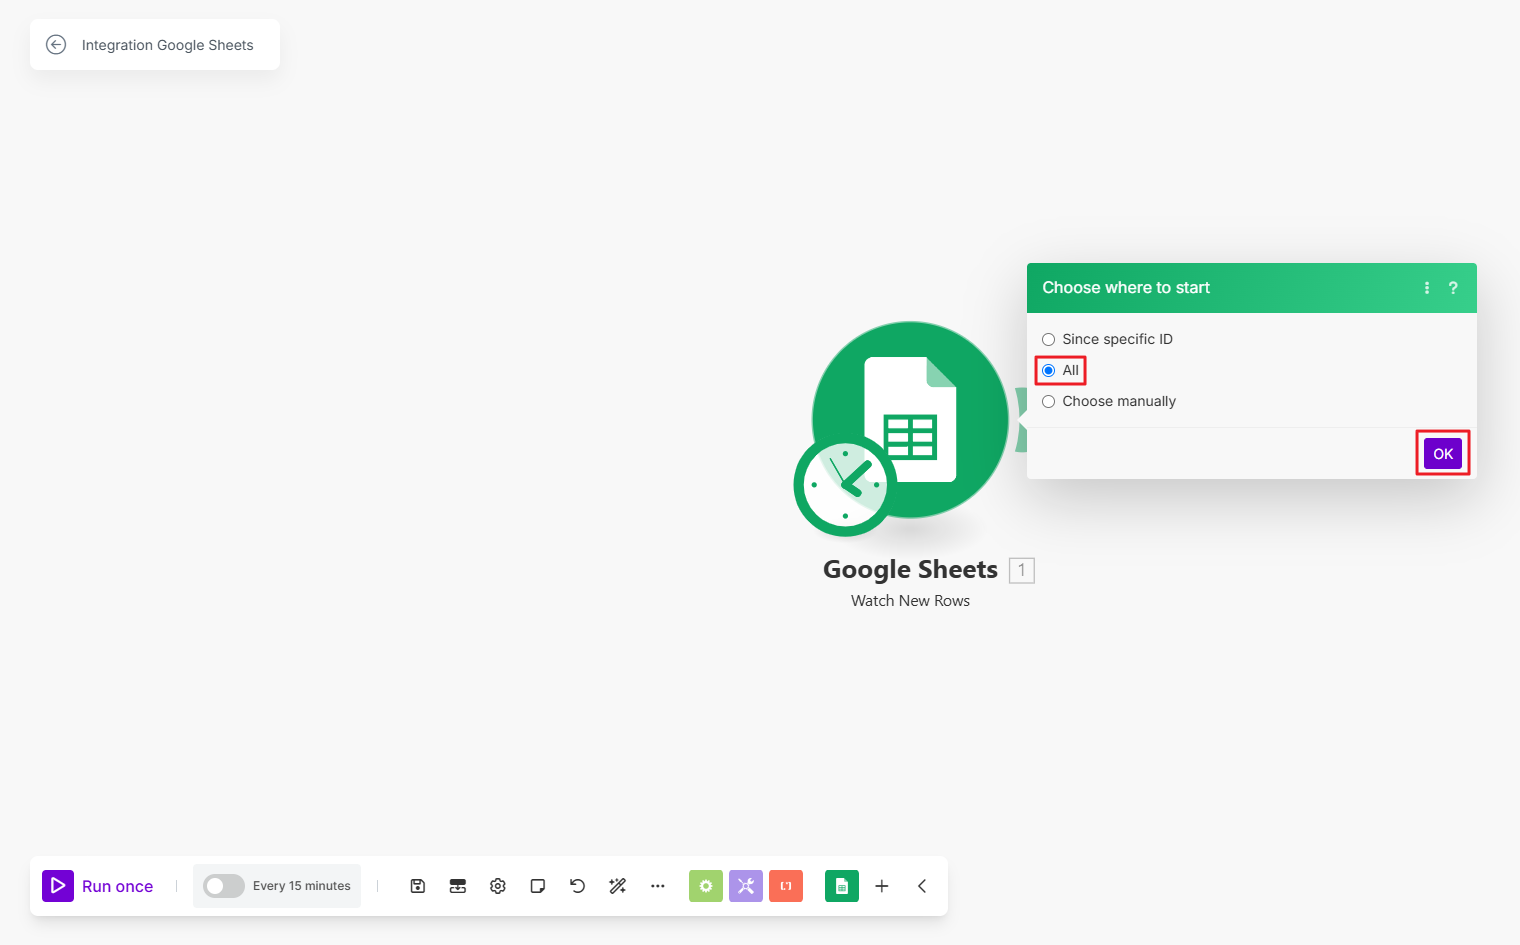
Now, select All in ‘Choose where to start‘ window and then click OK.
Click the ‘+‘ symbol which resembles ‘Add another module‘ to enable another trigger module.
Type in ‘MailBluster‘ in the search box and click on Show more.
Select ‘Create a Lead.’
Then click on Add button under ‘Connection.’
You will be prompted to input the API key from MailBluster in ‘Create a connection‘ window.
Sign in to MailBluster > your Brand > Settings > API Keys. Then click on Create new button.
Enter the ‘API key name‘ and click on Create API key.
Copy the Key value from the created API.
Paste the Key value generated from MailBluster to Make as shown below under ‘API Key’.
Highlight the ‘Email‘ as shown below.
Similarly add First Name and select ‘Yes‘ radio box as shown below.
Now, click on Run once to check the connection.
Once the connection established successfully, you will notice that the text color changed to Green.
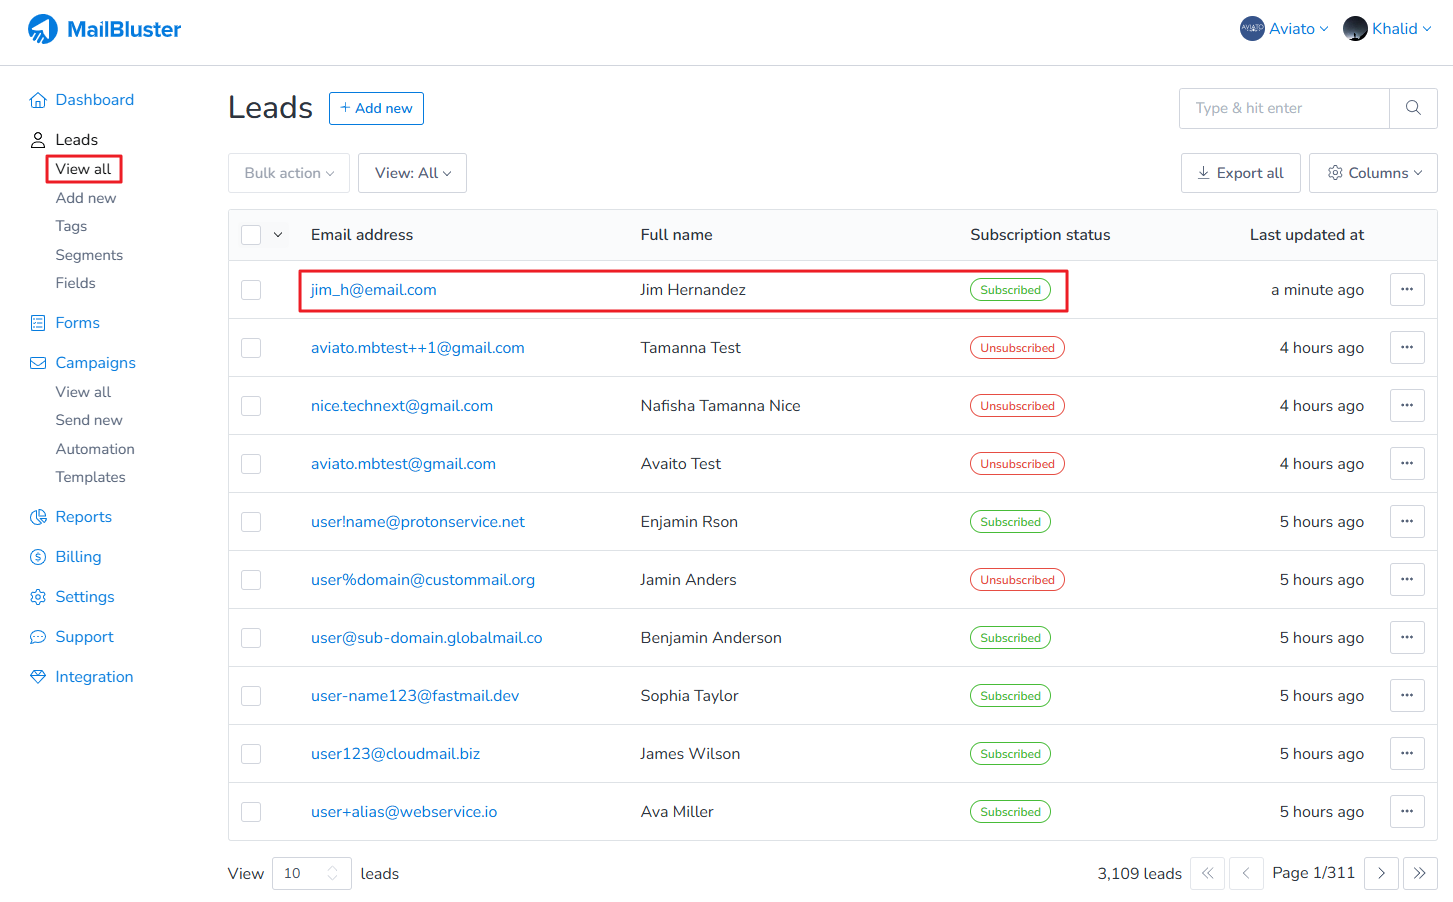
Two new leads will be added to MailBluster Leads section. To check, go to your Brand > View all.
Now, click the Save button as shown in the screenshot below.
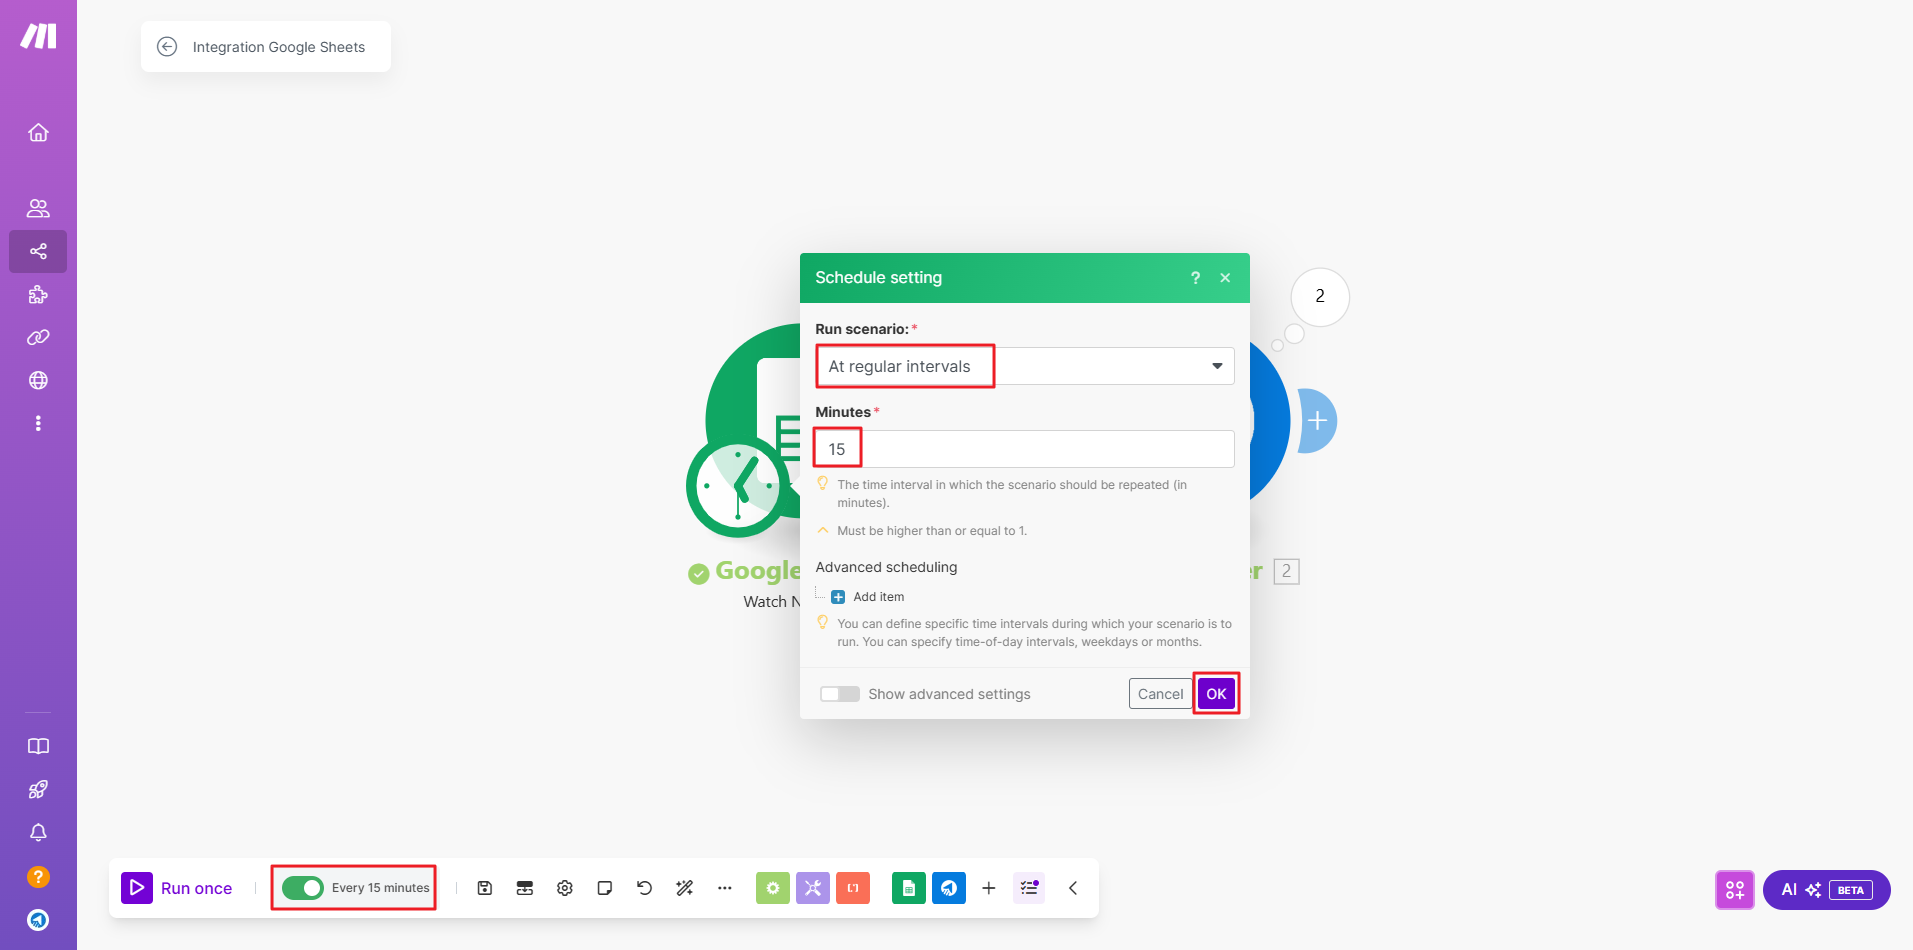
Click on Every 15 minutes and configure the Schedule setting – Run scenario and Minutes. Then click OK button.
You are done MailBluster has now been integrated with Zapier and Make using Google sheet.
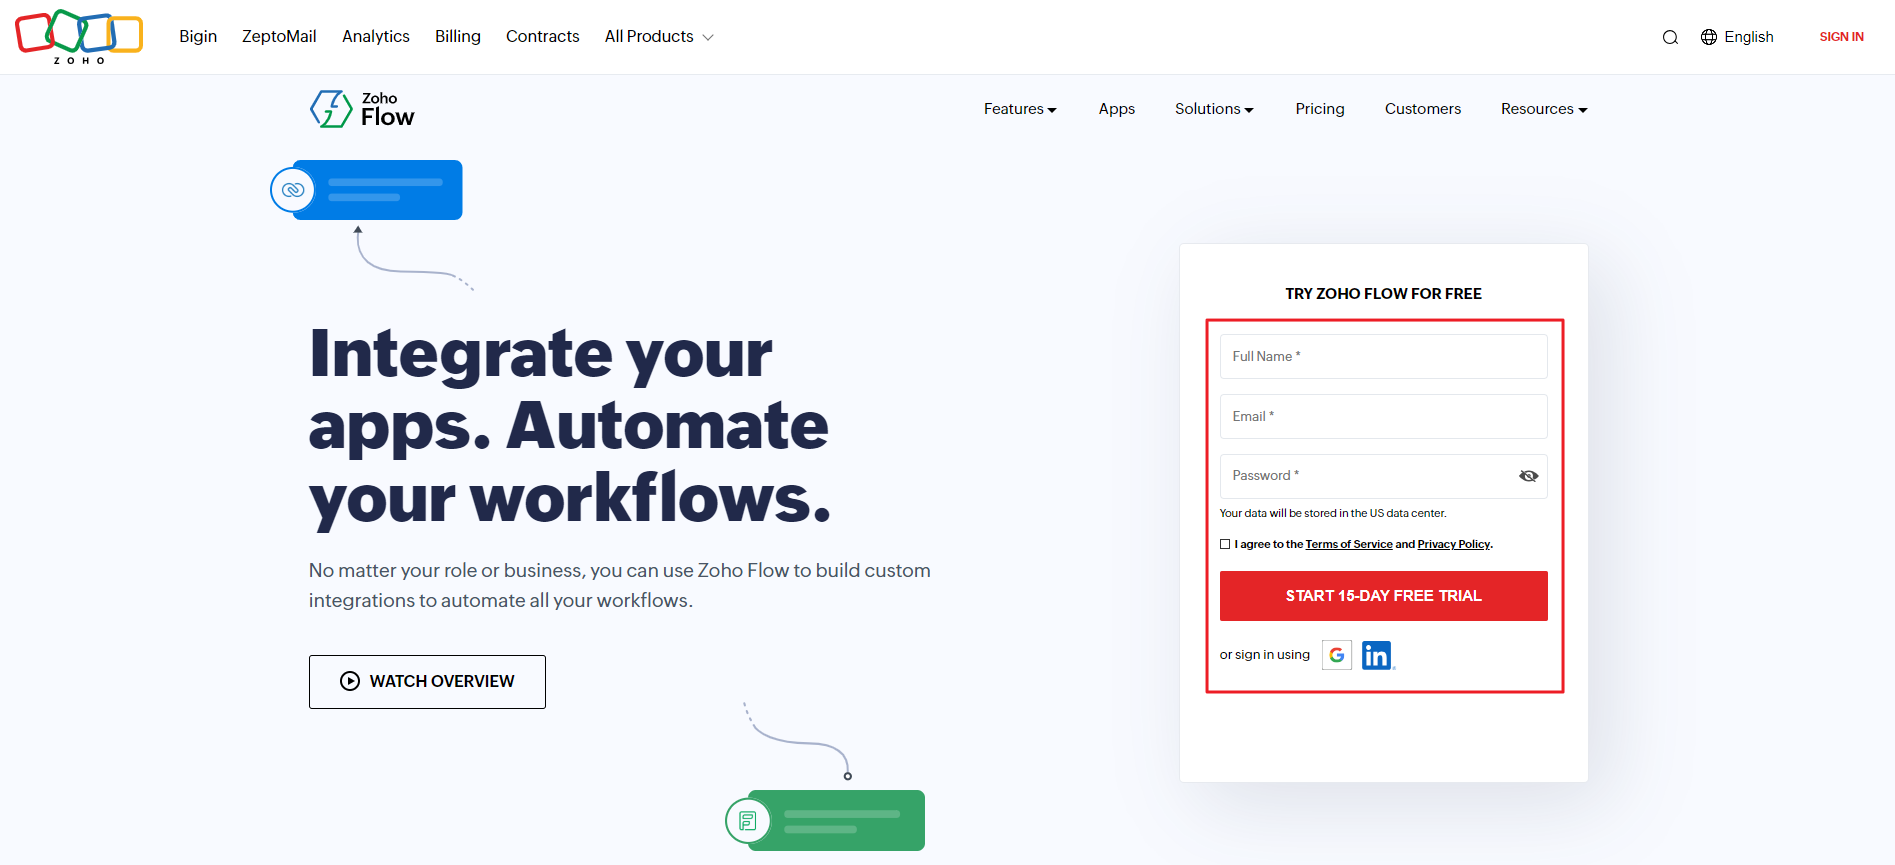
Zoho integration with MailBluster can be achieved using Zoho Flow, an automation platform designed to connect cloud applications and streamline workflows.. With Zoho Flow, you can create workflows (called “Flows”) without writing any code, allowing your apps to exchange data and automate tasks seamlessly. It works by triggering actions in one app when certain conditions are met in another app.
To begin the Zoho integration with MailBluster, first you need to sign up with Zoho Flow as shown below. Just type in the name Flow in the search bar and select Flow.
Signup with your Full Name, Email and Password or Sign in using Google.
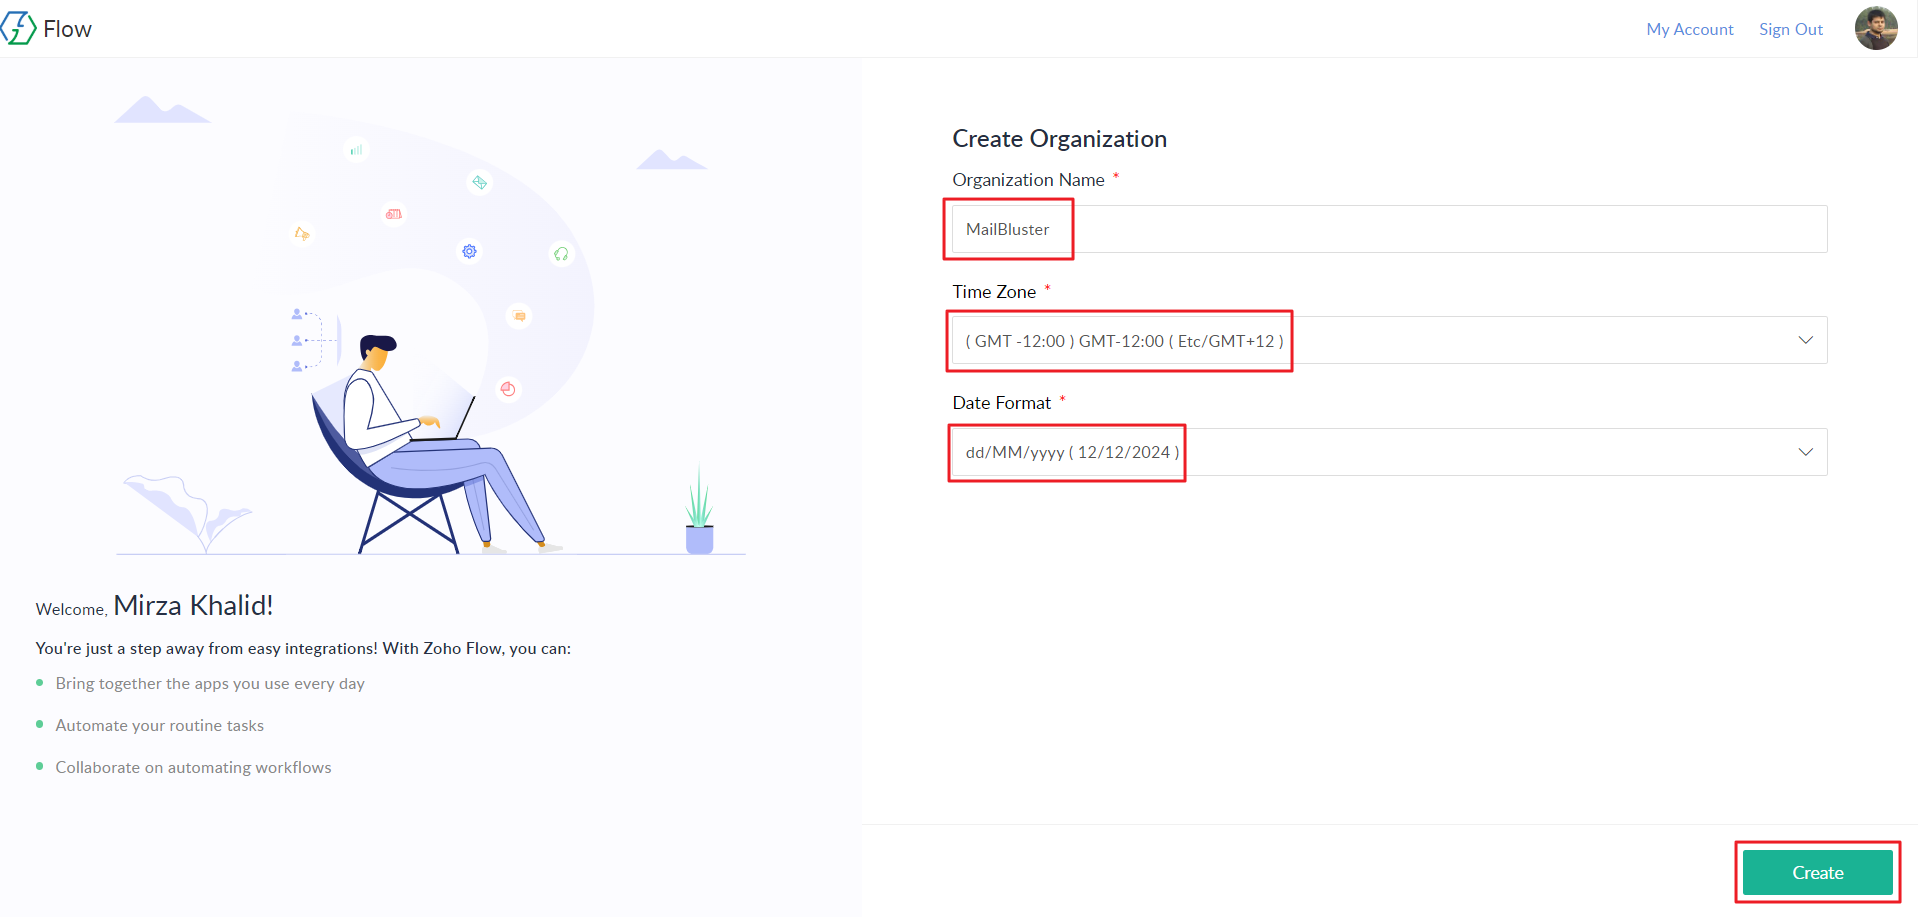
Enter your Organization Name, your Time Zone and Date Format.
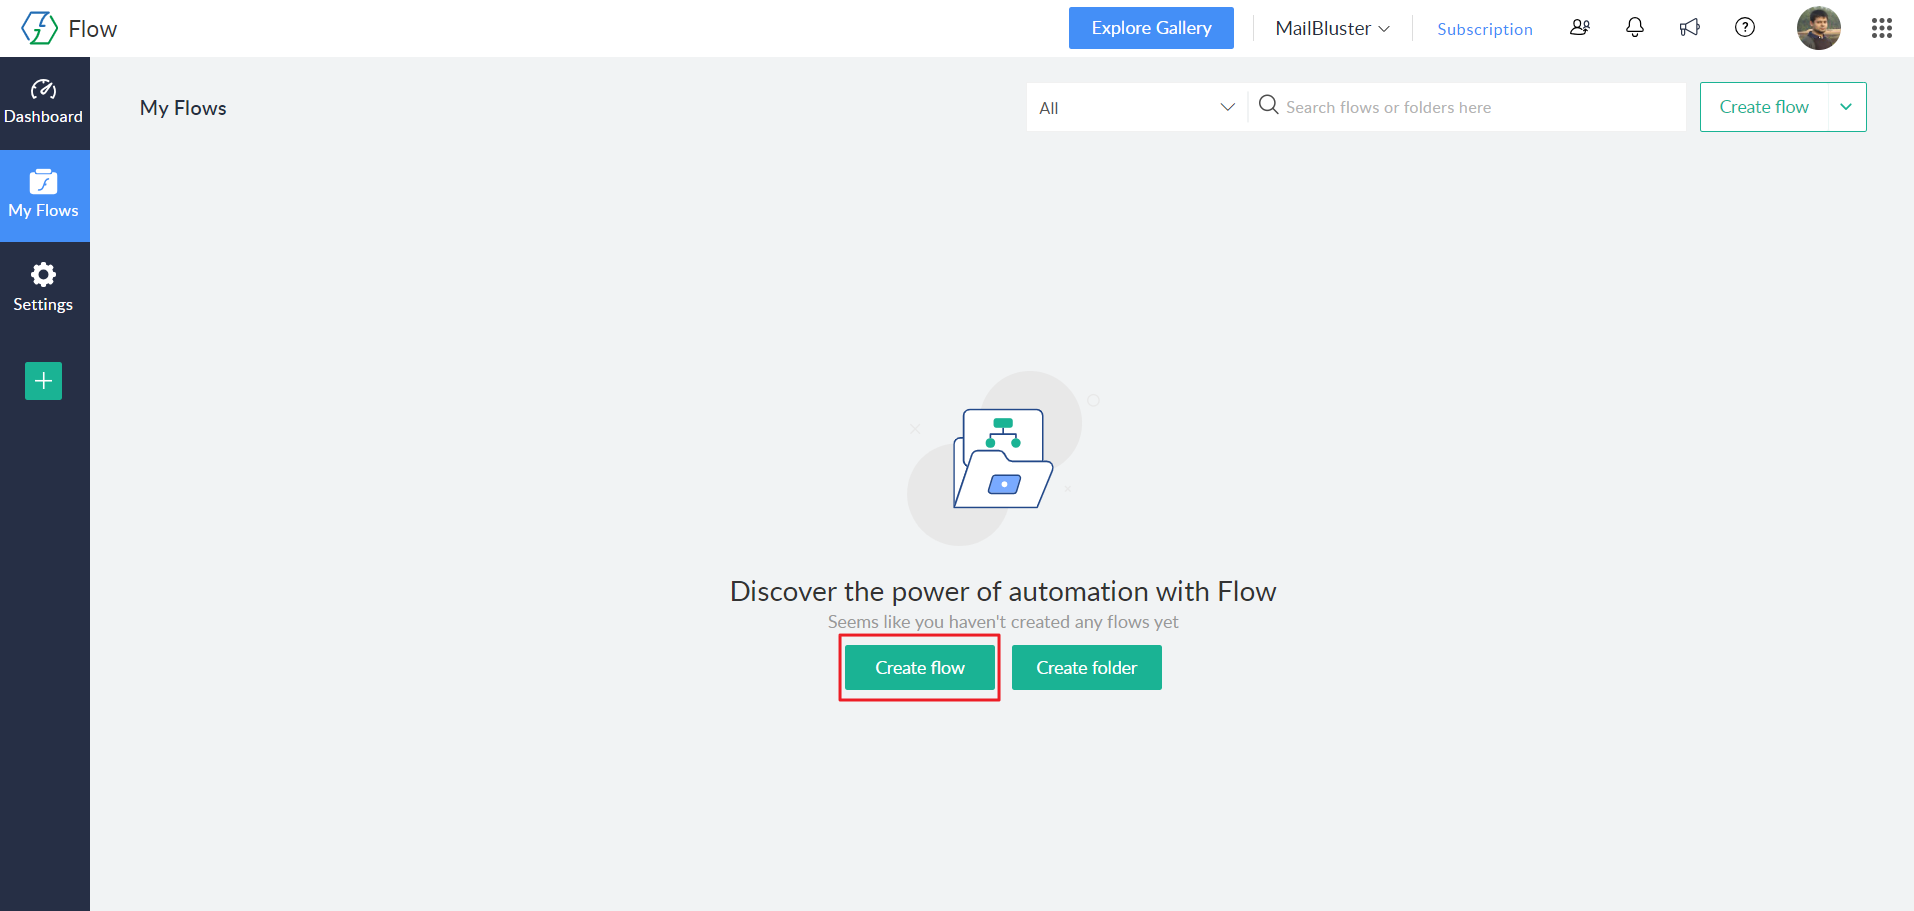
Click on Create flow.
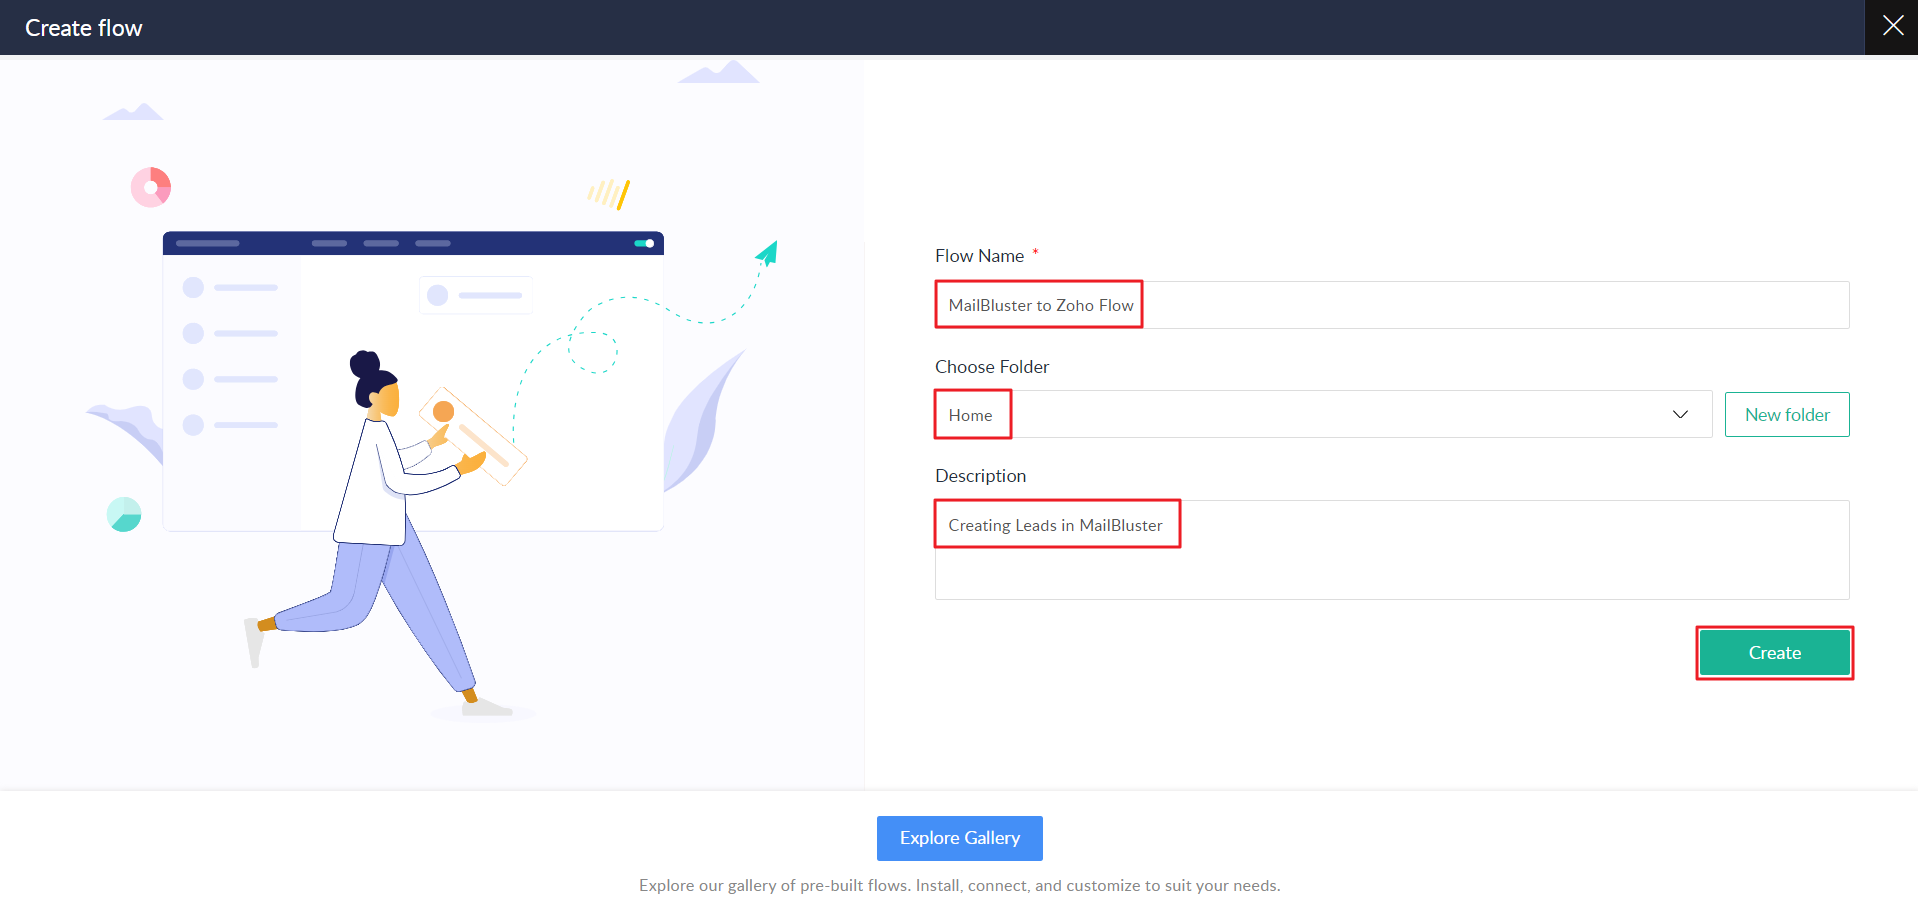
Enter Flow Name, select Choose Folder and enter Description. Then click on Create button.
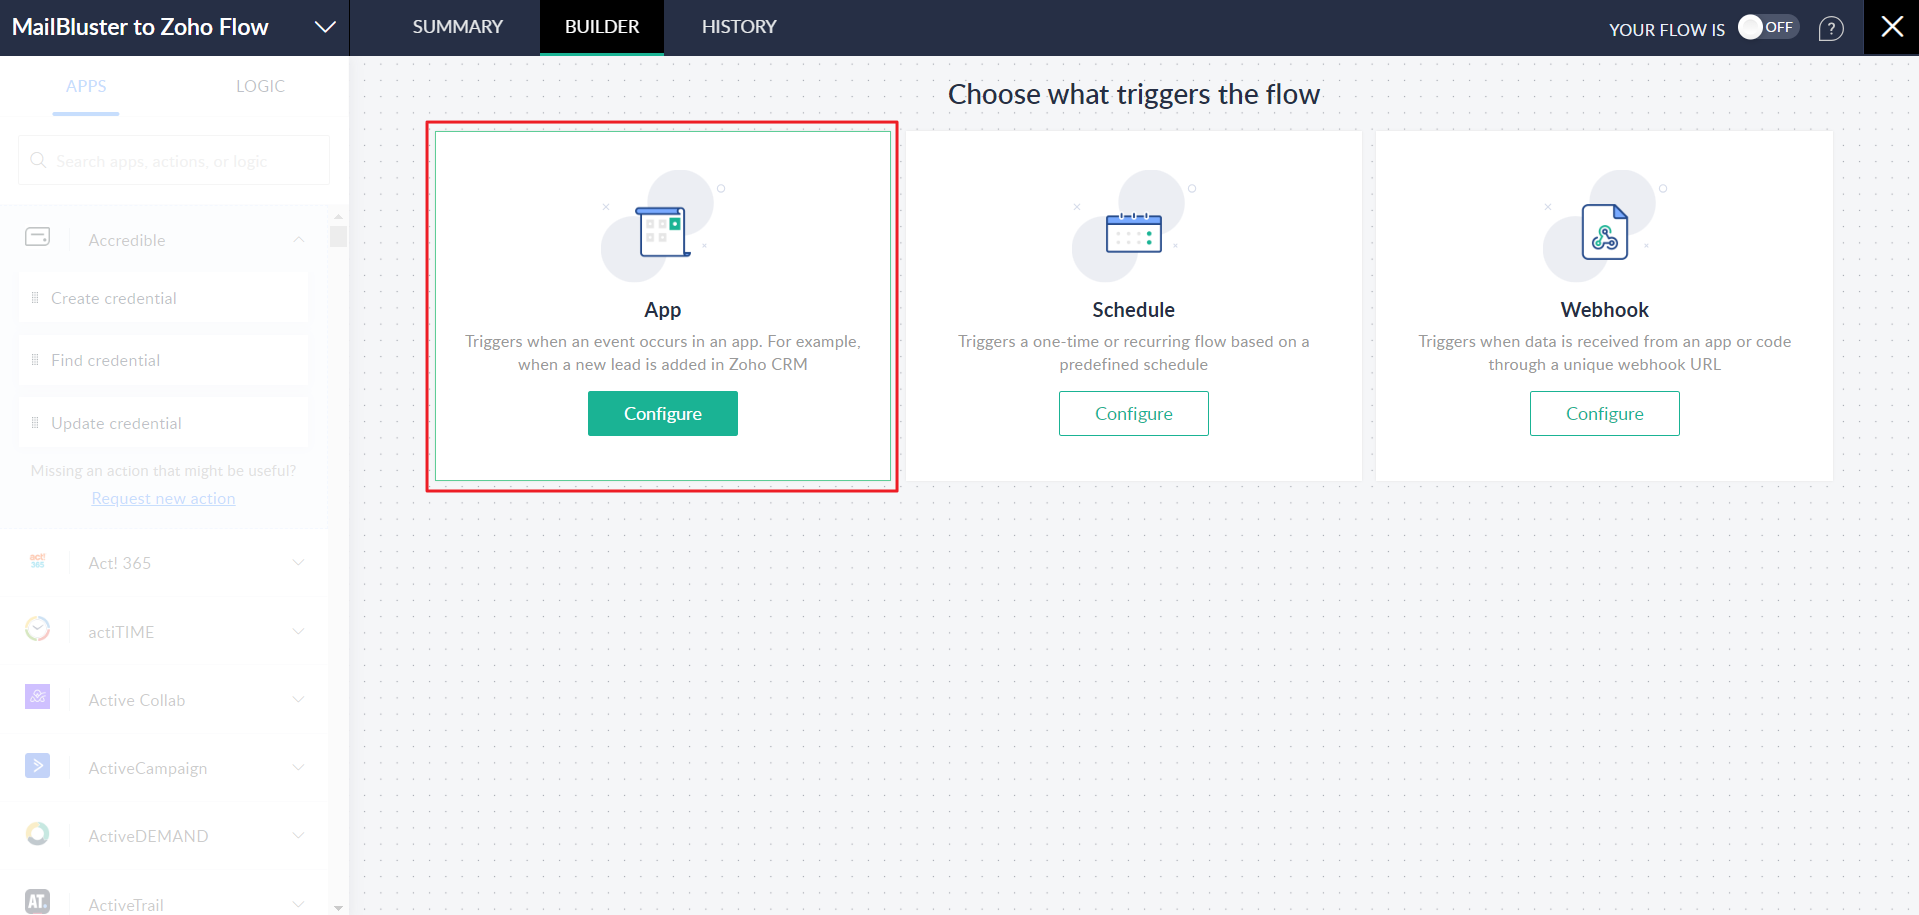
Select App as shown below.
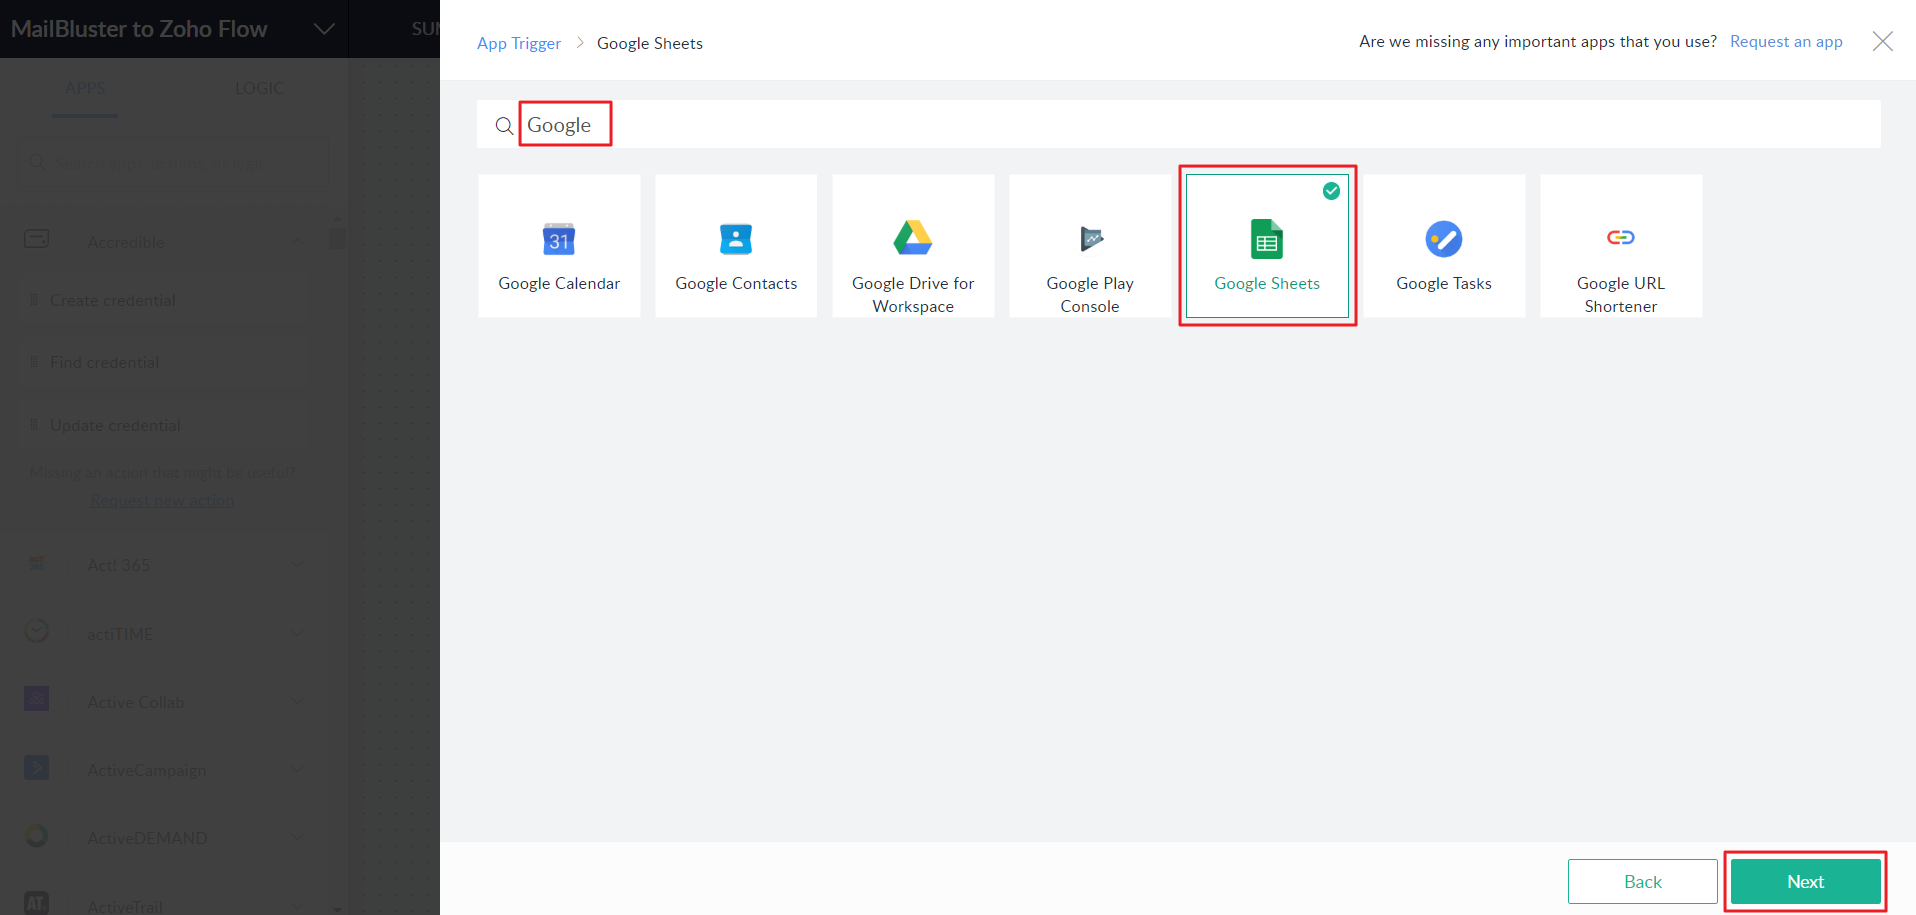
Type in ‘Google‘ and the click on Google Sheets.
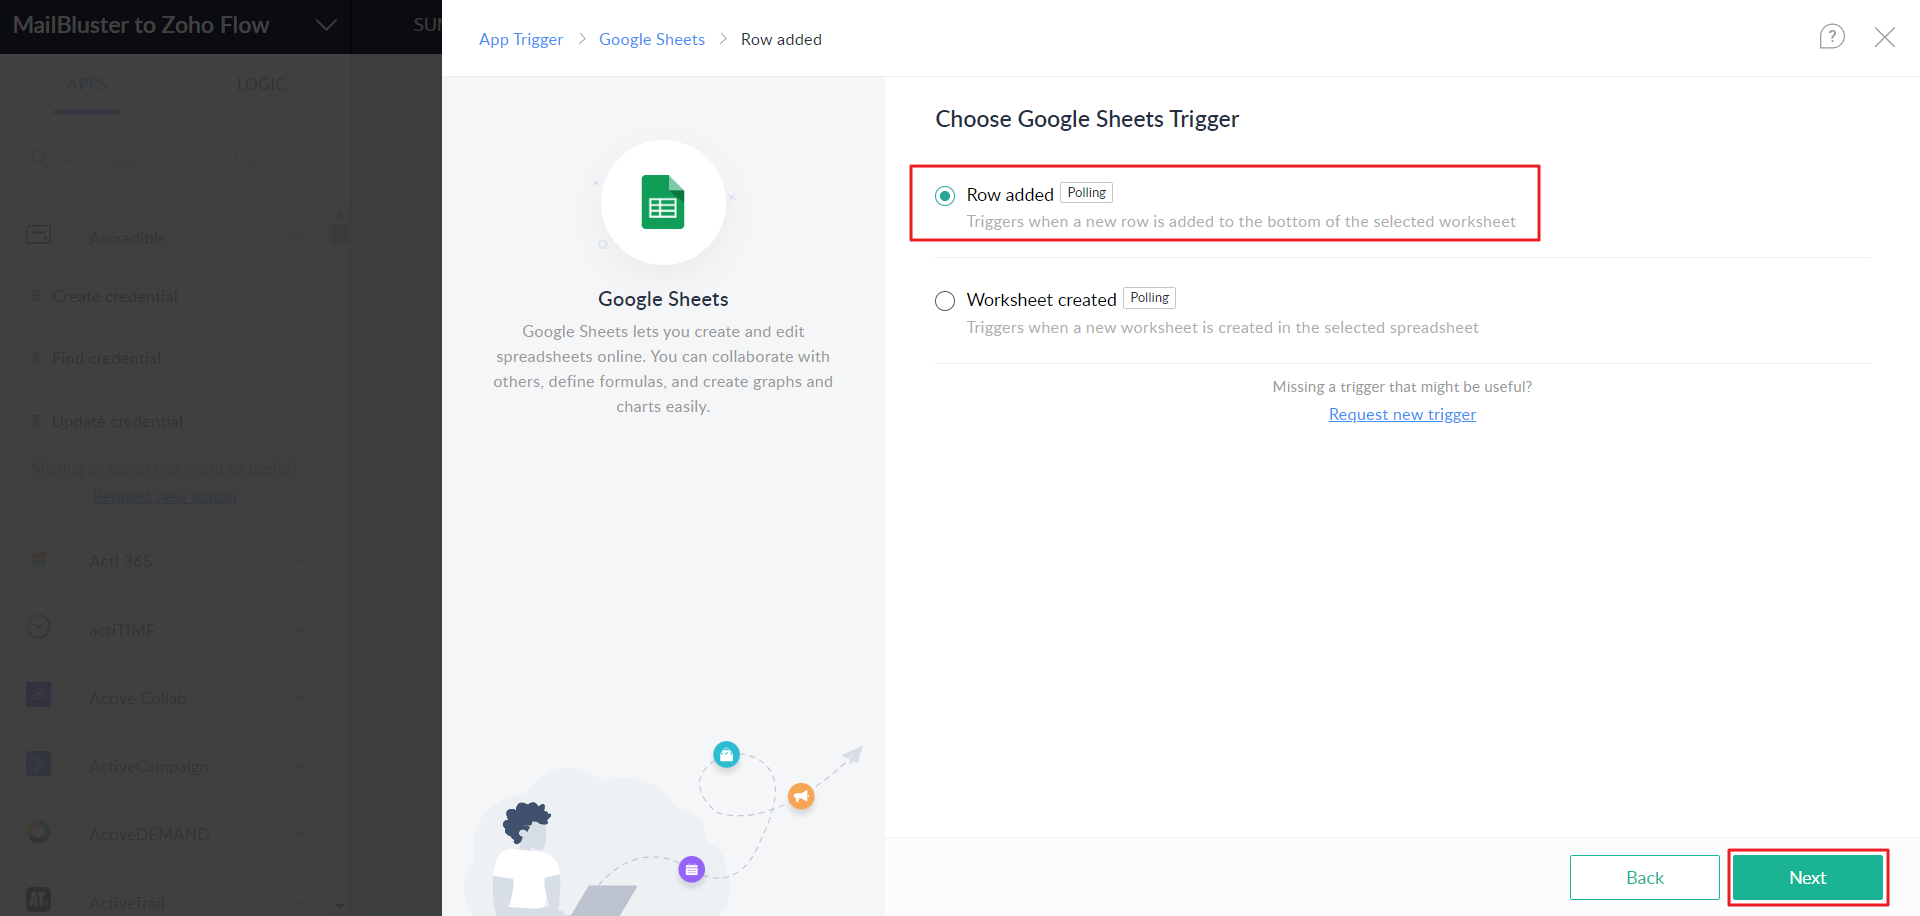
Click on Row added under Choose Google Sheets Trigger. Then click Next.
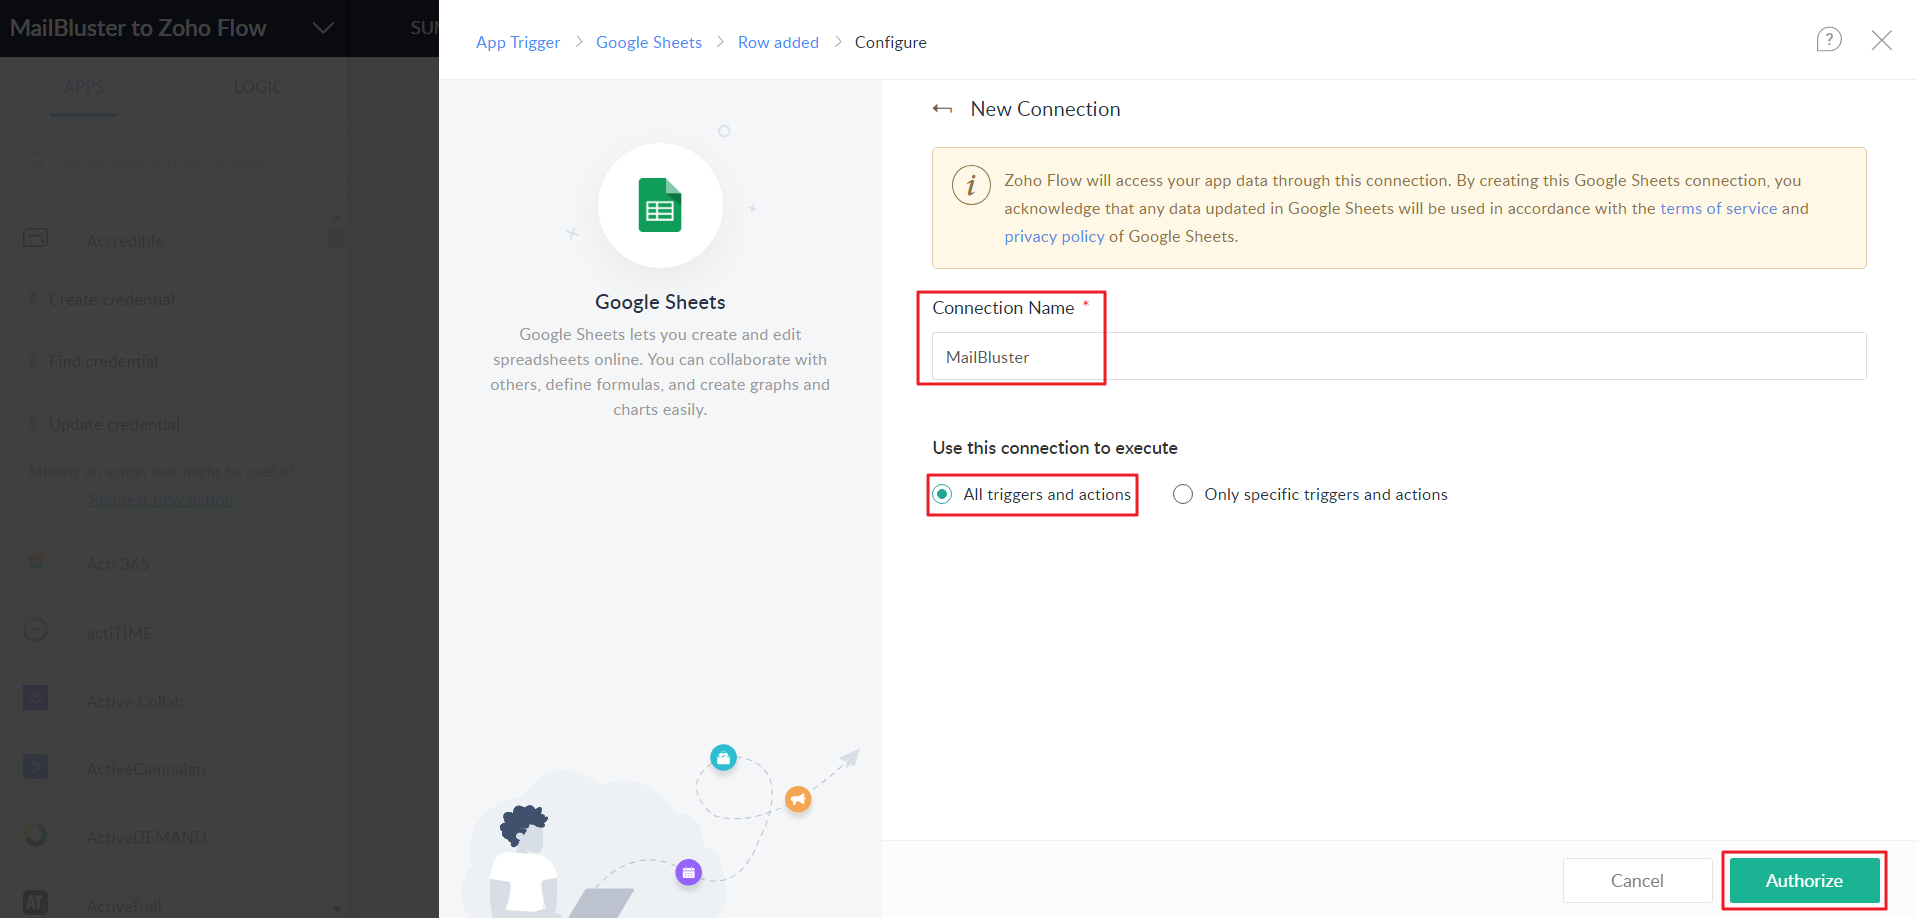
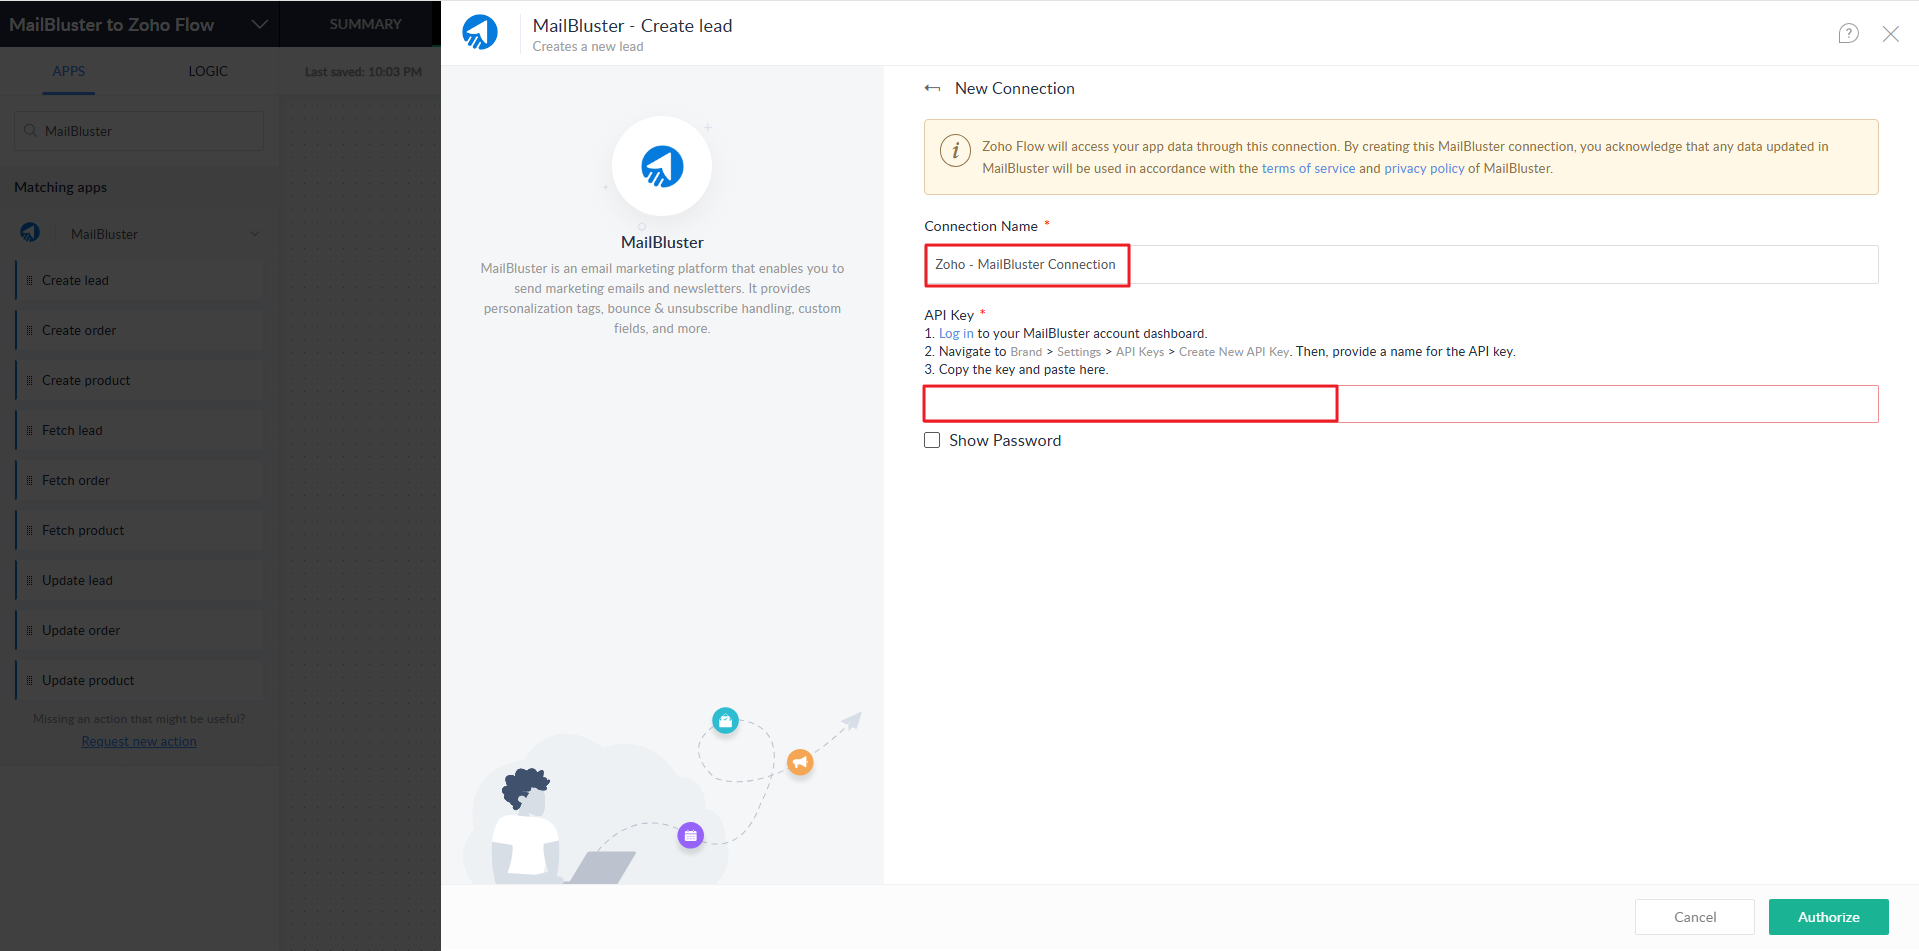
Now, click on Connect.
Enter Connection Name and select All triggers and actions. Then click Authorize.
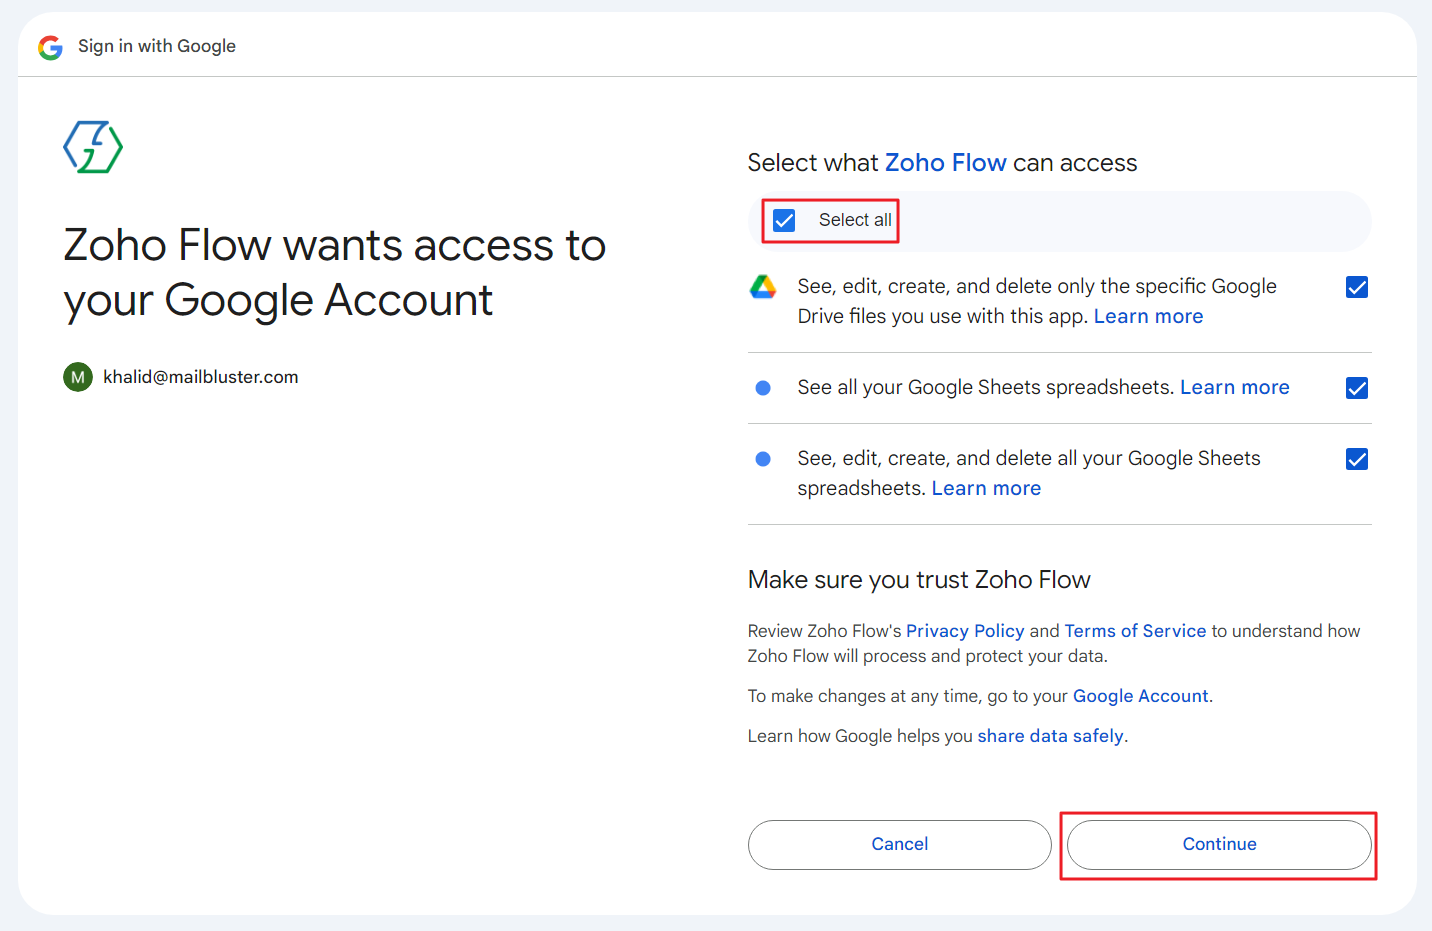
Tick Select all under ‘Select what Zoho Flow can access.’ Then click Continue.
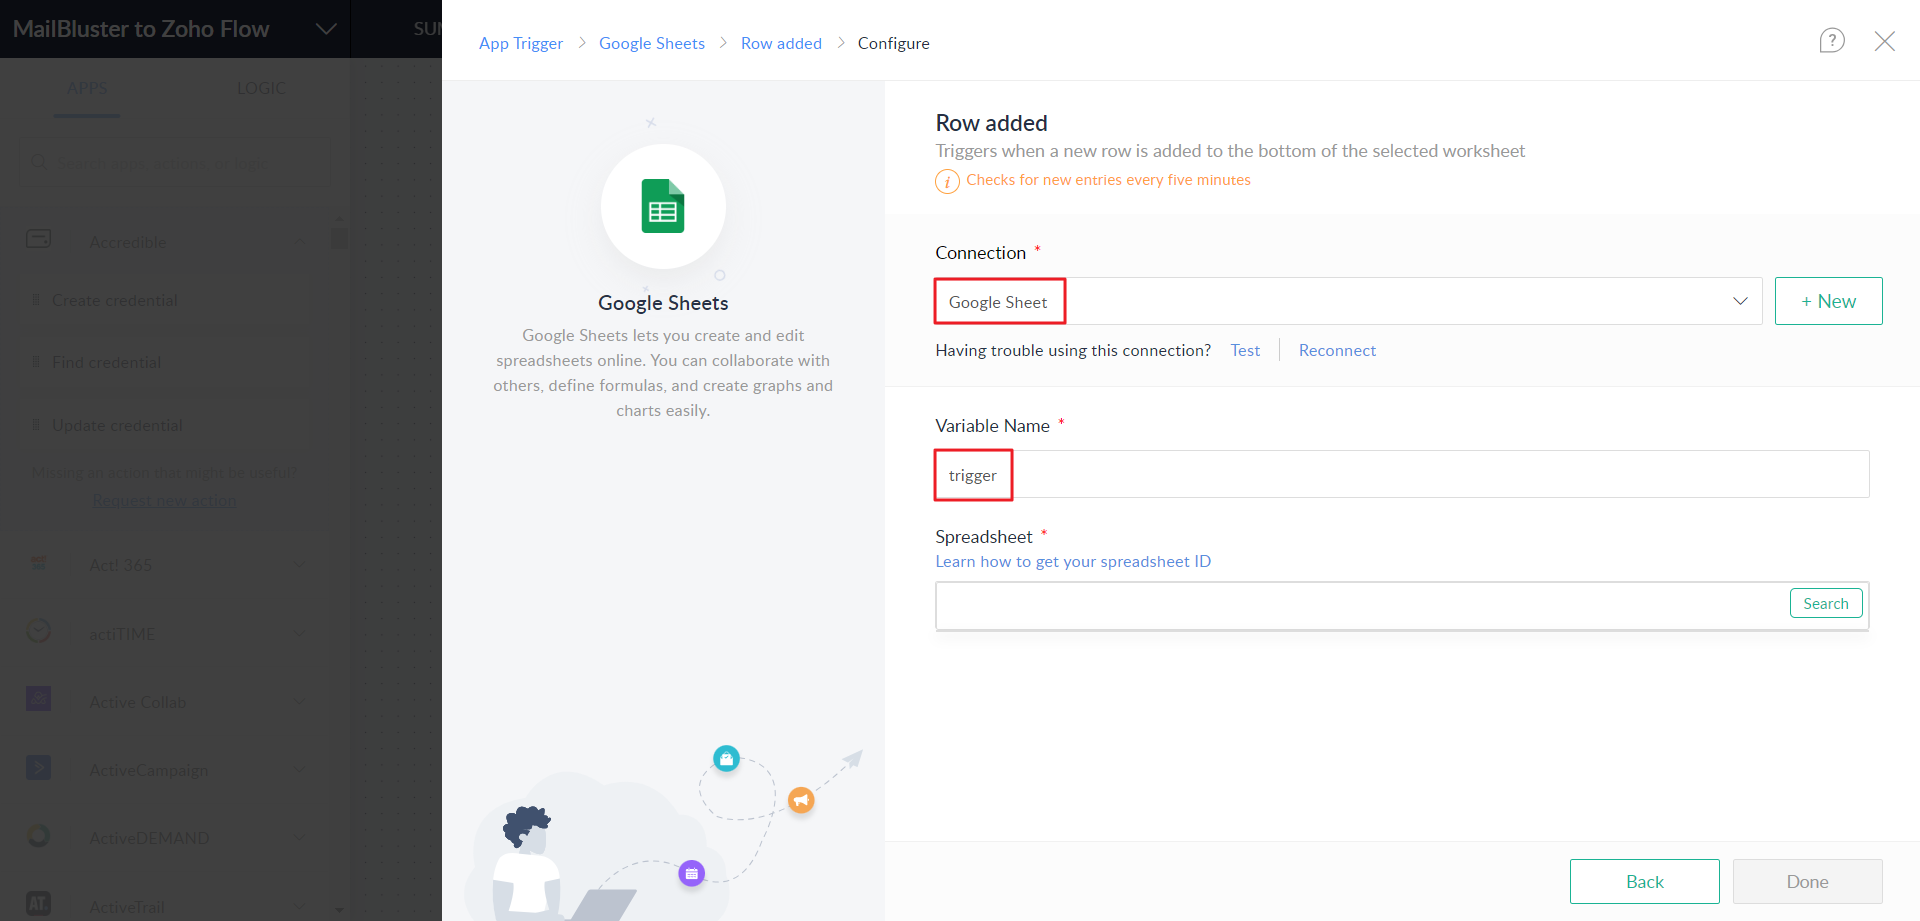
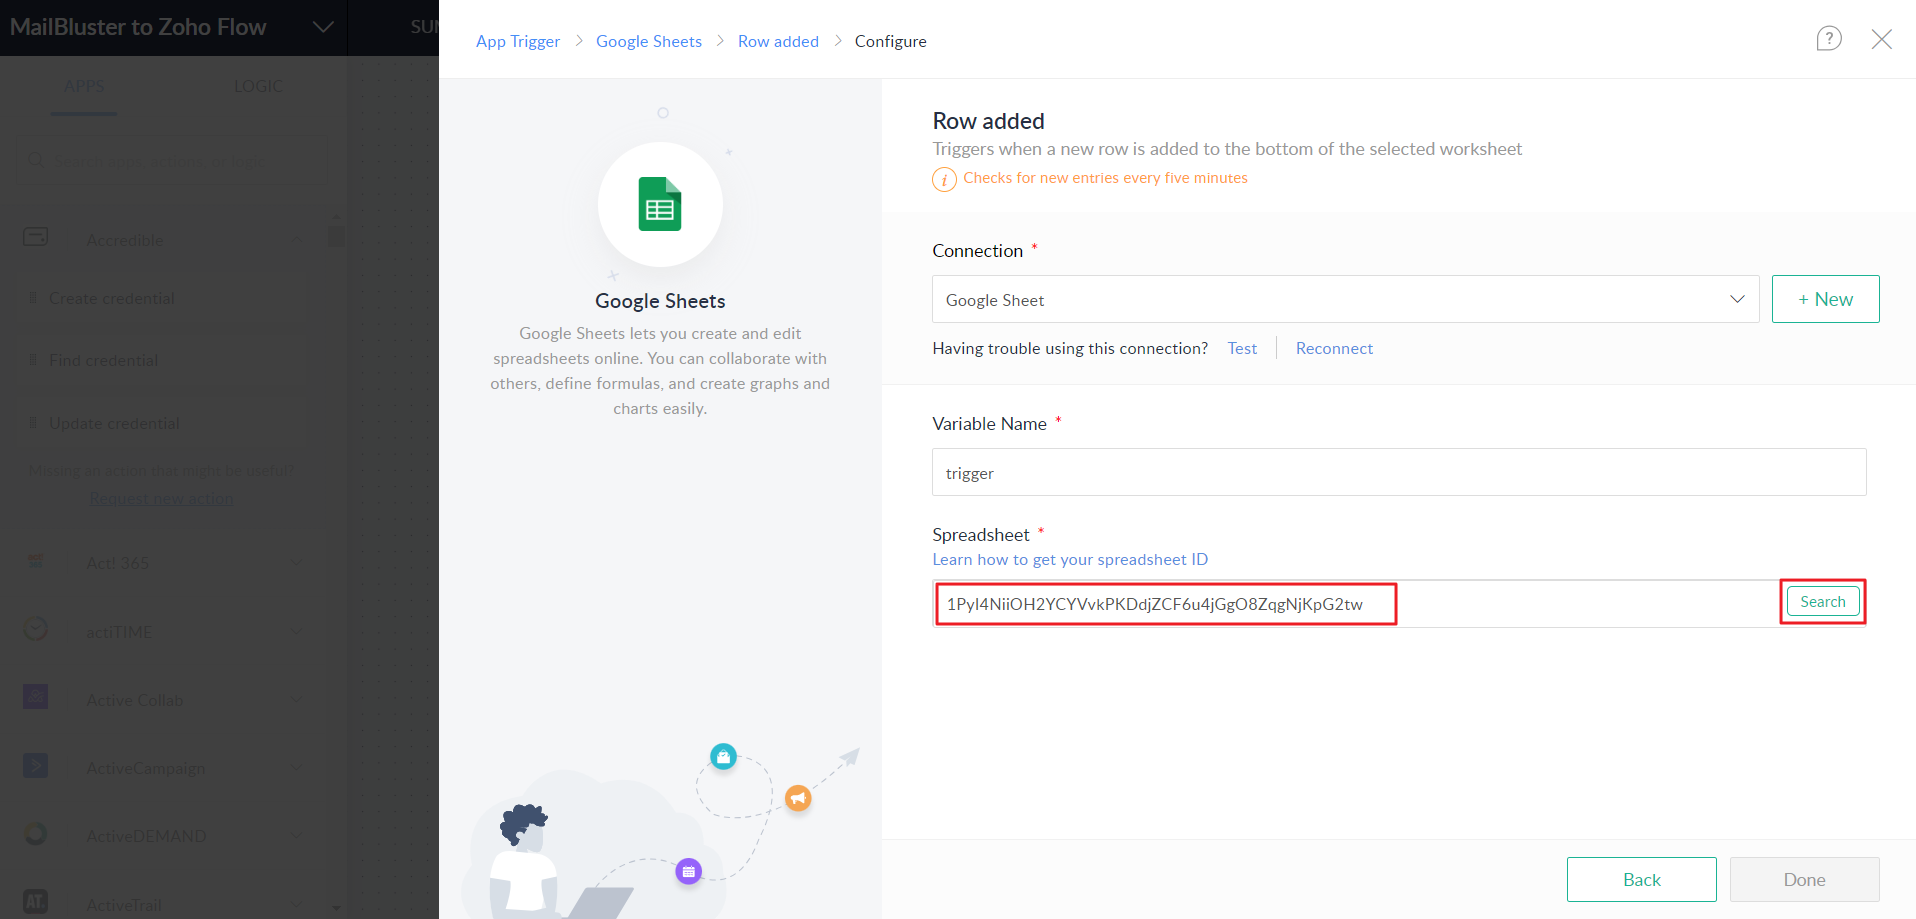
Select ‘Google Sheet’ under Connection and ‘trigger’ under Variable Name.
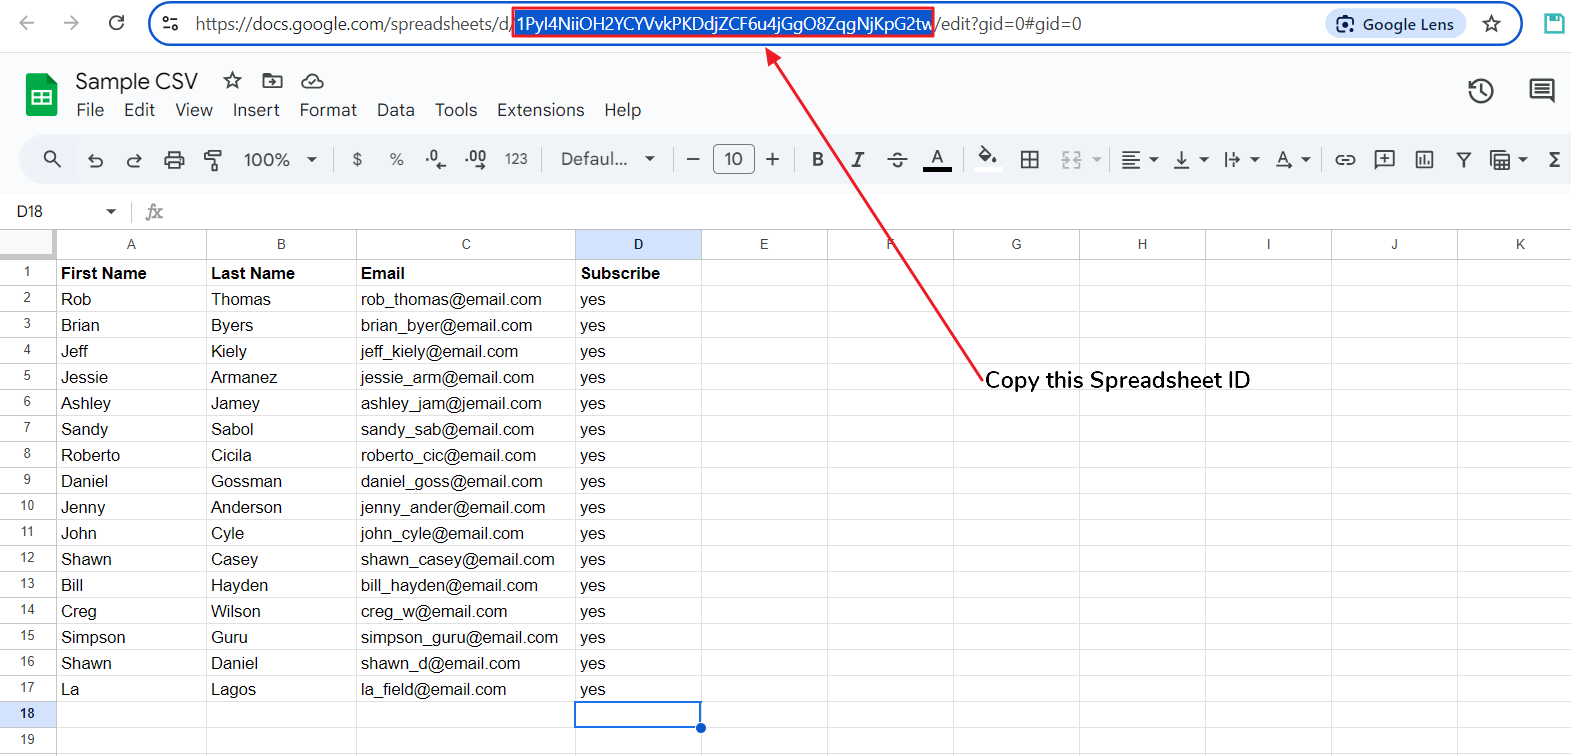
Then copy the Spreadsheet ID from Google Sheet as shown below.
Paste the Spreadsheet ID under Spreadsheet in Zoho Flow. Then click Search button.
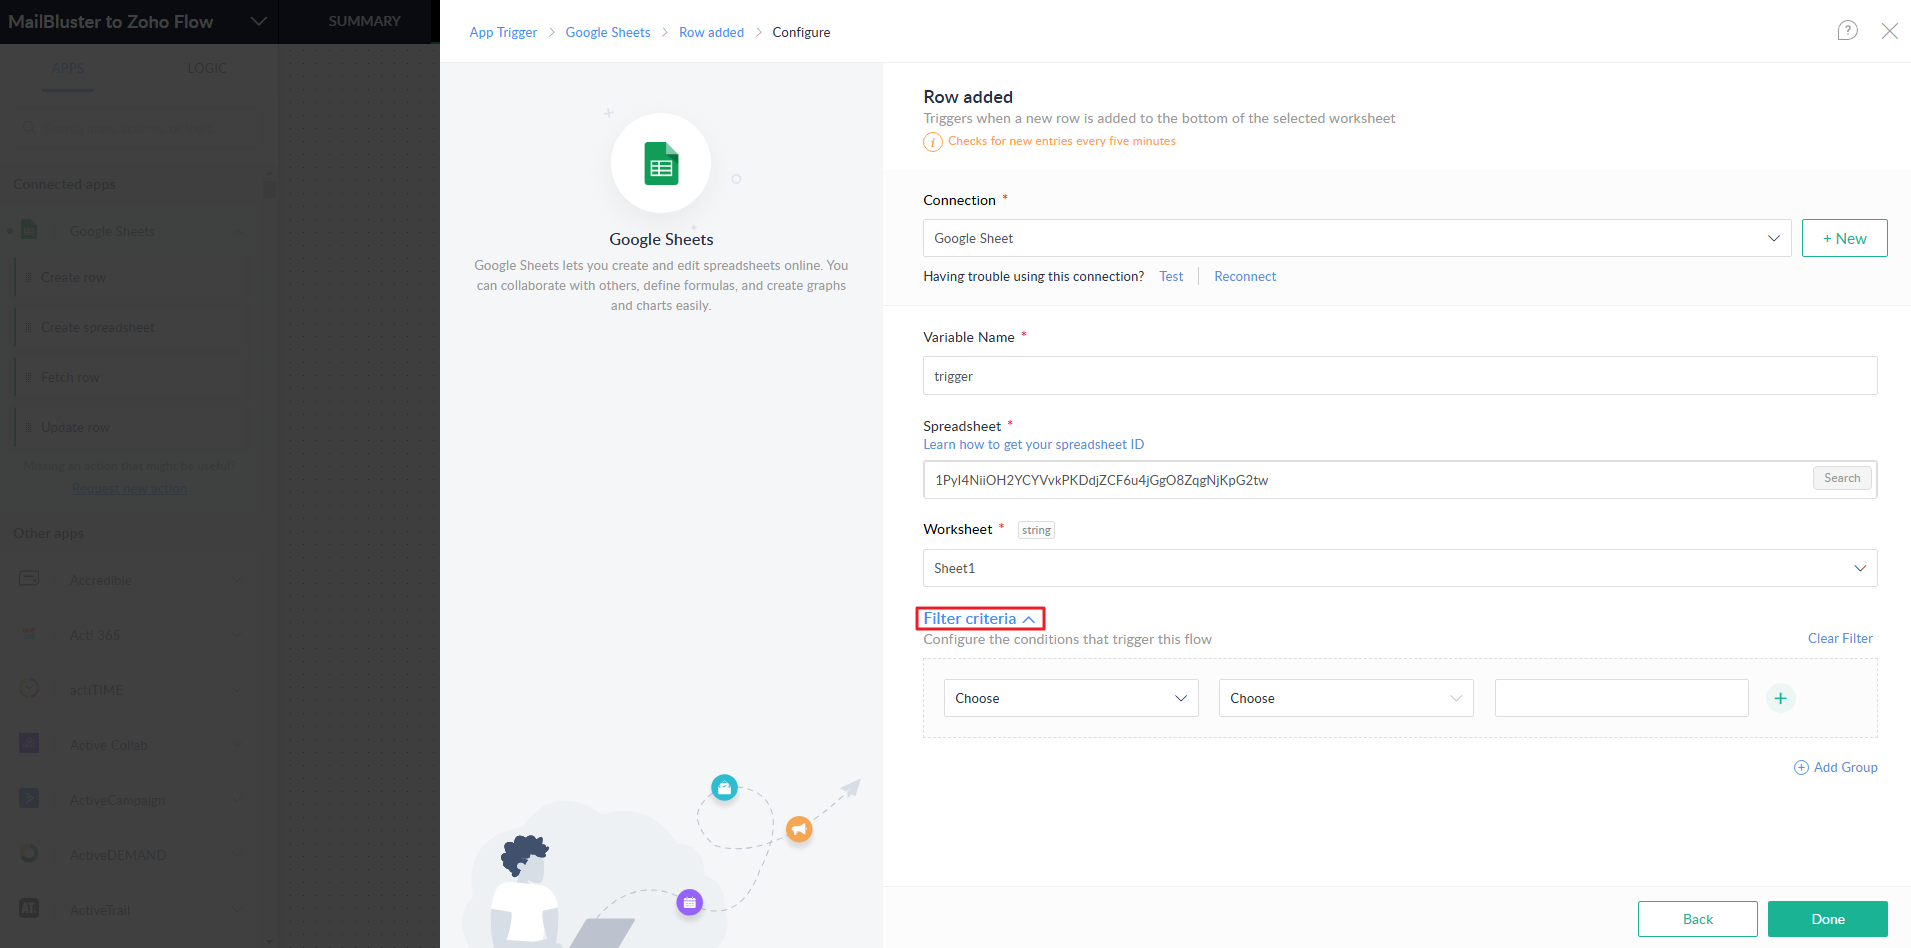
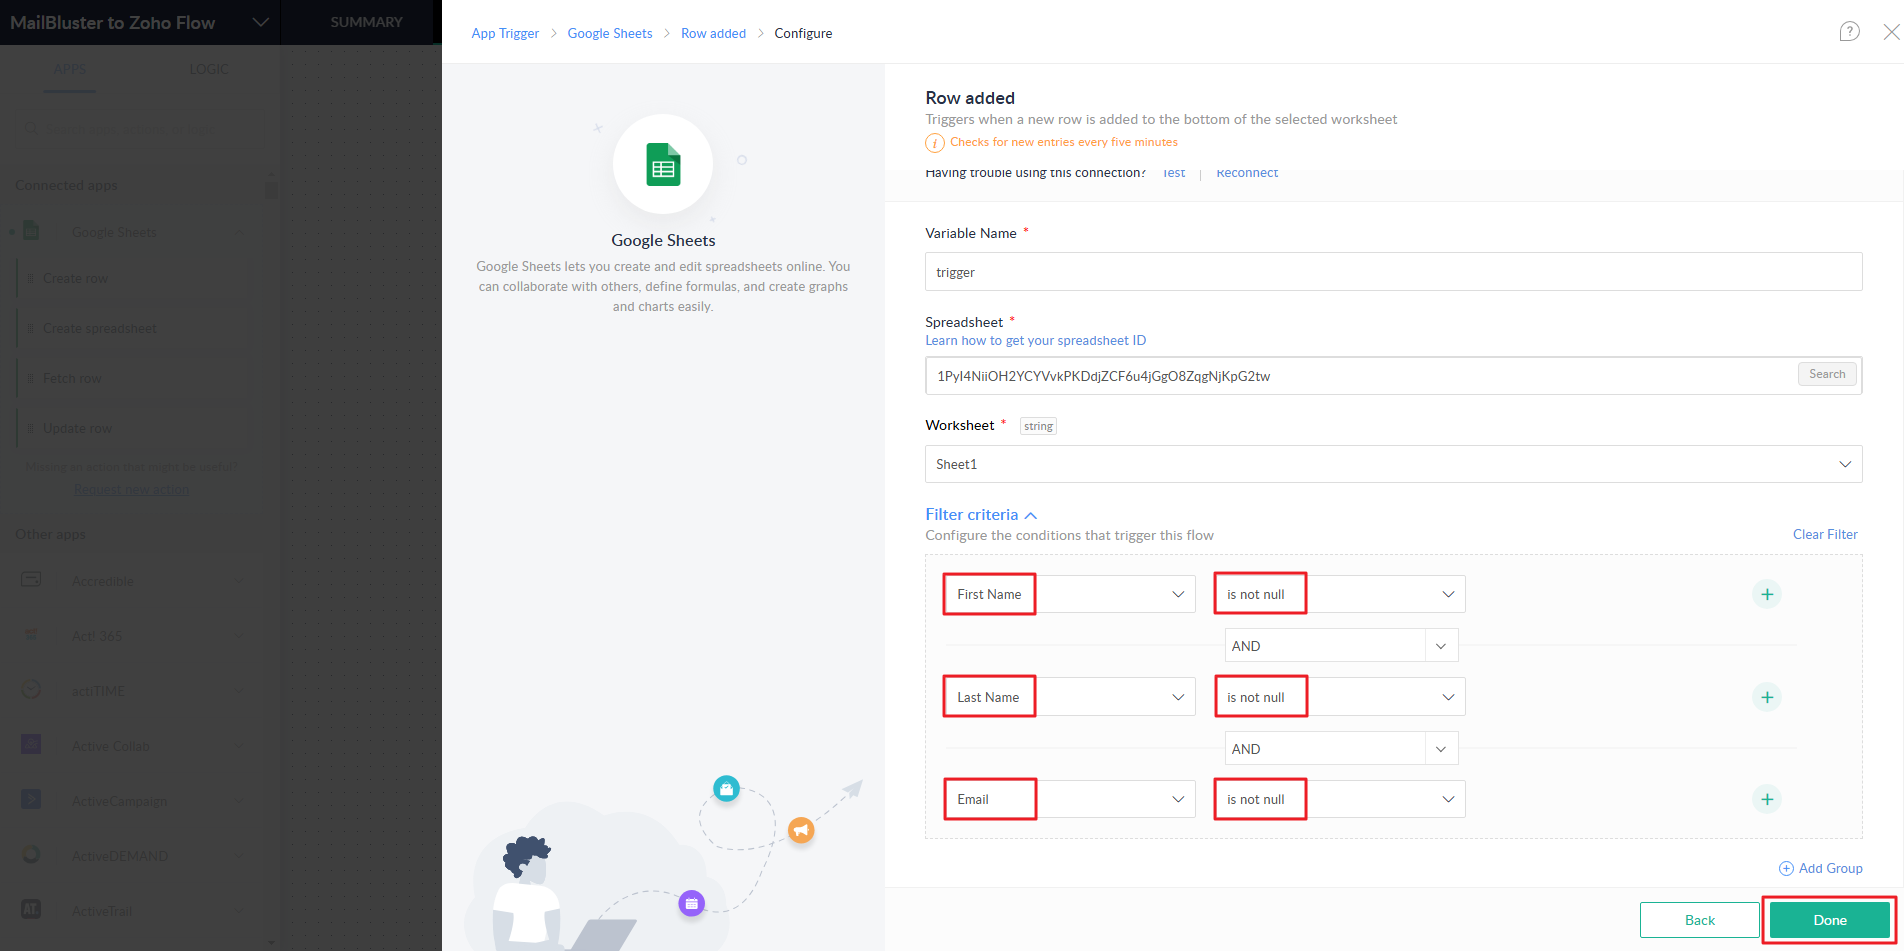
Click on Filter criteria and wait for it to load.
Under Filter criteria, select ‘First Name’ and then select ‘is not null.’ Similarly click on (+) and select Last Name and then select ‘is not null.’ Same goes for Email as shown below. Then click Done.
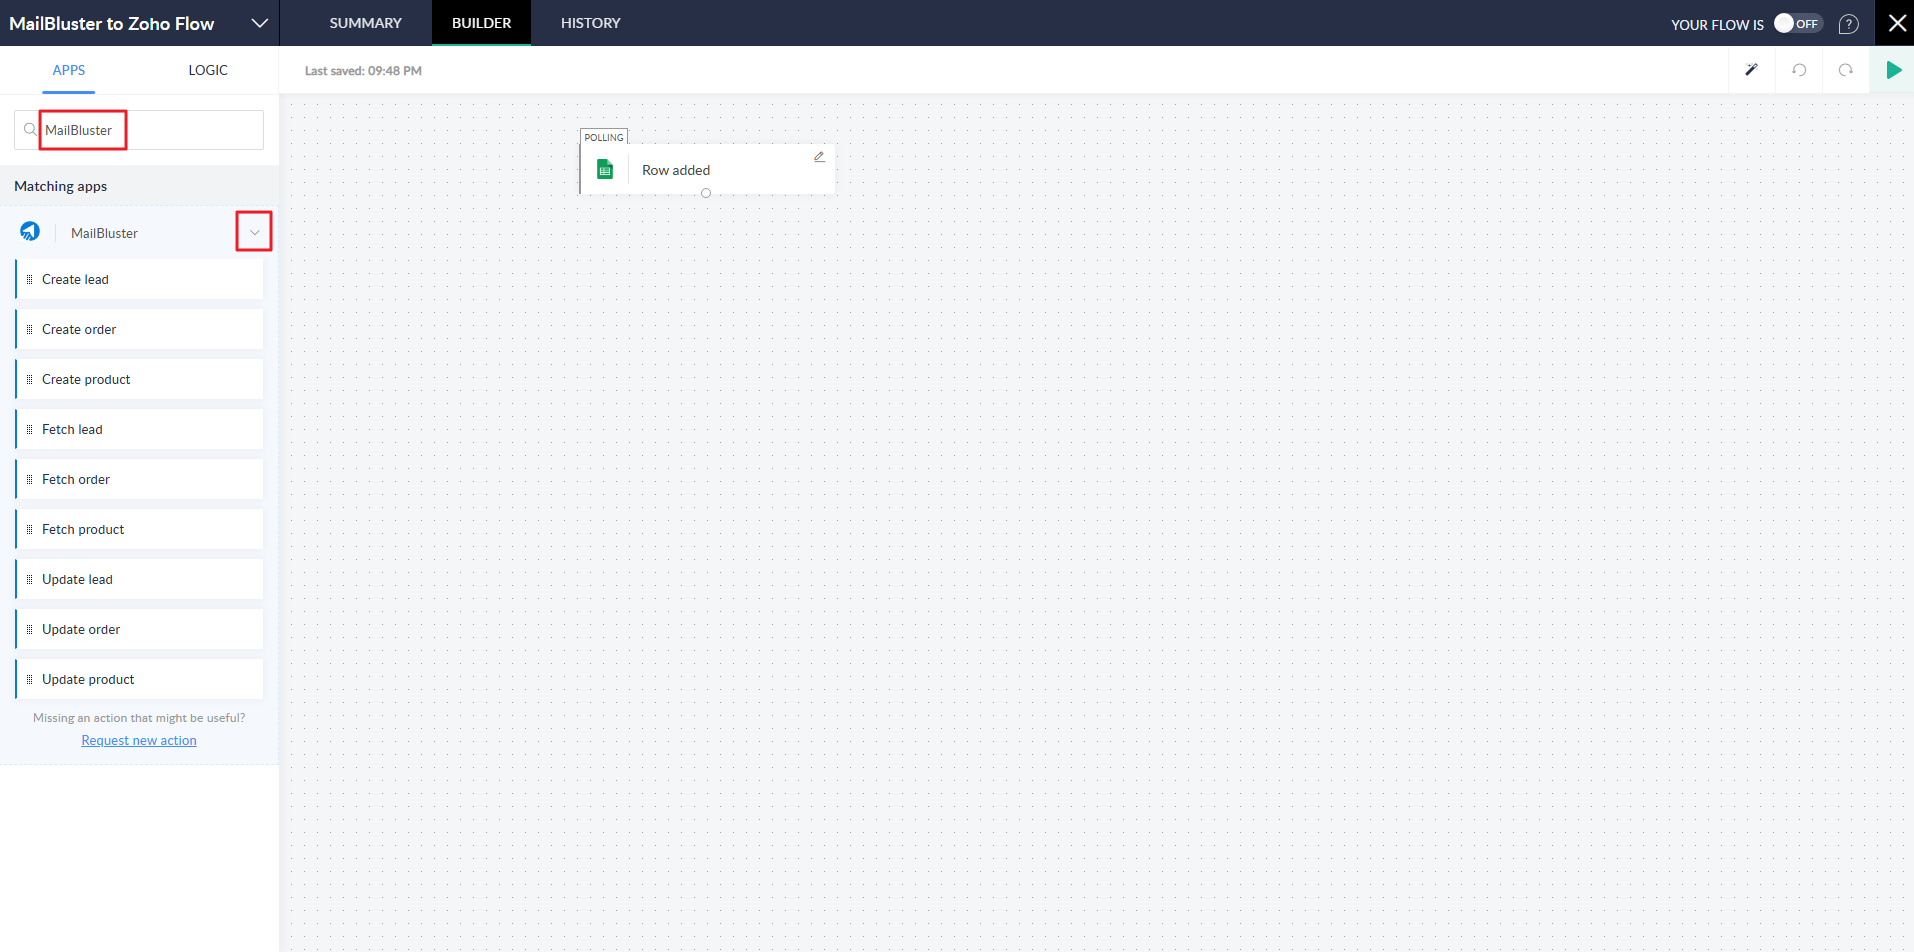
Type ‘MailBluster‘ and then ( v ) for the dropdown list under MailBluster.
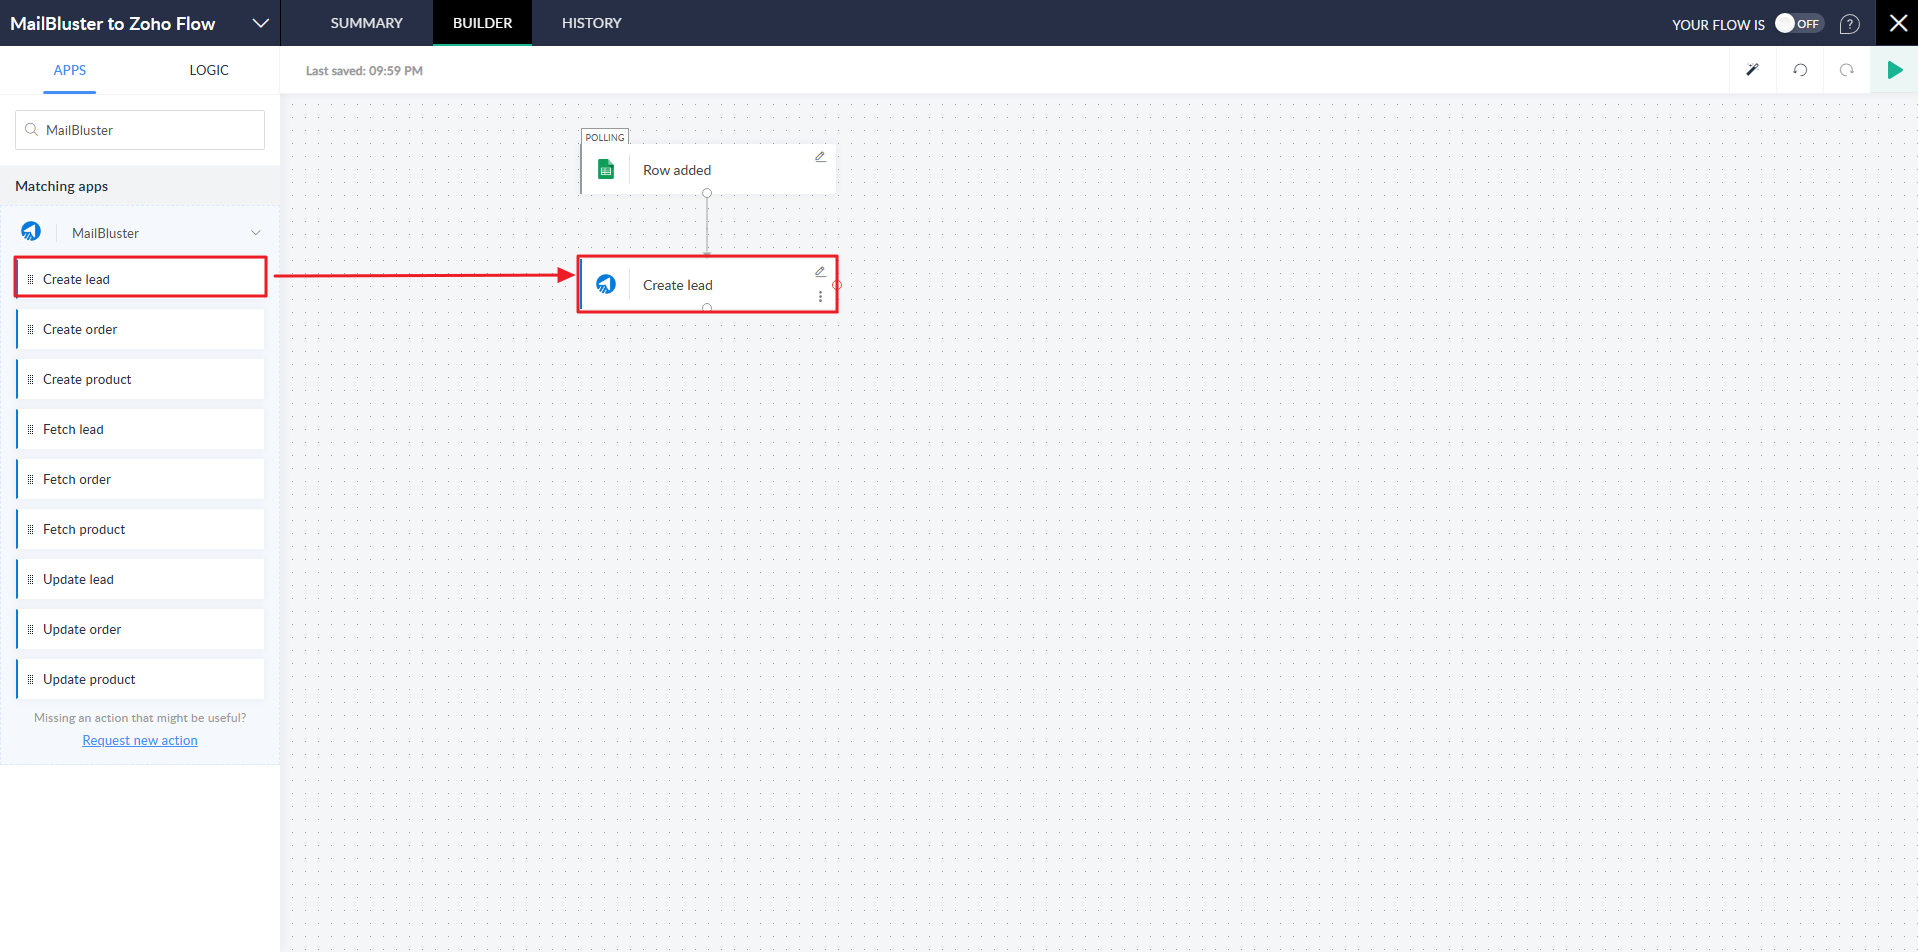
Then drag and drop Create lead to the flow diagram as shown below.
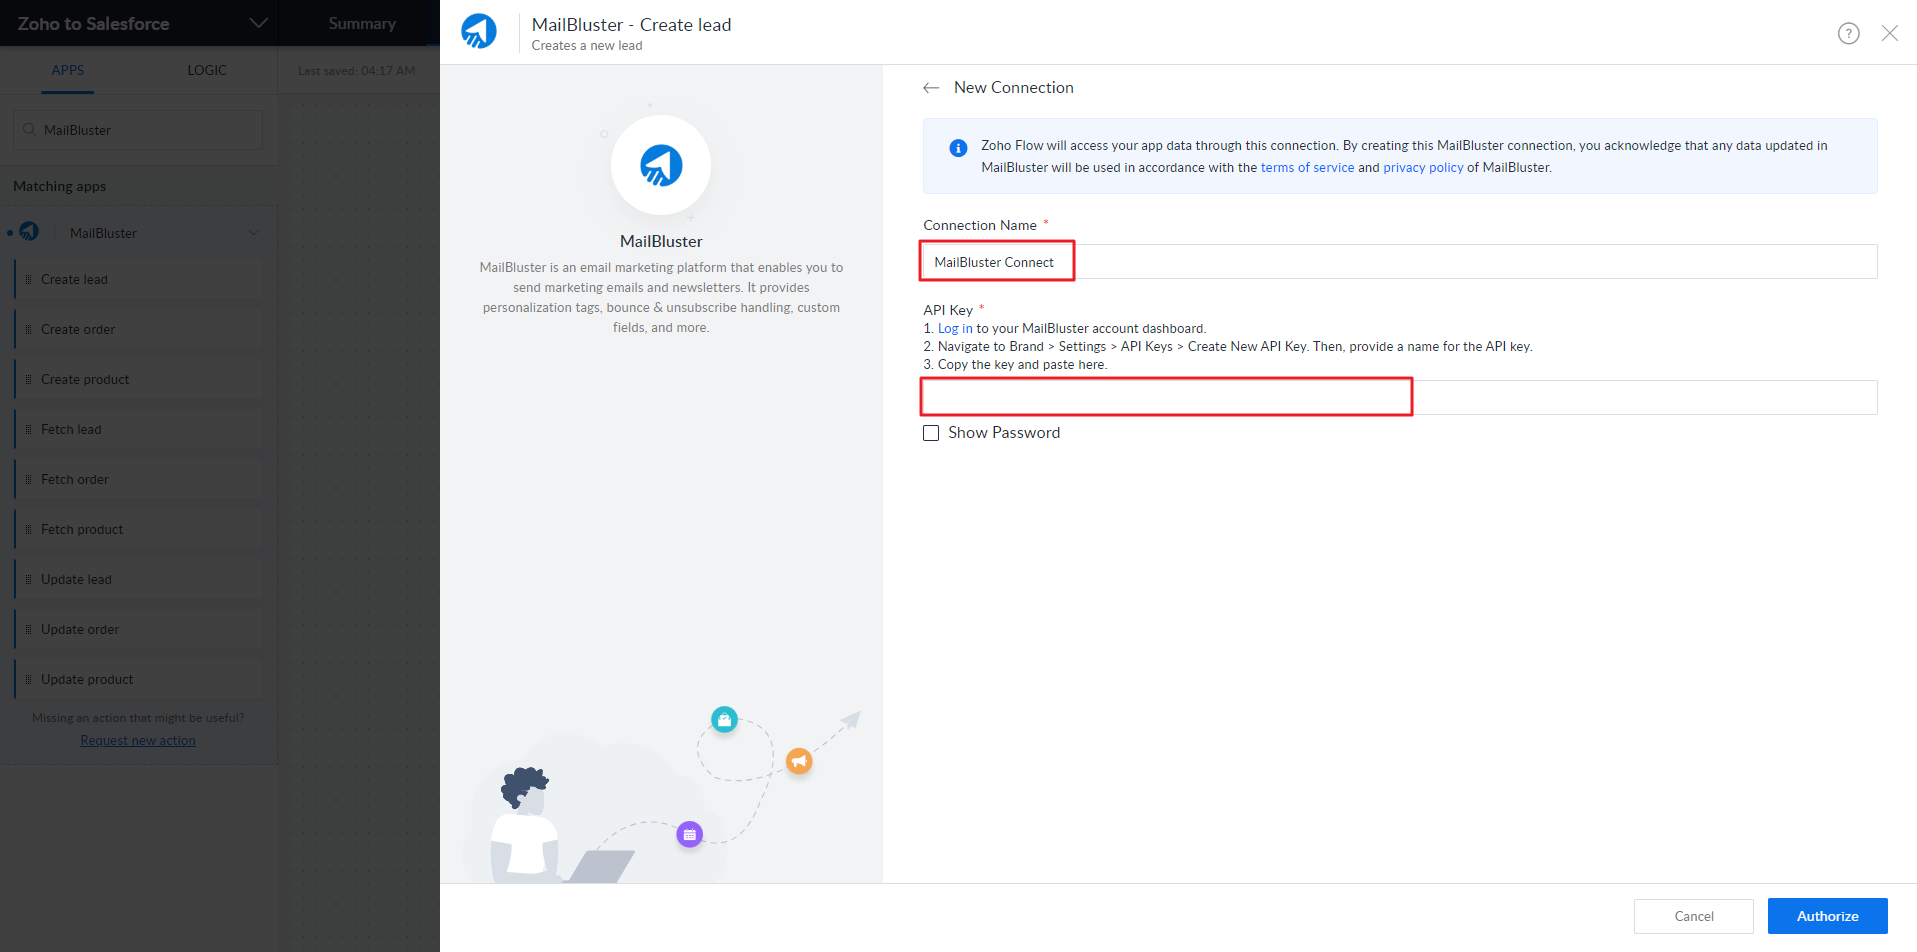
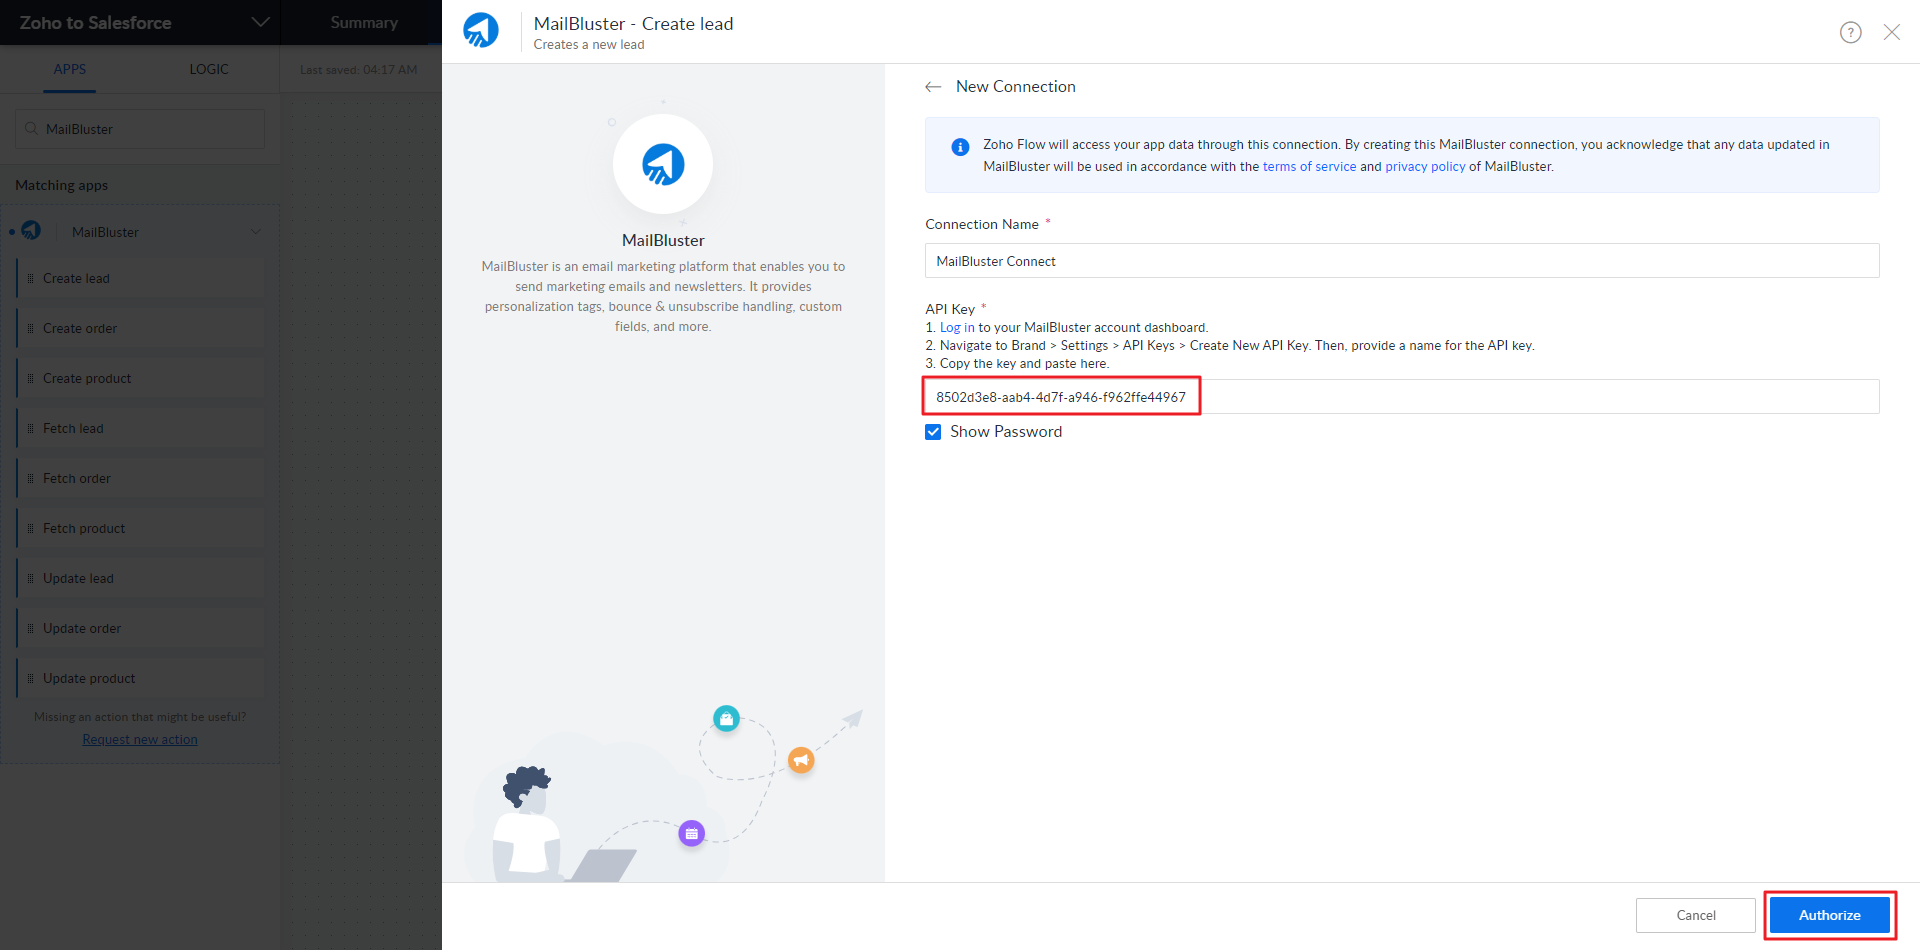
Now under MailBluster – Create lead. click the Connect button.
Enter Connection Name and now you need to copy and paste the generated API key from MailBluster.
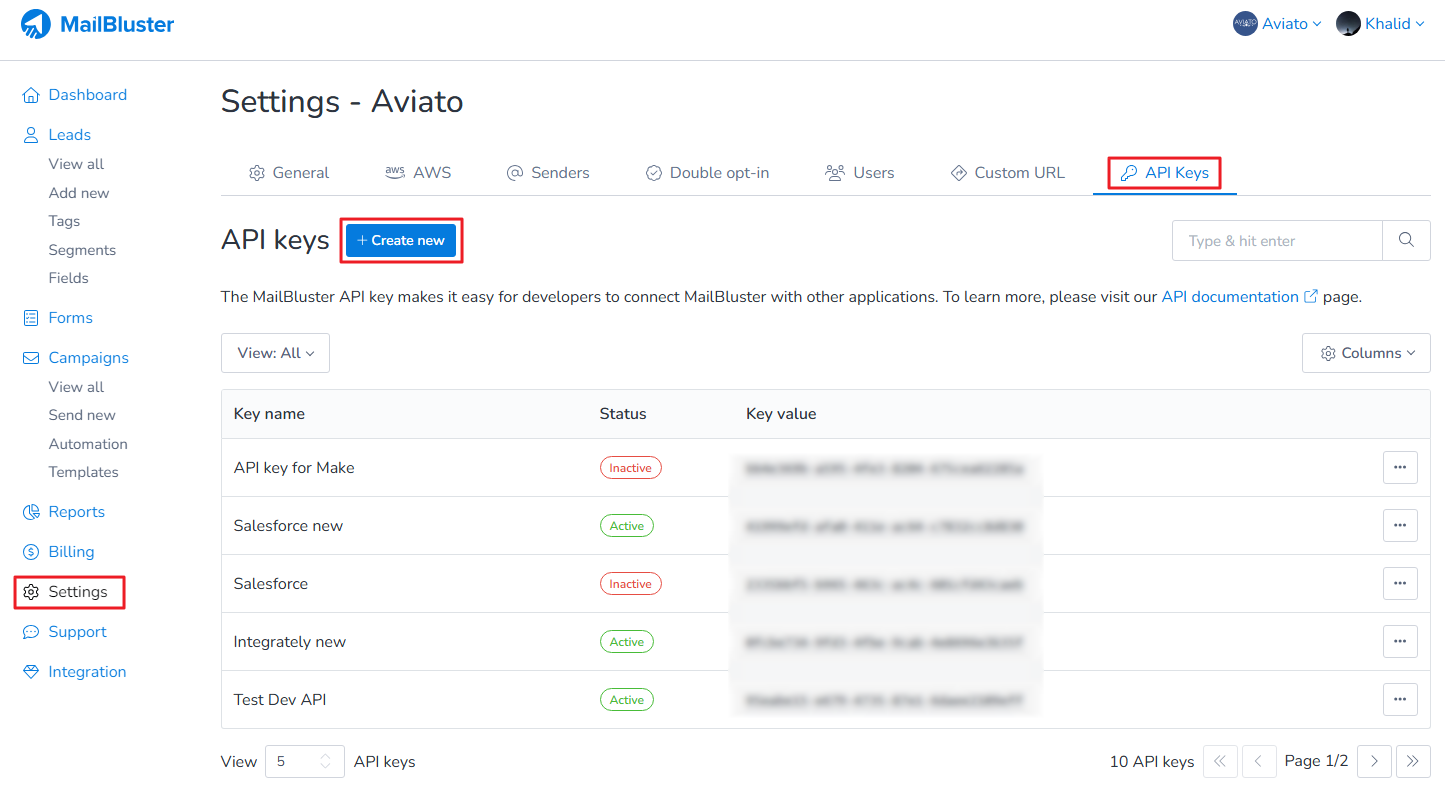
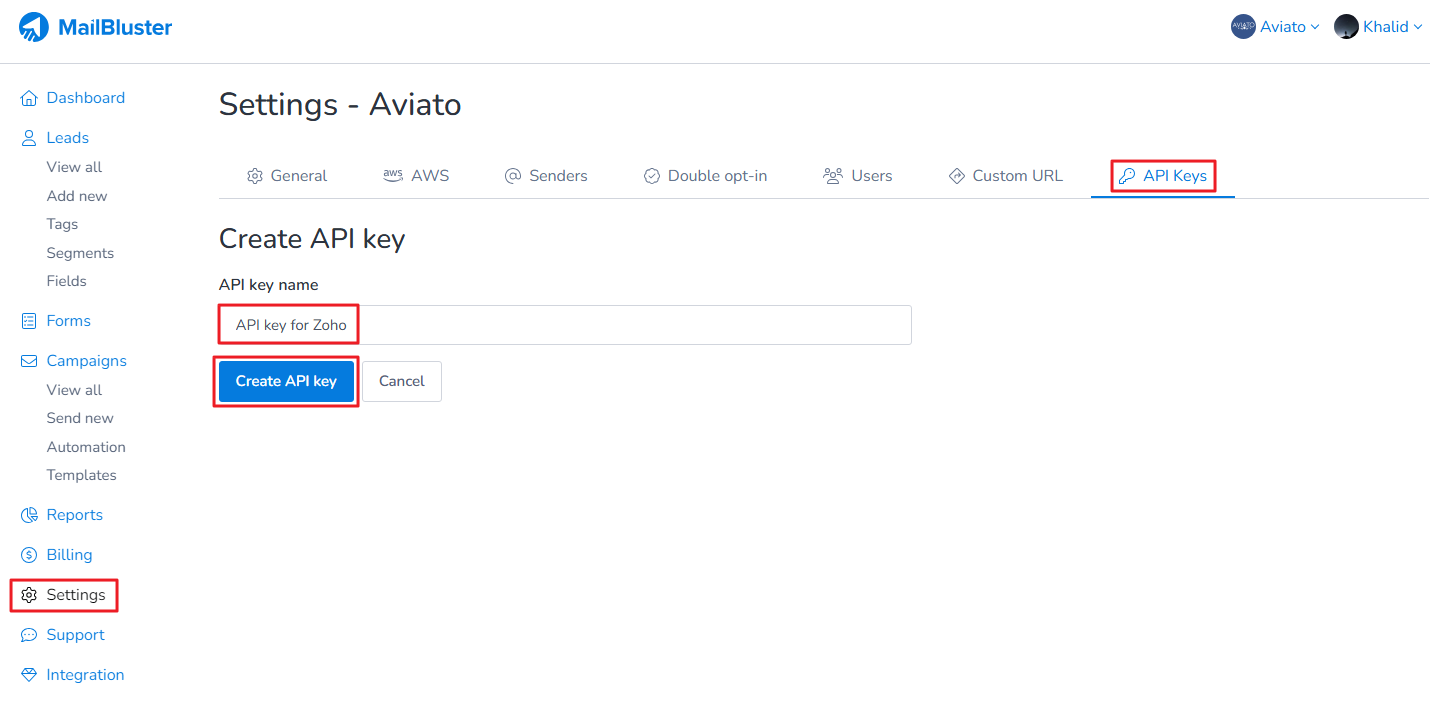
Go to Settings > API Keys and then click on Create new.
Enter API key name and click on Create API key button.
Copy the API Key value under API key for Zoho.
Paste the API key as shown below.
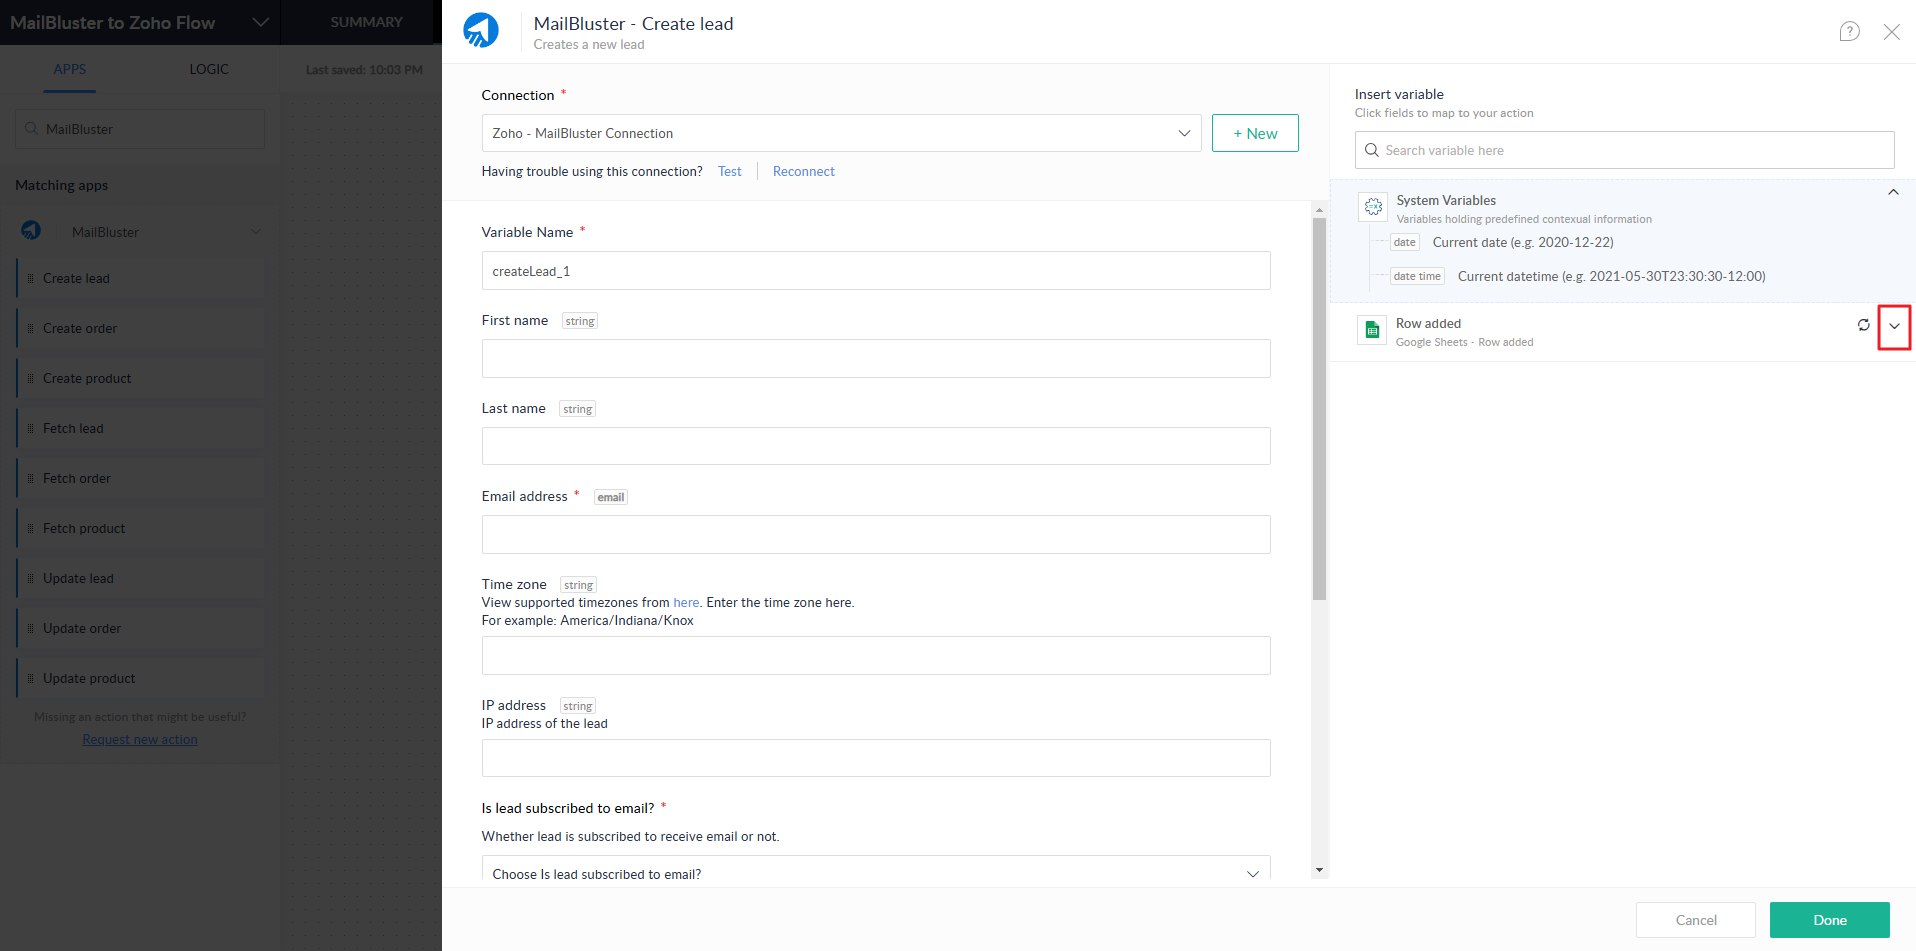
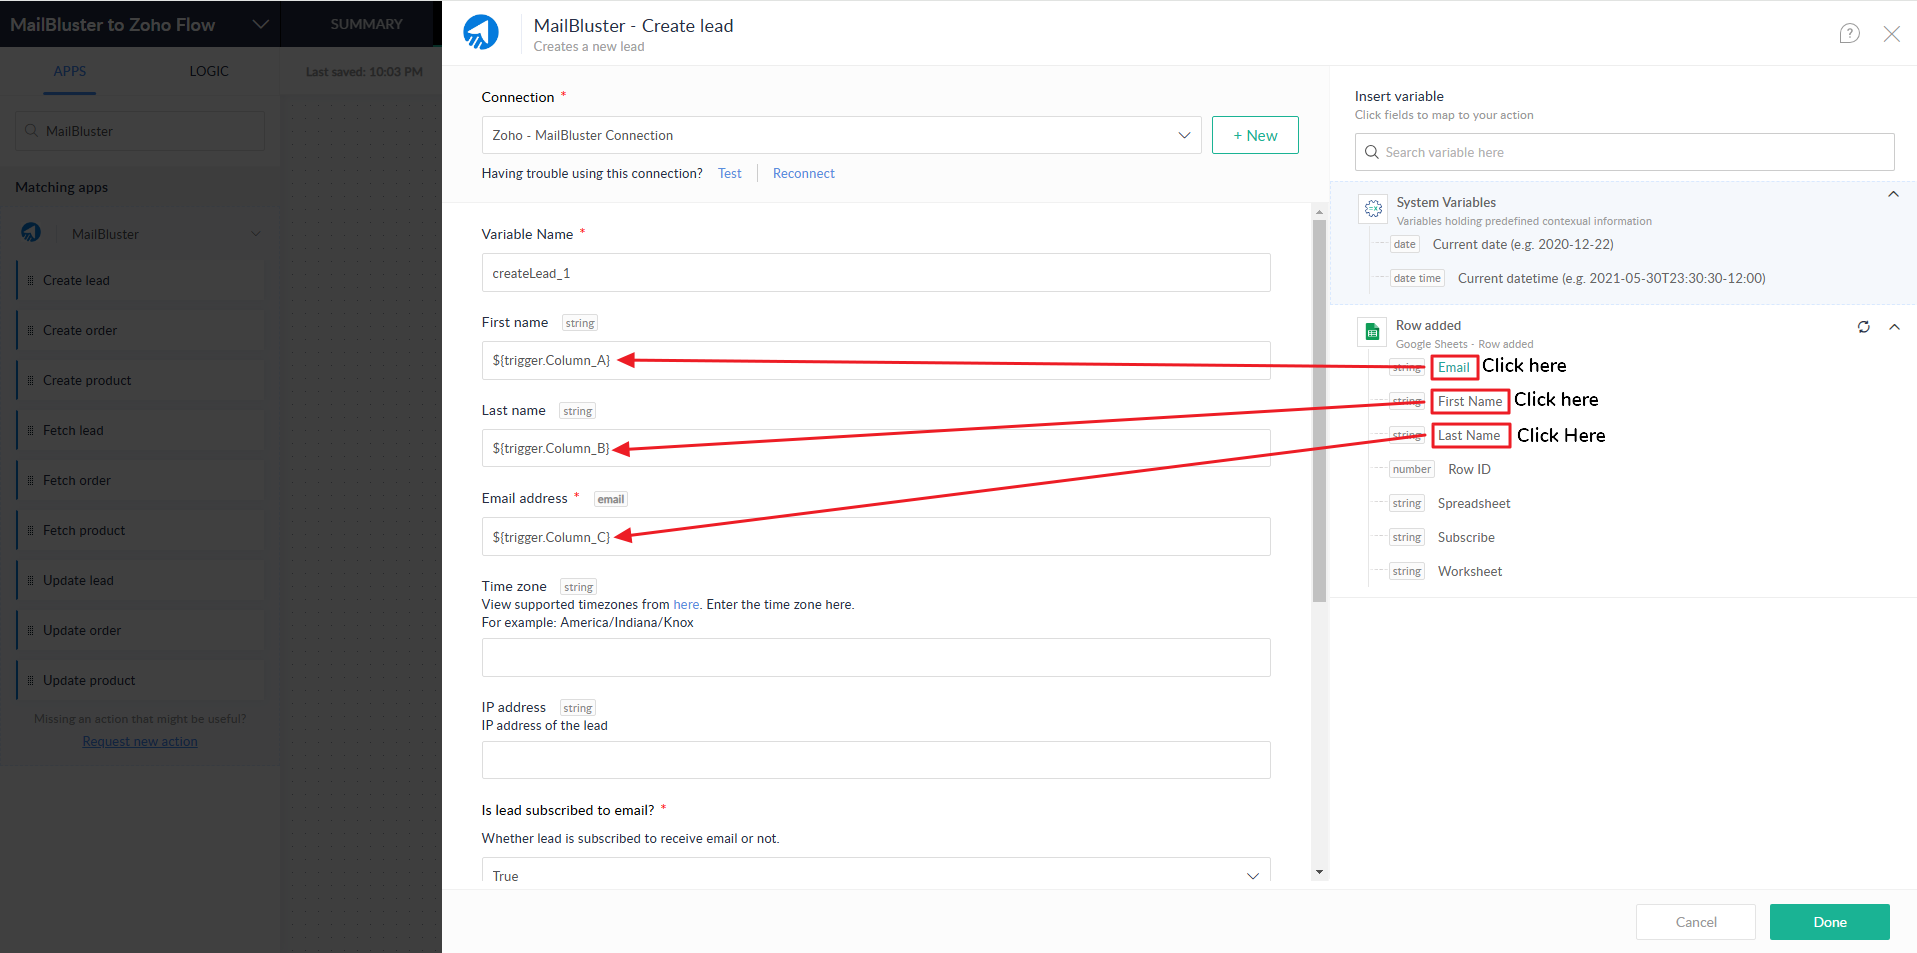
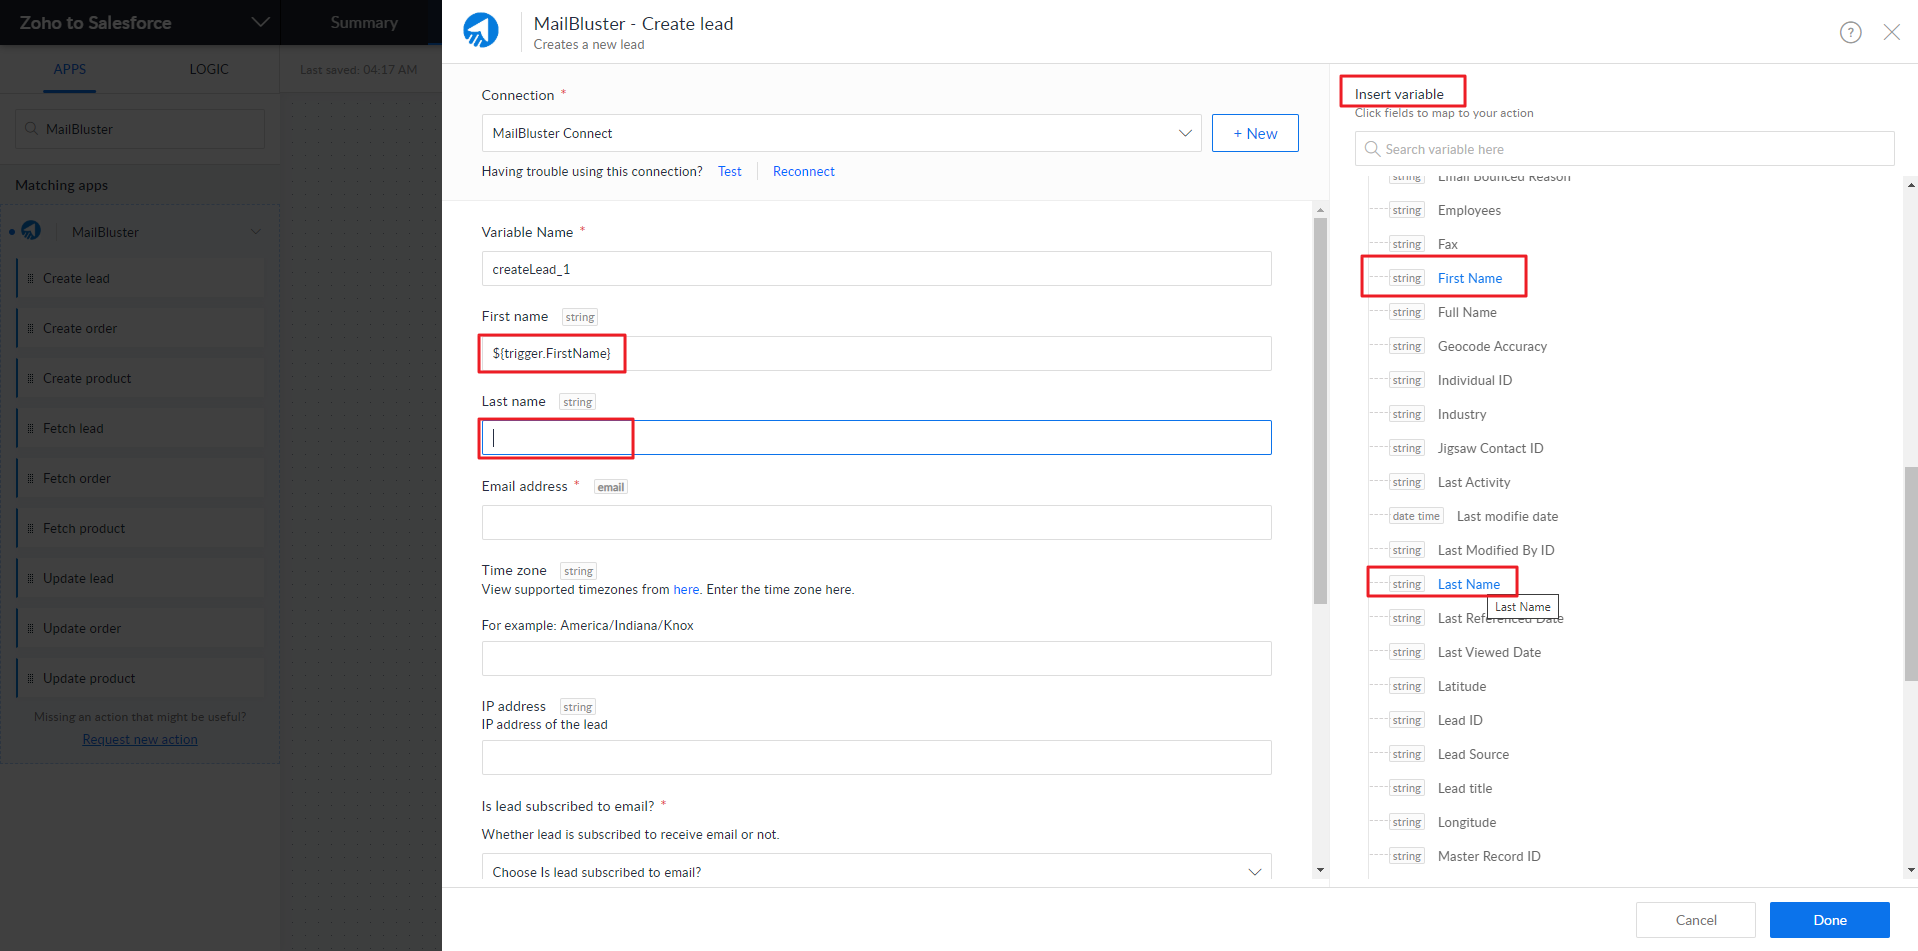
Click on the drop down ( v ) under Row added.
Select Email, First Name and Last Name for ‘Variable Name‘ as shown below.
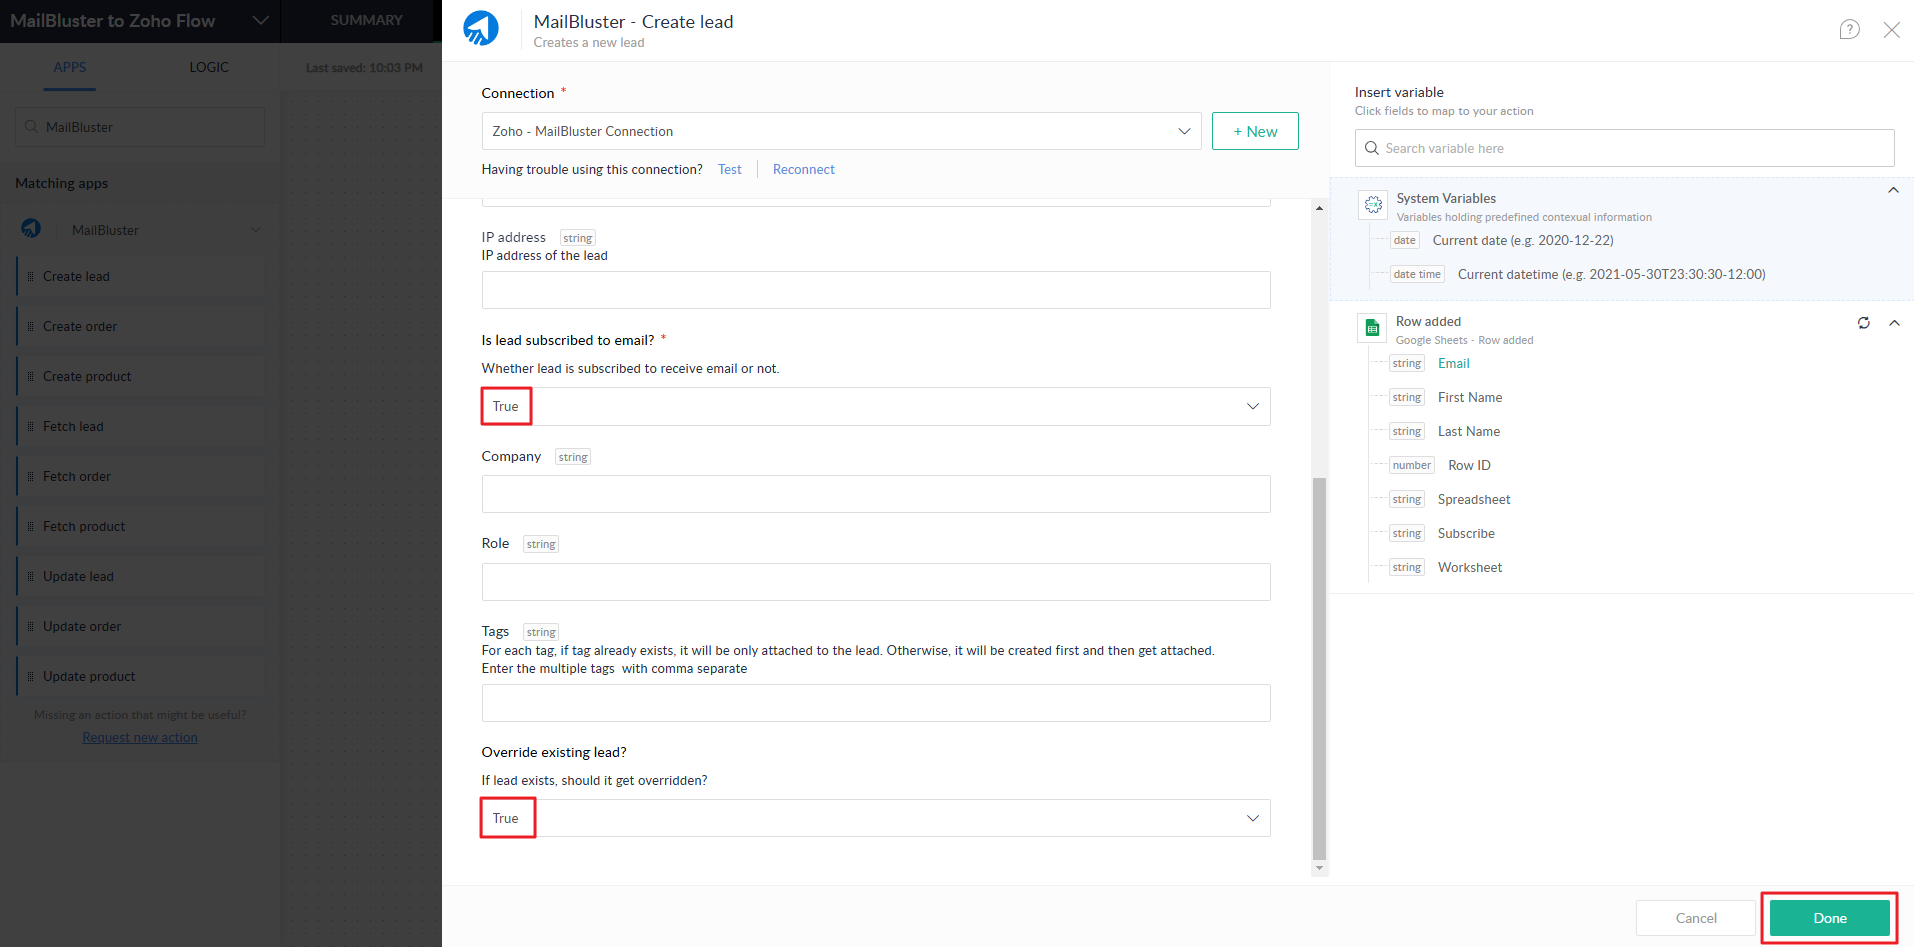
Select the option ‘True‘ for ‘Whether lead is subscribed to receive email or not‘ and ‘If lead exists, should it get overridden.‘
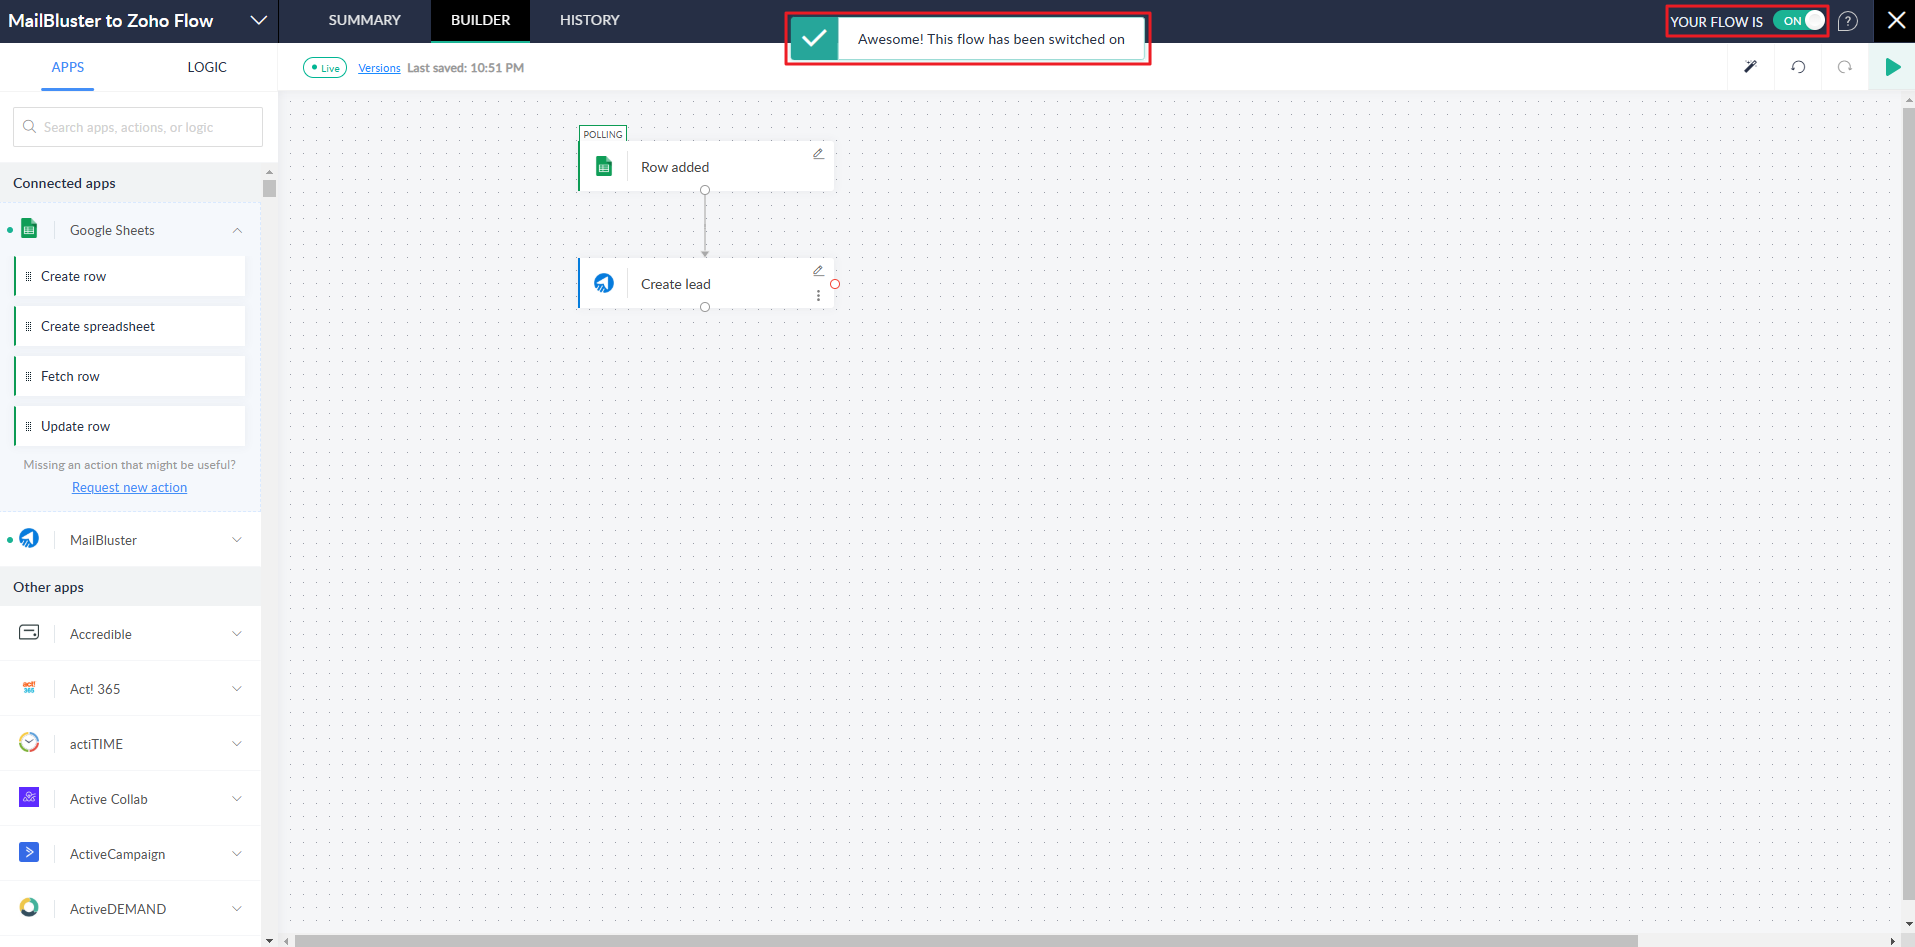
Set YOUR FLOW IS to ON. You will get a confirmation ‘Awesome! This flow has been switched on.’
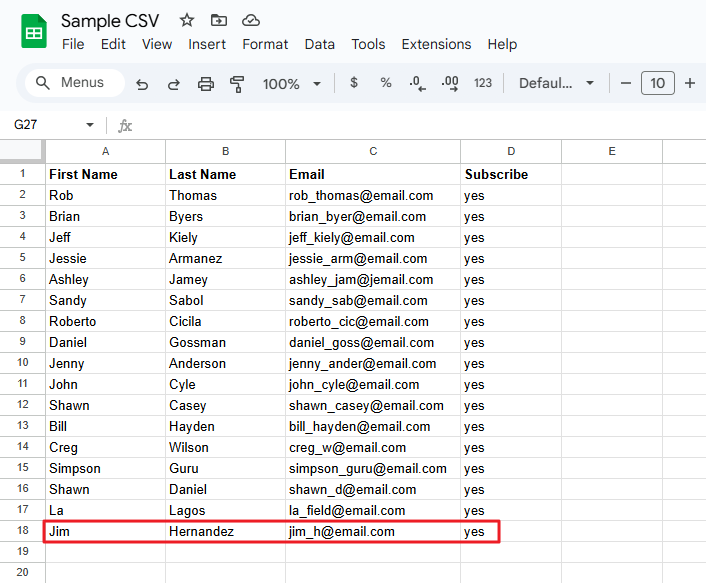
Enter the Lead’s First Name, Last Name, Email and Subscribe as shown below.
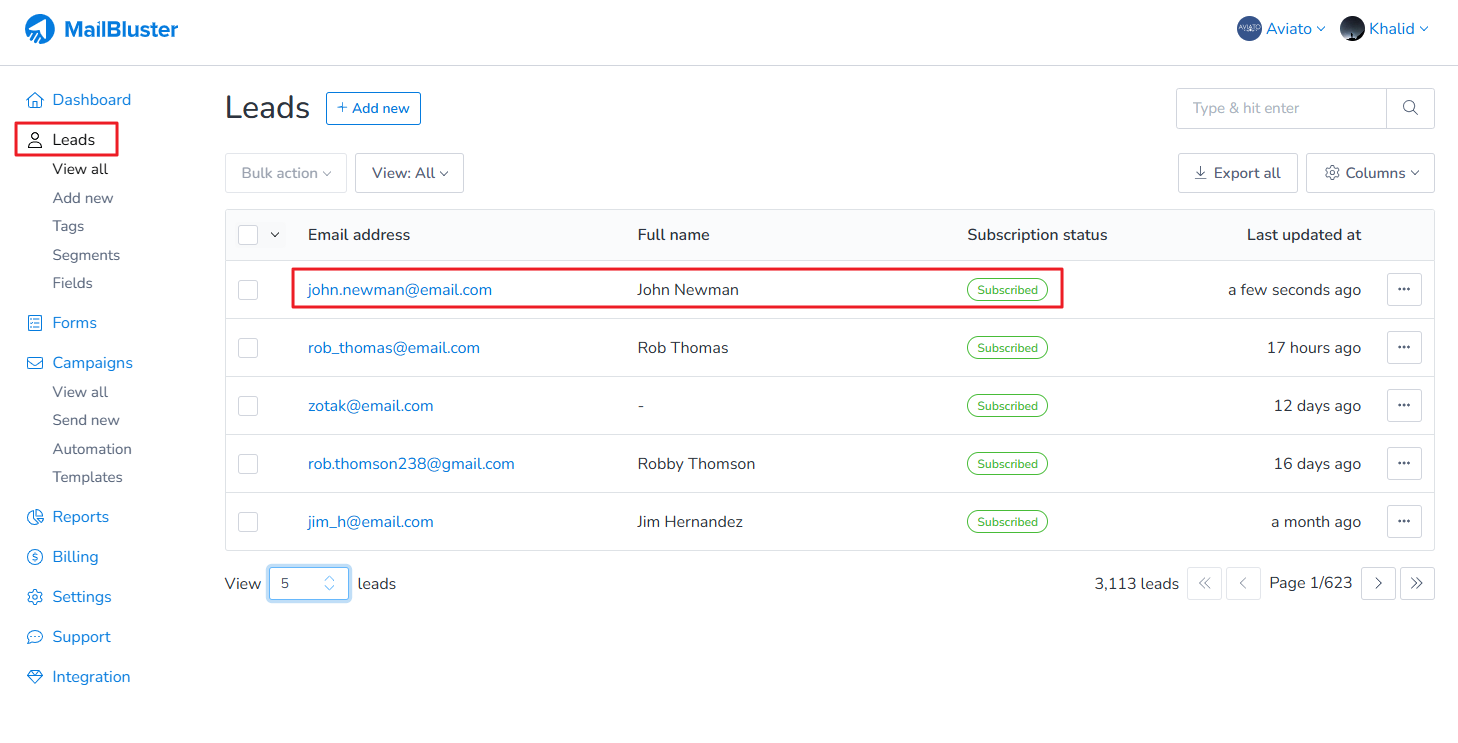
And the Lead will be added automatically to MailBluster > your Brand > Leads.
Salesforce integration with MailBluster using Pabbly provides an efficient way to automate lead syncing and email marketing workflows without writing any code. Salesforce is a cloud-based Customer Relationship Management (CRM) platform that helps businesses manage customer interactions, sales, marketing, and support processes. It centralizes data, streamlines workflows, and provides tools for automation, analytics, and personalized customer engagement. Salesforce also offers integrations, customizable solutions, and industry-specific applications, making it a versatile platform for organizations of all sizes.
In this guide, we’ve used Salesforce’s Developer Website to demonstrate how to integrate MailBluster with Salesforce.
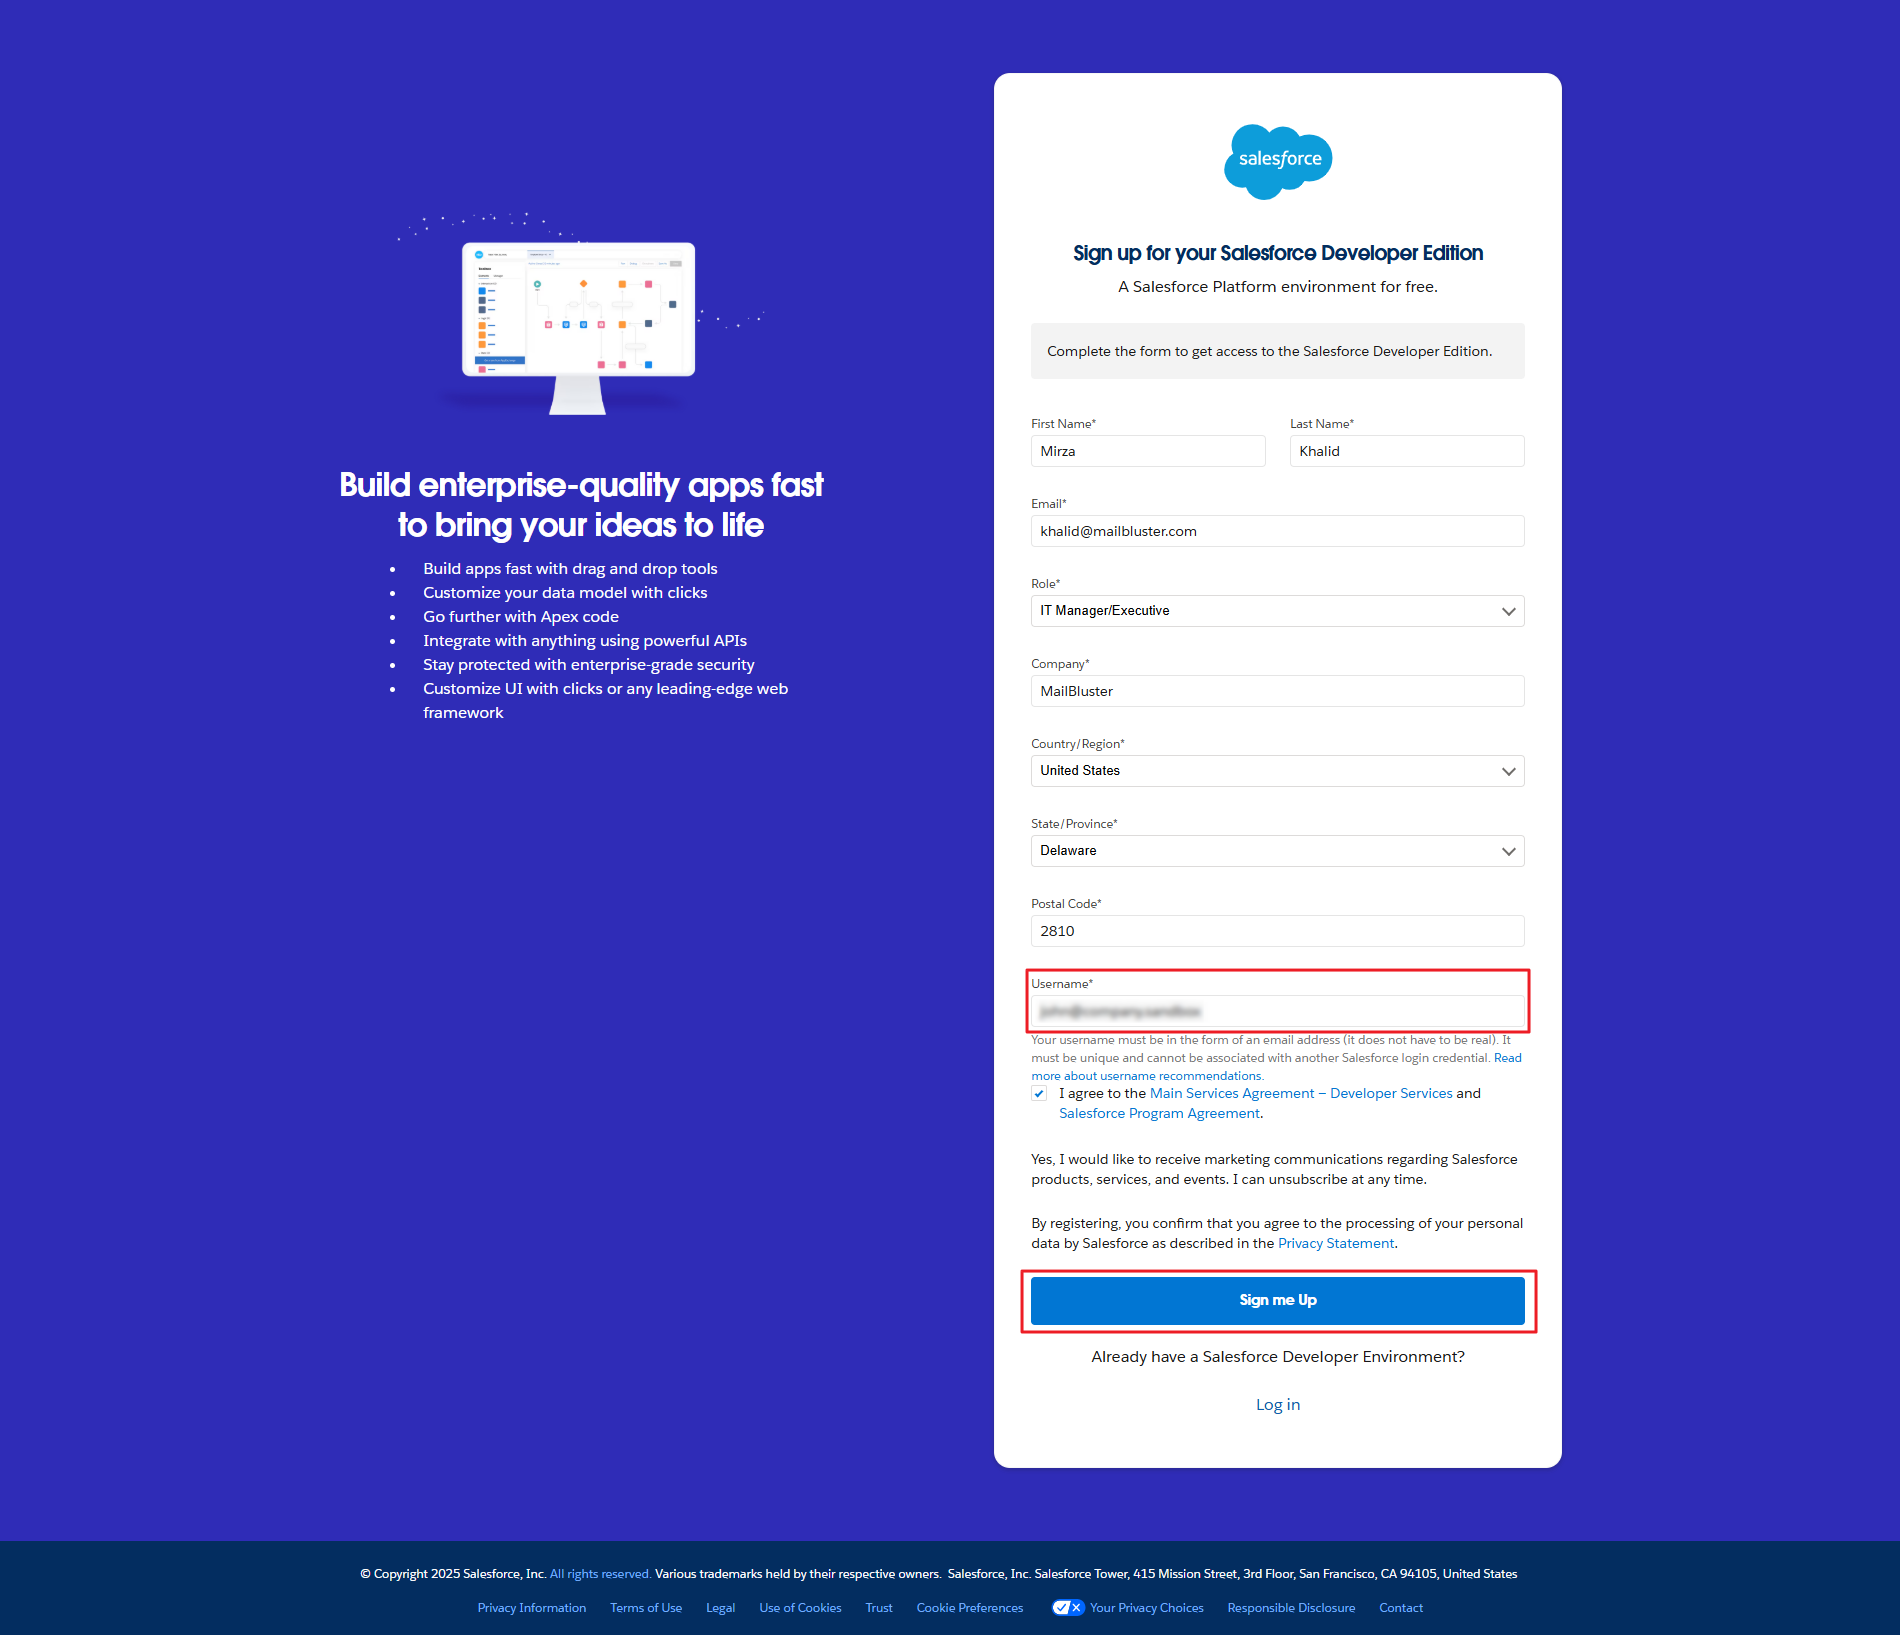
To begin, you need to sign up on Salesforce through the Salesforce Developer Website. Be sure to set a proper username as it will be used to sign in to Salesforce.
Remember to use your full email ID, including the domain (e.g., [email protected]), when filling out the form’s Username field.
Afterward, verify your email and log in to Salesforce Developer using your email ID and password.
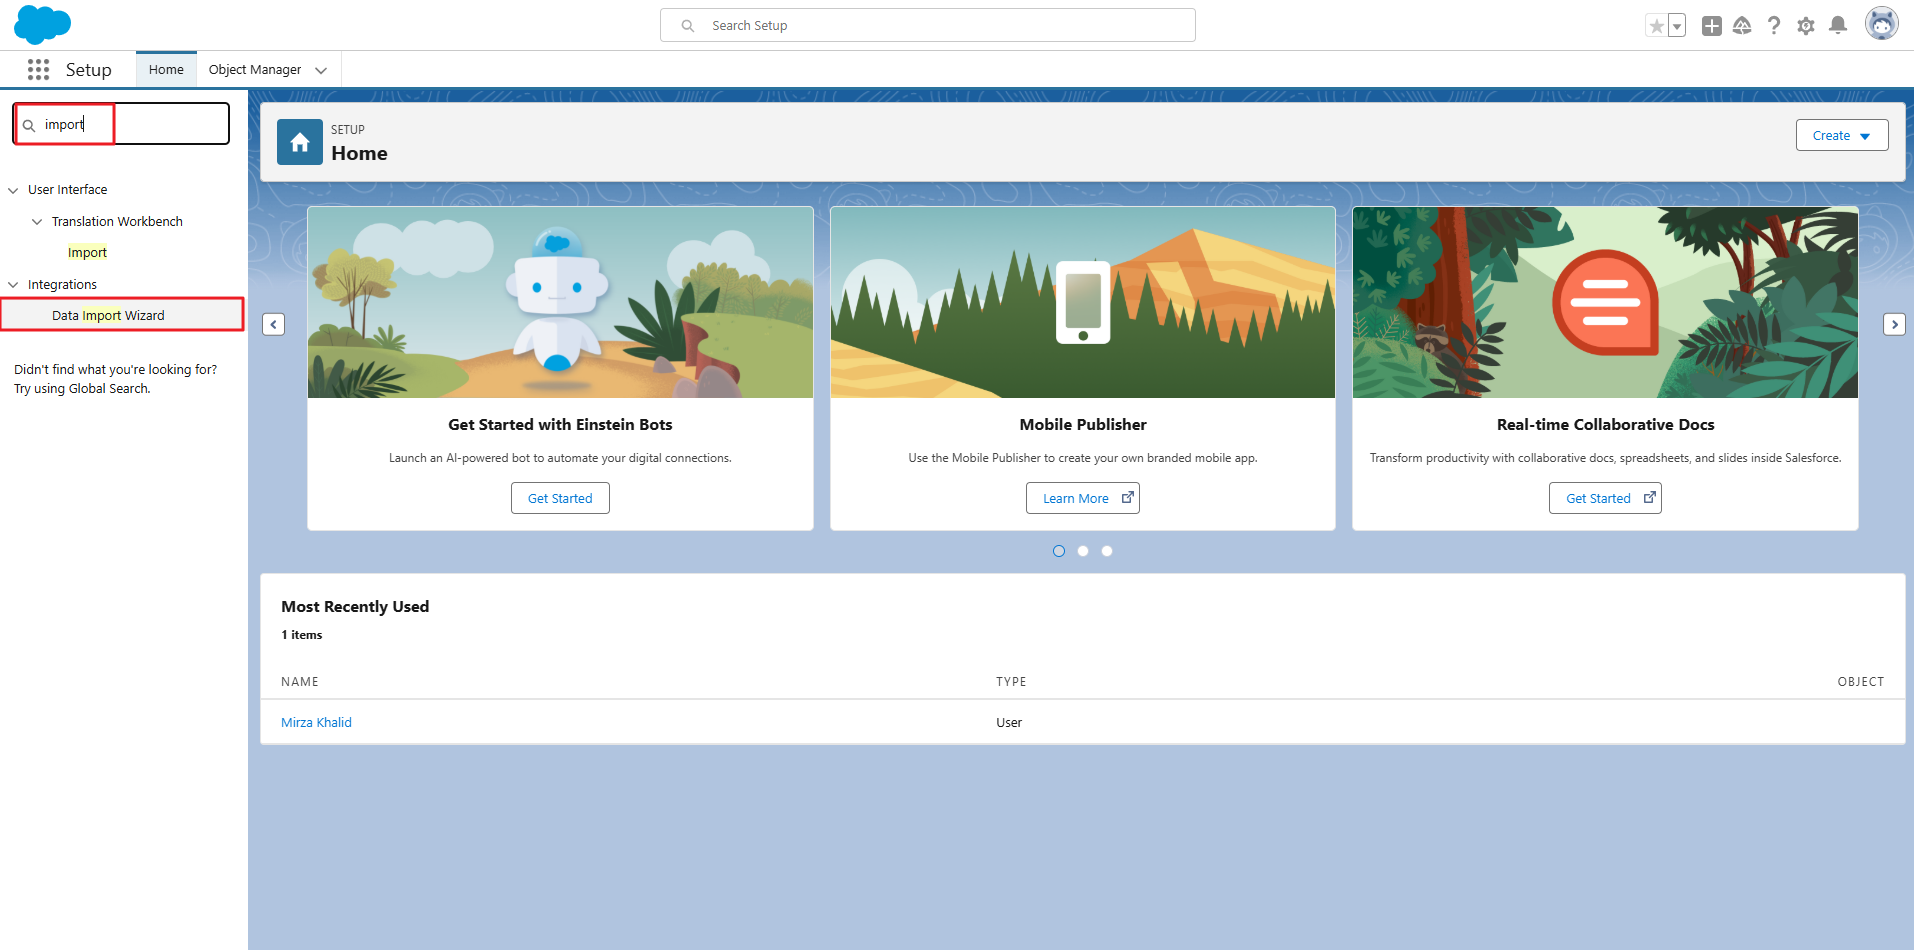
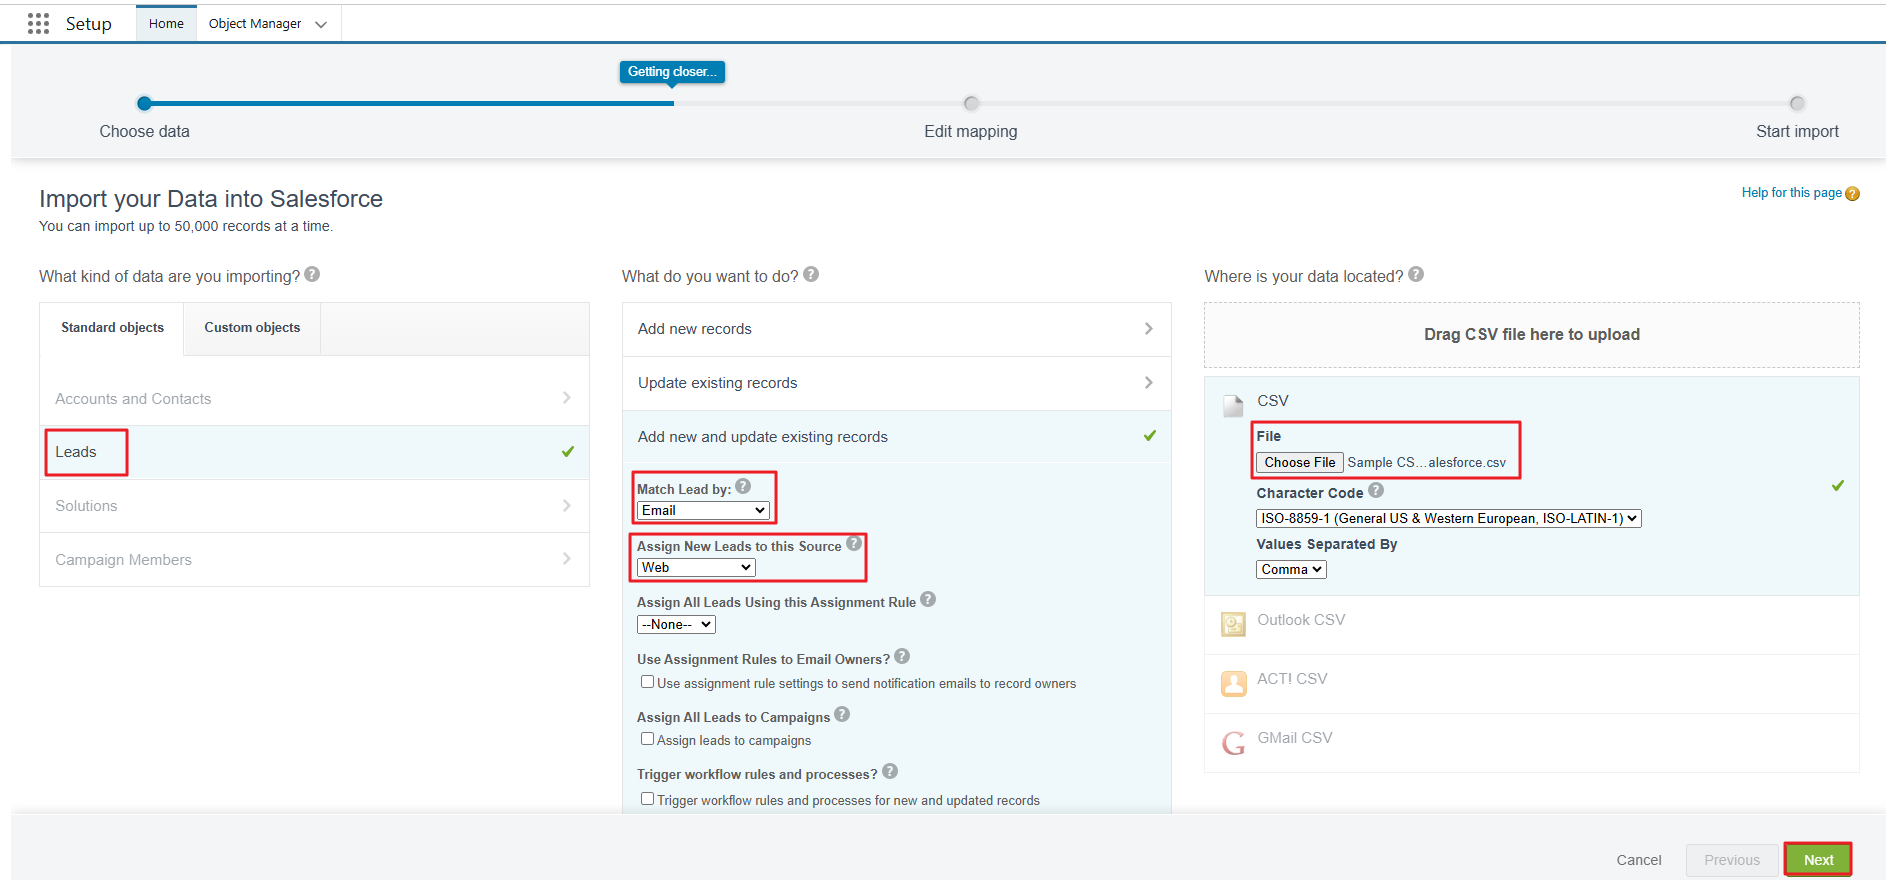
Now, you need to add or upload leads to Salesforce. Click on the Home, then type ‘import‘ under Search bar. Now, click on Data Import Wizard.
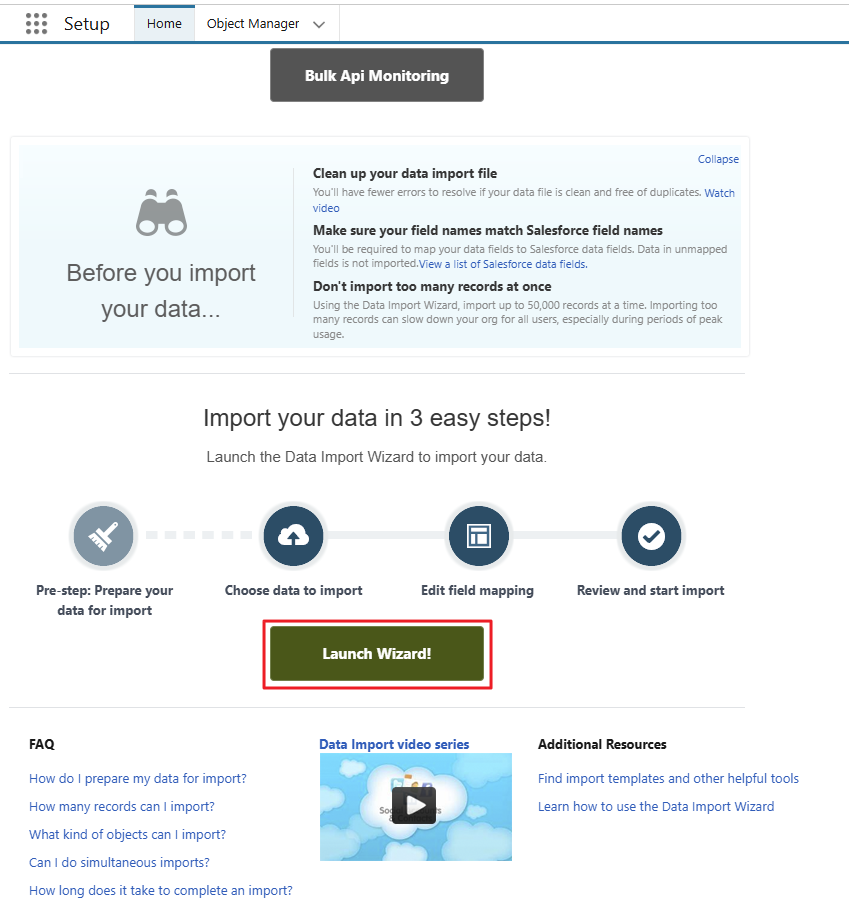
Click on Launch Wizard.
Click on Leads under Import Data into Salesforce.
Now, select Leads > Add new and update existing records. Select ‘Email’ for Match Lead by and ‘Web’ for Assign New Leads to this Source. Then click on ‘Choose File’ and upload a CSV file. Once everything is set, click on Next button.
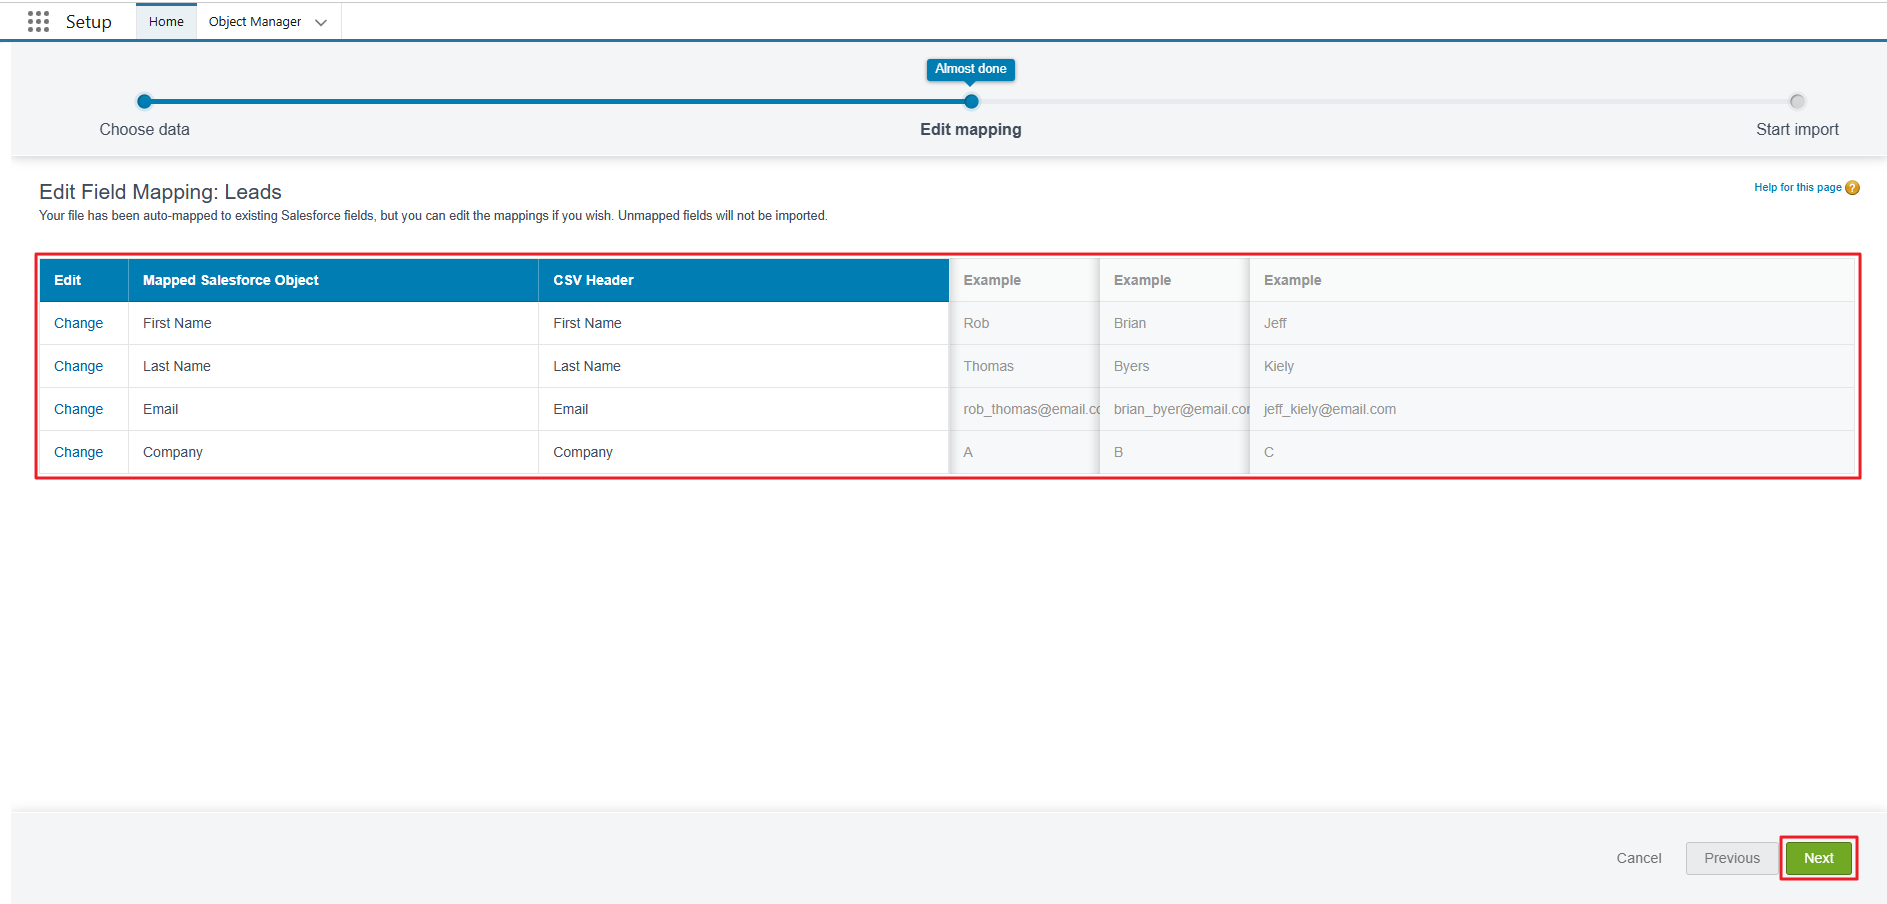
The imported fields of the CSV file has been auto-mapped by Salesforce fields as shown below. Click on the Next button.
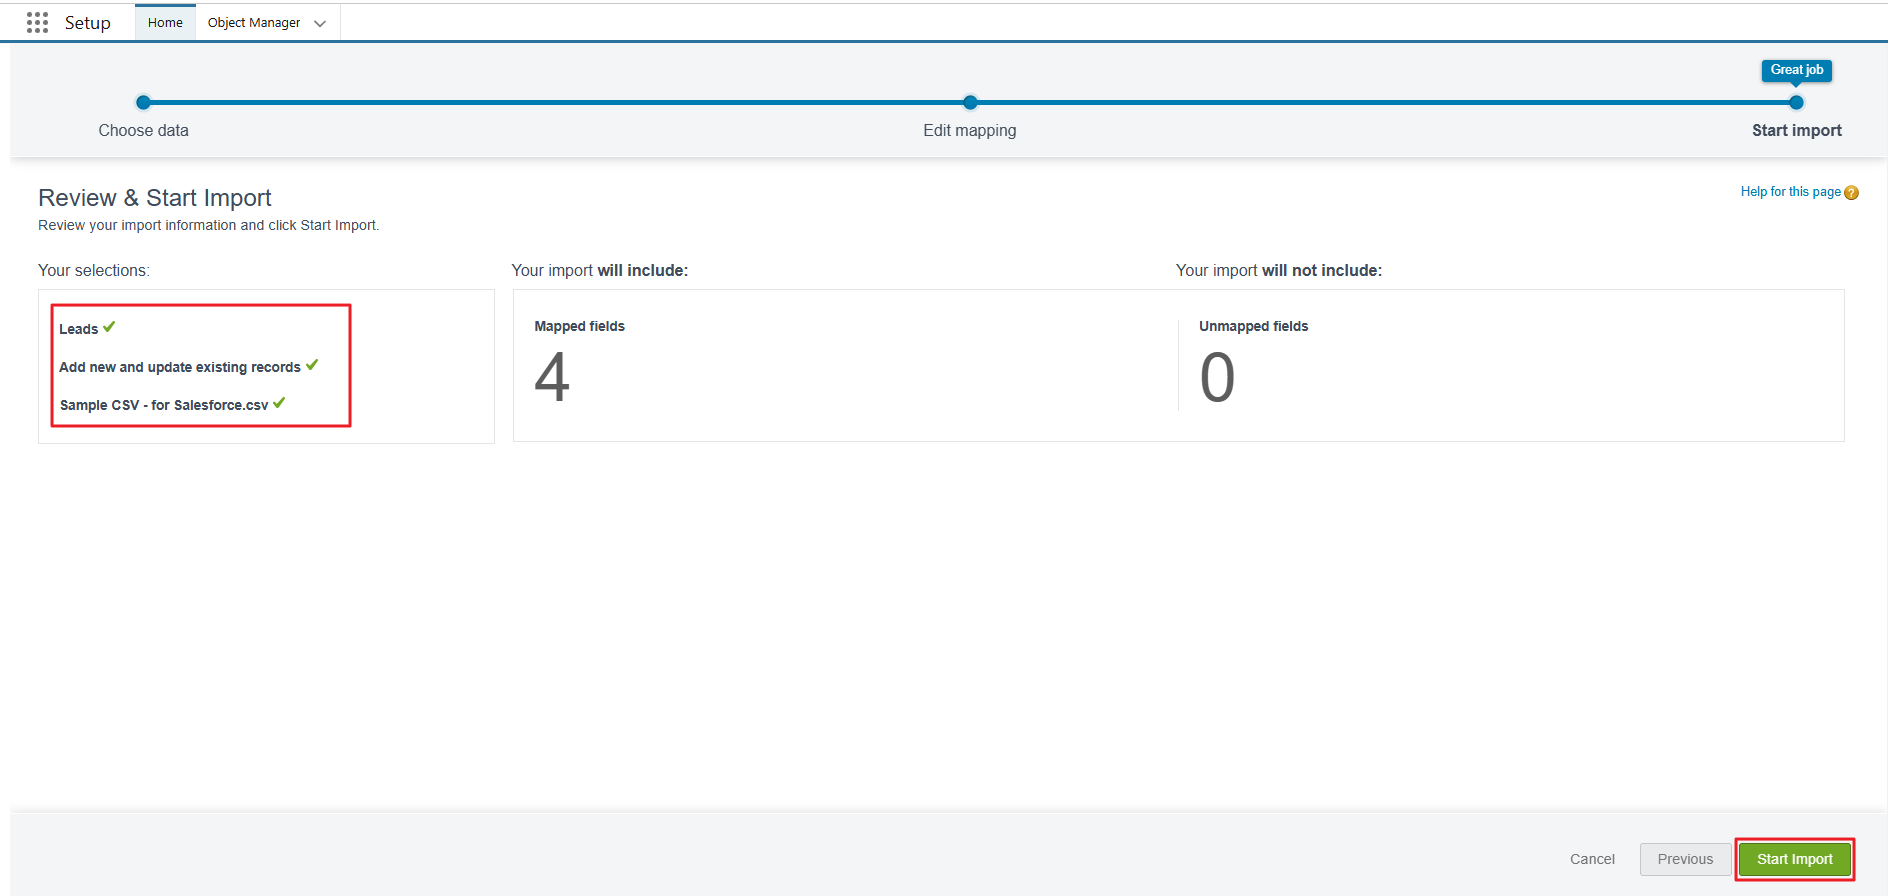
Review the selections carefully and then click Start Import.
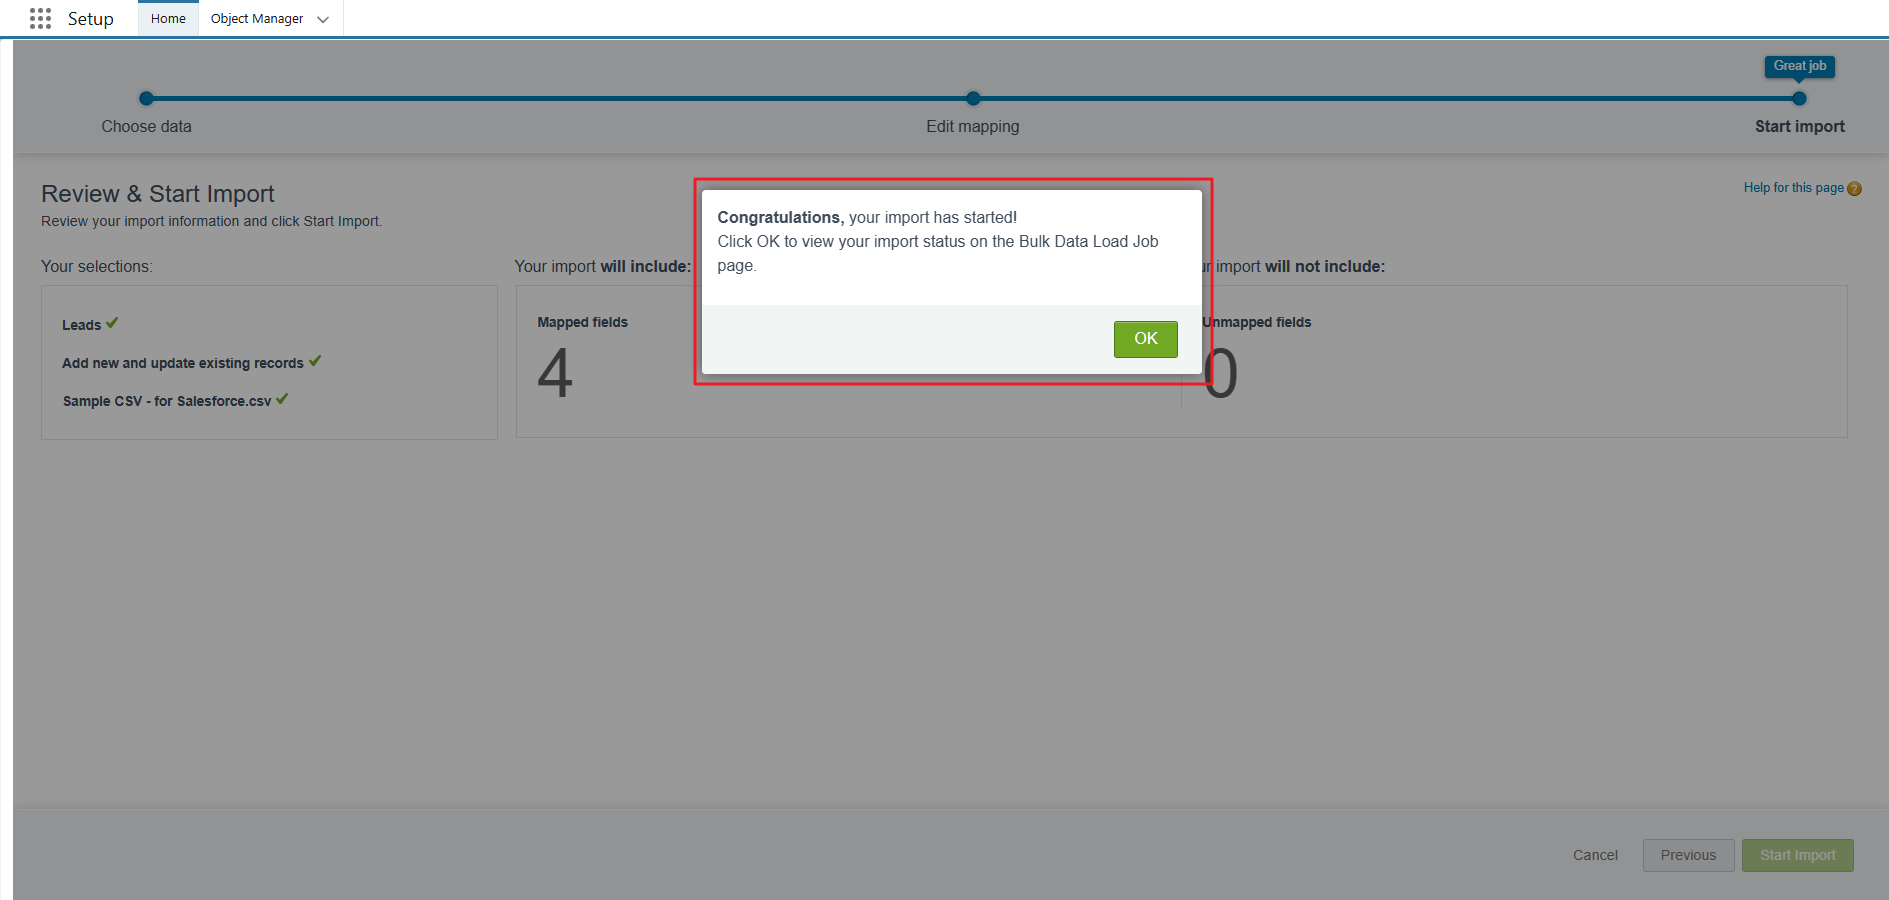
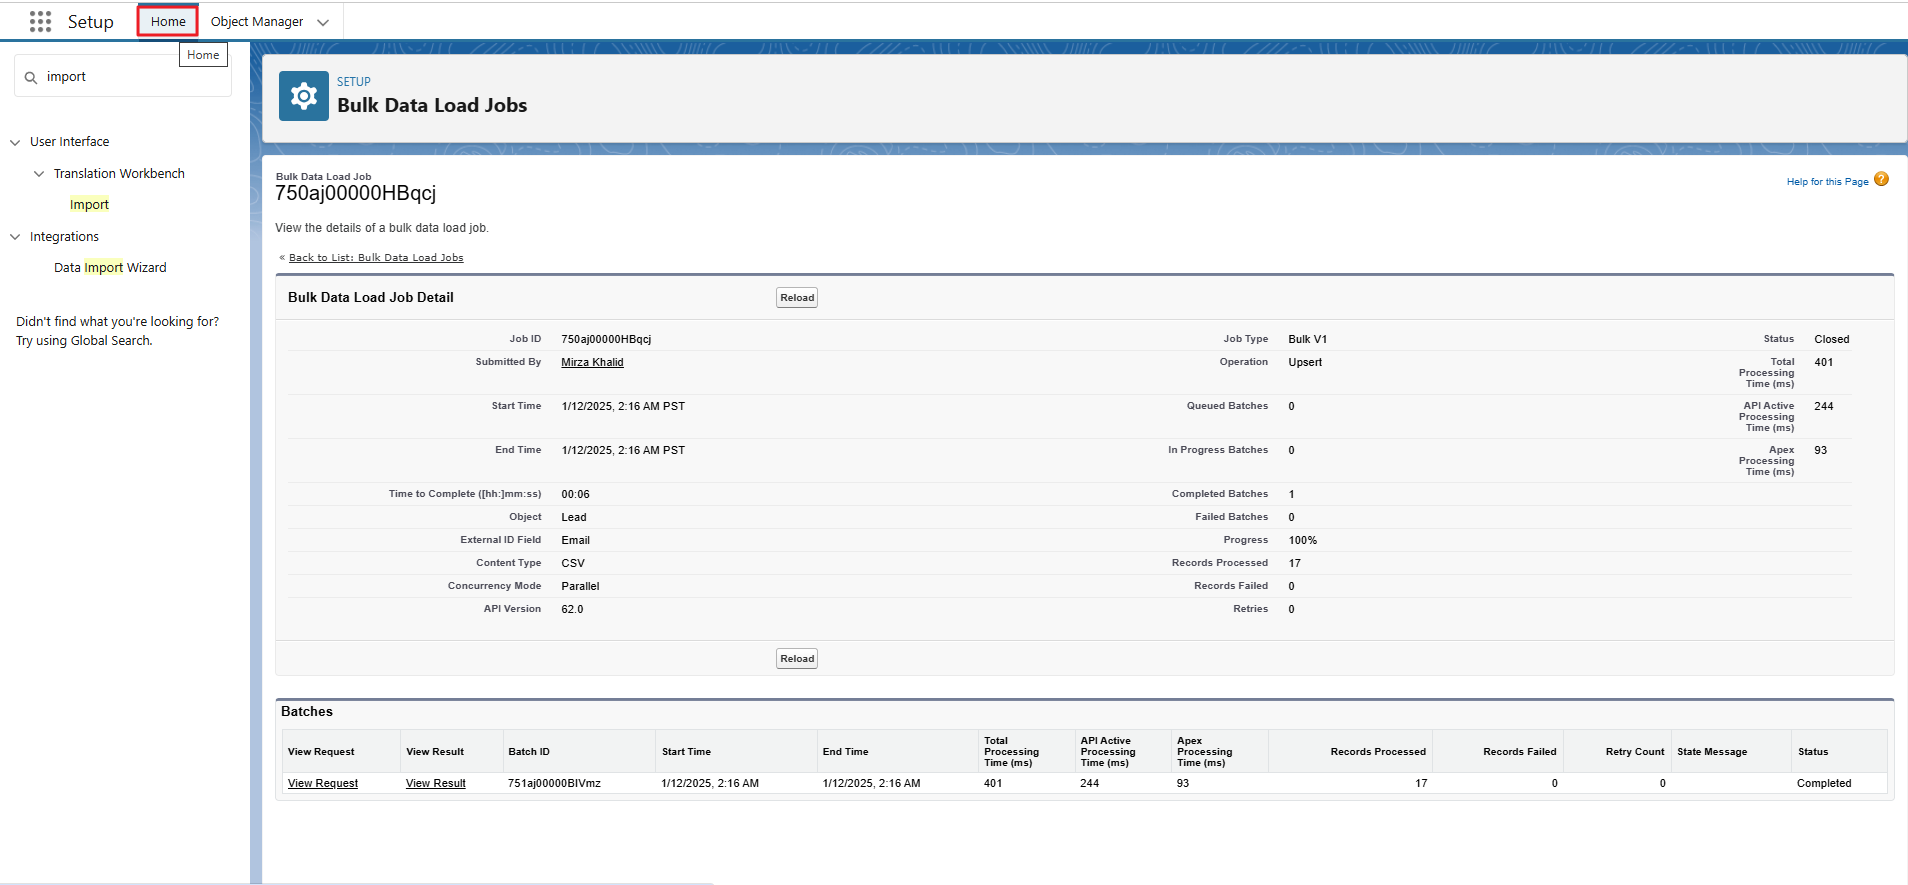
You will get a notification that your leads have been imported successfully. Click OK to close the popup.
Upon clicking OK button, you will be redirected to the following page. Then click on Home.
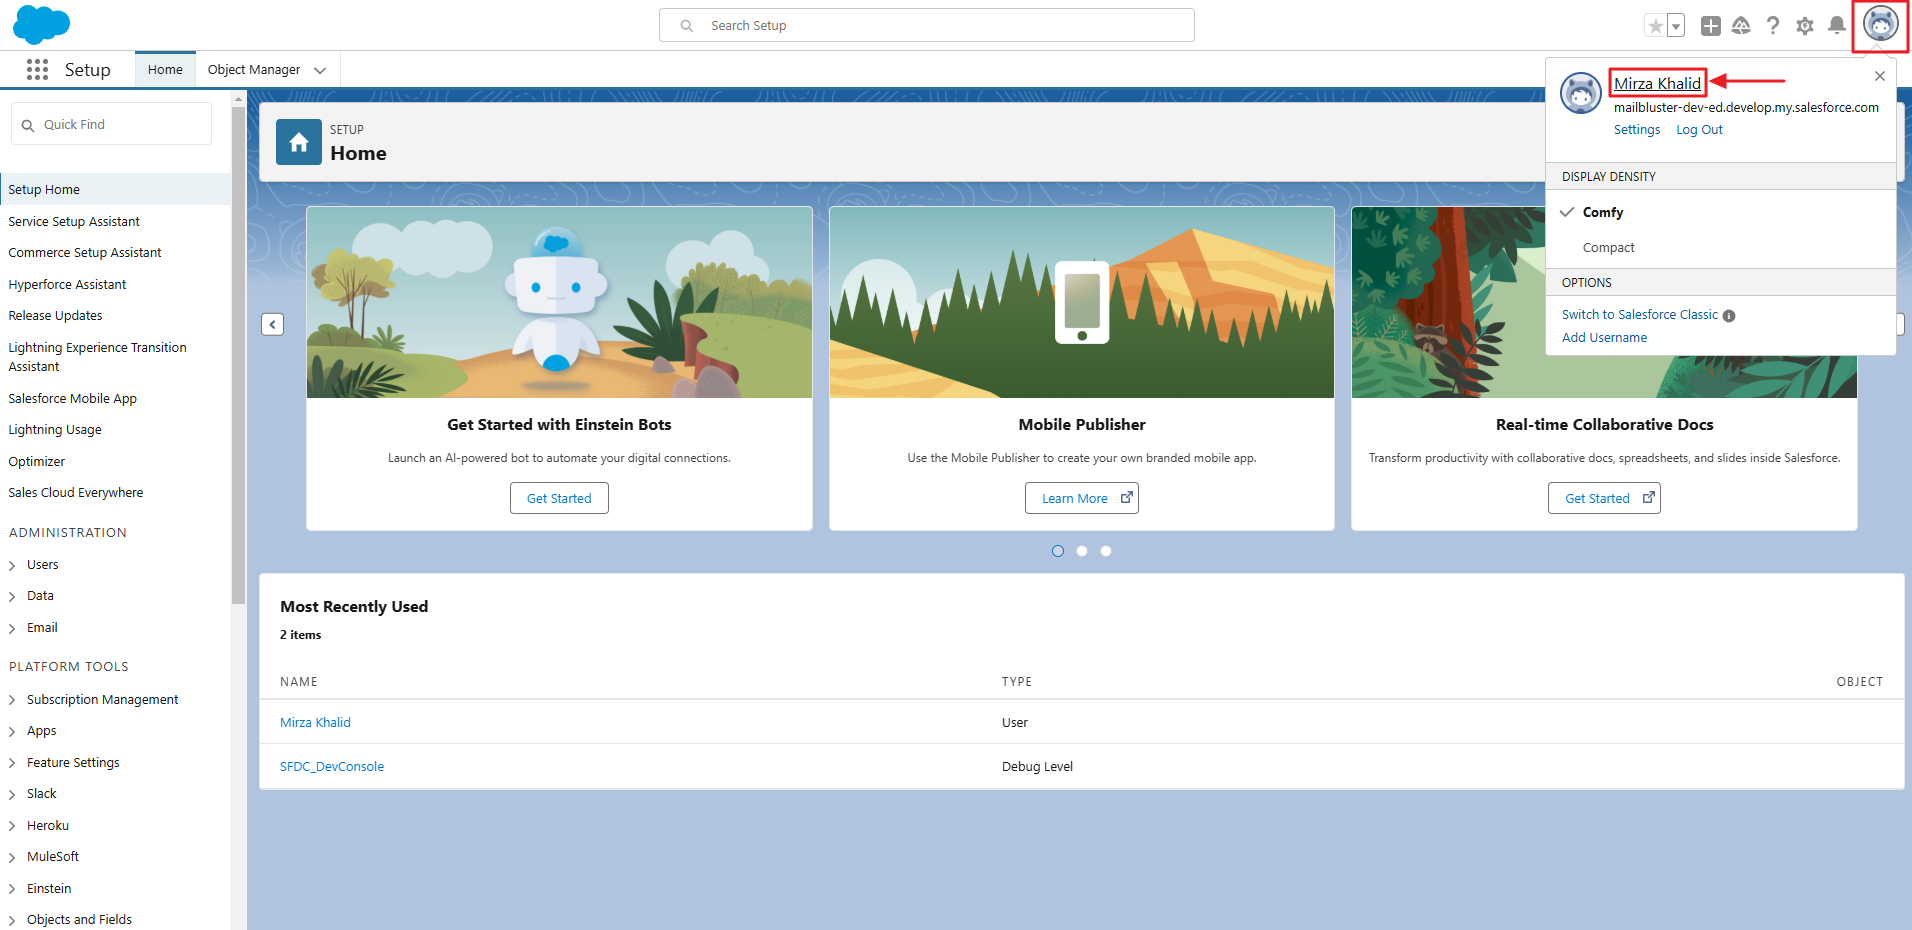
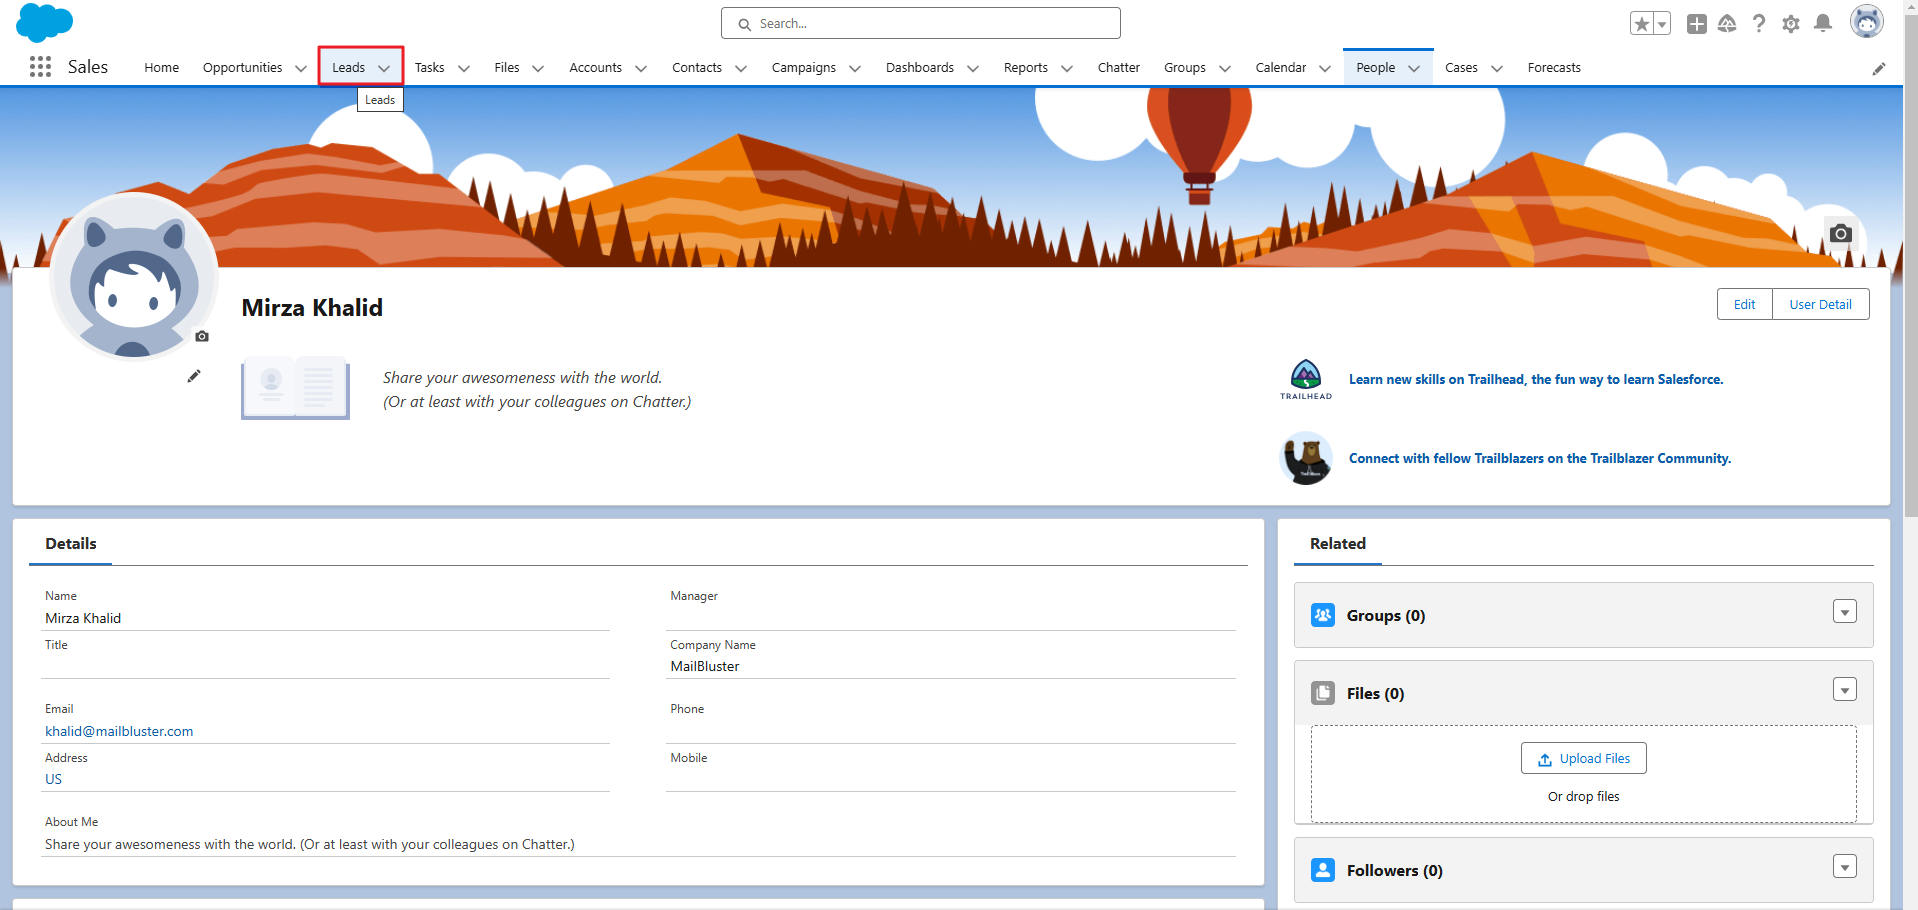
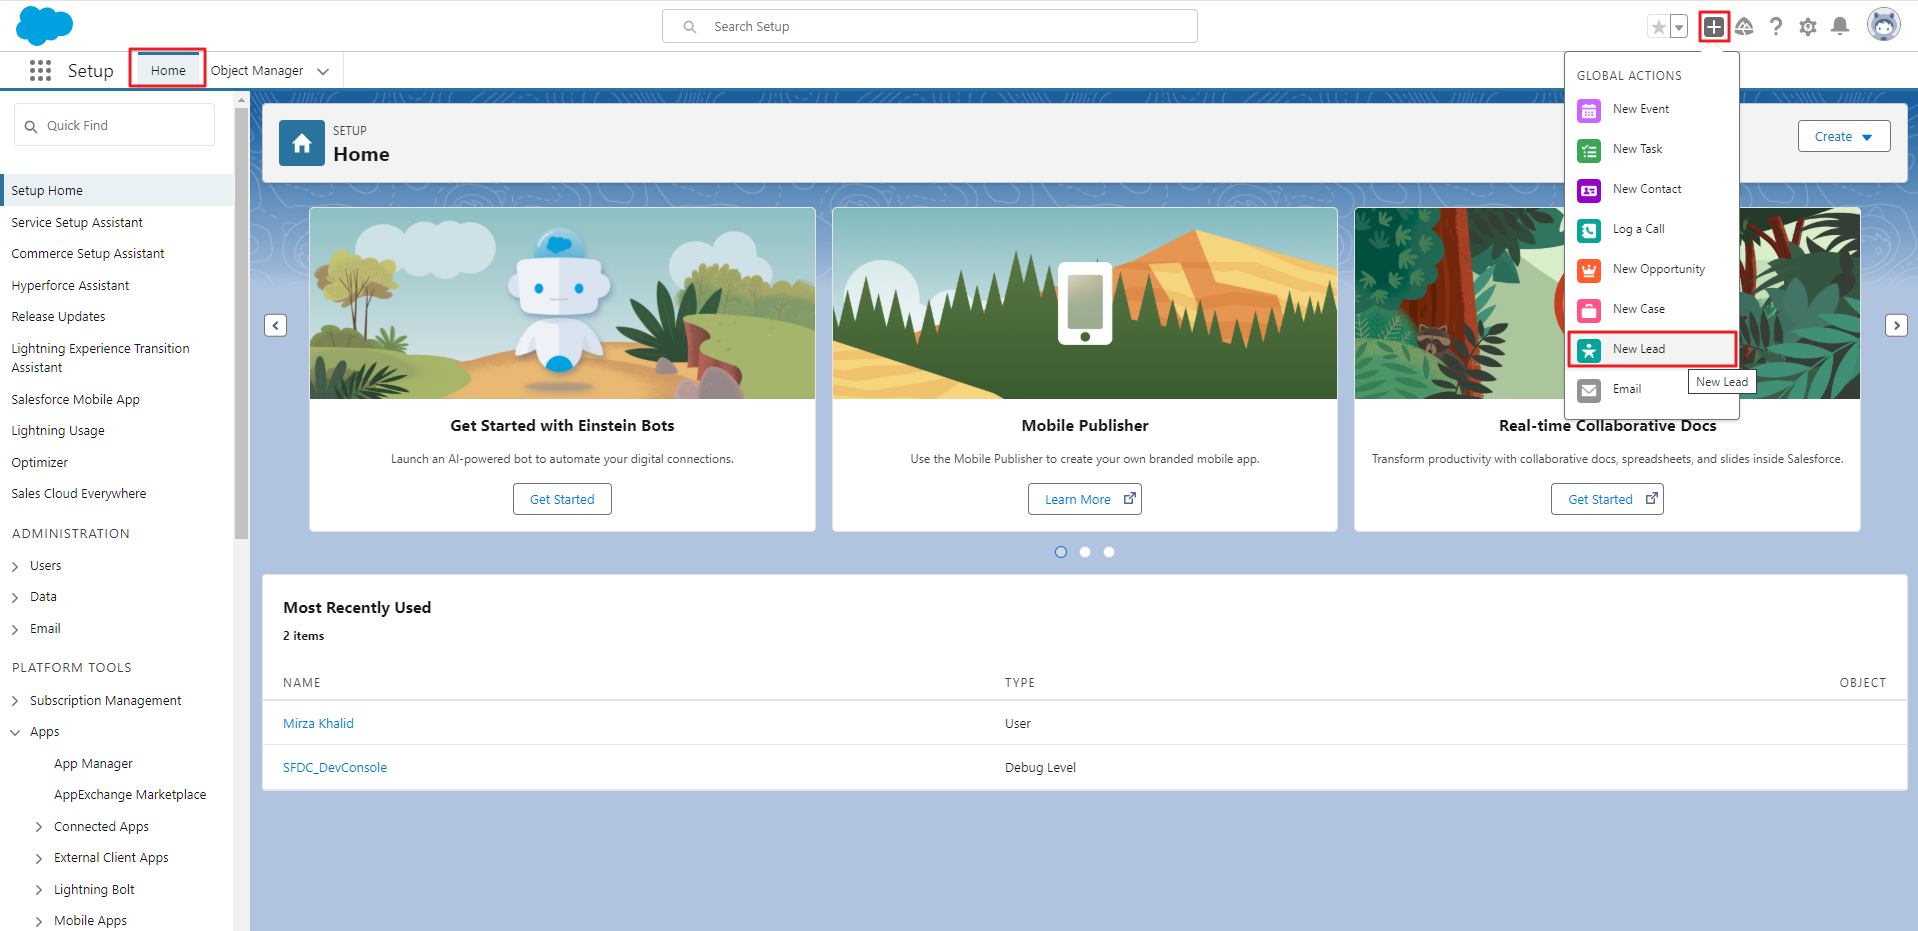
Now, click on your Profile Picture ->Your Name. This will redirect you to the Sales page.
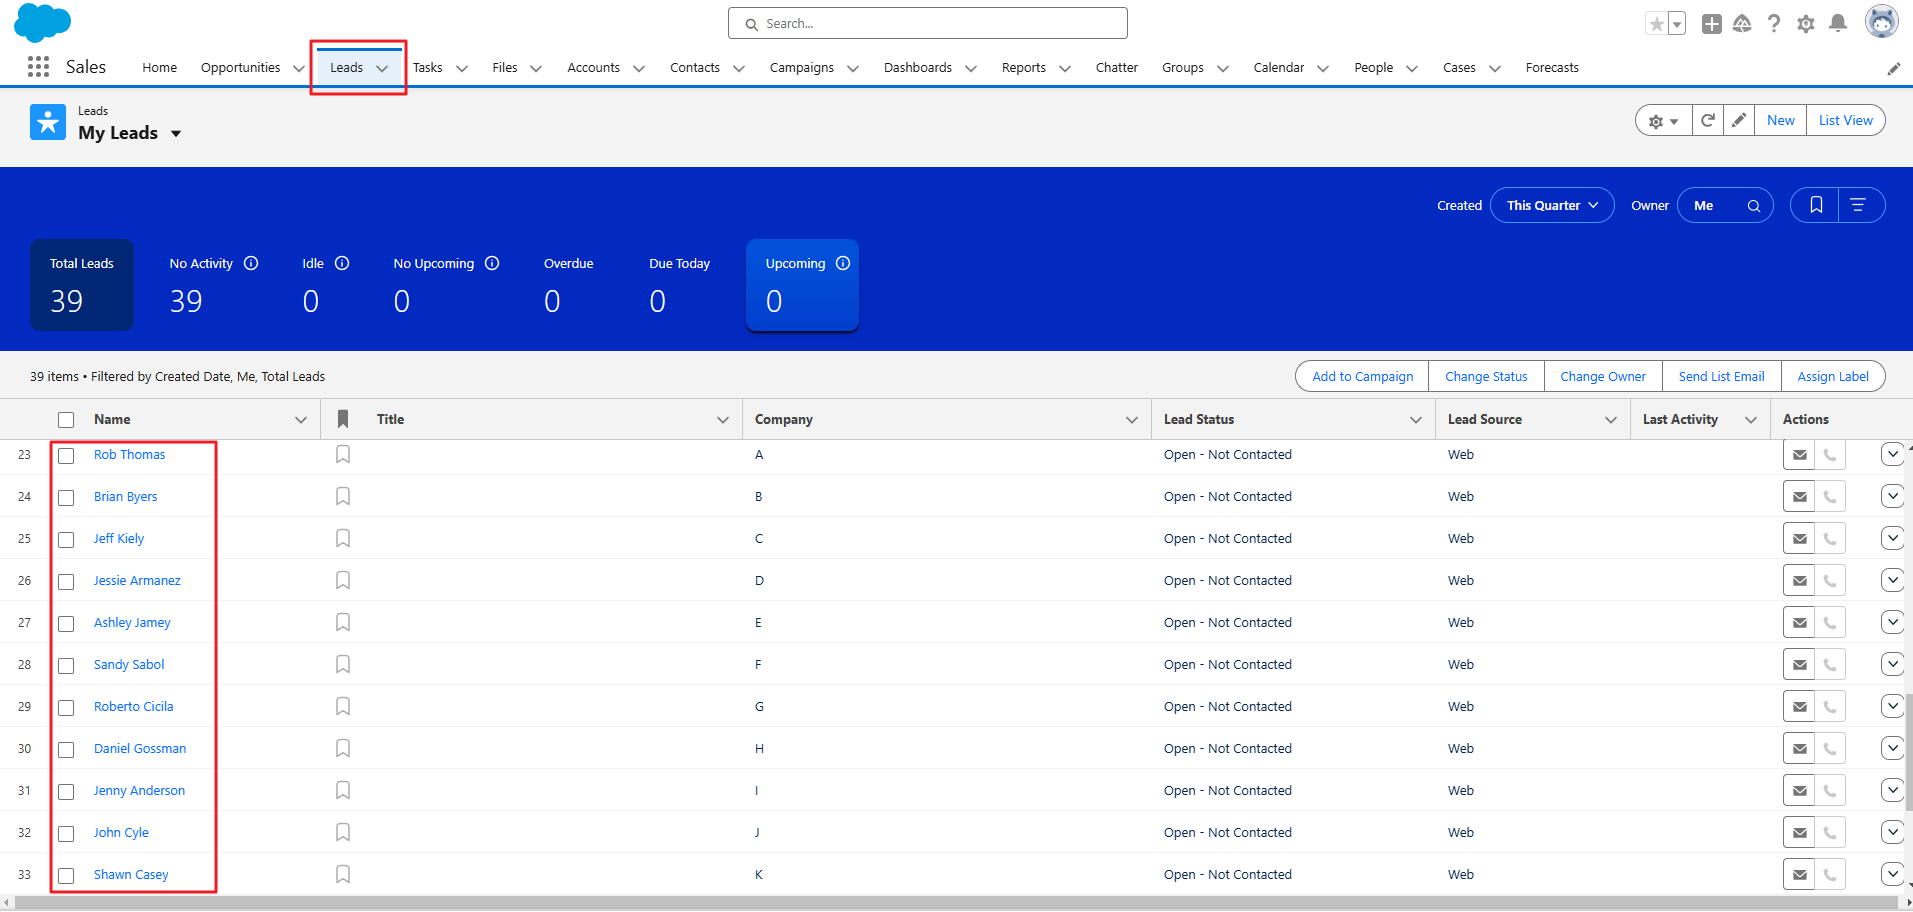
On the Sales page, click on Leads.
As you can see all of the imported leads are present here.
Now, we need a third party app called Pabbly for MailBluster and Salesforce integration. Salesforce offers numerous functionalities, including API integration for connecting external applications. In this guide, we will focus on the most convenient and easy-to-understand option. Signup with Pabbly Connect.
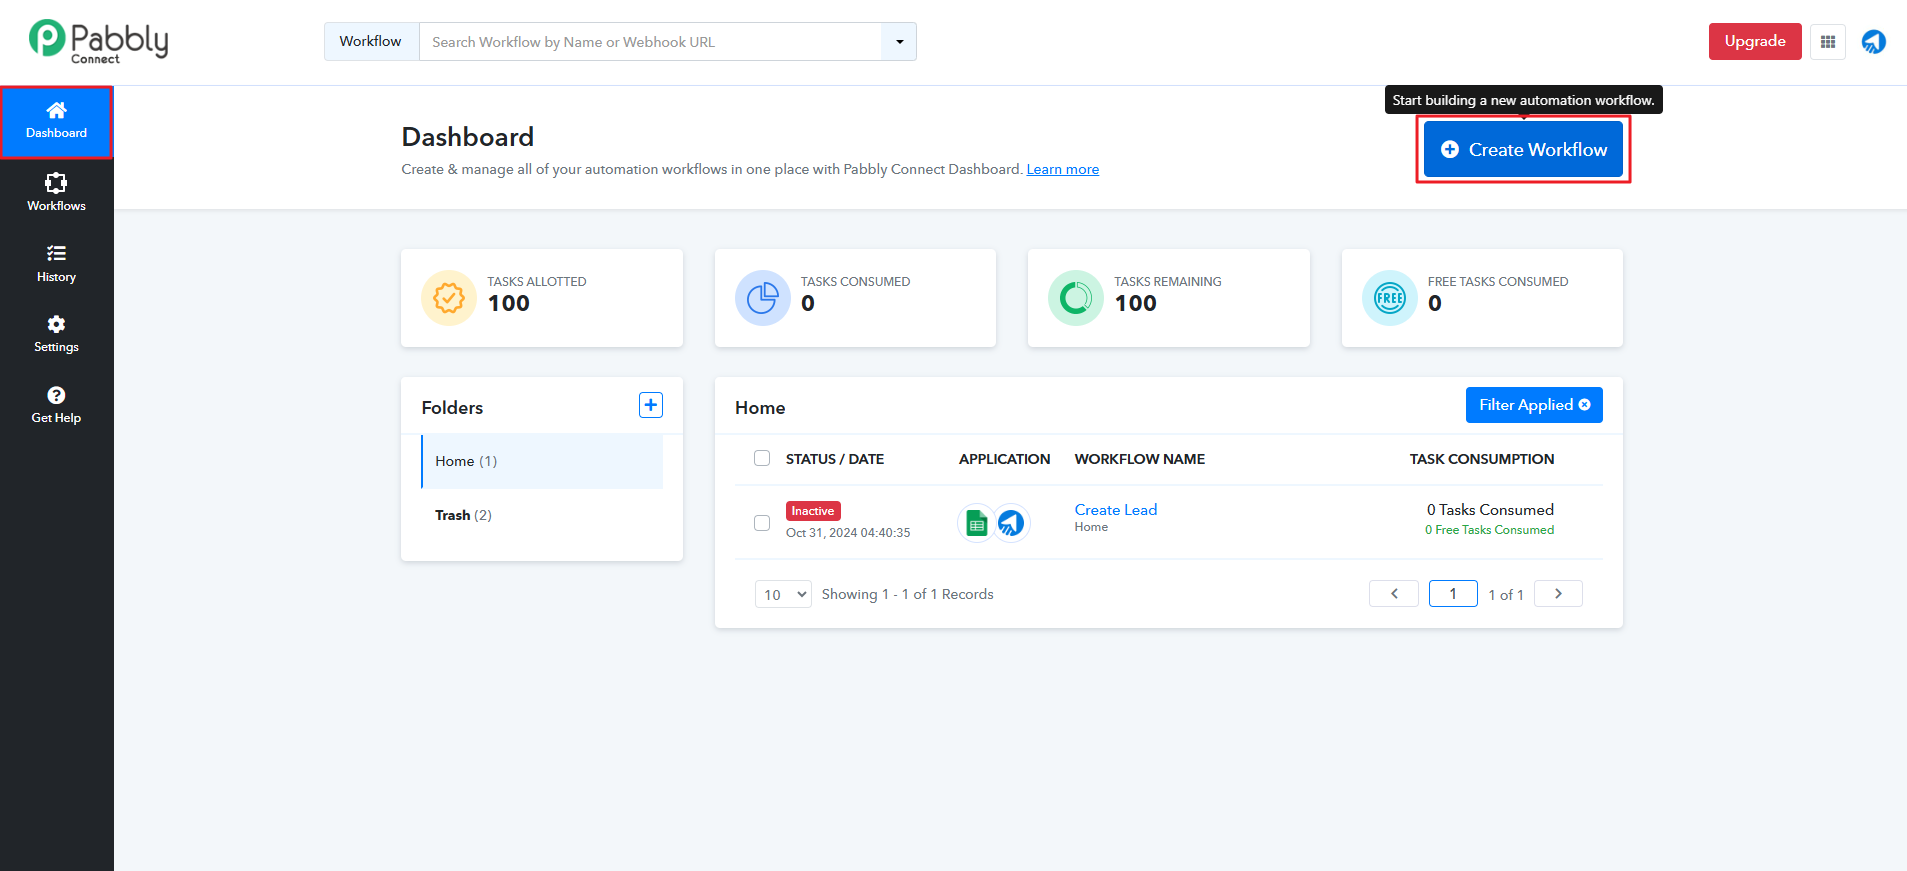
Click on Create Workflow button under Dashboard of Pabbly Connect.
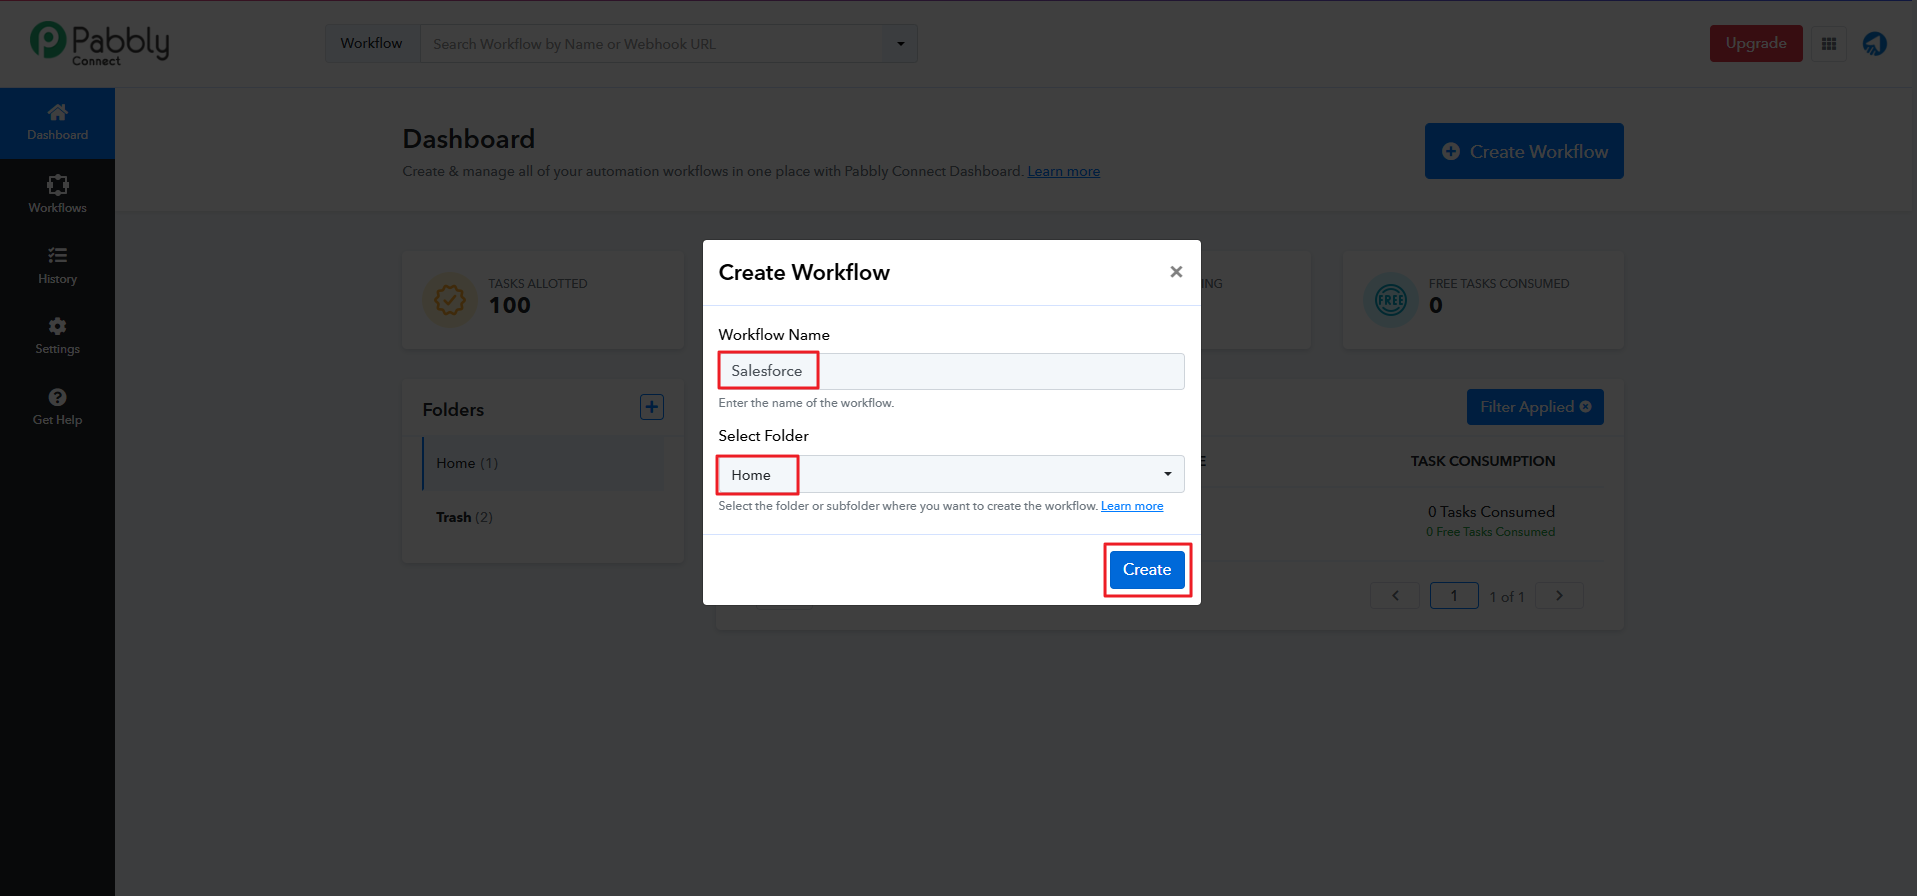
Write down the Workflow Name and Select Folder Home. Then click on Create button.
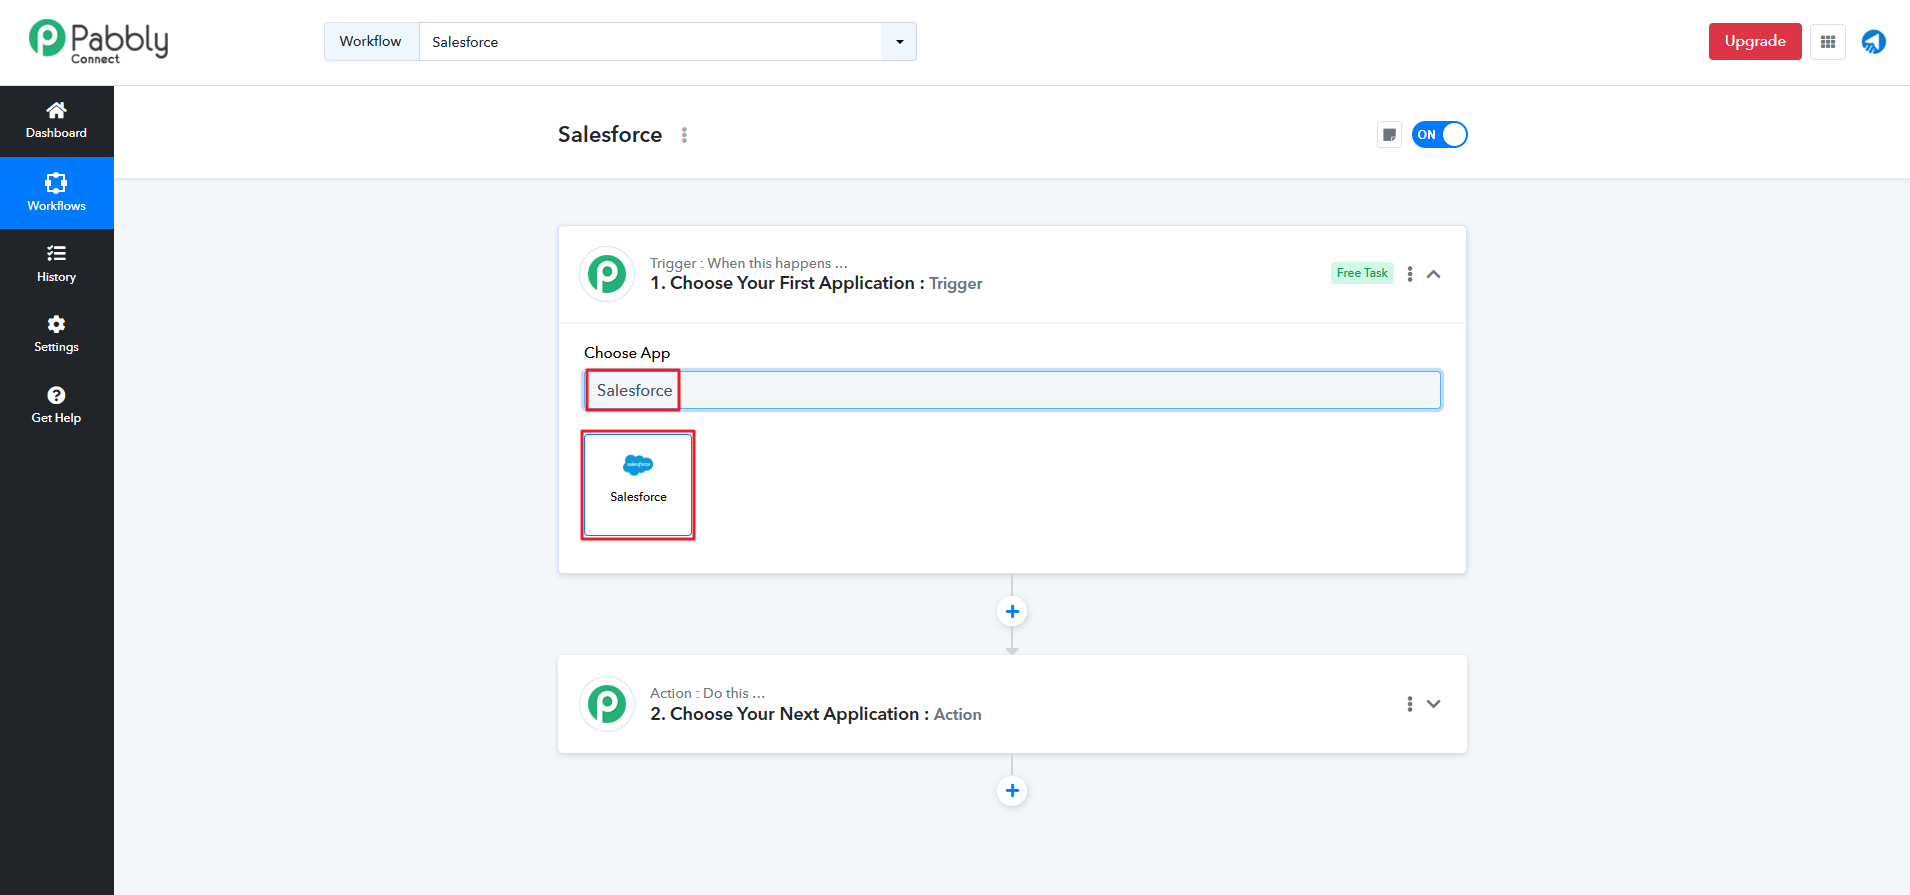
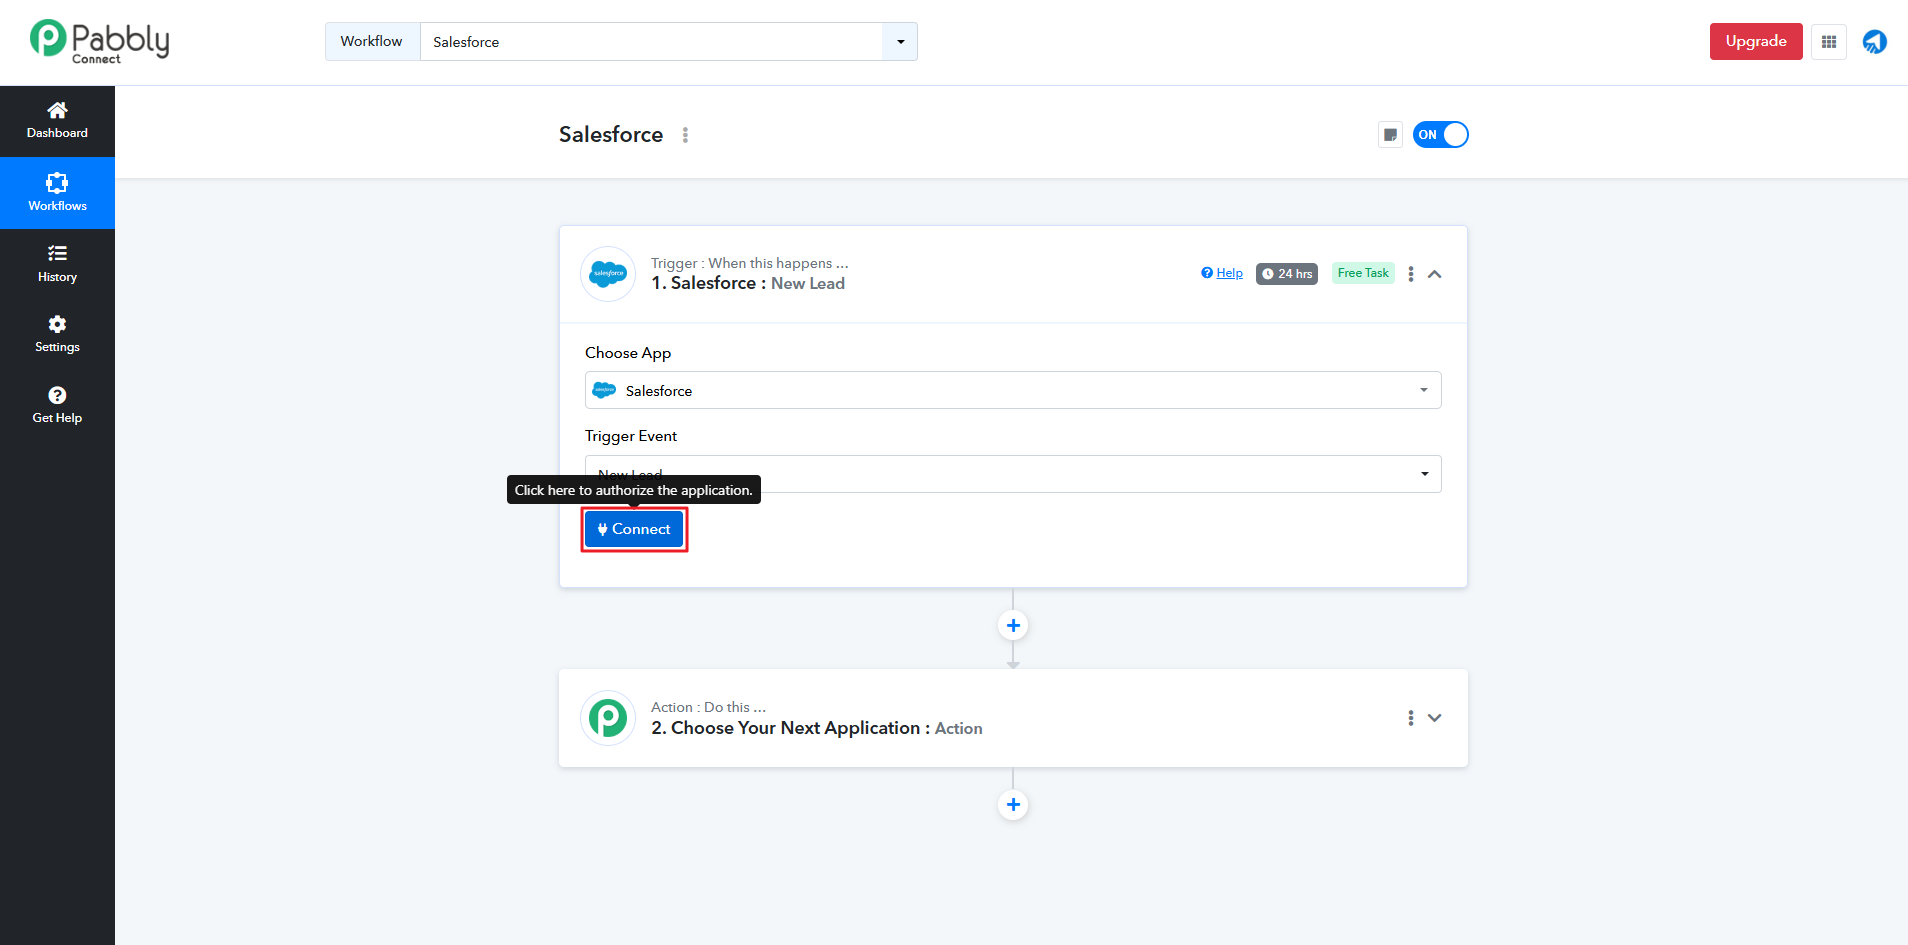
Select Salesforce under Choose App.
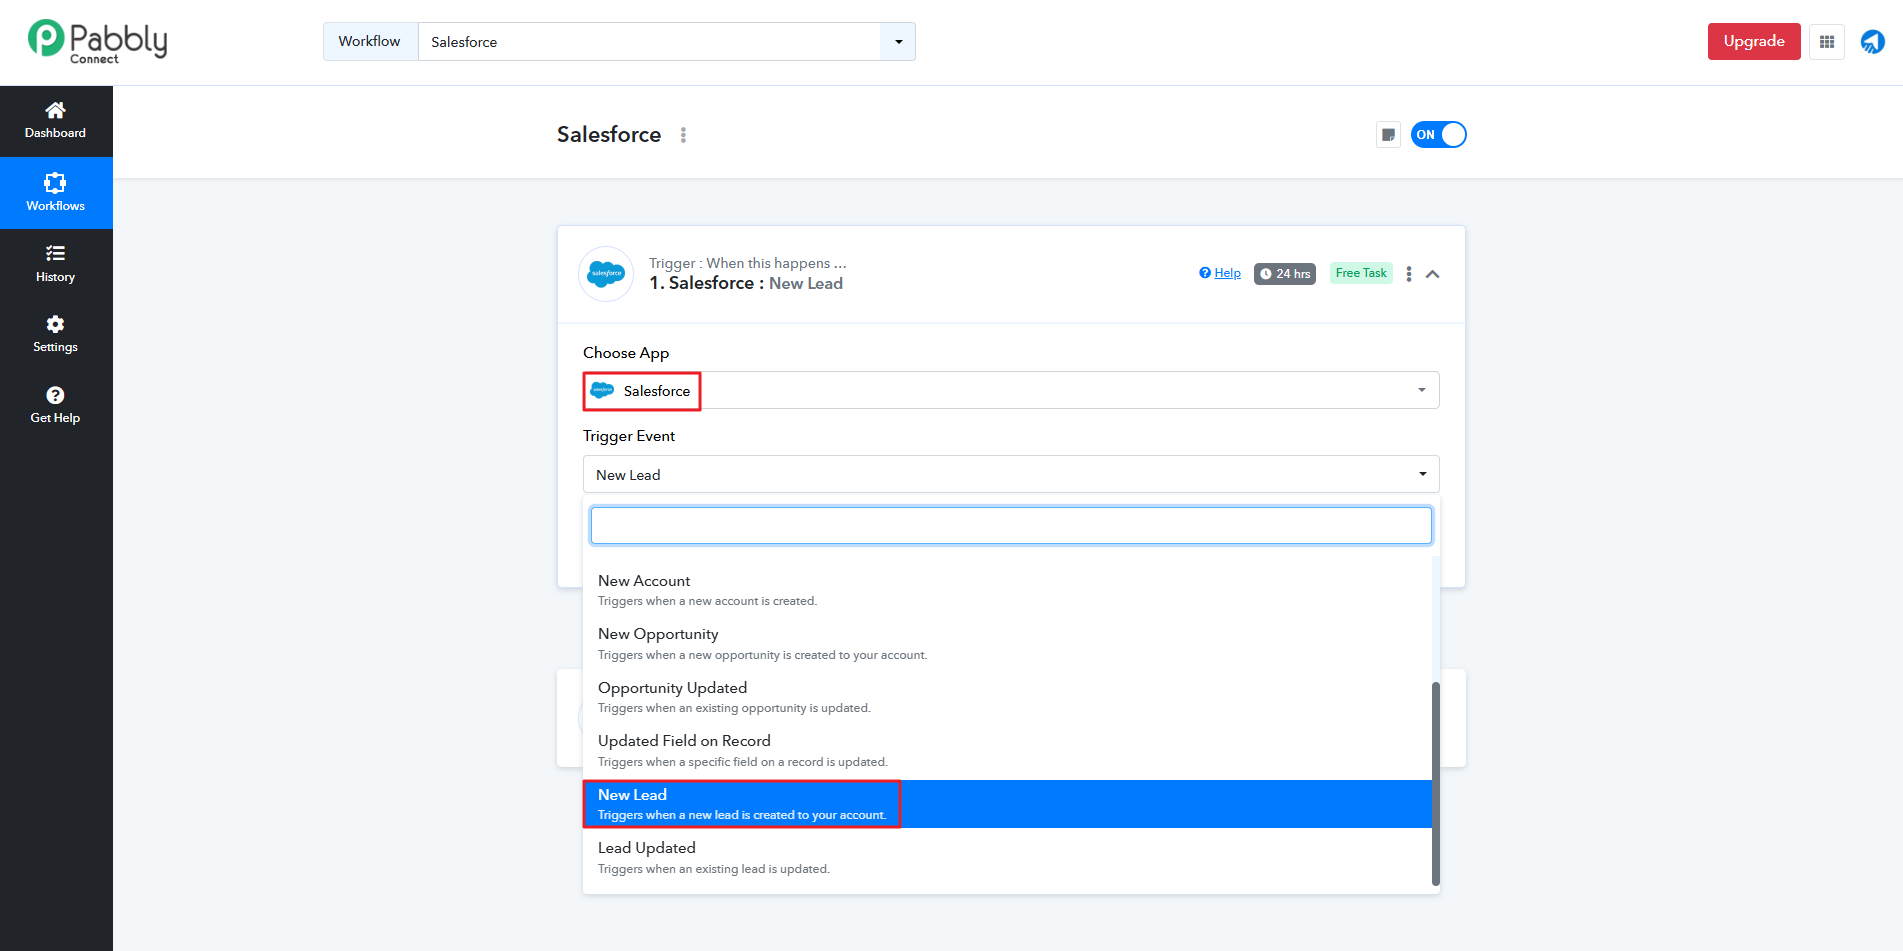
Then select New Lead under Trigger Event.
Now, click the Connect button.
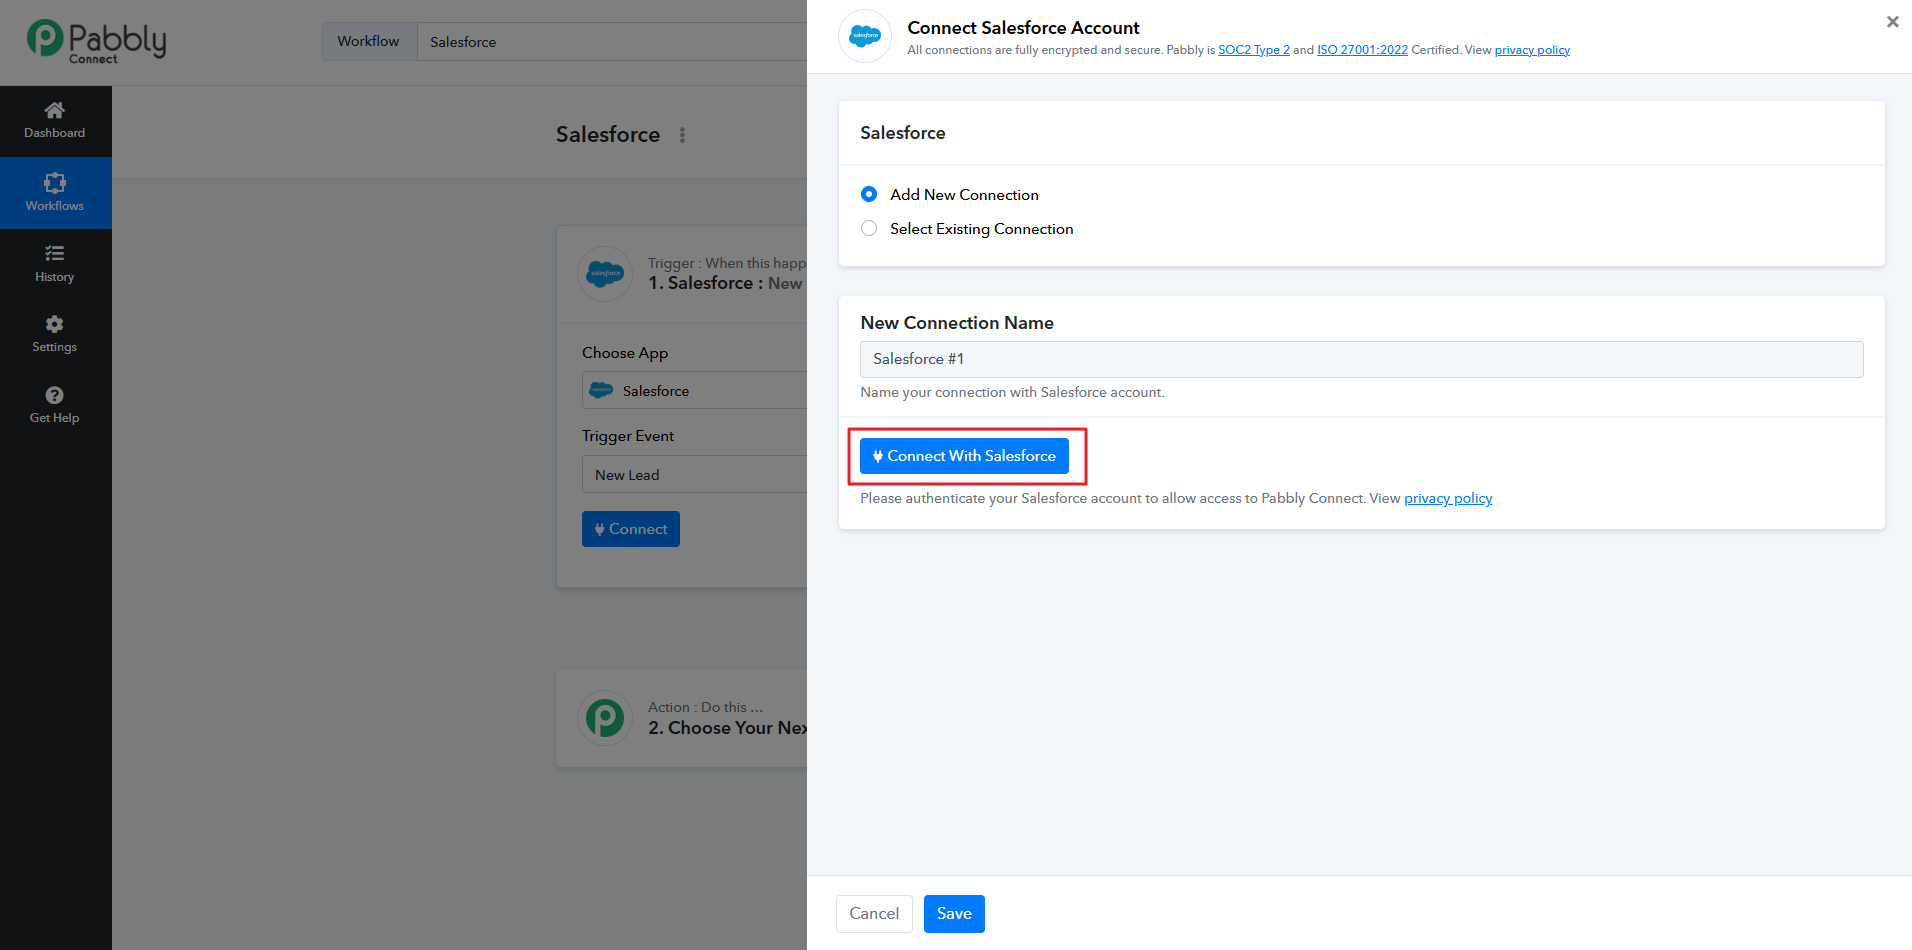
Click on Connect With Salesforce.
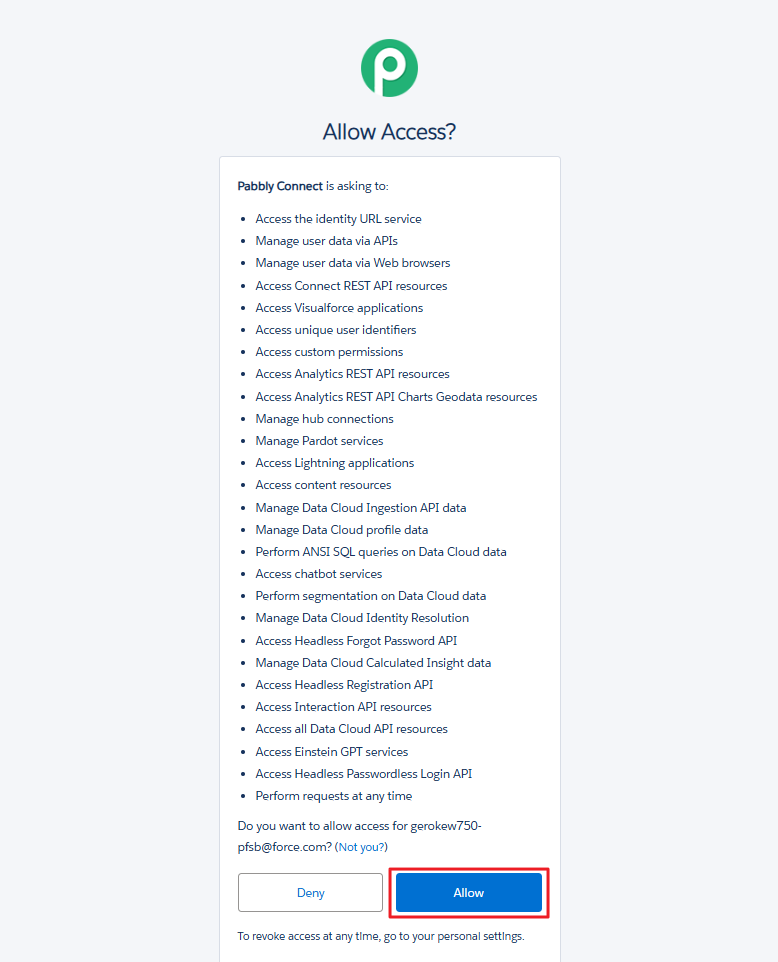
On the right side, a new window will pop up. Click Allow button. Authorization Successful message will appear.
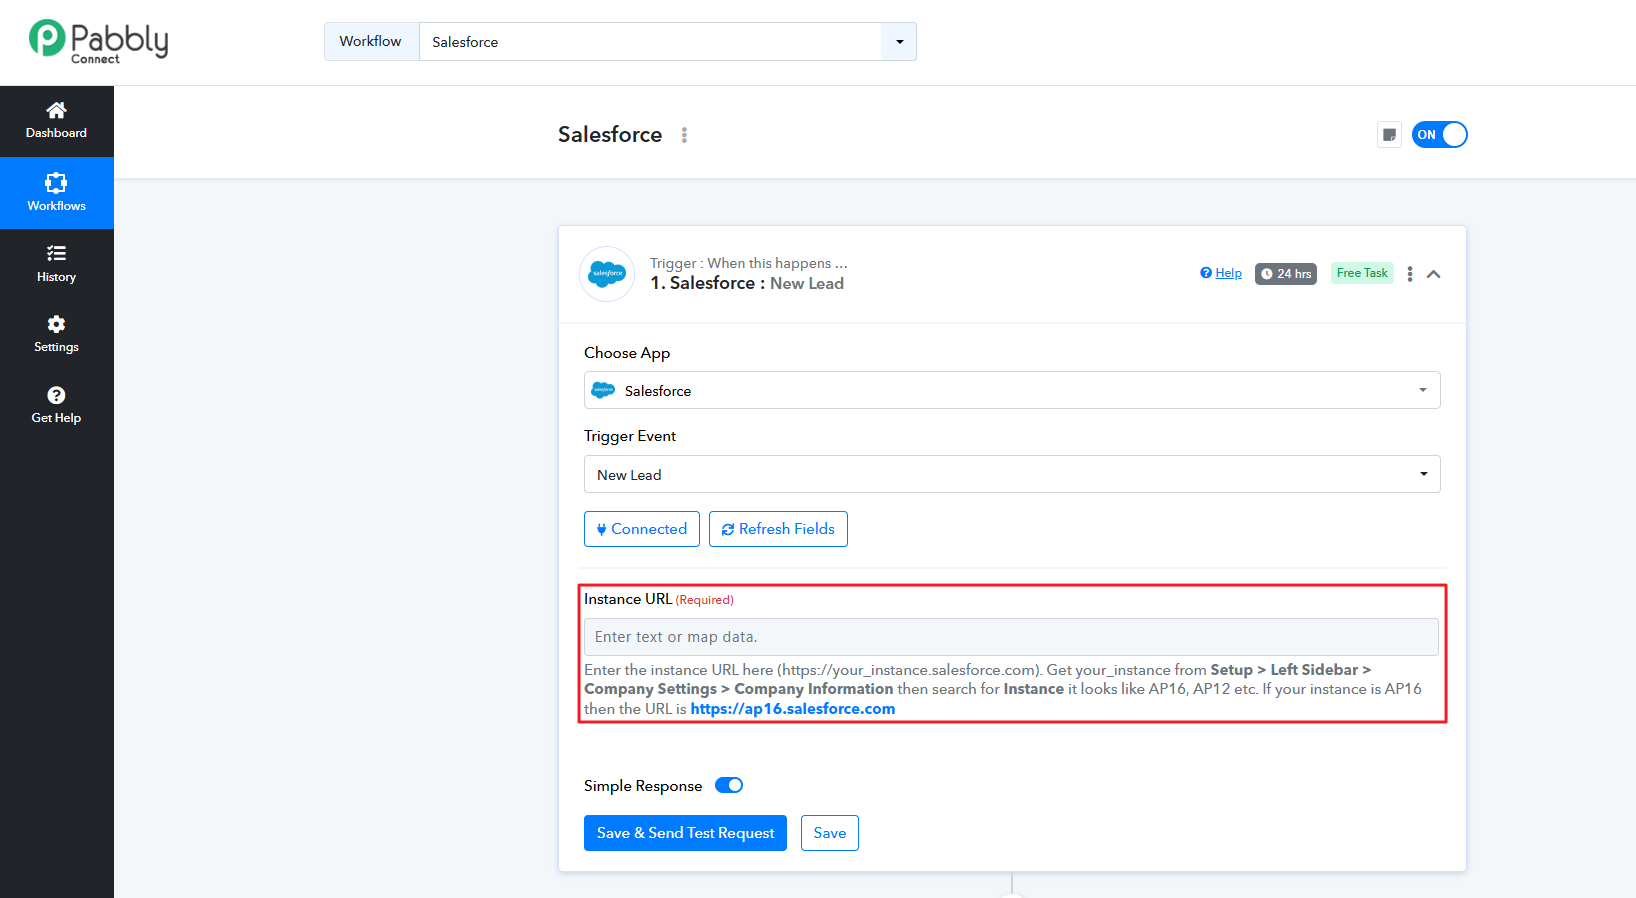
Now, you need to copy the Instance Code from Salesforce and then paste it here under Instance URL.
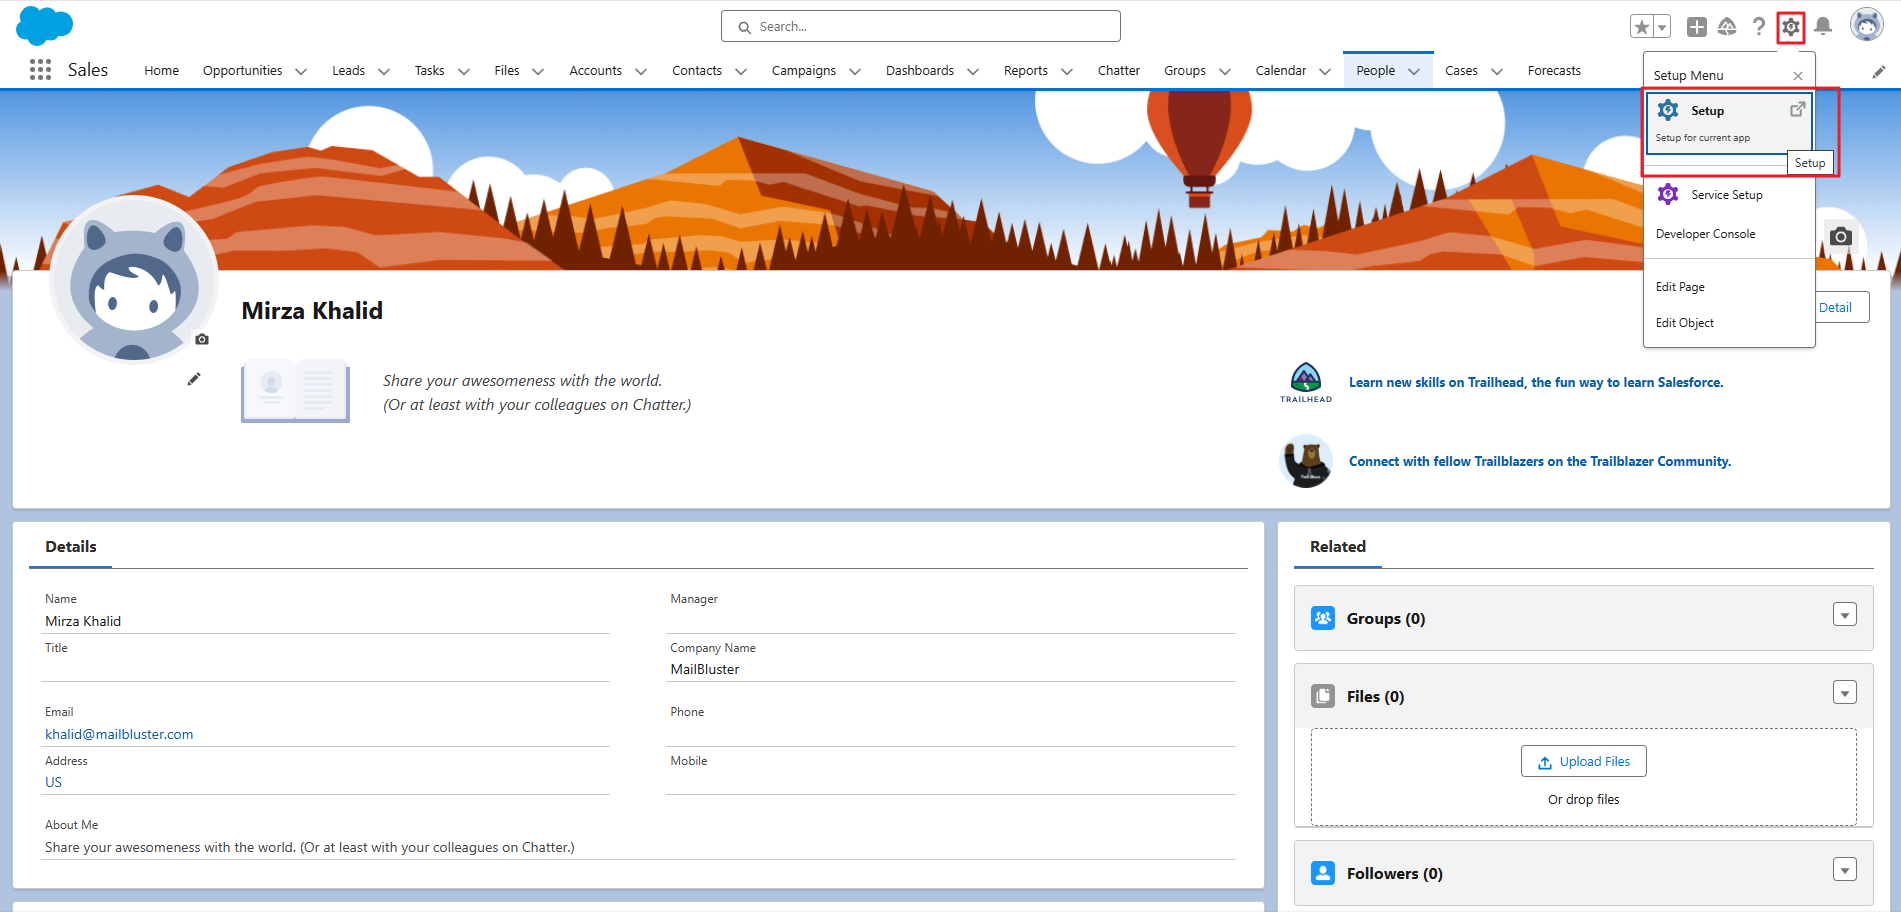
Go to Salesforce and click on the Setup icon and then on the dropdown list, click on Setup for current app.
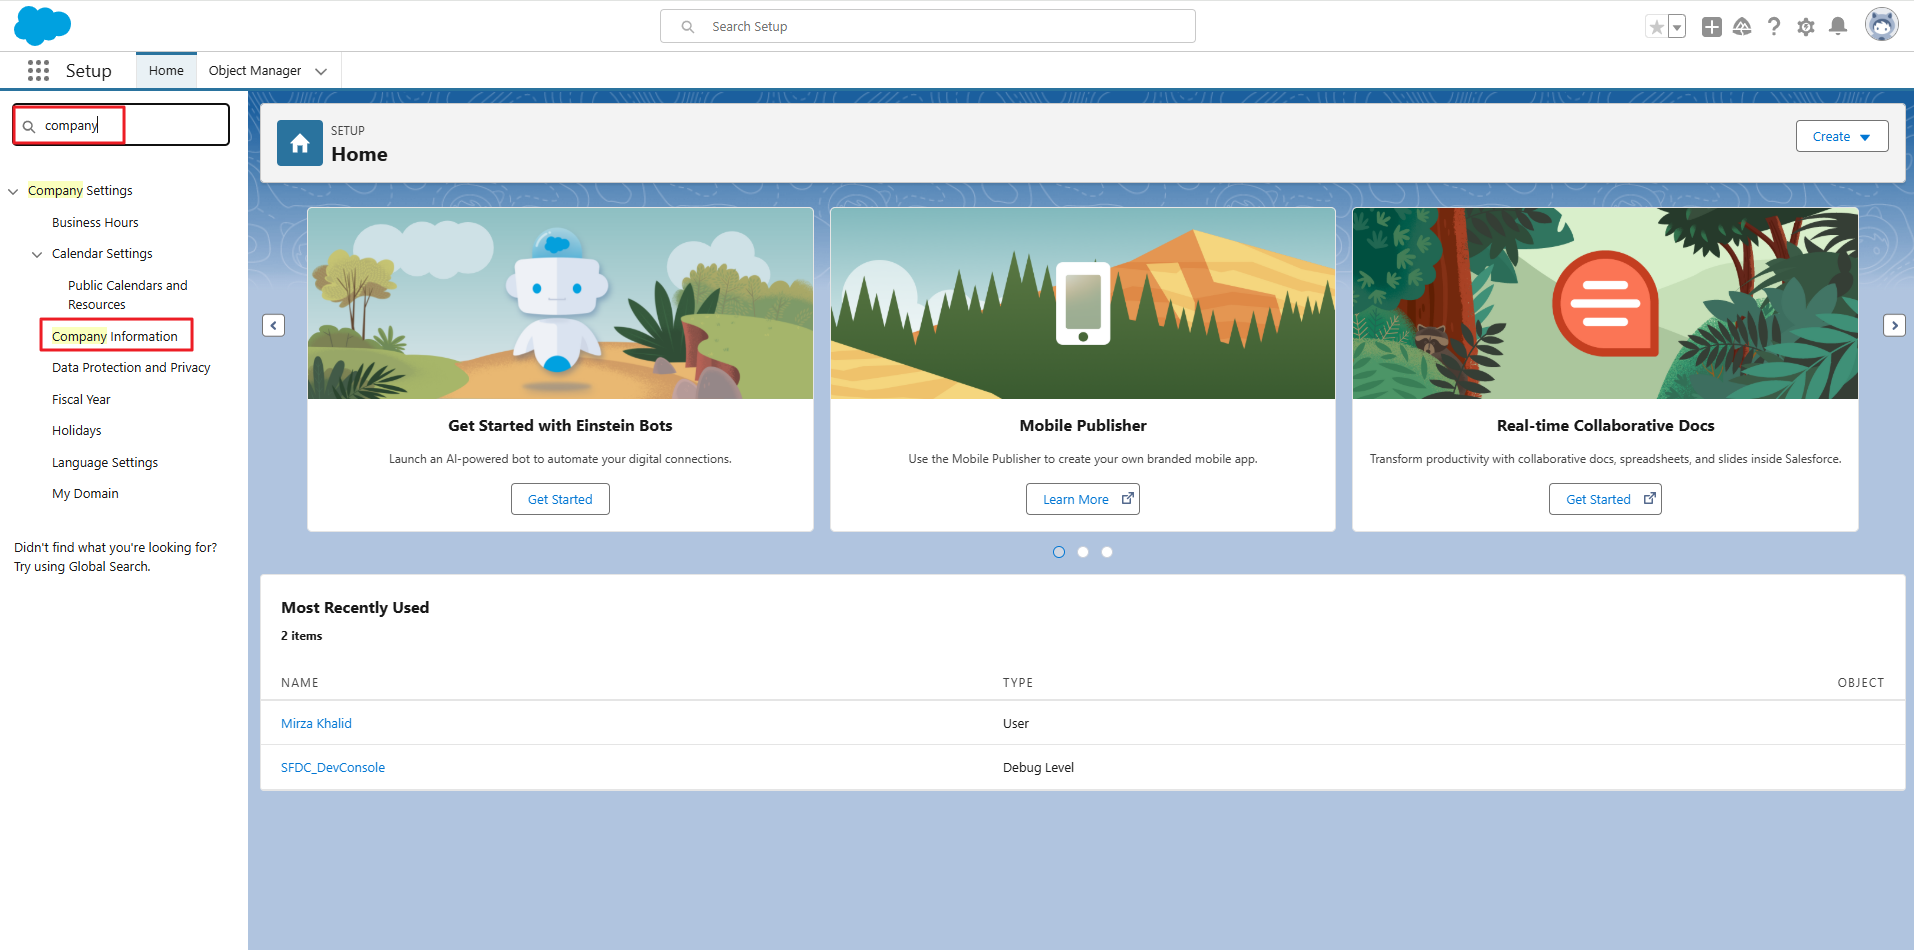
Type ‘company’ under search bar and click Company Information.
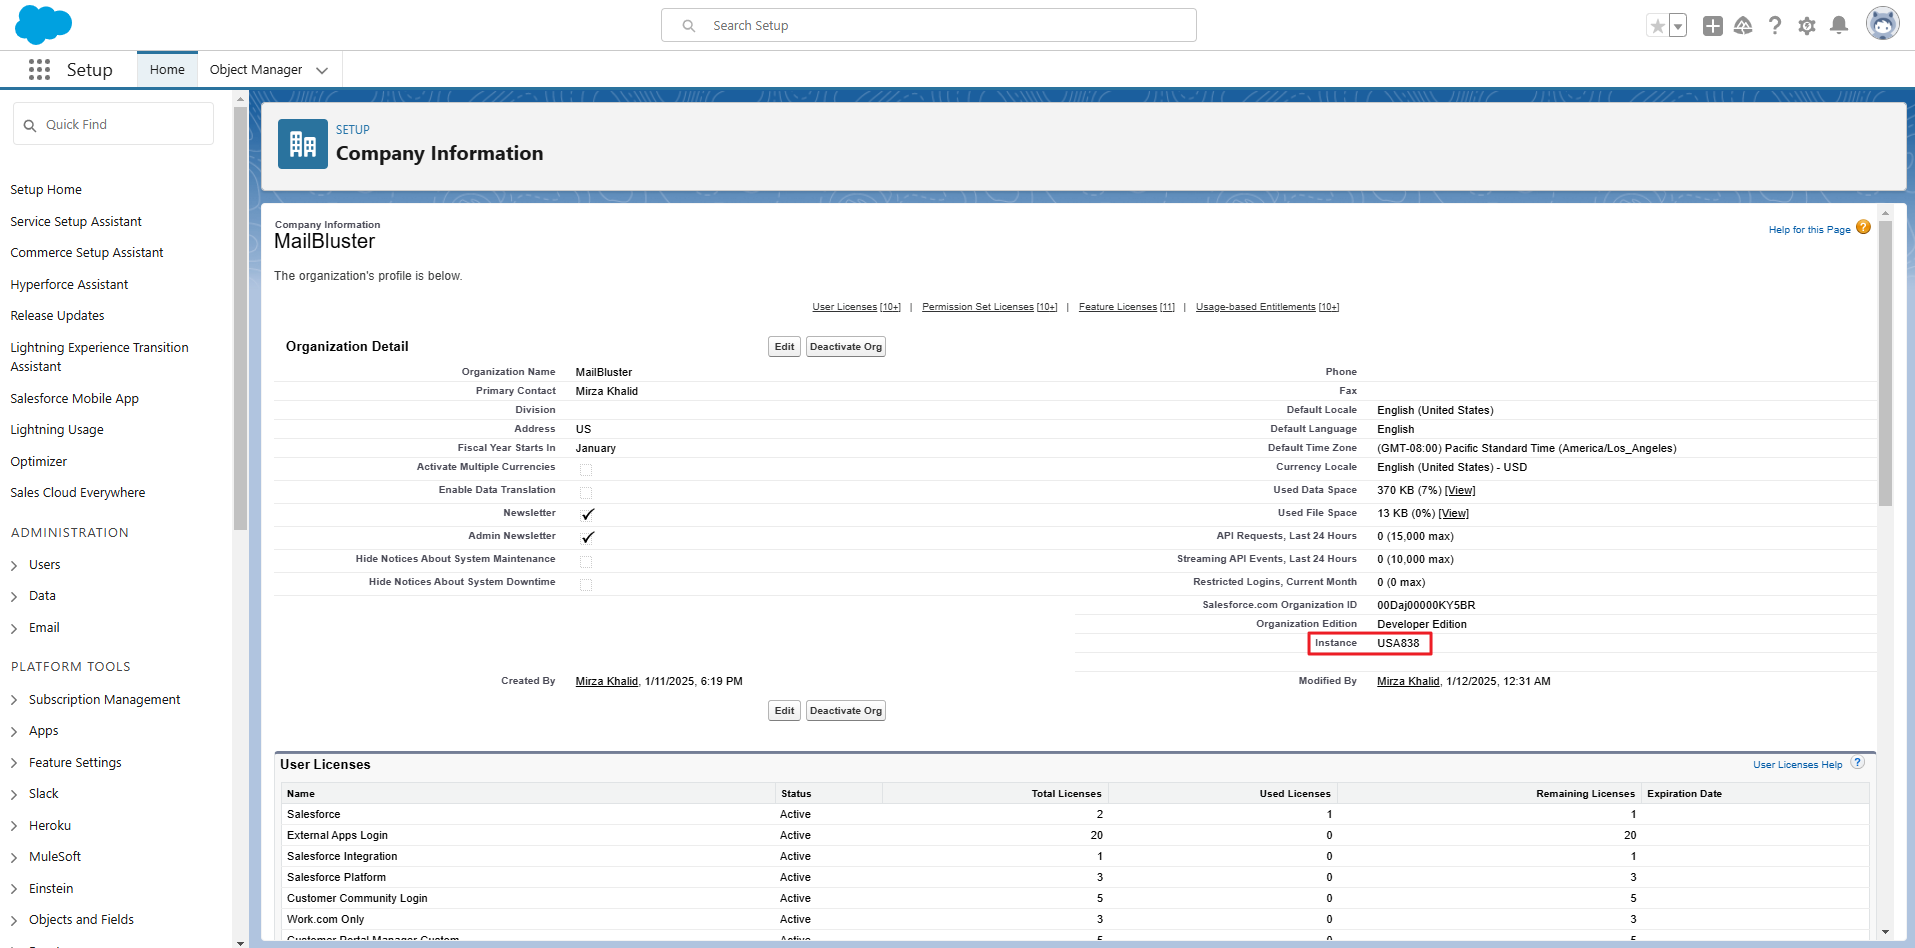
Inside the Company Information, you will find the Instance code.
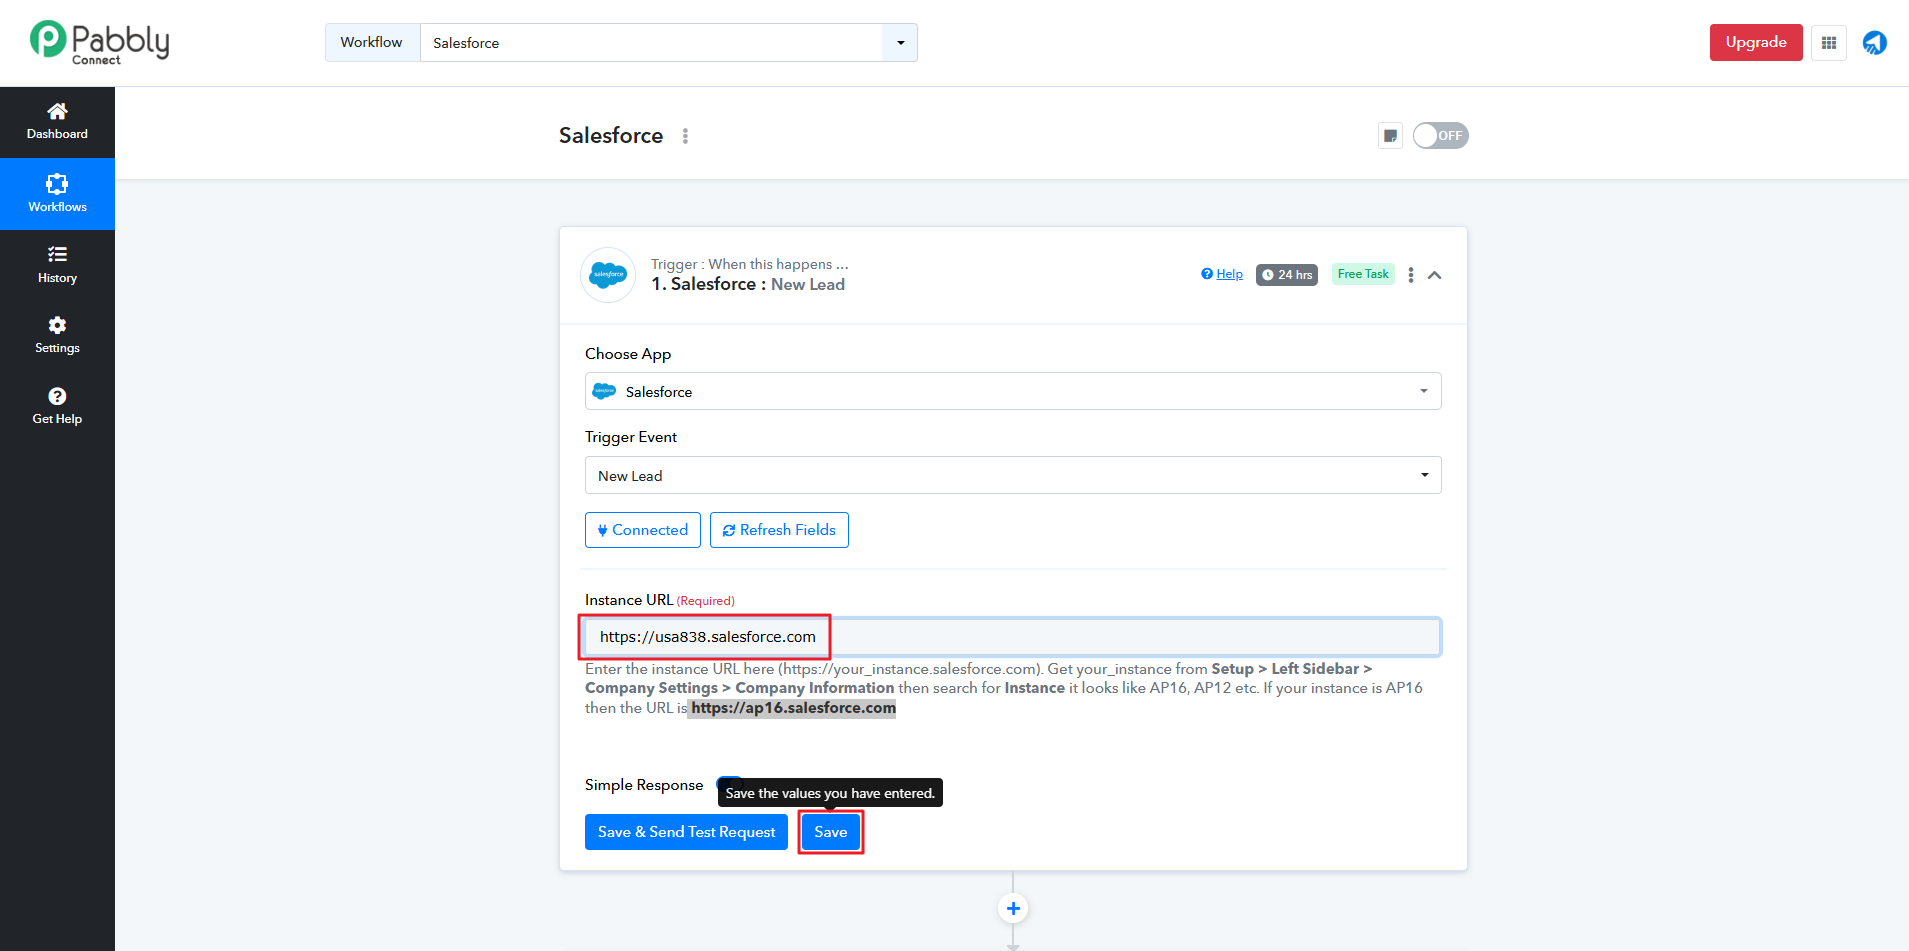
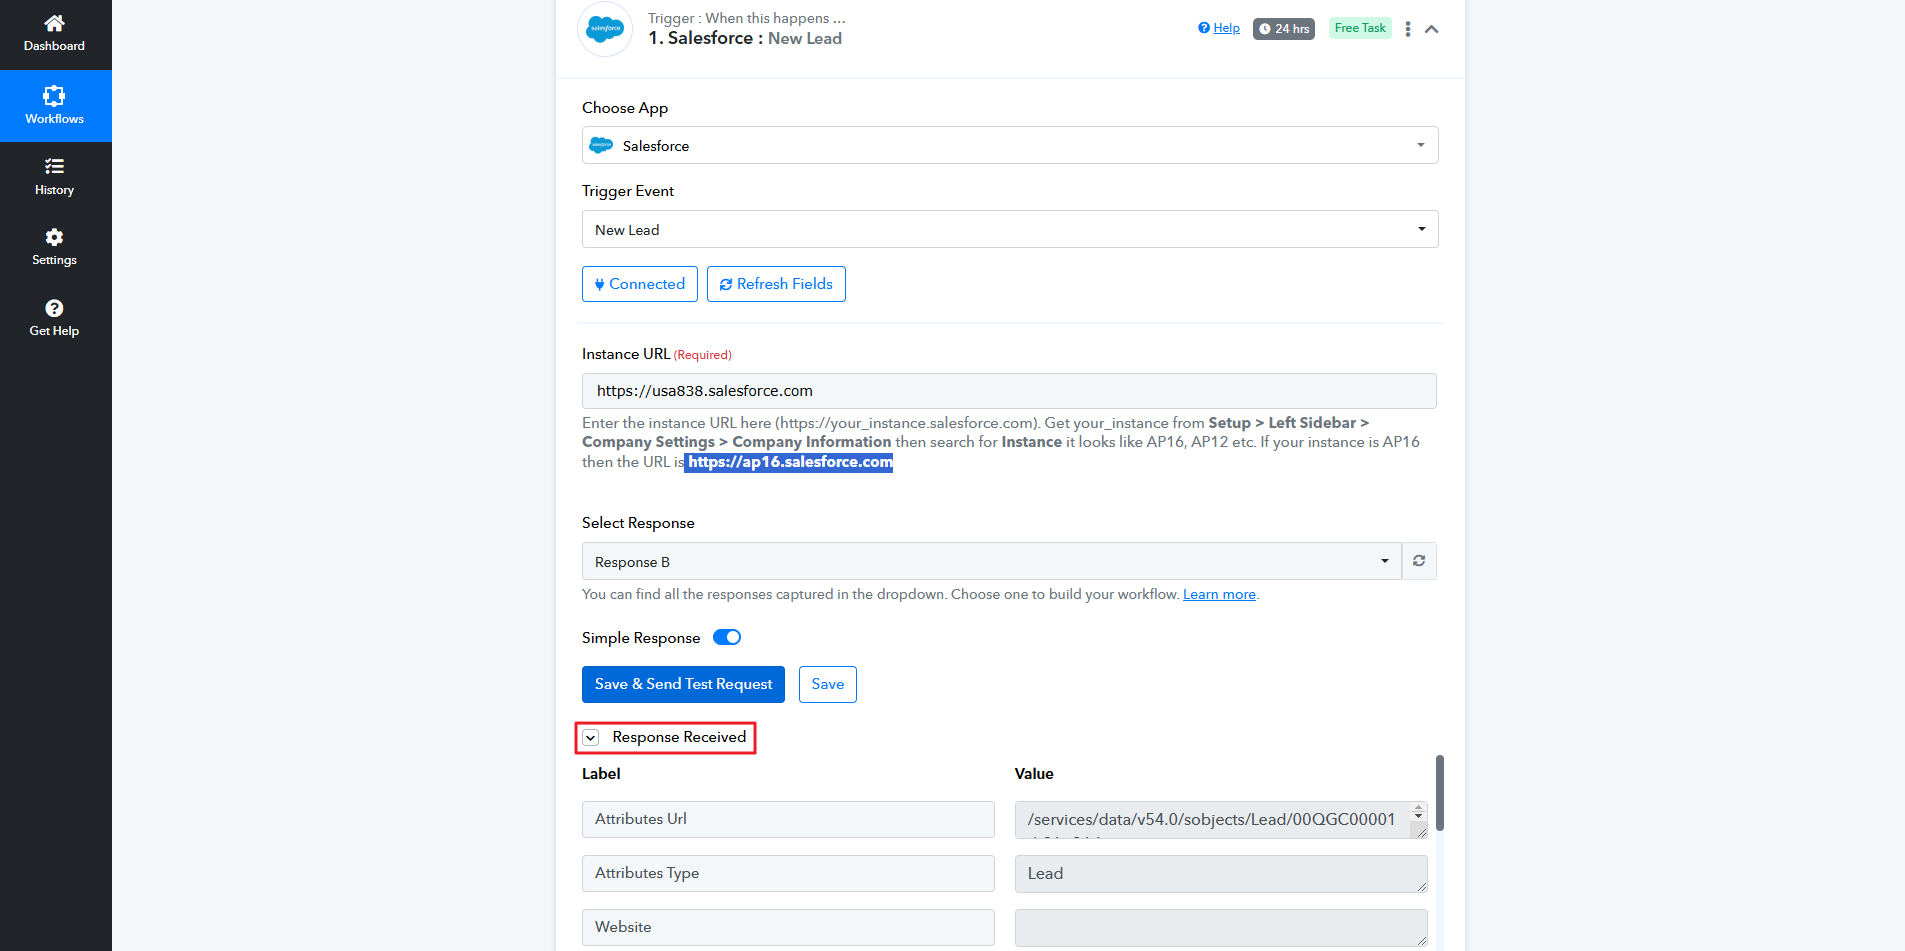
Now, go to Pabbly and paste the ‘Instance value’ inside Instance URL field in this format https://code.salesforce.com as shown below. Then click Save.
Type in Save & Send Test Request.
You will notice a Response Received from Salesforce.
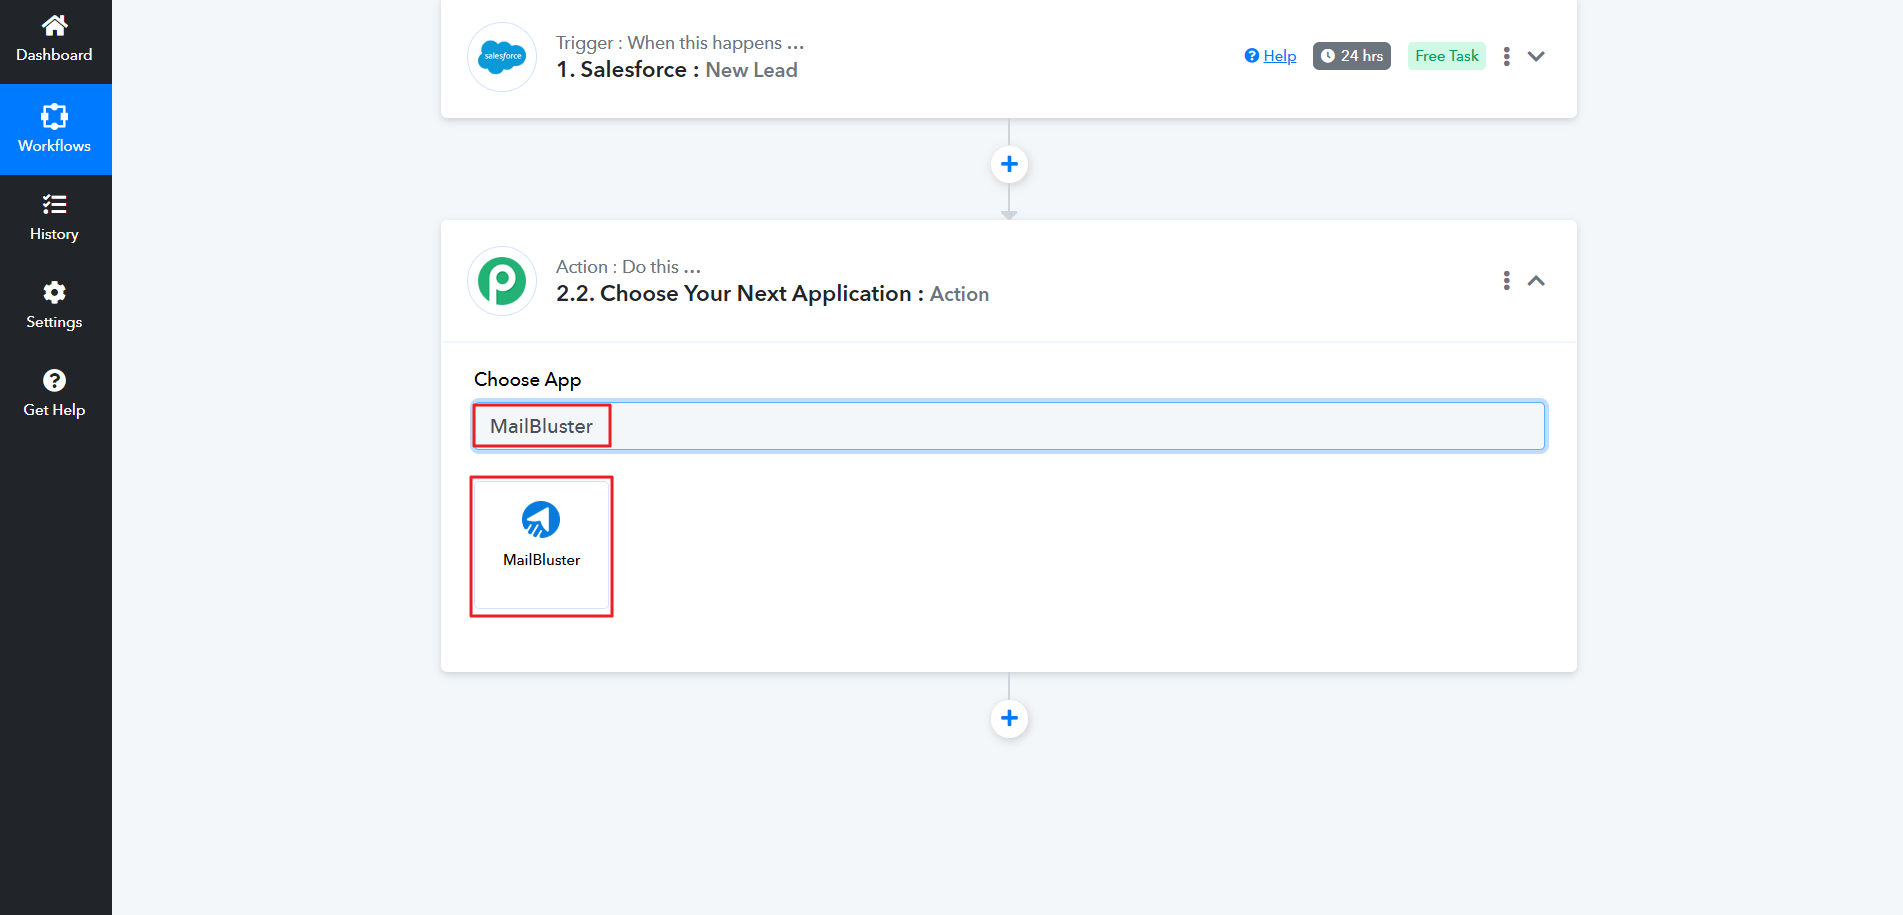
Now, it’s time to connect MailBluster with Pabbly. Pabbly requires API key from MailBluster to connect. So, type ‘MailBluster’ under Choose App and select MailBluster as shown below.
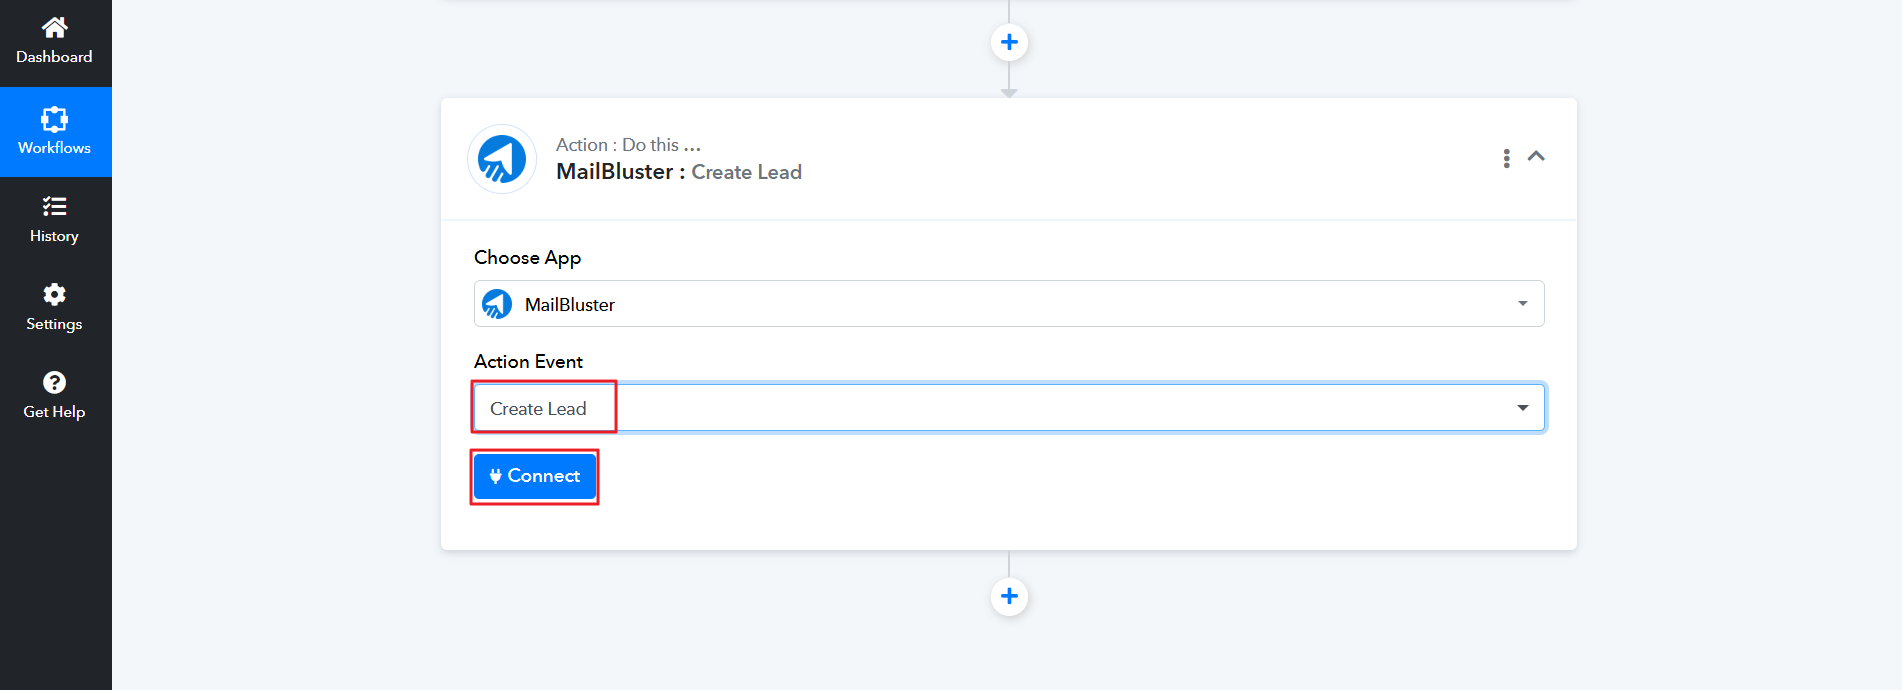
Now, select Create Lead from the dropdown list of Action Event as shown below. Then click Connect button.
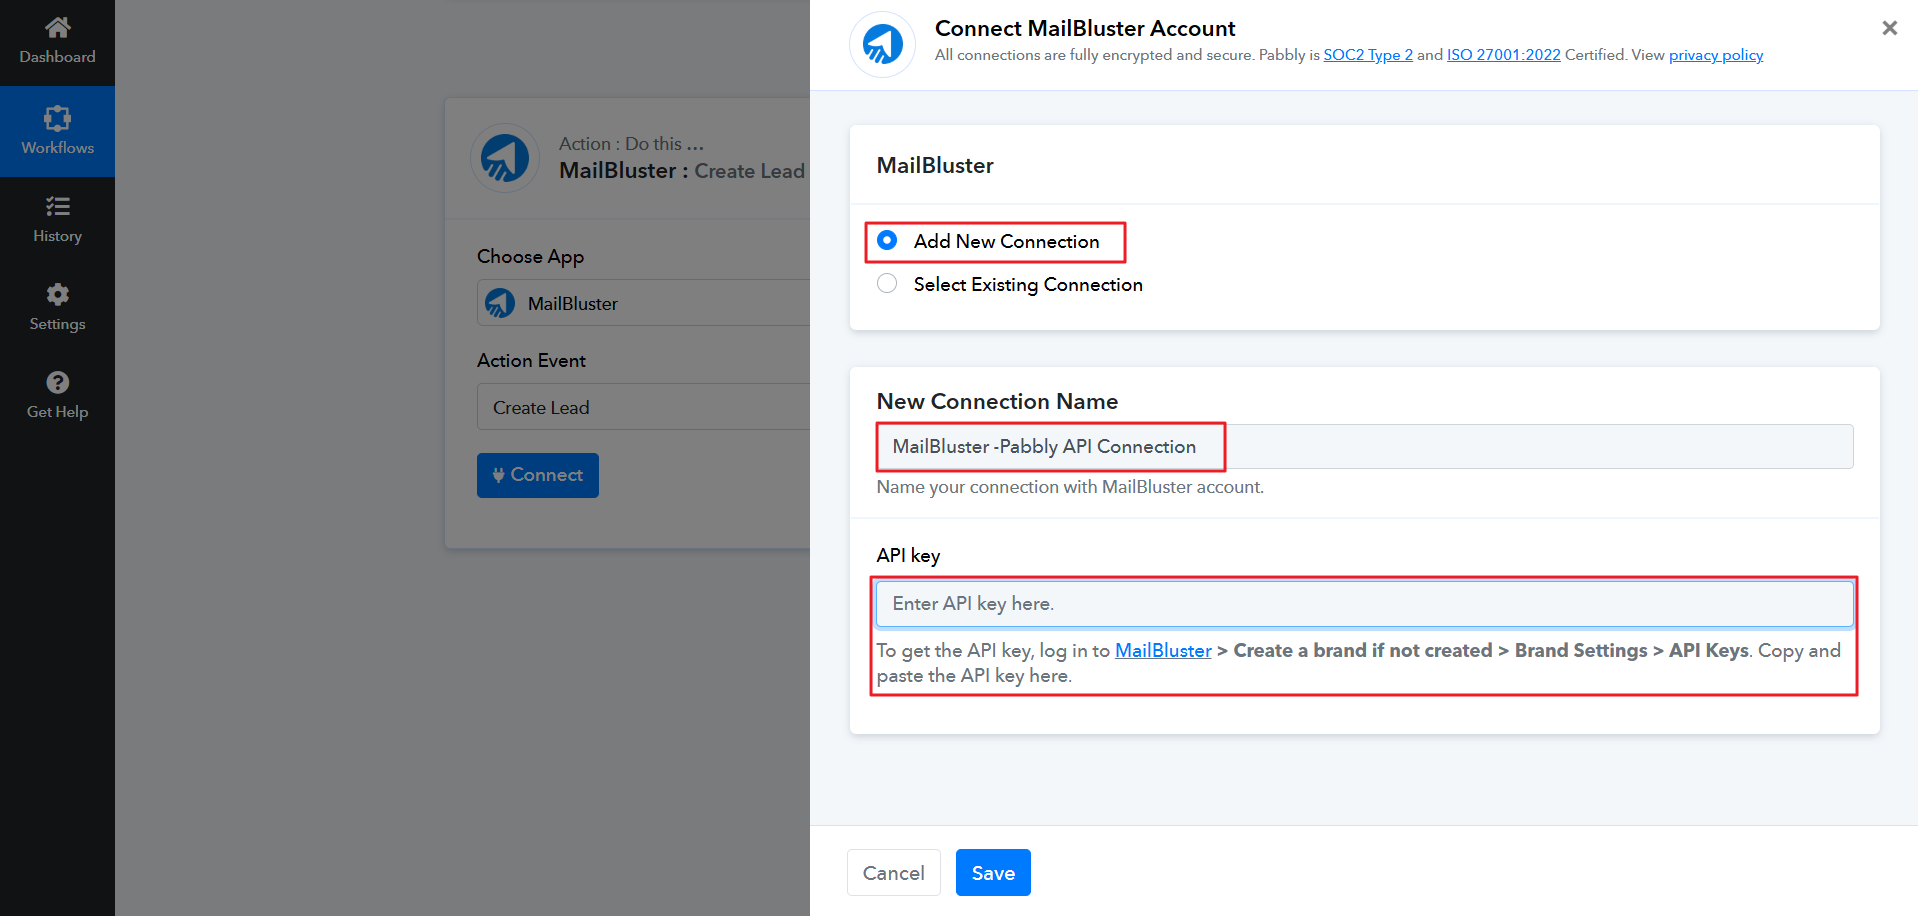
After clicking Connect, a window will popup. Select Add New Connection, write down New Connection Name. You will notice it wants an API key of MailBluster in the API key field. You need to generate the API key from MailBluster itself and paste it here.
Sign in to your Brand in MailBluster. Then go to Settings > API Keys. Then click Create new.
Enter the API key name and click Create API key.
Copy the API key value from MailBluster.
And paste it on Pabbly Connect API key.
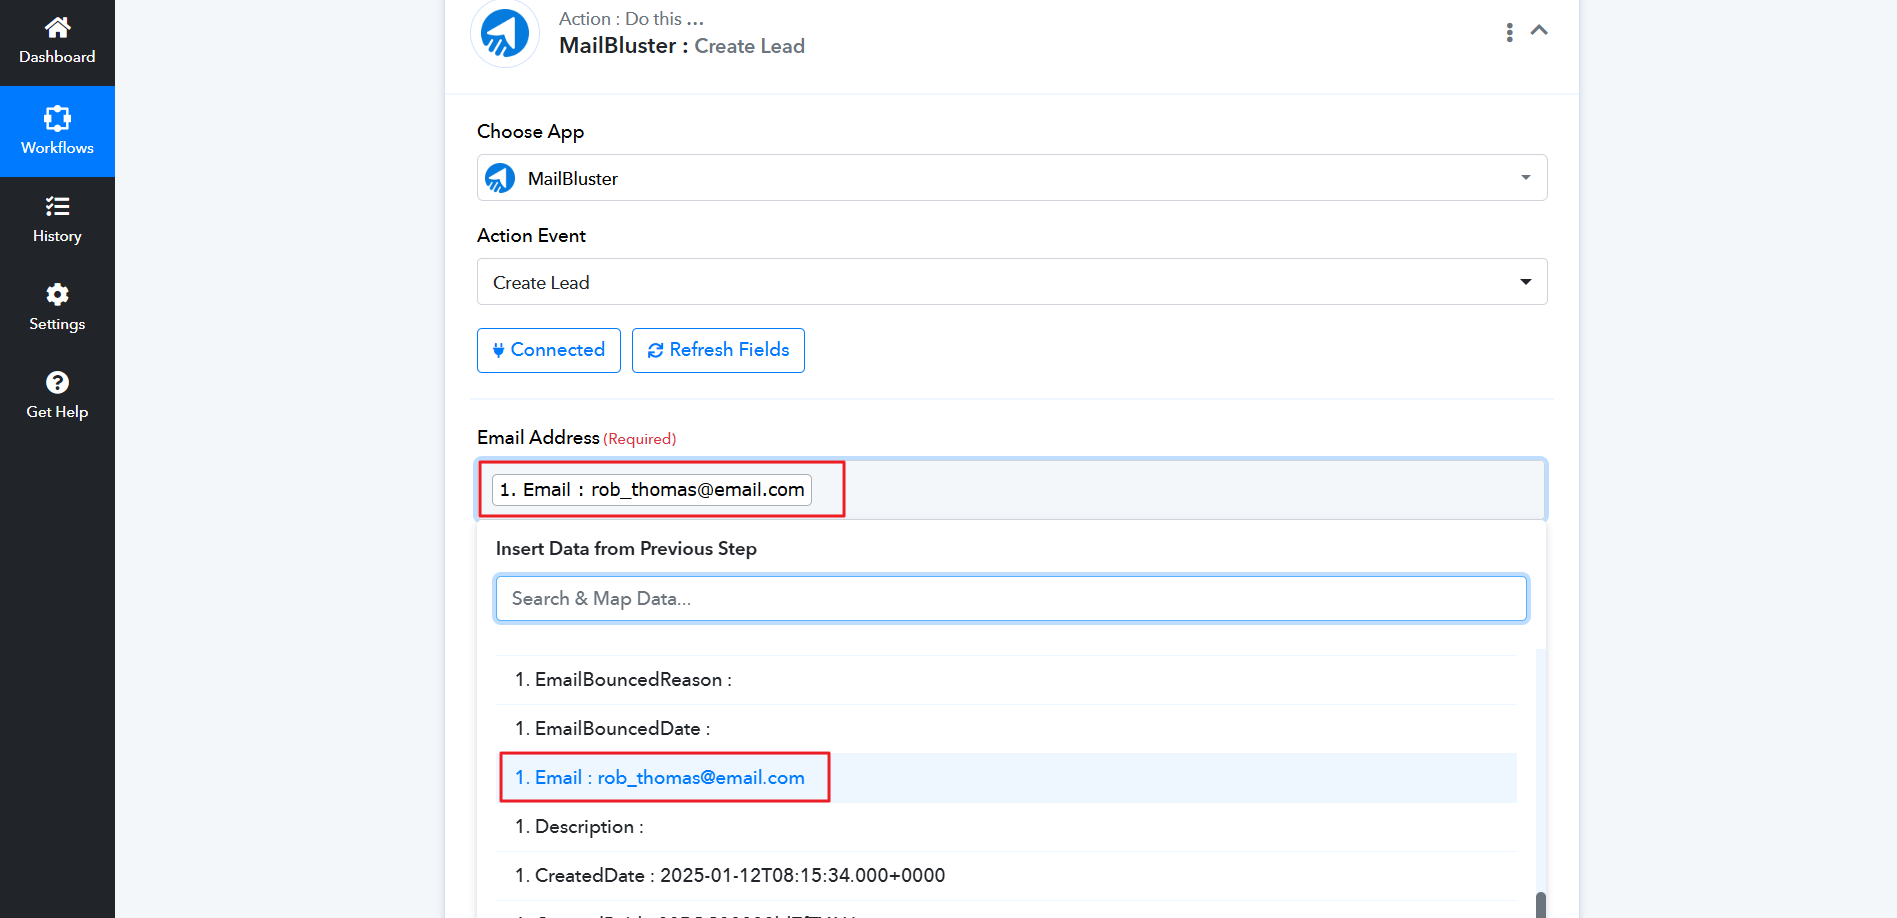
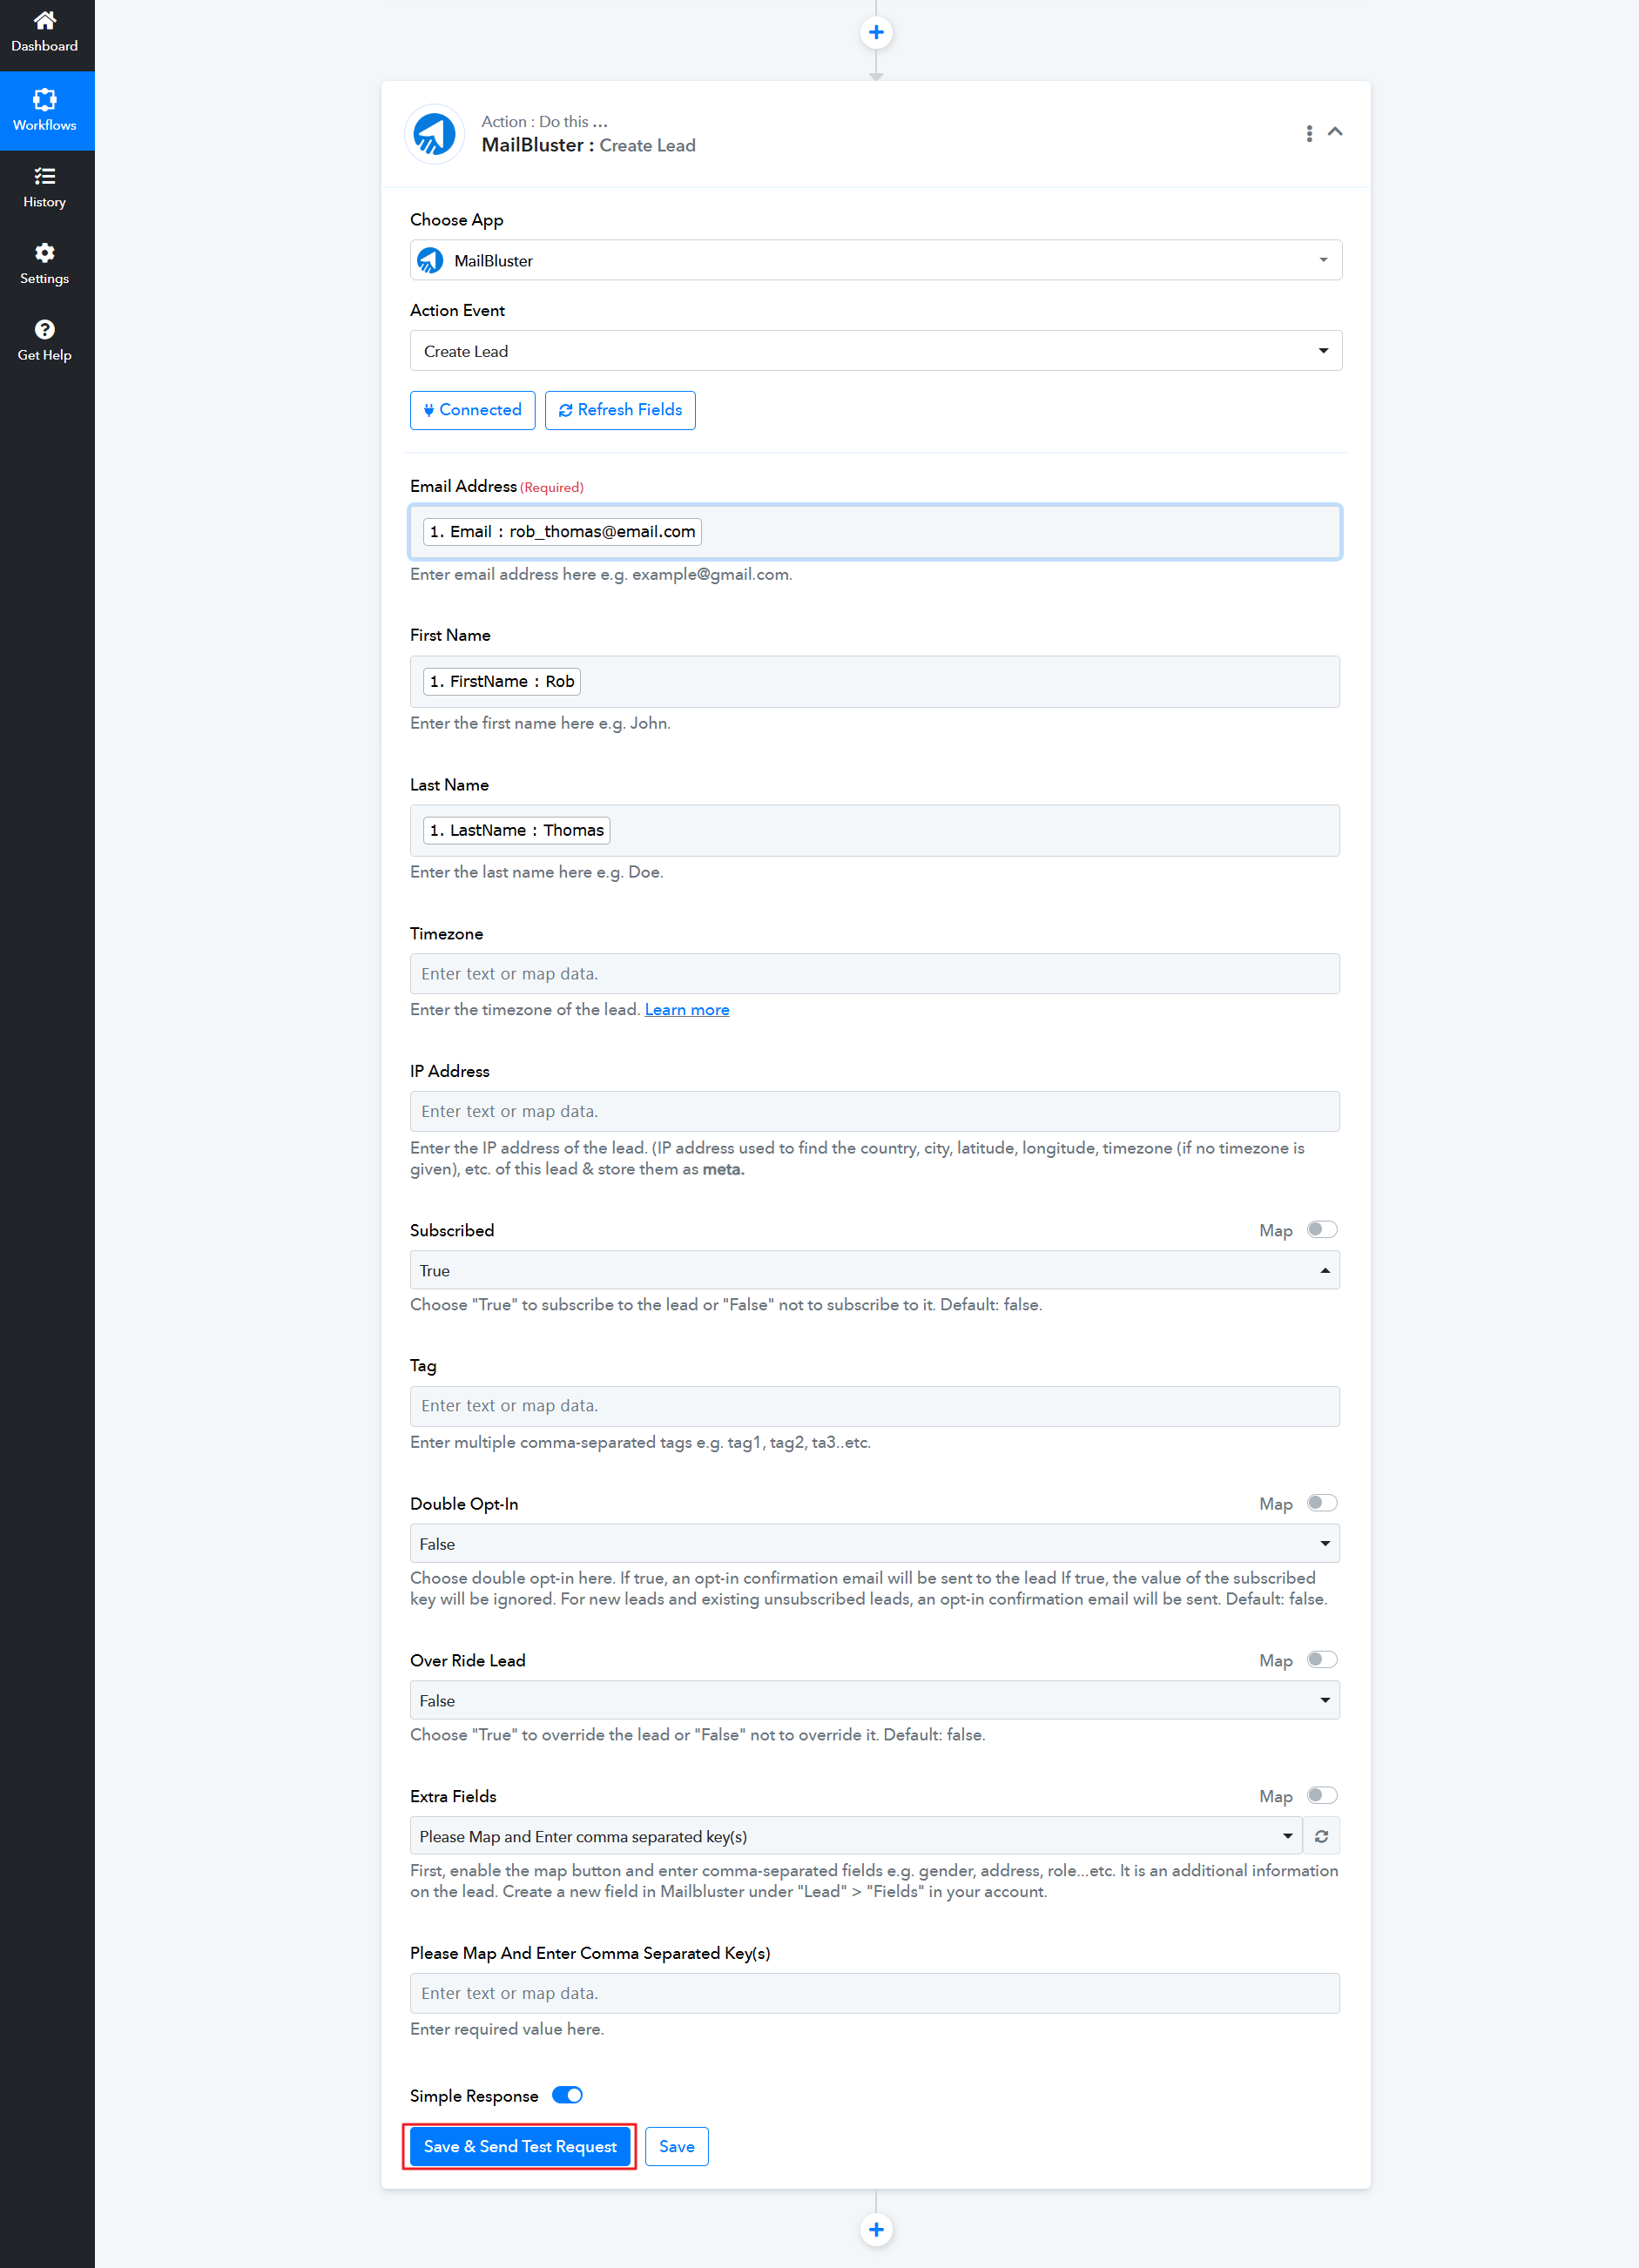
After connecting to MailBluster, add Email address as shown below.
Then add First Name and Last Name on Insert Data from Previous Step. Then click Save & Send Test Request.
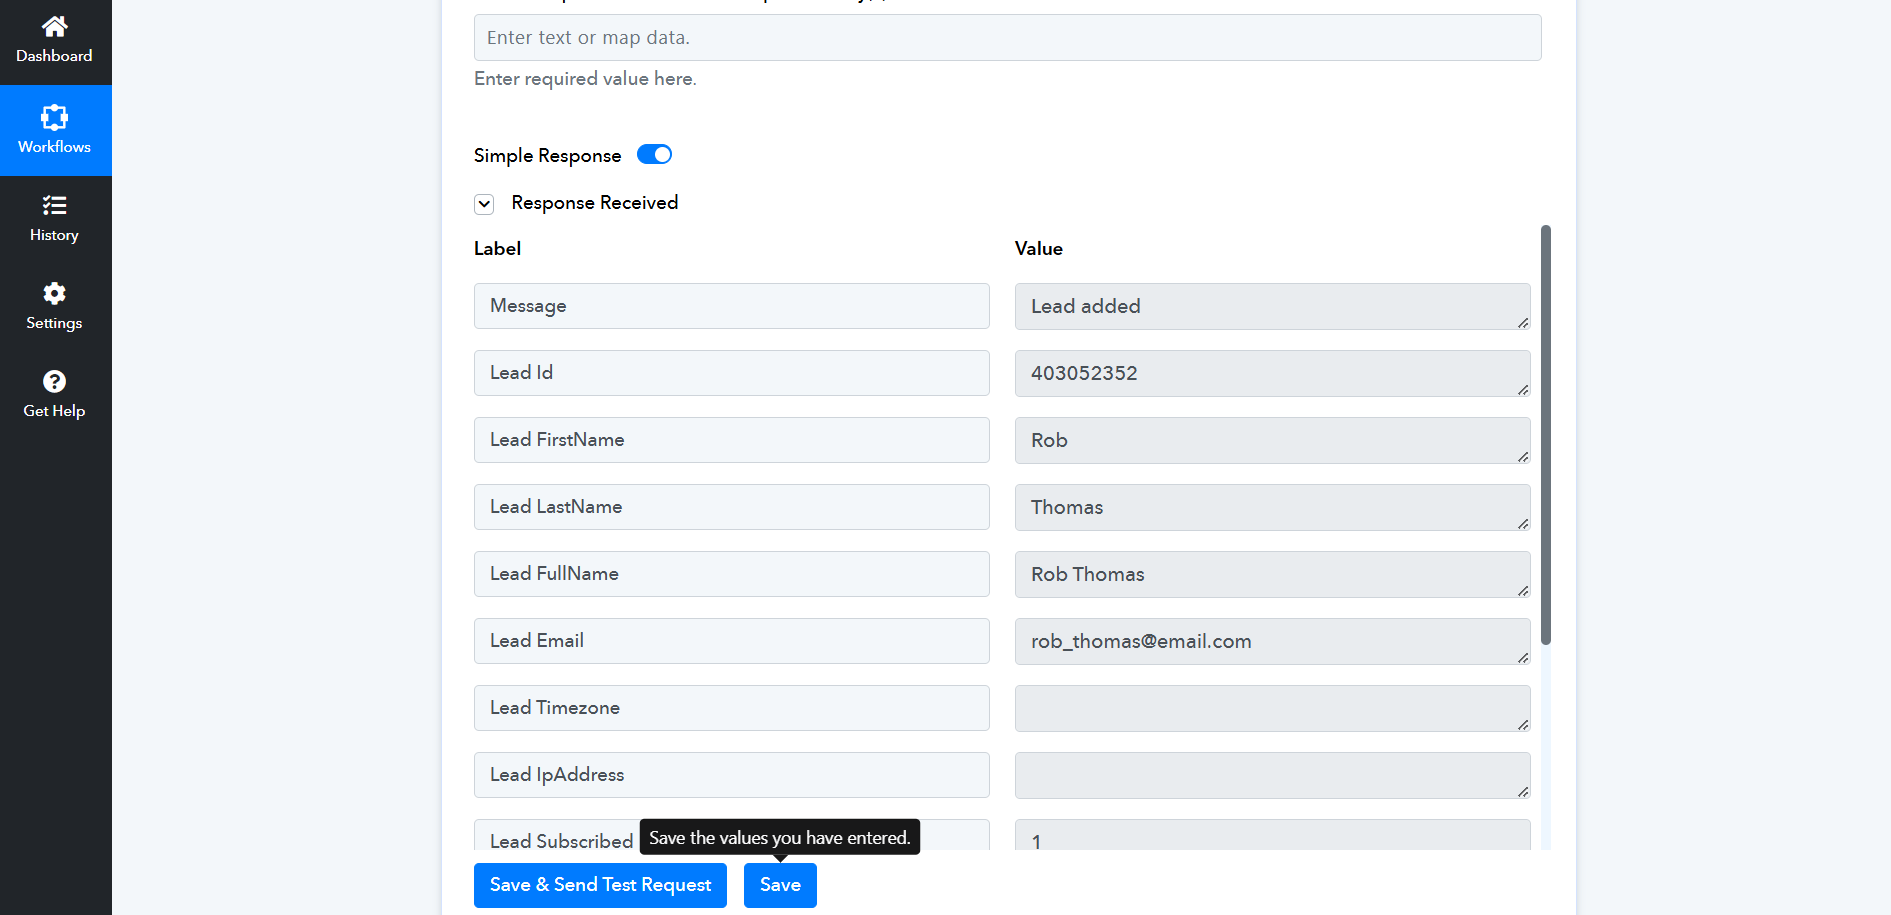
You will notice the Lead added message in Response Received as shown below.
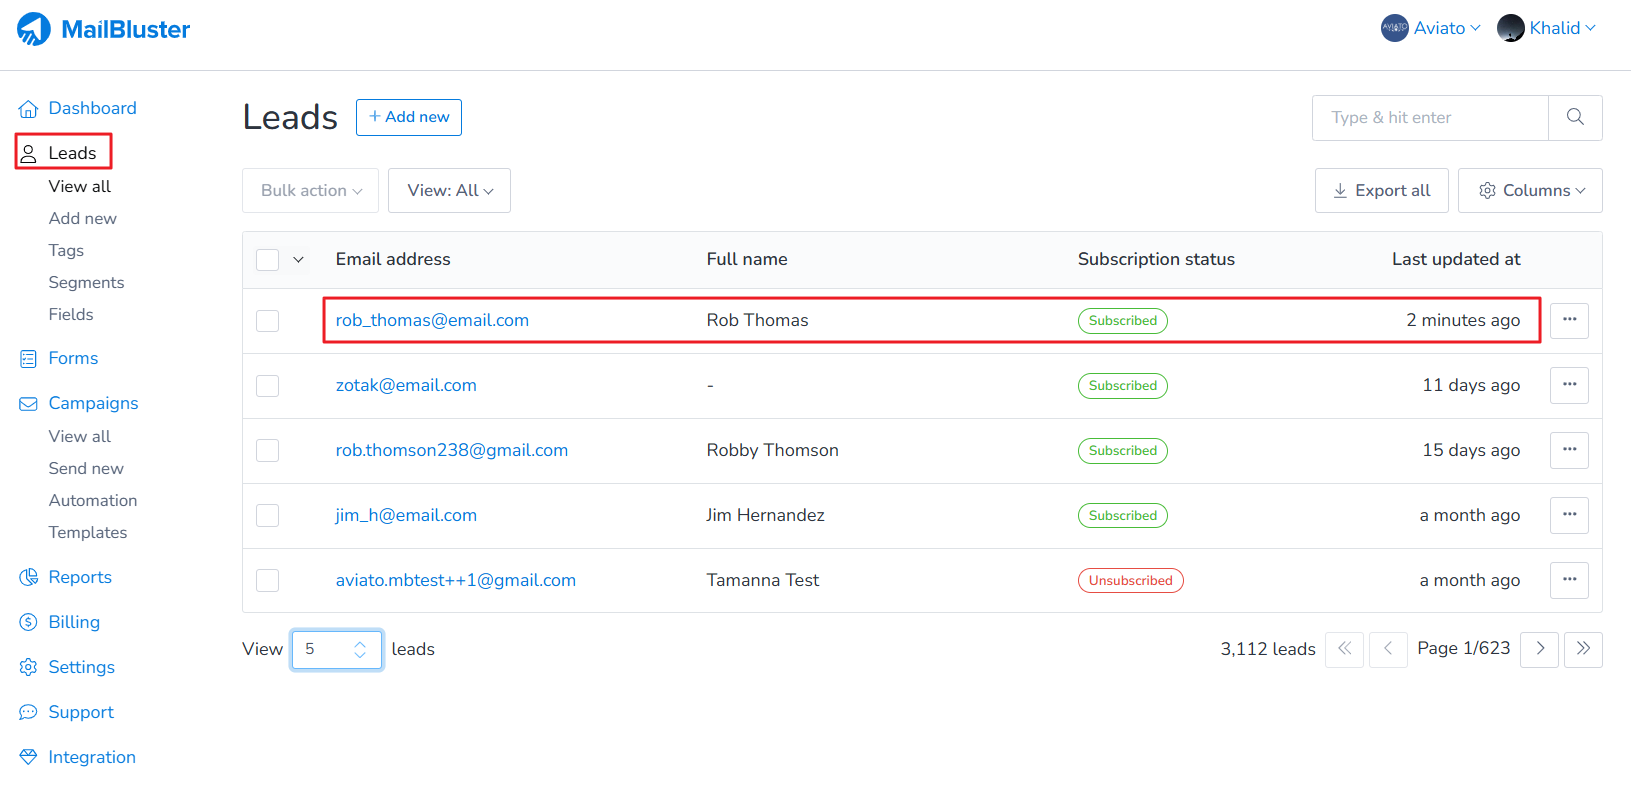
Check the lead in MailBluster > Brand > Leads.
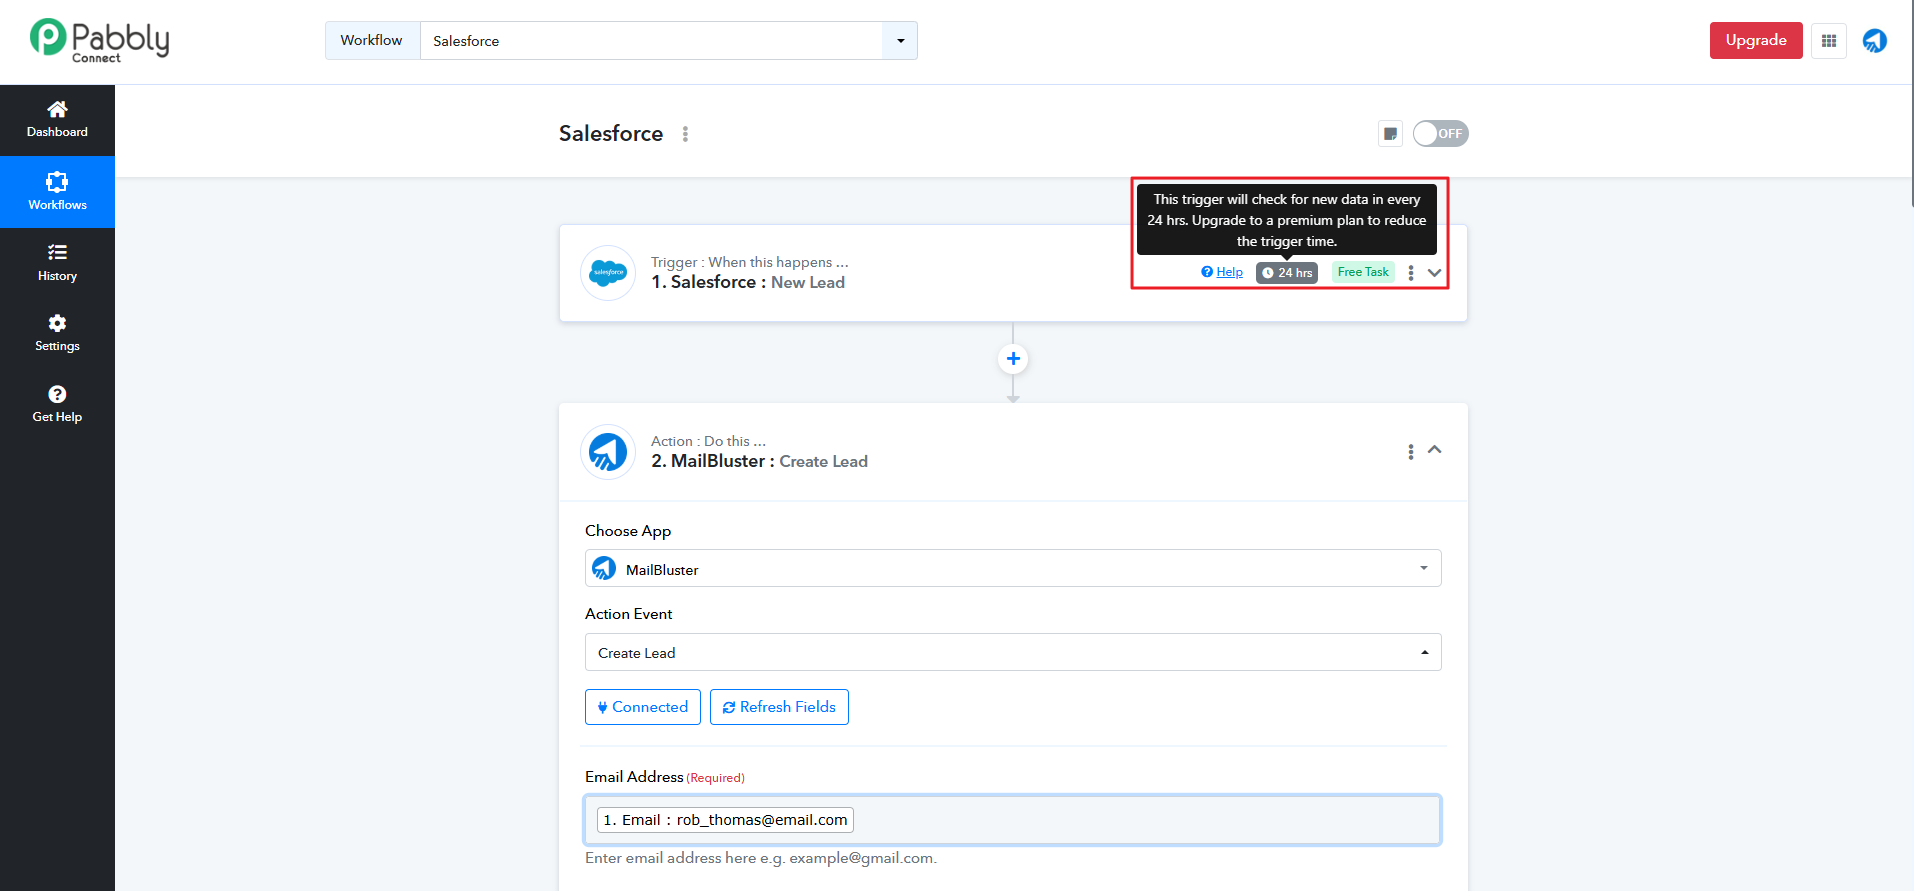
Please note, that Pabbly adds new leads from Salesforce every 24 hours. To add leads instantly, you will need to upgrade to their Premium plan of Pabbly.
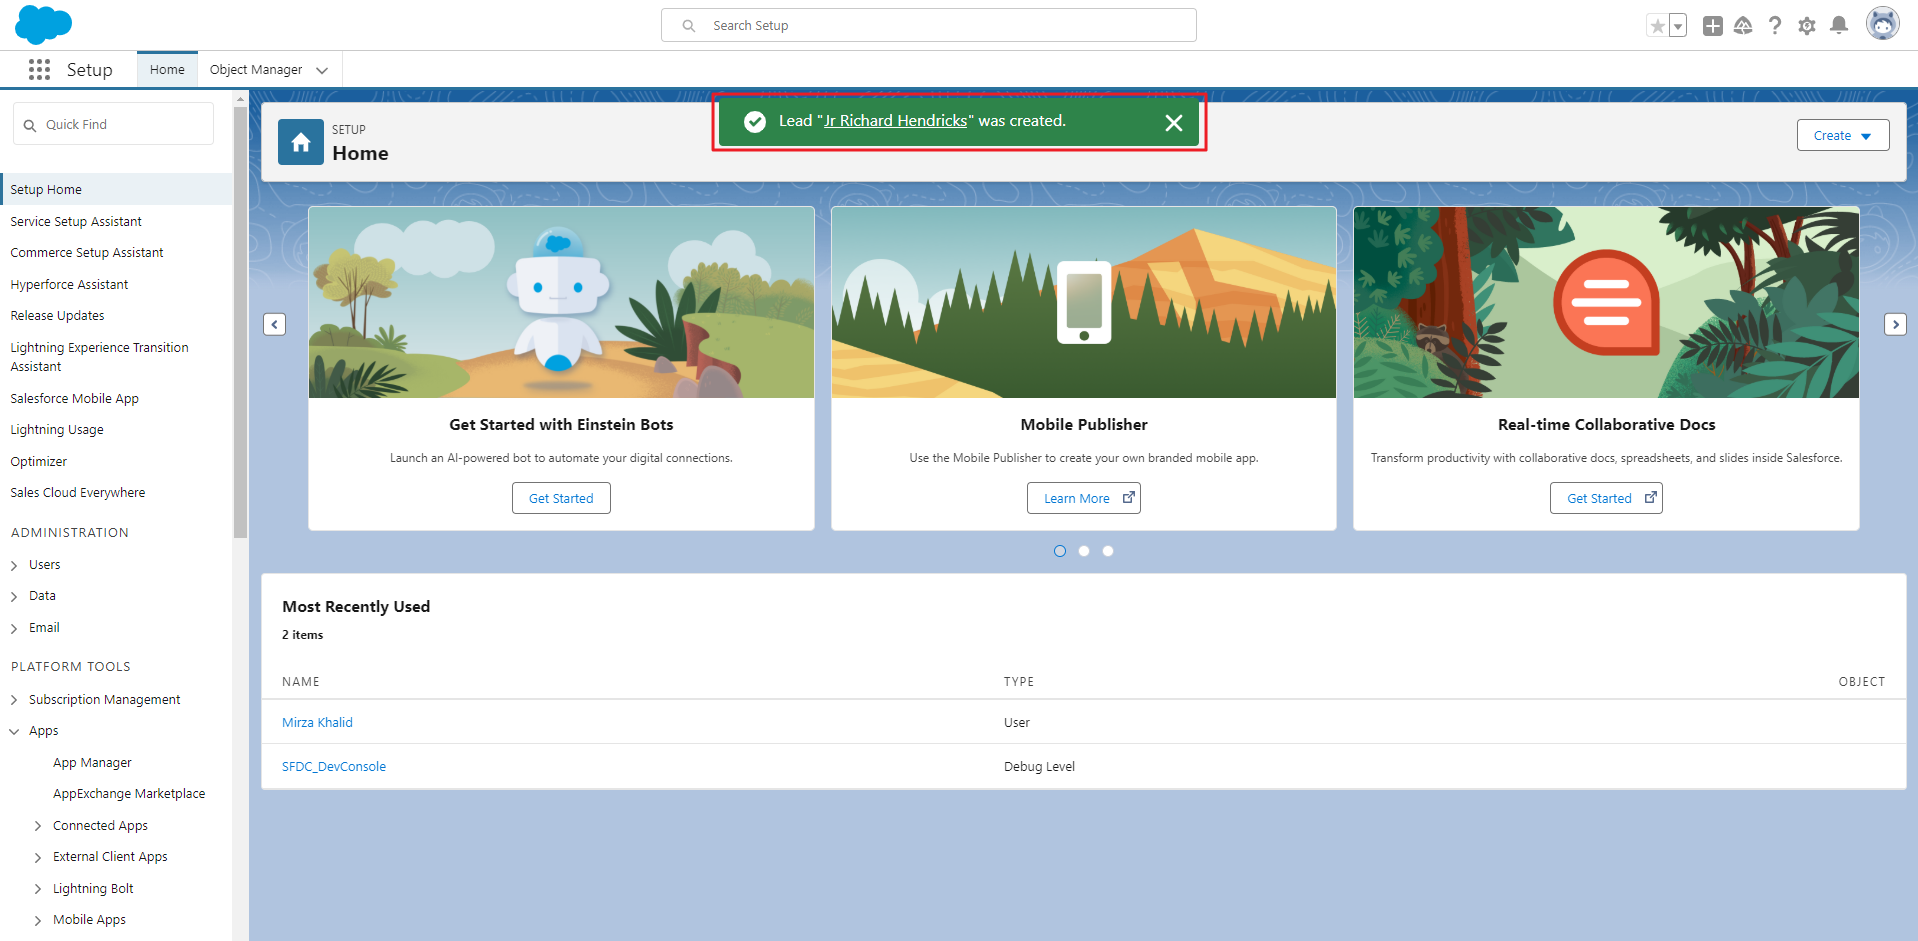
Now, it’s time to check the integrity of the integration by adding a single lead in Salesforce.
To check, go to Salesforce, click the ‘+‘ icon, then select New Lead.
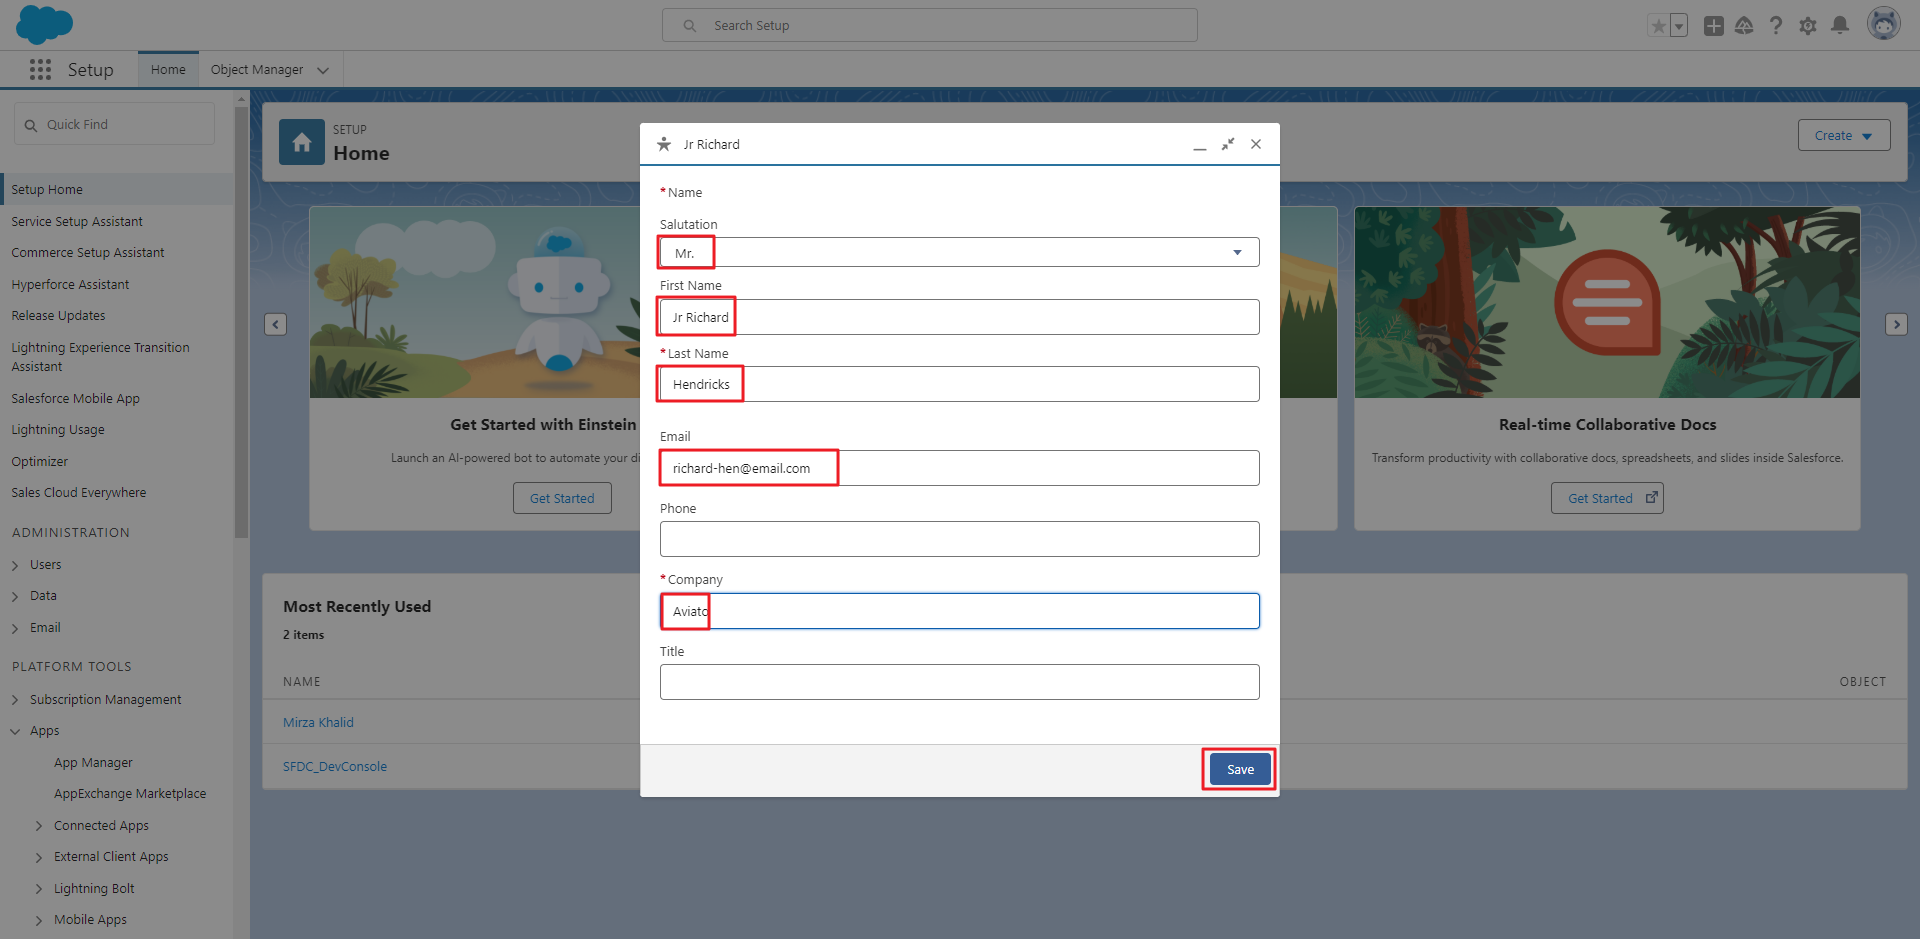
Fill out the form with ‘First Name‘, ‘Last Name‘ including the ‘Email‘ field and ‘Company‘, then click Save button and a confirmation message “Lead was created” will appear, indicating the lead has been added.
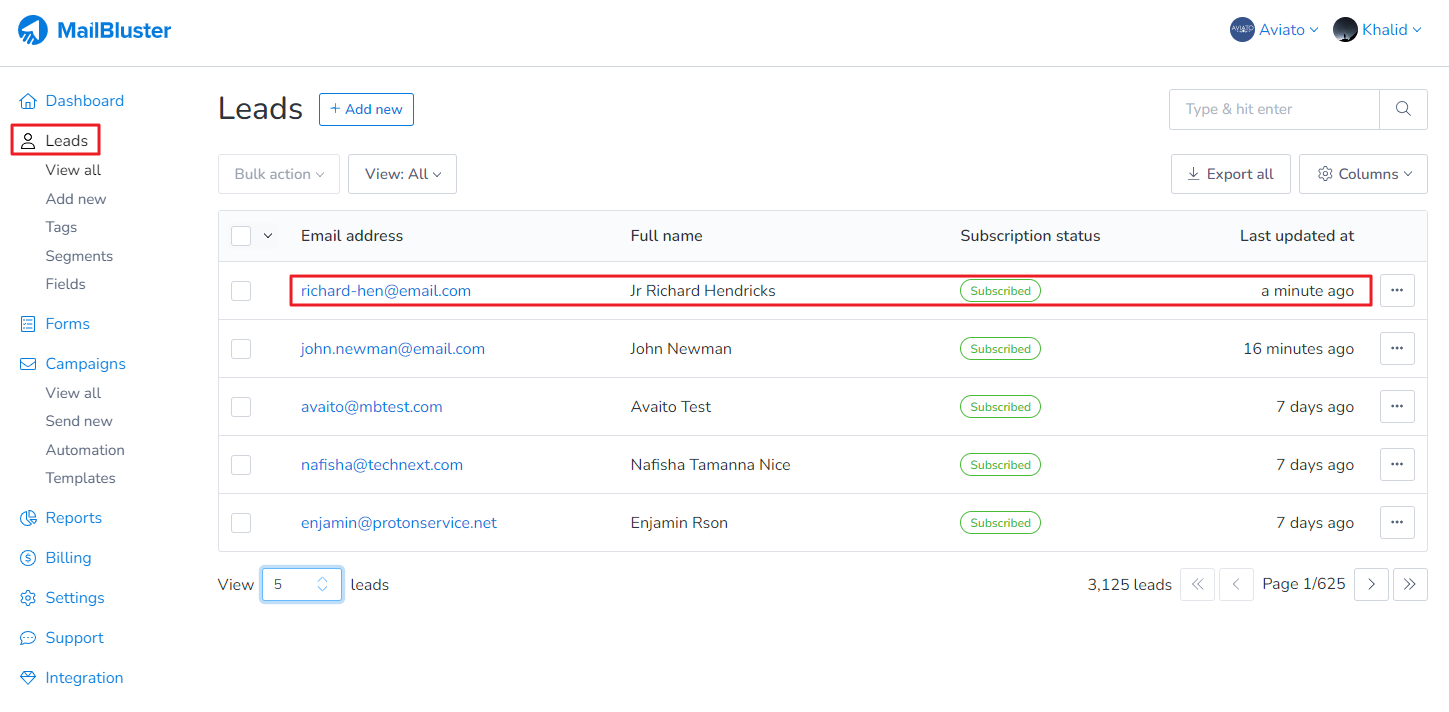
Now, you need to wait up to 24 hours for the lead to be added to MailBluster. Once the waiting period is over, check to confirm if the lead has been successfully added. Here we can see that the lead has been added to MailBluster. You can check by going to your Brand > Leads.
Salesforce integration with MailBluster using Zoho enables seamless lead transfer and email marketing automation between the two platforms. Salesforce is a cloud-based Customer Relationship Management (CRM) platform that helps businesses manage customer interactions, sales, marketing, and support processes. It centralizes data, streamlines workflows, and provides tools for automation, analytics, and personalized customer engagement.
This guide demonstrates how to integrate MailBluster with Salesforce using the Salesforce Developer Website. We are also using a third party app called Zoho Flow to integrate leads from Salesforce to MailBluster. Zoho Flow process information more quickly than the previously discussed Pabbly.
So, let’s dive into the Zoho integration with Salesforce right away first.
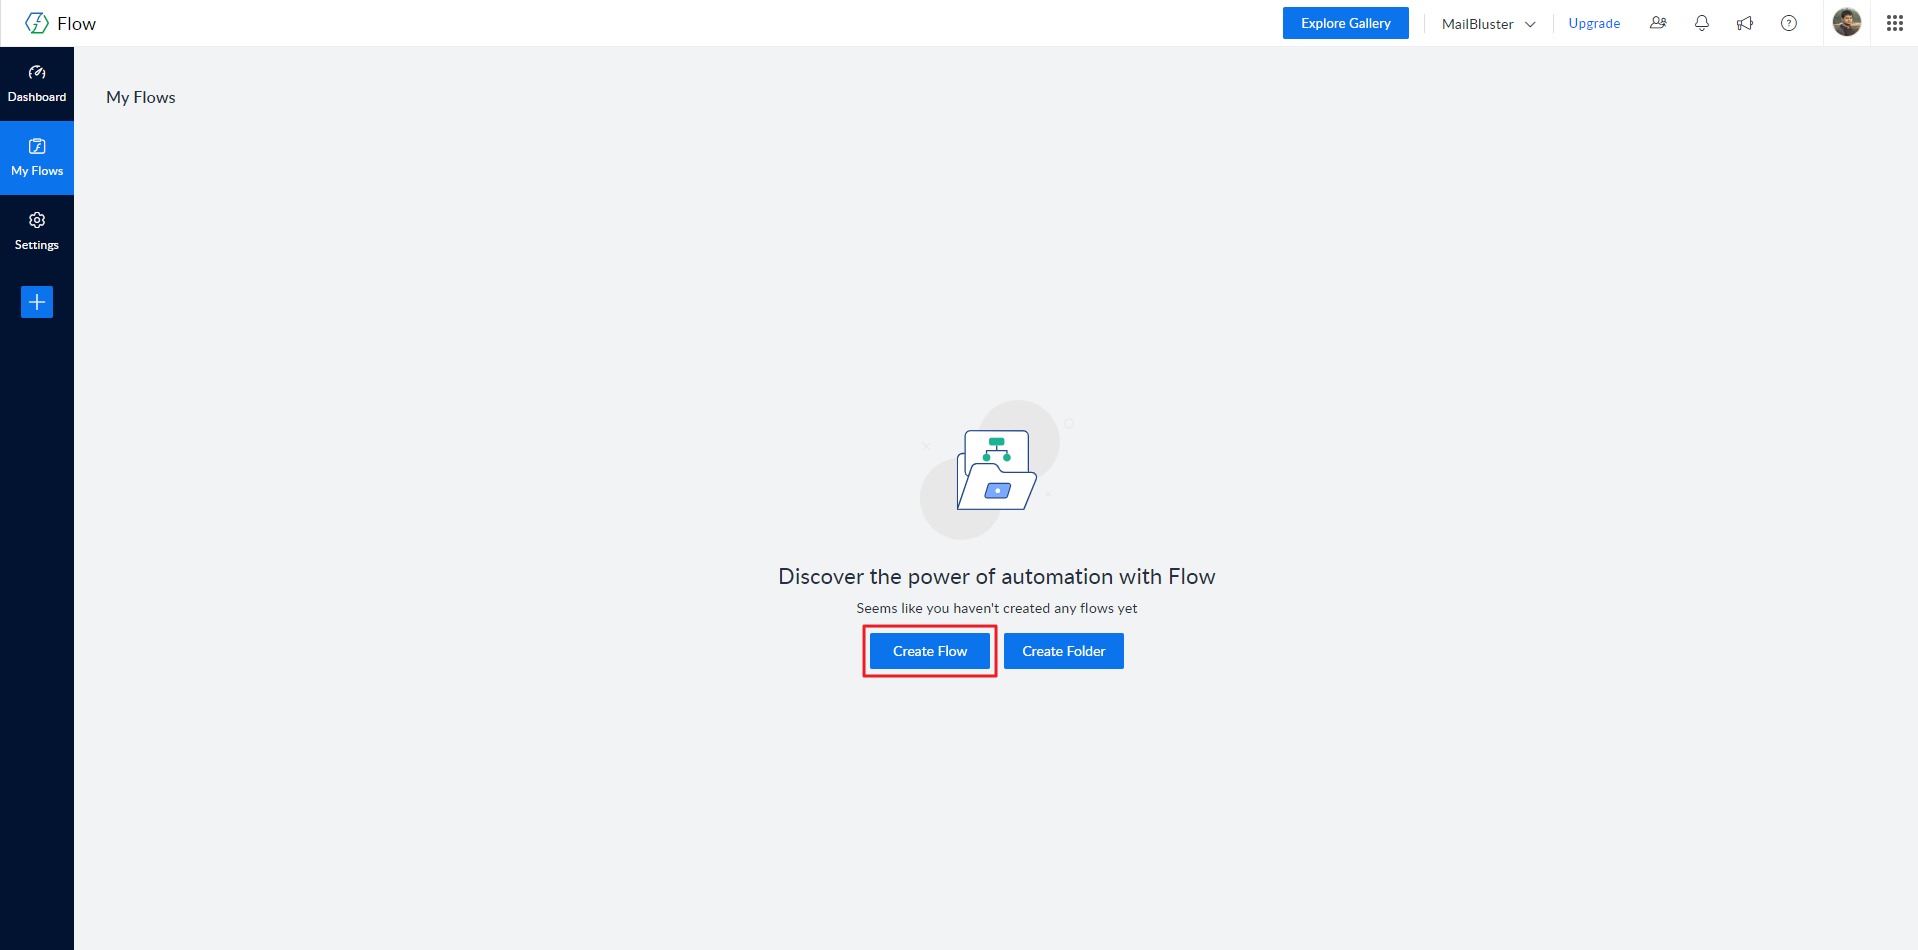
Just sign in to Zoho Flow, and click on Create Flow.
Enter Flow Name along with Choose Folder ‘Home’ and ‘Create Lead’ filling in the Description. Then click Create.
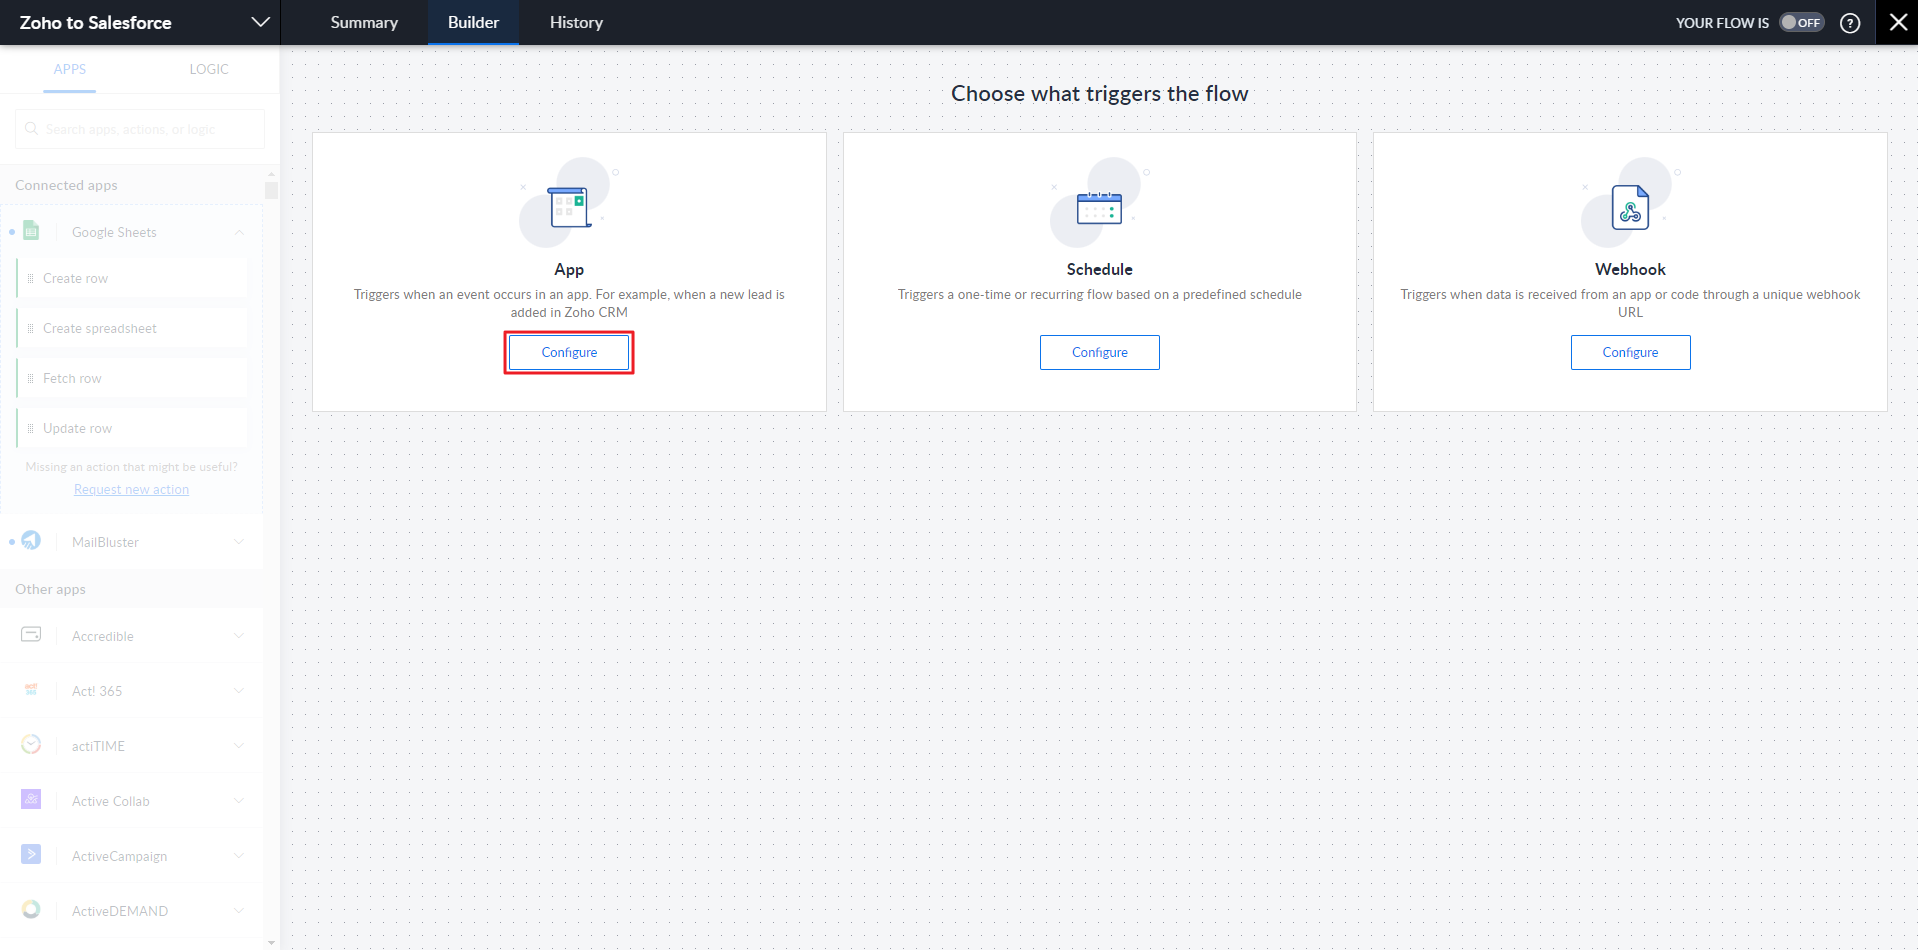
Now, under Choose what triggers the flow, click Configure in the App section.
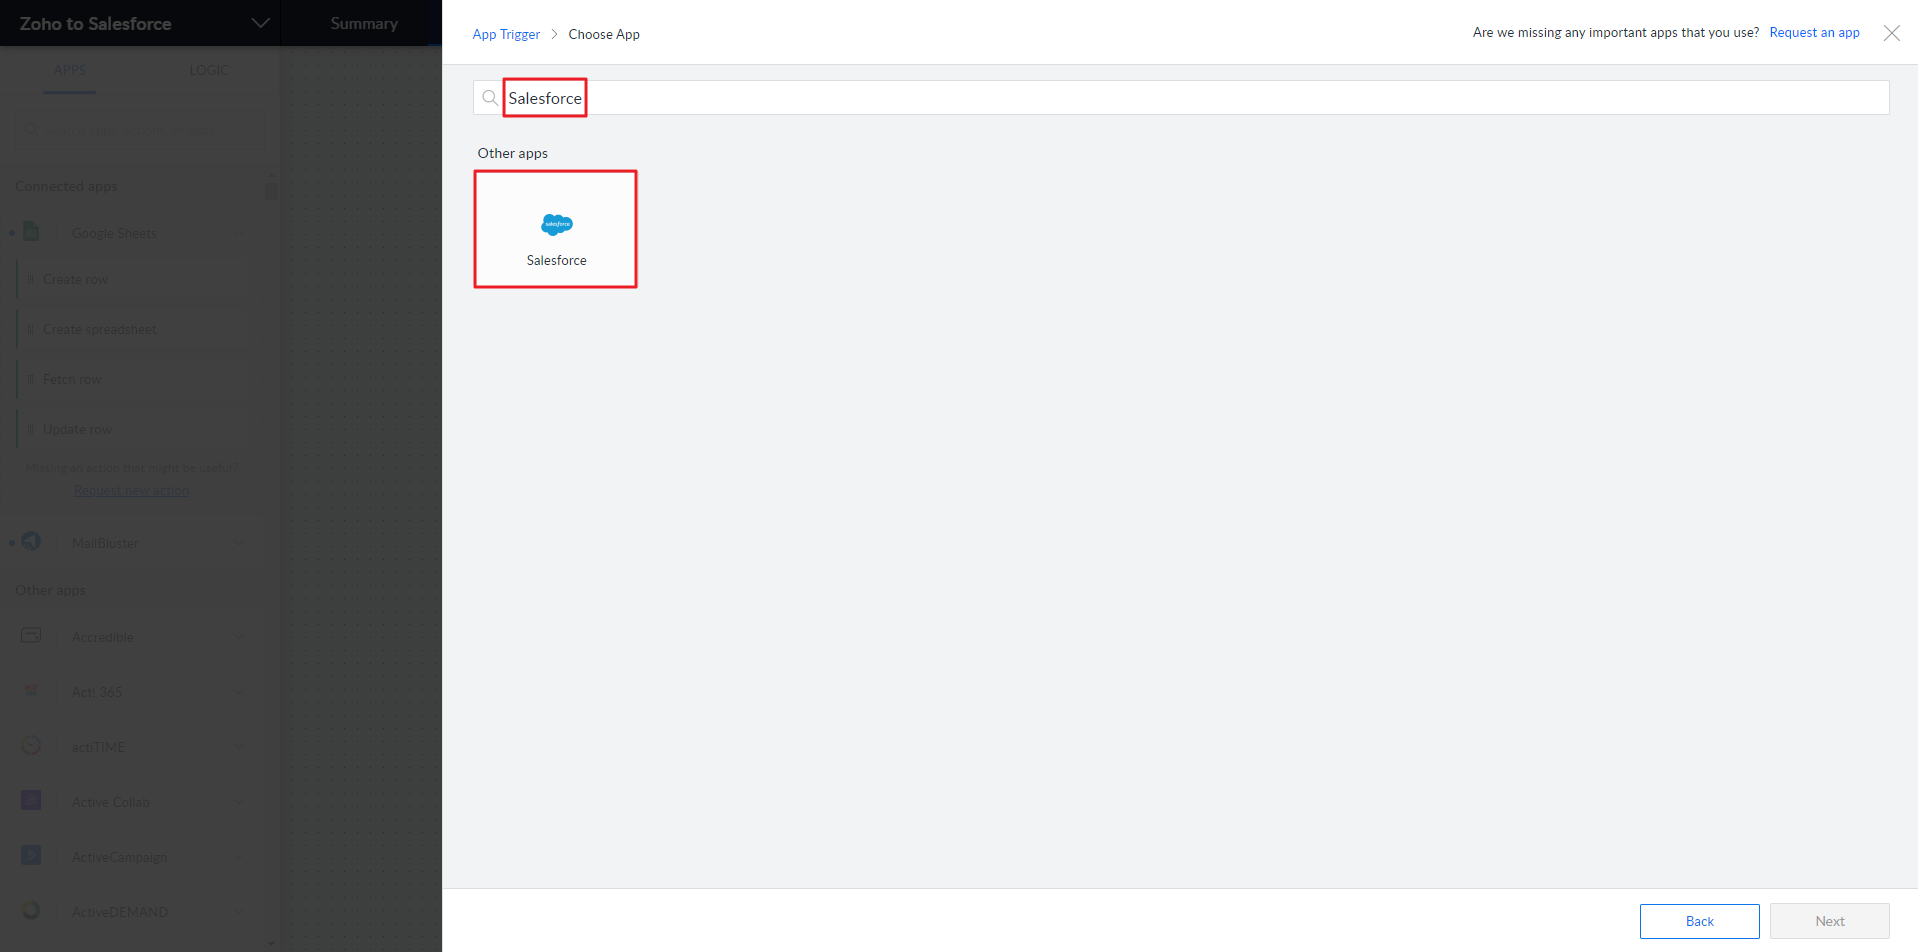
On the next screen, type ‘Salesforce’ in the search bar and select Salesforce.
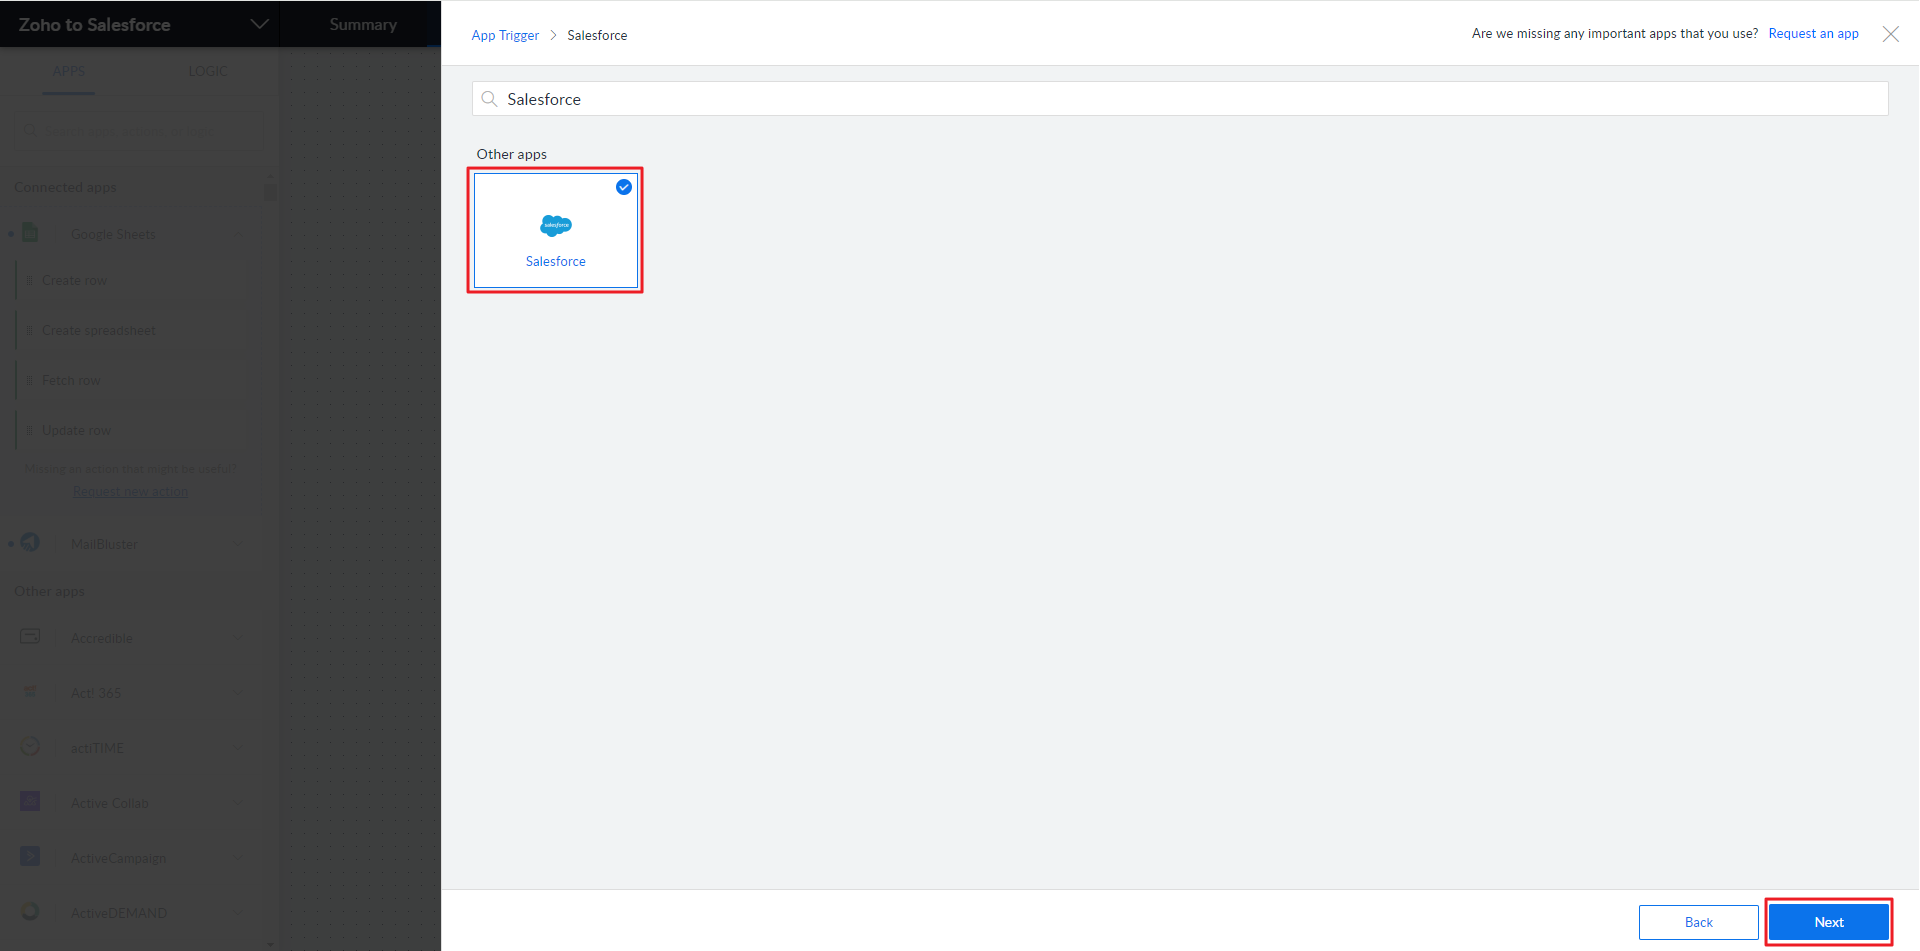
After selecting Salesforce, click the Next button.
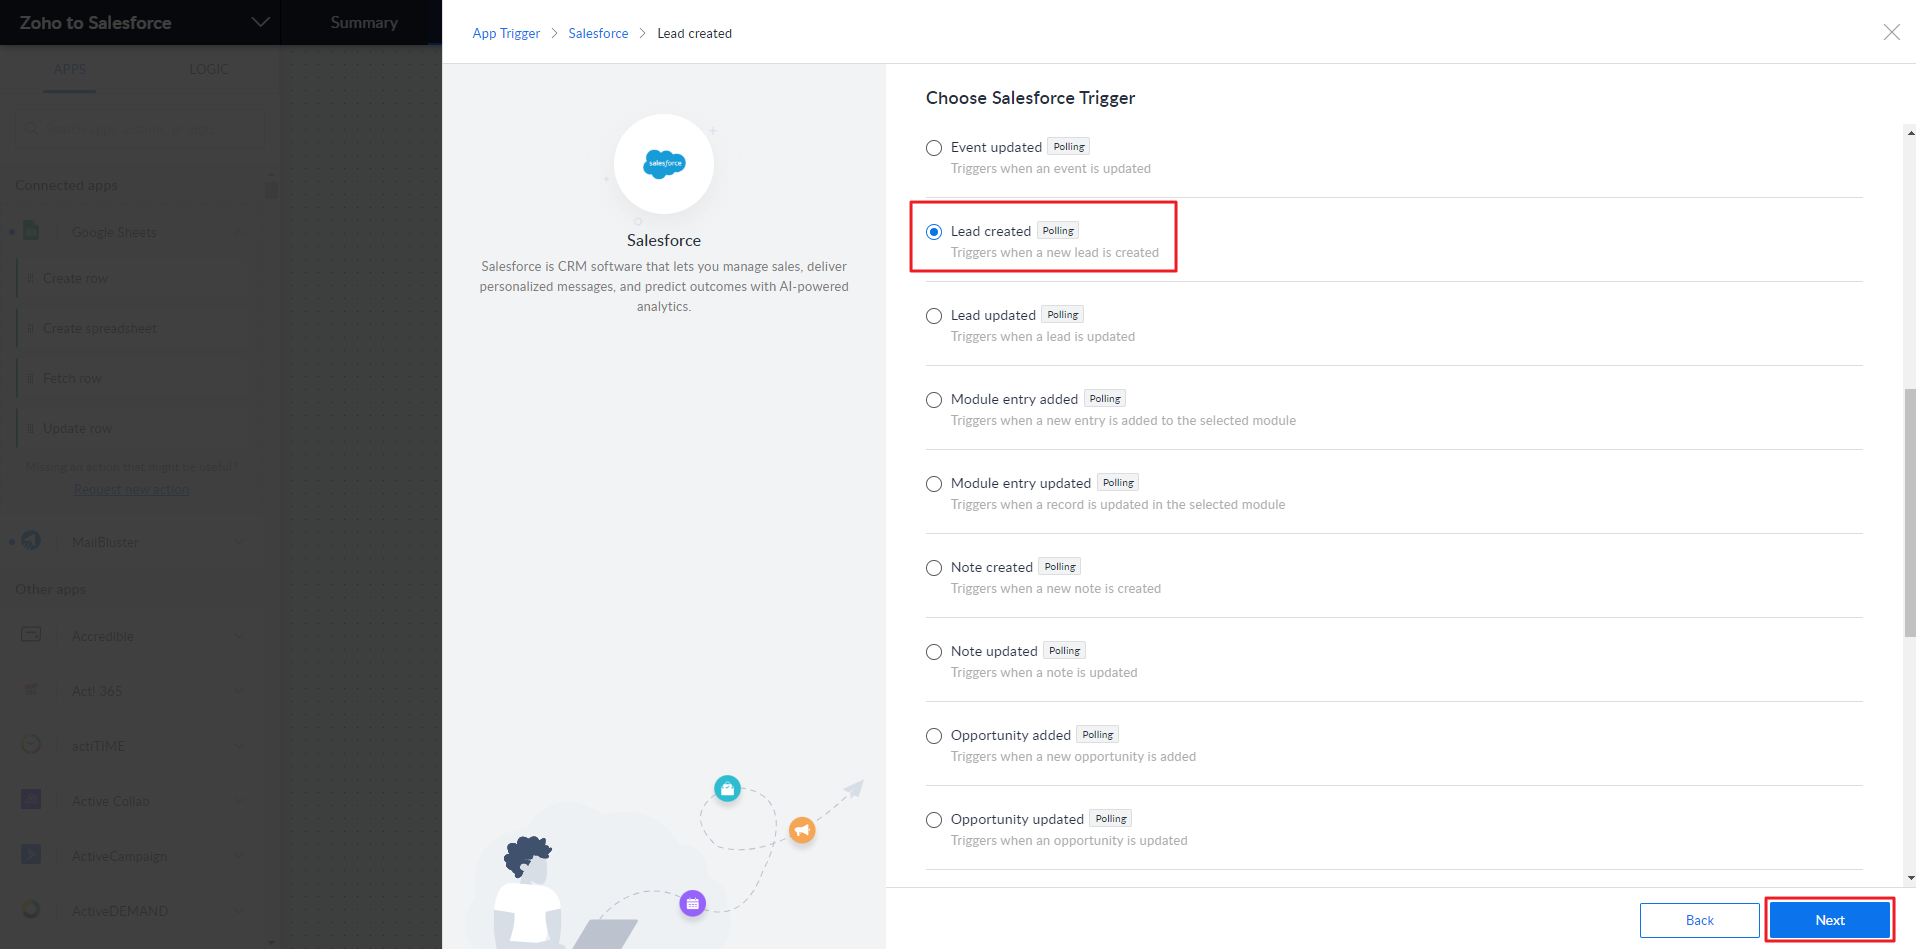
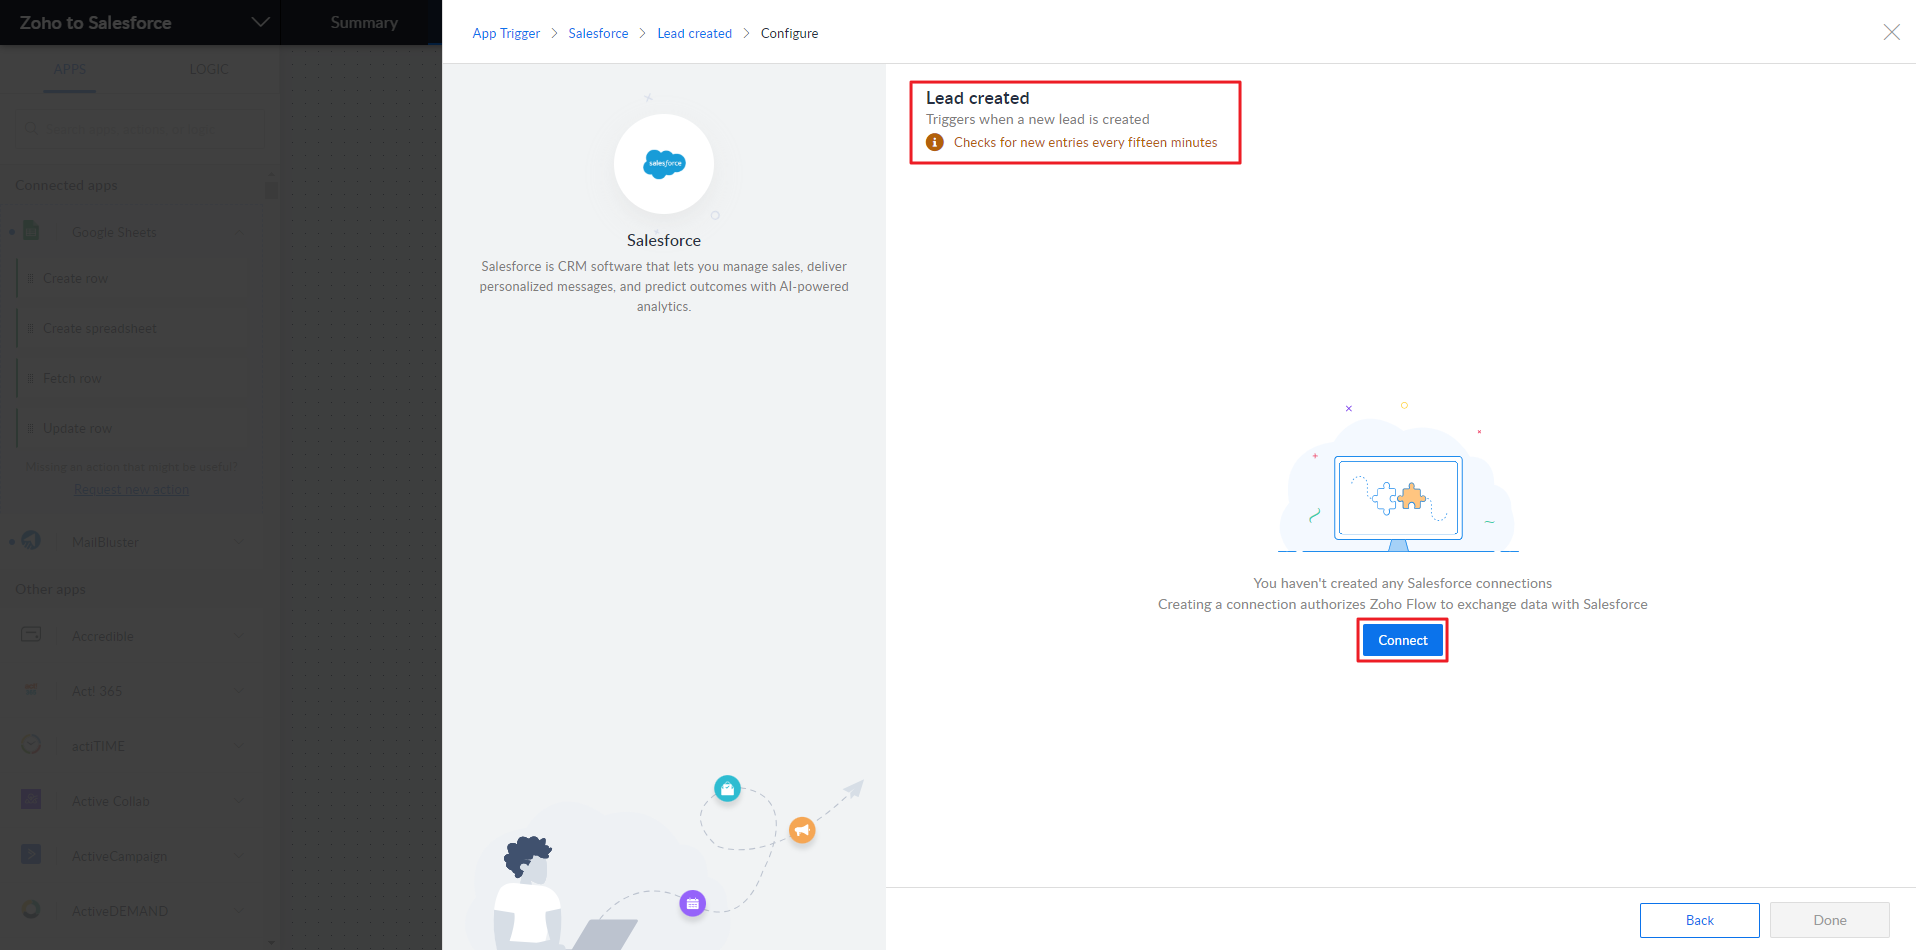
You need to ‘Choose Salesforce Trigger‘. Scroll down and select Lead created and and then click Next.
On the next screen, you need to ‘Configure‘ the Salesforce connection. You will notice that the ‘Lead created‘ notification. Click Connect button.
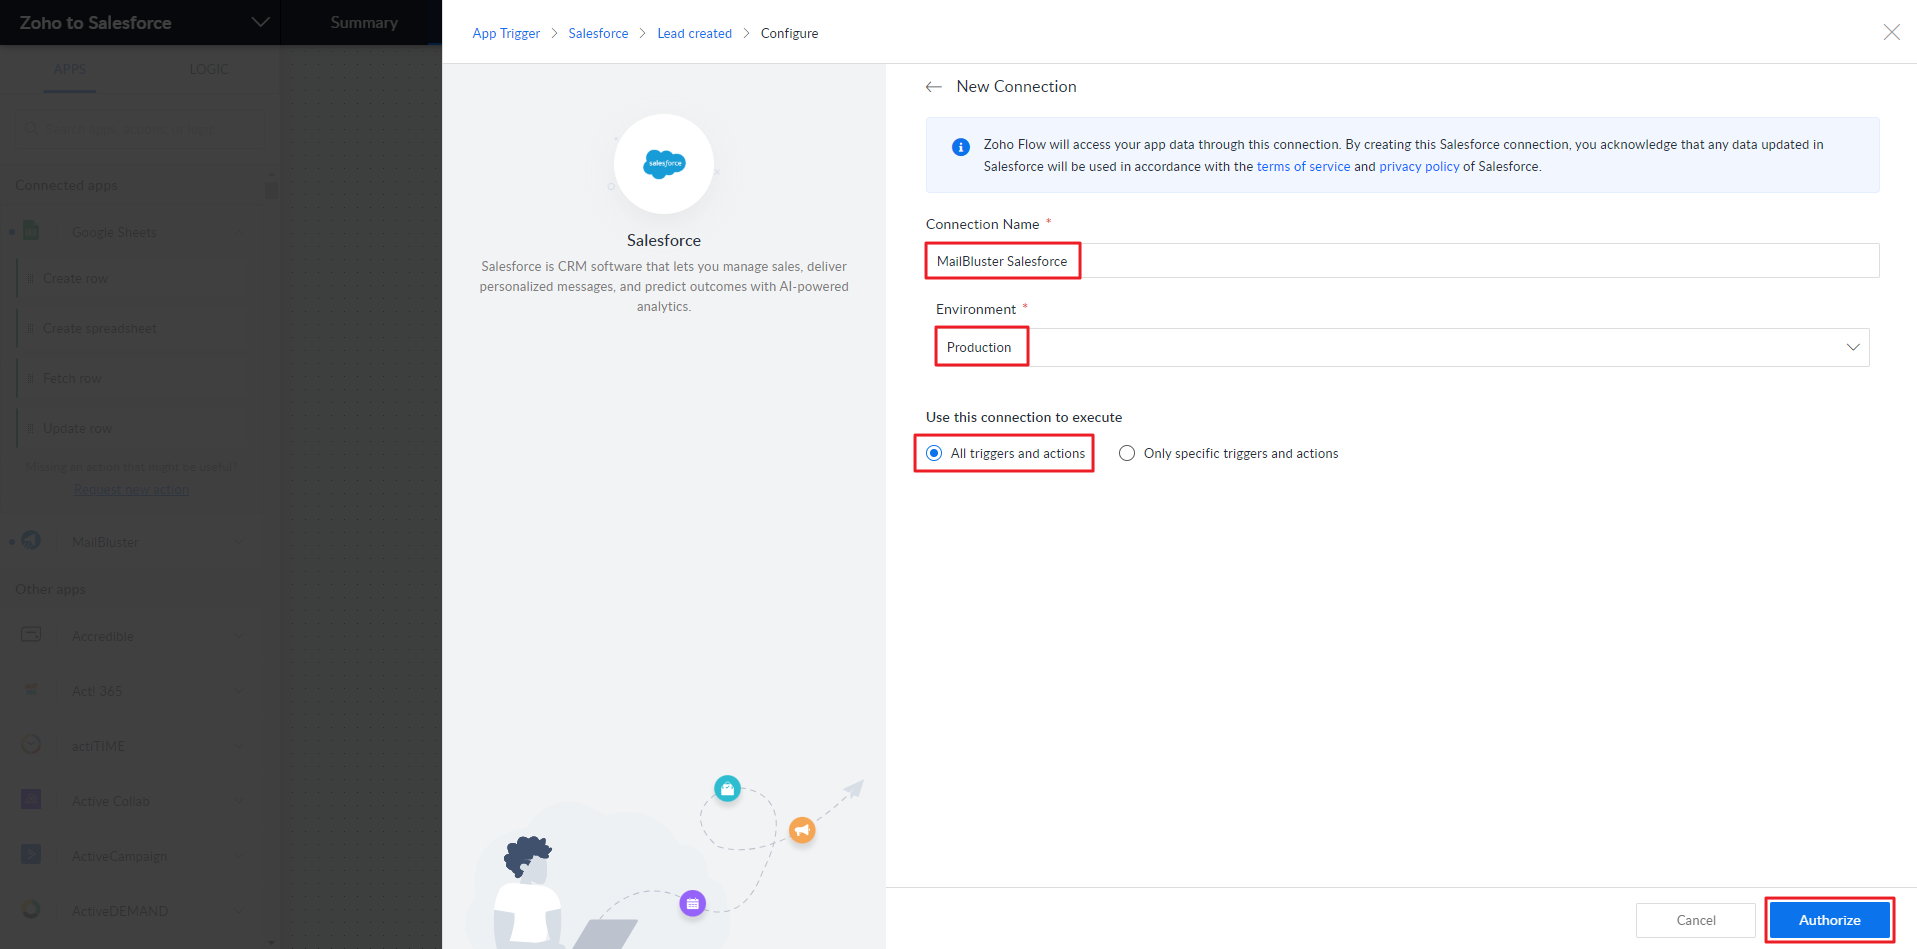
Enter the ConnectionName, select Production under the ‘Environment‘ tab. Then select All triggers andactions under ‘Use this connection to execute‘. Click Authorize button.
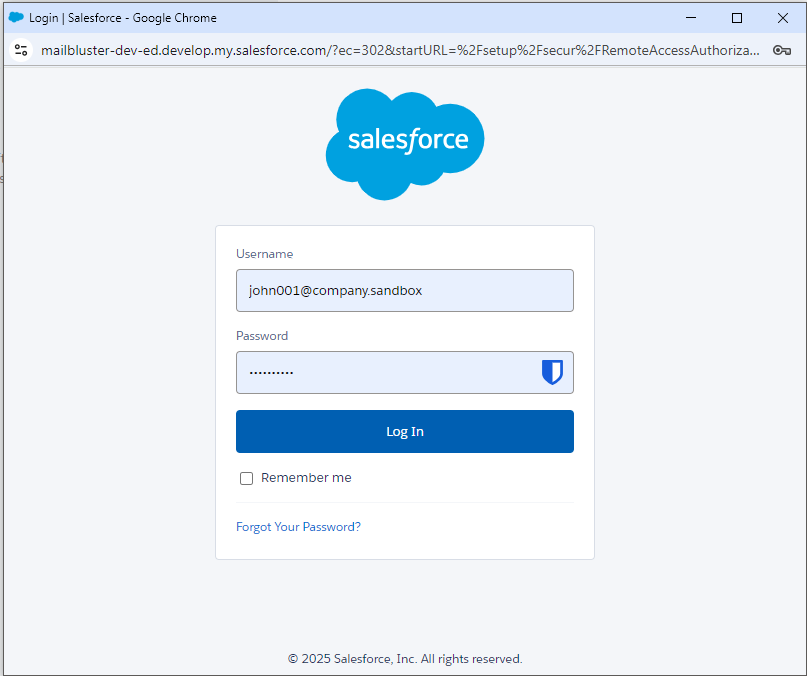
Now you will be asked to sign in to Salesforce Developer Website. Be sure to use your appropriate username, as it will be used to sign in to Salesforce.
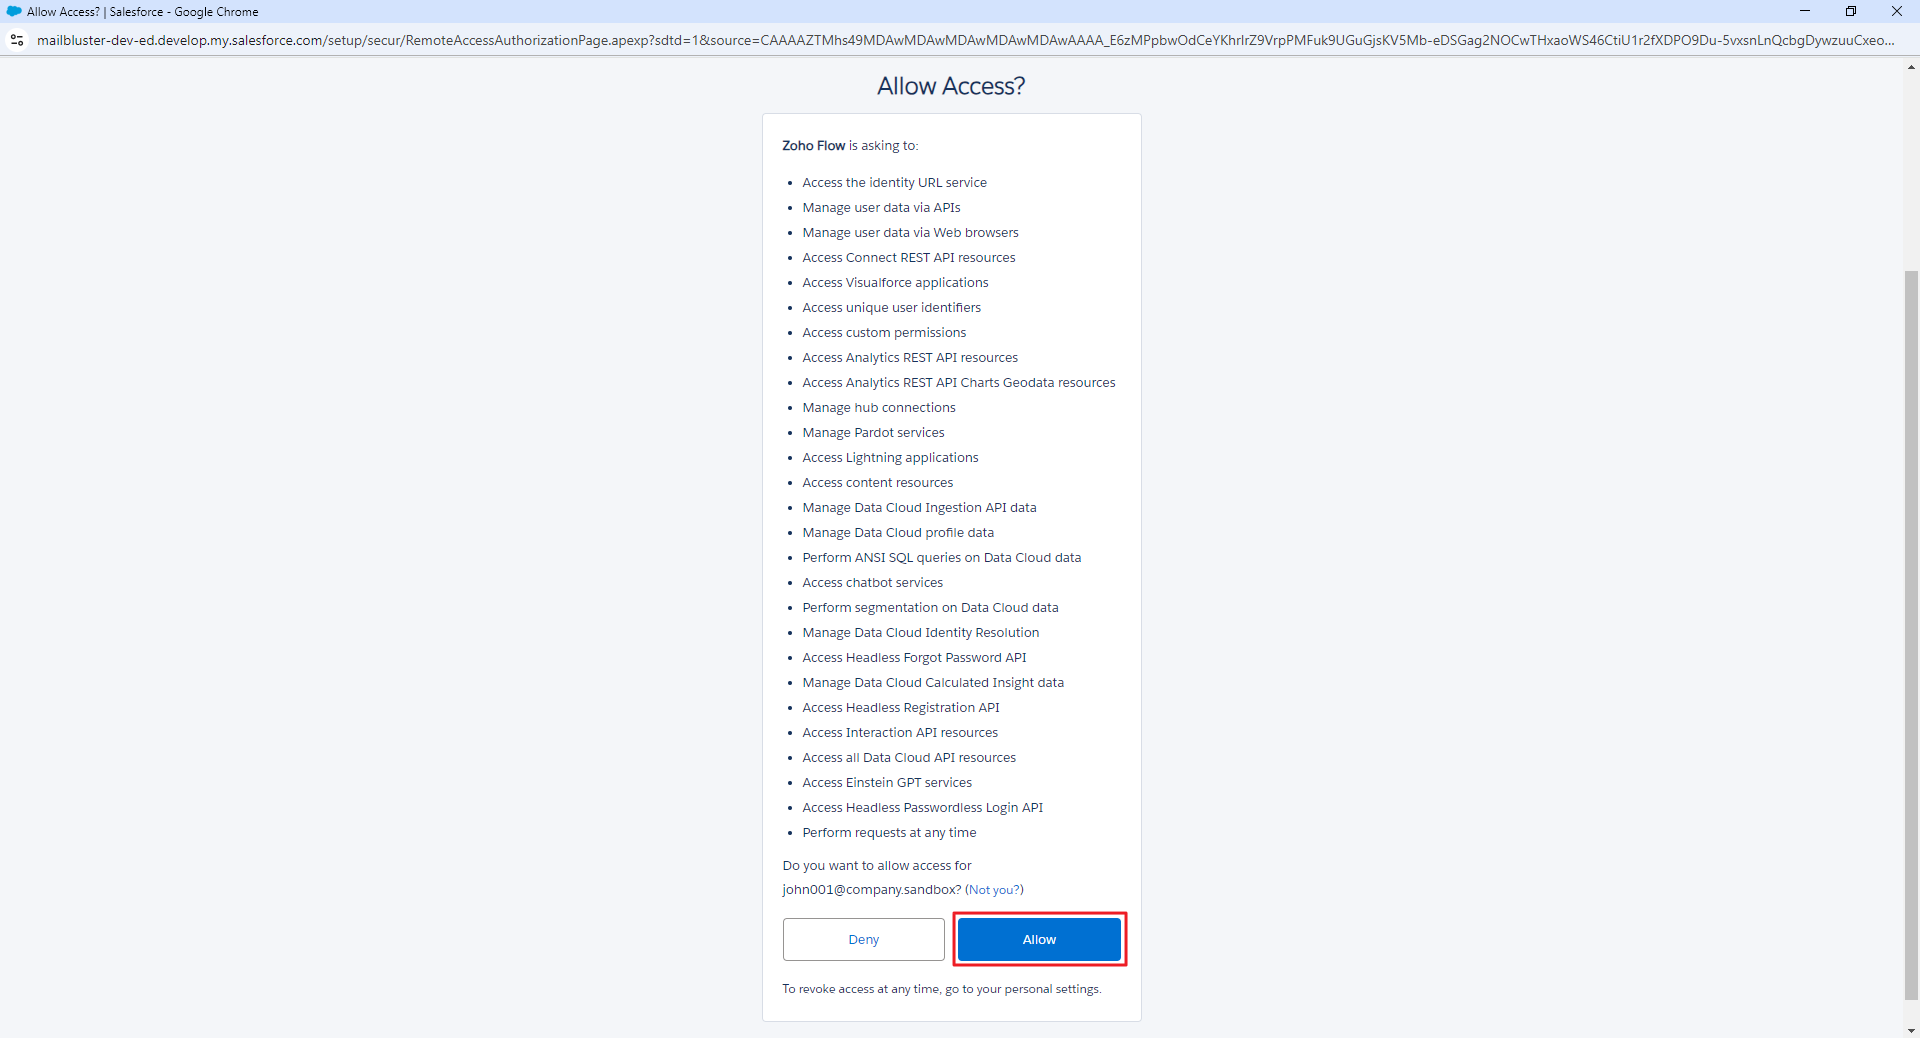
Click Allow button for Zoho Flow as it is asking to for access.
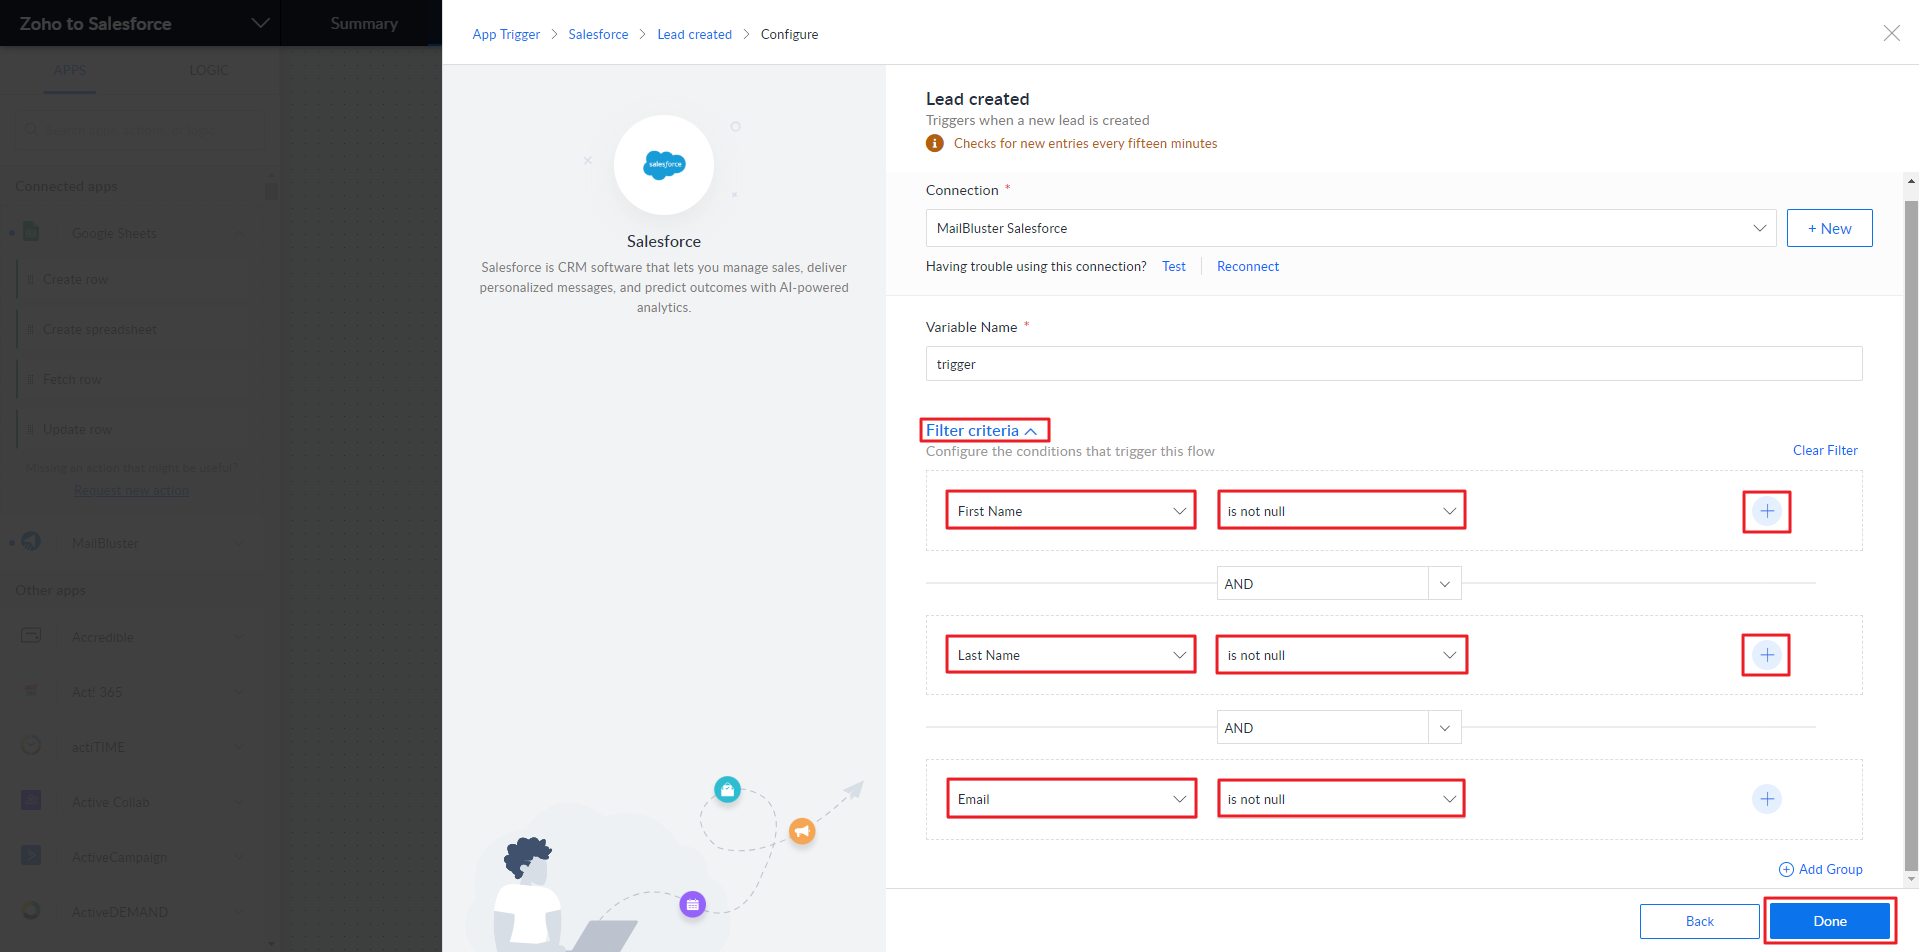
Now, you need to set the Filter criteria by clicking on it and Configure the conditions that trigger the flow. Set ‘First Name’, ‘Last Name’ and ‘Email’. Also, select ‘is not null’ in the next field in every condition. Then click Done.
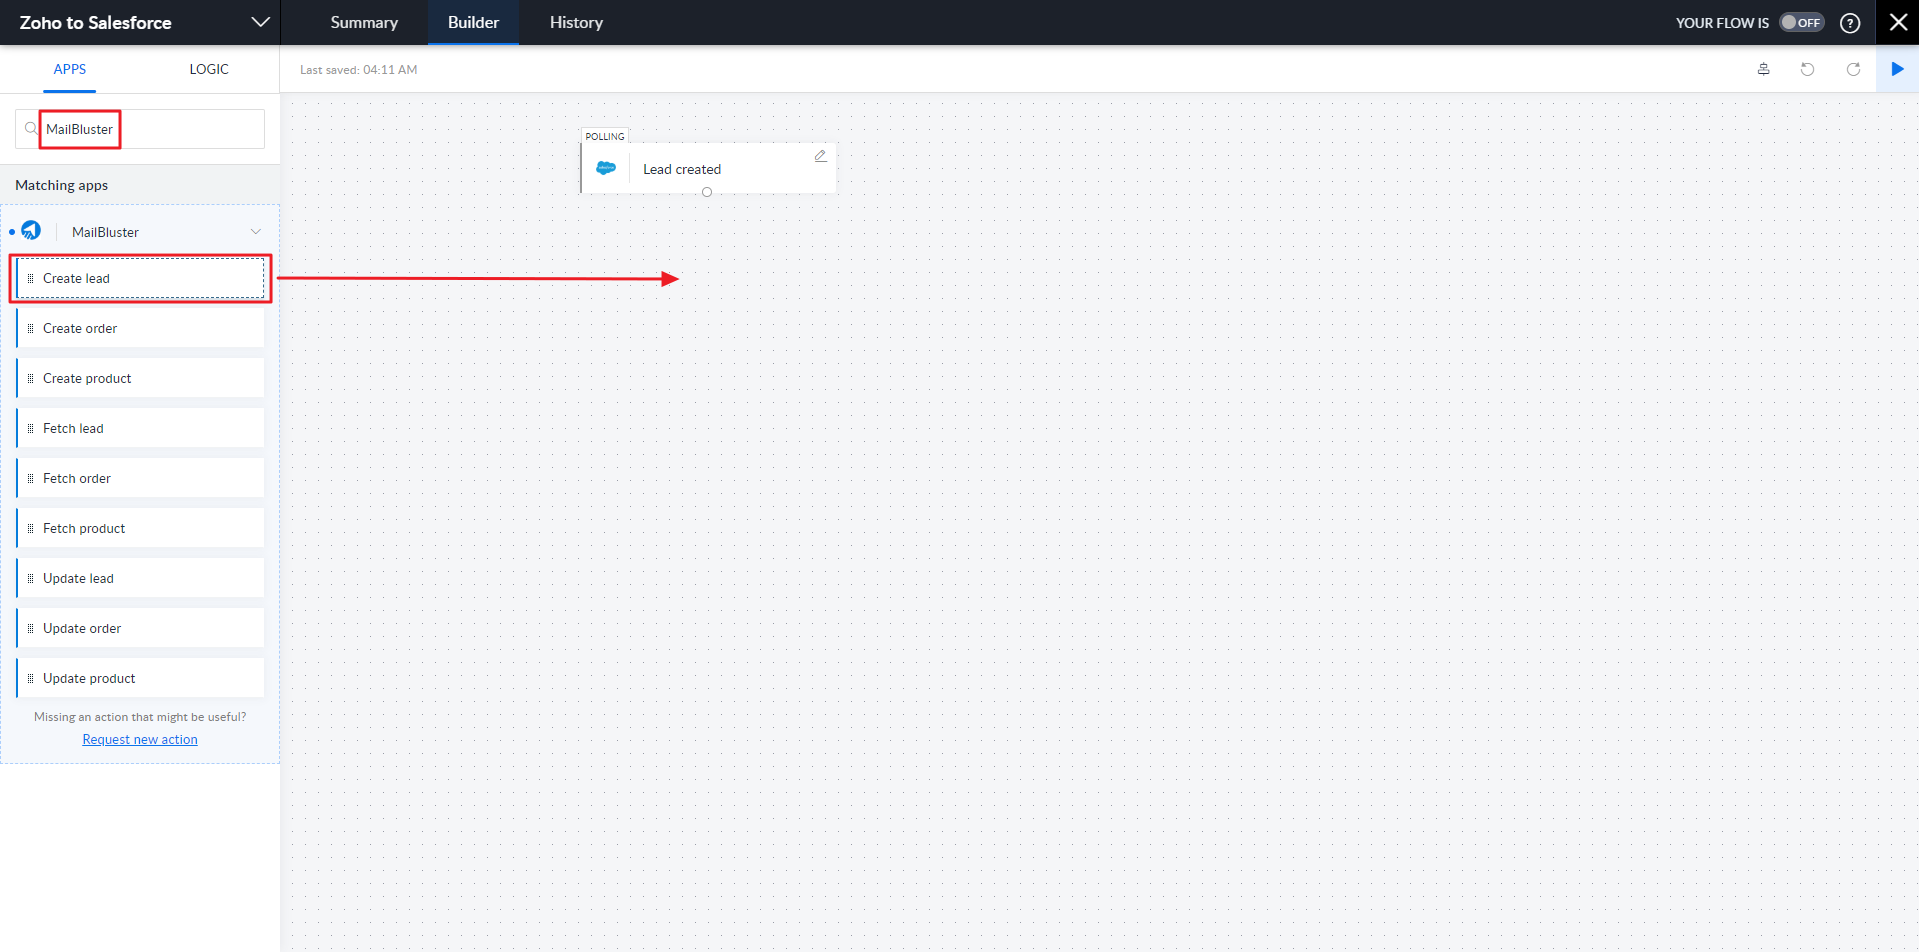
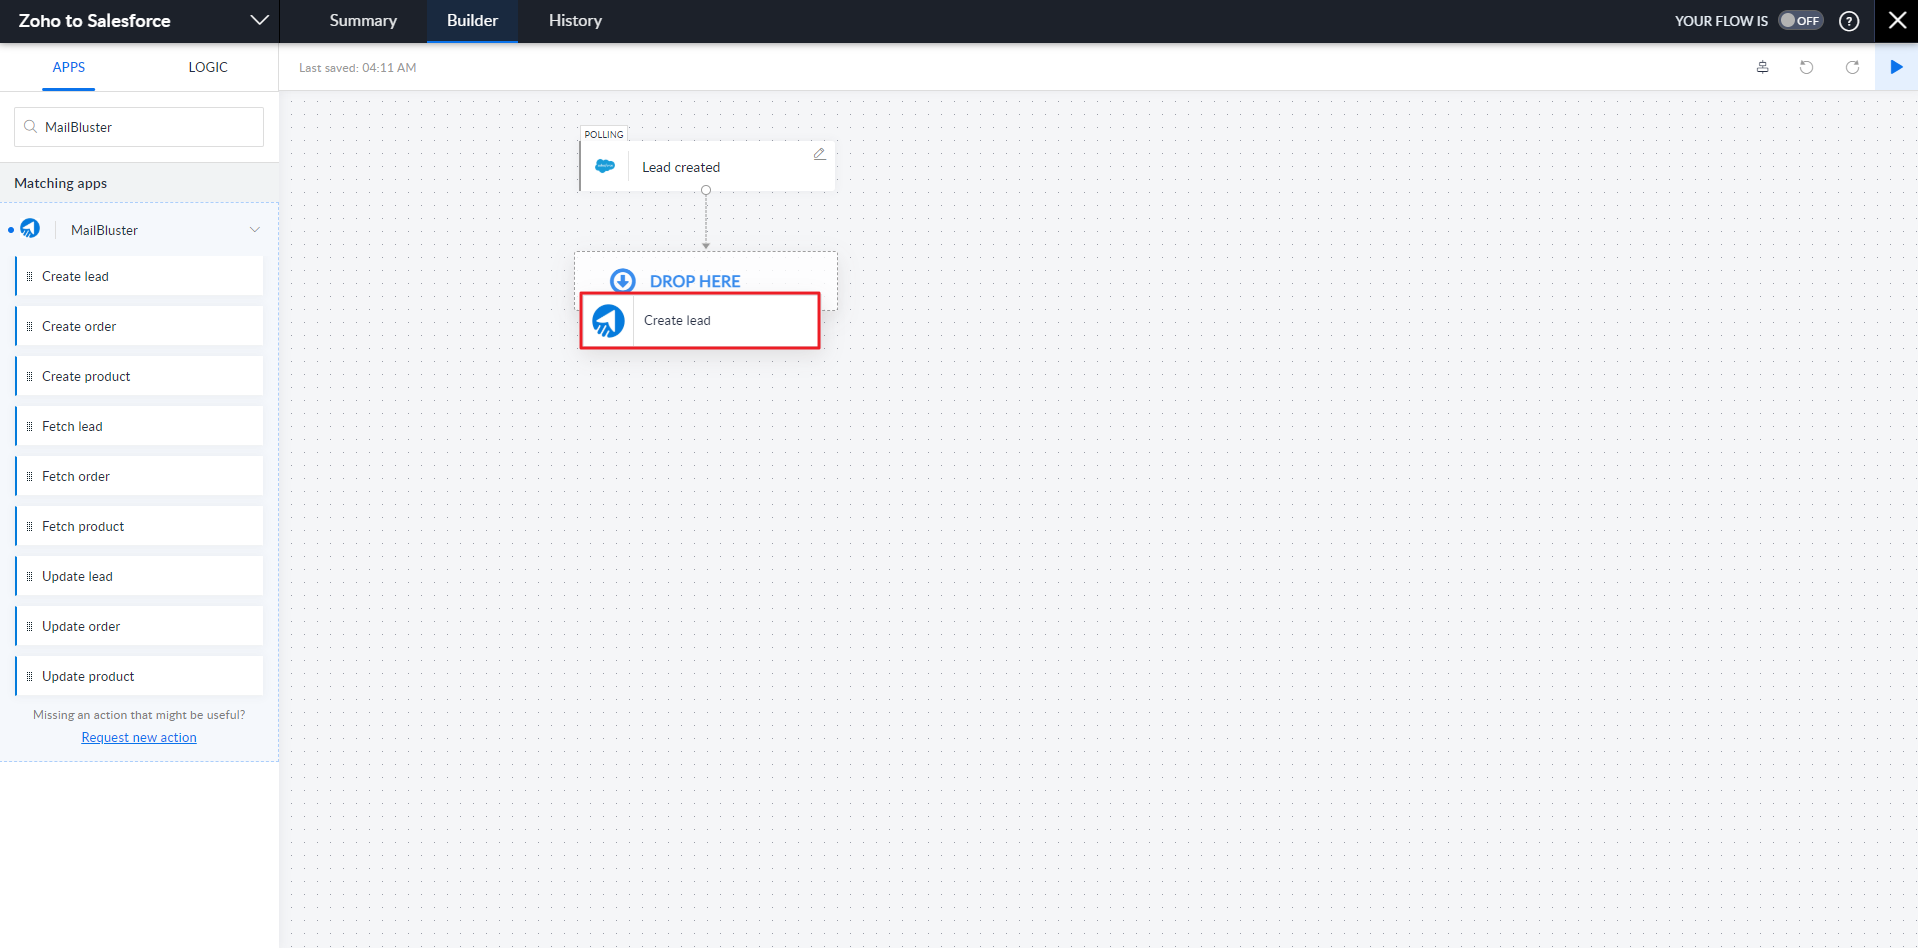
Now, Salesforce’s Lead created is created in the flow diagram. In the search field, type MailBluster and drag & drop the Create Lead block of MailBluster under Lead created.
Create Lead has to be dropped in the flow chart as shown below.
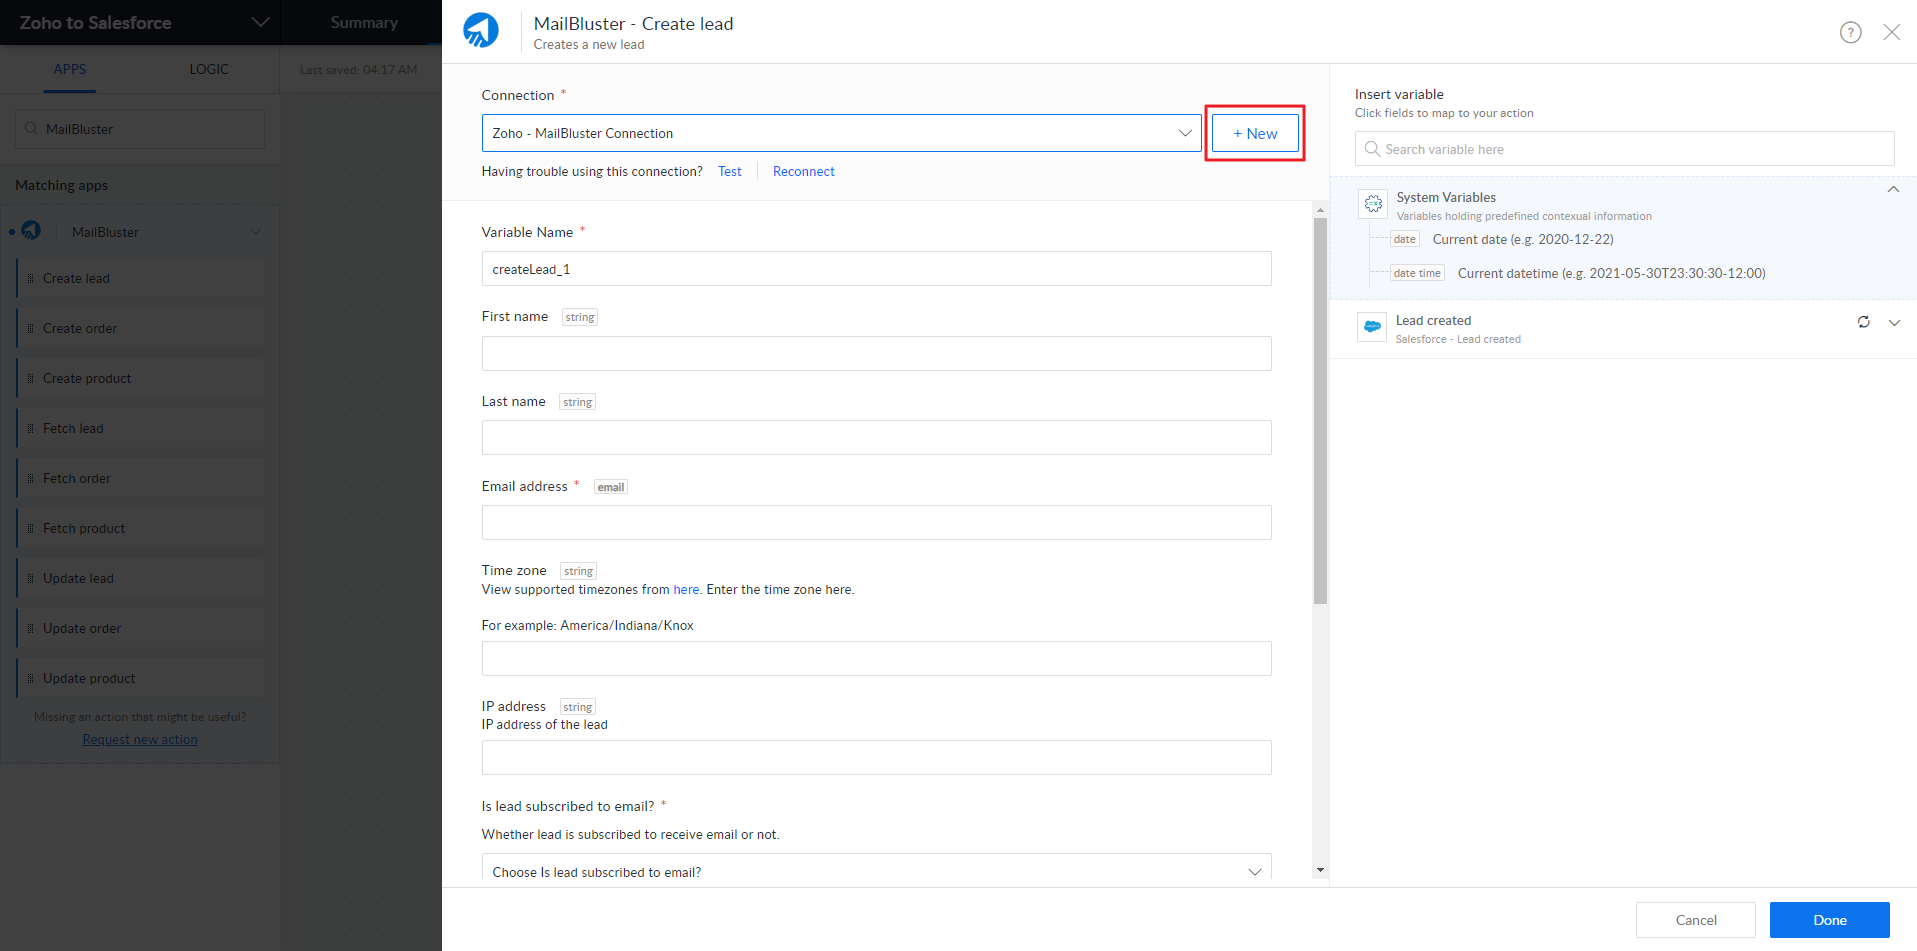
A new window will now appear. Click +New to connect MailBluster with the API key.
Enter Connection Name and copy the API key value from MailBluster.
Sign in to MailBluster and go to your MailBluster Brand > Settings > API Keys. Click +Create new button.
Type the API key name and then click Create API key button.
Copy the API key value as shown below.
Go to Zoho Flow and paste it there then click Authorize.
In this step, enter ‘String‘ in the Connection field. Edit the First Name field and click on ‘First Name‘ under Insert Variables. Repeat this action for the Last Name and Email fields.
Scroll down to the ‘Whether lead is subscribed to receive email or not’ field and ‘Override existing lead?‘ field are selected as True. Then click Done.
Your workflow has been completed successfully. Now, Switch ON the workflow and you will get a confirmation as shown below.
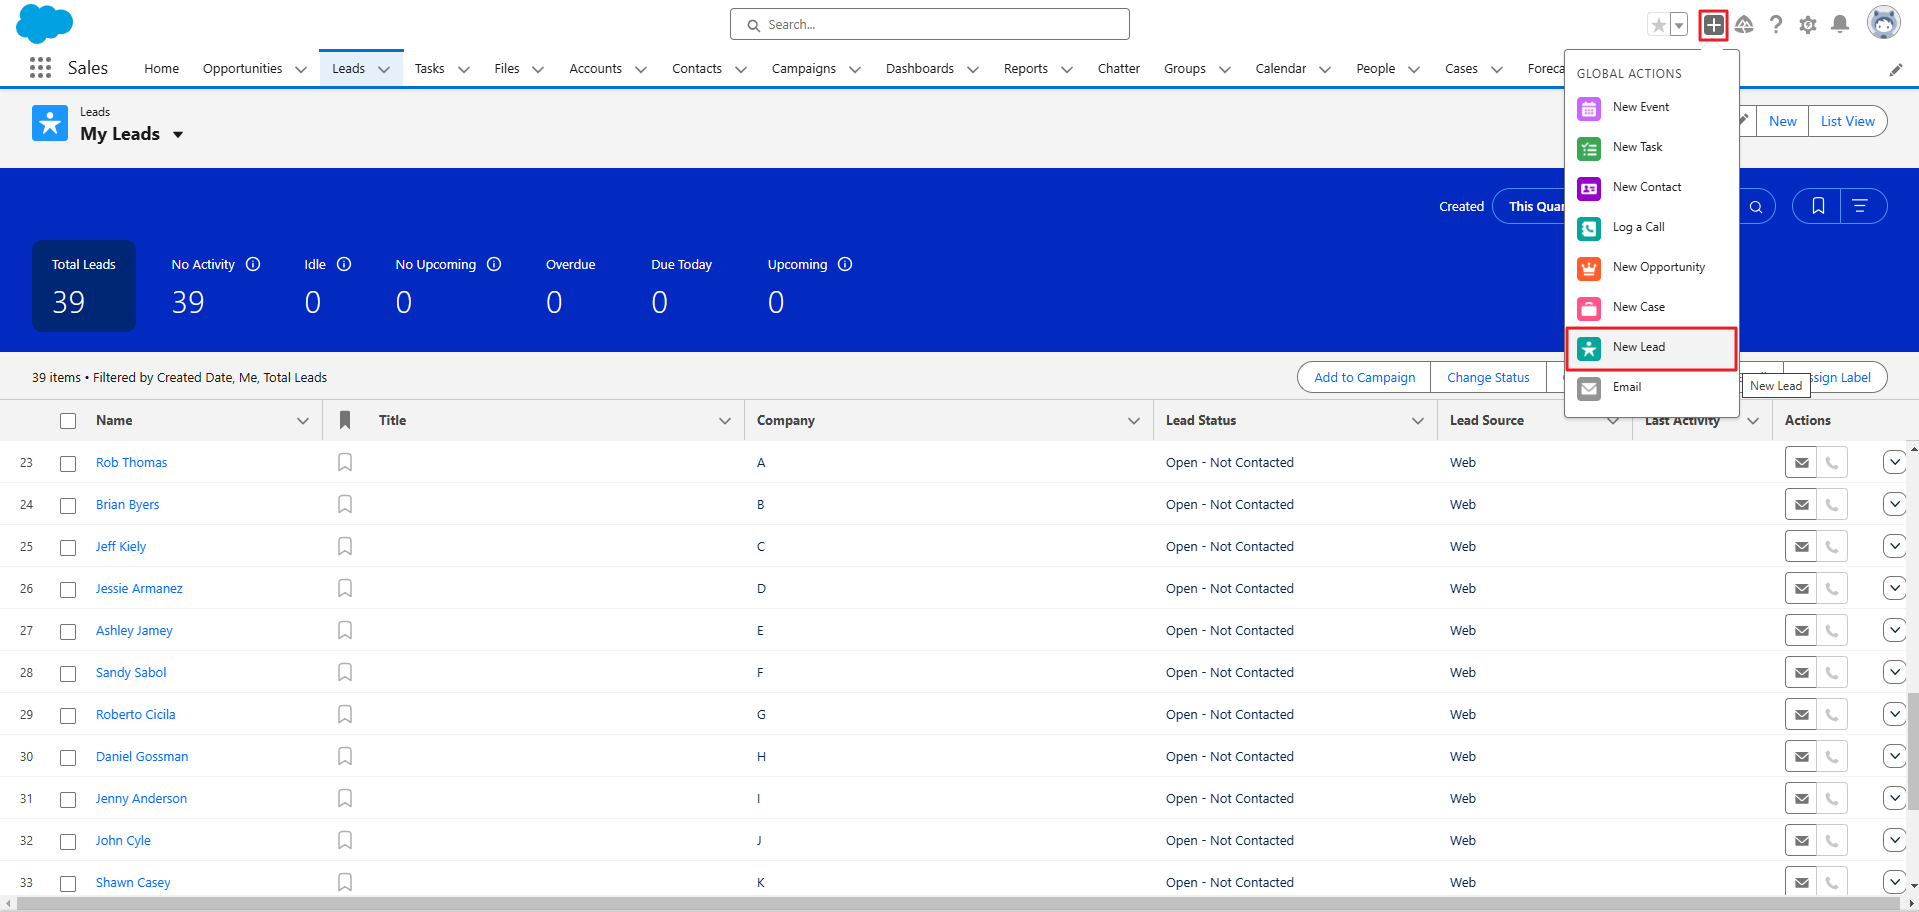
Go to the Salesforce Developer Website and sign in to your account. Click Home and then on the’+‘ icon and then click on New Lead.
Be sure to fill in the information along with the Company field as shown below. Click Save.
You will see a notification that a New Lead has been created.
You have to wait few minutes, then go to MailBluster’s Leads section and check if the lead is visible.
MailBluster does have Gravity Forms integration option. The Gravity Forms Webhooks add-on allows you to send your form data from your WordPress website to an external app or service. You will find this guide Integrating Gravity Forms with MailBluster using Webhook very helpful while integrating the plugin into your website.
To integrate Shopify with MailBluster, no native or direct connection is currently available.
But you can integrate MailBluster into Shopify using these two ways:
1. Using MailBluster developer API You need to customize Shopify to send the lead information to MailBluster using the developer API when a customer signs up to your store. You need to have the technical knowledge to do this or need help from a software developer.
2. Using Make (formerly Integromat). You need to create a scenario on Make to connect Shopify with MailBluster.
For both Shopify and MailBluster, you need to create a new connection on Make that is not shown in the video. For MailBluster, you just need to create a new API key from Settings > API Keys page from MailBluster and provide the Key in Make.
Gmail annotations are additional details you can add to your promotional emails, such as special deals, expiration dates, and discount codes. These annotations appear in the Gmail inbox and require using a structured data format called JSON-LD.
Unfortunately, this feature is not currently available in MailBluster. We appreciate your understanding and apologize for any inconvenience.
These links are independent of MailBluster and are not officially affiliated with or endorsed by MailBluster. If you notice any changes or errors, please consult with the respective developers. Use these packages at your own discretion, as MailBluster will not be liable for any impacts caused by their use.
Toconnect API key in MailBluster WordPress plugin, start by installing the MailBluster WordPress Plugin. Then, you’ll need to connect your MailBluster Brand from the main app with the MailBluster WordPress Plugin using the API key. A new item named MailBluster on the admin menu will appear after installing the plugin on your WordPress site.
Click on the Configure MailBluster API Key. It will redirect you to the API Key configuration page. Here you need to provide the API Key from MailBluster.
After obtaining the API Key from Mailbluster, you neeed to Paste it into the MailBluster API configuration field of your WordPress website and click the Save Changes button. Congrats! Your MailBluster Brand is now connected with the website as shown below!
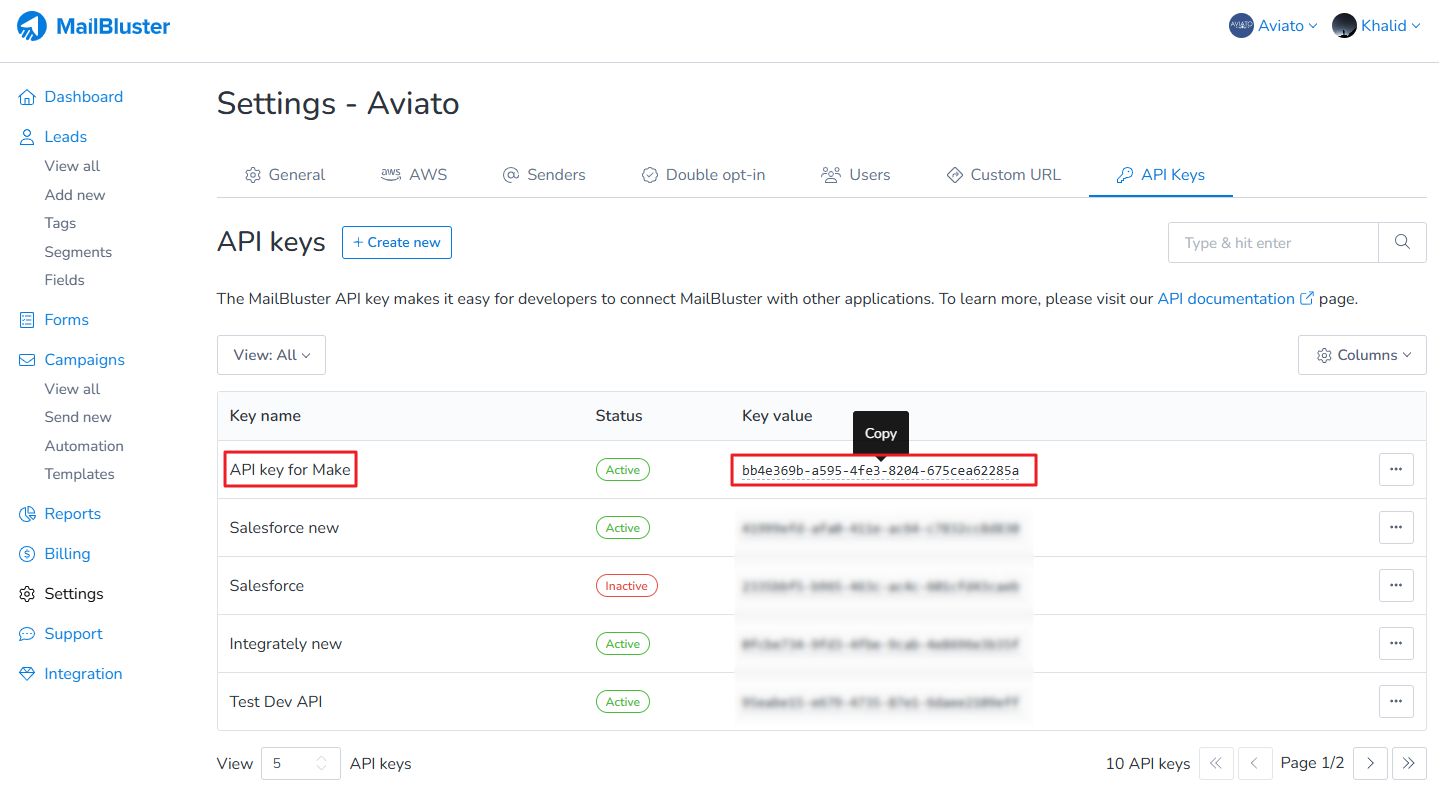
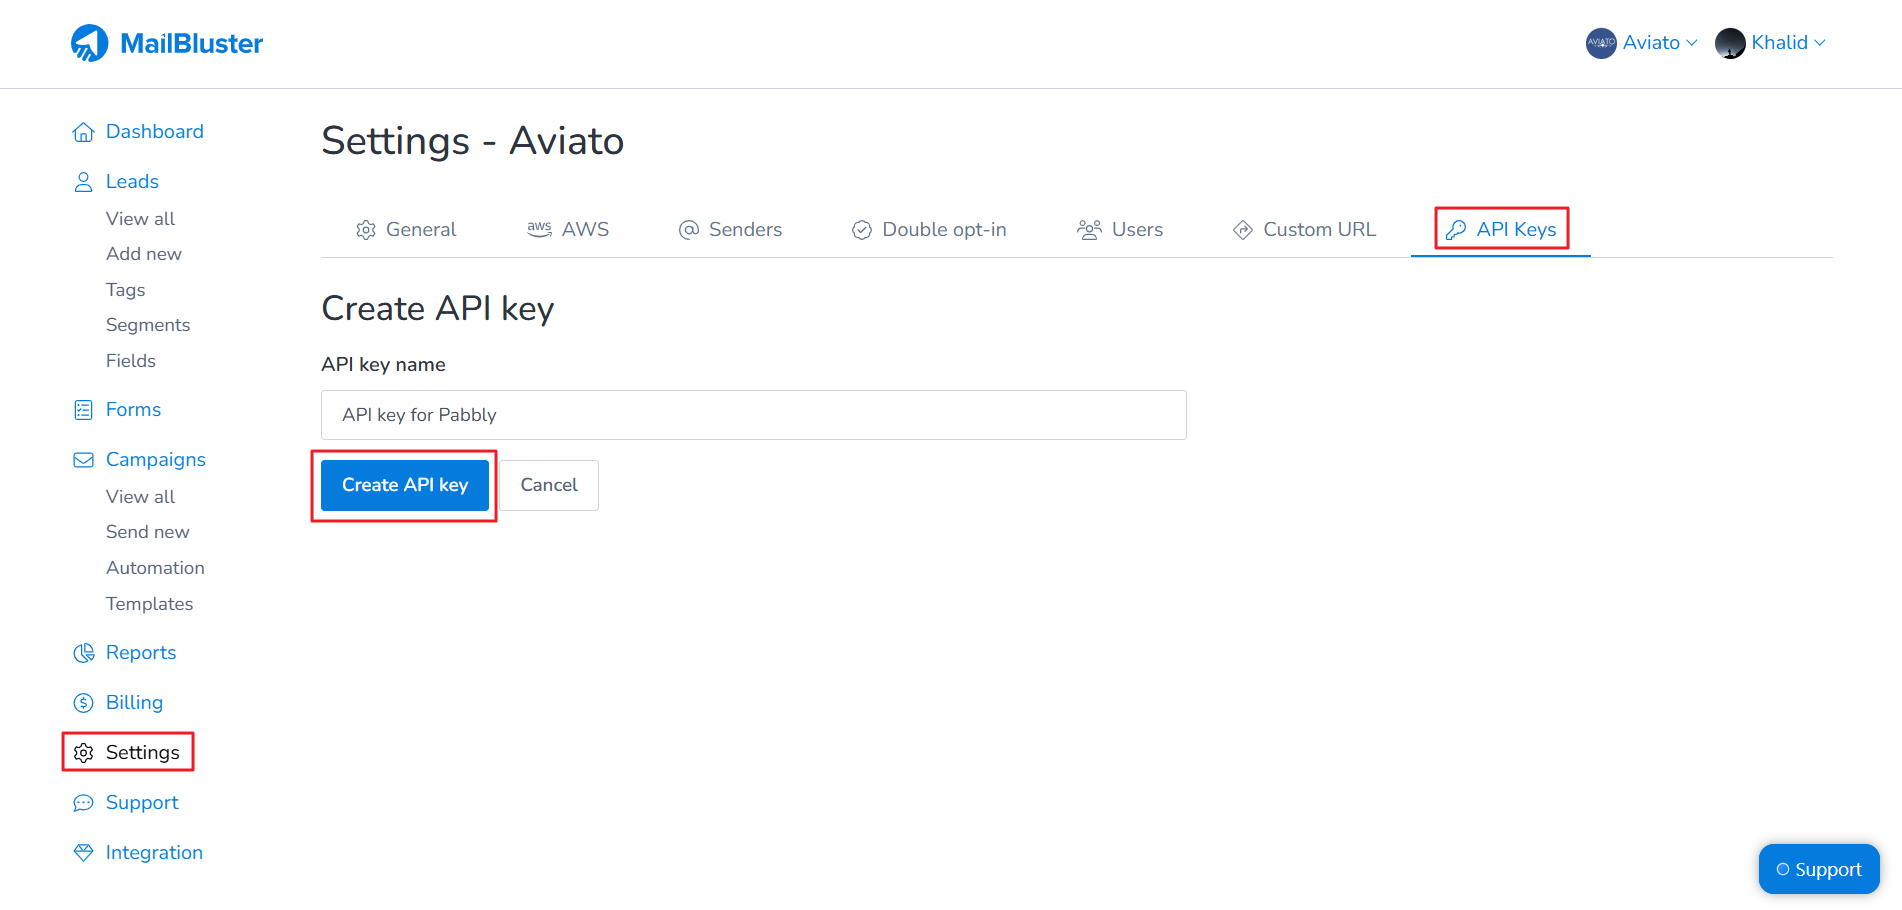
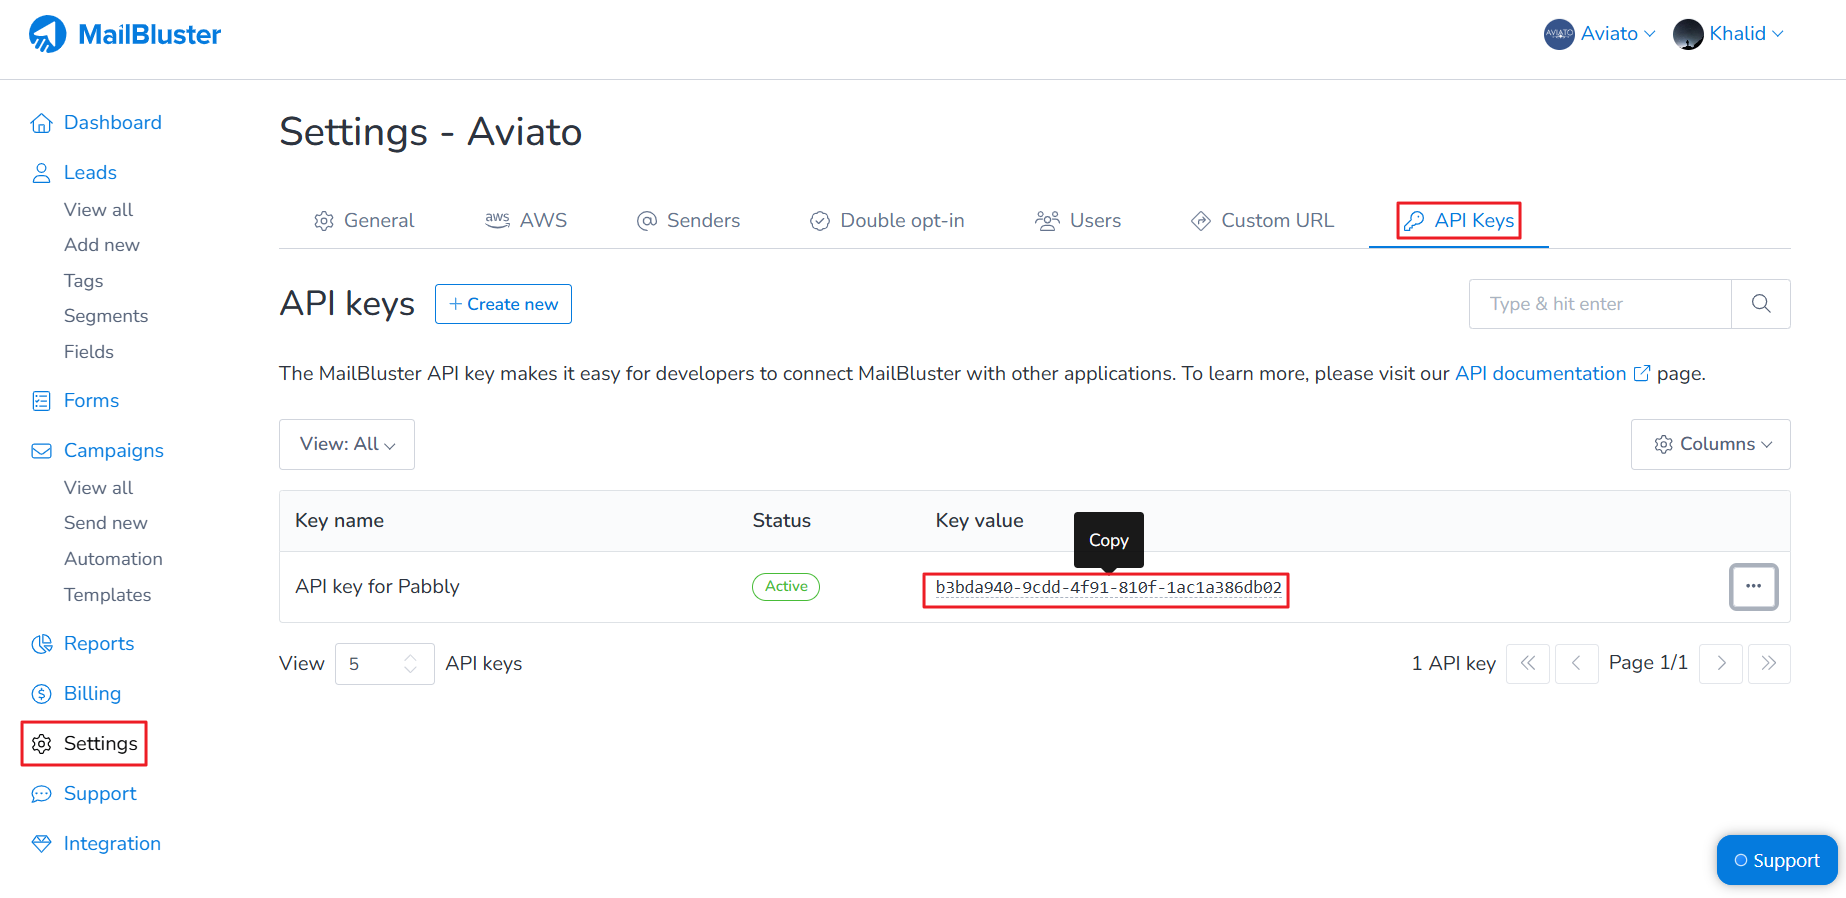
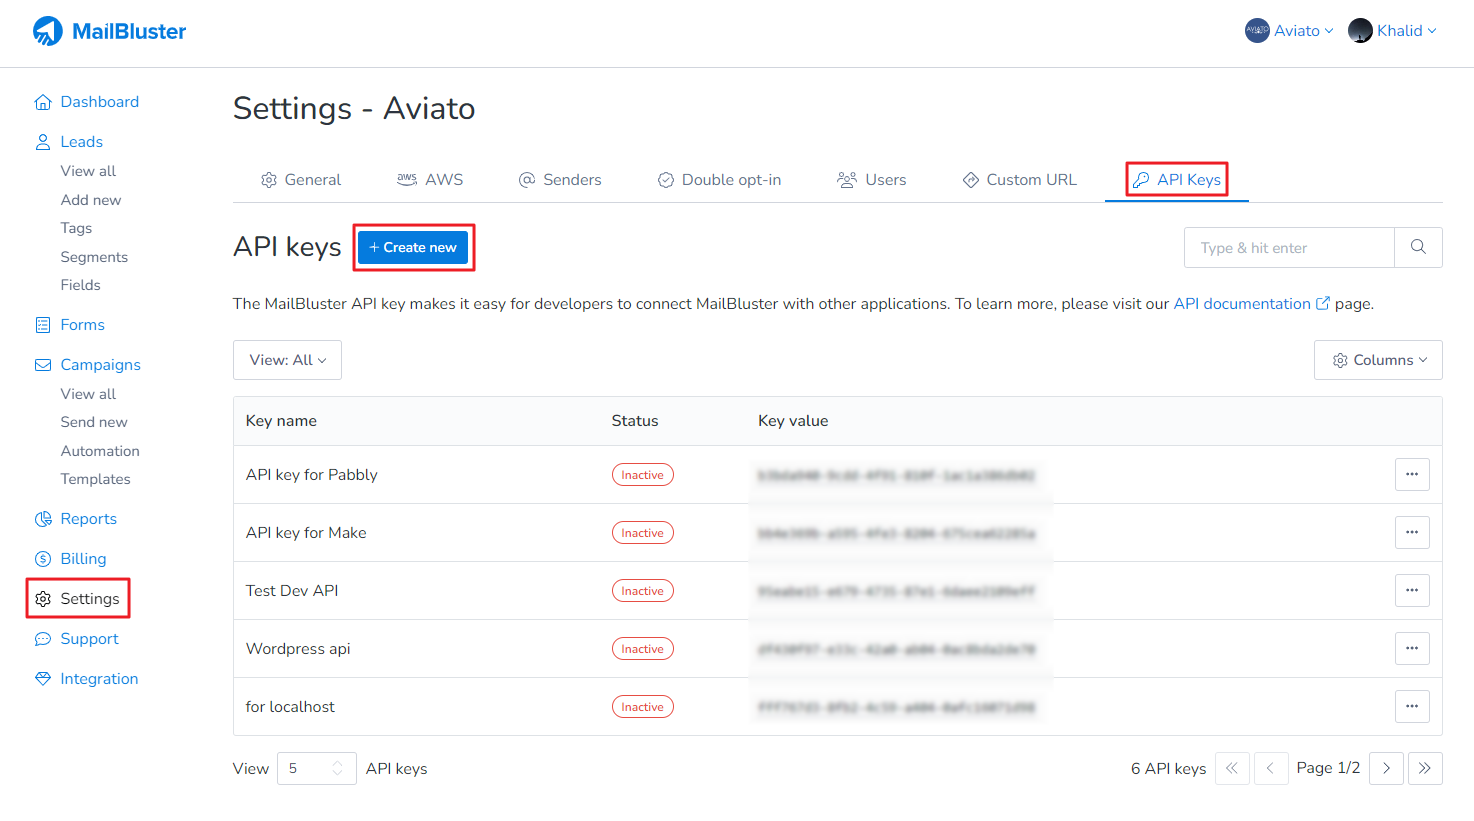
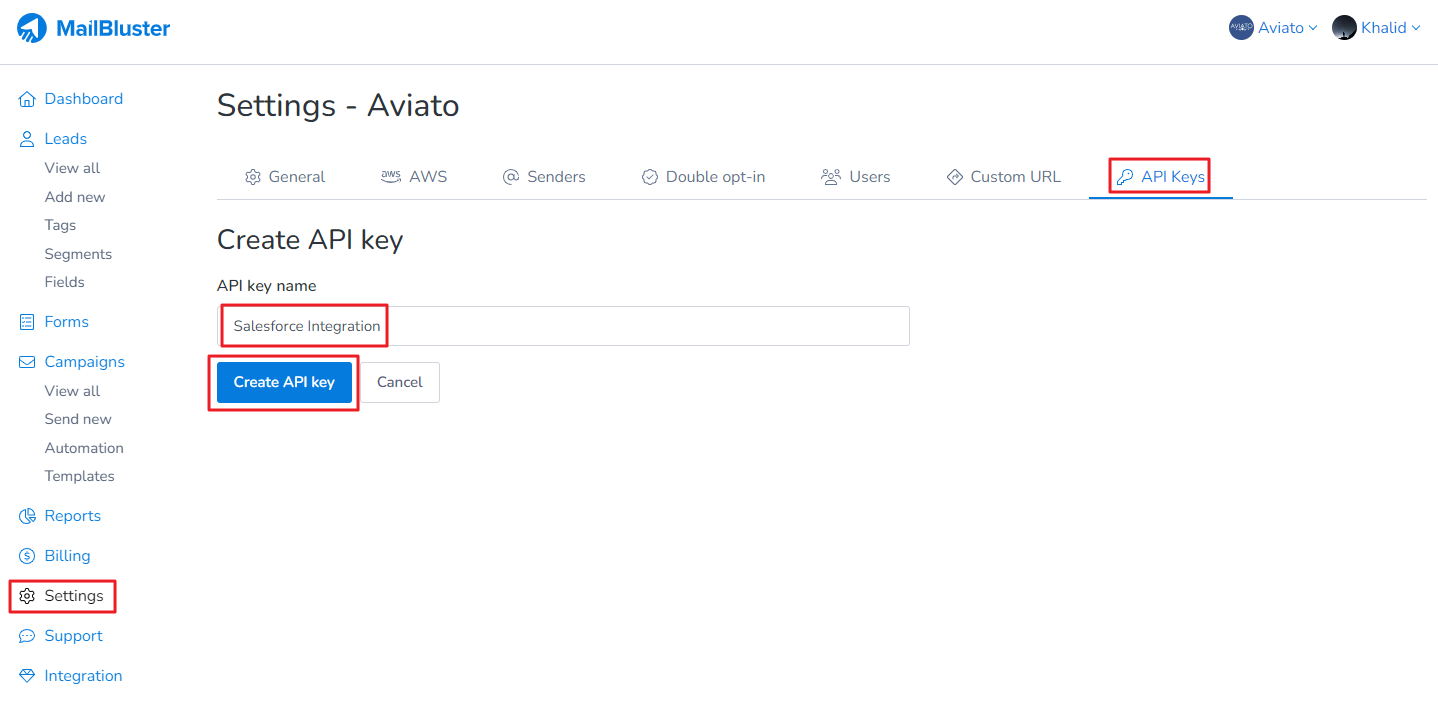
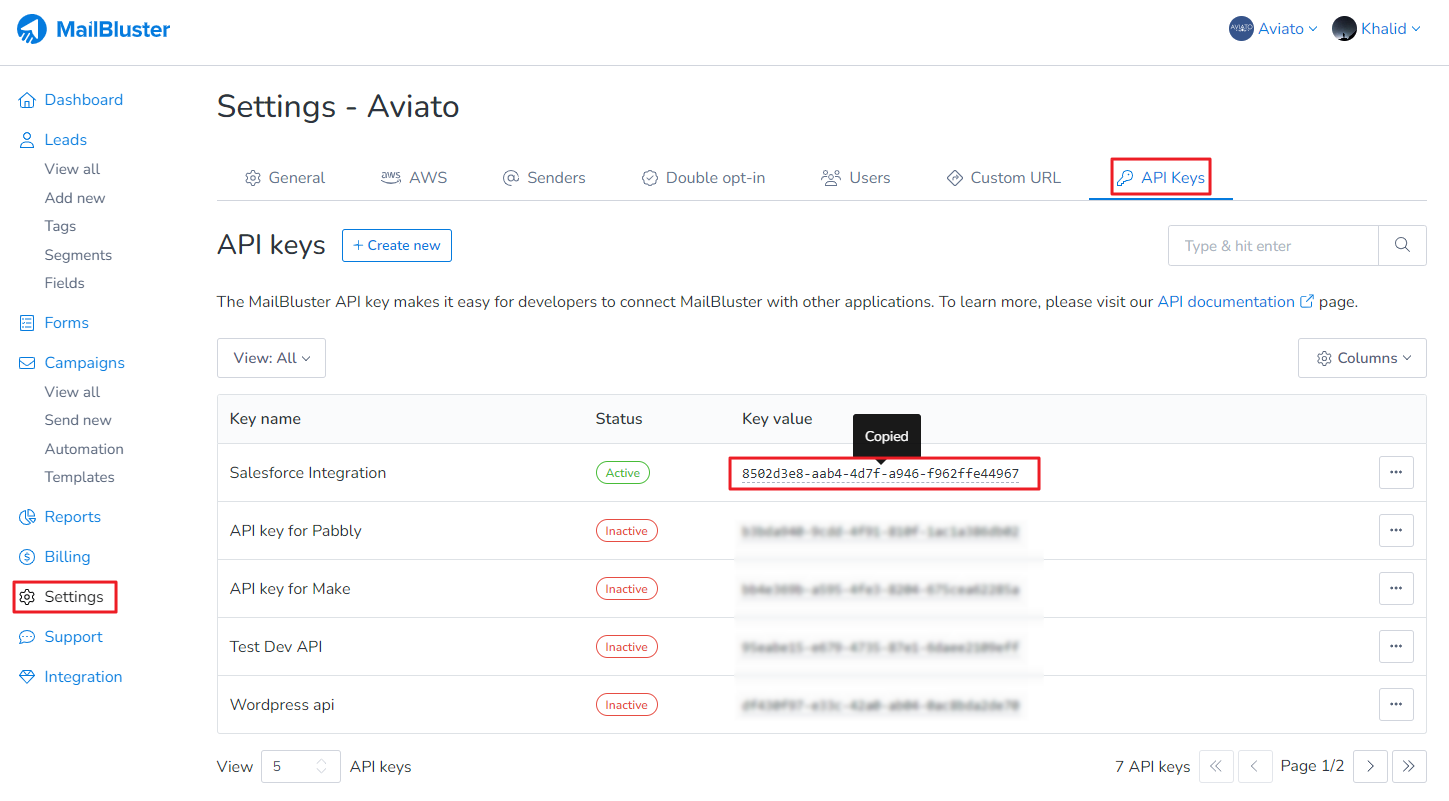
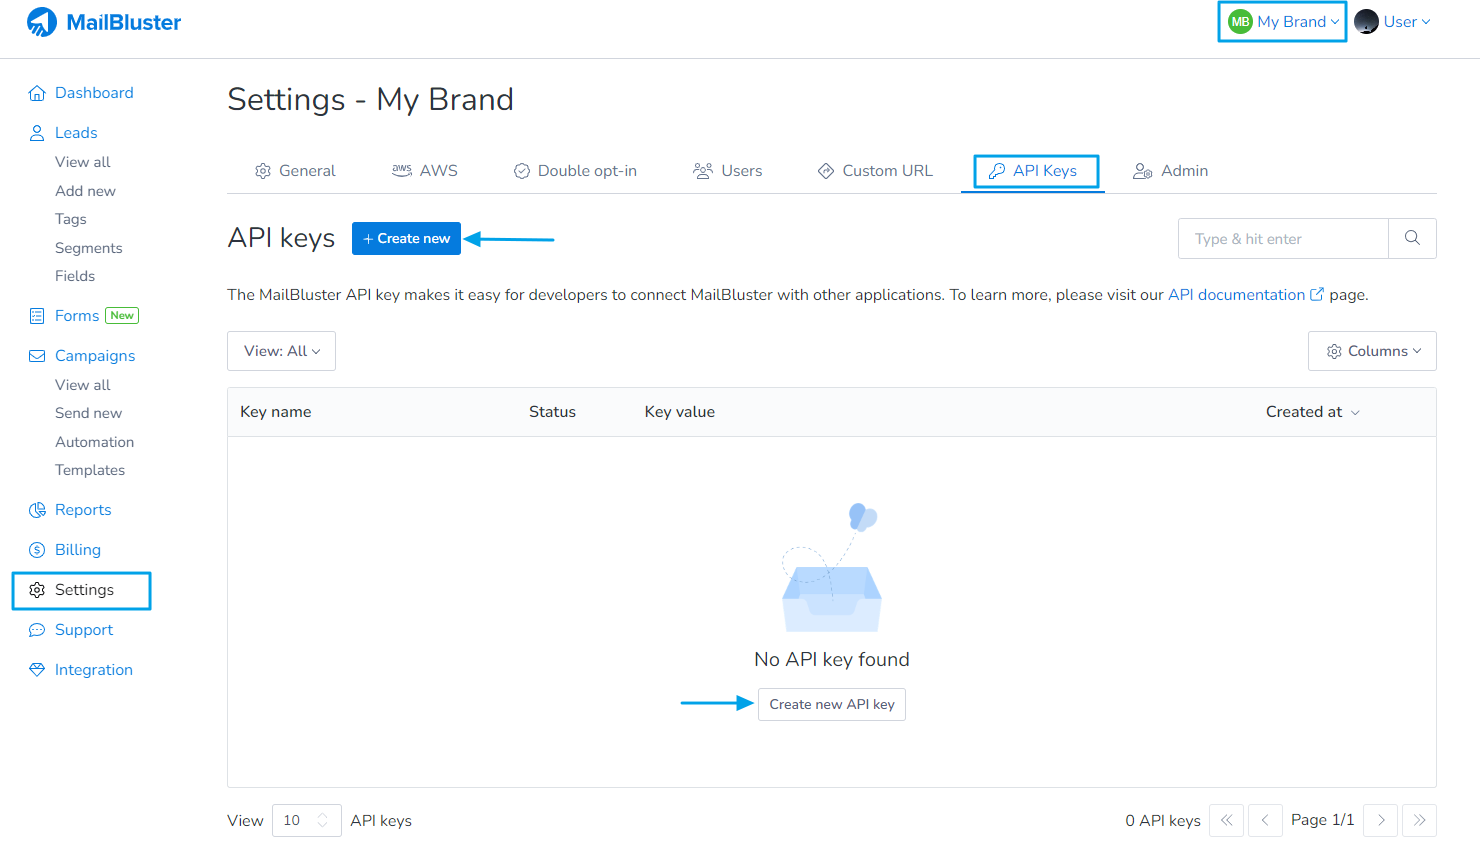
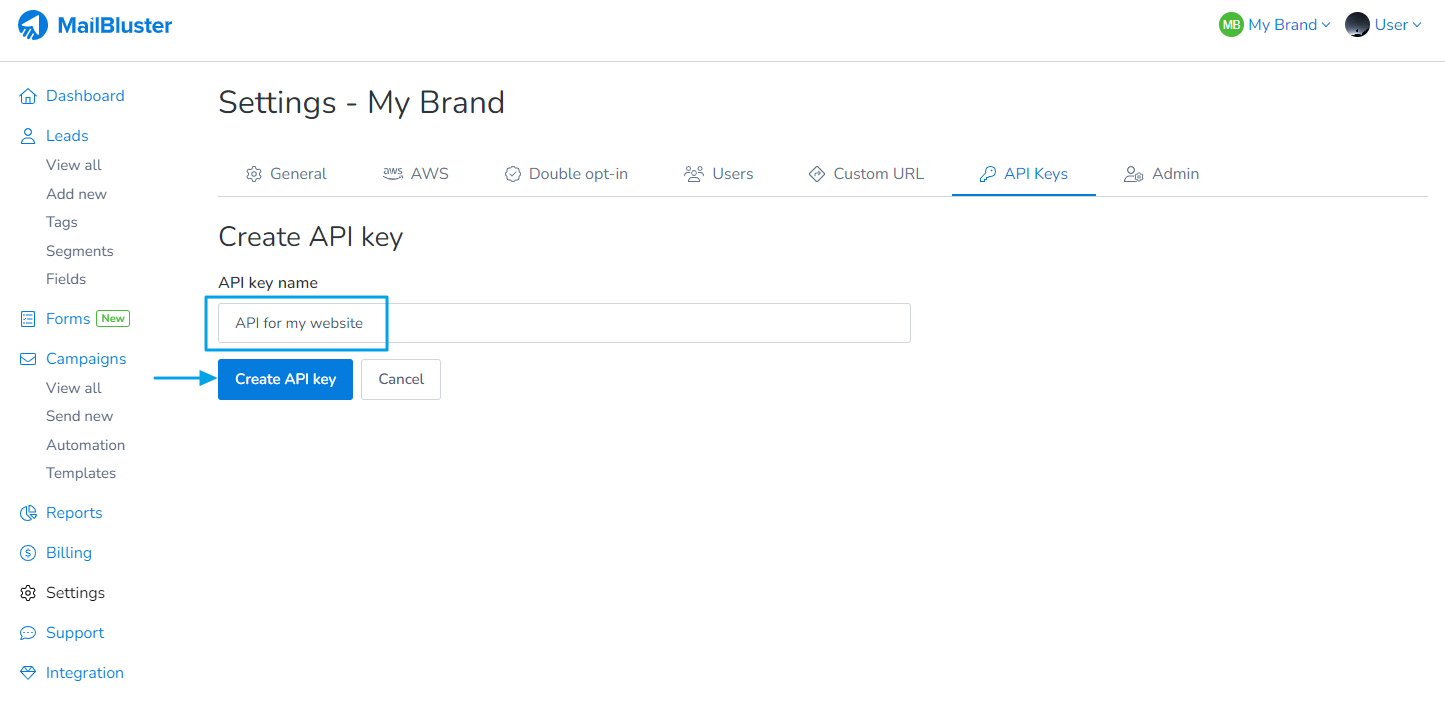
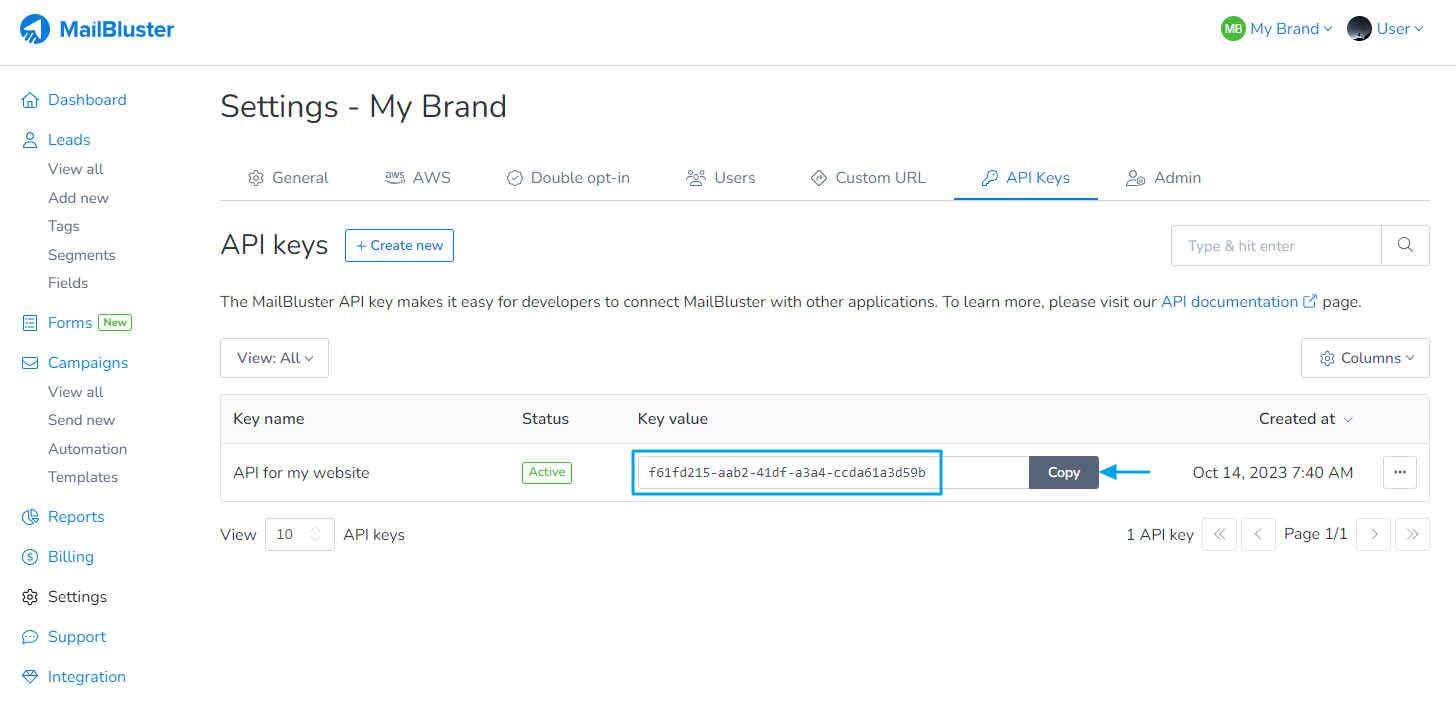
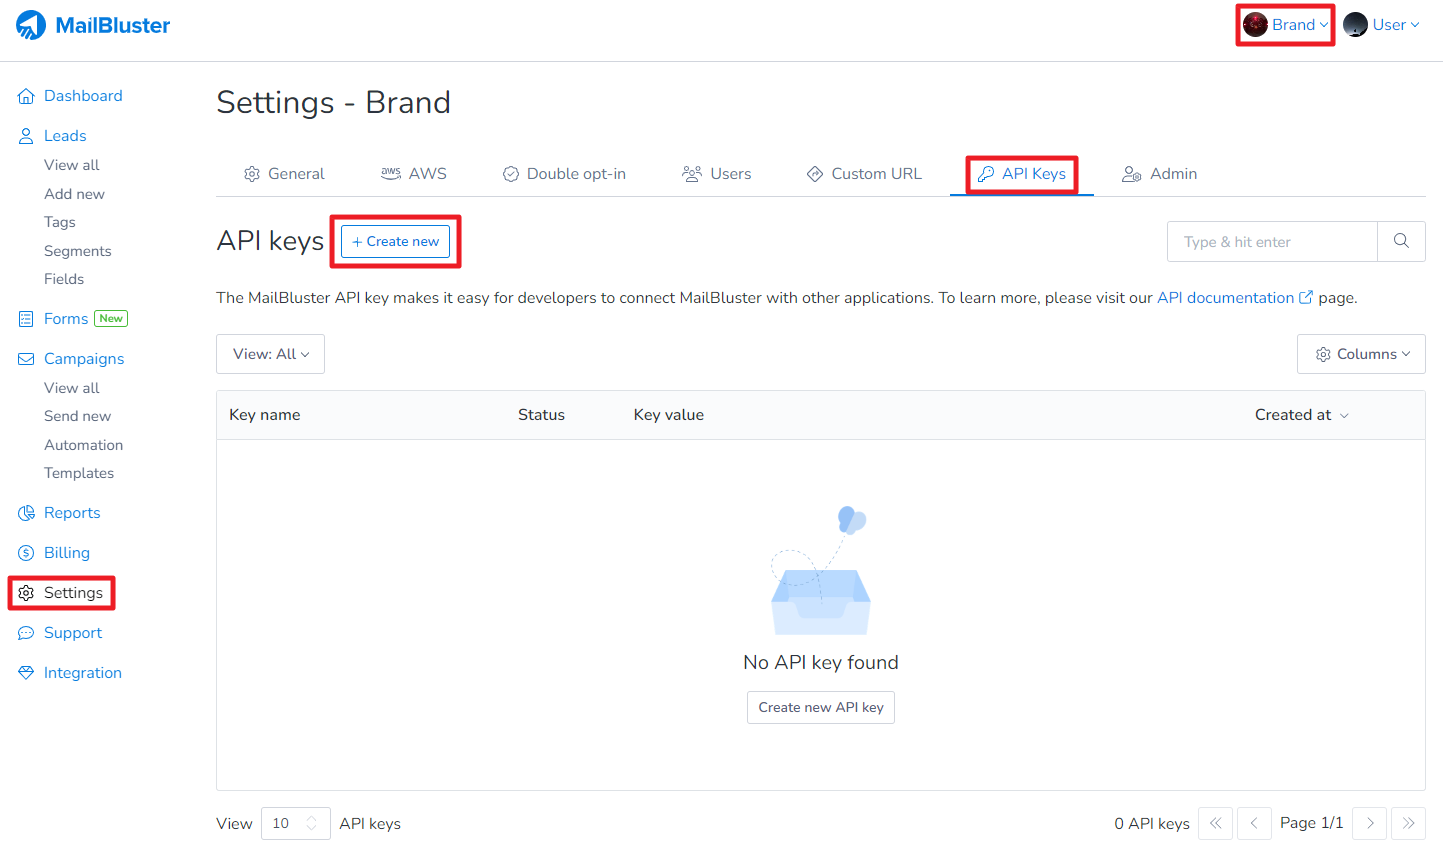
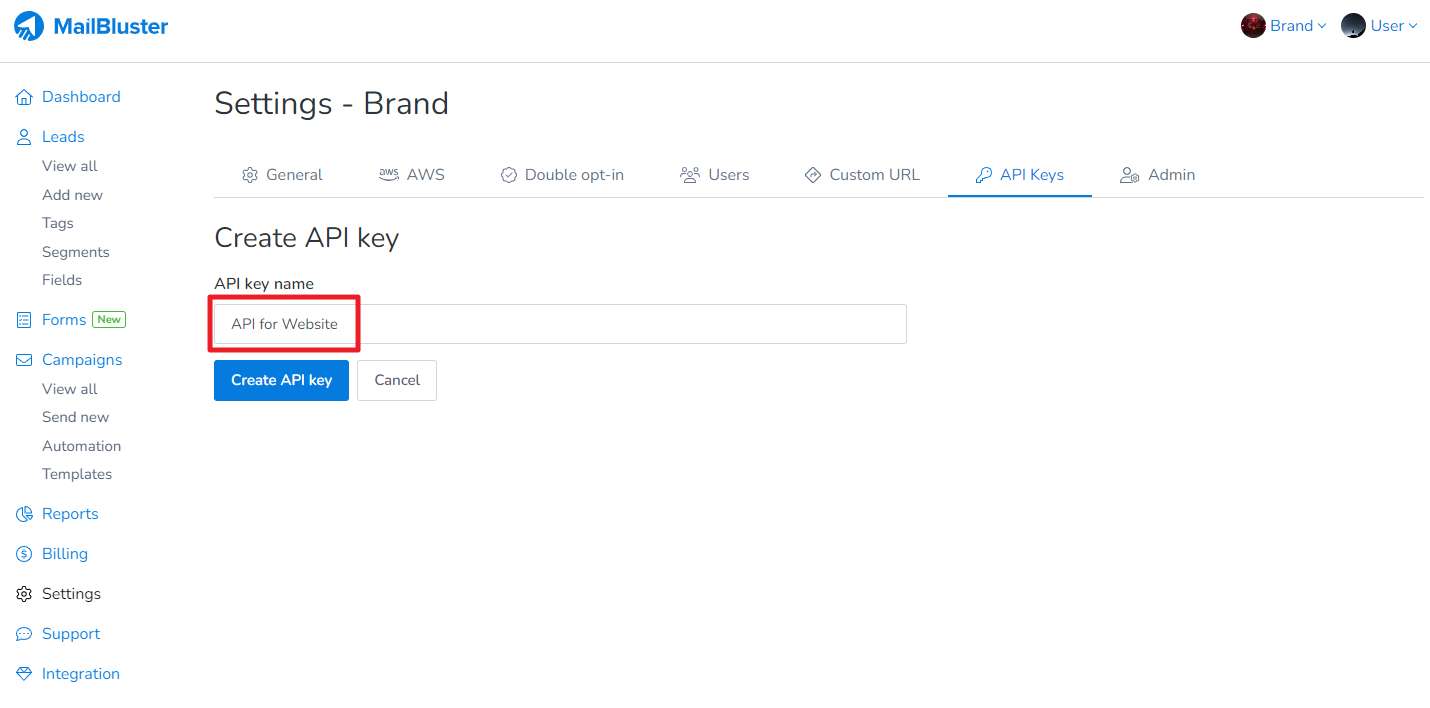
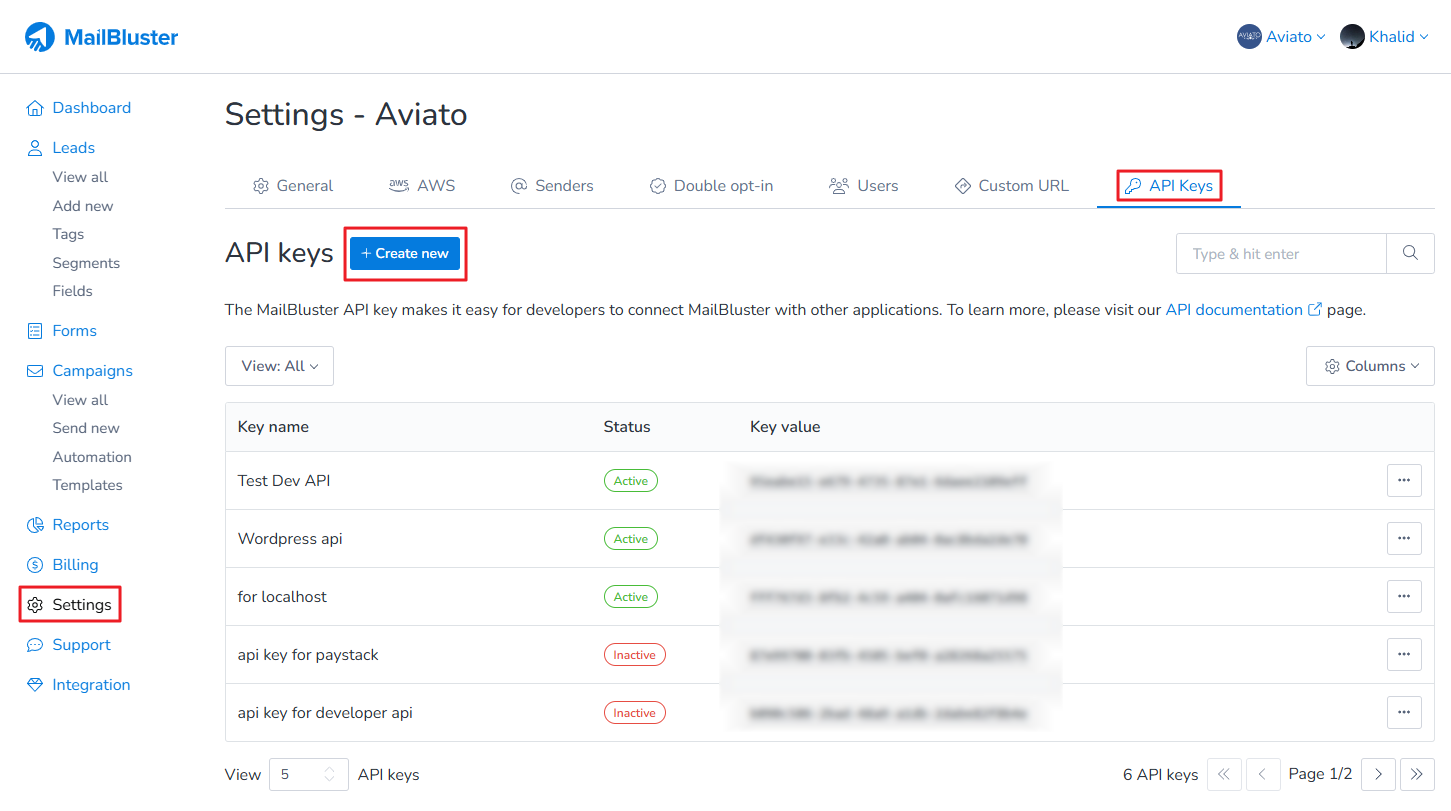
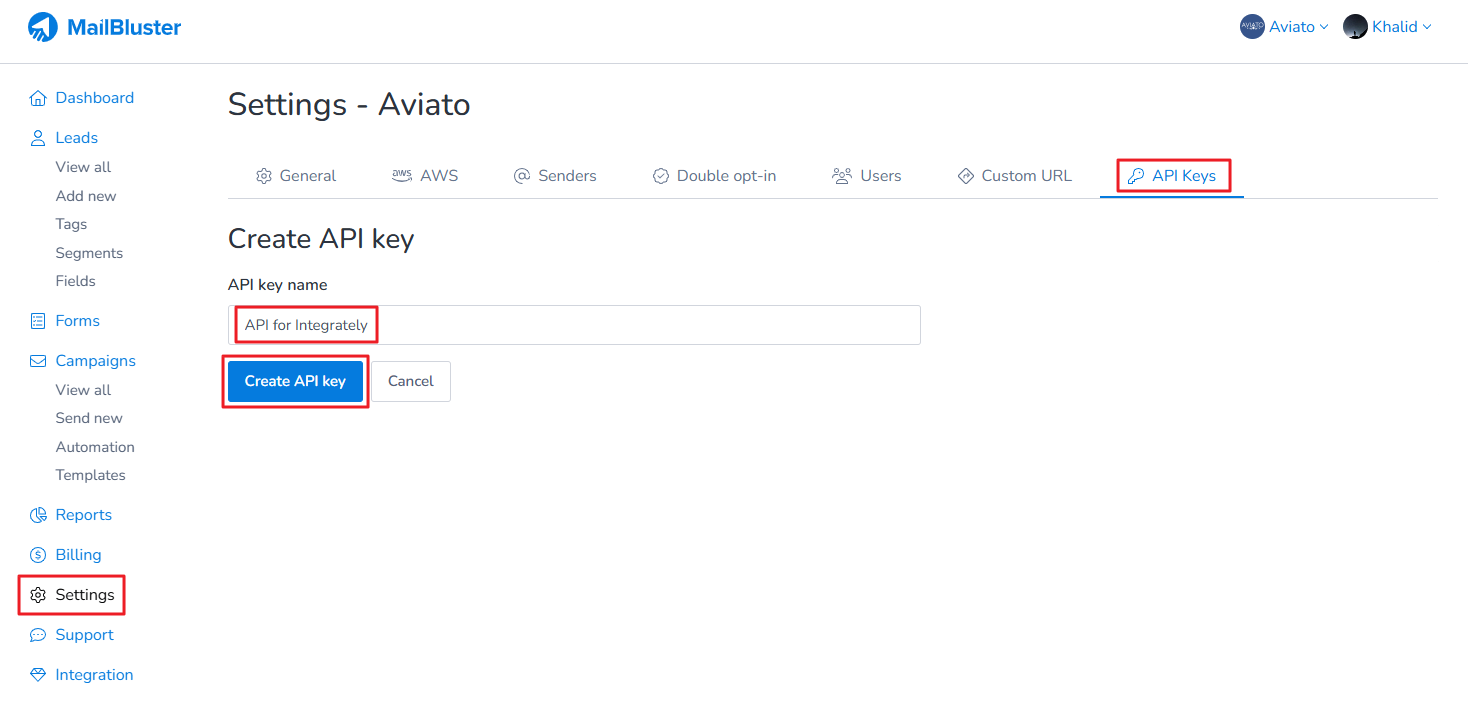
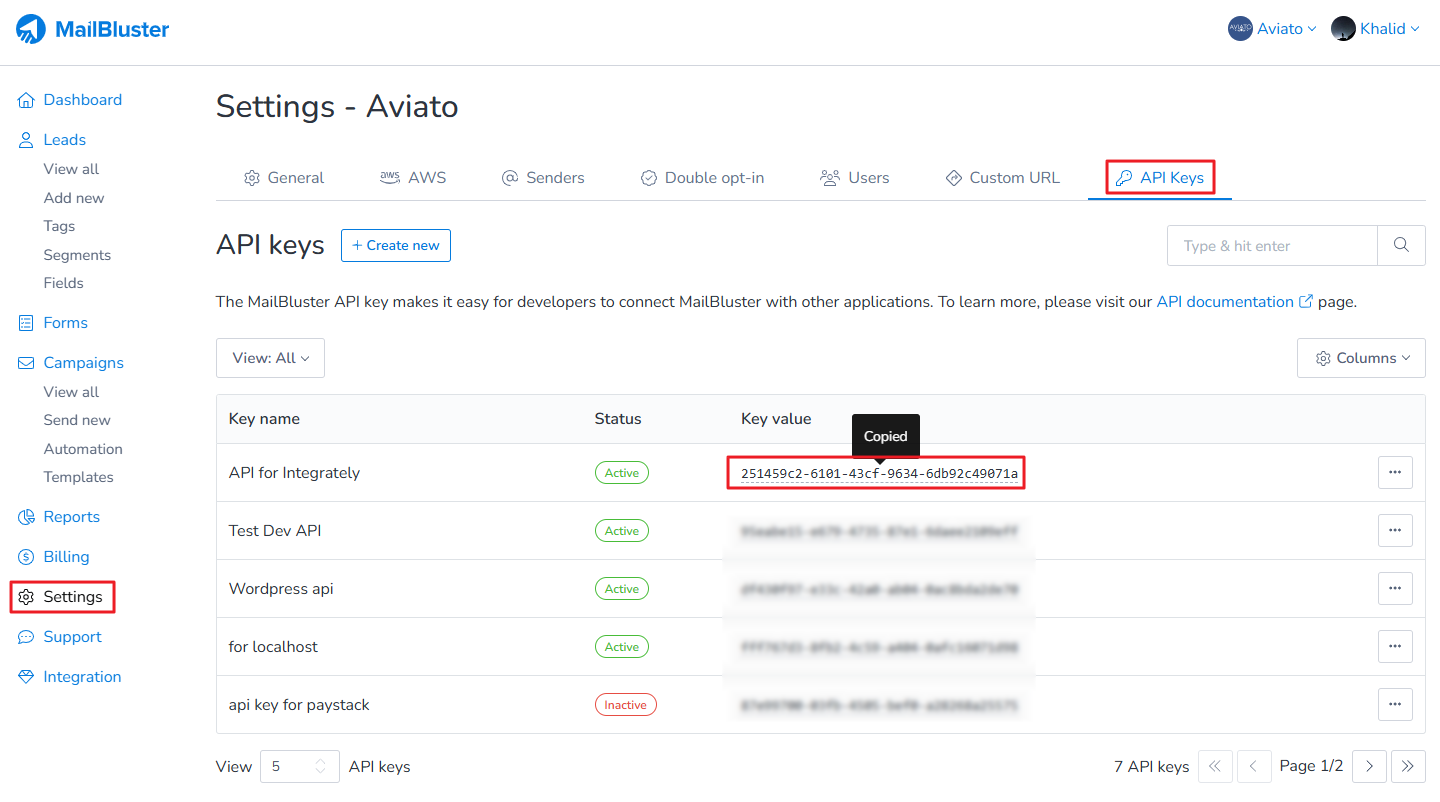
Here you will learn how to obtain API key from MailBluster. First sign in to your MailBluster account, and click on your Brand > Settings > API Keys > Create new or Create new API Key.
Type a name for the API Key and click Create API Key.
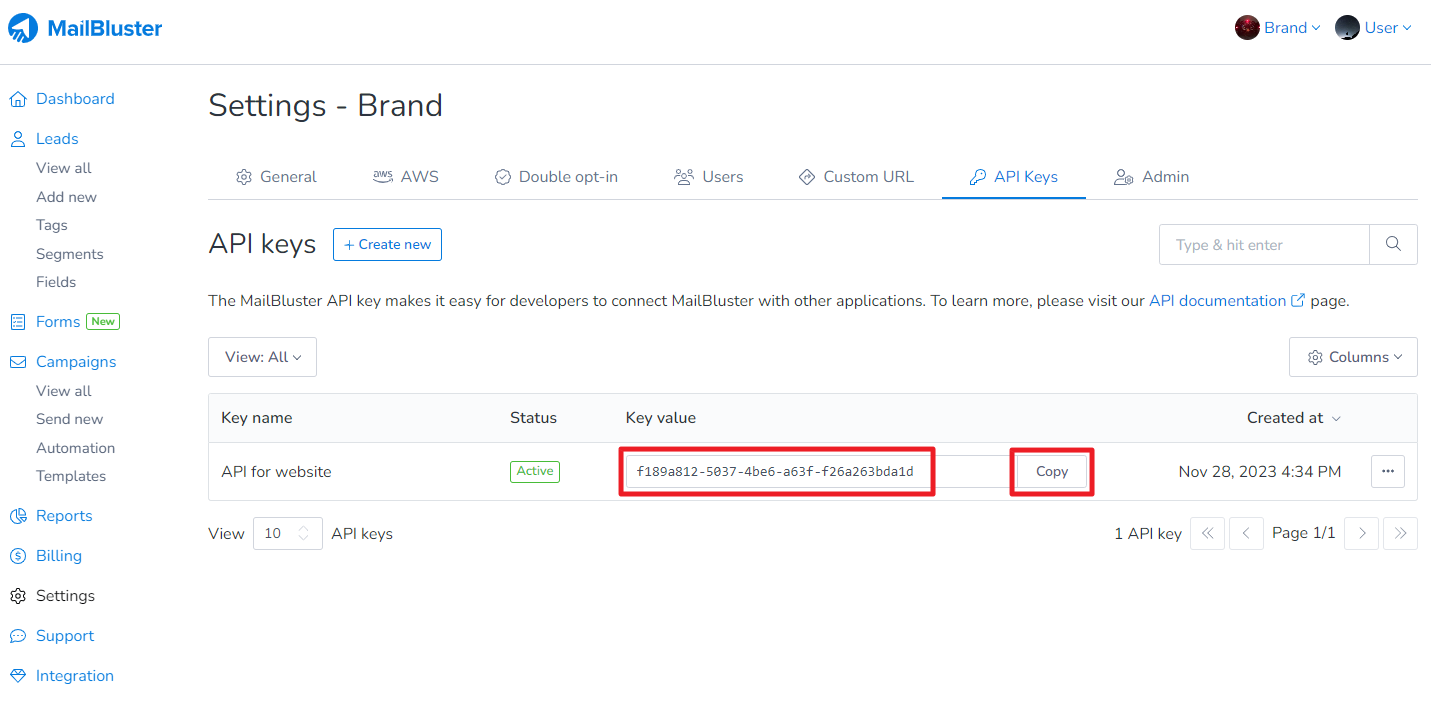
Your API key is generated and is now ready for use. Just copy the key, and you’re good to go.
MailBluster Form integration in WordPress site can be achieved through two simple methods. These options allow form data to be captured directly from a website and sent to a MailBluster subscriber list for automated email marketing.
The two supported methods for MailBluster Form integration in WordPress site are:

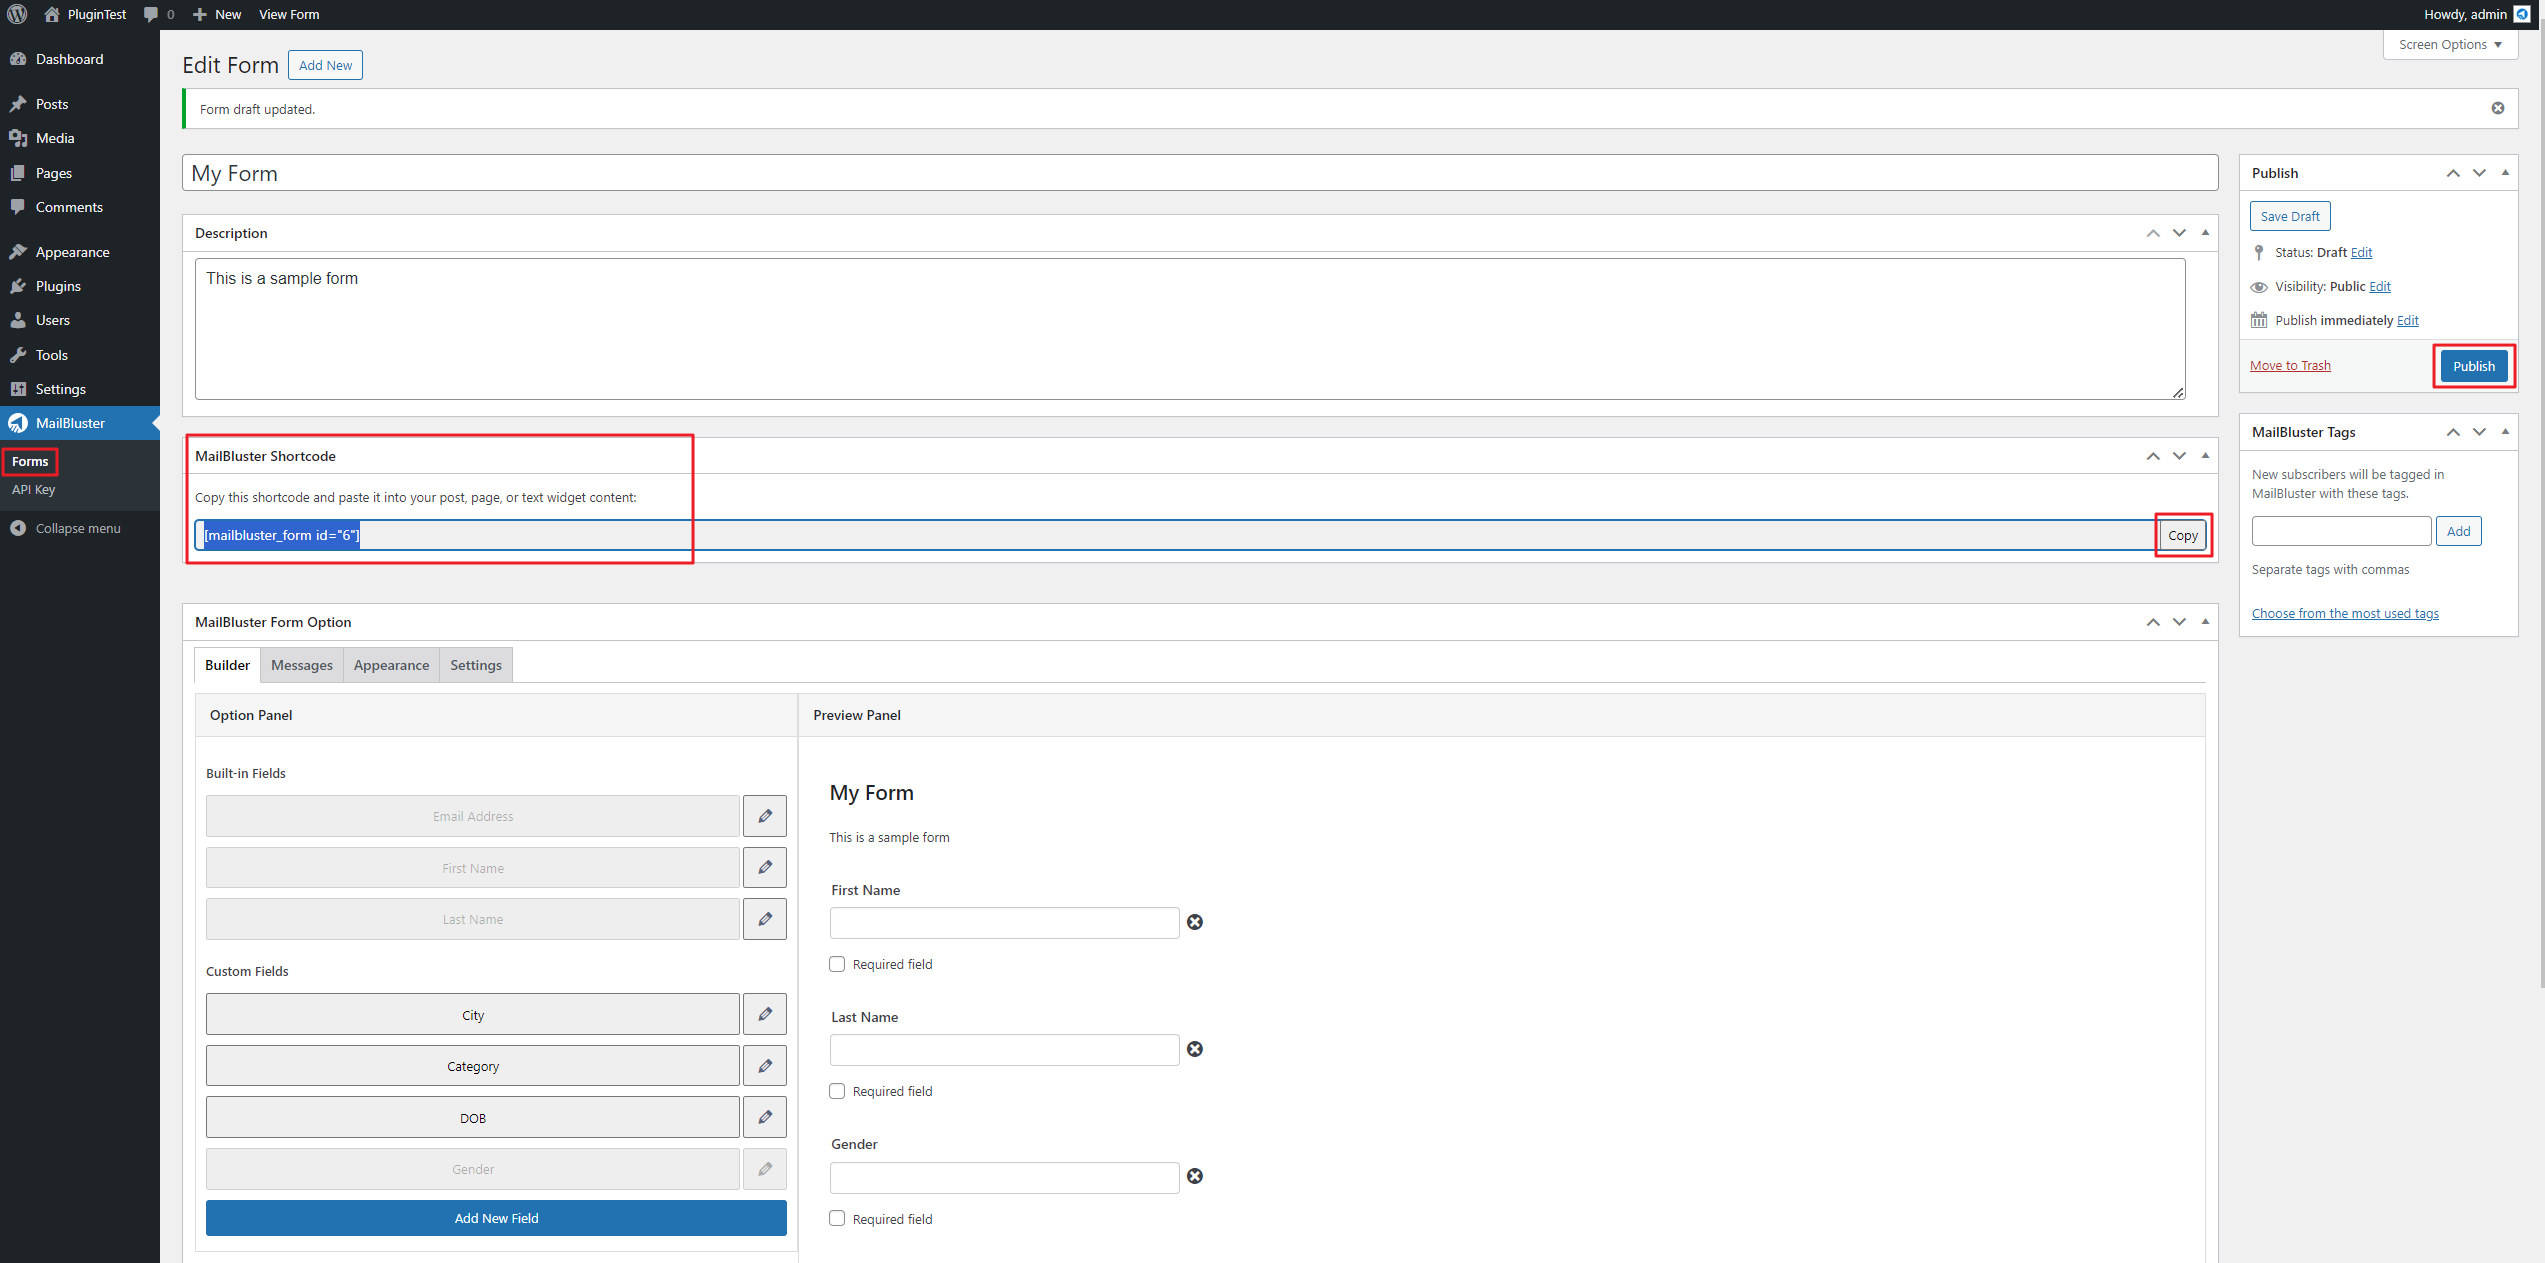
![Click the '+' symbol and drag and drop the Shortcode [/] into the WordPress page editor.](https://mailbluster.com/wp-content/uploads/2024/06/form28.png)
![Paste the MailBluster Shortcode under this [/] Shortcode field.](https://mailbluster.com/wp-content/uploads/2024/06/form29.png)


![Select the highlighted [Table] Email New Leads: Leads Tables and then click Continue.](https://mailbluster.com/wp-content/uploads/2024/11/zapier13-1.png)