What is AWS?
What is Amazon SES?
What is an AWS Region?
Pricing plans of Amazon SES
What is Amazon SNS?
Why do I need Amazon SNS?
Connecting AWS account with MailBluster
Can I use MailBluster without an AWS account?
Do I need to pay Amazon to create AWS Account?
Do I need to have a website for my AWS Account?
Do I need to pay an additional cost to AWS for using Amazon SES?
How to choose AWS Region for MailBluster?
How to move out of Amazon SES Sandbox?
Can I use my MailBluster Account when my AWS Account is in sandbox?
What is Amazon SES Sandbox and why does my account have sandbox access?
What if I don’t get approval from Amazon SES after requesting to move out of the sandbox?
I’m getting the error ‘Unable to connect with Amazon SES using your AWS account’
How to verify a domain in Amazon SES?
How to verify an email address in Amazon SES?
How to verify Sender Domain from MailBluster?
How to verify Sender Email Address from MailBluster?
What is a Sender Identity?
What is a Custom Domain?
How to set Custom MAIL FROM Domain in AWS?
Why set Custom MAIL FROM Domain in Amazon SES?
How to prevent Gmail from showing ‘via amazonses.com’?
Why my AWS Account has been “Paused”?
How to resolve AWS Account “Pause” issue?
Cloudflare configuration is not working with HTTPS?
How can I achieve positive sender reputation if I switch to a new domain?
I am getting this error: Unable to find the permission of ‘AmazonSESFullAccess’.
I am getting this error: Unable to find the permission of ‘AmazonSNSFullAccess’.
Gmail is still not showing the one-click unsubscribe (list-unsubscribe header) in my emails?
What is a Campaign?
How to edit a Campaign?
How to rename a campaign?
How to duplicate a campaign?
How to schedule a campaign in MailBluster?
How to cancel a scheduled campaign?
Changing the width of campaign email
Using query string in campaign
Removing MailBluster branding
What is double opt-in?
How can I set-up Double Opt-In for my campaign?
Difference between Standard Campaigns and Automation Campaigns
Is there a way to sent email in plain text using MailBluster?
How to create and send an email campaign?
How to send Personalized Email from MailBluster?
How to compose email using Drag and Drop Editor?
How can we share the email campaign from MailBluster?
How to set Unsubscribe URL using Drag and Drop editor?
How to set Unsubscribe URL using HTML editor?
How to set Unsubscribe URL using WYSIWYG Editor?
Why my email campaign is showing “outdated”?
Why is my campaign still in the “waiting” status?
Can I store images in MailBluster?
What is the maximum file size of an image file that can be used in an email campaign?
Why does the text look okay in the editor, but in the campaign, it becomes broken?
How to use UTM for tracking in MailBluster using Google Analytics?
If I exceed my sending limit, will my campaign continue tomorrow automatically?
How do you resolve “Content is invalid, merge tag or block tag contains error”?
How to resolve “AWS connection is invalid” under the “Sender email address?”
Is the short preheader text I use in my email campaign getting automatically populated?
I have set up my URL but in the test mail, it is showing 404 error and redirecting it to different URL
How to use default Merge Tag in email campaign if the recipients do not have the data (First Name, Last Name, Full Name, etc)?

What is Transient Bounce?

Last update: March 18, 2024

In email marketing, a “transient bounce,” also known as a “soft bounce,” refers to a temporary failure to deliver an email to a recipient. Unlike permanent bounces, transient bounces suggest a temporary issue that may be resolved in the future. Common reasons for transient bounces include:

  1. Mailbox Full: The recipient’s mailbox may be full, preventing it from accepting new emails. Once the recipient frees up space in their mailbox, future emails may be delivered successfully.
  2. Temporary Server Issues: The email server at the recipient’s end might be experiencing temporary problems, such as being temporarily unreachable or undergoing maintenance.
  3. Message Size Exceeded: Some email servers have restrictions on the size of incoming emails. If the email exceeds the maximum allowed size, it may result in a transient bounce.
  4. Greylisting: Some mail servers use greylisting as an anti-spam technique. When an email is initially sent, the recipient’s server may respond with a temporary failure, expecting the sending server to retry after a specific period. Legitimate email servers typically attempt redelivery, while many spam senders do not.
  5. DNS Issues: Transient bounces can occur if there are temporary issues with the Domain Name System (DNS), making it challenging for the sending server to locate the recipient’s mail server.

It’s important for email marketers to distinguish between transient bounces and permanent bounces. While permanent bounces warrant removing the email address from the mailing list, transient bounces may resolve themselves over time.
What is Permanent Bounce?

Last update: March 18, 2024

In email marketing, a “permanent bounce” refers to the situation where an email cannot be delivered to a particular recipient, and the failure is considered permanent. This typically happens when the email address is invalid, no longer exists, or is consistently rejecting the messages. Permanent bounces are also known as “hard bounces.”

There are various reasons why an email might permanently bounce:

  1. Invalid Email Address: The email address provided is not correctly formatted or does not exist.
  2. Domain Does Not Exist: The domain part of the email address (after the “@” symbol) does not correspond to a valid domain on the internet.
  3. Mailbox Does Not Exist: The email server cannot find a mailbox associated with the given email address.
  4. Mailbox Is Full: The recipient’s mailbox has reached its storage limit, and no more emails can be accepted.
  5. Blocked by Server: The email server or spam filter at the recipient’s end has blocked the email.

It’s important for email marketers to regularly clean their email lists by removing addresses that result in permanent bounces. This helps improve email deliverability rates and ensures that future email campaigns reach the intended audience.
How to check Bounce Leads for a certain campaign?

Last update: March 25, 2024

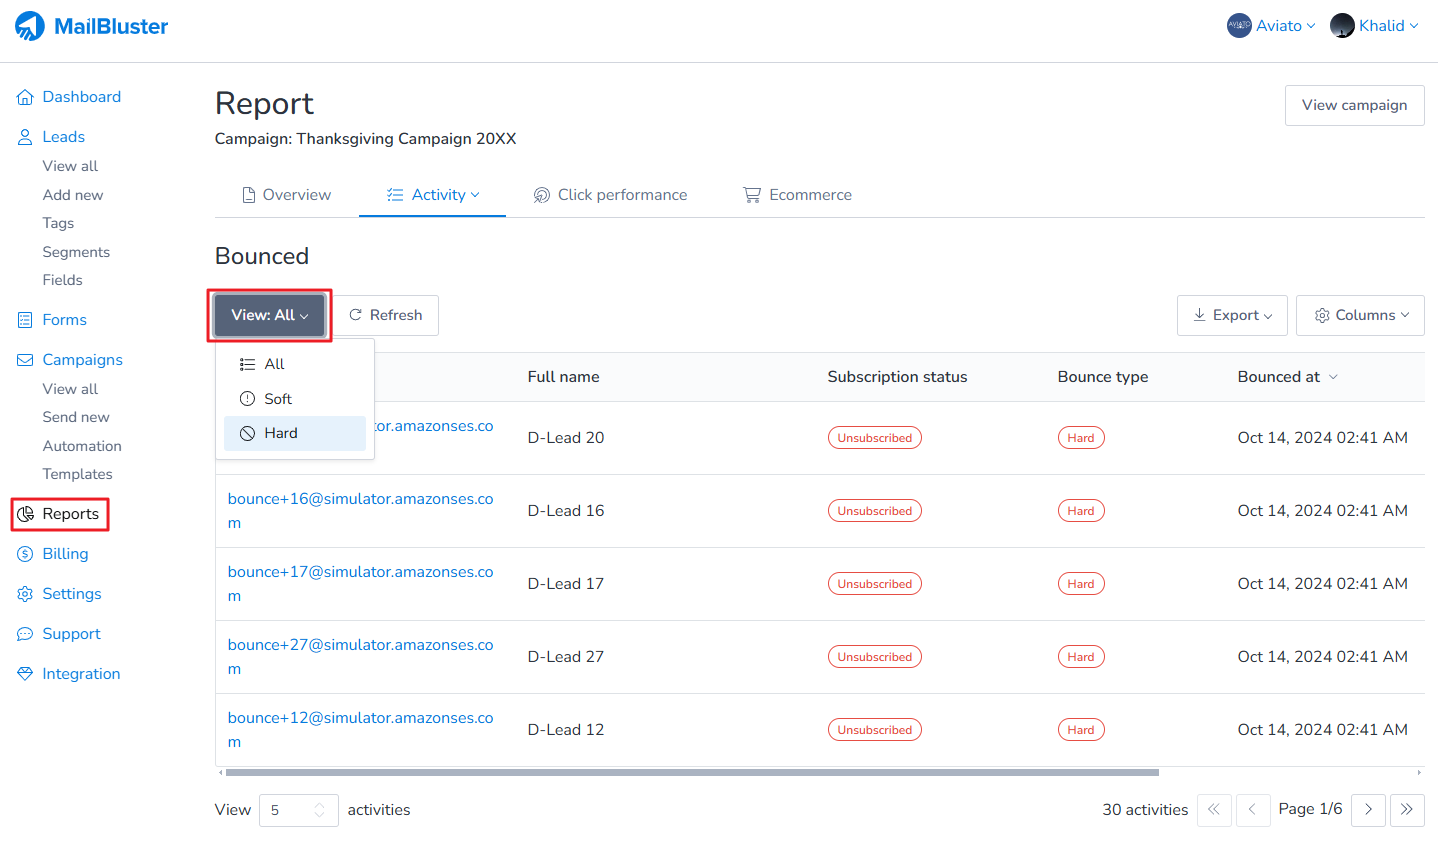
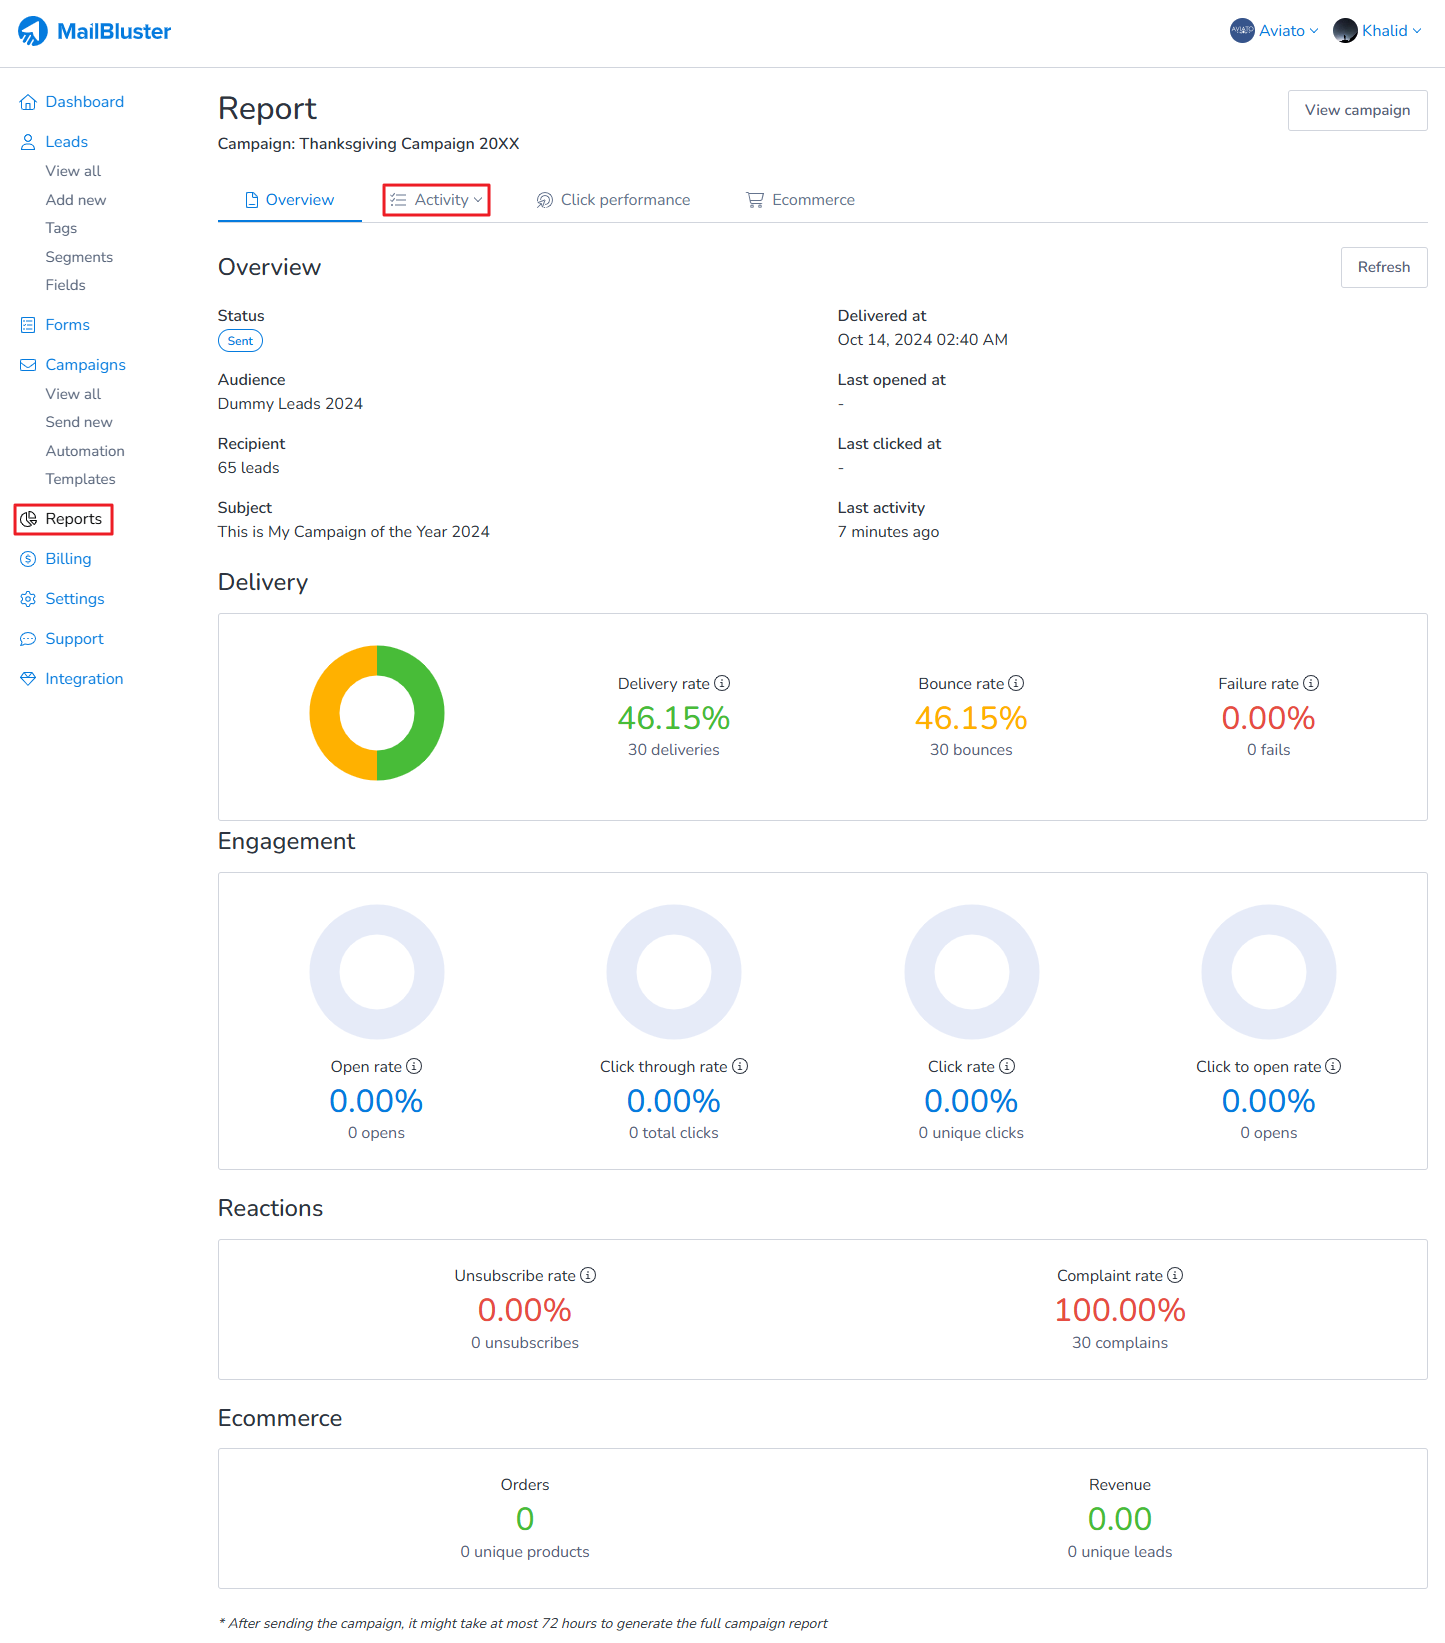
In your campaign Report section, you will find a metric that says Bounced. It shows the number of Bounced Leads in your campaign. It is clickable, and by clicking this, you will be able to view the detailed bounced lead information including bounce type and subtype.
It shows the number of Bounced Leads in your campaign. By clicking this, you will be able to view the detailed bounced lead information including bounce type and subtype.

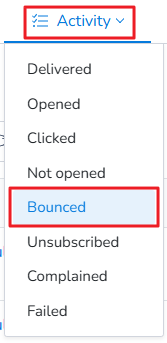
List of Hard Bounced (permanent bounced) leads and Soft Bounced (transient bounced) leads can be seen after clicking Bounced

List of Hard Bounced (permanent bounced) leads and Soft Bounced (transient bounced) leads after clicking Bounced

More Detailed information can be found if any bounced lead is clicked in the Activity tab. Here you can check whether the Lead is Transient Bounced (Soft Bounced)

Bounced lead is clicked in the Activity tab

Or, the Lead is Permanent Bounced (Hard Bounced)

Lead is Permanent Bounced (Hard Bounced)

How to remove Bounced leads?

Last update: March 18, 2024

If you want to remove all the bounced email addresses from your campaigns, you need to create a Standard Segment using the bounced leads activity condition. When the segment is created, you need to select all the leads of that segment and then delete them.

The following steps will guide you to remove the bounced leads or email addresses from your Brand completely:

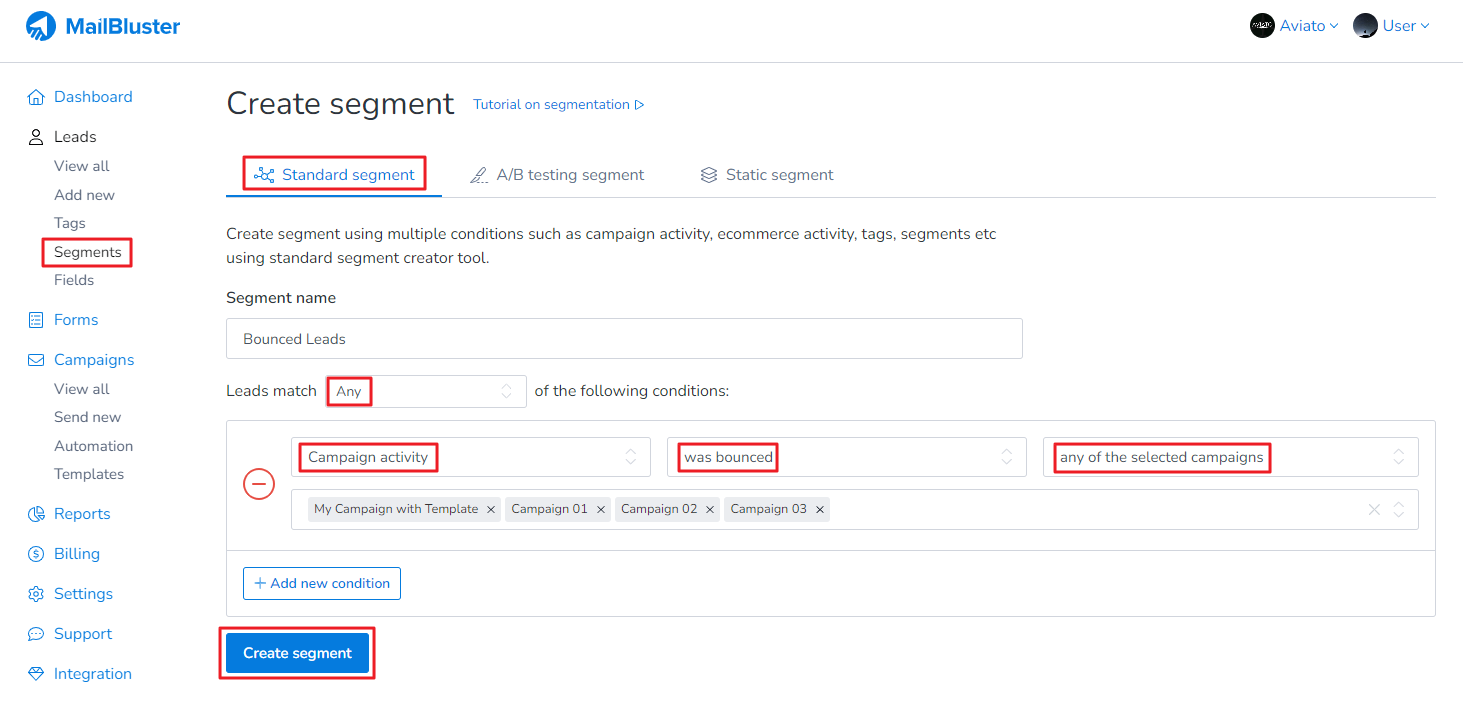
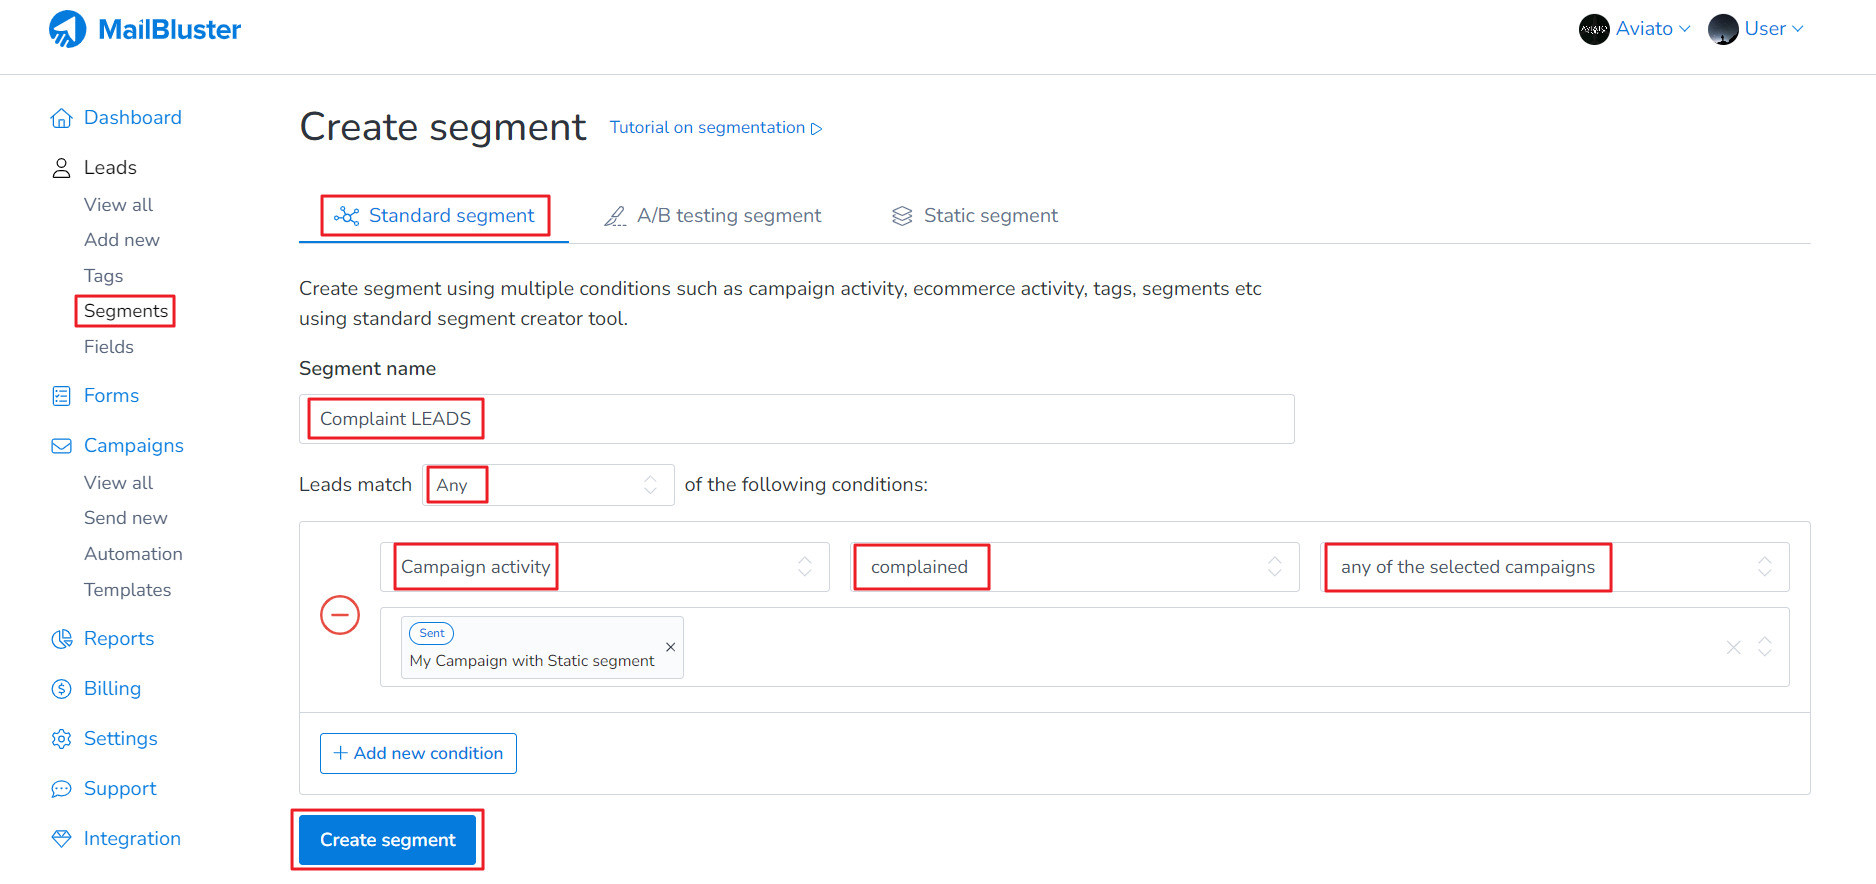
1. Go to Brand > Segments then create a Standard Segment name Bounced Leads. Set the bounced leads activity condition as shown below. Select Leads match: “Any“, Campaign activity to “was bounced“, and “any of the selected campaigns“. Then, select those campaigns which whose leads were bounced. Click Create segment

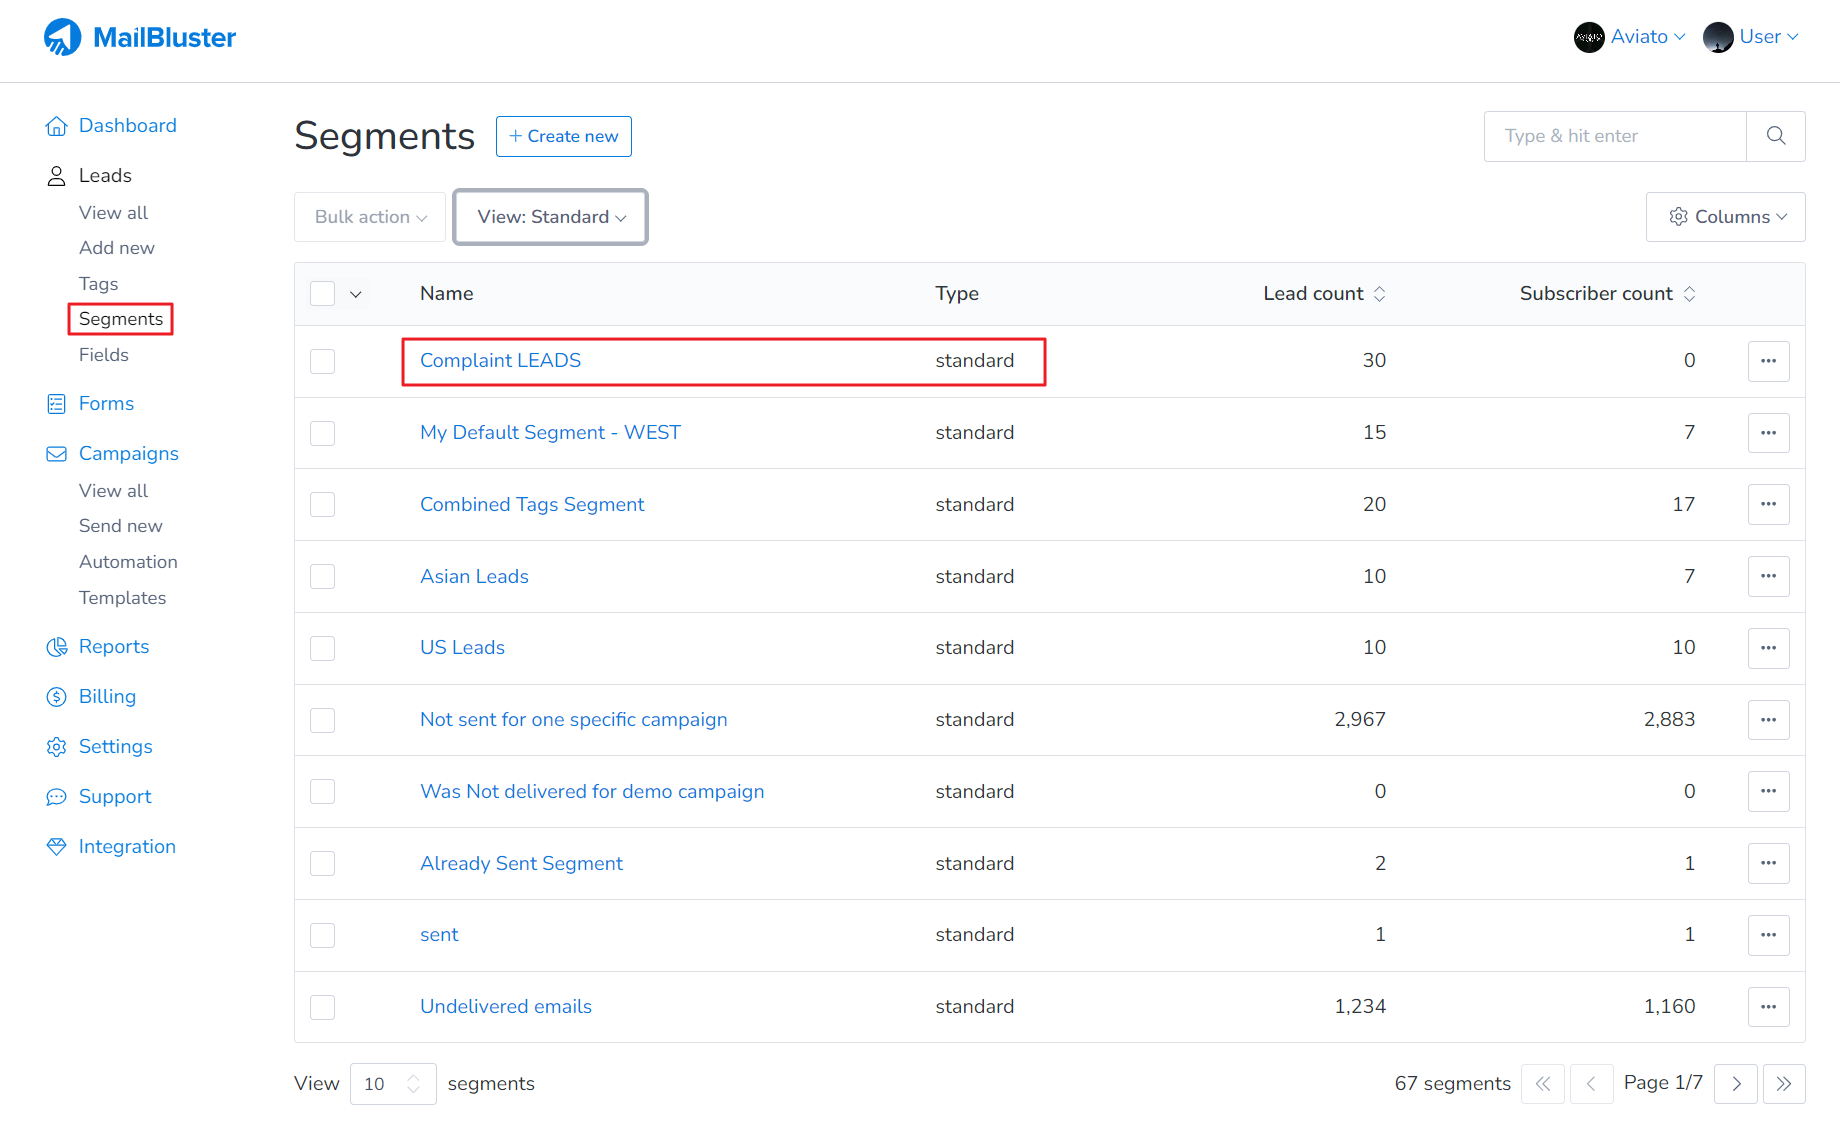
2. A Standard Segment with Bounced Leads will be created as shown below. Then click on the segment named Bounced Leads

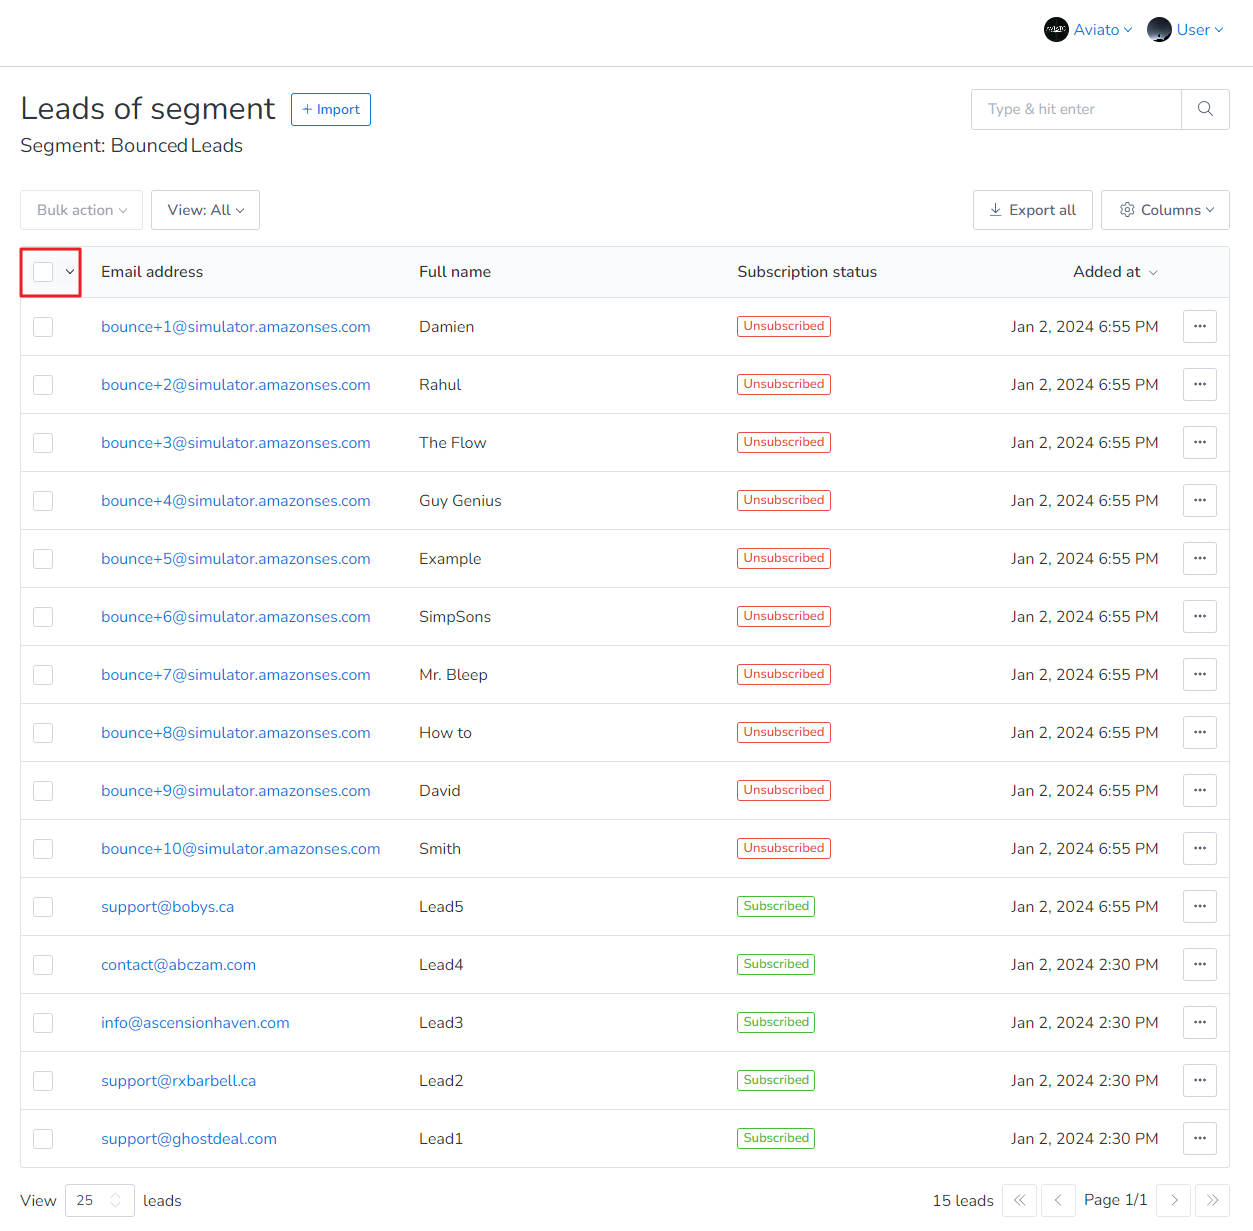
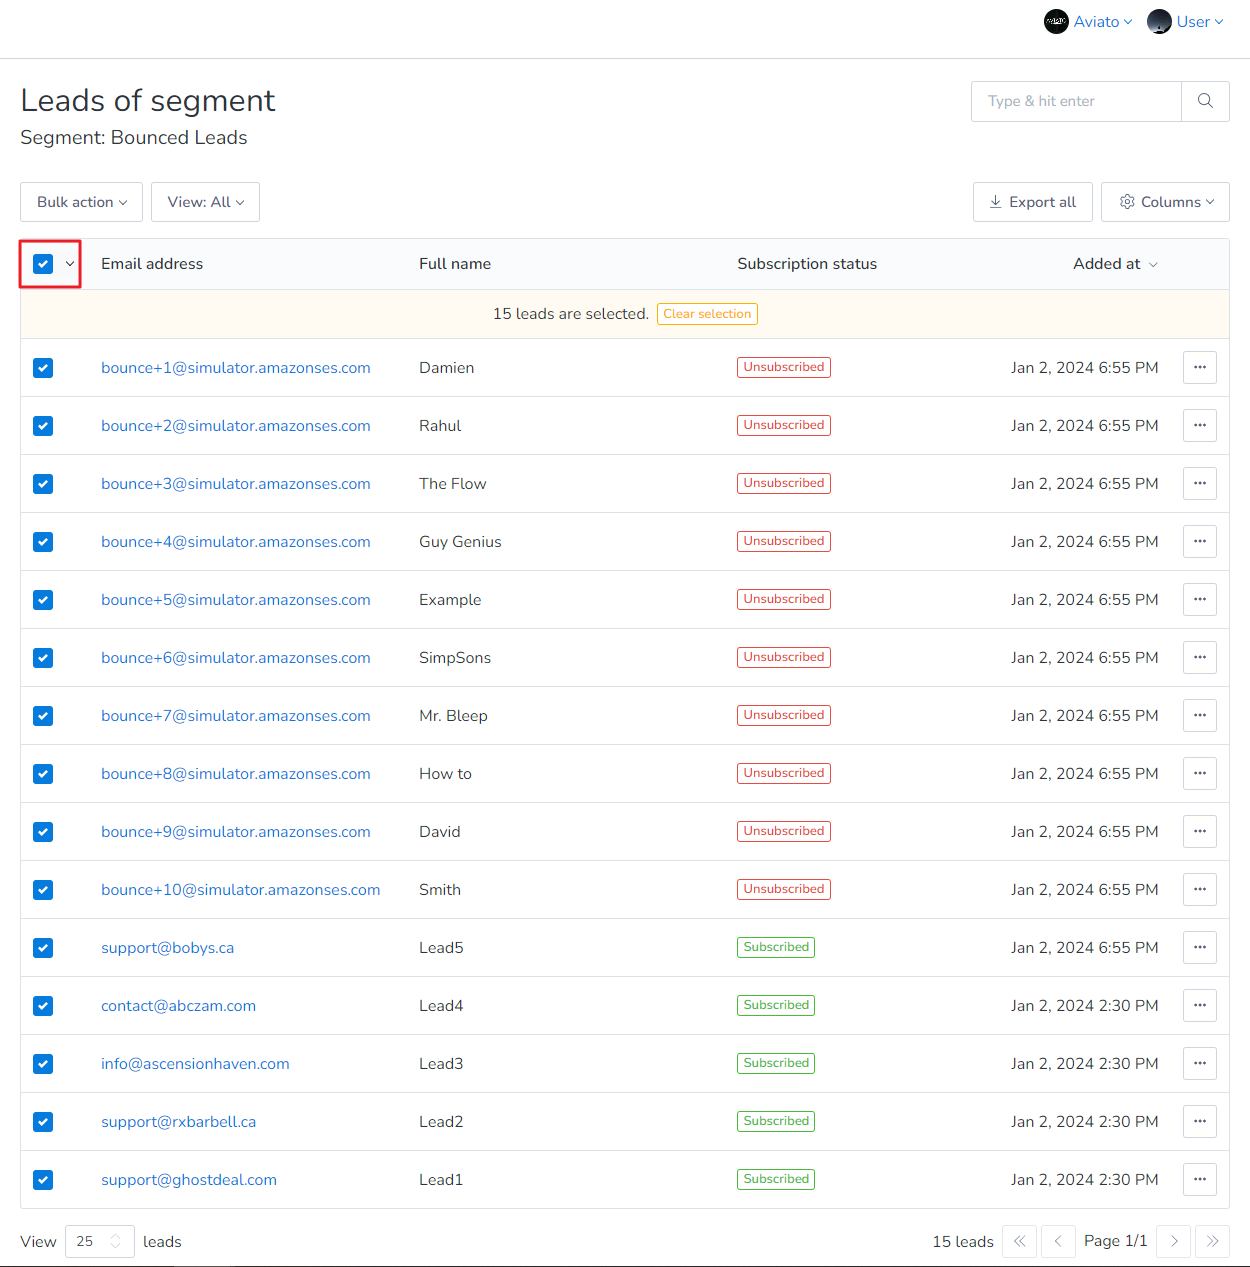
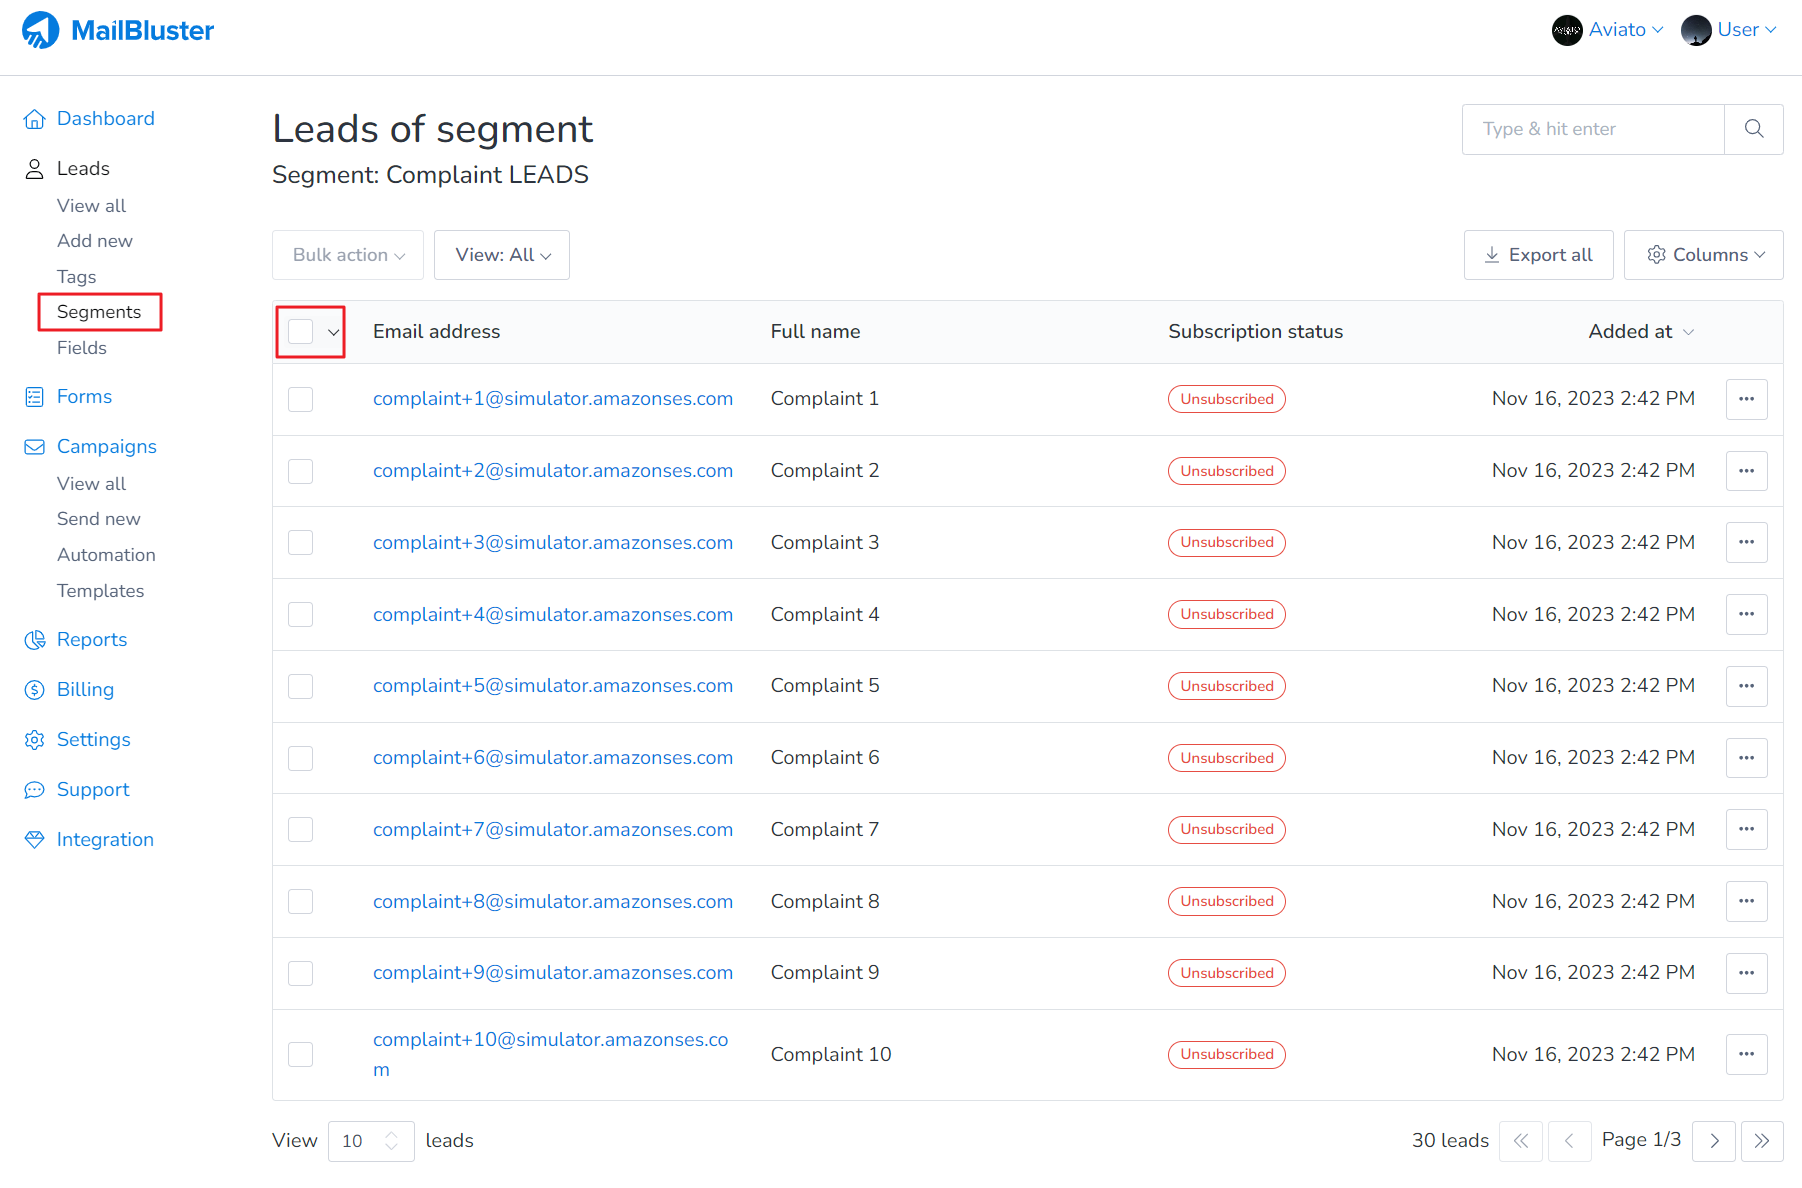
3. You will see a list of Bounced Leads (email addresses) which will appear under that segment. Now click on the check box where it has been highlighted by red marker

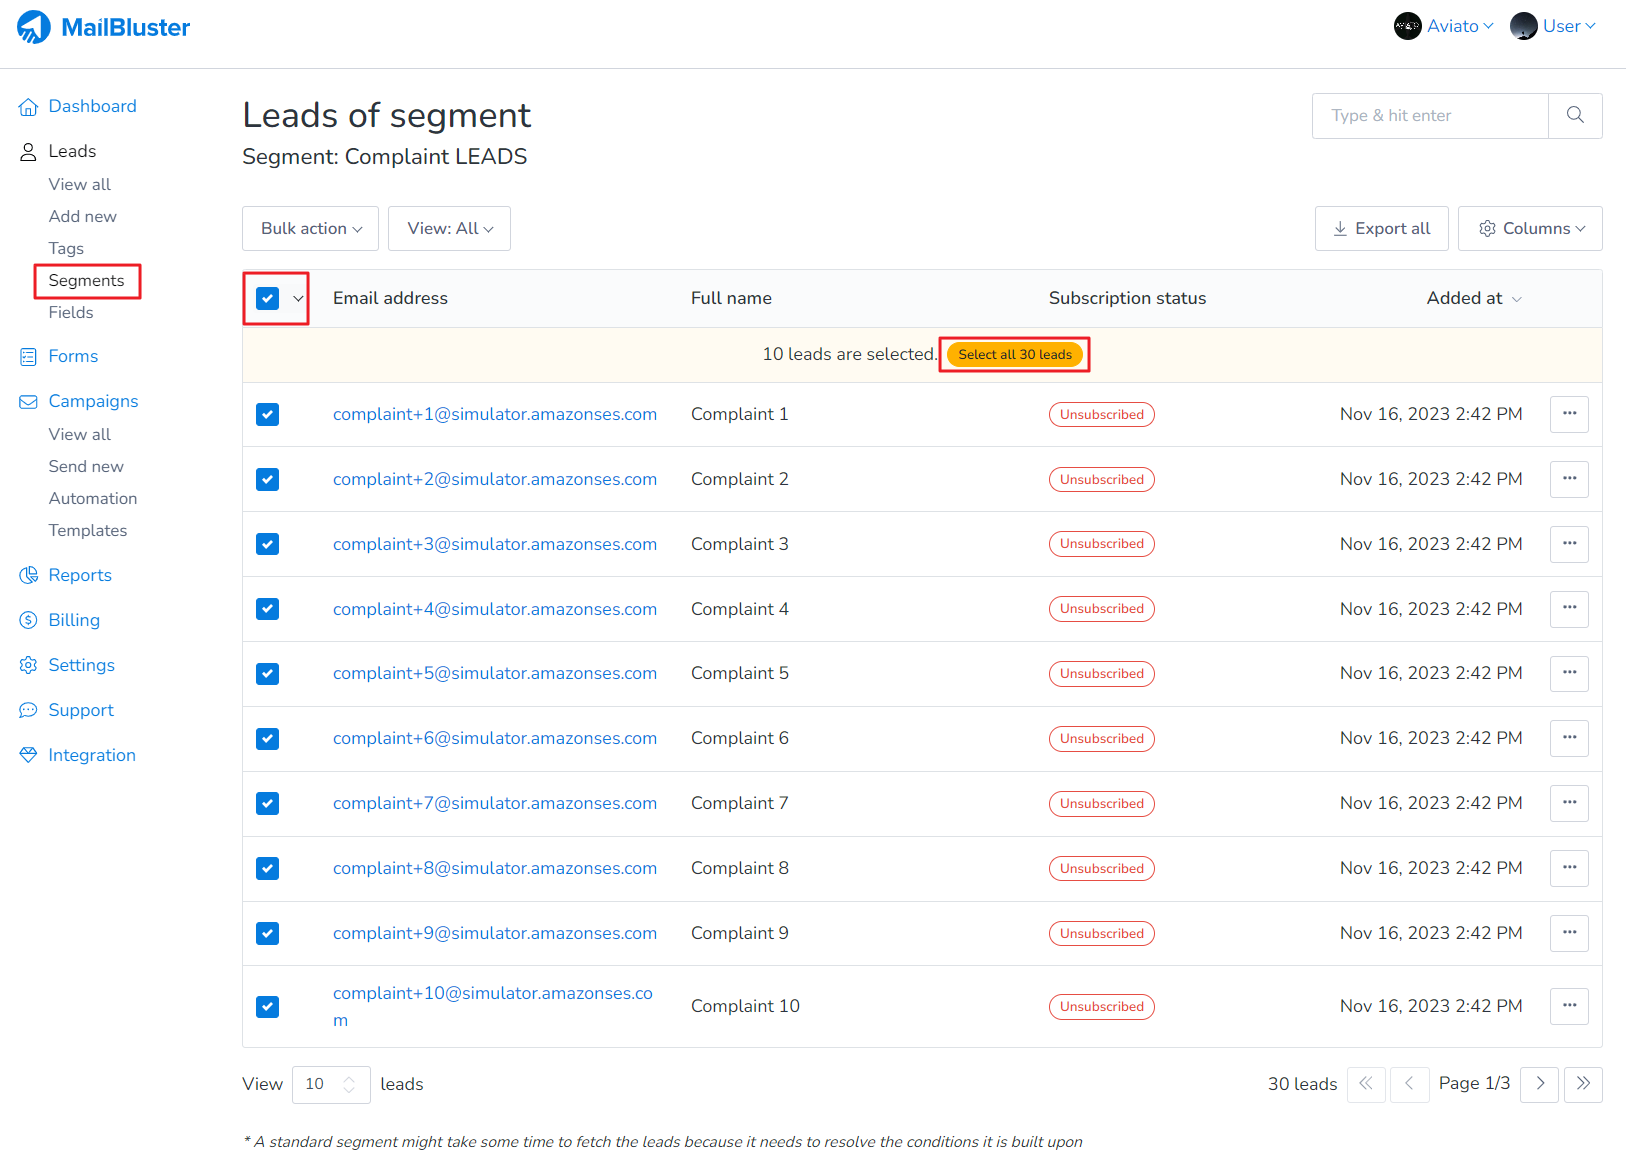
4. After clicking the highlighted checkbox, all the Bounced Leads will be selected. If you have more than hundred leads then click Select all leads – this will select all the bounced leads under that segment

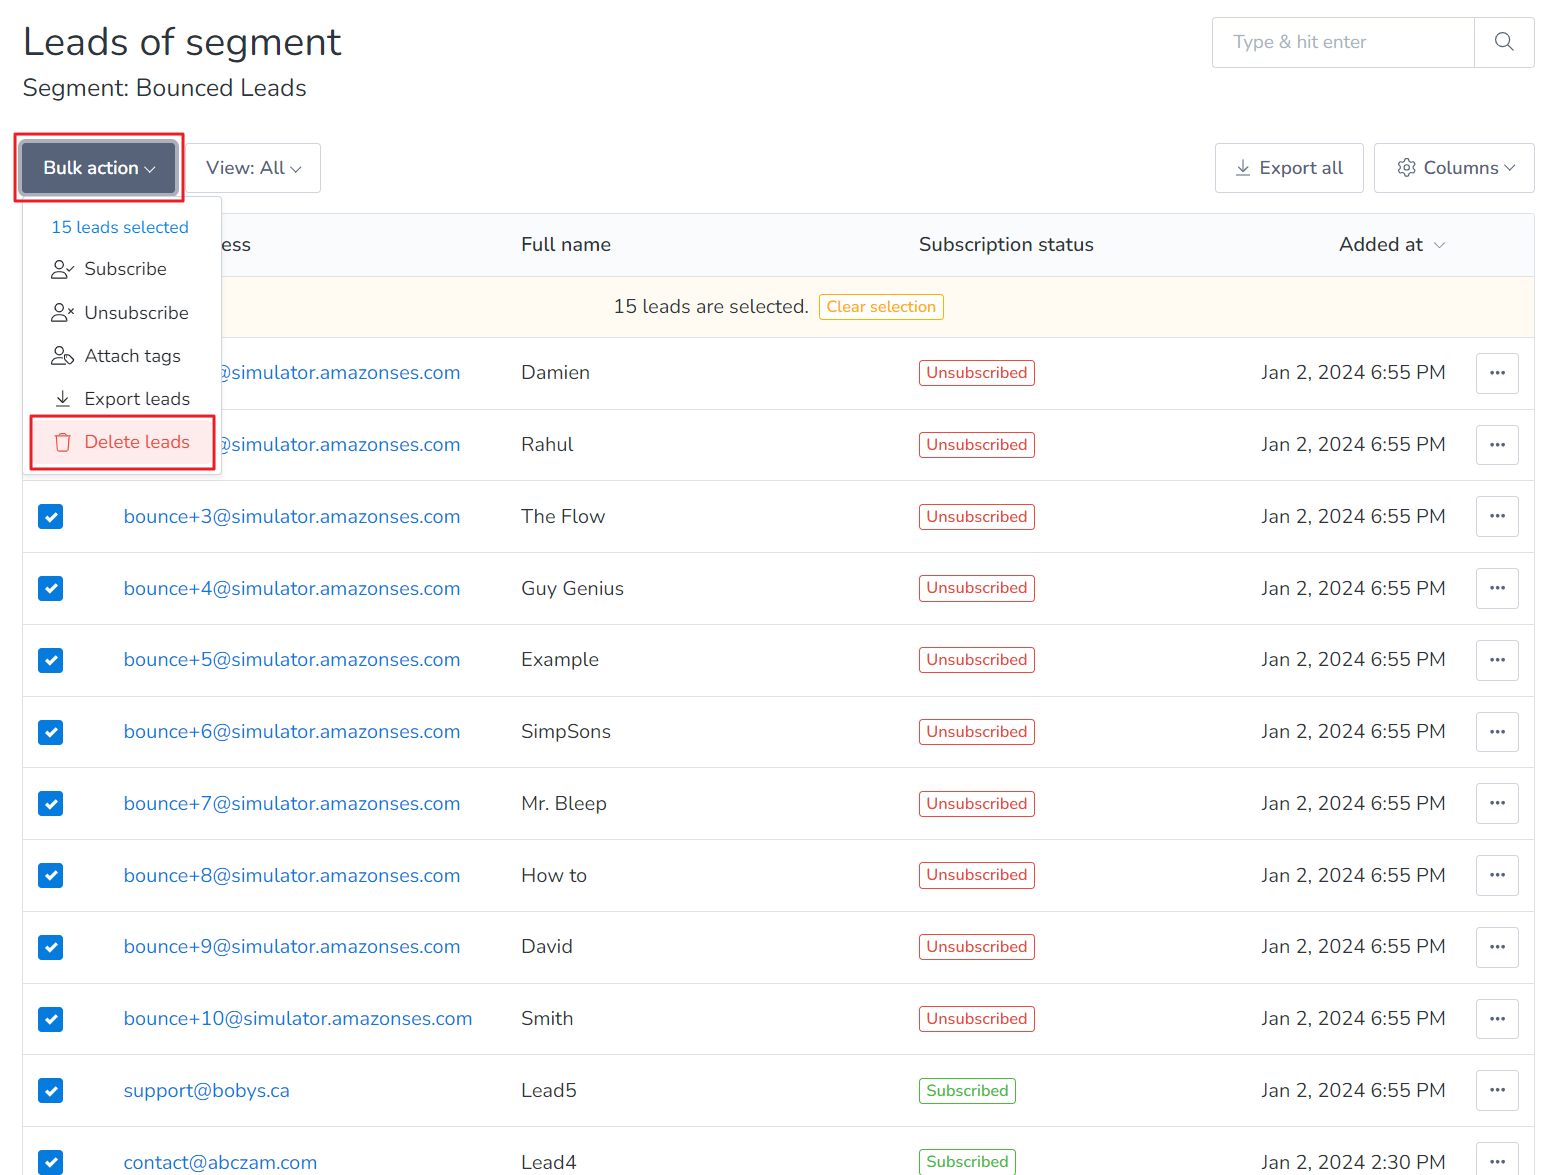
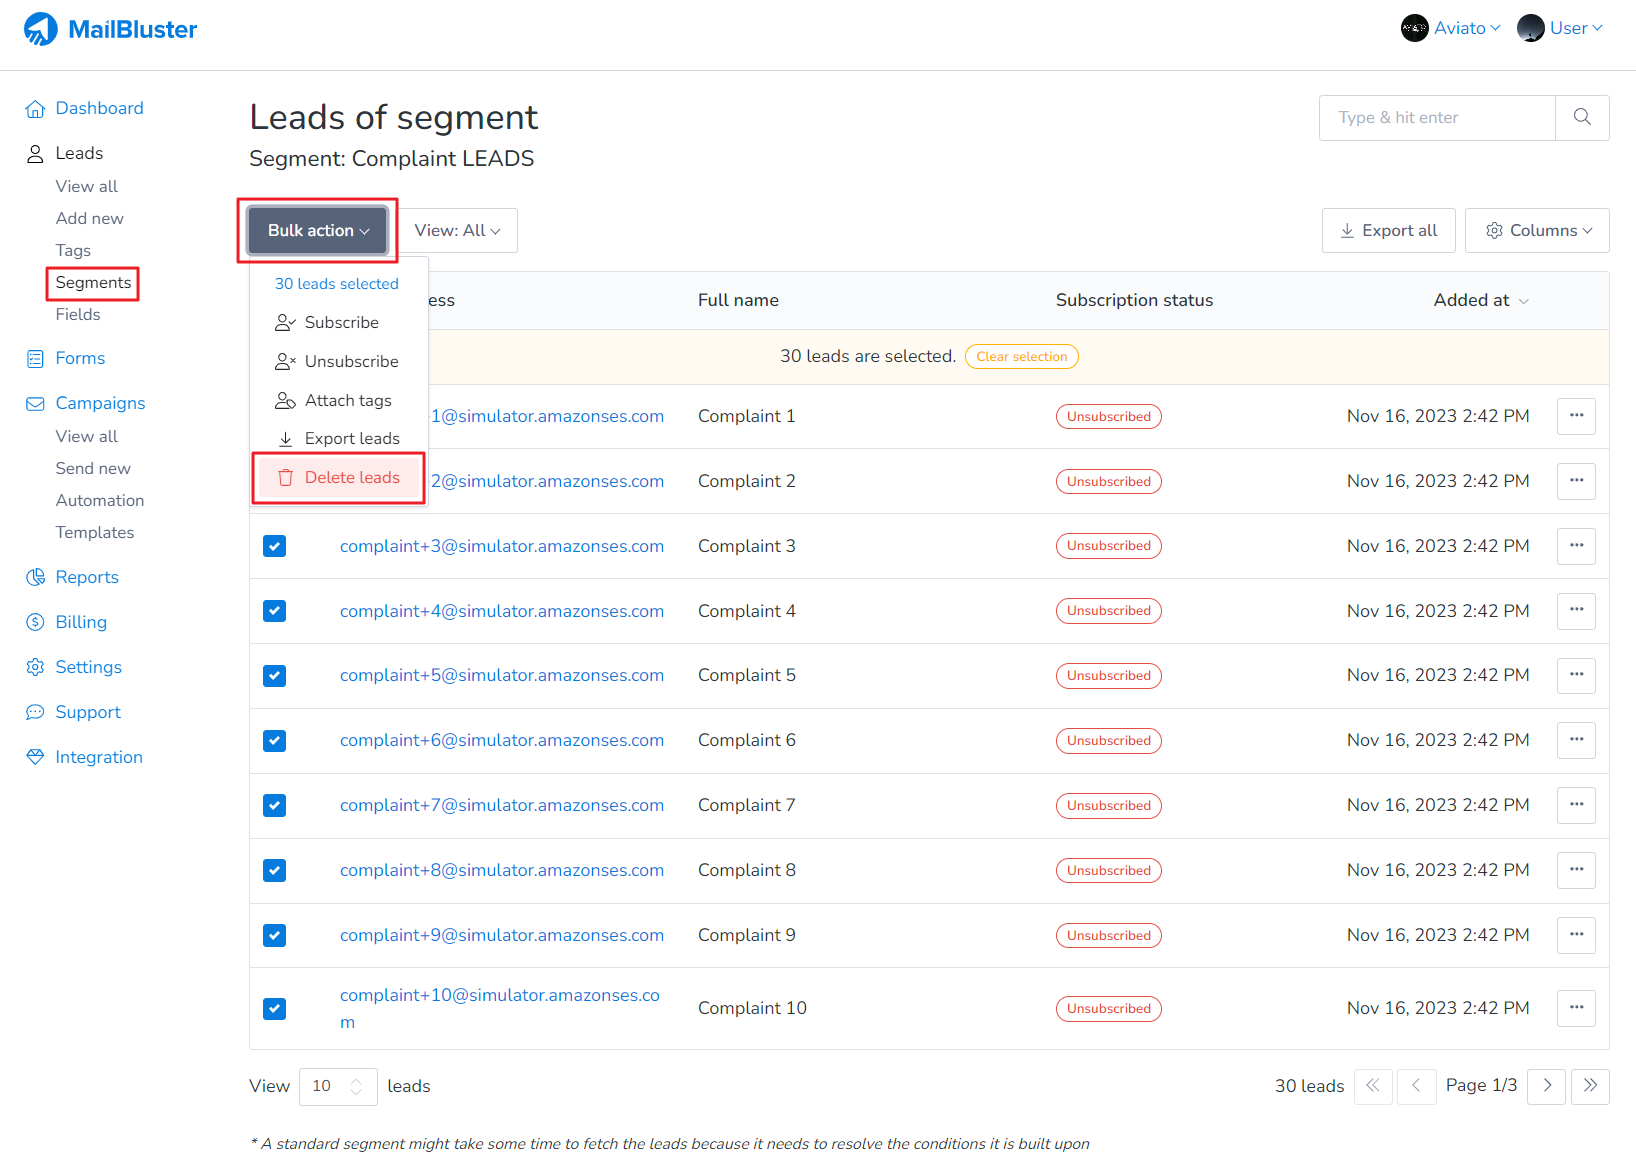
5. Click on Bulk action and then select Delete leads

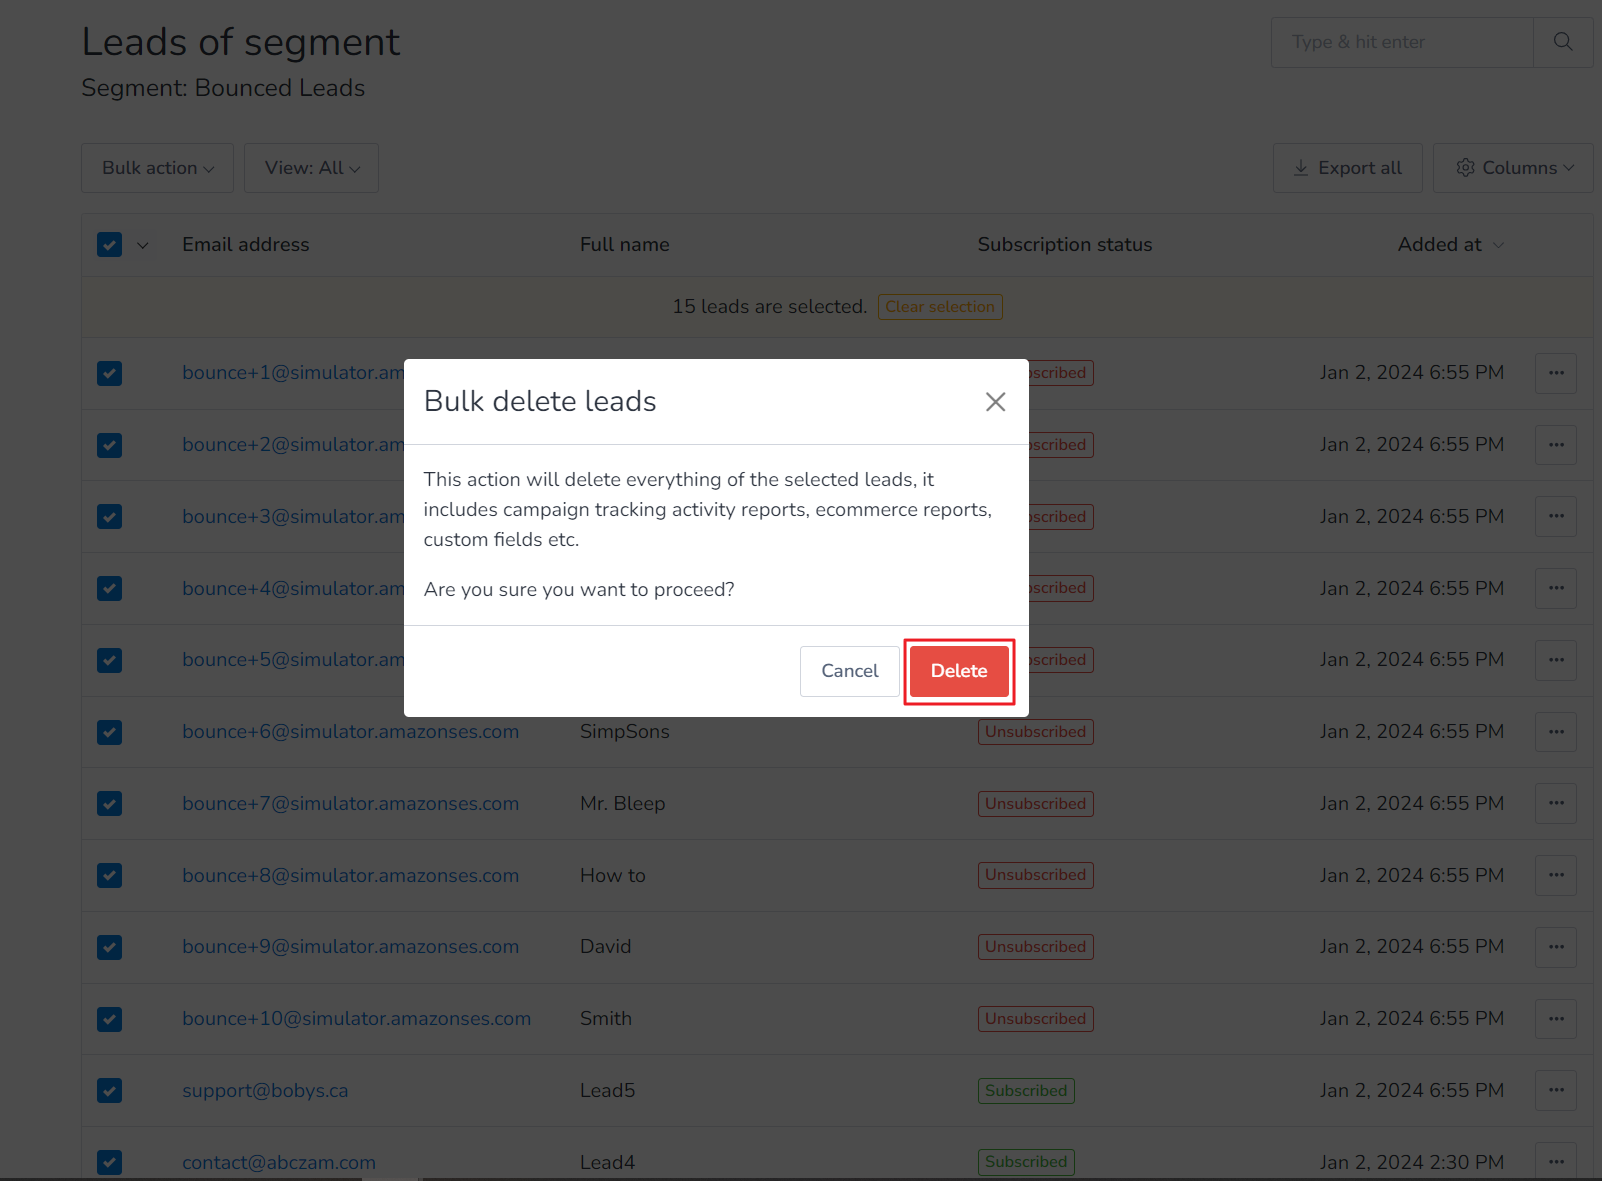
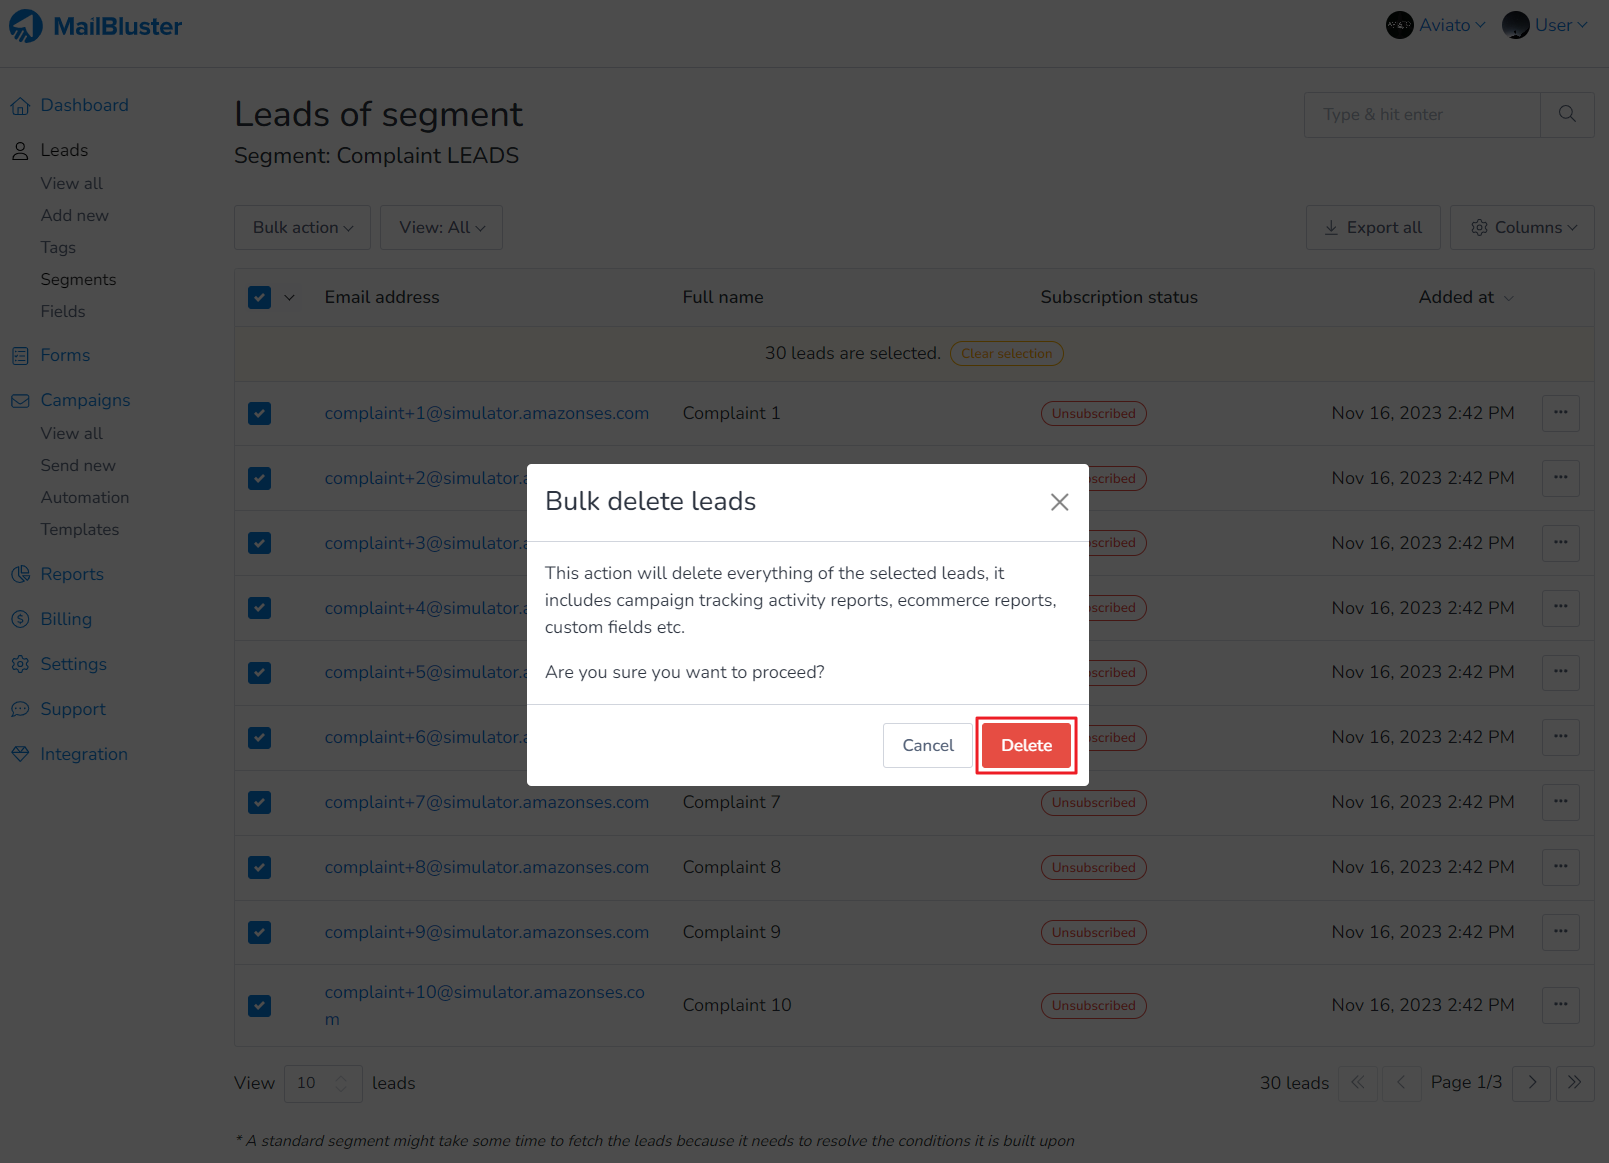
6. A confirmation dialogue box will appear. Click Delete. All the bounced leads will now be permanently deleted from the entire segment

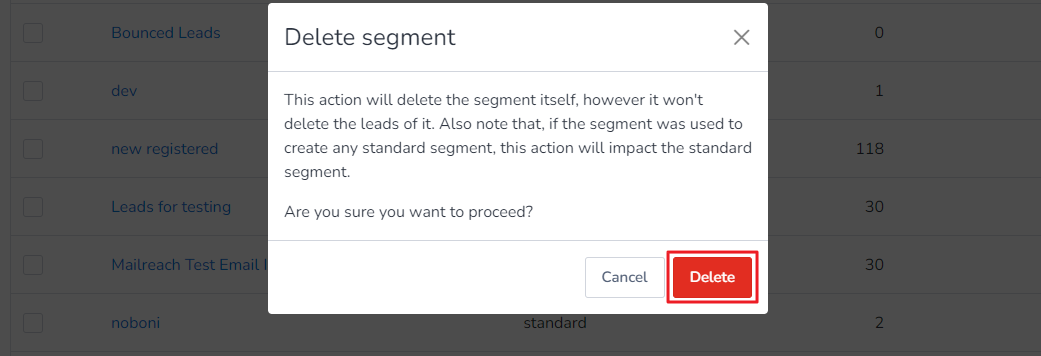
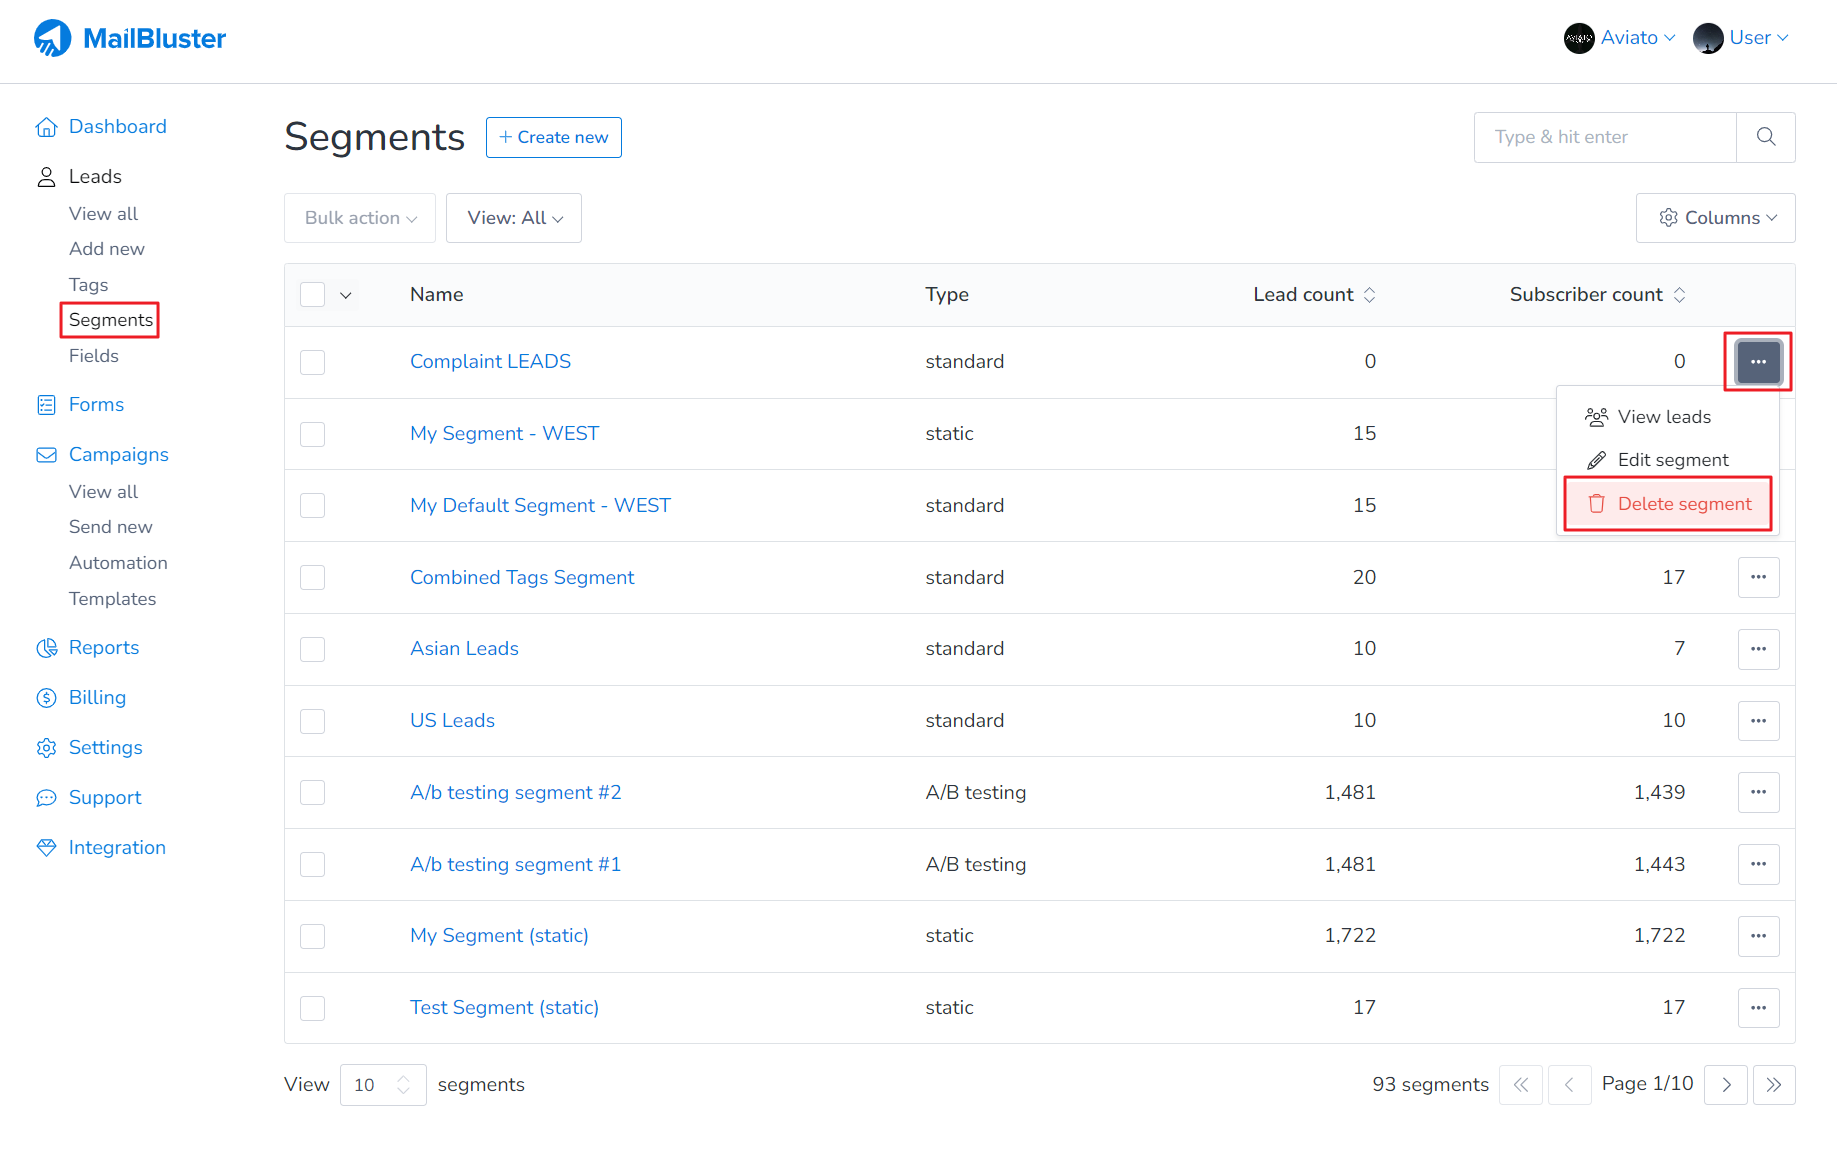
7. Now click on the highlighted check box and then Delete segment to remove the segment name Bounced Leads from MailBluster

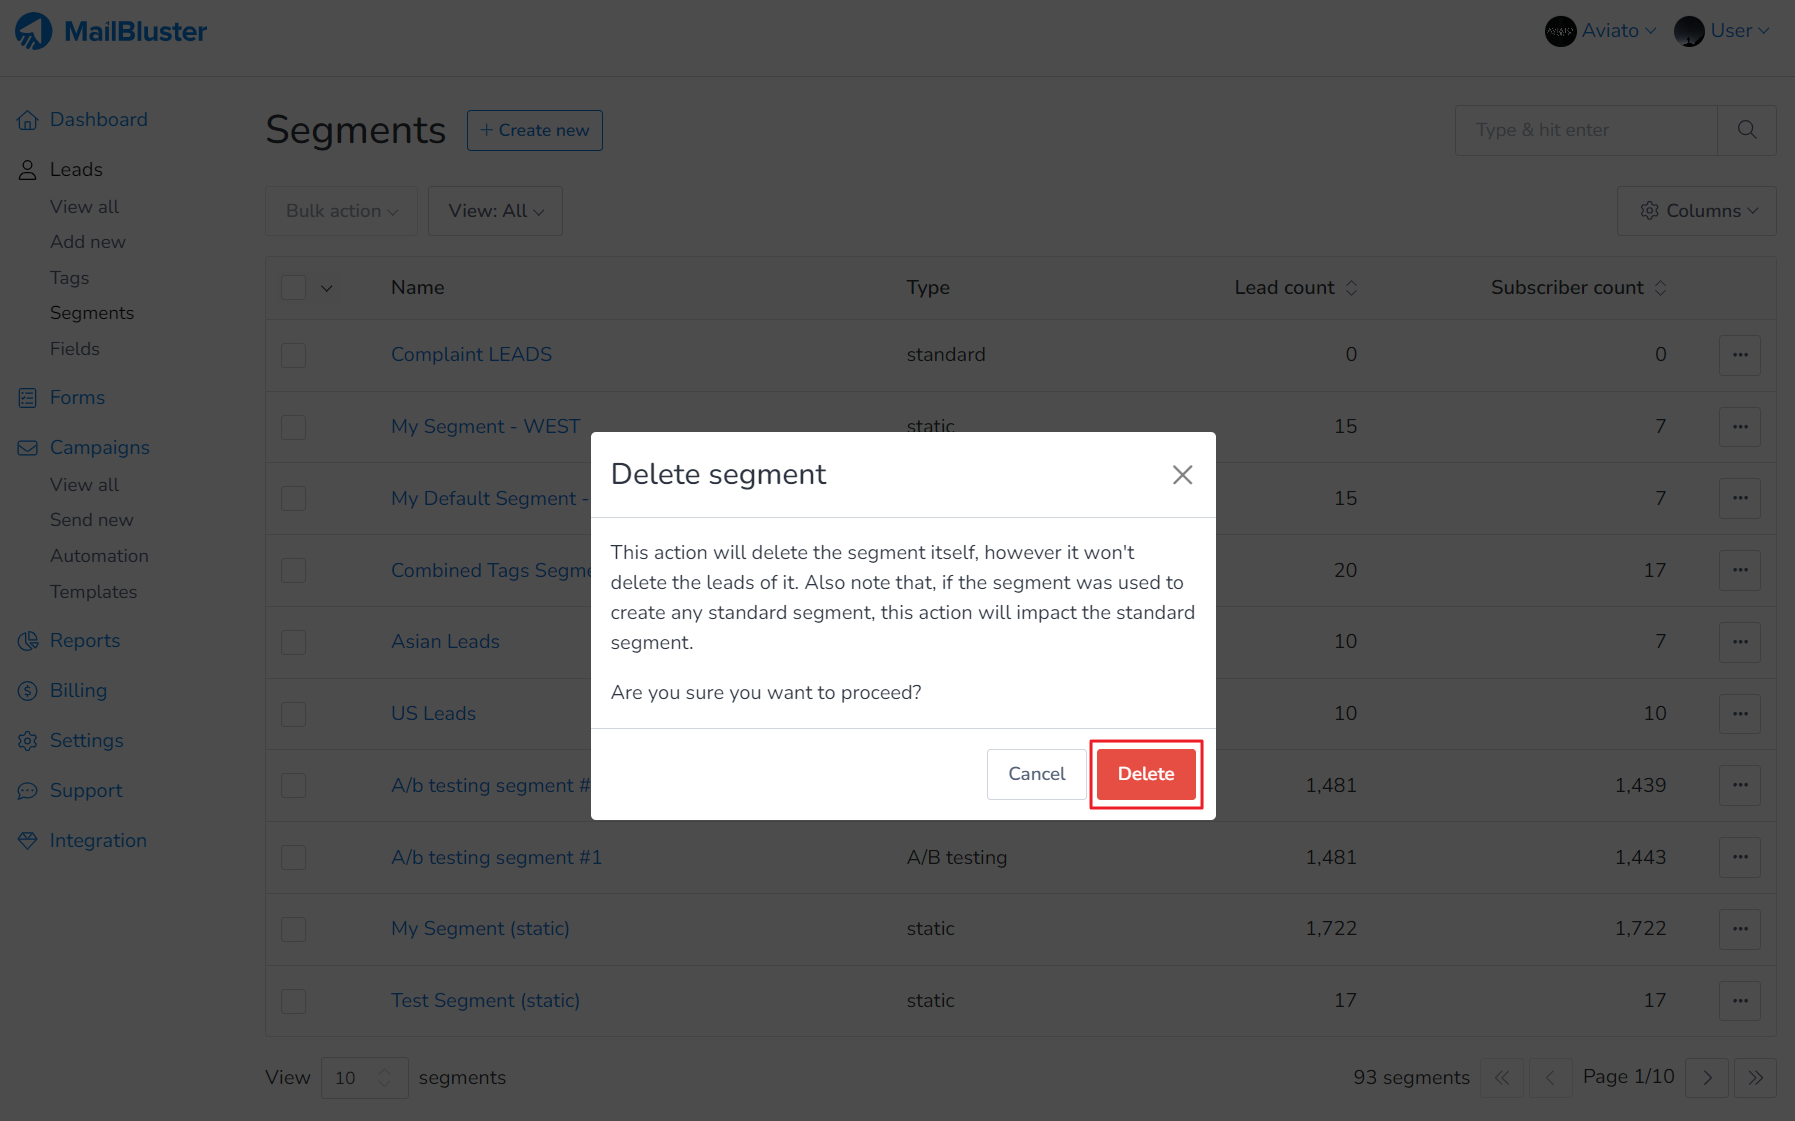
8. Finally confirm it by clicking Delete to remove the segment from MailBluster

What is a list-unsubscribe header?

Last update: March 18, 2024

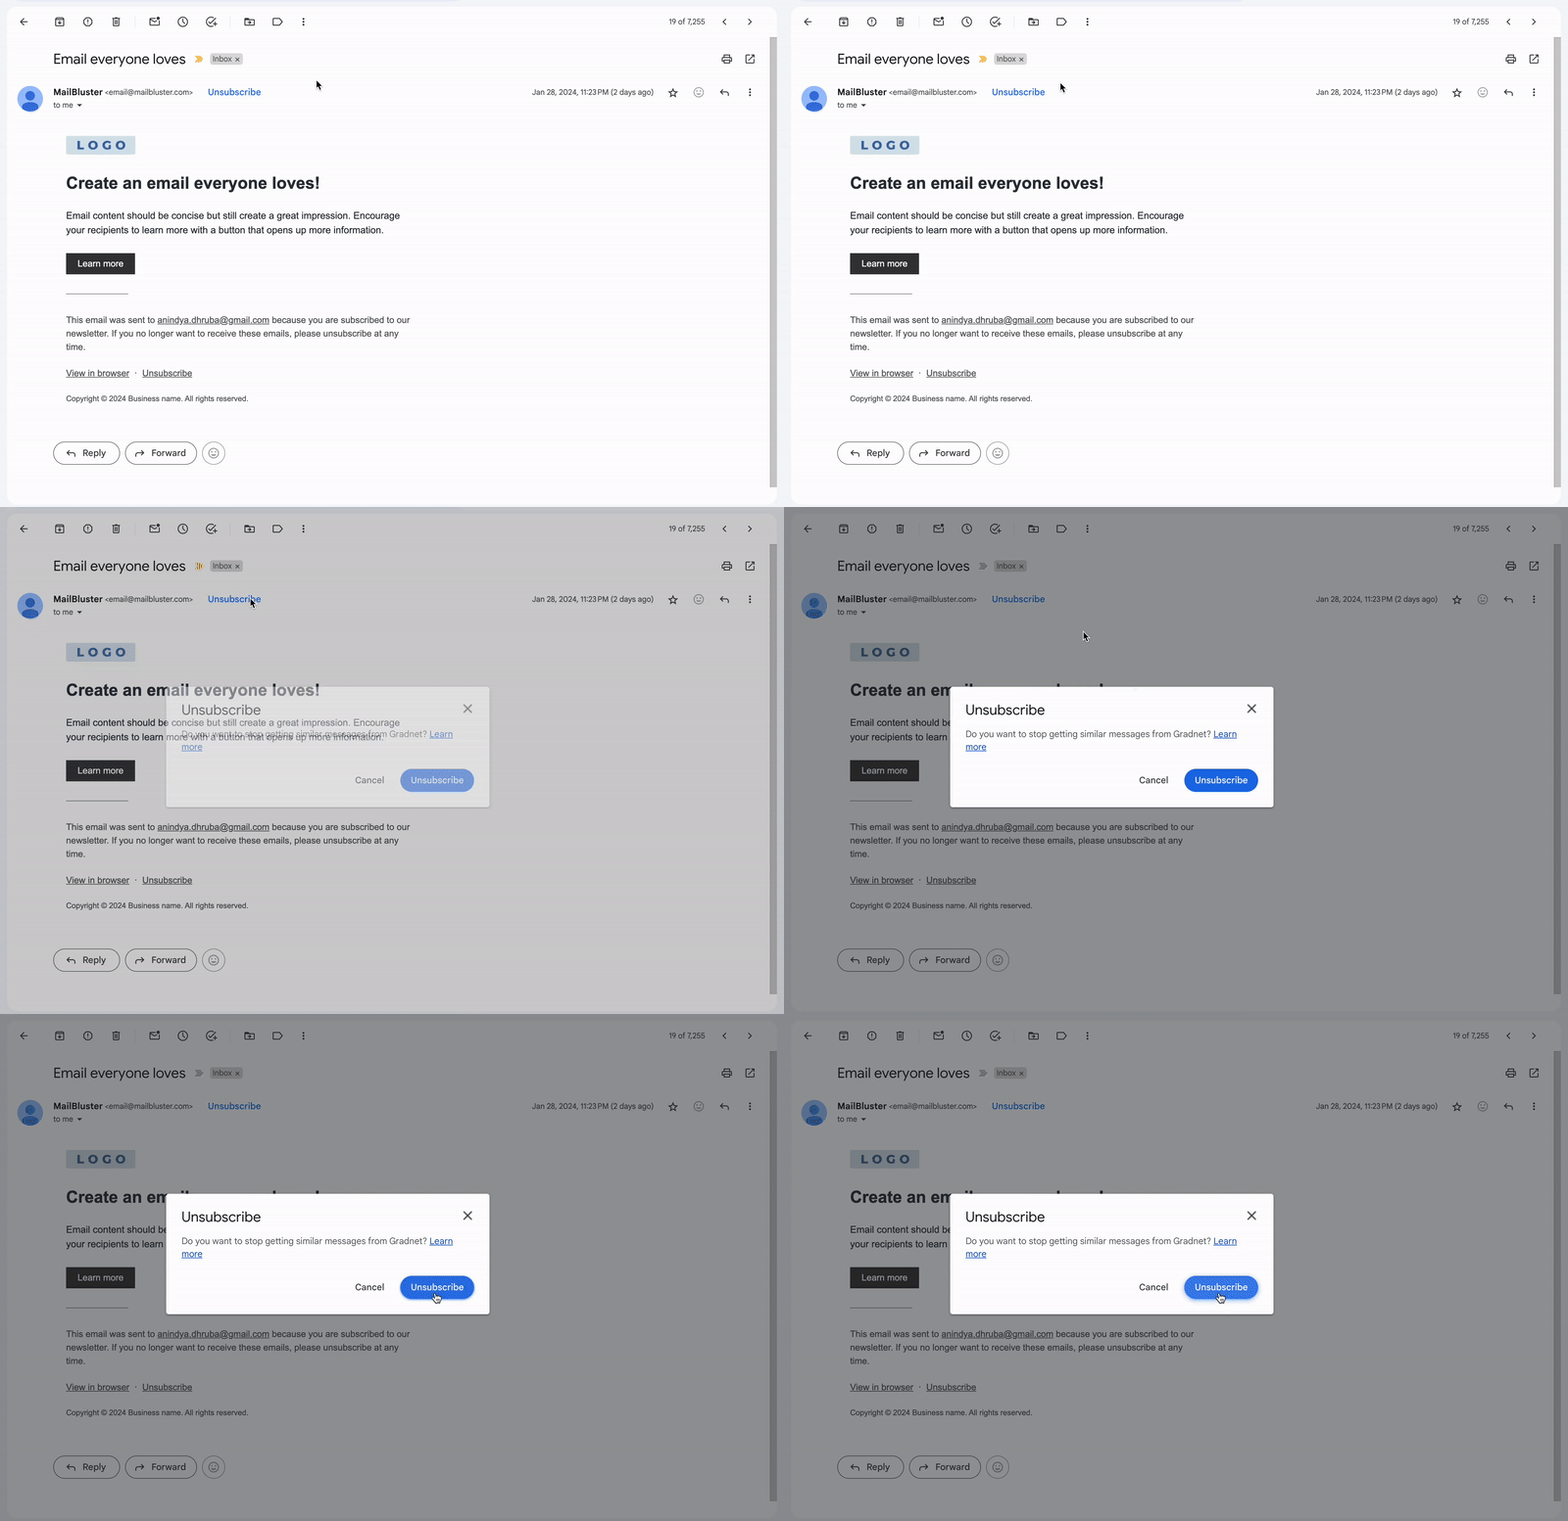
A list-unsubscribe header is a field in the header of an email, which adds an “Unsubscribe” link or button in the email client’s interface. This provides recipients with an easy and straightforward way to opt out of future emails, without needing to search for an unsubscribe option within the email content itself. The following is an example of list-unsubscribe header.

Sample email showing Unsubscribe button for list-unsubscribe header

What is Domain reputation?

Last update: March 18, 2024

Domain reputation means emails from your sending domain (SPF and DKIM) are less likely to get filtered to a recipient’s SPAM folder or inbox.

The definitions of SPAM below includes mail detected as SPAM by Gmail’s Spam filter, and mail reported by users as SPAM.

BAD: A history of sending an enormously high volume of SPAM. Mail coming from this entity will almost always be rejected at SMTP or marked as SPAM.

LOW: Known to send a considerable volume of SPAM regularly, and mail from this sender will likely be marked as SPAM.

MEDIUM/FAIR: Known to send good mail, but has occasionally sent a low volume of SPAM. Most of the email from this entity will have a fair deliverability rate, except when there’s a notable increase in SPAM levels.

HIGH: Has a good track record of a very low SPAM rate, and complies with Email sender guidelines. Mail will rarely be marked by the spam filter.

Please keep in mind that SPAM filtering is based on thousands of signals and domain reputation is just one of them.

Here is a sample Domain reputation from Google Postmaster:

sample domain reputation showing status in graph

How to set up Google Postmaster for your Sender Domain?

Last update: March 18, 2024

To set up Google Postmaster for your Sender Domain, you need to follow these steps.

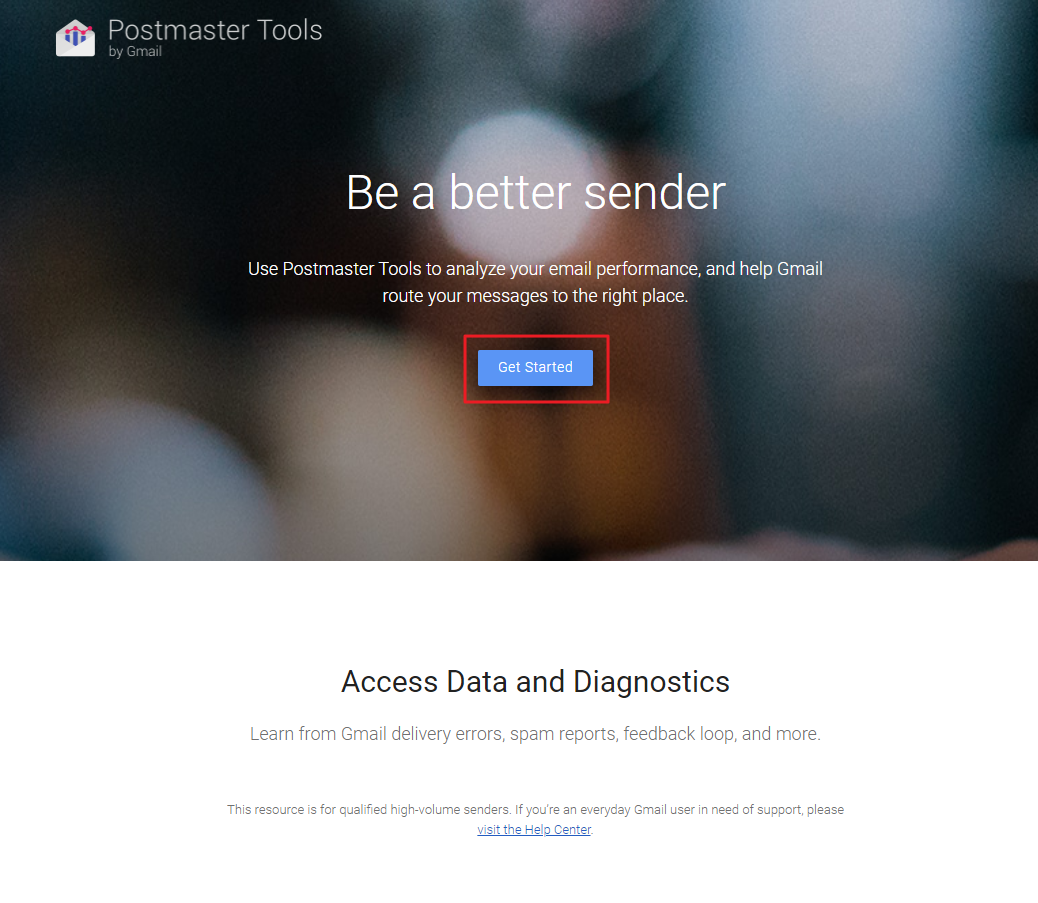
Sign in to https://postmaster.google.com. Then click on Get Started.

Clicking Get Started

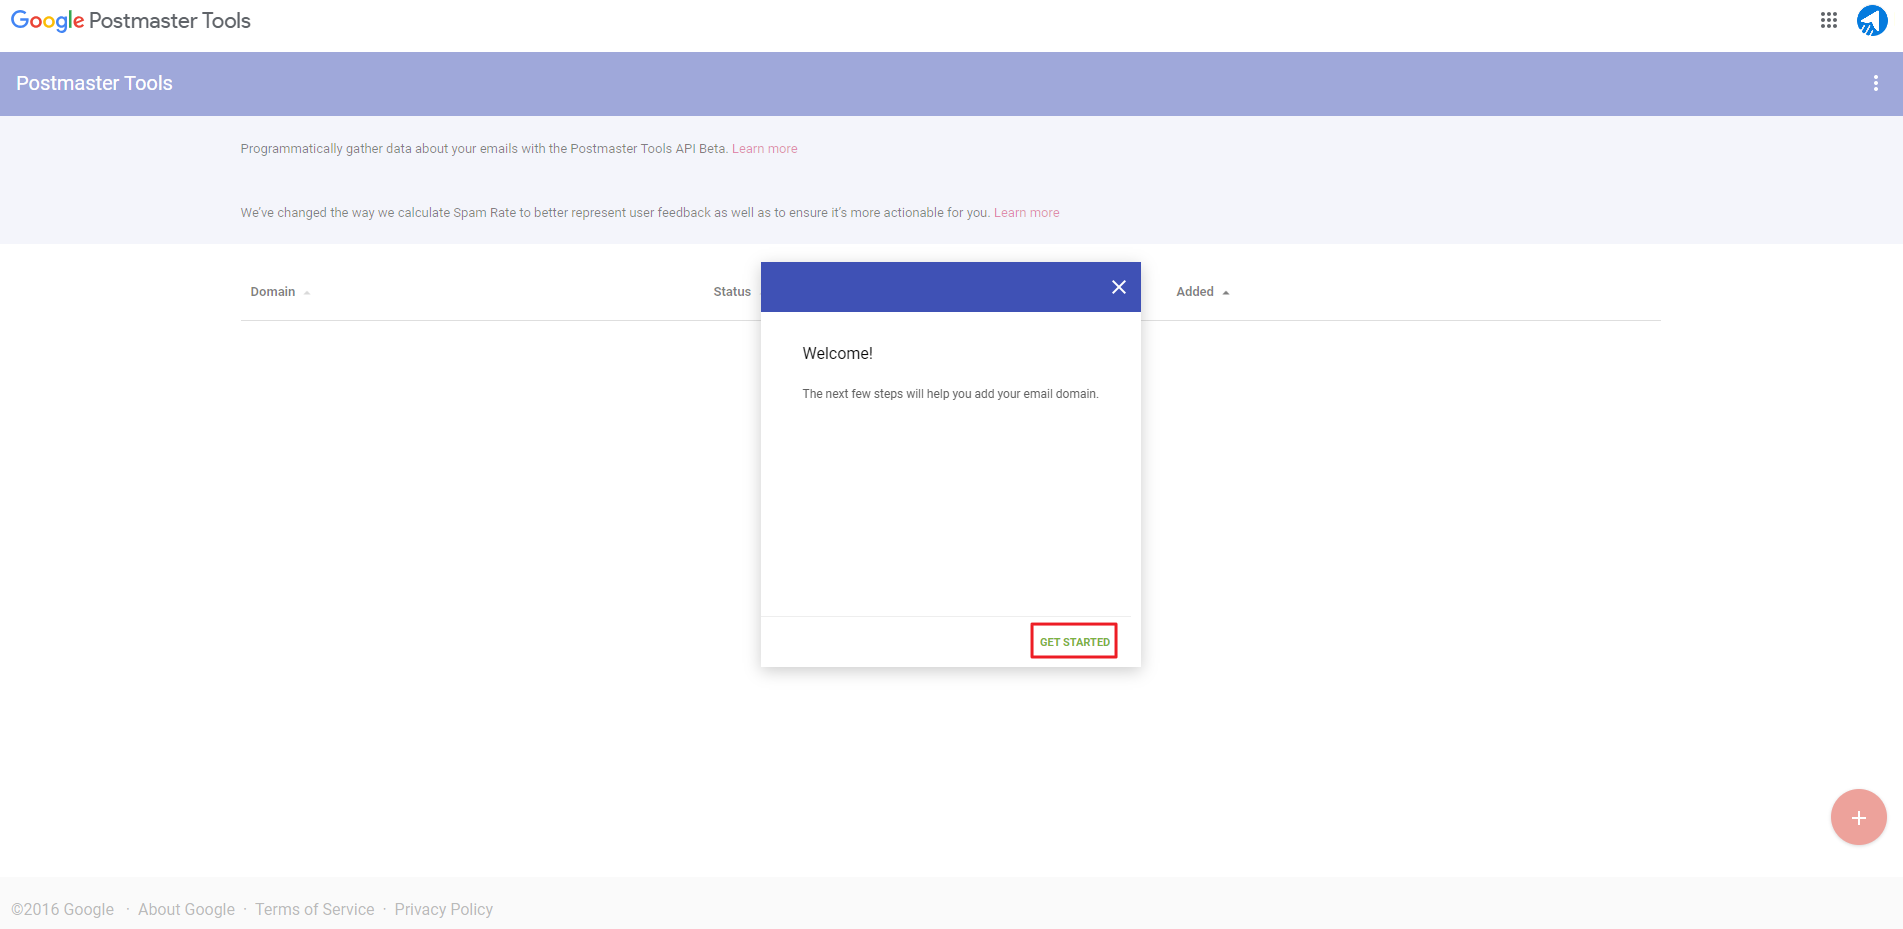
Click Get Started

Clicking Get Started in Postmaster Tools

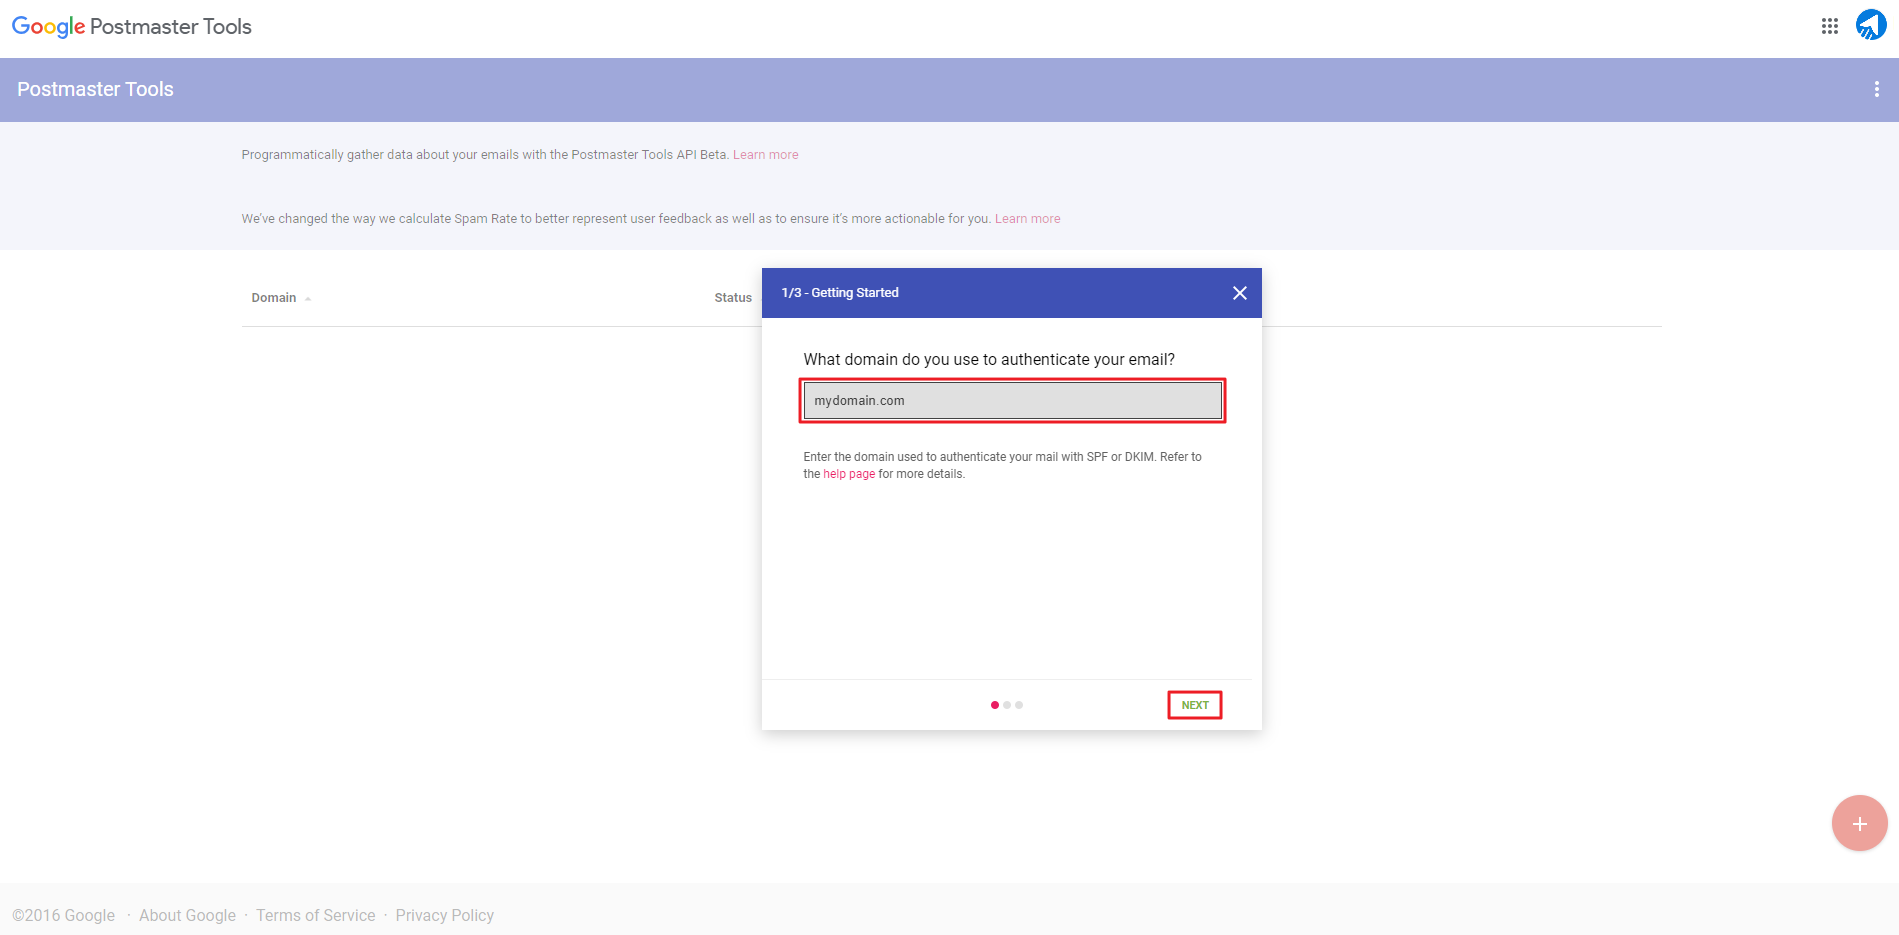
Enter your domain URL and then click Next

Entering Domain URL and then clicking Next

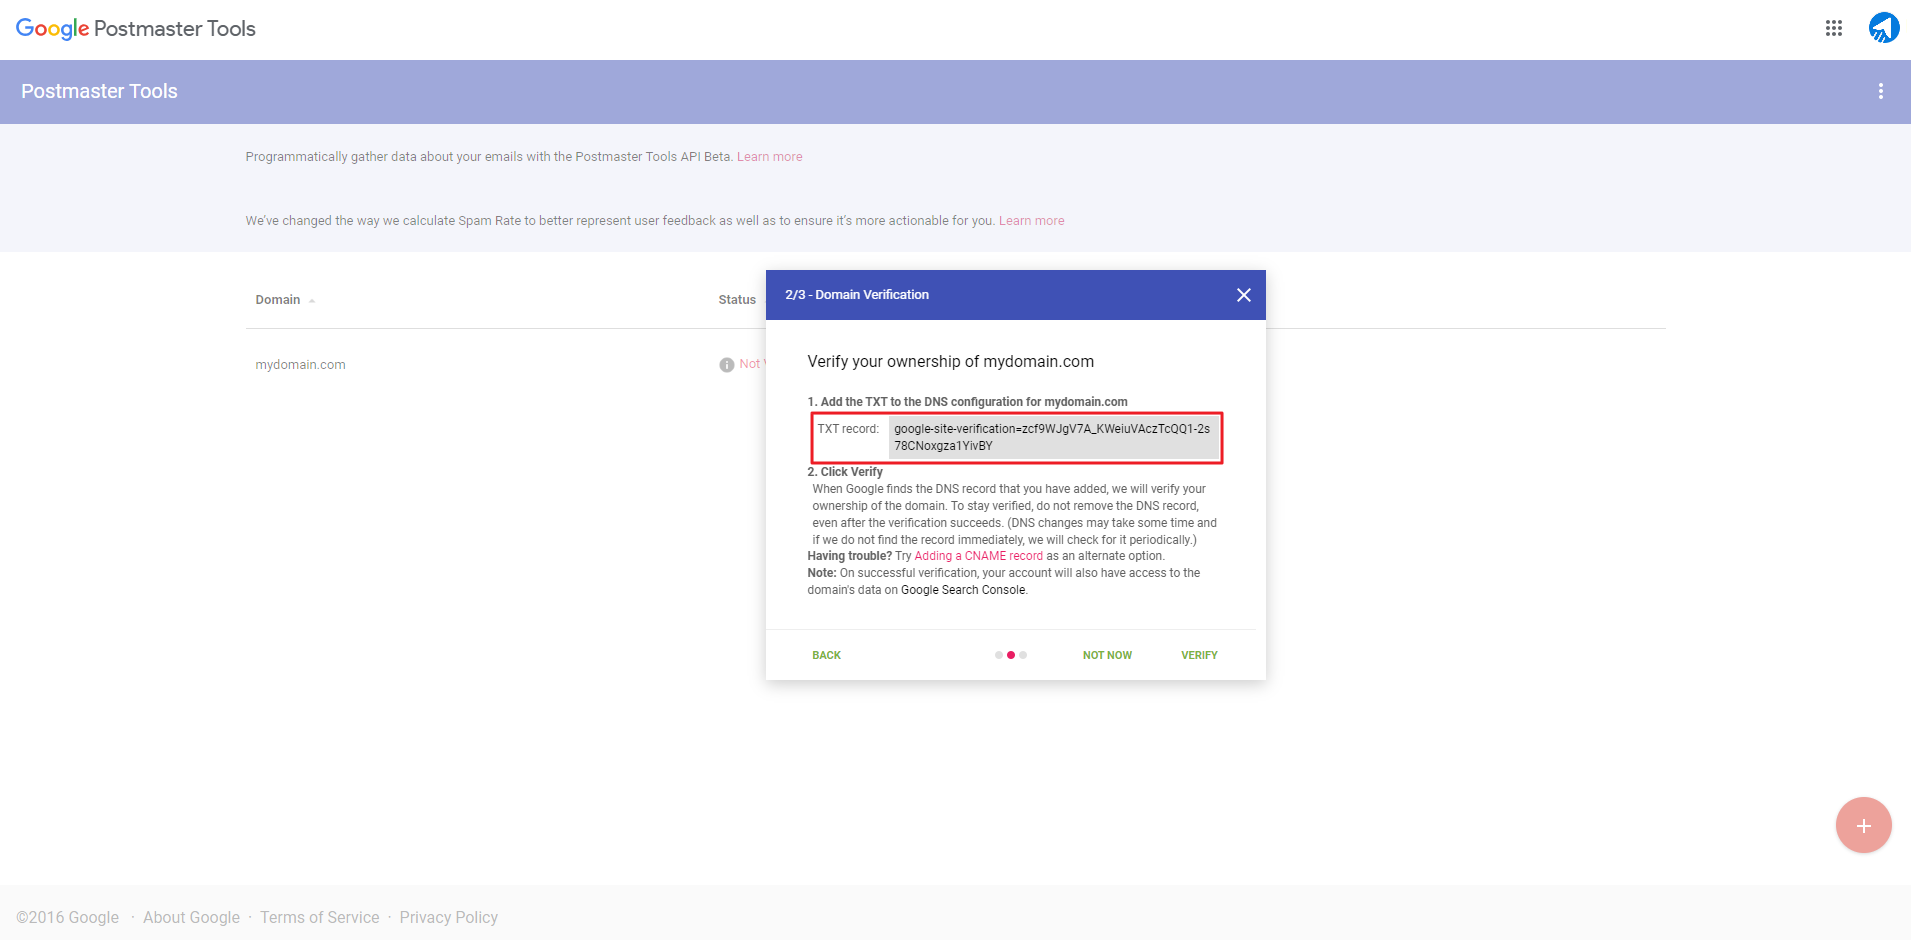
Copy TXT record from Google Postmaster and paste it in your DNS Management

Copying TXT record from Google Postmaster and pasting it in your DNS Management

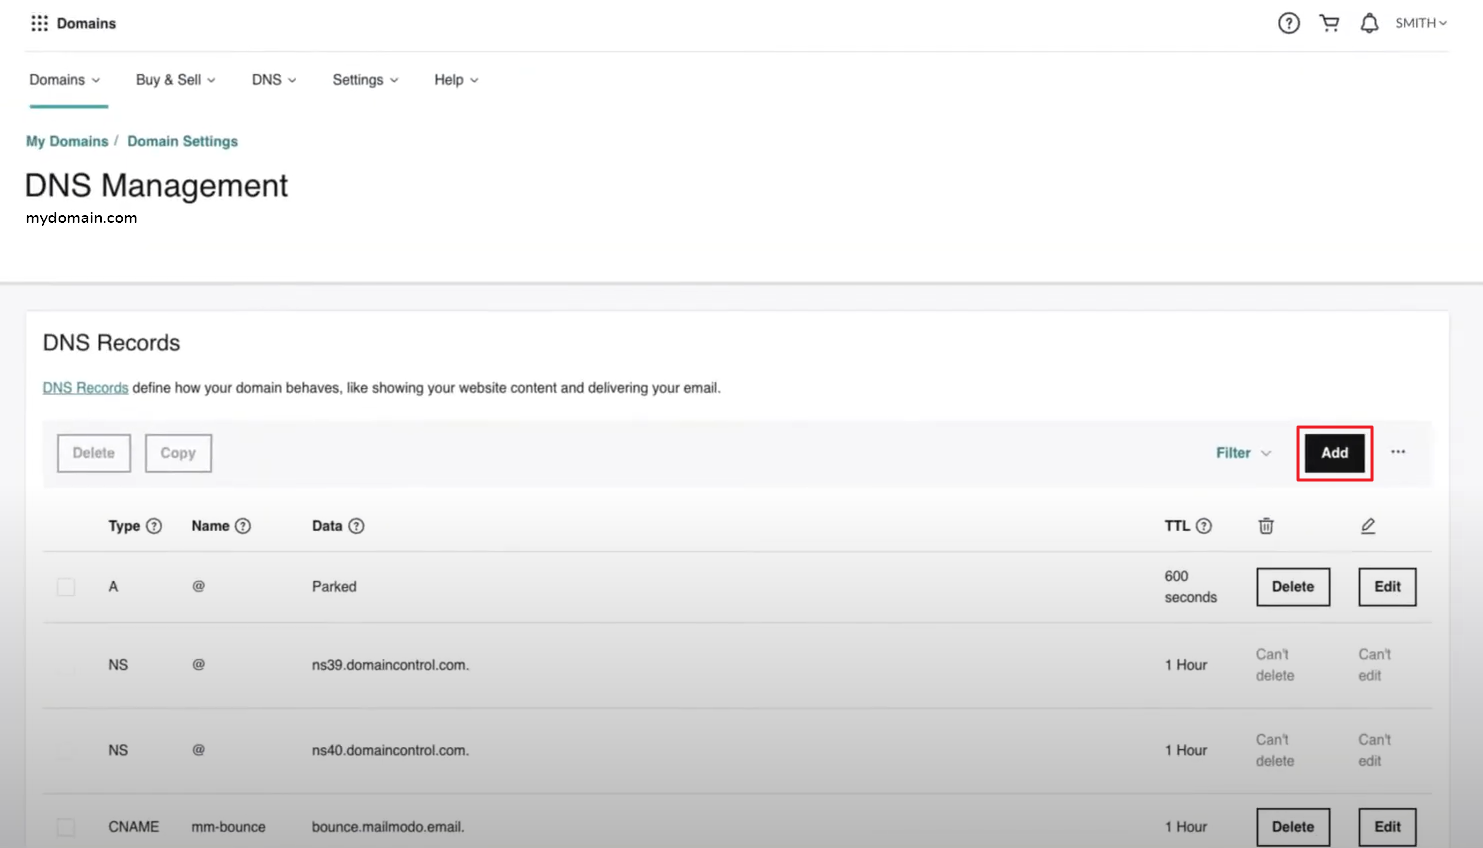
In your DNS Management, click Add

Clicking Add button

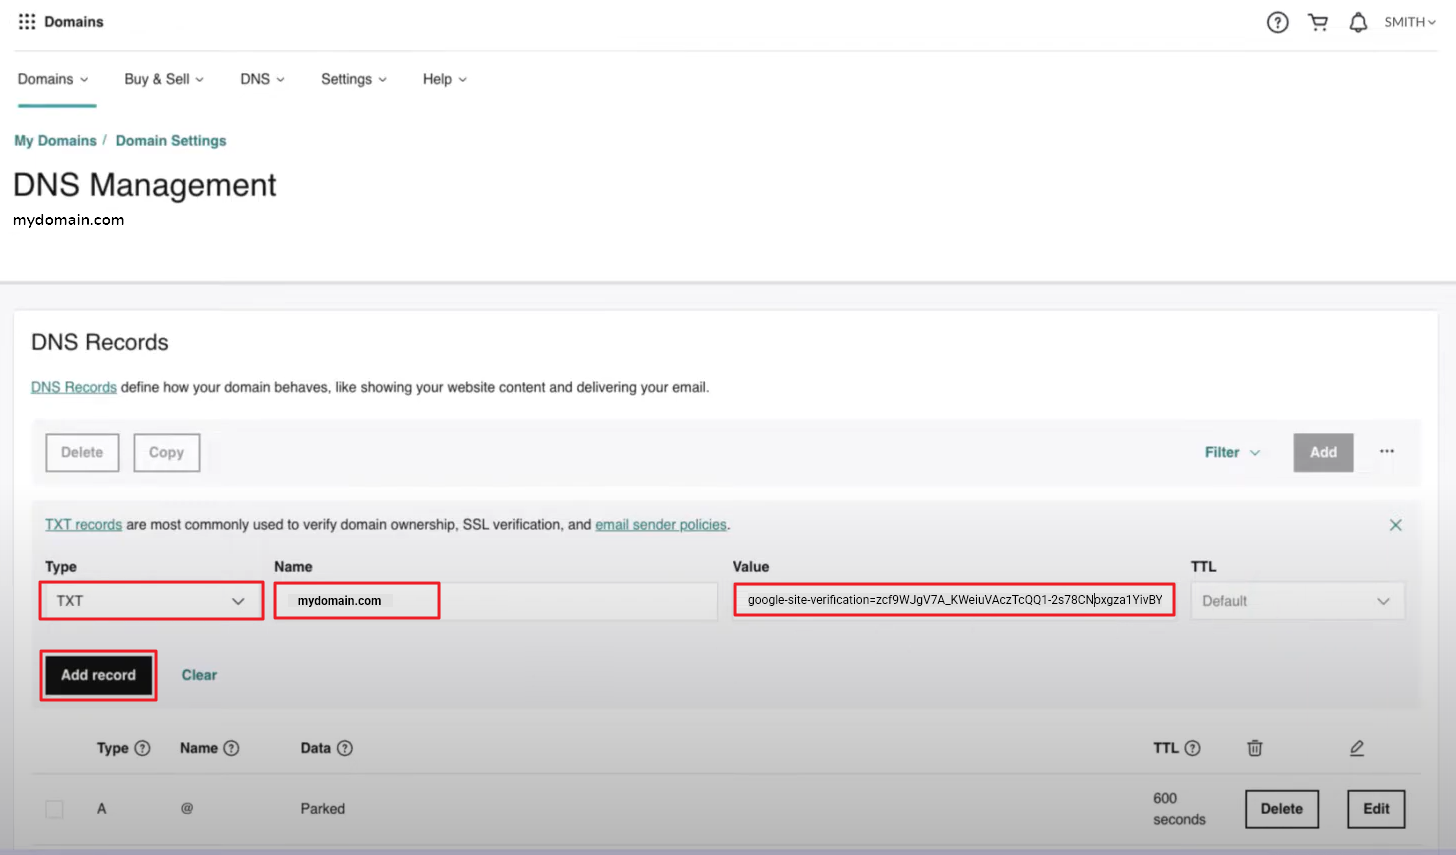
Select Type TXT, Name – yourdomain.com and Value – TXT Record from Google Postmaster. Then click Add record

Selecting TXT and setting Domain Name and Value

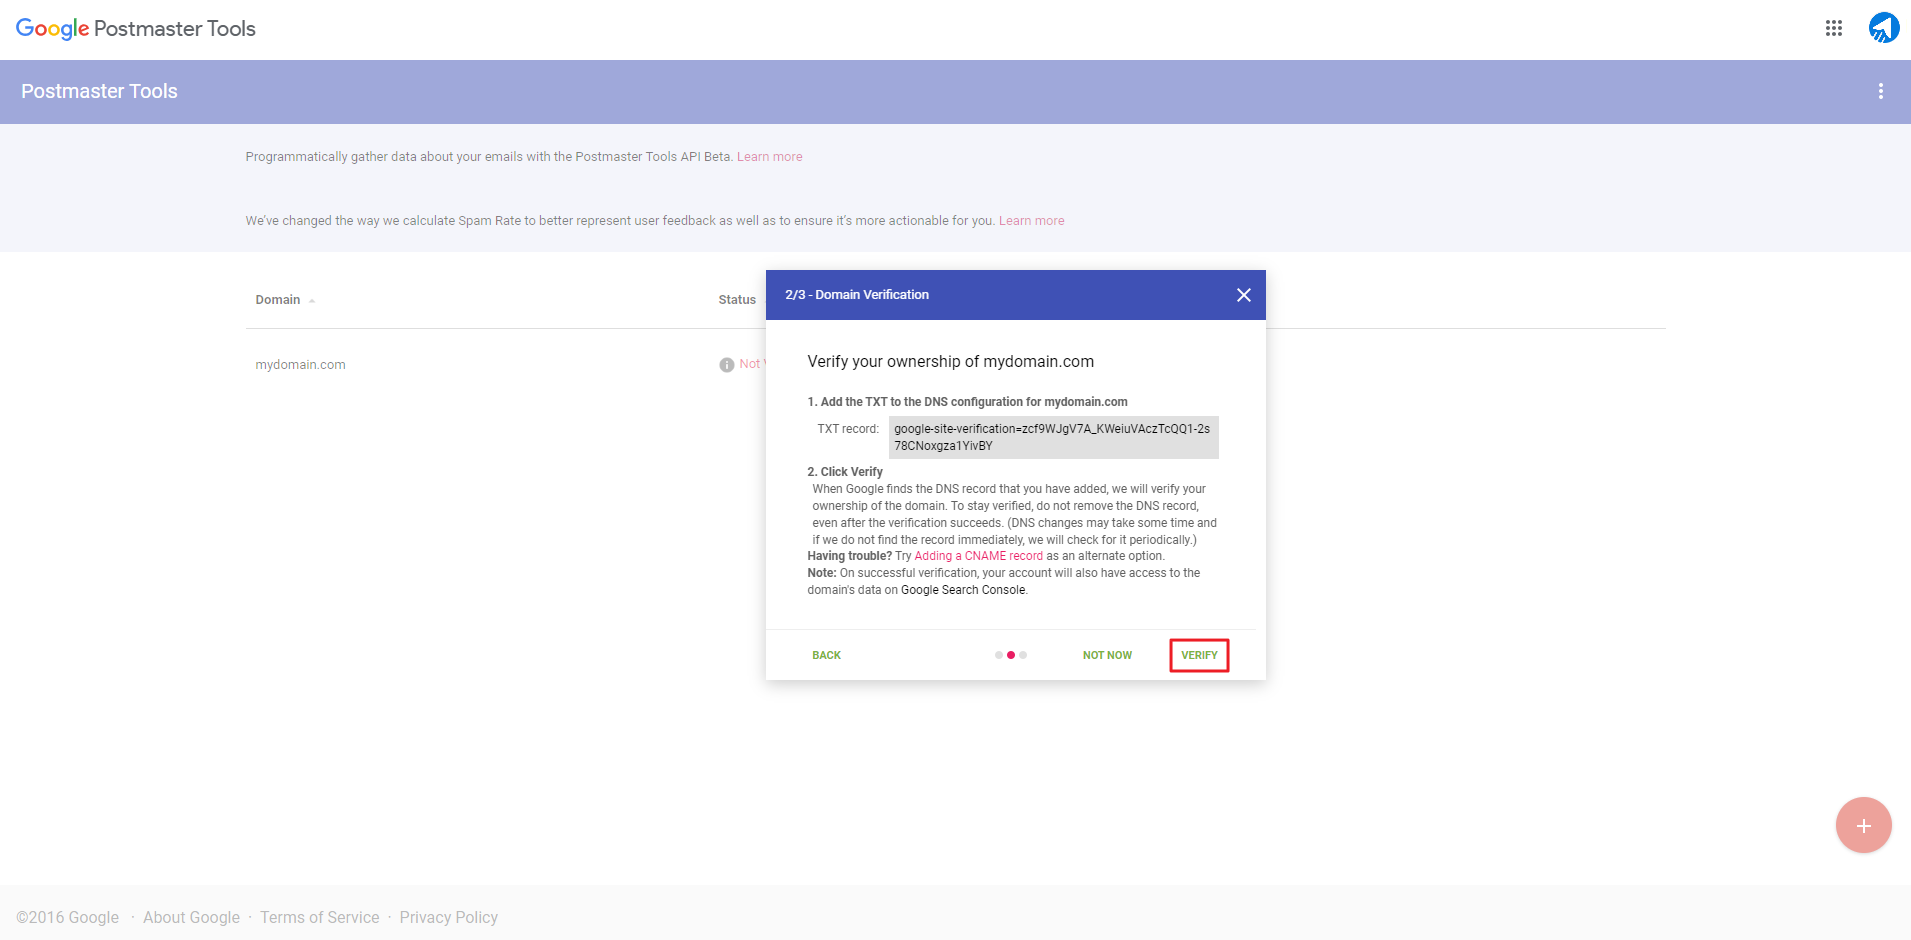
Once the domain record is added, go to Google Postmaster Tools and click Verify

Clicking Verify button

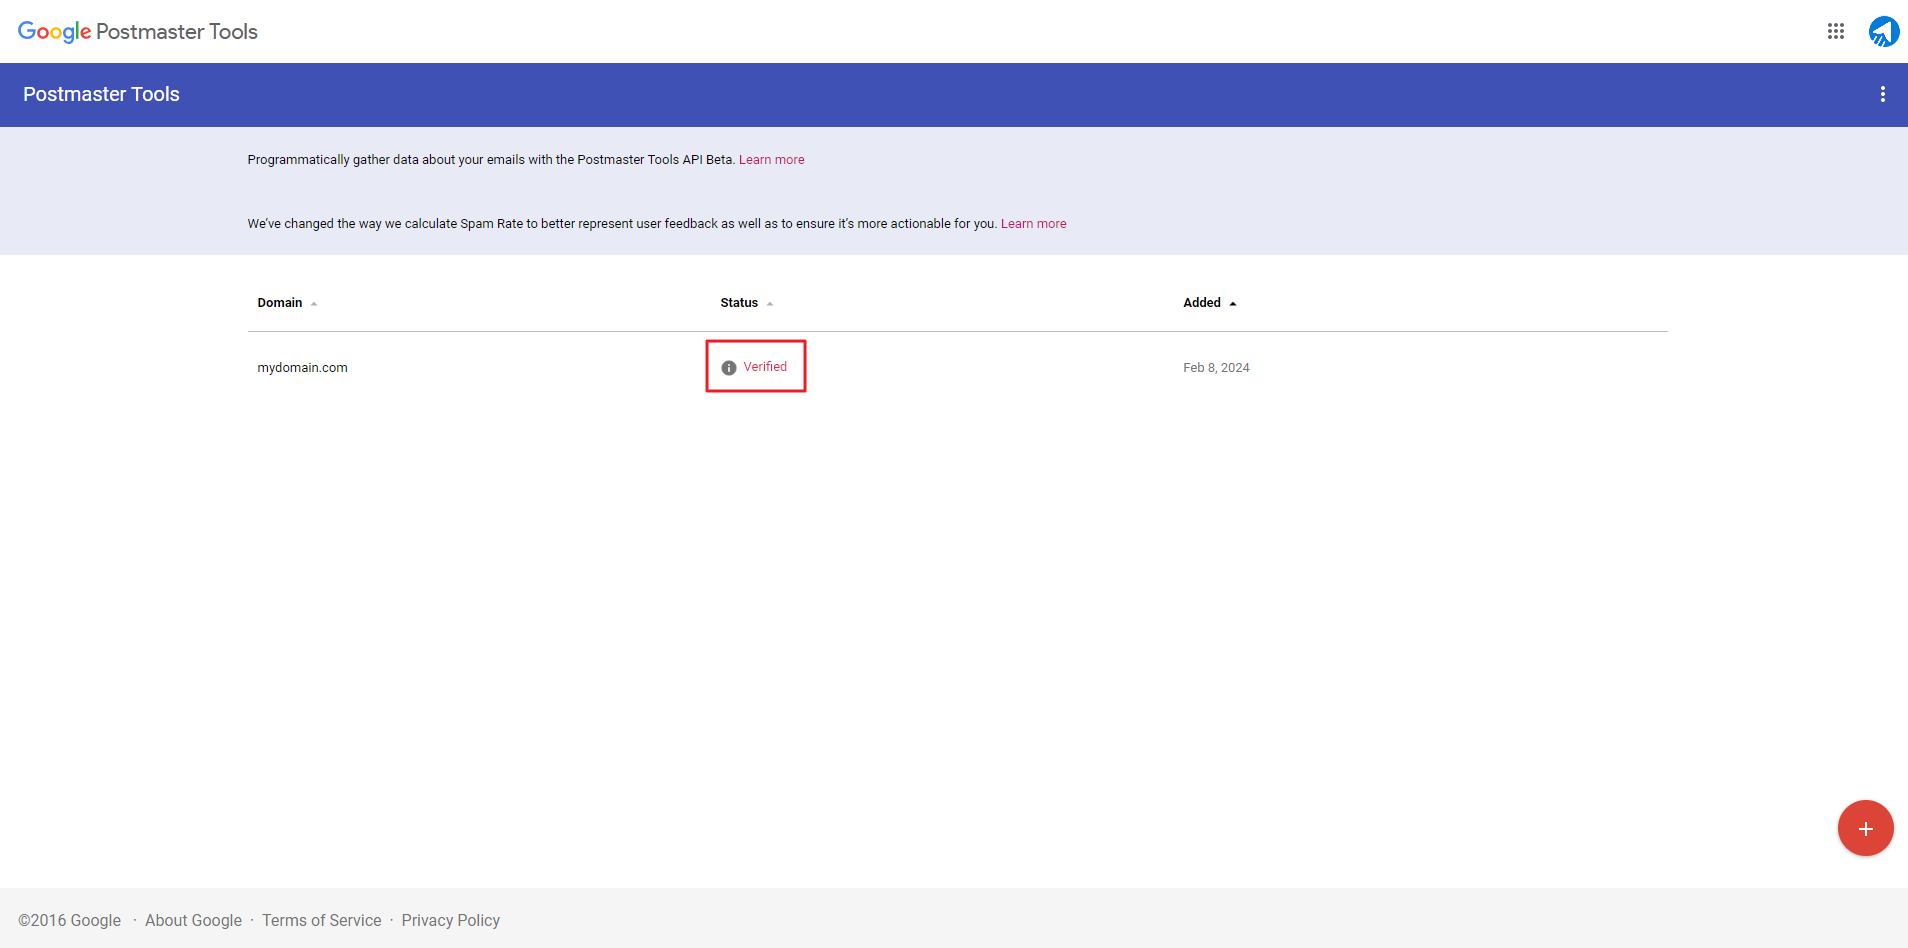
You will see the status as Verified in the Postmaster Tool

Domain is Verified successfully

Now that the Google Postmaster Tools is configured, use it to measure your spam rate and overall health of your sender domain.

What are the new set of requirements for Senders by Google and Yahoo?

Last update: March 18, 2024

Gmail and Yahoo Mail have introduced a new set of requirements for senders regarding the protection of user inboxes, which has taken effect from February 2024.

The first one is that you must adequately configure DKIM, SPF, and DMARC records for your sender domain instead of verifying the sender’s email address for better email deliverability. For this, you can follow this guide.

The second one is the introduction of easy one-click unsubscribe button on the email header. MailBluster has also implemented an easy one-click unsubscribe header automatically to all outgoing emails to make it easier for recipients to unsubscribe, reducing the spam complaints, as shown below :

One-click easy unsubscribe button in email campaign

The third one is Mailbox providers will require that all senders keep spam complaint rates below 0.3% to avoid having their email treated as spam by the mailbox provider. It is recommended to enroll with Google Postmaster Tools to monitor their spam complaint rates for Gmail recipients.

Kindly be informed that disregarding these requirements could result in Gmail and Yahoo rejecting the delivery of emails to their intended recipients.

Why do I receive messages from [email protected]?

Last update: March 18, 2024

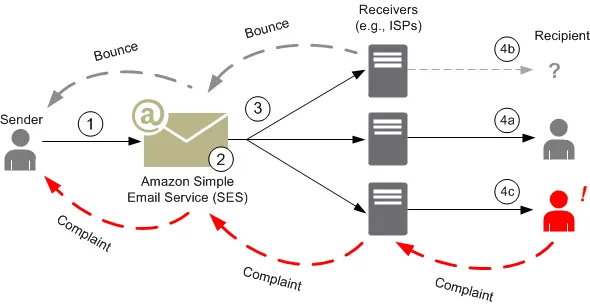
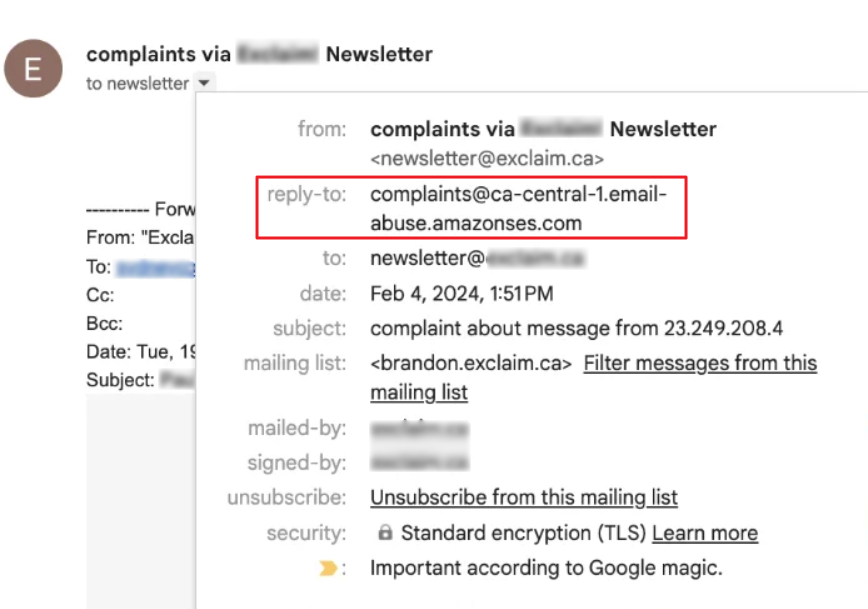
When a recipient of your email campaign clicks the spam button (or its equivalent, such as “junk” button) in their email application, their email service provider (such as Gmail, Yahoo, etc) typically sends a message back to Amazon Simple Email Services (Amazon SES).  This is done to let Amazon and you know that this recipient has marked your email as spam.

To notify you of this action, Amazon SES will send an email to the “from” address used in your email from their [email protected] address, providing you any of the technical information that came along with the spam complaint from the recipient’s email service provider.

When you receive such an email, you should verify that the complaining recipient is not included in your future email sends.  This will ensure that you have happy email recipients and fall under the good graces of Amazon SES.

Here is an example of complaint message:

Complaint email from Amazon SES

How to check your Email Sending Reputation using mail-tester?

Last update: March 18, 2024

You need to check whether your DNS records (DKIM, SPF, DMARC etc) are configured correctly or not. Sometimes ISPs (Internet Service Providers) and ESPs (Email Service Providers) takes the decision to reject the incoming emails. So emails from MailBluster ends up in Spam, Promotions or get bounced.

To check your email sending reputation, follow this process:

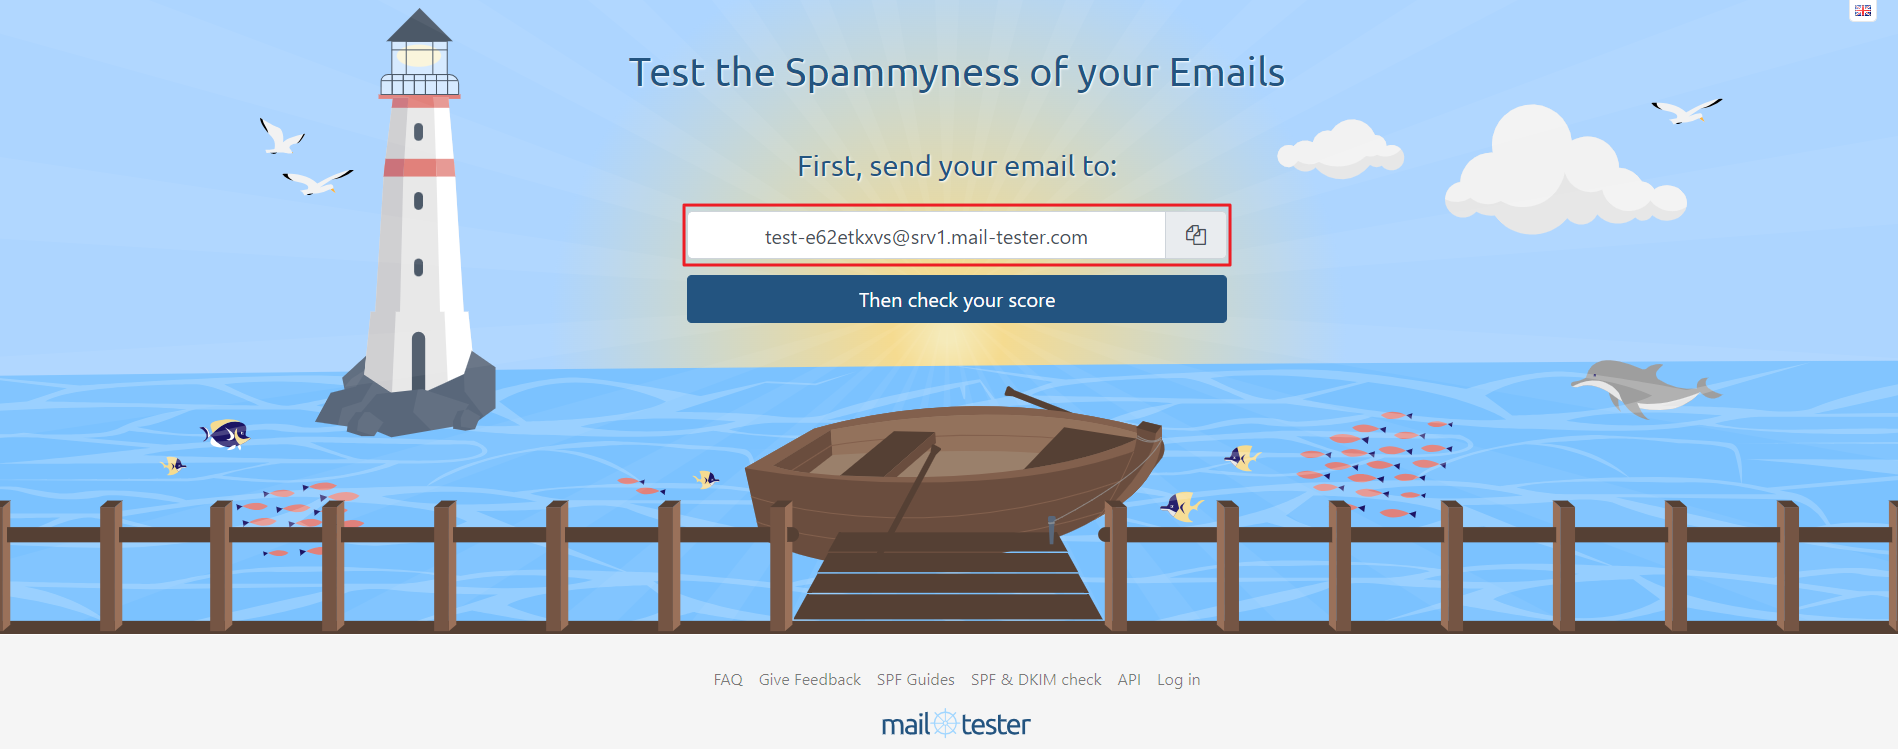
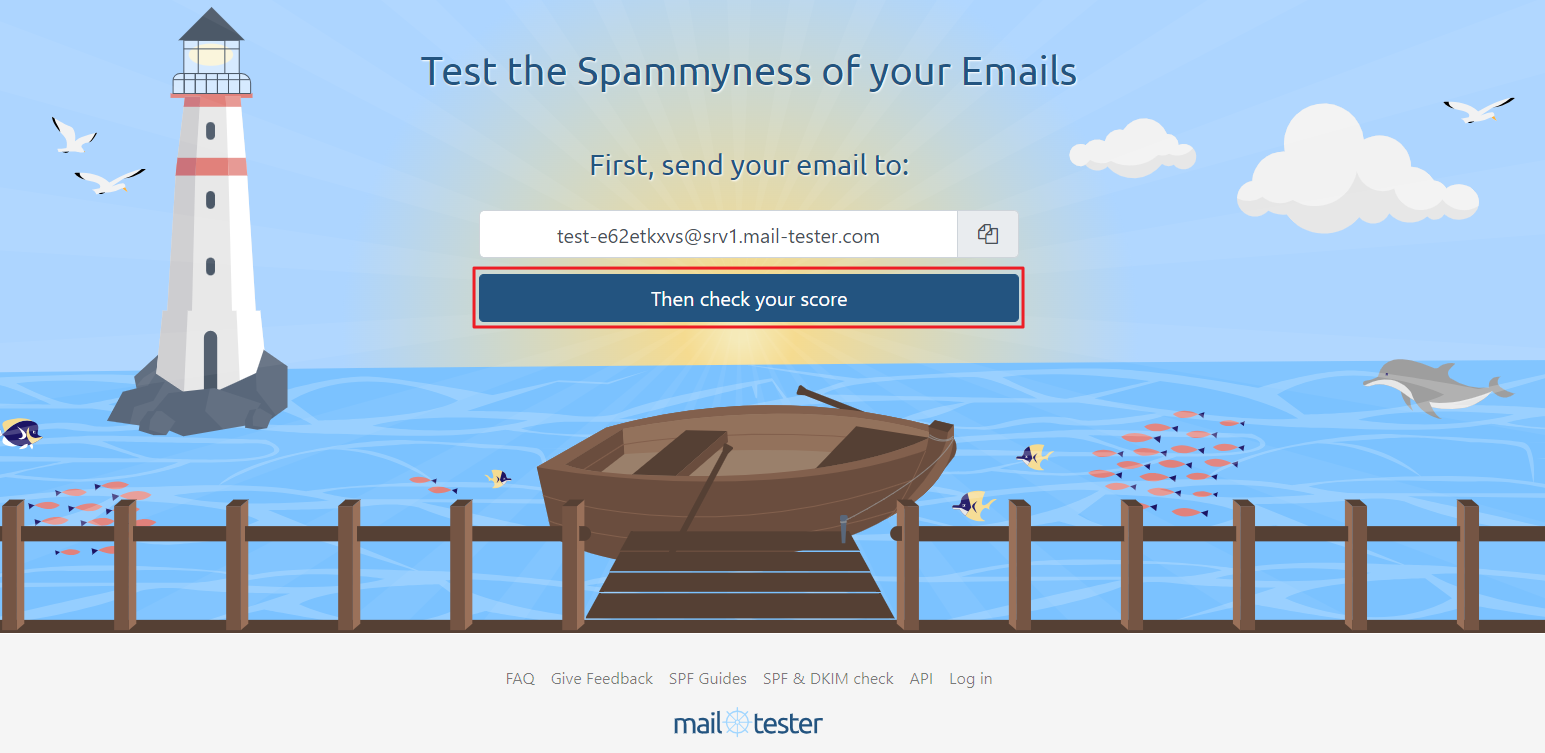
First go to https://www.mail-tester.com/

Copy the email address link provided by https://www.mail-tester.com/ . Do not close the tab of the browser. Leave it open.

Copying the email address link from mail-tester.com

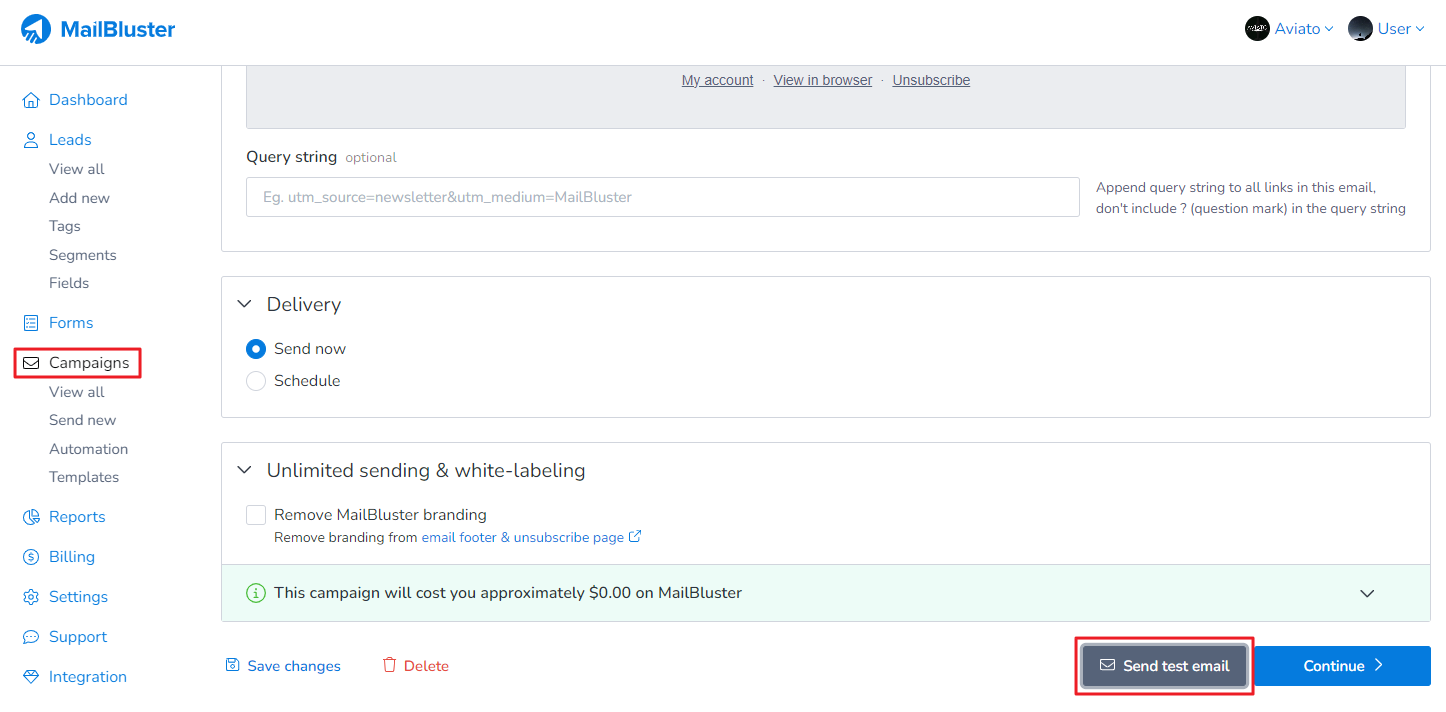
Then go to another tab and sign in to MailBluster. Go to Brand > Campaign and click on your desired campaign. Scroll down and click on Send test email.

Clicking Send test email

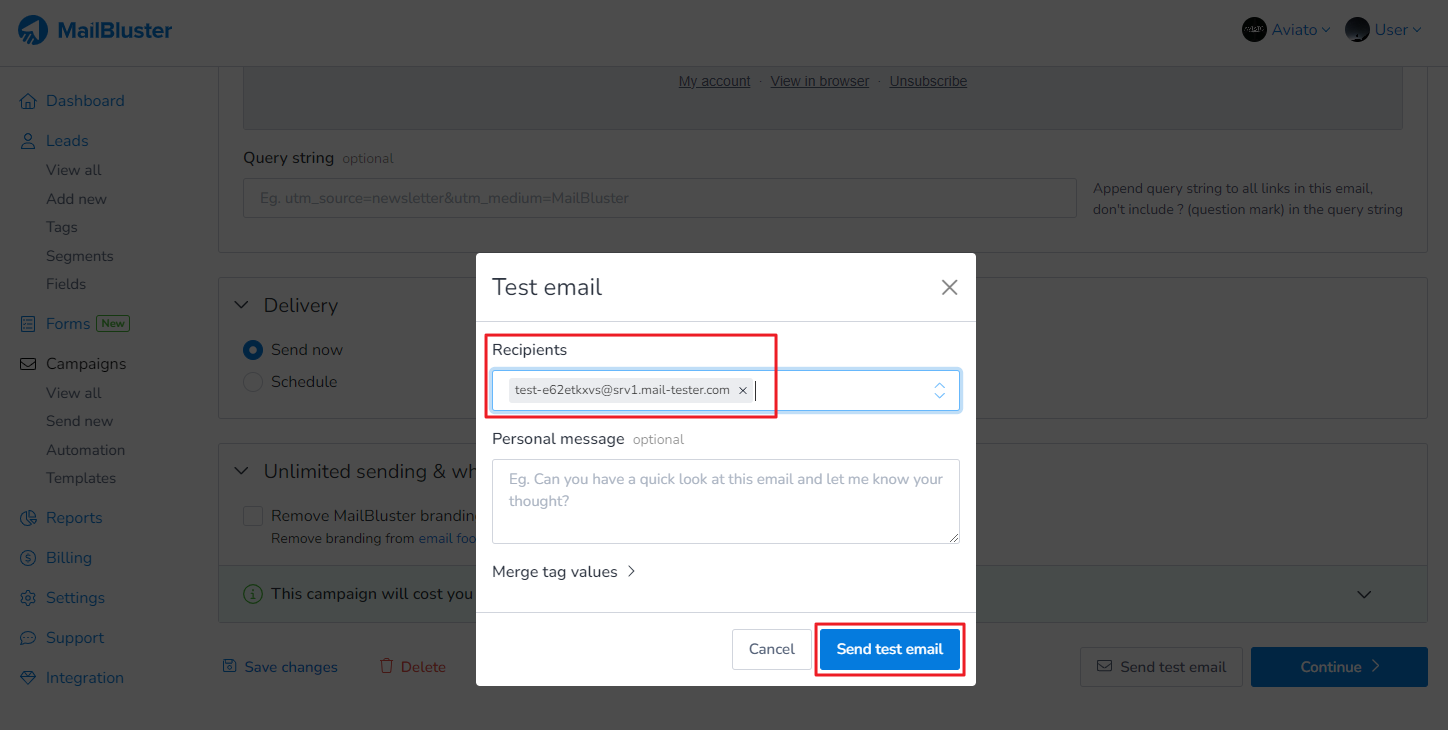
And paste the email link of mail-tester in the Recipients email address field of the Test email pop up box. Then click Send test email.

Pasting the email link in Recipients email address field and clicking Send test email

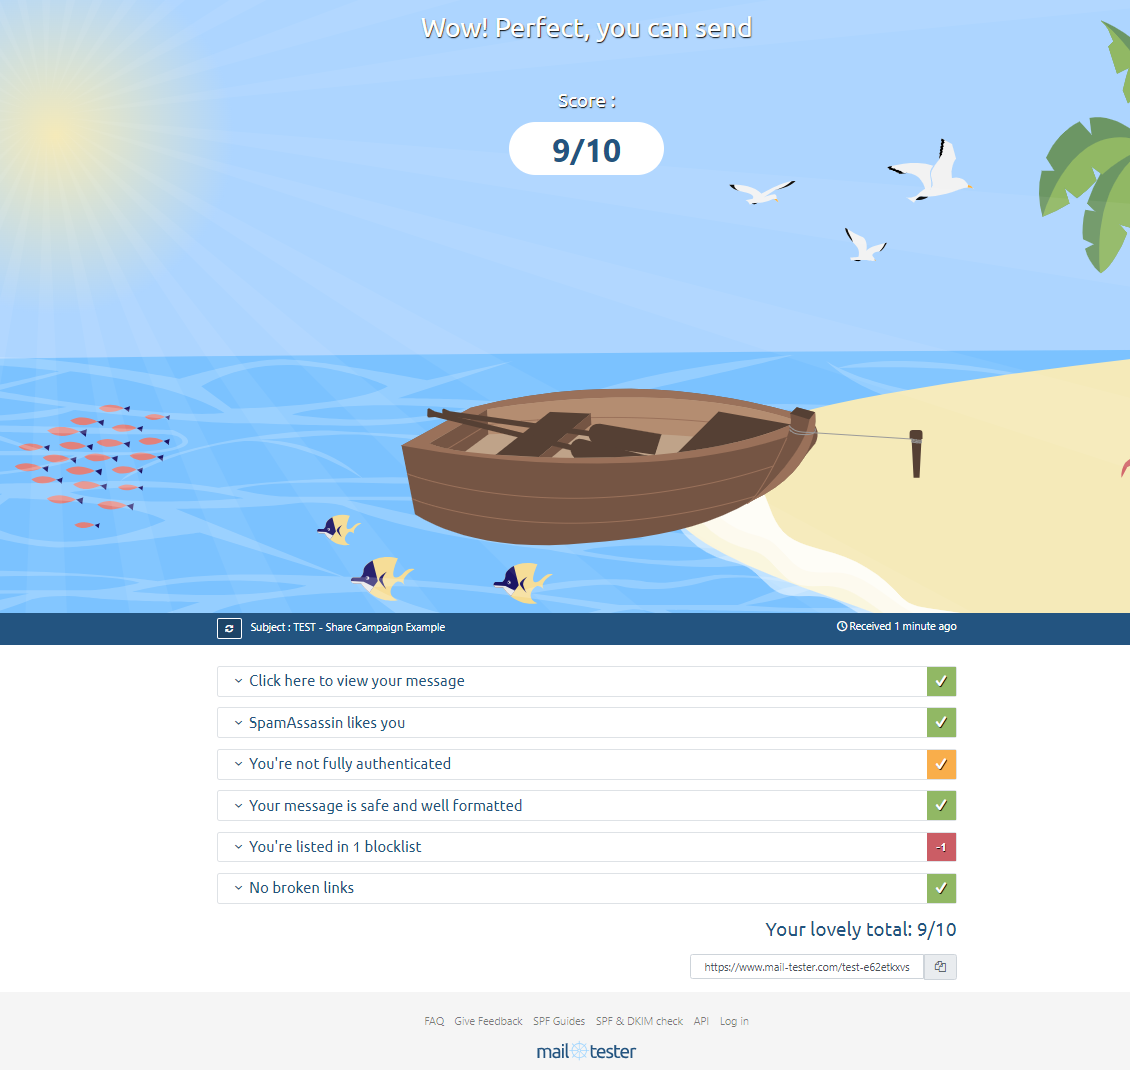
Now Click on Then check your score and you will be forwarded to a page with detailed results similar to this:

Clicking Then check your score in mail-tester.com
Mail-tester.com is showing score of the email

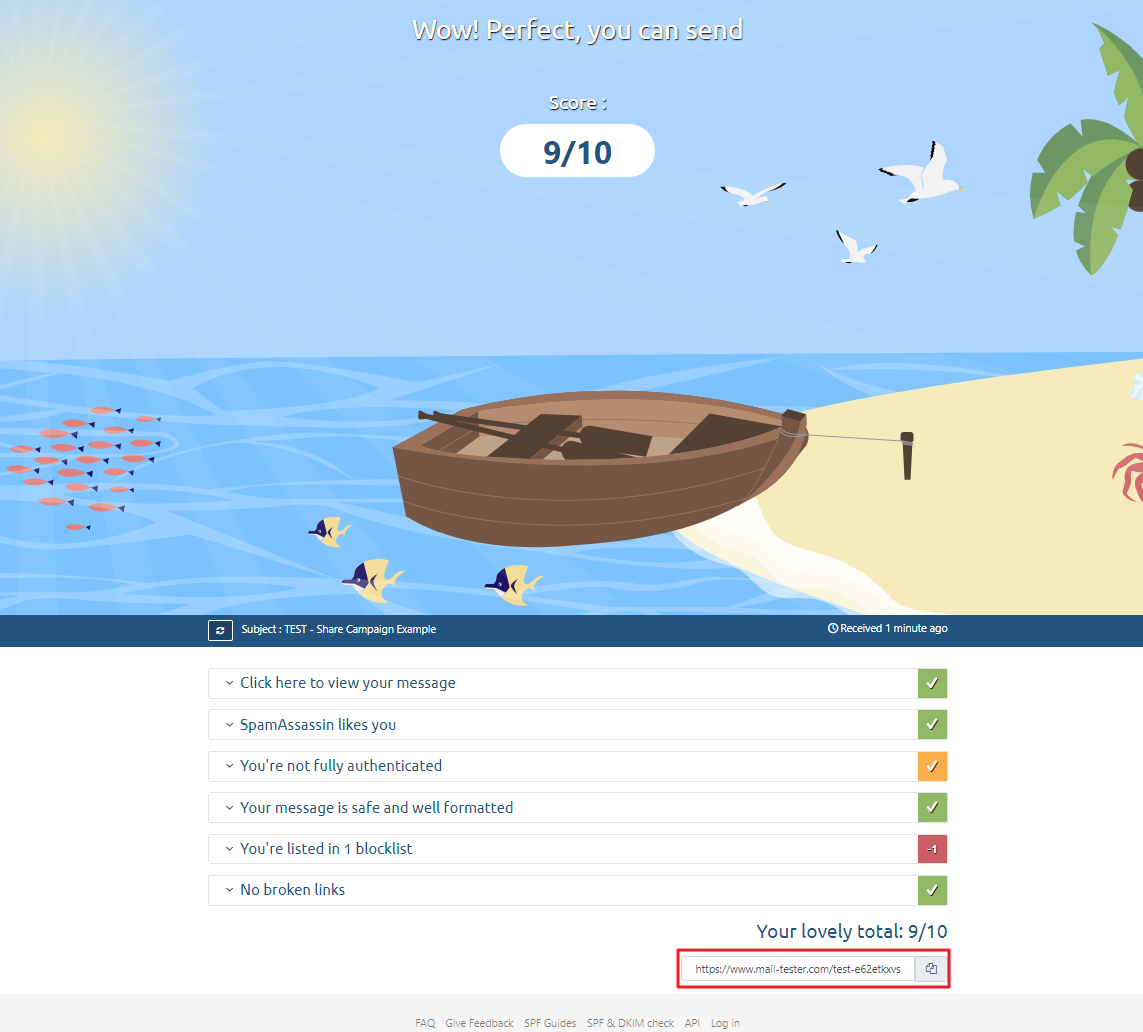
You can copy the shared link (highlighted) below to share the score with anyone, example tech team or support team

Copying the shared link with anyone

You will get detailed information whether your DNS MX records configured correctly or not by clicking each of the section:

Detailed information about DNS MX records

Why are my emails/newsletters landing in Spam?

Last update: March 18, 2024

First, please ensure the DKIM, SPF, and DMARC records of your sender domain is set up and working properly. You can take the help from this video tutorial for configuring DKIM, SPF and DMARC records from within MailBluster.

Verifying domain ownership helps to increase email deliverability, but there are other steps you need to consider as well.

The second most important is to use Action URL. You can set it from Settings > Custom URL tab. Custom URLs can be used to rename the links that MailBluster uses. For example, web version URL, unsubscribe URL etc. By default, it will use our own URL which is used by other users as well and lacks good reputation. Action URL will help you to resolve this case.

Here is a tutorial for setting up Action URLhttps://mailbluster.com/help/brand#brand-how-to-set-action-url-for-your-brand-in-mailbluster

After configuring all the mentioned settings, send a test email to mail-tester.com and check your sending score.

Please note that your emails might land in the spam folder again and there are opportunities to increase your deliverability. This blog might help you: https://mailbluster.com/blog/the-ultimate-guide-on-how-to-prevent-your-email-newsletters-from-going-to-spam

Why are the emails landing in the Promotions tab?

Last update: March 18, 2024

Whether your emails are delivered to your customers’ Promotions tab or their Inbox is typically determined by mail services such as Gmail. Given that you’re sending promotional emails, it’s only natural that they’ll be classified as Promotions by the Gmail algorithm.

Email landing in promotions tab

Gmail has implemented a categorization based on the following criteria:

  1. Email Content (whether the content you send appears to be marketing/promotional in nature rather than personal)
  2. Personalization (the level of personalization your email offers to each of the customers)
  3. User interaction (whether your customer personally marked your email to be categorized into the promotions tab)

If you create personalized content for each subscriber in your email campaign, it’s more likely your email will land in their primary inbox tab.

Why do I get this error ‘suspicious link’?

Last update: March 18, 2024

Using HTTPS links in your email campaign should resolve the “suspicious link” issue.

If the issue still persists, then you need to check for the following:

  1. Using the HTTP link instead of HTTPS
  2. No DKIM configured
  3. No SPF configured
  4. No DMARC configured
  5. Verifying your domain (click base URL) at postmaster.google.com
  6. Using public URL shorteners like http://bit.ly
  7. The Amazon SES is using shared IP to send your emails which might have a low reputation

Reporting spam or complaint email to MailBluster

Last update: March 18, 2024

Please contact our Support Center first for reporting any spam, complaint or abusive emails. You need to share the following details with the support team before submitting your spam or complaint email:

1.Sender’s Email Address

2, Recipient’s Email Address

3. Screenshot of the email you received

Our team will assess and investigate the report thoroughly and if we found that the customer is violating MailBluster Terms of use, we will take necessary actions against the sender.

Why is the lead’s double opt-in status is waiting?

Last update: March 10, 2024

Leads who subscribe with double opt-in enabled will be marked with the waiting status. It means that they received an extra confirmation email to verify their email address but they have not confirmed their subscription yet. When they open the email and click on the button there to confirm their email address, they will be automatically moved to the subscribed lead and the lead’s double opt-in status will be confirmed.